#libreoffice tips
Explore tagged Tumblr posts
Visit Tumblr Blog
Explore Tumblr blogs with no restrictions, modern design and the best experience.
Last Seen Tumblr Blogs


Fun Fact
Tumblr is available in 18 languages.
Text
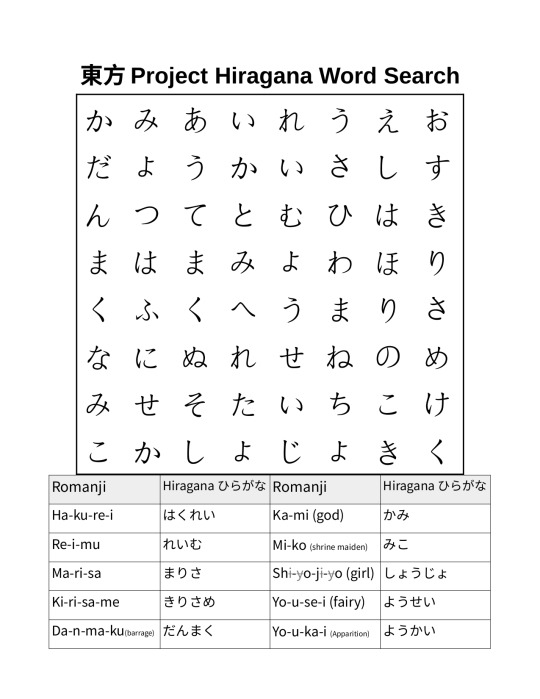
I made this Touhou Project themed word search for studying Japanese. Can you solve it?
The words are broken up with hyphens so you can figure out the sounds of the hiragana if you don't already know them. English translations, where applicable, are in parenthesis and non-pronounced letters are crossed out and in grey. This word search can be printed out on US-letter paper.
Also, a tip for using libreoffice I figured out while making this: You can adjust the horizontal spacing of tables with the ruler bars near the top. The entire word search is a table adjusted to a square shape with the bars at the top and sides and evenly divided with the split cells button. Make sure to select the entire table when setting the size, font, and alignment of the text.
#touhou#touhou project#東方project#東方プロジェクト#word search#hiragana#language learning#libreoffice tips#libreoffice#japanese
23 notes
·
View notes
Text
btw, for my writers out there that hate google but still rely on google docs- try CryptPad.fr
online doc editor, access your files from any device that can open a web browser
does spreadsheets and rich text (and more)
you can share view/edit links so your friends can read your wips, beta readers can proofread, do collabs with ur buddies, whatever
you can upload files and use it just like you would google drive with up to 1GB of storage completely free (which is more than enough for most people's purposes imo, but if you need more the upgrades are pretty reasonably priced)
AND it's encrypted and open-source (always a welcomed bonus)
it also plays nice with dark mode browser extensions (a life saver for me) unlike google docs.
also shout out to LibreOffice for being basically microsoft office but free and open source
god i love free programs
#talking#tips#i guess? idk what else to sort it under lmao#writing#also yes it is a choice to capitalize CryptPad and LibreOffice but not microsoft or google. it's about respect
303 notes
·
View notes
Text
in my research for what the hell Linux is in an effort to switch to it, I've watched a few "What your distro says about you" knowing that they're only partly joking probably.
Anyway I'm waiting for "Mint: you're scared of the command line but you're more scared of windows recall"
#Pire.txt#If it's not blatantly obvious that's me#I'm scared of the command line but more scared of windows recall#Anyway if anyone has Linux (specifically mint cinnamon) tips I probably haven't heard yet I welcome some advice#Or pointers to tools that mark me as today's lucky 10k#I'm gonna do it scared but by god am I going to do it#I already have it downloaded onto a flash drive#Which took more than one try already so I'm sure that bodes well for me#I'm already using Firefox and libreoffice#And discord and steam and minecraft is supposed to be supported#So I should be good on the programs I use#And I'm keeping the windows 10 on my laptop for troubleshooting until it dies completely and totally
4 notes
·
View notes
Text
...OR you could get LibreOffice for free, learn it from what isn't even the scratch (practically everything is the same but the loadout) and enjoy the fruits of labor given willingfully to and from the community of cool IT people with the hobby of making the internet a better place in their free time!
if you're subscribed to Microsoft word, you probably received an email recently saying they're upping their prices. Like, a lot. ($9.99/month instead of $6.99)
guess what though? you can log into your account, click Cancel Subscription, and get the option to continue your subscription at the same price WITHOUT their bullshit AI.
That's right, the new, higher price is actually a different subscription that includes AI that everyone is being opted into by force! What a cool and fun product that clearly everyone wants.
you can also choose to buy Word 2024 without AI for a single lump sum that will be yours in perpetuity, with no updates, for one computer.
Check your subscription if you need Word for work! Don't get duped into paying for something you might not even want
52K notes
·
View notes
Text
Novella November 2024 Announcement Post
Hate AI, but love writing challenges?
Want to take part in a global, fun project to write a Novella in one month?
Grab some friends, and take part in Novella November, by writing 1,000 words a day for the month of November, ending with a 30,000 word Novella to test and stretch your novel-writing skills!
Your goal is not perfection, but merely getting into the habit of writing a litte bit every single day :D
No website, no sign-ups -- Just a community initiative to write using only your own word!
What are the rules? Just Three so far!
#1 - No AI
#2 - No Plagiarizing
#3 - Wordcount for the month should only come from what you write during the month.
What does that mean?
Only words written during November should go towards your Wordcount for the month... but! Feel free to use your 30k words as a continuation of previous writing, or just make it the first 30k words in a longer novel!
Don't think you can write a whole entire 30k word story? Write a series of short stories that total up to 30k!
Not ready to write original works yet? Write a 30k word fanfiction that you can post after the month is over!
Share your writing experience, tips, encouragement, and questions in the #Novella November tag!
---
EDIT, from the tags: Want a progress tracker? Track your progress with TrackBear!
https://trackbear.app/
Don't have a word processor? Use LibreOffice , the free and open-source alternative to Microsoft Word!
Want to organize/storyboard your Novel and don't want to pay a subscription? Try 7writer by Simon Haynes!
Want to be able to listen to your story aloud for proofreading using TTS (text to speech)? Try Balabolka!
Or, create some custom progress / Goal Cards in advance you can fill out as you reach word goals! For ideas and templates, search this blog for "goal cards" :D
Want to do a writing challenge in more than just November? Check out my ideas here for year round challenges to keep you writing consistently! Got feedback? Send it in, I'd love to see everyone's ideas!
---
EDIT 2: I almost forgot to mention, if you are unable to write/type your story, you can also narrate/dictate your story to your preferred recording device!
If you're doing a Recording only and it doesn't automatically generate a transcript, it would obviously be hard to judge the word count -- but you're also working with a lot of obstacles, so I'd say if you're able to complete your story via voice recording from start to finish, you've definitely achieved the goal!
Edit #3: added the title "Novella November 2024 announcement post" to the top to make it more standard with my Ominous October and Drabble December posts (will be updating Outline October shortly) , added "Official Announcement Post 2024" to the tags so people can easily find the monthly events for 2024, and added a bit of bold to the third bullet point in the original post from September 2nd 2024 for emphasis.
#Novella November#anti ai#writing#Nanowrimo#Official Announcement Post 2024#edited#large text#bold text
11K notes
·
View notes
Text
Posting Fic - How to prep your writing to display correctly on AO3 (via LibreOffice)
So I've seen guides online about how to convert your fanfic for AO3 after writing it in Google Docs, because a lot of people use GDocs to do their writing (which is a decent option, since it saves it in the cloud and all that). I'm not planning on repeating that here.
But I don't do my writing in GDocs, I do my writing in LibreOffice Writer, because it emulates an older version of Word (which is what I grew up on and am most used to), and because I can have more robust spellchecking than on GDocs. And when I was first considering finally posting my work to AO3, I'd heard lots of commentary about how often pasting into the rich text editor sometimes loses formatting, or what hoops people had to jump through to make sure everything looked good.
So I'm here with the actually-pretty-darn-simple method I use to post to AO3 for anyone who needs this, because I want to be helpful.
Please note: this is largely for the basic formatting one might use on AO3. I haven't tested it with fancier things (not even smallcaps yet, though I'm hoping that won't prove too difficult when I finally get around to a chapter that needs that functionality). Also, these instructions are for Windows, which is what I use.
The first step is, obviously, to write up your story in LibreOffice Writer. I have some formatting standards I prefer because it makes my works look like they're publication-ready, which helps me stay in the "I'm actually writing fiction here" groove.

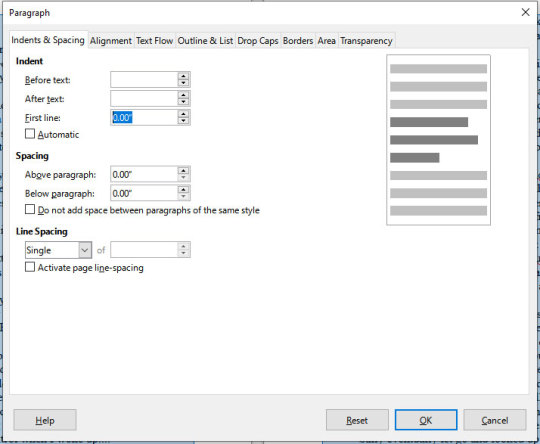
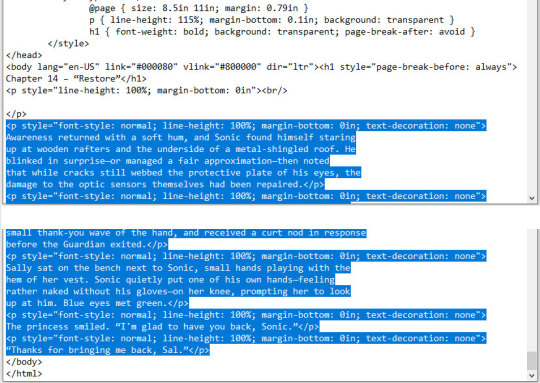
Once you're done writing, you need to make sure the file is ready to save for AO3. With how I write, the only thing I change is that I remove that first-line indent across the whole document. This is easy enough. Select everything, and then go to Format > Paragraph.
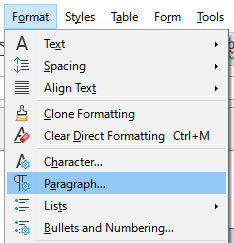
Once in that dialog, change the first line indent to 0. If you don't see a number there at all, just enter the number in there.
Then press "OK." This will realign all the paragraphs, including their first lines, to the left margin.
Note that I haven't changed the spacing between paragraphs at all. It's still single-spaced, and that's fine, because the next step can handle that.

DON'T SAVE OVER THE ORIGINAL.
What you want to do at this point is select "Save As" and make sure to save it as an html file, not whatever file format you normally use. LibreOffice will probably ask if you want to do that or use its native format, and you can just tell it "use html format."
You should now have an html file wherever you saved it. If you double-click it, it will open in your default browser, and you can check that the formatting carried over properly if you want. It should look ready for posting, complete with the internet-standard single empty line between paragraphs. LibreOffice knows to wrap each paragraph in html paragraph tags, which is what AO3 likes, and AO3 (and generally the rest of the internet) reads that as the extra empty space between paragraphs, just like you should see here on Tumblr.
Now you need to navigate to where you have the file on your computer via your file manager of choice (I'm on Windows, so I use File Explorer, which I can reach just by right-clicking on the Start button, but I also have a shortcut to it on my taskbar). Right-click on the file, and "open with" Notepad. You can also just open Notepad and open the file from within the program.
You should see the html code for the file.
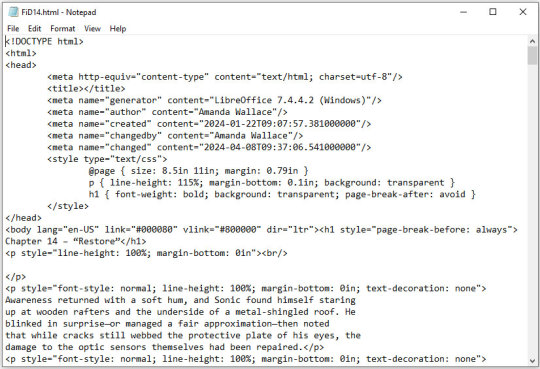
This is all set and ready to go. Copy everything between the "body" tags in the file (I also skip the lines that are for the chapter title, because I can enter that in a different spot on AO3).
Copy the selected code and paste it into the HTML editor on AO3. If you want AO3 to do a bit of cleanup for you, you can click over to the Rich Text editor, then back to HTML, and it will clean up extra carriage returns and such, but this isn't necessary. Double-check that everything looks good by clicking "Preview," and if you're happy, click "Post."
This even preserves smart quotes, which I don't bother to change to straight quotes, though I suppose you could do so if you wanted.
But honestly, that's how easy it is. Save the file as html, copy the html over to AO3, and done. No scripts, no file converters, no worrying if your formatting is going to survive being pasted into the Rich Text editor. Just LibreOffice and Notepad.
0 notes
Text
Several folks we know use (free) LibreOffice, which these days offers all the features writers need that Word (and the rest of the Office suite) has long offered - but without the cost of buying (or renting) the software.

155K notes
·
View notes
Text
T&T: Find & Replace within hyperlinks (LibreOffice)
Wasted too much of my damn life searchin' for a method to this shit only to spot non-solution after non-solution. Well, here y'all asses be. Ya welcome!

To be exact, just open the fodt/fogd file in a txt editor (like Notepad++) > Find & Replace (ctrl+h) > put whatever you want replaced in the Find What field > put whatever you want it replaced with in the Replace With field > Replace All.
In my case, I just needed dat damn https://href.li/? bs removed from ~76 hyperlinks and was absolutely not gonna do that shit manually any time soon. fuck me So I left the Replace With field blank and the txt editor simply removed that portion of the links. Next step was saving, opening the fodt/fogd as intended, and either Saving As to its original format or just copying its contents into the tumblr post I need to re-freakin' post.
Did this in LibreOffice Write, btw.
#Tips & Tricks#LibreOffice#LibreOffice Write#Flat XML ODF Document#Flat XML#fodt format#fogd format#Find & Replace#hyperlinks
0 notes
Text
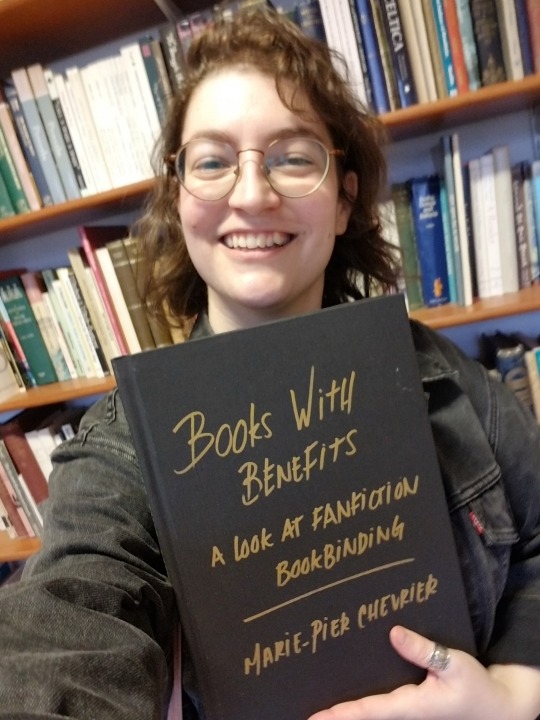
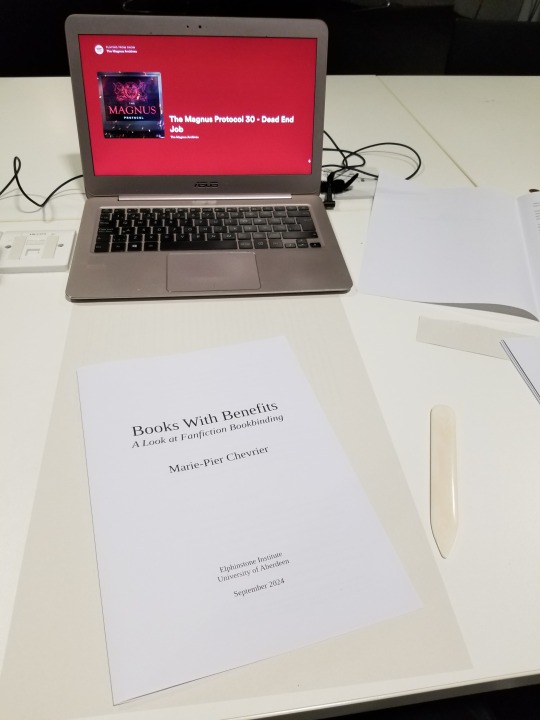
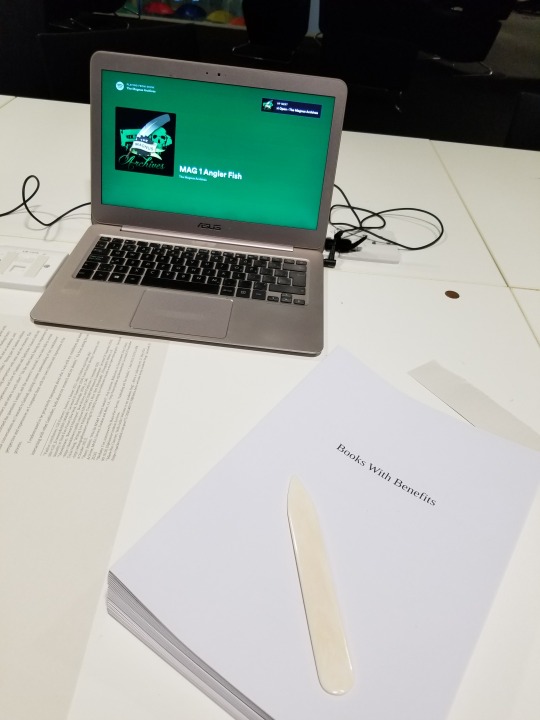
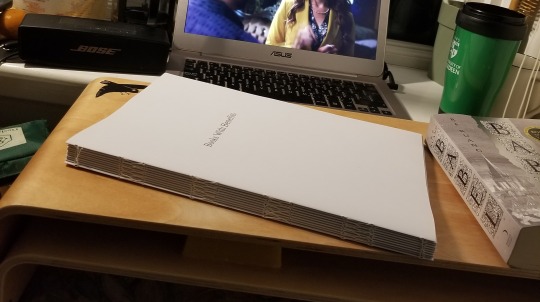
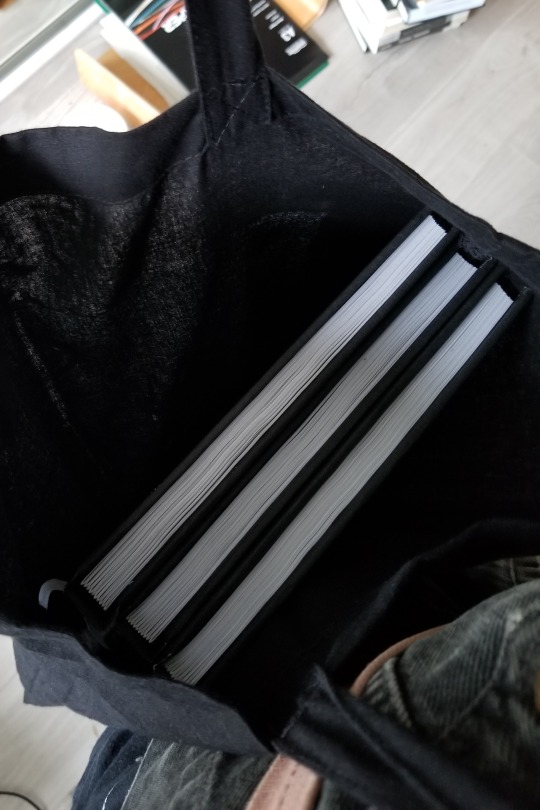
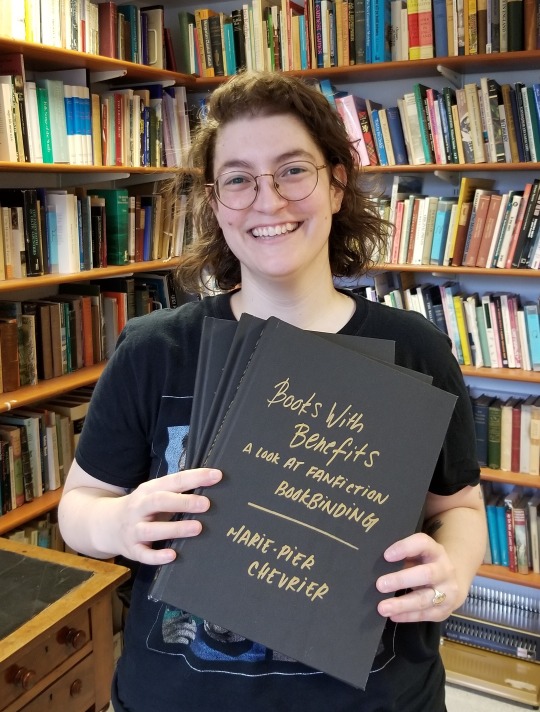
Update on fanbinding dissertation: binding the dissertation itself!
After many days and nights of writing and wrangling footnotes and proofreading (where I couldn't convince my laptop that yes, I meant textualisation, not sexualisation), 'twas time to bind the beasts! In three copies, no less! Which I approached with way too much confidence from my one fanbind experience, and came with many fun little surprises due to the format guidelines I had to follow 🤡
This is going to be a long one, so here's my happy unfocused mug to confirm that it all ends well:
First pickle: The typesetting. I absolutely loved typesetting fanfic, but the dissertation had to be A4 (way less fun, boo-hoo), one-sided, with every page numbered. Did you know that LibreOffice won't let you add blank pages and only number the non-blank ones, without skipping numbers? In order to print signatures I could fold into one-sided pages, only numbered on the right-hand pages, I ended up switching to landscape orientation and including the equivalent of a blank page in the left margin.

Second pickle: The imposing, which I couldn't figure out using the amazing bookbinder with my weird landscape 2-page layout. I finally gave in and rearranged all the pages manually, which looked like p. 1 on the recto / p. 10 on the verso, then p2/p9, p3/p8, p4/p7, p5/p8, p6/p7. And because there was no way I was paying print-in-colour prices for all of this, I further split the manually imposed pages into two files, one for the greyscale printer (cheaper) and one for the colour printer (highway robbery). Still came up to ~£70, just for printing.
Very glad I went in chunks of 10 for the signatures, it made both the math and the folding using sheets from two different piles much easier, highly recommend (if for some absurd reason you also want to bind one-sided numbered pages in folded signatures).
Third pickle: Linear time. Had planned on having so much time to print and bind this thing, but kept writing and rewriting and proofing and oops! It was due in less than 24 hours and it was still not out of the laptop. So.
22/09/24, 6pm: Got to the library, started printing.
6.45pm: Found another printer where all the paper was the same shade of white, started printing again 🤦♂️ (kept the the misprints to use as scrap paper when glueing)
7.30pm: Started folding the 150 sheets of paper (3 x 100-page dissertation, 2 pages per sheet). Went from the last episode of The Magnus Protocol, to an episode of Welcome to Night Vale, to deciding restart The Magnus Archive, which felt almost poetic.
9pm: Headed back home, trimmed the edges (with a borrowed guillotine), folded the endpapers, stabbed everything. Lack of pictures to be blamed on my inability to mess with linear time, and the eventual sleep deprivation.
10.30pm, I think? Started sewing the signatures together, again with Supernatural (which I started rewatching when I submitted my first dissertation assignment in mid-May, and finished 2 days after submitting the dissertation itself, again, such poetry).
2am, probably? Tipped the endpapers and glued cheesecloth over the spines. Somehow figured out where to set the three textblocks to dry (I don't have a press). Sadly gave up on sewing on (or glueing) headbands, because time.
3am-ish: Cut the missing cover pieces out of millboard (had already cut 4 of 6 covers, since I knew it had to be A4), measured the spines of the three textblocks and cut those as well.
???am: Did some math, because sure, that's the right time for that. Cut the bookcloth to size, glued the cover pieces on the bookcloth. Remarkably only messed up the measurements on one of them! That means one of the copies has a millimetre of millboard showing in the inside corners of the back cover, but not enough time/bookcloth/millboard to redo it, onward we go!
Way past dawn: Took a break for food while the covers somewhat dried. Cased the three textblocks in the three covers, with the endpapers bubbling, which took me by surprise since it was the same paper and same glue I had used for the fanbind without any problem. I'm now thinking that bigger book = more time needed to apply the glue = endpapers getting warped, but I was so exhausted by this point that who knows. Again, no time to redo it!
9.30am: Stacked the dissertations under the heavy reference books I used to write the dissertation. Toute est dans toute hein. Went to bed while they (mostly) dried.
2.30pm: Woken up by my neighbour's dj set. Eventually put all that hard work in a tote and walked to school to hand it in at 4.30pm.
Fourth and last pickle: The titling. Couldn't find paper long enough to do a half-dust jacket like I did last time. Had big cutout plans, ran out of time and couldn't finish testing those. Also had some thicker textured paper I thought of cutting and glueing to the cover as a title card, but it turned out too thin and was warping. Finally resigned myself to submitting it with a blank cover, but one of my teachers asked if I would mind adding the title on with metallic markers to make it easier to identify (one copy will eventually be on the shelf at the Institute), and I'm SO HAPPY with how it turned out. Metallic markers. Why didn't I think of that. (I did, however, think about dressing appropriately for the occasion.)

So, is it possible to print and bind 3 books in less than 24 hours? Yes! Am I glad I did it? Also yes, very satisfying, love being extra! Would I do it again? God no, I've been sleeping for two weeks and I still haven't recovered. Can't wait to start binding something else though, so I guess it wasn't that bad.
That's it! That's over! Aaaaaah! Now waiting for the grade and comments, and hopefully soon I'll be able to share the content as well.
I'll also try to post some more about the research/writing process itself, somewhere between the late nights reading international treaties on income tax and the early mornings spent figuring out how to apply for a phd next.
Thank you so much to everyone who followed along, this was way more fun than I ever could have hoped!
#fan studies#fanbinding#bookbinding#research#ficbinding#dissertation#fanbinding dissertation#autoethnography#fanfiction#fandom#fanfic
503 notes
·
View notes
Text
Okay, gotta say this: do not follow these instructions:
File > Options > Trust Center > Trust Center Settings > Privacy Options > Privacy Settings > Optional Connected Experiences > Uncheck box: “Turn on optional connected experiences”
DO NOT DO THAT. If you want to use Word, doing the above will break Word. It turns off 50+ features including things like read aloud and grammar checker.
Secondly, there's no evidence that Microsoft is AI scraping your work. Nor is there some secret opt-out feature. If you use Copilot, then that's an entirely different conversation. However, turning off connected experiences—this is not the answer. It creates far more problems than it solves.
If you're not comfortable using Microsoft's Office Suite products, then by all means (as OP says above) use LibreOffice or Scrivener, or some other word processor. That's far more effective and won't have detrimental consequences on your user experience like turning off your user experience.
Microsoft Office, like many companies in recent months, has slyly turned on an “opt-out” feature that scrapes your Word and Excel documents to train its internal AI systems. This setting is turned on by default, and you have to manually uncheck a box in order to opt out.
If you are a writer who uses MS Word to write any proprietary content (blog posts, novels, or any work you intend to protect with copyright and/or sell), you’re going to want to turn this feature off immediately.How to Turn off Word’s AI Access To Your Content
I won’t beat around the bush. Microsoft Office doesn’t make it easy to opt out of this new AI privacy agreement, as the feature is hidden through a series of popup menus in your settings:On a Windows computer, follow these steps to turn off “Connected Experiences”:
File > Options > Trust Center > Trust Center Settings > Privacy Options > Privacy Settings > Optional Connected Experiences > Uncheck box: “Turn on optional connected experiences”
#psa#microsoft#word#writers#libreoffice continues to reign supreme#scrivener too#please stop with the misinformation tho#these tech tips are getting bad#ive been meaning to fact-check this one for a while but didn't get around to it#sorry if you've already scuffed up your word program#just check the box again and refresh
40K notes
·
View notes
Text
My Hellaverse Writing & Drawing Resources (Masterpost) & Blog Tags
(A lot of this is for me, but feel free to use if you want.)
(Is updated as I stumble across more or make my own resources)
Blog Tags
#Undercover Angel AU (for my Angel Alastor au)
#allastoredoodles (my art tag)
#Poison AU (for my Angel & Alastor role-swap au)
My World-Building, Character Analysis, and Lore
The Hierarchal Power Structure in Pentagram City + Royal Family Character Analysis
Lucifer's Religious Trauma - Character Analysis
Why I Don't Include Dante's 9 Circles of Hell in my Hellaverse World-Building Lore
More About Dante's 9 Circles + Imp City and the Goetia
Hellborn and Sinner Similarities and Differences + Classism
Hellaverse Canon Lore Tidbits
Note: Some posts may have repeated canon lore
Post 1
Post 2
Post 3
Hazbin Hotel Facts Part 1
New Information Revealed By The Hazbin Playbill
Art Resources
Alastor
Alastor Drawing Guide
Alastor Cane Drawing Guide & Hand Reference Sheet
Alastor 3/4 (right) Expression Sheet
Alastor Side Profile Breakdown
Full Body Breakdown/Poses
Lucifer
Lucifer Drawing Guide
Demon Form Lucifer Drawing Guide
Vox
Vox Drawing Guide
Husk
Husk Drawing Guide
Rosie
Rosie Drawing Guide
Angel Dust
Angel Dust Drawing Guide
Vaggie
Vaggie Drawing Guide
Character Designs
Sinners From the Show (Collection 1)
Backgrounds
Heaven Embassy (Exterior)
Post-Extermination City-Scape
Writing Resources
The 5 Senses
75 Words That Describe Smell
Descriptive Words for Scents: List of Smell Adjectives
200+ Words to Describe a Voice
How to Describe a Smile in Different Ways
600+ Words to Describe Smiles
What a Decomposing Body Smells Like
300 Creative Words to Describe Hair
General Writing Help
How to Write Immersive Stories Using Description
World Building Tips: Writing Engaging Settings
Writing Action Scenes
Adjectives for Description
Dialogue Tags to Use Instead of Said
6 Seconds, 6 Months - Writing Advice/Challenge
100+ Architecture Terms to Help Describe Buildings
Body Language Cheat Sheets
23 Essential Body Language Examples and Their Meanings
Writing Sex Scenes: How to Heat Up Romance
Miscellaneous
How to Write Realistic Injuries
Explosives and Blasting Agents
BOM: The Next Generation of High Performance Explosives
Burning Points of Various Fabrics
English to Shakespearean (Perfect for Zestial! Thank you @witch-of-the-writing-desk)
English to Old English (Perfect for Zestial! Thank you @witch-of-the-writing-desk)
Fantastic Post About Louisiana and New Orleans (Great for writing Alastor!)
The Complete Butchers Guide to Different Cuts of Meat
What Are the Different Sections or Areas on a Casino Floor?
Casino Design - The Sneaky Tricks That Make You Spend More
A Walk Through the Casino
Radio Scripts from the Golden Age of Radio
Golden Age of Black Radio (Part 1)
Glossary of Early 20th Century Slang in the United States
Historical Slang For Having Sex, From 1351 To Today
Collection of Clothing References for Writing
Portraying Mixed People
Sexual Intimacy During Cancer Treatment
Helpful Websites and Writing Programs
Random Character Generators
Websites For Writers (Collection)
Pacemaker Planner
Hiveword: The Search Engine For Writers
StimuWrite Desktop
OneStopForWriters
LibreOffice (Free Microsoft Word Alternative)
Scrivener
Fighters-Block (Designed specifically to combat writers blocks)
MyNoise (Immersive and customizable soundscapes to help with focus or creating a specific writing atmosphere).
WorldBuilding.StackExchange (A website for answering specific world-building questions)
WordsNStuff (FANTASTIC blog for your all your writing needs)
My Ko-Fi
You know. If you wanna (◕‿◕✿)
#it'll be nice to actually have all my shit in one place#so many things#will add to it as I go#hope this helps for anyone else looking for some tips and resources#allastoredeer#drawing references#writing references#world-building#Hazbin World Building#Resource Masterpost#Hazbin Hotel#Helluva Boss
504 notes
·
View notes
Note
Any tips on script writing for a comic? I know a basic structure, mostly the kind that's taught or what I've been able to look up online. I really enjoy your writing and story flow in LR, so I wanted to get your thoughts so if there are any tools you would recommend.
ngl , I just use good ole' fashioned LibreOffice LMAO Though my script-writing process has definitely changed between my original work and Rekindled, I used to use a spreadsheet program (the LibreOffice equivalent to Excel) and the method I developed looked like this:
This method actually still works totally fine, I just never opted to use it for Rekindled, mostly because I was able to write so much of it through what already existed in LO. Here's what Rekindled's writing process looks like, which I've done entirely within Scrivener as I started using it a few years ago:
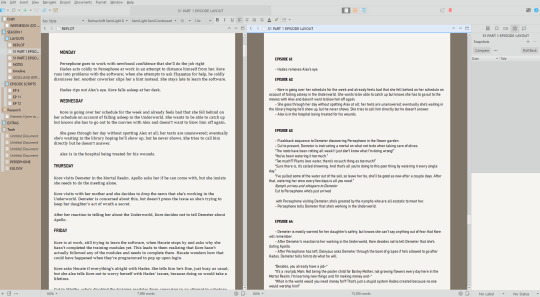
Things do change often between my initial scripting, final scripting (i.e. when it's time to actually sketch out the episode), and the final release of the episode. Things are often removed, added, tweaked, etc. along the way, sometimes even up until the point of final release depending on what's required. What I'm showing you here is actually one of the "cleanest" sections of my notes, because oftentimes these docs are just a disorganized mess of events and plot points that I've written and rewritten and shuffled around LMAO That's not even including hand-written notes that I've scrawled out on the go 😆
I try to keep my writing process cemented enough that I know where I'm going but flexible enough that I can edit on the fly and move things around when needed. Having documents for my notes and extra floating ideas is helpful, and I'm often redoing plot layouts and scripts just for the sake of "figuring them out" haha
But that's also why I like to write relatively far ahead of time, so that my brain can properly "reset" on what I wrote, meaning that when it finally comes time to draw it and I'm re-reading my scripts and notes, I'll notice stuff I don't like or isn't working a lot quicker, because I'm going in with a clearer perspective than when I wrote it the first time. There are ideas and plotlines and episode scripts I wrote in these docs aaaalll the way back in 2022 when this project first started :') (and am still eagerly sitting on for when I finally get to bring them to life huehuehue)
All that said, there's no right or wrong way to rough draft your stories, just the way that services you and the story that you're trying to write. Some stories require more detailed drafting and notes, others can get by with just simple post-it notes. The important thing to remember is that no one else but you has to see these drafts - so there's no need for it to be perfect or for it to be the "final draft" on the first try, let it be whatever you need it to be to make it work for you ╰(´︶`)╯♡
#ask me anything#ama#anon ama#anon ask me anything#writing advice#ironically what i'm showing you was also just cleaned up a few days ago#i didn't have those sidebar folders before LMAO all my docs were just kinda floating together#finally divided things by parts so that i could separate the old stuff we've already done from the new stuff that's ahead of us <3#it's very refreshing for the mind haha
76 notes
·
View notes
Text
in wake of yet another wave of people being turned off by windows, here's a guide on how to dual boot windows and 🐧 linux 🐧 (useful for when you're not sure if you wanna make the switch and just wanna experiment with the OS for a bit!)
if you look up followup guides online you're gonna see that people are telling you to use ubuntu but i am gonna show you how to do this using kubuntu instead because fuck GNOME. all my homies hate GNOME.
i'm just kidding, use whatever distro you like. my favorite's kubuntu (for a beginner home environment). read up on the others if you're curious. and don't let some rando on reddit tell you that you need pop! OS for gaming. gaming on linux is possible without it.
why kubuntu?
- it's very user friendly
- it comes with applications people might already be familiar with (VLC player and firefox for example)
- libreoffice already preinstalled
- no GNOME (sorry GNOME enthusiasts, let me old man yell at the clouds) (also i'm playing this up for the laughs. wholesome kde/gnome meme at the bottom of this post.)
for people who are interested in this beyond my tl;dr: read this
(if you're a linux user, don't expect any tech wizardry here. i know there's a billion other and arguably better ways to do x y and/or z. what i'm trying to do here is to keep these instructions previous windows user friendly. point and click. no CLI bro, it'll scare the less tech savvy hoes. no vim supremacy talk (although hell yeah vim supremacy). if they like the OS they'll figure out bash all by themselves in no time.)
first of all, there'll be a GUI. you don't need to type lines of code to get this all running. we're not going for the ✨hackerman aesthetics✨ today. grab a mouse and a keyboard and you're good to go.
what you need is a computer/laptop/etc with enough disk space to install both windows and linux on it. i'm recommending to reserve at least a 100gb for the both of them. in the process of this you'll learn how to re-allocate disk space either way and you'll learn how to give and take some, we'll do a bit of disk partitioning to fit them both on a single disk.
and that's enough babbling for now, let's get to the actual tutorial:
🚨IMPORTANT. DO NOT ATTEMPT THIS ON A 32BIT SYSTEM. ONLY DO THIS IF YOU'RE WORKING WITH A 64BIT SYSTEM. 🚨 (win10 and win11: settings -> system -> about -> device specifications -> system type ) it should say 64bit operating system, x64-based processor.
step 1: install windows on your computer FIRST. my favorite way of doing this is by creating an installation media with rufus. you can either grab and prepare two usb sticks for each OS, or you can prepare them one after the other. (pro tip: get two usb sticks, that way you can label them and store them away in case you need to reinstall windows/linux or want to install it somewhere else)
in order to do this, you need to download three things:
rufus
win10 (listen. i know switching to win11 is difficult. not much of a fan of it either. but support's gonna end for good. you will run into hiccups. it'll be frustrating for everyone involved. hate to say it, but in this case i'd opt for installing its dreadful successor over there ->) or win11
kubuntu (the download at the top is always the latest, most up-to-date one)
when grabbing your windows installation of choice pick this option here, not the media creation tool option at the top of the page:

side note: there's also very legit key sellers out there who can hook you up with cheap keys. you're allowed to do that if you use those keys privately. don't do this in an enterprise environment though. and don't waste money on it if your ultimate goal is to switch to linux entirely at one point.
from here it's very easy sailing. plug your usb drive into your computer and fire up rufus (just double click it).

🚨two very important things though!!!!!!:🚨
triple check your usb device. whatever one you selected will get wiped entirely in order to make space for your installation media. if you want to be on the safe side only plug in the ONE usb stick you want to use. and back up any music, pictures or whatever else you had on there before or it'll be gone forever.
you can only install ONE OS on ONE usb drive. so you need to do this twice, once with your kubuntu iso and once with your windows iso, on a different drive each.
done. now you can dispense windows and linux left and right, whenever and wherever you feel like it. you could, for example, start with your designated dual boot device. installing windows is now as simple as plugging the usb device into your computer and booting it up. from there, click your way through the installation process and come back to this tutorial when you're ready.
step 2: preparing the disks for a dual boot setup
on your fresh install, find your disk partitions. in your search bar enter either "diskmgr" and hit enter or just type "partitions". the former opens your disk manager right away, the latter serves you up with this "create and format hard disk partitions" search result and that's what you're gonna be clicking.

you'll end up on a screen that looks more or less like in the screenshot below. depending on how many disks you've installed this might look different, but the basic gist is the same. we're going to snip a little bit off Disk 0 and make space for kubuntu on it. my screenshot isn't the best example because i'm using the whole disk and in order to practice what i preach i'd have to go against my own advice. that piece of advice is: if this screen intimidates you and you're not sure what you're doing here, hands off your (C:) drive, EFI system, and recovery partition. however, if you're feeling particularly fearless, go check out the amount of "free space" to the right. is there more than 30gb left available? if so, you're free to right click your (C:) drive and click "shrink volume"

this screen will pop up:

the minimum disk space required for kubuntu is 25gb. the recommended one is 50gb. for an installation like this, about 30gb are enough. in order to do that, simply change the value at
Enter the amount of space to shrink in MB: to 30000
and hit Shrink.
once that's done your partitions will have changed and unallocated space at about the size of 30gb should be visible under Disk 0 at the bottom like in the bottom left of this screenshot (courtesy of microsoft.com):

this is gonna be kubuntu's new home on your disk.
step 3: boot order, BIOS/UEFI changes
all you need to do now is plug the kubuntu-usb drive you prepared earlier with rufus into your computer again and reboot that bad boy.
the next step has no screenshots. we're heading into your UEFI/BIOS (by hitting a specific key (like ESC, F10, Enter) while your computer boots up) and that'll look different for everyone reading this. if this section has you completely lost, google how to do these steps for your machine.
a good search term would be: "[YOUR DEVICE (i.e Lenovo, your mainboard's name, etc.)] change boot order"
what you need to do is to tell your computer to boot your USB before it tries to boot up windows. otherwise you won't be able to install kubuntu.
this can be done by entering your BIOS/UEFI and navigating to a point called something along the lines of "boot". from "boot order" to "booting devices" to "startup configuration", it could be called anything.
what'll be a common point though is that it'll list all your bootable devices. the topmost one is usually the one that boots up first, so if your usb is anywhere below that, make sure to drag and drop or otherwise move it to the top.
when you're done navigate to Save & Exit. your computer will then boot up kubuntu's install wizard. you'll be greeted with this:

shocker, i know, but click "Install Kubuntu" on the right.
step 4: kubuntu installation
this is a guided installation. just like when you're installing windows you'll be prompted when you need to make changes. if i remember correctly it's going to ask you for your preferred keyboard layout, a network connection, additional software you might want to install, and all of that is up to you.
but once you reach the point where it asks you where you want to install kubuntu we'll have to make a couple of important choices.

🚨 another important note 🚨
do NOT pick any of the top three options. they will overwrite your already existing windows installation.
click manual instead. we're going to point it to our unallocated disk space. hit continue. you will be shown another disk partition screen.
what you're looking for are your 30gb of free space. just like with the USB drive when we were working with rufus, make sure you're picking the right one. triple check at the very least. the chosen disk will get wiped.

click it until the screen "create a new partition" pops up.
change the following settings to:
New partition size in megabytes: 512
Use as: EFI System Partition
hit OK.
click your free space again. same procedure.
change the following settings to:
New partition size in megabytes: 8000 (*this might be different in your case, read on.)
Use As: Swap Area
hit OK
click your free space a third time. we need one more partition.
change the following settings to:
don't change anything about the partition size this time. we're letting it use up the rest of the resources.
Use as: Ext4 journaling system
Mount Point: /
you're done here as well.
*about the 8000 megabytes in the second step: this is about your RAM size. if you have 4gb instead type 4000, and so on.
once you're sure your configuration is good and ready to go, hit "Install Now". up until here you can go back and make changes to your settings. once you've clicked the button, there's no going back.
finally, select your timezone and create a user account. then hit continue. the installation should finish up... and you'll be good to go.
you'll be told to remove the USB drive from your computer and reboot your machine.
now when your computer boots up, you should end up on a black screen with a little bit of text in the top left corner. ubuntu and windows boot manager should be mentioned there. naturally, when you click ubuntu you will boot into your kubuntu. likewise if you hit windows boot manager your windows login screen will come up.
and that's that folks. go ham on messing around with your linux distro. customize it to your liking. make yourself familiar with the shell (on kubuntu, when you're on your desktop, hit CTRL+ALT+T).
for starters, you could feed it the first commands i always punch into fresh Linux installs:
sudo apt-get update
sudo apt-get upgrade
sudo apt-get install vim
(you'll thank me for the vim one later)
turn your back on windows. taste freedom. nothing sexier than open source, baby.
sources (mainly for the pictures): 1, 2
further reading for the curious: 1, 2
linux basics (includes CLI commands)
kubuntu documentation (this is your new best friend. it'll tell you everything about kubuntu that you need to know.
and finally the promised kde/gnome meme:

#windows#linuxposting#had a long day at work and i had to type this twice and i'm struggling to keep my eyes open#not guaranteeing that i didn't skip a step or something in there#so if someone linux savvy spots them feel free to point them out so i can make fixes to this post accordingly#opensource posting
122 notes
·
View notes
Text
I'm gonna "uhm actually" add onto this. Backing up your work is SUPER important, and I recommend everyone does it. The amout of stories abt someone losing 50K+ words because they only had it in one place is devastating.
With that said, PLEASE consider using anything other than A) and online website of any type as your primary backup and B) PLEASE think twice about using Google Docs. Rumors have been circulating for over a year that they can scrap practically any documents for their disgusting AI usage, and with the introduction of their god awful "gemini AI" its more likely than ever.
Save a word document, pages document, anything that is a LOCAL FILE and put it onto a flash/drive backup harddrive that you keep separate from everything else is the best way to guarantee that you don't lose your precious work, nor that a shitty corpo uses it for their own disgusting benefits.
LibreOffice is free and awesome, big recommend. Google docs doesn't have a perfect equivalent if you have beta readers or want a cloud document service, but Ellipsus is a decent alternative. Also just storing your word documents or mailing it between yourself is an alternative.
Keep your documents safe out there folks <3
people who write their fics directly onto archive of our own site do not fear death by the way
in all seriousness, please always keep backups of your works, write them somewhere else (google doc is a good choice) then copy and paste onto ao3 when you're done, because ao3 itself does not automatically save your works for you, meaning you can lose all of your progress
#writing#fuck ai#writing tips#sorry to be annoying but I think questioning google docs is really important even if the core messaging of prev is superduper important too#libreoffice#ellipsus#writing advice
17K notes
·
View notes
Text
Shoutout to this one rando internet poster's rando Grandma; I read a post where this person was setting up a computer for their grandmother, explained how it worked, and so on, and then got a call a week later from their indignant gran saying, "Why didn't you tell me about the knitting program?!?!"
Poster says, what knitting program? And she says, it's got lots of little boxes and you can colour them and put things in them. And when they go over to look - it's Excel. She's shrunk the Excel cells and is making knitting patterns in Excel.
Anyway. I now (for the last several years) make all my knitting patterns in Excel*, because if you use conditional formatting then it's extremely powerful. Type 'a' in a cell and it turns a colour; 'b', a different one.
Behold, a simple example.
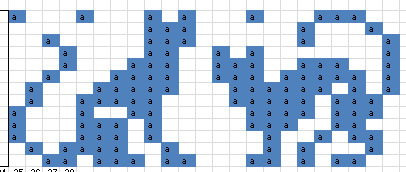
Can't show you what I'm working on but it's EnormousTM.
And you can just arrow key up and across, row by row; hit save before closing and it'll even save your place.
Also, you can calculate your knitting maths with it.
Random grandma, if you're out there, I owe you one. Call me. We can swap tips and tricks.
*LibreOffice Calc also works but is a little more annoying to use.
#knitblr#knitting#cats#edit: yes i know about x y z specially designed knitting program i don't like them#and i have been doing this for *years* i have my workflow down
63 notes
·
View notes
Text
Well. I have a feeling I'm about to have a million new followers. (March 31st, 2025; not an April Fool's joke, unless Nanowrimo has very poor taste and timing)
youtube
Here's a link that explains in long video format the whole entire thing in detail:
youtube
and to sum it up:
This blog was made as an Anti-Generative AI to Nanowrimo, as well as a way to actually build a friendly, low-pressure, helpful community of aspiring writers, without the hard-fast-do-it-or-die pressure brought on by nanowrimo.
There is no official "contest" -- only a community coming together to inspire each other to write, help out with motivation by setting community goals, keeping participation motivation via Trackbear.app, etc!
The most popular writing challenge is still November for most people, but I myself have also started to keep a year-round, daily writing goal of 444 via the website 4thewords, which has been an extreme help in getting me to write a little at a time.
This year has been very hectic for everyone what with the election results so I haven't been very active on tumblr (I think everyone can understand that) but I was originally planning on also having each month of the year being a different themed writing / art challenge but got a bit distracted real life.
So, what is the Novella November Challenge?
It's a fun challenge where writers come together to write 30,000 (or your own personal writing goal!) words in 30 days, sharing tips, writing advice, plot ideas, accessibility aids, and committing to having fun while explicitly fighting back against Generative AI by using our own words and disavowing the use of scraping and generating to take away the livelyhoods of artists of all spectrums, and proving everyone who insists "generative AI is an accessibility tool" wrong by committing to our creative visions and making it easier for everyone to find the tools they need to succeed by sharing tips, free programs, and finding a like-minded community to support you! 💙
There is no official website, there is no required place to show your participation, this is a community initiative that will never be monetized by predatory sponsors or dangerous moderators abusing their power.
This blog is here to inspire everyone, regardless of experience level, to write and create the story they want to tell, in their own words, while striving to remain a fun, low-pressure challenge that doesn't turn into a stressful spiral, like often happened with Nano.
Want to start writing but not sure how? Don't have money to spend on expensive writing programs? Have no fear!
LibreOffice: An always free, open-source alternative to Microsoft Word (and Microsoft's other office suits)
4Thewords: A website (both desktop and mobile web browser) that syncs your writing cross platform to the cloud, with built-in daily word goals, streak tracking, and you can fight monsters with your word count to game-ify writing!
Trackbear: A website dedicated to tracking your writing, setting custom goals, and creating leaderboards for community participation; you can join the year-long community leaderboard with the Join Code "f043cc66-6d5d-45b2-acf1-204626a727ba" and a November-limited one will release on November 1st as well.
Want to use Text to Speech to dictate your novel?
Most modern phones have a built-in option available on your keyboard settings which can be used on any writing program on your phone, and most modern PCs that allow a microphone (including headphone) connection has some kind of native dictation function, which you can find by opening your start panel and searching your computer for "Speech to text" or "voice to text".
Want to write while on the go, but don't want to / can't use the small phone keyboard to type, or speech to text?
You can, for as cheap as $40, buy a bluetooth keyboard that you can pair with your smart phone or tablet and use to write in any and all writing applications on your phone -- this allows you to write on the goal (especially using cross-platform websites or services, like 4thewords or google docs) , and the small screen can also help minimize distractions by muting notifications in your writing time.
#novella november#nanowrimo#large text#writing events#national novel writing month#community events#anti ai#novellanovember#Sam Beckett Voice: Oh boy#long post#Youtube
168 notes
·
View notes