#super SUPER basic html and css
Explore tagged Tumblr posts
Visit Tumblr Blog
Explore Tumblr blogs with no restrictions, modern design and the best experience.
Last Seen Tumblr Blogs


Fun Fact
Hackers stole 65M passwords from Tumblr in 2013.
Text
Again struck by the urge to make a website for this and then immediately lamenting the fact that the only coding I know is from. neopets petpages.
#text#super SUPER basic html and css#oh i had so much fun with those back in the day#anyway idk what id even want it to look like#and i kind of would rather have someone else set up the initial stuff or whatever#and then i could tweak and fiddle and fine-tune the rest possibly#ill find those old mockups i did a while ago maybe
12 notes
·
View notes
Text
The latest in Jojo Chases A New Whimsy...
I'm teaching myself basic HTML and CSS!
If you have any interest in following my progress, you can open my new Neocities site and periodically refresh it to observe the iterations of how-the-hell-does-that-work.
#personal#I've already got some basic HTML content up#that's working alright#there's a few links and my cat snail picture#currently figuring out the fundamentals of CSS#but can't be arsed with the colour codes yet#so it's not super easy on the eyes at the moment#but I have heading colours!#and a stripe!#and soon I'll have font choices!#(apologies to my cardigan which may not have finished sleeves for a bit longer)
7 notes
·
View notes
Text
are you an artist who wants to get away from big site-builders like squarespace & have a place to put your work that isn't social media? i threw together a super basic portfolio code template you can use to make your own website!
it should be easy enough to customize if you have a basic understanding of what html and css are. features include:
responsive to fit on different screen sizes
fairly compact — less than 300 lines of css, and you never have to look at anything after line 30 if you don't want to
customizable fonts, colors, image sizes, and decorations right at the top of the css
image gallery with a lightbox function (clicking an image to make it bigger)
free to customize to your heart's content!
enjoy! if you end up using it, please let me know; i'd love to see what you do with it!
blog post ✷ live preview & code ✷ tip jar
#kaylee.html#portfolio code#portfolio theme#neocities#artist website#neocities theme#neocities template#website template#note: i probably won't be able to answer too many questions about this since i have a lot of comic pages to do right now#but if you have questions that aren't answered in the code leave a reply & i'll try to help!#(please don't send asks with code questions though - i don't want to clog up my blog haha)
1K notes
·
View notes
Note
your oc website is SO SO SO SO INCREDIBLY COOL how the hell do you even start learning how to do this ?? if you learned how to do this by yourself online, are there any tutorials or resources you can share with us? was making this website free??
omg THANK YOU SO SOOOOOO MUCH!!! It makes me so happy to hear that folks like my little site. I code my site with Phoenix Code (for the live viewer and number dials) and I host my site on Neocities - it is all free. Phoenix can be used in browser or on desktop, but I like having it on desktop more for big projects in case my files get deleted. I use the browser version when I just want to test something quickly.
The 2 videos I use and can not recommend enough to anyone who asks me are this HTML tutorial and this CSS tutorial. They are simple and easy to understand, but I recommend watching it the first go, and then following along the next few watches until you get the flow of basic parts to a website, how they're organized, and what order they go in. At this point, I've memorized exactly where everything goes, and it is all thanks to these 2 videos.
If I am being honest, I learned how to code by myself, not quite even with online tutorials but just from being stupid and messing around myself (1, because I was a kid, and 2, because I didn't understand English very well to know what tutorials are saying.) I used to do html coding for Neopet pages when I was a kid with too much online time, first by just editing the default petpages and adding info and images, and then just doing trial and error with the html. I'll just try something and then if it doesn't turn out the way I want it, I try to find out why it didn't work and also get inspiration from other similar sites to figure out where things go or how they coded (with this nifty thing called right click > inspect page or right click > view page source). And BOOM, working webpage.
It was rudimentary, white blank background without any boxes or anything, you just scrolled down the page and sections were separated by a horizontal bar. OH and every text was centered! I had no idea how to make scrolling boxes or fancy assets, but damn I still had so much fun working on it every weekend. When you find authentic selfmade sites from the 90s and 2000s, most of them aren't super fancy either unlike what modern nostalgia makes you think. So I hope you don't feel discouraged if you begin making a website and feel it isn't "fancy", you're already doing a first big step which is making a webpage and learned your first set of html code!
It was over a decade later before I coded webpages with html again. I've gotten lazy and started relying on site builders, but nothing was quite as versatile as html. I wanted to try coding my own OC site again, so that was when I started working on OutKrop (the site I posted). Until I started coding again, I had literally no idea what CSS even is (and let me tell you, it's a game changer!)
Personally, I work best when I can do things hands on. I don't read through tutorials, I code first then go back and read through coding help sites like w3schools when I find myself stuck and unable to figure something out. Sometimes I grab existing codes and play around with them to see what changes and what I can do with it, cuz having visual context is what helps me a lot.
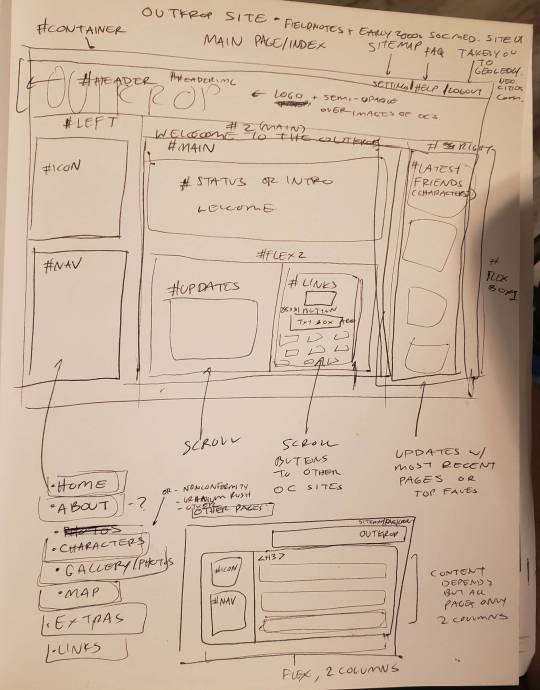
I can also share my process:
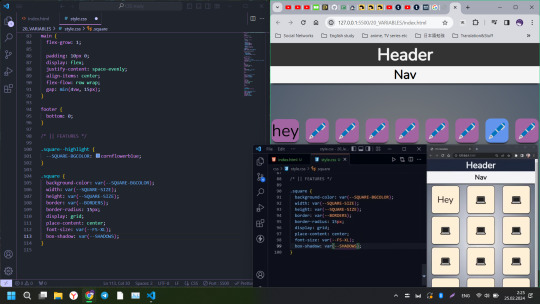
Once I gather up some ideas, I make a sketch, including what boxes (divs in css) should approximately go. It is very rough, but shows me exactly what I need to know.
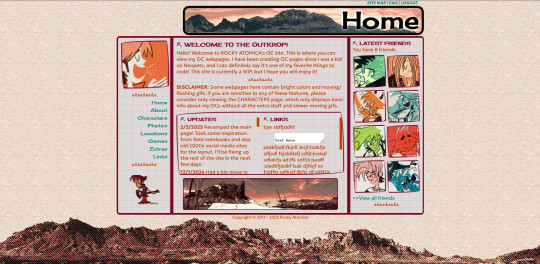
Next I load up my coding app (Phoenix Code in my case) and "sketch" the layout. Nothing fancy going on here, just putting things where they need to be, and fixing size of boxes and margins if needed. I give my boxes all a background color so I can easily see how big they are and where they are located.

After some adjustments like moving stuff around and adding assets like backgrounds and images, and changing colors of the boxes, rounding off corners, etc., we get this!
so recap + additional useful sites I use:
Coding app: Phoenix Code
Site hosted on: Neocities
Video tutorials: HTML and CSS
Sites for learning code: w3schools, also lissa explains is a great site that is written for kids to learn html so it's easy to understand. Finally, sadgrl has a lot of great resources for coding as well!
I recommend looking through these sites AFTER you tried taking a spin at coding - it doesn't have to be anything fancy just follow the HTML video tutorial I linked!
Thanks for the ask, and I hope this helps you and many others out there who are interested in building a site with html/css! Don't be afraid to get things "wrong" or have an "un-fancy" site. This is how you learn to code, and it'll become so easy once you get the hang of it.
Anyone is always more than welcome to reach out for coding help and advice :-]
58 notes
·
View notes
Text
Sugary Scribbles | #8
Saturday 6th January 2024
IT'S BASICALLY WORKING (on larger screens)! My never-ending war on website responsiveness continues! I have a large screen and I stupidly only took into account of MY screen size. What I did do though is created a message for phone-table sizes because it just wouldn't make sense it working on really small devices - in my opinion~! But for now I will put this on hold because I am excited about my other project idea I came up with yesterday oops~!
This is my first project of the year and it's super adorable in my opinion! It paints, it erases, it deletes and it saves your artwork! Ticks all the boxes I made at the beginning of the project! Turned a simple 'Make a HTML painting webpage' into something more cuter and cool! Job well done! 😩🙌🏾���
You can try it out (if you have a larger screen size), all that happens is the painting will be off the mouse direction a bit, sorry!
link to the Sugary-Scribbles web app! 🍡

Lastly, here is a cool drawing I made as I was testing the site~! I'm a better artist than this I swear, just not good using a mouse...

List of resources I used during the project
Figma - to plan the webpage
Canva: to make the header
Photopea: for further photo editing
RedKetchup: to colour pick quickly
CSS Animations: to add the zoom-in-n-out animation
MDN Canvas: to know what the element does properly
YouTube Tutorial: to get inspiration and extra help
Flaticon: for the icons and cursors
Html2canvas API: to turn the drawing into an image (tutorial)
That's all, have a nice day/night and happy coding! 🖤
#xc: project logs#sugary scribbles project#codeblr#coding#programming#progblr#studying#studyblr#dev logs#comp sci#computer science#programmer#devlogs#html css#javascript#tech#cute#adorable
104 notes
·
View notes
Text
i really want to see more of u guys on neocities because it's such a great way to make a corner of the web that's really your own and the community on there is so nice ... ! and i think i know most of the basics of html/css website making by this point (at least, what's relevant on neocities) so if i made a tutorial that shows how to go about coding your own site (it's SUPER easy) would anyone be interested...
11 notes
·
View notes
Text
i ended up just re-coding the damn windows from my old theme. i'm probably going to update this visually a little bit but i wanted the basic CSS done anyway


i don't even need the k-header class but it helps me visually parse my own HTML if it's there so i included it. the rest has been super streamlined from how it was before though, especially with the buttons (i tried to think of a more elegant solution than just three empty divs but this is the best i got. at least they no longer have individual class names i have to write over and over anymore)
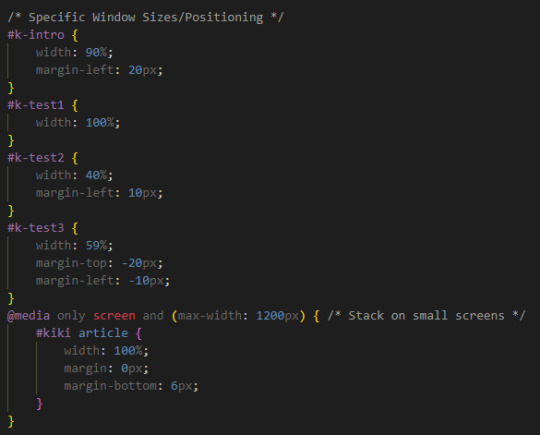
individual windows can have their size and position adjusted by id selector :) and they stack at a breakpoint (this was just a quick test)
10 notes
·
View notes
Note
would you be willing to share a neocities tutorial?
WELL basics i know of CSS/HTML (and i must stress this is BASICS, i am also a n00b) that would have saved me a LOT of headache is the code will have a <head> and <body> section
the <head> section will contain the CSS styling, and the <body> contains the actual content of the site. for example, to create the boxes containing text, this is a <style> tag within my <head> section, containing the CSS specifications for the default font color and size, as well as the box's size and border.
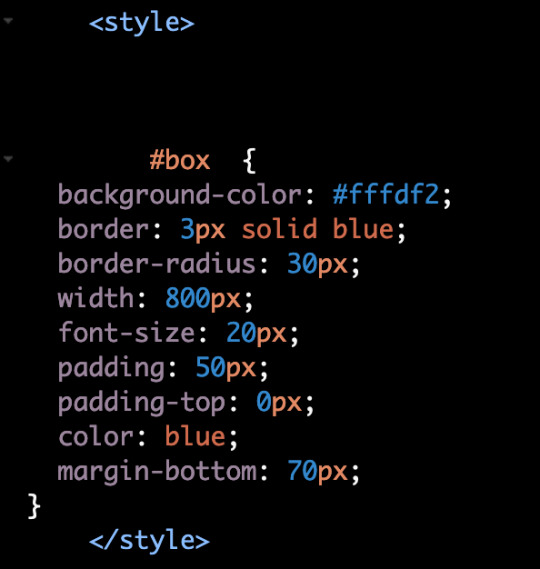
then, in the <body> section i can put <div id="box"> tag, telling the code "hey, this part of the CSS is what i want this to look like"
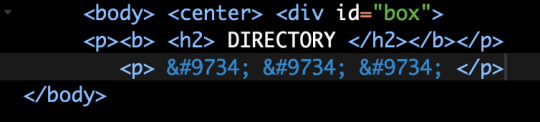
mines all super messy because i patchworked it together/wrote it from scratch and know nothing about html lol. last time i did anything like this was coding my deviantart page in 2014. but this was the biggest hurdle for me that was making me not understand what was going on
#there are some free layout builders and better written tutorials elsewhere on the internet i am sure...#dia answers
27 notes
·
View notes
Text
By the way, because I just found myself using this again - if you want to backup your blog, I really recommend using tumblr-utils as described in this document! I originally wanted to reblog the post where I first found this, but it was somewhere further down a reblog chain and apparently the op either disabled reblogs or deleted it, since it didn't work. So I'm just sharing the link to the document (written by user @/magz) here:
It's genuinely so useful, I've used to use Tumblr's own export feature but once a blog reaches a certain size this just takes super long (mine took literal days until it was ready to download), whereas here it was just a couple minutes, plus the folder as a whole is much smaller too. And if you set it up correctly (with incremental saves, which is also explained in the document) you don't need to download the entire thing every time!
Personally I did run into two smaller issues, one being that the download of embedded Youtube videos didn't work for me (despite running pip install youtube-dl). Maybe it's just a me issue that I missed something on the install, otherwise I could imagine that maybe there's some compatibility problem between the current versions of tumblr-utils and the youtube downloader.
The other, very minor issue (which isn't even an issue per se, more like a preference) is that there is no css styling applied on my backup, when I open the html file, so it looks like a really old website like straight from the 90s😅 I was mainly a bit confused about whether I had an error or it was supposed to be like that, because a screenshot in magz' document showed that their page apparently has some styling applied to it. I still need to look more into the documentation (btw, here is also the documentation on github directly, though I think the most important features are included in the document anyway), but as it looks you can add your own styling by either adding an override.css file to change some of the existing styles, or add your own entirely by adding a custom.css file. It would be super handy if there was also a way to easily pull your current styling from your blog to copy-paste it in there, but I haven't researched yet if such a feature exists (if you know anything I'd be happy about additions!).
But one of the best features for me was that it also allows you to export your likes. I'm sure I'm not the only one who sometimes runs into this problem that you like something, but maybe feel too embarrassed to reblog it, or may not want to do so for another reason (e.g. it's something nsfw, but you generally never share nsfw content on your own blog). [Btw I still encourage you to reblog posts when you can, as it will usually make the op happy :D But I absolutely understand why you won't sometimes.] Problem is that when the original poster deletes it at some point, it will be gone and you'll have no way of getting it back. However with tumblr-utils you can export your likes the same as your own blog. Mind you that it will have the same name as your blog, but will only contain your likes and not your own posts, so the way I did it was inside of my tumblr_backup folder, I made a likes folder and then just downloaded it into there, like this:

(For downloading my own blog, I did basically the same except one folder level above and without the --likes flag.)
I just wanted to point out this feature specifically because I actually completely missed it when I first started using this method of backing up my blog. I looked into the document again today because I wasn't entirely sure about the whole process anymore and suddenly spotted that likes flag and was like "👀👀 this has been here the entire time and I didn't use it yet??!" One thing to be noted is that your likes will have to be public for the download, otherwise it won't work, however you can of course just set them to public for the time it takes you to download them (which in my case was a couple minutes for about 4000 posts) and then make them private again, and all should be fine.
All credit goes of course to the developer(s) behind tumblr-utils and to magz for writing this instruction document, but I think that maybe this post helps at least some of my own mutuals who might not know of this amazing tool yet!
#also if you have questions about the install process or how to use it I'm open for asks!#may not be able to answer everything as I'm also just a user but I work in web dev so I'd say I have at least some background understanding#but like I can completely understand that doing stuff in the commandline can be lowkey intimidating if you're not used to it#it was for me too😅#tumblr#tumblr backup#tumblr stuff#selniasposts#idk how to tag this#also pls excuse any typos I'm writing this at 6 in the morning will try to check it later
4 notes
·
View notes
Text
How to Create Multi-Step Forms With Vanilla JavaScript and CSS
New Post has been published on https://thedigitalinsider.com/how-to-create-multi-step-forms-with-vanilla-javascript-and-css/
How to Create Multi-Step Forms With Vanilla JavaScript and CSS
Multi-step forms are a good choice when your form is large and has many controls. No one wants to scroll through a super-long form on a mobile device. By grouping controls on a screen-by-screen basis, we can improve the experience of filling out long, complex forms.
But when was the last time you developed a multi-step form? Does that even sound fun to you? There’s so much to think about and so many moving pieces that need to be managed that I wouldn’t blame you for resorting to a form library or even some type of form widget that handles it all for you.
But doing it by hand can be a good exercise and a great way to polish the basics. I’ll show you how I built my first multi-step form, and I hope you’ll not only see how approachable it can be but maybe even spot areas to make my work even better.
We’ll walk through the structure together. We’ll build a job application, which I think many of us can relate to these recent days. I’ll scaffold the baseline HTML, CSS, and JavaScript first, and then we’ll look at considerations for accessibility and validation.
I’ve created a GitHub repo for the final code if you want to refer to it along the way.
The structure of a multi-step form
Our job application form has four sections, the last of which is a summary view, where we show the user all their answers before they submit them. To achieve this, we divide the HTML into four sections, each identified with an ID, and add navigation at the bottom of the page. I’ll give you that baseline HTML in the next section.
Navigating the user to move through sections means we’ll also include a visual indicator for what step they are at and how many steps are left. This indicator can be a simple dynamic text that updates according to the active step or a fancier progress bar type of indicator. We’ll do the former to keep things simple and focused on the multi-step nature of the form.,
The structure and basic styles
We’ll focus more on the logic, but I will provide the code snippets and a link to the complete code at the end.
Let’s start by creating a folder to hold our pages. Then, create an index.html file and paste the following into it:
Open HTML
<form id="myForm"> <section class="group-one" id="one"> <div class="form-group"> <div class="form-control"> <label for="name">Name <span style="color: red;">*</span></label> <input type="text" id="name" name="name" placeholder="Enter your name"> </div> <div class="form-control"> <label for="idNum">ID number <span style="color: red;">*</span></label> <input type="number" id="idNum" name="idNum" placeholder="Enter your ID number"> </div> </div> <div class="form-group"> <div class="form-control"> <label for="email">Email <span style="color: red;">*</span></label> <input type="email" id="email" name="email" placeholder="Enter your email"> </div> <div class="form-control"> <label for="birthdate">Date of Birth <span style="color: red;">*</span></label> <input type="date" id="birthdate" name="birthdate" max="2006-10-01" min="1924-01-01"> </div> </div> </section> <section class="group-two" id="two"> <div class="form-control"> <label for="document">Upload CV <span style="color: red;">*</span></label> <input type="file" name="document" id="document"> </div> <div class="form-control"> <label for="department">Department <span style="color: red;">*</span></label> <select id="department" name="department"> <option value="">Select a department</option> <option value="hr">Human Resources</option> <option value="it">Information Technology</option> <option value="finance">Finance</option> </select> </div> </section> <section class="group-three" id="three"> <div class="form-control"> <label for="skills">Skills (Optional)</label> <textarea id="skills" name="skills" rows="4" placeholder="Enter your skills"></textarea> </div> <div class="form-control"> <input type="checkbox" name="terms" id="terms"> <label for="terms">I agree to the terms and conditions <span style="color: red;">*</span></label> </div> <button id="btn" type="submit">Confirm and Submit</button> </section> <div class="arrows"> <button type="button" id="navLeft">Previous</button> <span id="stepInfo"></span> <button type="button" id="navRight">Next</button> </div> </form> <script src="script.js"></script>
Looking at the code, you can see three sections and the navigation group. The sections contain form inputs and no native form validation. This is to give us better control of displaying the error messages because native form validation is only triggered when you click the submit button.
Next, create a styles.css file and paste this into it:
Open base styles
:root --primary-color: #8c852a; --secondary-color: #858034; body font-family: sans-serif; line-height: 1.4; margin: 0 auto; padding: 20px; background-color: #f4f4f4; max-width: 600px; h1 text-align: center; form background: #fff; padding: 40px; border-radius: 5px; box-shadow: 0 0 10px rgba(0, 0, 0, 0.1); display: flex; flex-direction: column; .form-group display: flex; gap: 7%; .form-group > div width: 100%; input:not([type="checkbox"]), select, textarea width: 100%; padding: 8px; border: 1px solid #ddd; border-radius: 4px; .form-control margin-bottom: 15px; button display: block; width: 100%; padding: 10px; color: white; background-color: var(--primary-color); border: none; border-radius: 4px; cursor: pointer; font-size: 16px; button:hover background-color: var(--secondary-color); .group-two, .group-three display: none; .arrows display: flex; justify-content: space-between align-items: center; margin-top: 10px; #navLeft, #navRight width: fit-content; @media screen and (max-width: 600px) .form-group flex-direction: column;
Open up the HTML file in the browser, and you should get something like the two-column layout in the following screenshot, complete with the current page indicator and navigation.
Adding functionality with vanilla JavaScript
Now, create a script.js file in the same directory as the HTML and CSS files and paste the following JavaScript into it:
Open base scripts
const stepInfo = document.getElementById("stepInfo"); const navLeft = document.getElementById("navLeft"); const navRight = document.getElementById("navRight"); const form = document.getElementById("myForm"); const formSteps = ["one", "two", "three"]; let currentStep = 0; function updateStepVisibility() formSteps.forEach((step) => document.getElementById(step).style.display = "none"; ); document.getElementById(formSteps[currentStep]).style.display = "block"; stepInfo.textContent = `Step $currentStep + 1 of $formSteps.length`; navLeft.style.display = currentStep === 0 ? "none" : "block"; navRight.style.display = currentStep === formSteps.length - 1 ? "none" : "block"; document.addEventListener("DOMContentLoaded", () => navLeft.style.display = "none"; updateStepVisibility(); navRight.addEventListener("click", () => if (currentStep < formSteps.length - 1) currentStep++; updateStepVisibility(); ); navLeft.addEventListener("click", () => if (currentStep > 0) currentStep--; updateStepVisibility(); ); );
This script defines a method that shows and hides the section depending on the formStep values that correspond to the IDs of the form sections. It updates stepInfo with the current active section of the form. This dynamic text acts as a progress indicator to the user.
It then adds logic that waits for the page to load and click events to the navigation buttons to enable cycling through the different form sections. If you refresh your page, you will see that the multi-step form works as expected.
Multi-step form navigation
Let’s dive deeper into what the Javascript code above is doing. In the updateStepVisibility() function, we first hide all the sections to have a clean slate:
formSteps.forEach((step) => document.getElementById(step).style.display = "none"; );
Then, we show the currently active section:
document.getElementById(formSteps[currentStep]).style.display = "block";`
Next, we update the text that indicators progress through the form:
stepInfo.textContent = `Step $currentStep + 1 of $formSteps.length`;
Finally, we hide the Previous button if we are at the first step and hide the Next button if we are at the last section:
navLeft.style.display = currentStep === 0 ? "none" : "block"; navRight.style.display = currentStep === formSteps.length - 1 ? "none" : "block";
Let’s look at what happens when the page loads. We first hide the Previous button as the form loads on the first section:
document.addEventListener("DOMContentLoaded", () => navLeft.style.display = "none"; updateStepVisibility();
Then we grab the Next button and add a click event that conditionally increments the current step count and then calls the updateStepVisibility() function, which then updates the new section to be displayed:
navRight.addEventListener("click", () => if (currentStep < formSteps.length - 1) currentStep++; updateStepVisibility(); );
Finally, we grab the Previous button and do the same thing but in reverse. Here, we are conditionally decrementing the step count and calling the updateStepVisibility():
navLeft.addEventListener("click", () => if (currentStep > 0) currentStep--; updateStepVisibility(); );
Handling errors
Have you ever spent a good 10+ minutes filling out a form only to submit it and get vague errors telling you to correct this and that? I prefer it when a form tells me right away that something’s amiss so that I can correct it before I ever get to the Submit button. That’s what we’ll do in our form.
Our principle is to clearly indicate which controls have errors and give meaningful error messages. Clear errors as the user takes necessary actions. Let’s add some validation to our form. First, let’s grab the necessary input elements and add this to the existing ones:
const nameInput = document.getElementById("name"); const idNumInput = document.getElementById("idNum"); const emailInput = document.getElementById("email"); const birthdateInput = document.getElementById("birthdate") const documentInput = document.getElementById("document"); const departmentInput = document.getElementById("department"); const termsCheckbox = document.getElementById("terms"); const skillsInput = document.getElementById("skills");
Then, add a function to validate the steps:
Open validation script
function validateStep(step)
Here, we check if each required input has some value and if the email input has a valid input. Then, we set the isValid boolean accordingly. We also call a showError() function, which we haven’t defined yet.
Paste this code above the validateStep() function:
function showError(input, message) const formControl = input.parentElement; const errorSpan = formControl.querySelector(".error-message"); input.classList.add("error"); errorSpan.textContent = message;
Now, add the following styles to the stylesheet:
Open validation styles
input:focus, select:focus, textarea:focus outline: .5px solid var(--primary-color); input.error, select.error, textarea.error outline: .5px solid red; .error-message font-size: x-small; color: red; display: block; margin-top: 2px; .arrows color: var(--primary-color); font-size: 18px; font-weight: 900; #navLeft, #navRight display: flex; align-items: center; gap: 10px; #stepInfo color: var(--primary-color);
If you refresh the form, you will see that the buttons do not take you to the next section till the inputs are considered valid:
Finally, we want to add real-time error handling so that the errors go away when the user starts inputting the correct information. Add this function below the validateStep() function:
Open real-time validation script
function setupRealtimeValidation() nameInput.addEventListener("input", () => if (nameInput.value.trim() !== "") clearError(nameInput); ); idNumInput.addEventListener("input", () => if (idNumInput.value.trim() !== "") clearError(idNumInput); ); emailInput.addEventListener("input", () => if (emailInput.validity.valid) clearError(emailInput); ); birthdateInput.addEventListener("change", () => if (birthdateInput.value !== "") clearError(birthdateInput); ); documentInput.addEventListener("change", () => if (documentInput.files[0]) clearError(documentInput); ); departmentInput.addEventListener("change", () => if (departmentInput.value !== "") clearError(departmentInput); ); termsCheckbox.addEventListener("change", () => if (termsCheckbox.checked) clearError(termsCheckbox); );
This function clears the errors if the input is no longer invalid by listening to input and change events then calling a function to clear the errors. Paste the clearError() function below the showError() one:
function clearError(input) const formControl = input.parentElement; const errorSpan = formControl.querySelector(".error-message"); input.classList.remove("error"); errorSpan.textContent = "";
And now the errors clear when the user types in the correct value:
The multi-step form now handles errors gracefully. If you do decide to keep the errors till the end of the form, then at the very least, jump the user back to the erroring form control and show some indication of how many errors they need to fix.
Handling form submission
In a multi-step form, it is valuable to show the user a summary of all their answers at the end before they submit and to offer them an option to edit their answers if necessary. The person can’t see the previous steps without navigating backward, so showing a summary at the last step gives assurance and a chance to correct any mistakes.
Let’s add a fourth section to the markup to hold this summary view and move the submit button within it. Paste this just below the third section in index.html:
Open HTML
<section class="group-four" id="four"> <div class="summary-section"> <p>Name: </p> <p id="name-val"></p> <button type="button" class="edit-btn" id="name-edit"> <span>✎</span> <span>Edit</span> </button> </div> <div class="summary-section"> <p>ID Number: </p> <p id="id-val"></p> <button type="button" class="edit-btn" id="id-edit"> <span>✎</span> <span>Edit</span> </button> </div> <div class="summary-section"> <p>Email: </p> <p id="email-val"></p> <button type="button" class="edit-btn" id="email-edit"> <span>✎</span> <span>Edit</span> </button> </div> <div class="summary-section"> <p>Date of Birth: </p> <p id="bd-val"></p> <button type="button" class="edit-btn" id="bd-edit"> <span>✎</span> <span>Edit</span> </button> </div> <div class="summary-section"> <p>CV/Resume: </p> <p id="cv-val"></p> <button type="button" class="edit-btn" id="cv-edit"> <span>✎</span> <span>Edit</span> </button> </div> <div class="summary-section"> <p>Department: </p> <p id="dept-val"></p> <button type="button" class="edit-btn" id="dept-edit"> <span>✎</span> <span>Edit</span> </button> </div> <div class="summary-section"> <p>Skills: </p> <p id="skills-val"></p> <button type="button" class="edit-btn" id="skills-edit"> <span>✎</span> <span>Edit</span> </button> </div> <button id="btn" type="submit">Confirm and Submit</button> </section>
Then update the formStep in your Javascript to read:
const formSteps = ["one", "two", "three", "four"];
Finally, add the following classes to styles.css:
.summary-section display: flex; align-items: center; gap: 10px; .summary-section p:first-child width: 30%; flex-shrink: 0; border-right: 1px solid var(--secondary-color); .summary-section p:nth-child(2) width: 45%; flex-shrink: 0; padding-left: 10px; .edit-btn width: 25%; margin-left: auto; background-color: transparent; color: var(--primary-color); border: .7px solid var(--primary-color); border-radius: 5px; padding: 5px; .edit-btn:hover border: 2px solid var(--primary-color); font-weight: bolder; background-color: transparent;
Now, add the following to the top of the script.js file where the other consts are:
const nameVal = document.getElementById("name-val"); const idVal = document.getElementById("id-val"); const emailVal = document.getElementById("email-val"); const bdVal = document.getElementById("bd-val") const cvVal = document.getElementById("cv-val"); const deptVal = document.getElementById("dept-val"); const skillsVal = document.getElementById("skills-val"); const editButtons = "name-edit": 0, "id-edit": 0, "email-edit": 0, "bd-edit": 0, "cv-edit": 1, "dept-edit": 1, "skills-edit": 2 ;
Then add this function in scripts.js:
function updateSummaryValues() nameVal.textContent = nameInput.value; idVal.textContent = idNumInput.value; emailVal.textContent = emailInput.value; bdVal.textContent = birthdateInput.value; const fileName = documentInput.files[0]?.name; if (fileName) const extension = fileName.split(".").pop(); const baseName = fileName.split(".")[0]; const truncatedName = baseName.length > 10 ? baseName.substring(0, 10) + "..." : baseName; cvVal.textContent = `$truncatedName.$extension`; else cvVal.textContent = "No file selected"; deptVal.textContent = departmentInput.value; skillsVal.textContent = skillsInput.value || "No skills submitted"; }
This dynamically inserts the input values into the summary section of the form, truncates the file names, and offers a fallback text for the input that was not required.
Then update the updateStepVisibility() function to call the new function:
function updateStepVisibility() formSteps.forEach((step) => document.getElementById(step).style.display = "none"; ); document.getElementById(formSteps[currentStep]).style.display = "block"; stepInfo.textContent = `Step $currentStep + 1 of $formSteps.length`; if (currentStep === 3) updateSummaryValues(); navLeft.style.display = currentStep === 0 ? "none" : "block"; navRight.style.display = currentStep === formSteps.length - 1 ? "none" : "block";
Finally, add this to the DOMContentLoaded event listener:
Object.keys(editButtons).forEach((buttonId) => const button = document.getElementById(buttonId); button.addEventListener("click", (e) => currentStep = editButtons[buttonId]; updateStepVisibility(); ); );
Running the form, you should see that the summary section shows all the inputted values and allows the user to edit any before submitting the information:
And now, we can submit our form:
form.addEventListener("submit", (e) => e.preventDefault(); if (validateStep(2)) alert("Form submitted successfully!"); form.reset(); currentFormStep = 0; updateStepVisibility(); );
Our multi-step form now allows the user to edit and see all the information they provide before submitting it.
Accessibility tips
Making multi-step forms accessible starts with the basics: using semantic HTML. This is half the battle. It is closely followed by using appropriate form labels.
Other ways to make forms more accessible include giving enough room to elements that must be clicked on small screens and giving meaningful descriptions to the form navigation and progress indicators.
Offering feedback to the user is an important part of it; it’s not great to auto-dismiss user feedback after a certain amount of time but to allow the user to dismiss it themselves. Paying attention to contrast and font choice is important, too, as they both affect how readable your form is.
Let’s make the following adjustments to the markup for more technical accessibility:
Add aria-required="true" to all inputs except the skills one. This lets screen readers know the fields are required without relying on native validation.
Add role="alert" to the error spans. This helps screen readers know to give it importance when the input is in an error state.
Add role="status" aria-live="polite" to the .stepInfo. This will help screen readers understand that the step info keeps tabs on a state, and the aria-live being set to polite indicates that should the value change, it does not need to immediately announce it.
In the script file, replace the showError() and clearError() functions with the following:
function showError(input, message) const formControl = input.parentElement; const errorSpan = formControl.querySelector(".error-message"); input.classList.add("error"); input.setAttribute("aria-invalid", "true"); input.setAttribute("aria-describedby", errorSpan.id); errorSpan.textContent = message; function clearError(input) const formControl = input.parentElement; const errorSpan = formControl.querySelector(".error-message"); input.classList.remove("error"); input.removeAttribute("aria-invalid"); input.removeAttribute("aria-describedby"); errorSpan.textContent = "";
Here, we programmatically add and remove attributes that explicitly tie the input with its error span and show that it is in an invalid state.
Finally, let’s add focus on the first input of every section; add the following code to the end of the updateStepVisibility() function:
const currentStepElement = document.getElementById(formSteps[currentStep]); const firstInput = currentStepElement.querySelector( "input, select, textarea" ); if (firstInput) firstInput.focus();
And with that, the multi-step form is much more accessible.
Conclusion
There we go, a four-part multi-step form for a job application! As I said at the top of this article, there’s a lot to juggle — so much so that I wouldn’t fault you for looking for an out-of-the-box solution.
But if you have to hand-roll a multi-step form, hopefully now you see it’s not a death sentence. There’s a happy path that gets you there, complete with navigation and validation, without turning away from good, accessible practices.
And this is just how I approached it! Again, I took this on as a personal challenge to see how far I could get, and I’m pretty happy with it. But I’d love to know if you see additional opportunities to make this even more mindful of the user experience and considerate of accessibility.
References
Here are some relevant links I referred to when writing this article:
How to Structure a Web Form (MDN)
Multi-page Forms (W3C.org)
Create accessible forms (A11y Project)
#:not#Accessibility#ADD#aria#Article#Articles#attention#attributes#background#border-radius#box#box-shadow#browser#buttons#challenge#change#classes#code#Color#content#CSS#CV#dept#direction#display#email#error handling#event#Events#Exercise
3 notes
·
View notes
Note
Thanks for your service all these years. I'm really glad you were able to add sustenance to my timeline! I'm excited to dive deep into your website!!!
Thanks for sticking with me all these years!
It's just finally time to give up on social media and go back to personal sites, methinks. It feels super freeing to be able to just post whatever the hell I want (nsfw, copyrighted material, strong opinions, etc) with no auto-mod bullshit, no arbitrary rules about what counts as "acceptable content", no anti-trans bullshit (LOOKIN AT YOU TUMBLR), and no Like button or Comment Section to give trolls a voice. It fucking rules!
I strongly recommend getting yourself a personal website. You can install a pre-made theme, or even build one from scratch. It's actually super easy to do once you know basic HTML or CSS. My whole site is built from scratch!
I'll keep stopping by here from time to time in case I get more nice messages like this, but otherwise this tumblr is on full autopilot until it runs out of gas. If you wanna say hi, you can find me in my private space station slash strip club at the link above!
#anonymous#neocities#personal website#there are a little over 1000 gifs still remaining in the queue
7 notes
·
View notes
Note
HI i saw u were struggling w builder , i super lowk know how to use builder .. !!! for scrollboxes / others ( NOT ALL WORK !! ) i use hauntedmansion . crd . co , u insert the codes into " edit html " , whats rlly great abt these is that it gives u the code while being aboe to be edited ! for the bg , youll see on the sides theres a page icon , there you edit the css style string , heres the code ! ;
body {
background-image:url(' img url ! i use catbox . moe for codes ');
^ is only needed if you want a bg in your sntry !
background-color: #fff;
I HOPE THIS HELPS ! builder was super hard to learn , n bc theres basically no resources to learn , unlike carrd , im ok w teaching ppl ^_^ you can also steal codes from other builders ( guilty .. ) as long as you arent copying them / give credits properly !

omg ty this is such a big help !!!!!!!!!!!!!!!!!!!!
and ur so right there's like no resources to learn anywhere im just looking at other ppls codes and being like "whar is happening...."
thank you!


17 notes
·
View notes
Text
Hello Tumblr
i have been on the platform since 2012 but i have never actually wrote any posts so i finally made a decision to create a new personal account (even tho that account have been created and been empty since 2020 but these last four years were hard for everyone). I graduated from a university in 2021 and got a translator degree but due to various reasons (in the world and in general) it was hard to apply it in job searching. and i've been feeling super lost and depressed all these years. and i decided to give a chance my small coding dream since i had since high school (in my country we need to pass entry exams at school and my computer science teacher prohibited me even trying passing the exam and during that time i was listless and AGAIN a lost teenager who had no idea what to do with their life so i didn't even try fighting and just gave up the idea and chose a path of my other passion: languages /after graduation i picked up japanese so i keep learning new stuff and it helps me a lot to cope ig/) so here i am just turned 26 this month and started learning how to code last month only. i had a slight idea of how html worked plus we had python usage in linguistic at university (for some reason it was super weird lol) i have been practicing for 10 days straight so i thought it's gonna be a good idea to participate in 100 days of coding as almost a complete beginner and track my progress (plus i haven't actually been practicing english that much so it is also a good reason to start that blog) so my progress in the last 10 days looks like that: 1. revised html basics 2. started css journey
i use online video courses on Youtube by freeCodeCamp.org and creating an actual web styling with a tutor does actually help a lot! i enjoy studying but i do understand that i need much more time to practice myself
after i am planning to start JavaScript but we'll see how it will go and i am still not sure which path to choose but ig front-end sympathise me a lot plus i am planning to pass JLPT N3 this year so maybe i will post some updates too but i am not sure yet is it better to participate in summer or winter exam i don't think anyone will be interested in my journey but when i see people posting their progress in any sphere it inspires me a lot

#10/100 days#personal#long post#100 days of code#codeblr#langblr#japanese#html css#beginner#100 days#hello tumblr#koneko codes
17 notes
·
View notes
Text
Commissions are open!
Basic Australian Aboriginal reading resources here
My experience on being Aboriginal on tumblr

Hey an actual pinned post with info in it about me so people can fucking learn shit about me or whatevers. This is just basic info and stuff, but if you wanna know more you can go to my about page!
I'm known on the internet as Kiunlo pretty much everywhere, and you can call me that if you like, but you can also call me Ash too :3 I'm a 26 yr old aussie who is Indigenous, and I'm super into stuff like Batman, World of Warcraft, arts and crafts, working on my neocities website (html and css is my passion), customising tumblr themes and making new blogs just to play w/ the new theme (lmao) and a bunch of other shit. If you wanna see the other shit I'm into you can also peruse through my tag page which shows all the stuff I (mostly) tag and stuff. But I will also tag this post with the most important tags that I use :3
Sideblog list here

Blog status:
DM's: Mutuals only
Public asks: Closed
Anon asks: Closed
Replies: Followers only
40 notes
·
View notes
Text
Hi-Hi! Hello!
I'm Estee Barnes. I'm a writer and self-taught traditional and digital artist. I love to make my own stories and worlds. I'm not so much of a fandom person, so there will be less fandom posting here. I still call my characters my OCs, even if the abbreviation has that fandom connotation. It's just easier.
(I have no problem with fandom either. It's just not what I usually dabble in!)
My sideblogs love to glitch out and not show up when I @ them. You may have to manually search for them! Please let me know if they do not show up in Tumblr search. Note that my blogs are hidden from people without an account.
Anyways, the sideblogs are all for my various OC stories. They are:
@halboro-1994 (H94; main OC story. Archived version of the blog is @/halboro1994. Don't interact with the archived version please!)
@ask-halboro (H94; an ask blog for the characters. In a cycle of being abandoned and then restarted every so often. If I find a format I like I might actually start encouraging asks.)
@oath-and-creed (O&C; main blog for Oath & Creed, another story of mine. Not to be confused with the 'official' blog!)
@oath-and-creed-official (O&C; the ask blog for the story. Not to be confused with the regular blog!)
@super-space-sailor (SSS; a story of mine from within H94/O&C but also its own separate universe. Blog needs a major renovation.)
@thebutterflyeffect-tbe (TBE; another story of mine. Does not link the @ for some reason. Should appear in the search bar, hopefully. Let me know!)
@intergalactic-inn (IINN; another story of mine. Currently considering a major change to/redo of the plot.)
@tualoma (no abbreviation; another story of mine. Currently exists only as vague concepts on the verge of forming into a story. It's been like that for a while. Pretty quiet blog!)
Fandoms/media I am interested in (to various degrees) include others' OCs, SDV, HtTYD (specifically RttE, specifically Snotlout), and MCSM.
Other things I like include PNGs, website coding (I am learning HTML and CSS), that sun and moon imagery which was everywhere in the '90s (AKA whimsigoth), and cats. I do reblog a lot of shitposts.
More stuff under the cut. Includes my permissions surrounding use of my creative endeavours (visual art, writing, OCs, et cetera). Read, understand, and heed them if you have not already!
Personally, I don't really have much of a DNI. I will say I don't want bigots and creeps coming here. However, I mostly rely on just blocking people. I tend to hard block a lot, even if I'm not super annoyed. Mutuals won't be hard blocked unless it's over something really big.
I do not consent for any of my writing, visual artworks, OCs, or other creative endeavours (items) to be used for anything by anyone without my explicit permission on a case-by-case basis per item. I have not ever knowingly and willingly consented to my items being used for scrapping purposes, nor will I ever knowingly and willingly consent to it.
Do not repost/re-upload my works to other sites or blogs (reblogging is different; you can reblog to your blog (not community)!). Do not reblog my works to Tumblr communities. Do not trace, edit, or otherwise copy my items (referencing the bare basics/fundamentals of a pose is okay; tracing broadly refers to mostly using the line art itself).
I believe all art is inspired by things and all art will continue to inspire. However, ripping entire concepts of my creative endeavours/items (entire outfits, full names, story, et cetera) for your own purposes is copying, not inspiration.
I know coincidences happen, but seeing a character with a unique outfit specific to an OC of mine (e.g., Renee's windbreaker jacket) is much more suspicious and likely to be called out than a regular/typical outfit (e.g., Lucas's green hoodie).
If you make fanwork of my OCs, let me know! Excluding Art Fight and if you're a mutual, I will only be comfortable having the artwork posted to my blog first. Proper artist credits and links will always be given and visible! I just don't trust the default scrapping settings on most social medias. You are encouraged to reblog it to your own blog or link to the post on your other social media(s)! Artists still deserve an audience. Again, I just don't trust default settings.
Please like this post (or preferably comment) so I know you have read it!
#estee's posts#this got long haha#oh well. I think it works better now#I'll never shut up with my terms and conditions type talking#I'll add my most often used tags here for easier access#estee's ocs#h94 ocs#o&c ocs#sss ocs#tbe ocs#rgr ocs#tualoma ocs#iin ocs#rgr exists it just has no sideblog#I haven't figured out if it's connected to the tualoma universe yet#but it has a separate tag because it came to me in a dream#literally. so much oc shit comes to me in my dreams
3 notes
·
View notes
Note
hey! absolutely LOVE your twine games. i was wondering what twine format did you use for your games? is it harlowe or sugarcube? just bc i've made twine intfics using harlowe and haven't had much luck with trying to put images and sounds into it. so i'm curious! hope you don't mind me asking!!
i used harlowe! i host files on github and embed them via a basic img/audio src command. images are pretty straightforward, use a bit of html or css to style width properties or whatever else you want.
it’s worth remembering that anything you can do with raw html or css you can do in harlowe, so if the twine cookbook isn’t helping, start looking through html coding sites :^)
audio is a little trickier in harlowe, you can’t really make continuous looping tracks between passages (there are plugins, but they’re clunky as hell and unintuitive) AND have to format audio sourcing very weirdly in the code itself, but if all you want is like… button click sound effects or other small things, its doable. anything more complicated and you should probably switch to sugarcube.
sugarcube is very good. it has good image and audio hosting, and works SUPER well with javascript, so you can make some absolutely gorgeous things in it. the downside is it’s a lot uglier code-wise than harlowe + takes more effort to learn. still worth it IMO.
i actually planned to code link rot in sugarcube before realizing i was better off just making my own website lol, so i did a fair amount of work in the program. Preddy Good
16 notes
·
View notes