#tutorials as part of the creation process
Explore tagged Tumblr posts
Visit Tumblr Blog
Explore Tumblr blogs with no restrictions, modern design and the best experience.
Last Seen Tumblr Blogs


Fun Fact
Tumblr has a 66 index score for customer satisfaction in the US.
Text
I am 100% serious, if staff implement an algorithm that cannot be turned off (the way they implemented Live which cannot be turned off) I'm out. I love you all, but I will go back to not being on any social sites. At least I might catch up on my reading.
#some days I truely miss forums#there are so many ways to help new users get used to the site#tutorials as part of the creation process#having all new users autpmatically follow a 'tumblr tips' blog#an email with helpful links#making the tutorial in help easier to find#but making this site just like all the (failing) others is not the best plan
17 notes
·
View notes
Text
pinned post/FAQ
TRANS RIGHTS!! TERFS GET THE FUCK OFF MY BLOG!!!!!!!

we have a source of income again, but if you like my work, donations are always appreciated!
who are you?
i'm just a guy who likes spore [2008]
why do this?
i just really like spore and making creatures in spore. it helps me practice my creature creation abilities.
can you make my oc in spore?
as of right now i do not take requests. i generally find characters and creatures i want to make by them appearing on my dashboard. refer to the Request Beast.

what is in your icon?
captain thunderhide, my main spore space stage captain.

what is peeling?
peeling is when i remove all detail parts from a creature and show the bare sculpt underneath - anything that is not eyes, mouth, hands, feet, or limbs will be removed. it is a tradition around these parts
what are "original spores"?
original spores are spore creations that aren't based on existing media - ocs, copyrighted characters, or otherwise. usually, they're just making things to make them in spore, or are based on simple prompts such as "a plate of spaghetti" or "a penis".
do you use mods?
i exclusively play this game with mods.
can i download the creatures you make?
only if the original creator of the design is okay with it and requests a png. please note that in order to successfully download the creatures, you will need to download every mod used to create them.
i will not always be able to say what mods i use to make something, so it's a gamble if you don't have all of the ones i use.
how do i mod spore/do advanced creature creation like you?
darkedgetv's FAQ is a very good resource to begin. i started there, and it's where i recommend you to start if you're interested in spore modding. it also contains many other mods i have not listed under the cut.
as much as i disagree with the process of using a discord server to contain vital information and resources, the davoonline spore modding community discord is also a good source of resources and mods that even i do not use.
have you heard of [in-development indie sporelike]?
yes. i have heard of all of them.
i hold no interest in any of the currently in development indie "sporelikes". i believe they are trying to reinvent the wheel and overall they do not interest me.
are there any other blogs like yours?
there's a few and ever growing! i refer to this as the ecosystem or the making-you ecosystem.
i have a masterpost of all known individuals in this ecosystem here.
what editor mods do you use?
a lot, so they'll be under the cut.
not mods, but highly recommended for enhanced playing experience
4GB patch - Tutorial - patches spore [and other 32bit programs] to be able to use 4gb of RAM. recommended if playing a highly modded copy, and makes the game more stable.
Reshade & ReSpore - post-processing injector & shader that alters the appearance of spore, giving it more detailed shading and vibrant colors. i use this for gameplay and screenshots. runs on GPU power, so excellent if you have a strong graphics card
HD graphics fix - this doesn't actually seem to work for my copy, but it alters the textures of base spore to be more high-quality.
mods that are absolute must-haves
these mods are ones that i use in almost every creation, and add a lot of QoL to the editors. if i forget a mod in a creature png i post, it will be one of these.
Dark injection - THE spore mod. it's likely a lot of other mods you'll download will mesh well with dark injection. you can turn off whatever you don't want to use through the installer.
Universal Property Enhancer - a library mod that many other mods require
The Smoother - a useful tool for building muscles and smoothing out your creatures' bodies
Enhanced Color Picker - a requirement for super detailed creations, enables hexcode color picking and color wheel selection beyond normal limits of spore
[UPE] Infinite Part Scaling - allows scaling of parts near-infinitely, beyond the limits of the original game
Project Skyncraft - adds new creature skinpaints
Unshackled - adds nodes and limbs for creating custom wings, heads, hands, etc. a little bit unstable, i mostly use this for wings.
Spore Stacker - allows stacking of any part
Subtle Rotations - reduces part rotation snapping
Advanced CE - adds building editor manipulators to the creature editor
Every Part Costs Nothing - self explanatory
Rotate Anything - lets you rotate anything, including feet and hands
Advanced Creature Paint - allows for individual coloring of parts on a creature, like in the building and vehicle editors
Ambient Occlusion Disabler - removes baked-on shadows for creatures
Delta Paints - adds new skinpaints
Valla's Skinpaint Switcheroo - adds duplicates of all vanilla, C&C, and GA creature coat and detail skinpaints into their opposite category
Valla's Vanilla Style Parts - adds several parts which mimic the vanilla style
Delimbiter - increases the amount you can scale limb parts, and allows for more crazy movements of certain limb parts
test drive related mods
these mods are not required to download the creatures i post, but are recommended for the test drive.
No More Creature Editor Animations - turns off the animations that play when you add eyes, mouth, feet/hands, etc
Sevan's TF2 editor animations - adds multiple animations from tf2 into the creature test drive.
Mx3's Dance Animations - adds a multitude of dance animations into the creature test drive.
Tenebris's Creature Test Drive Animations - adds many animations from within the game to the creature test drive.
EditorBG - adds extra editor backgrounds
Ramone Kemono's MMD Drag Ball - high-effort dance mod complete with special effects and a reverse engineered camera system
part mods
these mods add parts to the editors.
DroneParts 2017 - adds many mechanical and polygonal parts useful for machine creatures, i like to use it for building clothes and markings.
New Drone Parts - a sequel to droneparts 2017, compatible with the old version. install both at the same time if you want to be able to use creatures from the old droneparts mod.
Himeric Engine - adds horror-themed parts to the creature editor.
Spore Resurrection Next Steps - adds a few parts to the creature editor and several new textures to the building and vehicle editors.
Dinosaur Parts - adds parts based on dinosaurs and other animals. mostly heads.
Strange And Beautiful - a now-discontinued, reuploaded mod that adds unusual and unique parts to the creature editor
Bionicle parts - adds a few bionicle pieces to the creature editor
Little Box Of Horrors - adds many parts with an overall horror theme. some are animated.
Pandora's Toolbox [1.0] - adds a multitude of basic shapes and polygons to build with
Replicant - adds non-textured animating parts and non-animating parts in a separate tab. good for if you want to use hands, limbs, etc without them animating or adding stats
Armoured And Dangerous - adds a few high detail mechanical looking parts.
Wordsmith 2.1 - adds letters to the creature, building, and vehicle editors
Kaiju parts - adds several parts based on popular kaiju
Organic Help - adds many membrane pieces to the creature editor, for creating wing webbing among other things
Project: Mad Mannequins - adds many human body based parts. and a horse for some reason
A Mouth For All Seasons - adds alternate versions of all vanilla mouths [and all unused cell mouths] with alternate diets
Valla's Captain Badges - adds all space badge models into the captain outfitter and creature editor
Rock On! - adds rock props from spore into the building and creature editors
Anime Parts - adds a couple anime human heads and anime hairs
2K notes
·
View notes
Text
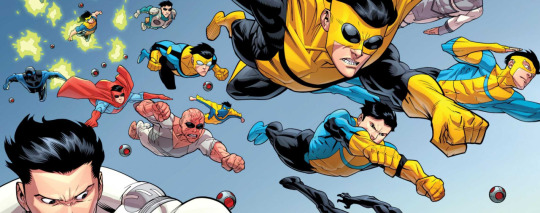
Quick Transmigration: Villain Creation System MASTERLIST
Pairing: Mark Grayson x Reader x Invincible Variants
Synopsis:
You died. Literally. The process itself was nothing special. The interesting part is what happened after. Instead of the abyss or paradise, a mysterious voice strikes up a deal with you in front of your fresh corpse.
[I am the Villain Creation System, if you want a second chance at life, then you must corrupt the souls of various Mark Graysons across the multiverse.] “Do I have a choice?” [Of course! Agree to our terms, or spend the rest of eternity alone and conscious of your own nonexistence, unable to move on to the next life and barred from what your ilk calls Heaven.] [ ˶ˆᗜˆ˵ ] “...okay, sold.” [Yay!]
You successfully destroyed the lives of different versions of Mark Grayson, but when it's time to claim your prize, something goes wrong and you are stuck in this godforsaken timeline. What's worse was that they have found you.
"Come with me and we will rule the universe together." "Be my wife and bear my children. No harm will ever come to you." "After you died, no one could compare to you, not even your own corpse."
You: (•_•)

General Trigger Warnings: you are literally dead, death in general, dark humor (e.g. necrophilia jokes), innuendos, mild swearing, mentions of violence and bodily harm, toxic relationships, the Marks are their own warning
Your Character Settings: AFAB
Chapter 1: Don't Mix Red Bull with Coffee
Chapter 2: Tutorial Mission START
Chapter 3: When In Doubt, Do Your Research
Chapter 4: Just Cut Their Red Thread of Fate
Chapter 5: This Boy is a Choking Hazard
Chapter 6: Square Root of a^2+b^2
Chapter 7: My Mama Done Tol' Me a Man…
Chapter 8: They Call Him–
Chapter 9: Coming Soon.
[A message from writerclaire: This story is also available on AO3 if you prefer the format there.]
Questions and Discussion about the fic
who is who
villain creation system and origins
path to destruction
how many variants
greedy for love and attention
cheat items
toxic viltrumites vs human love
maskless (gay) mark
villain reformation system
virgin viltrumite
will the marks find out the truth?
more on virgin viltrumite mark
mohawk's zipper
rizz 'im with the 'tism
1st mark's jealousy
meeting with main mark
which variants; also, angstrom?
we don't villainize love rivals here
piercings
system cheats are op
card and board games are free
random thoughts: sinister loves selfishness
fanart by @gluttonousriceflour
spoiler!! chapter 6 fanart by anon
Disclaimer: The images used in this post do not belong to writerclaire. They were lifted from the following sources:
Invincible flying
Alternate Invincibles
ദ്ദി(。•̀ ,<)~✩‧₊
MAIN MASTERLIST
Any questions for the author? Ask here.
#invincible#reader#y/n#mark grayson#imagines#mark grayson x reader#invincible x reader#invincible x y/n#angst#isekai#quick transmigration#qt#media transmigration#fem reader#afab reader#invincible variants#invincible war#mark grayson variants#masterlist#slow burn#system cheats#system#vcs#villain creation system
181 notes
·
View notes
Text
Coming Home (But Not to You) + Someplace New Physical Bind


i've done a few rebinds of paperbacks to hardcovers but this is my first ever full bind :')
i really love this universe written by @lesbianherald and i'm so delighted to have a forever copy! i keep coming back to it, so having it on paper will make it much easier to tab out my favourite parts when i need them.
there's definitely mistakes, especially with the cover (pls don't ask about the back cover it's none of my business). i hit a point where i chose done over good because otherwise this would have taken me 6 months. there is no prize to perfection etc.
Coming Home clocks in at around 360 pages and Someplace New is about 60. i included the playlists for both since i'm a sucker for 'bonus content'. in paper, that means 107 sheets of a4 split into 14 signatures of 7-8 pages.
some retrospectives and the guides i followed below:
what went well:
the actual process of folding signatures and sewing the binding was my favourite part. basically all the work that didn't involve fighting technology lmao
i struggled sourcing a4 short grain but i'm really happy i used it! it's such a floppy, soft book and it sits open on it's own
i hated the cover design in canva but on the book it looks sick as hell. very trust the process kind of deal
what didn't go well:
i'll never learn my lesson about text and heat transfer vinyl. this is where i almost lost my mind
speaking of htv, i really screwed up every step of the case creation. my boards are a little short, i wasted a load of book cloth, and i used to much glue for the endpapers that it seeped through a little. not enough to do major damage to the textblock, but the first and last 20 pages are a little wavy
Resources:
How To Typeset in Google Docs - i followed about 3 different tutorials for doing it in word before finding this video. very easy to follow and she shows how to impose to signatures afterwards
How To Bind on a Budget (Beginner Friendly)
French Link Stitch Bookbinding tutorial
268 notes
·
View notes
Text
CC Creation Tutorial: Smooth Seams in Blender

In this tutorial, I will show you how to make your mesh seams smooth inside Blender (no Milkshape required!) and walk you through the process step by step. We will make a perfectly smooth mesh and transfer the normal data from that mesh to our main mesh using the Data Transfer modifier.
I am using Blender 3.6 in this tutorial (though you should be able to follow along using other versions as well)
You do not need to have much previous knowledge to follow this tutorial, but I assume you know some basics in Blender like how to select, things, navigate around, etc, and know how to import the meshes and put them into Blender.
For this tutorial, I exported the Sims 3 afbodyEP4DressPromBigBow mesh with TSR Workshop. You can use any clothing mesh you like though, and works on any meshes, not just Sims 3 ones.

This is our mesh. You can already tell that it has the dreaded seams on the neck and the rest of the body.

First, we need to make a copy of the mesh (in Object mode, select the mesh and hit Ctrl+D Shift+D to duplicate it, then hit Esc to stop it from moving around).
Rename the mesh (I added Seamless to the mesh name).
Make sure the original mesh is hidden (click the eye symbol) and select the Seamless mesh.
Press the Tab key to go into Edit Mode.

Now we select the parts that we want to have smooth seams. Let's select everything that is skin (you can select a litte piece of the mesh and then press Ctrl+L to select the entire piece)!

Now, press M and in the menu, choose By Distance. (in older versions, this is called Remove Doubles).
This will remove all double vertices at the seams on the selection we made.

It will show you how many vertices it removed. The skin looks nice and smooth!
Let's switch back to our original mesh: Make sure you deactivate the eye on the Seamless mesh and activate the eye again on the main mesh. Then, select the main mesh.

Now, let's add a data modifier to our main mesh. Click the blue wrench icon in the vertical list of the properties panel and then onto Add Modifier, then choose Data Transfer from the list.

As the source, we choose our Seamless mesh.

Also toggle on Face Corner Data and click the Custom Normals button.
Hold on, there is a message saying that we should enable Auto Smooth in Object Data Properties. Let's do that next! (if the message does not appear for you, maybe Auto Smooth is already on).

Click the green inverted triangle button and in the Normals section, toggle on Auto Smooth.

Now we can switch back to the modifier tab by clicking the blue wrench icon again.
But hang on, what happened to our mesh? There are now black spots over the dress and shadows on the legs!

This is due to the Data transfer modifier's Mapping setting. If we change it to Topology, our mesh goes back to normal again. Phew!

Now that the normals look good, we can start the transfer of our new smooth normals from the seamless mesh to our main mesh. To do that, we hit the Generate Data Layers button. This button works destructively, so you cannot undo what it did, just FYI.

Note: On newer versions of Blender, Generate Data Layers may not be enough to transfer the normals and you may need to apply the modifier instead.
You can toggle the modifier's visuals on and off with the little screen icon to see the results after you click Generate Data Layers to see if it stuck. If it did not (and you see the seams of your base mesh when toggling it off), try to apply it instead.

I switched from textured to solid shading because the differences are just more noticeable in this mode. This is how our mesh looks now with the modifier turned off.
Because we clicked the transfer button, the normals have been permanently applied to our mesh. The skin is smooth now, and so is the dress (even though we did not smooth that one, hmm...)

If we toggle the modifier back on, suddenly the dress has seams again! What's going on there? I'm not exactly sure why, but Auto Smooth seems to be doing some smoothing on the dress mesh as well.
I am not sure if this is normal behavior or not, but let's pretend that this did not happen and the modifier in fact did not smooth the dress.
Maybe we just forgot to smooth some areas on the Seamless mesh that we noticed only later on. That's no problem. We simply modify our Seamless mesh again!

So let's swap back to the seamless mesh and select it (remember to click the eye icons so only the Seamless mesh is visible).

Let's select the main dress parts and press M -> merge by distance on them. We cannot smooth the whole dress all at once, because then that would remove some seams that we want (like those for the backfaces and the middle section of the dress where the bow is attached).
If we remove the wrong seams, we ruin our normals and will have black splotches.

Now, let's select the backfaces and areas we left out before and repeat this process: M -> merge by distance.

Look at how perfect our Seamless mesh is looking now! Now, let's transfer those beautiful normals to our main mesh.
Select the main mesh and toggle the eye icons again, to hide our Seamless mesh and reveal our main mesh.

Once again, we will use the Generate Data Layers button in our Data Transfer modifier. If you have previously applied the modifier, just add the modifier again to the main mesh and use the settings shown here.
And that's it, you are done! You have a perfectly smoothed mesh that you can export now.

Final Note: it is best to transfer the normals at the very end of your meshing process because any action that recalculates the normals can reset our custom-made smooth normals again.
Of course, you can simply use the Generate Data Layers button again to re-add them, but it saves you time to only do this step at the end.
I almost forgot to say: You still have to use Mesh Toolkit to fix the seams on the edges of your mesh and do the usual shenanigans.
188 notes
·
View notes
Text
Whatever project you're too afraid to start, just go for it
I know a lot of my posts lately have been video/content creation-related but I just want to say:
The learning curve that I have had to climb in the past week alone has been both frustrating as hell and ridiculously rewarding.
Already, I had to refresh my memory on basic video editing and sound comping, but for the first seven episodes of my little series I’d accepted the average quality of my voice recording as cest la vie, I’m not sinking money into this without proof of concept, you’re supposed to be a little rough around the edges when you’re first starting out. But one thing I couldn’t get over was the clipping from some technobabble shenanigans with frequencies that isn’t important here.
What I thought was a quick fix—replace and double the RAM in my laptop—was absolutely not the source of the problem and suddenly I was in the deep end trying to fix broken audio in post while also troubleshooting an issue no one else seemed to have between my microphone and my recording software and I was about tempted to just use my desktop mic, the built-in, because at least I could somewhat fix that in post.
After far too many hours deep in discussions with strangers on the internet who were very helpful, I half-fixed the problem. My mic stopped clipping, but it was distorting pretty heavily between two different processers and my recording software hated it for a whole different reason.
Reluctant Plan B was to record gameplay live, but record audio separately/after and then sync them in post. If you’ve ever made a gaming video like these, you’re staring at probably 15+ clips of useable content over the course of recording sessions, which means 30+ clips with all the separately recorded audio, and since I can’t hit start/stop congruently with both programs, they would always be a little bit off, which meant more tedious editing.
Why? Because I was recording in Program A, fixing audio in Program B, and editing the video together in Program C, and Program C is for like, tiktoks, not professional youtube videos. I was only using it because I was already paying for it in an Adobe package with InDesign.
Enter DaVinci Resolve.
It’s like, Photoshop compared to MS Paint, a free one-stop-shop for video and audio editing (and visual effects, this thing is used to make blockbusters) and here’s me still confused by all these audio terms like ratio, attack, threshold, etc.
So I’m still wading through tutorials, all while my mic only works through Program B, Audacity, with an episode deadline looming over me. From the time I committed to initially fixing my audio by replacing the RAM, to episode release date, I had 6 days. Today is day 4.
And I’m still without a proper recording setup because Program A hates my microphone. But I am not missing this deadline, not just for the youtube algorithm, but because I know I can make it.
So episode 8, at the time of writing this, I have only 9 minutes and 25 seconds all edited and ready to go, out of 22-24 that I usually publish. So what have I done?
Fuckin’ taught myself DaVinci Resolve and committed to recording my vocal track in post just this once, doing it over and over again until it sounds as genuinely live as it can, and doing regular voiceover and music montages wherever else I can to fill the time with meaningful content.
All to buy myself time for my replacement mic to deliver so I can get back to proper live recordings, because at this point, the time it takes to fix terrible audio in post isn’t worth it, when I can spend a little bit of money for a mic that isn’t 8 years old and is built for gaming, not podcasting (but I am keeping the problem child as a backup, because it’s not broken).
I’m waiting for a timelapse to render while I write this, staring at a workflow with one video source and 3 different audio layers—game sound, vocals, and music—and I can almost turn my brain off when trimming things because that part I already know how to do.
This thing is a mess, to be clear, but it sure as hell won’t look like a mess when I hit publish on time two days from now.
But like…. 3 weeks ago I knew next to none of this, beyond basic video editing I learned back in college. And here I am with my double-wide monitor up and professional video making software quietly churning along in the background.
So just—if you want to do it? Go fuckin’ do it. Whatever it is that you’ve been holding off on pursuing. When I started I already owned things like a gaming laptop (that I bought to run photoshop so I could paint), an 8-year-old podcasting mic from a dropped podcast attempt, my game of choice, and I was already paying for the bare bones version of Premiere: Premiere Rush.
But heck, even if I had none of the fancy equipment, the only limiting factor would have been my computer’s processing power to run all these programs at once, and I would have figured it out.
I’m a perfectionist bound and determined to fix my audio, but I didn’t hear any complaints when it was jank, and I’m learning all this because the whole process, not just the gameplay, is just so fun and fascinating.
#just do it#do it scared#video making#video editing#davinci resolve#it's a beautiful mess#and I'm so proud of it
32 notes
·
View notes
Text
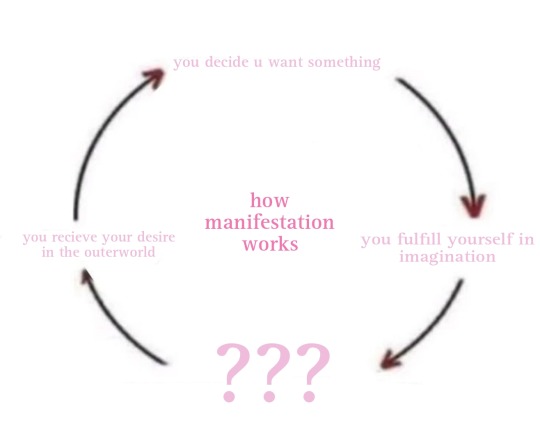
𝐓𝐇𝐄 𝐂𝐎𝐌𝐏𝐋𝐄𝐓𝐄 𝐆𝐔𝐈𝐃𝐄 𝐓𝐎 𝐌𝐀𝐍𝐈𝐅𝐄𝐒𝐓𝐈𝐍𝐆 𝐀𝐏𝐏𝐄𝐀𝐑𝐀𝐍𝐂𝐄 𝐂𝐇𝐀𝐍𝐆𝐄𝐒 𝐖𝐈𝐓𝐇 𝐒𝐀𝐓𝐒! ♡︎

𝒔𝒕𝒆𝒑 𝒐𝒏𝒆: 𝒅𝒆𝒄𝒊𝒅𝒆 𝒘𝒉𝒂𝒕 𝒚𝒐𝒖 𝒘𝒂𝒏𝒕. 🎀

technically this should be step zero. but it's important to get clear on what you actually want. there are a lot of ways to do this. below i've compiled a small list for you!
- look into archetypes + system. they are patterns and associations based on body type, facial features, and personality traits. (i know there's ones that exist for feminine presenting people, i'm not sure about masculine presenting people. you are obviously not obligated to follow these, but they can be fun sometimes, especially if you're looking to curate a specific image of yourself.)
- observe the people you admire. this is a great way to try and find patterns in the people you look up to. (for example, i tend to gather inspiration from celebrities who have very youthful, sweet, and angelic faces. this helped me realize what my desired face was.)
- get creative. use faceswap and apps similar to blend together people you want to look like! if the beauty you're going for is more conceptual, make a collage board of things that visually describe your beauty. (for example, my collage board included things like cats, bunnies, deer, angels, dolls, etc.)
- you can also look at pinterest and save images of bodies, body parts, and facial features to help you know you want. this is especially useful if you're a person who has trouble keeping track of things you're manifesting.
- write a list of all the features you want. (notion is a great app to make lists and sort things if you don't enjoy using paper.)
- if you just want to become better looking overall, your subconscious knows what you truly want, so don't stress about specifying it if you're having trouble doing so.
♡- knowing that we are limitless can be a very freeing feeling, but it's important to remember that just because we can do something, doesn't mean we should do something. remember to be critical of what you want, especially when it comes to manifesting appearance changes. society has taught most of us what we are supposed to deem beautiful and healthy and what is ugly and unhealthy. do not allow indoctrination to control you. read this for more clarification.
𝒔𝒕𝒆𝒑 𝒕𝒘𝒐: 𝒈𝒆𝒕 𝒔𝒕𝒂𝒓𝒕𝒆𝒅. ˚₊‧꒰ა ☆ ໒꒱ ‧₊˚
fulfilling yourself is the most important part of the process. you must do it continuously until you feel as if you no longer need to do it because your desires are truly yours. you do not engage in methods to get anything, creation is finished. this post focuses specifically on fulfilling yourself using the state akin to sleep. there's many tutorials that already exist, explaining how to get to the state. here's a few of my personal favorites: 1, 2, 3, 4.
i personally have trouble quieting my mind down and getting into the state of thinking about my desires, so i like to either listen to music or do a meditation beforehand. here are some mediations i enjoy using: 1, 2,. while i relax my body, i sometimes listen to soundscapes to calm myself down (1, 2, 3,). depending on how i feel, i will either use the lullaby method or visualize. below, I've listed some ideas for imaginal scenarios.
- people asking you if you're [insert celebrity/person] because you look just like them!
- overhearing people gossiping about you, and accusing you of having work done when you're really just a natural beauty
- people constantly asking you for makeup tutorials or what your skincare routine is
- seeing yourself on thumbnails of subliminals/seeing yourself all over pinterest
- getting showered with compliments everywhere you go, people give you things for free and do you favors bc of how beautiful you are
♡- you don't have to fall asleep in the state for it to work. it's beneficial, but not essential. i personally like to do sats visualization midday, and the lullaby method at night.
♡- try not to make your scenarios too convoluted or have too much going on, especially if you're going to fall asleep looping it. it will be more difficult to keep track of what's going on as you slip farther into sleep. (from personal experience, the people in my scenario start slurring their words when i get too sleepy during a complicated sats scenario.)
♡- sats also works for revision. just imagine scenarios working the way you wanted them to, or an event in the past, and imagine you had your desired appearance then.
as for the lullaby method, here are some phrases you can repeat.
- it is done.
- i am stunning.
- i am beautiful.
- it is finished.
- i am free.
- it has been this way.
♡- remember that while doing this, you don't have to feel any particular emotion. you don't need to feel happy, grateful, sad, or peaceful. if you do that's great, and if you don't, that's also perfectly fine. knowing isn't this wise, specific feeling, it's just being aware and accepting what you have as truth. the device you're using to read this post now exists, right? you know you just have it. that's how it should feel to you while fulfilling yourself. it is also okay for the scenario/phrase to not feel natural at first. just keep doing it and eventually the sense of realness will begin to set in.
𝒔𝒕𝒆𝒑 𝒕𝒉𝒓𝒆𝒆: 𝒅𝒆𝒕𝒂𝒕𝒄𝒉𝒎𝒆𝒏𝒕 𝒂𝒏𝒅 𝒑𝒆𝒓𝒔𝒊𝒔𝒕𝒆𝒏𝒄𝒆. 🎀
the art of detatchment is an essential one. detatchment doesn't refer to completely neglecting 3d responsibilities, shutting yourself in a dark room, not going to the bathroom, or not showering— it means do whatever you need to in the outer world, but don't identify with anything that doesn't align with your desires. if you find yourself crying about how ugly you are, seek comfort in imagination and remind youself that the true you, the inner you, doesn't cry over their appearance because they are confident in how they look.
detatchment includes stopping yourself from controlling things that don't manifest, like thoughts. stop thought flipping, forcing yourself to think positively, and putting yourself on these super strict mental diets because they don't solve the real issue. thoughts stem from states, and they do not manifest anything. you have the power to reject thoughts that don't align with your desires, and accept the ones that do. anything you think that aligns with your desire say "i accept this thought." and anything that doesn't, simply say "i reject this thought." as soon as you fully fulfill yourself, your thoughts will begin to naturally flow from your new dwelling state (the wish fulfilled). you should not be burning yourself out, take it easy.
detatchment also refers to letting go of the how. logic and law of assumption absolutely do not mix, they're oil and water. you have to let go of logical limitations and focus only on the end result. obsessing about waking up with your new appearance or revising it is not going to help you. how you get your desires is not your problem, nor your job. you do not need to take any sort of 3d action, like working out or eating well (although this is a great thing to do, of course!). mental work is the only work you need to do. everything else will simply fall into place, that's the law.
persistence is another important aspect of manifestation. you cannot manifest anything without some degree of persistence. once you decide you have something in imagination, you have to remain faithful to the idea. you can't continually go back to wanting your desire when you've decided it belongs to you in imagination. persisting in the idea that you truly have what you want will end your hunger and allow you to feel free and fulfilled.
a good way to continually fulfill yourself is to set up a sort of routine, like entering sats before getting out of bed each morning, or doing the lullaby method as you fall asleep. as neville said, we are creatures of habit, and habit acts as law, even though it is not. changing your negative habit of remaining in an undesired state into a positive one of consistently remaining in a desired state is very beneficial in solidifying persistence. your routine doesn't have to be extremely convoluted or detailed, it just has to be consistent, like skincare. you don't see results if you only wash your face once a day, you have to persist in your assumptions for them to become facts.
𝒔𝒕𝒆𝒑 𝒇𝒐𝒖𝒓: 𝒕𝒉𝒆 𝒔𝒂𝒃𝒃𝒂𝒕𝒉. ⋆ ˚。⋆୨୧˚
the sabbath is the rest period in which you are completely aware that you have your desires, and know that they absolutely must materialize. although the experience of the sabbath can be slightly different for everyone, what typically happens during this stage is:
- feeling no desire to use any methods (why would you need methods if you know you have your desire?)
- not feeling anything towards your desire (in the same way you feel nothing towards objects in your 3d, you just know they exist)
- thoughts naturally flow from the state of having your desires
- not spiraling or wavering
𝒕𝒊𝒑𝒔 𝒂𝒏𝒅 𝒂𝒅𝒗𝒊𝒄𝒆. 🎀
question: is the lullaby method just vain affirming?
answer: according to neville, it is not. i am aware some blogs say you can just affirm, but he has always suggested to add feeling to your words, as feeling acts like glue, connecting the imagined reality to the physical one. (again, the feeling is not an emotional one, but rather a feeling of knowing.)
question: minnie, i'm always reminded of my 3d appearance by my family/friends, what do i do?
answer: i think this ask would be helpful!
question: what if i am unable to visualize?
answer: use your other senses (smell, touch, taste, hearing). you can also try studying images of whatever you want to visualize to make them stick in your mind.
question: i can't get into sats on my own, i need guidance, any suggestions?
answer: this meditation is absolutely perfect!
♡︎- stop overconsuming information! you know everything you need to know. there are no more new discoveries to be made. the law is easy and simple. get off tumblr if you're using it in hopes of finding some kind of life-changing information, because you will not find it.
♡︎- stop procrastinating. no, that youtube video you're choosing to fall asleep to isn't going to fulfill you, but doing the lullaby method will. that video will always be there to watch later. what is more important: your happiness, or your momentary entertainment?
♡︎- forget about time. time is not real. focusing on time is focusing on lack- which isn't what you should be doing. continue to fulfill yourself in imagination. what you experience there must be expressed.
♡︎- don't stop persisting. do not let the lack of results in the outer world deter you. if you really want your desires the way you say you do, is persisting really that much work? if your answer is yes, you probably didn't want it that much in the first place. what do you have to lose by visualizing every night or saying an affirmation as you fall asleep? the law is universal, it does not discriminate. no matter how "long" it takes, it shouldn't be worth giving up if you truly, truly want it.

thankyou for reading! <3 (please don't repost without credits)
#manifestation#law of assumption#minnie luvs the law ♡#state akin to sleep#neville goddard#law of conciousness#desired appearance
589 notes
·
View notes
Text
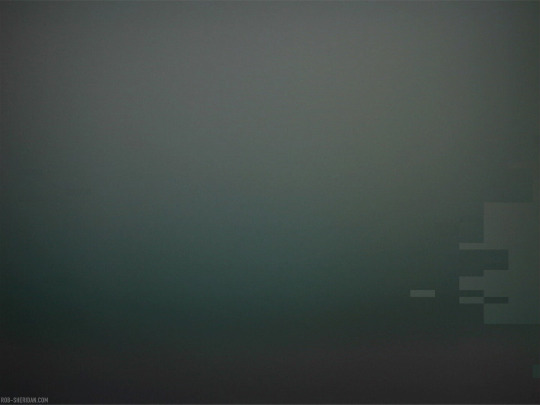


recombinance (2004). Early works with DV data corruption, 20 years ago. As I mentioned in a recent post about NIN’s 2002 And All That Could Have Been DVD, I became during the creation of that film fascinated with the aesthetics of Y2K-era consumer digital video. I was drawn to the uniquely chunky corruption blocks that occurred on lightly-damaged DV tapes, how they were sparse and sometimes gentle in nature.
I filmed some soft gradients, some out-of-focus landscapes and other smooth organic surfaces, and then damaged the tapes (wrinkling the tape, applying magnets/heat, just enough to disrupt the data but still let the tape pass through), seeking the right balance where the harsh digital corruption disrupted and contradicted the soft backdrop while also at times trying to become part of it.
It’s how things felt in the post-millennium migration to all-things-digital, like our old organic analog world was fading out of focus as more of it became rapidly mass-digitized, encoded, and compressed down into tiny efficient grids that more or less replicated what we were at the expense of all the complicated gradients of humanity in between.
Harsh DV data glitches and video interlacing against soft organic textures would form much of the inspiration and methodology of my NIN With Teeth album art in the latter part of 2004 and early 2005.
You can read more about my digital glitch art processes for With Teeth, and download a full tutorial, on my Patreon.
#glitch art#nine inch nails#y2k aesthetic#with teeth#nin#dv glitch#dv tape#digital glitch#data corruption#rob sheridan
160 notes
·
View notes
Note
how do you manipulate the in-game camera to get screenshots from different angles in FF7? I got Rebirth for my computer and some of the things you've pointed out in your shots are really amazing (Sephiroth's look of affection at the Edge of Creation is a personal standout). I'd love to be able to do that too
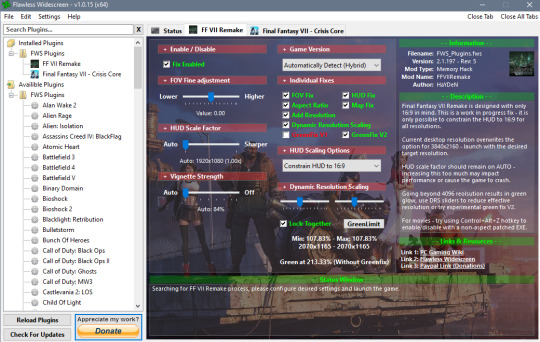
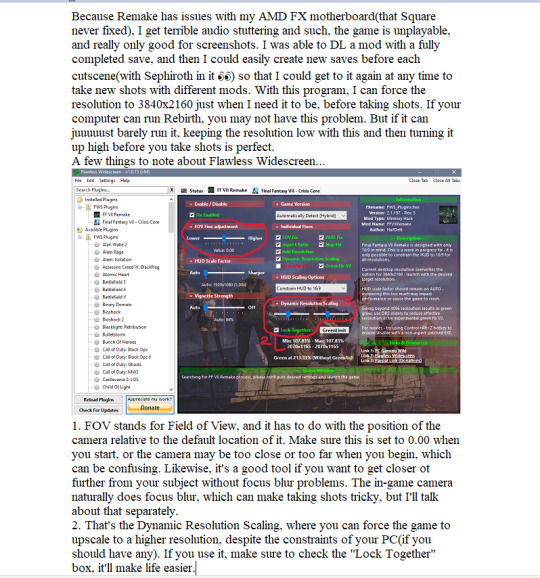
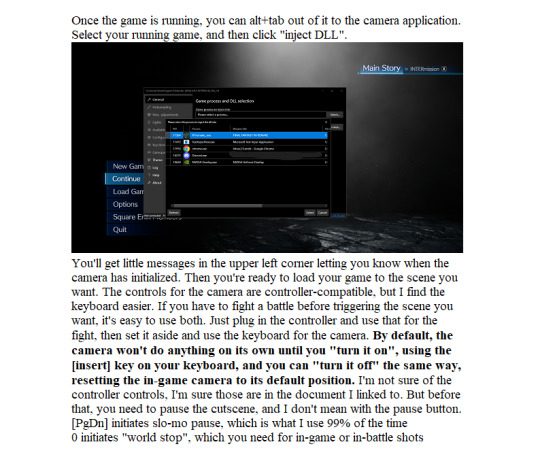
I'm happy to share with you! 🥰 The trick is that it's a mod, so after Rebirth comes out, you may have to wait just a little while for it to become compatible, but I'll tell you my setup for Remake. Rebirth will be a tidbit different, since it runs on Unreal Engine 5 instead of 4, like Remake. Still, the process should be about the same. 🤔The beauty of having the game on PC is being able to use lovely mods, and I get 99% of them on Nexus.
On this page here, you will find all the information you could need about the Universal Unreal Engine Unlocker, or UUU for short(the link is for Unreal 5, so this should be the one you need). The download link at the top will take you to his Patreon, and I did pay $6 at the time for a one-month subscription to him in order to download it. I was able to keep using it all this time without any updates, it's a very solid program. But you may want to wait just a couple months to make sure it's a solid version with FF7R compatibility before you pledge on Patreon and download it. Then you won't have to worry about bugs and such. If you have the means, you can continue to pledge to him and receive updates, I just don't have the means to do that every month. I know that the instructions look extremely long and daunting, and a lot of it is very technical, talking about all the things it can do. So I'll just give you the simple guide, with the easy things you need to know.
...I have a feeling that I'm going to exceed the character limit, so I'll just put this in Word and screenshot it for you to make it easier on everyone, haha...
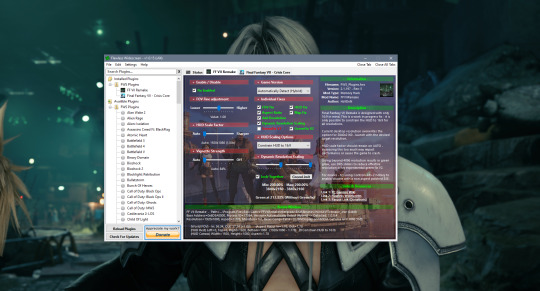
In my case, my computer is meant for 1920x1080 resolution. So I use a program called Flawless Widescreen, which looks like this:
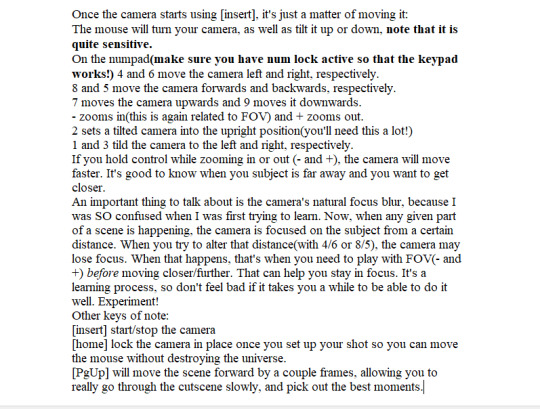
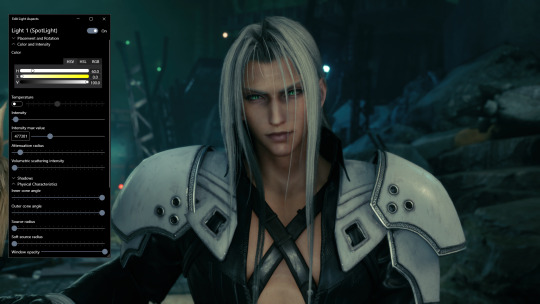
Next, the camera...
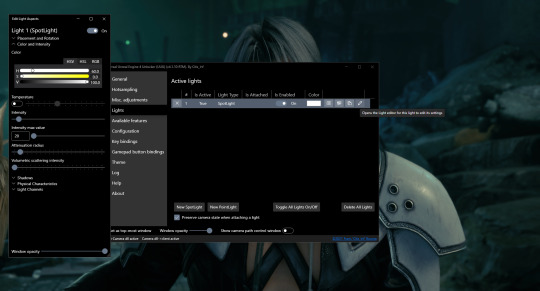
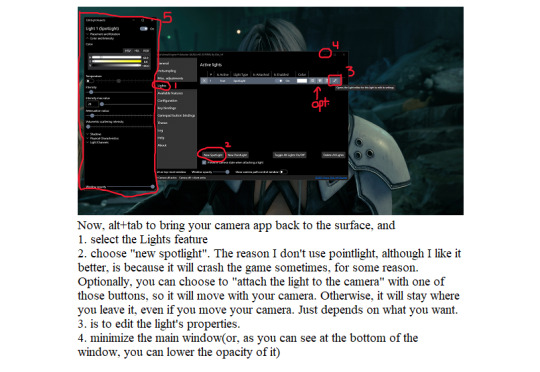
The other part of the camera that's important is the lighting ability. It won't work in every part of every scene(for some reason), but it's quite useful most of the time.
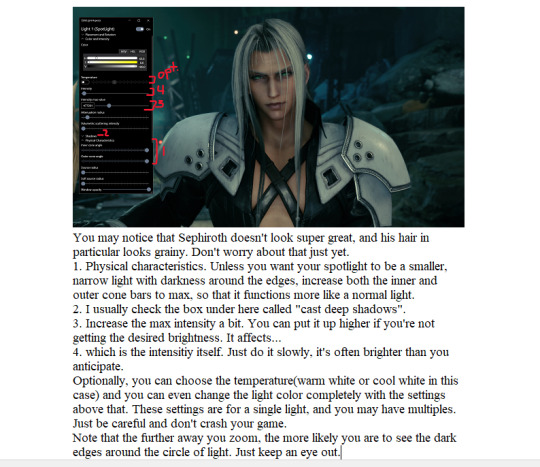
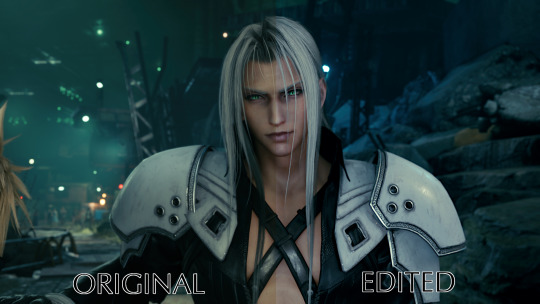
Once I have my light in place, time to use Flawless Widescreen. I just alt+tab to bring it up, then increase the resolution as high as it will go. Once in a while, it will seem to blur the camera a bit and I may have to readjust it.
After that, the character's hair(and everything else) will look smooth and beautiful~...there are other things to consider, such as if you'll need a hook in order to have an ini file, but that's more in the fine details, which varies from game to game. It depends on how the settings are in Rebirth, which may be just fine if they did it right, and how your computer runs those settings, which may be also fine if you have a beast of a machine. You may think that the colors seem washed out from what I'd usually post, and you're right. The rest is what you might call post-processing, which are the things I do with GIMP(GNU Image Manipulation Program). That would be a different tutorial, but I wouldn't mind doing it if you're interested.
31 notes
·
View notes
Text
Elaboration on my past shameful cc hair practices (I have learned the error of my ways)
Context over there. This here post is an answer to an inquiry by @sillysoraya.
This whole time since I started trying my hand at Sims 2 cc hair recoloring/retexturing, this had been my process: find recolors by a creator whose textures I want to use as a base, export said textures from their recolors via simPE, modify and/or recolor them in GIMP, then make fresh recolor files in bodyshop, reimport them immediately, close bodyshop, promptly delete everything that was generated in the Projects folder, take the new recolor files out of the SavedSims folder, and put my edited textures onto my them by building DTX in simPE.
When I say “textures”, I mean textures that look like this, you know, the ones you see in simPE with the transparent background:
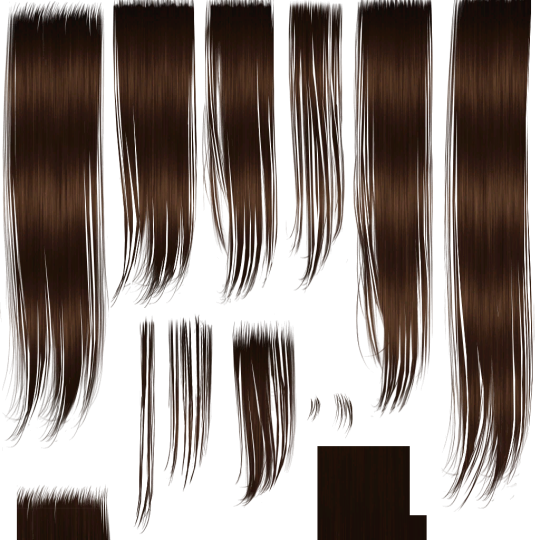
[↑ that's evannamari's DBrown retexture of Newsea Miles Away]
That's how I do it for clothing, so why wouldn't it work for hair, I told myself naively in my immense hubris.
Well turns out there's a reason why the tutorials (such as this one by DeeDee) tell you to apply the textures not in simPE but in bodyshop. You’re supposed to put your textures in the Project folder - this kind of texture, that covers more than just the alpha:

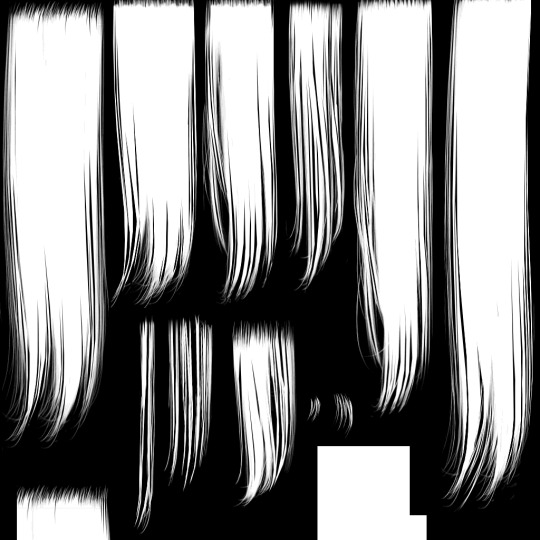
[↑ the texture on the left / the alpha on the right ↑]
And only then you reimport and let bodyshop do its thing. The alpha will do its job carving out the texture properly (or whatever kind of sorcery happens in there).
Because if you give your recolors the already alpha’d out textures with the transparent background, what I believe happens is as the transparent background gets floodfilled with black during bodyshop’s file creation process, all the parts of the texture that had some wispy half-transparent hairs on them now have a layer of black underneath. Or at least what I know for sure is that those wipsy sections don't turn out looking nice but weirdly wire-y, especially on light recolors. Many hairs don’t have wispy strands and therefore are very forgiving (which is why I didn’t see a problem when I did the Rosesims hairs for example) but others have plenty of them, like the Newsea hairs. On those, it makes a clear difference. In game, it shows most as you zoom out, for instance in CAS from a face close-up view to a full-body view. It’s the same principle as this seam problem I had a while ago (and several times since), with clothing texture that was floodfilled with white too close to the borders of the texture mapping. When you zoomed out, the white would start showing.
Anyway, this is definitely stuff that creators in the community have known for 20 years and it’s 100% my fault for not following a hair tutorial and instead relying on prior knowledge of clothing-making that turned out not to be applicable 1:1.
I’m sure I still have a lot to learn on hair retexturing even after figuring this out. I was working on Newsea Yesenia when I had the realization that I was doing things wrong, but before I upload anything else, I’m gonna go back and look at all of the hairs I’ve done so far, fix them up when needed, learn more. Fortunately I think all of the Fakeblood gender conversions are fine but I’ll check and get back to you on that, there’s something I need to investigate. Edit: yes, all the gender conversions and copy-pasta of other people's unedited textures are completely fine, thank god.
Seems like as long as the texture didn't go through GIMP's import-export, it's fine, even if I didn't apply it via the Projects folder.
33 notes
·
View notes
Text
youtube
Tribute AMV for Dr. Underfang and Mrs. Natalie Nice/Nautilus.
From TyrannoMax and the Warriors of the Core, everyone's favorite Buzby-Spurlock animated series.
After all, who doesn't love a good bad guy, especially when they come in pairs?
Process/Tutorial Under the Fold.
This is, of course, a part of my TyrannoMax unreality project, with most of these video clips coming from vidu, taking advantage of their multi-entity consistency feature (more on that later). This is going to be part of a larger villain showcase video, but this section is going to be its own youtube short, so its an video on its own.
The animation here is intentionally less smooth than the original, as I'm going for a 1980s animated series look, and even in the well-animated episodes you were typically getting 12 FPS (animating 'on twos'), with 8 (on threes) being way more common. As I get access to better animation software to rework these (currently just fuddling along with PS) I'm going to start using this to my advantage by selectively dropping blurry intermediate frames.
I went with 12 since most of these clips are, in the meta-lore, from the opening couple of episodes and the opening credits, where most of the money for a series went back in the day.
Underfang's transformation sequence was my testing for several of my techniques for making larger TyrannoMax videos. Among those was selectively dropping some of the warped frames as I mentioned above, though for a few shots I had to wind up re-painting sections.
Multi-entity consistency can keep difficult dinosaur characters stable on their own, but it wasn't up to the task of keeping the time-temple accurate enough for my use, as you can see here with the all-t-rex- and-some-moving-statues, verses the multi-species effort I had planned:


The answer was simple, chroma-key.


Most of the Underfang transformation shots were done this way. The foot-stomp was too good to leave just because he sprouted some extra toes, so that was worth repainting a few frames of in post.


Vidu kind of over-did the texturing on a few shots (and magenta was a poor choice of key-color) so I had to go in and manually purple-ize the background frame by frame for the spin-shot.
This is on top of the normal cropping, scaling, color-correcting, etc that goes into any editing job of this type.

It's like I say: nearly all AI you see is edited, most of it curated, even the stuff that's awful and obvious (never forget: enragement is engagement)
Multi-Entity Consistency:

Vidu's big advantage is reference-to-video. For those who have been following the blog for awhile, R2V is sort of like Midjourney's --cref character reference feature. A lot of video AIs have start-end frame functionality, but being able to give the robot a model sheet and effectively have it run with it is a darn nice feature for narrative.
Unlike the current version of Midjourney's --cref feature, however, you can reference multiple concepts with multiple images.
It is super-helpful when you need to get multiple characters to interact, because without it, they tend to blend into each other conceptually.
I also use it to add locations, mainly to keep them looking appropriately background-painting rather than a 3d background or something that looks like a modded photo like a lot of modern animation does.
The potential here for using this tech as a force multiplier for small animation projects really shines through, and I really hope I'm just one of several attempting to use it for that purpose.
Music:
The song is "The Boys Have a Second Lead Pipe", one of my Suno creations. I was thinking of using Dinowave (Let's Dance To) but I'm saving that for a music video of live-action dinosovians.
Prompting:
You can tell by the screenshot above that my prompts have gotten... robust. Vidu's prompting system seems to understand things better when given tighter reigns (some AIs have the opposite effect), and takes information with time-codes semi-regularly, so my prompts are now more like:
low-angle shot, closeup, of a green tyrannosaurus-mad-scientist wearing a blue shirt and purple tie with white lab coat and a lavender octopus-woman with tentacles growing from her head, wearing a teal blouse, purple skirt, purple-gray pantyhose. they stand close to each other, arms crossed, laughing evilly. POV shot of them looming over the viewer menacingly. The background is a city, in the style of animation background images. 1986 vintage cel-shaded cartoon clip, a dinosaur-anthro wearing a lab coat, shirt and tie reaches into his coat with his right hand and pulls out a laser gun, he takes aim, points the laser gun at the camera and fires. The laser effect is short streaks of white energy with a purple glow. The whole clip has the look and feel of vintage 1986 action adventure cel-animated cartoons. The animation quality is high, with flawless motion and anatomy. animated by Tokyo Movie Shinsha, studio Ghibli, don bluth. BluRay remaster.
While others approach the scripted with time-code callouts for individual actions.
#Youtube#tyrannomax and the warriors of the core#unreality#tyrannomax#fauxstalgia#Dr. Underfang#Mrs. Nautilus#Mrs. Nice#80s cartoons#animation#ai assisted art#my OC#vidu#vidu ai#viduchallenge#MultiEntityConsistency#ai video#ai tutorial
23 notes
·
View notes
Text
idk my stained glass post is going around again and a lot of people are saying it's inspiring them but they're still hesitant to start whatever craft has their fancy rn, so here's a dipshit's guide to getting from horsey to whale when you're starting out a craft


Step 1: skim a tutorial.
don't take notes, don't pay all that much attention to it, give it like. at max 10 minutes of your time. Just get the general shape of the process into your head along with any relevant safety precautions.
the point of doing this is to stop yourself from forming expectations. Expectations are the motivation killer. Strangle them to death.
Step 2: Tool time
You may want to start right in on a project, you might even have one in your head already.
Don't. Stop that, see the point above about expectations. Your first project is going to suck major nuts, it doesn't matter what you do, so you simply must plan to make your first project as nut-sucktastic as physically possible. Burry your expectations so deep in the ground that you will leap over them by simply faceplanting.
So here's what you do instead, gather the necessary tools and materials then set aside an amount of material that you are ok with just pissing away. just absolutely wasting. If you went right in and got discouraged enough to drop a project while doing it, youd be wasting the materials anyway. Might as well get the wasting over and done with Before it eats hours of your mortal life.
Ok, now pick the first tool and associated skill involved in your new craft and just practice That. Don't try to make anything, just learn the motions and teach yourself how things move or break or bend or etc etc etc. all the real basic boring parts that don't produce anything.
Then move onto the next steps associated skills and tools. Connect them back to the product you got from practicing the first step if you can, then the third and so on, so that at the end of this ordeal you too can have a horrible abomination you can pretend looks like a horse.
Step 3: nap
With that done, fuck off and do something else for a bit. like for at Least a few hours if not a full day. Take a nap. do some drugs, play a hentai gatcha game, fuck if I care man. Just don't do the craft. This is the best way to kill expectations: fuckin forgetting what you're capable of.
step 4: learn it right this time
Actually watch/read that tutorial now. like. for real. give it your full atten and take notes on where you fucked up and how you struggled back in step two. like actual written/typed notes. You're going to be focusing on those areas and having a neat list to keep thing orderly in your head can help.
at this point it's also a good idea to try to find other tutorials that explain the Thing, but have a different person explaining it. or tutorials that are more granular. like ones that talk about the skills involved in a single step instead of the whole process. having that little bit more detail can be a game changer.
step 5: visualization
Come up with the easiest and most basic project you can think of while referring to that list of areas you struggled. You want this project to primarily focus on those weak spots and give you room to practice and improve them. ok. and now scrape the top 10% off the project. Make it easier make it smaller, make it less detailed, find a pattern instead of making your own, whatever just simplify it that little bit more.
Step 6: just do it
actually do that project while referring to your tutorials and notes.
Let yourself fuck up. Let yourself waste shit. And then move on. Don't get tangled in expectations, or let your perfectionism strangle you. Look it in the eye and strangle it back, make your shit uglier just to spite it.
Skills take time to develop. Give yourself that time and don't let your brain issues take the joy of creation from you. It's fuckin hard, but you've Got to do it if you want a modicum of happiness in this hell world. the vibe is Cognitive Behavioral Therapy but done with pure violence and vitriolic hatred of what your own neurosis are trying to take from you.
step 7: aw shit it's a never ending cycle
repeat step 5, but go for something a bit harder, then step six until you find a new muse to start over at step 1 with.
40 notes
·
View notes
Text
Sunday Reset Routine for Busy Content Creators
This routine is designed to help you recharge creatively and prepare for a productive week of content creation:
Step 1: Wake Up and Mindfulness
Wake up at a consistent time to establish a routine.
Start your day with a few minutes of mindfulness or meditation to set a positive tone.
Step 2: Morning Pages or Journaling
Dedicate time to morning pages or journaling.
Write down your thoughts, ideas, and any creative sparks that come to mind.
Step 3: Visual Inspiration
Spend time browsing visual platforms like Instagram, Pinterest, or art websites.
Gather visual inspiration that aligns with your content style and future projects.
Step 4: Review and Planning
Review the content you created during the past week.
Plan your content strategy for the upcoming week, including ideas, themes, and platforms.
Step 5: Creative Learning
Invest time in learning something new related to your content niche.
This could involve watching tutorials, taking online courses, or reading articles.
Step 6: Brainstorming Session
Set aside focused time for brainstorming new content ideas.
Let your creativity flow without self-judgment, and note down any exciting concepts.
Step 7: Outdoor Break
Take a walk or spend time outdoors to refresh your mind.
Nature can provide a new perspective and inspire fresh ideas.
Step 8: Declutter Digital Space
Organize your digital files, including photos, videos, and graphics.
Decluttering makes it easier to find assets when you're creating content.
Step 9: Content Creation
Spend a dedicated chunk of time creating content.
Whether it's writing, filming, designing, or editing, immerse yourself in the creative process.
Step 10: Technology Detox
Set aside a specific period to disconnect from devices and screens.
Engage in analog activities like reading a physical book or drawing.
Step 11: Review and Edit
Review the content you've created during the day.
Make any necessary edits or improvements to ensure your work meets your standards.
Step 12: Self-Care Break
Take a self-care break that aligns with your preferences.
It could be a bath, a hobby you enjoy, or spending time with loved ones.
Step 13: Social Media Engagement
Engage with your online community by responding to comments and messages.
Building connections with your audience is an essential part of content creation.
Step 14: Planning Tools Check
Review your content scheduling and planning tools.
Ensure your content is organized, and your posting schedule is set.
Step 15: Reflection and Gratitude
Take a few minutes to reflect on your creative journey.
Express gratitude for the progress you've made and the opportunity to create.
Remember, adapt this routine to your own preferences and creative process. The goal is to create a rejuvenating and inspiring Sunday routine that supports your content creation journey.
#black femininity#black luxury#leveling up#femininity#blackwomen#selflovemovement#pretty privilege#self care#self love#black girl luxury#hyperfemininity#hyper feminine#hypergamous#self care sunday#sunday reset
151 notes
·
View notes
Text
🌿 A dreamer building a digital sanctuary.
Hi there, dreamers and creators!
So, here I am—just trying to build my own little corner of the internet. A digital sanctuary, if you will. You know, one of those cozy spaces where creativity flows freely, stories come alive, and maybe (just *maybe*) someone else finds comfort or inspiration in what I create. But let’s be real: I’ve got *so much* to learn. Like… an overwhelming amount. But hey, isn’t that half the fun? :p
I’m diving headfirst into the world of AI, visual novels, and RPG game design because… well, why not? It’s equal parts thrilling and terrifying, but mostly thrilling. The idea of crafting worlds, characters, and stories that people can interact with? Yeah, sign me up for that rollercoaster. Of course, it’s not like I expect to become some legendary indie dev overnight. I mean, I still mix up basic coding terms sometimes (*is it “if” or “when”? Or is it both?! Help!*), but I’m here for the journey.
Digital art, storytelling, AI tools—they all fascinate me to no end. There’s something magical about taking an idea from your brain, feeding it into technology, and watching it grow into something tangible. And yeah, okay, sometimes it grows into something hilariously broken instead. But even then? Progress. Baby steps. Tiny pixelated victories.
As I stumble through tutorials, experiment with new tools, and probably cry over a few failed projects (hey, it happens to the best of us), I’ll do my best to share bits and pieces of my progress here. Think of it as part journal, part brainstorming session, and part “laugh-at-my-mistakes-because-they’re-kind-of-funny.” Who knows? Maybe someone out there will relate, offer advice, or even join me on this chaotic adventure.
So, if you’re reading this, thank you for stopping by. Be patient with me—I promise I’m learning as fast as I can! In the meantime, let’s embrace the messy, beautiful process of creation together. Oh, and feel free to drop a comment or message if you have tips, resources, or just want to chat about your own projects. Community vibes only, always.
P.S. If anyone has advice for staying motivated when things get tough, hit me up. Coffee and chocolate are great motivators, but I could use more sustainable strategies, lol. Catch you in the next post, friends! 🫂
#indie game developer#visual novel#indie game#indie games#game development#game dev#artists on tumblr#visual narrative#storytelling#creativity#tecnology
8 notes
·
View notes
Note
Hey, Swann, how are you? About the creators ask game: pick 10 random questions of your choice. Thank you :-)
Thanks for the ask!!!
Since I am super indecisive, I used a random number generator lmao.
7: Thoughts on free content, donations, or paywalled CC?
Anti paywalls, anti early access even if EA says it's ok. Donations are fine, of course. Commissions are fine if they are reasonably priced (no, your one swatch recolor isn't worth 10 bucks if you just slapped another's artwork on a shirt). Honestly, I started charging for commissions because I was a broke student and didn't wanna beg, but if whatever the person is asking would only take 5 minutes, I'd be willing to do it for free.
32: A tutorial that made you up your game!
@zeussim's whole Youtube channel. I am not a tutorial person. I usually learn by trial and error (let's be real, a loooooot of error). But these are GOOD, couldn't recommend them enough. especially the ones on textures, if you make recolors like I do.
16: List some creators that always inspire you with their creations and talent!
@syboubou, @ice-creamforbreakfast, @simandy, zeussim whom I tagged above... there must be others but my brain refuses to think more.
12: CASt and fully customizable/recolorable content, or color/style swatches?
Never played sims 3 (which had a color wheel I think) so I am fine with swatches... as long as there is a decent number of them. Why would you go through the hassle of making a mesh for it to only have 2 swatches? I will never understand.
45: Do you post WIPs, or show your creations to anybody before posting them?
Sometimes I share them with my discord friends (simmers or not). It's fun showing the process to non simmers!
I have made one tutorial on youtube (very bad quality because I used a laptop microphone, also it's an hour long) which covers most techniques I use while recoloring, though.
This post is too long, will answer the rest in a part two (I hate scrolling past long posts so I won't inflict it upon you)
10 notes
·
View notes
Text
Just like last time, my thoughts for Pokemon Legends are immediately subsumed by potential futures rather than the immediate present
This time it's because the title is "Z-A", confirming that the titles are not directly named after the associated Legendary while also giving the impression that unused titles like Z are being revisited. Since that won't be applicable to every generation, though, they may also draw from concepts, places, times, people, etc.
With that in mind
Gen 1: Legends Rainbow - the player is a Rocket Scientist (not a literal one, but one that works for a not-yet-totally-evil Team Rocket) working in the Pokemon Mansion and the project to clone Mew; the first major story beat after the tutorial is the discovery of a Mew sample, with the rest being further research and gathering materials needed for the cloning process/raising process for Mewtwo; named Rainbow in reference to being a part of the color generation and as a nod to Team Rocket's eventual evolution into Team Rainbow Rocket
Gen 2: Legends Brass - focuses on the Brass Tower and the events leading up to the creation of the Beast Trio; possibly the only game that doesn't somehow involve the player being part of a to-be villainous team; may introduce a new "Brass" or "Copper Legendary" to complement Ho-Oh and Lugia's Gold and Silver
Gen 3: Legends Meteor - the player chooses between being on the Magma or Aqua research team and investigates the ecological effects of a recently fallen meteor that, unbeknownst to anyone, carries Deoxys; may also be fun to call it "Legends Peridot," as generation 3 was the gem generation and peridot are found in meteors
Gen 5: Legends Grey - the player is a Plasma Knight under the Twin Heroes; halfway through the game, the Heroes have a falling out that splits the Original Dragon, and the player must choose who to side with (though they will likely end up seeing the other half of the story later cus the idea will be to understand both sides)
Gen 7: Legends Stars - the player begins as a resident of Ultra Megalopolis and member of the Ultra Recon Squad, with Poipole and two other Ultra Beasts as their possible starters, exploring Ultra Space. At the midpoint of the game, the player goes on a recon mission to Alola, where they capture a new "starter" to help blend in
Gen 8: Legends Darkness - leads up to the events of the Darkest Day; rather than being a part of an equivalent to Team Yell, the player is part of the group that one day becomes the Macro Cosmos conglomerate; could also be called "Legends Armor" or "Legends Arrow" or something to that effect if they want to complete the Hero Trio with a "Zayellow"
Gen 9: Legends Zero - covers the events of the Area Zero expedition with Heath and has the player being flung between the past and future, possibly getting branched evolutions for their starter based on which time period they evolve in
46 notes
·
View notes