#what is html attribute
Explore tagged Tumblr posts
Visit Tumblr Blog
Explore Tumblr blogs with no restrictions, modern design and the best experience.
Last Seen Tumblr Blogs


Fun Fact
Post activity is at the highest at 4:00 pm EDT; notes peak at 10:00 pm EDT.
Text
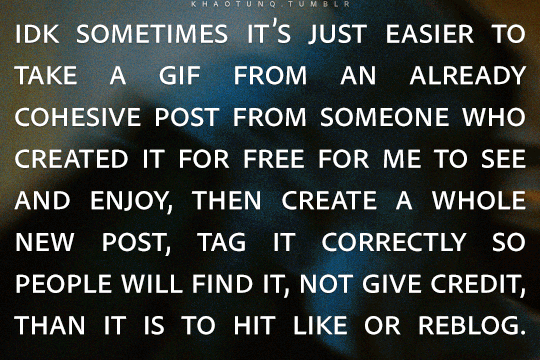
How to credit GIFs
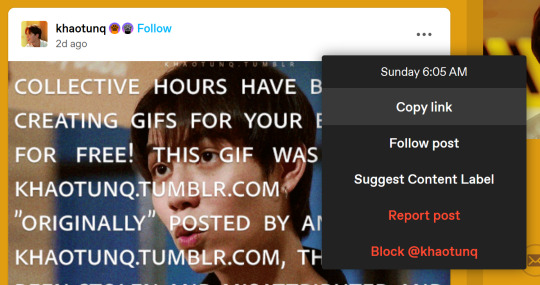
I know there are other posts around this hellsite of how to do this, but because @khaotunq made this amazing post, I wanted to remind some of you of how to include a GIF that credits the original post/creator even if the GIF does not appear in the GIF options.
Option #1:
Step #1 - If you know which GIF you want to use, find the post its from, and click the three little dots to bring up the menu. Click "Copy Link"
Now, in your own post, click the "GIF" button

Step #2 - When the next box appears, paste the link you just copied in it.

Step #3 - The GIF should appear, so click it, and it will insert the GIF with credit to the original post and creator.

HOWEVER, it will only insert the first GIF in the post, so if you want a different GIF in the post, you have to make a small change.
Option #2:
Step #1 - Do everything in Option #1. EVERYTHING! Now, once you have inserted the GIF into your post, it will be the first GIF in the original post as stated in Option #1.
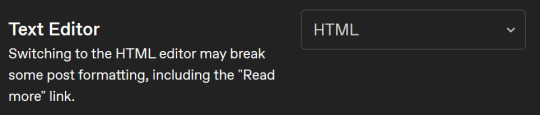
Step #2 - Click the wheel at the top of your post

Step #3 - Once you do that a menu box will appear, and where it says "Text Editor," switch from "Rich text" to "HTML"
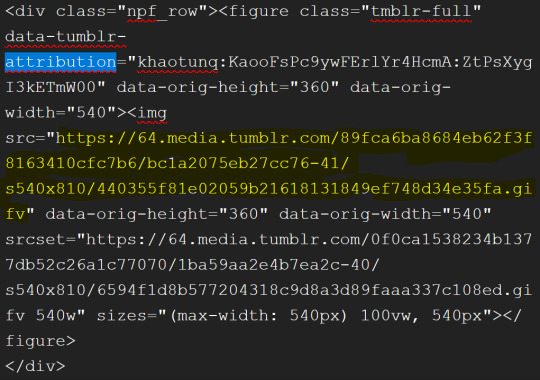
Step #4 - It might look scary now, but have no fear! Hit "Ctrl +F" to find what you need! Type "attribution" and it will locate the GIF for you.
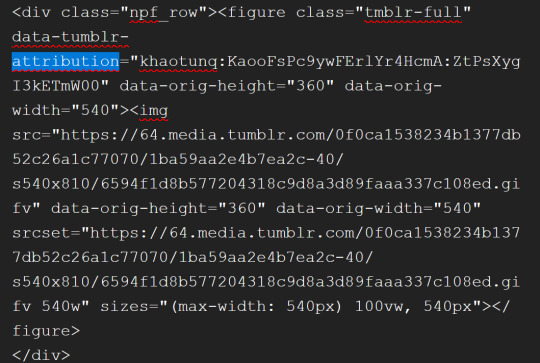
Step #5 - After "attribution" is the GIF's link that you copied earlier in quotes. Look for it!

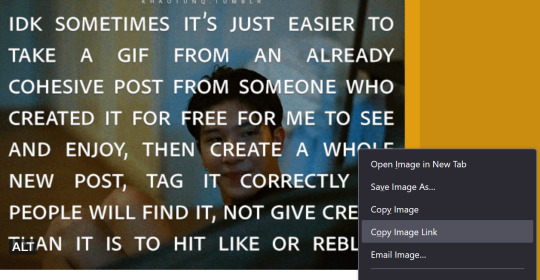
Step #6 - Now, in another window, go back to the original post with all the GIFs and find the GIF you want. Once you see it, right-click on the GIF, and when the menu pops up, select "Copy Image Link"
Step #7 - You will paste that new link into your post in the same spot the other link was within the quotes. In other words, replace the highlighted yellow part with the new link.
Step #8 - Click the little wheel at the top again and select "Rich text" to switch back to your normal viewing mode.

The new GIF will appear!
It seems overwhelming, but once you get the hang of it, it's easy peasy. And if you think this process is too time-consuming, remember that this is nothing compared to how much work GIF makers put into creating these GIFs for us.
Tumblr is actually very user-friendly with some practice, so do our community a favor and be friendly to the people who put in the effort.
#bl things#myspace taught a lot of us how to be tiny little code changers#bl community#be kind and attribute
326 notes
·
View notes
Text
hi tech #2
Tim and Tucker are working on some code together Danny, passing by: have you considered adding a value attribute to your object tag? Tim: this is C++ Fenton! And even if I were working in html, you can’t use value with object! Danny leaning towards screen: I mean you’ve got object right there points at screen Tim: Tucker[weary]: he’s trolling you Tim: Shut the fuck up Fenton! Danny: (smirks) you can’t make me Tim swivels his chair, grabs Danny by the shirt, pulls him down and kisses him hard. He releases Danny and swivels back to the project as though nothing has happened Tucker meeting Danny’s eyes behind Tim’s back: *wiggles his eyebrows* Danny:(mouths) what the fuck Tucker: *wiggles his eyebrows again* Danny’s phone rings. Danny: Hey Jazz! Danny: yeah I’ll be there in five
several minutes later….
Tucker, grabbing Tim’s shoulder: (scream whisper) DUDE YOU KISSED HIM Tim: (panicked) I KNOW!
EDIT: I have written a different version of this post here
464 notes
·
View notes
Text
.。*♡゚ A/n: totally not trying to learn html (which technically isn't a programming language, for what I had read), and well, if Idia was teaching me I would learn everything so quickly tbh. Or not. He would start explaining and I would have the sudden urge to kiss him, oh well it happens ig

"Uh... I think I have an error in my code." You break the silence, tone soft as the computer screen lights up your eyes just the right way for Idia to lost himself in the reflex. He love your eyes, your concentrated face, the way you stick out your tongue without realizing.
And he loves the way you timidly look to him, as if he has all the answers to your questions - which, about this subject, he have, by the way.
"Ah~ your closing array is missing a closing slash. Here, Yuu-shi." He pointed your error with a soft tone, blue nail hitting the screen, and a surprised pout grew on your lips.
He wanted to smother you in his arms, to pick you up and hold you till his arms fell off and his corpse rot - that was how bad he yearned for you, your skin, you smell. He breathes really hard to refrain from doing it, though. You wouldn't want that. He was just a mere R card, a lonely gamer, a-
"Thank you, Idia. You're the best." You giggle to yourself, feeling yourself warm under his eyes and lousy smile. Unbeknownst to you, the only things that were going through his head were about you.
Your smile, the way your eyes lightened up, your laughters and giggles, the messages you passed each other in class (when he was there in person), your secret handshake. Idia loved you. He loved your very dearly.
He loved you so much that he could cry.
"Uh... it's no big deal," yet his hair was getting hotter, rosey tone starting to burn brightly. "Don't forget the closing stash, and everything should work properly. This programming language is not that used anymore, but most can learn useful things learning it anyway. I think."
Idia had half of his mind to know that he was rambling again, talking so fast that he could make Eminem cry. But he couldn't stop when you looked at him with such big eyes filled with curiosity and wonder, taking notes of everything he was saying.
He noted then that you had hello kitty stickers on your page. A few drawings that Ortho made of him, Idia and you; that almost killed him right then and there.
"Ah... HTML uses elements, tags, and attributes to organize text, images, links, and other multimedia elements. It can be combined with CSS for styling and JavaScript for interactivity."
#twst idia shroud#yandere idia shroud x reader#idia shroud x reader#idia shroud#idia x reader#idia x mc#yandere idia#twst idia#twisted wonderland idia#yandere idia x mc#yandere idia x reader#idia x yuu#idia x you#yandere idia x yuu#yandere idia shroud x yuu#yandere idia shroud x mc#yandere idia shroud
40 notes
·
View notes
Text
Convert HTML to Image: A Step-by-Step Guide ✨

Do you want to turn some HTML code you've made that's on your website and have a way to convert it into an image for you to save?
Well, look no further! I too wanted to do the same thing but funny enough, there weren't any straightforward tutorials out there that could show you how! After hours of searching, I finally discovered the solution~!
This is an old tutorial I made 🐼

💛 Set your environment
Before we dive into the conversion process, I'll assume you already have your HTML code ready. What you want to learn is how to turn it into an image file. You should have a good grasp of HTML and JavaScript. For this tutorial, we'll use the following HTML code example:

We won't include the CSS code, as it doesn't affect this tutorial. The JavaScript file (script.js) at the bottom of the body element is where we'll add the functionality for the conversion.
Your page should resemble the following:

As you can see, the "Click me" button will handle the conversion. We aim to convert everything within the div.info-div into an image.
💛 Using the html2canvas JavaScript Library
The html2canvas library allows you to take screenshots of webpages and target specific elements on a screen. Here are the steps to include the library in your project:
The steps to put the library in your project:
Visit the html2canvas website for more information.
Copy the CDN link from here

and include it in a script tag in your project's head tag in the HTML file:

That's it for including the library on the HTML side. Now, let's move on to the JavaScript code.
💛 JavaScript Functionality
Here's the JavaScript code to handle the conversion:

In this code, I want to turn the whole div.info-div into an image, I put it into a variable in const div = document.querySelector(".info-div");.
I also put the button into a variable in const button = document.querySelector("button");
I added a click event listener to the button so when the user clicks the button, it will follow the code inside of the event listener!
You can find similar code like this in the documentation of the html2canvas library:

What is happening here is:
We add the div (or what the element we want to take an image of) into the html2canvas([element]).then((canvas)
Added the image file type url to a variable = const imageDataURL = canvas.toDataURL("image/png"); - You can replace the png to other image file types such as jpg, jpeg etc
Created an anchor/link tag, added the href attribute to imageDataURL
The download attribute is where we will give the default name to the image file, I added "dog.png"
Perform the click() function to the anchor tag so it starts to download the image we created
And that's it!
💛 The End
And that's it! You've successfully learned how to turn your HTML into an image. It's a great way to save and share your web content in a unique format.

If you have any questions or need further clarification, please comfortable to ask. Enjoy converting your HTML into images! 💖🐼
#my resources#coding#codeblr#programming#progblr#studying#studyblr#programmer#html#html css#javascript#neocities#coding tips#html5 tutorial#html tutorial
155 notes
·
View notes
Text
Hey you
all of you complaining about tumblr live

Seethe and cope 😎
Okay but seriously
Get yourself the Stylus extension For Firefox users: https://addons.mozilla.org/en-GB/firefox/addon/styl-us/ and for everyone else: https://chrome.google.com/webstore/detail/stylus/clngdbkpkpeebahjckkjfobafhncgmne
Get the Old Tumblr Dashboard Style: https://userstyles.world/style/11286/old-tumblr-dashboard-2023
You should get this stuff even if you don't plan to remove tumblr live :3 Now here is where the magic comes from:
Stylus allows you to add custom css styles to websites, and you can edit themes made by other people to fit your needs!

See that little fucker? How about we fuckin g kill it?
Press f12 to open the Developer Tools (or however it is called lmao)
Click on this little guy

Now you can select an element on the website, and it will show where it is in the html!
3. Point
Click on it, and now we will see something like this in the inspector!

Collapse a bunch of this stuff, since here we only care about the list items, or <li>
These are the different buttons in the banner
Now, how do we fucking kill that guy?
There are a number of ways to do this, so let's start with the simplest one
Delete
Just select the list item that has the title "Live" and press delete!

So it is gone now, right?
Well... not really. If you refresh the page, it is back. Which makes sense, since the only thing we did is remove that part of the "code" (if you can call html "code"), but when we refreshed it, the server gave us a version of the site that obviously had the button still there.
So what is a smarter way to get rid of it?
While you can't really delete a specific part of the site with just css, you can hide it! To do that, all you have to do is apply the style display: none;

Like that! While it doesn't fix the problem with the refresh, it brings us closer to the solution.
Remember when we got Stylus? yeah!
Go inside of it (😳), and inside the Old tumblr dashboard theme (😳😳), and now we just need to apply the css style of "remove that fucker" to the specific list item. How do we do that, since we can't add it directly into html? We use the attribute selector, and we look for title="Live"!
Where do I write this????
Well, css applies the styles from top to bottom of the style sheet (usually, this post is already too long), and you see how the list item has a few classes assigned to it? It so happens that they also modify the display property, so we have to override it by putting our selector after those in the css sheet... so basically you can just write the thingie at the end 😅
Here is how the attribute selector works!

the .IYr09 part is that specific class, so that if there is ever something on this page that has the title="Live" but isn't what we are looking for, it won't apply there (You don't need to do this, but whatever). The attribute selector is written in the square brackets, and you just... write the attribute that you are looking for there ;P
(I also did the same for the Explore button, but that can be an exercise for the interested ;P)
And now, BEHOLD

(How am I so popular that I got dms during the making of this >.<)
And it will stay like this, forever*
*except if something happens to the addon, theme, css of it or whatever, but you get the point!
#this post is too long#I could've just given the solution immediately#but this is funnier >:3#(am I on the autism spectrum? I kinda feel like it is the case tbh >.<)#Like this isn't how you write tutorials I think#whatever#css#tumblr live#fuck tumblr live#removing tumblr live#get stylus#get firefox too#idk at this point#196#pin
259 notes
·
View notes
Text
Day 2 [Multimedia Elements In HTML]
Welcome to day 2 :D
Day 1 [Introduction To HTML]

Line By Line Explanation:
(An attribute is extra info added to an HTML tag. So, is a tag. Src, alt, width and height are the attributes)
Tag : Used to add images to webpages
src : Used to give the URL of the image or the name of the image file
alt : specifies what will appear on the browser in case the image doesn't appear.
Width and height : Specifies the width and height.
Tag : Used to add audio
controls: shows a play/pause bar.
: your audio file (paste your file link there).
Type: Tells the browser what file you're showing it
Tag: Used to add videos
controls : lets users play/pause the video.
width and height: size of the video frame.
: your video file (paste your file link there).
Here's The Output →

Additional Tip : Download these two extensions because they're really helpful.

Live Preview helps you to look your output without having to save it every time you make a change in VS code
Live Server is similar, it just shows you the output on the webpage.
You can search for these two in the extensions icon on the side.
_____________________
Hope it helps. Tomorrow, we'll cover links and lists xD
#code#codeblr#css#html#javascript#python#studyblr#progblr#programming#comp sci#web design#web developers#web development#website design#webdev#website#tech#html css#learn to code#school#study motivation#study aesthetic#study blog#student#high school#studying#study tips#studyspo#website development#coding
13 notes
·
View notes
Text
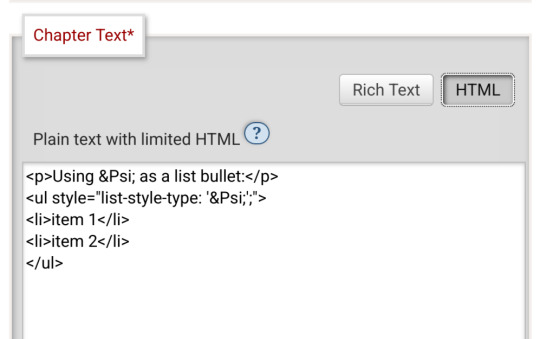
Is there an actually complete guide to AO3's limited HTML somewhere? I know for a fact that some features work but only under slightly weird rules.
For example, if you're using the <a> tag to form an anchor to refer to later, you HTML will end up looking like <a name="Anchor" rel="nofollow" id="Anchor"> when it's done auto-correcting in the Preview. If you type in <a name="Anchor"> or <a name="Anchor" id="NotAnchor">, it will autocorrect to that, but if you type <a id="Anchor"> it will correct to an <a> tag whose only attribute is rel, or <a rel="nofollow">. (The rel="nofollow" attribute has no practical effect for most users' purposes.)
I know that AO3 will autocorrect any incompatible HTML to compatible HTML, but I don't know what the compatible HTML is, and the above <a name="Anchor"> example demonstrates that some things are compatible but don't look compatible unless you do them right!
This is especially confusing because the editor will autocorrect some HTML as soon as you switch from the HTML editor to the Rich Text editor - but it won't correct everything. I've attempted to do slightly funky things with styling that seemingly worked just fine in the editor, but vanish when I preview the chapter.
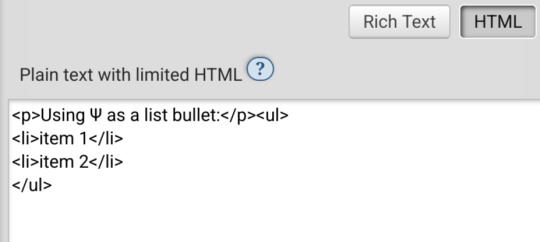
For example, here I am trying to use using the Greek character Ψ as a list bullet. When I originally typed it into the html field, I used the actual character Ψ. As soon as I switched to rich text and then back to html, it had autocorrected to Ψ, which is the escape character for Ψ. (For those who don't know, escape characters are a special code to tell the browser that this is NOT supposed to be code. <p> is an html tag; < p > will literally render "< p >".) So, it accepted the style attribute and the list-style-type, but it forced it into an escape character. So far so good.
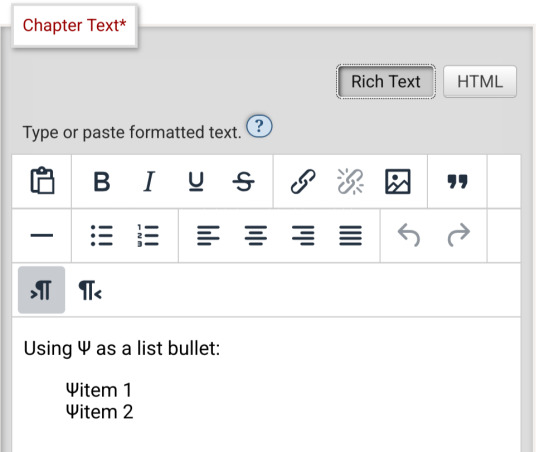
Until I click preview. Now the custom bullet is gone, replaced with the standard circle. If I click edit again, the code has removed the CSS attribute that changed the bullet... and also replaced the escape character Ψ with the character Ψ.
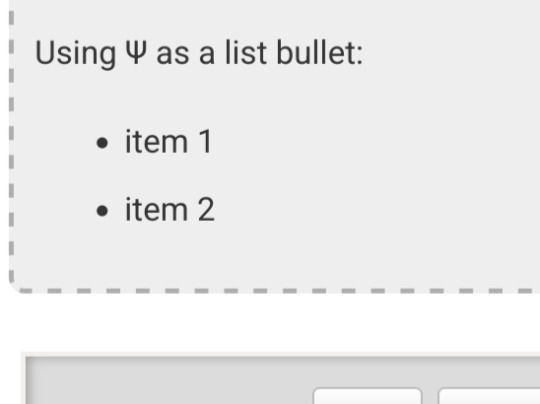
Weird.
#ao3#otw#html#ao3 formatting#ao3 html#I do not mind the lack of a clear standard at all#OTW is a nonprofit full of overworked staff and volunteers#and complete documentation is very hard#I just wanna be able to nerd more effectively#Can anyone direct me to the part of the open-source code that dictates HTML autocorrection? Is that a thing I can examine?
19 notes
·
View notes
Text
How to Download (Almost) Any Audio File from Tumblr
Use this method at your own discretion. Proper credit and attribution is key to a healthy online ecosystem. Just be cool. I was inspired to make this how-to because the Wikihow article on this subject doesn't work (at least for me).
Step 1:
Find the post containing the audio file you want to download. It doesn't matter if this is on your own blog, in a tag, on your dash, or whatever.
Step 2:
Right click/Control+click on the audio player and select "Inspect." The Inspector panel will contain the programming for the audio link.
Step 3:
Orient yourself in the Inspect panel. Look at the ribbon at the top of the panel and make sure you're in the "Inspector" tab or the "Elements" tab (this depends on your browser, i think). This tab is open by default and contains the code for different elements of the site (like the audio player).
Just below the tab ribbon, on the left-hand side of the panel, there should be a search bar.
Step 4:
Use the search bar to search for the audio source in the html code. The quickest way to find the audio file is to type "audio-source". Hit Enter when you're done typing.
The code panel should highlight an inner line that goes something like this: source class="audio source" src=https://64.media.tumblr.com/a bunch of gobbledygook.mp3
That link is what you want.
Step 5:
Right click the highlighted line, and Open Link in New Tab. This should open up a black page containing nothing but a basic audio player (which will probably autoplay depending on your browser settings).
Step 6:
Right click on the audio player from the previous step, and Save Audio As...
This allows you to save the audio to your computer as a .mp3 file. The Save As window will probably say you're saving it as an MPEG file (mp3 is a type of MPEG; don't worry about it). Give the file a name that is easy to find/sort and save it to whichever folder you want.
Step 7:
Enjoy! You can play that .mp3 file on your computer's native audio player or do whatever.
(Anyone who's more knowledgeable is welcome to jump in with tips or corrections. I've only done this on a Windows PC on Firefox, and the process might look different on a different browser or OS.)
8 notes
·
View notes
Text
semi-useless computer terminology
if you've used html sometimes when adding a file to a page you have to add the "type" attribute, and it would be something like "text/css", "text/javascript", "image/png" or something like that
this is a MIME (Multipurpose Internet Mail Extensions) type, though it's apparently more modern to just call it "media type". unlike Windows, the browser does not use the file extension of a file to determine what kind of file it is. The MIME type is often inferred from the extension and contents of the file, but it can be specified manually, such as the "type" attribute as mentioned, and also through javascript.
MIME types are also used on Linux to determine which program opens which file type.
it's a "Mail Extension" because it was originally used to determine what kind of content is being sent over the mail, but it's more often used for what kind of content is being sent over HTTP/S today.
12 notes
·
View notes
Text
neocities heracles trials: from a chaotic newbie
okay so i want to actually start posting here and i finally got it through my thick skull that this is LITERALLY A BLOG. i'm supposed to blog. so here's a blog post.
anyways, for context, i've been working on my neocities for a while now, recently started over to make things more original and more me. another thing to note is that i'm using VScode.
the issue here is that i have zero well not exactly zero but i lack any professional/academic background experience with making websites. the html isn't the issue (thankfully) but holy shit dude...css+javascript implementation . basic styling with css is no biggie, right? absolutely, however...may i introduce: smooth transitions + the absolutely tragic fact that the <marquee> tag is deprecated an accessibility issue.
so, my first goal day one was to recreate a marquee animation through css. so i tried to simply implement this incredibly useful bit of code into my site (in which if you're interested i totally think my failure to get it working was user error so please check it out it works great if you're not me) but, lo and behold, despite me getting it to work in my V1 project, i could not, for the life of me, get it to work. so i, not too familiar with css animation and completely lost when it comes to javascript, started grasping at straws. i ended up finding this tutorial and, with some improvisation since the tutorial is for webflow and i'm manually writing everything, managed to make my own css recreation of a marquee effect essentially from scratch, and even learned about the animation-play-state css attribute so i could pause the effect when the marquee is hovered over! victory, basically.

then, i looked around the many cool and absolutely awesome sites on neocities to get inspiration, and then i was like "hey what if i made a custom button background image" and with some trial and error, made myself a pretty decent base (for now) with aseprite, and learned more about the program in the meantime which is always a plus.
then i decided that i wanted to do more with the buttons. i wanted to make it animate on hover. not too hard right? you'll...you'll see why i struggled...in a moment...
anyways, i settled on a simple shrink animation. which THIS i could do with ease, messed around a bit, got the keyframes, assigned that to the button:hover and all of that and all was good!...until i realized that once i stopped hovering over it, it snapped back to its original scale instead of transitioning smoothly again. THIS is where the "fun" began.
see, although i can wrap my head around things easily when it comes to css, i have to constantly look up what the proper syntax for everything is because otherwise i'll mess everything up. and through my research i had conducted (aka surfing through multiple blogs and reddit posts alongside other things on random forum websites) i had discovered the very neat transition attribute.
but we'll have to return to this because i have adhd, and i ended up getting distracted during this process. see, originally i had decided that the button would change it's visual to appear like it was pressed when the user's mouse hovered over it. then i was like "i don't think this makes sense" so i changed it so that the button wouldn't change its background image unless the user actually clicked on it. so i did that. then i had to make sure that the button wouldn't magically scale up again so i had to transform the styling and blah blah blah those details aren't really that important ANYWAYS the actual important bit about this is that if you use the transition attribute and there's a change in background images that change will also be transitioned unless you set the transition to only apply to a specific change. and i didn't know that originally. so every time i tried to fix things up with a transition so the button wouldn't snap back to it's original size out of nowhere the background would slooowly change as well and i actually got so frustrated with this that i wanted to burn something down because that's a totally normal reaction i guess. anyways, then i started frantically searching for answers on the topic and EVERY. SINGLE. THING. THAT I FOUND. INCLUDED JAVASCRIPT.
i do not know javascript. i have not learned anything about it unlike css and html. it SCARES me and it is FRUSTRATING. but i thought i'd try it anyways. news flash that shit didn't work at all and i almost thought about scrapping the animation entirely especially when it randomly stopped working when i made certain changes, but i ended up eventually figuring out what i mentioned earlier (CSS transitions and the fact that you can assign them to only affect a specific change instead of everything) so with some dabbling here and there i eventually managed to finally figure out how to make everything smooth through pure css and although it still snaps if the element hasn't finished animating i'm happy with it.

moving on to another thing, i wanted to then make a sound effect play when you click the button. yes, we are still talking about buttons. THIS i could not do with css, like, at all. javascript admittedly is for interactivity and i had already been bending the rules quite a bit with the animations since those teechnically should've been done with javascript as well but this? this was impossible without javascript. so i found a free mp3, and searched up a nice little tutorial on the very basics of javascript.
little did I know that apparently, this would be my own personal little hell.
see, no matter how many times i tried a different script, the sound just would not work like at all. i'd do everything in what i assumed to be the correct way, and no matter what, it would not play. knowing that i'd just have to revisit this, i decided it was best to just sort of put it on the back burner.
and this is where i wish i could say this is the end of my absolutely gobstopping rant. however, i cannot.
see, one thing that i really like that i've seen in a lot of other people's sites is draggable windows. i think they're sick. but this ALSO requires javascript, but i didn't think this could POSSIBLY be that bad since so many people did it.
...right?.......right? guys. right?
MOTHERFUCKER I WAS SO WRONG.
see, it turns out that a lot of people do this sort of thing with jQuery, specifically for user interfaces. but vscode doesn't have a "user friendly" way to get jquery to work with it. and because i don't want to mess with program files, i decided that logically speaking jquery just makes writing things in js scripts less complicated and doesn't introduce things that are impossible in vanilla javascript so i decided i could suffer a little bit and try and do things without jquery.
this led me to looking at many sites with draggable windows to look at their own scripts, in which every single time i tried replicating things i FAILED.
i eventually stumbled upon a nice code that worked. but the issue with it - in which unfortunately i can't find it, else i'd link it - is that it works with not only element classes but also a specific ID. see, this would be fine if i only wanted ONE draggable element. but i want multiple. and i thought that maybe if i just duplicated the script and dedicated it to a different ID and changed function names it would work but nooo life cannot be this easy apparently. so after setting up my webmaster status window, getting that to work, i tried doing the aforementioned method for what will eventually be a guestbook of sorts. it failed.
so i decided, "hey i'll revisit this later!!" and i went on to finding a way to implement a status widget into my site. this honestly was really easy as i ended up stumbling upon status.cafe . so i registered, eventually got my account activated, and i got it working in my live port of vscode just fine!! all is good in the world.
well that's what i thought until i found out that since i had created my neocities account in march of 2024, and i'm unemployed since i'm still in high school hence i have a free account, that i could not. use the widget. in neocities. so i tried finding a work around, found this handy guide (which is genuinely useful by the way) and set up things through a RSS feed instead which is essentially just a work around that complies with the security restrictions of neocities that i'm bound by. anyways, this works great but i literally just can't customize it to how i want so this is another fail. then i find imood.com which, although is NICE, doesn't suit what i want on its own. so i'm at a loss here too.
so, again, another thing to put to the side i suppose.

so i started working on getting my guestbook, browsed through people's homepages again, and found chattable . and you probably think i have another paragraph complaining about this but honestly i can't write about something when i can't figure out how to even create a chat to implement onto my site in the first place so...y'know.
plus, i honestly have no clue if it'll work on my site either due to security restrictions so this is fun!!
anyways, after dealing with all of this, i finally decided it was about time i ported what i had so far over onto my neocities account. which isn't actually that hard i just had to wipe all of my files, overwrite the content in my index.html file there and paste in what i have now, and then upload my new files. but for some god awful reason after i went through all of this chrome just. kept depending on my old stylesheet??? so i had to clear some of my browsing data and eventually everything was loading properly for me.
and THIS is finally the end of my ridiculous documentation concering my neocities adventure so far.
i have no doubts i'll end up ranting here AGAIN about all of this but for now this is all i have on my plate...besides finally caving and learning javascript for real and continuing to learn more about html and css. hopefully one day i'll stop having such frequent issues but now is not the time and i doubt that'll be anytime soon either.
moral of the story, if you want to start something new and pick up a new hobby, please for the love of all that is of substance in this world don't go in completely blind like i've done if you're going to be making a project of some sorts. it will only lead to many misfortunes.
anyways you can see what i currently have done in my neocities here, make suggestions or give advice in the notes and whatnot i don't know.
#neocities#rant post#rant#coding#web development#geocities#html#html css#htmlcoding#css#javascript#losing my mind#holy shit#send help
6 notes
·
View notes
Note
Question from someone just starting with creating and then posting art to Tumblr, do you think I should be watermarking my pieces?
I’ve always disliked watermarks as they naturally tend to dissuade people from interacting with art in a natural manner; it depends very heavily on the size and placement of the mark, obviously. BUT, often times an artist will overzealously obscure their work with identification and it has a somewhat repulsive effect on the average viewer - a wall has been erected between the viewer and the art, in a sense. Watermarks, to me, exist to prevent very specific situations from unfolding with your work - almost all of those reasons seem to be financially motivated, like preventing strangers from printing your art out at home or reposting without attribution. Situations that could affect your ability to profit off of your work.
Admittedly, much of my perception about this issue was inspired by an article included in the book “Context” by Cory Doctorow, wherein he writes about how he’s benefitted from “thinking like a dandelion”, which is an idea that was inspired by conversation the author had with Neil Gaiman — I’ll try and summarize the parts of the point that are more relevant to visual arts; since portions of the allegory refer more specifically to certain qualities of written media.
He begins with, “Mammals worry about what happens to each and every one of their offspring, but dandelions only care that every crack in every sidewalk has dandelions growing out of it. The former is a good strategy for situations in which reproduction is expensive, but the latter works best when reproduction is practically free — as on the Internet.”
So how do you “think like a dandelion” then?
��Your work needs to be easily copied, to anywhere whence it might find its way into the right hands. That means that the nimble text-file, HTML file, and PDF (the preferred triumvirate of formats) should be distributed without formality — no logins, no e-mail address collections, and with a license that allows your fans to reproduce the work on their own in order to share it with more potential fans. Remember, copying is a cost-center — insisting that all copies must be downloaded from your site and only your site is insisting that you — and only you — will bear the cost of making those copies. Sure, having a single, central repository for your works makes it easier to count copies and figure out where they’re going, but remember: dandelions don’t keep track of their seeds. Once you get past the vanity of knowing exactly how many copies have been made, and find the zen of knowing that the copying will take care of itself, you’ll attain dandelionesque contentment.”
The rest of the allegory more specifically applies to written work, but I’ll link it here for the sake of posterity. Essentially: every wall or pre-requisite that you establish before allowing a fresh set of eyes to fall upon your work actually may deter people from engaging with the work and sharing it with others. Signatures, subtle watermarks that are “baked” into the work, or maybe like.. a well-placed QR code that links people back to you — all of those would be my suggestion for someone who wants to leave a lasting, linking thread between a given work and it’s artist. If the right person sees your art and connects with it, there SHOULD be a way for them to follow that thread back to you and discover more; but if you over-prioritize demonstrating ownership over your work, you’re likely to drive those coveted genuine connections away.
On the other hand, if your primary goal is to sell prints or other products, brazenly watermarking your work will protect your bottom line from the kind of low-level art-scraping that drives all those shady redbubble shops and etsy stores that sell stolen works on cheap t-shirts and hankies. For me, art is a primarily social interest in which I prioritize the sharing of culture and ideas. I don’t want financial factors to take precedence and alter how/why I created something; it feels like I’d have to take much of myself out of my art in order to make it palatable for consumer spaces.
You should determine your priorities and then strive to make art that fulfills those priorities without compromise. I think you’ll find that self-satisfaction manifests readily at different points in the midst of that process.
#my asks#hope this helps! I’m against watermarking my own stuff bc I’m not really concerned about someone trying to steal/sell my weirdo works#in spite of that: I’ve had several people ASK to buy stuff from me on occasion; I’m always glad to facilitate that personally#but yeah as a result I’m obviously not moving boxes of prints of anything#and this is what works for me right now - my mind may change on it later if my life and priorities change#it’s an everongoing process
21 notes
·
View notes
Note
hi! i’m wanting to make custom templates for my twine games. i was wondering — for the main menu screen you have on your template, did you have to delve into the storyinterface? honestly thats the only part thats confusing me 😂
Hi there! I'm not entirely sure which of the two templates you're referring to, but I did use StoryInterface for both of the templates 😊
Using StoryInterface allows you to build the user interface entirely yourself using HTML, but it will replace all of SugarCube's built in code, so you'll have to create all the elements of the UI yourself - if that makes sense.
You must include an element with the id "passages" for your story's passages to show up, for example with a <div id="passages"></div> element. Just leave it empty, and Twine will populate it with your story's passages.
Another neat trick is using the "data-passages" attribute to populate elements with content from certain passages. For example, in my first template the StoryInterface contains this element:

class="story-author" obviously allows me to style the element using CSS in the Story Stylesheet, whereas the data-passage attribute is an attribute native to Twine that allows you to populate elements with the content of specific passages. This one has the value "storyAuthor", which means that Twine will automatically populate the <h2> element with whatever content is inside a passage called "storyAuthor" when the game runs.
Other than that, if you're looking to learn more coding, I find w3schools really helpful, it's completely free and you find everything you need there. I also used the Twine documentation a lot. To learn more about how everything works, maybe download one of my templates and play around with the StoryInterface that's already built to learn what everything does? 💁🏼♀️
Hope that helps, anon! Have a nice weekend 🤎
29 notes
·
View notes
Text
You know what, I'll bother making this post. It's long overdue.
PSA: Please don't install uBlock Origin rules for Tumblr that use :nth-of-type(), and please remove or fix any you have installed. They can and will hide the wrong things. I'll show you a few alternatives below.
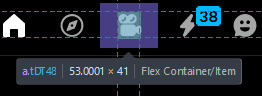
First, an example of how we get here. I've used the uBlock Origin element picker to try to hide the "Get a Domain" sidebar item:
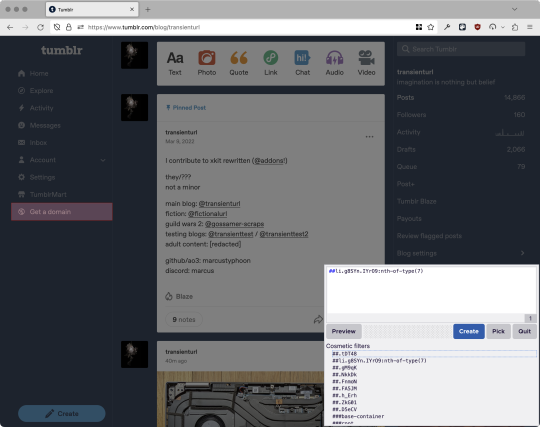
With some different adjustments of the sliders, it gave me these two snippets, one of which targeted a whole bunch of sidebar items, and the other of which selected the right one. Great, right? Read on.
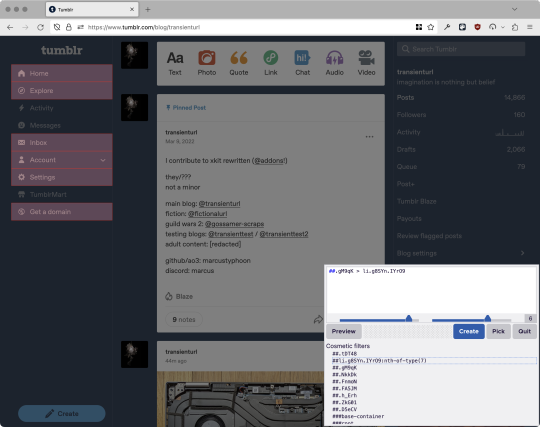
www.tumblr.com##li.g8SYn.IYrO9:nth-of-type(7) www.tumblr.com##.gM9qK > li.g8SYn.IYrO9
As you can see, these both target a particular kind of sidebar item via "li.g8SYn.IYrO9"—fine—and as you can probably guess, the second one counts them all up and hides the seventh it finds.
This is bad, because what it actually hides depends on exactly how many sidebar items there are! Users can "snooze" Tumblr Live, which will make an item appear or disappear, and users with/without Ad-Free subscriptions will have or not have another. I have seen many, many people accidentally hide their activity, messages, inbox, etc using someone else's rule that's supposed to hide Live. Worse, some rules intended for e.g. recommended post carousels that use nth-of-type translate to something like "hide item number three on the dashboard no matter what it is," which will lead to a seemingly random post on your dashboard disappearing!
This isn't a problem specific to Tumblr, of course—I personally think uBlock Origin should never autogenerate these rules—but Tumblr has a ton of elements that aren't in fixed positions, so I feel comfortable wording that PSA the way I did. On a very static site, those rules might be fine. Here they almost always aren't.
So how do we fix this? First of all, as a developer of XKit Rewritten (check out @addons!), I must suggest you check if it has a feature to do what you want. Plenty of times it won't, though, and if not, we want to make a rule that hides an element based on what it is, not where it is. Here are three ways to make a robust rule:
First, I'll right-click the element I want and use the inspect element tool in my browser's developer tools to look at the element I really want (Firefox and Chrome/Edge/Opera have different but overall similar interfaces for this):
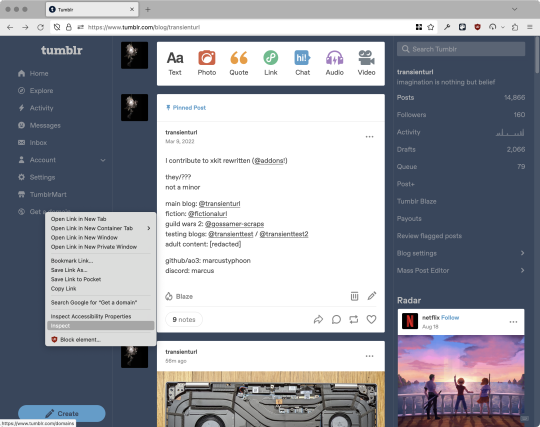
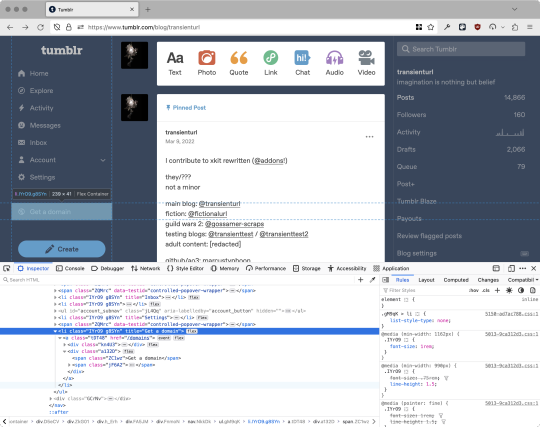
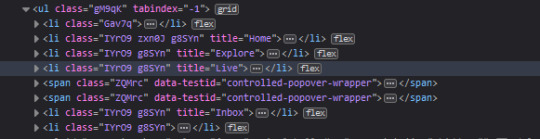
The HTML looks, for reference, like this (Tumblr sucks at code blocks but I'll try):
<li class="IYrO9 g8SYn" title="Get a domain"> <a class="tDT48" href="/domains"> <div class="kn4U3"> <svg> <use href="#managed-icon__earth"></use> </svg> </div> <div class="a132D"> <span class="ZC1wz">Get a domain</span> <!-- other unimportant stuff removed--> </div> </a> </li>
What's something unique about this element, preferably about the outermost element, and preferably contained within the <angle brackets> (HTML tags)? In this case, we have it easy: title="Get a domain" is definitely unambiguous and fulfills all of those three. If you're very familiar with web design using CSS, you'll know how to target that; if you've vaguely heard of CSS, you may be able to look at a reference sheet of CSS selectors, see [attribute=value], and figure it out, and if neither is true, I'll spoil it for you and say that we just put it in square brackets in this case.
So—taking the rule uBlock Origin made, removing the :nth-of-type() and replacing it with our better selector—here's our first working, bug-free uBlock Origin rule:
##li.g8SYn.IYrO9[title="Get a domain"]
Okay, great. But what if we didn't have that attribute to target? What if our top-level element looks the same as the other ones? What if we want this rule to work if we change our Tumblr language to Spanish? Let's move on to :has().
:has() is a CSS selector (supported in uBlock Origin even in browsers where you can't use it for web development yet, i.e. Firefox), that lets you check the contents of an element for whatever is in the parentheses. Let's assume that Tumblr would never make two sidebar items with the same icon, and target that href="#managed-icon__earth" property:
##li.g8SYn.IYrO9:has([href="#managed-icon__earth"])
Yep, that works too!
Finally, what if we couldn't use either of those because we need to target the content of the page that's not contained within the <angle brackets>? We can take a look at the uBlock Origin documentation and find that it has something for that too: :has-text(). You can do very powerful things with this (e.g. you can sort of implement Blacklist entirely using uBlock Origin using something like article:has-text), but it doesn't perform well and can pretty easily be used incorrectly, so I'd suggest you avoid it when possible.
However, let's try using it here to target the "Get a domain" label text:
##li.g8SYn.IYrO9:has-text(Get a domain)
And that also works!
With these techniques, you should be able to target any specific thing you'd want to hide without using any fragile positional selectors. If you're going to share your uBlock Origin rules with others, please make use of this! If you're just using your rules for yourself, then hopefully I've given you enough information so that you can understand what a rule does and decide for yourself if it's worth bothering to fix (menu item order might not change that often, so maybe you're fine with certain rules being a bit prone to breakage; if your rule hides the first post in your timeline you really do need to fix that one!)
-
And, of course, a note for you web developers out there: :has() isn't natively supported in Firefox quite yet, so you can't really use it (I would not recommend using JQuery's simulated version—it's not quite the same). And :has-text() is just not a thing for CSS at all. Just use javascript at that point! Edit: No longer true in 2024; style away!
Final note: any rule with a random 5-character string like g8SYn will eventually break when Tumblr rebuilds its CSS map, though they haven't done that in ages. But when they do: no, it's not "Tumblr devs breaking our rules because they hate us." (Yes, I hear that sentiment a lot in contexts when it almost always makes zero sense.) If you're fairly experienced with CSS you can sometimes make Stylus/uBlock Origin rules that don't reference any, but it's usually convoluted and more trouble than it's worth.
80 notes
·
View notes
Note
Hello, wanted to say I read and loved the demo. Very well done. I just had a few questions, would love to know what Twine Template you use, especially at the beginning. Where you have the character creator, I love that the box around your selection changes to say/match what you chose. Such as depending on what skin color I choose it changes to signify that. Would love to know if you would share how you did that. I look forward to future updates! Best of luck.
Thank you! 🤍
I'm using the default template for SugarCube, if I remember correctly. Glad that you liked the box effect, it was my solution to reducing the number of passages whilst still allowing the validation of user input in character creation.
I did it through a combination of HTML tags and SugarCube native macros. Technical stuff under the cut:
Here is an example for eye color:
<fieldset class="charbox"><legend id="chareyes" class="chartxt">$p.appearance.eyes</legend> <div class="charoptions">Your eyes are: <<link "hazel">><<set $p.appearance.eyes to "hazel">><<replace "#chareyes">>$p.appearance.eyes<</replace>><</link>> <<link "brown">><<set $p.appearance.eyes to "brown">><<replace "#chareyes">>$p.appearance.eyes<</replace>><</link>> [rest of the options removed for brevity]</div> </fieldset>
The fieldset and the legend HTML tags together form a single box, a so-called legend, which I declare per attribute such as name, skin color, etc. You need a fieldset to make legend work iirc, but legend is where that text is displayed and it is positioned on the box frame by default. Important here is to give a unique ID to the legend tag ("chareyes" in this case), as we are interested in manipulating the text shown in it depending on our box.
In the sample above, the options I present for the eye color are listed within the Twine <<link>> tags. For these links there is no target passage to go to. Instead, you can see it is coded to do two things upon clicking the respective option. One, setting a game variable to the selected color.
<<set $p.appearance.eyes to "brown">>
Two, triggering a replace command to change the value shown in the legend to the description of the selected eye color according to the variable we have set in the same line. This is the bit you are asking about:
<<replace "#chareyes">>$p.appearance.eyes<</replace>>
Replace triggers without changing passages, so this way you can adjust multiple variables on a single "page". You'd obviously need to adjust the corresponding CSS classes to make it look the desired way, but the mechanics are serviced with just this idea above.
Hope this helps!
12 notes
·
View notes
Note
Hii ! I’m in a bit of a problem rn and I’m wondering if you could help ( sorry for bothering you )
So school just finished and I’m on vacation for like 3 months so I really want to learn how to code ( I mainly want to make cool websites and stuff ). So I started to learn html and css but it just seems so overwhelming especially seeing all the ressources and tutorials online, could you please help me know what to learn first ? 💖

Hiya! 💗
Yeah, I can help! It can be overwhelming at first, but it's best to break it down into chunks and tackle them bit by bit.
For now, as a complete beginner, use these 3 resources:
HTML and CSS course video - LINK
W3School (for extra help) - HTML LINK | CSS LINK
MDN (for even extra help) - HTML LINK | CSS LINK
After that, work on projects to test your knowledge:
List of 11 projects to tackle - LINK
Here is the list of things you want to cover in HTML:
Basic structure
Tags and elements
Attributes
Forms
Semantic markup
Tables
The same but for CSS:
Selectors
Box model (margin, padding, border)
Typography (fonts, text properties)
Colours and backgrounds
Layout and positioning (floats, flexbox, grid)
Responsive design (media queries)
Transitions and animations
Now that you have a list of what you need to cover, tackle them one by one, making sure you understand the topic before you head over to the next. The video tutorial covers all of this and more. If you don't understand a bit in the video, stop and look on W3School and MDN for further understanding and then continue on with the video. Also, tackle the video slowing. Don't rush, don't do it, it'll just make the learning process even longer if you getting not understand things.
The resources I listed are my complete go-to. After that, as you've noticed, there are hundreds more. Go through the ones you need for the specific project you're working on or the topic you're studying only.
Hope this helps and good luck! 💻💗
#reources#coding#codeblr#programming#progblr#studying#studyblr#comp sci#tech#html#css#html css#coding resources
100 notes
·
View notes
Text
Day 4 [Link Tag In HTML ]
Introduction To HTML
Day 2 [Multimedia Elements In HTML]
Day 3 [Table in HTML]
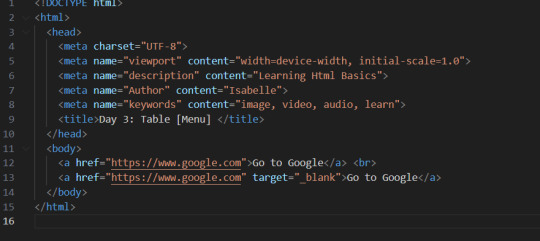
Line By Line Explanation:
: Anchor tag (used for links)
href = It stands for Hyper Text Reference. You paste the URL of the link here
Text between the tags : What the user clinks
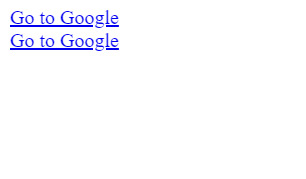
The first link will open google in the same tab. If you want the link to open in a new tab, then you use the target attribute.
Target="_blank" : Opens the link in a new tab
Final Output
____________________
Hope it helps :)
#code#codeblr#css#html#javascript#python#studyblr#progblr#programming#comp sci#web design#web developers#web development#website design#webdev#website#tech#html css#learn to code#school#study motivation#study aesthetic#study blog#student#high school#studying#study tips#studyspo#website development#coding
11 notes
·
View notes