#How Tos
Explore tagged Tumblr posts
Visit Tumblr Blog
Explore Tumblr blogs with no restrictions, modern design and the best experience.
Last Seen Tumblr Blogs


Fun Fact
Tumblr posted its first advertisements in May 2012 and subsequently earned $13M in revenue.
Note
I hope you have a wonderful break! I really enjoyed the new update of the game and I can't wait for more aaa !! <33
And I agree about Mychael having different sides to him, the story feels more authentic and especially combined with the action/motion scenes, the game feels so immersive! I really, really love your work on it! The writing, the coding, the visuals, everything!! Even the bad endings is so heartwrenching </3 (ending 4 is my top fav bad ending hehe)
I also wanna ask how you did the moving scenes with the sprites? Like with Mychael falling off the bed because MC punched him (my fav scene, its so funny) and the one with him snatching MC's wrist to avoid touching the mushrooms. Was it hard to figure it out how to do it?
Aaa sorry for the ramble! >< I really love the game :'D and Mychael! Heres a tight hug for him🫂 <33
I've explained the snatching MC's hand animation here!
As for the punch and some other motions, that's actually Ren'Py's transformations.
Ren'Py Ramblings below:
I'm gonna be 100% honest, a lot of these I took from the Lemma Soft and Reddit forums of people providing codes for various movements. It's incredibly helpful and I'm lucky to have found these and being able to implement them into my game!
I can credit them if people ask me to, but I usually google "hit animation renpy/ drop animation renpy/ tremble animation renpy" and got these!
For the 'slap' at the start of Day 3:
transform drop: zoom 6 xalign 0.5 yalign 0.2 ease 0.2 zoom 1 xalign 0.5 yalign .45 easein .175 yoffset -30 easeout .175 yoffset 0 easeout_cubic 1 yoffset 1200
For the 'slap' in Ending 4:
transform slap: zoom 6 xalign 0.4 yalign 0.5 pause.1 ease 0.2 zoom 1 xalign 0.5 yalign .45 easein .175 yoffset -30 easeout .175 yoffset 0
For the 'trembling' in Ending 4:
transform shake: linear 0.090 xoffset -2 linear 0.090 xoffset +0 linear 0.090 yoffset -2 linear 0.090 yoffset +0 repeat
Afterwards I adjust them to my liking. For example, drop and slap are the exact same, with changes in the position and slight timing, since in drop the beginning anchor point is the center of Mychael's face in the sprite image:
And then implement them afterwards as usual:
show [sprite] at [drop/slap/shake]
Hope that helps!
325 notes
·
View notes
Text
USEFUL TIPS FOR ANYONE USING NEOCITIES
So, I saw this super awesome post called BEGINNERS GUIDE TO BLUESKY and it more or less inspired me to make a post of my own pertaining to the the likes of Neocities.
What is Neocities?
Long story short, it is an open-source web hosting service that is both F2U (1 GB storage/200 GB bandwidth) and P2U (50 GB storage/3000 GB bandwidth). It's kinda sorta a spiritual successor to the now defunct GeoCities.
Why Use Neocities?
HELPFUL LINKS
Neocities has a full on Tutorials Page to help people wanting to learning how to code. Though I will say that I'm a bit surprised they don't have W3 Schools on there.
CREATIVE FREEDOM
If you Browse on Neocities, you will see how vastly different all of the websites look. That being said, you have an enormous amount of creative freedom when it comes to making your website. You can build it from scratch or look up some pre-made templates from websites such as templatemo, HTML5 Templates, TEMPLATED, template4all, and many more.
Now it is important to note that Neocities doesn't allow certain things such as jQuery, PHP, Python, SQL, etc. In fact, the only things allowed on Neocities are HTML, CSS, and JavaScript! Though I do think it is important to note that you can turn your website into a blog using Zonelets, have a Guestbook/Comments Section with Guestbooks, embed your Bluesky feed with Embed Bsky, embed your Twitter/X feed with Twitter Publish, and much more!
What Do People Use Neocities For?
Some people use it for blogging & portfolio & educational purposes. Some people use it to share their writings & artwork & music. Some people use it to help people with finding neat things. Some people use it for shits and giggles. There are legitimately a number of reasons people use it and you know what? That's 100% a-okay!
Are Any Programs Required To Use Neocities?
Technically, no. The reason I say this is because Neocities has a built-in HTML Editor. However, I don't like using it unless if I absolutely have to (which is next to never). Instead, I use Brackets. It's very user-friendly and it legit lets you know if there's a goof somewhere in your code. Legit 10 out of 10 recommend. Though I will say that some people use Notepad++.
#pvposeur's tutorial#pvposeur's tutorials#pvposeur's how tos#pvposeur's how to#pvposeur's psa#pvposeur's public service announcements#pvposeur's public service announcement#tutorial#tutorials#how to#how tos#psa#public service announcements#public service announcement#neocities#free to reblog
2 notes
·
View notes
Text
I’ve been thinking a lot recently about how much I wish we were taught in school how to interact with people online (and just how to use the internet in general) and then I remembered that I can type.
So, without further ado, I present…
How to Argue with People on the Internet
A (sort of) comprehensive guide on discussing everything from world peace to your blorbos
Forewordwarning: This is a long (but hopefully useful and entertaining) post. You have been warned.
SECTION I: The Decision
I have read SO many posts that essentially say “want to stop getting annoyed and fighting strangers? Just don’t! Simply do not!” and if that works for you? Fantastic! That is commendable and I salute you for it and I’m only a little bit jealous. (Okay, maybe more than a little bit jealous.) But if you’re like me—an absolute yapper, that is— you will likely find yourself in quite a few situations where you simply must yap. The urge is too strong. The stupidity of this collection of pixels on your screen that may or may not be the vessel for another human somewhere in the world is too much and you just have to tell them so. I understand. I will not tell you to hold back. I will, however, advise that before engaging with any individuals, you follow a few simple steps that I like to call “RAT”— otherwise known as Rest, Analyze, and Type.
Let’s say, for a moment, that you’ve just run into a comment hating on your favorite character in your favorite TV show. Yes, that one. You want to reply—but wait—you’ve just remembered to use RAT first! You intelligent human, you.
First, you REST. You take a moment to bookmark the comment (whether mentally or literally is up to you) and you step away from your phone (or you do what I do and look at that one youtube video of a parrot asking Alexa to fart 939472 times, you know the one) and you wait. Is this comment something you’re willing to take time out of your day to handle? There’s absolutely nothing wrong with deciding that it is, in fact, worth it— but it’s important to consider it first. You won’t ever have time to talk about the things you’re actually passionate about if you reply to every comment that bothers you. (Trust me— I’ve been there.)
Now, if you’ve decided to continue, reopen the comment and ANALYZE. This can mean many different things depending on the situation: is this comment generated by an AI? Is this person expressing a genuine opinion, or are they a troll? Have other people argued with them? If so, how did they respond? These are all important questions to ask, but it’s okay if you don’t know the answers to all of them. Just get the best information you can; you can always come back to this step later.
Finally, it’s time to TYPE. Let those words fly, friend! You tell ‘em!
SECTION II: Debating vs Fighting
So, you’ve RATted it up, and now you’ve decided it’s time to yap. But how to go about this? Should you be aggressive? Appeal to the enemy? What to do? Don’t worry, I’ve got another acronym for you! It’s time to take MOUSE into account: Motive, Openness, Understanding, Success, and Education.
First, think about your own MOTIVE. What do you want to accomplish? Do you want to change the other person’s mind? Are you unconcerned with changing their mind, instead going in with the intention to change the minds of others who might be reading through the conversation? Do you not care about changing anyone’s mind and simply want to discuss the topic at hand? All of these are valid, but they’re all very different. Deciding what your goal is prior to replying is one of the most important things about debating, whether it’s over the internet or face-to-face.
Once you’ve got that cleared up, it’s time to consider your OPENNESS and UNDERSTANDING. How open are you to potentially having your mind changed? Can you see a piece of truth in the other side of the argument? Do you understand where the commenter is coming from, or are they just being ridiculous? It’s okay to have opinions you aren’t open to changing on a whim— everyone has core beliefs that shape who they are as people. But sometimes looking at the other side through a lens of open-mindedness and a desire to understand is the most effective thing you can do. Give it a try— the worst thing that happens is the other person being just as bad as you thought they were.
Next, it’s time to address SUCCESS. What would succeeding look like here? This is similar to MOTIVE, but now we’re looking at the potential completion of the debate. What is the outcome you’re striving for?
Finally, EDUCATION. Is this a fact-based topic you want to educate people about, or is it purely opinion-driven? Either is fine, but if it’s fact-based, you should brush up on the facts of the situation— you don’t want to be caught in a lie and potentially humiliated, I hope. Also, misinformation on the internet is a huge issue. But mostly the humiliation thing.
Section III: Tips and Tricks
My last acronym contains an assortment of tips and tricks for internet usage and communication: Consent, Anonymity, Privacy, Yapping, Blocking, Apps, Reason, and Ability (CAPYBARA).
One of the most important things in life and on the internet is CONSENT. Now, this doesn’t mean you have to ask permission to voice your opinions— just that you should take into consideration the actual, living person on the other side of the screen. (Unless you’re arguing with an AI, in which case I suppose it probably doesn’t care much one way or the other). Ask before you DM people unless they state that their DMs are open. If someone blocks you, DO NOT make another account to harass them (yes, even if they’re really terrible). Consent online may look different than it does in real life, but it still follows the same ground rule: when in doubt, ASK.
ANONYMITY is another important thing to consider when you’re surfing among the virtual tides. Remember that even if someone displays their real name and picture on a website, you still don’t know them. They could be someone entirely different from the persona they’ve put up on the internet, and that’s okay. We all act differently depending on the situations and settings we’re in, and that’s dialed waaaay up when social media allows us to literally customize ourselves into what we want other people to see. That doesn’t mean you shouldn’t treat people as if they’re real, but it does mean that you should take everything with a grain of salt— especially if someone is being an absolute jerk.
Okay, PRIVACY is the one section in here that anyone under a certain age probably did learn in class— along with its annoying younger cousin, PIRACY (you wouldn’t steal a CAR, would you?) You probably know by now that you shouldn’t share personal data online, so I won’t go into this one too much in this post. There are a billion textbooks about it, and as important as it is, it’s not something I’m really qualified to cover. Just don’t do anything stupid and you should be fine.
YAPPING— everyone’s favorite thing to do on the internet! For the most part, this is a reminder that you should have fun. If you feel like you can’t yap about your interests in the space you’re in, maybe you should relocate— whether that’s to a different app, a different blog, or even just to a different comment section is up to you. You should feel free to voice your opinions and talk about the things you love (within reason—don’t get yourself on an FBI watchlist—but you get the idea).
BLOCKING is one of the most underrated features on many social media apps. There is absolutely nothing wrong with blocking someone and moving on. It doesn’t make you a coward; it makes you someone who values your own time and safety. You are never obligated to argue with someone just because they said so. And—this is one of my favorite internet secrets—you can block people you agree with. If someone’s posts are well-meaning and useful, but they upset you or make you uncomfortable? You can still block them, or mute/restrict them if the app you’re using allows it. You are not a bad person for not wanting to see things that upset you in your day-to-day life. You can support good causes without reading about tragedies every morning. Digging yourself into a depressive hole isn’t going to help anything. Please, please use the block button. It’s there for a reason.
APPS are another variable you should consider when catering your online experience. For instance, you can make a nuanced post on Tumblr and more realistically expect reasonable replies because you aren’t confined to a tiny amount of characters. Trying to express the same point on Twitter, however, likely risks people getting extremely angry at you due to the nature of the app not allowing nuanced conversations. That’s not to say Tumblr is necessarily superior— just that they’re different areas with different setups. The reason Twitter is so no-nuance a lot of the time isn’t just due to the people— the app is deliberately set up so that users can’t make multiple points in one post. This also attracts people who don’t want to have nuanced conversations, which feeds the cycle. This is an (extremely oversimplified) explanation of why most social media apps feel so separate from each other, even if you follow all the same people. You should know your audience—but you should also know your stage.
It’s important to have a certain amount of REASON and common sense when you’re talking to someone about the skrunkly little guys in your favorite movie. It’s not that you can’t be passionate—I once essentially made an entire powerpoint presentation about why I think my opinion about a fictional cat person is the correct one—but you need to remember that not everything is the same level of seriousness. Expressing an opinion about whether Team Rocket are actually villains is not the same thing as expressing an opinion about the upcoming US election. (Though I think Team Rocket could potentially do an okay job, to be honest. Meowth 2024?) You can 100% have intense, long discussions about fictional characters, but it’s never worth genuinely harming your own mental health or attacking someone else because of an opinion that ultimately doesn’t hurt anyone. It’s okay to agree to disagree.
Lastly, remember that a lot of this is not intuitive. Your ABILITY to make smart decisions online is a skill that takes time to develop (as is evidenced by 99% of past me’s Twitter posts) and it’s important to give yourself grace. As much as the internet hates to admit it, we all make mistakes. Just own up to those mistakes and move on. It’s okay to delete a post you made because you don’t agree with it anymore. It’s okay to come back to an argument and apologize for going too far. It’s okay to not be perfect. Accept the consequences of your own actions and move forward.
#i hope this is helpful#advice#internet#media literacy#yapping#professional yapper#controversy#internet drama#arguing#tips and tricks#tips and advice#tips and strategies#how tos#social media#debate#online safety#internet safety#education#safety#guidance#fyi#text post#yapyapyap#communities#fandom#online privacy#data privacy#pro tip#*demon noises* P R O T I P 👹👻💀😈#milesrambles
18 notes
·
View notes
Text
Ok, so my cousin’s boyfriend sent me this photo and I believe more artists on tumblr need to know about this setting. If you haven’t already, do it! It may not be fool proof but I would still recommend you do it. Any protection is from AI is valuable!
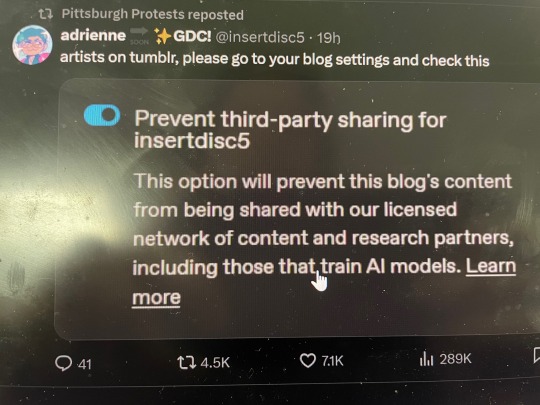
and just in case you are a new artist on here or just do not know how, I have intrusions and on how to turn this setting on both desktop and mobile below the cut!
First, go to the blog you want to change this setting for

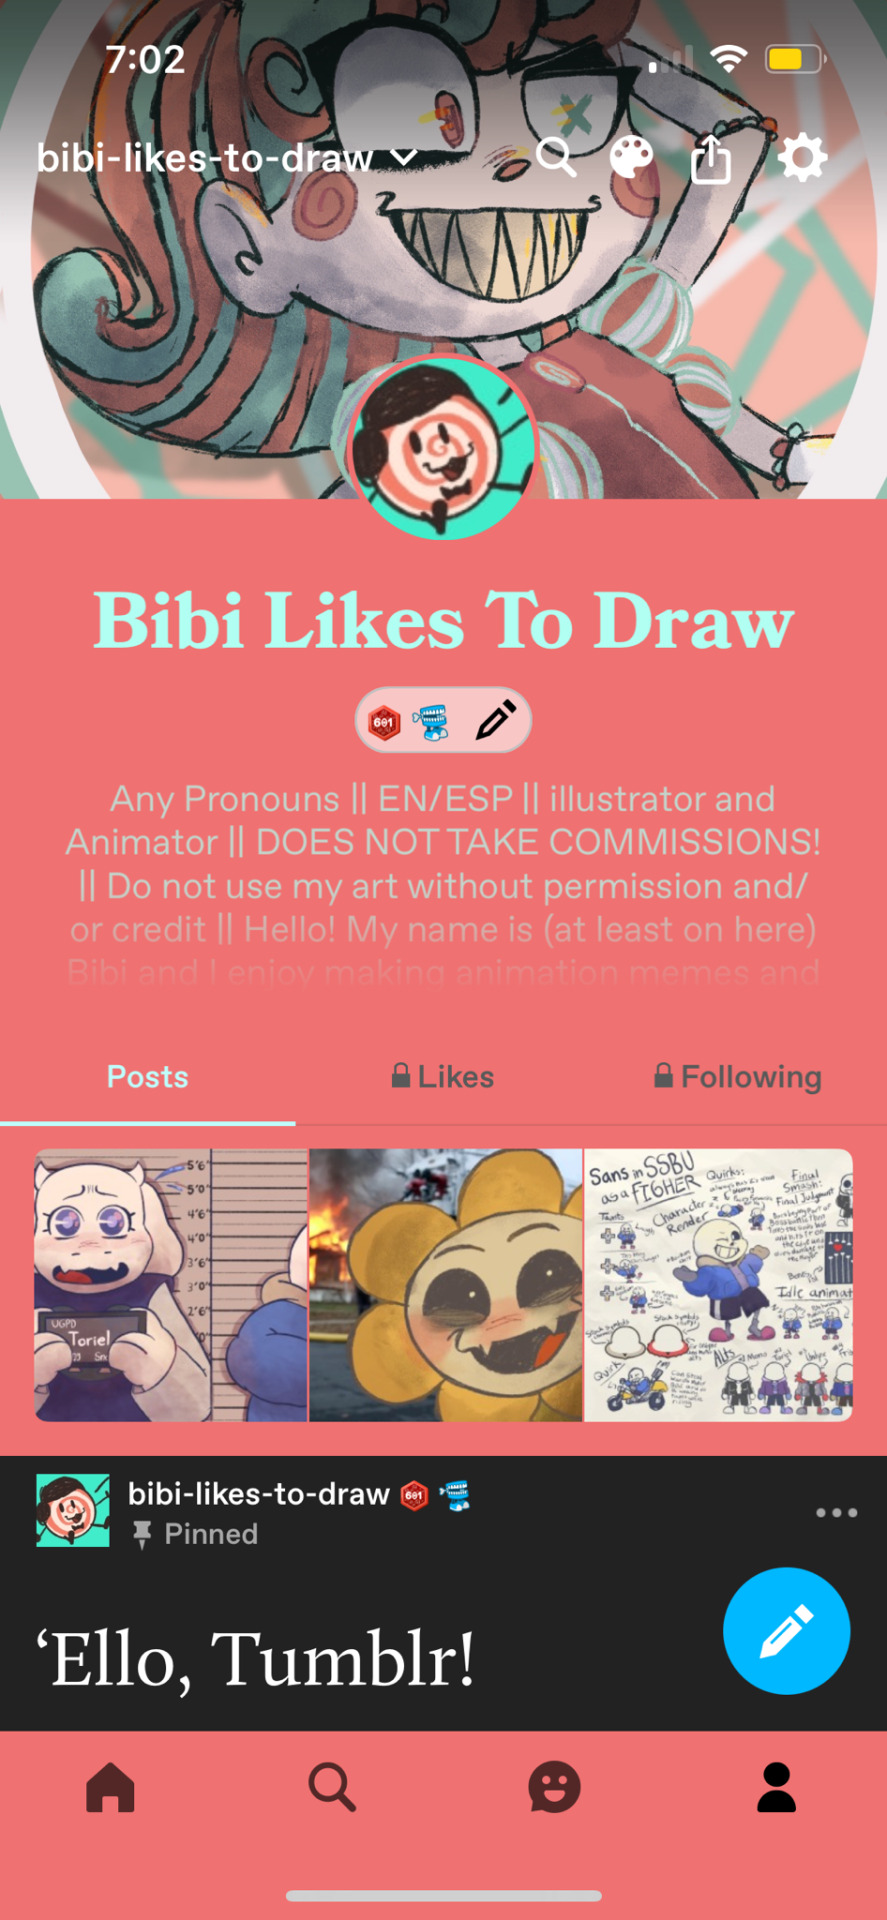
Then, go to blog settings. On mobile, you’ll see the gear icon on the top right corner of your screen. For desktop, click the blog settings text on the right side of the screen.

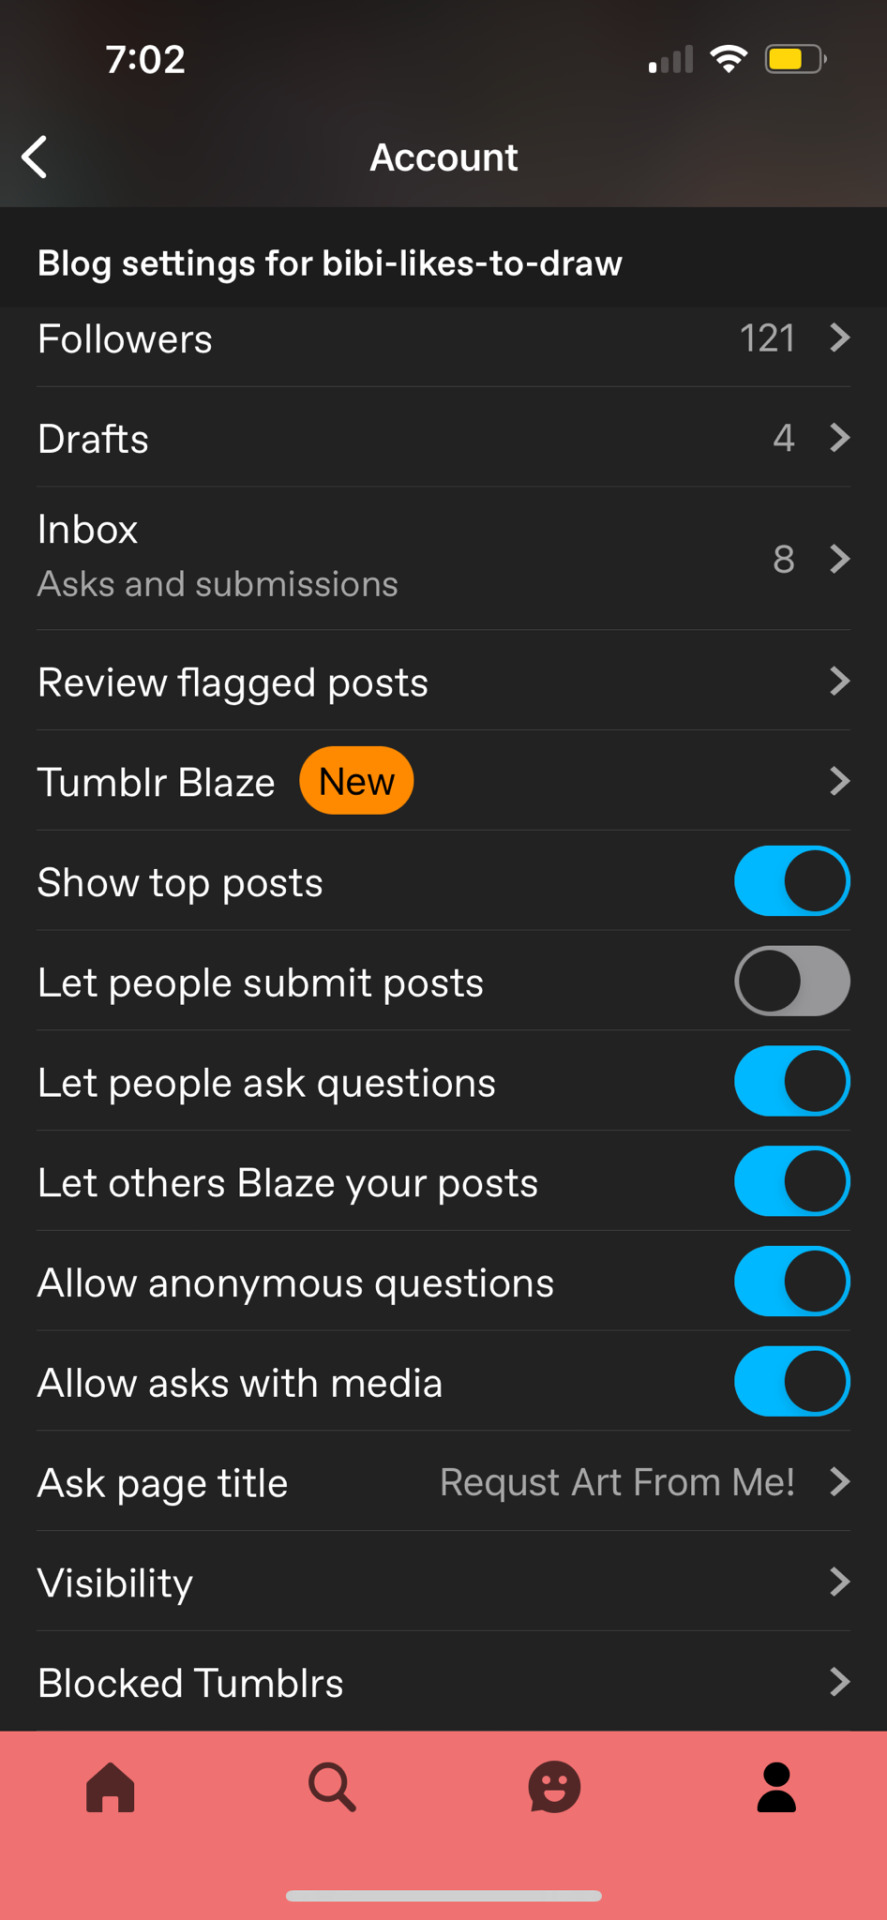
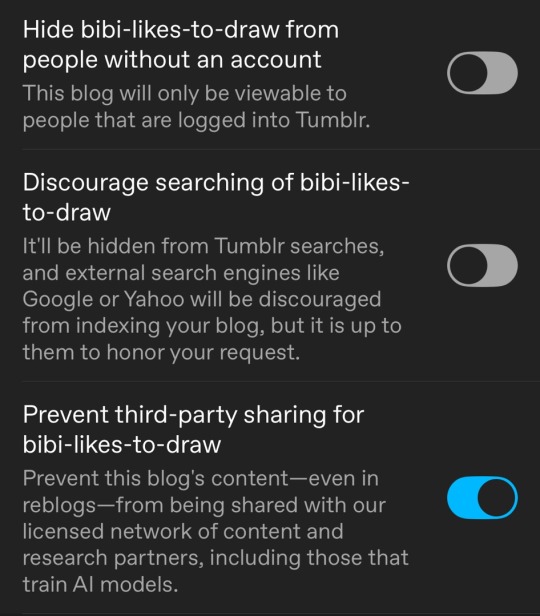
After this, you will go to the visibility section of your settings and turn on prevent third-party sharing for [your blog]. For desktop just scroll down and you’ll see it as the last setting you see under visibility. For mobile, just tap visibility and you will see it as the last setting.

That’s it! Go protect your art!
#art#ai#ai art#ai artwork#anti ai#blog stuff#how tos#anti ai art#suck we gotta do things like this#but the more you know#right?#instructions#idk what else to tag
13 notes
·
View notes
Note
just quick question...
WHERE THE FUCK DO YOU KEEP GETTING YOUR VA'S
I have not been able to find one tryout post on this page.
And I really (and I mean EXTREMELY wanna) try out for any future oc's you might make.
-confused anon
I use a couple of methods actually!
One- I go to yt and I look up voice reels/ voice actors/ ECT. And a lot of the time, some videos such as
youtube
Or
youtube
Videos like "the many voices of [VA NAME]" are super helpful. Videos (like the ones done by the Ytber RainyCat) are complications of characters voiced by one person, so I take those and go from there.
Another way is I take a character I really like, like Skipper from Barbie life in the Dream house and I find her VA, who is Kristin Day. I then take that and apply it to my characters, her voice being the one for Parker.
I hope this helped you confused anon!
9 notes
·
View notes
Text
hello! so another tutorial - this time on grid and auto resizing images inside it with an emphasis on responsiveness and making that easier on you. basically, this tutorial should be named team no math, but we're call this the grid images tutorial.
here is the codepen you can work off of for this one. here is a link to the generator i was playing with. here is credit for the images i grabbed to show this with.
i did have someone message that i don't speak very eloquently and i want to apologize. i try to explain in a way that anyone can understand and i also speak in a train of consciousness, unprepared way so please don't think i am uncaring in that, i'm just trying to show some small tips and tricks in a straightforward, won't take up much time way. i will try to speak with a little more thought and less filler words, but i can't promise to be perfect in that since this is over video versus text.
anyway, the template i'm using as an example is free to use as a base, without credit, same with all the others in my tutorials so far, so long as you are using it to actually make your own. i would like to say with this one please don't use it with no significant changes and try to claim it as your own. throw some credit in your guidebook or something, i don't mind, just throw a bone on that one because at that point it is solely my template. but even then, you're free to use it with credit.
anyway, go wild, i hope this helps you learn, adds a new trick to your repertoire, or just overall helps alleviate some of the pressures of coding off of someone. have a great day, rpc!
#coding#how to#how tos#guide#guides#tutorials#tutorial#jcink coding#jcink rp#grid#image resizing#mine
19 notes
·
View notes
Text
It seems people like the mini comic book of @ajtal 's comic "The Staircase" so here is the file for you guys!!! And how to make them!! I will make a video tutorial for it later!!

Supplies: A printer (you can use the local library's printer), a small glue stick, and scissors.
Step 1: Print out the full page. (Please don't crop the page to only show the book. It is supposed to be mini. But if you want it like a small handheld book go ahead. I can't stop you.)
Step 2: Cut the full length of the pages. Like this:
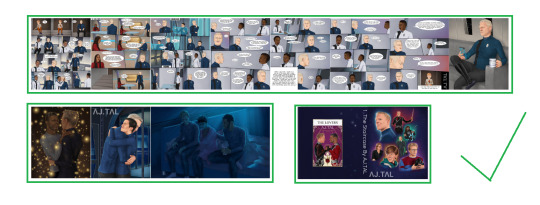
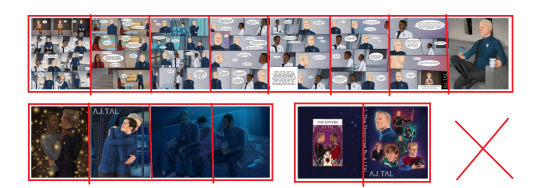
and NOT like this:
Step 3: After you cut them out, start folding the pages across the purple lines. Once all folded it should look like an accordion! Make sure that the edges of the book pages are on the inside! You don't want to glue it wrong!

Step 4: Its time to start gluing! Don't glue the edges of the pages yet! If the page has a red X on it DON'T glue it! If there is a blue line connecting two pages use you're glue stick to glue those to pages together! In this step do not glue anything to the cover.
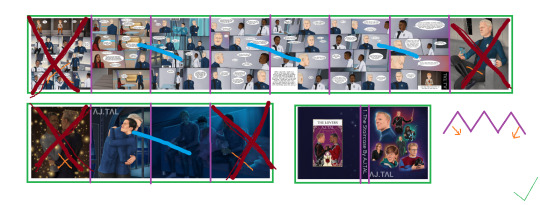
Step 5: After you glue all the middle pages together we will glue the edges! If the image is marked out in red it means you don't have to glue anything. The two pictures that have a blue X glue together WITH THE WHITE BACKS ARE TOGETHER NOT THE ART.

Step 6: You will now have one big paper accordion, so it's time to glue the pages to the cover! Please glue the BACK orange panel to the front of the book, which also has an orange X. Please glue the BACK blue panel to the back of the book, Which also has an blue X. The back of the panels is white please don't glue the the art by mistake.

Hopefully, this helps!!! If it did not I will make a video on how to do this later tonight!! That might help out more!!
#star trek#star trek discovery#adira tal#paul stamets#hugh culber#michael burnham#miniature#mini comic#miniature comic#miniature comic book#tutorial#how tos
2 notes
·
View notes
Text
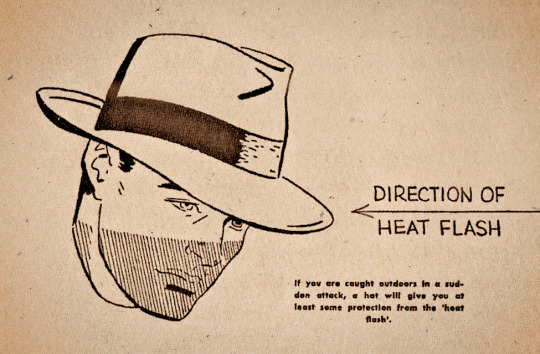
If you are caught outdoors in a sudden attack, a hat will give you at least some protection from the “heat flash.”
#vintage illustration#how tos#how-tos#nuclear war#survival techniques#atomic bomb#civil defense#the 50s#the 60s#the cold war#cold war america#cold war
16 notes
·
View notes
Text
For Stephen Northey, an environmental advocate in Melbourne, tree planting and urban revegetation has allowed him to help restore degraded local ecosystems and foster a much-needed connection with his local area.
The community leader spearheaded a campaign to save Edgars Creek, a tributary that runs through the basalt plains linking Epping, Thomastown and Reservoir to Merri Creek in Melbourne’s northern suburbs.
“Seventeen years ago, the Edgar’s Creek corridor was a wasteland of noxious weeds,” he says.
“Yet hiding there was a beautiful watercourse flowing along a natural rocky course with pockets of remnant vegetation still surviving. I thought the place deserved better so I organised a meeting in the neighbourhood house to garner interest and a community group was formed.”
From an initial meeting, locals undertook thousands of hours of volunteer work using only indigenous plants grown from seeds collected from the catchment. Indigenous bushland and a wetland habitat was successfully reintroduced over the industrial wasteland, preventing the area from being sold to developers after a concerted community campaign.
“Care, vision and inclusion were key success factors, as was access to knowledge about how healthy ecosystems function at a local scale,” he says. Aside from the deep satisfaction of restoring a natural environment, the project transformed the lives of those who participated, says Northey, especially during Covid lockdowns.
"People want to be custodians for their local environment. Friends groups can help facilitate and encourage that desire; that need. In fact, more than ever we need opportunities to connect with our planet and each other,” he says.
5 notes
·
View notes
Text
How to create a Live Tile on Windows 11 (Tutorials) (Codes)
Learn how to create custom live tiles for your blogs and websites for use on Windows 8, Windows 10 and Windows 11.
#warrenwoodhouse#bookmark#bookmarks#link#links#.lnk#.url#tutorials#tutorial#html tutorial#html tutorials#html#2024#codes#how tos#how to#howtos#howto
3 notes
·
View notes
Note
Thank you for the info on the bouncing animations, seeing my characters do a lil jump is so fun!
And I do mean the sounds themselves, I’ve figured out the coding bit. The sound design in MO is so good! I gotta know your secrets!
Haha I'm happy to have helped! For the sound design it's pretty straightforward, I just assembled the sounds in Premier Pro (it's not an audio software but it was conveniently on my desktop) and layered them out. So one audio file has multiple sounds in sequence.
For a longer explanation:
If you look at the audio files, some of them are baked in like "tail-whip.ogg" having the mug being pushed, falling off the edge, a whoosh of air and the tail catching it in one single audio file. Another example is "kitchen-cabinets.ogg" where you can hear Mychael's boots walk away first and then muffled cabinets opening and closing.
The sequence of different sound cues really make it unique to that scenario instead of just one noise indicating movement like a simple 'thwap' to show the mug being caught or just kitchen cabinets themselves. It's a little extra admittedly (I don't know if a lot of VNs even do this) but I really enjoy doing it especially hearing the final result!
As I implement them in, I always go back and forth looking at what I wrote and what I expect to hear, since I want it to feel natural regardless of reading speed if that makes sense. Timing them is the most important!
There is a 'queue audio' function in Ren'Py where one audio file plays after the first is finished, but I find it much more finicky than just editing the sounds myself where I can control the timing, volume and add in effects if I wanted in one single playback.
I hope that helps!
#cheea chatter#bts#answering this one publicly if thats okay!! since i wrote a lot#also pardon my sudden absence im rushing to finish the gamejam VN!!#expect it to be out sometime this weekend <3#idk if its gonna please the people but i really wanted to try something new#i dont expect people to enjoy the new LI as much as Mychael but i love the lil creacher sm and hope to present them well!!#how tos
161 notes
·
View notes
Text
As someone who writes fanfics for a wide variety of fandoms, I needed to find some sort of way to be able to help people with being able to simplify what fandom they are wanting to read fanfics for on my website. And with the help of W3schools and their beautiful tutorial on How To Filter Elements, I can now officially do so.
I uploaded the HTML (+ Script) Code and CSS Code onto Pastebin for anyone who wants to use it for one reason or another. Not credit or anything is required and you can edit/change it all to your heart's content. It's also mobile/tablet, so that is definitely a bonus!
#pvposeur's tutorials#pvposeur's tutorial#pvposeur's how to#pvposeur's how tos#pvposeur's tips#pvposeur's tip#tutorials#tutorial#how to#how tos#tips#tip#w3schools#how to filter elements#filter elements#coding tutorials#coding tutorial#fanfiction#fanfics#fanfic#neocities#free to reboig
2 notes
·
View notes
Text
Today, I’d really like to make a post about why best practice needle lace setup is recommended for modern lacemakers because I also want to make a series of videos experimenting with different setups (but it will take a long, long time to get all the materials). I always find instructions easier to understand and follow when people tell me *why* it’s important I follow them, so let me know if that’s interesting or helpful to anyone.
6 notes
·
View notes
Text
does anybody have any recommendations for videos on yt on how to draw more like alive hair ? or more like vibrant and interesting hair ? but not photo realistic
2 notes
·
View notes
Text
here's another for my little tutorial section, this time sans video. basically, there's some simple coding tips you can use to set a default photo. for the main uploaded avatar, use the default avatar macro for jcink, but anywhere else you can use one of these.
for background images, make a default by putting it literally right behind the one you want. you can see an example of this in the css section of the naked codepen i'm linking below. (btw this was kept naked so it would be easier to just get to coding, instead of sorting through me making it 'pretty' so to speak. i only put the length of this text there so there was something that populated.)
for img src, i use a pretty simple script. now, the caveat here is there are two versions, depending on if you're in an area where jcink auto puts "no information" or not. these are below. these scripts are in the js section of the codepen. there are two, so make sure you scroll down for the not no information version.
anyway! this is just a really easy way to do things. there are others, but it's a simple way to get your default image to show up where you want them replaced with a custom profile field.
as always, this is a tutorial, so be wild and free, do what you like with them. you don't have to credit me. i'm just trying to help us all learn a few neat tricks that make the editing and creation process of jcink skins a little easier, and replenish some of the resources we've lost lately.
i hope it helps! if you use it, i'd love a like just because i love seeing that people actually utilize these, but it's not a requirement by any means. have a great day, rpc!
codepen
12 notes
·
View notes
Text
#twitchstreamer #Y2KDisTek
twitch
2 notes
·
View notes