#How can use vector image
Explore tagged Tumblr posts
Visit Tumblr Blog
Explore Tumblr blogs with no restrictions, modern design and the best experience.
Last Seen Tumblr Blogs


Fun Fact
Tumblr.com rank in the US is 25.
Text
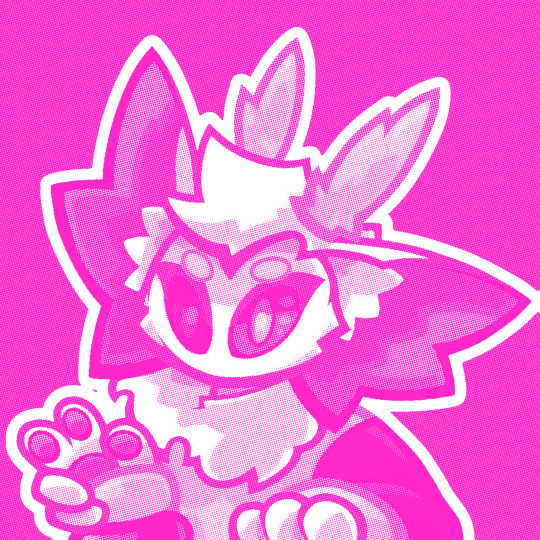
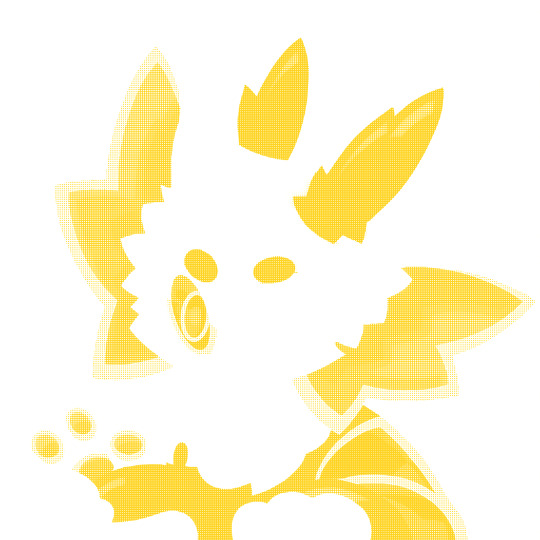
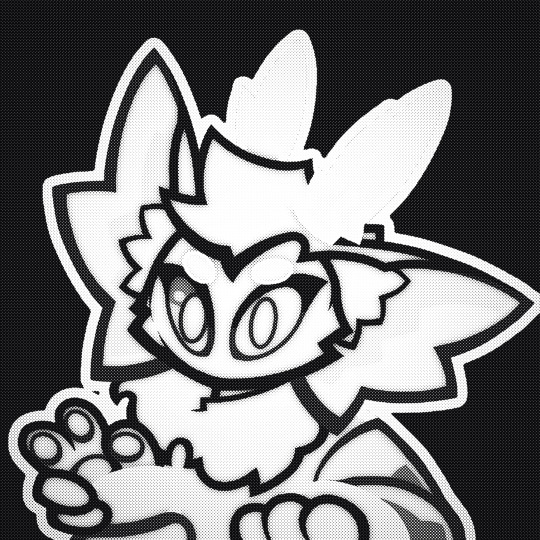
Fig Faeth Set

Jacket 1 Requires Discover University, All Other Items Base Game Compatible
T-shirt options are both useful for alternate outfits, or can be used with any accessory jacket so you can choose one you like!
Fishnet sock comes with all color options the base game fishnet tights have
Download Here (Patreon, Free) Download Here (SFS)
#sims 4 custom content#sims 4 cc#sims cc#fantasy high#fig faeth#recolor#shirt#fig fantasy high#fig fh#dimension 20#dimension 20: fantasy high#d20#figueroth faeth#d20 fh#had to figure out how to make vectors in inkscape for her shirt design and a jawbone cardigan shirt logo thing#if anyone wants those for some reason i can share them#theyre not great though#also sorry about the kinda ugly image#im lazy#horns used for my fig sim are by strangegrapefruit btw#they have multiple sets of tiefling horns#and tails and stuff too
25 notes
·
View notes
Photo
Can’t, too busy flirting ♥ (Patreon)
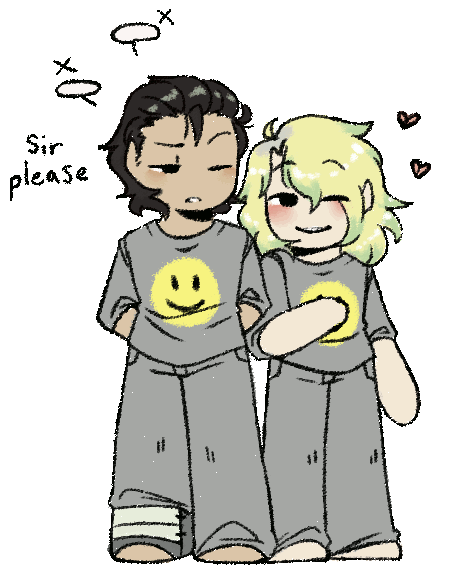
#My art#SCII#Damned#DAX#ZEX#FRICK I forgot ZEX's bruises lol#I drew them in the sketch even! It's why his left eye is closed rather than his right fjdsaklfdfds#Well DAX will probably have that ankle brace on him still by the time ZEX's face and neck are all healed up anyway *handwaves handwaves*#Anyway lol#I've been wanting to try my hand at the ''heartbeat'' style for a while now! Pretty sure this is my first ever attempt! :0#I guess that one blushy react I made a couple years ago for VLH could count? But that was with vectors so#Was mostly curious as to how long it would take and how tedious it would be with my tablet#Using my crayon brush for the lineart and colours made it more fun :) Very unconcerned with how ''clean'' it would look by the end#Which I think is how this style is meant to be approached - if it was too smooth or too aligned then it wouldn't move!#I think I like it well enough :)#I had another one I was thinking about doing first - even sketched up a while ago now - but this image hit me most recently#New shiny - you know how it is :P#And they're so cute how can I resist <3#Max being shorter than Dexter is So good and then ZEX nad DAX are in there and it's just jdkslafd#Extremely yes very much so agree#They're cute! I love them!#Someday I'll get really good at DAX's parade rest pose because I keep attempting to draw it correctly and haven't yet#But I haven't given up!! I'll get it someday!!!#ZEX is effortlessly adorable so that's easy lol#Even if I didn't get the bruises his blush was still real fun to texture :)
12 notes
·
View notes
Text
Compositor is a database of 18th century printing ornaments, which you can browse by keywords, book subject and language, publication year etc. It even has a visual search function which can find similar ornaments in other books/pages.

#image database#compositor#18th century art#18th century#printing ornaments#ive been in love with printing ornaments for years and had no actual source for them then i find this????#you can even vectorize them in inkscape and use them for digital art or text decorations#also go read their blog post on how they made the database it's pretty rad
0 notes
Text
I'm scouring compositing information there has to be a way to automatically add motion blur to stop motion by now
#some part of my brain wonders what the point of that would be#some other part of my brain is 100% certain i could pull off convincing stop motion before i could learn to use blender convincingly#they had to devise elaborate mechanics to make gomotion or whatever but we've got after effects now baybee#or however you'd do it#extracting the difference between frames and using that to blur the image seems simple enough I'm pretty sure someone's figured it out#I'm pretty sure i figured out how to do it at some point but I'm confident that i don't have access to whatever software it was now anyway#can you force blender to generate some kind of vector data based on the difference between frames#am i barking up the wrong tree here
0 notes
Text

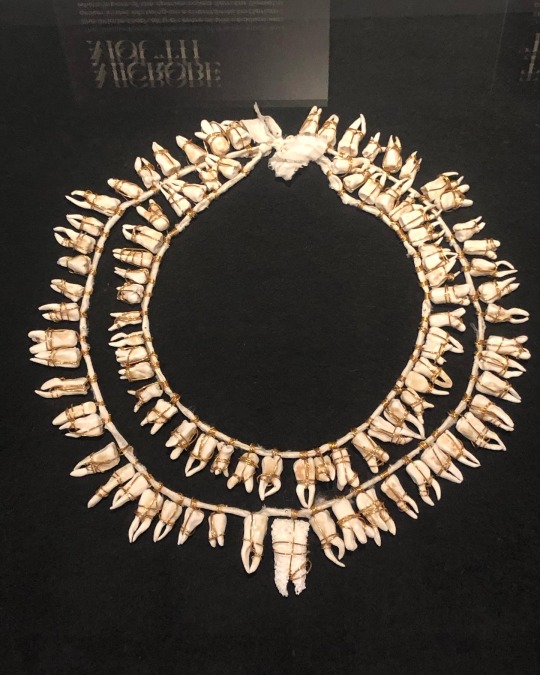
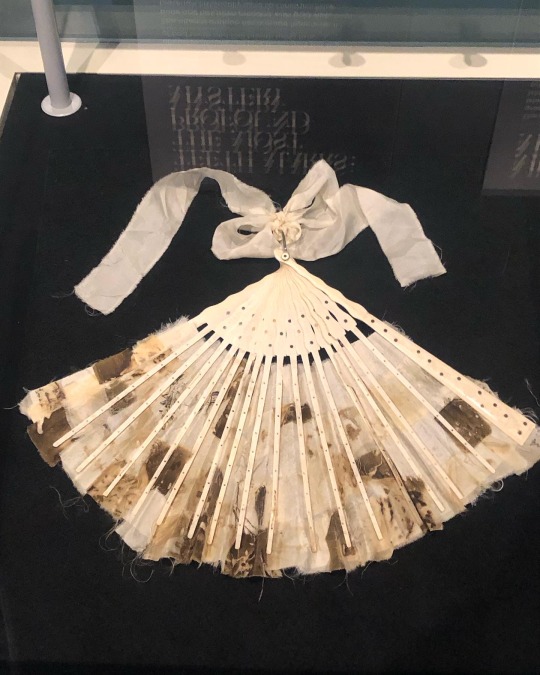

‘Fragile Microbiomes’ by bio-artist Anna Dumitriu
1. SYPHILIS DRESS- This dress is embroidered with images of the corkscrew-shaped bacterium which causes the sexually transmitted disease syphilis. These embroideries are impregnated with the sterilised DNA of the Nichols strain of the bacterium - Treponema pallidum subsp. pallidum - which Dumitriu extracted with her collaborators.
2. MICROBE MOUTH- The tooth at the centre of this necklace was grown in the lab using an extremophile bacterium which is part of the species called Serratia (Serratia N14) that can produce hydroxyapatite, the same substance that tooth enamel is made from.
The handmade porcelain teeth that make up this necklace have been coated with glazes derived from various bacterial species that live in our mouths and cause tooth decay and gum disease, including Porphyromonas gingivalis, which can introduce an iron-containing light brown stain to the glaze.
3. TEETH MARKS: THE MOST PROFOUND MYSTERY- In his 1845 essay “On Artificial Teeth”, W.H. Mortimer described false teeth as “the most profound mystery” because they were never discussed. Instead, people would hide the stigma of bad teeth and foul breath using fans.
This altered antique fan is made from animal bone and has been mended with gold wire, both materials historically used to construct false teeth (which would also sometimes incorporate human teeth). The silk of the fan and ribbon has been grown and patterned with two species of oral pathogens: Prevotella intermedia and Porphyromonas gingivalis. These bacteria cause gum disease and bad breath, and the latter has also recently been linked to Alzheimer’s disease.
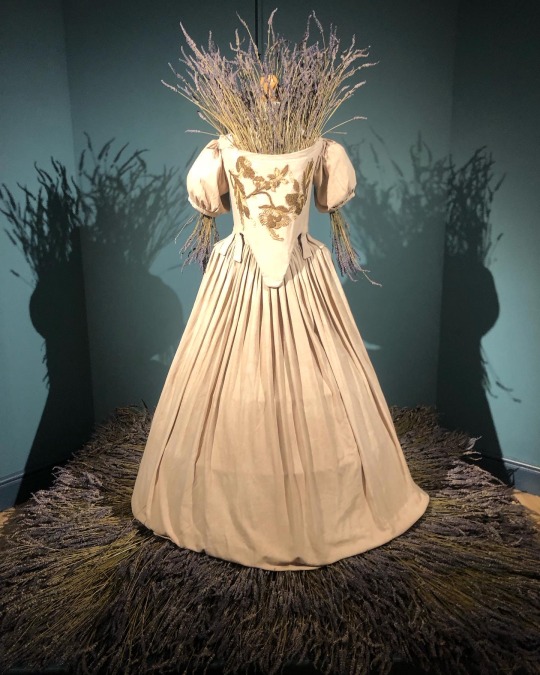
4. PLAGUE DRESS- This 1665-style 'Plague Dress' is made from raw silk, hand-dyed with walnut husks in reference to the famous herbalist of the era Nicholas Culpeper, who recommended walnuts as a treatment for plague. It has been appliquéd with original 17th-century embroideries, impregnated with the DNA of Yersinia pestis bacteria (plague). The artist extracted this from killed bacteria in the laboratory of the National Collection of Type Cultures at the UK Health Security Agency.
The dress is stuffed and surrounded by lavender, which people carried during the Great Plague of London to cover the stench of infection and to prevent the disease, which was believed to be caused by 'bad air' or 'miasmas'. The silk of the dress references the Silk Road, a key vector for the spread of plague.
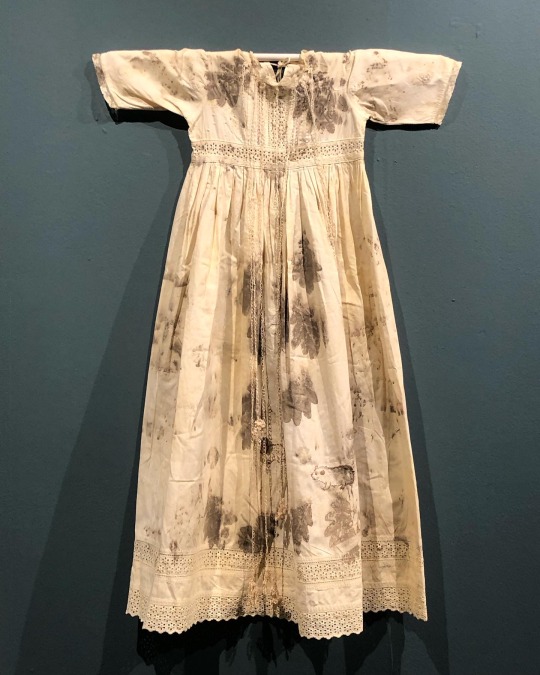
5. BACTERIAL BAPTISM- based on a vintage christening gown which has been altered by the artist to tell the story of research into how the microbiomes of babies develop, with a focus on the bacterium Clostridioides difficile, originally discovered by Hall and O’Toole in 1935 and presented in their paper “Intestinal flora in new-born infants”. It was named Bacillus difficilis because it was difficult to grow, and in the 1970s it was recognised as causing conditions from mild antibiotic-associated diarrhoea to life-threatening intestinal inflammation. The embroidery silk is dyed using stains used in the study of the gut microbiome and the gown is decorated with hand-crocheted linen lace grown in lab with (sterilised) C. difficile biofilms. The piece also considers how new-borns become colonised by bacteria during birth in what has been described as ‘bacterial baptism’.
6. ZENEXTON- Around 1570, Swiss physician and alchemist Theophrastus Paracelsus coined the term ‘Zenexton’, meaning an amulet worn around the neck to protect from the plague. Until then, amulets had a more general purpose of warding off (unspecified) disease, rather like the difference today between ‘broad spectrum’ antibiotics and antibiotics informed by genomics approaches which target a specific organism.
Over the next century, several ideas were put forward as to what this amulet might contain: a paste made of powdered toads, sapphires that would turn black when they leeched the pestilence from the body, or menstrual blood. Bizarre improvements were later made: “of course, the toad should be finely powdered”; “the menstrual blood from a virgin”; “collected on a full moon”.
This very modern Zenexton has been 3D printed and offers the wearer something that genuinely protects: the recently developed vaccine against Yersinia pestis, the bacterium that causes plague.
#my favourite pieces from this exhibition that I visited last month at the Thackray medical museum in Leeds#absolutely fascinating reading about the process and meanings behind these works#mine#anna dumitriu#works
2K notes
·
View notes
Text
PLEASE JUST LET ME EXPLAIN REDUX
AI {STILL} ISN'T AN AUTOMATIC COLLAGE MACHINE
I'm not judging anyone for thinking so. The reality is difficult to explain and requires a cursory understanding of complex mathematical concepts - but there's still no plagiarism involved. Find the original thread on twitter here; https://x.com/reachartwork/status/1809333885056217532
A longpost!

This is a reimagining of the legendary "Please Just Let Me Explain Pt 1" - much like Marvel, I can do nothing but regurgitate my own ideas.
You can read that thread, which covers slightly different ground and is much wordier, here; https://x.com/reachartwork/status/1564878372185989120
This longpost will; Give you an approximately ELI13 level understanding of how it works Provide mostly appropriate side reading for people who want to learn Look like a corporate presentation
This longpost won't; Debate the ethics of image scraping Valorize NFTs or Cryptocurrency, which are the devil Suck your dick
WHERE DID THIS ALL COME FROM?
The very short, very pithy version of *modern multimodal AI* (that means AI that can turn text into images - multimodal means basically "it can operate on more than one -type- of information") is that we ran an image captioner in reverse.


The process of creating a "model" (the term for the AI's ""brain"", the mathematical representation where the information lives, it's not sentient though!) is necessarily destructive - information about original pictures is not preserved through the training process.
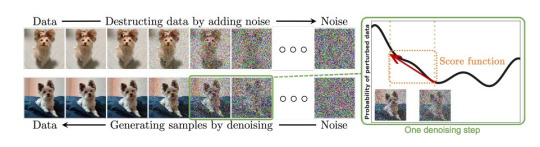

The following is a more in-depth explanation of how exactly the training process works. The entire thing operates off of turning all the images put in it into mush! There's nothing left for it to "memorize". Even if you started with the exact same noise pattern you'd get different results.

SO IF IT'S NOT MEMORIZING, WHAT IS IT DOING?
Great question! It's constructing something called "latent space", which is an internal representation of every concept you can think of and many you can't, and how they all connect to each other both conceptually and visually.

CAN'T IT ONLY MAKE THINGS IT'S SEEN?
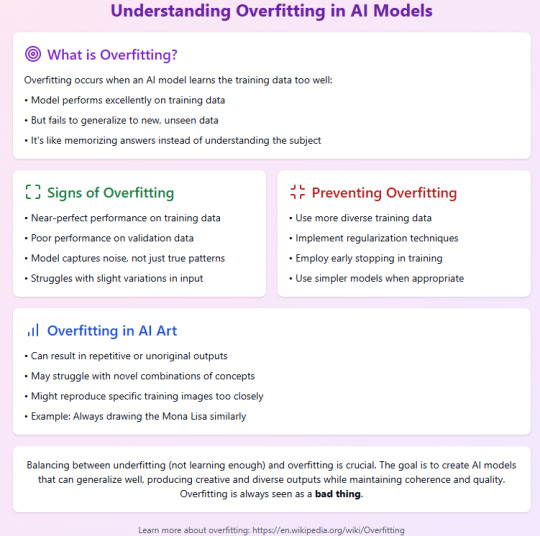
Actually, only being able to make things it's seen is sign of a really bad AI! The desired end-goal is a model capable of producing "novel information" (novel meaning "new").
Let's talk about monkey butts and cigarettes again.

BUT I SAW IT DUPLICATE THE MONA LISA!
This is called overfitting, and like I said in the last slide, this is a sign of a bad, poorly trained AI, or one with *too little* data. You especially don't want overfitting in a production model!
To quote myself - "basically there are so so so many versions of the mona lisa/starry night/girl with the pearl earring in the dataset that they didn't deduplicate (intentionally or not) that it goes "too far" in that direction when you try to "drive there" in the latent vector and gets stranded."
Anyway, like I said, this is not a technical overview but a primer for people who are concerned about the AI "cutting and pasting bits of other people's artworks". All the information about how it trains is public knowledge, and it definitely Doesn't Do That.
There are probably some minor inaccuracies and oversimplifications in this thread for the purpose of explaining to people with no background in math, coding, or machine learning. But, generally, I've tried to keep it digestible. I'm now going to eat lunch.
Post Script: This is not a discussion about capitalists using AI to steal your job. You won't find me disagreeing that doing so is evil and to be avoided. I think corporate HQs worldwide should spontaneously be filled with dangerous animals.
Cheers!
1K notes
·
View notes
Text
So, you want to make a TTRPG…

Image from Pexels.
I made a post a long while back about what advice you would give to new designers. My opinions have changed somewhat on what I think beginners should start with (I originally talked about probability) but I thought it might be useful to provide some resources for designers, new and established, that I've come across or been told about. Any additions to these in reblogs are much appreciated!
This is going to be a long post, so I'll continue beneath the cut.
SRDs
So, you have an idea for a type of game you want to play, and you've decided you want to make it yourself. Fantastic! The problem is, you're not sure where to start. That's where System Reference Documents (SRDs) can come in handy. There are a lot of games out there, and a lot of mechanical systems designed for those games. Using one of these as a basis can massively accelerate and smooth the process of designing your game. I came across a database of a bunch of SRDs (including the licenses you should adhere to when using them) a while back, I think from someone mentioning it on Tumblr or Discord.
SRDs Database
Probability
So, you have a basic system but want to tweak it to work better with the vision you have for the game. If you're using dice, this is where you might want to consider probability. Not every game needs this step, but it's worth checking that the numbers tell the story you're trying to tell with your game. For this, I'll link the site I did in that first post, AnyDice. It allows you to do a lot of mathematical calculations using dice, and see the probability distribution that results for each. There's documentation that explains how to use it, though it does take practice.
AnyDice
Playtesting
So you've written the rules of your game and want to playtest it but can't convince any of your friends to give it a try. Enter Quest Check. Quest Check is a website created by Trekiros for connecting potential playtesters to designers. I can't speak to how effective it is (I've yet to use it myself) but it's great that a resource like it exists. There's a video he made about the site, and the site can be found here:
Quest Check
Graphic Design and Art
Game is written and tested? You can publish it as-is, or you can make it look cool with graphics and design. This is by no means an essential step, but is useful if you want to get eyes on it. I've got a few links for this. First off, design principles:
Design Cheatsheet
Secondly, art. I would encourage budding designers to avoid AI imagery. You'll be surprised how good you can make your game look with only shapes and lines, even if you aren't confident in your own artistic ability. As another option, public domain art is plentiful, and is fairly easy to find! I've compiled a few links to compilations of public domain art sources here (be sure to check the filters to ensure it's public domain):
Public Domain Sources 1
Public Domain Sources 2
You can also make use of free stock image sites like Pexels or Pixabay (Pixabay can filter by vector graphics, but has recently become much more clogged with AI imagery, though you can filter out most of it, providing it's tagged correctly).
Pexels
Pixabay
Fonts
Turns out I've collected a lot of resources. When publishing, it's important to bear in mind what you use has to be licensed for commercial use if you plan to sell your game. One place this can slip through is fonts. Enter, my saviour (and eternal time sink), Google Fonts. The Open Font License (OFL) has minimal restrictions for what you can do with it, and most fonts here are available under it:
Google Fonts
Publishing
So, game is designed, written, and formatted. Publishing time! There are two places that I go to to publish my work: itch.io and DriveThruRPG. For beginners I would recommend itch - there's less hoops to jump through and you take a much better cut of what you sell your games for, but DriveThruRPG has its own merits (@theresattrpgforthat made great posts here and here for discovering games on each). Itch in particular has regular game jams to take part in to inspire new games. I'll link both sites:
itch.io
DriveThruRPG
Finally, a bunch of other links I wasn't sure where to put, along with a very brief summary of what they are.
Affinity Suite, the programs I use for all my layout and designing. Has an up-front cost to buy but no subscriptions, and has a month-long free trial for each.
Affinity Suite
A database of designers to be inspired by or work with. Bear in mind that people should be paid for their work and their time should be respected.
Designer Directory
An absolute behemoth list of resources for TTRPG creators:
Massive Resources List
A site to make mockups of products, should you decide to go that route:
Mockup Selection
A guide to making published documents accessible to those with visual impairments:
Visual Impairment Guidelines
A post from @theresattrpgforthat about newsletters:
Newsletter Post
Rascal News, a great place to hear about what's going on in the wider TTRPG world:
Rascal News
Lastly, two UK-specific links for those based here, like me:
A list of conventions in the UK & Ireland:
Convention List
A link to the UK Tabletop Industry Network (@uktabletopindustrynetwork) Discord where you can chat with fellow UK-based designers:
TIN Discord
That's all I've got! Feel free to reblog if you have more stuff people might find useful (I almost certainly will be)!
459 notes
·
View notes
Text
Inspired by this post by @thanergetic-hyperlinks, I present to you
Tessellations of the Nine Houses
(Or "I can't really draw figurative art so my Locked Tomb fanarts are geometrical vector drawings")
"A tessellation or tiling is the covering of a surface, often a plane, using one or more geometric shapes, called tiles, with no overlaps and no gaps." — Wikipedia.
Making tilings themed after each necromantic House seems obvious: for each House you pick a tile with the same number of sides as the number of the House; but this does present some challenges for some of the Houses.
note 1: this might give the impression that I first decided on the symbols and then found patterns to match them in a very organized and motivated manner; in practice it was much more chaotic and multidirectional, the patterns informing the symbols as much as the symbols informed the patterns; this is fine since symbolism is entirely associative and arbitrary anyway
note 2: I added alt-texts for all the images, but I have no idea of how to properly describe abstract geometric art; if you feel you can do a better job than I did, feel free to put your fingers where your mouth is--wait, hang on-- I mean feel free to provide better descriptions if you can
note 3: looking forward to the geometry nerds explaining to me how I got basic geometric details wrong, friggin nerds
The First House
The First House seems obvious, as a shape with one side is an ellipse (of which the circle is a special case). There's just one problem: ellipses do not tile the plane. No matter how much you stretch them and deform them, the very nature of ellipses means you'll always have gaps or overlaps.
So we cheat and we work with overlaps: turns out there is a history of tilings that use circles as a construction pattern, then turn the overlapping sections into the actual tiles. Such patterns have been used extensively in European and Middle Eastern art, and have also been associated with the New Age movement, so it fits Jod's style perfectly. And so we get this:

The different cells correspond to different House colors, with the resulting gothic stained-glass appearance quite in line with the Roman Catholic Empire vibe Jod is going for. The overlapping circles convey the intricacy of the relation between the First House and the eight other, both autonomous from it yet intrinsically part of it.
The Second House
There's a variety of geometrical shapes that have two sides, but most of them don't tile the plane, altho there is one that does — if we take a crescent shape and slightly thicken it so that the inner and outer curves are identical, we can do this:

The waving pattern is of course evocative of the flag of conquest which the Cohorts of the Second House have planted on many worlds.
The Third House
With the Third House things get a lot easier, because equilateral triangles are one of the three regular polygons (where all sides are the same length and all angles are identical) that tile the plane all by themselves without needing any other shape! Which however doesn't mean we have to be boring; we can have a little bit of fun:

Flowers for the beauty and ionizing radiation warning signs for the rancid vibes.
The Fourth House
Squares are the second regular polygons that tile the plane by themselves, so again our job is easy here, altho we still want to not go for the easiest option in order to be able to work in some symbolism:

The four big navy squares with a small white square at the center of course evoke the number five and the shadow of the Fifth House's regency over the Fourth.
The Fifth House
Regular pentagons do not tile the plane, so we have to use a more unusual shape — there are many options, but obviously we want to again pick one that offers some interesting numerical symbolism:

The cross-like patterns of course bring up the number four and the hold of the Fifth House over the Fourth. As for the crosses themselves and the fact that they appear to be made of wooden stakes, well uh… Abigail Pent, Vampire Hunter??? She does have Van Helsing vibes.
The Sixth House
Hexagons are the third and last regular polygons that tile the plane on their own. But this is the Sixth House we're talking about, things need to look orderly but in a convoluted way. So how about multiple levels of recursion:

The apparent complexity of the pattern is created by different orientations of a small number of elements, either 3 irregular hexagons, or 1 patterned regular hexagonal tile, depending on how you look at it, in line with the kind of hermetic scientism one imagines the Sixth House indulges in. The result is those apparent three-dimensional elements and emerging higher-order patterns, including that of ꙮ, the Multiocular O found in exactly one word of one 15th century Old Church Slavonic translation of the Book of Psalms ("серафими многоꙮчитїй" many-eyed seraphim).
The Seventh House
Regular heptagons do not tile the plane, but they don't need much tweaking to work, which is fine since for the Seventh House we want something deceptive yet simple (deceptively simple? deceptive in its simplicity?):

Hearts for the beauty, snake scales for the poison [the Seventh House is on Venus, the planet named after the Roman Goddess of love, but etymologically "Venus" is actually the same root as "venom", and of course "Septimus" resembles "septic" — tho in that case there's no etymological connection, it's just a happy coincidence].
The Eighth House
Octagons do not tile the plane, but they come pretty close, so we can give the Eighth House a simple, stern, but slightly threatening pattern:

Boring sterile bleached temple mosaic, with just a little bit of passive-agression, a perfect fit for Evangelical Christians Tumblr puritans the Eighth House.
The Ninth House
And so we reach the Ninth House. Now the thing about the Ninth House is that, even by imperial standards, they're huge freaks, like they're completely unhinged heretical weirdoes. So, when it comes to their tiling, we need to get weird, like, a lot weirder than we've been so far, and this will require some context, so get ready because now we're officially going on a wild tangent.
So far all the tilings we've seen were periodic. That is, they were drawing a pattern that repeats itself indefinitely in all directions.
But starting in the 1960s, mathematicians began to study aperiodic tilings, tilings that don't repeat; you can keep expanding them forever and never exactly find back the original pattern you started with. The first mathematical proof of such a pattern was made in 1964 and theoretically required 20,426 distinct tile prototypes… This was soon refined to just 104 tile prototypes, then a mere 40. By 1971, it was mathematically demonstrated that you could make such a pattern with just 6 tile prototypes.
Except that was a lie.
Note that I said mathematically demonstrated. As it turns out there was an aperiodic pattern with just 5 tile prototypes, known as Girih, that had been used in Islamic art… since at least the 13th century — but it had historically been treated merely as an element of architectural design, and its mathematical properties weren't studied until 2007.
Then in 1973 this guy Penrose came along and demonstrated you could make an aperiodic tiling with just 2 tile prototypes. So now the goal was to find the ultimate aperiodic tiling, the one that would use only one tile prototype. Given how fast the field had progressed so far, it seemed that this discovery was imminent.
It took 50 years.
Not only that, but it was the work of amateur mathematician David Smith who accidentally discovered a 13-sided polygon that could make an aperiodic tiling all by itself (he then had his discovery checked by and co-authored a paper with a number of professional mathematicians).
EXCEPT THAT WAS A LIE AGAIN.
In turns out an aperiodic tiling using only one tile prototype had already been found… in 1936. But since the study of aperiodic tilings only started in the 60s, its significance in that domain wasn't understood at the time. It was seen as significant, but for an entirely unrelated reason: it was the first demonstration of a polygonal shape that needed only two copies of itself to completely enclose the original one — many mathematicians before that point thought the minimum possible was 3 (think of the Triforce from Zelda, with one equilateral triangle completely enclosed between three other identical triangles).
And coincidently, that shape happens to be a highly-irregular nonagon [yes "enneagon" is """technically""" more correct but "nonagon" has been used since the 17th century and is more common and it has Nona in it and Nona loves you]. So here it is, the Voderberg tiling, the freakish freakish tessellation of the Ninth House:

Like you see this and you're like "what is this, what is that thing, that's not a tiling, what the fuck is that" — but it is, it is a tiling, you can keep adding the freaky polygon and it keeps expanding outward forever, with no gap, no overlap, and with an ever-changing pattern. A double-spiral radiating outward, for Anastasia and Samael, Anastasia and Alecto, Alecto and Harrowhark, Harrowhark and Gideon.
And if you were thinking that this last one must have been significantly harder to draw than the other ones, you would be correct.
222 notes
·
View notes
Text
Kinktober 31/10/2024 The Grid - Halloween Party
Plot: Halloween Party Couple Costumes
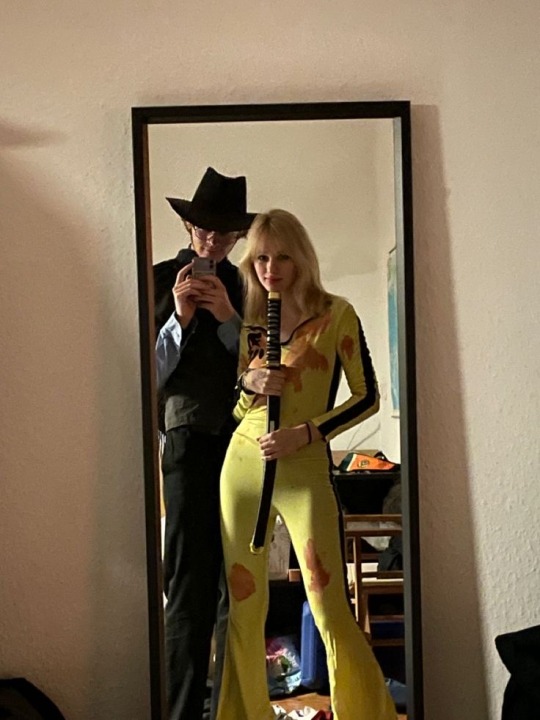
MAX VERSTAPPEN:
You both went to the party as the characters from Kill Bill, it was one of Max's favorite films and you were excited to dress up as the Bride. Originally you were going to go for the full latex outfit but because Max had a few parties in the same night you'd both be travelling between you had to do a bit of makeshift work.
"You look hot" he says looking over you as you unzip the bright yellow top you had on, just to show off a little more cleavage for him.
"Yeah?" you ask pulling the katana up and holding it in positions being goofy as he took some pictures of you.
"And i think dying your hair blonde ... good shout" he grins running his hands through your freshly dyed blonde locks just so you could pull of this Halloween costume without a wig.
LANDO NORRIS:
You wanted to be funny and go as Gru and Vector ... but no McLaren thought it was too 'silly' and wasn't a 'good image' for Lando as a now championship contender.
So you guys decided as you were only going to a small Quadrant Haloween party that you guys would go lowkey and just try and use as much stuff as you could from home.
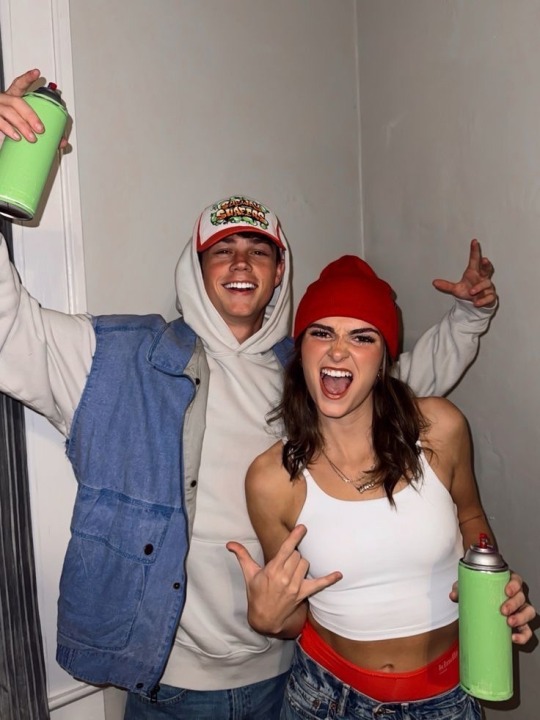
Naturally you were both at home when he had the idea of both going as the game characters from Subway Surfers, out of all the games both you and Lando played you didn't expect to go as mobile game characters, something from Valorant or even Tarkov but no here you were with a red beanie, hitched up red underwear under low rise jeans and an empty aerosol can.
"Cant believe you convinced me into this" you shake your head, knowing all the girls there would be going as either really hot people or would be very funny like you'd intended ... but at least you were with Lando and you guys both couldn't escape the costume police you knew would be at the party.
"You love me babe now come on lets go jump some trains"
OSCAR PIASTRI:
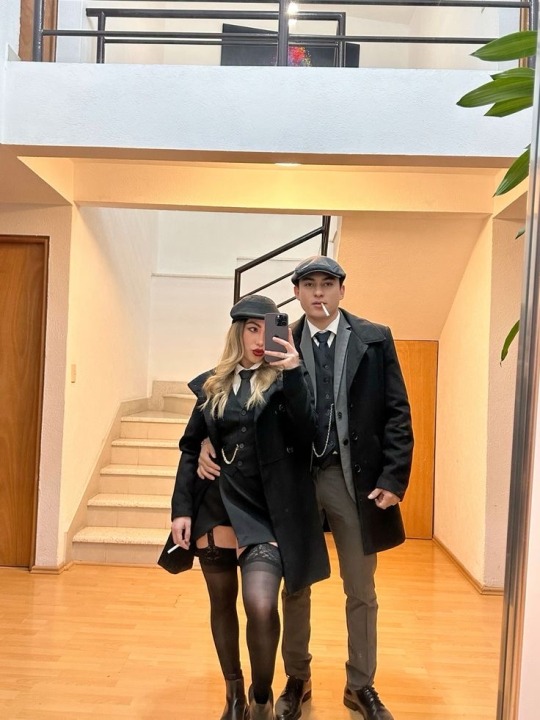
When Oscar had met you when he first came to England you made of point of forcing him to binge your comfort show, Peaky Blinders with you which led to this years Halloween costume for the both of you.
While Oscar was the gentleman and got his outfit as show accurate as possible you took the hot slant on it despite having a shirt, waistcoat and jacket covering up the majority of your upper body leaving your legs to do all the hot girl work.
"We look good" Oscar smiled looking at you guys in the long full length mirror in your apartment as you guys were about to leave.
"You're right we do" you smile reaching up to kiss his cheek forgetting the bright red lipstick that was covering your lips.
"AH AH. Let them dry first" he says putting his finger on one showing the stain.
When you got to Logan's party you were met with such a different vibe. You and Oscar had decided to stay in America for Halloween which was a good choice as they were crazy for any kind of holiday celebration.
"Will anyone here know who we are?" you ask wondering if you're costume was too niche.
"Lets hope they don't, quick and easy conversations so we don't look rude and unimpressed" he kisses the side of you head, knowing how introverted you both are/
CARLOS SAINZ:
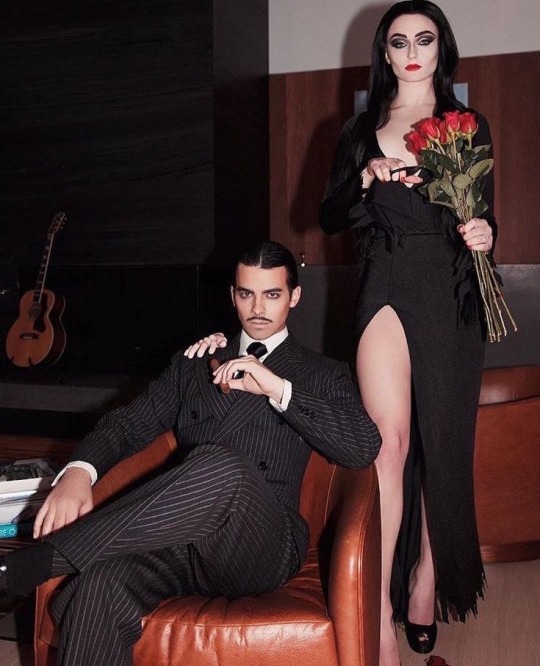
Of course you had to go as young Morticia and Gomez Addams. It was something you knew for a fact Carlos would look incredible in and you had the perfect features to pull of Morticia.
You guys were attending a Halloween Party that actually had a lot of the drivers at, it was in a club that had invited you all as a brand deal with F1 and you guys all didn't really have an excuse not to go.
You guys got an uber, which is a strange experience when you have a boyfriend who drives for a living.
So many of the other wags were there and a costume competition had been held which you and Carlos had ended up winning, you think Lando most defiantly forged the votes but you couldn't deny that you and Carlos looked like you both put the most amount off effort in.
CHARLES LECLERC:
Charles didn't ever really understand the hype for spooky season, enjoying other more family oriented holidays more such as Christmas or even birthdays.
But when you said that your sister was hosting a small party (that of course ended up being not so small at all) that she was dying for you to make an appearance at you had to go despite the late notice.
So there you guys were two days before ironing patches to blue and red tops you'd brought from the most accessible shops in Monaco and because you were bringing Charles and you wanted to match but with the lack of time options were thin.
So of course doing a really bad attempt at Sally and Lightening McQueen was the option Charles decided on and everyone at the party found you guys so funny especially once they realised who Charles was as a famous racing driver.
To say despite the 5 minute crafts outfit you guys put together you were everyone's choice of conversation both at the party and after.

YUKI TSUNODA:
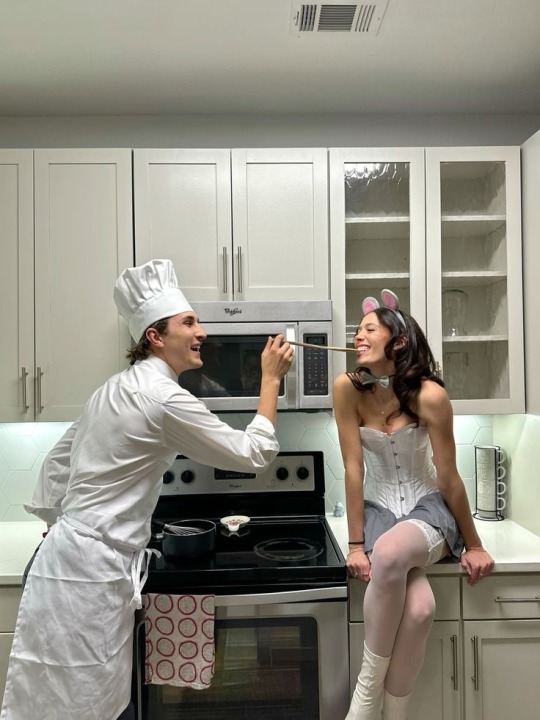
Chef Linguine, absolutely not Chef Tsunoda and you as his Remi. It meant you got to dress up as a sexy mouse while Yuki could live his dreams of being a chef, dressing up in the whole outfit that you were surprised to see he just had in his closest already.
"You look like a cute mouse" he smiles looking over the white corset and sort grey skirt you'd opted for.
"Do i make a good Remi?" you ask sweetly and he nods.
"I still don't get why you didn't go as Collette" he sighs, thinking it would be odd for him to kiss you tonight when this was your outfit.
"Because canonically Collette is a better chef than Linguine because actually Linguine cannot cook without the rats help ... so I'm still not sure why i went as the rat. Maybe i should have gone as Chef Skinner" you groan now overthinking the whole costume.
FRANCO COLAPINTO:
Franco's nickname for you was 'princesa' so of course you going as one of the Disney Princesses made sense however when he said you guys should do Flynn Ryder and Rapunzel you almost lost your shit.
You were going to suggest the little mermaid as you'd love to see him in Prince Eric's soft pirate outfit but the Flynn outfit was just as exciting and you of course looked great in purple and could use your naturally blonde hair.
"Are you ready my Princesa?" he asks from the bottom of the stairs. You were expecting to turn round the corner with a soft graceful smile to see HIM awestruck at your costume.
Unfortunately god had other plans and it was you who was gobsmacked at your incredibly sexy boyfriend.
"Fuckkkkk Francoooo. Lets skip the party" you say running down the stairs to grip onto his arm.
FERNANDO ALONSO:
As an older couple on the grid who still loved a party and having fun you and Fernando decided old school was the best way forward. And for Fernando seeing you in sexy leather pants and a tight black top he was all but happy to keep pulling you away for sneaky kisses once you'd got to the club.
Nando was normally very ... sexually driven but this outfit of yours had turned him into some kind of beast and you were not complaining.
Especially when you guys got home that night.

ESTEBAN OCON:
Being the Marvel nerd that he was he'd asked if he could do Deadpool and you do Wolverine, which you did want to at first but when you couldn't find the right hairstyle and decided the outfit just didn't look good this year it fell through to be picked up another year.
Which is where his next idea came in, you'd both decided to go as Spiderman's he'd worn some grey joggers with him as the suit was pretty tight on him and he didn't want anything to come out in the media however you took the Spiderman look the whole way and for the whole night Estaban had to stay close to you warding off all the other guys who were watching you with what he explained to you as 'fuck me' eyes.
Taglist:
@littlebitchsposts @hockey-racing-fubol @laura-naruto-fan1998 @22yuki @simxican @sinofwriting @lewisroscoelove @cmleitora @daemyratwst @lauralarsen @the-untamed-soul @thewulf @itsjustkhaos @purplephantomwolf @chasing-liberosis @summissss @gulphulp @starfusionsworld @jspitwall @sierruhhhh @georgeparisole @youcannotcancelquidditch @tallbrownhairsarcastic @ourteenagetragedy @peachiicherries @formulas-bitch @cherry-piee @spilled-coffee-cup @mehrmonga @eiraethh @curseofhecate @alliwantisadonut @dark-night-sky-99 @i-wish-this-was-me @tallrock35 @butterfly-lover @barnestatic @landossainz @darleneslane @barcelonaloverf1life @r0nnsblog @ilove-tswizzle @laneyspaulding19 @malynn @landosgirlxoxo @marie0v @yourbane @teamnovalak @nikfigueiredo @fionaschicken @0picels0 @tinydeskwriter @ironmaiden1313 @splaterparty0-0 @formula1mount
#f1 imagine#f1 x reader#formula 1 x you#formula 1#formula one#formula one fanfiction#lando norris#formula 1 fanfic#formula 1 fic#formula 1 imagine#formula one x y/n#formula one x you#kinktober f1#kinktober 2024#halloween f1#happy halloween#oscar piastri x you#lando norris imagine#carlos sainz fluff#carlos sainz 55#max verstappen x reader#max verstappen f1#max verstappen imagine#lando imagine
253 notes
·
View notes
Text
Sims 4 Render Lighting Tutorial

"Environmental Lighting" won my most recent poll, so let's get right into it!
A few notes before we begin:
I render exclusively in cycles!
This tutorial assumes some basic knowledge of blender
Though this tutorial covers the basics, HDRIs can be used in conjunction with any scene/your built scenes
I decided to focus on environmental and other lighting in this tutorial, since they all kind of go hand in hand.
For this tutorial, I'll be using my recent Cupid Sim. Here's a render of her with no additional lighting:

1. Base lighting
In any full body, single sim render (like lookbooks, for example), I really like to use a glowing base. It grounds the sim a bit and casts some interesting lighting on them.
To do this, I add a circle under their feet by pressing shift+A and selecting circle.

An empty circle will appear, but we need it to be a solid disk, so go into Edit mode (by pressing tab while the circle is selected) then hitting F on the keyboard to fill it.


After that, you can go into the Materials tab and add in color and glow.
Mine is adjusted like this:

And gives this rendered result:

2. HDRIs
HDRIs (High Dynamic Range images) are extremely useful when it comes to environmental lighting, I always use them now to add better/more dynamic lighting to my renders.
HDRIs are 3D/panoramic, which makes them extremely useful.
You can find/download HDRIs online in a few diff places: PolyHaven, AmbientCO, and Blender Market.
There are also several available for FREE using BlenderKit (my preferred method).
So how do you use an HDRI?
We can add HDRIs to our render by navigating to the world tab and changing the color to "environment texture".


I chose this vaporware HDRI from BlenderKit, & here it is with no adjustments, but it's looking a little rough so let's adjust it.

By adding vector nodes, we can adjust how the HDRI behaves. Here I mostly use the Z rotation and the background strength:


Here's the same render with the Z-rotation set to 50, 150, 200, & 250.


You can put in any value for the Z-rotation, this is just an example of how the HDRI turns. This is maybe not the best example of the rotation, but putting her in a forest just didn't feel right lmfaooo, hopefully you can see how the light changes on her depending on the rotation.
You can also adjust the strength of the HDRI. Here's the HDRI (rotated to 150) set at .5 and 1.5 strength:


For this tutorial, my favorite lighting is the HDRI set to 150, and the strength set to .5, like this (this is a rendered image):

3. Transparent HDRIs + Point Lights
But I'm not fully happy with the lighting. I don't love how the HDRI is a bit blurry, so I'm going to set it to be transparent.
To do this, go to the Render Tab, scroll down to the Film option, and check Transparent:


The lighting effect from the HDRI will stay the same, but the background will be transparent.
From here, you can add a background (when I do this, I like adding a plane, & moving/shading it until I'm happy (kinda like this):


NOTE that you have to put the plane far enough behind your sim so it doesn't affect the HDRI lighting too much.
SECOND NOTE You can use this same method to use HDRIs in conjunction with scenes. They can provide the perfect backdrop!
This is still really dark, so I'm going to add three point lights: -Two on either side of her head/shoulders that will be smaller (in radius) and brighter -One in front of her to add actual light (so details aren't lost)

Here's how I set up my lights.


The pink light settings are for the two point lights on the sides The white light setting is for the light in front of her
For a basic render, this is almost good enough for me, but I really like the glowing effect I get in my renders.
To achieve this, we have to go to the compositing tab:
4. Compositing
Full disclosure, my compositing tab is set to glow by default (that's how much I love it), so all of the renders in this tutorial have it turned on.
I use the glare node and set it to fog glow.
Here's my preferred setting:

I prefer the fog glow effect, but bloom, ghost, streaks and star are also options.
Here's a guide to the glare node!
Tbh, I never use any of the other settings, so I'll leave this tutorial here for today.
Here's the final result (with no additional editing):

If you have any questions, please don't hesitate to send an ask, message or join my discord (no minors pls) for help! <3
#ts4 render tutorial#ts4 blender tutorial#sims 4 render tutorial#sims 4 blender tutorial#sims render tutorial#sims blender tutorial#salemsims tutorial#render school tutorial#blender
193 notes
·
View notes
Text

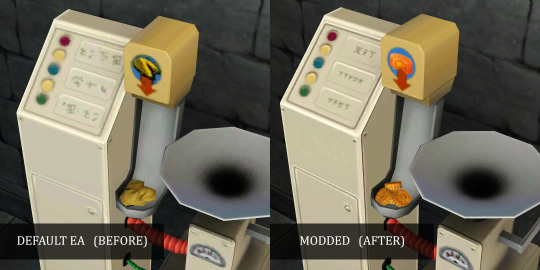
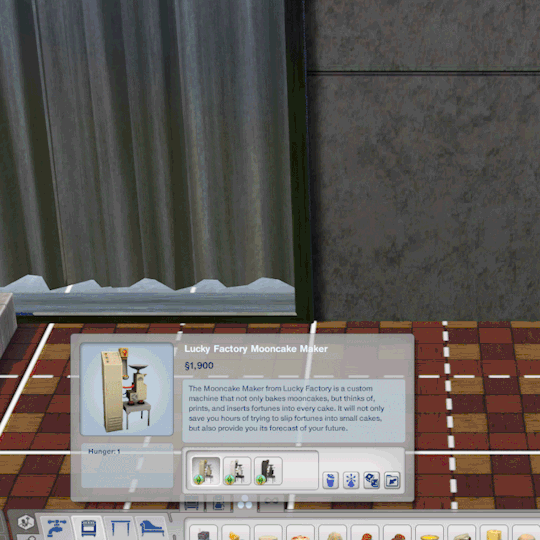
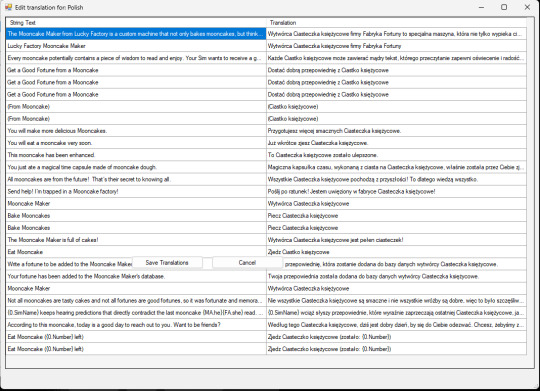
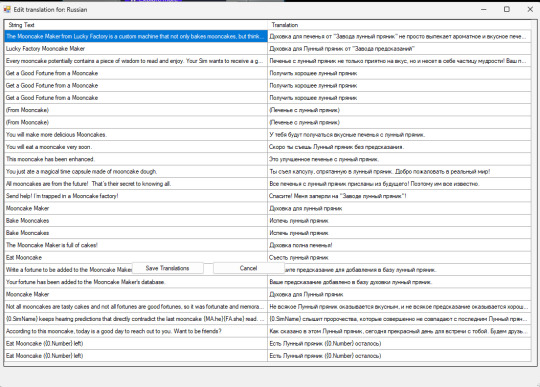
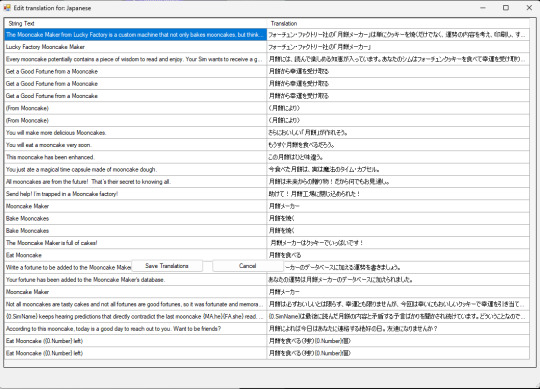
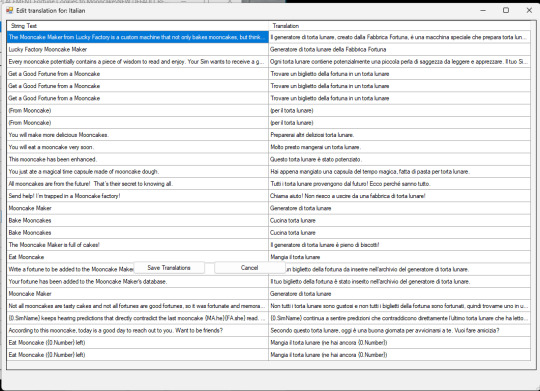
TS3 World Adventures - Mooncakes & Mooncake Machine Maker Remastered: Mooncake Mesh & Texture with Enhanced Graphics & Enabled to Buy Mode & Renamed Mod (All Languages) & Icons Replacement Mod
D E F A U L T R E P L A C E M E N T
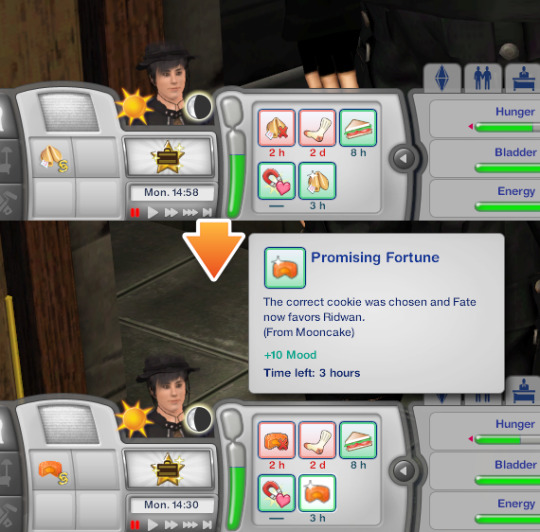
New custom Mooncake mesh & texture, to replace EA's "Fortune Cookies" machine maker and edible cake taken from machine maker with working Geostates & animation


EA's graphics from 512x512 with noise was enhanced to 1024x1024 with less noise and adding Simlish Hanzi to replace EA's "bad handwriting" texture on the machine maker. Click this picture below to enlarge.
Enabled to Buy Mode (Appliances > Miscellaneous Appliances), for easy access no need to type cheat "Buydebug" mode ever again.

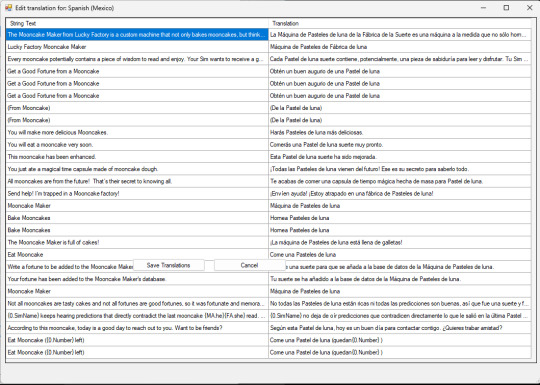
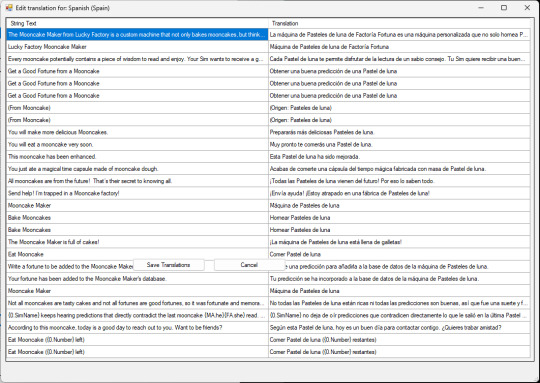
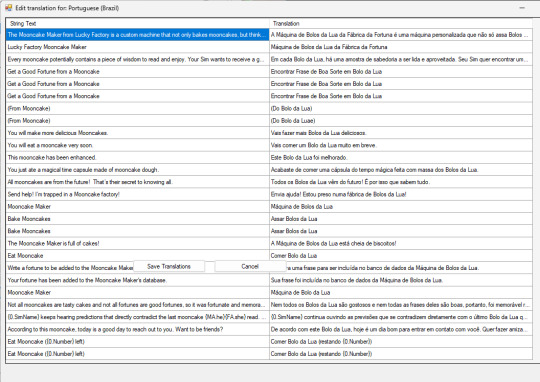
STBL Renamed mod, from "Fortune Cookies" to "Mooncakes" translated to all languages.
月餅 (Yuèbǐng)= Moon Cake
ⓘ For language translations except Chinese, I use online translator to change word "Fortune Cookies" ---> "Mooncakes" & "Mooncake" depending on singular and plural context. Feel free to correct in comment section if you feel the translation and the grammar is wrong or I accidentally deleted other word.


Icons changed from EA's Fortune Cookies to Mooncake

Reason why I made the change:
Because Shang Simla is taking place in China, not American Chinatown, thus the portrayal of the cookies should be authentic of actual China in real life, not American cookies that are foreign to actual Chinese people. Fortune Cookies are U.S.A.- made cookies: American invention originating in California. History of Fortune Cookies (source: fancyfortunecookies.com) Mooncakes are cakes originated from China, dates back over 3,000 years to ancient China. Mooncakes are a traditional treat during the Mid-Autumn Festival, which is celebrated on the 15th day of the eighth month of the lunar calendar.
Mooncakes are the must-eat Mid-Autumn food in China. They are a traditional Chinese pastry. Their round shape and sweet flavor symbolize completeness and sweetness. At the Mid-Autumn Festival, people eat mooncakes together with family, or present mooncakes to relatives or friends, to express their love and best wishes. Mooncakes are usually eaten after dinner while admiring the moon. History of Mooncakes in China... (source: chinahighlights.com) Fortune Cookies are made in USA and only exist in USA, but mistaken by USA people themselves as "Chinese" cookies just because the cookies are sold in American Chinese restaurant in USA. We actual Chinese live on our country have never seen Fortune Cookies, as we only know the presence of those cookies in Hollywood (U.S.A.) movies. Not just culture inaccuracy, I enabled this machine maker in Buy Mode section for easy access because this item must have been forgotten in the corner and only been played once when the player visit Shang Simla.
Colour & Presets: Same as original EA's: 3 Presets & original EA's Fortune Cookies Machine Maker colour channels.
How to Change Default EA's Fortune Cookies to Mooncake in Shang Simla world.
Fortune Cookies maker in Shang Simla doesn't automatically change to Mooncake due to different coding in-game.
❗You must buy Mooncake Machine Maker from Buy Mode (Appliances > Miscellaneous Appliances) to load the texture first, then travel to Shang Simla world, do "Reset Textures" using Nraas' Debug Enabler.
You need to install Nraas' Debug Enabler (Core mod by Twallan) in order to work correctly ❗
Follow these steps to reset textures:
Click on the Fortune Cookies Maker > Nraas > Debug Enabler > Options: Lucky Factory Mooncake Maker > Object… > Reset Textures > (Choose one) All Sims3.Gameplay.Objects.Appliances.FortuneCookieMaker or This Object
Requirement: World Adventures Expansion Pack
Thank you credits: - Simlish Hanzi: Komorebigo font by Deastrumquodvicis - Mooncake Vector: by Shutterstock - Mid-Autumn Festival Vector & Images by Freepik
Instance code compatibility: 0x010F16B00BA8342B

As usual, install one of these packages on Package folder. You can safely delete the package if you no longer want to use the default replacement.
[ Download Mooncake Machine Default Replacement ]
Language Translations: Click this picture below to enlarge.


#EA The Sims 3 employees from San Francisco please do some research about Chinese culture from your fellow employees from EA Shanghai#ts3#ts3cc#ts3 mod#ts3 default replacement#ts3 chinese#the sims 3#tumblrts3cc#the sims 3 mod#ts3 asian#shang simla#ts3 world adventures#happy mid autumn festival#mooncakes#中秋節快樂#月餅#renamed mod#ts3 override mod#chinese culture
124 notes
·
View notes
Text
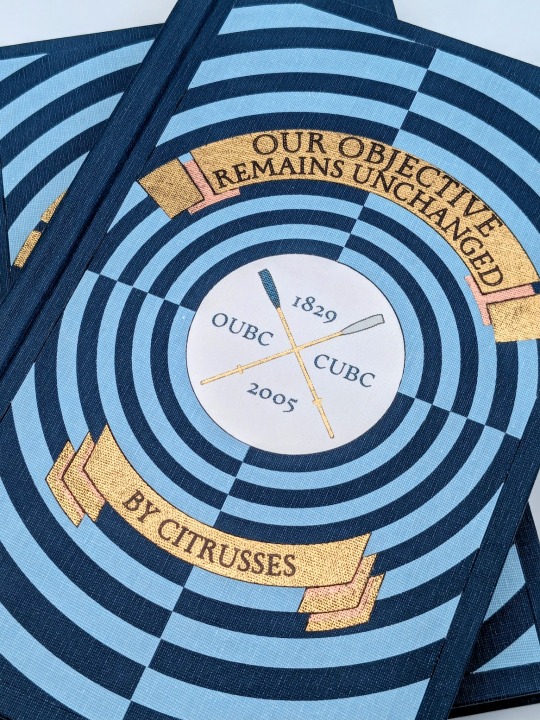
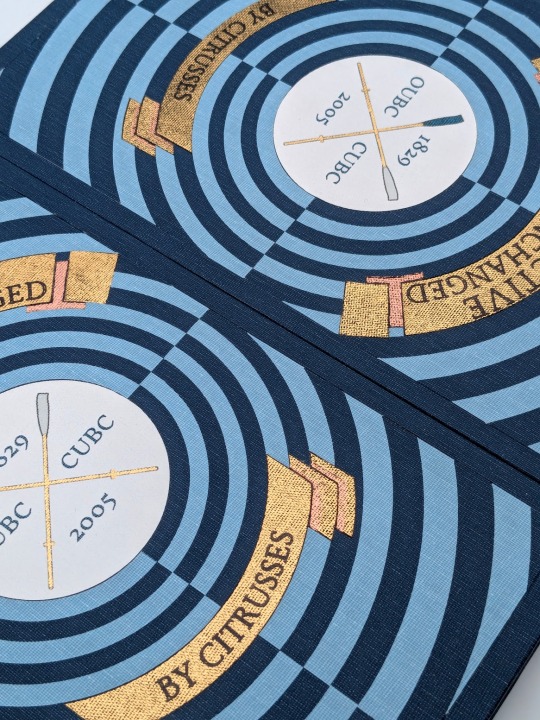
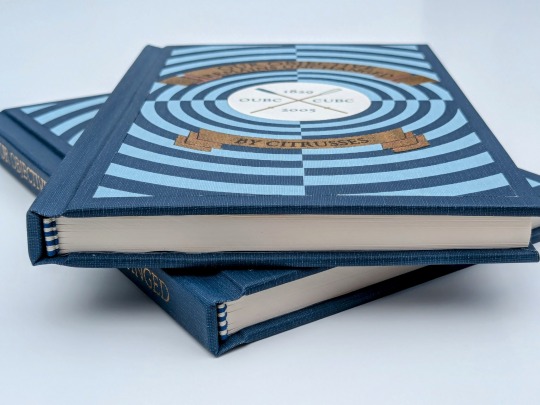
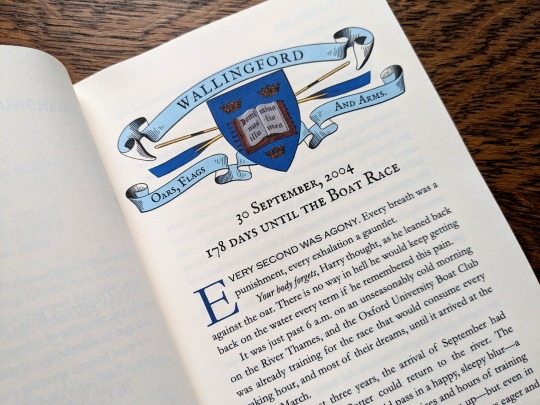
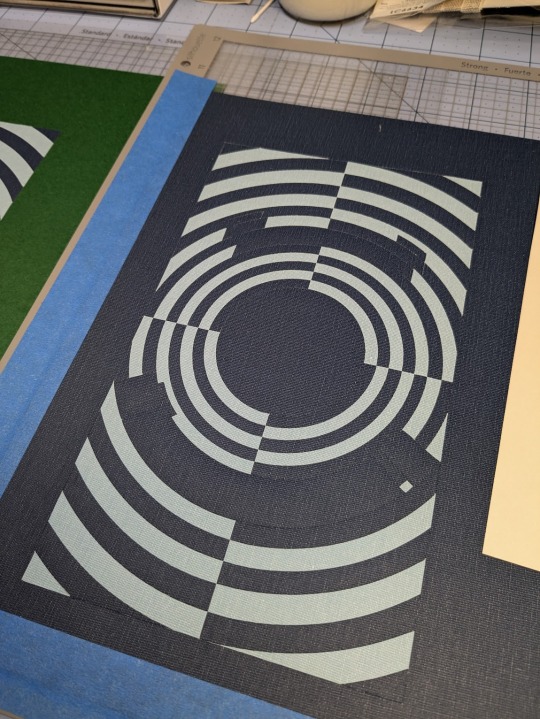
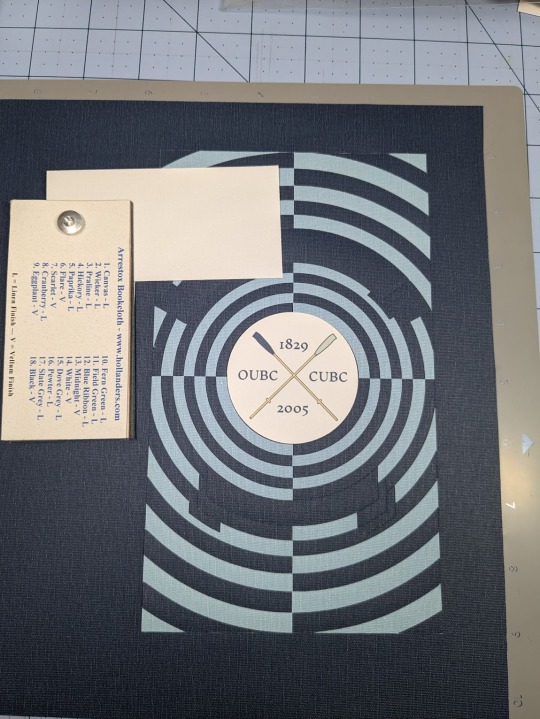
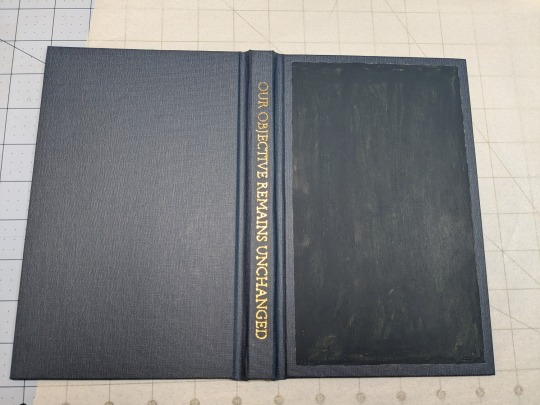
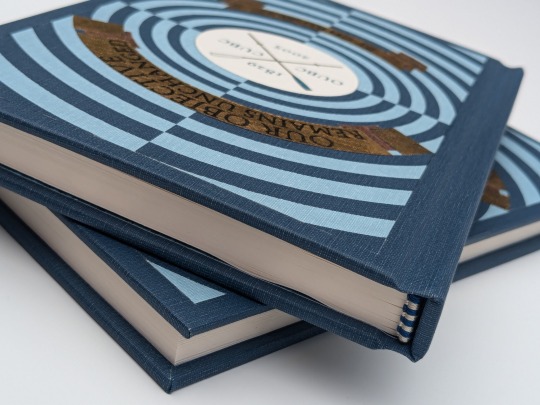
Our Objective Remains Unchanged by @citrusses
"Harry Potter, returning member of the Oxford University Boat Club, has two goals for the spring of 2005: beat Cambridge, and beat Draco Malfoy. Perhaps not in that order."
This has to be one of the most creative and meticulously researched fics I have ever had the pleasure of reading. If you haven't read it yet, don't walk— run! Citrusses is an absolute genius, and kindly gave me permission to bind her masterpiece.
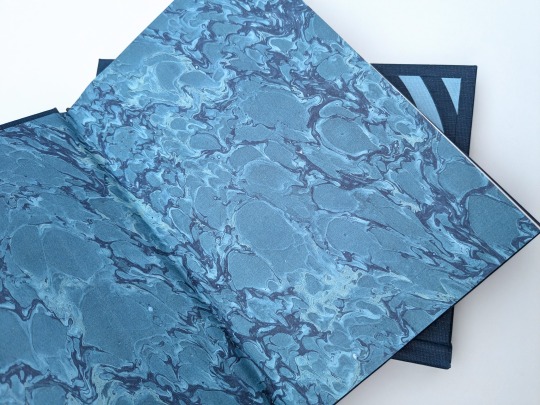
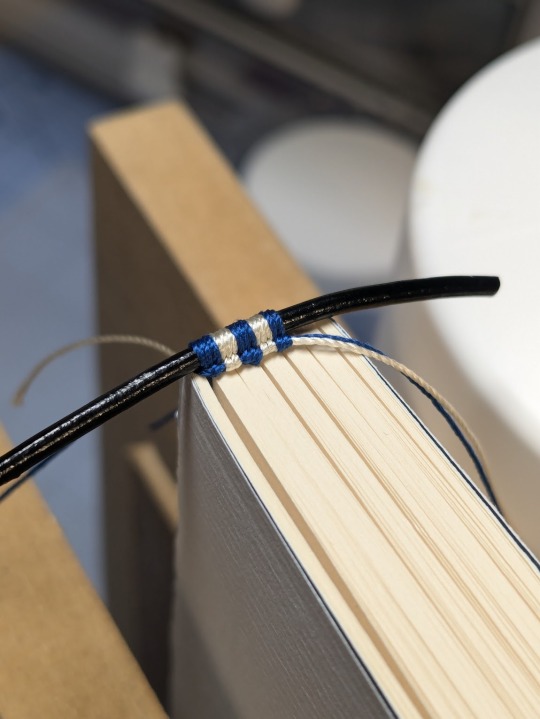
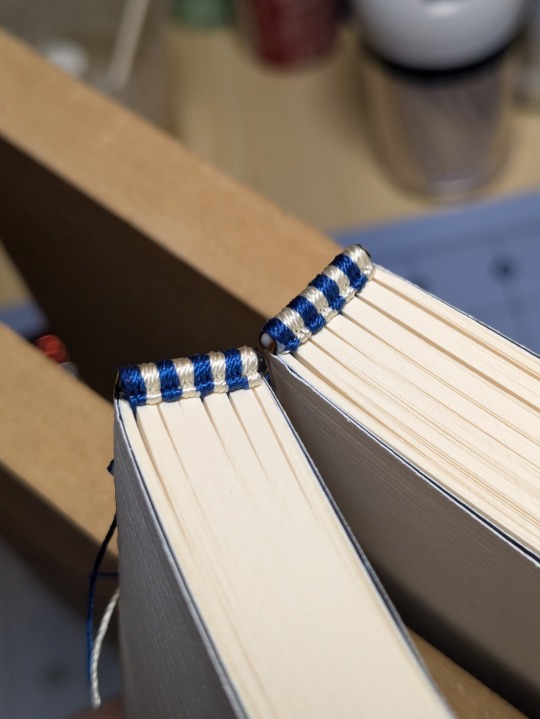
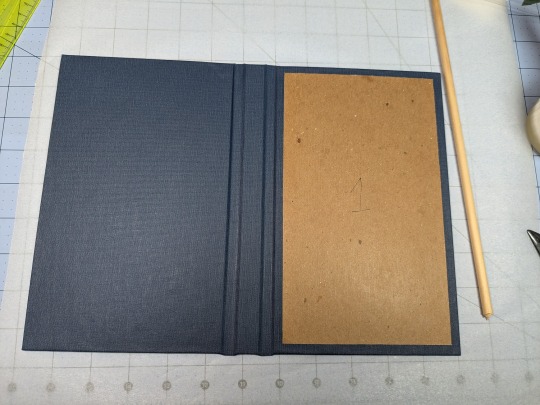
The cover of this bind is made out four different shades of Allure bookcloth cut by my Cameo 4, and the centerpiece is printed and hand foiled. The banners were machine foiled in gold and black with hand foiled rose gold shading. The endbands were hand sewn with Gutermann silk thread.
You can find more pictures and information about my process under the cut.
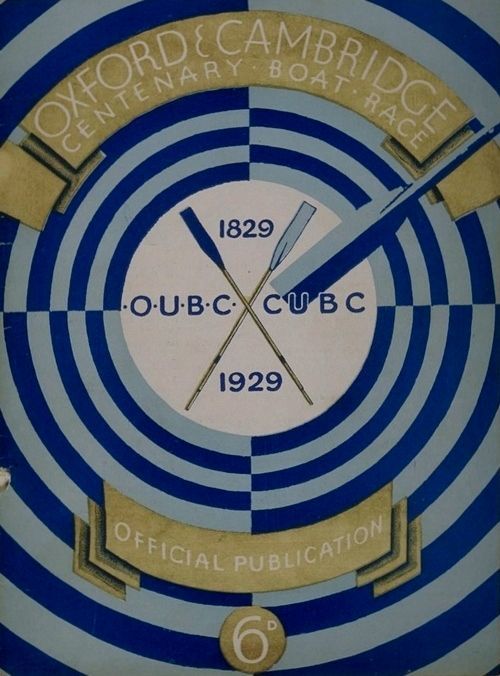
The amount of inspiration this fic gave me was overwhelming, and Citrusses' writing fully immersed me in the world of competitive rowing. While designing this bind, I was struck by the sheer wealth of Oxford rowing memorabilia available to me. I settled on this 1929 illustration from an official publication on the Oxford and Cambridge Centenary Boat Race for the cover.
"How hard could it possibly be?" I thought, foolishly. The answer was HARD, but I'll get into that later.
Due to the wealth of design options, I believe that this may be the best typeset I have created to date. Thanks to the help of my friend @tsurashi-bindery, I was able to learn the basics of InDesign (kicking and screaming all the way). There will be spoilers in the text of these photos, so try not to read them if you haven't finished the fic!
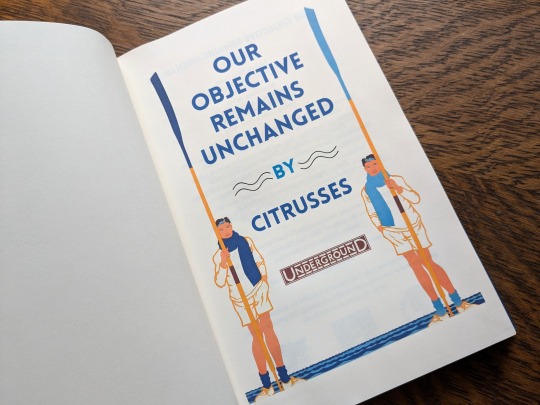
For the title page, I modified To See the Crews in Training by Charles Pears (1930). I believe that this was part of a series of advertisements for the race in the London Underground.
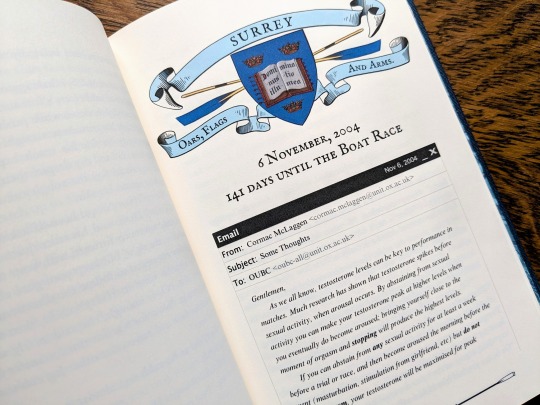
For the chapter headers, I redrew the crest from an Oxford Oars, Flags, and Arms postcard, presumably pre 1914. I also had some fun creating a mock email using La_Temperanza's How to Mimic Email Windows on Ao3. Cormac's email makes me laugh every time I read it, and Citrusses provided an appropriately pompous subject.

I also had lots of fun editing the oars from the official OUBC logo to serve as dividers and decorations for the page numbers.

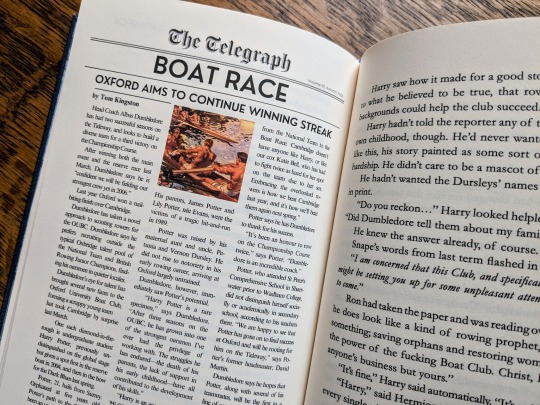
Additionally, I got to edit a full newspaper page for the fic! I was very excited find an opportunity to slip Leyendecker's The Finish (1908) in.
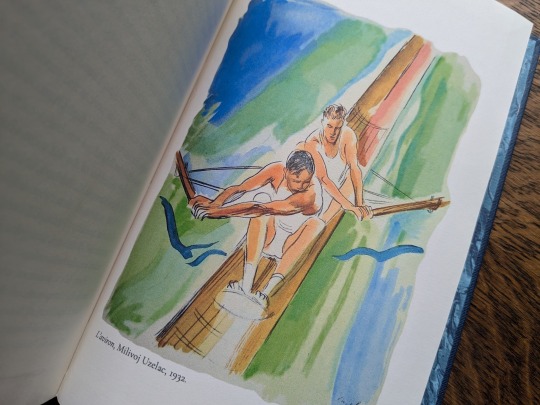
The fic ended beautifully, so I wanted to include one last element at the end to capture the atmosphere. I settled on L'aviron (1932) by Milivoj Uzelac. It makes me feel as though Harry and Draco will continue rowing together long after I've closed the book.
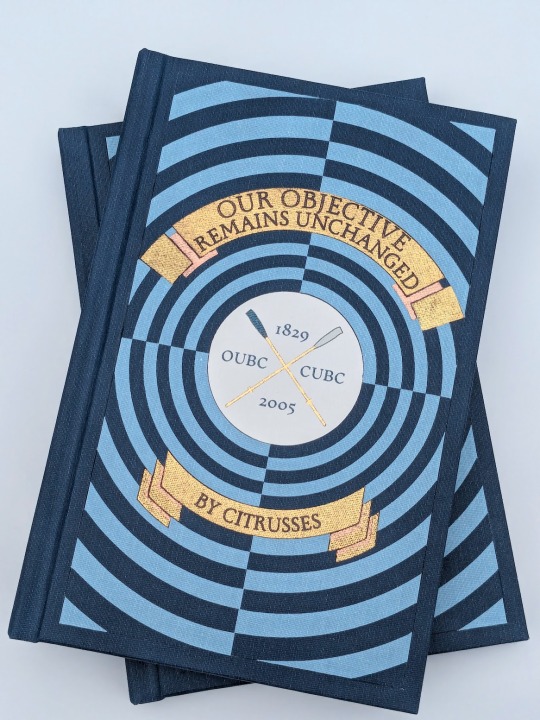
I of course had lots of fun sewing the headbands, and got to do it with not one but TWO copies!
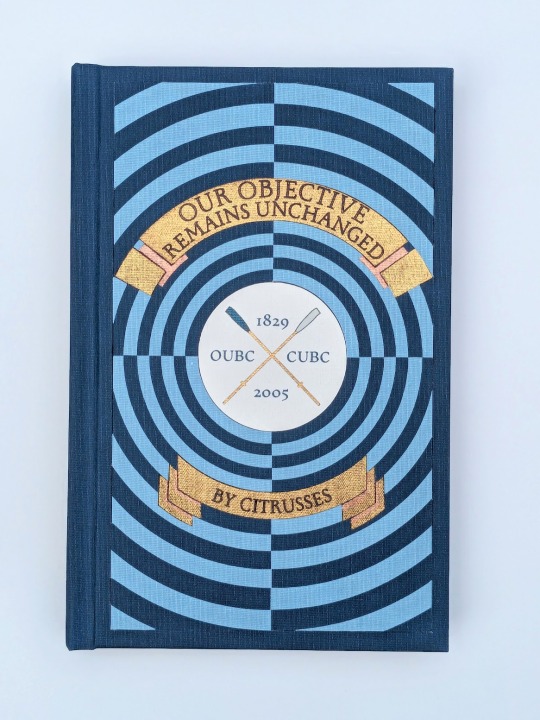
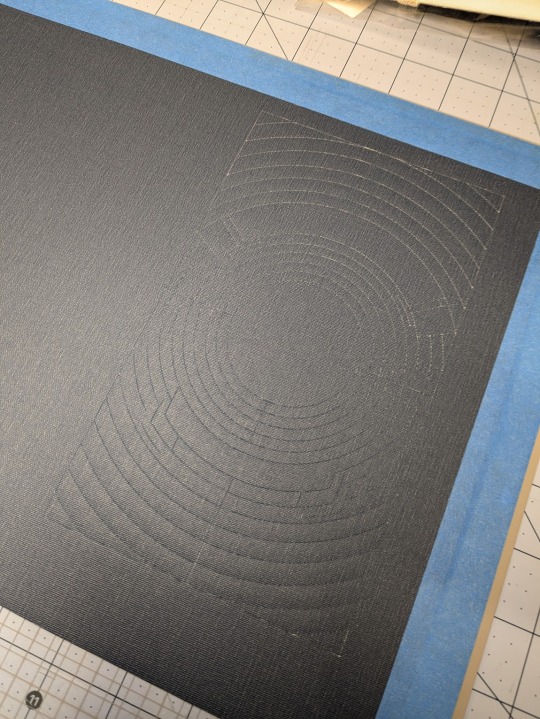
Things got tricky when I had to recreate the cover. I had a poor understanding of how vector images worked, and ended up having to redraw it three times. Once I finally cracked and taught myself how to use Illustrator, the program crashed...and I had to redraw it a fourth time!
I set the vector to cut on my Cameo 4, and I assembled the pieces together like a puzzle on my Silhouette mat. I used Allure's indigo, skylight, white, and black bookcloth in the process. I will be making a tutorial video on this method, so I will keep it brief here.
I also cut a piece of bookcloth to 8.5"x 11" and fed it through my inktank printer to print the center design. I then cut it out using the print and cut feature on my Cameo 4. Both of these methods were a first for me, and they were very scary!!
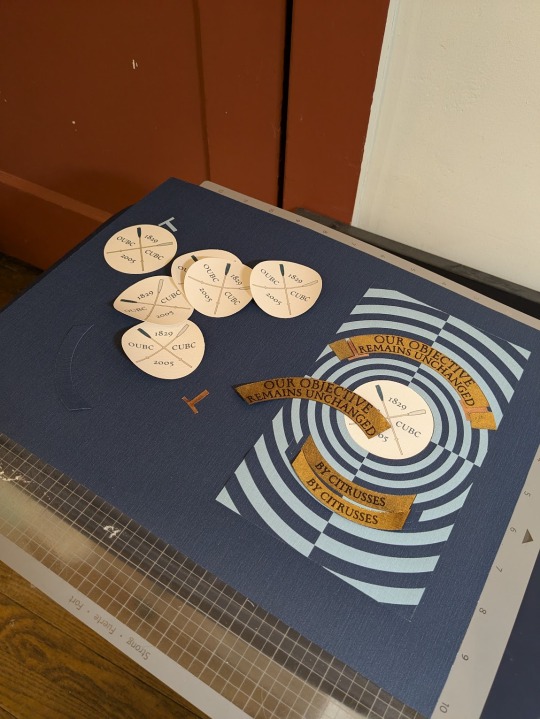
To be perfectly frank, the foiling was a nightmare and I don't want to get into it. I machine foiled the gold, and then foiled black lettering on top of it. I foiled the rose gold shading by hand, and then foiled a thin black outline along the edge of the banners to make them stand out more.
I hand foiled the spines (because I'm scared of measuring), painted the exposed board (to hide any gaps in the inlays), and used transfer tape to lift my design from the Silhouette mat and onto the cover.
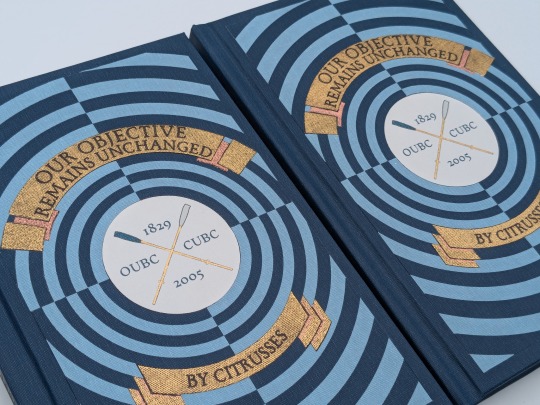

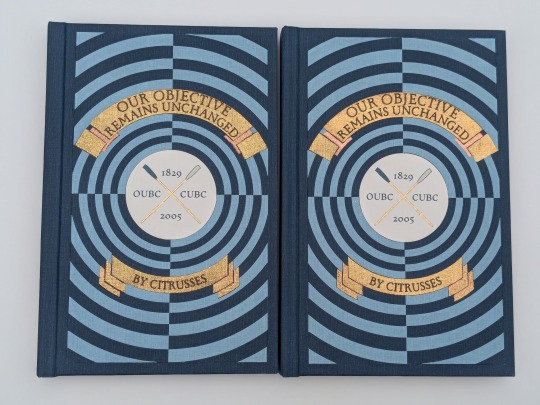
One more fun detail— my copy and the author's copy are sisters! The dark blue and the light blue are inverted on the author's copy, making it distinguishable from mine. This is the first time I have made an author's copy for a fic, and I was admittedly incredibly nervous. I always worry about what authors will think of my work, but Citrusses gave me an incredible amount of encouragement and support throughout the process! Thank you for trusting me with your precious fic!
This story is a work of fanfiction and can be read on Ao3 for free. My bind and typeset are for personal use only and not for sale or profit. Keep fandom free!
#book binding#fic binding#fanbinding#fanfic binding#drarry#our objective remains unchanged#harry x draco#my binds
339 notes
·
View notes
Text
The secret of fluff
There is no secret, only volumes and vectors. Now I will proceed beam the knowledge of simple structures under the details of this drawing straight into your brain.

The best way to achieve fluffy fluff is to get into the right mindset when you go to draw it. It may be made up of thousands of hairs, but unlike long hair, which can be simplified to ribbons, fluff can be simplified to a volume, a solid piece of geometry.

The largest blocks of it are already here, but it's the smaller extra volumes of it that really help sell the illusion.
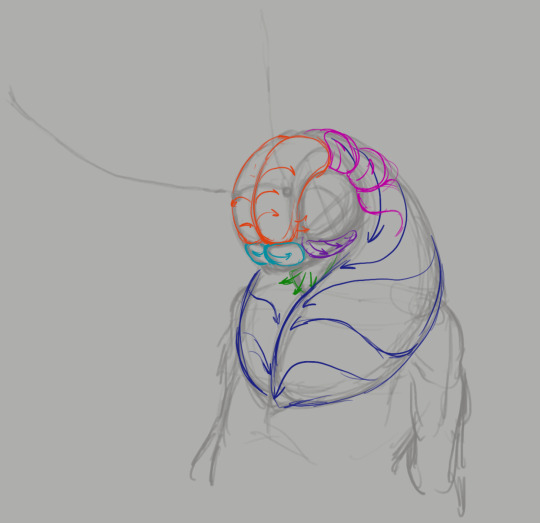
These distinct groups of fluff create a feeling of some kind of growth pattern, rather than an even fur coat thrown over a statue. They also squish and push each other, which adds that extra 3d feeling to the fluff. At this stage I also decide the growth direction of these volumes, these guides are what prevents me from getting lost in all the fur. Well, honestly I've done this so much that the guides are no longer a necessity, but you get my meaning. It's very useful when you're still figuring it out.

Anyway, scratch and scribble your way along the guides until you're happy. I found it most effective to add more lines to the parts of the fur that are facing away from the camera and fewer to the parts that are viewed straight on. It makes the fluff appear more voluminous and soft. Follow the same logic as a fresnel shader, basically.

That's how the effect looks for those who don't know. (Image snatched from Unreal's documentation on fresnel node.) More guides, now on antennae.

Once again, there is coherent geometry guiding the hairs that can wobble and deform in perspective. First - a simplified ribbon, then - hair detailing.

Lastly, shading. For this step don't follow all the individual hairs you've drawn on the detail pass, what you're shading is the entire volumes, not individual fluff clumps. Doesn't hurt to pick out a few strands of course, but don't over do it or the 3d feeling will be lost.
Thanks for reading my quick and dirty tutorial, I'm going back to work. Control rigs don't set themselves up on their own.
608 notes
·
View notes
Text
Writing Notes: Book Cover

“Don’t judge a book by it’s cover!” We’ve all heard the phrase and we all know that’s impossible. Because the cover of a book is the first thing a potential reader sees—it should stop them in their tracks. It’s a very powerful marketing tool; having a well-designed book cover is crucial.
Tips for Making a Great Book Cover Design
Using more than two to three typefaces on a cover is discouraged, as it can look really messy.
Keep things simple. Your cover will be in a sea of other covers so try to keep your design from getting muddy and make sure it stands out.
Show your designs to people who have a design eye and/or you trust. It’s great to get feedback.
If you hire a professional designer, write a brief and send them info. Be really clear on what you want. Designers usually do a certain number of design rounds included in the agreed upon fee and any extra rounds of design will be extra.
If you hire a professional designer, they will likely have ideas about printing and may have connections to printers. They are a resource so don’t forget to ask questions.
Don’t forget: a book cover is an important part of selling any book. Whether you decide to do it yourself or collaborate with a professional, pay special attention to this part of the process, as a great cover goes a long way.
6-Step Guide: Professional Book Cover
STEP ONE Generate Ideas. Look around at book covers you like. Go to a bookshop and peruse what’s currently happening in book cover design. Take notes of what elements you like on the cover image. A certain typeface? Color? Do you prefer an image or an illustration or something purely typographic on the cover? Another option is to create a mood board. You can use a platform like Pinterest or Evernote, or create a folder on your desktop, and pull book cover inspiration from the web. While you’re gathering inspiration, keep in mind what genre your book is and what kind of book design feels appropriate.
STEP TWO Find a Designer (Who Could Be You!). Do you have design skills? If so, your next step is to begin layouts and mock-ups of the covers. You should use whatever software program you are comfortable with. Most professional book cover designers use a program from the Adobe Creative Suite:
InDesign. InDesign is a multi-page design platform but can also be used for single page design.
Photoshop. Used to manipulate and experiment with photography.
Illustrator. Illustrator is a vector-based program, which means you can create graphic art that can be scaled up or down without loss of quality.
Photoshop and Illustrator. These can also be used together as you can bring your Photoshop file into Illustrator to set the type after you have worked with your cover image.
If you don’t have design skills, now is a great time to hire a book cover designer. The first step is to figure out what kind of budget you have for this. A designer’s fee will range depending on their expertise. Get a figure in mind and then write a design brief which should include the book specs:
Size
Print-run
Intended audience
Where and how the book will be published
Anticipated publish date
You should also include a summary of what the book is about and what you are looking for in a cover. Also share the inspiration you’ve gathered with the designer.
If you don’t have design skills but want to create the cover without the help of a professional, there are a few software programs you can use, such as Canva or 100 Covers, design tools that allow you to DIY the cover (for free or a fee).
STEP THREE Decide on the Dimensions. If you’re self-publishing and printing with a local printer you can work with them to make sure your book dimensions will fit on their printer (remember a book prints front, back, and spine in one sheet of paper). It’s also a good idea to find examples of books whose size you like and feels good to hold. Use that as a jumping off point for your book.
Book Cover Dimensions List. If you are printing for a specific market, from print to ebook, here is a handy list:
Amazon Kindle Direct Publishing File Format: JPEG or TIFF Cover Size (Recommended): 2560x1600 pixels Cover Size Requirements: between 1000x625 pixels and 10,000x10,000 pixels (one side must be at least 1000)
Apple iBooks File Format: JPEG or PNG Cover Size (Recommended): 1400x1873 or 1600x2400 pixels Cover Size Requirements: at least 1400 pixels wide
Barnes & Noble File Format: JPEG or PNG Cover Size (Recommended): Rectangle height and width, at least 1400 pixels Cover Size Requirements: Min. 750 pixels height and width
Kobo Books File Format: JPEG or PNG Cover Size (Recommended): 1600x2400 pixels Cover Size Requirements: Min. 1400 pixels width
Smashwords File Format: JPEG or PNG Cover Size (Recommended): 1600x2400 pixels Cover Size Requirements: Min. 1400 pixels width Draft2Digital
File Format: JPEG Cover Size (Recommended): 1600x2400 pixels Cover Size Requirements: Tall rectangle
STEP FOUR Choose Your Style
Photo-based cover. If you’re creating an photo-based book cover, you’ll need to source stock imagery. There are lots of great resources online to find stock imagery including ShutterStock, Getty Images, and Adobe Stock. (Keep in mind: most photography archives require payment to use their images. Always investigate the copyright of images you’re interested in using.) Look for images that convey or allude to your book’s genre. You can use programs like Photoshop to manipulate your image, making it black and white instead of color or cropping it in a certain way.
Illustration-based cover. If you’re considering a more graphic approach to your cover, Illustrator is the tool to use. You can bring hand-drawn drawings into it and outline them to create scale-able, high-res illustrations which you can manipulate within the program. You can also create shapes, patterns, experiment with typography within illustrator and play with color, transparency, size and much more.
Typography-based cover. Finally, many successful book covers use typography as the main graphic device. This takes some skill and knowledge of typefaces, the historical context of a typeface, and how to manipulate it thoughtfully. That said, using type as a graphic can be very impactful.
STEP FIVE Pick a Typeface (Font). No matter what kind of cover you are designing, you are going to need the title of the book and the author’s name on the cover. As mentioned above, picking an appropriate typeface is very important. You want to pick something that feels right for your book—is it a sans serif or serif? A heavy weight or lighter weight? You want to make sure it’s not something with a lot of baggage, like Comic Sans or Papyrus. It is a good idea to actually do a little research on when, where, and who your typeface was designed by to give you context and feel out if it will be right for your book. You might also consider using up to two different typefaces, one for the title and one for your name. A serif and sans-serif mix can give a bit of contrast and visual interest. There are some typefaces that pair really well together. Check out the website TypeWolf to get ideas of what fonts pair well together.
STEP SIX Test, Tweak, and Repeat. Once you have a few versions of your cover, print them out on your home printer and take a look with a critical eye. Does the type size feel chunky? Too bold? Too small? How does your image look? Is it cropped right? Are the lines of your illustrations too thin and not showing up? Go back and refine your design and then repeat! Don’t forget to look at your book cover as a small thumbnail as well. People are on their mobile phones and you want to make sure your cover still stands out and is impactful.
Book Cover - serves as your first impression with potential readers—and though book covers don’t always look the same, they do tend to contain the same essential elements.
Design standards may be different in the world of traditional publishing than they are in self publishing, and book cover templates for physical paper books may differ from those of ebooks—but they all serve the same purpose.
Some Functions of a Book Cover
A book’s cover provides essential information. At its most elemental, a good cover includes a book’s title, the author’s name, the publisher, and the price.
A good cover offers clues about your book’s content and tone. Your cover design indicates whether your book is a work of high-minded literary fiction, a pulpy page turner, or a compelling work of non-fiction.
A front cover reveals a book’s genre. You can usually tell if you’re holding a thriller, a memoir, a sci-fi epic, or a nineteenth century classic just by looking at a book’s cover art and typography.
A back cover offers broader context. It may feature quotes from reviewers and fellow authors. Softcover books may contain a plot summary or author biography on the back; those summaries and bios are typically moved to the inner flaps of a hardcover book.
How to Hire a Professional Book Cover Designer
Book covers are marketing materials, and a well-designed professional cover can make your book stand out among the competition. If you want someone with expertise in the realm of cover design to work on your book, you may want to hire a professional book cover designer. Here are some steps to consider when hiring creatives to design your book cover:
Hire a cover artist. A cover artist produces the cover art and imagery that will appear on your book cover, either on their own or with heavy input from an author or publisher.
Hire a graphic designer. Certain graphic designers specialize in layout; they incorporate cover art that you provide them—whether that’s an original illustration, photograph, or even a stock image—into the overall design of the cover.
Find a cover designer online. Reedsy is one of a number of online resources for independent authors, self-publishers, and anyone connected to the world of books. Many professional book designers list their services on Reedsy.
Use your personal network. Seek out writers’ groups, either locally or on Facebook. In these groups, people share professional referrals and help support one another when a member has a new book in the works. A group of like-minded individuals can be an invaluable resource when creating your own book cover for the first time.
When to Call a Pro:
You have a budget (a designer’s fee will vary depending on experience and location).
You have enough time to work with the designer.
You have a clear idea of what you want or at least what you don’t want.
You don’t have any design skills.
You don’t want to invest in the design software.
Your book isn’t selling.
How to Design a Book Cover Yourself
If you don’t have the budget for a pro designer or just have a DIY itch you want to scratch, it is easier than ever to design your own book cover. While it may not be quite as rudimentary as when you covered your textbooks in a brown paper bag back in fifth grade, modern technology has made cover image design accessible to anyone with a computer. Here are some tips:
Use a template. There are numerous websites that offer book cover templates and step-by-step tutorials covering basic cover design skills. Some even have a free book cover creator tool, along with cover ideas, design tips, pre-made design templates, and digital cover image tools.
Use standard design software. Book covers can also be made using standard home computing software including Photoshop, Microsoft Word, and even (with a little sweat equity) Google Docs. This is particularly easy if you are importing a pre-made cover image from another source.
Make a prototype. The process for assembling a book is straightforward and satisfying. If you want to test out how your book will appear in print, you can learn to bind a copy yourself.
When to DIY:
You don’t have any budget for design.
You have design skills to do it yourself.
You have the design software.
You have a template and know exactly what you want.
You have people with an eye for design that can guide you.
How to Make a Hardcover Book
So you’re ready to bind your own book. Here’s what you’ll need:
Content, of course.
Uncoated printer paper for book pages
Decorative paper for endpapers, such as wrapping paper or cardstock
Davey board (aka bookbinder’s board), thin chipboard, or cardboard for the book covers
Craft knife
Polyvinyl acetate (PVA) glue such as Elmer’s glue
Hot glue gun and glue sticks
Ruler or straight edge
A long stapler
Thin fabric or book cloth for cover
Binder clips
Thick decorative paper (optional, for dust jacket)
Paper trimmer (optional, for trimming book pages)
Paintbrush (optional, for spreading glue)
There’s more than one way to bind a book, and you’ll find tons of great tutorials online for making homemade books, including Japanese bookbinding and perfect bound softcover books. The most popular style of hardcover book binding is called case binding, which is traditionally done by stitching pages together with thread. Here is how to make a hardcover book step-by-step—no sewing or special materials required:
Assemble the content. The number of pages and the type of paper you work with depends on whether you’re binding a novel, a full-color photo book, or a sketchbook. Familiarize yourself with the format by taking some hardcover books down from your bookshelf and observing how they were made.
Format your pages. If you’re creating a blank book, you can skip this step. If you’re printing a book with text, you'll need to format the text so that you can print it into a book. You can get help with this at a copy shop, or you can download book design software and print at home. Eventually, you’ll end up with a PDF with a page count. This page count has to be divisible by four so that your book can be bound as folios made up of eight sheets of paper (32 pages) each. You may need to add some blank pages at the end of the book to keep your page count correct for the folios.
Print and fold. Once all of your pages are printed, fold pages in half and stack eight within each other, making sure the pages are in the correct order. Staple the folios together in the folds, alternating the location of the staples so that you don’t end up with a bulge in the spine.
Bind your folios together. Arrange all of the folios in the correct order and flatten them between heavy books. Once your folios are flat, it’s time to glue them together. Hold the folios together with binder clips and use a glue gun to glue the folios together along the stapled edge. This will become your book’s spine. Be careful not to overdo it on the glue: Use just enough to keep the folios together. Before the glue cools, use a thin piece of fabric to cover the spine only.
Even out the pages. Carefully trim the edges of the pages with a paper trimmer or craft knife, if needed.
Make the hardcovers. Cut two pieces of cardboard for the front and back covers of your book. For the spine, cut a piece of cardboard that is the same height as the front and back covers, with a width equal to the thickness of the spine plus the front and back covers.
Attach the hardcovers. Paint the cardboard (both covers and the spine piece) with a thin layer of PVA glue and attach to the cloth you’ll use to cover your book, leaving a space between the covers and the spine equal to one and a half times the thickness of the cardboard. Let dry.
Assemble the book. Use PVA glue to attach the fabric-lined spine of your bound folios to the cardboard spine. Keep the book propped up between other books while you wait for it to dry.
Attach the endpapers. Trim the paper lining so that it’s twice the size of the first page and fold it in half. Paint glue onto the inside of the front cover and the front page, and attach paper lining. Repeat with the back cover.
Make the dust jacket. If you’d like to cover your book with a dust jacket, measure a piece of thick decorative paper as tall as your book and as wide as the entire book, plus a few extra inches to fold over the edge of the cover. Fold the dust jacket over the bound book. Lay another heavy book on top of it to help the dust jacket keep its shape. This is the place to add a cover design, if you’d like.
Sources: 1 2 3 4 ⚜ More: Notes & References ⚜ Writing Resources PDFs
#books#book cover#writing tips#writeblr#booklr#literature#writers on tumblr#writing reference#dark academia#spilled ink#writing prompt#creative writing#bookblr#writing inspiration#writing ideas#writing advice#on writing#light academia#writing resources
118 notes
·
View notes
Note
Sorry if this has been asked before, but how do you make your lineart so nice, clean, and not pixelated? Your art and animations are incredible btw 👌👌❤️❤️
Thank you!
I use big ass canvases!
As you can see, smaller details still look a bit crunchy, but they will be okay once you zoom out to view the whole image.
Alternatively, maybe drawing with vectors in CSP would be useful for clean lines?
#I animate with Vector lines as well so they can be adjusted and scaled once drawn#I rarely if ever post the full size drawings and scale them down a bit first - now more so thanks to the rampant ai theft#personal#text#I would love to draw on canvases larger than 5000px and very rarely I have to but PS struggles....
532 notes
·
View notes
Text
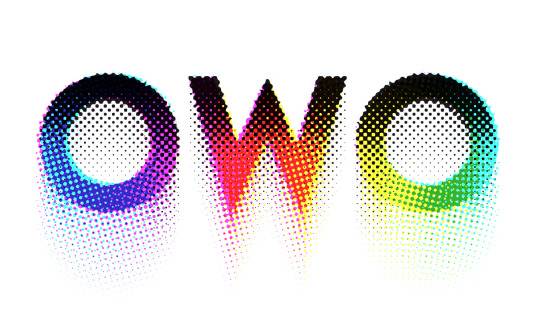
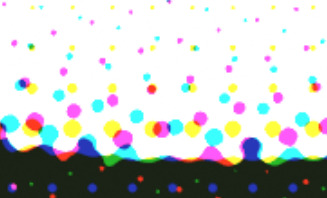
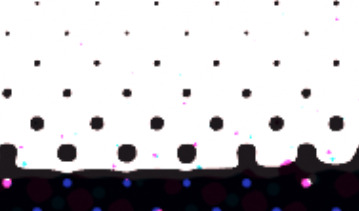
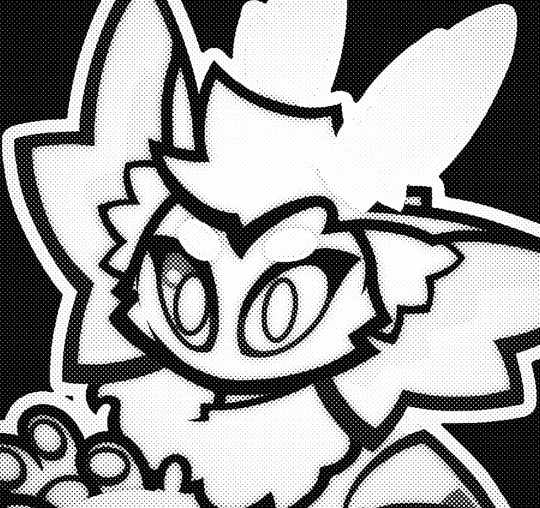
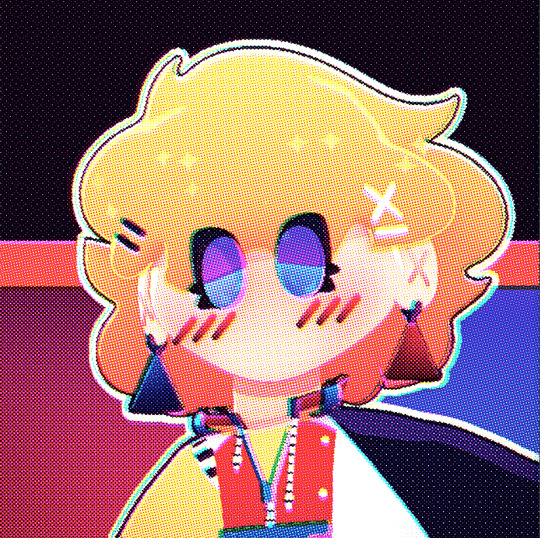
Was experimenting with halftone effects after watching this video and it almost has spiderverse vibes honestly. I actually learned some neat things about why printers use CMYK instead of just CMY so I thought I'd share !!
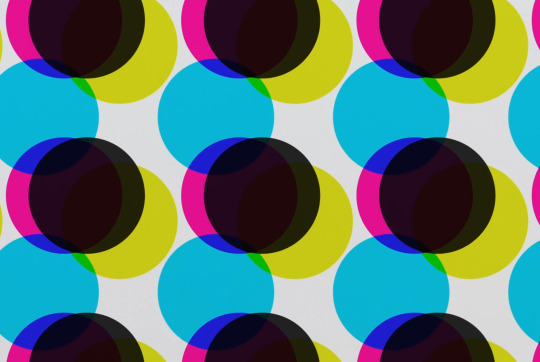
So in our optimal little computer space, Cyan (0,255,255), Magenta (255,0,255) and Yellow (255,255,0) all multiplied together gives us a perfect black (0,0,0) Awesome! The issue is that ink colors irl arent exactly perfect like this, and color is a bit more complicated irl compared to how computers represent it, so they aren't the greatest at combining into black if they aren't those perfect CMY values:
Left: CMY
Right: CMYK
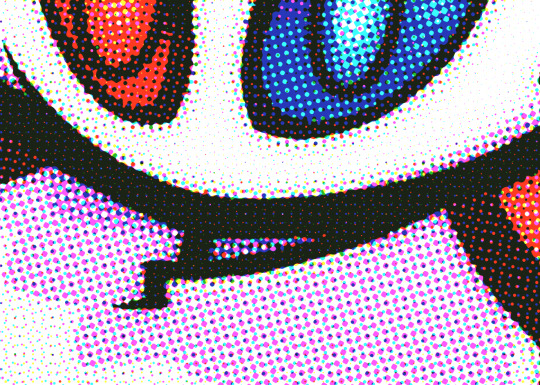

(thats not even black, its a dark blue in the original image but dark colors just look so much richer)
An important step to make sure you arent doubling up on the black values though is to divide the image by it's own "value" (the max of all 3 color channels) that way the value is equal to 1 everywhere, and you're letting the black ink take care of the value on its own.
Left: CMY (normalized value)
Middle: K (black)
Right: Combined


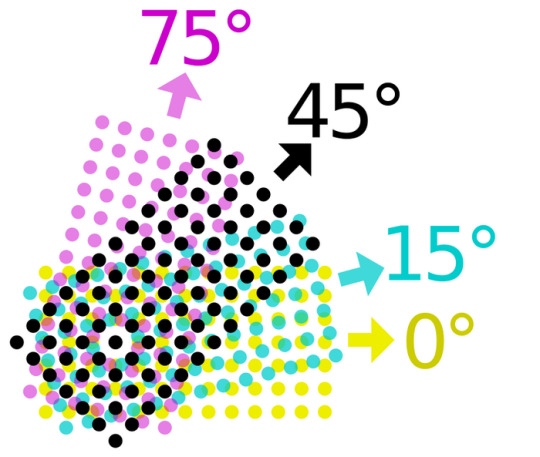
Now obviously the grids of dots cant be aligned perfectly with each other because you'd just get a bunch of black dots in unwanted areas, but if the grids are misaligned, then some dots become more prominent than others which tints the whole image. This was an issue because older printing methods didn't have great accuracy and these grids were often misaligned.
The solution was to rotate these grids such that they can move around freely while getting rid of that tint effect if they aren't perfectly aligned :D
(I have no idea how they came up with these angles but that might be something to look into in the future who knows)
SPEAKING OF MISALIGNMENT
I wanted to implement that in my own filter to get some cool effects, and I discovered another reason CMYK is better than CMY for lots of stuff !!
With CMY, you're relying on the combination of 3 color channels to make the color black. This means if you have thin lines or just details in general, misalignment can make those details very fuzzy. Since CMYK uses a single color of ink to handle value, it reduces color fringing and improves clarity a lot even if you have the exact same misalignment as CMY!
Left: CMY
Right: You guessed it! CMYK
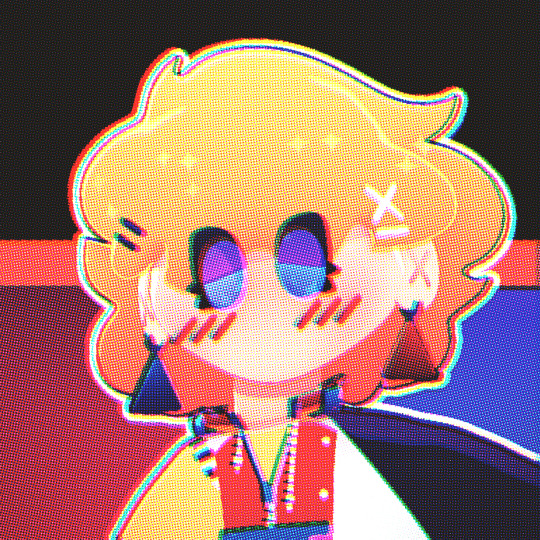

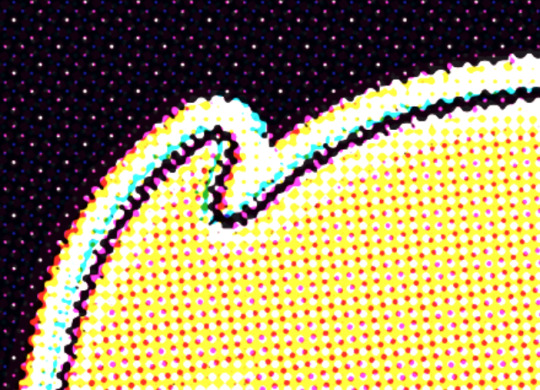

(yes these comparisons have the exact same color misalignment, the only difference is using a fourth ink color for black)
ANYWAY I just thought there was a lot of cool information in this tiny little day project, I also just think it looks really neat and wanted to share what I learned :3c


EDITING BECAUSE THERE'S ONE MORE THING I WANTED TO ADD
So, I talked about how to get K in addition to CMY instead of just CMY, but how exactly do you separate CMY from an image in the first place?
Well, CMY is a subtractive color space, meaning the "absence of color" is white, compared to RGB where it's black. This makes sense because ofc ink is printed on white paper. You can use dot product to get the "similarity" between two vectors, and this can be used to separate RGB actually! Using the dot product of a color and red (255,0,0) will give you just the red values of the image. This is cool though because if we get the dot product of our image and the color cyan (0,255,255), we can get the cyan values from our image too! If we first divide our colors by their value to separate the value from them, then separate CMY using those dot product values, and using K for our final black color value, our individual color passes end up looking like this:
While it's called a "subtractive" color space, I find it more intuitive to treat white as the absence of color here, and then multiply all these passes together. It makes it much easier to understand how the colors are combined imo. Notice how cyan is the opposite of red: (255,0,0) vs (0,255,255) and magenta and yellow are the opposites of green and blue respectively! This means you can actually kinda get away with separating the RGB values and just inverting some stuff to optimize this, but this example is much more intuitive and readable so I won't go too deep into that. THANKS FOR READING I know it's a very long post but I hope people find it interesting! I try my best to explain things in a clear and concise way :3

oh thank you I realized I should probably add an eyestrain tag
1K notes
·
View notes