#Keyword Selection Tools
Explore tagged Tumblr posts
Visit Tumblr Blog
Explore Tumblr blogs with no restrictions, modern design and the best experience.
Last Seen Tumblr Blogs


Fun Fact
25% of US internet users with an annual income of $80-100K use Tumblr.
Text
Using AI to Do Keyword Research for Authors
Introduction SEO for authors isn’t just a fancy buzzword; it’s the secret sauce to getting your books noticed online. Imagine your book as a needle in a haystack. SEO—or Search Engine Optimization—helps readers find that needle with ease. It’s all about making sure your content appears at the top of search engine results. Keyword research is the cornerstone of effective SEO. By understanding what…

View On WordPress
#AI algorithms for keyword selection#AI tools for keyword analysis#AI-based content optimization#AI-driven keyword analysis#AI-powered SEO strategies#artificial intelligence in SEO#automated keyword research in SEO#machine learning for SEO keywords#NLP for keyword research#semantic search in SEO#SEO keyword planning using AI#SEO keyword research with AI#SEO optimization with AI technology#SEO ranking with AI assistance
0 notes
Text
Introduction To SEO Keyword Selection - #AffordableSEO, #ContentMarketing, #DigitalMarketing, #Google, #KeywordResearch, #Keywords, #LocalSEO, #LocalSEOTampa, #SearchEngine, #SEO, #SEOAgency, #SEOCompany, #SEOTips, #SmallBusiness, #Tampa, #WebMarketing - https://localseotampa.com/introduction-to-seo-keyword-selection-202402/
New Post has been published on https://localseotampa.com/introduction-to-seo-keyword-selection-202402/
Introduction To SEO Keyword Selection
Choosing the right SEO keywords is crucial for the success of your business marketing. Keywords are the foundation of SEO and play a significant role in determining the visibility of your website on search engines. Here’s a comprehensive guide on selecting the best SEO keywords for your business.
Understanding Keyword Relevance
1. Identify Your Business Niche: Understand the specific niche your business operates in. This will help you target the right audience.
2. Know Your Audience: Analyze your target audience’s search habits. What terms do they use when looking for products or services you offer?
3. Analyze Your Products/Services: List down the key features and benefits of your offerings. This can give you a basic set of keywords.
Research and Brainstorming
1. Brainstorm Initial Keywords:
Begin by identifying the core aspects of your business, products, or services.
Consider the language your customers might use when searching for your offerings.
Include both broad and specific terms, as well as synonyms and industry jargon.
Think about the intent behind the searches—what problems or needs might lead someone to your business?
2. Utilize Keyword Research Tools:
Employ tools like Google Keyword Planner, SEMrush, or Ahrefs for a more comprehensive list.
These tools offer insights into keyword search volume, which indicates how often keywords are searched.
They also provide data on keyword competition, helping you understand how difficult it might be to rank for specific terms.
Look for related keywords or phrases that you might not have considered initially.
Analyze trends to see if certain keywords are gaining or losing popularity.
3. Study Your Competitors:
Examine the websites of your main competitors. Pay attention to the keywords they use in their titles, headers, and content.
Investigate the backlink profiles of your competitors to see which keywords are driving traffic to their sites.
Look for gaps in their keyword strategies that you could exploit.
Evaluating Keyword Metrics
1. Search Volume: Look for keywords with a decent search volume. These are terms that your target audience frequently searches for.
2. Keyword Difficulty: Be mindful of the competition. High-competition keywords might be challenging to rank for, especially for new or small businesses.
3. Relevance and Intent: Ensure the keywords are not just popular but also relevant to your business. Understand the intent behind the searches – are they informational, navigational, transactional, or commercial?
Strategic Keyword Implementation
1. Balance Long-Tail and Short-Tail Keywords: Long-tail keywords (more specific, longer phrases) are often less competitive and more targeted, while short-tail keywords (one or two words) have higher search volumes but are more competitive.
2. Localize Your Keywords: If your business serves a specific geographical area, include local keywords. For example, “boutique in downtown Chicago.”
3. Update Regularly: SEO is dynamic. Regularly review and update your keywords to align with changing search trends and business focus.
Monitoring and Refining
1. Track Performance: Use SEO tools to monitor how your keywords are performing. Look at metrics like search rankings, website traffic, and conversion rates.
2. Refine Strategy: Based on performance data, refine your keyword strategy. Discard underperforming keywords and experiment with new ones.
3. Stay Updated: Keep up with the latest trends in SEO and keyword research. Search engines frequently update their algorithms, which can affect keyword effectiveness.
Ethical Considerations
1. Avoid Keyword Stuffing: Overusing keywords on your website can lead to penalties from search engines. Ensure your content is natural and user-friendly.
2. Focus on Quality Content: While keywords are important, the quality of your content is paramount. Provide value to your users with informative, engaging, and relevant content.
In summary, selecting the right SEO keywords involves understanding your business and audience, thorough research, strategic implementation, continuous monitoring, and a commitment to providing quality content. Enhancing your website’s visibility, attracting the right audience, and driving business success are complex tasks, and sometimes expert assistance can be invaluable. For businesses in Clearwater, Florida, Local SEO Tampa Company offers specialized services to optimize your local SEO strategy, ensuring that your business stands out in a competitive market. By partnering with professionals like Local SEO Tampa Company, you can guarantee that your SEO efforts are not only effective but also tailored to your unique business needs.
Picture Credit: Freepik
#Content#Content for SEO#content marketing#Content Marketing Strategy#Google#Keyword research#Keyword Research Tools#Keyword Selection#keywords#Local SEO#Online Marketing#SEO#SEO Company#SEO content#SEO Strategy#SEO Tips
0 notes
Text

How Effective Keyword Research is done in 2024?
Learn how to do keyword research well. Find valuable keywords, check out the competition, and boost your rankings. Click to win!
#How Effective Keyword Research is done in 2024?#How to improve keyword research and boost your website’s visibility?#Which Keyword Research Tool is Best in 2024?#Factors to consider while selecting a tool#Which tool we should select?
0 notes
Text
#Keyword optimization"#“Keyword research”#“Long-tail keywords”#“Keyword density”#“Keyword analysis”#“Effective keyword usage”#“Keyword selection strategies”#“Competitive keyword analysis”#“Keyword ranking factors”#“Keyword trends”#“Local SEO keywords”#“LSI keywords” (Latent Semantic Indexing)#“Negative keywords”#“Keyword tools”#“Keyword targeting”#“Keyword stuffing”#“Keyword placement”#“Keyword-driven content”#“Keyword competition”#“Keyword performance metrics”
0 notes
Note
Hey there. I feel like I have to triangulate everything these days in the news. Do you recommend any specific news outlets? I’m exhausted. #FakeNewsSucks
It's probably/definitely a result of me living in England for five years doing my PhD, but on the (increasingly rare) occasions I actually want to see Big Picture World News, I still tend to use UK outlets, i.e. the BBC and the Guardian. If I want to see if something is remotely true and/or get a reputable source on it, I use the Associated Press or other newswire (but mostly AP). I tend to avoid all US-based corporate media (CNN, CBS, maaaaaaybe sometimes selectively will use NBC) like the plague. The Washington Post and especially the New York Times are acceptable if you want to confirm that something is actually real or has happened, but given the extent of their editorial kowtowing to Trump, otherwise useless, and I don't check them. Some people like NPR; given that Trump is going after them, they can certainly use your support.
Frankly, these days I mostly read local news, which consists of my home city's reputable and long-established newspaper and two local news affiliates. My general policy for vetting and verifying news, however, is "for God's sake if the only source is a Bluesky/Twitter screenshot that says something either very alarming or which is designed to confirm your biases in a certain way, imma need more than that to go on." Of course, I am as guilty as anyone else of sometimes reblogging that kind of post, though I try not to do so unduly. If the screenshot source is reputable enough that it's probably not completely pulling it out of their ass, I may be more inclined to reblog, but "random person on social media" is not a source. As ever.
If you do want specifically US-based political news that is realistic but not doomery, HopiumChronicles.com has been useful for me in the past. He is good at both acknowledging reality, finding action items, keeping up morale, organizing fundraisers, and a lot more. It is about the only site I can look at for long in that regard, tbh. Overall I try to limit my news consumption and to mostly read local news, as noted, since that is what is currently most relevant to me and will not overwhelm me with Everything Everywhere Is Terrible All At Once.
I realize Google has become an AI dreck pit like the rest of the internet, but if you see something and want to know if it is at all real, it is still possible to plug in some keywords and see what comes up. If you generally avoid reblogging unsourced screenshots or Twitter/Bluesky rage-bait, you're already doing better than most of social media. I know that nobody likes someone pedantically and extensively verifying every post, but if you do see something going around that pings your Is This Real antenna, it is good to do a quick check and plug in a reliable source in your reblog. No commentary necessary -- just a tool to help confirm that this is in fact legit.
90 notes
·
View notes
Text
How To Find Cool Games: On DriveThruRPG!
So disclaimer upfront: I don’t use the DriveThruRPG website nearly as much as Itch.io. Some of those reasons are practical (there’s no tagging system, the catalogue is rather D&D saturated,), while others are more… well, shallow (the website isn’t as pretty).
However, DriveThruRPG is a very good tool to have in your toolbox when it comes to finding cool ttrpgs, for a number of reasons, the primary one being that it’s for TTRPGS and only TTRPGs! Let’s get started.
The Search Bar / Categories.


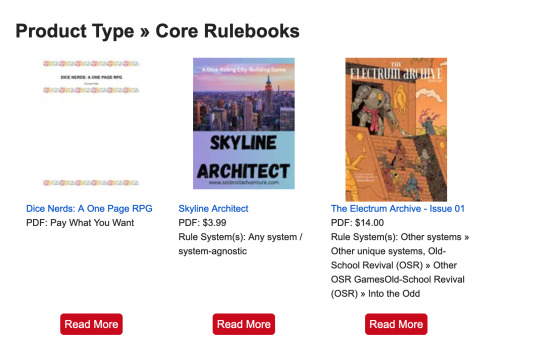
You can start by doing a basic search for a game that you already know about, or by searching for a keyword, like “pirates” or “zombies”. You’ll get titles sorted by “relevance”, so things that have the keyword in the name will show up first. One of the biggest downsides of this strategy is that everything kind of gets lumped in here: supplements, maps, expansions, adventures, character sheets… the list goes on. However, you can narrow down what you’re looking for by using the toggles at the top of the website. I personally usually narrow down search results by selecting “Product Type” and then “Core Rulebooks”.

One nice thing DriveThru has compared to Itch.io is that you can combine categories, so if I wanted to brows say, Gothic Horror Core Rulebooks priced under $20, well I can do that! My favourite categories are for genre, but another set of categories that you may find very useful once you’ve familiarized yourself with some games is the Rule System category. There are categories for systems like the Year Zero Engine, Forged in the Dark, BRP (Basic Roleplaying), OSR, and so much more. There’s also “other systems” and “any system” categories if you want to find something that’s unique or that can be used across games.

DriveThru also has a lot of games published in different languages, and you can narrow your results to see what’s been offered in your language. I think there are more options on this website than there are on Itch, although you might benefit by finding one or two publishers in your language on DriveThru, and then check the publisher’s website from there.
The Homepage
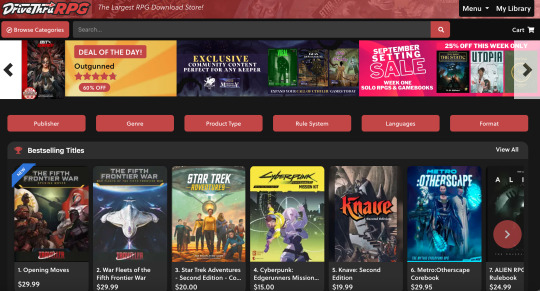
Another reason to check out DriveThru regularly is the sales and promotions. The top banner of the homepage will typically advertise a few things: the Deal of the Day, current themed sales, and special offers that DriveThru RPG wants you to know about. Their homepage also has Bestselling Titles, Most Popular Games Under $5, Newest Games, Featured Titles, and, if you scroll down enough, Personalized suggestions. Unlike Itch.io, DriveThru does a lot of work to show you what’s new, what’s hot, and what’s a really good deal right now, which can all be really helpful things!

When you land on a game, you’ll be able to see whether or not DriveThru sells physical copies, some basic information like book size, rule system, publisher & author, and a blurb describing the setting and other general information about the game. DriveThru has a side panel with “Customers also Bought”, which is great for showing you things that you might like, either because they surround the same theme, they work for the same game, or they are in a similar genre. (Another thing that Itch isn’t quite as good at.)

You’ll also be able to see (and leave) reviews for game, including the ratings left by other people who have picked it up. Occasionally I’ll find really useful information in the reviews, as reviewers might talk about mechanics they love or loathe, or recommend styles of play that they feel the game matches.
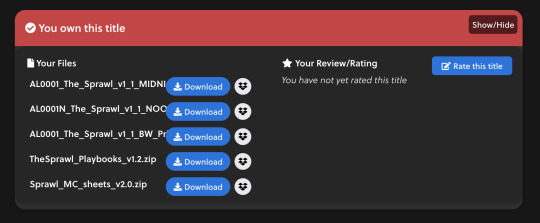
Finally, like Itch, DriveThru will let you know if you’ve already bought the game, and provide you with a download shortcut.
Publishing House Pages

Larger publishing houses typically have their ttrpg content sorted very nicely for you on their publisher pages, to help you find the things that you want. Modiphius is a great example, sorting Star Trek, Dune, Fallout, and their 2d20 games all in special categories.

Many publishers also have a Community Content section, which is great if you’re looking for assets, new adventures, hacks of a game system and some very reasonably priced (or even cheap) game additions. Similar to Itch, DriveThru has a Pay-What-You-Want feature for many games, although, unlike Itch, most PWYW titles require that you pay a non-zero amount.
Newsletters


When you create an account on DriveThruRPG, you can sign up for various different kinds of newsletters. Some come directly from DriveThru itself: this includes the Follow Your Favourites and Deal of the Day options, as well as weekly/monthly newsletters carrying information about new releases, special promotions, and (often) a free ttrpg product of the month.
However, on top of that, when you purchase a game or follow publishing pages, you can also get emails about new releases specific to those creators, as well as updates if a new version of a game you bought has been added. Often if it’s a game you already bought, this means you own the new version too - something that DriveThru has in common with Itch!

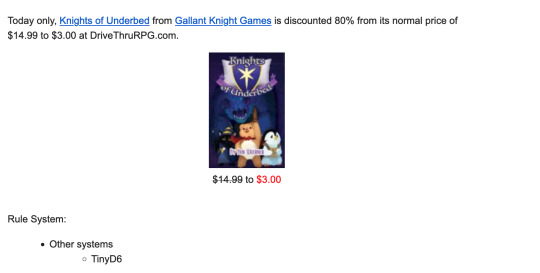

The Follow Your Favourites announcements will line up with whatever you’ve chosen to follow on the website. I’ve asked for updates about new Core Rulebooks, and I also get updates from the Onyx Path and a few other places where I found games I really liked. I also check the Deal of the Day offers fairly regularly; sometimes there are really really good deals offered and if it’s a game you know or like, then you don’t want to miss out on a sale!
Wishlists
DriveThru allows you to add games to wishlists to look at later, and even gives you the ability to sort your wishlists, although the process feels harder to look through than Itch does; I think it might be a UI issue.

However, because it acts like a wishlist, you can move games from the wishlist into your cart and vice versa, as well as move the games to another list. One really nice thing about the wishlist section is that DriveThru will alway show you when something you want is on sale, and how much it is normally - Itch does this too, but in this case, DriveThru is much easier to read!
I mostly sort my wishlists into Core Rulebooks and Supplements, because I don’t have nearly as many games bookmarked on DriveThru. If it exists on Itch, I store it on Itch - but there are plenty of other, “someday’ games, that I want to be able to find again in the future.
Your Library


DriveThruRPG has an app that you can download onto your computer or your phone, and it basically acts as a library that you can look through. In both the webpage and the app, you can sort your purchases alphabetically, from new to old, by publisher, by whether or not they were updated, and using similar categories as the search bar on the store front.
Free things can definitely be found here, even if they’re harder to look for. On DriveThru, most free products are things like character sheets, playtest games, or Quickstarts. However, some publishers do put up their stuff for free. Whenever I can get a Quickstart of something interesting, or if I find something being offered for free, I add it to my library. Free games are how I got started in ttrpgs, and QuickStarts are wonderful introductions to a system that usually give you a good idea of what the game is going to feel like.
Conclusion
Overall, DriveThruRPG is great for folks who like certain big publishing houses, and folks who like a good deal. I personally usually end up on the site because something in my emails caught my eye, which is the opposite of how I navigate Itch. DriveThru was my home base before I discovered Itch.io, so I still have a little fondness for the website, even if looking through it is a little bit of a slog.

One thing that might be a bit of an annoyance is that if you own something from a certain company, they might be able to send you a lot of emails for every sale and new product. If this becomes too much, you can choose to opt out from those publishers.
If you don’t want to have to actively engage with the website as much as say, Itch, DriveThru’s email system is also a big help. You can customize your subscriptions to match what you’re interested in, and then just check your emails once in a while to see what’s on offer. After a while you’ll also learn about yearly events, like the Summer Sale, which often provides big discounts on a lot of different games.
DriveThru is also a great place to start if you’re looking for print versions of games: I don’t know what shipping is like to places outside Canada, but I definitely appreciate that it’s an option, and sometimes all you need to do is find a game or publisher - once you know that it exists, you can google that publisher, check out their website, and figure out the best place to order from there.
#how to#drivethrurpg#mint speaks#indie ttrpgs#tabletop games#indie ttrpg#there's a lot of stuff to wade through on both DriveThru and Itch#but the email updates certainly feel like the easiest way to customize your experience#DriveThru's sales also do a good job of promoting things that you might otherwise not see
171 notes
·
View notes
Note
i was wondering, how do you make your icons? :0
Download/Find the transparent pngs of the icons
Browse around for textures/wallpapers/background that you’d liek to use for the pfp/icon. (I use pinterest) (Alsp, tip; I always use the keyword texture bc it brings up the best and least distracting stuff)
(Optional) Find some overlays that youd wanna play around with and add to the image
Open any image editing software. I use Ibis paint X on my Iphone but you can use procreate or Pixlr. Really js anything that works for you :3
Select a square frame thingy like below :D

6. Add your background and then your icon, mess around with some overlays and maybe even fuck around w/ the clipping tool!


And then ur done
i think
#the way that it says 11 hours but i have multiple file thingies for my icons…#morons icons#moronkyne#tutorial
23 notes
·
View notes
Text
Tools Tuesday - Tagging - March 18
This Tools Tuesday is all about tagging, for when you’re ready to post your finished work on Archive of Our Own or any other site that uses tags! AO3, as the most popular fic posting site, will be the focus.
To begin: what are tags? And why do we use them?
Tags are keywords used to describe a fic or post. They can serve a variety of functions, but at their core they tell a viewer what to expect when they click in. On some sites (like Tumblr), they are at the bottom of the post or in the body of the post (like bsky). On AO3, they are the third thing seen, after title and author.
As seen in this handy infographic from SummerofSpock on tumblr, tags on A03 fall into 5 rough categories: Canon, Format, Tone, Relationship, Theme.
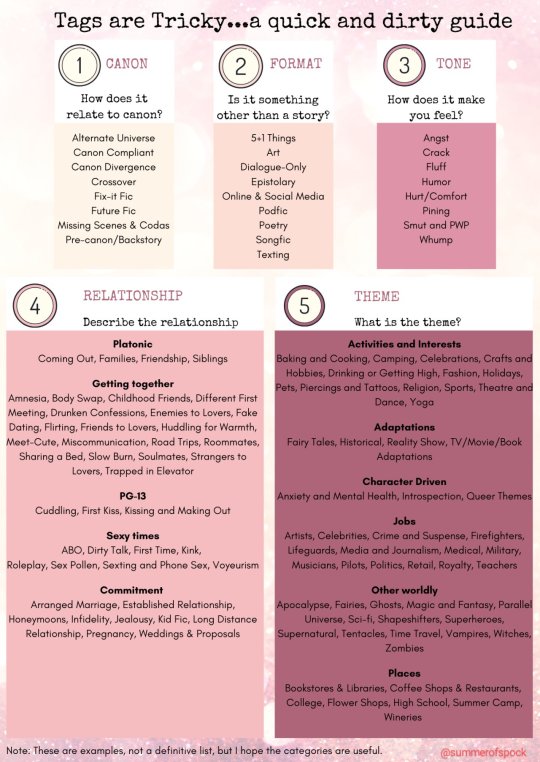
[full image ID in ALT text. Infographic titled “Tags are Tricky…a quick and dirty guide” with tag example lists in the categories of Canon, Format, Tone, Relationship, Theme. Each box is a different pink, in a gradient. End ID.]
source: https://summerofspock.tumblr.com/post/698388759652319232/mostlyinthemorning-i-kind-of-suck-at-tagging-so
Not every fic might use every category, and there are certainly tags that overlap categories. There’s also what I consider a 6th category, which is Author Commentary (no beta we die like xx, character needs a hug, why did i do that much research for a single paragraph, etc).
All of that aside, why should you use tags?
They help readers find and enjoy your fic! The two main uses of tags when searching is Seeking and Avoidance.
Seeking is when a reader really wants to read a particular thing, like they want fix-its only or just Modern AUs. Once they narrow it down to fandom, these are the tags they’ll type into the search bar. If your work isn’t properly tagged, it won’t show up, even if it’s the epitome of a Coffee Shop AU and that’s the term they search. Generously tag so readers can find you!
Avoidance is excluding a fic from consideration due to a particular theme or topic. Maybe their pet just died, so any mention of Animal Death is out. Maybe they are really tired of a particular ship, or are narrowing down for a rarepair. On AO3, there’s a section in the filter bar for excluding tags (see below, boxed in blue). Readers can eliminate what they don’t want to see, which is wonderful! They can select exactly what they want; not every fic is for every reader. Generously tag, so readers can be selective!
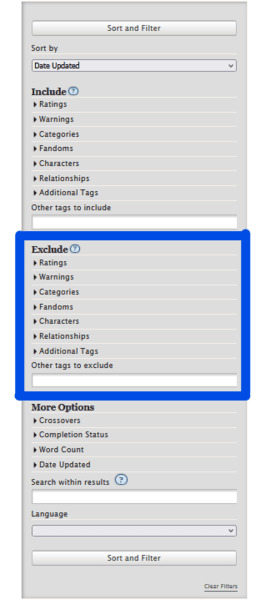
[ID: the Archive of Our Own filter bar Exclude section. End ID.]
Still unsure how to tag your work? Or stuck on other aspects, like ratings and warnings? The Fanfic Author’s Guide to Metatext (As Used on Ao3) by Eiiri is an incredible, in-depth explanation of everything contained within the metatext (tags+warnings) block on an AO3 fic. I — this event’s mod — use this text as part of my determining for rating guidelines, and I have found it extremely helpful for tagging my own works. View in full on tumblr and AO3 at these links
full text in post:
AO3 version, from which you can download as a pdf, epub, or other format:
https://archiveofourown.org/works/30986561/chapters/76535018
Additionally, this event requires certain tags be honored and present as needed, primarily common content warnings or hot topics. See the rules post for more information. These tags at least need to be present in any promo post that are applicable, though tagging the fic itself is always good practice. After all, tags are like the ingredient label of a fic.
Still not sure what to tag and want more inspiration? This post from @/insanitysilver has great links to further help, as well as an example of a tagged fake fic!
~
Have a question not answered above? Is there something important I missed? Want to see a post about tagging for Tumblr, Twitter, or another site specifically? Start a discussion in the replies and reblogs! Thanks for participating, and good luck with your wip!
-
Tools Tuesday is a weekly part of the Finish What You Started event where I share various resources I have found to help everyone complete their WIP. Have a resource you want to share? Send it in a message and I’ll take a look!
25 notes
·
View notes
Note
hihi!!! how do you make yr rentry graphics? for example, the madohomu matching graphics u made?
Hihi~ Here’s what I use and how I make my graphics!
1. Photopea! Hosted online for absolutely free, this is an in-browser version of Photoshop
2. PSDs! These are tools used for coloring your graphics. These can be found on DeviantArt, as well as tumblr. I typically search “PSD download” + the colors I’m looking for!
3. Art! What will be featured in your graphic.
3A. Great sources of official art can be line stickers, promo art, and official merchandise!
3B. If you need transparent art, try looking up already-transparent versions of what you’re looking for! Use the keywords “render”, “transparent”, and “PNG”. (Pro tip: if you’re on your desktop using Google, and wanna avoid those annoying fake PNGs, go to the “Tools” -> “Color”, and then select “Transparent”!)
3C. If you found a transparent you wanna use, but it’s on one of those annoying wikis that makes everything tiny, open the image in a new tab and delete everything after .png in the URL!
3D. Additionally, if you’re downloading from tumblr, open any image you download in a new tab. The default tumblr file types are .pnj and .gifv. Simply replace those parts of the URLs with .png and .gif!
4. Masks! I find my masks on Pinterest, for the most part. You can find a lot of great ones all in one place here! I use this method for making my gifs custom shapes.
Hope this helps! 💖
165 notes
·
View notes
Text
Crown of Glory: A Hair Growth Working
This is a simple working that is meant to be a fun addition to your hair care routine. I am using this as a weekly hair oil treatment. Feel free to use all of it, parts of it, or none at all. It’s your hair journey, so make it your own! Go wild and create your own working if you would like, too. I will post updates in the next few months of the results.
Hair, that crowning glory atop our heads, has long been revered as a symbol of power, vitality, and spiritual connection. It is said to be an extension of the self, a tangible manifestation of inner strength and identity. In bygone eras, hair was so cherished that its loss was often seen as a sign of misfortune or a weakening of the spirit.
This working is a form of Wortcunning, where magick and medicinal plant knowledge intertwine. This hair growth oil is infused with herbs known to help stimulate hair growth, combat hair loss & thinning hair, breakage, and nourish the scalp. It is essential to remember that while magick can be a potent tool, it is not a replacement for proper hair care and a healthy lifestyle. Nourish your body from within, and let this working be a catalyst for transformation.
As with all workings, approach this spell with reverence and intention. Harness the power of nature and your own inner strength to cultivate a Crown of Glory worthy of royalty.
Ingredients for the Crown of Glory Hair Growth Oil:
To harness the power of nature for lush, thriving hair, I have carefully selected a blend of potent herbs and oils.
Rosemary: Renowned for its hair-growth-stimulating properties, rosemary has been shown to rival the effects of commercial hair growth treatments.
Nettle Root: Rich in nutrients, nettle root helps combat hair loss by inhibiting DHT, a hormone linked to thinning hair.
Saw Palmetto Berries: Traditionally used to address hair loss, Saw Palmetto Berries offers support for overall hair health.
Garden Sage: Stimulating blood circulation to the scalp, sage encourages thicker hair growth and pairs beautifully with rosemary.
Horsetail (Herb): Packed with silica, this herb strengthens hair strands, preventing breakage and promoting growth.
Evening Primrose Oil: Nourishing both new and existing hair, evening primrose oil contributes to longer, healthier locks.
Safflower Oil: A lightweight carrier oil, safflower oil aids in absorption of the herbal properties while also stimulating hair growth at the cellular level, and nourishes the scalp. Liquid Coconut Oil can also be used.
To maximize the potency of the ingredients, the oil infusion process spanned a full 30-day moon cycle. However, a rapid infusion method can also be employed for those seeking a quicker remedy. There are plenty of resources and videos on YouTube on both of these methods.
______________________________________________________________
Ingredients Used For Working:
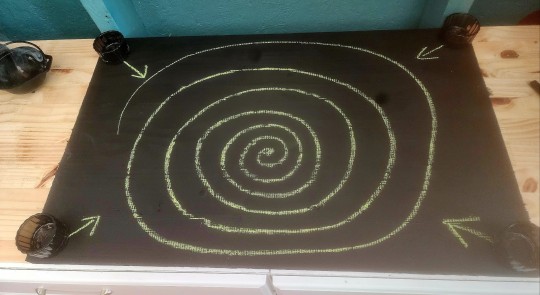
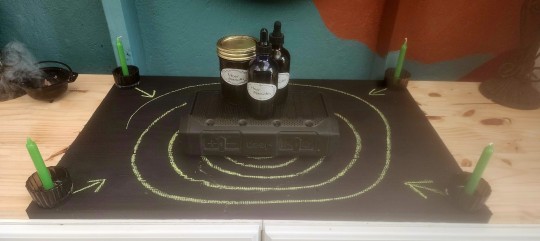
I painted my workspace with chalkboard paint, but don't worry if you can't! Any flat surface or even paper will work as long as your candles are safe and sound in holders while burning.
Hair Growth Oil or Your favorite hair growth oil
4 green candles ( I used chime candles)
Green chalk (white is a good sub)
Blessing oil (I use a mix of Frankincense & Myrrh with clear quartz crystal inside the bottle... all charged by a full moon)
A Bluetooth speaker
Frankincense & Myrrh Incense Cones
____________________________________________________________
Steps For My Working:
First, let's get your space ready for magick! Cleanse everything up, and give your candles and tools a little cleansing & consecrating. I love burning Frankincense & Myrrh incense for this part.
Next, you can write "Hair Growth" or whatever phrase/keywords work for you on your green candles, starting from the bottom and going up. Put them safely in their holders and drip your blessing oil on each candle.
Next, draw a spiral with green chalk, starting from the outside and working your way in. Then, draw little arrows pointing from your candles to the spiral. This is like focusing all the candle magick into one powerful spot!
Now at the spiral's heart, position the speaker and place your bottled hair growth oil on top of the speaker. I used a hair growth frequency to pulse through it, like a sonic energy spell to charge and attune the oil.
youtube
Then you will want to turn on the music and light those candles. Remember to light them going clockwise – it's like winding up the working.
Now as the music plays and the candles flicker, close your eyes and picture your Crown of Glory! While you’re visualizing your dream hair, say this:
By the power of nature's might, May my hair grow strong and bright. Roots deep, strands long and free, A crown of glory, wild and free. Grow, my locks, strong and deep, Let ancient powers your spirit keep. With every drop, a potent spell, To break the bonds where tresses dwell. Crown my head with growth anew, May hair flourish, strong and true. Let follicles awaken, deep and sound, As vital force is richly found. As this oil is blessed and shaken, May hair growth be fully awakened.
When all the candles are finished burning, you can clean up your space. You can throw away or recycle things as you normally would.
____________________________________________________________
May the Gods, Goddesses, and Moon bless your workings, and may the universe conspire in your favor. Happy Casting Seekers!
#traditional witchcraft#witchcraft#witch#magick#witchblr#spellcasting#pagan witch#green witch#green magic#witches#folk witchcraft#folk magic#hair magick#spirituality#green witchcraft
48 notes
·
View notes
Text
So...what's going on with the NIH?
A (very reductive) breakdown
With the current “flood the zone” agenda overwhelming our feeds, I’m sure that all this news about the NIH feels like just another drop in the bucket. I figured I'd try to write out what's going on and why it matters, since this is all HUGELY impactful, despite getting pretty buried in the news cycles (my explanation is under the cut—the article above is a helpful reference).
TL;DR: The NIH funds most medical research in the US; this medical research funding is being slowed and cut effective immediately; and we need to contact our representatives about this ASAP.
You can say that you "urge them to oppose all funding cuts and DEI-related restrictions in the NIH." Stick this onto your other phone/email/letter scripts, and feel free to add more specifics and personalization!
What happened, and why does it matter:
As of 2/8/25, the Trump administration has:
Indefinitely halted NIH study sections, which are how research gets reviewed and approved, as well as travel and communications (some of all this is just now restarting, but this has been selective/on a delay)
Planned to flag and possibly reject grant renewals and any new proposals with "DEI" and "DEI-related" terms, ranging from obvious keywords like "LGBT" and "transgender" to standard technical terms like "race, "gender," "health disparities," and "bias" (source on terms is re: the NSF, but I can confirm as an NIH funded researcher that we have similar directives)
Ended "DEI" programs in the NIH and removed multiple webpages on diversity-related grants and funding
Frozen hiring and rescinded job offers starting on 2/8/25
Capped the indirect cost funds of grants at 15%, effective immediately (from an average of 30%)
(NOTE: This is a non-comprehensive list—and while I'm an NIH-funded researcher, I'm not high up enough on the food chain to be a total authority on this. Please feel free to add more details if you know them.)
What does this all mean?
The NIH is the largest funder of health/medical research in the United States, which is usually conducted at universities and hospitals (public AND private). This includes research on everything from cancer, heart disease, dementia, addiction, depression, HIV, and the flu to—in my specific case—co-occurring conditions of autism (so basically, anything at all health related? That's probably being studied via NIH funds).
Funding includes things like:
Direct costs of supplies, tools, machinery, etc.
Research team salaries, from lead scientists to administrative staff
Fellowships (i.e. how PhD students typically get paid)
Indirect costs (utilities of lab operation, etc.)
Basically, what all these directives do is slow and/or cut health research funding. What this means is slowing "non-DEI" research funding and entirely cutting "DEI" research funding (which we don't have solid definitions for yet!).
What does this all look like?
At this rate, and if unchanged, this could likely result in:
Months-long (or longer) delays on "non-DEI" medical research (i.e. for the average population)
Unknown cuts to health disparities research (i.e. research on health differences between specific demographics of people)
A near-complete loss of "DEI" research in most US institutions (e.g. BIPOC health, LGBTQ+ health, disability health)
Fewer proposals of new/novel research ideas
Fewer PhD acceptances and hiring opportunities for new researchers (possibly shrinking an entire generation of scientists)
Mass layoffs of research staff
Breakdown of international research collaborations
Huge tuition increases for college students (including undergrads)
Closures of research institutions/universities
Privatization of research funding (possibly creating a bias towards "profitable" research interests/health conditions more common to wealthy populations)
Potential brain drain of American scientists to other countries
USA's loss of status as a scientific leader and powerhouse
For the average American, this all translates to things like:
Fewer medical breakthroughs and "weaker" medical research
Fewer medical/health experts
Increased drug/treatment costs
Lower quality of life
Stagnant (or lower) average life expectancy
(Plus economic repercussions I don't have the expertise to predict).
So what do we do about this???
I hate to sound like a broken record, but...CONTACT YOUR REPS! Call daily if possible, but send emails/letters at the very least! Use the language in the TL;DR at the top of this post if that gives you a framework.
If you want, include personal reasons as to why this will impact you, or just mention that it will slow life-saving medical research (bonus points if you tell them to block all cabinet picks until Elon is no longer interfering in the government)!
This is dire and immediate, but it isn't all doom and gloom. With enough pressure, we can (and have!) gotten things reversed.
Take care of each other, stay alive, and keep fighting back 💛
#time sensitive#please spread the word!!#again feel free to correct me on anything if you know more!#everything is changing so rapidly and no one has the full picture right now (and that's by design)#and like I said. reductive#us politics#stem#nih#public health#news
31 notes
·
View notes
Text
JavaScript Fundamentals
I have recently completed a course that extensively covered the foundational principles of JavaScript, and I'm here to provide you with a concise overview. This post will enable you to grasp the fundamental concepts without the need to enroll in the course.
Prerequisites: Fundamental HTML Comprehension
Before delving into JavaScript, it is imperative to possess a basic understanding of HTML. Knowledge of CSS, while beneficial, is not mandatory, as it primarily pertains to the visual aspects of web pages.
Manipulating HTML Text with JavaScript
When it comes to modifying text using JavaScript, the innerHTML function is the go-to tool. Let's break down the process step by step:
Initiate the process by selecting the HTML element whose text you intend to modify. This selection can be accomplished by employing various DOM (Document Object Model) element selection methods offered by JavaScript ( I'll talk about them in a second )
Optionally, you can store the selected element in a variable (we'll get into variables shortly).
Employ the innerHTML function to substitute the existing text with your desired content.
Element Selection: IDs or Classes
You have the opportunity to enhance your element selection by assigning either an ID or a class:
Assigning an ID:
To uniquely identify an element, the .getElementById() function is your go-to choice. Here's an example in HTML and JavaScript:
HTML:
<button id="btnSearch">Search</button>
JavaScript:
document.getElementById("btnSearch").innerHTML = "Not working";
This code snippet will alter the text within the button from "Search" to "Not working."
Assigning a Class:
For broader selections of elements, you can assign a class and use the .querySelector() function. Keep in mind that this method can select multiple elements, in contrast to .getElementById(), which typically focuses on a single element and is more commonly used.
Variables
Let's keep it simple: What's a variable? Well, think of it as a container where you can put different things—these things could be numbers, words, characters, or even true/false values. These various types of stuff that you can store in a variable are called DATA TYPES.
Now, some programming languages are pretty strict about mentioning these data types. Take C and C++, for instance; they're what we call "Typed" languages, and they really care about knowing the data type.
But here's where JavaScript stands out: When you create a variable in JavaScript, you don't have to specify its data type or anything like that. JavaScript is pretty laid-back when it comes to data types.
So, how do you make a variable in JavaScript?
There are three main keywords you need to know: var, let, and const.
But if you're just starting out, here's what you need to know :
const: Use this when you want your variable to stay the same, not change. It's like a constant, as the name suggests.
var and let: These are the ones you use when you're planning to change the value stored in the variable as your program runs.
Note that var is rarely used nowadays
Check this out:
let Variable1 = 3; var Variable2 = "This is a string"; const Variable3 = true;
Notice how we can store all sorts of stuff without worrying about declaring their types in JavaScript. It's one of the reasons JavaScript is a popular choice for beginners.
Arrays
Arrays are a basically just a group of variables stored in one container ( A container is what ? a variable , So an array is also just a variable ) , now again since JavaScript is easy with datatypes it is not considered an error to store variables of different datatypeslet
for example :
myArray = [1 , 2, 4 , "Name"];
Objects in JavaScript
Objects play a significant role, especially in the world of OOP : object-oriented programming (which we'll talk about in another post). For now, let's focus on understanding what objects are and how they mirror real-world objects.
In our everyday world, objects possess characteristics or properties. Take a car, for instance; it boasts attributes like its color, speed rate, and make.
So, how do we represent a car in JavaScript? A regular variable won't quite cut it, and neither will an array. The answer lies in using an object.
const Car = { color: "red", speedRate: "200km", make: "Range Rover" };
In this example, we've encapsulated the car's properties within an object called Car. This structure is not only intuitive but also aligns with how real-world objects are conceptualized and represented in JavaScript.
Variable Scope
There are three variable scopes : global scope, local scope, and function scope. Let's break it down in plain terms.
Global Scope: Think of global scope as the wild west of variables. When you declare a variable here, it's like planting a flag that says, "I'm available everywhere in the code!" No need for any special enclosures or curly braces.
Local Scope: Picture local scope as a cozy room with its own rules. When you create a variable inside a pair of curly braces, like this:
//Not here { const Variable1 = true; //Variable1 can only be used here } //Neither here
Variable1 becomes a room-bound secret. You can't use it anywhere else in the code
Function Scope: When you declare a variable inside a function (don't worry, we'll cover functions soon), it's a member of an exclusive group. This means you can only name-drop it within that function. .
So, variable scope is all about where you place your variables and where they're allowed to be used.
Adding in user input
To capture user input in JavaScript, you can use various methods and techniques depending on the context, such as web forms, text fields, or command-line interfaces.We’ll only talk for now about HTML forms
HTML Forms:
You can create HTML forms using the <;form> element and capture user input using various input elements like text fields, radio buttons, checkboxes, and more.
JavaScript can then be used to access and process the user's input.
Functions in JavaScript
Think of a function as a helpful individual with a specific task. Whenever you need that task performed in your code, you simply call upon this capable "person" to get the job done.
Declaring a Function: Declaring a function is straightforward. You define it like this:
function functionName() { // The code that defines what the function does goes here }
Then, when you need the function to carry out its task, you call it by name:
functionName();
Using Functions in HTML: Functions are often used in HTML to handle events. But what exactly is an event? It's when a user interacts with something on a web page, like clicking a button, following a link, or interacting with an image.
Event Handling: JavaScript helps us determine what should happen when a user interacts with elements on a webpage. Here's how you might use it:
HTML:
<button onclick="FunctionName()" id="btnEvent">Click me</button>
JavaScript:
function FunctionName() { var toHandle = document.getElementById("btnEvent"); // Once I've identified my button, I can specify how to handle the click event here }
In this example, when the user clicks the "Click me" button, the JavaScript function FunctionName() is called, and you can specify how to handle that event within the function.
Arrow functions : is a type of functions that was introduced in ES6, you can read more about it in the link below
If Statements
These simple constructs come into play in your code, no matter how advanced your projects become.
If Statements Demystified: Let's break it down. "If" is precisely what it sounds like: if something holds true, then do something. You define a condition within parentheses, and if that condition evaluates to true, the code enclosed in curly braces executes.
If statements are your go-to tool for handling various scenarios, including error management, addressing specific cases, and more.
Writing an If Statement:
if (Variable === "help") { console.log("Send help"); // The console.log() function outputs information to the console }
In this example, if the condition inside the parentheses (in this case, checking if the Variable is equal to "help") is true, the code within the curly braces gets executed.
Else and Else If Statements
Else: When the "if" condition is not met, the "else" part kicks in. It serves as a safety net, ensuring your program doesn't break and allowing you to specify what should happen in such cases.
Else If: Now, what if you need to check for a particular condition within a series of possibilities? That's where "else if" steps in. It allows you to examine and handle specific cases that require unique treatment.
Styling Elements with JavaScript
This is the beginner-friendly approach to changing the style of elements in JavaScript. It involves selecting an element using its ID or class, then making use of the .style.property method to set the desired styling property.
Example:
Let's say you have an HTML button with the ID "myButton," and you want to change its background color to red using JavaScript. Here's how you can do it:
HTML: <button id="myButton">Click me</button>
JavaScript:
// Select the button element by its ID const buttonElement = document.getElementById("myButton"); // Change the background color property buttonElement.style.backgroundColor = "red";
In this example, we first select the button element by its ID using document.getElementById("myButton"). Then, we use .style.backgroundColor to set the background color property of the button to "red." This straightforward approach allows you to dynamically change the style of HTML elements using JavaScript.
#studyblr#code#codeblr#css#html#javascript#java development company#python#study#progblr#programming#studying#comp sci#web design#web developers#web development#website design#ui ux design#reactjs#webdev#website#tech
400 notes
·
View notes
Text
How to create your OC in RDR2 story mode! Part II - Animations

This follows on from my post on how to create your OC model and get it ready for a scene with Rampage Trainer and Outfit Changer mods installed. Now that we have have our mods installed and we're familiar with creating our character and spawning in other characters, it's time to animate them!

Now hopefully you installed the full animation list from the install mods section in the previous post!
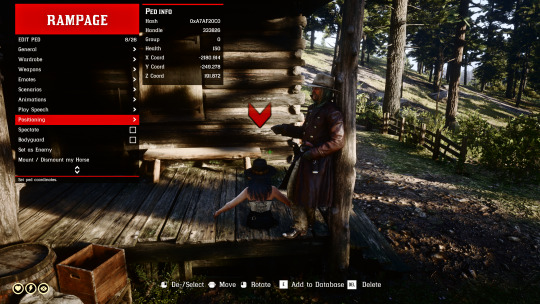
With our peds added in the database, let's select one of them to start an animation (make sure you still have creator cam turned on from the Spawner > Object settings as it make positioning your characters so much easier!)

Now there are two types of animations we can choose:
Scenarios: limited but come with props and can almost interact with nearby objects correctly eg leaning on a bar
Animations: thousands of raw animations you can loop but have no props, you must add these in manually
Let’s do a scenario first
In your selected peds context menu, select Scenario and click search to try a keyword eg “drinking” or “lean” or “journal”, try your luck you’re bound to find something!
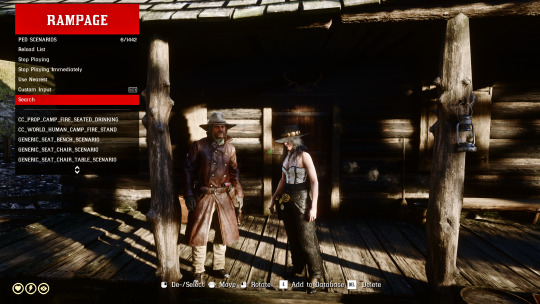
Here we'll have Micah lean back smoking against the structure, cigarette prop automatically loads in and he can easily be positioned with creator cam against the beam. Easy!

Let's try animations now
Now lets select our other ped and this time, in their context menu choose Animations > Dictionaries > Reload Lists
You can try your luck here by searching with a keyword (there are thousands from general gestures, to combat, to camp interactions and story missions!) and trying out some animations.
Make sure to enable looping and you can play around with the different settings here. If you find your ped is moving around the scene, make sure you’ve set them to be frozen from their general menu options so they stand in the one spot.
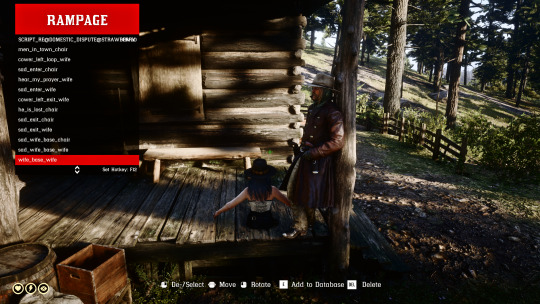
In animations, unlike scenarios, some will not position correctly like sitting poses even if you position them over an object they should be able to sit on, like a chair.
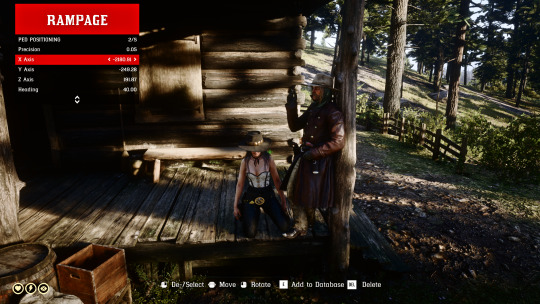
To get around this, in the ped menu go to Positioning and manually play around with the settings here but note that doing this will stop the animation from playing, so it’s a bit of back and forth between this menu and the animations menu. A bit fiddly, i know.
Once you have your poses more or less how you like them, you can also do a few things to tweak the overall scene from the Rampage Trainer World Menu like change the time of day which affects the lighting as well as the weather.
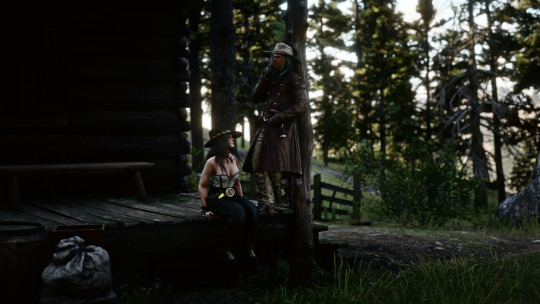


Tools like Otis_Inf makes the screenshot process easy because we can hit pause in the game to get the right animation frame we want from any looping animations, it also allows us to easily hide the UI and maneuver a freecam all with a few hotkeys.ReShade also makes it easy to add more DoF to our shots too, so less post-processing edits required.
Now go and have fun! The best way to learn is to simply play around with all the settings in Rampage Trainer 🙂
Feel free to tag me in any screenshots you take, I’d love to see them!
11 notes
·
View notes
Text
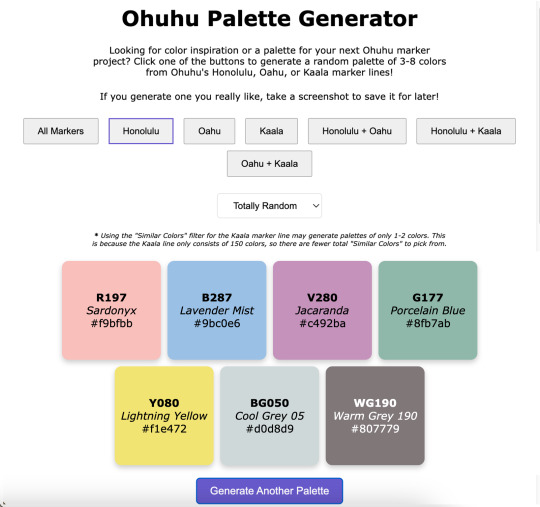
Ohuhu Palette Generator
----------
Hey look, I am actually capable of finishing & posting something!
What can I say? Life was just too chaotic the past couple of months and something had to give. Art posts were unfortunately the easiest thing to cut. 😅
Anyway. I have managed to chip away at a few projects in between other things, and this in particular was kind of a spur-of-the-moment decision I spent most of January working on: A very basic website where you click a button (or two) and get a random assortment of Ohuhu marker colors to then use however you see fit! ✨
If you are interested in listening to me ramble about how exactly we got here, that's what the "Keep Reading" button is there for. 😉
Like My Art and Want to see more of it? Here's All My Links! ⭐️
----------
Well Sparklers, this is certainly not how I expected to start off 2025 (nor did I plan to end 2024 as silently as I did as far as art posts go), but here we are! 🤗
Quick Recap: I made a very bare-bones website that will generate palettes of randomly selected Ohuhu markers colors for you!
I've probably said this somewhere before, but it bears repeating: I've been slowly but surely chipping away at various projects behind the scenes, a couple of the bigger more involved ones being related to yes, Ohuhu markers. [And for the record, no I really didn't forget about OhuHueVember, this past November just turned out to be one of the most chaotic and busiest of my entire life, and unfortunately putting art posts on Pause was what made the most sense at the time, and then December was just naturally busy what with Christmas and Family and all.]
A few days into the New Year, while I was taking a break and scrolling social media, since I am pretty deep into the wider Ohuhu Community at this point, I saw a kind of post that I've seen a few times before: Someone asking about generating color palettes of Ohuhu markers for coloring (as in adult coloring books). Usually, the "answer" to this is to use an existing color palette generator (of which there are many) and just manually match your markers to the colors, but that's not usually as easy of a solution as people are looking for.
I think there's at least one generator out there that can tell you Copic marker (and maybe Prismacolor pencil?) matches for the colors it generates, but it hasn't quite caught up with the boom in popularity that Ohuhu has had, so instead of matching to the color itself, you'd just be trying to match to the Copic color instead, which I would argue might actually be harder to do, even with some community resources that are out there.
The point is I know in the Coloring Community, people tend to like easy solutions and there really wasn't one for this specific problem. And I've known this for a while—since the first time I saw a post asking for something like that, which was many, many months ago (maybe even a year or more), but yet for some reason this most recent, totally inconspicuous post sighting was the straw the broke the camel's back and made me finally snap:
Surely there has to be something out there were you can put in a custom list of colors and it'll randomly spit like 5 of those colors back out at you. There are all kinds of random generator tools out there, surely at least one could do something like that, couldn't it?
So down the rabbit hole I went.
There wasn't a terribly straight line that lead me here and I went back and forth to a few things a few times, so I'll just give you a list of the highlights that had the most influence in how we got to this point:
I tried just about every keyword combination I could think of for "custom palette generator," "make your own palette generator," "make random color palettes," "color randomizer," etc. Even if it wasn't terribly fancy and the absolutely barest of bones of the concept I described. No real luck there, but it's very possible I just totally missed something.
I eventually checked Flippity.net because I love their Flippity Manipulatives tool (for digital Mini-Magnets), and their "Flippity Randomizer" would have worked except it has a very strong default color palette for what the final randomizer looks like. While it still would have been totally functional otherwise, I know the strong color mistmatch could very well be a dealbreaker for some people to not want to use it at all. (And, to be fair, the final Flippity links tend to be...long and suspicious looking if you've never seen one before.) You can use images with the Flippity Randomizer, but the thought of having to make 300+ separate small image files that would also need to include the color names and numbers directly in the image and then also put them in order in a Google Sheet sounded torturously tedious (even for me), so I filed that idea away as "Plan C" and kept looking.
Flippity did give me the idea to try looking for more generalized randomizers that could be re-purposed for what I wanted since theirs' was originally for making sentences. Through that, I finally stumbled upon perchance.org
Perchance all by itself was a big step in the right direction because it's entire purchase is making your own generators and you can use existing Perchance generators as a starting point to make new ones.
So imagine my delight to learn that there have been a few color generators already made with Perchance, and buried among them even a couple of Ohuhu ones!! 😃
But you'll notice my final generator isn't running through Perchance. Suffice to say, I know just enough about coding to be a menace, but not enough that I could truly say I ever really "know" what the heck I'm doing. My "coding experience" consists of:
Messing around with CSS and Journal Skins on deviantArt, back before the Eclipse update when those were still Things™
Many half-hearted attempts to make a Blogger blog, all of which were eventually deleted and lost to time
Creating and Maintaining Fandom Wiki pages (and, within the last couple of years, a whole Wiki for my own personal use)
Relatedly, I briefly tried messing around with some code on Toyhou.se but that ended up going nowhere
Playing with a premade theme here on Tumblr to make my page look nicer
And anyone with real coding experience might gather from that list that I certainly don't have the skills to build anything from scratch, but I can generally fumble around with existing code and figure out how to change things to make the end result look the way I want. So, as I said: I know just enough to be a menace.
This means that I started off by spending a lot of time hopping back and forth between different palette generators that had already been made with Perchance and Google while trying to combine various elements I liked in a way that ran smoothly...and also trying to not "break" anything so it would run at all.
I kept hitting walls with Perchance because, as I eventually figured out, I kept finding solutions and suggestions that were for "regular" HTML coding, not Perchance's specific variety.
After some Googling, this led me to move over to Glitch.com so that I could use regular HTML code but also still see the "live" results alongside the code, which was something I really liked about Perchance (and was familiar to me from Tumblr themes).
I also thought I'd end up making posting the final site through Glitch too, but we'll get to why that didn't happen in a bit.
The primary culprit that had me switch from Perchance to Glitch was the fact that I realized the code would be so much longer and probably what would be considered "messier," and I would guess more difficult to update at a moment's notice if I had to manually type 300+ color number codes, names, and hastily-selected hex codes (just to have a visual representation of the color) in there, let alone if I decided to basically do that twice to cover both the Honolulu and Oahu lines.
I keep a few different spreadsheets for Ohuhu markers already, so I wondered if there was a way to get the code to reference something like that instead to keep the code itself "cleaner" and maybe make edits/additions to the color list easier in the long-term. And lo and behold—There is! You can, apparently, paste in "CSV" Google Sheets links in a specific way into the code and it'll look at those instead of having to type everything directly into the code itself. I did have to make three separate spreadsheets—One for Honolulu, one for Oahu, and one for Kaala—but I was able to copy and paste a lot of the information I already had in my other spreadsheets into those, so overall that was still way easier than the alternative! The catch is that, as I alluded to, there might be a way to do that using Perchance, but the results I was finding were all for regular HTML code and I really did not feel like chasing down Perchance-specific instructions. So to Glitch I went.
Moving to Glitch did have the additional bonus of me being able to paste in the widget for my Ko-fi Page, which I only thought to do because I got a Ko-fi notification in the middle of working on the code and while I was checking that, I remembered: "Hey doesn't Ko-fi have like an HTML thingy you can put on your website?" [They have two, actually!] Anyway. I got what I'd already been working on moved over to Glitch, which was most of the basic set up for the page; I was just using a placeholder list of colors from OhuHueVember so I could get the Categories and page layout taken care of first. Then I did kinda the same thing—I set up the basis for the spreadsheets I'd need using the OhuHueVember list as placeholders since I already had hex codes picked out for them and wanted to make sure the whole spreadsheet thing was actually going to work before I went any farther.
Once I did verify that method was working, I got to take a very tedious detour and actually fill out the spreadsheets with the proper information. As I said, I was able to paste in a lot of what I needed from my other spreadsheets—The number codes and names for all the colors—but it was that last piece of information I needed for each color that ended up taking the longest: The hex codes. Since I wanted to have this thing at least functional sooner rather than later, I did not have time to go through and meticulously curate matching hex codes for each color like I did for OhuHueVember, and technically I couldn't have done that even if I wanted to for the Oahu and Kaala lines since my collection is all Honolulu. So I relied mostly on quick eyedropper color-picking from swatch photos from my collection and photos/images online for the rest.
From that, I know a lot of the hex codes are not good matches, but again: The point was to get everything functional first. Especially since I was able to switch to using spreadsheets to store the information, I can always (and intend to!) go back and update the hex codes to better matches later on.
Still: Once I got all the hex codes filled out, the most basic version of the generator was in fact functional! 🎉
That by itself was super exciting and I had to spend several minutes generating palettes just because I could now...But me being me, and not always knowing when to quit when I'm excited about a project...I wanted to do more, especially now that I was working in regular HTML coding.
So I spent the next couple of days trying to figure out how to add a Filter so people could narrow down the types of palettes a little more. My very first thought was Pastel, since I know soft/pastel palettes tend to be kind of popular in coloring communities, and then I figured if I was going to do Pastel, why not include bright "Vivid" pastels and dark "Moody" ones, too? [And a little later on I ended up adding a "Neutral" filter for greys + earth tones too, just because I could.]
Getting the little dropdown button in there for the Filter wasn't actually that bad, but getting it to actually filter like it was supposed to was another story. I lost count of how many times I accidentally broke the whole generate (mostly buttons not working like they should) while trying to get the filter to cooperate with me. 🫠
I did eventually....mostly get both the filters and the marker line buttons to work at the same time after enough trial and error, though.
And originally, this was the point in the story where I had to explain that I did run into issues with having "Kaala" + "Similiar Colors" in the dropdown selected at the same time causing the generator to freeze up about 7 out of 10 times, even though everything else was working fine, and I couldn't figure out how to fix it to save my life. 🙃
But! Shortly after I started writing this description I took a procrastination break and I went back in to try and clean up some of my notes I'd left in the code to tell the different sections apart...And I couldn't help myself. I had the code in front of me, so I started fiddling with it again.
Finally I hit the right keyword search I needed and was able to find a solution that actually worked and I could mostly just copy and paste in without breaking anything else in the process! 🙌
As I had suspected, the problem mostly stemmed from the fact that there are just a lot less Kaala colors to pick from—150, vs. the over 300 for either Oahu or Honolulu. So sometimes the generator would try to pull 3-8 "Similar Colors" and it just...couldn't because there weren't 3-8 colors that fit the "Similar" range it was calling for.
So I put in a few lines that basically force it to just use whatever colors are available even if it's not the intended 3-8...This does mean (as noted in the preview image and on the site itself) now you'll sometimes get just 1-2 colors with that specific combination (Kaala + "Similar Colors") but I think that works a whole lot better than the entire page bugging out.
But so, okay! Generator is (mostly) working as intended and I even added some extra things I hadn't originally planned on—I even got really crazy and tried adding some SEO things to the code because I found a template and you hear so much about how important that is now [I can't tell if it's really working or not, but it's in there)—Great! But there was one last thing that was bothering me...
Glitch has a limit of 1000 active hours per month on a project, and that includes both hours I spend editing the code and time people spend actually using it. Logically, do I really think I need to be worried that my very basic site that will only appeal to a very niche community within a niche community will come anywhere close to actually hitting 1000 hours of activity in a month? No.
But I also know this is the internet and sometimes you post things and they get way more attention than you expect (as sort of became the case with Ohuhu markers themselves), and to be fair I have no statistics whatsoever on the kind of time people usually spend on palette websites, so I really have no way to know if 1000 active hours is even an unrealistic expectation or not, in either direction.
Between that and past experiences with "Oh, I'll worry about that limitation later when it actually proves to be a problem," I decided to look into other options that wouldn't be limited by hours, and after a cursory look around, GitHub is probably way more complicated than what I really need, but it felt like the obvious choice. At least I'd actually heard of it before!
I can't edit the code "in real time" like I can with Glitch (at least not without signing up for a subscription, I don't think), but so far I can still edit in Glitch and just copy & paste the updated code into GitHub, so that'll work for me. And it might be for the better anyway since that's another layer between my trial-and-error editing and the final site, so if I go back and try to change or add to the site in the future (which I very well might) and I accidentally break more things, it won't effect the "live" site people are actually using. 😅
I must admit I kind of want to keep toying with the site to see just how far I can push it...And it's given me some ideas for other projects, too, but I have to draw the line in the sand somewhere so people can actually use it and it's not just a private project I tinker with sometimes for all eternity 😆 😊
At least I did accomplish what I originally set out to do + a few extra things, so I don't feel like it's really "missing" anything and it should be plenty usable even if it's not totally perfect. (And I'm speaking mostly of the imperfect hex codes when I say that, for the record.)
Like I said at the beginning: This is definitely not how I expected to start the year off, but I'm really happy with the end result and I'm cautiously optimistic about where/how things might go from here.
In any case, I hope any of your Sparklers that chose to try it out like/enjoy the generator too...Or at least that you got some enjoyment out of my rambling about it here. 😆 (Which I'm assuming you have if you managed to get this far....)
The Ko-fi widget is there on the final site, but I would like to get better at promoting myself and my work so it bears repeating: If you do like the generator and feel like sending a little monetary support my way, my Ko-fi Page has a few different ways you can do that. And if it means anything to anyone: My Ko-fi Supporters got a little early preview of the generator before today and if I add anything to it in the future, they'll probably get an early look at that too. 😉
I think that's going to do it for me here today, though. It's been a while since I made a "big" public post so I have to go get re-acquainted with my cross-posting process...Which I'm not really looking forward to, but oh well—has to be done!
I look forward to seeing you Sparklers again (hopefully) very soon...! 👋
----------
Website created by me, MysticSparklewings
The Generator/Website is not officially affiliated with or sponsored by Ohuhu
----------
⭐️ Like My Art and Want to see more of it? Here's All My Links! ⭐️
#mysticsparklewings#xxmysticwingsxx#ohuhu markers#alcohol markers#copic markers#limited palette#palette challenge#color challenge#art supplies#art resources#resource#free resource#cool websites#coloring tools#adult coloring#coloring challenge#colors#art inspirations#palette generator#markers#art tools#color palettes#ohuhu.
13 notes
·
View notes
Note
do you have any tips for making your notion pages (esp. planning/assignment tracker pages) both functional and aesthetic? what resources do you use? i've been using notion for a little while as a sort of academic planner, mostly with the table/database function, but would appreciate any advice/resources you have :)
Preface: Notion is first and foremost a workspace. If there's a tension between form and function, function has to win every time. That said, it's definitely possible to have both!
Tip #1: Use templates. Notion itself has a huge database and unless it brings you personal joy, there's no point wasting time building your page from the ground up. If you're in the studyblr tag, you probably want something aesthetic, and I've had good luck with these. The eternal studyblr queen EmmaStudies also has some pages.
Tip #2: Curate your pictures. Do you have a pinterest? No? Get one! I find it's best to start out with one or two focal images and then work from there. Don't be afraid to use dark images either, Notion does have selectable light/dark mode. Images with partial transparency can be nice to break up the sharp-cornered square that is Notion's default and Notion does also support GIFs. My biggest suggestion is to select 1 neutral base color (Notion provides black or white), 2 somewhat similar colors, and then one accent. On my current page, I'm using black, brown, gold, and white.
Tip #3: Beautiful is not synonymous with useful! Before you download a template, ask yourself: what organizational tool am I actually looking for? Personally, I can't use Notion as a planner —typing takes too long when I could scribble in a scratchbook instead. So I don't get much use out of the Calendar feature, the ToDo lists (hence why I post them here), or Kanban boards. I do get a ton of use out of the hyperlink, embed, stack text, and font color options for notetaking!


Please pardon the contract law screenshots lol. Notion lets me have a colorcoded system, open/close toggles for things we may only discuss briefly, and hyperlink to separate pages for (law school) each individual case. That in particular is amazing because on those case-pages I can include links, citations, and put searchable 'tags' for year, jurisdiction, keywords, etc. That means that as I go through law school, I'm actually building a searchable database of relevant case law on every topic I study. Brigance isn't a case with a media component, but if I was working on White v. Samsung or Leonard v. Pepsico, then I could include the relevant video and audio clips.
So notetaking on Notion is exactly what I want! But if you want to have a daily planner, or a journal, or a habit tracker, make sure you include that. YouTube is the best possible resource for finding something specific, but I occasionally find something neat on Instagram.
Tip #4: The most useful thing for me (and I really believe the most useful thing for any student who has syllabi) is an assignments database. This is really just Notion's basic Database: Table View that I've curated into a workhorse.
At the beginning of the semester, I look at all of my syllabi and put all of my readings, homework, exams, and special dates into a table, tagging each one with the class, type of assignment, and due date. Then I can use Notion's "Views" feature to sort them. I have a tab where I can see everything, a tab where I can see the next 2 weeks, a tab just for tests, a tab to sort by each class, and a 'catchup' tab that lists everything incomplete with a due date that's passed —by checking it off, it deletes itself from that "View" because it no longer fills all the criteria. (I have actually done the things shown here, I just wanted you to have something to look at).

Plus, I looove checking things off of the 'Full' tab and seeing that little % complete number at the bottom tick up!! This table means I'm never surprised by an assignment, exam, or event and preparation is more than half the battle. I've found that the best way to balance this really heavy-duty table on the opening page is to keep it on half the screen and fill the other side with gizmos and pictures. There's not a lot else you can do besides selecting the color of your tags.
Tip #5: Widgets! This is really where the fun aesthetic part comes in. Both Indify.co and Widgetbox.app work with Notion and it's how people include clocks, timers, weather reports, playlists, etc. They can be a bit of a humbug to install because they're hosted externally so to make adjustments you have to re-embed the new code into Notion; in particular, Spotify playlists take 10-20 minutes to update.
In general, I would still consider myself a Notion novice. There are some true wizards on YouTube doing things that frighten and impress my brain. If anyone has more resources, please add them below!
10 notes
·
View notes
Text
Color Monologue
Because color is one of my obsessions, I figured I’d share this. It’s nice to have names for the colors we don’t often have words to describe.
Below are some charts for examples, followed by a personal monologue.
List of Colors: 550 Color Names and Hex Codes
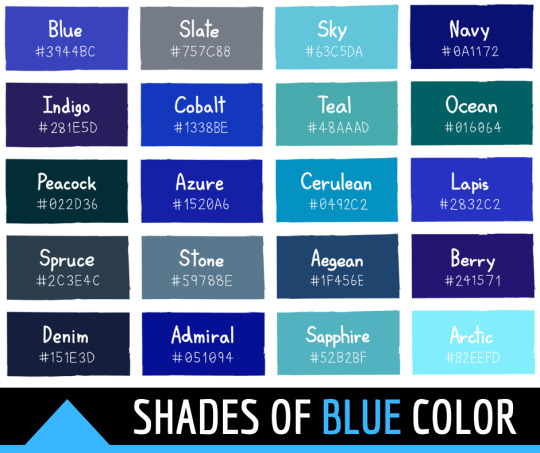
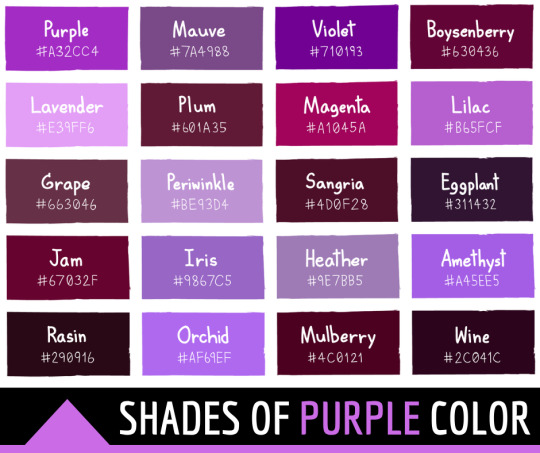
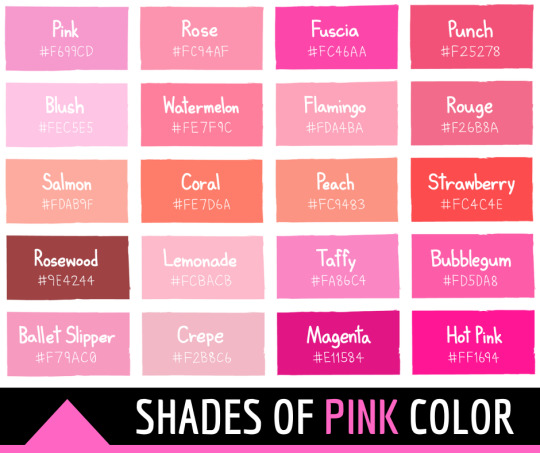
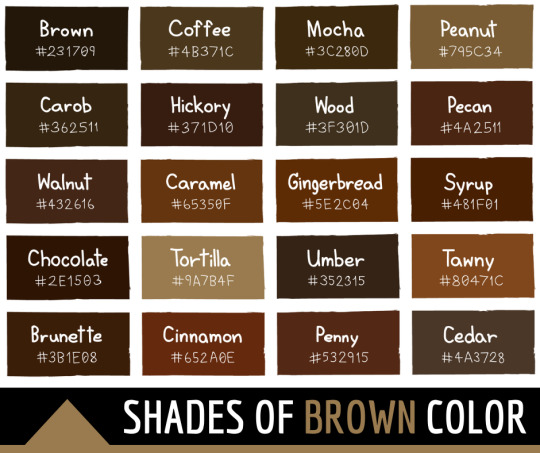
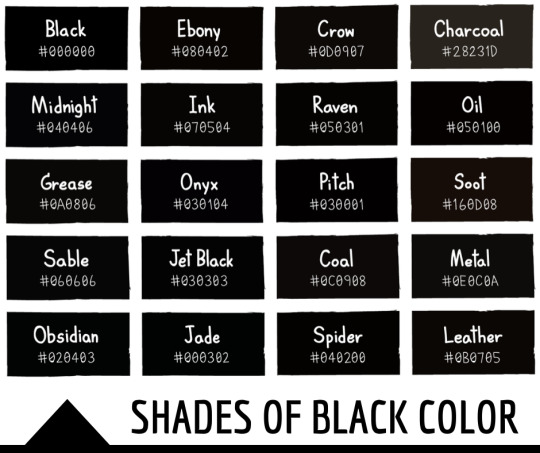
(If you can distinguish between these shades of black, let me know…. I can’t! Lol)
Finding My Favorite Color
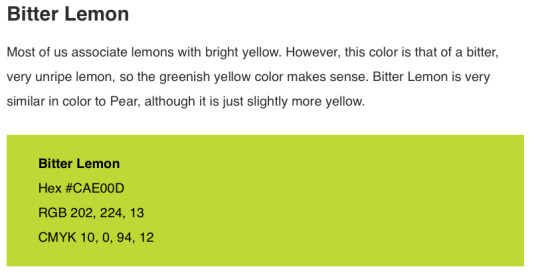
Spoiler alert: It’s #E0EE00
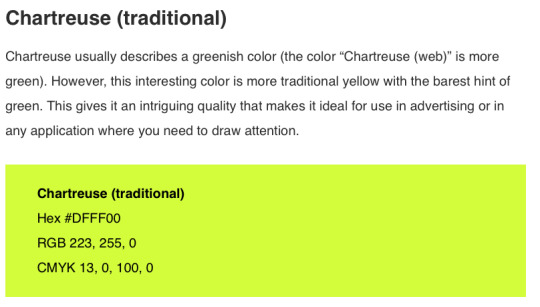
Their “summary” color charts don’t include my favorite color, so I went into their more in-depth lists and found Bitter Lemon, which I think is about right. Actually, this “traditional” Chartreuse is likely closer:
My Favorite Color is an Experience
When people ask me what my favorite color is, I may come off as ridiculous when I respond “the color of new spring leaves when sunlight shines through them,” but it’s really the truth.
I care a lot about that exact sensation. It’s very captivating to me. I don’t even have to get on a plane to witness it. I can just go down the street or to a local park.
The experience of standing under a tree and gazing up through its branches is enchanting, and this array of color tones glows around me and inside of me. The below image kind of communicates this idea.

I particularly like the yellower green, right where the sun hits the leaves. Source
The term “chartreuse” is still inexact because the examples provided are usually not yellow enough.
This next pic is just for fun:

Source
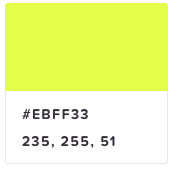
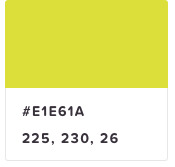
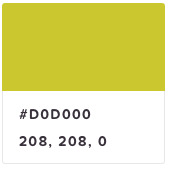
Using a Color Picker to Find My Favorite Color
Here are some more examples of my favorite color.
Color Picker Source I’m aware these are multiple shades, but oh well. I’m searching.
Sometimes I feel like I get to my favorite color fastest if I go to yellow first, then darken it a little.
Funny how this color now looks worse as I place it against the dark background of Tumblr. In fact, it looks like boogers and I don’t like it as much at all.
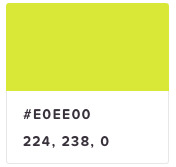
The hex code “E0EE00” is really satisfying. Old Macdonald had a farm, E-0, E-E, 0-0…..
I think I’ll settle there for now.
Clothing With (Almost) My Favorite Color
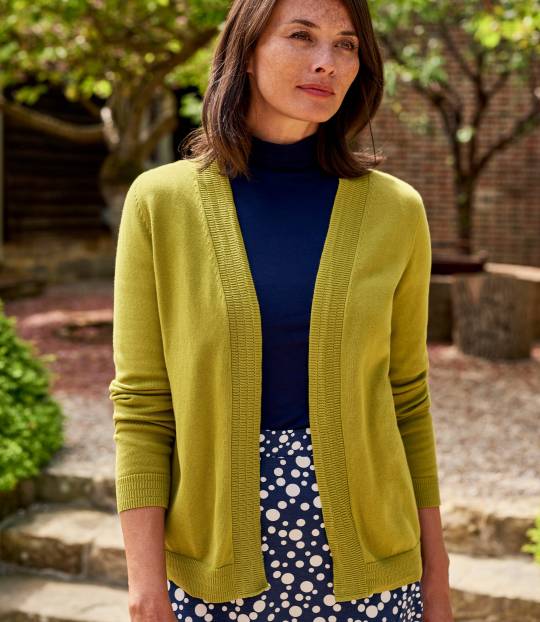
Source

Source
It’s very, very difficult and rare to find clothing in my favorite color.
Is Chartreuse Green or Yellow?
(and who cares?)
Sometimes I wear a sweater from F21 that is pretty close to my favorite color, and people compliment me on my “yellow sweater,” at which I am always amused. To me, the sweater is green. So I have fun randomly asking people if they think the sweater is yellow or green. I just like to see which one they say. There are no wrong answers. I, too, remain uncertain as to which general category my favorite color inhabits. Relatedly, “Chartreuse” falls under “Green,” while “Chartreuse (traditional)” falls under “Yellow” on the first website I linked, List of Colors: 550 Color Names and Hex Codes. (Their version of “Chartreuse” I do not like at all. It is way too blue-green and not yellow at all.) Well, It’s a good thing that the determination of whether this shade is “yellow” or “green" is not particularly important one way or the other, because if people cared about this, I do think they’d never come to a consensus.
Clothing Website Color Pickers
I do, however, wish clothing websites would recognize “chartreuse” in a keyword search or have a more intelligent color picker when filtering results. It would not be too hard to code a tool that analyzes each clothing image and provides 10-20 color names depending on the hex codes it picks up. One could build in a “margin of error” where hex codes that are within a few degrees of variation are also included under those names. So the user could actually use a color picker (or a longer selection of specific colors, at least) to filter by color, and all matching or near-matching clothes would be included in the results.
Thanks for coming to my color monologue!

Source
#colors#color chart#color names#colorful#art#colorful art#color-meanings.com#color meanings#yellow#red#orange#black#white#blue#green#chartreuse#color monologue#hex codes#hex color codes#hexadecimal codes#hexadecimal#color picker#html color codes#html#hex#clothing#fashion#green clothes#st. patrick’s day#rare colors
9 notes
·
View notes