#angular tutorial
Explore tagged Tumblr posts
Visit Tumblr Blog
Explore Tumblr blogs with no restrictions, modern design and the best experience.
Last Seen Tumblr Blogs


Fun Fact
Celebrities use Tumblr as well.
Text
In this article, we will take a look at how to deploy an angular application to an Amazon S3 Bucket and access it via AWS Cloud Front. Let's read here -
#angular web#deploy angular app#Angular Web Deployment#angular version#Aws Cloud#Cloud Service#angular tutorial#angular 17#habilelabs#ethicsfirst
0 notes
Text
Sokka's face shape eludes me... very hard to translate it into my round, chubby art style for some reason...??
#his head shape is just. its round but also long. korra's art style doesnt help cuz it makes him hella angular and sharp as a 40smth yro#wanna keep his adult angles in mind while still giving him youngster roundness... maybe im too ambitious...#also wanna keep his culture's inspo in mind. so that's a third thing to tack on...#anyone with a style similar to mine wanna show me a sokka face tutorial... unless...??#majart#wip#delete later#atla#atla fanart#sokka#suki#atla suki#atla sokka#scene redraw#i looked to suki's LA actress for inspo fyi. but sokka's actor just doesnt match what i had in mind ig???
57 notes
·
View notes
Text
bbngh…
Trying something new.
Traced over a redraw of smth i did during english class. Not the original bc apparently i had to turn in the page i drew it on. Lowkey forgot to write my name on it so idk if im getting it back lol
this style is inspired by a ton of people, all of whom i forgot the names of TwT
#airy hfjone#hfjone fanart#hfjone#hfjone airy#Lowkey kinda love the chunky arms and legs#maybe not the angular lines as much but its still cool#Oh yeah the tutorial i used for the paper overlays was from cheesyx33 on yt!!#Scribbles of the phoenix
12 notes
·
View notes
Text
Best Angular Course

— — — — — — — — — — — — — — — — — — — — — — — — — — -
Join our affiliate program to promote Angular and React courses.
You will only receive money when sales are made, and these should be through your link. Then you will receive 45% commission.
Sign up:
#angular #react #affiliate #commission
0 notes
Text
Why React is so Popular? - Coregenic Software
Why React is So Popular? React has gained immense popularity among developers and companies worldwide due to its modular architecture, simplicity, efficiency, and unique features.
Let’s explore some of the reasons why React is more popular than other libraries/frameworks.
Simplified React Web Development;
React offers a simple and effective way to create complex web applications. Unlike other libraries/frameworks, React focuses on a single development process that involves creating individual components and organizing them into a single, presentable app.
This modular approach ensures faster development, stable and predictable code, and easier maintenance.
#Why React is so Popular?#react#why react is so popular#react js#react tutorial#what is react#why is react js so popular#learn react#react js tutorial#why reactjs is so popular#why react is so fast#why react is so difficult#why react is so important ?#learn react js#why react is so complicated#react course#react native#react javascript#react is wrong#react vs angular which is best#which is easy react or angular#react crash course#what is react js
1 note
·
View note
Note
do you have any tips/a tutorial i missed for drawing the stans' torsos and limbs? it might be random, i just struggle with it fsr 😭
honestly so much more proud of my art after finding your other tutorials thank you so much for making them and such good art
Sorry it took me a bit to answer! In all honesty, I still struggle a bit but hopefully I can help.
Think of Ford having a more angular and sharp torso type and Stan having a more rounded one. Kinda of like a flour sack that’s cinched in the middle.

It’s easy to imagine the limbs as tubes connected to circles. Hands are square in a sense.

It all starts as basic shapes and then adding details as you go. I know it’s not as detailed as I could have made it but I’m hoping this helps in some way! ;w;
#ask#kittynugg#tutorial#art tutorial#stan twins#my art#probably should make an updated tutorial#but hope this helps!
925 notes
·
View notes
Text
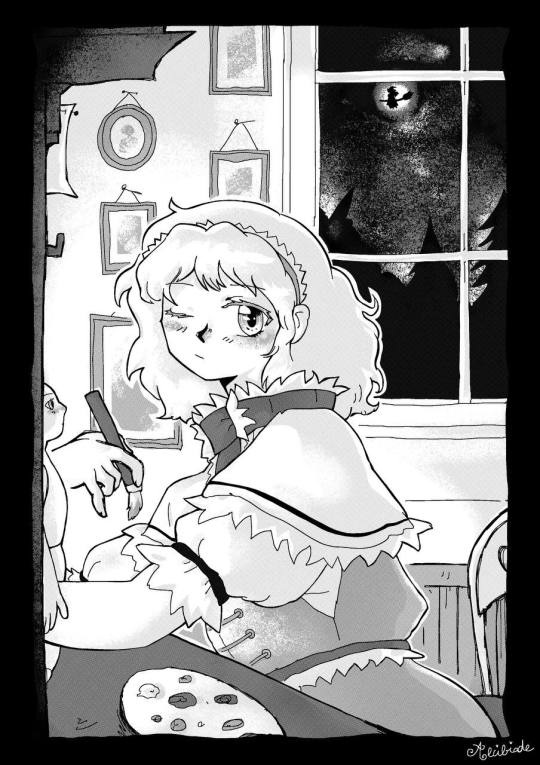
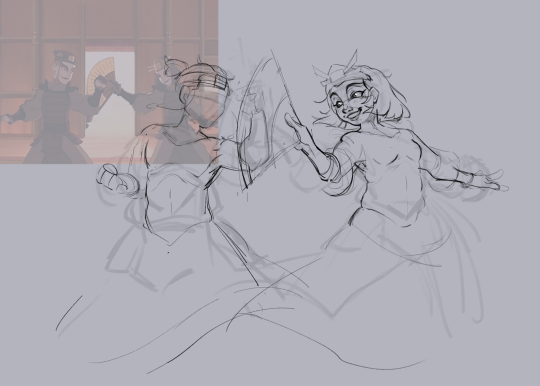
I made this picture for my digital halftone tutorial that you can find here!
There isn't much context to it though, but it's kinda linked to the next touhou manga I'm working on, in which we'll see a lot of scenes of Alice making her dolls. I'm still trying to figure what art style I'm going to use for this project right now (I hesitate between something more angular than what I'm used to, like this picture here, or something rounder than what i'm used to (kinda like the last Satori picture I made). Idk yet, but I'm excited about this next manga! I'll try to work on the rythm of the story a bit more than what I did last time.
163 notes
·
View notes
Note
Hii, sorry if it may be a little annoying, but I love how you draw anatomy anatomy!! maybe you can make a tutorial? or maybe some advice! thanks anyway ;)
oh of course my friend, NOW im gonna be honest i dont have a secret technique or anything nor have i studied anatomy extensively...its more just little things ive picked up over the years, but to sum up what i do:
observe -> simplify -> memorize and apply!
OBSERVE a reference, your own body, real life, I also highly recommend observing other art if looking at real life references gets too intimidating! I personally found it easier looking at how others drew bodies, to give me a sense of direction when I'm not sure where to start with a real picture.
SIMPLIFY what you're observing into shapes, personally i don't use any specific shapes like boxes or circles like i used to...I just create a vague shape that makes it easiest for me to get the general form down. also i highly suggest not making everything a circle, angular shapes are more helpful to me bc it's easier to put them in different perspectives.
MEMORIZE, it's easier for me now bc most shapes of the body I have memorized, i often look at my own body for reference, note down things that you notice about your own body, check out how your muscles move in the mirror and apply them to your art!
for any video references, David Finch has sooo many great tutorials for anatomy. Here's a playlist of all of his tutorial videos!! (the male torso one is essentially what I'm doing 80% of the time..)
don't get too caught up in what's anatomically correct, not to say you shouldn't know the basic proportions before you try to bend the rules. However i find that It's quite common to disregard the real anatomical form in an art piece if it looks more aesthetically pleasing to do so!
104 notes
·
View notes
Note
Wait so like... Toshinori hair tutorial when? 🥺💗💗
i see someone must have unearthed my ancient excessive amounts of toshinori art sksjdfkdsf its been actual YEARS since i last drew him
so u start with baldinori

doodle his little anime girl hair vents which are incredibly important if he doesnt have proper hair ventilation he will overheat and DIE. and then limp noodle out the rest of the front of his bangs and try to pose them in a way thatll frame his face well. if its hard to make it work in a certain angle i'll tuck it behind his ear sometimes

finish off the bangs, do lil hair definition lines too. for the tufts at the bottom i just kinda scribble little things until it looks nice
for his main hair i always start with the little bit i drew in pink above, that little sort of flattish part on the top is like the anchor point n then i just kinda bullshit the rest of the hair under it on that side. on the other side its always kind of tough but i do that little sort of upwards tuft to the side of the anchor bit and then continue to bullshit the rest skfjsakfjdsaf

i tend to draw it either really sharp and angular or softer depending on the vibe of the overall drawing im goin for
hope this helps :P i tried to draw it the same way i always drew it while i was still super hyperfixated on him
#ask#anon#toshinori yagi#all might#bnha#mha#this was nostalgic to draw tbh#i was obsessed with toshi from the ages of 12-16#i think ive drawn him over 200 maybe 300 times. i know i drew that one nomu au over 100 times and it wasnt even my au i just liked it a lot#my dedication was unmatched#miss u toshi xx#now im stuck on another piece of media with a tall yellow sad tired guy
41 notes
·
View notes
Note
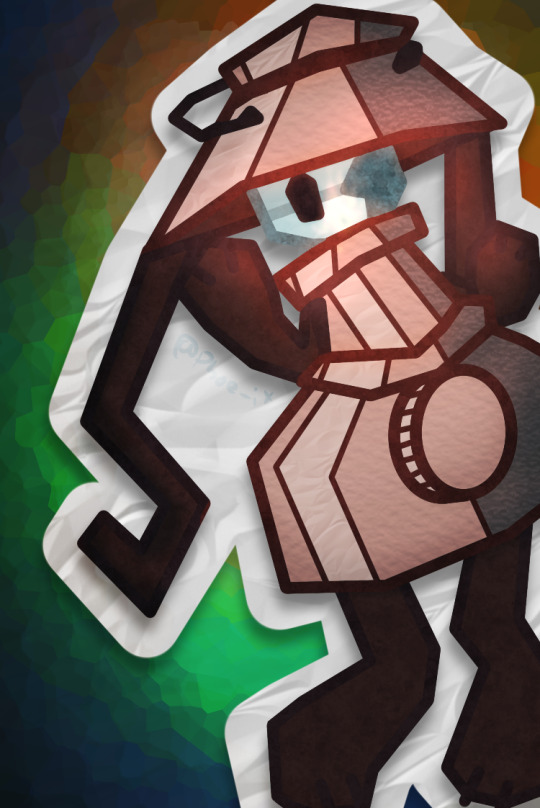
Hey fren, is there a possibility you could show us how you draw Fort Max’s big ass head? I struggle with the little overhang in the front - loveofbots
Waaa! Hello there! Im glad you asked and Im willingly here to help you with that!
Although,Im not a really an expert for tutorials. So please bear with me with some grammatical errors qwq
long post ahead!
Okay,so here it is: I. Angles and shapes
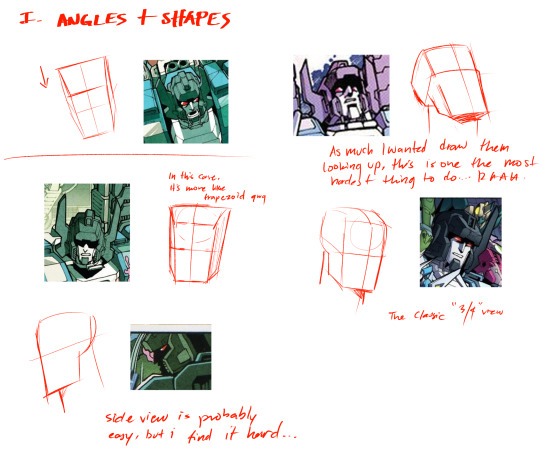
First off,you need to determine his head angle. I used some angles from the existing pics of Fort Max from MTMTE for this owo When you do,try to make a basic shape. In other words,draw a box. So when you draw a box,it should be look like 3D-ish like my illustration above. Fortress Maximus has a very Square-shaped individual and his head shape could vary in some angles and may inconsistent. (my brain is not brainging atm)
II. Drawing For drawing,now I picked the 3/4 angle because it's easy,lol.


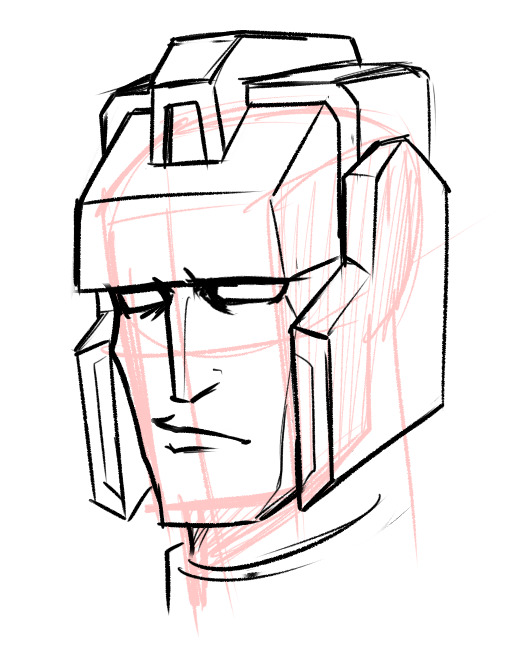
I started sketching his head with a circle first and then proceed to add the box shape. The top of his head is not completely flat,but more like curved. But it won't be neccessary later on,I think? (It's just my liking when sketching tho qwq). Then you see a shaded part so it looks like 3D-ish,and I added a jawline and neck.
Next,drawing his face and neck. It didn't go the way the base looks like,but you could overlap on some areas if you needed to (such as chin,jawline,forehead,etc..). Btw,you can use the lasso tool and transform tool to adjust the angle for you liking.


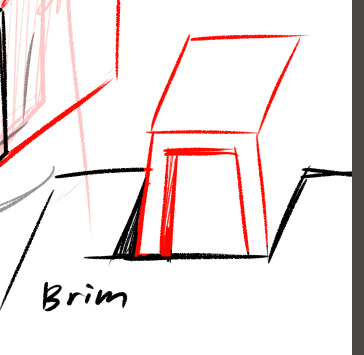
Then,you draw a slightly elevated angular square for his brim.(similar to this lego piece,lmao). Also,you can add his side thingy-stuff (ii have no idea what are those called). I preferrably draw those things angular,but you can draw it straight up a rectangle and more easier.

Then add that little thing in the middle like most every cybertronian have. Again,repeat the same "Slightly elevated angular square" but its now a triangle-rectangle hybrid.
Also,try to make it look like buried within the brim. (It still depends on you if you want it on top or look pushed down)
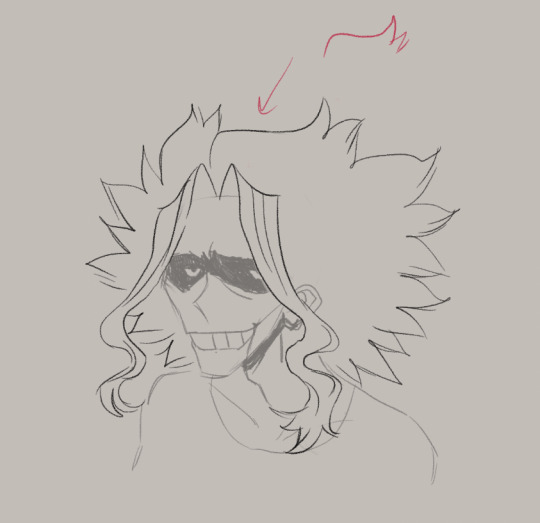
I erased some of his forehead and jawline. And Ta-Da! This looks cursed af,but we're getting there! Final step is to add his antlers or horns.
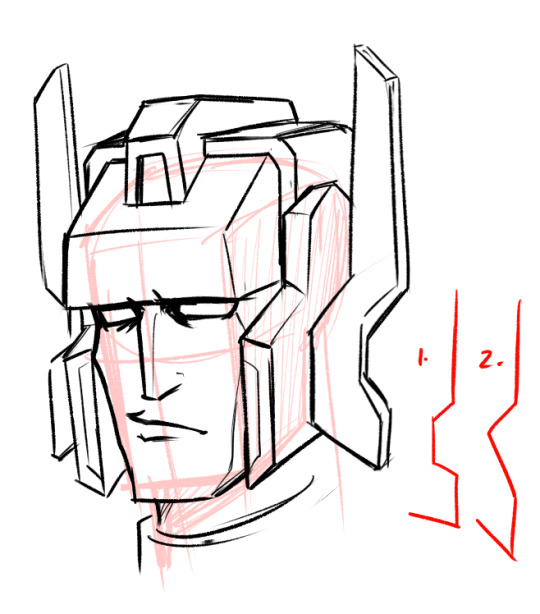

I finally added his horns/antlers! his horns/antlers could vary in shapes too! some examples seen on the lower right,but ive seen more than that!
keep in mind that to flip/mirror the canvas if you drawing those so you can be aware if it looks weird
Add that smol half square between his helm and antlers


and we're almost done! added some details too You can also add those "shadows" on his eyes,like in the idw comics. Max eyes looks a bit small and weird,but it can be fix by erasing some parts to make his eyes looks better.

Finallly...Done!
I made some few minor adjustments for my liking.
I hope you find this tutorial helpful,this is my first ever tutorial i made. It may not be 100% percent accurate,but you get some ideas. Also,I really appreaciate that you asked me for this and it makes me very happy!
Also some bonus side profiles sketch i made last week or so:

Fort max,Inferno and Red alert
my brain is not entirely functioning since i woke up middle of the night and,decided to make a tutorial instead of staring in the darkness qwq
231 notes
·
View notes
Note
Do you have any advice for drawing rodents? Any advice help as I'm having trouble drawing their faces.
Hey there! I hear you honestly, rodent faces took me forever to figure out. I will say my style is very cartoonish, and I take a lot of liberties with my characters so I can have them fit a persona, style, or look that I'm going for.
But if you'd like a quick little tutorial I'd be happy to give it!
Most important thing is to study. Look at real life rodents, look at rodent skulls. The skulls especially are the building blocks of the entire anatomy of the face.
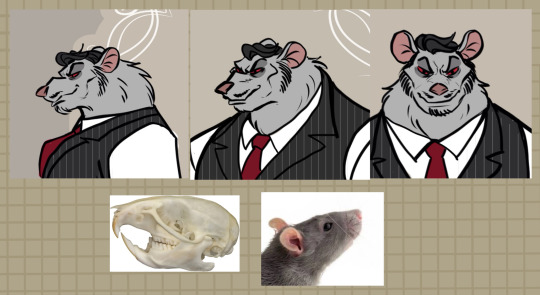
I'm mainly going to focus on side profile of a rat for now! Pads here is a good example of how you can take the basic form of the skull and add your own style to it.

When I look at the rat skull I break it down into the separate forms. I use circles here but you could easily use rectangles and squares to assist you with the volume/depth. I like to imagine the muzzle area as one slightly stretched egg shape. When switching to front view you're looking at the egg from top down, it's almost completely round.
You can use these forms when you are sketching out the outlines to help you draw the face. The most prominent feature on rats is their large upper jaw. A lot of mammals share this trait, but on rats its more pronounced and it's far more sloped.
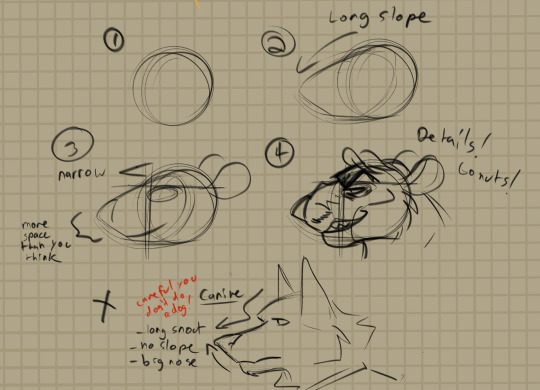
Here's a quick step by step. Rat/rodent heads are far more narrow and sloped downward than say a canine head, which often sports a longer more upward turned snout.
Once you have the basic of the form down you can pretty much go crazy from there! Pads here is a bit more angular and intense than say his sister Sorcha, who I've softened and made more sleek in comparison. Here's a pic of her and a few other rats!
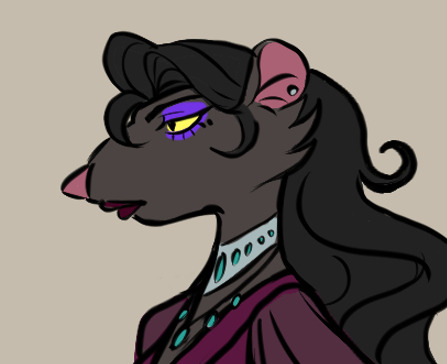
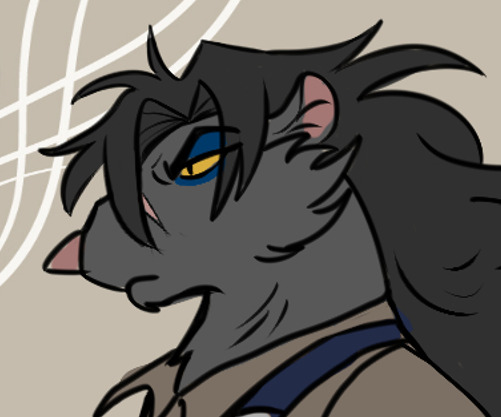
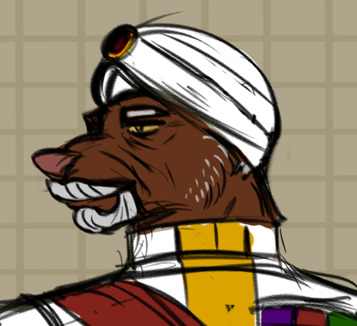
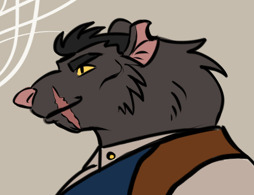
But creating stylized characters is all about breaking rules. Once you have a basic understanding of the form, you can learn all the angles from there!
Hope this helped!
#how to draw#my art#tutorial#rodent tutorial#how to draw tutorial#rat#rat furry#rodent#rodent furry#original characters#ocs#ratterrock#how to draw rat#how to draw rodent
128 notes
·
View notes
Text
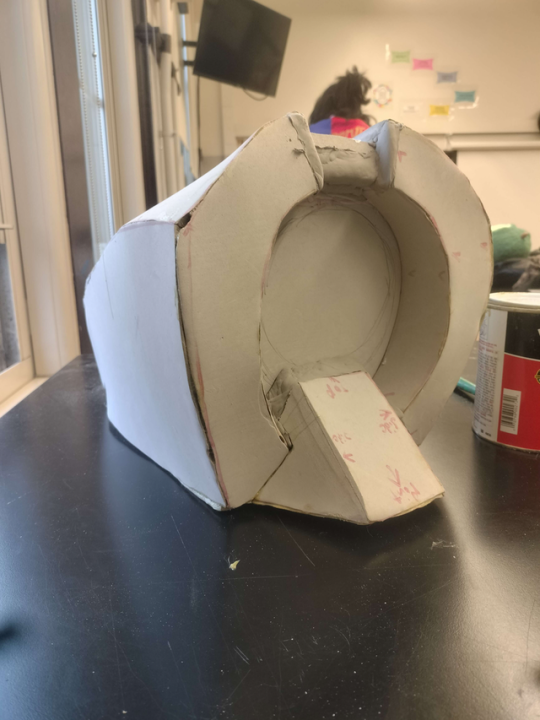
How I Made my V2 Cosplay
Oh boy! This right here is about how I make my cosplay head of V2. Some of the stages don't have photos, but i'll do my best to explain what I did. I also have no WIPs of the gloves, but those were super straight forward. Some photos are very low quality due to my phone having a damaged camera at the time, and other photos were taken from my instagram story as they're the only photos I have from that stage. Please note that this is not a tutorial! This is more of a story of a disastrous (but ultimately successful) project done by someone with no idea what they were doing. Please find actual tutorials by more experienced people!
The Modeling Base


This right hear is a big chunk of upholstery foam! I own a ton of this stuff, so i decided the best way to start this was a foam blank. Well, this was a bad idea in retrospect, but hey it technically worked. Kinda. I started by drawing the basic shape, then cutting out thick sheets. From there, I glued them together and began shaping with scissors to get the desired shape. Honestly a 3D modeled blank may have been better, or a base made of foam board pieces used instead. Live and learn I suppose.

After I got the shape to something i was happy with, I began the transition to EVA foam. To do this, I mummified the thing in duct tape and marked seam lines in sharpie. I then cut out these duct tape pieces, and stuck them to paper to act as a backing.
Foam Shell Construction
Once I had a pattern, I began making the actual head. To do this, I traced the pattern onto sheets of EVA foam (I believe 4mm or 6mm) and cut them out. Lots of these pieces needed bevels, some of which i had to dremel as shown below due to them not cutting correctly. Bevels are important as they make the foam crease as desired for angular shapes. I'm still pretty amateur with it though, and frequently got bevels wrong.


As I cut pieces, I began gluing them together with an awful gunk called contact cement. This stuff is a special glue that you let dry before sticking the pieces together, and it pretty cool. Unfortunately it's flammable and a carcinogen. As stated before, I'm pretty new to armor, so lots of the seams have weird gaps I had to fix farther down the line. After quite awhile, I had the basic shell assembled. However, the shell had numerous gaps and pieces that didn't fit correctly. Enter the foam clay.
Foam clay is a substance similar to model magic, and was honestly a life saver here. This thing has a second shell basically made of the stuff. I had to fill gaps primarily around the eye socket, but the entire thing honestly barely fit together.

After some filling and sanding, I made a test optic. And the head looked preeeety bad. There was something just incredibly off about it. This began the massive amounts of revising and reshaping I had to do. And fixing of awful symmetry. The head required a massive amount of sanding around the sides of the face and the chin. Between initial construction and when I began painting, I completely reshaped these areas. I made the chin significantly smaller, and added the indents or whatever (fins?) on the side of the head. However, doing all of this required me to fill in chunks of the interior with large wads of foam clay. If I hadn't done so, then I would've sanded through it in places. I also made the awful decision to gap fill with hot glue. If you've not dremeled hot glue, I don't recommend trying it. It melts the glue and sends globs of it flying, and those things are hot and really hurt.


After even more sanding, gap filling, and re-sanding, I finally got the shape to something i was happy with. Unfortunately I don't have any photos from just before painting.
Priming and Painting
The next step was for me to slather this thing in primer so it could be painted. I use Plastidip, as a tutorial i saw years ago said it was the best primer. Why does it need primed? I'm not actually entirely sure, but it's what I've heard needs done, so that's what I do.


Plastidip is a spray, so I of course did this outside. After a ton of coats, I was left with a shiny surface ready for the paint. Not much to say on primer.
Due to not currently having a functional airbrush, V2 is entirely hand painted. I coated this guy in red paint, and i mean coated the entire thing. Even areas I'd later paint black. Quick tip: Don't do that. It's a waste of paint. But i did it anyway cause I'm a dumbass. I also had issues when doing the black with getting it to stick, and when removing tape it caused some paint to peal off too. I originally had painted a barcode on the side of the head, but removing the tape took the black paint off too. Sooooo no bar code.

Once I got the shell painted, I did the optic. The test optic I used was marker on unicorn buckram, but that stuff is really hard to see through, the markers looked bad, and I couldn't pain it without clogging the mesh (due to not having an airbrush and having to do it by hand.) So, I got different mesh: a larger weave black mesh. This stuff I was actually able to hand paint, thus how I got the iris I did.
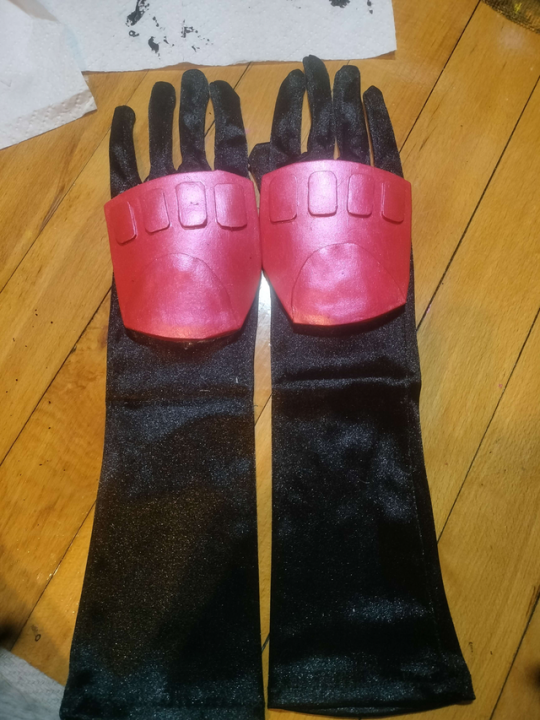
The Gloves
The gloves were, frankly, rushed. I bought a pair of cheap black costume gloves online, and then glued foam to em. For the gloves, I just used paper patterns to make the foam pieces. No fancy patterning here, just drawing shapes. After cutting the foam, I hot glued it, and then painted them. No priming on these, cause I was lazy and had a con coming up.
Conclusion
So that's about it! Thank you for reading this monster of a post! I'm hoping to eventually do a V1 head, so I'll be repatterning the V unit head soon. When I do, I'll probably make an actual tutorial. I dunno. We'll see.
54 notes
·
View notes
Note
oh didn't you know? Every man in Lore Olympus is twice as big as any woman, Hades and Persephone aren't even the worst example
its literally like those pinterest tutorials that are like men are SQUARE they are BIG and SQUARE and ANGULAR and dont forget the SQUARES. while women are 3 circles stacked on top of each other
47 notes
·
View notes
Note
Sorry to bother you, how can I draw realistic paintings about frev?😢
Thanks for the question!! (I love answering he he)
I'm sorry for being late in answering. I wanted to make it as detailed as possible (how I usually do it step by step), and hope it can be useful and helpful as a tutorial, it doesn't mean it's the best method, you can always do what suits you better.
First of all, I take as reference a lot of images of the historical character that I am going to draw. In the case of Robespierre, there is a lot of documentation and images of how he looked like. Even Deseine's bust help me a lot.
(Thanks @silver-whistle and @monimarat for this photographies❤️)
Thanks @perfectlysweatypanda ❤️
*I always try to make the character as realistic as possible
Second, I look at the features which are similar in every image I have consulted. There are always patterns which are repeated. Even, if the artists of that time painted him in different ways (it often happens with DTIYS currently)
For example, the most noticeable features would be:
-the shape of the nose
-The shape of the jaw, square and angular
-the shape and position of the eyes (a little almond-shaped *with a feline look)
-the lips in almost all images are thin and straight
-broad and clear forehead with some wrinkles
-Square head (fun fact: typical for Earth zodiac signs)
-rounded eyebrows…

Then I look at the written descriptions of the people of that time and their contemporaries. I try to make sure they are reliable sources.
The ones, which are repeated the most, are not always the most accurate (be careful with it, look closely the images you have previously searched for to get it)
Then I usually make the baselines of the bone structure that it usually has:

I determine the position of the eyes, mouth and nose of the face with the basic lines:

Second, searching the clothes and suits of that time:
As explained above, look at a lot of images and references about how the clothes were.
Written references about how our character used to wear. Maxime’s shake: dark suits (black) earthy colours or basic (Supreme Being celebration was an exception). It seems they like stripes on suits.
🤩Tip! You can look at the suits on frev films.
They have usually got a lot of information out it and you can watch different angles to draw it better.
Some examples:
La révolution française Robert Enrico

Un peuple et son roi Pierre Schoeller
Danton 1983
You can also draw accessories (I’ve just realised I forgot to draw the pocket watch 😱⏱️)
Before I search for a pose that I like and it could fit with the character (or I do it on Clip, with the 3D movement dolls)
Important!!! (^.^)
Look at the side of the historical character. In the case of Robespierre measures 1.6 meters.
As a plus, if you want to draw a background, look at different set ups of that time, such as Duplay's house, or even on video games like Assassins Unity. They help me a lot.
I think you can draw realistic frev characters images with these steps.😉
I want to watch them.💖💖💖💖🎨🎨🎨
I hope it helps you and if you have any questions I would be pleased to answer.🤩
I like when people ask me.😁
#frev#french revolution#art#robespierre#maximilien robespierre#frev art#artist#sketcher#sketch#artists on tumblr#how to draw historical characters#how to draw#thanks for the ask!
19 notes
·
View notes
Text
A run through the start of the new tutorial level. I used to wonder why you don't see many Quake maps with exteriors. I will wonder no longer. It is so much more complicated and time-consuming, you can't really improvise the way you normally do with interior detailing because all of the cliff brushes need to sort of flow into one-another. In future projects I'm thinking I'll just pick a more heavily contrasting cliff texture and stick to simple angular brushes like in Duke3D.
#gamedev#ctesiphon#fps#progress#low poly#screenshotsaturday#indiedev#game development#opengl#retro fps#solodev#quake#trenchbroom
7 notes
·
View notes
Text
Proposal
Miguel proposing? not proofread.

He was terrified, rightfully so. In all his years of living he’d never felt so helpless, so uncertain for the imminent future, a man swinging on the precipice of ruin.
“Will you… No.” He’d been rehearsing his speech in the mirror a million times over, double checking his appearance, smoothing out the wrinkles that’d formed in the frenzy of his panic.
Miguel was worried, a man teetering towards certain insanity, and it was all because of you.
You, who brought a blinding light into his life. You, he seemed to right every wrong that plagued his mind. With your smile you cast aside the shadows of his self-doubt, and with your love you reminded him what it meant to exist.
You deserved everything, more than he could possibly give you. Miguel knew it, loathed it, despised the fact that no matter how diligently he worked to be the best man he could possibly be, it would never be enough for him.
Because you deserved more than his feeble mortality could ever hope to offer, a man who was nothing if not yours.
Which was why he was so terrified for your answer.
“You’ve been together, what, four years?”
“Lyla.”
“I’m just saying! Elevated pulse and breathing pattern, excessive perspiration. You’re nervous.”
Miguel cleared his throat, fiddling with the fabric of his tie he’d watch tutorial following tutorial learning how to tie — he could simply never get it right. “I’m not nervous, Lyla. Not that that’s any of your concern.”
“So it doesn’t bother you they might say no?”
Of course it bothered him.
Ever since Miguel came to the conclusion he wanted to marry you, there was nothing that ruined his domestic longing more than the prospect of your refusal. In Miguel’s eyes, you were the very embodiment of Elysium, a real he could only hope to traverse in his wildest dreams.
And yet you stood beside him at every waking moment. When he was ill, ridden with heartbreak, and even when he’d stumbled into your apartment on the brink of death adorned in the symbol of the midnight vigilante Spider-Man.
Miguel was, and will infinitely remain, the being that lays dormant in your heart. The very flame to your spirit, the twin flame spoken of in childish prophesy.
And yet he’d made such fairytales a lovestruck reality.
“They’ll say yes.” Miguel looked to his reflection with determination, a smirk gracing angular features as he rationalized there was no need for doubt — if it wasn’t your intention to be his, you surely would’ve slipped from his fingertips by now. And while the thought ailed him, only heightened the tension between his ribcage, he did his best to remain optimistic. “I love them, and they love me. There’s nothing we wouldn’t do for each other.”
“Wow,” Lyla’s voice was dripping with sarcastic prowess. “Didn’t know you had it in you.”
“Please shut off for the day.”

Miguel’s hand was pressed firm on your waist, possessive as always, keeping you away from the public eye of those who could potentially catch your attention, pique your interest.
“Where are we going?” Your voice was one laced with laughter as Miguel led you down the sidewalk of the park, both of you dressed in casual attire — as casual as Miguel would allow in the frenzy of choosing his outfit, meaning he was suspiciously overdressed.
“In a minute, querida.” The nickname brought a smile to his lips, knowing it was one reserved between the two of you, something nobody in this world or the next could possibly take away from him. “We’re nearly there.”
When bramble and bush cleared, thicket foregone for pristine greenery, your hands flew to your face in a gasp.
In the midst of golden hour greenery — sickeningly sweet honeysuckle, lovely lavender and trees that encapsulated the two of you in your own private existence — a picnic had been made up atop of a thick blanket woven with woolen fabric.
“Miguel, is that your cobija?” The very one he set out for the both of you every winter, ensuring that neither of you grew chilly in the midst of nipping cold.
“Si, amor. I thought it was perfect for the occasion.”
“Con tigre y todo?”
“Especially, con el tigre.”
You smiled up a him, pressing a kiss to lips, standing tall to reach his majesty. Slowly, his hands found yours, leading you to sit on the plush of the cobija, the fabric perfect for cushioning your descent.
He truly always thought of everything.
Beside him, a basket of your favorite delicacies— within reason — to be shared between you.
“Ay, Miguel.” You brought your hand to your heart, his mind swirling with your adoration. “This must’ve taken ages.”
He shrugged his shoulders, feigning passivity, when in reality he’d been a stressed man at the grocery store — gripping the cart with an iron force, a dent in the handle — onlookers terrified as an enraged man stomped from isle to isle in search of everything that would ensure the perfect late-afternoon. “It was nothing, amor. Anything for you.”
Shared giggles and looks of longing were passed between you the entirety of your time spent in each other’s presence. Slowly, painstakingly, the sun dipped below the horizon, a promise of an evening with stars that kissed the sky.
Miguel took a deep breath, rubbing his sweaty palms on the fabric of his trousers, a mantra in his mind like music to his heart — you can do this, you can do this.
“It’s hard to believe we’ve been together for so long.”
Smooth Miguel, so smooth.
You nodded you head in confirmation, looking to the stars that glimmered in your eyes, galaxies reflected in your vision. It was everything Miguel saw in you, an eternity of love in a galaxy of possibility.
His hands reached deep into his pockets, a smile on his face as he held eye contact, the tension building like a balloon prepared to burst. “There’s something I’ve been meaning to ask you for some time, amor. A question that’s been on my mind since I first met you.”
“It seems like we met so long ago.” You took a moment to reflect on when you’d first met him, bumping into him while picking up your nephew from school, his own daughter in the same class. He knew then and there he couldn’t live a life without you in it, couldn’t stand mortality if it meant expiring without your hand to hold his. “I’m so glad mi sobrino ended up getting sick that day.”
“No hablas así, vida.”
“Lo siento.”
The two of you fell into fits of laughter, falling into each other’s embrace once more, only pulling away when Miguel’s previous words ran rampant in your mind. “What were you gonna ask me, Miguel?”
“Oh!” Miguel dug his hand deeper into his pocket, sure the ring was there, only to find nothing but lint in his touch. He tried the other, only to come up with the same result, his blood running cold.
“Where’s the ring…?”
Your brows furrowed in confusion. “Ring? What ring?”
“M-My uh…” Miguel surveyed the area, his eyes landing on his keychain. “My key ring! Can’t get home without it!”
“…Okay.”
Miguel could feel tears prickling in his eyes, throating itching with worry as he tried to retract his steps, thinking to every possibility. When could he have possibly lost it? How could he do something so juvenile.
Your fingertips brushed something cold against Miguel’s cobija, a silver band glimmering in the moonlight, you hand clutching your chest. “I think someone left their—“
“You found it!” Miguel was desperate as he practically leapt on top of you, fumbling to grasp the ring between his fingers, sighing as he made contact with the band he’d thought to be lost forever, his perfect moment overshadowed by idiocy.
And when he looked to you, your eyes filled with all the love this world had to offer, glazed over with sopping tears of admiration and joy, Miguel knew he’d made the right choice.
“I’ve been meaning to ask…”
“Yes!”
“Vida, I have to ask first.” His lips were curled into a smile, the ring held impossibly close to his heart, an extension of his love to rest on your finger until time called your name. And even then, even when Miguel’s heart could no longer beat, it would forever sing a song of your love.
“Will you marry me?”
#across the spiderverse#beyond the spiderverse#miguel o’hara x reader#spiderman 2099#spiderman 2099 x reader#spiderverse#into the spiderverse#spiderman#spiderverse x reader#miguel o’hara
76 notes
·
View notes