#bookbinding tips
Text
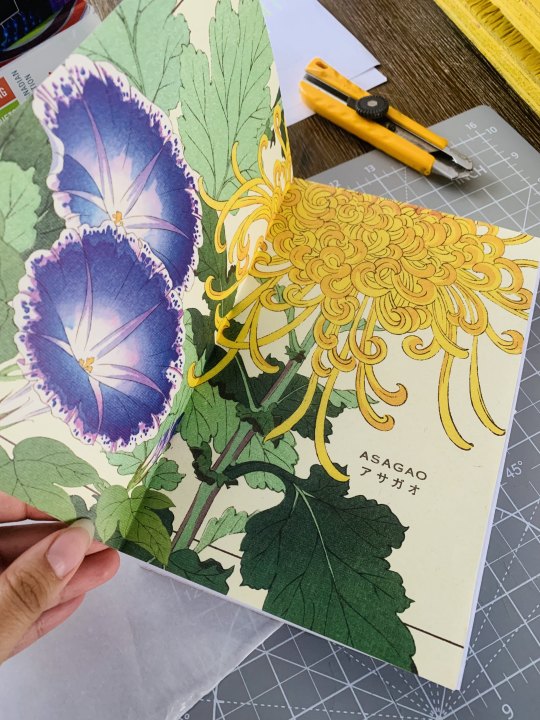
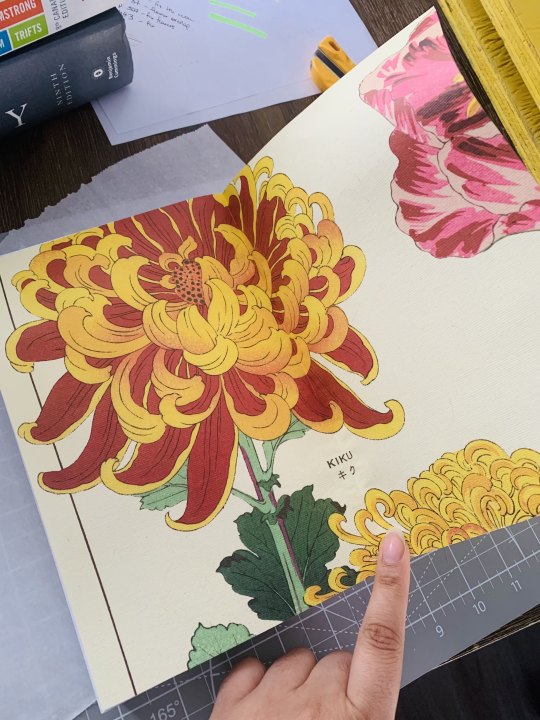
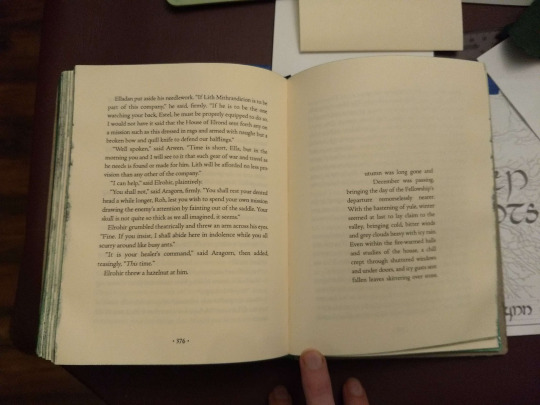
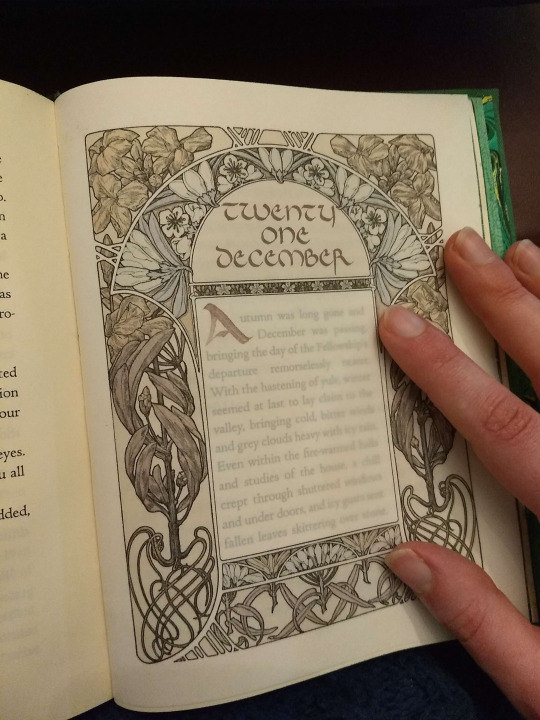
Added the end pages to my (own) fanfiction bind 🥹 So happy with the way this is turning out!
Today's Bookbinding Learnings:
Light touch when using an exacto - I struggled a lot cutting straight lines and I realized I was using too much pressure on the cutting mat.
Improvised materials - Similar to my upcycling suggestion, I couldn't find the end papers I wanted at my local art store, so I bought a poster to cut into parts! This leaves me with materials for future binds!
#amateur bookbinding#bookbinding#binding fanfiction#fanfiction#bookbinding for beginners#bookbinding tips#my binds#fanbinding#bookblr#wildflowers bind
32 notes
·
View notes
Note
What's something you find really cool and would like to talk about?
OH BOY OHBOYOHBOYOHBOY
I have a few!
-CJVerse (Chonny Jash rp I and a handful of friends are in)! I take part of a few AUs there and adore ranting about my blorbos/ (technically???) OCs
-Biology!!! I’m a Biological Sciences major in my first year and am very passionate abt it :)
-Sustainability (to narrow it down, sustainable architecture, arts, and crafts!)
-Foraging! I need to research more about what’s found and native to my uni campus, but I can rant about what I found in my tiny ass backyard back home :) and what I’ve cooked and ate from there!
-Bookbinding, especially on how to bookbind for Cheap, and what you do/dont need and what’s helpful to have. Love it. Currently binding a fic two of my close friends collabed on!!!
#send me dms#send asks#send me asks#asks open#ask me anything#ask#anon ask#cjverse#cjverse chatroom#sustainability#sustainable architecture#sustainable art#solarpunk#foraging#foraged#foraged food#bookbinding#bookbinding tips#biology
5 notes
·
View notes
Text
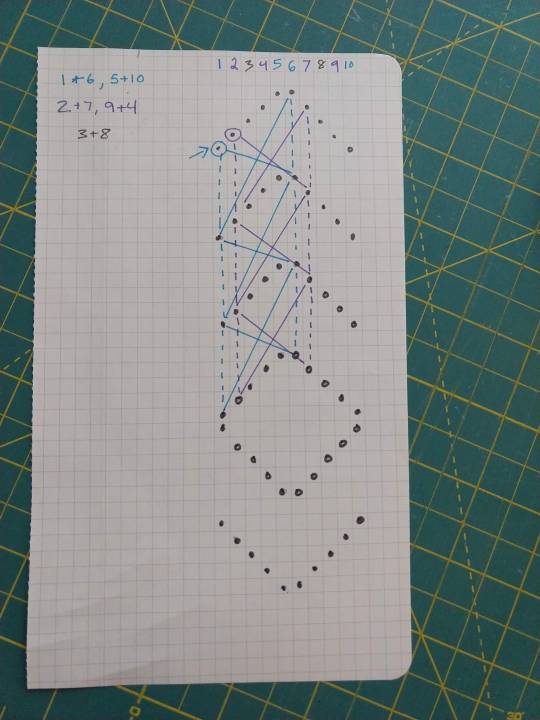
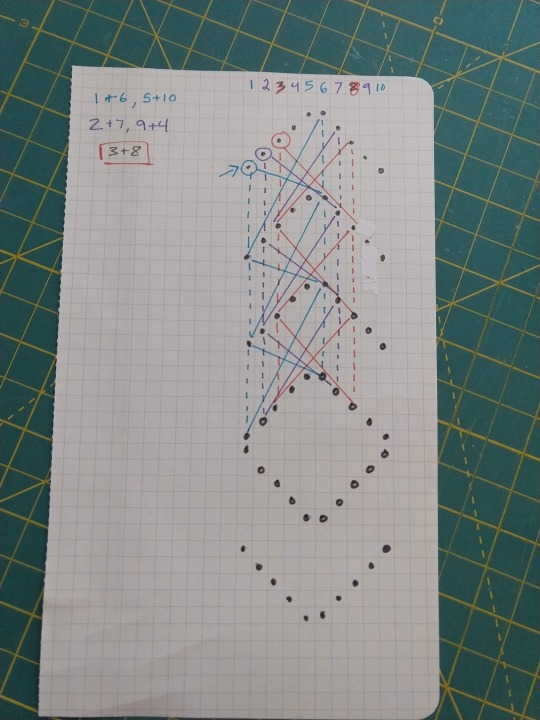
Bookbinding Thread Options
In my soon-to-be ongoing series of "components of bookbinding", here are some options for thread and a discussion of why different options might work better or worse for your book.
Thread is used to sew signatures together. The thread used for bookbinding needs to do several things:
Be small enough to thread into a needle to poke through the signature holes
Be large enough so that it doesn't slice through the paper after repeated page turnings
Be strong enough so that it doesn't break when subjected to wear from the paper after repeated page turnings. If you are using a binding that leaves the threads exposed (such as Coptic binding), this goes double
Let's start off with S-tier bookbinding thread, and then discuss what's possible to skimp on. (note: None of the links are affiliate links. I am not making money on these recommendations. Links are provided merely for illustration purposes.)
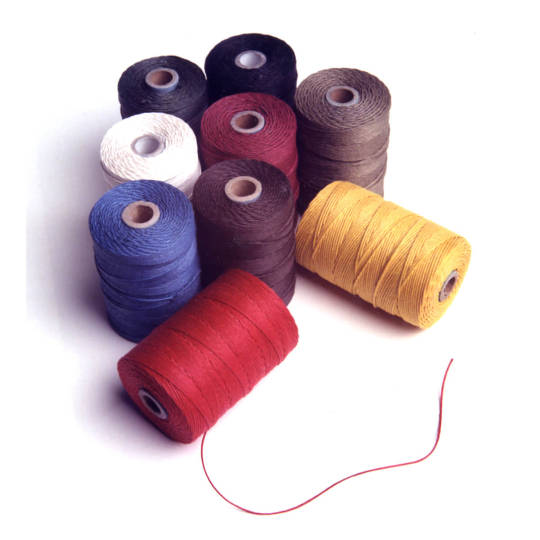
This is Irish Linen Bookbinding Thread, from Talas (a well-respected bookbinding supplier).
Linen is used because it is an extremely tough, long-staple fiber. Linen withstands wear much better than cotton. This particular thread comes pre-waxed with just enough wax to make it strong and prevent it from untwisting, but not so much that it's sticky to work with. It comes in multiple thicknesses. However, one spool of this will set you back between $13 and $24, and while it will last you a while, that's still a pretty hefty chunk of change, so let's look at alternatives.
Alternative #1: Sewing Thread
Sewing thread is a very common option.
Pros
Commonly available, even at places like Walmart
Significantly cheaper
Many people already have some
Cons
Varies widely in quality, and therefore in durability. Cheap polyester thread is not going to hold up to nearly as much wear as high quality cotton thread
Thinner than much bookbinding threads. I'm not going to get into thread weights here (I looked it up to try and give some recommendations but it turns out that thread sizing is bonkers and kind of complicated) but because it's thinner, it has the dual problems of potentially cutting through your paper, and wearing out sooner.
Does not come pre-waxed.
Some solutions for these problems
Double or quadruple your thread when you sew with it. Luckily, unlike other types of hand sewing, it's very easy to sew in short chunks, knot in new pieces of thread, and hide knots where they can't be seen, so you don't have to use long, tangly, unwieldy pieces.
Wax your thread. You can buy straight up chunks of beeswax for pretty cheap (plus it has lots of other uses!), or you can buy those little "thread magic" or "thread waxer" items at craft stores.
Don't buy the absolute cheapest thread. I know this is a post about cheap thread alternatives but it's better to buy one spool of good thread than a big box of dogshit thread. (ask me how I know)
Alternative #2: Embroidery Floss
Pros
Also commonly available
Thicker
Comes in lots of fun colors, which is nice for exposed-stitching binding styles
Can also be used for making your own decorative endbands, embroidering your covers, and other fun bookbinding-related activities
Cons
Not as cheap as sewing thread
Not necessarily manufactured for tensile strength since embroidery isn't usually put under a lot of stress
Unwaxed
Solutions
Make sure you only use cotton embroidery floss, not rayon or wool
Make sure to wax it with beeswax
Alternative #3: Waxed Dental Floss
Make sure that you are getting thread based dental floss, NOT plastic based dental floss!!
Do NOT get this stuff:

The stuff you are looking for will say "waxed" on it.
Pros
Cheap
Readily Available
Already Waxed
Manufactured to stand up to abrasion
Cons
May be hard to find unflavored
Archival Quality unknown, potentially not the best
Long term strength unknown - while it is meant to stand up to quite a bit of short term abrasion via the teeth, it is also a one-use product in most cases.
Solutions
Know what you're getting into
Use for beginning and testing purposes, so you can get the hang of skills before committing more expensive materials
Use for smaller sizes of books
56 notes
·
View notes
Text

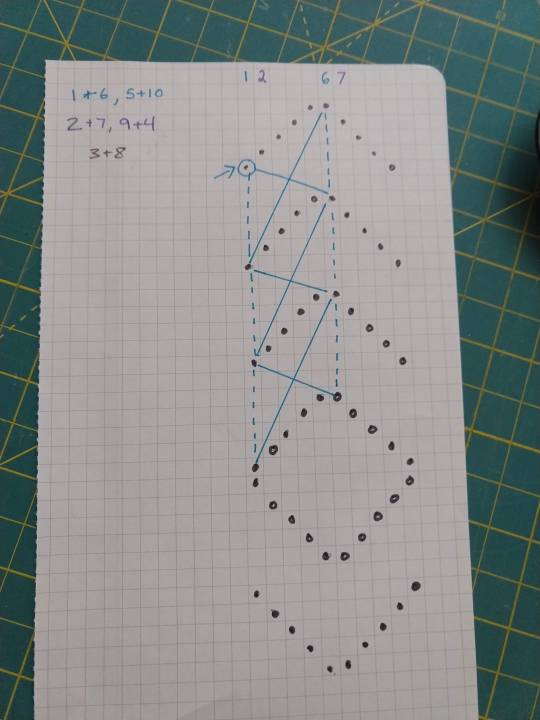
A notebook I made a year ago and still haven't used! Long stitch binding done with embroidery floss. The video below is the best explanation of the technique I could find, and you can expand it to as many pairs of signatures as you want, and play with the placement of the holes. I hope the diagrams are vaguely helpful in showing the order to sew them in!
youtube
Since the holes have to be a little bit apart on the spine, I'd recommend using multiple signatures per hole. You can double back through the signatures to sew two of them in at once but that is Super Not Worth It, so just kettle stitch the additional signatures around the attachment points of the original signatures once you're done.
7 notes
·
View notes
Text
homemade bookbinding paste
To make a thick, smooth paste, measure 1 1/2 cups of cold water into a saucepan. Measure 4 tablespoons of plain white wheat flour into a separate container. Add the flour to the cold water a little at a time, beating it in thoroughly with an egg beater. Put the saucepan over medium heat and stir the mixture constantly while the water is brought to a boil ... When it reaches the boil, remove it from the heat and allow the mixture to cool. This paste can be thinned to any desired consistency by adding water that has been boiled and cooled.
~~ from aldren a. watson's hand bookbinding: a manual of instruction
7 notes
·
View notes
Text
It's late and I'm here (only 2 am but I'm actually trying to sleep) lying awake trying to figure out how to design a planner so that when I print it for bookbinding it doesn't mess up the order of days and months but my math and logic aren't computing right now. I kind of feel like the answer is super obvious but I just can't visualise it working and I'm making a mess out of myself.
Does someone here have the answer? I tried googling and watching videos but I just don't find them or don't get it. And I do really have to get up early tomorrow to study and clean my house.
I really don't want to waste paper on trial and error (I don't get along with my printer good enough and there'll be plenty of mistakes even if I knew how not to mess up the order of the days).
#help#bookbinding#bookbinding tips#also this would help me figure out how to print books to bookbind them myself! i really want that#i have a friend whos a writer and id love to gift her her own novel bookbinded by myself so that its a hardcover and handmade#and with some fabric that reminds me of her book
3 notes
·
View notes
Text
here’s my guide to making typesets! I use Word to make my typesets, Canva for designs, and Adobe to insert the majority of my designs.
this is a ton of info and I tried to make it as readable as possible, but plz let me know if u need any clarification!
Word: always use the app, the online program doesn't have all of the options needed
paper size: US Letter Borderless
then i flip it landscape, do custom borders, and select book fold. I do 1 inch on top and bottom, .75 in inside, and .5 in outside. i leave the gutter option alone and leave it set to 0. You can choose how large you want your signatures to be (sheets in booklet option on the margins page): I normally do 40 page signatures, but if it's a smaller text you'll want to go smaller for stability. after that, you should have a half page to start your typeset!
Inserting your fic:
the next thing you’ll do is insert your fic; on ao3 click entire story, CTRL A to select all, CTRL C to copy it all. Paste it into your document. word automatically detects the headings, and you should be able to see all your chapters on the left side bar (if you can’t see it, click the page numbers on the bottom left to open the tab).
Formatting:
you can do the next few steps in any order, but we’re going to fix the formatting now. you’ll want to CTRL A everything, pick a font and a font size. I normally use georgia and size 10, going smaller or larger depending on the file size.
To have an indent on every line: CTRL A your work to select all, right click the “normal” style, on the home tab. go to the bottom left, open the drop-down menu, and select “paragraph”. next to special, hit first line. i like to do .3, you can do whatever you want. i then like to make sure the space after is set to 0, the line spacing to single, and then hit save. it should automatically adjust your lines to start at whatever indent you picked.
To fix the spacing: go into the layout tab, and go to spacing. There'll be a before and after option: write in 0, then click enter for both of them. Word is a little bit bitchy so you have to force it do things sometimes. after this you can choose if you want single spacing, or 1.5, or whatever you want.
*sometimes, the way the fic was formatted when posted to ao3 means that even after setting the line spacing to zero, there will still be a space in between each line. this is where you have to troubleshoot. you can either go line by line to delete the excess space (yes, for real. and yes, it's just as awful as it sounds) or, sometimes, not every-time but sometimes, you can highlight the chapter text, go into the home tab on top, click the A with the purple eraser to erase all formatting, and then do all the beginning steps again, and it will get rid of the extra space.*
Now that your format is mostly fixed, delete the archive of our own beta, and anything else you don't want. I normally delete everything up to the title of the work, and leave that for creating my copyright page. Remember to do the same for the end of the work!
Page Breaks and Section Breaks:
the next part is the most crucial. it's how we format both the chapters, but also how we format the headings and footer. this was the part that took me the longest to figure out: it's the page breaks and section breaks. page breaks mark the place where one page ends, and another begins. section breaks will create a new section in your document, so you can break the beginning few pages from the rest of your textblock. This will allow you to insert page numbers that start on page one, instead of at the first page of the document.
I like to go the end of the description, and then click on the first chapter. then I'll add a section break. you can find this in the layout tab, click breaks, and then click section break. so now our section 2 starts with chapter one. After this, add a blank page after the description and before your new section, and then click on the first chapter. (adding a blank page allows for smoother formatting later with headers and footers)
I then go to each chapter, delete the authors notes at the start and end of each chapter, and add a page break at the start of each chapter. i like to use the heading tab on the left to click each chapter, so I know I'm actually starting the new page right where I need to, and other formatting won't delete the page break.
when I create a compilation fic, where I have muitlple fics in one typeset, I use section breaks at the starts of each new fic. this will allow the page numbers to continue, but I can then edit each sectio to change the fic title and the authors name. if you're really fancy, you can do this for each chapter title as well, you would just hve to use a section break for each chapter instead of page break. *Remember to click link to previous to turn it off, so you are only editing that section, and not all the other sections. this can be found in the heading and footer tab on the top, which will automatically open when you click on the heading or footer.*
Adding page numbers, authors name, text name:
To add a page number, I click the footer, which automatically opens the header/footer tab on top. Then, I click page numbers, add page numbers. I turn on different odd and even pages, which is also found in the header/footer tab. you'll have to insert page numbers on both an even and odd age to get them to show up once you click that option. Page one should be an odd page, page two should be an even page. I like to put the page numbers on the outside of the page. Then you'll click format page numbers, click "start at" instead of "continue from previous section", and write in 1. now your typeset starts at 1 on chapter one instead of the start of your document! you'll need to go back and delete the numbers that showed up on the first section, but remember to deselect link to previous before you do that! or you'll end up deleting your page numbers again.
to add text on page numbers:
click into the header/footer again. double click directly on the page number, then start typing. You ca highlight the whole thing to change the font, font seize, etc. I normally do the same size as my text, and I'll either do georgia font or garamond font. I google "copy paste line for text" to get that line dividing the page number from whatever text I have next to it.
to add graphics on an entire work:
you can go into the header or footer, go to the insert tab, and insert a picture. Doing it in the header or footer will ensure it's on every single page that shares that header or footer. I have done this in the past, and find it's cute, but it's also tricky because it needs to be small enough to fit inside the header or footer, and won't really be able to interact with the text because it's different on each page, while the graphic will stay in the same position regardless.
Blank Pages:
you want blank pages at the start and end of your textblock: this is what you'll be glueing your end papers to. even more, you'll want to ensure your total page number is both divisible by 4 (each page of paper will have four pages of your text on it, two to each side) and fits into your signature count. If you're working with a 40 page signature, and you have 420 pages, that's fine. You'll end up having the last signature only be 5 regular pages instead of 10, which is plenty enough to sew. you really just want to try and avoid only having one of two pages in that last signature, as that won't be very strong in holding up your end page, or be very stable in sewing on to your book block.
to make sure they're blank, with no page numbers, you'll want to insert a section break on the last page of text. Deselect link to previous, delete the page numbers and you should be all good!
Printing/Saving:
I'm on a mac. I don't know how you would do this on anything but a mac. let that be a warning lmao. but I will CTRL A everything, ensure it's US Letter Borderless, and then hit print. if you don't tell the document it's the right size, it'll be funky when you go to print because of the margins. to insert images, i click save as pdf. it'll save it in the correct order to print for your signatures, and then I upload it into adobe to edit further. that'll have to be a different post bc this is entirely too long already.
If you want to print directly from here, ensure it's printing the right size, flip on short edge, double sided. and you're all done!
#tips and tricks#typesetting guide#i woke up at 630 am with a purpose and shat this out#it might not even be legible#apologies in advance#how to typeset#bookbinding#fanfiction#ao3 fanfic#typesetting#microsoft word#adobe#canva#signature#resource
85 notes
·
View notes
Text
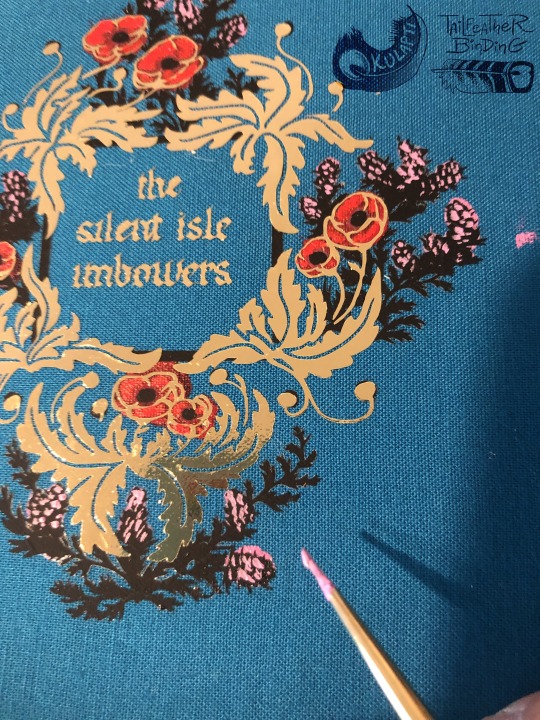


Cover construction for The silent isle imbowers, July-Aug 2023.
Finished binding here.
Materials shown: metallic gold and matte black heat transfer vinyl with cricut-cut designs, cricut-cut paper stencil, acrylic paint, bookcloth made of cotton + drawing paper backing + Lineco PVA glue. Calligraphy by quillingwords, flower art and cover construction by me.
————-General tips on how to make smth like this:
Steps in order were (1) have bookcloth, (2) cut and paint stencil, (3) cut and weed both HTV layers, (4) apply black HTV, (5) apply gold HTV, (6) add paint detail with paintbrush over the vinyl, (7) apply bookcloth to cover board.
This is not a beginner-friendly design LOL. Be like me and try most of the steps by themselves on other projects first.
I drew this design knowing how the sections would be layered, and which materials (and therefore colors) would go with each layer. Achieving a similar result with a premade design will likely require editing in a digital art program.
Test how your materials will layer before committing to a complex design. In this case I discovered that the type of bookcloth I made actually helps conceal the adhesive spread under the black HTV.
Layering HTV over small sections of acrylic paint works! Cannot confirm the result if you were to use large painted sections.
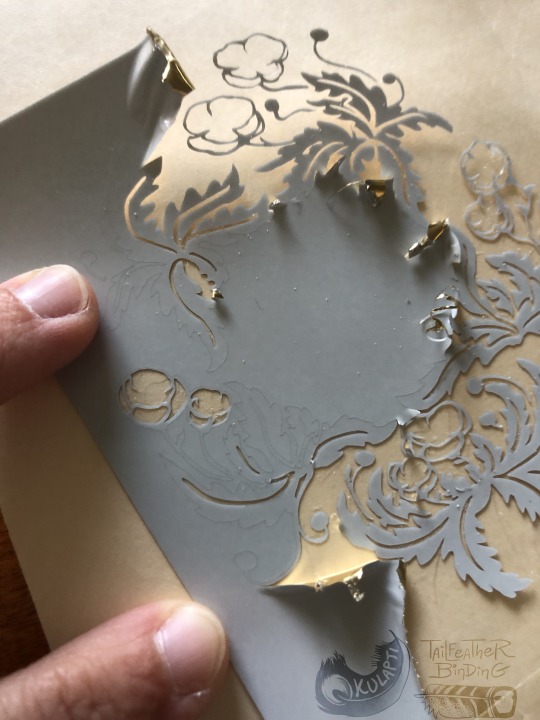
PSA This black layer with many very small pointy bits is at the extreme limit of what I think is possible to weed from machine-cut HTV. A different material might work better, and I got a lot faster at weeding the second copy than the first one, but some of this is just a technical limit. The gold section worked great but I would not recommend this for the black.
Layering HTV is much easier to do uniformly with a heat press! Check if your local library or maybe an art class studio has one you can use before doing smth like this with your iron.
Paper stencils are easy to make with the cricut but don’t try to use them for anything with small details. The above example is pushing it despite being very simple shapes. Stick-on stencils are better.
Tiny HTV design tip: designs with jagged sections and very thin lines are hardest to weed successfully. Smooth curves are much easier.
Scale all pieces of a stacked design on the same drawing program and within the same canvas in cricut so they layer precisely.
Cut tiny HTV designs with the washi paper setting on a cricut. I did not find this out myself but I can confirm the results! Using the HTV setting will cause the blade to catch on and pull up small sections of the design while cutting, ruining parts of the design.
—————-Tiny HTV design weeding tips:
For the love of cheese do not try anything this complicated the first time you use a cricut. or the second. you will cry
Seriously consider trying both HTV and cricut stencils before doing anything complicated like this. I wish I had at least attempted the black layer as a stick-on stencil.
This isn't a weeding tip but again you better cut this with a washi setting.
Use a very sharp weeding tool, good lighting, and consider a magnifying glass
Be prepared for this to take several hours, especially if you have never done a tiny piece before.
Important! The cricut does not perfectly cut out designs, leaving very small connected sections around the design at various locations. This is almost unnoticeable on large designs but can ruin tiny designs very easily. Be prepared to hold down the “keep” sections of the design with tweezers or a fingertip while pulling or trimming off some of the “remove” negative space.
Do NOT attempt to pull off all the negative space in a single piece. Either add dividing lines to your design for the machine to cut, or use a sharp tool to scrape them yourself. You are much less likely to accidentally remove part of your design if you weed the design in distinct sections.
#my art#bookbinding#work in progress#fanbinding#art tips#artists on tumblr#here there be fandom#long post#weeding the black layer was so. lol. I started the first one and was like I may have made a terrible mistake#renegade chat lighting candles for me#worth it!! also would hopefully come up with a more efficient stencil strategy instead next time!!#I normally post wip stuff on my side blog but figured this might be worth going on main#also the first wip photo looks neat so#only the vision of this fic being a Really Hecking Badass Book could sustain me thru 12 hours of weeding those black layers#my Learn Bookbinding Skills strategy is basically to choose an extremely ambitious project that excites me enough to keep me motivated#and then to just work on it for months because I am stubborn as all hell and genuinely find this fun instead of frustrating :D#tailfeather binding#id in alt text#described#update I have added ids!
44 notes
·
View notes
Note
Hello! Maybe you’ve answered something similar before, but do you have any major tips for first time book-binders? I’m taking my first intensive soon <3
Hello
In fact, I have not :)
So what to tell, hm, don't be afraid of big projects. The small ones are quicker and you see the results faster, but if there's a big project your hear beats for, go for it!
Don't use up your most expensive materials in the very first project. Rather go for something you can replace easily again, because you will have plenty of ... unique features in your early books (and in some of the later ones too, to be fair).
If you cut something, rather cut a tad too big than too small. (Even 1 mm is a lot in book dimensions.)
There will be plenty of things to improve in books to come, but be kind to yourself, you're doing this the first time and fortunately the learning curve is very steep so you will see how your work improves quickly.
Don't be afraid to ask questions!
There are a lot fanbinders out here and I have not come across one who was not willing to help however they could. (If you're looking for a community there is a renegade bindery discord server where you can find all stages of binders from first book binders to up to a hundred books bound with support from typeset to binding methods to improvised tools).
You can do bookbinding very elaborate, complicated and expensive, but it can be done very low cost and simple as well. There are plenty of things you may wish for, but most of them are not needed to bind a book.
But most of all, enjoy the ride. Bookbinding is a wonderful and as I think very rewarding hobby and I'm happy for you to get started and make those experiences the first time <3
#zhalfirin answers#bookbinding#perhaps no major tips to work by; but I hope it is of some help anyway#@championistic
78 notes
·
View notes
Text
I put what I hope is the last finishing touch on my copy of Deep Roots tonight - replacing the one chapter frame I somehow forgot to print.
You see, I printed all the text on the laser printer so it would be more crisp and then used the color inkjet to overprint all the colored elements. Which worked shockingly well, the color inkjet is feeds very evenly.
But somehow I forgot the frame on the last chapter of Deep Roots (thankfully my copy and not the author's). Totally fixable...if I had noticed before I folded, sewed, trimmed, marbled and then cased the damn book.
fuck.
theoretically I probably could have trimmed out the offending page, tipped in a replacement, trimmed it perfectly to size & edge painted it to match the rest of the marbling but gods. the effort involved.
Zhalfirin suggested printing on vellum instead and trimming it slightly smaller than the book so it wouldn't show too much against the marbled edges and that was so much easier. In real life you can read through the vellum pretty easily and it's a lovely effect. I love vellum overlays in books.
So now they are actually finally actually fully done. & coincidentally Ealcynn's copy just went out in the mail this afternoon. So I think that's a wrap!
#bookbinding adventures#mine#just imagine a whole book of fixes kludges and mistakes and that's this project#if you pile your mistakes up tall enough nobody can see them anymore pro tip right there
2 notes
·
View notes
Photo
(via 8 Ways to Add Extra Income to Your Bookbinding Business)
10 notes
·
View notes
Text
Welcome to my little corner of the internet. If you’re looking for my typeset files 🔗: click here. The files are already formatted as 32 page signature booklets. I’ve typeset various fandoms and ships, but primarily Harry Potter fics. I am happy to answer any typesetting questions to the best of my ability, but keep in mind I’m familiar with using MS Word and not other programs.
If you’re an author of a fanfic (any fandom, any ship) and wanting a typeset of your story, feel free to reach out! I am happy to accommodate for authors and base the typeset on your needs/preferences.
You can find my twitter here.
#typesetting#typeset#fanfic typeset#fanfiction typeset#bookbinding#fanfic bookbinding#typesetting tips
38 notes
·
View notes
Text
My friends are often surprised when I say I buy beeswax for bookbinding, but it's super useful! 📚🍯
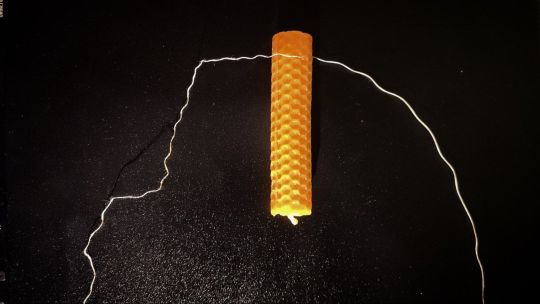
It's untangled the thread and avoid humidity to go through the thread, inside the pages.
It can also be used to protect decorated paper for the covers 🐝
Also, the beeswax candle stick smells so good. I want to take a bite so much
4 notes
·
View notes
Text
ao3 is still lowkey down n ive decided that ima try bookbinding n printing fics after this like i doubt its that hard n i could totally do it hut also i go through like 10-30 fics a week because im mentally ill n its the only thing that makes the world feel a little less bad so idk how thats gonna work out yet
1 note
·
View note
Text
so, you wanted to start bookbinding?
so @princetofbone mentioned on my post for "factory settings" about wanting to know more about the binding style that i used for it. so i thought i might make a post about it.
i was as terrible as i always am for taking in progress shots, but i can link you to the resources i used in order to make my book. i would also like to point out that "factory settings" is my 120th bind, and i have been doing bookbinding as a hobby for just over 3 years now. unfortunately this means some of the methods that i used for that bind aren't particularly beginner friendly, just in terms of the tools and methods i have used, but i would love to point you in the right direction when it comes to resources. i dont say this to sound pretentious which i fear i might come across, just so that youre fully informed. getting into this hobby is fun and rewarding, but it can definitely be intimidating.
with that caveat, heres a list of links and resources that i have used for bookbinding in general, with additional links to methods i used specifically in regards to this bind.
ASH's how to make a book document. it gives you a great introduction into typesetting fics (where you format the text of fics to look like a traditionally published books) and then turning them into a case-bound book (the style i used for "factory settings"). it is comprehensive, and explains how to use microsoft word to do your bidding. it was invaluable to me when i was just starting out! currently i use affinity publisher to typeset/format my fics for printing, but i only bought and learned how to use that after i had been binding books for a year and a half. i made some beautiful typesets with word, and some of my close friends use it still and design stuff that i never would be able to in my wildest dreams (basically anything by @no-name-publishing)
DAS Bookbinding's Square Back Bradel Binding. a great style to do your first bind in! this method requires, when making the case, to attach the cover board and the spine board to a connecting piece of paper, which makes it so much easier to match the size of the case to the size of the text block (your printed out and sewn fic). using this method is what allowed me to get much more accurately fitting cases, and made me much more confident with the construction of the books i was making. a well-made book is something that is so wonderful to hold in your hands!
DAS Bookbinding's Rounded and Backed Cased Book. This is the specific method that i used to create my bind for "factory settings"! even before i could back my books, i found that watching DAS's videos in particular helped me see how books were traditionally made, and i was able to see different tips and tricks about how to make nicer books.
Book Edge Trimming Without... i trim the edges of my text block using my finishing press and a chisel i have sharpened using a whetstone and leather strop with buffing compound on it. i follow the method for trimming shown in this video!
Made Endpapers. i follow this method for my endpapers, as i used handmade lokta endpapers, and they can be quite thin, but they look beautiful! i used "tipped on" endpapers (where you have your endpaper and then put a thin strip of glue on the edge and attach it to your text block) i used for a very long time before this, but these feel like they are much more stable, as they are sewn with your text block.
Edge Sprinkling. this is the method that i used for decorating the edges of my text block. but the principle is basically clamping your text block tight and then sprinkling the edges. i do not believe you need to trim the edges in order to do sprinkles on the edges, and that's what makes it accessible! i personally just use really cheap acrylic paint that i water down and then flick it onto the edges with my thumb and a paint brush.
Double-Core Endbands. i sew my own endbands, which i followed this tutorial for. that being said, it's kind of confusing, and this video is a bit easier to follow, but it is a slightly different type of endband.
Case decoration. i used my silhouette cameo 4 to cut out my design for "factory settings" in htv (heat transfer vinyl). i also used my cameo 4 to cut out the oval of marbled paper on the front, as i honestly didn't want to try my hand at cutting an oval lol. i also glued some 300 gsm card with an oval cut out of the centre of it onto the cover before covering it with bookcloth, to get a kind of recess on the cover. i then glued the oval of marbled paper onto the top of the recessed area once it was covered with bookcloth, so that it was protected. the images i used were sourced from a mix of rawpixel, canva and pixabay. a more accessible way to get into cover decoration is by painting on a design for your cover as described in @a-gay-old-time's tutorial just here. or even doing paper labels, which look classy imo.
physical materials. sourcing these will depend on your country. i am located in australia, and have compiled a list with some other aussie bookbinders of places to buy from. here is a great post describing beginning materials for getting started binding.
@renegadepublishing. this tumblr is great! its what got me started bookbinding, and being in the discord has been inspiring, motivating, and honestly just one of the best online experiences i have ever had. it is full of resources, and most people in there are amateur bookbinders, with a couple of professionals thrown in. the discord is 18+, and anyone can join!
i'm sorry this post got so long, but i hope that this has a lot of information for you if you would like to get started bookbinding. its one of the best hobbies ive ever had, and i genuinely believe i will have it for the rest of my life.
3K notes
·
View notes
Last Seen Blogs

kazeecomua
Kazeecomua


taylorswiftfolkloreuwu
𝑻𝒂𝒚𝒍𝒐𝒓 𝑨𝒍𝒊𝒔𝒐𝒏 𝑺𝒘𝒊ft

donald9and10backup
✨💖InfinityArts💖✨

ellsluv
ellie