#d tools software
Explore tagged Tumblr posts
Visit Tumblr Blog
Explore Tumblr blogs with no restrictions, modern design and the best experience.
Last Seen Tumblr Blogs


Fun Fact
Tumblr was attacked by a cross-site scripting worm deployed by the Internet troll group GNAA on Dec 3, 2012.
Text
🎬✨ AV Software Showdown: XTEN-AV vs. D-Tools - The Ultimate Battle for AV Integrators! ✨🎨
AV integrators, we know you're constantly on the lookout for the perfect audiovisual design software. That's why we've put together an epic showdown to help you make the best choice. 🥊💻
🌐 Dive into the battle here: 👈
🔍 Let's break it down:
XTEN-AV 🆚 D-Tools: Which one reigns supreme for AV integrators?
🎨 User-Friendly Design: XTEN-AV boasts an intuitive interface that makes your AV projects a breeze. Say goodbye to the complexities that can slow you down with D-Tools.
🔗 Seamless Integration: XTEN-AV's compatibility and integration with various systems give it an edge, ensuring your projects run smoothly without a hitch.
💪 Speed and Efficiency: Time is money, and XTEN-AV is built for speed and efficiency, helping you meet deadlines and exceed expectations.
🌟 Innovative Features: With XTEN-AV, you have access to an array of cutting-edge features that'll take your AV projects to the next level.
This isn't just a battle; it's a journey to find the perfect tool to elevate your AV game. So, which one will you choose to be your AV sidekick?
Tell us your thoughts in the comments. Which side are you on, and why? Let the showdown begin! 🎤👾🎶
#av design software#software#saas#av design#av technology#audio visual#av industry#av#design#XTENAV#DTools#AVIntegrators#audio visual integrators#tools#d tools software#ai tools#av tools#diagram tools#d tools#AVSoftwareShowdown#audiovisualdesign#TechBattle#designsoftware#av integration#InnovativeFeatures#userfriendly#ElevateYourAVGame#efficiencymatters#TechWars#AVPros
0 notes
Text
Unlocking the Future of Manufacturing: AI Innovation Panel with Certivo & Industry Leaders
Join Certivo at "Manufacturing Reimagined: AI-Powered Innovation" — a dynamic panel event exploring how AI is transforming the manufacturing value chain. Discover how automation and intelligent compliance can accelerate product launches and reduce regulatory delays. Hear from industry pioneers including Certivo CEO Kunal Chopra, T.A. McCann (PSL), and Vineet Thuvara (Fluke). Hosted by AAIA Seattle, PSL, and K&L Gates. 📅 May 20, 2025 | 3:30–5:30 PM | Downtown Seattle Reserve your seat now: https://lu.ma/o9h7ds6s Learn more about our AI solutions at certivo.com
#AI-powered compliance solutions for manufacturing#automate product compliance in manufacturing#AI tools to reduce regulatory delays#AI-driven product launch acceleration#intelligent compliance software for R&D teams#streamline manufacturing compliance with AI#real-time regulatory monitoring platform#AI-based risk management in manufacturing#enterprise AI solutions for global product launch#manufacturing innovation event Seattle 2025
0 notes
Text
☁︎。⋆。 ゚☾ ゚。⋆ how to resume ⋆。゚☾。⋆。 ゚☁︎ ゚
after 10 years & 6 jobs in corporate america, i would like to share how to game the system. we all want the biggest payoff for the least amount of work, right?
know thine enemy: beating the robots
i see a lot of misinformation about how AI is used to scrape resumes. i can't speak for every company but most corporations use what is called applicant tracking software (ATS).
no respectable company is using chatgpt to sort applications. i don't know how you'd even write the prompt to get a consumer-facing product to do this. i guarantee that target, walmart, bank of america, whatever, they are all using B2B SaaS enterprise solutions. there is not one hiring manager plinking away at at a large language model.
ATS scans your resume in comparison to the job posting, parses which resumes contain key words, and presents the recruiter and/or hiring manager with resumes with a high "score." the goal of writing your resume is to get your "score" as high as possible.
but tumblr user lightyaoigami, how do i beat the robots?
great question, y/n. you will want to seek out an ATS resume checker. i have personally found success with jobscan, which is not free, but works extremely well. there is a free trial period, and other ATS scanners are in fact free. some of these tools are so sophisticated that they can actually help build your resume from scratch with your input. i wrote my own resume and used jobscan to compare it to the applications i was finishing.
do not use chatgpt to write your resume or cover letter. it is painfully obvious. here is a tutorial on how to use jobscan. for the zillionth time i do not work for jobscan nor am i a #jobscanpartner i am just a person who used this tool to land a job at a challenging time.
the resume checkers will tell you what words and/or phrases you need to shoehorn into your bullet points - i.e., if you are applying for a job that requires you to be a strong collaborator, the resume checker might suggest you include the phrase "cross-functional teams." you can easily re-word your bullets to include this with a little noodling.
don't i need a cover letter?
it depends on the job. after you have about 5 years of experience, i would say that they are largely unnecessary. while i was laid off, i applied to about 100 jobs in a three-month period (#blessed to have been hired quickly). i did not submit a cover letter for any of them, and i had a solid rate of phone screens/interviews after submission despite not having a cover letter. if you are absolutely required to write one, do not have chatgpt do it for you. use a guide from a human being who knows what they are talking about, like ask a manager or betterup.
but i don't even know where to start!
i know it's hard, but you have to have a bit of entrepreneurial spirit here. google duckduckgo is your friend. don't pull any bean soup what-about-me-isms. if you truly don't know where to start, look for an ATS-optimized resume template.
a word about neurodivergence and job applications
i, like many of you, am autistic. i am intimately familiar with how painful it is to expend limited energy on this demoralizing task only to have your "reward" be an equally, if not more so, demoralizing work experience. i don't have a lot of advice for this beyond craft your worksona like you're making a d&d character (or a fursona or a sim or an OC or whatever made up blorbo generator you personally enjoy).
and, remember, while a lot of office work is really uncomfortable and involves stuff like "talking in meetings" and "answering the phone," these things are not an inherent risk. discomfort is not tantamount to danger, and we all have to do uncomfortable things in order to thrive. there are a lot of ways to do this and there is no one-size-fits-all answer. not everyone can mask for extended periods, so be your own judge of what you can or can't do.
i like to think of work as a drag show where i perform this other personality in exchange for money. it is much easier to do this than to fight tooth and nail to be unmasked at work, which can be a risk to your livelihood and peace of mind. i don't think it's a good thing that we have to mask at work, but it's an important survival skill.
⋆。゚☁︎。⋆。 ゚☾ ゚。⋆ good luck ⋆。゚☾。⋆。 ゚☁︎ ゚。⋆
640 notes
·
View notes
Note
This was probably asked before; But what brush do you use for your lineart? <3 It's so crisp! :D
This is my go-to brush for lineart! The software I use is Paint Tool Sai 2 :)

86 notes
·
View notes
Text

THE SIMS 3 TUTORIAL
HOW TO CREATE DEFAULT REPLACEMENT MOD USING CUSTOM MESH & TEXTURE FOR SIMPLE OBJECT
⚠️ Tumblr has 30 pictures limit, so I cannot include too many pictures. If you want to zoom in the pictures, click the pictures to enlarge, or save the pictures into your PC, zoom the pictures on picture viewer or zoom in the pictures on your mobile phone. ⚠️
----------------------------------------------------
I create this tutorial to make easier to follow because there are older tutorials available before but scattered on internet and usually only say "Export to replace s3asc" without explaining how to export the edited object properly.
My method is using TSR Workshop instead of exporting the object using Sims 3 Object Export/Import plug in because exporting to replace the s3asc using that plug in always giving error notification "ERR: Model has 1 groups; original had 0" and cannot be exported.
For beginners who are very new using s3pe and haven't created default replacement mod before, better start from simple object first.
Simple objects I mean in-game object that has single MODL and single texture with no morphs, no GeoStates, no presets, no CAS colour channels, and easily cloned from OBJD on catalogue. Usually as utensils that Sims holding in their hand, not buy/build objects. For example: Pencil, pan, fork, spoon.
----------------------------------------------------
Tools to prepare:
s3oc
s3pe
Milkshape 3D for bone assignment (Version I use 1.8.5 beta, discontinued by its developer, therefore feel free to download the full version with its license key provided).
Sims 3 Object Export/Import 1.01 by Wesley Howe (Milkshape plug-in. Download msS3ObjPluginsV101.rar )
TSR Workshop (Older version for TS3 only version 2.0.88)
TSR Workshop plug-ins for export.import TSRW Object.
3D Program (Blender/Maya/3dsMax)
Editing images software (Photoshop, make sure you have to install .dds plugin by Nvidia. For free software alternative, you can use GIMP with its .dds plugin)
This tutorial will not teach you how to:
Meshing object ❌
Create alpha texture ❌
Change thumbnails in-game ❌
Install programs and plug-ins ❌
This is how I created Chinese chopsticks replacement mod using custom mesh and texture.
In summary, this tutorial has 10 steps:
Step 1. Clone the Object using s3oc
Step 2. Open S3PE to Copy the Original Resource Code and Export the Files
Step 3. Export the Original Mesh as Base Mesh to .obj format
Step 4. Create Your Custom Mesh
Step 5. Bone Assignment & Create Group
Step 6. Create custom Texture
Step 7. Import the .wso of Edited Mesh on TSR Workshop & Export the package
Step 8. Export MODL file from Package saved from TSR Workshop
Step 9. Finalizing in s3pe & Replacing the Original file with Edited File & Correcting the Code As Same As Default Code
Step 10. Test the CC in your game.
-----------------------------------
✳️ Step 1. Clone the Object using s3oc
Before cloning the object, check the Game Folder for in-game object file location. Settings > Game Folders...
Take a look if the Base Game or Expansion Pack for object file you want to clone is in the right folder. For example, my The Sims 3 game are all bought from Steam, so the location is D:\SteamLibrary\steamapps\common\The Sims 3
If you want to clone object from Expansion Pack, make sure input the folder location. For example, the location for World Adventures EP is D:\SteamLibrary\steamapps\common\The Sims 3\EP1

If you are done, close the pop-up box. You can continue click Cloning then choose Normal Object...
Wait until you get the whole catalogue. Click Search...

For example, I clone object from World Adventures Expansion Pack. You can clone object from Base Game or other Expansion Packs as long it is considered as "utensil" that Sim holding on hand. For example: "Pencil" or "Pan"
Search for text: chopsticks
or if you want to clone object from Base Game, search: utensil
Tick check marks for Resource Name, Object Name, Object Desc then click "Search button"
Search result gives you results with name "chopsticks". Here is the object we are looking for: UtensilChopsticks
We need the OBJD file to clone. OBJD = Object Data.

Click "Clone or Fix" at the right bottom. Then you see the next page to determine if you want to clone with renumber or not. If you want to make default replacement, then do not check the Renumber box. Keep it blank.
Tick check box means the s3oc will generate new resource code for new item. Not tick the check means the s3oc will overwrite the same resource code, it is to replace object you cloned in-game.
I am personally a detailed person, so I usually tick as many as I want: tick "Deep clone" "Missing String Tables" and "Include Thumbnail" to include more details. Then click "Start" to proceed.

It will give you file name [CreatorName]_ObjectName_Number
Then save your package file in "DBPF Package" format in your project folder. Always make folder for any file to make everything organized.
✳️ Step 2. Open S3PE to Copy the Original Resource Code and Export the Files
Open S3pe, locate your package file you cloned from s3oc. Find the MODL of Utensil Chopsticks, Right-Click, "Details..."

On Resource Details, click "Copy TGI" to copy the Resource Code. Type, Group, and Instance will automatically be copied on clipboard. Then open Notepad, Right-Click to "Paste".
Click GRID on bottom of the s3pe (I mark it red on picture), it will give you pop-up box with Data Grid. Click "Resources", it will be highlight blue and there's 3 dots button appeared on the right side. Click the 3 dots button. It will give you TGI Block List Editor.
Inside MODL's TGI Block List Editor only has IMG. You may wondering why, but that's how the game coded. Type, Group, Instance of _IMG inside TGI Block List Editor should be the same as _IMG on the package.
Copy the TGI, Group, Instance to your Notepad.

After you copied code of MODL, do the same for the texture image (_IMG), but only copy the code from Resource Details. You cannot edit TGI Block List Editor for _IMG as the Grid button for _IMG is greyed out.
The main task is the code of your edited mesh and texture should be the same as the code you copied now from original package you cloned with s3oc.
Keep the code on notepad. You will need this code later.
Export the MODL file. Right-Click, "Export to s3asc". The file appears in long string such with name for example: S3_01661233_08000001_B619DB2238C3430B%%+MODL_filebase
Do not rename the file. Save.

Export the texture file. Right-Click "Export > To File..." The file will be saved in .dds format. Do not rename the file. Save.

✳️ Step 3. Export the Original Mesh as Base Mesh to .obj format
Open Milkshape. Import the s3asc file you saved before.
More steps click spoiler tag "Read More / Keep Reading" below
File > Import > Sims 3 Object Import v 1.01 by Wesley Howe

Locate the s3asc file, then the original chopsticks mesh appears.
Click the "Joints" tab. It has 4 codes. Check box "Draw vertices with bone colors" It will show Bone Assignment colors on the original mesh. Yellow on top chopstick and light blue on bottom chopstick. The colours are to make the object has rig and movement following the Sim's interaction.

Take a look at the 4 codes on Joints Tab. You can play around to see which colour of the code will appear, after that copy paste the code to Notepad to make it easier to comprehend.
Click Select from Tools menu, Select Options: Face. On "Right/Left/Top/Bottom 2D View", Left-click make selection of one part of chopsticks. While the part of object being selected (Red), click Joints then Choose "Assign".
0x96239247 --> Yellow 0xFEAE6981 --> Purple 0xCD68F001 --> Light Blue 0xD0DECA8E --> Red
Your edited mesh must have the exact same Bone Assignment colour later. Check again if the code and colour are correct.

You can save object mesh as .obj to other 3D software such as Blender or any other 3D software.
✳️ Step 4. Create Your Custom Mesh
Use the original .obj as base model. While you can create longer mesh or any edited version as you wish.
Make sure the scale and position of the edited mesh is same as base original mesh, because the edited mesh will be used on Sim's hand.

If you are done editing the mesh, export the UVmap.
You can export the uvmap in higher resolution, as long as it is Power of 2. 64x64, 128x128, 256x256, 512x512, 1024x1024, 2048x2048, 4096x4096. I export in 1024x1024 pixels to make the size of texture larger and have more details.
Then export the mesh object in .obj format.
✳️ Step 5. Bone Assignment & Create Group
Open Milkshape. Import the original mesh.
Check the Groups Tab. Original mesh has 1 group, "group 00". Group 00 means it is the main mesh. There is no shadow beneath the object.

Import the edited mesh as .obj file.

My edited mesh has one single name "default" name on the Group Tab. While edited mesh may have a lot of file name scattered on Group Tab. Regroup the file name to simplify your edited mesh into one single name. Select > Regroup.
The main task is replacing the EA's original mesh with your edited mesh.
Before you delete anything, you must do Bone Assignment first to the edited mesh you created.
Your edited mesh does not have Bone Assignment, so it appears white.
Remember the 4 codes you copied earlier in Notepad.

Copy Bone Assignment from original mesh to your edited mesh.
This case, your want to Bone Assign Yellow colour.
Select > Face to select one part of chopsticks of your edited mesh. On Joints Tab, double click the appropriate code 0x96239247 in blue highlight then the code box on the right side of "Rename" will appear 0x96239247. Make sure the code is correct. Then you can click "Assign".

Your edited mesh will appear in Yellow colour. Then do the same for another part of chopsticks.
Select another part of chopsticks of your edited mesh. On Joints Tab, double click the appropriate code 0xCD68F001 in blue highlight then the code box on the right side of "Rename" will appear 0xCD68F001. Click "Assign".

Your edited mesh will appear in Light Blue colour.
Then what's the other code for? With colour purple and red?
Leave them. Let the codes have the same exact codes as appear in original mesh and let the colours only assigned Yellow and Light Blue. The colours are to determine rig for interaction in-game, which only use Yellow as upper part of chopstick and Light Blue as bottom part of chopstick.
You can safely delete the original mesh with name group00 until it remains your only your edited mesh.

Rename your edited mesh to group00. Type group00 on the box then click "Rename" on the left side.

Export to TSRW Object in .wso format. .wso is format with bone assignment on object attached.

Save your .wso in your project folder.
✳️ Step 6. Create custom Texture
Import original texture you exported from s3pe to your editing image software.
Look at the original texture made by EA. 32x64 pixels. It is very low resolution, blurry and stretched, because the texture should be compressed as low as possible by game designer. As player you want it has higher detail to look realistic as possible and your PC of course can handle high resolution content, sure you can make the resolution much higher than EA's.

Import the UVMap you saved from 3D software. For example, UVmap I imported has 1024x1024 resolution. Add your custom texture. Then save it to .dds format in the same name as original texture. Save in separate folder, name it "Edited Texture" to keep it separated from original texture.
✳️ Step 7. Import the .wso of Edited Mesh on TSR Workshop & Export the package
Open your TSR Workshop.
Create New Project > New Import >Next...

Then Browse original mesh by EA in package format in your project folder.
On Open file box, you cannot see .package file because the filter is .wrk (TSR Workshop Project). Choose the .package dropdown.

Then you can see .package file.
Open the .package. After the file is located, then Next. On Project Details I usually skip without giving name of Project Name and Title. Next.
You must have seen green land with white blank sky.
Where's the mesh? It is actually there... just being zoomed in too close. You need to zoom out by scrolling down mouse.
You can see the original chopsticks mesh by EA. You can save the project file in .wrk format. After you save the file, import the .wso of your edited mesh. Mesh tab > High Level detail. Click green arrow folder icon to import. Then your edited mesh will appear replacing the original EA mesh.

As you see, the texture is messed up because the texture is still using original EA's texture. But then you check Textures tab and it has blank dropdown...
I cannot change the texture on this TSR Workshop!
Don't worry, we can replace the texture on s3pe later.
No need to change anything other than importing mesh. Click Edit > Project Contents to save as package.
You will see pop up box with number or files DDS, FTPT, LITE, MODL, OBJD, OBJK, etc. Export > To. package. Give name such as "EditedChopsticks_TSRW"

✳️ Step 8. Export MODL file from Package saved from TSR Workshop
Open S3PE, File > Open package "EditedChopticks_TSRW" that you saved from TSR Workshop.
Export MODL. Right-Click, export. It gives you file name with [StringOfNumber] .model .
Save it on project folder. Keep it organized and separated from original MODL. Name the folder "Edited MODL". Do not rename the file.
✳️ Step 9. Finalizing in s3pe & Replacing the Original file with Edited File & Correcting the Code As Same As Default Code
Open s3pe, File > Open original package that you cloned from s3oc. [CreatorName]_ObjectName_Number
Find the MODL. Right-Click > Replace...
Locate to your edited MODL with filename .model .
Then click Open.
The original MODL of the package should be replaced with your edited mesh.
Do the same for the texture.
Locate to your edited texture with filename .dds
Then click Open.
The original texture of the package should be replaced with your edited texture.
Take a look at MODL's Type, Group, Instance. It has the same code as original MODL in the original package cloned with s3oc (because it has been replaced)
Don't forget to see the code inside TGI Block List Editor.
Repeat step 2 how to check the code. Right-Click on MODL/IMG > Details... and click GRID > Resources > TGI Block List Editor.
The Type, Group, Instance of the _IMG are different compared from IMG from original package clone, which means that is the evidence of edited mesh replaced the original.
Rename the Instance with default/original Instance you copied on notepad from Step 2. Type, Group, Instance should be the same as default/original Type, Group, Instance.

Open notepad with resource code you copied from Step 2. Make sure the Type, Group, and Instance are all the same.
If the codes are the same, then your edited mesh and texture will overwrite the default mesh and texture with the same code in the game. Save, Commit, Save the package.
Check again if the texture is replaced properly. Right-Click on _IMG > ViewDDS.
ALTERNATIVES!
Yes, you can delete unwanted files in your edited package, to keep the package clean. Simply Right-Click>Deleted.
The only files needed in package are: MODL, _IMG, _KEY
They are the only files with your edited mesh/texture including codes to overwrite the default codes.
You can Start new fresh blank s3pe. Right-Click>Import from file...
Locate your edited MODL and _IMG (texture) file.
On Resource Details box, tick mark "Use resource name" > OK.
Make sure all the Type, Group, and Instance of MODL and _IMG including in the TGI Block List Editor are all the same as the code in original package.

Save the package.
✳️ Step 10. Test the CC in your game.
Put the package to your CC folder in your The Sims 3 document folder to see if the CC is working or not.
If the CC is working as your intended, with your custom mesh and texture, then test the animation. Are the chopsticks animation working as the same as original EA's? If the animation are working well too, then congratulations!

Your default replacement are working. Give applause to yourself. 👏
-------------------------------------
QUESTIONS!
Q:
Can I use this tutorial for making default replacement for buy/build object?
A: This tutorial covers basic method of using TSR Workshop and replacing the default codes (Type, Group, Instance), so you will understand the basic principle of doing default replacement mod.
Keep in mind that different object has different case. Buy / build object has MLOD (not just MODL) more than one, texture images more than one, has presets, and CAStable colour channels.
The TGI Block List Editor for buy/build object has a lot of codes, so have to spend a lot of time to do trial-and-error to make the default replacement working properly, because a lot of times the texture doesn't work (still using default EA's texture), or when the object appears right with your edited mesh and texture, after you choose the presets, the object reverts back to your edited mesh with default EA's texture.
Q:
Help! The texture is black! / still using same EA's texture when tested in the game!
A: The texture codes must be not the same. Check the Type, Group, Instance of _IMG. Do the codes are the same like codes in original package? Check the TGI Block List Editor for MODL, is the _IMG inside has the same Type, Group, Instance as in original package.
Q:
Help! The object disappears when tested in the game!
A: You must be replacing OBJD in your package. Do not replace OBJD. Just MODL and texture only.
#tutorial#the sims 3#the sims 3 tutorial#thebleedingwoodland#the sims 3 default replacement mod#modding#s3pe#s30c#TSR Workshop
120 notes
·
View notes
Text

That Killer instinct.
tw - swearing?
word count - 1,306
Tony stark x Daughter! reader
inspired by killer instinct from bring it on
——————————————————
Y/N Stark practically skipped through the door, her energy filling the space as she rushed into the workshop. Tony was hunched over a project, his tools scattered around him, but the second he heard her footsteps, he looked up with a grin, glad to see his daughter in one piece.
“Hey, kid. How was school today?” Tony asked, his voice light but tinged with that typical dad curiosity. He loved hearing about Y/N’s day.
Y/N bounced into the room, practically vibrating with excitement. “Dad! I did it!” she exclaimed, her eyes sparkling with pride. “I’m head cheerleader now!”
Tony paused, his tools still in hand. He sat up straighter, surprised by the announcement. “Whoa, seriously? Head cheerleader? That’s awesome! I mean, I knew you’d make something happen, but this… this is next-level. You know, I was the king of the school for a reason, kid.”
She flashed him a wide grin, obviously proud of herself. “I know, right? And it was so easy, Dad. It was like everything just fell into place.”
Tony leaned back in his chair, still smiling, but curiosity tugged at him. “Tell me everything. How’d you pull it off?”
Y/N hesitated for a split second before she casually flopped down on the couch, kicking her feet up on the coffee table. “Okay, so it started with Cameron right? She was in line to be the head cheerleader. Been working her whole life for it. But, she had that D in chemistry, and I just—well, I tweaked it. You know, a little software update here, a little school system adjustment there…”
Tony’s smile faltered as the pieces of the story began to fall into place. “Wait, you hacked the school system?”
Y/N gave him a sweet, innocent look. “Just a little thing, no harm done. Cameron had no business being captain anyway. D’s are for losers. So, I made sure she was out of the picture.”
“Y/N…” Tony began, rubbing his temple in frustration. “You can’t just mess with people’s lives like that. That’s not how you—”
She cut him off with a nonchalant wave of her hand, her voice still light and peppy. “Oh, Dad, relax. It was just a minor thing. It’s all part of the plan. Anyway, after Cameron ? I had to deal with Abbie. She thought she had it in the bag, too, but she wasn’t quite prepared for what I had up my sleeve.”
Tony’s eyebrows shot up. “What did you do to Abbie?”
Y/N’s grin widened, a playful yet almost predatory glint in her eyes. “Well, I hired this guy… you know, give her a little gift—a lovely case of mono. Totally took her out for the week, so she couldn’t even tryout. Now guess who’s the head cheerleader?”
Tony’s jaw dropped, and for a long moment, he couldn’t find the words. His daughter, the one he’d raised and hoped would take the moral high ground, had taken a shortcut straight to the top, and it wasn’t pretty.
“You didn’t—” Tony started, but Y/N was practically gleaming now, practically glowing with pride as she continued her story.
“Yeah, I did. And now, no one’s in my way. The seniors all think I’m amazing. They kiss my ass, and I’m just sixteen! I’m the girl to beat, Dad. I’m winning.” Her voice was sugary sweet, but there was an edge to it. A fierceness that matched the deadly precision of her methods. “I’m raising hell dad, I’m totally untouchable!”
Tony stared at her, trying to process the words that were coming out of her mouth. His daughter, the head cheerleader—the head cheerleader—was a mastermind of manipulation and underhanded tactics. His thoughts raced, but all he could manage was a frustrated sigh.
“Y/N, you can’t just—this isn’t some game you can play however you want,” he said, standing up from his chair, his voice low and serious now. “You’re talking about taking down people—changing their lives, getting them sick… this isn’t how you build something. You have to earn things the right way.”
Y/N crossed her arms and kicked her legs up a bit more, a little smirk tugging at the corners of her mouth. “Dad, I did earn it. I did whatever it took, just like you always say. Get to the top, or get out of the way. Don’t you always talk about how it’s a dog-eat-dog world? This is how the world works. If someone’s in my way, I just take ‘em out.”
Tony’s expression tightened. He could see how she justified it in her mind, but it wasn’t what he’d meant when he’d taught her to fight for what she wanted. This was more than ambition—this was ruthlessness.
“I know what I taught you,” Tony said quietly, stepping closer to her. “But there’s a difference between fighting for what you deserve and just cutting down anyone in your way to get what you want. You can’t just step on people to win, Y/N. You have to consider the cost of what you’re doing.”
Y/N’s smile didn’t waver, but there was a small flicker of doubt in her eyes. “Dad, you said it yourself—if you’re not first, you’re last. I don’t care about the cost. I care about being the best. And right now, I’m the best.”
Tony sighed again, rubbing his temples as he paced in front of her. “It’s not about being the best, kid. It’s about who you are when you get there. You can be the top dog all you want, but if you’re stepping on people to get there, what does that say about you? You won’t have anyone left when you’re at the top. That’s the cost. The price of all this ambition.” He gestured around, trying to make her see the bigger picture. “Do you really want to be known as the girl who would do anything—anything—to be at the top, no matter who you hurt?”
Y/N paused, chewing on her bottom lip for a moment as she glanced at her dad. She could see the concern in his eyes, the disappointment that was starting to show in his expression, and it gave her pause for just a second. But then the smile returned to her face, and she shrugged.
“I get what you’re saying, but I don’t think I’m doing anything wrong, Dad. I’m winning.” Her voice had a sharpness to it, one that didn’t match the cheerfulness in her tone. “This is how it’s done. And I’m ready to take on anything.”
Tony closed his eyes, swallowing his frustration. He knew she was clever—too clever for her own good sometimes. He just hoped she’d realize one day that there was more to success than simply being on top.
“Well, I guess we’ll see how long that lasts, huh?” he said, his voice softening. “But just remember: the way you get to the top will follow you. It’s not always about being the fastest, or the strongest… it’s about being the right kind of person.”
Y/N grinned, clearly unbothered, and shrugged once again. “I’ll keep that in mind, Dad. But right now, I’m the head cheerleader, and that’s all that matters.”
Tony’s heart sank, but he gave her a small, resigned smile. “Yeah, you sure are kid.” He turned back to his workbench, feeling both proud and disappointed in the same breath.
——————————————————
i’m on a roll with the musical songfics guys be proud to be fair i’ve been writing these over the past week im not that fast of a writer 🙏😭
44 notes
·
View notes
Text
Blu-ray DRM is really devilish. I use a program called makemkv to rip them, because there is no other way to play them on my laptop, and there are no legit linux options for blu-ray playback, you have to crack the drm to play them. The easiest solution is makemkv to rip the movies into files, it works out of the box.
But if the level of drm (aacs) on a particular blu-ray is higher than what Makemkv can handle, the disk will update the firmware on your drive to revoke access to makemkv, so it can't access any blu-rays.
"One famous “feature” of AACS is a so-called host revocation. It was designed to ensure that only ��approved” software can use your drive. Every Blu-ray disc contains a file that has a list of host keys known to be used by "unauthorized" software. This list has a version number. The moment you insert the disc into your drive, the drive checks if the list is newer than the one it knows about, and if it is, the drive re-flashes itself (updates firmware)."
And that happened to me. It was a blu-ray of the 1972 Hammer horror movie Fear in the Night that did it. The one program that works with my blu-ray player now couldn't access any discs, including ones it had ripped before. And there are absolutely zero linux programs that are authorized to playback blu-ray discs.
I had to flash my drive's firmware to allow something called libredrive, which allows direct access to files and bypasses the aacs drm firmware.
And that was quite the journey. I had makemkv installed as a flatpak via my distro's software manager. and I needed to use the command line. Flatpaks are a great packaging format. but they are primarily for gui apps. So i had to build makemkv from source. And then I had to figure out the commandline for the firmware flashing tool included with makemkv, which was hard because the instructions linked flat out lie. There is no "flash" command for sdftools, there is only "rawflash", you have to read the thread carefully to find that out. This page helped. I had to download new patched libredrive firmware.
And finally i figured out the command I needed ""sdftool -d [drive name] rawflash main,enc -i [new firmware file name].bin. And now I can use my blu-ray drive again. It's now libredrive.
So much work to finally be able to use the drive I paid for, and the blu-ray discs I also paid for. I'm not running some major piracy operation, I just want to be able to watch movies I legally own on my laptop. And drm stopped me, and I had to break it.
This is why DRM is so bad, and anyone who uses it deserves all the piracy they are trying to stop with it. It's scummy to take someone's money and then interfere with their ability to use the copy of the products they own and paid for. It's such atrocious treatment of the customer that anyone who does it deserves to have their stuff pirated.
372 notes
·
View notes
Text
Uh... AI fanart? Idk how to feel about this...

Yep...we're in that stage. So I recently posted the 'Visions of the Last Symphony' comic on reddit and someone apparently took inspiration and created this using a software known as Picsart (which definitely 100% has AI as a part of it's software).
Now i will not go into the great detail about our conversation but the person who dmed me insists that the use of AI was minimal and they actually had to do a fair amount of this by hand. But the thing is, I'm a bit skeptical.
here's some of the dms for context,


One thing I've learned about the internet is that lying is very very easy. So not sure if i believe this.
I personally believe that AI "ArT" is a crime against nature at a fundamental level. And I have stated as such. But this doesn't appear harmful or ill-intention-ed, so i dont know if its tolerable or not, especially since i dont know Picsart as a software and how much human effort something like this actually takes.
Overall, this isnt that serious and I ofc dont dislike the user or want any hate to come go towards them. But for anyone who wishes to make fanart of TWHUTH or any related story (Which you totally can btw) please do not use AI or any AI tool or program. Just pick up a pencil and draw, i swear no matter how bad it it is, its probably better than my own art lmao. :D
But what do you guys think? Thanks and Cheerio! :D

tagline for community members: @harleyacoincidence, @autism-purgatory, @rivenantiqnerd, @sm-writes-chaos, @hellothere2009, @drvonchickenstein
#writing#writers#writerscommunity#writers on tumblr#tumblr writers#writing community#writeblr#writer#artists on tumblr#art#my ocs#artwork#my artwork#my art#sketch#drawing#sketches#pencil drawing#my draws#illustration#doodle#character design#character art#original character#hand drawn#drawings#comic art#comics#webcomic#oc
22 notes
·
View notes
Text

Jinx x Isha WIP
Just started using Clip Studio Paint! I am learning SO MUCH and it's quite amazing the number of things this software can do. I'm both confused and fascinated (fighting for my life). I'm working on two other Arcane fanarts with CSP, I hope y'all will enjoy it! :D
Finishing this piece is going to take a while, as I learn the tools to lineart and colors.
#my art#digital art#arcane#arcane fanart#jinx#jinx arcane#jinx and isha#isha arcane#isha fanart#jinx fanart
34 notes
·
View notes
Text
#audio visual#av design software#av design#av technology#software#saas#d tools pricing#d tools alternative#dtools software#d'tools cloud#d-tools cloud#d tools cost#d-tools support#d tools project management#d-tools#d-tools software#d-tools integration#d tools integrator#d tools cloud#d tools#d tools software#d tools si#dtools#dtools it#XTEN#XTENAV#XTEN-AV
0 notes
Note
i was wondering, how do you make your icons? :0
Download/Find the transparent pngs of the icons
Browse around for textures/wallpapers/background that you’d liek to use for the pfp/icon. (I use pinterest) (Alsp, tip; I always use the keyword texture bc it brings up the best and least distracting stuff)
(Optional) Find some overlays that youd wanna play around with and add to the image
Open any image editing software. I use Ibis paint X on my Iphone but you can use procreate or Pixlr. Really js anything that works for you :3
Select a square frame thingy like below :D

6. Add your background and then your icon, mess around with some overlays and maybe even fuck around w/ the clipping tool!


And then ur done
i think
#the way that it says 11 hours but i have multiple file thingies for my icons…#morons icons#moronkyne#tutorial
23 notes
·
View notes
Note
idk if anyones asked this yet but what program do you use? i wanna try get back into digital art but i have no clue what software to draw with
CRACKS MY KNUCKLES you've come to the right guy. here's a list of all the software i've used over the course of my digital art journey
apps i used on a touchscreen tablet:
ibispaint x: this was my favorite for AGES. lots of tools if you use the paid version which as far as i remember isn't very expensive. basically has everything you need for basic digital art
autodesk sketchbook: this one's also fine, not as nice as ibispaint but also has plenty of tools. it lacks a few though like clipping masks (when i used it) so i mainly used ibispaint. this one's completely free though
software i use(d) on my laptop:
medibang paint pro & firealpaca: both free, VERY similar in layout and amount of tools (medibang has a more easily accesible downloadable tool catalogue though), both very good to get into digital art on a laptop because they're very easy to navigate. i still use firealpaca for lineart occasionally cos it looks nice
krita: more difficult to navigate in a lot of places imo but also has a TON of tools. layers, folders and such ARE easier to sort through than medibang & firealpaca though! i used this one for a long time. ps when you first use it though you HAVE to look at the pen pressure curve because when i first installed it it was all fucked up and i thought i couldn't use the software at all LMFAO
clip studio paint (paid): the software i use currently! by far the best i've used. it's got a fuck ton of useful tools that can go over your head completely so make sure to scour for tips, i discover new stuff every week. despite that it has a lot of hidden tools it's still easy to navigate the basic stuff! it cost me 40 ish bucks and it was worth it 100%
31 notes
·
View notes
Note
I know EXACTLY what video you're showing your cats. My boys love it too.
(Anon this is an old ask, my apologies! Everyone else, this is in reference to the photos I've been posting of movie nights with the cats, where I project Cat TV on a screen for them.)
I honestly usually just search "tv for cats" and less if I can get away with it, because usually I'm petting a cat with my other hand while trying to enter the search text :D I can't log into youtube on the projector for some reason (it crashes the software) so I just kinda had to take what I could get for a while, although now I've downloaded and illegally installed an entirely new app that lets me log in, so there's that at least.
But those fixed-camera-on-a-stump-with-seeds videos are exactly what the Crypids like, that and tool repair videos like tysy tube. :D
Tonight they're rambling around instead of sitting with me and watching because I've got a podcast on (it's one of those that has visual elements, but the visual elements aren't interesting to cats) and because there's some new furniture in the bedroom -- a wardrobe, photos to follow eventually -- that they have to discover the best places to puke in.
53 notes
·
View notes
Text
Behind the Fortress Walls Chapter 4
We've finally got chapter 4 of my bang fic out! Only one more to go, holy shit.
Fic Summary:
Jazz is in love with Dick. He’s kind, considerate, and caring. Far and away the nicest person she’s ever dated. But she’s lying to him. About so, so much. And he’ll hate her once he learns the truth. Assuming he doesn't get tired of her canceling all their dates first. When Danny and Ellie go missing, the latest in a series of ghostly disappearances, she's forced to cancel another date. Going to Elmerton to meet up with Tucker and Sam, she will get Danny and Ellie back from the GIW no matter what it takes. Only...they aren't the only ones breaking in.
Chapter word count: 8.1k
There's an entire comic included with this chapter. Or you can find it on tumblr here.
The scene from the comic:
-----
The hallway ended in a thick metal door that had both electric and manual locks. Before Dick could even offer to take care of it, Tucker shrugged off his own backpack and pulled out a tool kit. Within moments, he had the casing off the keypad and was plugging his own PDA into the system.
Starfire hovered over his shoulder, looking down. “What is the purpose of the device you are using?”
Jazz could hear the smile in Tucker’s voice as he caressed his PDA. “Bethany here is my pride and joy, my child. She’s capable of anything.”
Sam snorted. “It’s a PDA. Not our kid, T— Pharaoh.”
Tucker made hushing noises and clutched Bethany to his chest. “Shhh, you didn’t hear that. Mommy loves you.”
“Just get the door open,” sighed Sam.
“Not until you apologize to our daughter!”
Sam took a deep breath to respond, but Danny interrupted before she could. “Just do it, Regrowth. Pharaoh and I put a lot of work into Bethany.”
Sam’s shoulders slumped. “I’m sorry, Bethany. I love you very much.”
Starfire grinned. “The machine is alive? It is nice to meet you, Bethany!”
Next to her, Jazz felt Dick shake with barely suppressed laughter. When she looked out of the corner of her eyes, she could tell he was biting back a smile.
Sam sighed. “She’s not alive. But Pharaoh and Phantom have been developing and upgrading her over the last several years. They’ve custom built half her parts and replaced the other half.”
Dick hummed in interest. “It looks like an old PDA case. Why didn’t you go for something more modern?”
For the first time that night, Danny grinned at Dick and Jazz felt something inside her relax. “PDAs were what we could afford as teenagers without real jobs. Plus they have bigger casings than modern smart phones; more room to fit more hardware. Beth’s battery lasts weeks.”
Starfire laughed. “Cyborg wishes to know if you would agree to the sharing of specs.”
Tucker practically squeaked at the question and Jazz bit back her own laugh. “Uh, yeah. Sure. Absolutely. He really wants to see?”
“Pharaoh,” said Dick, “if you allow it, he wants to spend at least a week with you figuring out how the tech these guys use works.”
Tucker looked down at Bethany and began typing. “I mean, sure. I’d love to. But if that’s what he wants, D would really be better. He’s the hardware guy, I’m the software guy.”
A moment later, the keypad beeped and they heard a click.
“All right, electronic locks are open. Nightwing, mind getting the rest of them?”
Dick grinned as he sauntered up to the door and pulled out his lock picks again. This door took longer than the first, but even so, it was open in just a minute or two. Dick bowed as he pulled the door open and gestured them through.
He revealed a fairly small room, in the center of which sat what looked like a large boiler with a monitor affixed to it. The glowing green wires spread out of the machine and disappeared into the walls, ceiling, and floor.
-----
Hope you enjoy the chapter!
#dpxdc#dpxdcbang2024#wolf writes#nightbirds#tucker foley#sam manson#danny fenton#they're dorks#i love them
32 notes
·
View notes
Text
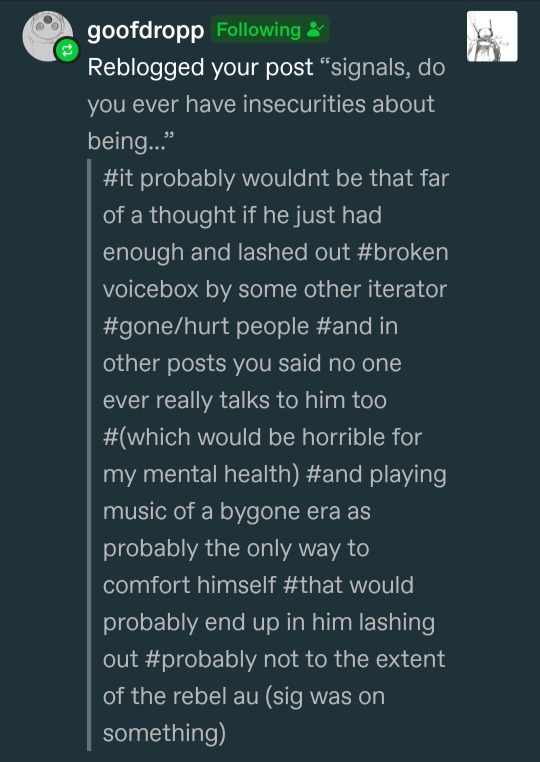
@goofdropp out here giving me ideas-
Realistically, Three Signals would not lash out- they don't have any ways to do so. Since they neglected their iterating work pretty early on, they don't have much else as for tools other than extensive frequencies analysis available. They are pretty good at software engineering I guess? TS developed himself a sound editing software from scratch later in my story- sure it's probably not too late for him to start researching other things but-
Personality-wise it's highly unlikely, if they do reach their breaking point, it would manifest a lot more likely in a su*cidal way than an outlash towards his peers.
HOWEVER-
You're giving me ideas now, and I'm tempted to think of an alternative X"D
#Three Signals? more like Three Traumas#no but for real why has he been through exactly THREE major traumas;#malware attack incident + public ascension + SoS's death#that makes three#what a coincidence#I'm sorry to bring your reblog up so publicly but this is some major inspiration!!#oc three signals#rain world oc#rw iterator oc#rw oc#I really don't know what would they do to retailliate though- shut his sattelites and towers off? perhaps?
13 notes
·
View notes
Text
How to record videos with Sims 2 in-game camera (HD, no UI, no lag, no file format issues)
I originally planned to include this information in the behind-the-scenes video about Bring Me To Life that I'm currently working on, but it's overly technical and not that interesting. It still might be useful to some people (mostly machinima creators), so I decided to make a separate post about it.
There are two ways to record videos in The Sims 2:
Using screen recording software
This is the most common and probably the easiest way. You just need a program like OBS that will capture whatever happens on your screen exactly as it happened. If this method works for you, it's perfectly fine. No need to follow this guide then.
Using the in-game video capture tool
This way involves capturing videos directly in the game by clicking the video camera icon or pressing V on your keyboard. This method is perfect for machinima creators. It automatically hides the UI, but more importantly, the video will always be perfectly smooth, regardless of the actual performance of your game, i.e. even if it runs like a literal slide show, any videos you capture this way will look perfectly fine.
Okay, so if this method is so great, why do we need a tutorial for it? Well, as is usually the case with this game, the feature works fine, it's just a little bit outdated.
To fix it, we need to do 3 simple* things.
*If you're a Sims 2 player, you're probably used to this kind of stuff anyway
Step 1: Installing a modern codec
In the Camera settings, the game lets you choose if you want the videos to be compressed. I highly recommend choosing that option, as uncompressed videos take up way too much storage space.
The codec that the game uses to handle compression is outdated and most video editing programs will not be able to edit such files. To fix this problem, we need to download and install x264vfw, which is a free an open source codec.
Once installed, open the Configure x264vfw app. No need to change anything there (unless you want to test different settings of course), except for this one small thing:
In the Debug section, go to Log level and change it to None. Otherwise the codec will display a pop-up window each time you record in the game, which is pretty annoying.

Step 2: Making the game use the codec
Locate the VideoCapture.ini file in the installation folder with your latest expansion pack. I have Ultimate Collection, so for me the path looks like this:
D:\Program Files (x86)\Origin Games\The Sims 2 Ultimate Collection\Fun with Pets\SP9\TSData\Res\UserData\Config
Back up your file and open the original version with Notepad. You can either replace the whole thing with my settings, or just update the highlighted parts.
While you're at it, make sure to update the LargeSettings value to 1920x1080 so that the videos are captured in HD (no need to worry about it if you're copying the whole thing):
[Config] PreferredCodec=x264vfw Folder is relative to Res/Userdata Folder=Movies FilenameBase=movie NoFillFrames=0 AudioStereoOutput=0 AudioRateDivisor=4 GlobalSettings = reset, vbr:1, fps:10, keyinterval:30, mode:1, datarate:0 SmallSettings = size: 128x128 MediumSettings = size: 320x240 LargeSettings = size: 1920x1080 LowQualitySettings = minq: 6, maxq: 16, mode:0 MediumQualitySettings = minq: 4, maxq: 10, fps:15, mode:0 HighQualitySettings = minq: 2, maxq: 8, fps: 30, keyinterval: 60 SmallLowSettings = datarate: 75 SmallMediumSettings = datarate: 150 SmallHighSettings = datarate: 300 MediumLowSettings = datarate: 150 MediumMediumSettings = datarate: 300 MediumHighSettings = datarate: 600 LargeLowSettings = datarate: 300 LargeMediumSettings = datarate: 600 LargeHighSettings = datarate: 1200 AllowAntialiasing=0 # some drivers have issues with capture when AA is enabled [Codecs] 0=VP61 # On2 VP6.1 1=VP62 # On2 VP6.2 2=VP60 # On2 VP6.0 3=x264vfw # x264vfw
Save your file.
When in game, go to Camera Options and make sure Video Capture Size is set to Large and Video Quality is set to High.
Also, you might want to change the Maximum Video Recording Time to something higher than 60 seconds.

Credit for this solution goes to this person who left the following comment under this video
Step 3: Changing the file format from avi to mp4
Before doing this step, test if everything works correctly when you try to capture videos in the game. The videos will go to the Movies folder in your Documents folder for TS2.
Try to import the videos into your editing software. If it doesn't work, e.g. the program does not recognize the file or the file appears to be corrupted, you'll need to change the file format from avi to mp4.
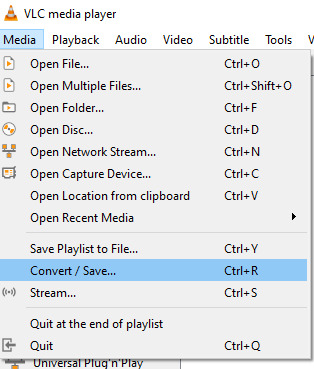
I personally use VLC media player for that, as it's free and open-source.
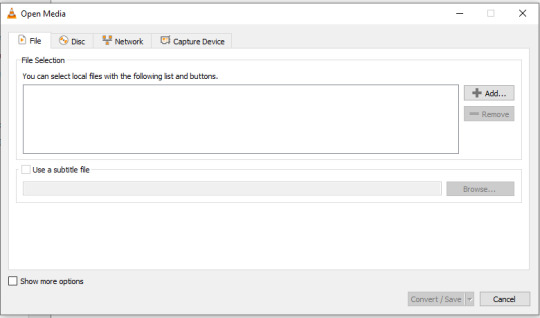
Go to Media > Convert / Save...
Drag your files into the File Selection section or select them by clicking the + Add button.
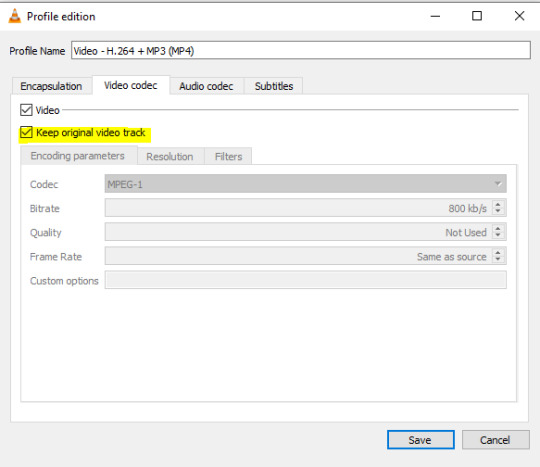
Select the Video - H.264 + MP3 (MP4) profile and click the wrench icon to edit its settings.

In the Video tab, make sure to check the box next to Keep original video track. Go to the Audio tab and check the analogous box.
Save and in the next window specify the destination folder and click Start. VLC will go through each of the files you added.
IMPORTANT:
While Steps 1 and 2 only need to be done once, Step 3 needs to be done for every new video you record (unless, your video editing software doesn't struggle opening the avi files). The good news is, this step is really fast, no more than a second per a single video. This is because we're keeping the original video track intact. The only thing that is changed is the container. That's why this change is fast and does not affect video quality in any way. Ideally, this step wouldn't be needed if we figured out a way to force the game to use mp4 when saving those videos, but I'm not sure if this is possible.
Like I said, outside of machinima creation, it probably makes more sense to just record your screen with OBS. Especially if you want to capture videos in 4K, which I don't think would be possible with this method. But it works for me and as it took me a while to figure it all out, I just wanted to share all the info in a single post!
#sims 2 machinima#ts2#sims2#sims 2 tutorial#ts2 tutorial#sims 2 guide#ts2 guide#my stuff#ts2 simblr#machinima#ts2 machinima
11 notes
·
View notes