#em tag html 5
Explore tagged Tumblr posts
Visit Tumblr Blog
Explore Tumblr blogs with no restrictions, modern design and the best experience.
Last Seen Tumblr Blogs


Fun Fact
Mobile Tumblr US users spend an average of 4.04 minutes per session on the app.
Text
No-Google (fan)fic writing, Part 5: Obsidian
Storytime
In terms of how long I’ve been using Obsidian, well. Currently, a little more than a week ^^ And I’ll be honest, I’ll probably only use it for writing fic sporadically, because it’s proprietary software and I prefer Open Source (and I also love LaTeX too much, but that’s a different question).
The reason why I decided to give it a try in terms of writing fic was that I’ve been talking with others about moving to Markdown, Obsidian is Markdown-based and I’d been playing around with it in a different context for a while already. So, out of curiosity, I decided I’d try to write a story in Obsidian and see if it could live up to my demands.
Word/Google docs versus Obsidian
Again, Word and Obsidian do not work in the same way. If anything else I have described here so far can be compared to the way Obsidian works, it’s Zettelkasten. The same principle of “one note for one idea/scene/thought” also applies to Obsidian. Also like Zettelkasten, Obsidian relies heavily on connecting these notes by way of links, using tags to categorise/find specific notes and it also has the same feature of using folders for collecting “sub-notes”, which can be used for structuring in the same way the virtual desk is used in Zettelkasten. Actually, I would say that the main difference between those two is that Obsidian uses Markdown and a folder-with-subfolders structure, whereas Zettelkasten has its own file format and relies on XML behind the scenes.
Cost
The personal use version of Obsidian is free, so technically +1 for that. However, Obsidian is not Open Source. It is not free in the same way Writer, LaTeX, Zettelkasten and Markdown (= many MD editors) are free, the code behind it is proprietary. This does not have any impact on the cost, at least not at present, but there is a chance that at some point, the developers might choose to charge for private use of it. I think it’s unlikely, but. Just so you know.
File formats
Unlike Word, however, Obsidian relies on Markdown as its file format and stores every “note” as a separate .md-file in a folder. The “notebook” where all notes are collected is called a “vault” and it’s just one big folder with lots of subfolders. In other words, even if the software is proprietary, the files can be read and used without needing Obsidian itself. Which is really great, because again, it means you have plain text .md-files with your ideas, scenes and stories, and they wil be readable even if Obsidian as an app disappears.
+1 for that!
Features
What you need Obsidian for is the features. And of those, there are many. I’ll save words and say, read about Markdown features like bold, italics etc. here, but I really do want to talk about other features Obsidian offers that plain Markdown with an editor does not.
Firstly, an important feature that I talk about a lot is the export function. AO3 needs either HTML or RTF, fanfiction.net ODT or DOC(X). Obsidian can export to all of these, provided you install the Pandoc plugin. This is not the same as installing Pandoc on your computer; you need to install the plugin in Obsidian itself to use it. But as long as you do, you can export to whatever you like.
+1
Another feature very important for me when I tried Obsidian was whether outcommenting would work (again, I’ve talked about this here). Basically, what that means is that parts of the text are not exported when you export the rest of the note – such as comments to yourself, notes on what you still need to write in a scene or simply – as I use it frequently – stuff you wrote and don’t want to delete, even it doesn’t fit anymore. Much to my delight, it works in Obsidian as well, again because it’s Markdown and it works in Markdown. [text you want outcommented]: # will do the trick.
+1
Lastly, another plugin I would recommend is Smart Typography. It “[c]onverts quotes to curly quotes, dashes to em dashes and periods to ellipses”, as the description says, and that’s really useful if you use a regular keyboard layout to write, where you get the standard ' and ".
+1
Installing both the Pandoc and Smart Typography plugins is easy. Open the Obsidian vault settings (the little wheel you can see in the left lower corner, to the right of “example”, which is the name of the vault), Third-party plugins (which you need to enable) and then browse Community plugins by name and install and enable them. Done.

Now for the most important part: putting together a story.
If you want one big vault containing all of your stories, you need to create “folders” for every story and then store the single notes for that story in that folder. Personally, I prefer to have one vault per story, because I find it a lot easier to focus on working on one story at a time if I don’t have several other stories in the same vault. This, I want to note, is different to how I used Zettelkasten, where I generally had one big Zettelkasten containing all of my stories for a specific fandom. I don’t know why that’s different with Obsidian, it’s just that way.
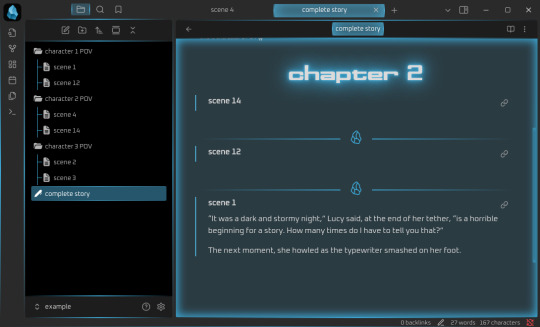
In any case, the following examples are for when you have one story per vault. In this case, I’ve decided that I’m going to write a story involving the POVs of three different characters. I’m going to keep their respective pieces sorted by character, so I always know who’s talking right now. Every scene where that character is the main narrator gets its own note within the respective character folder.

This, in theory, is no different than what I do with regular Markdown. What is very useful in Obsidian, however, is that Obsidian offers the possibility to “embed” notes in other notes.
And that, in turn, means that just like with Zettelkasten, you can use one note to put together the whole story and move around scenes without ever having to worry that you’ll accidentally delete and lose texts while copypasting.
It works like this: [[name of note]] establishes a link from one note to another (useful if you want to connect different ideas). If you add ! before the brackets, like so: ![[name of note]], it means that the whole text of the linked note will now be embedded in the note with the link. Which will give you this:

And, because you’ve installed the Pandoc plugin, this will now allow you to export the note named “complete story” to HTML, ODT or whatever, and all of the linked notes will be exported into that file. You need to change the order of scenes or move one scene from chapter 1 to chapter 2? Just delete ![[name of note]] in chapter 1 and put it in chapter 2. You can also insert horizontal rules, by the way, which I have done here. These will also be exported.
If you need your story structured in chapters rather than as a whole, the process is analogue: one note per chapter, where you !-link all the scenes that belong to the chapter in question. Then, if you want it as a whole, create a note where you !-link the notes for the single chapters, done. Export at your leisure.
Embeds are hands down in my opinion the best feature Obsidian has. They offer a distinct benefit over other Markdown editors like Ghostwriter, KATE or Notepad++, because Markdown, other than LaTeX, does not come with a feature that would make it easy to include “child files” in a “parent Markdown” file that only includes the header and the child files in the order in which they should appear in the final output document. Thus, none of the three editors I like to use for Markdown can show me the whole story if I decide to create a separate file for each of the scenes, and that is really annoying, because it means that I’m back to cutting and pasting pieces of text from one part of my Markdown document to another. Which in turn increases the probability that I will lose something, and well. See Zettelkasten as to how I feel about that.
So that is definitely an extremely useful feature deserving a big +1 because like with Zettelkasten, it means you can move the order of your chapters and scenes around without running the risk of losing the actual text.
Interface
Something I find quite enjoyable is that there are a lot of “skins” made by the community that can be applied to Obsidian. This is important to me because, as the previous instalments have probably shown, I’m a big fan of simple, clean, customisable interfaces. I’ve tried several of the community-made skins already, and my current favourite is Cyber Glow – but there are also others I’ve found quite nice.
Again, skins can be installed via the wheel/settings button, and just to show it, the below is the vault from above with Cyber Glow enabled.
Syncing
One of the big benefits of Obsidian is that it comes with a syncing service. Yes, you don’t need anything else, you can just create an Obsidian account and your notes will be synced across your devices, even on mobile devices. And file versioning is an option (I’ll get to that in due time). And that is really great, because it’s a one-in-all solution.
If you don’t need or want that, you don’t have to sign up for it. You can also continue syncing your Obsidian vaults with your preferred service (Dropbox, OneDrive, GIT, USB etc.). But you can and it’s at least nice to have the option. Downside: sync is a paid-for service, starting at 4$/month for 1GB of storage. Which isn’t a lot generally, except you’re writing plain-text/Markdown, so your files are Kb-tiny in most cases, and it takes a lot of Kb-sized files to fill up 1GB.
Personally, I will say that I’d much rather pay 4$ a month and know that my stories are not going to be scraped for AI, but it’s really a decision everyone has to make for themselves. Just remember – if you aren’t paying for the product, you are the product.
Ease of use for Word/Google doc-users
It’s not intuitive in the same way as moving from Word to LibreOffice Writer is. At least having a look at some Markdown guides (linked over there) is important if you are going to use Obsidian. But as I wrote there already, Markdown takes you about half an hour to learn, if you don’t know it already. And yes, you’ll have to wrap your brain around the concept of “one note = one thought/scene/idea” as well, but honestly? In terms of cost-benefit ratio, Obsidian is probably one of the most rewarding transitions you could make if you’re looking to get away from Word/Google docs. My only gripe with it is really that it’s proprietary software, but otherwise? Definitely recommended.
Read No-Google (fan)fic writing, Part 1: LibreOffice Writer
Read No-Google (fan)fic writing, Part 2: Zettelkasten
Read No-Google (fan)fic writing, Part 3: LaTeχ
Read No-Google (fan)fic writing, Part 4: Markdown
#degoogle#no-google (fan)fic writing#fanfiction#fic writing#fanfic writing#degoogle your fics#degoogle your writing#software recommendations#resources#obsidian
9 notes
·
View notes
Text
Readers' Choice Rec List Part 7 of 7
Part 1 | Part 2 | Part 3 | Part 4 | Part 5 | Part 6 (ft. sentimental thank you note from me at the end ❤️)
History in the Making by watchmecope
anon: It is an adorable piece that has made me laugh more than once. It's a fantastic palette cleanser if I read something a bit too angsty!
All our Sweetest Hours Fly Fastest by AHistoricDistraction (WIP)
anon: This fic is so good and so suspenseful! It is so thoroughly researched with so much feeling
And All The Tears On Her Guitar by @saywhatjessie
anon: This is so good for a number of reasons, but my favorite part was finally finding someone who didn't make me feel bad for not liking Taylor Swift.
(don't be alarmed if i fall) head over feet by weather_stained
anon: This fic is so damn funny. It is 100% crack, and I love it!
Give 'em hell by th0ughts
anon: Great look into Alex and Martha's potential relationship.
Gemma's husband by floatingaway4
anon: Lovely and original take on firstprince through an outside perspective
Nova, Baby by @cha-melodius
@leaves-of-laurelin: Amazing spy au. Reading it feels like watching an sexy, action-packed, heart-wrenching movie.
I trace your constellations by viciouslyqueer
anon: A well written taste of representation that doesn't once feel like pandering. A feel good falling in love tale.
A Whole Problem by @thenburntheashes
@daisymae-12: A fic I come back to often, especially when I'm in need of some roommates + college au goodness ❤️
Just a sappy lil thank you note from me (@daisymae-12) A huge THANK YOU once again for following and supporting this blog. When we hosted this celebration for 500 followers, I didn't think we'd currently be at 1k but here we are 🥺 It's been so nice to spread joy through this blog for both authors and readers 🥰 I've also ended up with such a lovely discord community with the Volunteer team, so a big thank you to them as well for helping out and for contributing so much. I wouldn't be able to do this without them, it really takes a village ❤️ Last but not least: shoutout to my husband who has listened to all of my blog ideas and ramblings. For the amazing IT support, writing me code to not only generate index spreadsheets and html formatting, but a code to download every single fic in the rwrb ao3 tag so I can search within fics as well 😭 We're continuing to workshop ways to improve the admin side of the blog with his codes, so this blog is his passion project as much as it is mine ❤️ He always goes above & beyond in his support of my hobbies and I am so grateful ❤️
142 notes
·
View notes
Text
Let's understand HTML

Cover these topics to complete your HTML journey.
HTML (HyperText Markup Language) is the standard language used to create web pages. Here's a comprehensive list of key topics in HTML:
1. Basics of HTML
Introduction to HTML
HTML Document Structure
HTML Tags and Elements
HTML Attributes
HTML Comments
HTML Doctype
2. HTML Text Formatting
Headings (<h1> to <h6>)
Paragraphs (<p>)
Line Breaks (<br>)
Horizontal Lines (<hr>)
Bold Text (<b>, <strong>)
Italic Text (<i>, <em>)
Underlined Text (<u>)
Superscript (<sup>) and Subscript (<sub>)
3. HTML Links
Hyperlinks (<a>)
Target Attribute
Creating Email Links
4. HTML Lists
Ordered Lists (<ol>)
Unordered Lists (<ul>)
Description Lists (<dl>)
Nesting Lists
5. HTML Tables
Table (<table>)
Table Rows (<tr>)
Table Data (<td>)
Table Headings (<th>)
Table Caption (<caption>)
Merging Cells (rowspan, colspan)
Table Borders and Styling
6. HTML Forms
Form (<form>)
Input Types (<input>)
Text Fields (<input type="text">)
Password Fields (<input type="password">)
Radio Buttons (<input type="radio">)
Checkboxes (<input type="checkbox">)
Drop-down Lists (<select>)
Textarea (<textarea>)
Buttons (<button>, <input type="submit">)
Labels (<label>)
Form Action and Method Attributes
7. HTML Media
Images (<img>)
Image Maps
Audio (<audio>)
Video (<video>)
Embedding Media (<embed>)
Object Element (<object>)
Iframes (<iframe>)
8. HTML Semantic Elements
Header (<header>)
Footer (<footer>)
Article (<article>)
Section (<section>)
Aside (<aside>)
Nav (<nav>)
Main (<main>)
Figure (<figure>), Figcaption (<figcaption>)
9. HTML5 New Elements
Canvas (<canvas>)
SVG (<svg>)
Data Attributes
Output Element (<output>)
Progress (<progress>)
Meter (<meter>)
Details (<details>)
Summary (<summary>)
10. HTML Graphics
Scalable Vector Graphics (SVG)
Canvas
Inline SVG
Path Element
11. HTML APIs
Geolocation API
Drag and Drop API
Web Storage API (localStorage and sessionStorage)
Web Workers
History API
12. HTML Entities
Character Entities
Symbol Entities
13. HTML Meta Information
Meta Tags (<meta>)
Setting Character Set (<meta charset="UTF-8">)
Responsive Web Design Meta Tag
SEO-related Meta Tags
14. HTML Best Practices
Accessibility (ARIA roles and attributes)
Semantic HTML
SEO (Search Engine Optimization) Basics
Mobile-Friendly HTML
15. HTML Integration with CSS and JavaScript
Linking CSS (<link>, <style>)
Adding JavaScript (<script>)
Inline CSS and JavaScript
External CSS and JavaScript Files
16. Advanced HTML Concepts
HTML Templates (<template>)
Custom Data Attributes (data-*)
HTML Imports (Deprecated in favor of JavaScript modules)
Web Components
These topics cover the breadth of HTML and will give you a strong foundation for web development.
Full course link for free: https://shorturl.at/igVyr
2 notes
·
View notes
Text
Os Erros Mais Comuns no Tráfego Pago e Como Evitá-los
Evite desperdício de dinheiro! Descubra os principais erros no tráfego pago e como corrigi-los para ter campanhas lucrativas e profissionais.
Introdução
Muitos iniciantes e até profissionais cometem erros básicos ao criar campanhas de tráfego pago. Isso gera prejuízos, baixa performance e até a suspensão de contas.
Neste artigo, vamos revelar os 7 erros mais comuns e como evitá-los, para que você alcance resultados reais e sustentáveis.https://googleads.g.doubleclick.net/pagead/ads?client=ca-pub-3605319658031784&output=html&h=600&slotname=7080382811&adk=418858044&adf=3139007672&pi=t.ma~as.7080382811&w=350&abgtt=6&lmt=1747943036&format=350x600&url=https%3A%2F%2Fflaviofreitas.com.br%2F&wgl=1&dt=1747943036177&bpp=55&bdt=1738&idt=435&shv=r20250521&mjsv=m202505190101&ptt=9&saldr=aa&abxe=1&cookie=ID%3D26d045406c860bca%3AT%3D1733156186%3ART%3D1745495433%3AS%3DALNI_MaY67JXE4SYf_RAZiBpC8AXk8b9Ow&gpic=UID%3D00000fa6425942ae%3AT%3D1733156186%3ART%3D1745495433%3AS%3DALNI_MbB6BV4PKgoZxSSpHBJXbos5iUzsw&eo_id_str=ID%3D675cd212667fb3b5%3AT%3D1733156186%3ART%3D1745495433%3AS%3DAA-AfjbtADAzAyGHIbZO-3s9zmIH&prev_fmts=0x0&nras=1&correlator=8790248377995&frm=20&pv=1&u_tz=-180&u_his=2&u_h=768&u_w=1360&u_ah=728&u_aw=1360&u_cd=24&u_sd=1&adx=497&ady=18&biw=1343&bih=643&scr_x=0&scr_y=0&eid=31092201%2C95353387%2C95361619%2C95360956&oid=2&pvsid=7359826220208687&tmod=1330047353&uas=0&nvt=1&fc=1920&brdim=-8%2C-8%2C-8%2C-8%2C1360%2C0%2C1376%2C744%2C1360%2C643&vis=1&rsz=%7C%7CfeE%7C&abl=CF&pfx=0&fu=0&bc=31&bz=1.01&ifi=2&uci=a!2&fsb=1&dtd=496
1. Anunciar sem estratégia definida
Ir direto ao gerenciador de anúncios sem planejamento é como atirar no escuro.
Como evitar: Tenha um objetivo claro: tráfego, conversão, leads? Defina metas e a jornada do cliente.
2. Não instalar pixel ou eventos
Sem rastreamento, você não sabe o que funciona. Campanhas ficam cegas.
Como evitar: Instale o Pixel do Facebook, Tag Manager e eventos personalizados antes de rodar qualquer anúncio.
3. Público mal segmentado
Público genérico = cliques vazios e desperdício de verba.
Como evitar: Pesquise sua persona, crie públicos com base em interesses, comportamentos e lookalike de clientes.
4. Criativos fracos e sem conexão com a oferta
Um anúncio visualmente ruim ou com mensagem genérica afasta o clique.
Como evitar: Use imagens impactantes, vídeos curtos com linguagem direta e legendas que criam curiosidade.https://googleads.g.doubleclick.net/pagead/ads?client=ca-pub-3605319658031784&output=html&h=600&slotname=7080382811&adk=418858044&adf=3139007672&pi=t.ma~as.7080382811&w=350&abgtt=6&lmt=1747943036&format=350x600&url=https%3A%2F%2Fflaviofreitas.com.br%2F&wgl=1&dt=1747943036177&bpp=55&bdt=1738&idt=435&shv=r20250521&mjsv=m202505190101&ptt=9&saldr=aa&abxe=1&cookie=ID%3D26d045406c860bca%3AT%3D1733156186%3ART%3D1745495433%3AS%3DALNI_MaY67JXE4SYf_RAZiBpC8AXk8b9Ow&gpic=UID%3D00000fa6425942ae%3AT%3D1733156186%3ART%3D1745495433%3AS%3DALNI_MbB6BV4PKgoZxSSpHBJXbos5iUzsw&eo_id_str=ID%3D675cd212667fb3b5%3AT%3D1733156186%3ART%3D1745495433%3AS%3DAA-AfjbtADAzAyGHIbZO-3s9zmIH&prev_fmts=0x0&nras=1&correlator=8790248377995&frm=20&pv=1&u_tz=-180&u_his=2&u_h=768&u_w=1360&u_ah=728&u_aw=1360&u_cd=24&u_sd=1&adx=497&ady=18&biw=1343&bih=643&scr_x=0&scr_y=0&eid=31092201%2C95353387%2C95361619%2C95360956&oid=2&pvsid=7359826220208687&tmod=1330047353&uas=0&nvt=1&fc=1920&brdim=-8%2C-8%2C-8%2C-8%2C1360%2C0%2C1376%2C744%2C1360%2C643&vis=1&rsz=%7C%7CfeE%7C&abl=CF&pfx=0&fu=0&bc=31&bz=1.01&ifi=2&uci=a!2&fsb=1&dtd=496
5. Não testar variações (A/B)
Rodar apenas um anúncio é um erro clássico.
Como evitar: Teste variações de imagem, título, chamada para ação e público. Identifique o que gera melhor performance.
6. Direcionar para páginas ruins
Se o anúncio é bom, mas a landing page é confusa, o cliente desiste.
Como evitar: Crie páginas rápidas, com CTA claro, visual profissional e adaptadas para celular.
QUERO AGORA
7. Não acompanhar métricas corretamente
Ignorar métricas é desperdiçar oportunidades de otimização.
Como evitar: Monitore CPC, CTR, ROAS, taxa de conversão e tempo de permanência. Use os dados para ajustar sua estratégia.
Dica extra: fuja de atalhos e promessas milagrosas
Muitos caem em fórmulas prontas e “hacks” que prometem lucro rápido. O tráfego pago exige método, teste e paciência. Mas os resultados são reais quando bem feito.
Tráfego pago sem erros = site lucrativo + curso vendido
Ao evitar esses erros:
Conclusão
Tráfego pago é poderoso, mas exige atenção aos detalhes. Ao evitar esses erros, você economiza dinheiro e acelera os resultados.
Chamada para ação final
0 notes
Text
SEO for Developers: Technical Tips to Boost Your Website’s Ranking
As a developer, you might think SEO (Search Engine Optimization) is a marketer’s job. But the truth is, technical SEO is the backbone of every high-ranking website—and it’s your expertise that ensures search engines can crawl, index, and understand your site. At Coding Nectar (codingnectar.com), we’ve helped countless developers bridge the gap between code and visibility. Here’s how to optimize your website’s technical foundation for better rankings.
1. Start with a Lightning-Fast Website
Page speed isn’t just a ranking factor—it’s a user experience game-changer. Google prioritizes fast-loading sites, and studies show that 53% of users abandon pages that take longer than 3 seconds to load.
What to do:
Compress Images: Use modern formats like WebP and tools like Squoosh or ImageOptim.
Minify Code: Remove unnecessary characters from HTML, CSS, and JavaScript.
Leverage Caching: Implement browser and server-side caching (e.g., Redis, Varnish).
At Coding Nectar, we use automated build tools like Webpack to bundle and optimize assets during deployment. For example, lazy-loading images with <img loading="lazy"> can cut load times by 20-30%.
2. Master Mobile-First Indexing
Google now uses mobile-first indexing, meaning it primarily crawls the mobile version of your site. If your site isn’t responsive, you’re invisible to most search traffic.
What to do:
Test Responsiveness: Use Chrome DevTools or Google’s Mobile-Friendly Test.
Avoid CSS/JS Blockers: Ensure critical resources load first.
Use Fluid Layouts: Replace fixed pixels with rem, em, or % units.
Pro Tip: At codingnectar.com, we design all client projects with mobile-first frameworks like Tailwind CSS to ensure seamless responsiveness.
3. Fix Crawlability Issues
Search engines rely on crawlers to index your site. If they hit roadblocks, your content won’t rank.
What to check:
robots.txt: Ensure you’re not accidentally blocking critical pages.
XML Sitemap: Generate and submit a sitemap via Google Search Console.
HTTP Status Codes: Fix 404s (broken links) and 301-redirect old URLs.
Example: A client at Coding Nectar saw a 40% traffic boost after we fixed crawl errors caused by misconfigured rel=canonical tags.
4. Structure Data with Schema Markup
Schema markup helps search engines understand your content, increasing chances of earning rich snippets (e.g., star ratings, FAQs).
What to add:
JSON-LD: Embed structured data for articles, products, or events.
Breadcrumbs: Improve navigation and SEO with BreadcrumbList schema.
Tool Recommendation: Use Google’s Structured Data Testing Tool to validate your markup.
5. Optimize for Core Web Vitals
Google’s Core Web Vitals measure user experience through metrics like:
LCP (Largest Contentful Paint): Load time for the main content.
FID (First Input Delay): Time until the site becomes interactive.
CLS (Cumulative Layout Shift): Visual stability during loading.
What to do:
Prioritize above-the-fold content.
Defer non-critical JavaScript.
Use font-display: swap to prevent layout shifts from fonts.
Case Study: After optimizing Core Web Vitals for a SaaS platform, Coding Nectar reduced their CLS score by 75%, boosting organic traffic by 28% in 3 months.
6. Secure Your Site with HTTPS
HTTPS is a non-negotiable ranking signal. It encrypts data and builds user trust.
Steps:
Buy an SSL certificate (many hosts offer free Let’s Encrypt integration).
Force HTTPS by redirecting HTTP traffic via .htaccess or NGINX configs.
Update internal links to use https://.
7. Audit Regularly with SEO Tools
SEO isn’t a one-time task. Use tools like:
Google Search Console: Track performance and errors.
Ahrefs/Screaming Frog: Analyze backlinks and technical issues.
Lighthouse: Audit performance, accessibility, and SEO.
Pro Tip: Coding Nectar offers custom SEO audits (codingnectar.com/seo-audit) to identify hidden issues like duplicate meta tags or slow API calls.
Final Thoughts
Technical SEO isn’t about chasing algorithms—it’s about building websites that are fast, accessible, and easy for search engines to love. By focusing on speed, mobile optimization, structured data, and regular audits, you’ll create a foundation that drives organic growth.
At Coding Nectar (codingnectar.com), we blend cutting-edge development with SEO best practices to help businesses rank higher and convert better. Ready to optimize your site? Let’s turn your code into a traffic magnet.
1 note
·
View note
Text
Diferentes modelos de paginação.
Bom, eu gosto de ficar mexendo nas paginações, criando efeitos, mudando, vendo o que é ou não possível para ser feito e etc. Vou postar alguns modelos para vocês, passando o código do css e do html, Pois bem, eu usei a paginação da Madlyluv.com como base, mas eu quero que me creditem pelas alterações feitas na mesma, ok?
Como utilizar: Você vai abrir o arquivo do css de cada paginação. Vai copia-lo e colar antes da tag </style> do seu theme.
Depois voce vai usar a do html, colocando aonde você quer que ela fique. (sugiro que seja embaixo dos posts, pois fica muito mais facil para quem estiver lendo seu tumblr, não ter que voltar tudo para passar de página)
Para colocar depois dos posts, você vai dar ctrl+f no seu html, e procurar por: {/block:posts} logo depois disso, virão algumas </div>. Você terá que colocar após a primeira div, e entre as outras que virão, bem assim:
{/block:posts}</div> CODIGO HTML DA PAGINAÇAO <outras divs, geralmente serão 3>
Modelo 1)
(normal)
(hover no 2)
Css | Html
_______________
Modelo 2)
(normal)
(hover no 2)
Css | Html
_______________
Modelo 3)
(normal)
(hover no 2)
Css | Html _______________
Modelo 4)
(normal) (hover no 2)
Css | Html _______________
Modelo 5)
(normal) (hover no 2)
Css | Html _______________
Por enquanto são apenas essas.
Alterações opcionais:
Para retirar o “Pagina 1 de … ” você vai ter que ir até o css da paginação (que colamos antes de ) e apagar a parte que vai de #paginacaoml-ht span.info { conteudo até }.
As cores foram utilizadas para orientação de quem for utilizar a paginação.
Alterando as cores:
Por base, as cores do background estão divididas em:
paginacaoml-ht a: #9F1513; paginacaoml-ht a:hover: #8ABFC4; paginacaoml-ht span.pagina_atual: #9F1513; paginacaoml-ht span.info: #8ABFC4;
Em todos os exemplos estão da mesma forma.
#8ABFC4 = azul #9F1513 = vermelho.
Façam bom proveito, e credite ao Having Themes.
Se gostou dê like. Se usar, nos credite. Não reblog esse tutorial.
0 notes
Note
algum conselho para quem deseja entrar em um rp only tumblr mas é 100% mobile?
claro, migalhinha! na verdade, vou te dar vários conselhos, se me permitir.
1. se você nunca jogou no tumblr, procure por helpers brasileiros! alguns postam tutoriais de como criar um sideblog, criar postagens etc. uma dica que deixo, é que, para não ter problemas com a sua conta, aguarde mais ou menos 12 horas antes de realizar alguma postagem, para sair do shadowban.
2. quase tudo o que você faz no desktop, você pode fazer pelo mobile, basta ter um navegador ativo, por lá você consegue editar as postagens via html para estilizar seu turno etc.
3. se você usar o android, aconselho baixar o xkitwritten para cortar os turnos! é um pouco chato de ativar, então aconselho você baixar o kiwi ao invés do firefox, já que o firefox às vezes desconfigura e pra configurar ele novamente é uma dor de cabeça enorme.
4. não se sinta pressionado quanto à estética! muitas migalhinhas podem arrumar a conta com algum theme bonito, mas não tem problema manter sua conta com o tema padrão do mobile, afinal, o que vale mais é a biografia e os seus turnos.
5. não esqueça de configurar a dash! dependendo da situação, pode acontecer do tumblr mostrar postagens mais antigas para você, ou deixar a sua dashboard completamente bagunçada com tags que você segue, sugestões de likes, etc. essas informações você consegue verificar melhor nas configurações da conta.
6. faça as coisas no seu tempo! não se pressione quanto à rapidez que você responde um turno, se seu fixado está bonito etc. de novo, migalhinha, o que importa é mais o jogo do que a estética geral.
7. escreva seus turnos em qualquer lugar antes de jogar para o tumblr! isso vale tanto para o desktop quanto mobile. infelizmente, o app do tumblr pode atualizar no momento em que você está escrevendo, e você acaba perdendo toda sua escrita.
não prometo criar um tutorial pra você, migalhinha, até porquê sou um pouco ruim com tutoriais. mas se quiser me chamar no privado para vermos juntes enquanto falo o passo à passo, estou disponível!

1 note
·
View note
Text
HTML Text Formatting

HTML provides various tags to format text, allowing you to change the appearance and structure of your content. Here's a guide to the most commonly used text formatting tags in HTML:
1. Headings
HTML provides six levels of headings, from <h1> (most important) to <h6> (least important). Headings are used to create titles and organize content hierarchically.<h1>Main Heading</h1> <h2>Subheading</h2> <h3>Sub-subheading</h3> <h4>Sub-sub-subheading</h4> <h5>Sub-sub-sub-subheading</h5> <h6>Smallest Heading</h6>
2. Paragraphs
Paragraphs are used to group blocks of text together. HTML automatically adds space before and after paragraphs.<p>This is a paragraph of text. Paragraphs are block-level elements, meaning they take up the full width available.</p>
3. Line Breaks
To create a line break within a paragraph or other text, use the <br> tag. This tag is an empty element and doesn’t have a closing tag.<p>This is the first line.<br>This is the second line, on a new line.</p>
4. Horizontal Lines
A horizontal line (thematic break) can be created using the <hr> tag. This is often used to separate sections of content.<p>This is some text before the line.</p> <hr> <p>This is some text after the line.</p>
5. Bold Text
To make text bold, you can use the <b> or <strong> tag. While both tags visually render text in bold, <strong> also indicates that the text is of strong importance.<p>This is <b>bold</b> text.</p> <p>This is <strong>strong</strong> text, which also has semantic importance.</p>
6. Italic Text
To italicize text, you can use the <i> or <em> tag. The <em> tag emphasizes the text semantically, meaning it can affect the way assistive technologies interpret the content.<p>This is <i>italicized</i> text.</p> <p>This is <em>emphasized</em> text.</p>
7. Underlined Text
To underline text, use the <u> tag. This is not as commonly used today due to styling being handled by CSS, but it's available in HTML.<p>This is <u>underlined</u> text.</p>
8. Superscript and Subscript
Superscript: The <sup> tag raises text slightly above the baseline, often used for exponents or footnotes.
Subscript: The <sub> tag lowers text slightly below the baseline, often used for chemical formulas.
<p>This is superscript: x<sup>2</sup></p> <p>This is subscript: H<sub>2</sub>O</p>
9. Strikethrough Text
To strike through (cross out) text, use the <s> or <del> tag.<p>This is <s>strikethrough</s> text.</p> <p>This is <del>deleted</del> text, often indicating something that has been removed.</p>
10. Monospaced (Code) Text
To display text in a monospaced (fixed-width) font, typically used for code, use the <code> tag.<p>This is <code>inline code</code> within a paragraph.</p> <pre> <code> function example() { console.log('This is code'); } </code> </pre>
11. Small Text
The <small> tag decreases the font size of the text, often used for disclaimers or fine print.<p>This is normal text.</p> <p>This is <small>small</small> text.</p>
12. Marked Text
The <mark> tag highlights text with a yellow background, similar to using a highlighter.<p>This is <mark>highlighted</mark> text.</p>
13. Quotations
Inline Quotes: The <q> tag is used for short quotations and automatically adds quotation marks.
Block Quotes: The <blockquote> tag is used for longer quotes, usually indented.
<p>This is an inline quote: <q>To be or not to be, that is the question.</q></p> <blockquote> This is a block quote. It is usually used for longer quotations. </blockquote>
Source: Understanding HTML: From Basics To Advance
0 notes
Text
Mobile responsive websites

Creating mobile responsive websites involves using a combination of techniques to ensure that your website looks good and functions well on various devices, including smartphones, tablets, and desktops. Here are the key steps to create a mobile responsive website:
1. Use a Responsive Framework Frameworks like Bootstrap, Foundation, or Tailwind CSS provide pre-designed responsive components that make it easier to create a responsive layout.
2. Viewport Meta Tag Include the viewport meta tag in the head of your HTML document to control the layout on mobile browsers.
3. Fluid Grid Layouts Use relative units like percentages, ems, or rems for layout elements instead of fixed units like pixels. This allows elements to resize based on the screen size.
4. Media Queries Use CSS media queries to apply different styles based on the screen size.
5. Flexible Images and Media Make images and media flexible by setting their maximum width to 100% of their containing element.
6. Responsive Typography Use relative units for font sizes, such as em or rem, to ensure text scales appropriately.
7. CSS Flexbox and Grid Layouts Use CSS Flexbox and Grid layouts to create flexible and responsive layouts.
8. Responsive Navigation Implement a responsive navigation menu that collapses into a more mobile-friendly format, like a hamburger menu, on smaller screens. CubicDesign is the best web design agency in Chennai, providing premium websites to elevate your business.
#ecommerce#marketing#branding#healthcare digital marketing agency#digital marketing#seo services#smm#smm services#real estate digital marketing#social media marketing
0 notes
Text
thanks for the tag!!!
1. How many works do you have on AO3?
75
2. What’s your total AO3 word count?
214,434
3. What fandoms do you write for?
oh jeez. we'll stick to just what ive got posted bc otherwise this list will crash my computer. mcu, obviously, but there's also stranger things, gravity falls, danny phantom, miraculous ladybug, random kids movie called the little vampire that i got obsessed with, atla, my old mcyt fics, mia and me, phineas and ferb, my old sanders sides fics, stardew valley, exactly 1 undertale fic, and mha. i refuse to make pseuds or new profiles if you subscribe to me you WILL see all my works.
4. What are your top 5 fics by kudos?
i think they're all irondad? nobody knows like a waterfall System Error: Reboot i’ll always come back mr. dad❤️🔧 yep. all irondad
5. Do you respond to comments? Why or why not?
i try to! but i have bad adhd and completely forget most of the time. trust me, i see it and i love it and then i forget to answer it
6. What is the fic you wrote with the angstiest ending?
probably The Phantom Menace just because it's short and there's no closure. one of my earliest irondad works, if not my earliest
7. What’s the fic you wrote with the happiest ending?
good question!! most of mine are pretty happy or at least hopeful, i'd say mr. dad❤️🔧 just because there's little to no angst throughout the entire thing
8. Do you get hate on fics?
yep! as previously mentioned, i have horrid adhd, so sometimes ill get stuck in a little echo chamber of my own brain, and ideas that make sense in my head, with all the surrounding details i've come up with, the full thing won't make it into the story so it makes little to no sense.
9. Do you write smut? If so, what kind?
i've never written a smut fic, i tried my hand at writing smut (with ocs) when i turned 18 just to see if i could. however i sincerely doubt it'll exit the specially made password-locked document i made for it
10. Do you write crossovers? What’s the craziest one you’ve written?
i don't, not really, so i guess i'll have to say my pnf and irondad crossover, which is less crazy when you remember phineas and ferb already did that.
11. Have you ever had a fic stolen?
nope! no one wants 'em
12. Have you ever had a fic translated?
also no
13. Have you ever co-written a fic before?
i've been a supportive cheerleader on the sidelines for a couple of my friends fics, as well as an idea generator that they've been like "ooh thats good i want to use that" but never a co-writer
14. What’s your all time favourite ship?
i might have to go with my stupid little elf polycule from mia and me. its my all time favorite because if i don't love them, who else will?? and i can never get tired of content from them bc there is none.
15. What’s a WIP you want to finish but doubt you ever will?
oh god. ive never finished a multichapter. did you all know that about me?? i've never made it all the way through. the final chapter of silent spidey has been complete since november 2022. but i haven't made it there yet. and now i doubt i ever will.
16. What are your writing strengths?
dialogue. i like to think ive got a good handle on dialogue. also spelling and grammar are fun for me so none of those pesky little errors
17. What are your writing weaknesses?
my willingness to sacrifice important plot points for a joke i found marginally funny. looking at you, stranger things wips.
18. Thoughts on writing dialogue in another language in fic?
depends!! i'm bilingual, so if it's a language i've got a handle on then yeah, why not? if i gotta translate it, i'll probably include the translation in there somewhere with an html code
19. First fandom you wrote for?
miraculous ladybug, back on wattpad. if you find my old unfinished fic on wattpad with no clues from me ill give you five bucks
20. Favourite fic you’ve written?
i really like to be a bit of warmth for you. it was fun to write and i can still reread it without cringing so i count that as a win!
no pressure tags: @creative-girl @multifandomforthemostpart @call-me-coley @ironfidus
(under the read more is the blank questions for everyone)
1. How many works do you have on AO3?
2. What’s your total AO3 word count?
3. What fandoms do you write for?
oh jeez. mcu, obviously, but there's also
4. What are your top 5 fics by kudos?
5. Do you respond to comments? Why or why not?
6. What is the fic you wrote with the angstiest ending?
7. What’s the fic you wrote with the happiest ending?
8. Do you get hate on fics?
9. Do you write smut? If so, what kind?
10. Do you write crossovers? What’s the craziest one you’ve written?
11. Have you ever had a fic stolen?
12. Have you ever had a fic translated?
13. Have you ever co-written a fic before?
14. What’s your all time favourite ship?
15. What’s a WIP you want to finish but doubt you ever will?
16. What are your writing strengths?
17. What are your writing weaknesses?
18. Thoughts on writing dialogue in another language in fic?
19. First fandom you wrote for?
20. Favourite fic you’ve written?
20 Questions for Fic Writers
thank's for the tag @waitingondaisies
1. How many works do you have on AO3?
- 180
2. What’s your total AO3 word count?
- 1,701,826 (Holy Crap!)
3. What fandoms do you write for?
- All of my fics are MCU, predominantly Irondad but there are a few Spiceychell fics mixed in there too.
4. What are your top 5 fics by kudos?
- A Parent Apparent (528,718 words, 7,349 kudos) A really freaking long slow burn Irondad co-parenting with May fic.
- So Many Things to Say (82,998 words, 3,914 kudos) A electivly mute, foster child Peter fic. This is the first part of an extended series.
- What I Really Need is You (18,520 words, 3,581 kudos) A fluffy 5+1 of Peter needing things from Tony.
- Distracted by a Dime (56,169 words, 2,476 kudos) A homeless Peter AU- Stony AU. This is the first part of a series.
- Suspended (3,607 words, 2,177 kudos) A One-shot about Pter getting suspended and Tony picking him up from school.
5. Do you respond to comments? Why or why not?
I try really hard to reply to every comment!
6. What is the fic you wrote with the angstiest ending?
I don't really do angsty endings... So Maybe this one? Breathe, Kid (You're Not Alone) (4,086 words) Ned Dies and Peter feels responsible. Tony is there to help him pick up the pieces. The ending is hopeful and comforting- but there is no instant fix.
7. What’s the fic you wrote with the happiest ending?
Oh geez. You want me to pick one??? Uh... Let's go with this one because it has some sweet Christmassy vibes. Secret Sugarplum Spiderling (27,923 words) Peter is a ballet dancer and he doesn't want Tony to know- yet. Lots of super sweet fluff.
8. Do you get hate on fics?
Sometimes. Usually, it's someone who has decided that my fictional story filled with fictional characters who have fictional superpowers isn't 'realistic enough.'
9. Do you write smut? If so, what kind?
I have written exactly ONE smut fic- but it has NEVER been posted. 😘
10. Do you write crossovers? What’s the craziest one you’ve written?
One- by request. It was a mini-fic about Pokemon trainer Peter and Pokemon Professor Tony. Rotom Roundup (979 words)
11. Have you ever had a fic stolen?
Nope. My art, despite emailing them several times, is still up on a 'coloring sheets' website though. Which mostly annoys me because what they nagged was a draft. I would have happily sent them the clean line art.
12. Have you ever had a fic translated?
No. I had someone offer once and gave full permission but I don't htink it ever happened.
13. Have you ever co-written a fic before?
Yes! I have co-written a few fics. And I have one in the works with @waitingondaisies
14. What’s your all time favourite ship?
Most of my fics are platonic relationships. But I often have background relationships in them; usually Stony or Pepperony. Some spideycelle and once, Ned/Peter.
15. What’s a WIP you want to finish but doubt you ever will?
I hope I eventually finish all of them! But there is one I found that I am not even sure where it was going. All I have written is 800 words of Kraven the Hunter confronting Peter.
16. What are your writing strengths?
I think I am pretty good at dialogue.
17. What are your writing weaknesses?
I am still learning a lot about POV depth, visceral details, and deep introspection.
18. Thoughts on writing dialogue in another language in fic?
I don't use it much, if at all. But it doesn't bother me.
19. First fandom you wrote for?
Irondad
20. Favourite fic you’ve written?
Oh! It's a tie!! So Many Things to Say will always me towards the top of my favorites lit. But my newest fic, The Hoax, is starting to creep into 'favorite fic of all time' territory.
I am going to tag (If they are interested) @spicler-manie @cajun-fangirl @asyouleft @thwip--thwip @justme--emily and @kubabergen
18 notes
·
View notes
Text
HTML em Tag
The HTML <em> tag is used define emphasized text.It emphasizes the text inside the <em> tag by using verbal stress and the browser renders the text in italic. Syntax <em>Text Content...</em> Example <!DOCTYPE html> <html> <head> <title>HTML em Tag</title> </head> <body> <p>This is a normal paragraph</p> <p>This is an important paragraph with some…

View On WordPress
#b tag#curso em vídeo#em tag#em tag examples#em tag html#em tag html 5#em tag in bangla#em tag in html#em tag in html in hindi#em tag vs i tag#how can use em tag#how em tag#html em tag#html em tag example#html em tag tutorial#html i tag#html5 em tag#i tag#i tag & em tag in html#i tag and em tag#i tag in html#i tag vs em tag#learn em tag#strong tag#tag em#tag em do html5#tag em html
0 notes
Text
Ch-ch-changes…
🌟 Novidades
Continuamos disponibilizando o recurso de enquetes para mais pessoas! Devagar e sempre, e corrigindo os bugs antes poder de dar acesso a mais gente. Se você ainda não tem, aguarde só mais um pouco!
Substituímos o indicador “novo” ao lado do ícone do TumblrMart na web por um pouquinho de brilho. Além disso, assim que você acessa o TumblrMart, ele desaparece.
Alguns de vocês já começaram a ver a aba “Hoje” na página Explore, que apresentará em tempo real o que anda acontecendo no Tumblr.
Na web, os botões que aparecem na imagem que você adiciona a um post agora apresenta rótulos. A ideia é tornar o editor de posts mais amigável aos leitores de tela.
Agora na web, você verá uma mensagem bastante útil quando chegar ao final de um feed (em uma página de tags com poucos resultados, por exemplo) ou ao visitar um feed completamente vazio (na aba "suas tags", caso não siga nenhuma tag, por exemplo).
Você não pode mais formatar uma pergunta de enquete. Isso estava fazendo com que o HTML ficasse visível quando o post fosse publicado.
A mensagem inicial do Kokobot agora inclui a informação sobre como parar de receber mensagens (basta responder “parar”).
🛠️ Melhorias
Corrigimos um problema na web para dispositivos móveis em que o botão “Invocar caranguejos” apareceria por cima de outros botões. Ele agora desaparece após 5 segundos.
A versão 28.0 dos aplicativos para iOS e Android traz uma correção que melhora as cores usadas nas pesquisas em determinadas paletas de cores.
Corrigimos um problema na web para dispositivos móveis que impedia a criação de blogs adicionais.
Corrigimos outro problema na web para dispositivos móveis que impedia os usuários de acessar mensagens.
Corrigimos um problema que fazia com que o editor de posts desse erro ao reblogar algumas enquetes.
Corrigimos um problema que possibilitava que o total de resultados da votação fosse superior a 100%.
Corrigimos um problema que fazia com que, por vezes, os resultados da enquete não fossem carregados nas notas de reblogue.
Na web, corrigimos um erro que fazia com que a atribuição de reblogue não aparecesse nos posts na aba de curtidas na visualização do blog.
Corrigimos um erro que fazia com que alguns posts incorporados fossem exibidos com barras de rolagem.
🚧 Em andamento
Este é o seu lembrete semanal para continuar denunciando posts com aspecto de bot ou spam. Algumas pessoas andam perguntando o que estamos fazendo com isso. Embora não estejamos passando muitos detalhes aqui, estamos usando algo semelhante ao Akismet, um outro produto da Automattic (link em inglês) para acabar com esses bots.
Está tendo algum problema? Preencha o formulário de ajuda e entraremos em contato com você assim que possível!
Deseja enviar comentários e sugestões? Confira o blog “Work in Progress” e comece a conversar com a comunidade.
41 notes
·
View notes
Text
New AO3 Script / Screenplay Tutorial
Some time back I posted a tutorial for how to format CSS and HTML for a screenplay on AO3, but since then I have improved upon it and I wish to now share with you all the (hopefully somewhat better) new version.
I previously had a significant problem with the spacing of certain elements, which would end up breaking the formatting. So recently I spent two days studying and trying code after code until I got it right.
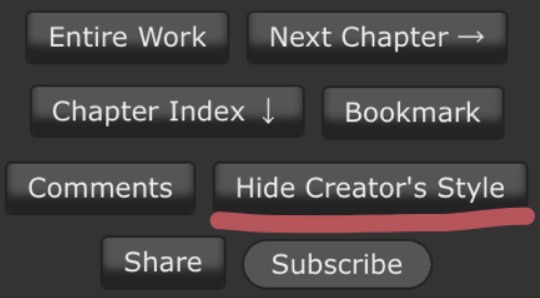
Note that though this formatting makes the screenplay look authentic enough on a computer monitor or on mobile in landscape mode, it does not (in my experience) tend to show up well in portrait mode. This version is at least readable in portrait mode, however, whereas the old version was not. Still, you might like to make an author’s note mentioning that readers in portrait mode may need to use the “hide creator’s style” button, which will take away the formatting:
Okay, let's get to work! First you are going to have to create a new AO3 work skin. Name it whatever you like, then insert this code:
#workskin p { font-family: "Courier Prime", Courier, monospace; text-align: justify; text-justify: inter-word; }
#workskin p { margin-left: 5%; }
#workskin p { margin-right: 15%; }
#workskin .indented { padding-left: 15%; padding-right: 25%; text-align: justify; text-justify: inter-word; }
#workskin .par { display: block; padding-left: 15%; padding-right: 25%; }
#workskin .character { display: block; padding-left: 25%; }
You can adjust things like the margin and padding percentages to fit your own style, of course!
Now comes the fun part. After you have written your script, make a new draft using your screenplay skin. Then get onto the HTML editor.
The SHOT, SCENE HEADING, and ACTION elements will be left alone. The only tagging necessary for them is < p > (close up the < and >, of course... Tumblr is giving me a hard time about showing it as it really should be) for paragraph transitions. But do be sure to use the < p > tag, or it will break the formatting.
Next are the CHARACTER, PARENTHETICAL, and DIALOGUE elements... which are a bit more involved.
Before blocks of character/parenthetical/dialogue, you need to put the following tag (with closed up < & >): < div class="indented" align="left" > . Note that if there is more than one Character involved with no action breaks in between (in other words, if there is a conversation going on), you do not need to put the tag between each character, just before the first one. Like so:
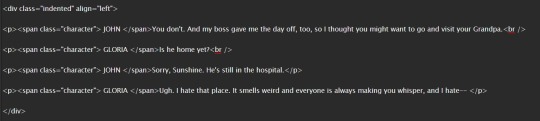
And be sure to close it back up after the blocks of conversation with < /div >
Next up is CHARACTER, which, as you can see above, is tagged: < p >< span class="character" > CHARACTER NAME< /span >
Notice that there are no line breaks between the < /span > and the dialogue. Due to the nature of < span > if you try to put a line break in there it will turn it into a paragraph break, which doesn't work well for the screenwriting thing. I am sure there is a workaround, but that's what I got for the time being!
Now we come to PARENTHETICALS, which are the bits of action within dialogue:
To tag those, once again do not make a line break, but simply insert this: < span class="par" > then close it after inserting the parenthetical with < /span >
It might be easier to simply visualize, but note that as a personal preference I tend to italicize my parenthetical elements with < em >... you don't have to, that's just my style:

And that is basically it! If you would rather just look at the code than to try and figure out what I was trying to explain (I am not sure I did a good job of that!), here is a basic visual:
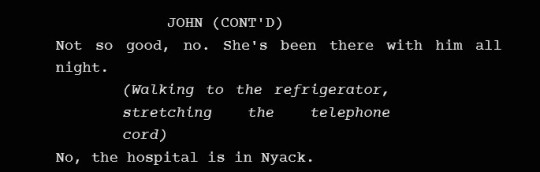
This:

Should get you this:

Or something similar, anyway. It may vary on your screen. If you would like to see a live example of how it will look on your monitor or with your device, you can click below to get to a small fic I have formatted this way (it isn't the story sampled above, however, since that is a WIP I have not posted anywhere yet!)
If I have made any mistakes or anything is in need of clarification, let me know! I will do my best to fix it!
#ao3#fanfic#ao3 tutorial#tutorial#writing#writeblr#screenplays#screenplay format#screenplay tutorial
37 notes
·
View notes
Photo

PARTE 1 — GUIA PARA O TUMBLR POR SALEMCER.
Por esses dias eu senti uma falta tremenda de jogar no tumblr e comentei com algumas amigas, que nunca tinham passado da plataforma do twitter. Com a grande quantidade de contas caindo no passarinho e a vontade de trazer minhas amigas pra dash, pensei… Por que não criar um guia para o tumblr?
Pode não ser de interesse de todos, mas para aqueles que desejam um dia se aventurar, venho aqui tentar mostrar pra vocês que não, jogar no tumblr não é um bicho de sete cabeças!
Abaixo do read more, você encontra a primeira parte do guia, com informações básicas sobre o tumblr.
1. Criação.
O que você precisa: Simples e unicamente de um email válido.
Registrar > Coloque um email, senha e a url (equivale ao user to twitter) > Get to Know (clique em skip) > Confirme o email > Pronto! Conta criada.
2. Dashboard.
A dashboard equivale a timeline de um twitter ou o feed do instagram. É onde vai conseguir ver os posts das pessoas que você segue e postar seu conteúdo. É assim que a dashboard vai parecer assim que você criar!
Como não segue ninguém ainda, aparecem posts aleatórios, não se preocupe, é normal! Uma coisa que acontece na criação do tumblr é que ele de cara já começa seguindo o equipebrasil, você pode simplesmente parar de seguir eles.
Como deixar de seguir? Passando o mouse por cima do ícone deles e clicando em “Parar de Seguir”, ou no mobile, clicando no perfil deles e em “Parar de Seguir” no canto superior direito. (Print aqui)
3. As postagens.
Existem 7 tipos de postagem no tumblr, mas no contexto do rpg, os que são normalmente utilizados são apenas texto, foto, link e diálogo.

Texto: Utilizado para a maior parte das postagens. É aqui onde você turna, posta gif chats, gif turnos, smalls, starters e afins! Todos esses termos são explicados na parte 2.

No contexto do rpg, vai um exemplo de como que funciona a postagem, lembrando que, se for com uma pessoa específica, é necessário citar ela no turno!
Foto: Utilizado normalmente para postar edits dos personagens. Não tem segredo, você simplesmente adiciona a foto ali.
Adicionei duas fotos e elas vão aparecer assim. Tem como deixar elas lado a lado, é só você arrastar uma das fotos pro lado da outra e como dá pra ver no gif, você pode adicionar uma descrição. Um exemplo é essa postagem de uma antiga personagem minha, que praticava arquearia.
Gif de como colocar as fotos lado a lado!
Link: Utilizado para a postagem do link da ask no caso de askgames. É como você indica que está aberto a participar da brincadeira. Não é usado em outras ocasiões, que eu saiba.
Diálogo: Uma das minhas ferramentas favoritas, honestamente! É usada para simular um “bate-papo”, como uma troca de sms ou conversa de kakaotalk/wpp/telegram. Você coloca o nome do seu personagem, dois pontinhos (assim o nome vai ficar em negrito) e a mensagem, pronto! Outras pessoas vão poder responder e você responder de novo e por aí vai. Um exemplo é esse chat que fiz em uma personagem antiga.
4. Os botões.
No canto superior direito, você vai encontrar esses botões e provavelmente vai ficar “Que?”. Não se desespere, pequeno gafanhoto! Vou te ensinar pra que cada um serve.

Dashboard/Dash (A casinha) = Equivalente a timeline, feed.
Segundo botão/Explore (A bússola) = Serve de nada, pode ignorar.
Askbox (A cartinha) = Aqui é onde você recebe asks, ou seja, perguntas. Onde funcionam as askgames. Algo como o curious cat!
Message (A carinha feliz) = Chat fechado, equivalente a dm’s. Diferente do twitter, normalmente essa área é usada para conversas unicamente OOC, para combinar plots ou só bater um papo. Tem quem use IC, mas eu pessoalmente nunca vi.
Atividade (O raio) = Equivalente a notificações/mentions. É aqui que você descobre quando fulano ou cicrano respondeu/curtiu/reblogou alguma postagem sua, também aparece quando alguém lhe envia uma ask!
Penúltimo botão (Ícone aleatório) = É uma extensão do tumblr explicada na área de dicas na parte 2!
Configurações/Conta (O ícone de pessoa) = Aqui é onde você checa a quantidade de curtidas/likes que você tem, quantos e quais seguidores, quem você segue, as configurações do tumblr, a paleta da dashboard e muito mais!
Um de cada vez, vamos entender como eles parecem e funcionam.
Askbox.
Askbox vazia. Askbox com pergunta.
Clique em responder, escreva sua resposta e depois clique em postar. Pronto! Fácil, certo? Agora vamos falar no universo do rpg?
Askgames: É uma pequena brincadeira que normalmente as centrais liberam para os jogadores. Aqui, as pessoas enviam perguntas e/ou starters e respondem. Exemplo.
Perguntas:
Em primeira pessoa, sendo o personagem; Em terceira pessoa, como um headcanon; Em primeira pessoa, sendo o player.
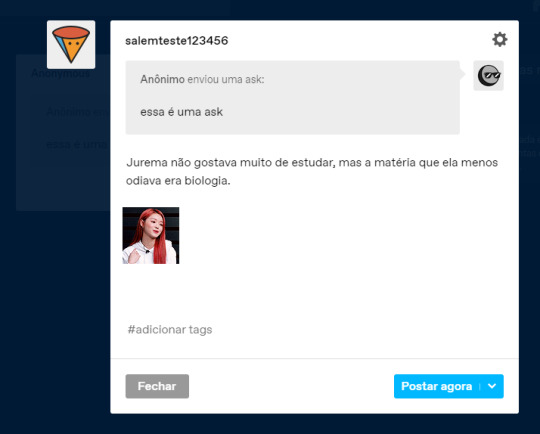
Ex: “Qual era sua matéria favorita no colégio?” / “Qual era a matéria favorita do seu personagem no colégio?”
Eu não gostava muito de estudar, mas minha matéria menos odiada com certeza era biologia!
Jurema não gostava muito de estudar, mas a matéria que ela menos odiava era biologia.
Minha personagem não gostava muito de estudar, mas imagino que a que ela menos odiava era biologia.
Starters:
Em IC!
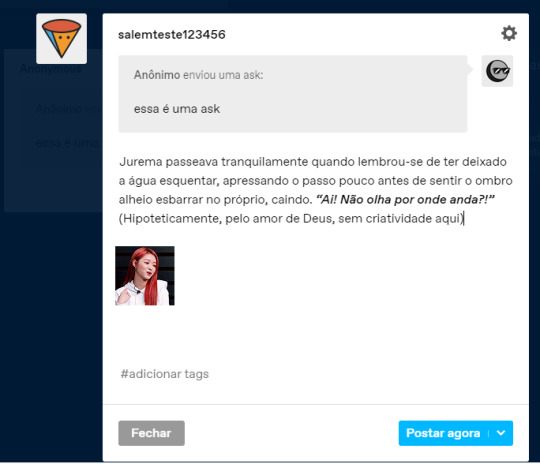
Ex: “Meu personagem esbarrou no seu durante uma caminhada noturna.”
Jurema passeava tranquilamente quando lembrou-se de ter deixado a água esquentar, apressando o passo pouco antes de sentir o ombro alheio esbarrar no próprio, caindo. “Ai! Não olha por onde anda?!” (Hipoteticamente, pelo amor de Deus, sem criatividade aqui)
Ex 2: “Ai, que fome…”
“Por que não vai comer, fulana?”
“Por que não vai comer, fulana?” Jurema perguntou curiosa, atentando seu olhar a sicrana.
Message.
Sem enrolar muito, é basicamente um chat privado. Não, você não turna por esse chat como rola no twitter, aqui é onde você conversa, normalmente em OOC, para combinar plots e pequenos detalhes de starters. Eu, pessoalmente, nunca usei em IC e nem conheço quem tenha usado. É uma forma de manter contato OOC com a central do rpg também, se for o caso de uma.
Imagem 1.
Clicando em nova mensagem, é só pesquisar o blog da outra pessoa, clicar e enviar sua mensagem, pronto!
Imagem 2.
Outra forma de enviar é pela dash ou entrando no perfil. Pela dash, você passa o mouse por cima do icon da pessoa e clica na caixinha de mensagem. Pelo tumblr da pessoa, você procura no canto superior direito pela caixinha de mensagem e clica.
Imagem 3.
Atividade.
Aqui é onde você é notificado de algo! Quando alguém curte um post seu, o responde, rebloga ou envia uma ask, por exemplo, vai aparecer no raio a notificação e clicando, você pode ver o que aconteceu.
Imagem 1.
Se você clicar na atividade específica, ele vai abri-la! No print acima tem uma ask, se eu clicar, vai abrir a askbox para eu responder. Como da pra ver, tem como você ver separadamente menções, reblogs e respostas também, mas normalmente eu uso no “tudo”.
Se você clicar no “Ver tudo”, vai abrir uma página mais detalhada da atividade, mostrando quais seus posts mais respondidos/famosos, etc.

Conta/Configurações.

Imagem maior.
Na imagem tem indicando tudo, mas segue em texto também.
Curtidas: Auto-explicativo. É onde você vê os posts que você curtiu.
Seguindo: Auto-explicativo. É quem você está seguindo.
Configurações: Auto-explicativo. São as configurações do tumblr e provavelmente uma área que pode parecer confusa, mas não é.
Mudar paleta: Equivalente ao modo noturno/diurno do twitter. Clicando você pode conferir as mais de 5 paletas da dashboard.
O blog: Clicando no nome do seu blog, vai abrir suas postagens.
Seguidores: Auto-explicativo. Aqui você checa quem te segue e quantos te seguem.
Atividade: A mesma coisa do que foi explicado no tópico anterior.
Rascunhos: Onde você pode salvar algo pra postar depois, é basicamente um rascunho mesmo, fica privado pra ninguém mais ver.
Configurações especificas.
Clicando em configurações, é assim que vai aparecer. O que você vai precisar se preocupar e configurar em primeiro momento são: Conta, painel, notificações e privacidade.
Conta.

Aqui você pode mudar o idioma do tumblr, ver sessões e mudar seu email (ou desativar a opção de encontrar seu tumblr por ele). É onde você pode silenciar tags ou palavras também e excluir sua conta.
Painel.
Tudo é bem autoexplicativo, mas vou indicar a melhor forma de deixar configurado.
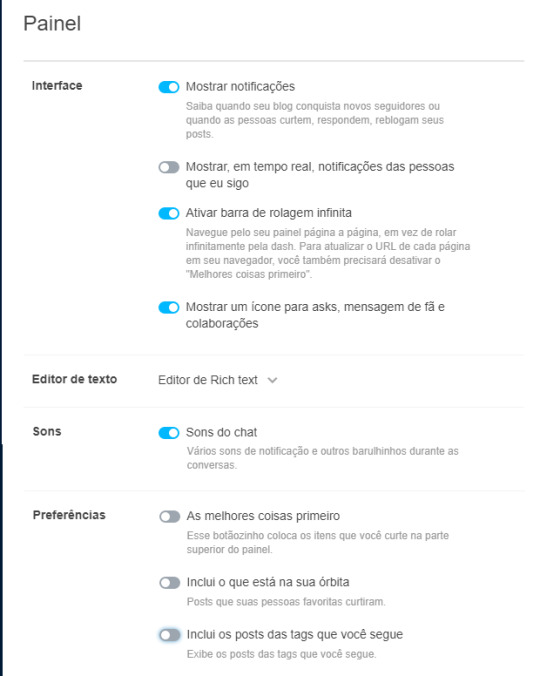
Desativo as preferências pra ver tudo da forma crua, os posts de quem eu sigo por ordem de postagem. Desativo o “Mostrar, em tempo real, notificações das pessoas que eu sigo”, pois aparece notificações que não mudam na minha vida no jogo, por exemplo, que fulana curtiu o post de cicrano ou notificações de turnos que não me fazem jus, então desativo isso.
Notificações: Desativo as de email para não lotar minha caixa, mas é só isso!
Imagem 1. Imagem 2.
Privacidade: Bem opcional, é só pra você habilitar ou não que te vejam online!
Imagem 1.
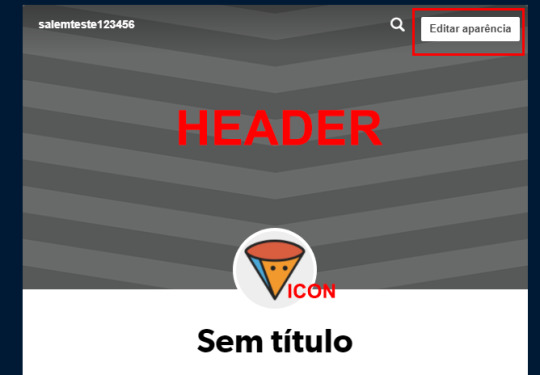
Editar Perfil/Configurações do Blog.
Tem 4 formas de chegar até essa página.
Clicando no nome do blog em configurações. (Imagem)
Clicando em Conta (o ícone de pessoa) e em editar aparência. (Imagem)
Passando o mouse sobre o icon do seu perfil na dash e clicando na engrenagem. (Imagem)
Nos seus posts, clicando em editar aparência. (Imagem)
Vamos começar com o visual. Bem de cara você se depara com o perfil que vai aparecer no mobile das pessoas, aqui é onde você coloca, como no twitter, uma header e um icon, também coloca o título do blog (ou nome do personagem) e uma pequena descrição. Para editar, é só clicar em editar aparência.
Você também pode mudar a cor do texto, do fundo e desabilitar a header.
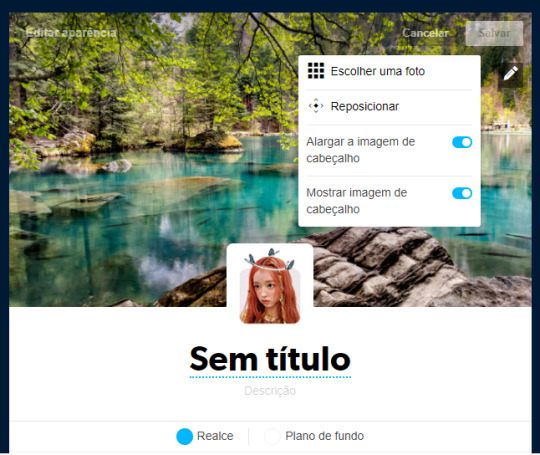
E é assim que fica quando você salva. (Resultado)
Descendo a página, vão aparecer algumas configurações, é tudo bem autoexplicativo.

Tema do site/theme: É o visual do seu tumblr no COMPUTADOR. É opcional arrumar ele, afinal, é mexendo normalmente com html, mas farei um guia básico de como editar themes no futuro.
Curtidas: Isso é bem opcional, a realidade é que não vai fazer muita diferença, então eu normalmente nem mexo nisso. Se estiver habilitado, as pessoas que entrarem no seu perfil do tumblr vão conseguir ver o que você já curtiu por aí, então cuidado se você curte umas safadezas, vão conseguir ver, é melhor desabilitar!
Seguindo: Bem opcional também, mas em comunidades, às vezes é legal deixar aberto pra que a moderação cheque se você está seguindo todo mundo, se for 1x1, realmente não é muito importante.
Respostas: Respostas de posts. Basicamente, nem só do reblog funciona o tumblr e você pode “comentar” uma postagem, normalmente em ooc. Eu pessoalmente deixo isso aberto, não faz muita diferença mudar.
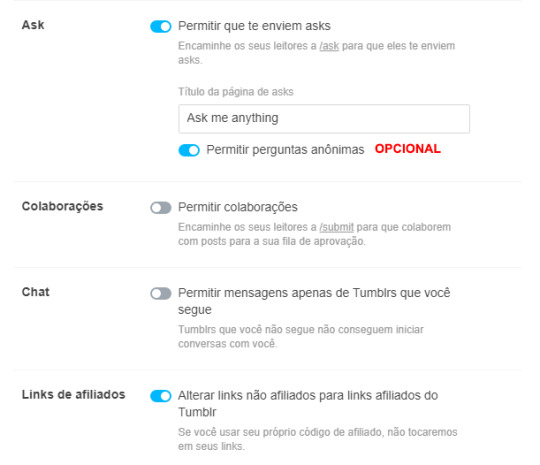
Asks: Você precisa habilitar a ask para que possam te enviar, caso não habilite, não irá aparecer essa opção para outros. Permitir asks de anônimos é opcional, eu normalmente deixo ativada porque quando alguém é bloqueado de enviar asks em asksgames (porque existe um limite por conta), a pessoa pode enviar em anonimo e indicando quem é na ask.
Colaborações: É o submit, basicamente uma forma de enviar uma “ask gigante”. No contexto do rpg, não deixo aberto porque nunca tem a necessidade de usar.
Chat: Eu deixo desabilitada aquela opção, assim posso receber mensagens de outras pessoas, mas isso é uma opção sua! Eu deixo assim porque, se eu não estiver seguindo fulano, a pessoa pode me avisar, mas tem gente que só permite quem segue por conta de bots.
Links afiliados: Honestamente nunca entendi pro que serve então tanto faz………. (Alá a burra)
Twitter: Você pode filiar sua conta do tumblr com o twitter, assim quando postar algo, vai ser postado também no twitter. Eu particularmente não gosto de habilitar isso para não floodar a outra rede social.
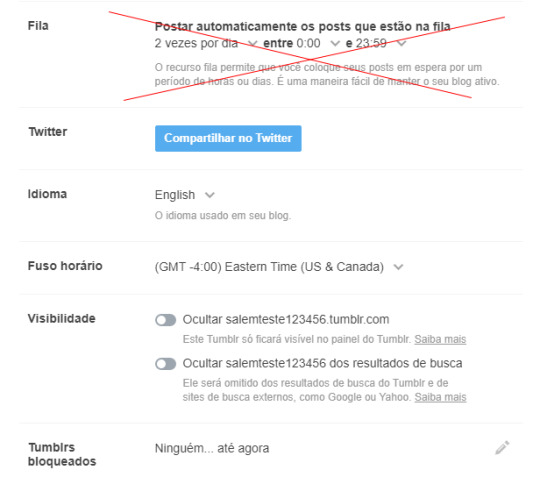
Visibilidade: Habilitando a primeira opção, seu tumblr vai continuar aberta para que vejam seus posts, mas só na dashboard, não existe um theme. Habilitando a segunda opção, as pessoas não conseguem encontrar pela busca o user do seu tumblr (Não habilite isso).
Tumblrs bloqueados: Autoexplicativo.
Encontro vocês na PARTE 2!
41 notes
·
View notes
Text
Efeito Wishlist 7.0
Olá pessoas queridas do meu s2.
Como o tumblr tava em reforma eu fui fazer oq? kkkk pesquisar tutos e fazer blends achei 2 tutos de efeitos wishlist ultra fofos ! vou postar os 2 separados !
PREVIEW DA WISHLIST
Então gostaram? Sim! Vamos aos códigos? Ah, vamos João!
Quase todos os tutos que eu posto eu sempre peço pra colar os scripts, mas esse não precisa ! ahaha ! então vamos colar logo o css do efeito, ou seja cole esse código abaixo logo depois de <style> e antes de </style>:
@font-face {font-family: "Pf Arma Five";src: url('http://static.tumblr.com/bigjj8s/1Tmm7vjp6/pf_arma_five.ttf');} ol{ counter-reset: li; /* Initiate a counter */ list-style: none; /* Remove default numbering */ *list-style: decimal; /* Keep using default numbering for IE6/7 */ font: 8px 'pf arma five'; padding: 0; margin-bottom: 4em; text-shadow: 0 1px 0 rgba(255,255,255,.5); } ol ol{ margin: 0 0 0 2em; /* Add some left margin for inner lists */ } .rectangle-list a{ position: relative; display: block; padding: .4em .4em .4em .8em; *padding: .4em; margin: .5em 0 .5em 2.5em; background: #ddd; color: #444; text-decoration: none; transition: all .3s ease-out; } .rectangle-list a:hover{ background: #eee; } .rectangle-list a:before{ content: counter(li); counter-increment: li; position: absolute; left: -2.5em; top: 50%; margin-top: -1em; background: #fa8072; height: 2em; width: 2em; line-height: 2em; text-align: center; font-weight: bold; } .rectangle-list a:after{ position: absolute; content: ''; border: .5em solid transparent; left: -1em; top: 50%; margin-top: -.5em; transition: all .3s ease-out; } .rectangle-list a:hover:after{ left: -.5em; border-left-color: #fa8072; }
Logo depois de colar o css voce vai fazer as alterações que quiser como por exemplo a fonte, o tamanho da fonte, a cor do background etc…
Agora que voce aplicou o css vamos para o html ou seja a aparição do efeito, cole esse código aonde quiser que o efeito apareça:
<ol class="rectangle-list"> <li><a href="http://land-of-designs.tumblr.com">Efeito Wishlist 6</a></li> <li><a href="http://land-of-designs.tumblr.com">Por João Netto</a></li> <li><a href="http://land-of-designs.tumblr.com">Dá like vai :3</a></li> <li><a href="http://land-of-designs.tumblr.com">Credita tbm </a></li> <li><a href="http://land-of-designs.tumblr.com">bjox <3</a></li> </ol>
Pronto, o efeito está funcionando já! adicione quantos quiser e lembre-se de nao tirar a tag <ol class=“rectangle-list>conteudo</ol> porque ele faz o efeito funcionar !
0 notes
Note
Oi Anyh, tudo bem? Sei que o Tumblr permite que estilizemos o CSS de acordo com a página, como {IndexPage} e {PermalinkPage}. É possível fazer essa mesma alteração no CSS para uma página do tipo "/tagged/tag01"?
Oi! Até por onde eu sei só é possível fazer isso utilizando JavaScript.
Então eu tentei fazer um script genérico que funcione em qualquer theme e que você possa usar para modificar qualquer coisa na página. Eu testei e funcionou, mas se você tiver algum problema com ele é só me chamar de novo. E eu não to com muito tempo agora, então vou fazer só uma explicaçãozinha básica aqui, talvez outra hora eu faça um tutorial mais completo e organizado.
Bom, o script funciona da seguinte forma: no script, você vai definir a página que você quer personalizar e ele irá adicionar uma classe CSS à tag body (a tag “mestre”) dessa página. Ou seja, assim você vai poder acessar os elementos dessa página separadamente através do CSS utilizando essa classe... Vou explicar isso melhor daqui a pouco.
Passo a passo:
1. Abra o HTML do seu tema e cole o seguinte script logo antes de </body> ou </html> (substitua as aspas):
<!-- PÁGINA DE TAG PERSONALIZADA --> <script> if(location.pathname == "/tagged/tag01") { document.querySelector("body").classList.add("tagged-tag01"); }; </script>
2. Na terceira linha do código, onde tem "/tagged/tag01" é onde você vai colocar o caminho da tag de sua preferência;
3. Na quarta linha do código, onde está escrito "tagged-tag01", é onde você coloca o nome da classe que vai ser aplicada ao body da página. A classe pode ter qualquer nome que você quiser;
4. Após fazer isso, é só utilizar essa classe para conseguir selecionar somente os elementos que estiverem dentro dela (ou seja, apenas os elementos que estiverem na página personalizada) através do CSS do tema. Por exemplo:
body.tagged-tag01 .caixa {border: 5px solid red;}
De acordo com o código CSS acima, todos os elementos com classe "caixa" que estiverem dentro do body que possui a classe "tagged-tag01" (ou seja, todas as "caixas" da página que você definiu no script) irão receber uma borda vermelha de 5 pixels.
Se tiver ficado com alguma dúvida, é só perguntar. Tenha um bom dia/noite! :)
2 notes
·
View notes