#html em tag tutorial
Explore tagged Tumblr posts
Visit Tumblr Blog
Explore Tumblr blogs with no restrictions, modern design and the best experience.
Last Seen Tumblr Blogs


Fun Fact
Tumblr has 16.74 million mobile monthly users in the US.
Text
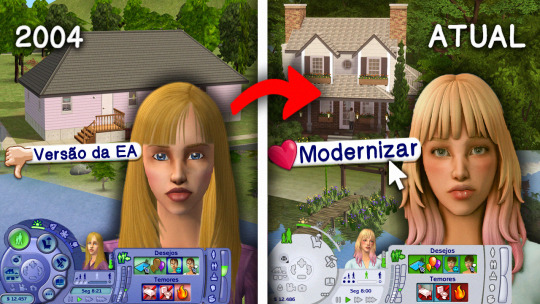
Guia COMPLETO de como deixar os GRÁFICOS do The Sims 2 MODERNOS!
✨ Link do vídeo: https://youtu.be/6ofGeyhWIQ8
Lembre-se que os itens vão na pasta DOWNLOADS, se não existe na sua pasta, abra o jogo e saia. Caso ainda não esteja lá, crie uma pasta chama 'Downloads', como ensinei no vídeo. Depois você precisa ativar os conteúdos personalizados como fiz no vídeo.
Também tenha em mente que os itens foram defaults/de substituição, você deve baixar apenas um arquivo.
MOD CLEAN UI:
https://greatcheesecakepersona.tumblr.com/post/190825573525/download-clean-ui-post-updated-011121
tutorial para quem tem ultimate colection ou 🏴☠️ do Mr DJ (se o seu é 🏴☠️ do anadius, vc usa a versão legacy, ou seja, a mesma que a minha): https://www.youtube.com/watch?v=IvOj_1A7MDA
ÁRVORES:
https://criquette-was-here.tumblr.com/post/631601714436423680/basic-linden-trees-redux-default-replacements
https://sixfootsims.tumblr.com/post/640878205133275136/well-heres-my-first-post-on-this-blog-so-i
https://lowedeus.tumblr.com/post/638682683409596416/tscs-seasonal-pines-as-base-game-nhood-pines
CÉU:
https://lowedeus.tumblr.com/post/163917091786/victory-over-the-sun-invisible-realistic-sky
https://lowedeus.tumblr.com/post/163111276336/every-july-we-celebrate-a-very-special-date
FUNDO DA VIZINHANÇA:
https://greatcheesecakepersona.tumblr.com/post/158813484310/download-post-updated-on-14042017-see-the
https://greatcheesecakepersona.tumblr.com/post/180760734605/download-city-rural-skyline
GRAMA:
https://criquette-was-here.tumblr.com/ (a grama que uso)
https://curiousb.dreamwidth.org/28103.html
https://siletkasims.tumblr.com/post/136087319102/i-made-very-small-edits-to-curiousbs-default
ÁGUA:
https://modthesims.info/d/587597/pond-amp-sea-water-overhaul.html
RUA:
https://curiousb.dreamwidth.org/28103.html
https://criquette-was-here.tumblr.com/
https://gardenofshadows.org.uk/gardenofshadows/index.php?topic=37429.0 (a rua que uso)
DEFAULT SKIN, OLHOS, CABELOS E ROUPAS
https://sims2defaults.dreamwidth.org/
https://gryning.tumblr.com/post/722213048441520128/final-duet-skinblend (a skin DEFAULT que uso)
https://www.tumblr.com/acottonsocksims2/775227183173124096/ara-fusilli-hello-redundancy-my-old-friend-in?source=share (o olho DEFAULT que uso)
CÍLIOS 3D (não é default, mas são mais bonitos que os 2D)
https://modthesims.info/d/680833/3d-eyelashes-eu-cu-update.html
PACKS DE DEFAULTS DE CABELO:
Esses arquivos são pack que possuem praticamente todos os defaults de cabelo, OU SEJA, você pode baixar apenas um entre dessas duas opções abaixo e não pode baixar outros cabelos defaults avulsos. Caso queira substituir algum, analise bem e procure pelo nome do cabelo no sims2defaults, procura na sua pasta e exclua, depois disso, pode baixar outro cabelo do mesmo default.
Clay Hair (estilo The Sims 4): https://platinumaspiration.tumblr.com/post/735878637799260160/when-i-say-basically-everything-i-mean-basically
Mikexx2's hair system (alpha misturado com maxis match): https://spookymuffinsims.tumblr.com/post/611290311879180288/ive-been-chipping-away-at-this-for-a-while-and
SKINS OVERLAY/OLHOS/CABELOS /MÓVEIS (ou seja não defaults):
Quando for baixar skins, olhos e você já tem a sua default e não quer mudar, baixa a versão CUSTOM, exemplo: https://lilith-sims.tumblr.com/post/151904708573/heeeey-i-made-this-skinblend-a-few-weeks-ago-it
Para cabelos, roupas, móveis, etc é só baixar normalmente, cuidando o post para ver se não é default.
CONVERSÃO DE OBJETOS, CABELOS, ETC DO THE SIMS 4 PARA O THE SIMS 2:
https://tvickiesims.tumblr.com/
https://www.tumblr.com/kestrelteens/754265693757849600/this-is-for-sims-2-whew-i-really-really-loved?source=share e https://www.tumblr.com/kestrelteens/tagged/4t2
https://www.tumblr.com/4t2clay (apenas cabelos)
DICA: pesquisar no tumblr a tag 4t2, exemplo > https://www.tumblr.com/tagged/4t2
https://www.tumblr.com/sims4t2bb/639693929792651264/sims-4t2-conversions-index-this-blog-provides-a?source=share (achei depois do vídeo um tumblr que coloca todas conversões de objetos dos conteúdos do 4 bem organizado)
LOTES:
https://www.tumblr.com/plumbtales (tem vários outros criadores, mas indico muito esse aqui!)
Como baixar LOTES? https://www.youtube.com/watch?v=UZsWiBLzLWc
Lotes com CC: https://www.youtube.com/watch?v=n8ZiAHKbaOM
CAMERA:
https://modthesims.info/d/97642
Caso queira checar esse mod de CAS, o Boring Bones mostrou como fazer: https://www.youtube.com/watch?v=1WhbIx0AR7I&t=287s
SOMBRAS:
https://www.tumblr.com/dreadpirate/180178957562/pineapple5050-post-processing-mod-snow-fix-this
CHEATS QUE MAIS USO:
Motherlode: Adiciona $50.000 em sua conta.
boolProp snapObjectsToGrid true/false: quando está em false (boolProp snapObjectsToGrid false) pode-se mover tranquilamente os objetos sem se preocupar com os quadriculados. Para desligar o cheat digite boolProp snapObjectsToGrid true/.
moveObjects on/off: remove a limitação de área afetada para todo o posicionamento de objetos no Modo Compra e no Modo Construção. Remove as limitações colocadas na Ferramenta Mão quando os objetos estão em uso ou são objetos que normalmente não podem ser movidos. Observe que usar esse truque permite que você exclua objetos que normalmente não podem ser excluídos, como Sims, a caixa de correio e a lata de lixo. Embora os Sims excluídos reapareçam quando você recarregar o lote, NÃO há como recuperar a caixa de correio e a lata de lixo, então tome cuidado!
boolProp allow45DegreeAngleOfRotation true/false: permite rotação de 45 graus em objetos. Use as teclas < e >para girar objetos diagonalmente.
Mais cheats: https://www.alalasims.com/the-sims-2/cheats
EXTRA: Luz Maxis Match que traz uma iluminação realista de fim de tarde, manhã, já que no The Sims 2 é apenas dia (claro) e escuro (noite).
https://dreadpirate.tumblr.com/post/175989937517/maxis-match-lighting-mod-at-last-i-finally
Se você precisa de um tutorial, assiste o da diva acottonsock: https://youtu.be/Y3TZV8FplcY?si=nH4EpoiCfVmMI678&t=3725. Está em inglês, mas dá para acompanhar, além disso, tem como ativar legendas. Eu realmente queria ter trazido esse, mas esqueci, lembrei muito tempo depois, desculpa :(
Caso seu The Sims 2 não abra, vá ná pasta Documentos>EA Games>The Sims 2 Legacy e exclua os arquivos 'Accessory.cache' e 'Groups.cache'. Não precisa fazer isso sempre apenas quando não abrir.
70 notes
·
View notes
Text

— COMO JOGAR PELO TUMBLR MOBILE?
Tutorial básico de como jogar rpg pelo aplicativo mobile do tumblr.

Recebi essa ask aqui me pedindo um guia pra jogar rpg pelo mobile, e como disse, eu nunca joguei pelo celular. Fui dar uma procurada em tutoriais e tentei explorar o app pra jogar, e trago boas e más notícias. A boa notícia é que é possível sim jogar pelo celular, mas além de ser um pouco mais complexo, você precisa usar o navegador pra isso e para formatar, usar o html.
É obrigatório formatar usando html? Não. Eu vou explicar o que eu usei aqui, mas são detalhes opcionais e preferências minhas. Você pode pular essas partes.
Já adianto também que, felizmente, não muda muita coisa entre mobile e desktop, além de alguns detalhes específicos que vou colocar aqui. Então é totalmente possível jogar.
De qualquer forma, se tiverem dúvidas, minha askbox está aberta!
Primeiro, a forma de jogar não vai mudar. Você vai reblogar posts e postar posts, como eu expliquei no primeiro guia de como jogar no tumblr.
Nesse guia, vou repassar as mesmas informações, usando o aplicativo, mas recomendo a leitura do primeiro guia para mais detalhes.
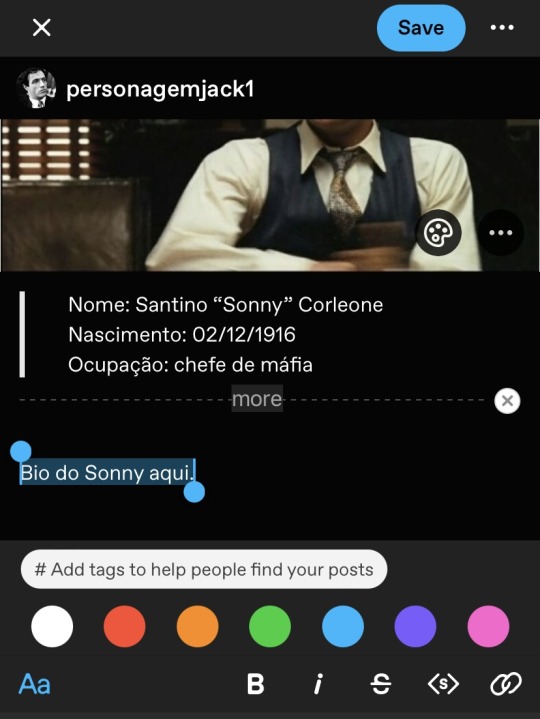
Customização e fixado:
No aplicativo, a opção de customização é diretamente no seu perfil. Você vai entrar no blog, clicar na paleta de tintas e vai abrir a seleção para customização do icon, header, cor de fundo e de realce.
Eu acredito que, quando você cria um tumblr diretamente pelo mobile, a opção de theme customizado já vai estar desativada, então você só precisa customizar normalmente. Eu vou usar o app do pinterest pra buscar as imagens e o lingojam para as fontes.
No final, vou ter algo assim:
Agora, vamos para o nosso fixado. Para criar posts você vai selecionar o lápis, e para ser um post de imagem, é só selecionar a sua foto de header primeiro, já que o app não permite escolher um formato específico como no desktop.
Feito, vou colocar a minha descrição inicial, e depois o readmore com esse ícone na barra inferior:
E depois adicionar a bio. Igual ao post no desktop, nós vamos ter algo assim depois de postado:

Você seleciona os três pontos no topo direito, e clica em fixar. Pronto!
Um detalhe: toda vez que você der enter, o app vai iniciar um novo parágrafo, dando espaço entre as duas linhas. Por isso os cortes no recuado.
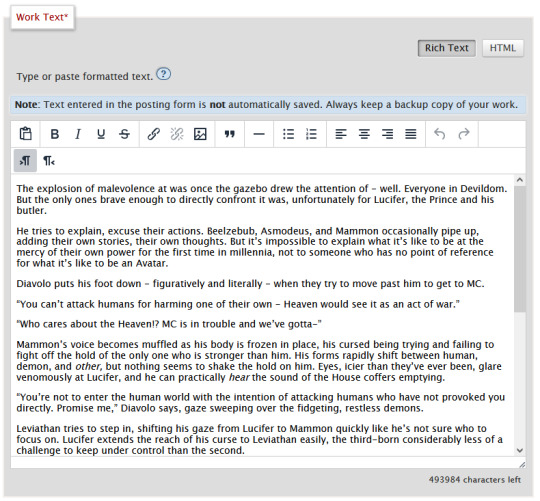
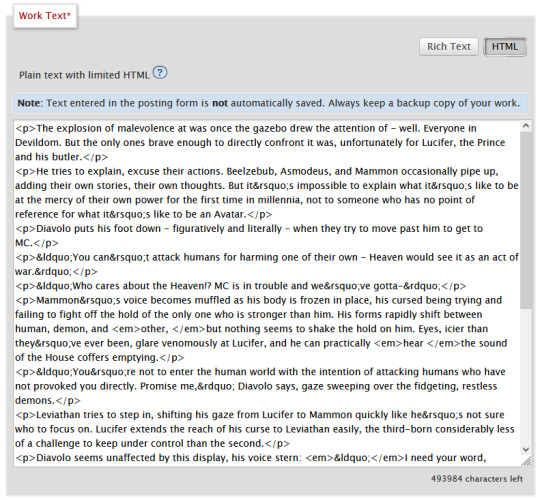
OPCIONAL: Pra retirar esses espaços, você vai precisar usar o navegador, ir até o post e editar ele. Você entra no menu do canto superior direito, rola até encontrar editor de texto e muda de rich text para html:
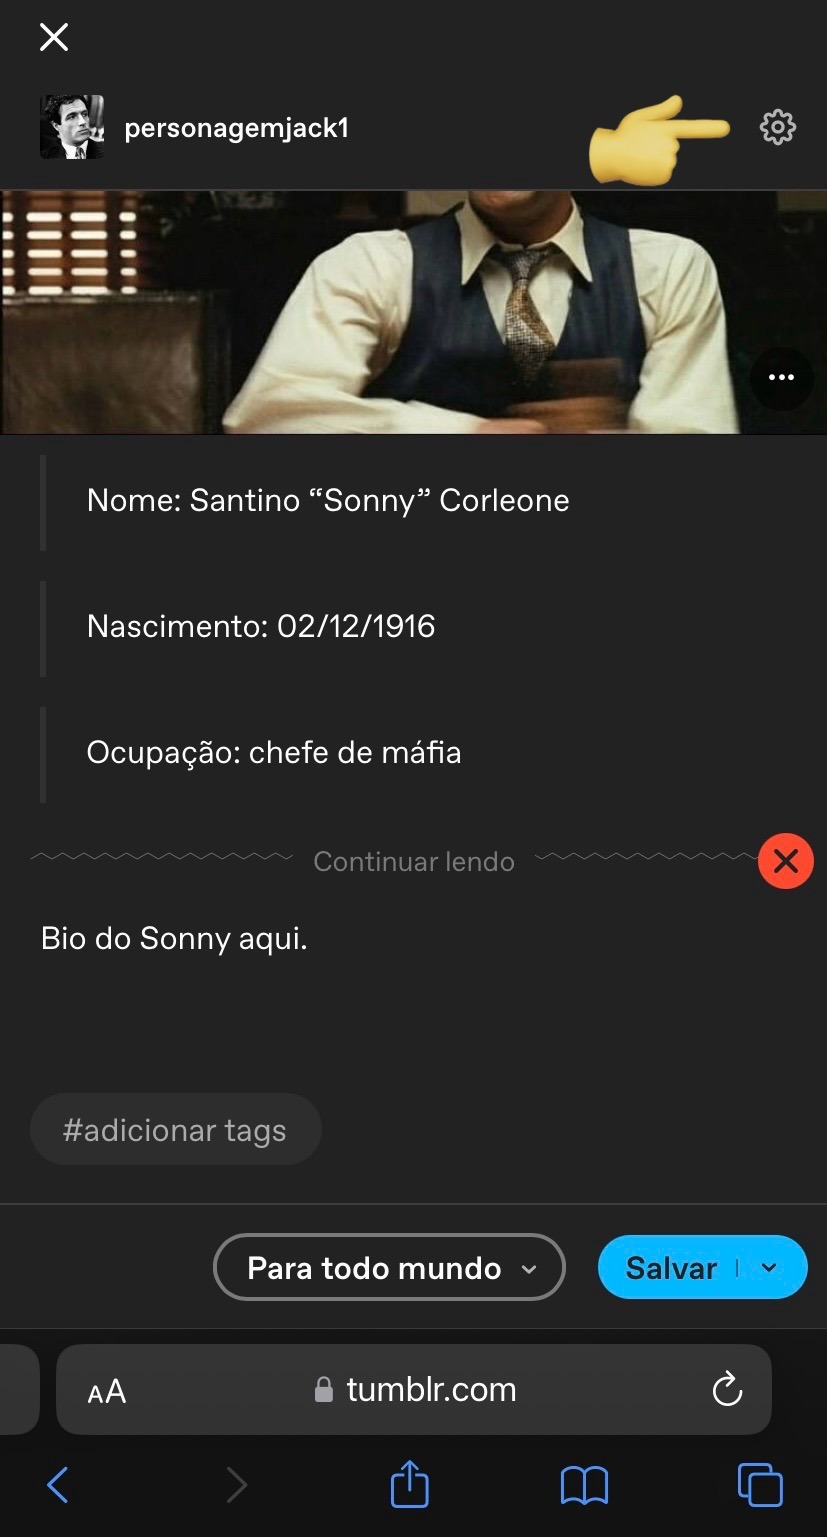

Depois que seu post for transformado em html, você precisa alterar duas coisas: os parágrafos e os blockquotes. Deixei marcado em amarelo o que precisa retirar e mais abaixo vou explicar o que significa:
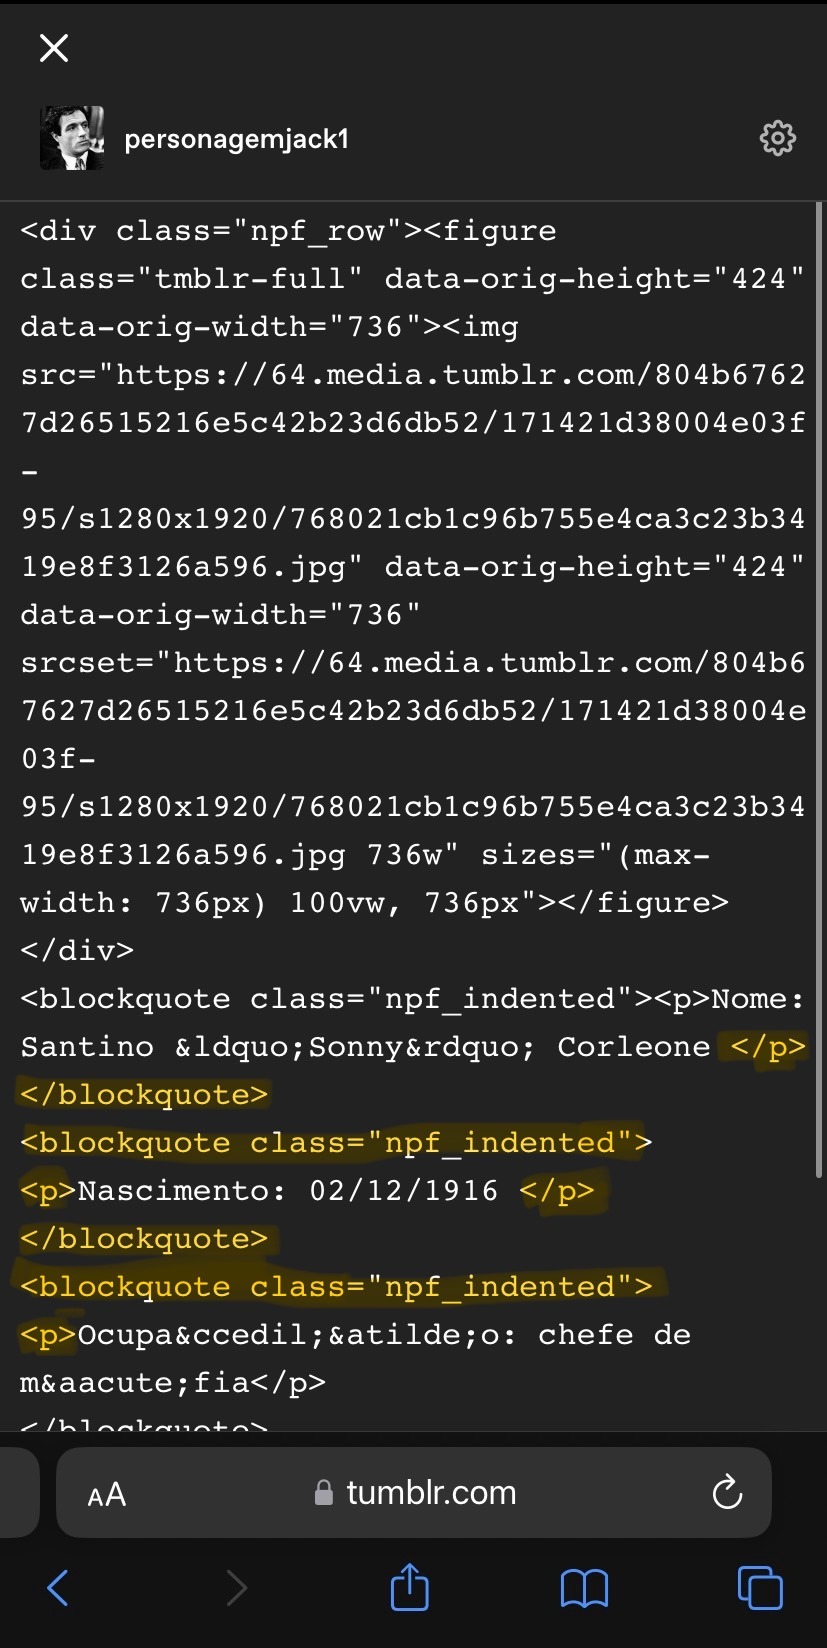
A tag <p> significa o início de um novo parágrafo, e </p> o fim dele. Perceba que no meu post essa tag está entre todas as linhas, justamente porque o app adicionou um novo parágrafo toda vez que eu iniciei uma nova. Primeiro, então, eu preciso retirar as tags de parágrafo, exceto a primeira e a última, e apenas no início das linhas novas eu adiciono a tag <br>, que significa uma quebra de linha.
Agora, <blockquote class="npf_indented"> é onde começa um novo recuado, e </blockquote> é onde finaliza. Da mesma forma que a tag de parágrafo, eu vou retirar todas elas do meio do texto, deixando a primeira e a última.
No final, meu código vai ficar assim:
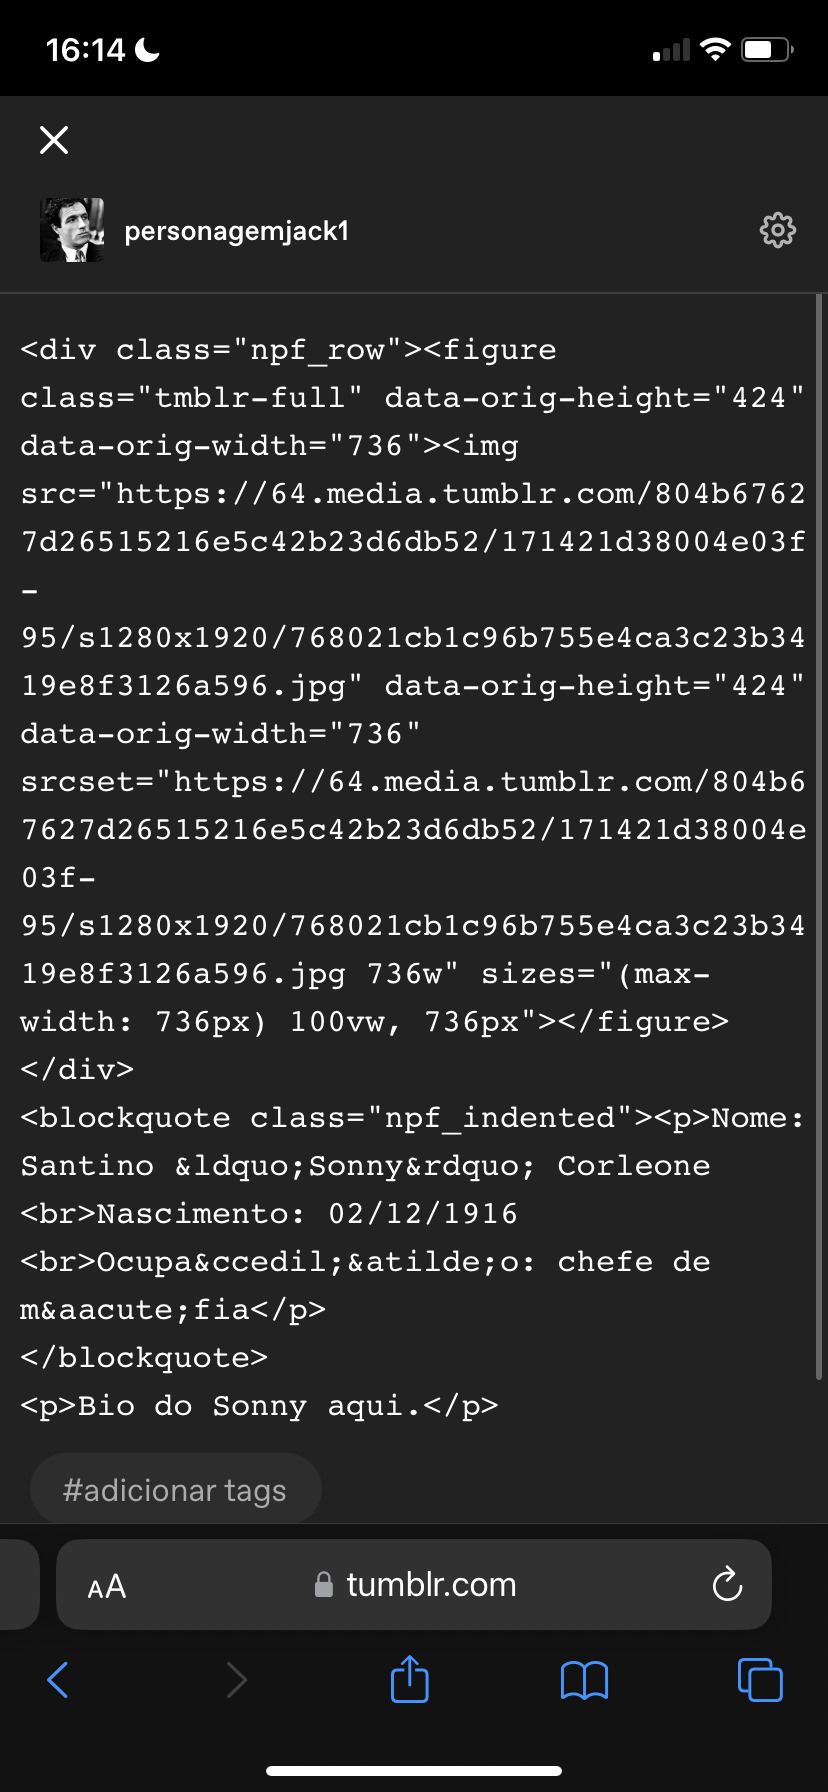
Note a posição do <br> no início de onde quero começar uma nova linha.
Salvo o post assim e volto pro app pra editar o post e adicionar o read more novamente. Se você seguiu esse passo, vai ficar assim:

Tumblr pronto!
Para ilustrar, é assim que os users de desktop vão ver o seu tumblr:
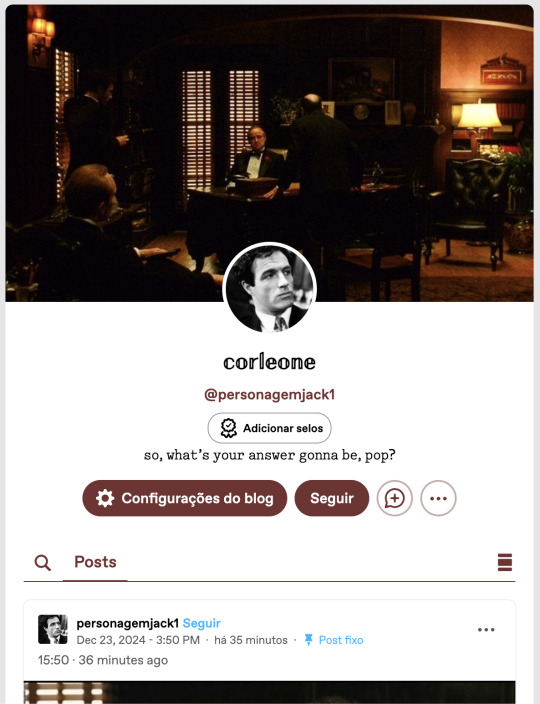

Tudo normal, nenhuma diferença de ter customizado ele pelo mobile.
Como jogar:
O básico continua o mesmo do meu tutorial inicial: posts de textos e reblogs. O tumblr mobile tem as mesmas funções que no desktop quanto a isso, então não tem muito o que explicar. Você vai seguir o padrão do tutorial inicial, mas o detalhe do mobile é que não tem como cortar os posts.
Eu testei vários tutoriais, adicionando código ao link, tentando baixar o firefox e editando no navegador, mas todos os tutoriais tem mais de 2 anos e desde então o tumblr atualizou algumas vezes, e isso não funciona mais.
Portanto, a ��nica opção para os users do mobile é pedir para o seu parceiro de jogos para cortar o post na vez dele. Ninguém vai se incomodar com esse pedido, já que o outro player teria que fazer isso de qualquer forma. Se alguém souber de uma maneira de cortar posts no mobile, por favor me avise que eu incluo aqui.
Depois, é claro, temos o detalhe dos gifs, que também vai ser precisar feito pelo navegador.
Antes de começar, você pode escrever a sua resposta pelo aplicativo e salvar nos rascunhos.
Eu aconselho que você já tenha as suas gifhunts salvas no navegador, então só vai precisar abrir ela quando for editar. Meu exemplo vai ser essa aqui:
Selecione o gif que vai usar e salve no seu celular. Depois vá até o navegador e abra o post nos rascunhos. Selecione o ícone de foto vermelho, o gif que você salvou da gif hunt e pronto:
Ele vai ser adicionado no tamanho correto e funcionando. Depois é só salvar, ou postar. Vai ficar assim:
Edição: recebi esse comentário e não precisa salvar o gif! Você pode só copiar e colar o link, como explicado.

"Posso fazer isso pelo app do tumblr?" Não. O gif não abre corretamente, ficando travado no primeiro frame. Aconselho vocês a testarem, mas essa foi a minha experiência tentando adicionar um gif pelo app.
Agora, então, sabemos como reblogar e adicionar gifs. Para entender a dinâmica e tudo mais, recomendo a segunda parte do guia.
Nele eu falei brevemente sobre formatação dos turnos, e o app do tumblr tem as mesmas funções, basta selecionar o texto ou clicar em Aa:
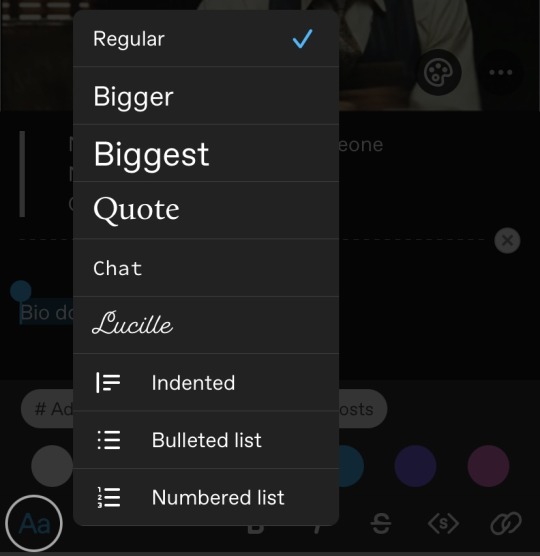
Para deixar as letras pequenas, você seleciona o texto e clica em <s>, da mesma forma que no desktop. E para adicionar o recuo, você vai clicar em Aa e selecionar 'indented', ou em português recuo mesmo.
No geral, as diferenças entre mobile e desktop não são gritantes. Eu pessoalmente acho um tanto inconveniente jogar pelo mobile por ter que ir até o navegador e tudo mais, mas não é algo que me impediria de jogar se fosse a única opção. Além disso, como eu já falei no outro guia, algumas centrais não cobram que você use gif obrigatoriamente, então é só um detalhe também.
A questão de html ali pra retirar os parágrafos é totalmente opcional, e sobre cortar posts, não há problema nenhum em explicar para seus parceiros de jogo que está no mobile e não consegue fazer isso. Eu já fiz algumas vezes no 1x1, por exemplo, e todos compreendem (a não ser que você dê o azar de encontrar algum player babaca, mas nesse caso aconselho até evitar interação em geral).
Espero que esse tutorial tenha ajudado de alguma forma, qualquer dúvida, a inbox está aberta!
30 notes
·
View notes
Note
sorry i couldn't find out how to ask on your other blog.
that book binding you posted is gorgeous btw !!
I noticed that in one of the photos you included the disclaimer that you also edited it. I just had a question about how you formatted the text.
one of my biggest gripes with AO3 is text formatting (i often feel like i'm reading a legal document vs a novel/story) . Did you change how it is formatted on AO3 compared to printed?
I feel like i'm in the 0.5% that hate AO3 formatting but i thought i might as well ask in case you have any tips for that. >,>
(also how do you decide on the page size, do you just choose a standard size for all your projects? or do you vary it depending on what you are binding?)
thanks so much for taking the time to answer and for sharing your projects :) !!!!!!!!!!!
hey anon! I have asks turned off for the sideblog, but happy to answer here. Thanks very much!
I'm taking this opportunity to info-dump and link a lot of resources. I think they're useful for people new to either typesetting or bookbinding, but not all are directly related to your queries. That said, hope this is of use!
one of my biggest gripes with AO3 is text formatting (i often feel like i'm reading a legal document vs a novel/story) . Did you change how it is formatted on AO3 compared to printed?
I do a fair bit of editing when I'm binding a fic; typesetting is often the longest part of the process. Your mileage will vary depending on your experience with using word processor software, particularly the paragraph style and page style settings. Another factor is how simple/complicated you want your typeset to look. Replicating a published novel in format is difficult but learnable for a complete beginner.
I'm not equipped to give a full tutorial on how to typeset, but I'll point you towards some useful resources for ficbinding then talk about my own process.
ArmouredSuperHeavy has a tutorial on how to make Ao3's HTML downloads into a printable book in Microsoft Word. I use LibreOffice Writer myself, so this adaptation of the same tutorial is what I follow. Both are very helpful to reference as you're learning the typesetting ropes.
Personally, I don't mess around with HTML. I find it easiest to start by doing a Ctrl+A copy of the Entire Work fic view on Ao3 then pasting that into my word processor. This video tutorial by Beautifully Bound runs through how to do this in Microsoft Word using an AO3 fic as an example, including the associated steps needed to make the fic look novel-like. This is probably the best tutorial to address your gripe with AO3 formatting. Other than that, I'd recommend looking into videos or tutorials about typesetting novels for print. Same idea, and you may get more hits than searching for fanbind/ficbind typesetting tutorials.
More under the cut! Once I start yapping, it's hard to shut me up 🤷♀️
As a point of comparison, here's one of my fics on Ao3 and the corresponding typeset side by side:


Beautifully Bound explains this in far better detail than I will, but off the top of my head, the steps involved:
making a new document and setting the default page size to whatever size I want the book's pages to be (A5 or A6 usually). You can also set the margins at this point, taking account of your printer settings.
CTRL+A and copying the entire work's text on AO3 then pasting it into the document.
removing all hyperlinks and AO3 frontmatter, things like the author tags, summary, notes, etc as well as any website text that got copied over alongside the fic.
(optional) running a spell check and ensuring grammar usage is consistent. For me that's substituting em dashes for hyphens between clauses, enforcing curly double quotation marks for dialogue, etc. LibreOffice Writer automates a lot of this with customisable settings, via Tools -> Auto-Correct. Here's also where to make sure character names are all spelled right, convert the text to or from US to UK English, etc.
picking out fonts for the body text, headers, page numbers, etc. This is where you'll want to use paragraph style settings. Page style settings also comes in clutch if, for example, you'd like different headers on alternating pages. I like having the author on the right, the fic title on the left.
setting the body text first line indent to whatever makes sense visually). This in particular helps make the fic feel more like a novel. You can also play around with line spacing and space between paragraphs at this stage. For this A6 typeset, I had a 0.75cm first line indent, 1.15 line spacing, and 0.15 spacing between paragraphs.
(optional) formatting the first line of the work to use small capitals and to add a drop caps to the first letter of the first word. Again, this is a convention in publishing which add a novel-like feeling to a printed fanwork.
Inserting page numbers, adding images, coming up with how I wanted the "copyright" page to look—optional for the most part, but these are details that make a fic appear more like a novel.
For multi-chapter works, there's extra work in formatting chapter titles as headings so that they're referenced correctly in the automatic table of contents word processors can generate.
Once you have a typeset you're happy with, and if you're considering printing and binding it as a book, then you'll need to look into how to create and print signatures. Personally, this is something I had to actually try (and mess up a bunch of times) before I got to grips with it. Understanding how both your printer and your PDF reader work, particularly printer margins and booklet print settings, is key.
I won't go into as much detail on this, but if it's something you have an interest in, I'd recommend starting with DAS Bookbinding's tutorial. DAS has tutorials for everything bookbinding related so when in doubt, check his channel! Plenty of other YouTubers also have good videos on making signatures.
This resource is extremely useful once you've got your head around how to print signatures manually, so here's a link for anyone in that space: GitHub Bookbinding Imposer. Essentially, this does the signature creation for you, removing the need for booklet print settings in your PDF reader.
also how do you decide on the page size, do you just choose a standard size for all your projects? or do you vary it depending on what you are binding?
I have access to both A4 and A5 sized paper and my printer can handle printing on either size. In bookbinding, normally two pages are printed per side of the paper (which are then folded in half as part of a signature). That is, when I print on A4 paper, it's to make an A5 sized book. Printing on A5 paper will yield an A6 sized book.
Before I begin typesetting, I'll usually know what paper I plan to use, so the typeset will be one size down from the paper. So far, I've made softcover pamphlets at A6 size and casebound books in A5. No real method of choice for me, it's whatever I feel most suits the project.
---
If you made it this far anon, thanks for reading! Here's links to a few general resources if bookbinding is something you'd like to explore more:
DAS Bookbinding (YouTube, bookbinding in all forms)
Sea Lemon DIY (YouTube, bookbinding and other crafts)
bitter melon bindery (YouTube, bookbinding, particularly beginner friendly!)
Jess Less (YouTube, demonstrations of fanbinding and re-binding existing novels)
Papercraft Panda (blog, lots of detailed tutorial on bookbinding)
Renegade Bookbinding Guild (collective and website, loads of fanbinding-specific resources from their members and they have a helpful Discord).
24 notes
·
View notes
Text
Instead of doing a Six Sentence Sunday today, I think I'll do a short tutorial on copying over fanfic from FFnet to Ao3.
So you've got some old fics on FFnet and you'd like to back them up to Ao3, given the instability of FFnet. And for whatever reason you don't have the original files for the fics, or maybe you have edits to the FFnet versions that you don't want to lose that the OG files don't have. Whatever the reason, you're looking to directly copy over your fic from FFnet to Ao3. And you're looking for a relatively easy way to do so, but Ao3's import functionality doesn't work with FFnet web pages.
Never fear! It's actually a fairly easy process to get your fic copied over from FFnet.
First, head over to FFnet and open up the fic you want to port over to Ao3. You don't need to log in if you don't want to, just so long as the fic in question is yours and you can access the page, then you're good.
In a separate tab, open Ao3 and login, then choose the option for posting a new work.
Now back on the FFnet tab, you should be able to directly copy over the title, summary, fandom, and what little tagging was available on that site onto the relevant Ao3 fields in the tab you have for a new fic. You'll also want to take note of the published date on FFnet and back date the new work in the Ao3 tab.

FFnet may not have a lot of useful tag data, but it's pretty easy to replicate and build off that in Ao3.
Now for the hard part. Which is still pretty easy. Getting the fic body, plus any notes in the fic itself, copied over to FFnet.
While getting around FFnet's lockdown on the text of the fics they host is fairly simple - I'm pretty sure it's entirely css based - you don't really need to do that in order to get the body of your fic copied. And, honestly, even if you do have a work around in place to allow copying of the fic's text... you will probably find the following method a lot easier still.
In the body of the fic, right click the first line of the fic, which should bring up a menu with a bunch of options. On Firefox or Chrome you want the inspect option.

This'll bring up the dev tools with the html inspection tab open and, if you give it a few seconds to load, the specific line you right clicked to inspect should become the visibly selected section of the html.
The selected section of the html should be a paragraph (or <p>) element. You're going to want to right click the div (<div>) element that encapsulates that paragraph and the rest of the paragraphs in the fic body. This'll bring up another browser menu with the option to copy, which will bring up a flyout menu when you select it. From that flyout menu, you want the select the option for Inner HTML.

You have officially copied the html for the fic body. And you can dump that entirely in html format straight into Ao3's html work text editor. Then switch it to rich text for easier editing if you want to fix any spelling, grammar, formatting, or aesthetic issues. I typically try to fix at least the line breaks since it took a long while before FFnet adopted real line breaks and so there are a lot of fics where I have various combinations of dashes, em-dashes, equals signs, and other characters as line breaks. I figure, if I'm bringing the fic to Ao3 then I can try to make it more screen reader friendly in the process.
You can also move fic notes around in order to move pre/post fic notes out of the fic body or basically whatever you want to the fic. Maybe re-read it to determine any additional tagging you want to add now that your fic has access to Ao3's much more robust tagging system.
But that's it. You can hit post and have your fic with all it's original notes, and a back dated post date to reflect when it was actually written, all available on Ao3 now.
It's a pretty quick process, all told, and the only real bottleneck you might encounter is any time spent in re-editing the fic between migrating and posting. Even chaptered fics are fairly easy to migrate with this process, since the bulk of the work in publishing a new chapter is just copying the inner html and then moving any notes to the appropriate location before hitting post.
Anyway, for my fellow fic writers looking to move your old FFnet fics to a more stable archive, I hope this process helps a lot.
#kitkatt0430 rambles#fanfiction archiving#migrating from fanfiction.net to ao3#ao3#ffnet#fanfiction.net#tutorial
13 notes
·
View notes
Note
Olá, boa tarde. Por favor, você poderia fazer um tutorial ensinando como compartilhar posts do tumblr para outros sites? E que dê pra customizar os ícones, como os que vc usa no Anyh'sTheme? Seu tumblr é maravilhoso. Estou fazendo um theme do zero e aqui está me ajudando muito. Tenha um 2024 maravilhoso.
Oi! Fico feliz em estar ajudando, obrigada! 💕
Pra fazer os botões de compartilhamento que eu uso, eu fui literalmente atrás do link de compartilhamento de cada rede social que eu incluí ali. Eu fui pesquisando no Google "facebook share button", "whatsapp share button" e etc. Daí peguei o link de compartilhamento de cada um, personalizei com as tags do Tumblr, peguei os ícones do FontAwesome e fiz os botões dentro do theme utilizando HTML e CSS.
Mas alguns deles devem não estar funcionando mais devido a algumas mudanças recentes no código dos posts do Tumblr e também à mudanças recentes em algumas dessas redes sociais (como o Twitter, que mudou de nome e ícone). Então eu teria que resolver isso primeiro e eu ando com muito pouco tempo livre no momento, por isso talvez eu demore pra conseguir postar um tutorial detalhado e bem organizado. Mas pra te dar um empurrãozinho, vou te dar um exemplo...
Ah, e você vai precisar incluir as tags do link, título, descrição ou imagem do post nas URLs de compartilhamento. Pra isso você vai precisar entender um pouco de como usar variáveis em URLs.
Aqui vai um exemplo utilizando o link de compartilhamento do Blogger (que até a última vez que eu chequei ainda estava funcionando)... Esse é o link para compartilhar no Blogger:
https://www.blogger.com/blog-this.g?u={Permalink}?spref=bl&n={block:PostSummary}{URLEncodedPostSummary}{/block:PostSummary}&t={block:Text}{URLEncodedBody}{/block:Text}{block:Answer}{URLEncodedQuestion}{Name} respondeu:{URLEncodedAnswer}{/block:Answer}
Explicando:
Ali, na frente de "u=" deve ir a URL do link permanente do post, então eu usei a tag {Permalink};
Na frente de "n=" deve ir o título do post, então eu utilizei a tag {PostSummary} que retorna um resumo do post (com "URLEncoded" na frente, pra evitar que acentos e caracteres especiais façam o link bugar), caso ele não tenha título;
E na frente de "t=" deve ir o conteúdo do post, então eu utilizei a tag {Body} e também {Question} e {Answer}, pra quando o post for um post de Ask (mais uma vez com "URLEncoded" na frente das tags, pra evitar que o link bugue).
Você pode usar esse link e testar pra entender melhor como funciona.
OBS: Lembrando que essas tags do Tumblr são para os posts, então só funcionam dentro de {block:Post}{/block:Post}. Então o código dos seus botões de compartilhamento devem estar em algum lugar entre {block:Post} e {/block:Post} no HTML do seu tema, ou as tags não irão funcionar.
Claro que esse é apenas o link de compartilhamento do Blogger, os de outras redes sociais serão diferentes, mas é basicamente isso... Cada um vai ter suas variáveis que você vai precisar preencher com as tags corretas dos posts do Tumblr.
~ x ~
Espero ter ajudado em algo. Mas qualquer coisa é só ir pesquisando no Google e conferindo as tags do Tumblr que você pode usar lá na Documentação sobre Temas.
Tenha um ótimo 2024 você também! 😊
13 notes
·
View notes
Note
Eu sofro procurando aprender BBCode. Você pode me dizer como conseguiu aprender todos os códigos secretos? Eu não encontro em lugar nenhum.
Olá! BBCode usa os mesmos códigos CSS que os templates normais para personalizar, mas em vez das tags normais de HTML, usa tabelas de BBCode ( [table] para a tabela, [tr] para as linhas, e [td] para as colunas). Então, a estrutura é toda feita com tabelas, por isso é preciso saber como funcionam também as tabelas (se precisar de aprender aconselho a ver um tutorial, tipo esse: https://www.homehost.com.br/blog/criar-sites/tabela-html/).
Para fazer os códigos bonitos, esses BBCodes podem ser personalizados com CSS, por exemplo, se quiser criar uma tabela com largura de 500px ficaria [table style="width: 500px;"]
Espero ter ajudado!
3 notes
·
View notes
Text
Nuvem de tags.
Nuvem de tags é nada mais nada menos que uma pagina com TODAS as tags do seu tumblr, tipo, todas! E para você colocar é só seguir o tutorial ♥
Crie uma page/página, se você não sabe como criar é assim:
Vá no eu customize » Add page » Depois da URL do seu tumblr na primeira caixinha você vai colocar “tag” ou o que você quiser, NÃO FECHE A ABA E NEM CLIQUE EM CREATE PAGE, depois você vai seguir estes passos:
Vai entrar neste site;
Vai colocar a URL do seu tumblr;
E depois para personalizar a sua nuvem, você seguirá estes passos
Em Limit você vai colocar quantas aparições de tags você deseja que apareça; Em Order você pode escolher em deixa-las na ordem alfabética ou não; Em CSS você pode escolher a opção “flickr-esque”, ai as tags vão ficar girando *muito show, mas se não quiser deixe a primeira opção*;
Clique em Refresh preview e veja como ficará a sua nuvem de tag, se estiver do jeito que você quer e/ou gostou, é só copiar o códio daquela caixinha do lado direito e vai seguir os seguintes passos:
Na page que você criou, vai clicar em <html> e vai abrir uma outra janela, nela você vai colocar o código que o site da nuvem de tags lhe passou, depois clique em Update, e depois Create Page, e prontinho, sua nuvem de tags está pronta ^^
0 notes
Note
algum conselho para quem deseja entrar em um rp only tumblr mas é 100% mobile?
claro, migalhinha! na verdade, vou te dar vários conselhos, se me permitir.
1. se você nunca jogou no tumblr, procure por helpers brasileiros! alguns postam tutoriais de como criar um sideblog, criar postagens etc. uma dica que deixo, é que, para não ter problemas com a sua conta, aguarde mais ou menos 12 horas antes de realizar alguma postagem, para sair do shadowban.
2. quase tudo o que você faz no desktop, você pode fazer pelo mobile, basta ter um navegador ativo, por lá você consegue editar as postagens via html para estilizar seu turno etc.
3. se você usar o android, aconselho baixar o xkitwritten para cortar os turnos! é um pouco chato de ativar, então aconselho você baixar o kiwi ao invés do firefox, já que o firefox às vezes desconfigura e pra configurar ele novamente é uma dor de cabeça enorme.
4. não se sinta pressionado quanto à estética! muitas migalhinhas podem arrumar a conta com algum theme bonito, mas não tem problema manter sua conta com o tema padrão do mobile, afinal, o que vale mais é a biografia e os seus turnos.
5. não esqueça de configurar a dash! dependendo da situação, pode acontecer do tumblr mostrar postagens mais antigas para você, ou deixar a sua dashboard completamente bagunçada com tags que você segue, sugestões de likes, etc. essas informações você consegue verificar melhor nas configurações da conta.
6. faça as coisas no seu tempo! não se pressione quanto à rapidez que você responde um turno, se seu fixado está bonito etc. de novo, migalhinha, o que importa é mais o jogo do que a estética geral.
7. escreva seus turnos em qualquer lugar antes de jogar para o tumblr! isso vale tanto para o desktop quanto mobile. infelizmente, o app do tumblr pode atualizar no momento em que você está escrevendo, e você acaba perdendo toda sua escrita.
não prometo criar um tutorial pra você, migalhinha, até porquê sou um pouco ruim com tutoriais. mas se quiser me chamar no privado para vermos juntes enquanto falo o passo à passo, estou disponível!

1 note
·
View note
Text
HTML em Tag
The HTML <em> tag is used define emphasized text.It emphasizes the text inside the <em> tag by using verbal stress and the browser renders the text in italic. Syntax <em>Text Content...</em> Example <!DOCTYPE html> <html> <head> <title>HTML em Tag</title> </head> <body> <p>This is a normal paragraph</p> <p>This is an important paragraph with some…

View On WordPress
#b tag#curso em vídeo#em tag#em tag examples#em tag html#em tag html 5#em tag in bangla#em tag in html#em tag in html in hindi#em tag vs i tag#how can use em tag#how em tag#html em tag#html em tag example#html em tag tutorial#html i tag#html5 em tag#i tag#i tag & em tag in html#i tag and em tag#i tag in html#i tag vs em tag#learn em tag#strong tag#tag em#tag em do html5#tag em html
0 notes
Note
Tenho vontade de começar a jogar no tumblr mas não sei por onde começar… não entendo os termos, não sei como as cmms funcionam num geral, como os blogs são organizados, como o pessoal turna na dash e também não sei o propósito desses gifzinhos pequenos e como usar kkkk e parece que as cmms não tem um tutorial pra quem é novo, é mais voltado pro povo que já tá acostumado a jogar na plataforma (o que eu entendo). Vocês sabem me guiar um pouco?
Olá pompurin! Esse post vai ser longo, por isso, demorei tanto para responder, mas já adianto que pode nos chamar no chat, caso tenha mais duvidas, ou no discord (tá no nosso fixado), ficarei feliz em te ajudar com qualquer duvida extra. Clica no cut e vem aprender comigo.

Fiquei pensando se explicava tudo do começo ou te indicava alguns tutoriais já prontos e que me ajudaram muito, como eu sou uma negação para explicar, sempre fico desperça, deixarei o básico da plataforma + jogos para o tutorial feito pelo meu amigo, ele é super completo e foi graças a ele que aprendi a jogar! Pode acessar a parte um e a parte dois! (No futuro, quem sabe, eu faço um exclusivo do Sakurajjam, com a minha experiência pessoal conforme aprendia a jogar) Também temos os guias feitos pela salemcer, eles também são bons, siga as partes aqui: um, dois, três, quatro e para mobile. E a moderação da @haneulcomplexhq fez um tutorial recentemente sobre o assunto, abordando pontos cruciais para se jogar em uma comunidade, tá perfeito também.
Mesmo te passando ótimos guias, também quero te dar explicações mais rápidas, no estilo Rinn, seguindo os pontos da sua ask, por isso, vem comigo. Os termos são explicados nesses guides que passei, então para não ser repetitivo, visto que todos colocam logo de destaque, irei pular isso.
O funcionamento de uma comunidade é variável, cada uma tem seu estilo, apesar de todas seguirem o mesmo modelo de reserva > ficha > enviar a ficha (chat ou submit) > ser aceito > mandar blog > ser feliz na dash. No começo, quem comanda tudo são as centrais, porque depois de enviar a ficha, tem que esperar a aceitação + liberação do blogroll (se for aceito logo quando o lugar abrir) OU esperar seu post de follow para seguir os demais membros do rp, isso é bem parecido com o twitter, na verdade, porque tem que esperar aceitação pra seguir todo mundo. É tudo focado nos jogos, no desenvolvimento dos personagens no plot da central que se cadastrou, não tem isso de tweet de bom dia/boa tarde/boa noite contar como atividade, só conta thread, independente de seu tamanho; edit ou musing não contam como atividade, porque não é muito "plausível". Cada local tem sua base de regras, mas, no geral, é assim que funciona.
Os blogs também vem das mais variadas formas, porque quando olhamos um rp de tumblr pensamos em html, tem que ter um theme no blog e essas frescuras, mas não. Você não é obrigado a usar theme no blog do seu char, principalmente se não sabe mexer com os codes, pode deixar o theme original que a plataforma disponibiliza ou nem usar, porque agora temos essa opção, de deixar apenas o painel (muitos optam por isso). A organização vai de você, se quiser ter um fixado com as infos do muse, faça um da sua forma. Se não sabe editar, coloca um/dois gifs do fc utilizado e as infos que achar importante, não tenho um exemplo meu para te mostrar, mas uma amiga disponibilizou um char dela com essas características, vale a pena ver. Ela colocou dois gifs, uma divisória, um perfil e o bg do personagem, pronto, isso já é o suficiente para as pessoas conseguirem conhecer seu muse e ter material para pensar em plots, se você quiser adicionar conexões, pode colocar no mesmo post ou fazer um separado, linkando no principal.
Depois do fixado, temos as tags. Essa é minha parte favorita da organização dos blogs pro tumblr, porque dá pra fazer algo simples ou elaborado, além de ser a maior organização pro game. Pode usar letras enfeitadas, emojis ou o que for de sua preferência, tem quem só coloque "thread." e tá feliz, tá tudo bem, o que for mais fácil para a pessoa. Normalmente usam essas tags: inter ou thread para as interações do personagem, starter para os starters que já fez, musing/study para tudo que for relacionado com personalidade e o muse ao todo, visage/mirror/fc para reblogar gifsets ou fotos do faceclaim utilizado e eventos que correspondem aos eventos do rp, ai entra como evento: nome do evento. Você coloca as tags que desejar, se não sabe, pode dar uma olhada nas tags que o pessoal que já tá no rp usa, ver o que combina mais contigo, só não copia, ok? Faz no seu estilo, nunca no do outro já que cada um faz de acordo com seu gosto pessoal. Sei que algumas pessoas usam frases de músicas, mas corre o risco de ficar algo gigantesco e difícil de ler, muitas vezes, o tumblr não "lê" elas e buga o blog; aconselho colocar uma palavra chave, que combine com seu char, e só adicionar a parte de starter, interação e por ai vai.
Os turnos na dash, não sei se consigo explicar tão bem, pois é algo que precisa ser observado com o tempo, vou tentar passar da forma que me explicaram quando comecei: é igual turnar na dm do twitter, só que na dash todo mundo vê (só que nem todos vão parar pra ler) e você pode colocar gif icon. Não é nada compreensível, eu sei, acabei aprendendo na marra e cometendo pequenos erros, porque começar em uma nova plataforma é isso, acertar e errar constantemente. O guia do oldtalks mostra muito bem como fazer um turno na dash, eles explicam melhor que eu, de verdade...
Agora sobre os "gifzinhos", nós chamamos de gif icons ou gif hunt (também são os termos usados para encontrar na plataforma). O propósito é mostrar a expressão do seu personagem no turno, como uma imagem complementar, ou descritiva, a ação realizada na thread. Se a situação no jogo é engraçada, colocar um gif do faceclaim rindo ou sorrindo é o indicado, mediante a situação, use um gif! Não é obrigatório, use se quiser, porque tem page de gif que demora para carregar e fica difícil ficar vendo um a um, atualmente, os rps não obrigam ninguém a usar gif, só usa quem quer. Só não use gifs em situações de smut ou com temas pesados, não é lei, mas acaba sendo uma "regra" implícita de todos os players da tag, como um acordo comum de que é errado colocar gif em threads com temas mais pesados, inclusive, os gifmakers (aqueles que criam esses gifs) tem regras claras quanto a isso, sempre bom seguir o que eles impõem em seus trabalhos para que não seja restringido quanto ao uso.
Creio que é isso, pompurin, espero ter ajudado! Como disse, não sei explicar muito bem, mas não queria só te encher de links e parecer que não to com boa vontade para explicar/ensinar, qualquer duvida, pode me chamar no chat e eu posso te explicar melhor, com prints ou em uma demonstração em tempo real, como um passa a passo.
#♡ · ✉️ : respondidas#♡ · 🎀 : rinn talks a lot#( rinn a poderosa chefinha )#♡ · 🔎 : guides#♡ · 💭 : help#( tumblr )#♡ · 🌸 by sakura
23 notes
·
View notes
Text
A not-so-quick how-to for Ao3 work skins
Ao3 has some pretty powerful customization tools at your disposal - if you know how to use them. Did you know this entire time you could change your text colors, size, background colors, outlines, underlines, overlines, and even fonts of your works? It's fairly easy to do - you only need a little knowledge about markup languages to get started. The way this is done is through classes and the clever application of some simple CSS. Though I've written this guide around using my Obey Me coloring and work skin, the principles are applicable across anything you may want to do with your Ao3 styling.
I've done all the heavy lifting this time around, and have actually created a very, very simple skin that you may want for the purposes of your Obey Me fic including:
Unique colors for each character (sticking to WCAG 1:3 minimum contrast ratio for accessibility)
Heading font and size styling (separate from character colors)
Styled 'pullquotes' for written letters/passages/quotes (at 75% size)
Make sure to keep checking back for updates - I'll put word out here on my tumblr whenever I update, but I've also created a codepen (work skin CSS found in the CSS tab) with the latest version of the skin that you can use to play around in.
Just a heads up before you start: there is a bit of a learning curve, but I have tried to make the explanation as simple as possible, and hopefully provide enough tools and knowledge that you can run with what I've given you and start creating your own styles.
1. Markup: The Basics
I'm sorry - no matter how simple I try to make this work skin, you're going to need at least a little understanding of what markup languages are and how they work. But don't fret: I've had a few years experience now teaching this to absolute beginners so hopefully by the end of this tutorial you'll be feeling like a real Hackerman.
So what is Markup? A tl;dr
Markup is a set of instructions used to tell a program (in this case your internet browser) how something should behave. HTML stands for Hypertext Markup Language and is likely the markup language you'll encounter most often. Ordinary text like you would type in a word document is meaningless to a computer browser - it doesn't know how to read. You need to talk to it in a language it understands so that it can translate your wonderful words into something that appears in your browser. This is done through the use of 'elements'.
Like how you know "words captured in these quotation marks" are quotes (or text written in parentheses is related to but non-essential to the main body), elements are essentially markers that indicate how a thing should be read. In HTML, these elements are denoted through angular brackets <> containing the necessary info that your browser understands. These often consist of an opening tag <[element type]>with content within, followed by a closing tag</[element type> denoted through the use of the "/" slash. Every element that has been opened must always be closed. Common tags include:
<p></p> for paragraphs
<em></em> for emphasis (typically displayed as italic)
<strong></strong> for strong (typically displayed as bold)
<h1></h1> for your highest headline (and subsequent-level headings use 2-6)
<div></div> for generic sections or blocks
<span></span> for specific selections of text.
<a></a> for anchors (links)
<img> containing images <- this one doesn't have closing tags because it's special
and more!
Everything you see on the internet rests within tags like these. You don't see them because they're only for your browser's eyes. Even your fics are formatted with this - though Ao3 does it automatically. You can freely switch between Markup (HTML) and Rich Text Formatting up in the top right corner.
Attributes
Attributes are additional information you can add to an element. Some attributes are essential, like a href (hyperlink reference) for anchor elements. Some are additional information used to differentiate between different identical elements like a class or id. It's this latter, non-essential attribute we're going to be utilizing for our work skins.
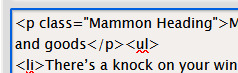
Once you have your fic in Ao3, make sure to switch over to the html editor. From there, you are going to find the element that you want to change the look of, and we're going to add a class.
We do this by finding the open tag of an element. That will probably be a <p>. Inside those angular brackets, after the name of the element, we are going to type class=""
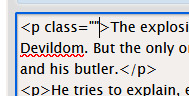
What we've done there is create a field for the class, but we haven't actually given the element a class yet.
It's always a good idea to name classes that describe the content, not what you want it to look like. You could change your mind down the line, but then you're stuck with a class called red that's really changing the color to blue. So rather than calling a class "gold", you might instead give it the name "Mammon" as it indicates when Mammon is speaking. This is known as Semantic markup.
Here's a few things you need to know about classes:
Class names cannot contain spaces. We use spaces to delineate new classes in the same element (like commas to separate tags on tumblr).
You can use as many classes as you want, as many times as you want.
They are case-sensitive.
You can add classes to all most html elements. That means that you don't have to just make entire paragraphs a particular style.
I have already specified several classes in my existing work skin. These are [Luci Mammon Levi Satan Asmo Beel Belphie Dia Barb Luke Sol Sim Heading pullQuote] - remember that these are case-sensitive. Feel free to use any one of these, or use your own! Put your chosen class name between those quotation marks I had you make earlier like so!

These don't actually do anything just yet. For that, we need to now head on over into our work skin.
2. Introducing the work skin: CSS
Now that we hopefully have our heads wrapped around the basics of elements and classes, we can start using that to make things look interesting. CSS stands for Cascading Style Sheet. HTML gives the browser structure, CSS gives the browser style.
But first, we have to create a new work skin.
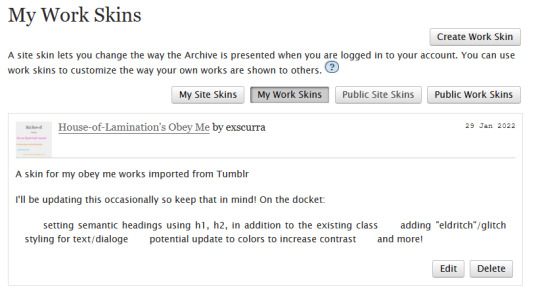
Go to your Ao3 Dashboard and up in the top left underneath "Profile" and "Preferences" you should see an option for Skins. It'll land land you in "site skins" by default, so make sure to click on My Work Skins. From here you can click on Create Work Skin in the top right corner.
In the "About" section, make sure Work Skin is selected, and give your new skin a title!
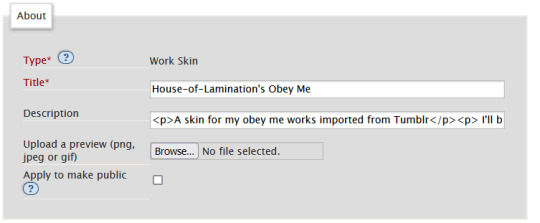
Feel free to also include a description for your own sake. Now. Onto the fun part!
Below the "About" section, you should see a box labelled CSS. In that box, feel free to copy+paste the styles below into that box:
#workskin .Luci { color: #0071ed;}
#workskin .Mammon { color: #e5a71c;}
#workskin .Levi { color: #e26600;}
#workskin .Satan { color: #00c117;}
#workskin .Asmo { color: #ff00bd;}
#workskin .Beel { color: #e80b00;}
#workskin .Belphie { color: #4f08b5;}
#workskin .Luke { color: #00c0ed;}
#workskin .Dia { color: #9b0000;}
#workskin .Barb { color: #007215;}
#workskin .Sim { color: #c1ac44;}
#workskin .Sol { color: #757575;}
#workskin .Heading { font-size: 1.25em;}
#workskin .pullQuote { text-align: center; font-size: 0.75em; display: block;}
This can also be found in the CSS section in this codepen. (disclaimer: tumblr may or may not mess with the line spacing when you copy things over. After you've copied, save your work skin and then reopen it in "edit" - Ao3 will automatically format your work so that it's nice and clean).
So what's actually happening here?
Let's read from left-to-right, top-to-bottom - because that's precisely what CSS does. Feel free to skip this part if you're not interested in creating your own styles and you're happy to just copy and paste existing work skins :)
#workskin .Luci { color: #0071ed; }
This first part here is what is called a "selector". Here, we're specifying what exactly we want to target in order to change its looks. Every character, including the spaces, symbols, and capitals matter.
#workskin .Luci { color: #0071ed; }
#workskin is specifying a unique ID within the HTML - one that encapsulates everything that you want to apply the work skin to - so basically your entire work. This is absolutely necessary in order for the work skin to actually function. We didn't create this ID in our HTML because Ao3 (will) create it for us automatically down the line.
#workskin .Luci { color: #0071ed; }
Following the work skin id, we have a space, a period, and then - hey! That's a class name! The space between the ID selector and the next part indicates we're looking for things inside this particular ID. Periods are used to indicate classes. When targeting a class, you use the period, followed by the class name. So if you're targeting your Levi class, you would write #workskin .Levi . If you were targeting a class that you created in your html, you would write #workskin .[classname] (removing the square brackets, of course).
#workskin .Luci { color: #0071ed; }
Now it's time for the fun stuff - the rules. Once we've targeted what we want to style with our selector, we use curly brackets to contain all the "rules" that we're using to make the browser appear a certain way.
#workskin .Luci { color: #0071ed; }
We start with our property - or what we want to change. In this case it's the text colour, denoted through 'color'. Yes. It's American spelling. I have no control over this. Find a simple list of css properties here! There's loads, but the ones that are probably of most use to you at this point are color, font-size, font-weight, text-align, text-decoration, and display. Make sure to put a colon after the property - that links us into the next step.
#workskin .Luci { color: #0071ed; }
Finally, we have our value - or what we're asking the property to do. In this case, we're changing the color, so the value is a hex color value. Color can also be denoted through rgb [written as rgb(0,0,0)]. Different properties will have different values. For example, text-align can have a value of left, right, or center (note the Americanized spelling again). If you click on the property in this list, it will tell you what values you can use!
You can have as many rules as you want in your selectors, as long as you end each of them with a semicolon. I cannot stress the semicolon enough. If your CSS isn't working - it's probably a missing semicolon. An example of multiple rules being used within one selector is in the pullquote styling:
#workskin .pullQuote { text-align: center; font-size: 0.75em; display: block; }
You can even write rules that override each other, though we try and avoid doing that. When this happens, your CSS will read from top-to-bottom, prioritizing the latest thing it has read (typically your bottom-most). There are exceptions to this, but that's not necessary for this guide.
So by this point you should have copied over the CSS I've written into your work skin, or perhaps tried your hand at making your own. This would be a good point to save.
3. With our Powers Combined
Right! So we have our work skin. We have our work formatted properly, resplendent with classes. Here's how we get these things talking to each other:
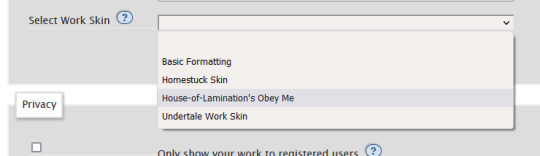
Once you've saved and closed your new work skin, open up or post the work you would like to apply the styling to. Down the bottom of the Associations section, there is an option to Select Work Skin. Ao3 already provides some work skins by default - Homestuck and Undertale - but you should be able to select your new work skin from this dropdown.
Now here's the magic. Time to check if this worked. Go through and make sure you've applied your classes to each of the elements you want to change the look of. These can be <p> elements, <em> elements, <strong> elements, or you can even make new, unique sections using <span>. Save your work as a draft and preview it - if you've done everything right, you should see the sections of text you've added classes to have changed in appearance!
A reminder that you can add multiple classes to one element: say for example you want to create section headings unique to each 'character', you can name both classes in the class field, separated by a space. See the example below:

And that's about it! You can use the same work skin for multiple works - just remember that you should be using the same class names if that's the case. If you create a new class in your html, make sure to go back to your work skin and make some rules for that class!
I've created this codepen that you can play in that is using all the same classes - it also has the work skin in the CSS which you're also very welcome to mess around with.
Ao3 itself has a great guide to using work skins, explaining things just like I did here. The Modzilla Developer Network is a great resource for learning more in-depth about html and css if you want to do weirder and wonderful-er things!
I hope this has been informative and useful! Best of luck using skins in your own fics! 💛
#obey me#ao3#tutorial#omswd#writing reference#long post#cs people dont come @ me about my oversimplifications. this is for beginners! i am not here for definitional semantics!!!!#literally only one person asked for this and YET. i really enjoy writing tutorials
237 notes
·
View notes
Text
New AO3 Script / Screenplay Tutorial
Some time back I posted a tutorial for how to format CSS and HTML for a screenplay on AO3, but since then I have improved upon it and I wish to now share with you all the (hopefully somewhat better) new version.
I previously had a significant problem with the spacing of certain elements, which would end up breaking the formatting. So recently I spent two days studying and trying code after code until I got it right.
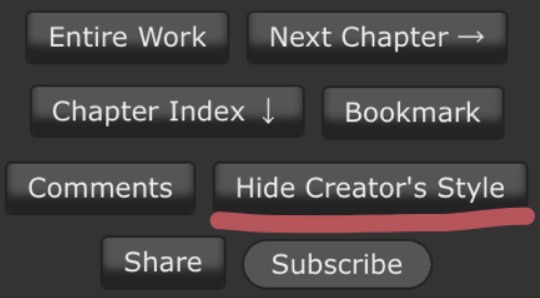
Note that though this formatting makes the screenplay look authentic enough on a computer monitor or on mobile in landscape mode, it does not (in my experience) tend to show up well in portrait mode. This version is at least readable in portrait mode, however, whereas the old version was not. Still, you might like to make an author’s note mentioning that readers in portrait mode may need to use the “hide creator’s style” button, which will take away the formatting:
Okay, let's get to work! First you are going to have to create a new AO3 work skin. Name it whatever you like, then insert this code:
#workskin p { font-family: "Courier Prime", Courier, monospace; text-align: justify; text-justify: inter-word; }
#workskin p { margin-left: 5%; }
#workskin p { margin-right: 15%; }
#workskin .indented { padding-left: 15%; padding-right: 25%; text-align: justify; text-justify: inter-word; }
#workskin .par { display: block; padding-left: 15%; padding-right: 25%; }
#workskin .character { display: block; padding-left: 25%; }
You can adjust things like the margin and padding percentages to fit your own style, of course!
Now comes the fun part. After you have written your script, make a new draft using your screenplay skin. Then get onto the HTML editor.
The SHOT, SCENE HEADING, and ACTION elements will be left alone. The only tagging necessary for them is < p > (close up the < and >, of course... Tumblr is giving me a hard time about showing it as it really should be) for paragraph transitions. But do be sure to use the < p > tag, or it will break the formatting.
Next are the CHARACTER, PARENTHETICAL, and DIALOGUE elements... which are a bit more involved.
Before blocks of character/parenthetical/dialogue, you need to put the following tag (with closed up < & >): < div class="indented" align="left" > . Note that if there is more than one Character involved with no action breaks in between (in other words, if there is a conversation going on), you do not need to put the tag between each character, just before the first one. Like so:
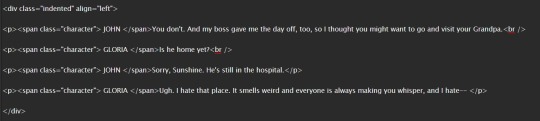
And be sure to close it back up after the blocks of conversation with < /div >
Next up is CHARACTER, which, as you can see above, is tagged: < p >< span class="character" > CHARACTER NAME< /span >
Notice that there are no line breaks between the < /span > and the dialogue. Due to the nature of < span > if you try to put a line break in there it will turn it into a paragraph break, which doesn't work well for the screenwriting thing. I am sure there is a workaround, but that's what I got for the time being!
Now we come to PARENTHETICALS, which are the bits of action within dialogue:
To tag those, once again do not make a line break, but simply insert this: < span class="par" > then close it after inserting the parenthetical with < /span >
It might be easier to simply visualize, but note that as a personal preference I tend to italicize my parenthetical elements with < em >... you don't have to, that's just my style:

And that is basically it! If you would rather just look at the code than to try and figure out what I was trying to explain (I am not sure I did a good job of that!), here is a basic visual:
This:

Should get you this:

Or something similar, anyway. It may vary on your screen. If you would like to see a live example of how it will look on your monitor or with your device, you can click below to get to a small fic I have formatted this way (it isn't the story sampled above, however, since that is a WIP I have not posted anywhere yet!)
If I have made any mistakes or anything is in need of clarification, let me know! I will do my best to fix it!
#ao3#fanfic#ao3 tutorial#tutorial#writing#writeblr#screenplays#screenplay format#screenplay tutorial
37 notes
·
View notes
Note
poderia me ajudar a encontrar um tutorial de como upar gifs numa página, tipo as de gif pack, por favor? eu tinha salvo, mas acabei perdendo :(
Oi, anon! Eu tenho alguns tutoriais em inglês, mas vou fazer um tutorial rapidinho em português aqui pra você com a forma que eu faço.

Primeiro você precisa upar os seus gifs em um post do tumblr. Eu tenho um tumblr trancado pra fazer isso, assim não posto direto no meu principal. Com as atualizações, o tumblr só permite que você upe 30 imagens por post, e tem um limite de 250 imagens por dia.
Depois de postar (e precisa postar pra garantir que o gif não vai ser deletado), você vai abrir o post para editar, clicar na engrenagem de opções do post no canto superior direito e descer até a opção "Editor de Texto". Você vai encontrar "Rick Text" selecionado, e vai clicar.
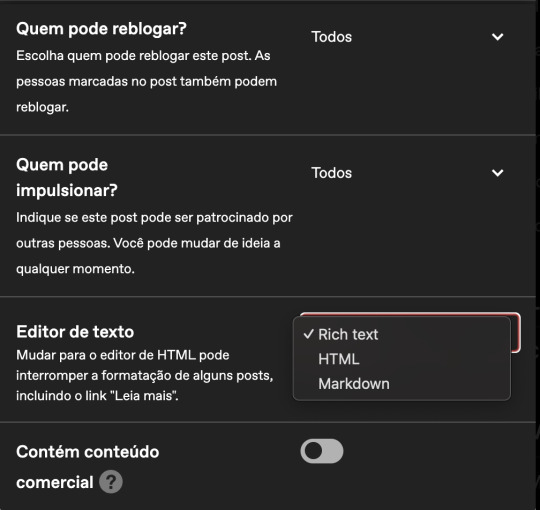
Primeiro você vai selecionar "Markdown" e seu post vai ficar assim:

Depois vai mudar para "HTML", e seu post vai ficar assim:

(Sendo bem sincero eu não sei exatamente o motivo de passar por markdown e depois para html, mas aprendi assim e sigo esses passos então não sei se vai alterar em algo. Se você reparar bem, ele retira algumas partes do código nessa alteração, então acredito que seja importante seguir esse passo.)
Depois disso, você vai abrir um site para limpar o html. Conheço o zubrag e o html washer. Eu uso o zubrag, então vou ensinar com ele.
Você vai copiar todo aquele código do seu post com os gifs, colar no zubrag e em allow tags, você vai colocar <img>. Passo importante!
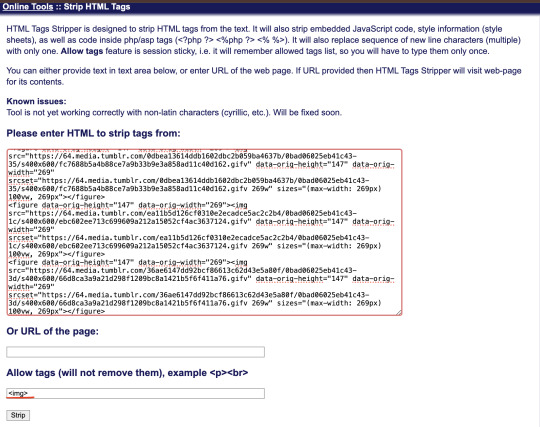
Clica em strip, e o zubrag vai limpar o html pra você. No fim vai sobrar só as imagens. Você vai copiar esse novo código e colar ele na sua página.
Pra isso você vai adicionar uma nova página, e escolher layout personalizado. Assim:
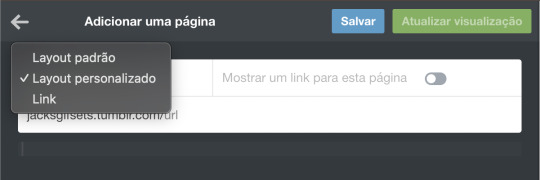
Agora você pode colar o código hmtl limpo nessa página e atualizar que eles vão aparecer certinho.

Você vai ter que fazer esse processo a cada 30 gifs, e é só repetir.
Você pode manter dessa forma mais simples, ou pode usar uma das páginas feitas para gifsets, como a que eu uso aqui no gifset do Vincent Corleone.
Se você quer usar uma página, é bem simples também. Você só precisa encontrar a página que gostar mais, e pegar o código html dela (não se esqueça de dar um like + reblog no post original para ajudar a divulgar o criador da página). Eu uso essa daqui, mas todas elas tem praticamente o mesmo processo de edição.
Você vai precisar copiar o código fornecido, copiar na sua nova página e encontrar a parte de edição e para colar os gifs. No caso da minha, encontro essa parte:
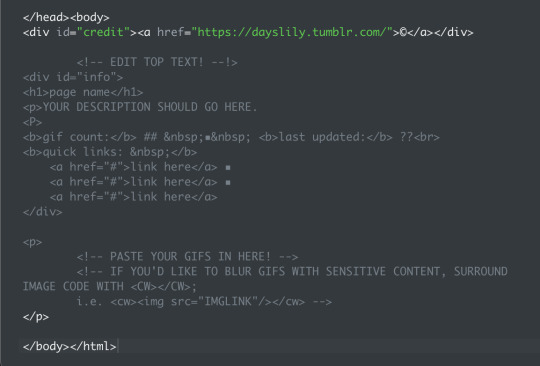
É bem auto explicativo, mas você basicamente coloca o nome do seu fc no lugar de "page name", adiciona uma descrição em "YOUR DESCRIPTION SHOULD GO HERE." (ou só apaga essa parte mesmo. Após o ## na linha de gif count é a quantidade de número, no lugar de ?? você adiciona a data em que atualizou, e embaixo de "quick links" você pode colocar links para voltar para o seu tumblr, ask, etc.
O código que você limpou lá no zubrag você vai colocar embaixo do último -->, logo acima de </p>.
Da próxima vez que for adicionar gifs, só vai precisar adicionar o código abaixo do último código que você colou, e seus gifs vão ir aparecendo em ordem. Fora isso, só atualizar a quantidade de gifs e a última vez que foi atualizado.
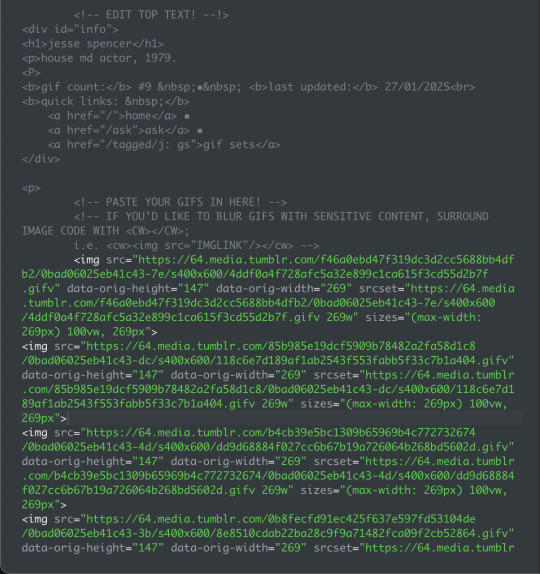
Meu código, por exemplo, ficaria assim:
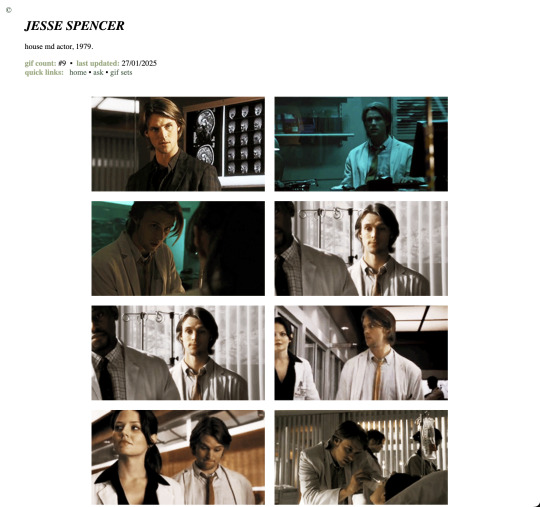
E a preview da minha página, assim:
Eu recomendo atualizar e salvar a cada passo que você fizer, para garantir que não vai perder seu trabalho.
Caso você queira, tenho outras recomendações de página de gifsets:
PAGE THEME: GIF PAGE 001
gif/icon page pack by autumn
GIF PAGE by fayechamberlins
LAZY LOADING GIF PACK PAGE THEME
FLOWERS FOR VASES ★ A GIF PACK PAGE BY FAKEHELPER
SUGAR ON THE RIM ★ A GIF PACK PAGE BY FAKEHELPER
Espero que tenha ajudado! Qualquer dúvida, só voltar aqui que tento explicar de novo!
13 notes
·
View notes
Text
Learn HTML Tags with WebTutor.dev: Your Ultimate Resource for Web Development Tutorials
HTML (Hypertext Markup Language) is the backbone of the web. It is the standard markup language used to create web pages. HTML consists of a series of tags that define the structure and content of a web page. In this blog post, we will dive deeper into HTML tags, what they are, and how they work.

HTML tags are the building blocks of a web page. They are used to define the structure and content of a web page. HTML tags are surrounded by angle brackets (<>) and are written in lowercase. There are two types of HTML tags: opening tags and closing tags. An opening tag is used to start a tag, and a closing tag is used to end it. For example, the opening tag for a paragraph is <p>, and the closing tag is </p>.
HTML tags can also have attributes, which provide additional information about the tag. Attributes are included in the opening tag and are written as name-value pairs. For example, the <img> tag is used to embed an image on a web page. The src attribute is used to specify the URL of the image. The alt attribute is used to provide a description of the image for users who cannot see it.
HTML tags can be used to define headings, paragraphs, links, images, lists, tables, forms, and more. Here are some examples of commonly used HTML tags:
<html>: Defines the document as an HTML document
<head>: Defines the head section of the document, which contains metadata such as the page title and links to external files
<title>: Defines the title of the document, which appears in the browser's title bar
<body>: Defines the body section of the document, which contains the content of the page
<h1> to <h6>: Defines HTML headings of different sizes, with <h1> being the largest and <h6> being the smallest
<p>: Defines a paragraph
<a>: Defines a hyperlink to another web page or a specific location on the same page
<img>: Defines an image to be displayed on the page
<ul> and <ol>: Defines unordered and ordered lists, respectively
<table>: Defines a table
<form>: Defines a form for user input
<br>: Inserts a line break
<hr>: Inserts a horizontal rule
<strong>: Defines text as important or emphasized
<em>: Defines text as emphasized
<blockquote>: Defines a block of quoted text
<cite>: Defines the title of a work, such as a book or movie
<code>: Defines a piece of code
<pre>: Defines preformatted text, which preserves spaces and line breaks
<sup> and <sub>: Defines superscript and subscript text, respectively
<div>: Defines a section of the page for grouping content
<span>: Defines a small section of text within a larger block of text for styling purposes
Learning HTML can seem daunting, but with the right resources, it can be easy and enjoyable. One such resource is WebTutor.dev, an online platform that provides tutorials on web development, including HTML. The tutorials are easy to follow and provide a hands-on learning experience. The platform also offers quizzes to test your knowledge and a community forum to connect with other learners and ask questions.
In conclusion, HTML tags are the building blocks of a web page. They define the structure and content of a web page and can be used to create headings, paragraphs, links, images, lists, tables, forms, and more. If you are interested in learning HTML, check out WebTutor.dev for easy-to-follow tutorials and a supportive community of learners.
#learn code#learn code for free#school of coding#introduction to coding#learn html#learn CSS#learn JavaScript#programming training courses#how to learn coding for free#best way to learn coding#how long does it take to learn coding#HTML tags for headings#HTML tags for paragraphs#HTML tags for images#HTML tags for links#HTML tags for lists#HTML tags for tables#HTML tags for forms#HTML tags for input fields#HTML tags for buttons#HTML tags for divs#HTML tags for spans#HTML tags for anchors#HTML tags for meta data#HTML tags for stylesheets#HTML tags for scripts#HTML tags for iframes#HTML tags for audio#HTML tags for video#HTML tags for semantic markup
2 notes
·
View notes
Note
mo, vc usa carrd ou docs para colocar a bio e as infos dos seus char? acho ruim q o carrd limita mt as coisas e o docs as vezes da ruim no mobile
Oiii!! Fui chamada de mo... será que somos casades?
Então, eu decidi fazer uma listinha de prós e contras de cada sistema que usei e depois eu faço meus comentários. VAI SER ENORME.
CARRD
Prós: altamente customizável, você tem toda a liberdade para criar, com uma gama legal de elementos free, bastante tutorial no youtube, carrega bem no desktop e no mobile, você pode editar pelo navegador do celular.
Contras: limite de 100 elementos por carrd, máximo de 3 carrds por conta, não tem como clonar modelos prontos, não tem salvamento automático.
GOOGLE DOCS:
Prós: ilimitado, altamente customizável, abre em qualquer dispositivo, tem app para celular que funciona bem, você pode copiar modelos prontos e tem muita gente que disponibiliza esses templates grátis (eu tenho essa tag, onde compilo os themes que encontro), salvamento automático.
Contras: templates construídos como colunas ou tabelas são ruins de visualizar no mobile, links grandes e não personalizáveis.
TUMBLR:
Prós: ilimitado, altamente customizável, tem bastante material disponível, funciona como tudo-em-um (pode colocar bio, cnn, POVs).
Contras: você precisa saber mexer um pouquinho com HTML para editar as páginas, a visualização do tumblr principal do mobile é a básica e você vai ter de fazer um mob nav ou um post fixo para os links, não possui salvamento automático.
NOTION
Prós: ilimitado, tudo em um, customizável com ressalvas, design limpo, tudo-em-um, boa visualização no mobile, você pode clonar um template inteiro, tem app para editar e você consegue adicionar widgets do spotify, por exemplo, possui salvamento automático.
Contras: poucos templates prontos para personagens (a @notxkahlo fez alguns, você pode conferir aqui e acho que ela está aceitando pedidos), a gama de cores é limitada, a interface é a mesma para todo mundo, o que vai mudar são os elementos e a estética que você escolhe, os links são grandes e você não consegue personalizar.

Agora, vamos a minha experiência com cada um, abaixo do corte:
Eu utilizei o carrd por meses, mas a desvantagem era o tempo que eu passava arrumando o bendito. A limitação de elementos me quebrava as pernas real. Caso queira utilizar carrd para hospedar os POVs e você acaba tendo de usar dois ou três carrds para um mesmo personagem ou contar com o suporte do docs.
Passada a desilusão com o carrd, migrei para o google docs, eu gostei bastante, acho que um bom template de docs pega o carrd de pau. Só que como você disse, se esse modelo é construído em colunas, fica ruim de ver no mobile, pelo menos no meu celular.
Já usei o tumblr algumas vezes, mas por causa do mobile, eu preferiria usar pages ao invés de um tumblr central. A grande vantagem do tumblr é que você pode fazer tudo em um lugar só! O central você posta os POV e faz uma página para a bio.
Agora vamos ao meu queridinho do momento: o Notion. A @notxkahlo fez um template para mim e utilizei em uma comunidade e hoje em dia eu não penso em voltar para nenhum dos outros sites, talvez o docs. No Notion eu consigo colocar todos os meus POV, fazer uma bio bonitinha com imagens e adicionar a playlist do personagem. O fato de ser meio limitado esteticamente não me incomoda, até prefiro o minimalismo.
28 notes
·
View notes
Photo
PARTE 2 — GUIA PARA O TUMBLR POR SALEMCER.
Continuando esse pequeno tutorial de introdução ao tumblr, seguimos para a parte 2! Aqui você vai aprender mais sobre os botões disponíveis no tumblr, alguns termos do rpg de tumblr e como jogar por essa plataforma maravilhosa.
Não esqueça de checar a parte 1 bem aqui antes de seguir para a parte 2.
Botões da dash.
Descendo a sua dashboard, vai perceber que cada post tem alguns botões no canto inferior direito e notas no canto inferior esquerdo. Você pode estar se perguntando… Pra que diabos serve isso? Bom, vamos lá.
O primeiro botão são os links. Clicando, algumas outras opções vão aparecer.
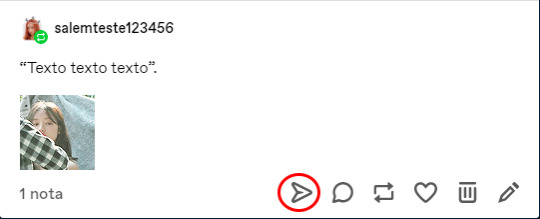
Copiar link: Copia o link do post original, se quiser mandar para alguém. Embed: Ignore isso. Facebook: Divulga seu post no facebook. Twitter: Divulga seu post no twitter.
Não é lá muito utilizado, mas checa esse print pra entender..
O segundo botão é o balão de fala, é onde você pode comentar um post, normalmente em OOC.

Todo mundo pode ver seu comentário no post clicando em “notas”. É assim que aparece quando clica no balão.
O terceiro botão é o reblog, que é explicado nesse mesmo post em “Como jogar no tumblr”. O quarto botão é a “curtida” equivalente a um “like” no twitter e instagram.

Os últimos dois botões só aparecem se for o post for seu. O lixo é para deletar a postagem e o lápis para editar.

Por último, as notas! É onde você checa os comentários feitos na sua postagem, reblogs, quem curtiu, é como um “atividade”, mas para um post específico.

Se você clicar, vai aparecer mais ou menos assim.
TERMOS.
Turno: Provavelmente conhecido por muitos. É aquele texto onde você descreve os pensamentos, ações, reações e falas do seu personagem.
Small: Um turno pequeno, menos cansativo. Normalmente usado para interações mais rápidas, você também descreve os pensamentos, ações, reações e falas do seu personagem, mas de forma resumida.
Starter: É basicamente um small, mas é aberto para que todo mundo possa responder. Você não combina isso com uma pessoa específica, só lança na dash e todos podem interagir. (Exemplo)
Starter call: Um post onde você oferece seu personagem para pequenos jogos/small/starter. Pode existir um limite, como um “up to 5”, onde você só posta starters com as 5 primeiras pessoas que curtirem sua call. Também existe a opção de postar o starter call com número limitado mas com as situações para que escolham, clique aqui para ver um exemplo. (Exemplo 1, exemplo 2 e exemplo 3)
Askgame: Uma brincadeira onde mandam e respondem asks com curiosidades sobre seus personagens ou starters. (Exemplo 1, exemplo 2)
Gif chat: Apesar do nome ser “gif chat”, não é obrigatório usar um gif, já que sabemos que alguns faceclaims não tem esse conteúdo. De toda forma, é um “starter” (com ação e fala ou só fala) com um gif do faceclaim demonstrando mais ou menos a expressão do seu personagem. Os gif chats acontecem com uma interação direta dos personagens, ou seja, pessoalmente. (Exemplo 1, exemplo 2 e exemplo 3)
Chat: É um bate-papo, um chat de sms, de kakaotalk, esse tipo de coisa! Não é algo que acontece pessoalmente, só virtualmente. (Exemplo)
DICAS
Como adicionar um gif a postagem.
Primeiro você precisa procurar um gif pack, essa parte pode ser meio chatinha porque alguns fc’s não tem conteúdo, mas devo lembrar que isso NÃO é obrigatório.
Você pode ir no google e pesquisar “Nome do fc gif icons” e vai aparecer algumas opções (Imagem) ou ir nas tags do tumblr (Imagem). Para pesquisar na tag é só colocar tumblr.com/tagged/fulana gif icons no navegador e soltar o enter.
Como deu pra ver, eu encontrei o meu pack da YooA, é só descer um pouco e clicar no link que tem em fonte (Imagem). Vai ver uma página inteira cheia de gifs e você pode escolher o que prefere usar, quando encontrar, salve o gif e vá na sua postagem/ask, clique em enter para ir pra próxima linha, quando fizer isso, vai aparecer essas opções e você só precisa clicar na câmera e depois no seu gif. Pronto, ele vai ser adicionado a postagem.


Esse processo do gif pode ser usado nas postagens (texto) ou respondendo asks!
Como decorar/formatar seu texto.
As formatações básicas são: negrito, itálico, traçado, tópicos, numerado, link e “citação”. Você pode encontrar todas as opções marcando a palavra/frase de interesse, como nesse gif.

Existe também a formatação por html, que eu, particularmente, não sou muito boa, no entanto, consigo mostrar como mudar a caixa e deixar sua fonte “menor”. Clicando na engrenagem, essas opções vão aparecer. Clicando em “Rich Text”, vão aparecer outras duas opções: HTML e Markdown. Clicando na opção que quer, ele muda a caixa. Mudei para html como exemplo e é assim que aparece.
Adicionando seu texto entre <small> e </small>, quando voltar ao rich text, ele vai estar menor. É visualmente mais bonito, mas menos acessível, então é bem opcional. Você consegue ver a diferença aqui.
Sobre as tags.
Opcional, mas ótimo para organizar melhor suas postagens, eu mesma adoro usar as tags em meus perfis para rpg.
Aqui tem um post com todas as minhas tags, que eu uso pra me “encontrar”. Quando eu clico na tag de selfparas, por exemplo, ao invés de ver todas as publicações do meu tumblr, eu vou ver só os meus selfparas, o que facilita demais se quero reler ou coisa do tipo.
As tags que normalmente usam no rpg de tumblr: starters, selfparas/povs, turnos, gif chats, asks, edits, musing. Eu adiciono mais algumas, como dá pra ver, enquanto outras pessoas não usam tag at all.
Como jogar no tumblr.
Salem, agora eu já sei como postar, mas como continua? Como eu jogo? Como eu respondo?
Vamos lá, pequeno gafanhoto, é facinho! Vou usar dois tumblrs meus pra exemplificar tudo, assim conseguem ver prints e entender melhor.
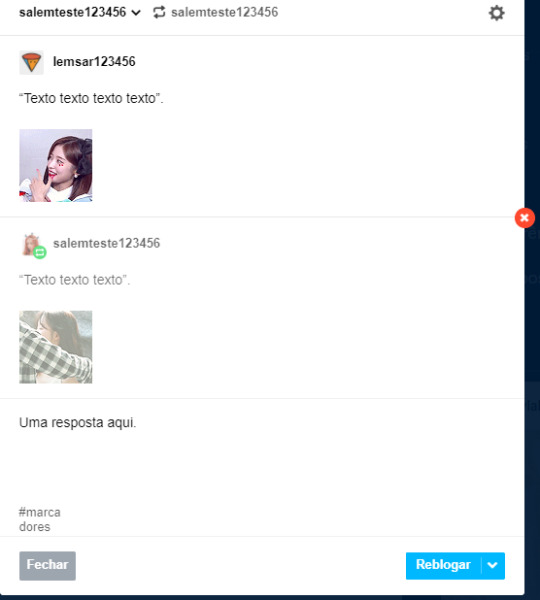
Personagem 1 posta algo e você vê na dashboard, para responder em IC, é só clicar em reblogar, no botão indicado no print.

Vai abrir essa caixinha e dai é só você colocar a sua resposta e clicar em reblogar (isso vai postar sua resposta na dashboard).

Pam! Apareceu logo a notificação no outro tumblr, dai é só abrir e responder de volta da mesma forma e por aí vai. As respostas são sempre por reblog. Olha aqui o post já feito.
Se as respostas forem muitas, você pode “apagar” do seu reblog as respostas anteriores, só pra não poluir a dash. Só passar o mouse por cima das respostas anteriores e clicar ali no x, pronto!
Isso tudo serve para gif chats, turnos, small, starter, etc.
Como seguir blogs.
Basicamente, você tem várias formas de fazer isso.
Entrando na url do blog: No navegador, coloque o blog que quer visitar (ex: salemcer.tumblr.com). Quando abrir, no canto superior direito, você clica em seguir e pronto. Alguns themes aparecem só com um símbolo de (+), só clicar e vai tá seguindo igual.
Pesquisando no tumblr: No canto superior esquerdo da dashboard, existe uma área de busca. Você pode pesquisar por imagens, tags e blogs. É só pesquisar o nome do blog e ele vai aparecer, então é só clicar em seguir.

Pelo mobile, se você abrir um blog, a opção de seguir aparece no canto superior direito.
Como enviar asks.
Na dash, quando você entra no perfil da pessoa, ao lado de seguir e do ícone do chat, tem três pontinhos, clique ali e a opção ask vai aparecer. Só escrever e enviar!

Quando falamos do computador e abrir o tumblr da pessoa, é só pesquisar onde está as asks nos links ou colocar no fim da url um /ask. Então é só escrever e enviar.
Ex: https://nomedotumblr.tumblr.com/ask
XKIT.
O abençoado XKIT é uma extensão do navegador que facilita (e muito) a vida de pessoas que usam o tumblr, e isso também envolve um tumblr de rpg! Antigamente usamos muito o xkit para colocar tags direto da nossa caixa de inbox, porque isso não era possível antes da última atualização do tumblr, no entanto, agora eu mesma uso só pra editar reblogs.
Vou reblogar um post e não quero apagar TODAS as respostas anteriores, só as mais antigas e manter a mais recente para não perder o raciocínio do turno, então, eu posso usar o xkit pra isso. Essa opção é a marcada no print, então é só clicar ali e os reblogs se tornam editáveis.
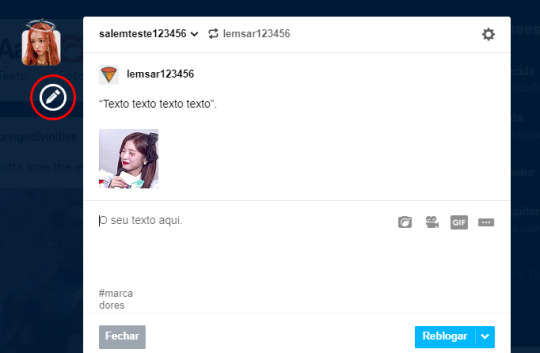
Eu posso simplesmente apagar a resposta da outra pessoa, assim deixando o post mais limpo. Isso não exclui a publicação da pessoa, só deixa seu reblog mais organizado e bonito.

Nesse post aqui tem algumas das funções dentro do xkit, não li tudo, mas pros curiosos pode ser interessante!
Aqui você encontra a extensão para baixar.
Várias contas, um email só.
Um hack legal no tumblr é esse: várias contas, um email só. Na realidade, são dois hacks, que vou apelidar de hack binnie e hack arin.
Hack binnie: A opção do tumblr, que não é realmente um hack, mas uma janela aberta para a criação de vários blogs em um. Clicando em Conta, perto do user do seu blog, tem a opção +Novo, clicando aí, você pode criar outro blog.
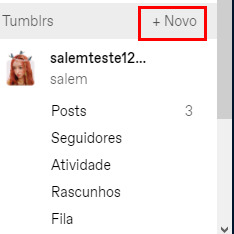
Você só vai precisar preencher uma outra url, título e provar que não é um robô, pronto.
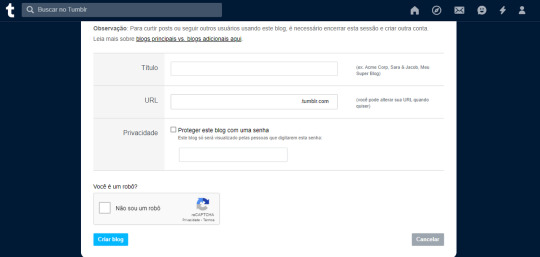
A parte ruim dessa opção é que você não tem uma “dash” pra esse segundo blog, você usa a normal e pra responder com ele, precisa alterar no reblog.

Hack arin: Aqui é um hack de verdade e eu adoro usar ele. Com um só email, você pode criar diversos blogs, só adicionando uma coisinha a cada letra.
Digamos que eu tenho um email chamado [email protected] e já tenho um tumblr com ele, mas quero criar outro do zero, sem ser um blog alternativo. Você vai em registrar um novo tumblr normalmente e só adiciona um ponto entre as letras, por exemplo: [email protected]. O email de confirmação vai ir pro seu email original, como se estivesse sem o ponto, mas vai criar um tumblr do zero. Uso muuuuuuuuuito esse hack pra jogar roleplay, facilita mil vezes a vida de players no tumblr.
Hack anony: Em homenagem ao anony que contou desse hack, o hack anony se trata da mesma coisa do hack arin, mas ao invés de usar ponto, você usa email original > + > palavra aleatória > @gmail.com. Se tenho o email [email protected], posso adicionar um + e uma palavra aleatória antes do @gmail.com, por exemplo: [email protected]. O email de confirmação vai parar na caixa de entrada do e-mail original, mas você vai ter criado outro blog do zero!
É isso até aqui! Você pode esperar a parte 3 com “como editar um theme” e checar a parte 1 com a introdução ao tumblr bem aqui. Vejo vocês na próxima. <3
47 notes
·
View notes