#every tutorial i find assumes i know all of the basics
Explore tagged Tumblr posts
Visit Tumblr Blog
Explore Tumblr blogs with no restrictions, modern design and the best experience.
Last Seen Tumblr Blogs


Fun Fact
Tumblr was created by web developers David Karp and Marco Arment.
Text
Also getting increasingly frustrated with digital art.....
#every tutorial i find assumes i know all of the basics#yeah ive heard of mutiply but where is it?#what does it do?#is it a preset color or does it need to be changed?#is there even a color element to it?#they click the buttons so fucking fast and their dash setup is different from mine#then they barely touch on the topic for 30 seconds and move on to something else#i can find 1000s of videos of comprehensive watercolor or alcohol marker tutorials#but NOTHING on the REAL BASICS of krita#UGH#mc og#idk man i feel like and idiot for not understanding this tool that eveyone seems to have such an excellent grasp on#i can barely understand how to make a sketch layer look good#doesnt help that my tablet is 10+ yrs old and a $30 piece of shit#but i cant justify buying a new tablet if i dont know how to use the program....
6 notes
·
View notes
Text
The art tutorials never cover the things that actually need tutorials (programming) (graphic design) (navigation) (resources) (terminology) (actually telling you the tool they used and how to use it in the first place)
#why is graphic design such an impenetrable fortress#why does every basics lesson assume you have already been working with and know the insides and outs of a programme for a decade#and know all the language#the tutorials exist but good luck finding them without already knowing everything about it#anyways the actual navigating of the programme is the hard part but apparently no tutorial ever made agrees with me#every time i try to learn a technique i get transported back to 2010 surrounded by tutorials on fire#and trying desperately to find someone who will tell me what luminosity is rather than just tell me to set it to x %
9 notes
·
View notes
Text


•°. *࿐ Simple yet full tutorial on how to manifest your dream life!
I will mention everything in this post! so if you comment something like “can i still manifest—“ or “how do i—“ it will be ignored! everything in this post goes by MY beliefs, you don’t have to change what you believe in! just understand these are what i’ve grown to believe/know. Enjoy the post! (also i’m not changing my theme i just think these colors go with topic i’m talking about. I WILL be a bit passive aggressive in this post so try not to get butt-hurt! i’m very straightforward with it.
╰┈➤ Step 1: Bury the old you for good. say goodbye to the old you.
are you the person who was, over-consuming information? couldn’t get off of tumblr because you assumed you needed to find more?, are you the person who keeps saying “i’m finally starting this time” just to get consumed by doubts and play the old story ONCE again?. are you the person who sobs in their room bed-rotting reading success stories so it can give you that “motivation”? oh but how you wish that were you? are you the person who keeps falling back into the old cycle?, are you the person who keeps thinking they need to be specific about their desires because you think if you aren’t “specific enough” you won’t fully get what you want? are you the person who keeps dwelling on the 3D for validation when they clearly know thats not what they’re supposed to do but continue it anyway? if you said yes ANY of this which i’m sure you did, then congratulations you made it to the right stop! because i’m here to burn that version of you. from now on you will become a better version of yourself, you WILL change self and you have absolutely no choice but to follow along with that fact. starting TODAY, THIS SECOND, NOW, NOW, NOW, NOW. you are no longer dwelling on the 3D, you are no longer the person who “just can’t do it”, you are no longer the person who “can’t manifest”. you are no longer the person who over-consumes. you are no longer the person who doom scrolls, you are no longer the person who isn’t trusting of themselves. YOU ARE NOW A CHANGED PERSON. you will promise to yourself RIGHT NOW that you will never dig up this old version of you again. you will promise to walk by faith and not by sight, you will promise to trust the unseen, you will promise yourself to win. burn and destroy the shovel that you’ve constantly used to dig your own grave that prevents you from success. you will win in this lifetime and the next and forever. your promise has been sealed, don’t break it.
╰┈➤ Step 2: Make your own rules in your reality.
if you understand, you know law of assumption is basically about making assumptions and you make assumptions EVERY-SINGLE-DAY 24/7. so use the law of assumption to your advantage and don’t feel guilty about it either because this is YOUR reality! nobody has a say in what rules you’re not supposed to have. make it fun for you. for example; You assume everything you do is the right way. then by LAW, BY LAW! everything you do is the right way, wether that be, making assumptions, persisting correctly, living in the end correctly, being in the wish fulfilled correctly. EVERYTHING YOU DO is the right way to do it because thats YOUR rule you decided to have. you wanna assume another rule? okay make it. decide thats your rule and live your life following those rules you make. you are LIMITLESS, don’t punish yourself because you make rules that maybe seen as crazy or too egoistic. this is your personal journey so don’t feel obligated to tell anyone you don’t wanna tell them. you are above everything. nothing exists outside of you.
╰┈➤ Step 3: Decide.
decide, decide, decide, decide, DECIDE. decide you have whatever it is that you want that you have it NOW. thats all you have to do to literally win. there really isn’t much about this topic because you decide every day. to get what you want is to simply decide you have it now. don’t say you don’t know how to decide because thats bs, you know how to decide you’re just scared you’re deciding the “wrong way”. hence to why i said “You assume everything you do is the right way. then by LAW, BY LAW! everything you do is the right way, wether that be, making assumptions, persisting correctly, living in the end correctly, being in the wish fulfilled correctly.” decide you make decisions the right way. and there’s literally no right way to make a decision but some of you are a bit dense (no shade!) but some of you need to have a feeling you’re doing something “right” so you can feel successful. please stop over complicating the simplest things. you’re grown so act like it, we shouldn’t have to keep spoon feeding you.
╰┈➤ Step 4: For the last final time surrender to imagination.
imagination is the only reality, it’s literally everything, the inner world (4D) is everything the outer world (3D) is just a reflection. in imagination you can be EVERYTHING if you wanna be the girl/guy who’s better than everyone at everything then you can be that in imagination, wanna be richer than elon? then you are in imagination, wanna have elsa’s powers? then you have it in imagination, wanna be a vampire? then you are in imagination, wanna switch lives with someone? then you’ve switched lives with someone in imagination. once you experience it in imagination then IT IS DONE. ITS MATERIALIZED, you’re not waiting for anything anymore because it already happened. all your focus goes to the 4D (imagination). i didn’t say ignore the 3D keep taking care of yourself but i just want you to understand your success is inevitable! once experienced in the inner world the OUTER WORLD, is automatically doing its job to reflect that for you. so why are you constantly getting mad at the 3D for doing its job? it reflects what you consistently put your awareness on it reflects what you claim to have in imagination, it reflects everything you make natural to yourself. a’lot of you are hellbent on trying to get results in the 3D. you have results already in the goddamn 4D. stop waiting for something you already have. its not coming. it’s already THERE. you HAVE it. creation is finished. so surrender to the 4D, fall in love with imagination. if you have it in imagination you have it now, nothing can take that away from yourself unless YOU say you don’t have it anymore. quit giving yourself mixed signals. this isn’t one of your situationships. this is YOU we’re talking about. don’t be a loser in your own reality.
╰┈➤ Summary.
this is your final push. you can manifest absolutely anything, you are not limited to anything, circumstances do not matter, THEY NEVER DID, always pay attention to what you tell yourself, you’re in control of everything. don’t withhold yourself from success, because if you won’t do in this reality you will never win. besides in that other reality you’re the worlds most handsome/beautiful person ever. you’re also on your 3rd world tour rn! and jeez are you rich, you made poor elon musk cry! must be nice being you in that other reality! identify with it. ⋆。゚☁︎。⋆。 ゚☾ ゚。⋆
#imagination creates reality#law of assumption#lawofassumption#manifesting#loa tumblr#permashifting#shiftblr#loablr#loassblog#neville goddard#void state#void
2K notes
·
View notes
Text
"Pick up" some Power Converters
“...no, what you want to do is to have most of the shipment be something innocuous – on every run. That way, even a random inspection probably won’t find anything. If you absolutely need to break that rule, still have some innocuous crates, but what you also want to do is to build up a friendship with the inspectors. Find out their routines if you can, and test out if you can bribe them to not bother looking – then you can aim the vital runs to be specifically with the people who you can bribe.”
“You’re sure that works?” Dodonna asked.
“Well, yeah,” Luke replied, with a shrug.
“Luke?” Leia called. “Luke?”
She leaned around the door. “How long have you been in here? We’ve been looking for you for twenty minutes.”
Luke frowned, then glanced down at his comlink. “Why didn’t you call me?”
“We don’t know your com code, kid,” Han provided. “You didn’t get around to telling us.”
Luke’s expression cleared.
“I have been going through Threepio if I need a com discussion,” he admitted. “I guess that’s not going to work if we’re staying with the Rebellion long term, though, I really should give you my com code-”
“Not now,” Leia objected. “What were you talking about, anyway?”
“He was giving us lessons,” Dodonna provided, indicating every single intel operative on Yavin IV and about half of the other Rebel Alliance techs sitting around.
“It’s basic stuff, right?” Luke asked. “I’m surprised you don’t know it.”
Leia frowned. “Lessons in what?” she asked. “Farming?”
“Well, sort of?” Luke replied. “Not moisture farming, not that bit, but the other stuff. I guess it’s helpful, and I’m glad to help!”
“What other stuff, then?” Han asked, leaning on the door, then got out of the way as Chewbacca made a questioning noise. “Right, sorry Chewie…”
“You know,” Luke said. “The basic stuff. Hiding stashes, underground hyperlanes, gun running, how to deflect attention from an enforcer without their realizing you’re doing it. Burning out slave collars, dead drops.”
He shrugged. “Farming.”
Leia blinked.
“That’s… not farming,” she said. “That sounds like a hostile-environment intelligence agent tutorial… how would you pass off vital information?”
“Let’s see…” Luke frowned. “One option – disguise it as something innocuous, while anyone would assume you’d hidden it in a much more complex way. Option two – copy it, send both versions by different routes or hide it in two different places. If you’re willing, get tortured, then crack under torture and give up one of them – that means they’ll believe they’ve got everything. Then another choice is to make it completely public, that’s a bit of a last-chance thing but if you make it completely public then everyone gets to see it including your intended recipient.”
He glanced up at her. “I guess you did the first one, gave up one location but they decided to keep looking for the other, and that’s what led them to R2? Or did you use one of the other methods? I could keep going.”
Leia shook her head.
“Okay, I’m convinced you know what you’re doing,” she said. “But how do you know all this stuff?”
“Do you not?” Luke replied, sounding slightly baffled. “This is boring stuff. Kid’s stuff, you’ve got to do it right but it’s a yawn fest. How does nobody have any ideas about it?”
“I know,” Han declared.
He pointed at Luke. “Farmboy, yes. Tatooine farmboy. The only thing that planet exports is crime.”
Luke looked momentarily offended.
“...yeah, I guess,” he agreed, relenting.
1K notes
·
View notes
Text
Apps we use as a system !

Simply plural!
Simply plural is a great app for Systems! it allows you to track who's fronting, add more in depth information about who's fronting, Sort headmates out into groups, it also has a chat function.
Negatives: whilst it is a great app! it is more ideal for Smaller to medium sized Systems or Systems that switch solidly or for longer periods of time, as a bigger system outself, we find it quite difficult to use Sometimes, as it can be difficult for us regrading having to get up and log things.
they are also supportive of endogenic "Systems" and their resources do contain misinformation.
Octocon!
octocon is very similar to simply plural!
you can add headmates, categorise them, it also has a bit directly in discord, so it could be easier for some systems to use! It also has a diary feature! we have less to say about this as we personally don't use it, but it could be helpful for other systems!, it is currently only on andriod but will be releasing on IOS late 2024/2025
we feel that the app is quite clunky and can be difficult to use, especially if your already using apps like simply plural.
they also have a limit on how many alters profiles you can create to "limit the amount of fakers" - to specify direct quote from the official octocon server linked on there website, “the alter limit is to basically protect against ddos attacks, without the limit someone could take up an unreasonable amount of the bots resources and crash it. theres no way to go past it, and nobody so far has gotten close to going past the alter limit as far as we know.” I heard the term fakers being thrown around, I also assume that by “fakers” they mean endo “systems” but still the tone is there and it rubs me the wrong way considering systems that have high high alter counts (such as ourselfs) :)
Notion!
Notion is a great app! we personally dont use it to track our system but we know many Systems that do! it can easily be used for tracking fronts, alters, giving alters journal pages etc! it's very easy to use for beginners and there are many tutorials on YouTube about it! It is also used by a alot of singlets too!
our only criticism is that it isn't built for Systems! So you would need to build it all yourself or use templates if that makes sense which we know for Some Systems could be a struggle!
Mindly
Mindly is a very easy to use app, which is commonly used for making innerworld maps! It's very simply to visualise and understand!
Our negatives for mindly are that there is a limit on how many maps you can make, if you are like us for example and have different layers in your system you wouldn't be able to make multiple maps for those layers, also it is very limited on how you can customise your bubbles, with only the colour, text and emoji
Fortelling
Fortelling is a great app! you can use it to create innerworld maps every easily! being able to include images and in-depth describes also!, we also use it to create split/fussion maps, and you can also use it similarly to Simply plural as you can add in depth information and also custom fields!
Anytype
Anytype is a good app for creating private journal pages for headmates!
It's a great way to allow alters there own private space to express themselves
Our negatives is that it can be quite confusing when you first start using the app, and it could get confusing if you are a bigger System
Twinote
we love twinote! it's such a fun way to communicate with your headmates! the app is very similar to twitter but it's completely private! alters can completely create there own profiles and communicate with each other very easily!, we also know singlets that use it for role playing also! :)
Daylio
We use daylio well daily! it's a great way to track things like switches or Symptoms eta very simply! we also use it for non system related things just like sleep, school, our mood etc!! It's been so helpful for us and our doctors!
We use daylio well daily! it's a great way to track things like switches or Symptoms eta very simply! we also use it for non system related things just like sleep, school, our mood etc!! It's been so helpful for us and our doctors!

#did system#endos dni#actually a system#anti endo#did stuff#anti endogenic#did osdd#traumagenic system#actually did#endos fuck off#didosdd#did education#system posting#system info#system blog#dissociative system
302 notes
·
View notes
Note
Hey, I was wondering if you had any starter tips for digital art? I'm a traditional artist and have been for years, but I was recently given a tablet and clip studio. I am having SUCH a hard time getting anything to look right: shaky lines, flat/too soft pieces, just an absolute childish mess every single time. I see all these gorgeous digital pieces and have NO IDEA how to get there.
Heya!
So, it's been a very very long time since I transitioned from traditional to digital art, but I DID do proper traditional for a few years; we're talking ink pens, color pencils, markers, watercolor, fancy papers, the works. I did some acrylic painting too but only monochrome (and before anyone asks, these works no longer exist so I can't share them) all that to say that I do have some experience with the former and definitely felt the learning curve when I changed to a tablet.
To get the unhelpful advice out of the way first: It's a different and unfamiliar medium, and there is probably nothing significant that you're "missing" about it except time and exploration. There are pillars to digital art just like there are in traditional art, but when it comes to personal process everyone has their quirks and habits - you gotta mess around and find what works for you. I suggest looking up tutorials and speedpaints on youtube even if you know all the basics or if the style you see doesn't appeal to you; just watching how others do their thing might help you figuring out how you would like to do yours!
Now, for the more practical advice:
-I don't know what kind of tablet you got, but assuming it's a non display, that's an extra hurdle you have to get over in developing the eye-hand coordination necessary to use it. This feels very alien at first but it shouldn't take longer than a few weeks to feel completely natural.
-On that note, if there is a significant size discrepancy between the tablet and the screen you are looking at, that might mess you up. Try adjusting the size of the CSP window so it fits the size of the actual drawing surface you are using more closely.
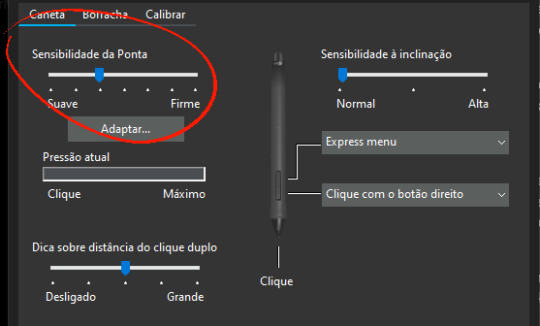
-Every drawing tablet's pen has pressure settings that can be tweaked to your liking, I for one always make it a little softer than the default.
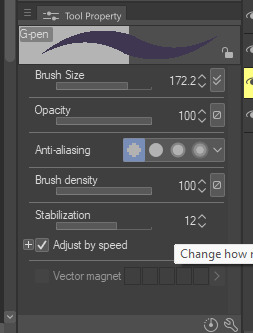
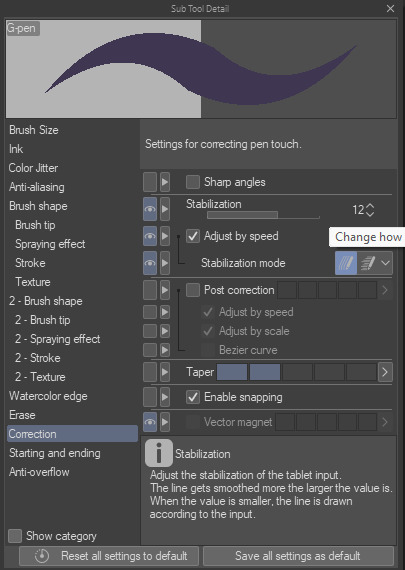
-BRUSH STABILIZATION! That's a setting every individual brush (and almost every tool, I believe) on CSP has. It does as advertised: stabilizes your brush strokes. A lot of people like this set between 8-20 depending on the brush, and it can make a huge difference to the way you draw.
It is usually always visible in the tool properties, but if not, you can toggle it on through the "sub tool details" menu by clicking the little wrench symbol on the bottom right.
Hopefully this has been helpful at all. Good luck!
208 notes
·
View notes
Note
hi i'm sorry to bother you but do you have any tips on giffing dark indoor scenes? yours always look so good!
hi there! not a bother at all :) i can definitely try to explain the steps i usually take under the cut!
this tutorial will assume that you already know the basic steps of gif-making — if you don't, there are lots of great tutorials floating around on this site that can help you out! :)
here's the gif i'll work with to explain my steps, the bottom being the original and the top being the coloured/brightened version.

before we start, a general tip i recommend keeping in mind: if you want to brighten a dark scene, you'll want to get your hands on the highest quality download you can find. 1080p is decent, but if your laptop can handle 2160p 4k hdr files* without sounding like it's about to explode, that'll get you even better results!
(*colouring hdr 4k files requires a different set of steps — the scene will appear washed-out on photoshop, so you need to make sure that you don't end up whitewashing anyone if you do choose to work with this type of file.)
since most of my downloads are 1080p, i'll use this type of file in this tutorial.
the first step of my gifmaking process with 1080p files is almost always the same no matter what scene i'm giffing. i make a brightness/contrast layer and set the blending mode to screen:

now my gif looks like this:

depending on the scene and how washed out it looks after this layer, i'll play around with the opacity. for this gif, i didn't touch the opacity at all. use your best judgement for this, because every scene is different!
i find that dark indoor scenes are usually tinted in yellow or green. one of my first goals is to try to fix the undertone of this scene before focusing on brightening it any further. i go to colour balance for this, and play around with the midtones, shadows, and highlights.
again, every scene is different, so the amount to which you use colour balance will differ, but for this specific scene, my goal was to neutralize the yellow. i focused particularly on the midtones and shadows of the colour balance layer, moving the scales to the opposite of the reds.


doing so will help with neutralizing the yellow. the only reason i moved the scales towards magenta and blue (therefore making it a bit more red than less) rather than green and yellow in shadows was because i wanted a darker contrast in the blacks. moving them to green and yellow made the overall scene more yellow since there were so many dark spots that shadows affected. (you'll see what i mean when you start experimenting with your own gif — this part of the process really just depends on your preferences!)
our gif might not look that much better yet, but it will soon! our best friend channel mixer is gonna help us out. for an in-depth post about how to use this adjustment layer, i recommend checking out this tutorial.
i'm someone who prefers to make more than one layer for the same adjustment layer for a reason i can't even explain (i just find that it helps me stay more organized). so don't think of this process like i can only use this layer once so i MUST fix it NOW. you can create multiple layers of the same adjustment layer, because every layer on top will affect the ones underneath it.
since my priority is getting rid of the yellow tint, i went to the Blue section of the channel mixer and increased it in all of the scales:

this step alone has helped us out so much, because look at our gif now!

not only does the background look less yellow, but so does izzy's skintone.
now i'm going to focus on trying to brighten the scene even more without destroying the quality. the levels layer can actually help out a lot with this.

the amount to which i move each toggle differs per scene, and i think experimenting depending on your gif works best for this layer.
side note: i prefer not to use the ink droppers on the side because the contrast in the result usually ends up feeling too strong for my preferences, but if you find that this works better for you, then go for it! basically, the first dropper with the black ink should be clicked before you select the darkest part of the scene that you can find, and vice versa for the third dropper with the white ink — click it, and then select the brightest part of your scene.
curves is the next layer that does fantastic work! unlike the levels layer, i do actually use the ink droppers for this. it's the same concept, with the first dropper being used on the darkest part of the scene, and the third dropper on the brightest.
try to think of curves as something that not only further brightens your scene, but also helps with the colour neutralizing process.
i grab the first dropper, then click the darkest parts of the gif that i can see. depending on the undertone of the blacks that you're clicking on, the tint of your gif might actually change significantly. this is why i prefer to click once, then undo the action if i don't like what it gives me. izzy's leather jacket was the sweet spot for this gif.
when i'm satisfied, i make another curves layer and use the third dropper to click the bright/white parts of the scene. for this gif in particular, the lights in the background were a good fit because they carried a yellow undertone — this meant that my curves layer actually helped to further neutralize the yellows in the scene as a whole!


(i manually dragged the curves graph upwards for the third dropper to make it brighter. i don't need to do this if the dropper does this for me automatically, but since the lights were pretty bright, it only changed the tone of the scene and didn't increase the brightness — hence the manual step.)
pat yourself on the back, because this is what our gif looks like now!

this is good, but it's not great — there's still just a bit too much yellow in the scene for my liking (sorry, i'm picky! :P)
i created another channel mixer layer and played with the toggles until i was satisfied:


ta-da! the gif as a whole is much less red/yellow now:

this is when i start fixing the colouring now — namely, his skin tone. selective colour will be your best friend here. i wanted to make his face just a tad brighter and less of a yellow-ish magenta shade, so i focused on the reds and yellows.


then, out of habit, i created another selective colour layer and took out more of the "yellow" in the whites to make them whiter, and increased the black (just by +1, since the contrast is pretty good enough already).


note: i switched to "absolute" for these two colours. basically, relative = less vibrant colour manipulation, and absolute = more vibrant/stronger colour manipulation. i prefer to stick to "relative" for fixing skin-tone since "absolute" can be a bit too strong for that.
our gif looks like this now!

his face looks brighter and much less yellow, so i'm satisfied!
this next step is not mandatory at all — again, i'm just picky and despise yellow-tinted scenes. i personally believe that indoor scenes that are yellow/green tinted make them look more dark than they actually are, so i do my best to get rid of these colours.
i also don't always do this, but for this gif, i just simply went to hue/saturation, selected the yellows from the drop-down menu and decreased its saturation.

be careful not to do this too much. depending on the quality of your download, this can significantly decrease your gif quality. i tend to worry less about this when i'm working with 2160p files, but again, those files require an entirely different set of steps when it comes to brightening/colouring.
since this was a 1080p file download (and one that was actually less than 1GB, oops, don't do that), i played it safe and decreased it by -39 only.
note: you also want to be cautious of colour-washing skintone when it comes to this step. i find that another selective colour layer can help perfect the skintone in case the yellow drains out of it too much, but skip the hue/saturation step if it's too difficult to work with — better to be safe than sorry.
anyway, this is the final gif!

that's usually what i do when it comes to colouring dark indoor scenes! i hope this tutorial makes sense, and if you have any further questions, don't hesitate to reach out! :)
#tutorial#gif tutorial#resources#completeresources#coloring tutorial#allresources#dailyresources#userraffa#userdean#uservivaldi#alielook#usercats#usermoonchild#usernaureen#userbarrow#userabs#useraish#useralison#userisaiah#*mytutorials#i am so sorry if this is incoherent#it’s so hard to explain things coherently 😫
752 notes
·
View notes
Text
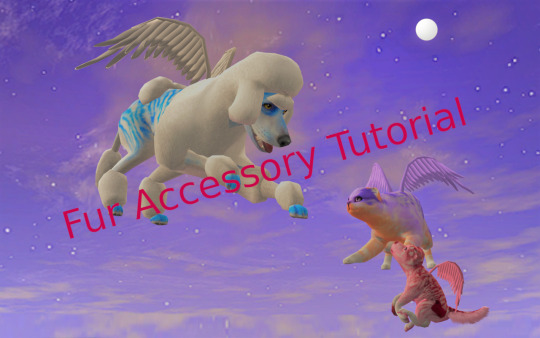
Custom Fur Accessory Tutorial
I have been meaning to put this together for a loooonnnng time, but as there is still a lot of information about the process that is undiscovered, I held off. I didn't have the energy to deep dive and solve those mysteries either, so I just kept delaying and delaying. The circle of procrastination in progress!
It's long overdue though, and even though the mysteries still remain, I am sure there are others eager for even the partial scoop of knowledge I've managed to glean. And also thanks @angelapleasant for helping re-motivate me! I appreciate the patience as I worked through to remember all the steps.
This assumes you already know the main basics of making a mesh and using SimPE, so I won't go over every excruciating detail for this. I personally will be using a cat mesh for this tutorial, but the method is the same for dogs as well (they just have way more meshes/resources).
Tools: SimPE, a mesh editor such as MilkShape, and a photoeditor. I also put together some Custom Pet Genetics Resources, which includes everything pet related I've ever utilized when making pet cc. Everything is separated by cats or dogs, and then sorted even further. For this tutorial, I will be making a cat item, so the resources I'm using will be from there. If you're making an item for dogs, just follow the same steps but using the dog equivalent of each resource instead. I tried to make it organized, but it's probably still messy.
Step 1 - Slaved Vs Recolorable: There are two types of Fur Accessories: slaved and recolorable. I will only go over the process for slaved furcards, but the process for recolorable is pretty much the same except at one part.
• Slaved are my personal favorite fur accessories; they grab their color from that of the pet’s coat color. They don’t require any recolors, just one simple package and they’re all done. The only downside is that they don't have their own textures. Examples of slaved furcards are the furry belly fluff on cats and dogs.
• Recolorable is by far the most tedious of all versions, as it requires an additional recolor of the accessory to be made for every single fur color, and any fur colors that don’t have a recolor made for them will default to white. Do yourself a favor and avoid recolorable accessory furs at all costs. Examples of recolorable furcards are dog beards, dog eyebrows, and poodle fluff.
Step 2 - Make the Mesh: Open MilkShape and import "bodyfurcards.5gd" from the zMeshResources folder.* There's 5 groups, don't delete any, just make your mesh on one of the group layers already available. I, personally, put my meshes on the bodyfurcards7 group.

After you've made your mesh, map the textures to "fubodyaccflowingfurcardREMAKE.png" in the zMaterialDefinitions folder. This is from my AccFurCardsTextureOct2018.package, which is a default replacement of Maxis' original body furcard texture. It adds a square in the corner (for the dog equivalent, it adds a teeny tiny rectangle near where the eye texture normally is).
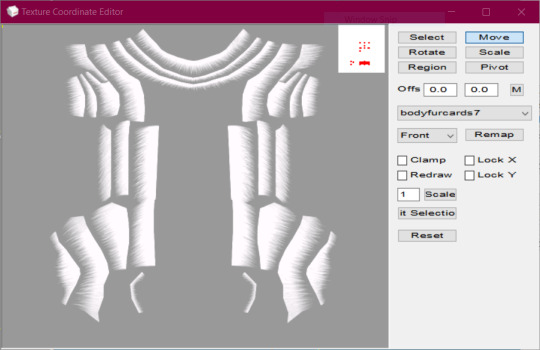
Once you're satisfied with the mapping, then make sure all the comments and joints are correct, and export. As a fair warning, pet weights are super weird, so your mesh might wind up with some strange issues such as morphing or floating.
*There is also a facefurcards version, but my attempts to use that one for custom fur accessories have been unsuccessful. I included it if anyone else wanted to try their hand at it.
Step 3 - Make the Mesh Package: In the zMeshResource folder find the BodyFlowingFurCardsMesh package. Open it in SimPE, Fix Integrity, then Save As under a new name. Then replace the GMDC with your exported Milkshape mesh, and save. Or don't, if you prefer a different way of mesh making. The TRULY important part is the Shape (shpe) file. Click it and make sure it has the correct number of parts in Plugin view. BodyFlowing (Cat) for example has 5 groups, so it should look like this:

Make sure the new mesh is in your Downloads folder, if you haven't already put it there.
Step 4 - Make An Accessory: Open up Bodyshop and make a brand new accessory. To make it easier on yourself, I would suggest choosing an accessory that has only 1 or 2 ages or genders. One age group if you are making a mesh for only adult cats, two if it will be for cats and kittens, etc. That way you won't need to delete unneeded overlays and other resources from the package.
Other than the number of ages, don't worry about anything else. Immediately import the accessory project into Bodyshop, and then close the program.
Step 5 - Clean Out Unneeded Textures: Inside your SavedSims folder should be the new accessory package you just made. Open it, and delete all the Material Definitions (TXMT) and Texture Images (TXTR). The only exception would be if you're making Recolorable Fur Accessories, then skip this step instead and skip step 6 as well. For the Recolorables' case, here is where you would import your recolor. Remember, each fur coat color will require their own recolors of your mesh, which means you will need to make a new accessory in bodyshop for every single fur color.
Step 6 - Link To Furcard Material Definition: Click on the 3IDR resources and let them load. Pick 3IDR, if it has a Resource Node and a Shape listed in the plugin view, perfect. Find the first available material definition line, and change it to the appropriate File type - SubType/Class ID - Group - Instance and delete any material definition lines underneath it.
0x49596978 - 0x08CCE154 - 0x1C0532FA - 0xFF7FC524
It's the same for both cats and dogs for some reason. I also included the "FUBodyAccFlowingFurcards.5tm.xml" in the MaterialDefinitions folder, if you prefer the package method. Repeat for additional 3IDR that have material definitions, ignore 3IDR that don't.
Step 7 - Link Accessory Package to Mesh: If you already know how to link, feel free to jump ahead. While still on the the 3IDRs, pick one that has a Resource Node and a Shape listed in the plugin view. Memorize the chosen 3IDR's instance. I picked the one with an instance of 0x00000801, which is usually the instance for adult female accessories. Click on Tools>PJSE>Body Mesh Tool>Linking Stage. Then select the mesh you made in step 3. Click on any other resource available, then save.
Step 8 - Edit Overlay XML: Click on the XMOL with the same instance as the 3IDR from step 7. As a reminder, I picked the adult female instance of 0x00000801 for this tutorial. Find the family string value, and copy it with ctrl+c and make sure you put it somewhere you won't lose it.
From there, right-click the XMOL and select "replace", then select the "XMOLReference.xmol.xmol" in the main folder. Paste the family value you copied earlier into the new XMOL, then save.
Click on the XMOL again and change the values of any lines necessary. For the Species line use 8 (cats), 2 (big dogs), 4 (little dogs), or 6 (big & little dogs, AKA puppies). For the Gender line use 3 (unisex). For the Age line use 18 (adults & elders), or 20 (kittens/puppies). The Parts line should be 8 or 2 (use 2 for meshes that need to morph and move with the pet's body/face, like the face fur cards). The Category line should be 7, but if they aren't then fix them. Delete the Outfit and Priority line, if they haven't been already. Override0subset needs to say bodyfurcards.
Step 9 - Choose A SubtypexBin: The most frustrating part about pet cc is that they have big limitations. For example, pets can only wear one "collar", and only a small number of custom fur accessories are allowed to be worn at once. You can have as many fur accessories as you want in the game, but if any two fur accessories share the same subtype and bin combo, then they can’t be used together at the same time. Pets can have a total of 10 fur accessories without conflict, but once you exceed 10 eventually some will have to use the same SubtypeXBin combo and thus be unusable together.
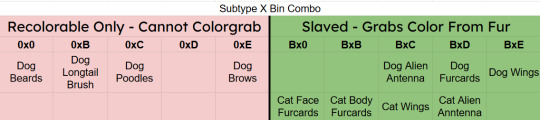
In the XMOL, change the Subtype line to B, if you're making a Slaved Fur Accessory*. If you're making a Recolorable one instead, use 0 as your subtype. Then change your Bin to either 0, B, C, D, or E. Now save.
Depending on your project, I might even suggest you choose a slot already filled instead of a free slot. For example, if you are making a wing accessory then choose BxC (BxE for dogs), or a head accessory that would look terrible with antenna then choose BxD (BxC for dogs), etc.
*There is a way to trick the game into allowing slaved fur accessories to use the 0 subtype. It involves loading the game with the fur accessory as a normal B subtype first, and then changing the subtype after. The game will then use the "old" version of the accessory, but with the subtype permissions of the "new" version.
Step 10 - Repeat Steps 6-9 For Additional Ages/Species: As it says, if you plan on making versions for kittens/big dogs/little dogs/puppies/etc. Have all of them share the same family, so that way they are all connected and can be passed down to offspring.
At the end, each XMOL should roughly resemble this, but with whatever their appropriate values are:

Don't forget to make sure the override0resourcekeyidx is correct for whatever line the material definition is in the 3IDR! ("4" means the 5th line, etc. The first line is number "0", so count the lines then minus 1.)
Step 11 - Delete Cache/Thumbnails/Registry: To quote @angelapleasant who worded it perfectly, pet cc is sticky. The game frequently gets stuck on old versions, and has to be forcibly updated. This stickiness is exactly yeah the subtype loophole mentioned earlier exists, but it can be very frustrating when testing new cc. In your game folder delete the Accessory.cache, Group.cache, cigen.package, ContentRegistry, and Thumbnails folder. Make sure AccFurCardsTextureOct2018.package is in your Downloads folder. Then load up the game, and check out your custom fur accessory.

If it all worked out, congrats! For Dogs if you mapped onto the tiny rectangle, then slaved fur accessory will appear gold with Maxis fur colors but custom colors will work just fine. Recolorable dog accessories on the other hand will require my MaxisAccFurDogFix to work.
I think that's everything, and good luck! Feel free to ask questions or reach out, I'll do my best to help. And if you do wind up making something, please let me know; I love seeing what people create!
102 notes
·
View notes
Text
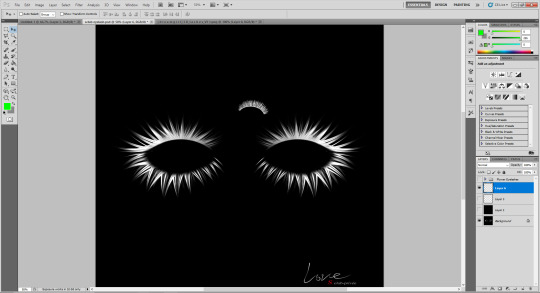
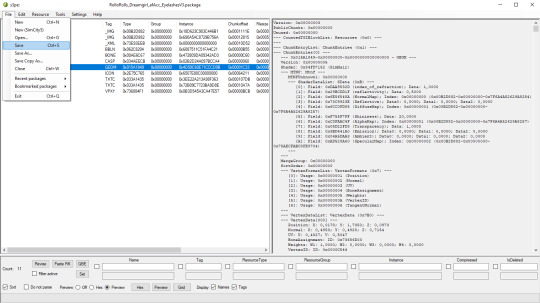
How To Convert Eyelashes
I was asked to make a tutorial on converting eyelashes. Well, here it is. Dirty, badly explained tutorial by Rollo. I'm assuming you know how to work with required programs, it won't teach you the basics, just a process of converting eyelashes from ts4 to ts3.
Requirements:
S4Studio
s3pe
TSR Workshop
Sims 3 Pack Multi-Extracter
These files (full credit goes to @gruesim)
Graphical program that works with .dds files
Let's go:
Open the desired lashes in S4Studio. Export diffuse of the ones you want to convert (you only need the black ones). You can also export the thumbnail. Close the program.
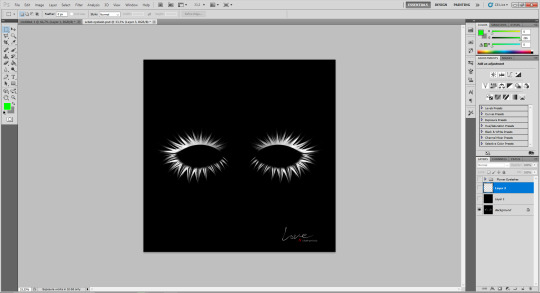
2. Unzip the folder that you downloaded from this tutorial. You will find a .dds files called "sclub eyelash". Open it up in the graphical program. Make a black layer above it and hide it for now.

3. Now open up your ts4 eyelashes file. Start from the upper eyelash, crop it and go to the sclub eyelash.
4. Paste it, click ctrl+i, it will make ts4 eyelash white.

5. This is the worst part. You have to make the ts4 eyelash fit to the sclub one as close as possible. Use every method possible!
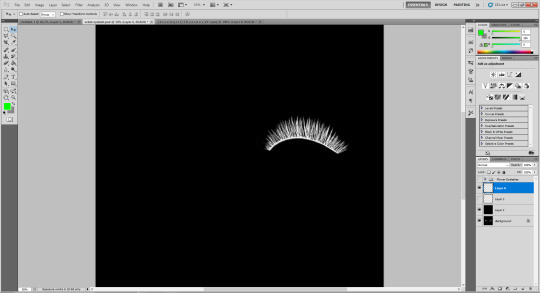
6. Unhide the black layer and see if your eyelash look alright. It may need some sharpening.
7. Now crop the bottom eyelash and follow the exact same steps as for the upper eyelash.
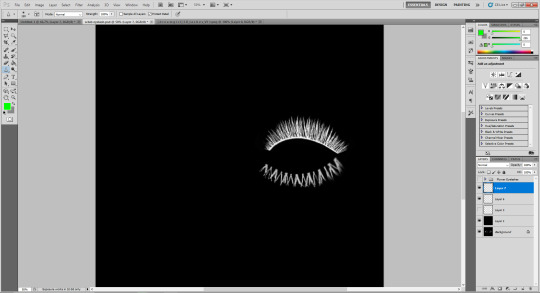
8. It should look more or less like this. Bottom eyelashes are always harder to adjust and may need even more sharpening.

9. Merge your upper and bottom eyelashes, duplicate the layer. Click ctrl+a, ctrl+t, then right mouse button and choose "Flip Horizontal".

10. Voila. You should have a complete set of your new shiny eyelashes! Save them as .dds. You can close the program. We're moving to TSR Workshop.
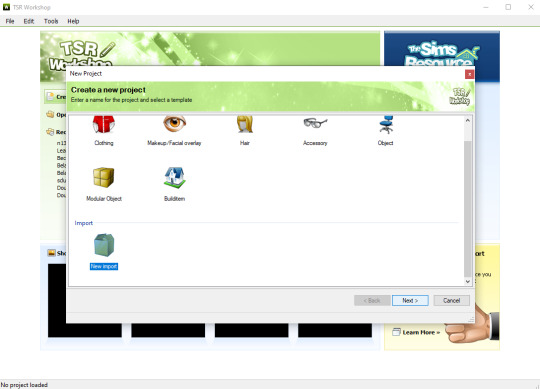
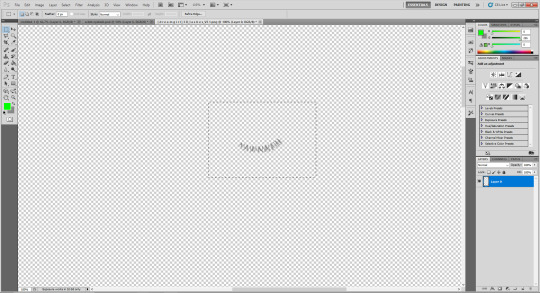
11. New Project -> New Import. Import Eyelashes AFBase from the downloaded folder.

12. Name your project, name your file and click "Next".

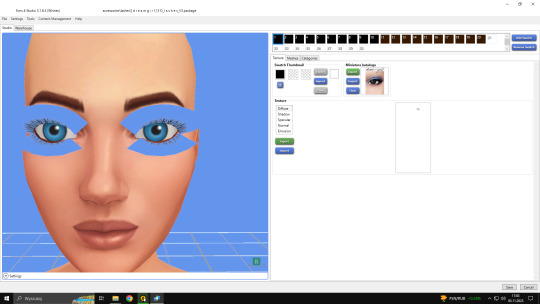
13. You should see this. Go to Texture tab and click "Edit" on the Transparency Map.
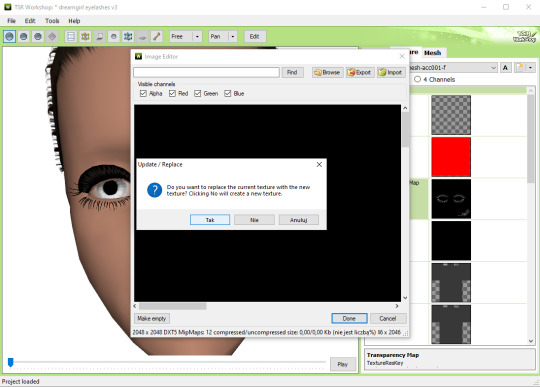
14. Import your eyelashes and click "Yes" when asked.
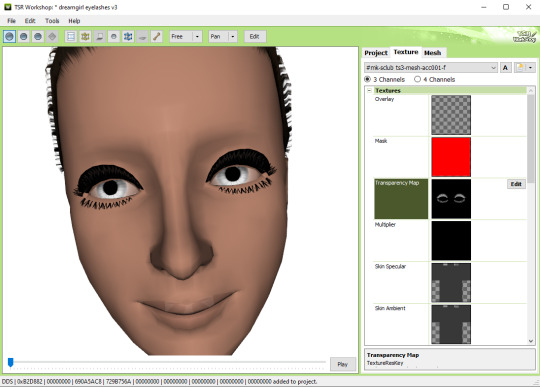
15. You should see your lashes, yay! But this is TSRW, they won't look exactly the same in game, as they look here. If you want a set of eyelashes, add more presets.
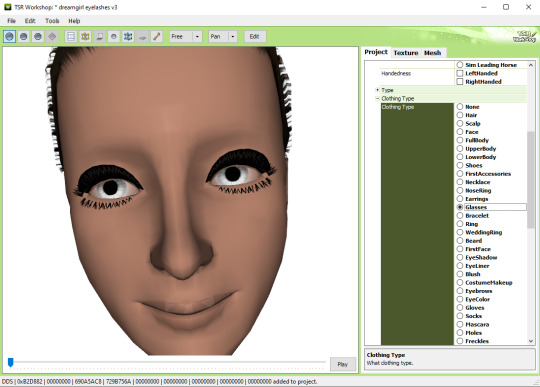
16. Now this is important. If you want to see your eyelashes in Accessories, go to Project tab, Clothing Type and change it from eyeliner to glasses. You also have to do this if you have more than one preset in one file. They won't show up in Eyeliner section. If you want to have set of eyelashes in Eyeliner category, you have to make each preset into seperate file. Also, eyelashes are recolorable ONLY in Accessories section. Don't forget to check Categories section to see which outfit has the eyelashes available.
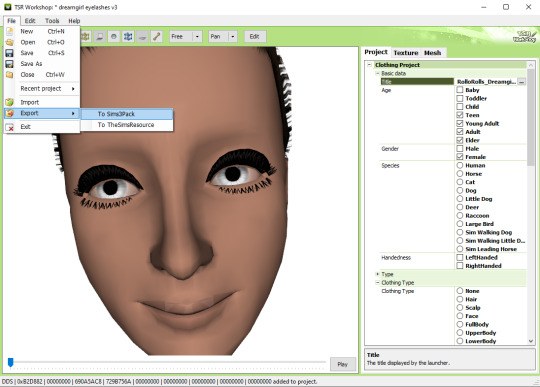
17. Now you're ready to export your file! Export -> To Sims3Pack. Use the Sims 3 Pack Multi-Extracter to convert your sims3pack to package file. We're moving to s3pe.
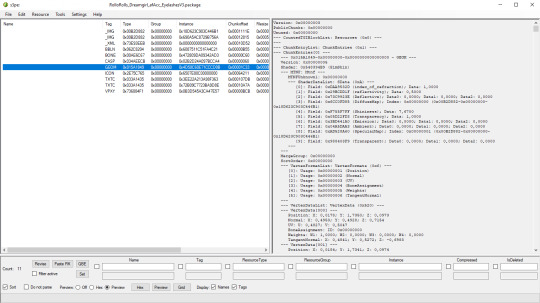
18. THESE STEPS ARE ESSENTIAL! Open up your shiny new package in s3pe. Click on the GEOM with the right mouse button.

19. Click Replace and choose AUID.simgeom from the downloaded folder. AUID is for adults, CUID for kids and PUID for toddlers. We have one more step to do.
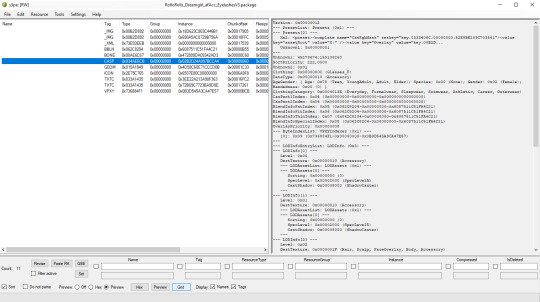
20. Now click on the CASP normally (left mouse button) and click Grid on the bottom of the program.
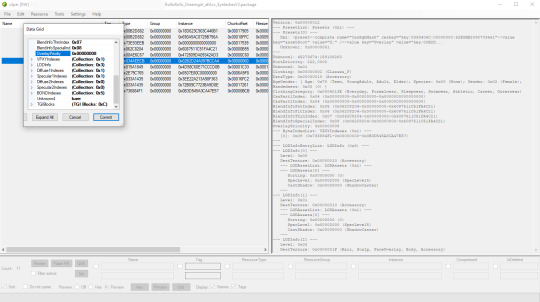
21. A small pop up window appears. Scroll to the very bottom and find a line called OverlayPriority.

22. Change the 8 to 2. This will make eyelashes not being visible through hair that's covering eyes.
23. Save your package. You're ready to test your converted eyelashes in game!

Here they are. Nothing fancy, it was a quick conversion :D They're also compatible with S-Club eyelash sliders ^^
Btw, you don't necessarily have to convert both upper and bottom eyelashes. You can have upper or bottom only. Play with the lenght, not all eyelashes have to be very long. Convert it for males, kids, toddlers. You just have to remember to change the options in TSRW and replace the correct .simgeom file in s3pe. There is a lot of possibilities and you'll probably get better in this than me :D
Good luck! ♥
207 notes
·
View notes
Text
How to make a UI Emotion Pose Override
I figured I'd explain how I made the UI Emotions pose overrides for Sims 4. This guide assumes you know how to make a pose and know Blender basics, it just explains how you find the relevant files to override and other little bits. I did search and couldn't find a tutorial for this, but maybe I didn't look hard enough. These aren't too tricky to make, and also for me make a pretty big difference in not having to look at EA animations / poses as much, haha.
You will need Blender, Sims 4 Studio and MCCC for easily achieving the relevant moods for testing.

Go to Animation > Override on Sims 4. Click the Animation button.

Type in ui_mood_ into the search bar and it will bring up all of the mood UI poses, the ones that appear in the bottom left of the screen. a_ui is the Adult poses, c_ui is Child poses. There's also i_ui which I assume is Infant, and p_ui which is Toddler. We'll edit an adult UI pose for this.
Some of them have different names to in-game: Depression - Very Sad, Elated - Very Happy, Fearless - Very Confident, In the Zone - Very Focused, Miserable - Very Uncomfortable, Pumped - Very Energised, Frustrated - Very Tense, Passionate - Very Flirty, Imaginative - Very Inspired.

This is an example from the Sims Wiki, even though this doesn't look too exaggerated on this particular example, I always thought this expression seemed a bit too cheery for some of the small things Sims get +1 happy about. (Hey, if we can't be happy then neither can any of our pixel dolls.) So let's find the one labelled 'happy' a_ui_mood_happy_x and open it. Leave the dropdown as Adult Female, then click Export and save the .blend file.
Open it in Blender, and then press 5 on the NumPad to set it to Ortho view. Now you have to try and move the view around to get the 3d viewpoint as close as possible to the rough viewpoint of the appearance of the emotion in-game. Use a screenshot of the Emotion as reference.

Once you have a similar enough viewpoint (this is more or less at the same angle as the UI pose), then make sure you Save and I recommend naming this file 'BASE' or something. This way, if you want to make more than one emotion override for the different emotions. Saves having to find the correct 'view' for every exported pose. Now it's time to make your pose!
Limitations to bear in mind: - You can't have anything that is too far forwards, like a hand reaching forward or something or it will cut off those parts (I tried a pose with the hands facing right the way forward for the 'possessed' emotion for a kind of 'grabbing at the viewer' effect, and they just are invisible if you do that) and you have to keep the arms relatively close to the body or they will also be cut off in-game if they are out to the sides too much.

This is the one I made, which is much more subtle and more suitably 'normal happy'. This tutorial assumes you know how to make a pose, so LocRot and lock in the pose on the 0th frame. Save, then go back to Sims 4 Studio, Import on the same screen you Exported the .blend on, import the new pose .blend file, then Save. Then put the .package in your Mods folder.
After that, you need to go to My Documents / Electronic Arts / The Sims 4 (or your equivalent on your computer). In this folder you'll see a file called localthumbcache.package. Delete it, otherwise you won't see your new pose in-game since it stores the emotion thumbnails.
Once you've done that, boot the game. With MCCC, if you shift-click a Sim it should give you an option to Cheat Emotions if you need to (you can use these multiple times to get the level of emotion you need depending on what Emotions you've made overrides for) to test how it looks in-game.


The top left is the new, more subtle Happy pose which I greatly prefer. The rest are examples of other poses that are part of my (free) UI Pose Overrides. The 'Very Happy' gives you an idea of the space you have and where the 'cut-off' points are.
You can easily take the overrides out without issues as well if you change your mind or want to try out new ones, you just need to delete the 'localthumbcache' package each time you add or delete a pose override so it can 'reset' the portrait images and show the right poses.
#freezerbnuuy#the sims 4 tutorial#sims 4 pose tutorial#sims 4 tutorial#sims 4 cc tutorial#ts4 tutorial
18 notes
·
View notes
Note
Hello, I want to ask you a stupid question? I want to know if I can ask tutorial on how to make multiple gifs in one? Here example: periodedits/tumblr/com/post/673464243167920128/15k-celebration-make-us-choose
hi there! that's not a stupid question at all (and even if it were, i'd still be happy to help) 💙 below the cut, i'll walk you through how to make something like you linked, with multiple shots in one gif:

We're putting two (or more) shots or scenes together in sequence into one gif, so that's how we'll start. I'm assuming a basic understanding on how to make gifs (if not, check the beginner tutorials tag on @gifmakerresource, the resource blog I run), so we begin by making each gif separately.
When putting multiple gifs together like this, it's important to be mindful of the number of frames you'll end up with. I tend to think it looks best if each scene is the same amount of frames, probably somewhere between 25-40 per gif, though it depends on the dimensions you're using as well. Don't sweat if they're not identical, but the closer they are, the better it'll look -- as opposed to one gif only being 10 frames and the other being 40.
So, create each gif separately. You may choose to sharpen and then color (which I believe is the more popular way, but you can always do it vice versa as well. You also might want to color once both gifs are together, but when I do something like this, I prefer to have everything completely finished before I put them both together. Here are my two sharpened and colored gifs:


Each gif needs to be the same dimensions as well. These are 540px x 500 px.
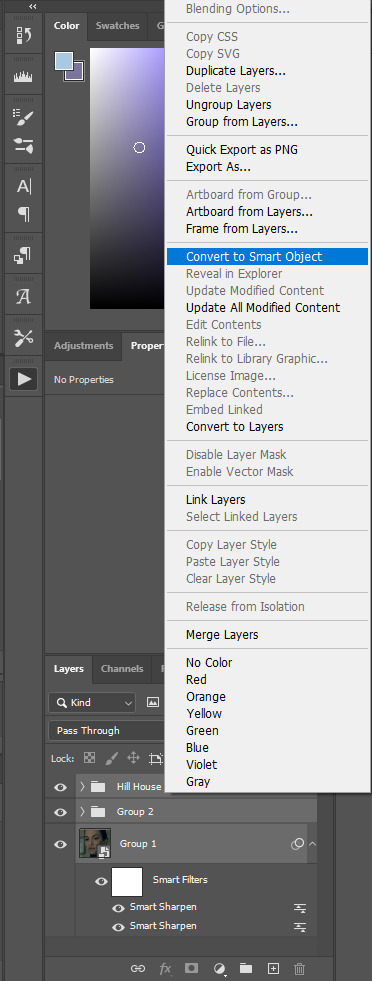
Assuming your gifs are complete, I find it easiest to convert them both to a smart object. To do this, highlight all the layers in your layers panel (shown below) and right click on one of them and select "convert to smart object." For this to work, you do already need to be using timeline animation, not frame animation. You can learn more about that in the beginner tutorials I linked above.
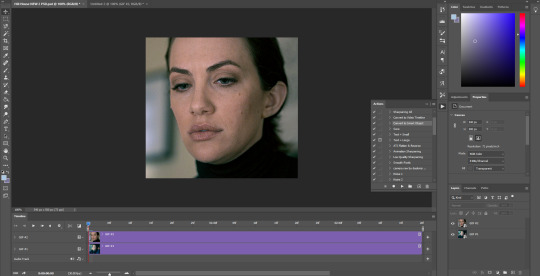
Once both gifs are smart objects, they'll be comprised of only one layer each, thus making them easier to work with and transfer. Now we want to bring gif #2 onto gif #1's canvas. As long as you're working with smart objects, it's as simple as copy (ctrl+c) and pasting (ctrl+p). Copy gif #2, click on gif #1's tab and then paste. This should also properly align the layers. If it doesn't for some reason, you can either use the move tool (v) or the transform tool (ctrl+t) and click and drag until they're aligned properly. This is what you should see now:
Gif #2 is currently on top of gif #1 in both the timeline and layers panel. If we were to save this gif, they're not going to play sequentially, but rather at the same time and only the top layer will be visible. To make one play after the other, we're going to drag gif #2 AFTER gif #1 in the timeline like so:
We're just clicking and dragging on that top layer and bringing it down to the same line as gif #1 and after it. What I'm doing at the end gets a little cut off, so this is what I'm showing in order to make the timeline smaller so we can see the whole gif. I don't like having to scroll to see it all, but this is just personal preference.
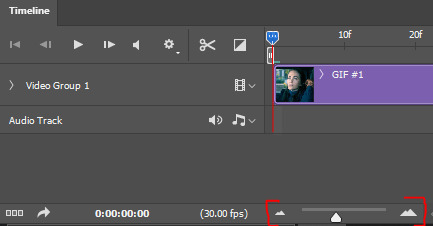
Dragging that slider to the left makes the timeline smaller and dragging it to the right makes it larger, which is great when you're working with detailed stuff like keyframes.
And that's literally all there is to it! You can now save your gif! Here are my save settings that I use for literally every single gif I make:

The size limit for uploading a gif to tumblr is 10mb, so at a total of 80 frames (40 each), my gif is too large. In this case, I'm okay with deleting some layers from each, but a tool I use a lot if I don't want to lose frames is ezgif's optimizer. when i tell you this website is a literal lifesaver! you select your gif, wait for it to upload, and then i always choose the first option, lossy gif. You may have to play around with the compression level to get the desired size and quality, though. At compression level 100, my gif is only 5.8mb, but it's pretty noisy. I don't always mind noise (in fact, I add it to my gifs fairly often), but in this case, we have a lot of wiggle room. I played around a bit and found that at compression level 35, my gif still looks nice and comes in at 9.4mb. Right-click and save your gif from here and then upload it to tumblr just like normal!
First gif is using ezgif compression and second is the original gif, just with frames deleted. I ended up having to take off 14 frames in total, 7 from each gif, to come in at 9.5mb. You can decide which method you think looks better!

In this case, I like the 2nd one better as it's less noisy, but it all comes down to personal preference! From here, you can learn cool stuff like transition effects!
I hope this was helpful, but if you have any additional questions, feel free to ask!
#answered#Anonymous#my tutorials#gif tutorial#gifmakerresource#dailyresources#completeresources#chaoticresources
17 notes
·
View notes
Text
Tribe Nine status update: Chapter 1 complete; Chapter 2 is NOT underway.
While the rest of the TooKyo Games/Kodaka/Post(?)-Danganronpa fandom is wrapped up in the demo and hype for The Hundred Line, I remain fixated on Tribe Nine. So this is more-or-less my follow-up to my first impressions post.
Despite its less-than-appealing roots as a mobile game with some gatcha elements, I'm still finding it to be quite good as a game in its own right. It doesn't flood you with a boring open world full of 20,000 objectives around every corner like some other gachas I've tried (Genshin Impact, Infinity Nikki), nor is it a glorified visual novel with just basic RPG combat added like other gachas I've quite enjoyed (Magia Record, Fate/Grand Order). Once you get past the tutorializing, Tribe Nine is an actual game with lots of legit gameplay exploration/combat routine—but there's still a lot of story pinning it down.
First off: The Steam version is finally playing smoothly! After a difficult process, I eventually got my Steam and IOS Tribe Nine accounts linked together. Now I can keep my progress rolling on my Steam Deck, and I MUCH prefer playing with button controls.
Perhaps most important to me is that I'm interested in the (goofily dark?/darkly goofy?) story. I've been compelled by the desire to take down the bizarre ruler of Shinagawa and its dominating ruleset—the evil "corporation" structure that lets the President and his twisted director execute whoever they want. I enjoyed driving that all the way to the climactic Danganronpa-style "baseball argument" thing.
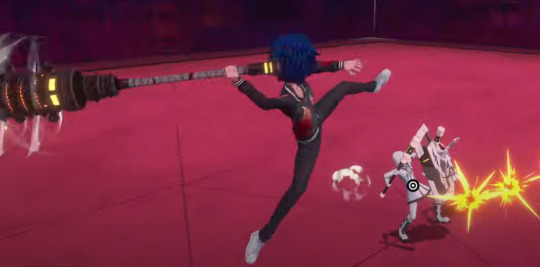
Senju severely wrecks shop.
I'm currently NOT so compelled by the characters, honestly; they're likable enough and have great Komatsuzaki-style designs, but their characterizations are pretty damn thin so far. The ones who I'm attached to are either just excellent in a fight (Hyakuichitaro Senju), have a central personality quirk that's endearing (Tsuruko Semba), or I've gotten to know them better by having recently watching the anime (Kazuki Aoyama).
Speaking of the anime: "Q" in the game is Ojiro Otori from the show. Some might consider that to be pretty obvious, but I was a little slow to put it together, so I'm just laying it out there: Same voice actor, considers Kazuki his most important friend, supposedly "atoning for past sins," same hair and eye colors... yeah.
...did I mention that the soundtrack is excellent? Danganronpa's Masafumi Takada is in the house on this one. Very moody, cool, funky, atmospheric.
I've currently finished the story of Chapter 1/Shinagawa, and I want to move on to Chapter 2/Minato (which already has a good central hook/mystery driving me there), but I'm stuck grinding out achievements due to the arbitrary gatekeeping where you can't pass certain points without having enough "stamps" from Zero. Which fucking sucks.
For the record: Beyond the trio of characters that all players get for free (Yo Kuronaka, Tsuki Iroha, and Koishi Kohinata), I've also unlocked Roku Saigo, Yutaka Gotanda, Hyakuichitaro Senju, Santaro Mita, Minami Oi, and Tsuruko Semba.
The barrier to starting Chapter 2 has given me time to work on every single side quest in Shinagawa, at least. On that note...
Most Upsetting Side Quest: Forcing a bunch of homeless people with nowhere else to go to vacate the aquarium because some fish-obsessed idiot thinks he's going to re-open the business despite knowing jack shit. I definitely felt like the bad guy.
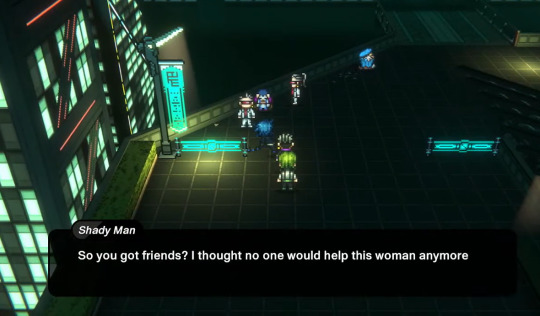
Why are they so intently after her???
Most "???" Side Quest: Repeatedly rescuing that one woman who keeps getting cornered and attacked by masked thugs who repeatedly assert that they don't know why ANYONE would take her side. It seems obvious that she's harboring a secret reason why she's always being harrassed, but by the current end of that quest line, it's not yet been explained. All we've done is beat up her harrassers without ever knowing why they're on her case. I assume this story thread will wind up continuing into Otami or popping up again elsewhere.
Something I want to know a lot more about is WHICH members from TooKyo Games were involved in this title. Who's writing, you know?
#tribe nine#tookyo games#too kyo games#Ojiro Otori#Kazuki Aoyama#Hyakuichitaro Senju#Tsuruko Semba#rui Komatsuzaki#Masafumi Takada#danganronpa
11 notes
·
View notes
Text
Basic Sims Blender Render Tutorial
Rendering seems like an intimidating process to many, and a lot of Simmers feel like they're in the dark and lost about where to even begin with rendering. And gatekeeping definitely doesn't help anyone!
This no-frills tutorial's not entirely comprehensive and assumes that you know some basics of Blender (how to move around, and switch tabs, and use basic tools). It's also not an absolute, perfect tutorial. My shaders and techniques are not perfect at all, and there are many other creators who have way more advanced rendering skills than me, but these are the steps I take for my current renders and they work for beginners. It's also great because it prevents you having to go back into CAS and redoing the Blend setup each time if you want to keep making renders of the same Sim.
GOOGLE SLIDES TUTORIAL: https://docs.google.com/presentation/d/1qI84QstCfa7E-F6b7qzRPuHW_eou_N4d/edit?usp=sharing&ouid=109770128121660962892&rtpof=true&sd=true
Please let me know if anything's missing or confusing. I won't be able to help with every issue (as Blender brings forth many), but if you have a question about something you see in my tutorial in specific, feel free to shoot me a message! Also, if you are one of the more knowledgeable creators, def let me know if there's anything I can do to improve or something I should add to the tutorial.
Thank you to all my friends over the last two years who helped me learn how to render! And to the Simmers who aren't gatekeepers and find the same joy of sharing with the community as I do. I'm also grateful to Simsonico for their Youtube Tutorial, which I recommend viewing.
If you're hesitant about trying out renders, know that I was too. Renders allow for more creative compositions and item placements. They also create higher quality pictures than in-game. The only downsides are the time it takes to render and set up everything and the fact that pretty much all Blender scenes are atrociously perma-paywalled. This isn't an issue if you want to build your own scenes or greenscreen, though! I recommend trying at least a few times just to see how you feel.
#mydl#simblr#the sims 4#the sims#ts4#sims tutorial#blender tutorial#sims blender#ts4 tutorial#sims blender tutorial#sims#simscommunity
83 notes
·
View notes
Text
Okok so we all know the Sims 3 is like, not super popular and is also notoriously buggy BUT on the off chance anyone is like me and loves it, i have some tips that have greatly helped my game run better. I also am including links to any specific creators or sites I recommend. Tips under the cut bc it's a long post, but I tried to be thorough! You will need to understand like, basic reading comprehension and basic computer-y stuff (downloading files, unpacking files, dragging and dropping into folders, editing the occasional file text) but most stuff I link to have tutorials for adding mods into the game and whatnot.
I really hope this helps people like me who love TS3! but know the game is.... outdated for basically all computers. These are all things ive learned over the past couple years, so I hope this can be a helpful resource for anyone wanting to play TS3.
Number one will probably be using this tutorial to make the game recognize your current computer specs. Because the game is, yknow, old, it wont recognize newer drivers and whatnot. This tutorial will allow the game to actually recognize them and therefore run better https://www.carls-sims-4-guide.com/forum/index.php?topic=26753.0
Nraas will be your best friend for managing things in-game. It's similar to MCCC for the sims 4 but you completely customize which like, modules you use. I highly highly recommend specifically Story Progression and Master Controller https://www.nraas.net/community/home
LazyDuchess is a goddess and I highly Highly recommend her Smooth Patch mod. It makes the game run so much better. Also she has so many other mods that make things like CAS load faster plus a search function for Build/Buy https://www.patreon.com/lazyduchess/posts
ModTheSims is a great resource for Sims 3 Mods as well, definitely recommend making an account and perusing their sims 3 mods https://modthesims.info/
Speaking of ModTheSims, I highly recommend Regul Save Cleaner to... clean up the extra data in your saves https://modthesims.info/download.php?t=652440
Also on ModTheSims theres an excellent bug fixing mod from Simler90, it touches on a bunch of like longtime bugs that havent been fixed (like the firefighter career being bugged) https://modthesims.info/download.php?t=659969
Make sure that before playing or after adding any new mods, delete the files: caspartcache.package, compositorcache.package, scriptcache.package, simcompositorcache.package, and socialcache.package. If not, the game WILL load slowly and/or crash. These files are found in Documents\ElectronicArts\The Sims 3. Not sure about Steam bc I use the EA app, but I assume its a similar path.
Save every half hour or so to prevent crashes killing too much progress. And don't play for longer than an hour per initial load (like, play for an hour, save, quit and load the game again). I find it helps the game run smoother when you dont play in 3 hour stretches.
make a backup saves folder for your saves. Im not sure why, but i found that keeping only one save in the actual saves helps it loads faster and smoother.
Also when saving your game, ALWAYS use Save As. If you Save As, you wont have to worry about accidentally corrupting your saves, which happens a lot
Also, when you're about to save, move the save you loaded into your backup saves folder BEFORE saving. I find it crashes/corrupts way less if its not trying to compete with the other save
also keep your sims personal inventory fairly empty (like 10 items max) to prevent a known bug from occurring when saving. Use a storage box or something to store collectibles like gems, plants, etc.
WHEN IN CAS WAIT UNTIL THE LITTLE FLOWER LOOKING ICON IS BLUE TO SCROLL THROUGH THE CATEGORY. When it turns blue, all the items have properly loaded, so it wont lag nearly as much.
Prev point applies to build/buy, wait for the category to load before messing with things. You'll save yourself a lot of stress
Dont use 4 speed, i find it just lags and stops progressing time. I use 2 or 3 max, even when sleeping
In BuyDebug you can buy these invisible lights that make the lighting much much better in game. Just have an actual light, like a lamp or outdoor light, to be able to change brightness and color in Live mode. Bc.... Its invisible so non-clickable
#sims 3#sims3#thesims#thesims3#sims tips#sims 3 tips#sims 3 mods#the sims 3#sims game tips#sims 3 game tips
29 notes
·
View notes
Note
I am sorry for bothering you, but if you don't mind, can you tell the tips for the very very begginers. I really want to start learning how to draw, but it is overwhelming and I don't no where to start and feel a little at loss
ha! One of these days I'm going to have to write something detailed and well-constructed to be able to answer these questions properly. ^^"
In any case, you're not bothering me at all and I'll try to give you a clear answer, but I apologise in advance if it's too long or if my English isn't good at times. In short version I would just quote Lorenzo from How to think when you draw : source
My long version:
It's hard because everyone functions differently, but I'd say that first of all you need to define a goal or a project that will be your driving force so that you don't lose your motivation. It could be a personal comics project or doing fan art, it doesn't matter as long as you're enthusiastic about it. If you have to choose between academic seriousness and fun, choose fun, because fun make you practice and practice make you progress anyway so you'll be less likely to get discouraged.
It's important to practice as regularly as possible, because your ability to draw is like a muscle that you need to maintain. If you don't practice enough, your progress will be slow, and if you don't practice for too long, you'll lose what you've learnt.
Having said that, learning fast is not an obligation - it depends on your goal.
For the technical aspects that you still need to learn between two sessions of fun, the order that seems logical to me is :
shape and volume || light and shade
anatomy
colour theory
perspective
composition
That's assuming you start by doing just characters before getting into complex backgrounds. And bearing in mind that certain parts are connected together and can be learned simultaneously. For example, I've put perspective towards the end, assuming that you come to the backgrounds last, but it's useful for drawing characters too.
To make each of these parts easier, they need to be broken down into stages.
Shape and volume || Light and shade :
Shape and volume :
Basically, it's useful for everything else. understanding shapes allows you to decompose complex subjects so that you can reproduce them more easily. Absolutely everything around you and everything you want to draw can be decomposed in this way. It will then help you to know how to apply light and shade. A good article here. Light and shade : not knowing how to sum it up in a few words, I found some useful links :
[link] [link] [link] these three articles talk about the same thing, but maybe if you look at what else their authors have in stock you'll find something different or explained in a way that suits you better.
Anatomy :
Once you know how to build a human being with tubes and rectangles, you can go into more detail about anatomy. You can start with the head alone, practising drawing it from all angles, with different characteristics, different expressions etc, then arms, then torso, etc and then gradually moving on to the whole human body. Study the skeleton and musculature, it sounds annoying but it really changes everything. Even if it's possible to know how to position a character correctly without it, the result will inevitably be better with it and it'll make your task easier and drawing skeletons is great fun! This doesn't mean that you have to learn every single piece by heart, just that you know enough to be able to place the bumps and hollows in the right places. a good article for beginners, giving the balance needed to avoid being overwhelmed by the study of anatomy. I suggest as an exercise : with the help of references and tutorials, draw a character 4 times in an identical posture, except that first you only do the skeleton, then the musculature, then a normal nude, and finally with clothes to familiarise yourself with the behaviour of the fabrics. (The folds and drapes are, I think, a sub-chapter of the anatomy part because clothes.) about folds and drapery [link] [link]
Colour theory :
Basically, it's what colour you get when you mix these two together, or which colour is best for shadowing this other one, or to produce a certain mood over the whole illustration, I have to limit my palette to these colours and so on. Again, I can't summarise this easily but it's a big important part. Just type colour theory in google or pinterest and you'll find so many good tutorials. Note: again I think that, colour and light / shade are connected and should be learned simultaneously.
[link] [link]
Perspective :
For this part it's easy to broke it in steps. Start by practising with a single vanishing point to understand the principle, then two points, then three, then the fish-eye effect. I forced myself to do the spiral staircase exercise with the perspective, it was terrible but once you've done it and understood what you've done then you're good. Better, you can test your understanding of perspective by having fun reproducing Escher's impossible constructions. I love his work. 1 point [link][link] 2 points [link][link] 3 points [link][link] [Escher]
Composition :
It's one of the last things I learnt and I can really guarantee that there was a before and an after to it. Composition is one of the fundamental that will make you say: I'm an illustrator, in the sense that I know how to tell a story, evoke a feeling with a single drawing. [link] [link] [link] [link]
To come back to more general things, accept that it can take time, it's OK if it's not great at first, we've all been there. Don't put pressure on yourself and don't make yourself feel guilty by comparing yourself to others. Be curious too, look for new challenges, and always do it for fun. Finding a community in which you can make artist friends with whom you can share projects can also be great, because you feed off each other and that helps to keep you motivated. Don't be afraid of failure, failure is good, failure is your friend. Because once you've identified the reason why you think your drawing is a failure or not good enough, you'll remember to pay attention the next time or it'll motivate you to do more training on that point. Knowing things is good, but turning them into reflexes is better.
Here it is, I hope it helps, most of the resources I learnt with were in French so I quickly tried to find the English equivalent, I checked them quickly, but I think it's ok. And, the links I've found are just entry points, in some cases you'll need to find other resources, like anatomy for example, but just type anatomy tuto on pinterest and see what seems easiest for you to start with. aaand this is the end, I think.
#ask#text post#every time I have a question like that I take the outline of the previous one and add a little something to it.#After some times I might have enough to write a book x)
24 notes
·
View notes
Text
Fantasian Neo Dimension console warnings
So far, great game. Amnesiac protagonist, but he's already got more character than Tiz from Bravely Default in spite of that(though not as much as Ringabel, that game's obligatory amnesiac, although I'm barely an hour in). However, two warnings for console buyers. There seems to be some issues with movement on PS5-the game is fixed-camera but the angle will change depending on where you move, and often when it does that I find that the protagonist is moving in a very different direction than where I thought I was telling him to move. And while I know this makes the drift worse, I sometimes get it even when the camera angle isn't changing, so idk what's going on. Not at all a deal-breaker and at absolute worst it's a moderate annoyance, but it's better to know in advance. Highly likely that PS4 will also have this issue, and since it's been two weeks since launch and this is still here I'm not holding my breath on a patch fixing it anytime soon.
I actually bought the game on Switch first, and while what little I played didn't seem to have the movement drift issue I couldn't even get out of the second room of the tutorial dungeon before the load times made me spend another 50 bucks to get it on Playstation instead. If Switch is all you have in the way of consoles and you're like me and have an autistic inability to play these kinds of games on PC(my brain just refuses to accept combining a controller and a laptop, and it also refuses to accept playing JRPG with keyboard and mouse), I do still think it's worth it, but if you have any other console options or can play it on PC then do that. The load times for cutscenes or dialogue scenes using the regular character models are basically zero, but every. Single. Time you transition from the overworld into a fight it will load for around FIVE seconds. Yes, really. I'm seeing people say "well, what'd you expect, it's an 8 year old system", but what I expected was that, when Bravely Default, one of the earliest games on the 3DS didn't have load times nearly half this bad, an objectively more powerful system playing a game originally exclusive to mobile wouldn't. Sadly, I was wrong. Now, one of the game's mechanics is that you can store up random encounters in dungeons and fight them all at once, which will mean this happens less often, but since this load is for the fight-transition there's no reason to assume it won't apply to bosses and any other non-random fight either. Also, you'll still be running into several dozen random encounters before you get that mechanic, and since this game apparently expects you to grind even on normal you're gonna be fighting alot. Again, it's worth it if you have no other way to play this game, but if you do, use that.
2 notes
·
View notes