#hardware hack
Explore tagged Tumblr posts
Visit Tumblr Blog
Explore Tumblr blogs with no restrictions, modern design and the best experience.
Last Seen Tumblr Blogs


Fun Fact
69% of Tumblr users are millennials.
Text
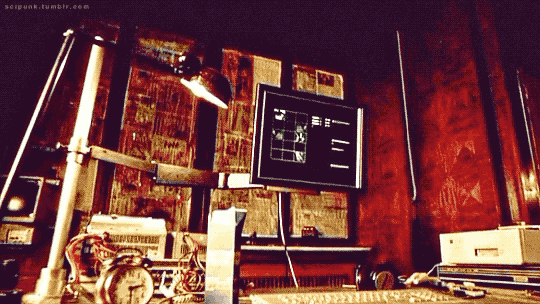
Paranoia 1.0 AKA One Point O (2004)
#paranoia#tech noir#hacking#electronics#hackers#computers#cyberpunk#cyberpunk movies#cybersecurity#cyberpunk aesthetic#glitch#00s#00s aesthetic#2000s#00s movies#neo noir#computer bug#microchips#hardware#programming
121 notes
·
View notes
Text
FruitJam 10 PRINT CHR$(205.5+RND(1)); : GOTO 10 🎮🕹️💾🍊
We're working on getting some fun emulators ported to the FruitJam
. Of course, we wanted to start with the C64, so when we found the MCUME
emulator project with many retro machines already done and ported to popular microcontrollers, we got right to checking it out! Here, Jepler is testing out the C64 with video output on HSTX. Next up is the keyboard, but for now, it's fun to test out the famous 10 print… goto 10 script
and watch the vibes generate.
#fruitjam#retrocomputing#c64#commodore64#emulation#microcontrollers#retrogaming#vintagecomputing#8bit#coding#programming#10print#nostalgia#gaminghistory#hacking#opensource#hardware#electronics#maker#diy#tech#circuitpython#adafruit#geek#oldschoolgaming#homebrew#hackaday#makersgonnamake#innovation#nerdlife
24 notes
·
View notes
Text

i made a little desktop unix epoch clock. 3d printed the stand for it but it didn’t quite work out how i hoped.
29 notes
·
View notes
Text

replaying sm as soon as i can get a damn screwdriver
@angeallen on the left
#scribbles#i've spent a couple of hours trying to get proper files for a more difficult rom hack on hardware and it is noottt working out#dying.
10 notes
·
View notes
Text
anyway i swept the leaves out of my garage and built a shelf and those two actions were enough to leave me too tired to do anything about the fact that now there are two shelves in my room that only has room for one of them
#ragsycon exclusive#inside you there are two shelves#one was the right depth but was made out of cheap particle board and was literally collapsing under the weight of all my books#the other is an industrial strength workshop shelf but the shelfs themselfs are too deep and now rigatoni's tank is entrenched in shadows#so i have to get a lighting system set up for my boy i guess#but i don't have the beans to go back out to the hardware store so i have to hack something together with what i have in my house#and my display shelf that was on my old shelf is now the top shelf of my new one which is higher than eye level#so i need to figure out some sort of riser system so i can see anything i even put up there#not to mention find a home for my old shelf#all this to say; i'm sitting here typing this instead of doing all that#because i'm tired#but i can't lie down because my bed is covered in half the shit i pulled off my old shelf and haven't put on the new one yet#march of the gladiators dot mp3
19 notes
·
View notes
Text
need a bit of advice on something rather new to me... i have been DYING to get into some semblance of diy electronics/robotics, specifically regarding the idea of building a flipper zero knockoff with a raspberry pi/esp32/arduino. or a hack rf one ripoff, etc. u get it? i wanna make a lil handheld pwnagotchi pet style device for rolljam rf shit, something that can copy and paste and send and receive rf signals, but homemade by my self....
please if anyone has experience, resources, ideas, anything at all= hit me up right now immediately asap today please.... i am so passionate and ready to do this please help me make device go beepboop
#flipper zero#hack rf one#raspberry pi#esp32#arduino#diy electronics#diy#diy hacking#car hacking#hacking hardware#hacking#help#hacking help#hacking question#need advice#diy projects#diy craft#diy punk#upcycle#homebrew
14 notes
·
View notes
Text
Whenever I feel bad I treat myself to sugar. Got Milk? Throw in a few teaspoons in there. Tea? Although sacrilegious, I do it anyways. Sometimes I’ll just have a teaspoon of sugar straight up.
Is it healthy? Hell nah, there’s more than enough sugar in other things I consume . But does it make me feel better? Yeah. And if it works, it works.
#i like to think of it as hacking the hardware#oh well#mmmmm#sugar#i need to have fewer bad days like please#IVe been beaten down enough times#my random thoughts#augh
3 notes
·
View notes
Text

4 notes
·
View notes
Text
Affinity DesignerでTayda向けのフルカラーUV印刷原稿を作成する
続・エフェクター用のアルミダイキャストケースを発注した話です。今回はフルカラーの印刷を発注してみました。

タイに拠点を持つ電子部品のネット通販サイト「Tayda Electronics」では、ペダル型エフェクターでよく使われているアルミダイキャストケースの塗装や穴あけ加工、UV印刷といったサービスも提供しています。1個単位で発注でき、価格もかなりリーズナブルなので、世界中に利用者がいるようです。
自分も以前P-EQのケースを発注しているのですが(下記がそのときの記事)、そのときは青の本体に白で文字やマークを印刷する、というシンプルなものでした。ただ、単色ではどうしてもシンプルなデザインしか作れないので、今回はフルカラーでのUV印刷を発注してみることにしました。
今回のゴール:Illustoratorを使わずに発注する
TaydaのUV印刷は、印刷するデータをオンラインで(Web上で)アップロードして発注する仕組みになっています。入稿データはPDF形式が指定されているのですが、TaydaではAdobe Illsutorator以外で入稿データを作成することは推奨していないらしく、入稿データ作成用の説明などもすべてIllustratorを前提としています。ただ、Illustratorは利用料金が通常価格で1年あたり約3万4,000円と、個人が趣味で利用するにはハードルが高いお値段です。ということで、今回は同じような印刷用データの作成機能を持つAffinity Designerというソフトウェアを使って入稿データを作成します。
Affinity DesignerはIllustratorを使ったことがあれば��較的すぐに習得できるかと思います。もちろん細かい点で違いはありますが、ドキュメントも充実しているため、不明点などがあったら検索すれば大体の問題はすぐ解決できるかと思います。
ちなみにAffinity DesignerはMac/Windowsで動作し、価格(2025年6月時点)は6,590円ですが、年1、2回の頻度でセールをやっており、そのタイミングだとかなりお安く購入が可能です。もし急ぎで必要でないのであれば、セール時の購入をおすすめします。
なお、先に述べたとおり基本TaydaではIllustratorの利用を推奨しているため、下記で説明している手順は単なる「こうやったらできた」というレポートです。当方では成功を保証できませんのでご了承ください。
テンプレートとサンプルファイルのダウンロード
TaydaのUV印刷サービスページではアルミダイキャストケースのUV印刷用のテンプレートが公開されているので、こちらをベースにデータ作成を始めます。
今回は1590Bサイズ(MXRのエフェクターとほぼ同サイズ)のケースに印刷してもらうので、「1590B type enclosure AI format template CLICK HERE (artboard size 56 x 108.50mm)」をダウンロードします。ちなみにAffinity DesignerはAI形式のファイルをそのままインポート可能です。また、同じページ内の「Here is example UV printing file we made for 125B enclosure size with Adobe Illustrator,」という部分の下、「EXAMPLE FILE AI FORMAT CLICK HERE」というリンクからサンプルファイルをダウンロードできるので、こちらもダウンロードしておきます。
テンプレートファイルを開いて編集する
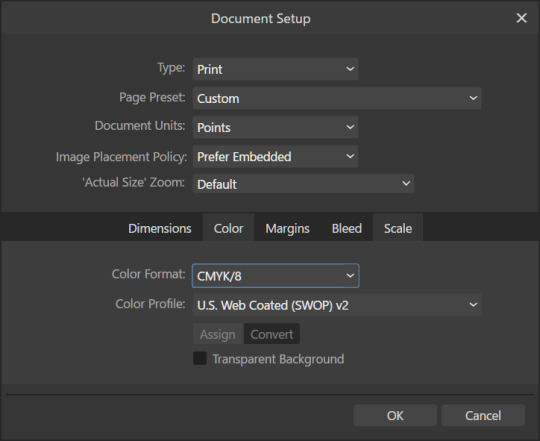
ダウンロードしたテンプレートファイルをAffinity Designerで開きます。この際、「PDF Options」という画面が表示されますが、デフォルト設定のまま「OK」を選択します。

また、ファイルを開いた直後はカラーモードがRGBになっているので、「Document Setup」の「Color」タブで「Color Format」を「CMYK/8」に変更しておきます。
「COLOR」レイヤーにフルカラー印刷したい文字や図形を配置する
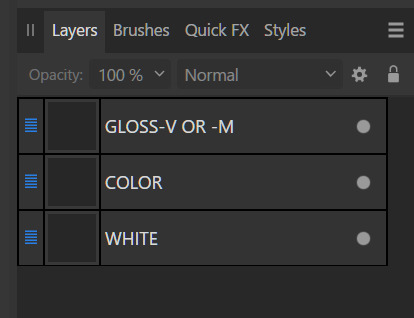
このテンプレートファイルには「GLOSS-V OR -M」「COLOR」「WHITE」という3つのレイヤーが用意されていますが、まずは「COLOR」レイヤーに印刷したい文字や図形を配置していきます。
このレイヤーに配置した文字や図形(オブジェクト)は、フルカラーで印刷されます。なお、ラスター画像(写真などの画像)は推奨しないとのことで、Affinity Designer上で図形ツールや各種ペン・ブラシツールを使ってデザインを作成していくことになります。
「WHITE」レイヤーに白で印刷したい文字や図形を配置する
「COLOR」レイヤーはフルカラー(CMYK)での印刷が可能ですが、白の印刷はできません。そのため、白い文字や図形は「WHITE」レイヤーに配置する必要があります。さらに、「COLOR」レイヤーの印刷は下地が白であることを想定しているため、(特に意図しない限りは)「COLOR」レイヤーに配置したオブジェクトの下が白く塗りつぶされるよう、「WHITE」レイヤーにも同じオブジェクトを配置することが推奨されています(イメージとしては、UVプリンタメーカーによる解説「透明な印刷対象物に印刷する (下地にホワイトインクを印刷)」や「印刷対象物の色に影響を受けずに印刷する(下地に白印刷)」が分かりやすいです)。
具体的な作業としては、「COLOR」レイヤーにオブジェクトを配置したら、それをそのままコピー&ペーストして「WHITE」レイヤーに配置して、同じオブジェクトが白でも印刷されるようにしておけばOKです。印刷時には最初に「WHITE」レイヤーが印刷され、続けて「COLOR」レイヤーが印刷されるため、このように設定することで白いインクで印刷された文字や図形の上にカラーで文字や図形が印刷されるようになります。
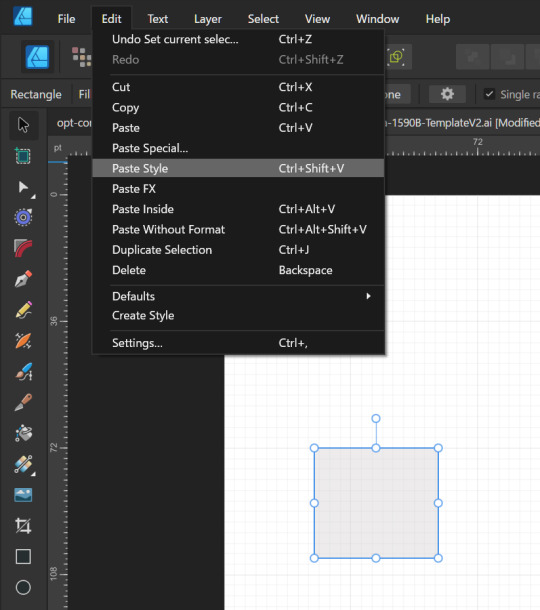
なお、「WHITE」レイヤーにオブジェクトを配置する際の注意点として、このレイヤー内に配置するオブジェクトの色はすべて「RDG_WHITE」というspot color(特色)を指定する必要があります。spot colorを指定する方法はいくつかあるのですが、サンプルファイルのスタイルをコピペするのが簡単で確実です。
まず、ダウンロードしておいたサンプルファイルをAffinity Designerで開きます。「WHITE」レイヤー内に「Curve」(Yの文字)があるので、これを右クリックしてコピーします(同じ「Y」の文字が「GLOSS-V」レイヤーにもあるのでそちらをコピーしないように注意)。
続いて、「RDG_WHITE」を設定したいオブジェクトを選択し、「Edit」メニュー内の「Paste Style」を実行します。
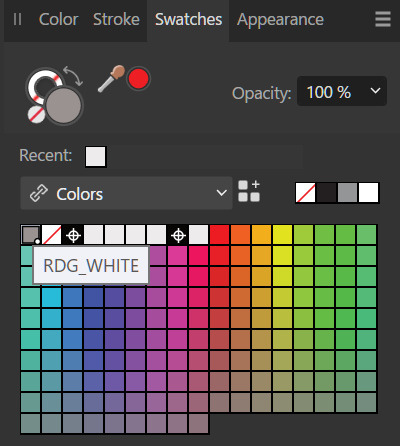
すると、そのオブジェクトの塗りつぶしカラーが「RDG_WHITE」に設定されます。

また、塗りつぶし色として「RDG_WHITE」が設定されたオブジェクトを選択した状態で「Swatchs」タブの「Colors」横にある「■+■■」ボタンをクリックするとSwatches内に「RDG_WHITE」が追加され、ここから「RDG_WHITE」を指定できるようになります。
「GLOSS-V OR -M」レイヤーについて
「GLOSS-V OR -M」はTaydaの有料オプションで用意されているグロス(光沢)/マット(艶消し)仕上げサービス用のレイヤーで、ここにオブジェクトを配置するとその位置に光沢/艶消しインクを乗せてくれるとのことですが、自分は使ったことがないので割愛します。なお、このレイヤーに配置するオブジェクトはすべて色としては「RDG_GLOSS」を指定しておく必要があります(参考:「表面を仕上げる(グロス印刷)」)
そのほかのレイヤーについて
Affinity Designerでは、出力用データの作成時(エクスポート時)に選択したレイヤーだけを出力する機能があるので、印刷しないガイド用の図形などは別レイヤーに分けて置きましょう。たとえば自分の場合、穴開けする場所に穴(円)を描いたレイヤーを用意したりしています。
出力するレイヤーの指定
デザインデータの作成が完了したら、PDFへの出力を行います。実はここが一番ハードルが高く面倒くさいところだったりします。
まず、ウィンドウ左上の「Export Persona」をクリックします。この状態では、エクスポートするレイヤーなどの設定を行うことができるので、「Layers」タブで出力したいレイヤー(「GLOSS-V OR -M」、「COLOR」、「WHITE」の3つ)をクリックしてエクスポート対象に指定します(ウィンドウから矢印が飛び出たアイコンがハイライトされた状態にする)。

この設定が終わったら、「Design Persona」をクリックするとデザイン画面に戻れます。

エクスポート設定
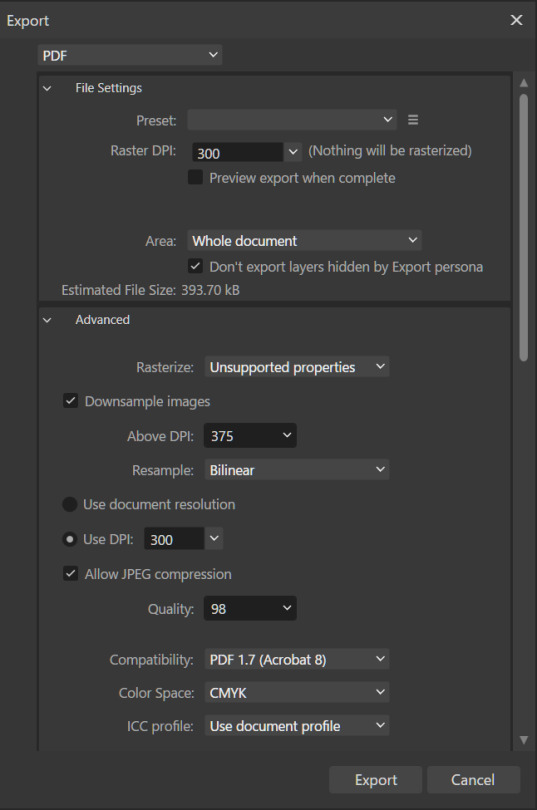
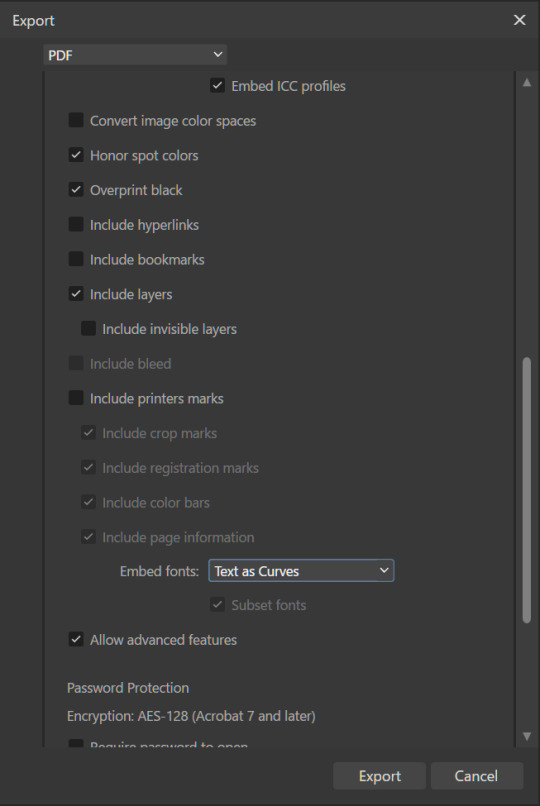
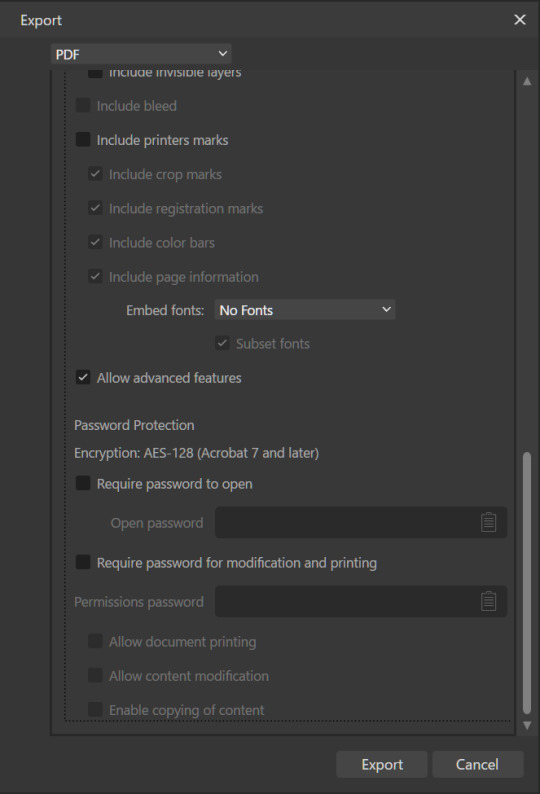
続いて「File」-「Export」メニューを選択し、エクスポート画面を開きます。ここではフォーマットとして「PDF」を選択し、続いてオプションを次の画像のように選択します。
(注:「Raster DPI」の部分に「Nothing will be rasterized」と表示されているかも確認してください。Affinity DesignerはPDFで表現できない機能を使ったオブジェクトを自動的にラスター画像化する機能があり、ラスター化された画像が含まれていない場合のみここに「Nothing will be rasterized」が表示されます。)
最後に「Export」ボタンをクリックし、出力するファイル名や保存先を指定します。
Acrobat(無料版)でデータを確認する
最後に、データが正しくエクスポートされているかをAdobe Acrobatで確認します。Acrobatは有料版(Pro)と無料版がありますが、最低限の確認は無料版のみで可能です。
まず、画面左のレイヤーアイコンをタップして、PDF内に含まれるレイヤーを確認します。
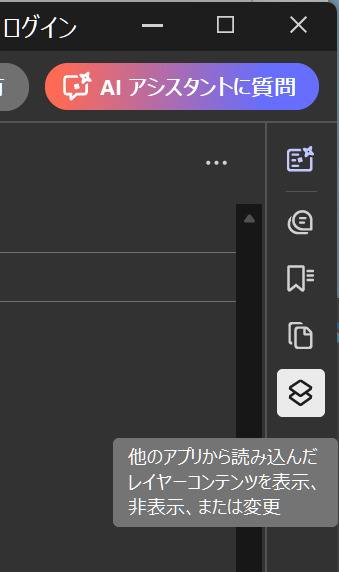
「WHITE」「COLOR」が(もし使用していれば「GLOSS-V OR -M」も)含まれていればOKです。また、レイヤーを右クリックして「レイヤーを表示」を選択することでレイヤーの表示/非表示を切り替えることができます。ここで「WHITE」レイヤーに本来「COLOR」レイヤーに含まれるはずのカラーの文字や図形が入っていないかなどをチェックしておきます。

(ちなみに、自分は事故を避けるために「WHITE」「COLOR」レイヤーの中にはレイヤーを作らないようにしているためこの2つのレイヤーしか表示されませんが、レイヤー内にレイヤーを作っている場合はそれもここに表示されるはずです)。
なお、Acrobatの標準設定では背景が白で表示されるのですが、この設定では「WHITE」レイヤーが確認しずらいです。そのため、自分はAcrobatの「メニュー」-「環境設定」で表示できる環境設定画面の「アクセシビリティ」で、「ページ背景色」を別の色に変更しています。この設定だと、「WHITE」レイヤーを非表示にした際にどうなるかが分かりやすくなります。
また、PDFを拡大表示して、輪郭がスムーズになっていない(ギザギザになっている=ラスター画像化されている)部分がないかもチェックします。
最後に、PDFコンテンツ表示エリアを右クリックして「文書のプロパティ」を選択します。すると「文書のプロパティ」画面が表示されるので、下記をチェックします。
「概要」タブの「PDFのバージョン」。Affinity Designerでエクスポート時に選択したもの(1.7)と一致しているか
「概要」タブの「ページサイズ」が適正かを確認。1590Bサイズなら「56.0×108.5mm」。
「セキュリティ」���ブの「文章のセキュリティ」および「文書に関する制限の概要」。「セキュリティなし」、「Acrobatの全バージョン」、「印刷」が許可になっているかを確認。
「フォント」タブでフォントが埋め込まれていないかを確認。何も表示されていなければOK。
これで問題が無ければ、あとはTaydaに注文&入稿を行えばOKのはずです。
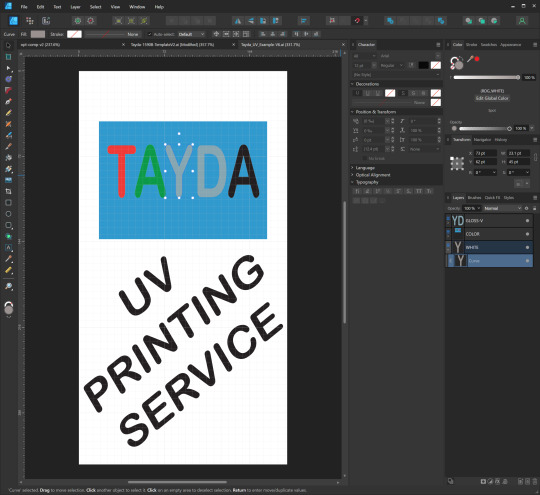
ちなみに、この筐体は最終的にはこんな感じになっています。このデザインでは、筐体がシルバー塗装なのを利用し、カラー印刷したい図形(「COLOR」レイヤーに配置した図形)の下にあえて白インクを重ねないことでメタリック感を残しつつ文字はくっきりさせています。

2 notes
·
View notes
Text


#ye#kanye west#future#tech#curatethewav#cyber#archive page#cyberpunk#cyberpunk aesthetic#explore page#awge#2000s#corecore#techno#technology#fypシ゚viral#hardware#set up#pcgaming#hacking#hacker#mood#digital#celebrity#disguise#pop culture#courtside#phishing#scammer#explore
3 notes
·
View notes
Text

USB-C "Fixer" for Missing CC Pins 🔌⚡🛠️
We have a few devices missing the 5.1K resistors on the CC pins, which frustratingly don't work with Mac computers or certain smart USB-C power supplies. To solve this, we designed a small adapter that combines our sunken USB socket
and USB plug breakout
This handy USB-C "fixer" adds the necessary CC resistors and includes a power-good LED indicator. It passes standard USB 2.0 signals (5V, GND, D+, D-) and fits onto any USB-C cable end, ensuring compatibility with a wider range of devices.
#usb#usbc#electronics#usbfix#maker#tech#hardware#diy#usbadapter#fixit#hack#engineering#powerfix#usbmod#maccompatible#poweradapter#charging#resistors#circuitdesign#usbprojects#techfix#usbhack#diytech#gadgets#electronicsprojects#techrepair#powergood#programming#linux#python
13 notes
·
View notes
Text
If It's a Hack and It Works, Is It Really a Hack?
I have a couple servers at home — one running Proxmox VE and one running Proxmox Backup. I use the VM server when I need to spin up a development environment, for running the odd game server, serving files locally, running Home Assistant, etc. I also like to donate spare cycles to Folding@Home. The backup server of course is in case I do something stupid on the VM server.
There's just one problem with that. My second-hand 8-year-old dual-Xeon server runs hot.
It was too much to keep running in my home office. Between the two servers, my desktop, and my work laptop, I was regularly seeing ambient temperatures around 26°C. It was just too warm for comfort.
Last summer I moved my network gear and the two servers into the front coat closet. This was great for me working in my home office, but not so great for my servers. Despite adding a passthrough vent to the closet door and a vent fan to the ceiling, the closet was still consistently in the 26°-30°C range.
The ideal solution would probably be to use an enclosed server rack and run an exhaust vent up from the top. Unfortunately, rack-mount server cases are expensive, enclosed racks are very expensive, and my closet is too small for that anyway.
So I hacked together a solution.

I built a frame out of some cheap 1x2 lumber and wrapped a piece of thin sheet steel around the sides to make a crude plenum. On top, I added a 10x6 register box with a semirigid vent hose coming out of it. This gives me a guide for drawing air out of the servers and guiding it up to the vent fan in the ceiling.
To help things along, I added a 120mm fan inside the register box. But not some whisper-quiet Noctua. This is (if the Amazon listing is to be believed) a 5000 RPM, 210 CFM monster of a fan. It's loud, but moves a lot of air.
Too loud in fact. Its droning could not be silenced by any mere closet door. I had to add a PWM fan speed controller to calm it down. It's a cheap unit from Amazon, but it came with a temperature probe and it has a configurable operating range.
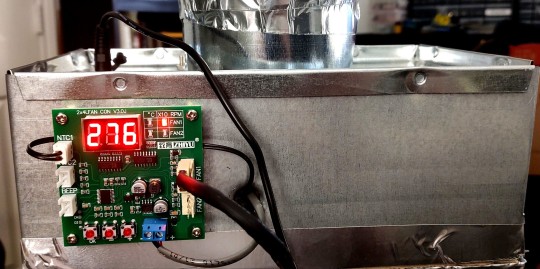
The result? Where previously the entire closet was consistently above 26°C, now it's staying around 23°. There is a difference of 5°C between ambient in the closet and the air inside the exhaust duct, so it is doing its job of redirecting the hot air from the servers.
I call that a successful hack.
18 notes
·
View notes
Text

Rhythm Heaven Fever
#polls#playing it rn now that ive got my wii u hacked#ive played it many times before but this is the first time ive done it on actual hardware#still probably never gonna get my hands on a physical copy tho LOL
28 notes
·
View notes
Text

just another wild hardware hacking prototype for fun. now i know why nobody uses white PCBs, the solder burns are super obvious and painful to look at.
31 notes
·
View notes
Text
I don't know who needs to hear this but:
Restart your computer.
Obviously this doesn't apply to everyone but if you're having computer trouble restart it. It solves like 90% of computer problems because the computer will forget what the problem was and go back to being normal.
#ive spent hours trying to fix problems that just went away when I rebooted my computer#computers#computer#IT#it support#computer troubleshooting#computer troubles#software#software troubleshooting#hardware#hardware troubleshooting#computer problems#splicespeaks#life hacks#I know the last part sounds like a shitpost but that's actually the reason
3 notes
·
View notes
Text
Unfuck your Tech
The Internet is increasingly profit-based in its design, intended to extract the maximum amount of value from your use of it. Proprietary tech, ads, monetization, algorithmic content dissemination, digital rights media (DRM) etc. are all things that benefit corporations, but that make the Internet more hostile to real individuals and communities.
This blog shares community-oriented tools, free alternatives to paid content, and ways for healthier more human media consumption with a focus on free open-source software (FOSS), that anyone can use to remove limiters, paywalls, ads, mindless endless content feeds, and take back digital autonomy, self-respect and fulfillment.
Unfuck your technology, and make your digital landscape a kinder place.
Header image made in aeCAD, a FOSS circuit board design tool.
#tech#technology#media consumption#media#content consumption#social media algorithms#yo ho ho#anti capitalism#community building#tech tips#life hacks#hacking#hacks#hardware
36 notes
·
View notes