#ios software provider
Explore tagged Tumblr posts
Visit Tumblr Blog
Explore Tumblr blogs with no restrictions, modern design and the best experience.
Last Seen Tumblr Blogs


Fun Fact
In 2020, 27% of US Tumblr users had an annual household income of over $100,000.
Text
Pros and cons of ios app development company in US

Sciflare Technologies: an ios app development company: Thinking of building an app for iPhones and iPads? The US has tons of talented iOS app developers, but is it the right move for you? Let's break down the good, the bad, and the apples (get it?) of US-based iOS development. ▶Reach us- IOS Application Development Company - iOS Ionic Apps - Sciflare https://www.sciflare.com/contact/ Sales : [email protected] | Phone: +91–9841110380 ✔
Pros:
Top-Tier Talent: The US boasts a massive pool of experienced iOS developers. From seasoned veterans to rising stars, you'll find the skills you need to create a polished, high-quality app.
Streamlined Communication: Working with developers in your time zone means easier communication and fewer scheduling headaches. No more waiting an extra day for a response because everyone's asleep!
Apple's Backyard: Being close to Apple HQ has its perks. US developers are often more familiar with the latest App Store guidelines and approval processes, saving you time and frustration.
Premium Users, Premium Payouts: Let's face it, iOS users tend to spend more on apps. If you're building a premium app or have in-app purchases, a US audience could translate to higher revenue.
Focus on Security: US developers are well-versed in the latest security protocols, giving you peace of mind that your users' data is protected. This is especially important if your app handles sensitive information.
Cons: ⏱️♀️
Costly Development: The US has a high cost of living, and that's reflected in developer rates. Be prepared to pay a premium for top-tier talent.
Limited Flexibility: US developers may be less accustomed to working outside of their comfort zone. If you have a unique project or need something built on a tight budget, you might find more flexibility elsewhere.
The Saturation Factor: The US app market is crowded, making it harder for your app to stand out. You'll need a strong marketing strategy to reach your target audience.
Communication Hiccups: Even within the US, there can be time zone differences. Depending on your location, there might be a few hours of communication lag which could slow down development.
Hidden Fees: Beware of unexpected costs! Get a clear, detailed quote upfront to avoid surprises like additional fees for project management or ongoing maintenance.
So, should you go US-based?
It depends! If you have a complex, high-budget project and a US target audience, a US developer could be a great fit. But if you're on a tight budget or have a niche market, consider exploring options outside the US.
Ultimately, the best choice is the company that best understands your vision and delivers the app you need, at a price you can afford. Do your research, compare quotes, and don't be afraid to ask questions!
#iOSappdevelopment #mobiledev #appideas #startup
#ios app development#ios application#ios software provider#ios application developer#ios app company in US#ios application company in US#mobile app development#fantasysportsapp#android app developers
1 note
·
View note
Text
#Mobile App Development Company near me#Mobile App Development Company#software development company in india#Cloud Consulting Services in Noida#Cloud Consulting Services#app development in noida#software development company in noida#custom software development company in noida#ios app development company in noida#AWS Cloud Services#Best Service cloud consulting providers#Microsoft Azure cloud consulting services#Cloud Consulting Services India#Amazon Cloud Consulting Services#Cloud Software Consulting Services#Devops consulting and managed cloud services#AWS cloud consulting services#Cloud Managed Services#Cloud Strategy & Consulting Service#Cloud Services#Cloud Consulting Services in India#Cloud Consulting Services & Solutions#Best software development company#Best software development company in noida#Custom Flutter App Development Company#mobile app development company near me#app development companies near me#app development company near me#mobile app development company#app development companies
0 notes
Text
i just think it’s funny that raspberry pi seems to plan their releases around that of apple’s
#stream#both cult followings ….#that im apart of ………#idk i’ve always been an apple fanthem i guess#perhaps it’s also due to me growing up poor & seeing it as a status symbol but by the time the 5s or so was released they had started being#subsidized for the poors following the monopoly breakup w at&t so i had an what was it it was either an 8 or 16gb 4s for 99c in#it was 2014/2015 or so i don’t remember i still have that fucking phone the back cracked bc my sexy fatass geometry teacher fucking stepped#on my binder on accident during a test u know when in school u had to put ur bag or binder at the front of class during tests#but i also got an ipod touch in like 2012 i think loved it it was green my mother got it for my brother & i for christmas#& that’s when i hopped on the Dual Phone Train#never grew out of it#i had an 14 & se 1st gen now i’m triple wielding bc i got robbed so ptsd ive got 12 mini 15 ? 16 ? idk i dont use it it just stays home that#the tx phone bc it doesn’t have a sim card slot as american so it’s esim only therefore literally an ipod#& that’s what i use it as - i also have my us whatsapp on there & i use it to call my banks#but that’s like once a month#so#triple wielding w the se#i hate the new ios like ios 18 it’s gotten too complicated#literally loved apple bc of its simplicity idk as if i didn’t get a pi to get into software & webhosting as was my dream as a child#literally in elementary school i wanted to build my own website so bad i literally went to the library & was reading books on how to build a#server then i asked my parents & they were like ‘wow that’s so cool :) we don’t have any money :) that’s why u were at the library :) & know#so much about libraries :) bc they’re free :) bc ur poor :)’ ALSKALSKALKSLAKSLALSASL#MORE PPL NEED TO USE LIBRARIES#blessed to live like down the street from a library#actually blessed to literally be living in a ‘15 minute city’#also accidentally ordered a compute module 4 so :/#i thought i was ordering the module 5 ALSJALKSLAKSLAKSLAKSLAKSLKSLA#RASPBERRY DROP THE 5S I KNOW U GOT STOCK FUCK U#i’m literally going to make a dual cloud hosting server & also a website host so i can finally provide my family back home w a website for#them to see when i take pics & stuff
1 note
·
View note
Text
Integrate Our UPI Collection API
Are you looking to integrate UPI payments into your business? Look no further! Rainet Technology Private Limited is here to provide you with the best UPI Collection API solution. Whether you run an e-commerce store, a subscription-based service, or any other type of online business, our API will enable seamless and secure UPI payment integration. In this blog post, we will explore what makes Rainet Technology the first choice for integrating UPI payments and how our features can benefit your business. So let's dive in and discover how Rainet can help simplify your payment processes!
What is the UPI Collection API?
What is the UPI Collection API? UPI stands for Unified Payments Interface, a revolutionary payment system in India that allows users to transfer money instantly between different bank accounts through their mobile phones. UPI has gained immense popularity due to its convenience and ease of use. Now, imagine integrating this powerful payment method into your own business operations. This is where the UPI Collection API comes into play. The UPI Collection API enables businesses to accept payments from customers directly into their bank accounts using the UPI platform. With Rainet Technology's UPI Collection API, you can seamlessly integrate this payment solution into your website or application. By leveraging our robust and secure API, you can provide your customers with a hassle-free way to make payments using their preferred mode - UPI. Our API ensures smooth transaction processing, real-time notifications for successful payments, and easy reconciliation of transactions. It also supports various features like QR code-based payments, recurring billing options, and customizable payment flows tailored to suit your business requirements. By implementing the Rainet Technology's UPI Collection API, you can enhance the customer experience on your platform while streamlining your payment processes. So why wait? Let's explore how Rainet Technology Private Limited can be the perfect partner for integrating UPI payments into your business!
Why is Rainet Technology Private Limited the first choice for you?
Rainet Technology Private Limited is the first choice for businesses looking to integrate UPI Collection API. With our extensive experience in the field of payment gateways and APIs, we have established ourselves as a trusted provider. One of the key reasons why Rainet should be your go-to option is our seamless integration process. We understand that time is of the essence for businesses, and our team ensures a smooth and hassle-free integration of UPI Collection API into your existing systems. Another feature that sets us apart is our commitment to security. We prioritize data protection and employ robust encryption techniques to safeguard sensitive information during transactions. You can rest assured knowing that your customers' data will be safe with us. In addition, Rainet offers flexible customization options for businesses. We understand that every organization has unique requirements, and our team works closely with you to tailor solutions that align with your specific needs. Furthermore, Rainet provides comprehensive customer support throughout the integration process and beyond. Our dedicated team is available round-the-clock to address any queries or concerns you may have. Choose Rainet Technology Private Limited as your partner for UPI API integration and unlock new possibilities for seamless payments within your business ecosystem!
What features do we provide?
At Rainet Technology Private Limited, we provide a range of powerful features with our UPI Collection API to help streamline and enhance your business operations. With our API integration, you can easily accept UPI payments from your customers and enjoy seamless transactions. One of the key features we offer is real-time payment notifications. You will receive instant alerts whenever a payment is made through UPI, allowing you to keep track of all transactions in real-time. This ensures that you never miss out on any payments and allows for efficient reconciliation. Our API also supports multiple payment modes, giving your customers the flexibility to choose their preferred method of making payments. Whether it's through QR codes or deep linking, our integration offers a user-friendly experience for both you and your customers. Security is always a top priority for us. That's why our UPI Collection API utilizes advanced encryption protocols to safeguard sensitive customer data during every transaction. Rest assured that your customers' information will be protected at all times. Furthermore, we understand the importance of customization in meeting the unique needs of different businesses. Our API provides extensive customization options so that you can tailor the user interface according to your branding requirements and create a seamless experience for your customers. With these features and more, Rainet Technology Private Limited stands as an ideal choice when it comes to integrating UPI collection APIs into your business operations. Experience hassle-free transactions and enhanced customer satisfaction with our reliable services!
Why Choose us?
1. Expertise and Experience: At Rainet Technology Private Limited, we have a team of highly skilled professionals who have extensive experience in UPI integration API development. We stay up-to-date with the latest trends and technologies to provide you with the most reliable and efficient solutions. 2. Seamless Integration: Our UPI collection API is designed to seamlessly integrate into your existing systems, making it easy for you to start accepting UPI payments quickly. We offer comprehensive documentation and support throughout the integration process, ensuring a smooth transition for your business. 3. Security: We understand the importance of securing sensitive customer data during payment transactions. That's why our UPI integration API follows strict security protocols to ensure that all transactions are encrypted and protected against unauthorized access. 4. Customization Options: Every business has unique requirements when it comes to payment processing. With our UPI collection API, you can customize the solution according to your specific needs, whether it's adding additional features or integrating with other payment gateways. 5. Competitive Pricing: We believe in providing affordable solutions without compromising on quality or functionality. Our pricing plans are flexible and tailored to suit businesses of all sizes, allowing you to get the best value for your investment. When it comes to UPI integration API services, Rainet Technology Private Limited stands out as a trusted partner that offers expertise, seamless integration, top-notch security measures, customization options, and competitive pricing options - everything you need for successful implementation of UPI payments in your business operations.
Visit Website: https://rainet.co.in/upi-collection-api.php

#upi integration api#upi api integration#upi payment gateway#paytm upi integration api#upi integration#upi payment gateway integration#app development#app developer#mobile app developer#android app developer#ios app developer#software development company#bbps login#bbps#bbps api provider#esc norway#education portal development company
0 notes
Text
Free or Cheap Mandarin Chinese Learning Resources Because You Can't Let John Cena One Up You Again
I will update this list as I learn of any more useful ones. If you want general language learning resources check out this other post. This list is Mandarin specific. Find lists for other specific languages here.
For the purposes of this list "free" means something that is either totally free or has a useful free tier. "Cheap" is a subscription under $10USD a month, a software license or lifetime membership purchase under $100USD, or a book under $30USD. If you want to suggest a resource for this list please suggest ones in that price range that are of decent quality and not AI generated.
WEBSITES
Dong Chinese - A website with lessons, a pinyin guide, a dictionary, and various videos and practice tests. With a free account you're only allowed to do one lesson every 12 hours. To do as many lessons as quickly as you want it costs $10 a month or $80 a year.
Domino Chinese - A paid website with video based lessons from absolute beginner to college level. They claim they can get you ready to get a job in China. They offer a free trial and after that it's $5 a month or pay what you can if you want to support their company.
Chinese Education Center - This is an organization that gives information to students interested in studying abroad in China. They have free text based lessons for beginners on vocab, grammar, and handwriting.
Pleco Dictionary App - This is a very popular dictionary app on both iOS and Android. It has a basic dictionary available for free but other features can be purchased individually or in bundles. A full bundle that has what most people would want is about $30 but there are more expensive options with more features.
MIT OpenCourseWare Chinese 1 2 3 4 5 6 - These are actual archived online courses from MIT available for free. You will likely need to download them onto your computer.
Learn Chinese Web Application From Cambridge University - This is a free downloadable file with Mandarin lessons in a PC application. There's a different program for beginner and intermediate.
Learn Chinese Everyday - A free word a day website. Every day the website posts a different word with pronunciation, stroke order, and example sentences. There's also an archive of free downloadable worksheets related to previous words featured on the website.
Chinese Boost - A free website and blog with beginner lessons and articles about tips and various resources to try.
Chinese Forums - An old fashioned forum website for people learning Chinese to share resources and ask questions. It's still active as of when I'm making this list.
Du Chinese - A free website and an app with lessons and reading and listening practice with dual transcripts in both Chinese characters and pinyin. They also have an English language blog with tips, lessons, and information on Chinese culture.
YOUTUBE CHANNELS
Chinese For Us - A channel that provides free video lessons for beginners. The channel is mostly in English.
Herbin Mandarin - A channel with a variety of lessons for beginners. The channel hasn't uploaded in a while but there's a fairly large archive of lessons to watch. The channel is mainly in English.
Mandarin Blueprint - This channel is by a couple of guys who also run a paid website. However on their YouTube channel there's a lot of free videos with tips about how to go about learning Chinese, pronunciation and writing tips, and things of that nature. The channel is mainly in English.
Blabla Chinese - A comprehensible input channel with content about a variety of topics for beginner to intermediate. The video descriptions are in English but the videos themselves are all in Mandarin.
Lazy Chinese - A channel aimed at intermediate learners with videos on general topics, grammar, and culture. They also have a podcast. The channel has English descriptions but the videos are all in Mandarin.
Easy Mandarin - A channel associated with the easy languages network that interviews people on the street in Taiwan about everyday topics. The channel has on screen subtitles in traditional characters, pinyin, and English.
StickynoteChinese - A relatively new channel but it already has a decent amount of videos. Jun makes videos about culture and personal vlogs in Mandarin. The channel is aimed at learners from beginner to upper intermediate.
Story Learning Chinese With Annie - A comprehensible input channel almost entirely in Mandarin. The host teaches through stories and also makes videos about useful vocabulary words and cultural topics. It appears to be aimed at beginner to intermediate learners.
LinguaFlow Chinese - Another relatively new channel but they seem to be making new videos regularly. The channel is aimed at beginner to intermediate learners and teaches and provides listening practice with video games. The channel is mostly in Mandarin.
Lala Chinese - A channel with tips on grammar and pronunciation with the occasional vlog for listening practice, aimed at upper beginner to upper intermediate learners. Some videos are all in Mandarin while others use a mix of English and Mandarin. Most videos have dual language subtitles onscreen.
Grace Mandarin Chinese - A channel with general information on the nitty gritty of grammar, pronunciation, common mistakes, slang, and useful phrases for different levels of learners. Most videos are in English but some videos are fully in Mandarin.
READING PRACTICE
HSK Reading - A free website with articles sorted into beginner, intermediate, and advanced. Every article has comprehension questions. You can also mouse over individual characters and see the pinyin and possible translations. The website is in a mix of English and Mandarin.
chinesegradedreader.com - A free website with free short readings up to HSK level 3 or upper intermediate. Each article has an explaination at the beginning of key vocabulary words in English and you can mouse over individual characters to get translations.
Mandarin Companion - This company sells books that are translated and simplified versions of classic novels as well as a few originals for absolute beginners. They are available in both traditional and simplified Chinese. Their levels don't appear to be aligned with any HSK curriculum but even their most advanced books don't have more than 500 individual characters according to them so they're likely mostly for beginners to advanced beginners. New paperbacks seem to usually be $14 but cheaper used copies, digital copies, and audiobooks are also available. The website is in English.
Graded Chinese Readers - Not to be confused with chinese graded reader, this is a website with information on different graded readers by different authors and different companies. The website tells you what the book is about, what level it's for, whether or not it uses traditional or simplified characters, and gives you a link to where you can buy it on amazon. They seem to have links to books all the way from HSK 1 or beginner to HSK 6 or college level. A lot of the books seem to be under $10 but as they're all from different companies your mileage and availability may vary. The website is in English.
Mandarin Bean - A website with free articles about Chinese culture and different short stories. Articles are sorted by HSK level from 1 to 6. The website also lets you switch between traditional or simplified characters and turn the pinyin on or off. It also lets you mouse over characters to get a translation. They have a relatively expensive paid tier that gives you access to video lessons and HSK practice tests and lesson notes but all articles and basic features on the site are available on the free tier without an account. The website is in a mix of Mandarin and English.
Mandarin Daily News - This is a daily newspaper from Taiwan made for children so the articles are simpler, have illustrations and pictures, and use easier characters. As it's for native speaker kids in Taiwan, the site is completely in traditional Chinese.
New Tong Wen Tang for Chrome or Firefox - This is a free browser extension that can convert traditional characters to simplified characters or vice versa without a need to copy and paste things into a separate website.
PODCASTS
Melnyks Chinese - A podcast for more traditional audio Mandarin Chinese lessons for English speakers. The link I gave is to their website but they're also available on most podcatcher apps.
Chinese Track - Another podcast aimed at learning Mandarin but this one goes a bit higher into lower intermediate levels.
Dimsum Mandarin - An older podcast archive of 30 episodes of dialogues aimed at beginner to upper beginner learners.
Dashu Mandarin - A podcast run by three Chinese teachers aimed at intermediate learners that discusses culture topics and gives tips for Mandarin learners. There are also male teachers on the podcast which I'm told is relatively rare for Mandarin material aimed at learners and could help if you're struggling to understand more masculine speaking patterns.
Learning Chinese Through Stories - A storytelling podcast mostly aimed at intermediate learners but they do have some episodes aimed at beginner or advanced learners. They have various paid tiers for extra episodes and learning material on their patreon but there's still a large amount of episodes available for free.
Haike Mandarin - A conversational podcast in Taiwanese Mandarin for intermediate learners. Every episode discusses a different everyday topic. The episode descriptions and titles are entirely in traditional Chinese characters. The hosts provide free transcripts and other materials related to the episodes on their blog.
Learn Chinese With Ju - A vocabulary building podcast aimed at intermediate learners. The podcast episodes are short at around 4-6 minutes and the host speaks about a variety of topics in a mix of English and Mandarin.
xiaoyuzhou fm - An iOS app for native speakers to listen to podcasts. I’m told it has a number of interactive features. If you have an android device you’ll likely have to do some finagling with third party apps to get this one working. As this app is for native speakers, the app is entirely in simplified Chinese.
Apple Podcast directories for Taiwan and China - Podcast pages directed towards users in those countries/regions.
SELF STUDY TEXTBOOKS AND DICTIONARIES
Learning Chinese Characters - This series is sorted by HSK levels and each volume in the series is around $11. Used and digital copies can also be found for cheaper.
HSK Standard Course Textbooks - These are textbooks designed around official Chinese government affiliated HSK tests including all of the simplified characters, grammar, vocab, and cultural knowledge necessary to pass each test. There are six books in total and the books prices range wildly depending on the level and the seller, going for as cheap as $14 to as expensive as $60 though as these are pretty common textbooks, used copies and cheaper online shops can be found with a little digging. The one I have linked to here is the HSK 1 textbook. Some textbook sellers will also bundle them with a workbook, some will not.
Chinese Made Easy for Kids - Although this series is aimed at children, I'm told that it's also very useful for adult beginners. There's a large number of textbooks and workbooks at various levels. The site I linked to is aimed at people placing orders in Hong Kong but the individual pages also have links to various other websites you can buy them from in other countries. The books range from $20-$35 but I include them because some of them are cheaper and they seem really easy to find used copies of.
Reading and Writing Chinese - This book contains guides on all 2300 characters in the HSK texts as of 2013. Although it is slightly outdated, it's still useful for self study and is usually less than $20 new. Used copies are also easy to find.
Basic Chinese by Mcgraw Hill - This book also fuctions as a workbook so good quality used copies can be difficult to find. The book is usually $20 but it also often goes on sale on Amazon and they also sell a cheaper digital copy.
Chinese Grammar: A beginner's guide to basic structures - This book goes over beginner level grammar concepts and can usually be found for less than $20 in print or as low as $2 for a digital copy.
Collins Mandarin Chinese Visual Dictionary - A bilingual English/Mandarin visual dictionary that comes with a link to online audio files. A new copy goes for about $14 but used and digital versions are available.
Merriam-Webster's Chinese to English Dictionary - In general Merriam Websters usually has the cheapest decent quality multilingual dictionaries out there, including for Mandarin Chinese. New editions usually go for around $8 each while older editions are usually even cheaper.
(at the end of the list here I will say I had a difficult time finding tv series specifically made for learners of Mandarin Chinese so if you know of any that are made for teenage or adult learners or are kids shows that would be interesting to adults and are free to watch without a subscription please let me know and I will add them to the list. There's a lot of Mandarin language TV that's easy to find but what I'm specifically interested in for these lists are free to watch series made for learners and/or easy to understand kids shows originally made in the target language that are free and easy to access worldwide)
456 notes
·
View notes
Text
A-Café (Update #25) - Community Discussion
Good morning everyone! I know it's been a while since I've posted, but I'm finally back with another community update. In the first part, I'll be giving a brief overview of where we're at in terms of project progress. Then, in the second half, we'll discuss a new development in app accessibility.
Without further ado, let's begin!
1) Where are we at in the project currently?
A similar question was asked in the A-Café discord recently, so I figured I'd include my response here as well:
Right now we’re reworking the design of A-Café, both visually and architecturally. The initial planning and design phase of the project wasn’t done very thoroughly due to my inexperience, so now that I’m jumping back into things I want to ensure we have a solid prototype for usability testing. For us that means we’ve recently done/are doing a few things:
analyzing results from the old 2022 user survey (done)
discussing new ideas for features A-Café users might want, based on the 2022 user survey
reevaluating old ideas from the previous app design
making a new mock-up for usability testing
Once the mock-up is finished, I plan on doing internal testing first before asking for volunteer testers publicly (the process for which will be detailed in an upcoming community update).
2) Will A-Café be available for iOS and Android devices?
Yes! In fact, the first downloadable version of A-Café may no longer be so device-specific.
What do I mean by that? Well, in the beginning, the plan for A-Café was to make two different versions of the same app (iOS and Android). I initially chose to do this because device-specific apps are made with that device's unique hardware/software in mind--thus, they have the potential to provide a fully optimized user experience.
However, I've since realized that focusing on device-specific development too soon may not be the right choice for our project.
Yes, top-notch app performance would be a big bonus. But by purely focusing on iOS and Android devices for the initial launch, we'd be limiting our audience testing to specific mobile-users only. Laptop and desktop users for example, would have to wait until a different version of the app was released (which is not ideal in terms of accessibility).
Therefore, I've recently decided to explore Progressive Web App development instead.
[What is a Progressive Web App?]
A Progressive Web App (or PWA) is "a type of web app that can operate both as a web page and mobile app on any device" (alokai.com)
Much like a regular mobile app, a PWA can be found through the internet and added to your phone's home screen as a clickable icon. They can also have the ability to work offline and use device-specific features such as push-notifications.
Additionally, due to being web-based applications, PWAs can be accessed by nearly any device with a web browser. That means regardless of whether you have an iOS or Android device, you'd be able to access the same app from the same codebase.
In the end, a PWA version of A-Café should look and act similarly to an iOS/Android app, while also being accessible to various devices. And, due to having only one codebase, development of PWAs tends to be faster and be more cost-effective than making different versions of the same app.
To be clear, I haven't abandoned the idea of device-specific development entirely. We could launch iOS/Android versions of A-Café in the future if demand or revenue end up being high enough. But as of right now, I don't believe doing so is wise.
[What Does this Mean for me as a User?]
In terms of app installation and user experience, not much should hopefully change. I'd like to have A-Café available on both the Apple App Store and Google Play Store.
There will also be the option of searching for A-Café via your device's web browser, and then installing it on your home screen (iOS devices can only do so using Safari). We will likely rely on this method until we can comfortably ensure user access to A-Café on the Apple App Store and Google Play Store.
-------------
And that's it for now! Thank you for reading this latest community update. For more insight into the development process, consider joining the A-Café discord. If you have any questions or concerns regarding this post, we would love to hear your input in the comments below. See you later!
26 notes
·
View notes
Text
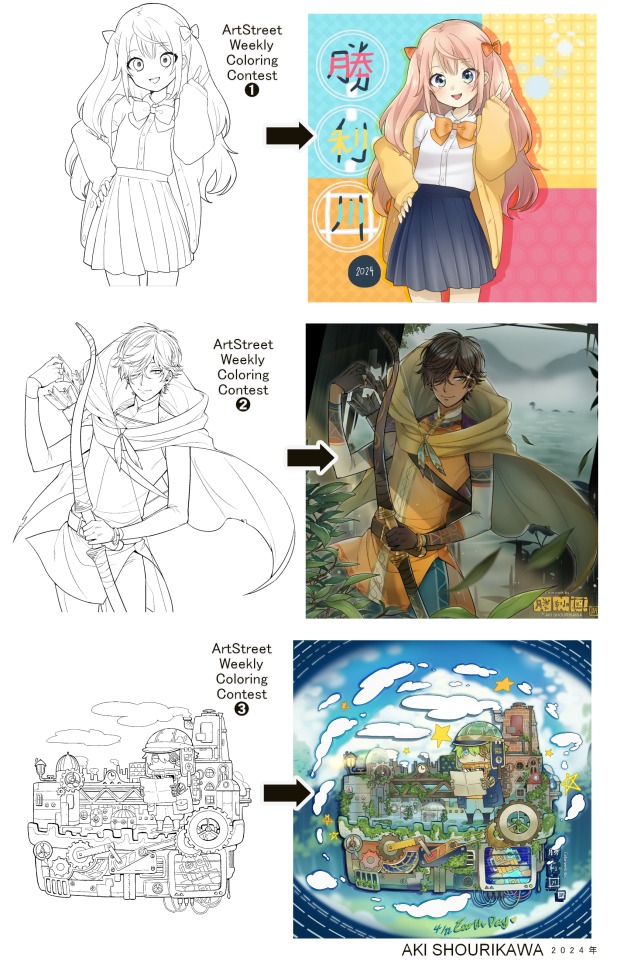
Blog No.003🍊 24年5月10日
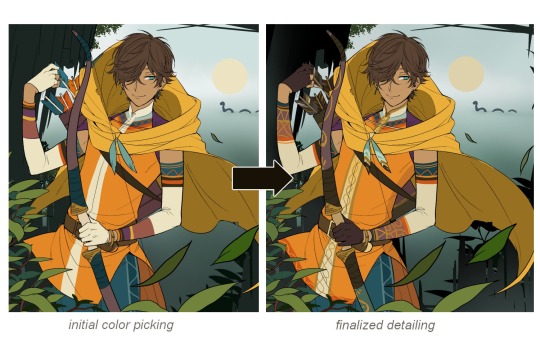
「Let's Talk About Coloring+Rendering!!」
~ The Chaos of Akehhh-style Layering w/ Colors & Values ~
ArtStreet recently released some weekly coloring contests and as someone who likes joining 'em + colorwork being the absolute joyous part in drawing for me, I got really into it!! One of them somehow won and I still have the raw .mdp file of it with most of the layers unmerged... so, I thought there might be some value in sharing my chaotic coloring progress with it. There may never be an opportunity like this again...
CONTENTS:
Preface・・・・・・・・・
The Linework・・・・・・
Composition + Planning・
The Render・・・・・・・
Additional FX Tips・・・・
The Layers of Dread・・・
1. Preface
I use the free software MediBang Paint, which is made by the same folks who made the aforementioned art-sharing website, Artstreet. Although its file type extension is .mdp, it can also save as and open .psd files all the same.
If interested, you can download it on their website here! I believe it's available in both PC, Apple, iOs, and Android (also on the PlayStore). ☞And here is my google drive link of my fully rendered entry's raw .mdp file. I also included a .psd version that should be accessible with most other softwares like Photoshop, Clipstudio, etc.
NOTE: Not sure how some layer effects will be displayed apart from MediBang though (either in name or function) . But I think "multiply" and "overlay" is fair game on most drawing/photo-editing softwares with layer systems.
Either way, ↑this is just a bonus thing if you wish to see for yourself how much my MediBang cries everytime I work on something, since visuals of the rough step-by-step will be provided here as well!
At the end of this post, all of the layers' purposes will be explained...y-you'll see...
■And just as a disclaimer: I'm an instinctively self-taught illustrator who is a heavy visual learner, so there are certain methods I do that I cannot readily explain with back-up studies on color theories or formally taught techniques in art schools and the like/certain made-up terminologies that may or may not exist as something else. I mostly operate on instinct, observation, subjective preferences, and vibes, so this would just be me trying to verbalize my process (with visual aid) as a means of share-rambling, rather than actually directly "teaching" anything, I think haha You can take it as a cautionary tale too, honestly-
※I will also be going through this with the assumption that the reader has some background knowledge on digital illustration and general drawing basics + lingo. If you have any questions or needed clarifications, please feel free to let me know!
Although art can be fundamentally "wrong" when it comes to achieving certain specific styles, structures (especially when involving realism as the standard), or general executions of intentions/themes, I am of belief that there is generally no wrong or right 'way' for drawing anything; or for doing ANY type of artistic endeavor for that matter. This might be perceived as a "bad anatomy defender" / "no need to improve, then" stance on my part, but it is absolutely not the case! An artwork is never finished, there's always room for improvementsーa galaxy's size of a room especially for myselfーbut I just think anything at all that brings you an expressive or creative outlet, joy, or peace of mind is worth pursuing, regardless of your own skill or tact and there's no shame in that. I do not wish anyone, especially people starting out with drawing to be discouraged for having their own different approaches in comparison to other people's works by misconception of, "oh, am I doing it wrong?". Sometimes having different or an uncommon worldview is not always a 'bad' thing, I think. Heaven forbid artists actually start getting creative and unique―
What I will be presenting here is simply my one way out of thousands of thousands of different possibilities. So, let's start★
2. The Linework
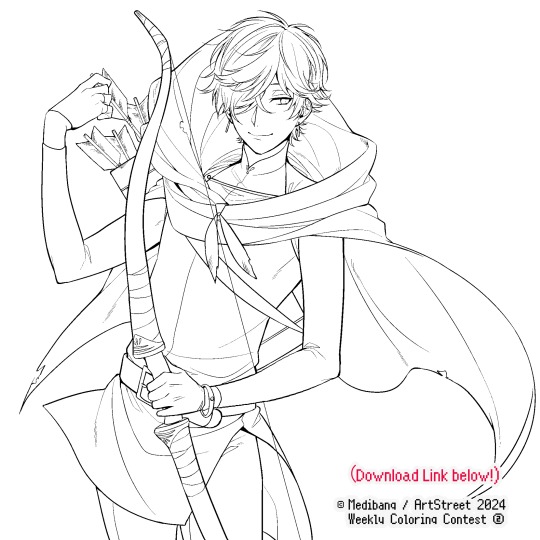
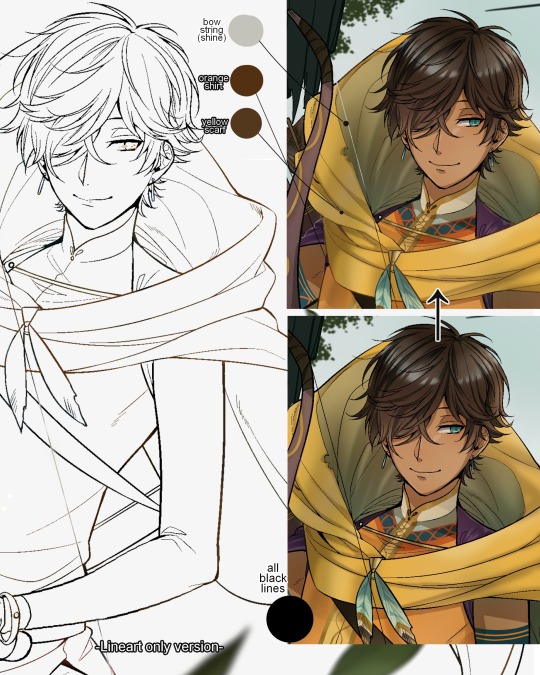
Equally lengthy talk of lineart is probably for a later discussion, but here is the template provided by ArtStreet for the contest + what will be colored in for today.
☞The contest has since ended, but you can still download the lineart template here if you'd like!
3. Composition + Planning
The contest rules said it's "OK to draw backgrounds", so let's go!!
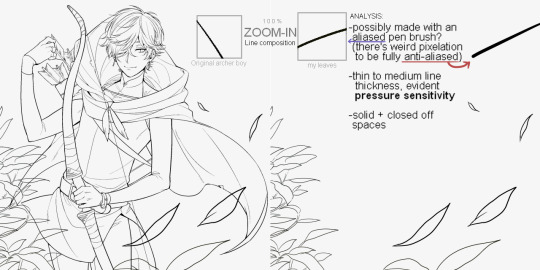
I had already decided on how I want to color it early on: It will be more scenic in nature, rather than stylistic. So, there will be more focus on looking 'real' than 'aesthetically stylish'! Just so it doesn't look disconnected or too out of place, I tried to draw my additions similarly to how Mr. archerman's linework looked as much as possible.
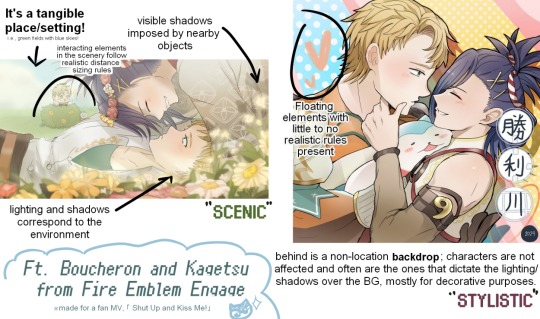
This how I visually define "scenic" VS "stylistic" illustrations (in my head)
I like experimenting and mixing different rendering techniques with varying linework styles and tend to think about my approach with the rendering long before the coloring process, even waaay before I line my final sketch, usually. But for this, I'm simply working with what was given to me.
At first, I just wanted a "cool breeze w/ leaves flying away ahhhh refreshing~~" mood, but the space at the side of his head looked rather empty as is, even with Nessie. So I thought about putting him inside a vague...darkly-lit abandoned ruins-setting to eat up some of that space.
And with that, it's time for colors.
4. The Render
My coloring process is the lengthiest and often makes people who see me color in real-time scream in horror, but I think it's actually fairly simple and can be summarized into three nutshelled stages:
①Fill in the colors with a finalized palette of your choice,
②cry Continuously render until your arms fall off you're satisfied.
③ cry even HARDER (optional) Adjust accordingly to fit in better with other elements of the illustration, such as with the focus/subject to background. *will be explained later.
oh and btw, the usage of the words 'render(ing)' tends to be confusing with its association with other mediums like 3D models, but when it comes to drawing I like to think of it this way:
🎨Coloring is the planned/intentional selection of your color range, tints, tones, and palette to use in a drawing, ☀Rendering is the act (or product) of the set of techniques (including effects, filters, etc.) you use with the colors/values to create the illusions of depth, shadows and light, movement, warmth/cold atmospheres, etc in a 2D illustration.
But that's just how I define it with my own step-by-steps. Otherwise, I think either term is pretty much interchangeable.
Anyhoo, what do you think should this man's hair, skin, eye, and clothing's colors be?
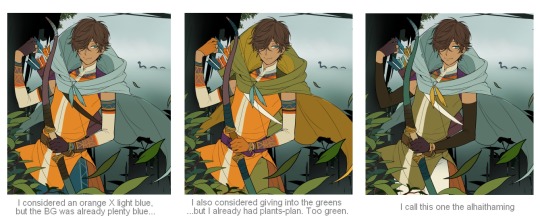
here are some of the variations on the color picks of his outfit that rotted my brain for about 3 hours straight, like it's a 2000s dress-and-match flash game
The many submissions for the contest had many fun color combinations and interesting interpretations I personally think should've won. I saw a lot of blonde archer-princes wearing greens, browns, and blues, as a lot also went for the "forest hunter boi" vibe. But I was saddened by the lack of my favorite colors being used as the primary colorーorange and yellow. So, let's use those!!
The start of my coloring/rendering journey is never at Layer '1'.........
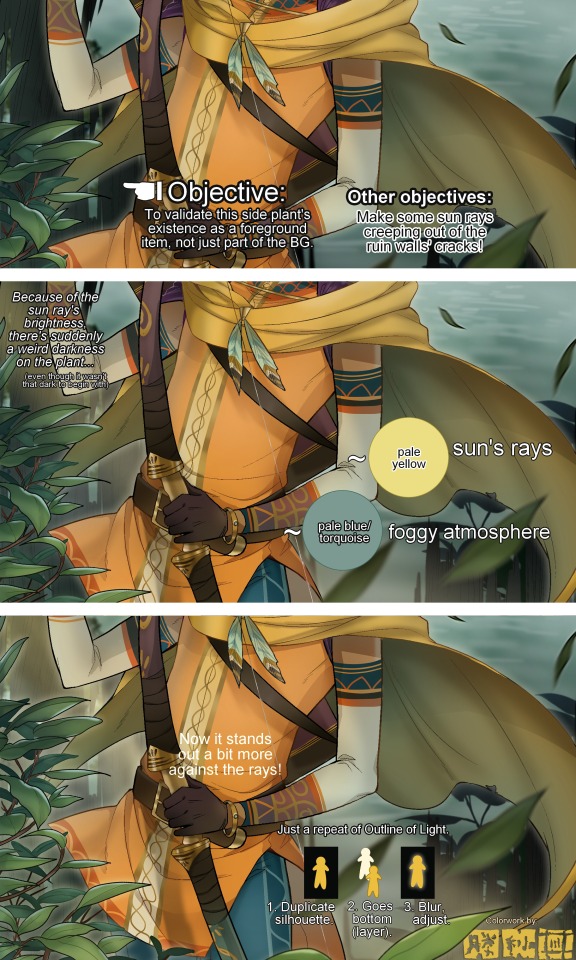
―Starting with what I've always referred to as "environment prep":
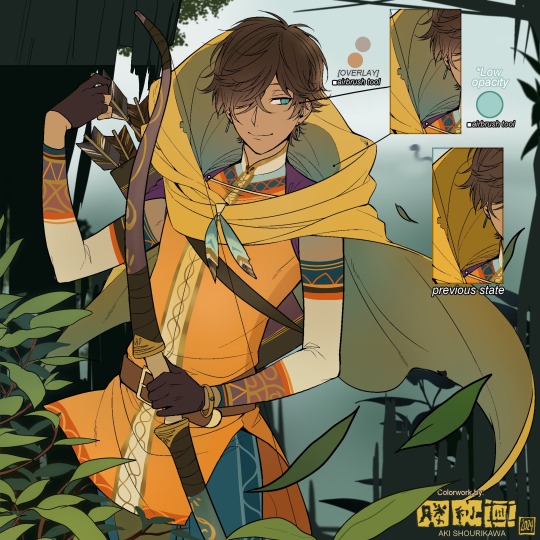
The purpose here is to 'set' the base colors so they match with the environment or general atmosphere. Get ready to see this over and over
This could mean adjusting the saturation, or spraying gradients of the BG's most prominent color on parts that...gives me anxiety the most-
As someone who tends to work with very, very bright color schemes with character designs, trying to blend in when the illustration is meant to be scenic or 'serious' in tone without it being a distracting eyesore can be a challenge. So, this is what I do to counter it.
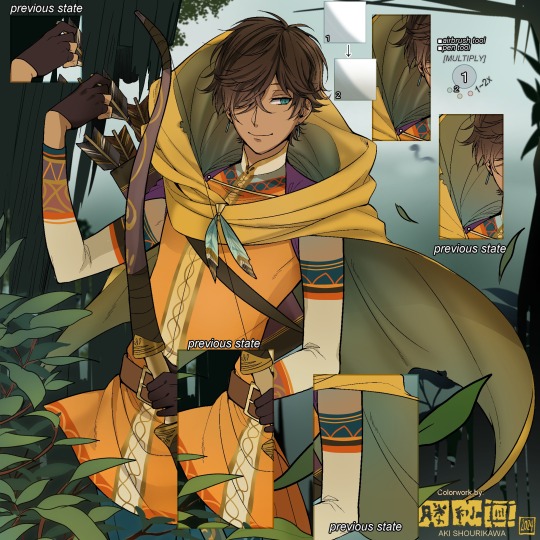
Shading is usually an early step for me as well, even though I think it's a lot of other artists' near-to-final step. I tend to lean towards an abomination mix of soft shade and cel shadeーthe strokes are sharp enough to trace where the shadows start and end, but softened around the edges for effect.
I also tend to apply an additional spray of subtly darker shade on top of the first one? It's usually on spots where I think the light source won't be hitting as much. I wouldn't do this for simple styles (stylized illustrations like with a chibi style), but for scenic illustrations I find it's necessary to achieve that depth against a fully-rendered environment.
※Just a side note: You may see multiple things changing around, but in real time I'm most definitely working on one part at a time lol. These visual aids were ripped off the raw .mdp by hiding some of the layers, so that's why different areas seem to progress together all at once, even if that's a bit idealistic in actuality.
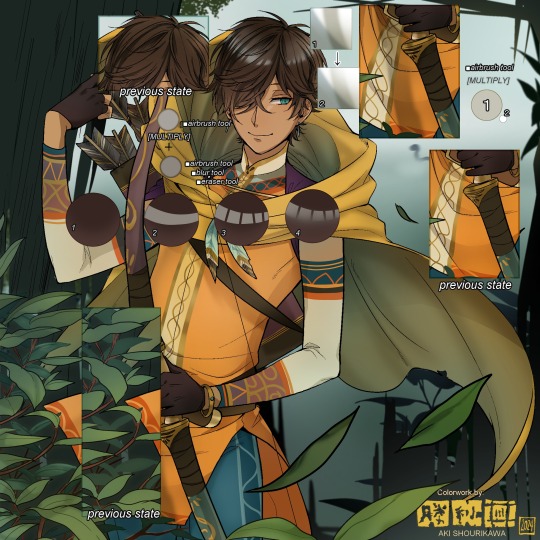
Apart from the previous adding of shades with a multiply-mode layer for the preliminary shadows, I add one more layer of shadow on there for objects or other characters that can cast distinct shadows on the subject. In here, it's the bow and the hovering strap across his chest.
Lighting is also starting to be added as well.
One direct alteration I did with the lineart template was change the line's colors. I find it really softens them to mix better with their filled-in colors + as well as not stand out too harshly against a light-colored scenic background.
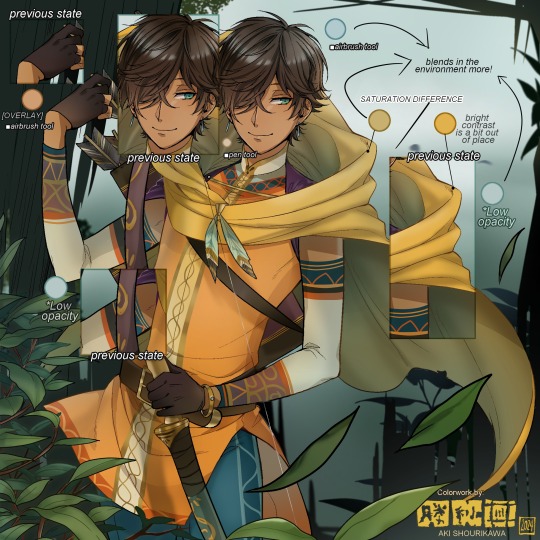
I think you now have a good idea over my hyperfixation on making sure colors are 'vibing' well against the BG lol A lot of these steps are basically just doing the same thing over and over with new layers for the sake of this purpose, really.
And after that, just repeating all the stuff we did with the character onto everything else (background, foreground, objects, etc.) until you're satisfied with it!
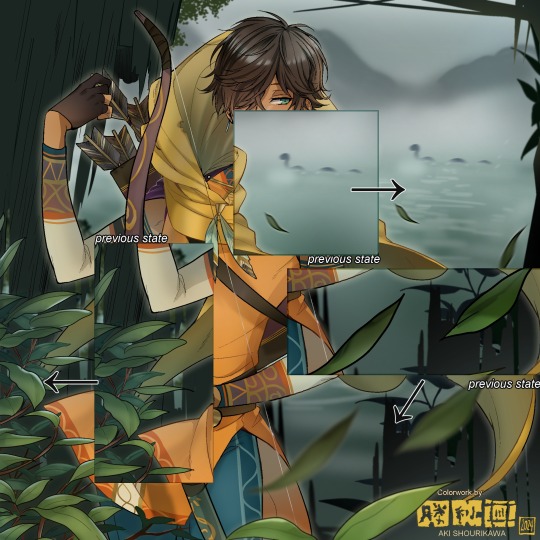
A lot of these changes are very subtle on their own, but makes all the difference in the bigger picture, I think!
Just maybe some additional finishing touches for some boom shakalaka and...that's pretty much it! You will notice that throughout the entire process, there's a lot of random little things that suddenly appear or change with seemingly not much purpose or meaning on its own. I unfortunately have always drawn in this sort of vague, quickly impulsive, directionless way since I was a child and I don't think even I will ever understand it, logically. It's mostly a... continuous string of instinctive feelings of "HEY let's do it this way, if not there's like 10 other things we can try next", is the closest I can get to an explanation of how it feels.
I don't know if it's common for other artists to think or function this way, but I do know for a fact that many people seem to be surprised and confused when they see me drawing in real time this way. Everytime I get asked 'how' I draw certain things, I say things like 'I turn my brain off and vibe with many, many layers with a broken back.' and people think it's just a dismissive joke. I-it's really not, it's literally what happens, I don't have any secret shortcuts for you-
Hopefully this very lengthy post + visual aids can help demystify some misconceptions on what "really" goes on when I'm drawing! It's also a bit of an update of my tutorials made for friendos starting out with digital drawing back in 2015!
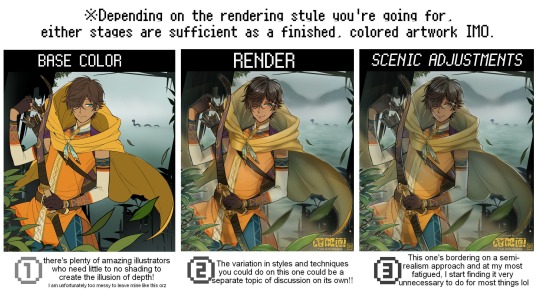
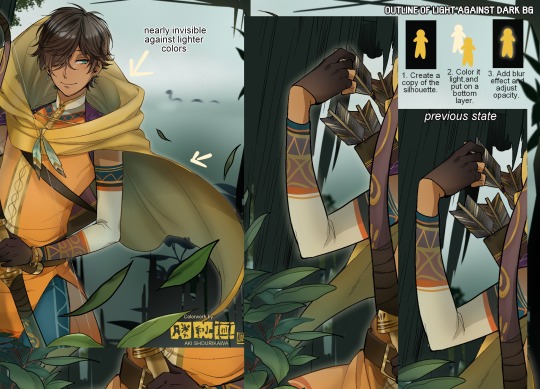
Anyway, the rendering stage is where the simplified steps ② and optional step ③ branch out like a fork in the road for me; I don't think one is any "better" than the other, I think doing either is simply a matter of personal preference and artistic choice;
➋being leaving all that 100++ layers rendering that we just did alone and calling it a day,
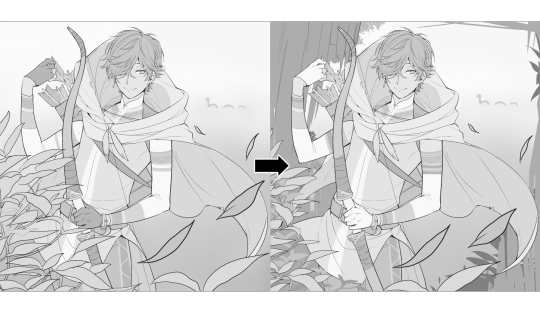
➌being a little bit more extra w/ additional shadows/lighting that corresponds with the environment the character is in.
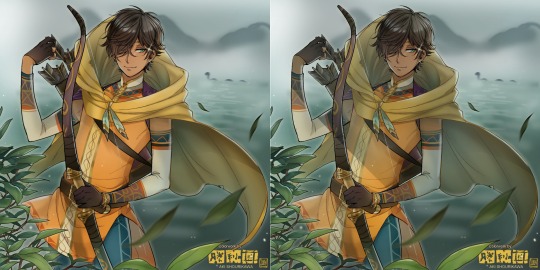
I removed the walls to see the whole figure better in a side-by-side comparison. I like the unadjusted (L) without the wall, but with the walls in the final illustration, I think adjusted (R) felt 'right'. What do you think?
There are some things, although realistic, don't look that good as a visual aesthetic and are just downright excessive/unnecessary to add to certain types of illustrations.
Then there's things that aren't possible in real life, but artistically? Looks really dang cool. Being biased for either ends of the hyperrealism and hyperstylized spectrums of styles is fine; only as long as no discrimination is involved towards people who don't share your opinions, in my opinion-
and to conclude this section, I say,
『 You go render however you wantーhellーno colors even necessary if you wish!
Simple ≠ laziness, just as much as complexity ≠ skill。』
I will never stop yapping about how a lot of minimalist styles require so much more amounts of planning and effort to make sure everything is nice and clean, especially compared to mindless rendering loops like these. Mine's a maximalist hell and I wouldn't have it any other way, but I greatly envy minimalist artists that can render with just something like my step ① with so much grace and tact; not a single stray or wasted stroke!! Anyone who dismisses these types as "lazy" I will violently stuff inside a couchーwithout any potato snacks to snack on!!!
5. Additional FX Tips
Just a shorter section for some optional finishing touches tips'n'tricks used in this I frequently (ab)use☆
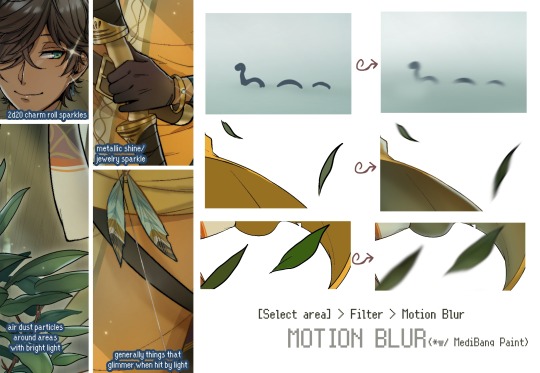
◆ From the very beginning, even before I understood how to draw, it's always been a tradition to doodle around sparkles all around the place. I usually do it with MediBang's sparkle brush if I want it to look polished, or simply draw it manually using either the pen or airbrush tool for a cruder charm.
◆ Motion blur is great, and MediBang in particular also has different types of blur effects like Gaussian and regular blurs. If your software doesn't have these effects / if you're working traditionally but still want to achieve the illusion of motion in a still drawing, you can still achieve the same effect through your linework! Try looking into incorporating action lines (commonly seen in manga and comics) into it. Otherwise, purposefully drawing something blurily to begin with oughta work as well.
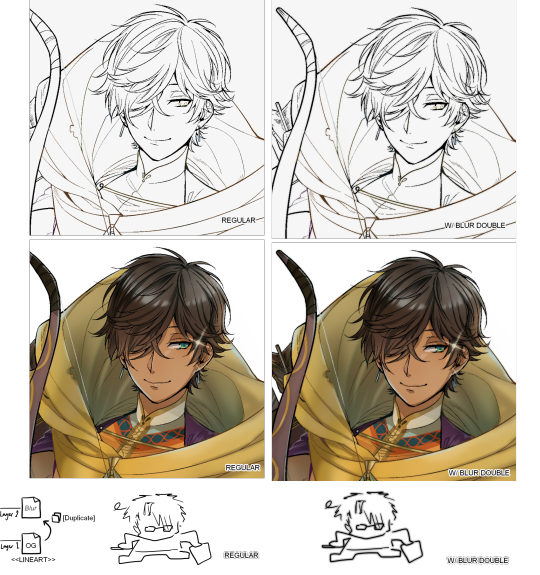
◆ Apart from changing the lineart's colors, there's also this little effect that is achieved by duplicating the lineart and blurring it. It gives something like a...'dreamy' quality to it? The higher the blurred copy's opacity is, the more emphasized it makes everything look.
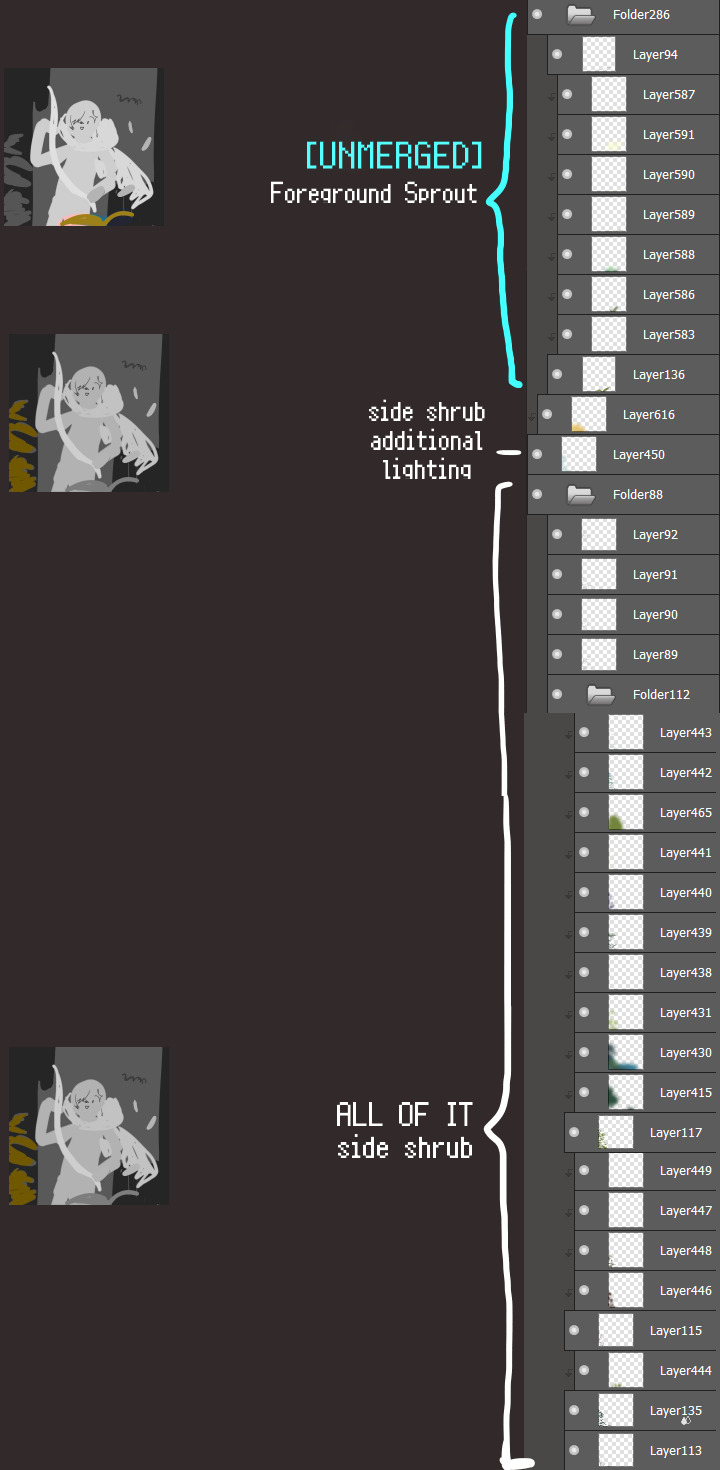
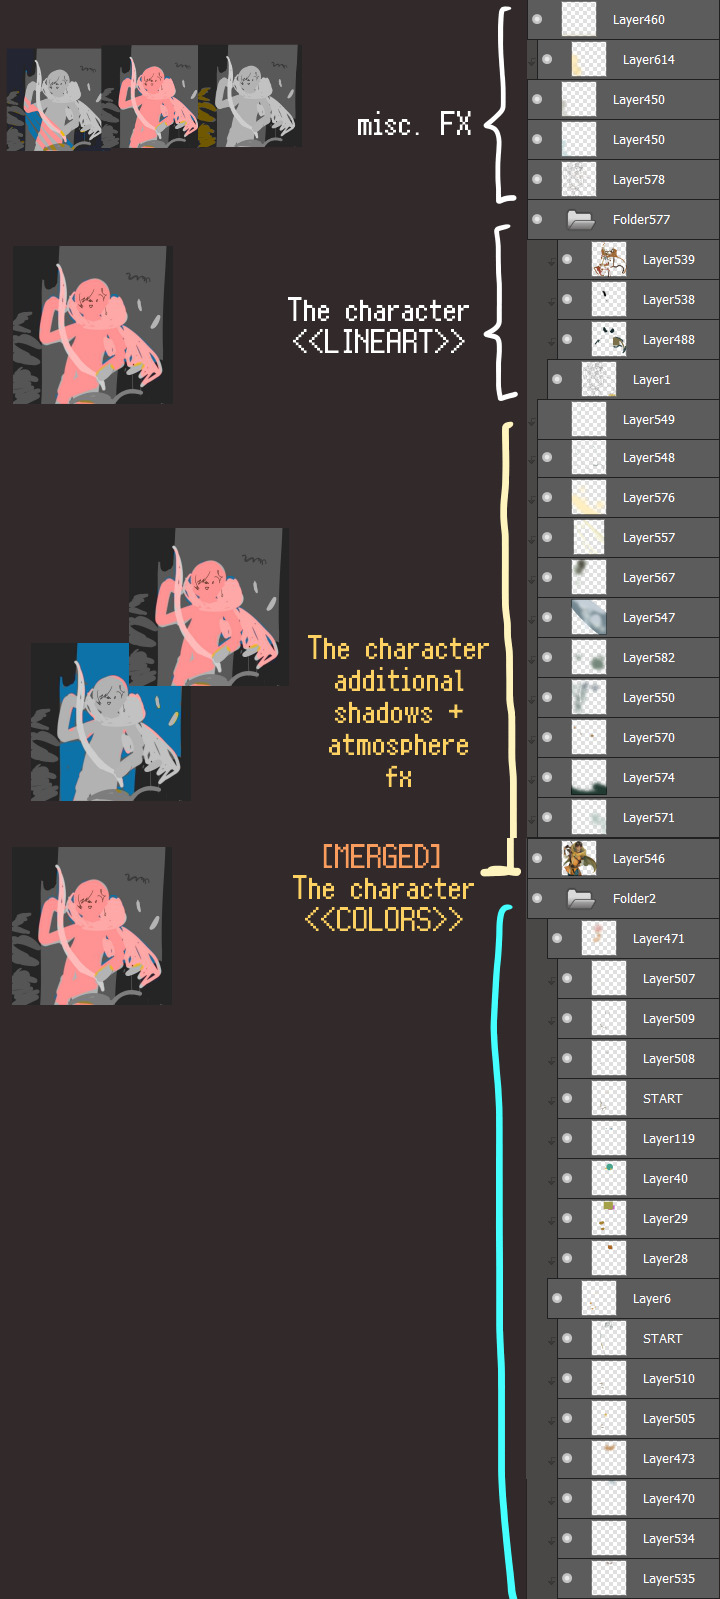
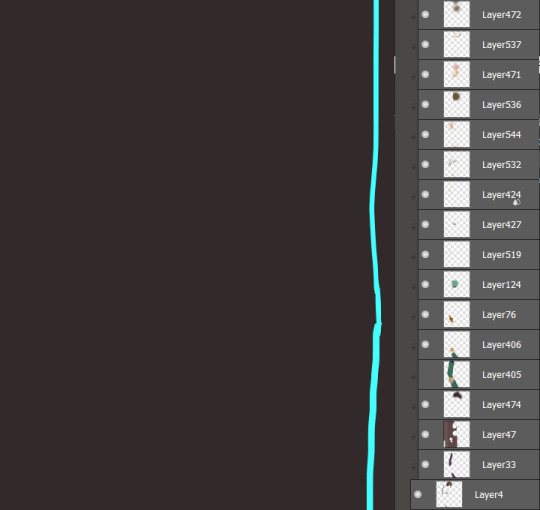
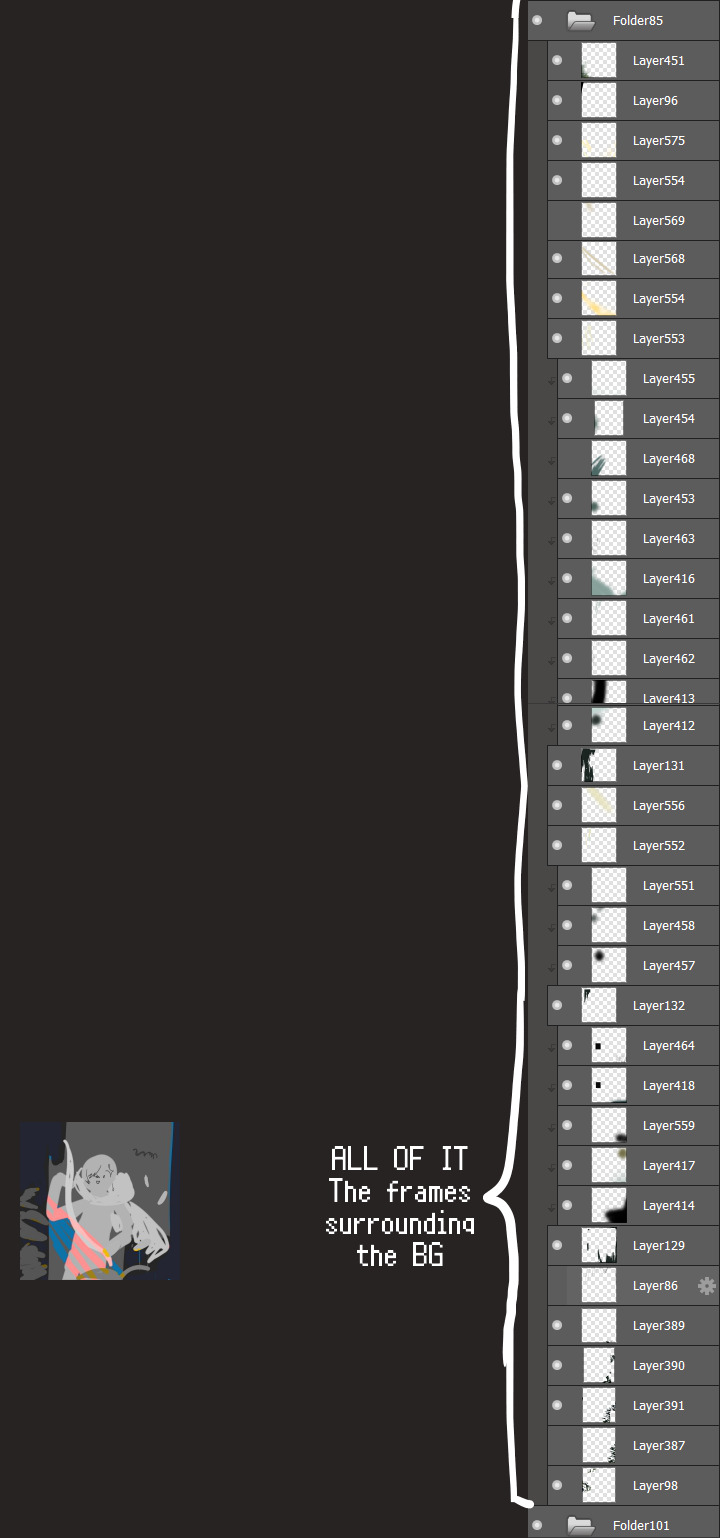
6. The Layers of Dread
At long last we've arrived... at my MediBang's repeating demise for all of eternity...
Here's a preview of what the .mdp/.psd file of this colored entry's unhingedmerged layers looks like + how I try to validate their existence. When I work on full-sized illustrations, I tend to merge layers as I go, so this is probably one of the rare times I can show something like this without either mine or your PC dying. If you'd like to see, play around with, and toggle them for yourself in all of its............glory, feel free to download it here.
Yes
we're starting at Layer 611. Enjoy.
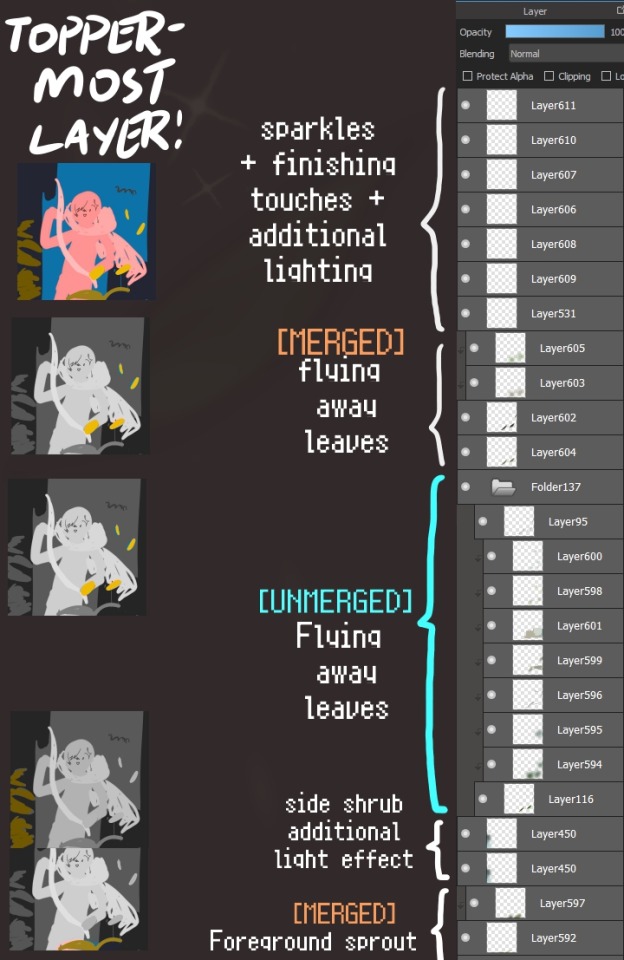
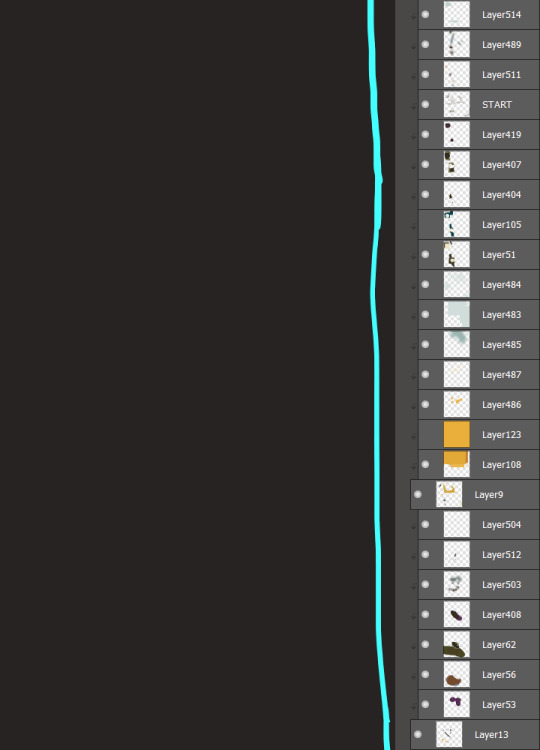
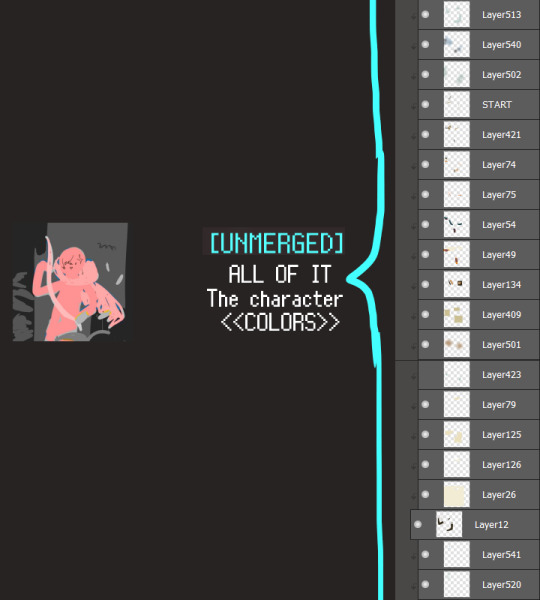
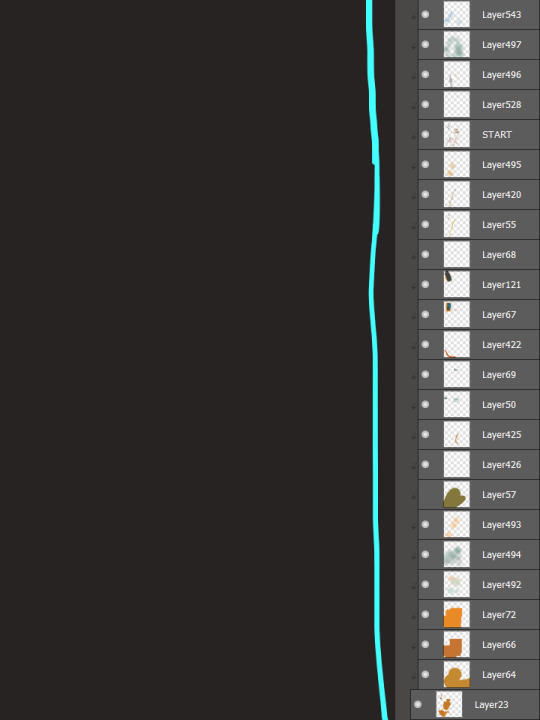
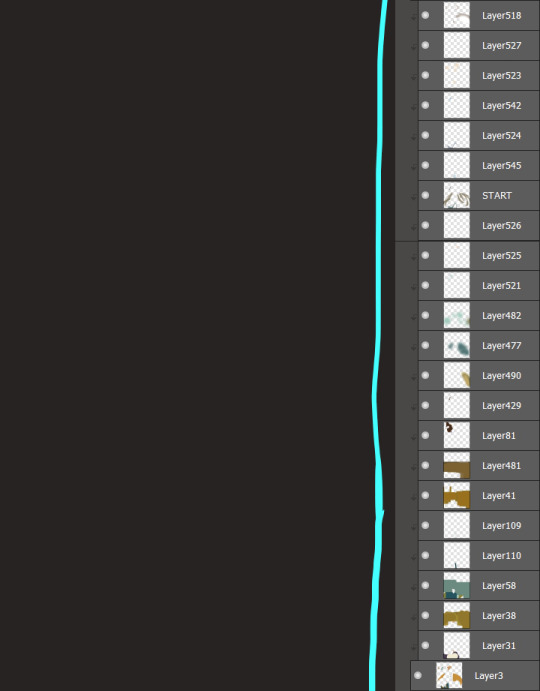
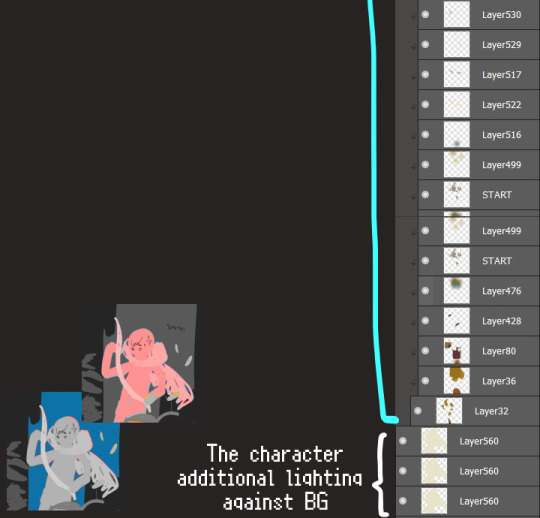
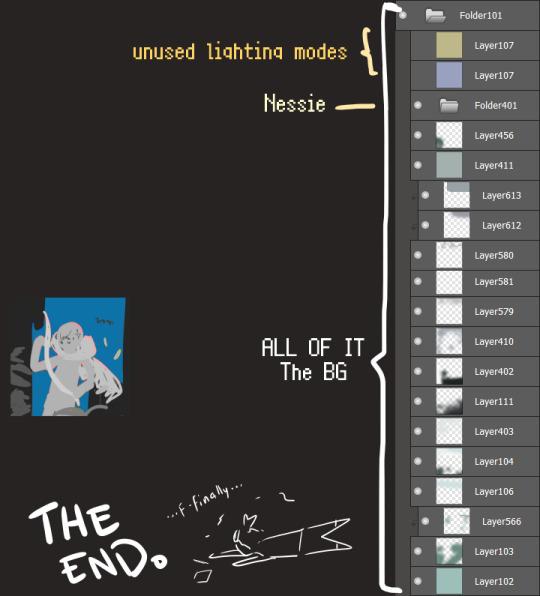
I will now delete my PC's copy because jfc that's one too many MBs ...and it's still eons lighter than what I usually work with on my own full illustrations from sketch to finish......。 (;´༎ຶٹ༎ຶ`) thank you for reading this far and making it out alive, goodbye for now...
・・・ホームページALL LINKS・・・
・Art Gallery・Commission Info・Ko-fi shop・
#art blog#long post#coloring#coloring tutorial#art tips#art tutorial#digital art#digital illustration#digital drawing#digital art tips#digital art tutorials#medibang#drawing journal#drawing process#illustration#coloring practice#nessie#the loch ness monster
32 notes
·
View notes
Text

mobile application service provider
#mobile application service provider#mobile application development services#native app development services#hybrid app development services#android app development#ios mobile app development#cross platform mobile development#mobile game development company#custom mobile apps#blockchain mobile app development#app development#mobile app development#app development company#mobile app development company#app development software#flutter app development#android development#ios app development#best app developers#create android app#web app development#mobile app development software#mobile development#android app development software#android application development#cross platform app development#best app development companies#best app development software#app development agency#make android app
0 notes
Text
#web development#web site development#web developer near me#web development company near me#Best Web Development Company#Web Development Company in Delhi NCR#Web Development Company in Noida#web development company#website design & development company#website and app development#Ecommerce Developer#Ecommerce Web Developers#Ecommerce website Development#Ecommerce Application Development#Ecommerce Website Development Near me#Web Development Company#web design & development#Ecommerce website Development company noida#ios app development company in noida#custom software development company in noida#software development company in noida#app development in noida#Cloud Consulting Services#Cloud Consulting Services in Noida#software development company in india#Mobile App Development Company#Mobile App Development Company near me#AWS Cloud Services#Best Service cloud consulting providers#Microsoft Azure cloud consulting services
0 notes
Note
I saw that you use a tablet, a desktop, and paper notes. How do you conciliate those notes?
Is there a mechanism of making primary notes on one resource and then passing those notes to other while reviewing them?


hi! thanks so much for asking! here are my favorite methods for sharing notes between devices :). i personally have apple devices so i can fairly easily airdrop and sync things between devices, but i also frequently work at the library desktop computers where i can't do that! so here's my tips and tricks for sharing notes between devices
for context: i've been mostly doing digital notetaking recently, but i also like to scan my paper notes as well!
i'm going to be dividing this post into 2 methods! (there will be some overlap). syncing already written notes and syncing notes (in progress) between devices
for already written notes:
the first step i would take is export your notes as a pdf or any other file type. if they're handwritten try going into your notes app (for ios) or downloading a pdf scanner app for your phone! if your notes are digital check the sharing options in your app to see if there's anything about "exporting".
personally, i like to use either discord or notion. i have created a discord server with only myself that i use just for sharing links/files/anything between devices! i like discord because there's apps for pc, mac, tablets, and phones; and even a web app! discord is really nice and fast, and you can make different channels (as pictured below) for organization. as long as your file size isn't too big, you should be fine.

my second app i like to use is notion! notion is such a beast in itself, but i like to use it to upload files and images and links! below are two ways i have used it: to upload pdfs/files, and to upload goodnotes (my notetaking app) links to the pages i'm writing on! similar to discord, notion has apps for all devices, but it also works great just by itself on the website (no app required)! it's really great to access it from all my devices.


another way you could share your notes on different devices is through the cloud! (yes, discord and notion are both through the cloud). google drive, microsoft onedrive, icloud storage, etc. are great tools that you can use to upload files and see on multiple devices. i personally like discord and notion more, just because they're already apps i frequently use, but if you can't get either one cloud-based storage platforms are also a great idea! they definitely have more security than discord or notion, because your files may be at risk of being deleted!
for the purposes of sharing notes to reference on another device when writing an essay, or something of similar vain, i really love discord and/or notion and they both work great!
for syncing notes in real time:
pretty similar to the last one, i would say notion or google docs (or microsoft word on the web i believe has similar functionality, or onenote, anything similar!)
if you want to be writing notes on one device and have them sync up quickly on another - i think any word processing software is the best bet for you.
both notion and google docs you can access them on any device, and/or on their websites too!
google docs is a lot more straightforward, but since notion is so powerful it provides a lot of flexibility for your notes! here's an (old) example of notes i've taken on notion. (i personally really like how easy it is to make columns!)
i hope this helped a little bit! please let me know if you have any more questions :)
also! notetaking is very much an individual thing, if something works for me and doesn't work for you - that's okay! we're all learning and just have to figure out what's best for ourselves.
#to: ilyastudies#from: silverfroot#thanks for the ask!#studying tips#studying#studying aesthetic#studyblr#study motivation#university#studyspo#study blog#study inspo#academia#chaotic academia#study aesthetic#study tips#advice#study advice#study methods#study resources#resource#text post#*
31 notes
·
View notes
Text
How to Build Software Projects for Beginners

Building software projects is one of the best ways to learn programming and gain practical experience. Whether you want to enhance your resume or simply enjoy coding, starting your own project can be incredibly rewarding. Here’s a step-by-step guide to help you get started.
1. Choose Your Project Idea
Select a project that interests you and is appropriate for your skill level. Here are some ideas:
To-do list application
Personal blog or portfolio website
Weather app using a public API
Simple game (like Tic-Tac-Toe)
2. Define the Scope
Outline what features you want in your project. Start small and focus on the minimum viable product (MVP) — the simplest version of your idea that is still functional. You can always add more features later!
3. Choose the Right Tools and Technologies
Based on your project, choose the appropriate programming languages, frameworks, and tools:
Web Development: HTML, CSS, JavaScript, React, or Django
Mobile Development: Flutter, React Native, or native languages (Java/Kotlin for Android, Swift for iOS)
Game Development: Unity (C#), Godot (GDScript), or Pygame (Python)
4. Set Up Your Development Environment
Install the necessary software and tools:
Code editor (e.g., Visual Studio Code, Atom, or Sublime Text)
Version control (e.g., Git and GitHub for collaboration and backup)
Frameworks and libraries (install via package managers like npm, pip, or gems)
5. Break Down the Project into Tasks
Divide your project into smaller, manageable tasks. Create a to-do list or use project management tools like Trello or Asana to keep track of your progress.
6. Start Coding!
Begin with the core functionality of your project. Don’t worry about perfection at this stage. Focus on getting your code to work, and remember to:
Write clean, readable code
Test your code frequently
Commit your changes regularly using Git
7. Test and Debug
Once you have a working version, thoroughly test it. Look for bugs and fix any issues you encounter. Testing ensures your software functions correctly and provides a better user experience.
8. Seek Feedback
Share your project with friends, family, or online communities. Feedback can provide valuable insights and suggestions for improvement. Consider platforms like GitHub to showcase your work and get input from other developers.
9. Iterate and Improve
Based on feedback, make improvements and add new features. Software development is an iterative process, so don’t hesitate to refine your project continuously.
10. Document Your Work
Write documentation for your project. Include instructions on how to set it up, use it, and contribute. Good documentation helps others understand your project and can attract potential collaborators.
Conclusion
Building software projects is a fantastic way to learn and grow as a developer. Follow these steps, stay persistent, and enjoy the process. Remember, every project is a learning experience that will enhance your skills and confidence!
3 notes
·
View notes
Note
so i found you from that post (which will be obvious once you read the rest off this ask) and want to say the following: get nazipie and the defender of that (or any for that matter) billionaire pdf file off of linux and maybe i’ll consider switching to linux
also please give the mad computer scientist an albert wesker makeover
A...are you not using Linux because Pewdiepie and Stallman are Linux users?
You know that, for one, you, potentially using Linux, will not positively or negatively affect the Lives of Stallman or Kjellberg and for two, there are some even worse people using Windows and Mac and Android and iOS, yet you still use it. You using Linux will have no positive or negative baring on you or anyone else.
This isn’t like JK Rowing and Harry Potter, where watching the new Harry Potter or buying a Galbraith book gives money to the Wicked Witch of Weem which she then uses to strip trans and gender variant people of their rights. Even when Stallman was fucking Head of the FSF before being kicked out, you using nano or any other GNU project did nothing to benefit Stallman or anyone because it was Free and Open Source Software! The whole point was that Stallman didn’t really own it as we would know it and he would not benefit financially because, again, it’s Free and Open Source Software: he doesn’t benefit financially because the whole point of it is that it’s released, free of charge, as a public good.
Also Pewdiepie is just a Linux user. You using Linux does not benefit him nor should it reflect badly on you. He’s not getting a check from the Linux Foundation every time someone downloads and installs Mint or Ubuntu. He’s literally just using Arch and Hyprland. Now would I use Arch? No, but that’s because Arch is a complicated Distro and I like GUIs, simple to use TUIs and a set up that doesn’t break with every update. Do I use Hyprland (despite some of it’s own drama)? Yes, because it’s a great Window Manager. I’m writing this post while using Hyprland! It does not, however, make me a Nazi because Pewds is too.
Unless you’re using a Distro that does something like, charge you to use it and sends money to the KKK or something, using Linux has no baring on you and provides no benefit to anyone like Stallman or Kjellberg because again, they do not benefit financially benefit or benefit in any way from you using it. Stallman doesn’t financially benefit from you using it on principle and right now, he’s toxic goods and nobody wants to even go near him, so he can’t even benefit on clout.
Terrible people are going to be using Linux, terrible people are going to even contribute to projects, hell, terrible people are going to start and lead projects (see xLibre, which is a laughing stock anyway because nobody is going to use X.org anyway and the guy leading it is a toxic rightwing nutcase who’s been kicked out of projects for being a right wing nutjob) but the thing about Open Source Software is that they don’t really benefit in any tangible ways because, by definition, Free and Open Source Software is free and Open Source. If you don’t use any technology used by horrible people, you’d be butt naked and living in the woods.
Go use Linux, Stallman and Kjellberg aren’t gonna benefit from it in anyway and the other people using it won’t have any baring on you as a person. If anything, using Linux is a net positive because it saves eWaste from going to the tip. If using the same distro as Stallman and Kjellberg bothers you, don’t use Trisquel or Arch. I don’t, but it’s not because of Stallman and Kjellberg, it’s because I wanna use Non-free stuff on my system and Arch is...well...Arch.
3 notes
·
View notes
Text
Get the Best Company in Delhi — Geeky Solution
In today's fast-paced digital world, businesses must stay ahead of the competition by leveraging the latest technology and innovative solutions. If you are looking for the best company in Delhi to handle your tech-related needs, look no further than Geeky Solution. With a strong presence in the industry and a reputation for delivering top-notch services, Geeky Solution is the go-to choice for businesses and individuals looking for exceptional IT solutions.

Why Choose Geeky Solution?
1. Expertise in a Wide Range of Services
Geeky Solution offers a comprehensive suite of services, making it a one-stop destination for all your technological requirements. Some of the key services include:
· Web Development: Geeky Solution specializes in designing and developing high-quality websites that are not only visually appealing but also highly functional.
· App Development: Whether you need a mobile app for Android or iOS, their team of expert developers can create seamless applications that cater to your specific needs.
· Software Solutions: Custom software development is one of their strong suits, ensuring that businesses get tailor-made solutions to improve efficiency.
· Digital Marketing: From SEO and PPC to social media marketing, Geeky Solution helps businesses grow their online presence effectively.
· IT Consulting: If you need expert guidance on IT infrastructure, cybersecurity, or business automation, their experienced consultants are ready to assist.
2. Skilled and Experienced Team
The success of any company depends on the expertise of its team, and Geeky Solution prides itself on having a highly skilled and dedicated workforce. Their team consists of professionals with years of experience in their respective fields, ensuring that clients receive only the best services.
3. Client-Centric Approach
Geeky Solution follows a customer-first approach, understanding client requirements thoroughly before developing a solution. Their focus on customer satisfaction has led to long-term relationships with many clients across various industries.
4. Use of Latest Technologies
To stay ahead in the competitive market, Geeky Solution incorporates the latest technologies and trends in their services. Whether it’s AI, cloud computing, or blockchain, they ensure that their clients get the most advanced solutions.
5. Affordable and Cost-Effective Solutions
Quality services do not always have to come at a hefty price. Geeky Solution provides cost-effective solutions without compromising on quality, making it accessible for startups, small businesses, and large enterprises alike.
Geeky Solution’s Success Stories
Geeky Solution has worked with numerous clients across different industries, delivering outstanding results. Here are a few success stories that showcase their excellence:
· E-commerce Growth: A struggling e-commerce business partnered with Geeky Solution for website revamping and digital marketing. Within six months, the company saw a 70% increase in traffic and a significant boost in sales.
· Mobile App Development: A healthcare startup needed an app to streamline appointment bookings and patient management. Geeky Solution developed a user-friendly and secure app that became a game-changer in their business operations.
· SEO & Branding: A local service provider wanted to improve their online visibility. Through SEO strategies and social media campaigns, Geeky Solution helped them achieve a top ranking on search engines, leading to more inquiries and conversions.
How to Get Started with Geeky Solution?
Getting started with Geeky Solution is a hassle-free process. Here’s how you can collaborate with them:
1. Consultation: Reach out to them with your requirements, and their team will schedule a consultation to understand your business needs.
2. Strategy & Planning: They create a detailed strategy and roadmap to ensure that the project aligns with your goals.
3. Execution: Their team of experts works diligently to develop and implement the solution.
4. Testing & Delivery: Before delivering the final product, thorough testing is conducted to ensure quality and performance.
5. Support & Maintenance: Even after project completion, Geeky Solution provides ongoing support and maintenance to ensure smooth operations.
Final Thoughts
If you are looking for the best company in Delhi to handle your web development, app development, digital marketing, or IT consulting needs, Geeky Solution is the perfect choice. Their expertise, customer-centric approach, and commitment to delivering high-quality solutions make them the ideal partner for businesses looking to thrive in the digital landscape.
2 notes
·
View notes
Text
Smartphone Reviews: The Best Devices of 2024
As smartphones retain to adapt, producers are pushing the boundaries of layout, performance, and camera era. With such a lot of options available, selecting the best device can be overwhelming. In this evaluation, we can take an in-intensity take a look at a number of the top smartphones of 2024, covering their specs, capabilities, and overall performance to help you make an informed selection.

Affordable smartphones with best camera reviews
1. Apple iPhone 15 Pro Max
Apple has another time set a excessive bar with the iPhone 15 Pro Max. This device capabilities a titanium frame, making it lighter and extra durable than its predecessor. The A17 Bionic chip ensures pinnacle-tier overall performance, and with a 6.7-inch Super Retina XDR show, the visuals are beautiful.
Key Features:
Processor: A17 Bionic Chip
Display: 6.7-inch OLED (Super Retina XDR)
Camera: Triple-lens machine (48MP foremost, 12MP extremely-huge, 12MP telephoto)
Battery Life: Up to twenty-eight hours of video playback
Software: iOS 17
Pros:
Exceptional camera overall performance, particularly in low light
Impressive battery existence
Premium build exceptional with titanium body
iOS 17 optimizations beautify average usability
Cons:
Expensive
No major layout overhaul from preceding fashions
The iPhone 15 Pro Max is the satisfactory choice for Apple lovers who demand pinnacle overall performance and camera nice. However, its high rate tag may not be for all people.
2. Samsung Galaxy S24 Ultra
Samsung keeps to dominate the Android space with the Galaxy S24 Ultra, a powerhouse of innovation and overall performance. With its Snapdragon eight Gen three processor and an advanced S Pen, this device caters to each productiveness and enjoyment desires.
Key Features:
Processor: Snapdragon eight Gen three (or Exynos variant in pick markets)
Display: 6.Eight-inch Dynamic AMOLED 2X, 120Hz refresh rate
Camera: 200MP major, 12MP ultra-huge, 10MP periscope telephoto, 10MP telephoto
Battery Life: 5000mAh battery with 45W speedy charging
Software: One UI 6 (based on Android 14)
Pros:
Stunning 200MP foremost digital camera for tremendous detail
Bright and vibrant display with a high refresh rate
S Pen support complements productivity
Strong battery overall performance
Cons:
Expensive
Large length won't be cushty for all customers
The Galaxy S24 Ultra is the remaining Android flagship, providing an unheard of camera experience and pinnacle-notch overall performance. However, its high cost and huge shape issue may not match everybody.
3. Google Pixel eight Pro
Google’s Pixel 8 Pro keeps to impress with its AI-powered software program and digital camera skills. The Tensor G3 chip brings AI enhancements that improve pictures, battery control, and standard tool performance.
Key Features:
Processor: Google Tensor G3
Display: 6.7-inch LTPO OLED, 120Hz refresh price
Camera: 50MP major, 48MP ultra-huge, 48MP telephoto
Battery Life: 5050mAh battery with 30W speedy charging
Software: Android 14 (with distinct Pixel functions)
Pros:
Best-in-class computational images
Clean, bloat-loose Android revel in
AI-driven software optimizations
Seven years of software updates
Cons:
Tensor chip nonetheless lags in the back of Snapdragon in raw performance
Slower charging in comparison to competition
The Pixel 8 Pro is the satisfactory choice for folks who prioritize digital camera first-class and a smooth Android experience. While it could now not be the fastest device, its AI features make it a compelling option.
Four. OnePlus 12
OnePlus has been progressively improving its flagship gadgets, and the OnePlus 12 is not any exception. It promises excessive-give up overall performance at a surprisingly lower fee in comparison to different premium flagships.
Key Features:
Processor: Snapdragon eight Gen three
Display: 6.Eighty two-inch AMOLED, 120Hz refresh rate
Camera: 50MP fundamental, 48MP extremely-wide, 64MP periscope telephoto
Battery Life: 5400mAh with 100W speedy charging
Software: OxygenOS 14 (based totally on Android 14)
Pros:
Excellent battery life with excellent-fast charging
High refresh rate display for clean scrolling
Competitive pricing
Minimal software program bloat
Cons:
Camera performance is good however not the pleasant
OxygenOS is turning into greater just like ColorOS
For users who need flagship-level overall performance without spending over $1,000, the OnePlus 12 is a high-quality alternative. It gives fast charging, a brilliant display, and a smooth software program revel in.
Five. Xiaomi 14 Pro
Xiaomi has been making strides within the top class smartphone marketplace, and the Xiaomi 14 Pro is a sturdy competitor. With pinnacle-tier specs and an appealing charge point, it affords super price.
Key Features:
Processor: Snapdragon 8 Gen 3
Display: 6.Seventy three-inch LTPO AMOLED, 120Hz refresh rate
Camera: 50MP predominant, 50MP extremely-huge, 50MP telephoto
Battery Life: 4880mAh with 120W fast charging
Software: MIUI 15 (primarily based on Android 14)
Pros:
Fast charging generation is a few of the quality
Strong performance with Snapdragon 8 Gen 3
High-satisfactory show
Competitive pricing
Cons:
MIUI can sense clutteredreview
Limited availability in some regions
The Xiaomi 14 Pro is a incredible choice for users who need excessive-stop performance at a greater reasonable rate. However, software program enjoy and nearby availability may be factors to don't forget.
2 notes
·
View notes
Text
Obsidian And RTX AI PCs For Advanced Large Language Model
How to Utilize Obsidian‘s Generative AI Tools. Two plug-ins created by the community demonstrate how RTX AI PCs can support large language models for the next generation of app developers.
Obsidian Meaning
Obsidian is a note-taking and personal knowledge base program that works with Markdown files. Users may create internal linkages for notes using it, and they can see the relationships as a graph. It is intended to assist users in flexible, non-linearly structuring and organizing their ideas and information. Commercial licenses are available for purchase, however personal usage of the program is free.
Obsidian Features
Electron is the foundation of Obsidian. It is a cross-platform program that works on mobile operating systems like iOS and Android in addition to Windows, Linux, and macOS. The program does not have a web-based version. By installing plugins and themes, users may expand the functionality of Obsidian across all platforms by integrating it with other tools or adding new capabilities.
Obsidian distinguishes between community plugins, which are submitted by users and made available as open-source software via GitHub, and core plugins, which are made available and maintained by the Obsidian team. A calendar widget and a task board in the Kanban style are two examples of community plugins. The software comes with more than 200 community-made themes.
Every new note in Obsidian creates a new text document, and all of the documents are searchable inside the app. Obsidian works with a folder of text documents. Obsidian generates an interactive graph that illustrates the connections between notes and permits internal connectivity between notes. While Markdown is used to accomplish text formatting in Obsidian, Obsidian offers quick previewing of produced content.
Generative AI Tools In Obsidian
A group of AI aficionados is exploring with methods to incorporate the potent technology into standard productivity practices as generative AI develops and speeds up industry.
Community plug-in-supporting applications empower users to investigate the ways in which large language models (LLMs) might improve a range of activities. Users using RTX AI PCs may easily incorporate local LLMs by employing local inference servers that are powered by the NVIDIA RTX-accelerated llama.cpp software library.
It previously examined how consumers might maximize their online surfing experience by using Leo AI in the Brave web browser. Today, it examine Obsidian, a well-known writing and note-taking tool that uses the Markdown markup language and is helpful for managing intricate and connected records for many projects. Several of the community-developed plug-ins that add functionality to the app allow users to connect Obsidian to a local inferencing server, such as LM Studio or Ollama.
To connect Obsidian to LM Studio, just select the “Developer” button on the left panel, load any downloaded model, enable the CORS toggle, and click “Start.” This will enable LM Studio’s local server capabilities. Because the plug-ins will need this information to connect, make a note of the chat completion URL from the “Developer” log console (“http://localhost:1234/v1/chat/completions” by default).
Next, visit the “Settings” tab after launching Obsidian. After selecting “Community plug-ins,” choose “Browse.” Although there are a number of LLM-related community plug-ins, Text Generator and Smart Connections are two well-liked choices.
For creating notes and summaries on a study subject, for example, Text Generator is useful in an Obsidian vault.
Asking queries about the contents of an Obsidian vault, such the solution to a trivia question that was stored years ago, is made easier using Smart Connections.
Open the Text Generator settings, choose “Custom” under “Provider profile,” and then enter the whole URL in the “Endpoint” section. After turning on the plug-in, adjust the settings for Smart Connections. For the model platform, choose “Custom Local (OpenAI Format)” from the options panel on the right side of the screen. Next, as they appear in LM Studio, type the model name (for example, “gemma-2-27b-instruct”) and the URL into the corresponding fields.
The plug-ins will work when the fields are completed. If users are interested in what’s going on on the local server side, the LM Studio user interface will also display recorded activities.
Transforming Workflows With Obsidian AI Plug-Ins
Consider a scenario where a user want to organize a trip to the made-up city of Lunar City and come up with suggestions for things to do there. “What to Do in Lunar City” would be the title of the new note that the user would begin. A few more instructions must be included in the query submitted to the LLM in order to direct the results, since Lunar City is not an actual location. The model will create a list of things to do while traveling if you click the Text Generator plug-in button.
Obsidian will ask LM Studio to provide a response using the Text Generator plug-in, and LM Studio will then execute the Gemma 2 27B model. The model can rapidly provide a list of tasks if the user’s machine has RTX GPU acceleration.
Or let’s say that years later, the user’s buddy is visiting Lunar City and is looking for a place to dine. Although the user may not be able to recall the names of the restaurants they visited, they can review the notes in their vault Obsidian‘s word for a collection of notes to see whether they have any written notes.
A user may ask inquiries about their vault of notes and other material using the Smart Connections plug-in instead of going through all of the notes by hand. In order to help with the process, the plug-in retrieves pertinent information from the user’s notes and responds to the request using the same LM Studio server. The plug-in uses a method known as retrieval-augmented generation to do this.
Although these are entertaining examples, users may see the true advantages and enhancements in daily productivity after experimenting with these features for a while. Two examples of how community developers and AI fans are using AI to enhance their PC experiences are Obsidian plug-ins.
Thousands of open-source models are available for developers to include into their Windows programs using NVIDIA GeForce RTX technology.
Read more on Govindhtech.com
#Obsidian#RTXAIPCs#LLM#LargeLanguageModel#AI#GenerativeAI#NVIDIARTX#LMStudio#RTXGPU#News#Technews#Technology#Technologynews#Technologytrends#govindhtech
3 notes
·
View notes
Text
#Cloud Consulting Services & Solutions#Cloud Services#Cloud Consulting Services#Cloud Consulting Services in India#Cloud Strategy & Consulting Service#Cloud Managed Services#AWS cloud consulting services#Devops consulting and managed cloud services#Cloud Software Consulting Services#Amazon Cloud Consulting Services#Cloud Consulting Services India#Microsoft Azure cloud consulting services#Best Service cloud consulting providers#AWS Cloud Services#Mobile App Development Company near me#Mobile App Development Company#software development company in india#Cloud Consulting Services in Noida#app development in noida#software development company in noida#custom software development company in noida#ios app development company in noida
0 notes