#noise reduction tool
Text
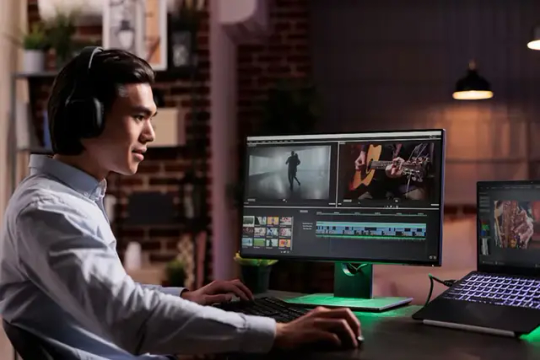
Optimizing Your Workflow with Denoise AI: Say Goodbye to Noise
The Importance of Denoising in Video Optimization
When it comes to video production, noise can be a major issue that affects the overall quality of your content. Whether you’re filming in a busy street or a crowded room, unwanted noise can distract viewers and take away from the message you’re trying to convey. This is where denoising technology comes in to save the day.
Denoising in video…
View On WordPress
#Artificial Intelligence#automatic noise removal#denoise ai#denoising software#enhance post-production#improve video quality#noise reduction tool#seamless editing#video noise removal#workflow optimization
0 notes
Text
youtube
Revolutionize Your Podcast with Podcastle AI
Explore the transformative impact of generative AI in podcast creation with us! This video delves into how AI technologies are revolutionizing the industry by automating content creation, enhancing audio quality, and personalizing listener experiences. We’ll discuss tools like Podcastle's clip generator and revoice feature that streamline workflows for podcasters and content creators.
Discover advanced methods for improving production processes, from AI-driven transcription services to programmatic podcast advertising. These innovations not only enhance accessibility but also help monetize content effectively. Join us as we uncover these exciting developments in media production!

Podcastle AI:
Explore the transformative impact of generative AI in podcast creation with us! This video delves into how AI technologies are revolutionizing the industry by automating content creation, enhancing audio quality, and personalizing listener experiences. We’ll discuss tools like Podcastle's clip generator and revoice feature that streamline workflows for podcasters and content creators.
#Youtube#Podcastle#Generative#Aritificial Intelligence#AI#Neturbiz#Revolutionizing Podcasting#Content Creation#AI Integration#Media Production#Innovative Solutions#Tech-savvy Creators#Streamline Workflows#Content Quality#Advanced Methods#Audio Distribution#Revoice Utility#Clip Generator#Social Media Promotion#AI Video Editor#Transcription Services#Programmatic Advertising#Audio Enhancement#Background Noise Reduction#Content Creation Tools#innovations#Technologies
0 notes
Text

Download Link
Pass: drop357
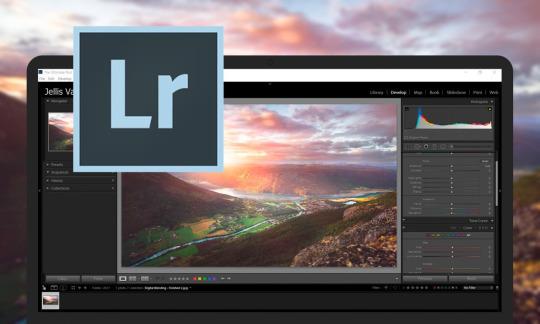
Adobe Lightroom 2024 Full Crack. Simple and advanced, that’s how you can describe this photo editing software from Adobe. By using this application you can easily produce interesting and colorful photos.
This version comes as a development of version 2023. In this version, Adobe Sensei did a lot of development to make this application more complete.
You will Experience more stable and powerful performance as well as a simple and intuitive interface. In addition, the features are also much more sophisticated.
To make your photos look more attractive, Adobe added a new Lens Blur Tool to adjust the blur in the image. In addition, integration support with other Adobe applications such as Photoshop is felt to be getting better.
If you are interested in this Lightroom 2024 crack, make sure your PC is using Windows 10 or 11. So get Adobe Lightroom 2024 full version free download on the Google Drive panel below.
#Photo editing#Adobe Lightroom Crack#Image management#Batch editing#Crack#Color correction#Adobe design#White balance#Noise reduction#Lens correction#Crop tool#Adobe#Install software#Export settings#Adobe 2024#HDR merging#Panorama stitching#Lightroom Crack#Portrait enhancement#Install
1 note
·
View note
Text
Download link
Pass: drop357
Adobe Lightroom 2024 Full Crack. Simple and advanced, that’s how you can describe this photo editing software from Adobe. By using this application you can easily produce interesting and colorful photos.
This version comes as a development of version 2023. In this version, Adobe Sensei did a lot of development to make this application more complete.
You will Experience more stable and powerful performance as well as a simple and intuitive interface. In addition, the features are also much more sophisticated.
To make your photos look more attractive, Adobe added a new Lens Blur Tool to adjust the blur in the image. In addition, integration support with other Adobe applications such as Photoshop is felt to be getting better.
If you are interested in this Lightroom 2024 crack, make sure your PC is using Windows 10 or 11. So get Adobe Lightroom 2024 full version free download on the Google Drive panel below.
#Photo editing#Adobe Lightroom Crack#Image management#Batch editing#Crack#Color correction#Adobe design#White balance#Noise reduction#Lens correction#Crop tool#Adobe#Install software#Export settings#Adobe 2024#HDR merging#Panorama stitching#Lightroom Crack#Portrait enhancement#Install
0 notes
Text
Creating a Sensory-Friendly Space for Neurodivergent Minds
For many neurodivergent individuals, sensory processing can make daily life a bit more challenging. Certain lights, textures, and sounds that others might not even notice can become overwhelming. But creating a sensory-friendly space at home can help mitigate these challenges and provide a much-needed sanctuary.
Here are some tips to get started:
1️⃣ Soft Lighting: Harsh, bright lights can be too much for many neurodivergent people. Consider using lamps with soft, warm light bulbs, or install dimmer switches to control the intensity. Fairy lights can also add a calming, cozy ambiance.
2️⃣ Comforting Textures: Incorporating a variety of textures, such as soft blankets, plush pillows, and fuzzy rugs, can create a comforting and grounding environment. Pay attention to the fabrics you choose for furniture and bedding, aiming for materials that feel good to the touch.
3️⃣ Noise Reduction Tools: For those sensitive to sound, noise-canceling headphones or white noise machines can be lifesavers. You can also consider adding thick curtains or rugs to help dampen sound and create a quieter space.Creating a sensory-friendly environment doesn’t have to be expensive or time-consuming. Small changes can make a big difference in how comfortable and grounded you feel in your own space.
#differentnotless#neurodivergent#self love#neurodiversity#neurospicy#adhd#audhd#autism#self help#actually autistic
17 notes
·
View notes
Photo
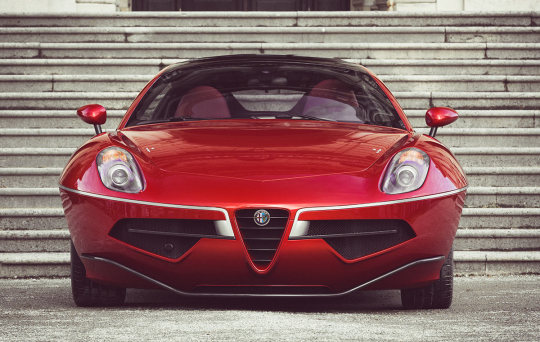
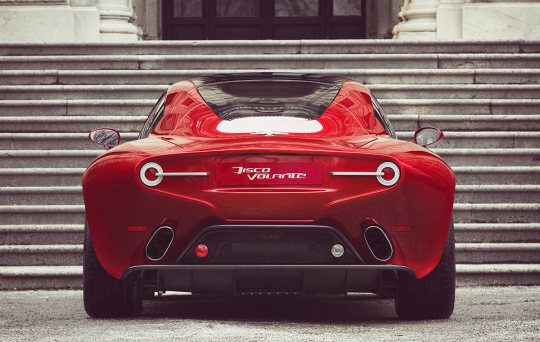
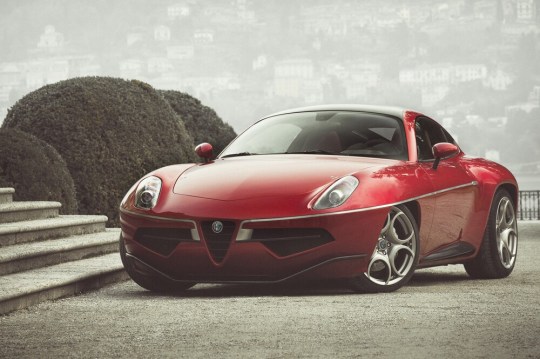
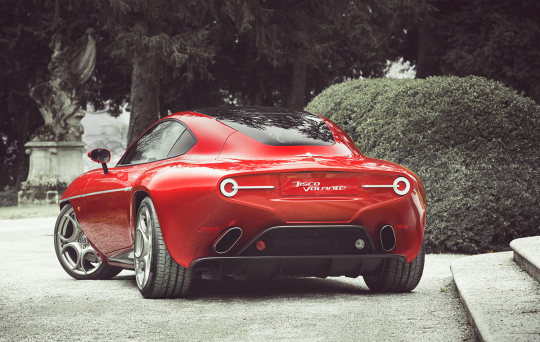
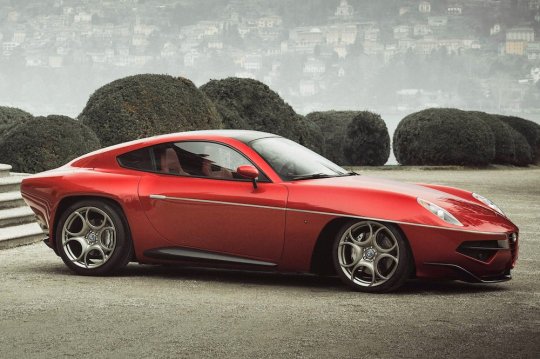
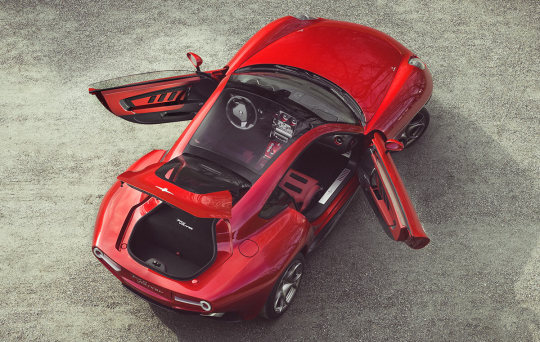


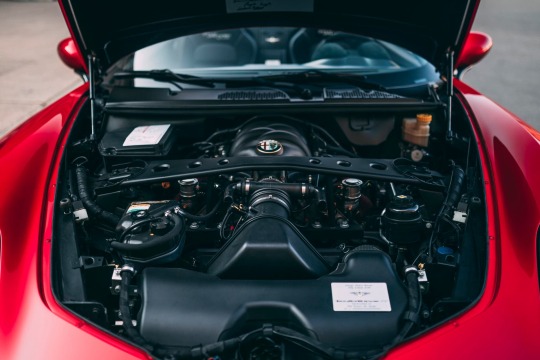
Alfa Romeo Disco Volante by Touring Superleggera
The Disco Volante is a two-seater Gran Turismo. It is based on the Alfa Romeo 8C Competizione coupé with its front-central mounted 4.7 litre V8 engine and a transaxle rear drive with unmodified specifications. Each unit, of which the construction requires 4,000 hours of manual work.The present Disco Volante celebrates the myth of the 1952 style icon. The new design briefing required to blend ingredients as innovation, emotion and aerodynamic properties into a timeless and essential shape.During the development stage, Head of Design Louis de Fabribeckers and his team cooperated with the engineers on an almost daily basis. “We focused on the preservation of the design essence. – says de Fabribeckers – Once the design frozen, we had to understand the manufacturing problems and solve them right away without compromising the design.”In consistency with the car’s design philosophy the interior has a ‘science fiction’ feel to it. Part of this ‘spaceship’ atmosphere was created by elements like the red LED interior light profiles. Also, aeronautics has been the inspiration for parts like the dashboard, instruments and seat adjustment lever.The Alfa Romeo 8C Competizione chassis was chosen for its light and rigid structure and its outstanding dynamic properties. Therefore it forms the perfect basis for the coach-built bodywork of the Disco Volante, integrally conserving the rolling chassis and drive train.The Alfa Romeo 8C’s steel space-frame and other structural elements were retained to guarantee torsion stiffness, high performance and the quality standard. The frame members and the central carbon cell remained unchanged. Elements of the underpinning and the body, such as the engine bay and firewall, the windscreen and cowl, the a-pillar and the locks and hinges have been retained too, just as the dashboard and instruments, the pedals and the steering wheel. Parts like doorframes, the roof frame and the c-pillar have been modified to match with the new shape.The layout of a front-central mounted engine, a transaxle transmission and rear-wheel drive offers an optimal weight distribution of 49-51% between the front and rear axles. To ensure excellent handling the front and rear double-wishbone suspension scheme is combined with hub carriers of forged aluminium and additional trailing arms for the rear suspension.The lightweight and compact 4.7 litre V8 engine delivers 450HP and 480Nm peak torque. It is coupled with a six-speed sequential transaxle gearbox with electronic control and paddle-shift gear selection. Together with a limited-slip differential and a state-of-the-art braking system with large diameter, ventilated discs a precise, dynamic and proactive drive is ensured. The Disco Volante can accelerate from 0 to 100 km/h (0-62 mph) in 4,2 seconds and has a top speed of about 290 km/h (181 mph).
All new and modified components of the Disco Volante have been CAD designed. In this process, which covers feasibility, safety, homologation, aerodynamics and structural analysis, the most advanced IT tools and simulation techniques have been used.
Since torsion stiffness and noise reduction are of critical importance, special attention has been paid to the under-body structure and its elements, like the tubular frames supporting the rear wings and bumper, and the roll bar joining the c-pillars. Other complex design issues were the tailgate hinges, the 3d-cambered door window, and the front wheel covers.
The Disco Volante was then submitted to a CFD aerodynamic study to enhance the airflow and ensure optimal downforce in the rear section. After that, FEM calculations were run to assess resistance and rigidity of all parts subject to homologation.
Touring Superleggera is synonymous with the manufacture of lightweight bodywork. The weight advantage of aluminium is one of the assets of Touring Superleggera’s construction methods. Nowadays however, the craft of hand-beating aluminium panels is combined with the use of carbon fibre reinforced plastic (CFRP). For the Disco Volante, Touring decided to use this combination of aluminium and CFRP. This has been the result of a study conducted to define optimal use of materials for the bodywork in terms of weight, resistance, precision, finish and quality, and ease of repair in case of damage.
The CFRP is used for specific components like the front bumper and grille, the bonnet, the skirts, the boot lid and the integrated rear-window frame. The bonnet and the boot lid are sandwich-built with Nomex filler in-between to obtain a better stiffness/weight ratio and to dampen vibration and noise.
The aluminium panels are hand-beaten using an epoxy mould. Since the inner frames of most parts of the bodywork are made of CFRP, this requires gluing of aluminium on carbon fibre. This technique adds to the rigidity as the glue has structural properties.
The body panels are pre-assembled on a laser measurement platform using a jig. This ensures that the strict tolerance required is respected. After adjustment, the panels are either welded or glued. The body-in-white is then used to preassemble and fit all trim components, brightware and moulding.
160 notes
·
View notes
Text
Lovely @larkral asked me about my podfic set up. Here is a quick run through for you, and to any who are curious, especially those working on @caught-on-tape-fest.
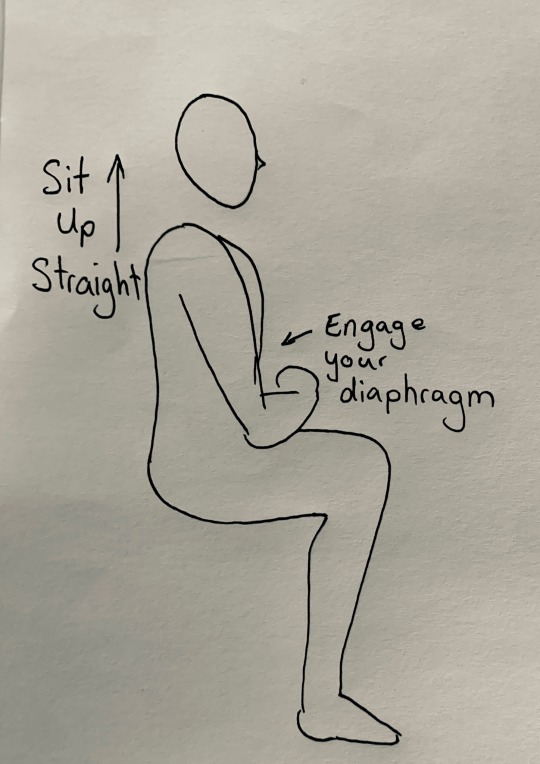
But remember, every person already has the most important tool for a good recording. Your breath. No matter what tools you use to record a podfic, be in a place where you are sitting comfortably. Raise your shoulders and engage your core muscles. When you slump, your diaphragm is compressed and your voice will be thin. Take some deep breaths before you begin.
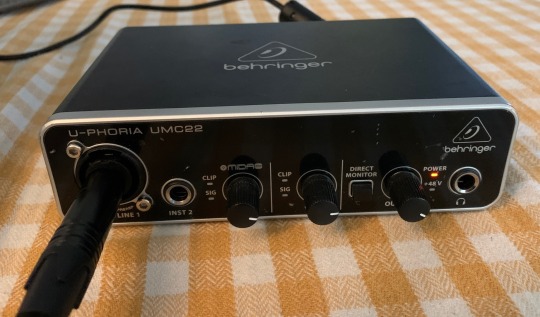
Okay, back to me. I work at my dining room table. I have my mic, amp, laptop, headphones and a glass of water. My next additions will be a pop shield and a boom to hold the mic. I've been pondering setting up a more permanent place, but this is good for now. It's bright and stable and mostly quiet.
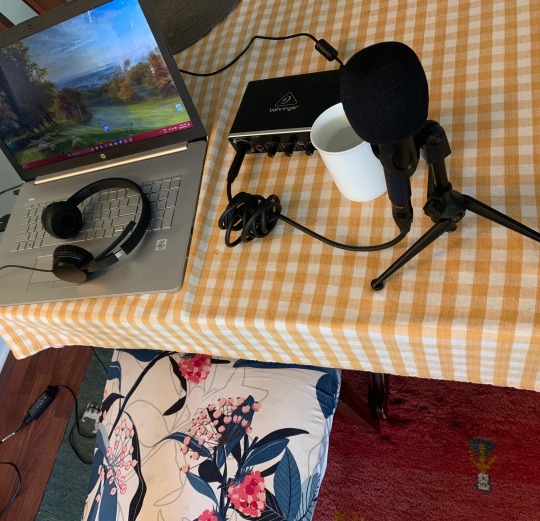
Well, quiet except for the fishtank, my cat (who yowls to get kibble and thinks that yowling at chipmunks out the window will equally as effective) and a stupid watch that beeps on the hour. So, yeah, maybe a better spot.


I was looking to purchase a used microphone off of kijiji, but @cutestkilla let me borrow her spare. She's an extremely talented musician and would be a good person to ask if you want to discuss hardware set up.

If you are lucky enough to use this kind of microphone, remember to hang ten, using the spacing of your hand to position your face before it. Also, you want the microphone to be stable.
When you press record, wait for a couple of seconds without speaking. That will give the software a baseline of the room's ambient noise to allow you to use its noise reduction tools.
45 notes
·
View notes
Note
Hi!! I have a question about gifs. I’ve noticed some users (yourself included) have something on their gifs that I could only describe as sort of a net on top of their gifs. I noticed it, for example, on your Barbie/suicide squad parallels post. It almost seems like some sort of tool like noise where it helps to make a gif appear more hq. I’m wondering what that might be, or if I’m totally off base!
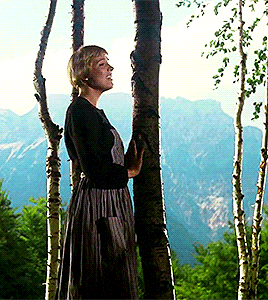
Hey! Unfortunately, I didn't save the PSD for that particular set - the closest one I still have was for this Sound of Music one, but the settings were fairly similar from what I remember.
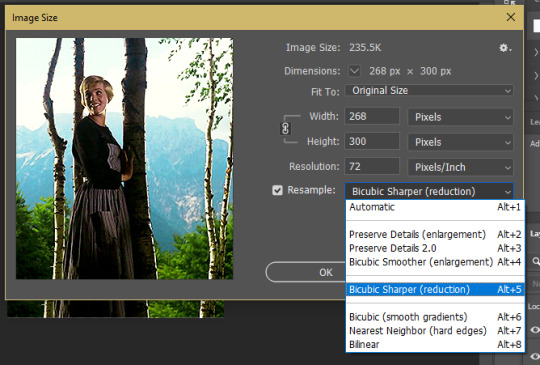
There isn't really much to it, and the easiest way I can explain what the "net" is, is that it's basically the combo of your resize settings, sharpening/noise you've added to your gif, and finally your export settings. At least that's how it is for me - keeping in mind I usually try to work with the most HD cuts available so the quality is already there. Anything less than 1080p will always require more adjustment.
When figuring out your image size early on, ensure the resample size is set to Bicubic Sharper (reduction) as that'll give your gif a cleaner, more sharpened look to start with and it should make things easier moving forward.
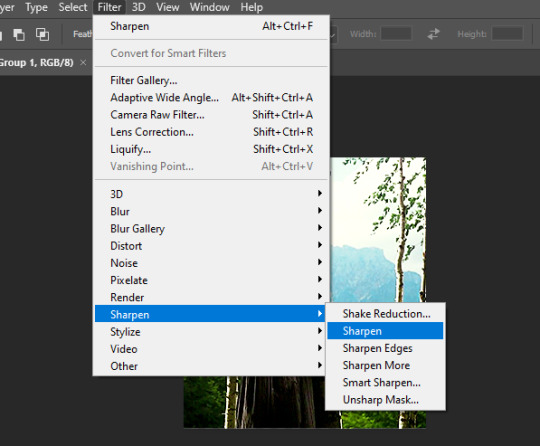
Proceed to make your gif as usual.
I add Smart Filters last, and these gifs didn't require anything more than the simple Sharpen tool applied to the gif once the layer had been converted.
You can mess around with noise or blurring etc. if your gif doesn't quite look the way you want. Before sharpening, I sometimes use Stylize > Diffuse > Anisotropic > ~20% opacity (under blending options) to give the gif a softer look first and remove any graininess. It can look a little funky sometimes.
Lastly, when exporting your image, select Adaptive and Pattern as your save settings these can significantly change the final appearance of your gif - especially Pattern. The two in combination are what create the "net" and will retain the quality of your gif in export.
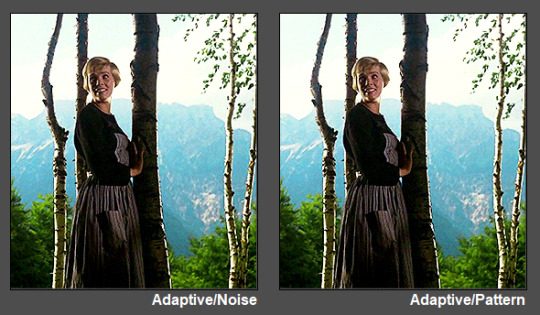

You should be all set with your quality-control "net"! 💜
#tutorial#ps tutorial#gif tutorial#mine*#gif making#I kinda suck at tutorials so let me know if this did/n't help anon and I can maybe offer some more suggestions if necessary :)
44 notes
·
View notes
Note
your gifs are always so crisp and clear. how do you make the magic happen??
thank you! i i've answered this question before but my process has changed a little since then so here's an update!
first and foremost, i start with the highest quality video possible. i only work with 1080p or higher, and the largest file size i can find.
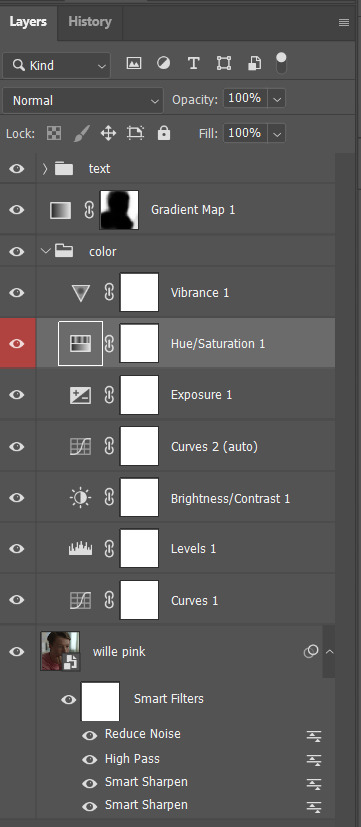
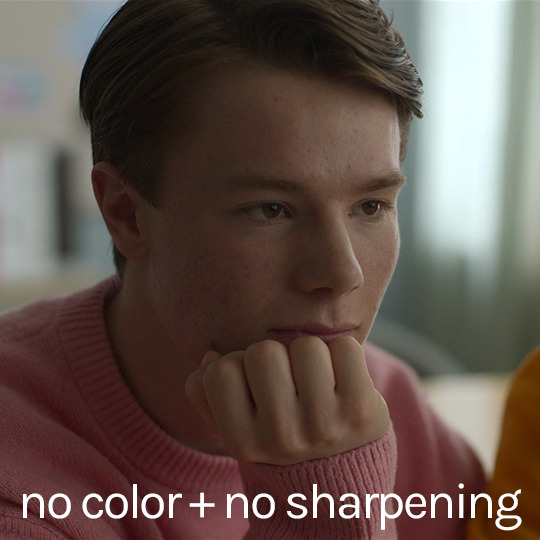
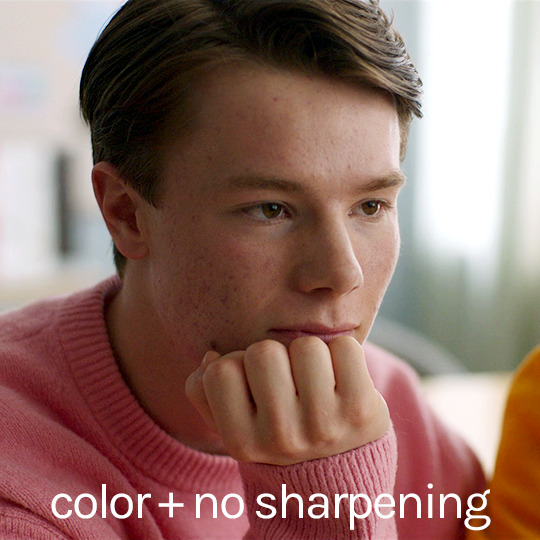
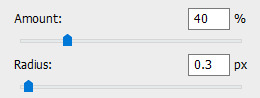
once i've picked my scene(s) and imported the files into photoshop, i always follow the same flow: crop | color | sharpen | tweak | export.
i won't go into too much detail about color but one thing to keep in mind is that it's likely you will lose quality with drastic color adjustments. i prefer to make several minor adjustments as opposed to drastic changes because they're much easier to undo if you find you've lost your way. i use the eyedropper tool and/or the individual color sliders on my base layers (levels and curves) on almost every gif. these layers do a lot of heavy lifting to even out coloring (curves are especially helpful in decreasing the yellow/orange hue that is so common in a lot of media these days). then i follow up with a combination of contrast, exposure, channel mixer, selective color, hue/sat and vibrance, as needed. i hand color all of my gifs so the layers i use vary greatly from gif to gif. in the sample pics i've included below, you will see that the only color layer i used is hue/sat. the rest of my color adjustments were made in the first curves layer. i'm also using a gradient map to adjust the background color of the scene, which is important to keep in mind when you're doing your coloring.
next up, sharpening! i use the sharper action in this pack as a base, which applies two layers of smart sharpening. next i add a high pass filter (filter | other | high pass) which i think adds an additional pop of refinement to a gif on top of the smart sharpening. you can read all about high pass here. i typically use a radius between .5 and 1.0, then set the blending to soft light. finally i add a noise reduction layer (filter | noise | reduce noise), set the strength 3-5 and preserve details to 15-20. i usually set the opacity of this layer to 40-60% but again, it varies from gif to gif. i know some other gifmakers who like to add a gaussian blur at this stage instead, so i'd suggest playing around with both settings to find what works best for you.
and that's basically it! i may make a few color or brightness tweaks to the final gif but otherwise it's ready for export.
here's a look at my layers panel and a frame from a gif i'm working on for an upcoming set at various stages in the process.

this all may feel like a lot of steps but once you figure out what works for you, it becomes second nature and part of the fun. sorry for the delay in answering and thanks for the ask! feel free to message me again if something isn't clear. 💜
9 notes
·
View notes
Note
how are u going to say it doesn’t matter who you vote for and here you are actively pushing kamala
here we go, time to use our brains kids
so let me say this: I think kamala harris is an objectively better candidate than either joe biden. I think a ham sandwich would be a better candidate than joe biden lol. I think that if someone is going to vote in the us presidential election, they would be smart to vote for a kamala ticket over a trump ticket, assuming that her policy platform is mostly in step with the democratic platform and doesn't try to out-fash trump on immigration or israel.
I do not think me saying that is pushing kamala. it's just my opinion, and I'm not even committing to voting for her. I'm not telling anyone they have to vote for kamala. I'm especially never going to tell palestinian americans that they need to vote for anyone because like what kind of monster would I be??? and I also do not think voting is harm reduction, not in the way many us american liberals say it is. I think voting is a tool, one of many, that can be effective in choosing your opponents. I think kamala will be an easier opponent to fight than trump. this is what organizers are saying, this is what activists are saying, this is what I personally believe based on my understanding of trump and republicans in general.
no, that does not mean it will be easy. I think kamala will become a war criminal like any us president will be. I think her record is mixed. I know I will fight her on day one, and I will also have to fight the liberal vote blue maga types because they refuse to give a fuck about anyone other than themselves.
I don't think there's a single candidate who I would be happy to vote for. even cornell west would become a war criminal. that is what will be the case until the united states is dismantled.
now, here's where I'm sorry to tell you that my vote for president does not matter. I have explained this many times. I live in delaware, and delaware has THREE electoral votes. there is not a way in which my vote will make or break a presidential election. when I lived in chester country, pa, I lived in a swing district. I voted for hillary in 2016 because my vote mattered a LOT more then. it is what it is.
I would probably recommend people living in swing districts to vote for the dems, but I'm never going to speak down to voters, and I'm never going to do that bullshit because it doesn't work. the only good argument I have ever heard is that we should vote for the candidate we think we could most easily beat through organizing. everything else is noise and ineffective when it comes to reaching those of us who are so angry we want to stick it to the dems.
if you think any of that is pushing kamala... idk man it's not that simple. it's the dems fault we are in this position. I see any nominee that isn't joe biden as a victory against genocide joe, even if we haven't won the fight. but this is a big step in pushing the party to represent the views of most of its base better. as far as I know, kamala doesn't hallucinate about golda meir lol she's too busy being copmala
anyway voting is a tool not the end of civic responsibility. focus on mutual aid, on community and esp LABOR organizing, on helping the people around you and building networks of support because no matter what we will only need more of that in the days and years to come.
6 notes
·
View notes
Note
I think the way you worded the Spotify situation was a bit victim-blamey 💀 in your post, you made it sound like ARMYs response to the Spotify fiasco was justified—it certainly wasn’t—and completely glossed over the disgusting behavior from ARMYs. I think this fandom has a big problem with trying to force BTS into this role of victim when that hasn’t been the case for years, and ARMYs really need to give it up. BTS aren’t underdogs anymore, they don’t need protection. The fandom as a whole looks bad when they respond this way to petty shit and, in a way, it makes BTS look bad, especially when they go on talk shows (James Corden, for example) and almost commend ARMYs’ protective, bullying response. Idk, this whole Lisa/SPOTIFY/Jungkook situation has left me with a bad taste in my mouth; it’s difficult to reconcile the image BTS has worked to portray with the behavior of a large portion of the fandom.
***
Lol Anon,
I mean, I was just writing off the cuff responses without going into detail…
You sent this just off the back of my latest post and it’s very easy to respond to so here you go:
I see your comment as just another extension of stan Twitter rhetoric from chronically-online siloed environments where people forget this is not just about BTS vs. Blackpink. I hope you realize you’re thinking exactly like the factions of the fandom you’re calling out when you frame it this way. Because why is gross negligence and incompetence from the music establishment towards artists being framed as “victimhood” to begin with? Why introduce charged moral language into a situation of clear corporate exploitation of a system that is opaque and ripe for manipulation, impacting artists from Mitski to BTS to Taylor Swift to Omalay. I find it interesting that in a situation where there was no excuse for a supposed numerical mistake to happen not once but twice in less than 24 hours, your impulse is to blame the fandom’s response, more concerned with how it looks, than the fact that Spotify manages a broken system on which millions of artists’ livelihoods depend.
If you want me to sit here and talk about ARMYs dragging Lisa and Blinks dragging Jungkook, the nasty spirit and behaviour towards the artists from everyone involved and how that’s disgusting and wrong etc, sure I can do that, but (1) why should I waste my time on it when every other blogger and/or pundit is already doing just that? You’re better off going to another blog for that content because I’m doing better things with my time here. And (2) why bother with that when the situation implies something significantly more serious? Because if Spotify cannot accurately count streams for something “fun” like Wrapped, what happens for more impactful things like Royalties?
Because in all the noise, perhaps you didn’t notice in Spotify’s vague apology that their statement did not mention the specific artists affected by their ‘numerical’ mistake. If it indeed was down to tags, BTS certainly aren’t the only artists affected. I already saw changes to my playlists following Spotify’s statement, to smaller African artists I support. Imagine if ARMYs didn’t have the knowledge to develop systems to accurately track these stats, they’d have no tools to point out the error and that’s if they’d notice it anyway.
If you’re looking for who to blame for your victimhood narrative, if there’s one at all, I fail to see how Spotify’s ignorance and lack of responsibility is not the root of it.
As to your wider comment of ARMYs always seeing BTS as underdogs and how that’s wrong, that’s yet another k-pop narrative that is stupidly reductive. In my opinion. The music establishment has survived with tactics that are nakedly exploitative because not enough people can look beyond fanwars in their stan environments to look at what is actually happening in the real world.
- Taylor Swift is a white American woman who with all her privilege still had a real battle with the music establishment to own her music.
- There’s a class action lawsuit from music fans in Canada, including ARMYs, against Ticketmaster’s exploitative practices.
- Taylor’s fandom as well as ARMYs are responding to the US Senate to investigate Ticketmaster and Live Nation for the sorts of ‘numerical errors’ that blatantly abuse the system.
- Bad Bunny’s fandom has been dragging Jeremy Erlich all over Facebook and Twitter for weeks now for the way that platform deleted concert showings in favour of Drake.
- Just as when the VMAs this year also had their ‘numerical mistake’ curiously also in favour of Blackpink, and just as with Shawols two months ago responding to a music magazine’s insensitive mention of Jonghyun’s suicide, what I saw yesterday was ARMYs writing thought out responses with verifiable facts and figures asking Spotify to correct their mistake. They spammed Twitter, email, and Spotify support channels.
All these are just very recent examples of artists and fans from everywhere rightfully responding to an establishment that has no excuse.
I hope by now you realize how silly and reductive it is to apply the mention of underdogs towards artists, anywhere, relative to the current music establishment. This is obviously more than that, it’s more nuanced than that, and the balance of power firmly rests with the establishment.
Much like my post about k-pop stans thinking wanting success in the largest music market in the world is driven by ‘xenophobia’, I think you’re applying the ‘BTS are not underdogs’ narrative in a situation that frankly simply does not call for it. There’s bigger fish to fry but if you’re stuck on fanwars and ARMY shooters acting a fool on Twitter, Blinks staying true to form and doing the same, I certainly agree with you Anon, but I’ve been into k-pop for a decade - I’ve seen 1st and 2nd generation k-pop stans physically assault people getting out of the subway on behalf of their oppas, I’ve seen them partner with real life Nazis to get people killed, so I guess I have a slightly different perspective on what makes a fandom look bad enough for me to comment.
#bts#kpop#kpop discourse#BTS and Spotify#army fandom#bts fandom#fandom behavior#bts army#taylor swift
48 notes
·
View notes
Text
youtube
Revolutionize Your Podcast with Podcastle AI
Explore the transformative impact of generative AI in podcast creation with us! This video delves into how AI technologies are revolutionizing the industry by automating content creation, enhancing audio quality, and personalizing listener experiences. We’ll discuss tools like Podcastle's clip generator and revoice feature that streamline workflows for podcasters and content creators.
Discover advanced methods for improving production processes, from AI-driven transcription services to programmatic podcast advertising. These innovations not only enhance accessibility but also help monetize content effectively. Join us as we uncover these exciting developments in media production!

#GenerativeAI #PodcastCreation
#Podcastle#Generative#Aritificial Intelligence#AI#Neturbiz#Revolutionizing Podcasting#Content Creation#AI Integration#Media Production#Innovative Solutions#Tech-savvy Creators#Streamline Workflows#Content Quality#Advanced Methods#Audio Distribution#Revoice Utility#Clip Generator#Social Media Promotion#AI Video Editor#Transcription Services#Programmatic Advertising#Audio Enhancement#Background Noise Reduction#Content Creation Tools#innovations#Technologies#Youtube
0 notes
Photo

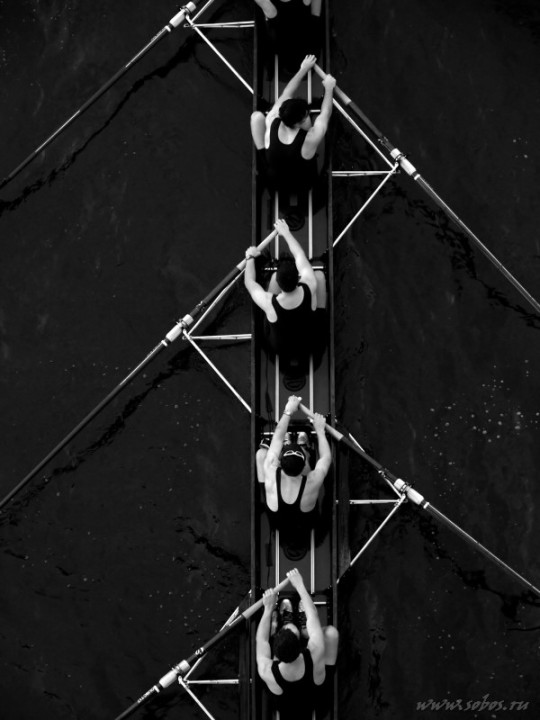
1 Cyril Power (1872-1951) UK The Eight reduction lino cut print (1930) 32.3×23.4cm
2 photographer unknown
economist.com
IT HAS become the custom nowadays,” wrote Claude Flight, a British artist, in 1926, “to go to a shop for the tools of one's trade.” Flight was scornful of shoppers and liked to make things for himself. He kept his own bees and championed the art of the linocut, believing that the use of cheap materials would help democratise art and bring it to the attention of the masses. For his own linocuts he insisted on “a sharp penknife—such a very rare thing among art students” and a gouge he fashioned by fitting a small wooden handle onto a rib he cut from an umbrella.
Hard to imagine health and safety regulations allowing children today to have such fun. But Flight, who was a friend to Henry Moore, Ben Nicholson and Barbara Hepworth, inspired many pupils at the Grosvenor School of Modern Art, where he taught, wrote and organised exhibitions on linocuts.
Among the most famous was Cyril Power, an extraordinarily creative printmaker, born in 1872, who soaked up Flight's enthusiasms and gave them new force. Power drew on many influences—of the German Expressionists (who invented linocutting before the first world war), the Italian Futurists, the Vorticist prints and paintings of Wyndham Lewis—and the enthusiasm for speed and movement that marked the work of so many artists of the period, from Natalya Goncharova to Marcel Duchamp.
While the work of the Germans, Italians, French and Russians has become very well known, the prints and linocuts made by Power and his fellow British artists have lingered in the shadows. An inspired little exhibition—the first major show of Modernist British prints in America, which began earlier this year at the Museum of Fine Arts in Boston and is now at the Metropolitan Museum in New York—will help change that. So too will a newly opened show at a private gallery in London that gathers together for the first time prints of all 46 of Power's linocuts. Some are for sale; others have been lent by museums and private collectors, of which the most important are two New Yorkers, Leslie and Johanna Garfield.
The first impression of the Power show is that he lived his life in reverse. Until he was almost 50 he followed in the professional footsteps of both his father and his grandfather and practised as an architect, making a name for himself also as the author of an erudite study entitled “English Medieval Architecture”. Then, as Philip Vann explains in an elegant essay that accompanies the show, he “embarked on a kind of Gauguin-esque adventure”, leaving his wife and four children to enrol in art school in the company of a 24-year-old artist, Sybil Andrews.
The early prints in the show were made by a middle-aged man and it shows. In black-and-white there is a bridge at Rickmansworth, a street corner in the sleepy Suffolk town of Lavenham. Then suddenly the movement of the windmill in “Elmers Mill, Woolpit” gives an indication of what is to come. Starting in 1930, when he was already 58, Power takes to speed as if he had taken personal charge of the Futurist manifesto, which C.R.W. Nevinson co-signed with an incendiary Italian, Filippo Marinetti, in 1914, with the words “Forward! HURRAH for motors! HURRAH for speed!…HURRAH for lightning!”
Power allows light, noise and speed into everything he sees. Using a series of easily recognised colours, particularly “Chinese orange”, “chrome orange”, “viridian” and “Chinese blue”, he created images of merry-go-rounds, rowers, acrobats, dancers, runners, hockey players and, of course—given that some of his influences were Italian—beautiful cars.
The most successful are those, like “The Eight”, in which the element of formal design is most visible. But Power's vision as an artist really comes to the fore in works containing a hint of menace. The bourgeois-assaulting spirit of Italian Futurism, Mr Vann explains, had fallen into the malign hands of Mussolini and was about to give way to Fascism, while Freud's and Jung's obsessions with the unconscious were increasingly helping to throw up visions of fears, hopes and dreams.
“Monsignor St Thomas” (1931, pictured at left) is a brilliant working of the murder in the cathedral of Thomas à Beckett, but it is technically skilful rather than edgy. The really potent, and most modern-looking, of Power's linocuts are those that lead the viewer right to the edge. These start with “Tennis” (1933, below), a magnificent rendering not just of the energy of the centre court, but of the physical and psychological effects of slicing and spinning—sport at its most gladiatorial.
As the 1930s move towards totalitarianism and then war, Power's work takes on a darker hue. The tube trains and the escalators of the London subway system provide ample opportunity for exploring man's addiction to the rat race. Two further works seem remarkably prescient. In 1934 Power made a linocut which he called “Exam Room”, full of hunched-up concentration and a complex set of figures that show, in turn, fear, nerves, gloating, dreaming—and one who is slyly distracting a neighbour. Watching over them is the overbearing timekeeper and the all-seeing eyes in the ceiling.
Similarly, “Air Raid”, which Power made in 1935 and which has been lent to this show by the RAF Museum in Hendon, is an extraordinarily filmic response to a period of history the artist had not yet even seen. It would be another five years before the start of the Battle of Britain would make such imagery routine. Cyril Power was not just an artist, he was a visionary
5 notes
·
View notes
Note
can i please know how you get your gifs looking so smooth. they are amazing and i have no clue how you do it. like the quality is so similar to a regular video (compliment) and im so curious how u could achieve that
yes sure, I will try my best to explain it to you!
well aside from the quality of the vid is the editing process.
I use kmplayer (to cut the clip when the vid is +3 mins) + photoshop
topaz clean: only move the settings under clean & edges (this are the settings I mostly use)
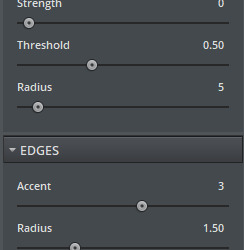
+ clean → radius is always betweet 3-5 depending of the video
topaz denoise: noise reduction section, keep the values under ONE (1) except adjust highlight and clean color those are always ZERO (0)
Smart sharpen is a useful tool but do not over used it
+ this is the setting I always use and sometimes it's too much, depending on the video file so I go nd play with the fill of the layer.
Now the colouring is important as well because if you add too much levels, hue/saturation the quality drop. So I highly recommend if you think one of this it's too much but you like how the color shade turned out instead of editing the adjustment it's better if you play with the opacity of the layer
And if you want a color to stands out more after you add you coloring how you like it, add a selective color layer and play with one of the color depending of wich you want.
hope this helps you ♡
2 notes
·
View notes
Note
The thing about Affirmation Action - most people are actually just ok at their jobs, and aren't Einsteins or Ramanujans or whatever. If they meet the minimum requirements to be a surgeon you're not in particularly worse hands than you really otherwise would be, because the bulk are always going to be first standard deviation. It's just now you have a tool to prevent communities in your society from self segregating (because people get jobs through connections) into unstable subclasses and can collect data to actively monitor for things like the name disciminatory effect. You don't even cut off the upper deviations with this, either, it's just about your mixing of the middle 95 in attempt to prevent things like gangs other issues with insular ethnic or income based subclasses.
Allow me to introduce you to The O-Ring Theory of Economic Development.
The basic gist of that article is that a long, high-value production chain, where that high value doesn't kick in until the end, requires a high probability of success at each node in the chain.
What you just said is fine for an insurance salesman. It is not fine for semiconductor design and manufacturing, which is an input into the production of the entire rest of the economy.
The amount of disruption will depend on 1) the discrepancy of the input labor pool from the ideal equality politically demanded, 2) the magnitude of the imposed ethnic quotas, and 3) the degree to which the job requires abilities far from the average.
If we have a dial labeled 'ETHNIC QUOTAS' and we turn it to 1 or 2, people might not notice, and we may have disrupted hiring network effects. There's a natural amount of noise in hiring.
The problem is that the political economy of the EQ dial is not really based on liberal ethnic conflict management by light-touch reduction of hiring network effects. That was something that was more reasonable for a young liberal to believe in 2010, or might be more reasonable to believe in a small state under a firm hand, like Singapore.
The jobs which require the highest and most reliable capability will be among the best-compensated and the most prestigious.
The political economy of the EQ dial is based more on compensation and prestige. The most prestigious and well-compensated jobs will tend to be both the most unequally distributed, and the ones that suffer the most - for O-Ring reasons.
Political entrepreneurs (rhymes with "norm entrepreneurs") can see this and bring those discrepancies into high visibility to emotionally motivate voters, build consensus within their coalition to go after firms of this class, etc.
Now at this point, you might say, "Well, can't the firm just hire a bunch of underperforming personnel in order to meet the quota? And if it turns out that the firm underestimated their performance, then great, or if it turns out that wealth and social connections cause performance, then maybe their kids do very well, and the problem is solved in the next generation."
The problem is that this is a multiple-round game and the political entrepreneurs can change their actions on the next round.
If you officially hire someone to do aerospace engineering and then sideline him because you're actually just using him to fill a quota, this can be detected from other metrics, which political entrepreneurs can then use to argue that you're still "cheating," and demand more resources and concessions. They have you over a barrel.
If your production system depends on Einsteins, well, you can't just make someone into an Einstein. The social technology for that doesn't exist at this time, so political entrepreneurs can make as high of a demand as they want, because they've locked you into a contradiction.
The political entrepreneurs will always try to turn up the dial, because the amount of difference forms a gradient that they can use to gain power (like exploiting a difference in temperature, a thermal gradient, to drive a geothermal power plant), and you are depending on the other members of their coalition to not cooperate, to shut them up and make them go home.
If the mismatch is bad enough, and you turn the dial high enough, you can crash the production system as a shortage of some bottleneck resource causes a cascading failure.
At that point, you'll probably be replaced by someone who was less willing to turn the dial, and then you'll no longer be in control of the situation.
Liberals have been indulging the political entrepreneurs since 2014, but this is a mistake - their programs are not connected to real life success, which means they'll end up promoting conflict and poverty regardless of whatever they say their intentions are. Liberals should care about good things happening, which requires they be rooted in real reality, even if it's a bit uncomfortable.
8 notes
·
View notes
Text
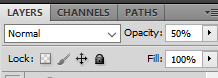
Advanced Photoshop Tutorial: Mastering Camera RAW Filter for Photograph Enhancement
Introduction: Adobe Photoshop's Camera RAW filter is a powerful tool for enhancing the quality of your photographs. It allows for non-destructive adjustments to exposure, colour temperature, clarity, and more. In this tutorial, we'll explore advanced techniques to make the most out of the Camera RAW filter to transform your images into stunning works of art.
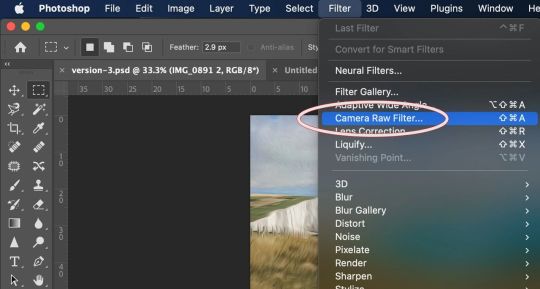
Step 1: Open Your Image in Photoshop Start by opening your image in Photoshop. Go to "File" > "Open" and select the image you want to enhance.
Step 2: Access Camera RAW Filter Once your image is open, go to "Filter" > "Camera Raw Filter" or use the shortcut Ctrl+Shift+A (Cmd+Shift+A on Mac) to access the Camera RAW filter.
Step 3: Basic Adjustments The Camera RAW filter interface provides various panels for adjusting different aspects of your image. Start with the "Basic" panel, where you can adjust exposure, contrast, highlights, shadows, whites, blacks, and clarity. Use these sliders to balance the overall tonality and contrast of your image. Pay attention to the histogram to ensure you're not clipping any highlights or shadows.
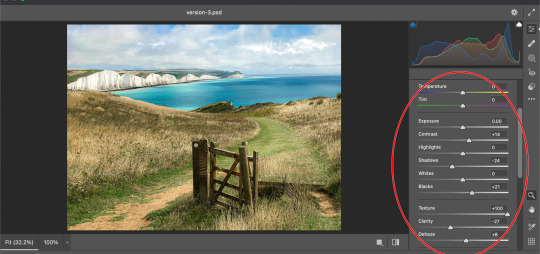
Step 4: White Balance Next, move to the "White Balance" panel to adjust the colour temperature and tint of your image. You can use the Temperature and Tint sliders to correct any colour casts and achieve a more natural look. Experiment with different settings until you find the right balance.
Step 5: HSL Adjustments The "HSL/Grayscale" panel allows you to fine-tune specific colours in your image. HSL stands for Hue, Saturation, and Luminance. Use these sliders to adjust the hue, saturation, and luminance of individual colours. This is particularly useful for making colors pop or toning down distracting elements.
Step 6: Detail Enhancements In the "Detail" panel, you can enhance the sharpness and reduce noise in your image. Use the Sharpening sliders to increase the overall sharpness while paying attention to avoid introducing artifacts. Additionally, adjust the Noise Reduction sliders to reduce any visible noise in the image, especially in areas with low light or high ISO settings.
Step 7: Lens Corrections If your image has any lens distortions or chromatic aberrations, you can correct them in the "Lens Corrections" panel. Enable the "Enable Lens Profile Corrections" option to automatically detect and correct distortions based on the lens used. You can also manually adjust vignetting and chromatic aberration sliders if needed.
Step 8: Effects and Vignette The "Effects" panel allows you to add creative effects such as vignettes and grain to your image. Experiment with the "Post-Crop Vignetting" slider to add a subtle vignette that draws attention to the subject. You can also adjust the "Grain" slider to add texture and character to your image, especially useful for achieving a vintage look.
Step 9: Graduated Filters and Radial Filters For selective adjustments, utilize the Graduated Filter and Radial Filter tools available in the Camera RAW filter. These tools allow you to apply adjustments selectively to specific areas of your image. Use the Graduated Filter for linear adjustments like sky enhancements or the Radial Filter for circular adjustments like spotlight effects.
Step 10: Final Touches and Output Once you're satisfied with the adjustments, click "OK" to apply the changes and return to Photoshop. You can further fine-tune your image using additional Photoshop tools or proceed with any further editing. Finally, save your enhanced image in your desired format.
Conclusion: Mastering the Camera RAW filter in Photoshop opens up a world of possibilities for enhancing your photographs. By following these advanced techniques, you can take your images to the next level, achieving professional-quality results with ease. Experiment with different settings and adjustments to develop your unique style and make your photos stand out.
#my art#artists on tumblr#art#photoshop#disabled artist#photographers on tumblr#adobe photoshop#graphic design#tutorial#art tips#art resources#art help#art tutorial#art reference#landscape#digital art#photographer#original art#how to draw#tips and tricks#useful#tips
4 notes
·
View notes
Last Seen Blogs

shreyan65
Untitled

its-grupo5-trastornos-depresivos
Trastornos depresivos

shrewdtraveler
Shrewd Traveler


itoshiikimi
Kyo no Takumi