#ui ux development
Explore tagged Tumblr posts
Visit Tumblr Blog
Explore Tumblr blogs with no restrictions, modern design and the best experience.
Last Seen Tumblr Blogs


Fun Fact
Tumblr has 16.74 million mobile monthly users in the US.
Text
Questions To Ask Before Hiring A UI UX Development Agency In New York
Looking for a top UI/UX development agency in New York? We specialize in creating user-friendly, visually stunning designs that enhance digital experiences and drive business success.
0 notes
Text
Premier ReactJS Development Services | Expert ReactJS Developers
Discover top-tier ReactJS development with our leading team of experts. At techdev.se, we offer customized ReactJS solutions designed to meet your unique needs. Hire our skilled ReactJS developers for affordable, high-quality services that drive results.
#ReactJS development services#reactjs development#react native app development company#react native development company#api development#react native development services#front end development#full stack development#back end developer#react redux#UI Ux development#android#git#web application development#web developer#desktop app#electron app
1 note
·
View note
Text
Harnessing SwiftUI for Next-Gen iOS Apps: Tips and Best Practices for 2024

Hey there, fellow iOS developers! Can you believe we're already talking about 2024? It feels like just yesterday we were getting excited about SwiftUI's initial release. Now, as we're diving deeper into this powerful framework, it's clear that SwiftUI is here to stay and will play a crucial role in shaping the future of iOS app development.
In this post, I want to share some insights, tips, and best practices for harnessing SwiftUI to create cutting-edge iOS apps in 2024. Whether you're a SwiftUI veteran or just starting your journey, I hope you'll find something valuable here. So, grab your favorite coding beverage, and let's dive in!
The SwiftUI Revolution Continues
First things first – if you haven't jumped on the SwiftUI bandwagon yet, what are you waiting for? Apple has been pouring resources into this framework, and it's evolving at a breakneck pace. In 2024, we're seeing SwiftUI become more powerful, more flexible, and more intuitive than ever before.
One of the things I love most about SwiftUI is how it encourages us to think differently about app architecture. Gone are the days of wrestling with complex view controllers and storyboards. SwiftUI's declarative syntax allows us to build user interfaces with less code and more clarity. It's not just about writing less code, though – it's about writing more expressive code that clearly communicates our intent.
Tips for SwiftUI Success in 2024
Embrace the Power of Previews
SwiftUI's preview feature is a game-changer, and in 2024, it's more powerful than ever. Don't just use previews for basic UI checks – leverage them to test different device sizes, orientations, and even localization. Create multiple previews for each view to ensure your UI looks great in all scenarios under ui ux development.
Here's a pro tip: use preview providers to create sample data for your views. This way, you can easily test how your UI handles different data states without having to run the full app.
Master State Management
As our apps grow more complex, managing state becomes increasingly important. SwiftUI provides several tools for state management, including @State, @Binding, @ObservedObject, and @EnvironmentObject. Understanding when to use each of these is crucial for building performant and maintainable apps.
In 2024, we're seeing a trend towards more granular state management. Instead of relying on large, monolithic view models, consider breaking your state into smaller, more focused pieces. This not only improves performance but also makes your code easier to reason about and test.
Leverage SwiftUI's Built-in Animations
One of SwiftUI's strengths is how easy it makes adding beautiful animations to your app. In 2024, users expect smooth, responsive interfaces, and SwiftUI's animation capabilities are up to the task.
Don't be afraid to experiment with different animation types and timings. SwiftUI makes it easy to add spring animations, delays, and even custom timing curves. Remember, though – with great power comes great responsibility. Use animations judiciously to enhance the user experience, not distract from it.
Optimize for Performance
As SwiftUI matures, we're gaining more insights into how to build performant apps with it. One key tip is to be mindful of your view hierarchy. Excessive nesting can lead to performance issues, so try to keep your view hierarchy as flat as possible.
Another performance tip for 2024: make liberal use of the @ViewBuilder attribute. This allows you to create more complex view hierarchies without sacrificing performance.
Embrace Accessibility
In 2024, accessibility isn't just a nice-to-have – it's a must-have. The good news is that SwiftUI makes it easier than ever to create accessible apps. Take advantage of SwiftUI's built-in accessibility modifiers to ensure your app is usable by everyone.
Don't forget about Dynamic Type support! SwiftUI makes it easy to support different text sizes, but it's up to you to test your UI with various font sizes to ensure everything looks great.
Integrate with UIKit When Necessary
While SwiftUI is incredibly powerful, there may still be times when you need to use UIKit components. In 2024, the integration between SwiftUI and UIKit is smoother than ever. Don't be afraid to use UIViewRepresentable and UIViewControllerRepresentable to bring UIKit views into your SwiftUI app when needed.
Leverage SwiftUI for Watch, TV, and Mac
One of the most exciting aspects of SwiftUI is its ability to help us build apps for multiple Apple platforms. In 2024, we're seeing more developers leverage this capability to create cohesive experiences across iPhone, iPad, Mac, Apple Watch, and Apple TV.
When building for multiple platforms, focus on creating a consistent user experience while still respecting the unique characteristics of each platform. SwiftUI makes this easier by allowing us to share core logic while customizing the UI for each platform.
Best Practices for SwiftUI Development in 2024
Modularize Your Code
As your SwiftUI apps grow in complexity, it becomes increasingly important to modularize your code. Break your app into smaller, reusable components. This not only makes your code more manageable but also improves reusability and testability.
Embrace Swift Packages
In 2024, we're seeing a surge in the use of Swift Packages for SwiftUI development. Don't reinvent the wheel – take advantage of the growing ecosystem of SwiftUI packages. And don't be afraid to create your own packages for reusable components!
Test, Test, Test
With SwiftUI's declarative nature, unit testing becomes even more powerful. Make sure you're writing tests for your business logic and even your UI components. SwiftUI's preview feature can be a great ally in UI testing.
Stay Up-to-Date
The SwiftUI landscape is evolving rapidly. Make it a habit to stay updated with the latest SwiftUI features and best practices. Follow WWDC sessions, read the official documentation, and engage with the SwiftUI community.
Document Your Code
As SwiftUI allows us to create more complex UIs with less code, it becomes even more important to document our intentions. Use clear, descriptive variable names and add comments to explain complex logic or UI decisions.
Wrapping Up
As we look ahead to 2024, it's clear that SwiftUI is not just the future of iOS development – it's the present. By embracing these tips and best practices, you'll be well-equipped to create stunning, performant, and user-friendly apps that stand out in the App Store.
Remember, the journey of mastering SwiftUI is ongoing. Don't be discouraged if you encounter challenges along the way – that's all part of the learning process. Keep experimenting, keep learning, and most importantly, keep building amazing apps!
What aspects of SwiftUI are you most excited about for 2024? Drop a comment below and let's discuss. Happy coding, everyone!
0 notes
Text
UI/UX Design: Key Strategies for Standout Digital Products
For any designer or business owner, creating a functional and visually appealing user interface is pivotal for the success of digital products. In today's competitive digital marketplace, employing robust UI/UX design strategies is crucial for creating smooth, intuitive, and visually striking websites.
It can sometimes be challenging to understand that UI (User Interface) and UX (User Experience) are distinct from each other, yet intricately linked. Understanding this relationship is akin to decoding the blueprint of a successful digital product.
User interface design is all about how a product looks and feels, focusing on aesthetics and presentation. On the other hand, user experience delves into ensuring a seamless and efficient interaction flow for users.

Essential Elements of UI/UX Design:
Simplicity:
The mantra in UI/UX design is often "less is more." A simple, clean, and focused design avoids overwhelming users and enhances user satisfaction. This simplicity is what ultimately crafts a sophisticated and enjoyable user experience.
Smooth Navigation:
Navigation is crucial for any digital product. A straightforward and easily navigable interface is essential. Clear labels and well-thought-out menu placements aid users in finding exactly what they need without frustration. Adding features like hamburger menus or sticky navigation bars can further enhance navigation, making your website design both intuitive and user-centric.
Consistency:
Consistency in website design ties your digital product together. Maintaining uniform fonts, colors, and design elements across all pages creates a cohesive brand identity, making it easier for users to navigate and interact with your product seamlessly.
Customization:
Providing a unique experience is key in today’s market. Integrating custom elements into your UI and UX design makes users feel valued and enhances their engagement with your product. Whether it's a personalized greeting or content tailored to user preferences, customization strengthens the connection between your brand and your customers.
Micro-interactions:
Micro-interactions, such as small animations or effects in response to user actions, significantly enhance user satisfaction. They provide immediate feedback, guide users through their interactions, and add an element of delight, playing a critical role in the success of UI UX design.
Accessibility:
Accessibility should be a core component of your UI UX design strategy. Implementing best practices such as alt text for images, high-contrast color schemes, and keyboard-friendly navigation ensures that your product is usable by people with disabilities, thereby expanding your reach and enhancing usability for all users.
Conclusion:
To carve a niche for your digital products in the market, blending creativity with a user-centered design approach and attention to detail is essential. Implement these design strategies to not only meet but exceed user expectations, setting your digital products apart in a crowded marketplace. Collaborate with a skilled UI UX design company to bring these ideas to life, ensuring your business achieves new levels of success.
0 notes
Text
Creating the best possible user experience (UX) is a top priority when developing an application. Consumers adore user-focused products with straightforward navigational interfaces, great value, and ease of use. You will undoubtedly succeed if you create programs using these kinds of considerations. Because of this, UI/UX is not something that should be disregarded, which is why it's critical to comprehend industry trends. The impact of these UX trends is timeless, thus it makes sense to monitor them in order to develop the greatest apps with top-notch user experiences.
0 notes
Text
Within the quickly evolving scene of mobile app development or advancement, choosing the correct system or framework is vital for victory. Among the heap alternatives available, Flutter has risen as a game-changer. For businesses within the U. States looking to use the control of this inventive framework, joining forces with a dependable Flutter App Development Company like Tecocraft Infusion is fundamental. The decision to hire Flutter developers or select Flutter App Development Services isn’t simply a choice; it’s a key move toward building high-quality, cross-platform mobile applications.
#website development#website designing#mobile app development#app development#software development#app designing#mobile app designing#digital marketing#seo services#graphic designing#ui ux designing#ui ux development#web app development company#digital marketing company
0 notes
Text
Ready to transform your digital vision into reality?
BootesNull is a full-service software development company with a team of Skilled Software developers, UI / UX Designers, and Strategists to efficiently tackle even the most intricate projects.
Services We Provide: ✅ Web Development ✅ Mobile App Development ✅ UI/UX Design ✅ Digital Marketing
Here's why you should choose BootesNull. ✅ Expertise and Experience ✅ Customized solutions tailored to your needs ✅ Proven track record of successful projects ✅ Timely Delivery ✅ Exceptional Support
No matter the complexity, we can build your product to your specific needs. Let's Talk!!
Book your FREE consultation now. 🌐 https://bootesnull.com/ 📩 [email protected] 📞 +91-9041114448
Follow Us:
https://www.facebook.com/bootesnull/ https://in.linkedin.com/company/bootesnull/ https://www.instagram.com/bootesnull/ https://twitter.com/bootesnull/
#bootesnull#Software Development Company#Best Software Development Services#Software Development#Software Development Agency#Web Development#Web Design#UI UX development
0 notes
Text
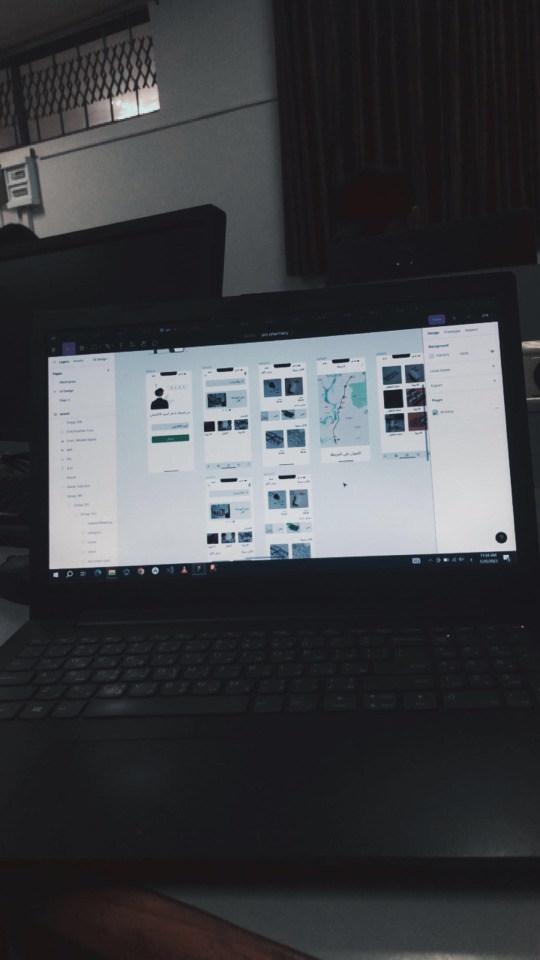
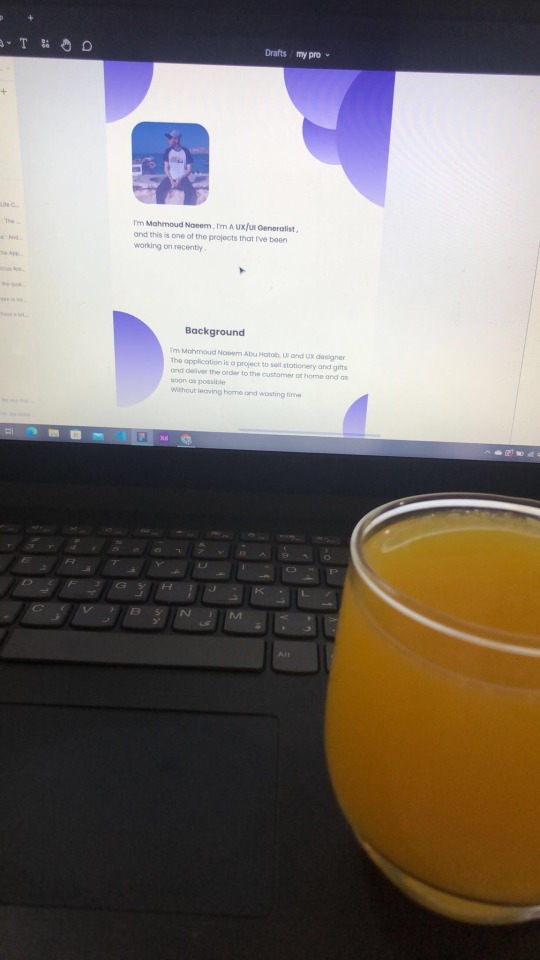
“My Dream Is Still Alive Despite the Rubble”


My dream has always been to become a UX/UI designer and a web developer. This dream has been my compass toward a better future for me and my family, giving my life meaning and hope despite the challenges.

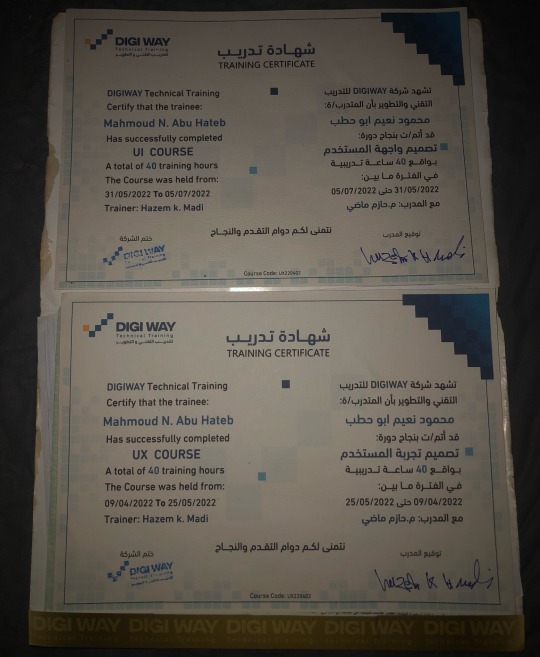
But the war in Gaza turned our lives upside down. We lost our home, my university, and even the laptop I relied on for learning and work. We were displaced to the southern part of Gaza, where we suffer daily from power outages and limited internet access. Despite these circumstances, my heart still clings to hope, and I refuse to give up on my dream.
I am not just asking for support to acquire equipment; I am asking for a chance to rebuild my future—not just for myself, but for my family as well. I believe that every challenge holds an opportunity, and I am determined to turn this hardship into a story of success.
Why Do I Need Your Support?
To continue my education and pursue my dream, I need some essential tools to help me learn and work under these harsh conditions:
• Laptop: $2,000
• Solar Panel: $2,000
• Power Inverter: $1,000
• 100Ah Battery: $1,000
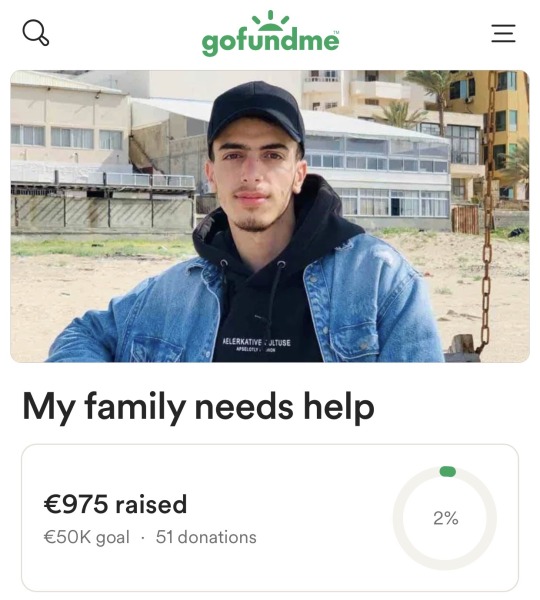
Total Cost: $6,000.
So far, I’ve managed to raise €975 through my GoFundMe campaign, but I need to reach €7,000 to cover all costs.
My Vision for the Future:
My ambition is not just to complete my studies but also to use my skills to support my community in Gaza. I aim to train young people in programming and design so we can contribute to building a better future despite the challenges we face.
Why Your Contribution Matters:
Your donation is not just helping me personally but is an investment in a young man determined to empower his community. I aspire to become a role model for Palestinian youth, showing that resilience and creativity can overcome any obstacle.

A Heartfelt Thank You:
I live under difficult conditions, but I believe that goodness exists everywhere. Every person who contributes to my dream brings hope back into my life and gives me the strength to keep going.
How You Can Help:
1. Donate to the campaign:
GoFundMe
OR USDT

TLns8czyFHsJQWkaAEeza3of5cgEH7vi3n
2. Share my story with your friends and family. It might reach someone who can help.
3. Offer advice or opportunities that could help me develop my skills and achieve my dream.
Finally:
I promise to share every step of my journey with you—from acquiring the equipment to completing my education and realizing my dream. You are part of this story, and your support is the light I need right now.
“In the darkest times, there is always a ray of light. That light is you and your support, which gives me the strength to carry on.”
Special Thanks:
I would like to extend my heartfelt gratitude to everyone who has supported me so far. A special thanks to:
@gaza-evacuation-funds @gaza-relief-fund @wellwaterhysteria @ayeshjourney @nabulsi @catnapdreams @vetted-gaza-funds @vetted
#gaza#free gaza#save gaza#palestine#free palatine#save palestine#help my family#ui ux design#programming#web development#web design#vetted fundraiser#vetted#university#figma#design#gaza gofundme#palestine gofundme#gofundme#gfm#palestine gfm#gaza gfm#vetted gfm#gaza fundraiser#palestine fundraiser#fundraiser#help gaza#help#please help#christmas
315 notes
·
View notes
Text

hyperfixated on this game so hard i tried to recreate ac syndicate's animus database using html css and js👍
i will make this responsive though, i've only started doing the frontend but i'll also start doing the backend as soon as i finish this
basically this is gonna be a website that will allow you to create a database of your assassin's creed OCs (btw this was inspired by @gwen-the-assassin's idea <33) and help you with worldbuilding and making AUs (i know the ac fanon wiki already exists for that but i wanted to make the experience of keeping a database more immersive u know....)
this might take a while to be completed, but I'll try to post updates on it as much as possible! if there are any programmers/web developers in the ac fandom that want to contribute to this project plsplspls DM me!!
actual pic of the database for comparison:

ik it's not entirely accurate but this is the simplest database in the game that i could recreate lmao
also code snippets just cuz (+ me crashing out)


#u know what#i might just pass this for my database systems class#assassin's creed#assassin's creed syndicate#ac syndicate#animus#video games#gaming#programming#coding#codeblr#web development#ui ux design#html css#javascript
156 notes
·
View notes
Text


Hello! I'm reaching out to share about a fundraiser that's very important to me. Muhammad, a hardworking UX UI designer from Gaza, is seeking help to escape the harsh conditions he and his family are currently living in. The funds raised will help Muhammad and his family move to Egypt, where they can live a safe and dignified life. The travel costs are high, and every bit of help counts. Muhammad's story is one of resilience and ambition. By supporting this fundraiser, we can help him continue his journey to safety. Please consider donating and sharing this message. Thank you!
Help me and my children we are dying now
This family has a lot of money, while my family and I have no food or drink. My father is dead and my mother is disabled. Help me.https://www.gofundme.com/f/support-alashqar-familys-path-to-safety
Blaze
857 notes
#america#basketball#legend of zelda#comics#video#czrsed#i stand with palestine#design#ui ux design#ui ux development services#web development#website#ux research#ui#ai#london#new zealand#self love#ecommerce#israel is a terrorist state#chairty#help my family#help my friend#mental health#death note#children#cats of tumblr#warrior cats#cute animals#united nations
60 notes
·
View notes
Text

Design meme - UI & UX problems 😅
#web design#design meme#tumblr memes#comics#funny pictures#ui ux design#us#nevada#los angeles#app development#uxfails#ui#design thinking#accesibility#design innovation#ideas
55 notes
·
View notes
Text
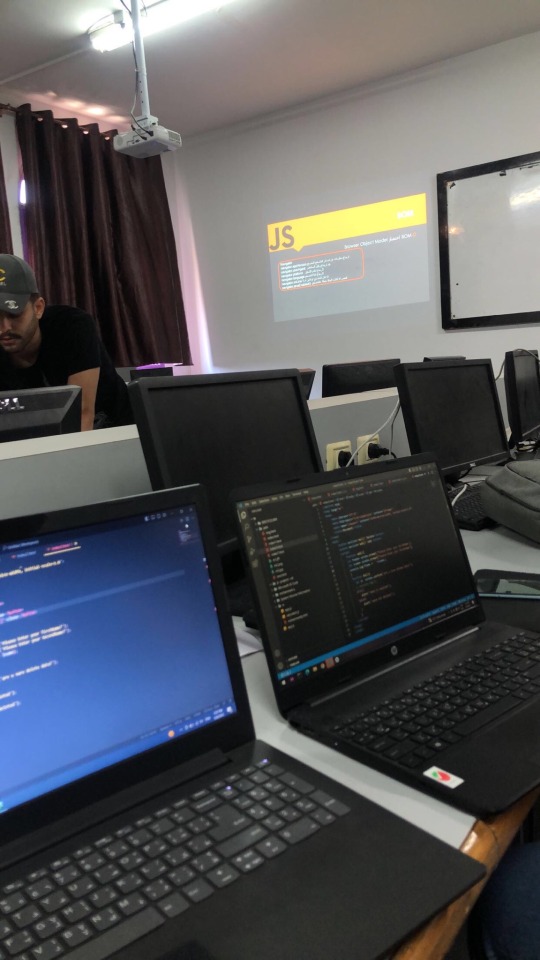
JavaScript Fundamentals
I have recently completed a course that extensively covered the foundational principles of JavaScript, and I'm here to provide you with a concise overview. This post will enable you to grasp the fundamental concepts without the need to enroll in the course.
Prerequisites: Fundamental HTML Comprehension
Before delving into JavaScript, it is imperative to possess a basic understanding of HTML. Knowledge of CSS, while beneficial, is not mandatory, as it primarily pertains to the visual aspects of web pages.
Manipulating HTML Text with JavaScript
When it comes to modifying text using JavaScript, the innerHTML function is the go-to tool. Let's break down the process step by step:
Initiate the process by selecting the HTML element whose text you intend to modify. This selection can be accomplished by employing various DOM (Document Object Model) element selection methods offered by JavaScript ( I'll talk about them in a second )
Optionally, you can store the selected element in a variable (we'll get into variables shortly).
Employ the innerHTML function to substitute the existing text with your desired content.
Element Selection: IDs or Classes
You have the opportunity to enhance your element selection by assigning either an ID or a class:
Assigning an ID:
To uniquely identify an element, the .getElementById() function is your go-to choice. Here's an example in HTML and JavaScript:
HTML:
<button id="btnSearch">Search</button>
JavaScript:
document.getElementById("btnSearch").innerHTML = "Not working";
This code snippet will alter the text within the button from "Search" to "Not working."
Assigning a Class:
For broader selections of elements, you can assign a class and use the .querySelector() function. Keep in mind that this method can select multiple elements, in contrast to .getElementById(), which typically focuses on a single element and is more commonly used.
Variables
Let's keep it simple: What's a variable? Well, think of it as a container where you can put different things—these things could be numbers, words, characters, or even true/false values. These various types of stuff that you can store in a variable are called DATA TYPES.
Now, some programming languages are pretty strict about mentioning these data types. Take C and C++, for instance; they're what we call "Typed" languages, and they really care about knowing the data type.
But here's where JavaScript stands out: When you create a variable in JavaScript, you don't have to specify its data type or anything like that. JavaScript is pretty laid-back when it comes to data types.
So, how do you make a variable in JavaScript?
There are three main keywords you need to know: var, let, and const.
But if you're just starting out, here's what you need to know :
const: Use this when you want your variable to stay the same, not change. It's like a constant, as the name suggests.
var and let: These are the ones you use when you're planning to change the value stored in the variable as your program runs.
Note that var is rarely used nowadays
Check this out:
let Variable1 = 3; var Variable2 = "This is a string"; const Variable3 = true;
Notice how we can store all sorts of stuff without worrying about declaring their types in JavaScript. It's one of the reasons JavaScript is a popular choice for beginners.
Arrays
Arrays are a basically just a group of variables stored in one container ( A container is what ? a variable , So an array is also just a variable ) , now again since JavaScript is easy with datatypes it is not considered an error to store variables of different datatypeslet
for example :
myArray = [1 , 2, 4 , "Name"];
Objects in JavaScript
Objects play a significant role, especially in the world of OOP : object-oriented programming (which we'll talk about in another post). For now, let's focus on understanding what objects are and how they mirror real-world objects.
In our everyday world, objects possess characteristics or properties. Take a car, for instance; it boasts attributes like its color, speed rate, and make.
So, how do we represent a car in JavaScript? A regular variable won't quite cut it, and neither will an array. The answer lies in using an object.
const Car = { color: "red", speedRate: "200km", make: "Range Rover" };
In this example, we've encapsulated the car's properties within an object called Car. This structure is not only intuitive but also aligns with how real-world objects are conceptualized and represented in JavaScript.
Variable Scope
There are three variable scopes : global scope, local scope, and function scope. Let's break it down in plain terms.
Global Scope: Think of global scope as the wild west of variables. When you declare a variable here, it's like planting a flag that says, "I'm available everywhere in the code!" No need for any special enclosures or curly braces.
Local Scope: Picture local scope as a cozy room with its own rules. When you create a variable inside a pair of curly braces, like this:
//Not here { const Variable1 = true; //Variable1 can only be used here } //Neither here
Variable1 becomes a room-bound secret. You can't use it anywhere else in the code
Function Scope: When you declare a variable inside a function (don't worry, we'll cover functions soon), it's a member of an exclusive group. This means you can only name-drop it within that function. .
So, variable scope is all about where you place your variables and where they're allowed to be used.
Adding in user input
To capture user input in JavaScript, you can use various methods and techniques depending on the context, such as web forms, text fields, or command-line interfaces.We’ll only talk for now about HTML forms
HTML Forms:
You can create HTML forms using the <;form> element and capture user input using various input elements like text fields, radio buttons, checkboxes, and more.
JavaScript can then be used to access and process the user's input.
Functions in JavaScript
Think of a function as a helpful individual with a specific task. Whenever you need that task performed in your code, you simply call upon this capable "person" to get the job done.
Declaring a Function: Declaring a function is straightforward. You define it like this:
function functionName() { // The code that defines what the function does goes here }
Then, when you need the function to carry out its task, you call it by name:
functionName();
Using Functions in HTML: Functions are often used in HTML to handle events. But what exactly is an event? It's when a user interacts with something on a web page, like clicking a button, following a link, or interacting with an image.
Event Handling: JavaScript helps us determine what should happen when a user interacts with elements on a webpage. Here's how you might use it:
HTML:
<button onclick="FunctionName()" id="btnEvent">Click me</button>
JavaScript:
function FunctionName() { var toHandle = document.getElementById("btnEvent"); // Once I've identified my button, I can specify how to handle the click event here }
In this example, when the user clicks the "Click me" button, the JavaScript function FunctionName() is called, and you can specify how to handle that event within the function.
Arrow functions : is a type of functions that was introduced in ES6, you can read more about it in the link below
If Statements
These simple constructs come into play in your code, no matter how advanced your projects become.
If Statements Demystified: Let's break it down. "If" is precisely what it sounds like: if something holds true, then do something. You define a condition within parentheses, and if that condition evaluates to true, the code enclosed in curly braces executes.
If statements are your go-to tool for handling various scenarios, including error management, addressing specific cases, and more.
Writing an If Statement:
if (Variable === "help") { console.log("Send help"); // The console.log() function outputs information to the console }
In this example, if the condition inside the parentheses (in this case, checking if the Variable is equal to "help") is true, the code within the curly braces gets executed.
Else and Else If Statements
Else: When the "if" condition is not met, the "else" part kicks in. It serves as a safety net, ensuring your program doesn't break and allowing you to specify what should happen in such cases.
Else If: Now, what if you need to check for a particular condition within a series of possibilities? That's where "else if" steps in. It allows you to examine and handle specific cases that require unique treatment.
Styling Elements with JavaScript
This is the beginner-friendly approach to changing the style of elements in JavaScript. It involves selecting an element using its ID or class, then making use of the .style.property method to set the desired styling property.
Example:
Let's say you have an HTML button with the ID "myButton," and you want to change its background color to red using JavaScript. Here's how you can do it:
HTML: <button id="myButton">Click me</button>
JavaScript:
// Select the button element by its ID const buttonElement = document.getElementById("myButton"); // Change the background color property buttonElement.style.backgroundColor = "red";
In this example, we first select the button element by its ID using document.getElementById("myButton"). Then, we use .style.backgroundColor to set the background color property of the button to "red." This straightforward approach allows you to dynamically change the style of HTML elements using JavaScript.
#studyblr#code#codeblr#css#html#javascript#java development company#python#study#progblr#programming#studying#comp sci#web design#web developers#web development#website design#ui ux design#reactjs#webdev#website#tech
397 notes
·
View notes
Text
November 2024 Check In

Hello, everyone!
Got some stuff to share! Our artists had a bit of a respite as we took a breather between the Moontail push, but we’re continuing back to work!
As stated previously, most of our art efforts have been towards accessories and mass illustration of the same things over again, so that legaves less “new” things to share, but we’ll be sharing what we’ve accomplished!
Accessory Illustrations
Necromantic Cloak
We’ve completed the Necromantic Cloak on all starter breed poses!
Illustration by Remmie, Tybaxel, and Hydde
And we have finalized colors!
Color design by Emma
Creeping Thicket
We’ve completed the Creeping Thicket on all starter breed poses!
Illustration by Remmie, linework by Tybaxel
We are actively working on the colors for this piece, but we shared a preview of the work in progress earlier this month!
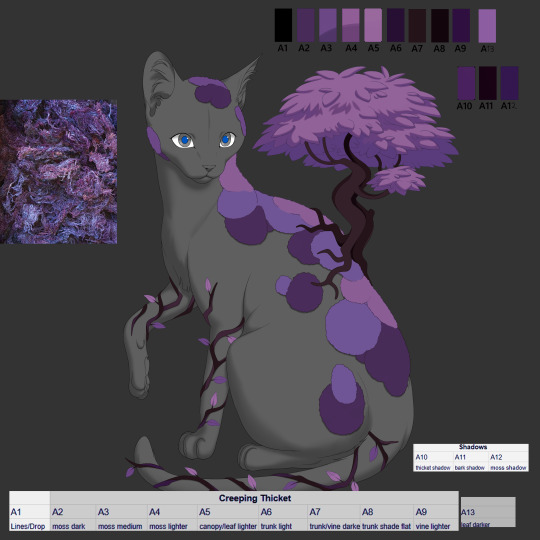

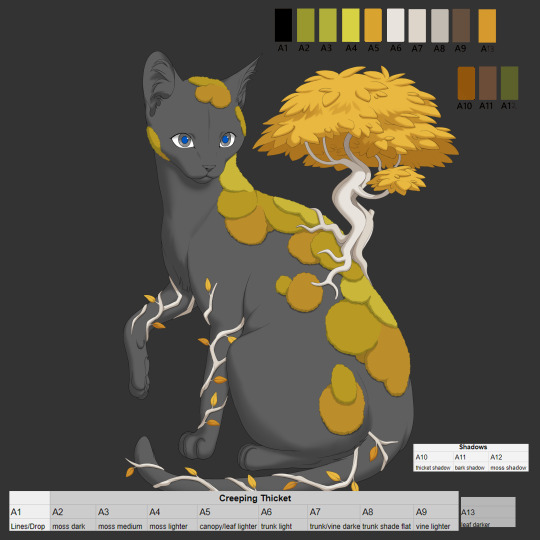
We have also decided to divide up the original item into two items: the Creeping Vine and Creeping Thicket.
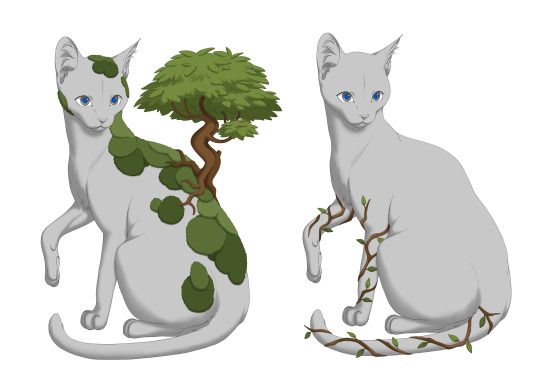
All Kickstarter backers who purchased a Creeping Thicket will receive both items!
We decided this after understanding that a division will allow for more variability and utility of the item.
Gilded Set
We have also divided this accessory into three items: the Gilded Teardrops, Gilded Collar, and Gilded Tailpiece, thus creating the Gilded item set!
We’ve completed the Gilded set on all starter breed poses!

Illustration by Azarel
Regal Set
We’ve completed the Regal set on all starter breed poses!
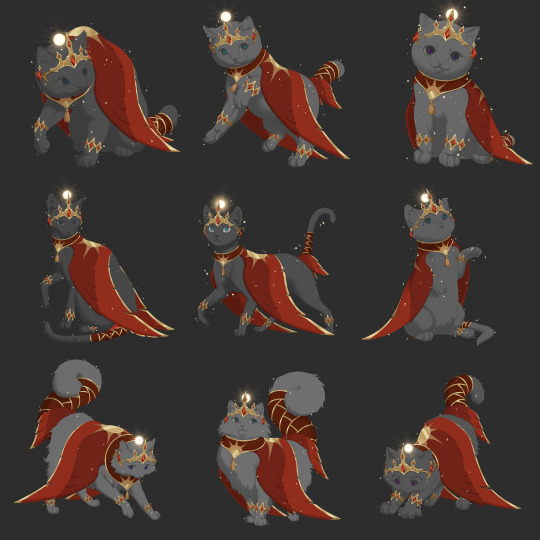
Illustration by Azarel
Backdrops
Grand Library
We completed the Grand Library backdrop!


Composition by Runeowl and Giulia, final illustration by Asp
Cogwheel Outskirts Nighttime


Nighttime edits by Giulia, original illustration by Kzart
Decor Check In
Previously, we shared decor which was attempted to fit into the backdrop style, intending for decor to fit seamlessly into a backdrop. However, after careful consideration and several iterations, we have decided that from now on, decor will by stylized like the cats and fauna.
Decor will be lined with soft-cell shading, and will not look blended into the backdrop itself. We found that with varying textures and shading unique to different backdrop environments, the aesthetics were unsustainable and problematic long term. We have begun production on decor which closer resembles the stylistic truth of cats, icons, and fauna, and we feel this direction will be much stronger in the long term!
Pelt System
And something big… a design for the pelt system! This design took a lot of work, as we wanted to make the process as seamless and quality as possible.
There is a lot of information to work with on this page, and we’re quite proud of how it’s turned out. We hope users enjoy!
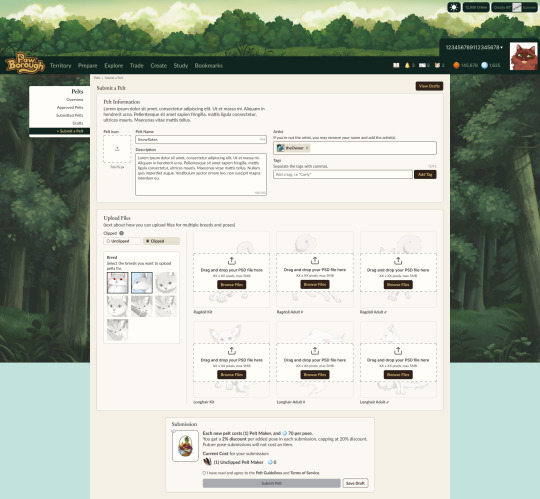
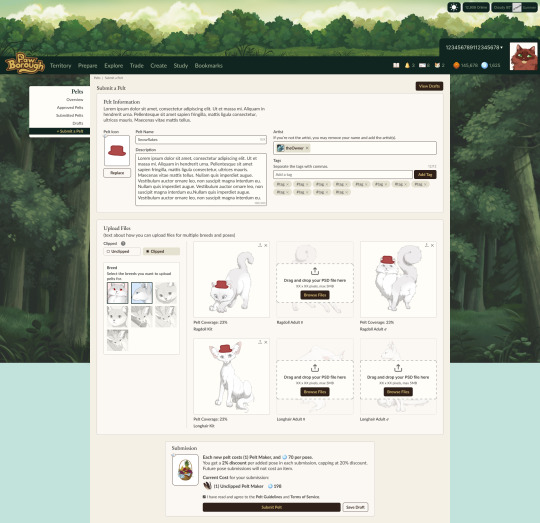
Users will be able to toggle on breed poses to upload, so as to avoid a long drop down. If a pelt is a commission, users will be invited to credit the proper artist.
In addition, we have an "add more" feature which will invite and allow users to submit more poses for their pelt even after the pelt has been approved and added into the game.
Submitting more poses at once offers a slight discount because it is easier on the mod team. But importantly, at any time users will be able to expand pelts into new breed releases. This will serve to prevent item and submission bloat!
One of the most exciting developments in this category has been our adaptation for pelts to utilize the dynamic layering. Using the PSD and layer system we already designed and implemented, users will be able to utilize it too for unclipped pelts!
Our system works by users paying an upfront fee for moderation approval, and then all further printing will be at a significantly cheaper rate. Creators will also be able to list their pelts for sale without printing, in which buyers pay the print cost as a tax, giving sellers more freedom.
We will be basing the cost of pelt submissions on our ability to pay moderators a fair rate. We are currently running tests to time and calculate our moderation efforts, so no prices are set in stone yet!
Development Check In
User Settings
We’ve completed work on user settings. Users can now change their icons to any cat they own, validate new emails, change their password, username, and Borough! Mundane, but hugely necessary advancements.


In general, we're currently working on the pelt system and general polish. We’ve also just begun implementing ways for users to pay for digital content, which is huge for us.
And with that, one more announcement regarding development support...
Trying out Patreon!
Many months ago, we discussed the option of opening up tertiary support efforts, such as "support bundles," as a way to continually aid and bolster development. We denied pursuing this avenue at the time, because we had to focus solely on development with the resources at our disposal already. We mentioned a plan to do something in the future when the time was right.
Since then, we've gotten countless questions on how people can support us after missing the Kickstarter, and how they may help contribute to our development.
We are at a point in our timeline now where we could utilize the support funds. Our scope is higher than it was when we first imagined the project, and while we've been able to manage expectations vs. the necessary additions to make our game the best it can be out the gate, we've decided to open up support for those who'd love to see more behind the scenes.
Introducing our Patreon!
! Not signing up will not harm the project! It does NOT void nor devalue your Kickstarter rewards, nor will we EVER be handing out retired goods through this platform !
Please do not feel obligated to signup if you are not in a place to! This is simply something we're pursuing as an additional avenue of support in a time where we can use it, especially for those who have asked how they can engage with the project while having missed the Kickstarter.
Like the idea of support bundles, we are offering something amidst the work. We'll be offering behind the scenes updates, showing off sketches, drafts, development shots, and the design process of content that is typically only shown in a finished or near-finished state for our public updates.
Simply put: see things before the public sees 'em!
We work every weekday, so there will always be something new to show. Get frequent posts of the lore workshopping, the design pipeline, UI/UX designs, compositions, and all the other juicy tidbits of behind the scenes.
We'll be thinking about what more to offer in addition, but the last thing we want is to introduce more retired stuff, or undermine the exclusivity of the perks promised in the Kickstarter. This is not Kickstarter 2.
However, if this Patreon offers a lucrative solution for us, we may be able to expand our expectations for breed releases, mechanic timelines, and content updates!
All content on this page is available at a low price, and higher tiers do not give more behind the scenes. Instead, we've priced higher options if users would like to be credited as supporters on the credits page of the game.
And Kickstarter backers will also be automatically credited from here on.
As a way to reward the highest tier, we will also feature exclusive community polling. This is different and more lowkey than the giant polls we have done in the past. Sometimes, we as a team have deliberations for small things; minor design choices, UI differences, or content that has generally been too inconsequential to burden the community with giant polls. As a way to engage and have some fun, we're taking these smaller discussions here!
Large polls which pertain to more serious and consequential topics, such as sweeping mechanic changes or big decisions that we specifically want community input on, will still be done publicly.
Lastly, it's unclear at this time what the fate of this page will be once we move into launch. We may repurpose it as a way to recruit beta testing for new updates post-launch, we may shut it down, and we may keep it exactly as is with behind the scenes exclusivities and previews before content hits the game. Depending on the pros and cons during slower development cycles, we'll have to make that call when we get there. But right now we're in full force on mass production, and we'd love to keep on that track!
Thank you everyone!
To summarize: We shared a large amount of accessory progress, backdrops, the pelt system, and what we're currently working on in development. In addition, we launched a Patreon to post sketches and early access content.
What to expect next update: Potential beta updates, further asset and development updates.
#paw borough#petsite#pet sim#development update#pawborough#kickstarter update#art update#indie game#pet site#apparel#pelts#ui ux design#patreon
44 notes
·
View notes
Text
Understanding the Basics: An Introduction to the Laws of UX Design

So, you've decided to take the plunge and start your own business. Maybe you're a budding entrepreneur in London, a tech whiz in Silicon Valley, or a visionary in Dubai. Whatever your story, you know that in today's digital age, having a killer website is non-negotiable. But here's the thing – it's not just about slapping together some fancy graphics and calling it a day. Enter the world of UX design, where psychology meets technology to create websites that not only look good but actually work for your users.
Let's dive into the basics of UX design laws, shall we? Don't worry, we're not talking about legal jargon here. These are more like the golden rules in ui ux development that'll help you create a website that your customers will actually enjoy using. And trust me, a happy user is more likely to become a loyal customer.
1. Hick's Law: Keep It Simple, Stupid
Imagine you're at a coffee shop in New York City. The menu has 50 different types of coffee, each with its own fancy name. Suddenly, ordering your morning brew feels like sitting for a PhD exam. That's Hick's Law in action – the more choices you give people, the longer it takes them to make a decision.
a) The Paradox of Choice
In the online world, too many options can lead to decision paralysis. Your potential customers might just give up and go elsewhere.
b) Simplify, Simplify, Simplify
Take a leaf out of Apple's book. Their product pages are clean, focused, and guide you smoothly towards making a purchase.
c) Progressive Disclosure
Think of it like peeling an onion. Reveal information gradually, giving users only what they need at each step of their journey.
Real-world example: Remember how Amazon started? A simple search bar and a few product categories. Even now, with millions of products, their homepage remains surprisingly clutter-free.
2. Fitts's Law: Make It Easy to Click
Picture this: you're trying to tap a tiny "Buy Now" button on your smartphone while riding the Tube in London. Frustrating, right? That's where Fitts's Law comes in – the easier it is to interact with an element, the more likely users are to do so.
a) Size Matters
Bigger buttons are easier to click. It's not rocket science, but you'd be surprised how often this is overlooked.
b) Location, Location, Location
Put important elements where they're easy to reach. On mobile, think about thumb-friendly zones.
c) Visual Feedback
Give users a clear signal that their action has been registered. A color change or subtle animation can work wonders.
Real-world example: Take a look at the BBC News app. Notice how the headlines and navigation elements are generously sized and spaced? That's Fitts's Law in action, making it easy for users to tap what they want, even on a bumpy bus ride.
3. Miller's Law: Chunk It Up
Imagine you're at a networking event in Dubai, and someone rattles off their phone number without pausing. Chances are, you'd forget it immediately. But if they group the numbers (like 055-123-4567), suddenly it's much easier to remember. That's Miller's Law – we can only hold about 7 (plus or minus 2) items in our short-term memory.
a) Group Related Information
Organize your content into logical categories. It makes it easier for users to process and remember.
b) Use Visual Hierarchy
Headers, subheaders, and bullet points aren't just for show. They help break up information into digestible chunks.
c) Progressive Disclosure (Yes, Again!)
Don't overwhelm users with all the information at once. Reveal details as users dig deeper into your site.
Real-world example: Check out how Gov.uk organizes its vast amount of information. They use clear categories, concise headlines, and a clean layout to make finding information a breeze, even when dealing with complex topics like taxes or immigration.
4. Jakob's Law: Don't Reinvent the Wheel
You know how when you walk into any supermarket in the UK, you pretty much know where to find the milk? That's because we're creatures of habit, and we expect certain things to be in certain places. The same applies to websites.
a) Stick to Conventions
Put your navigation where people expect to find it. Top or left is usually a safe bet.
b) Use Familiar Icons
A magnifying glass for search, a shopping cart for... well, shopping. Don't get too creative with the basics.
c) Follow Platform Guidelines
If you're making an app, stick to the design languages of iOS or Android. It'll feel more natural to your users.
Real-world example: Look at any major news website – BBC, CNN, Al Jazeera. Notice how similar their layouts are? That's not lack of creativity; it's Jakob's Law in action. Users can navigate these sites easily because they're familiar.
5. Law of Proximity: Keep Related Things Together
Imagine you're at a farmers' market in California. You'd expect to find tomatoes near other vegetables, not next to handmade soaps, right? That's the Law of Proximity – things that are near each other seem related.
a) Group Similar Elements
Keep your "About Us" link near other company information, not floating randomly on the page.
b) Use White Space Wisely
Don't be afraid of empty space. It can help create visual groupings without the need for borders or backgrounds.
c) Consistent Styling
Use similar colors, fonts, or shapes for related elements to reinforce their connection.
Real-world example: Take a look at Airbnb's search results page. Notice how each listing is a distinct unit, with the photo, price, and description all neatly packaged together? That's the Law of Proximity making it easy for you to compare options.
6. Von Restorff Effect: Make It Pop!
Ever been to a bazaar in Istanbul and noticed how one particularly vibrant rug catches your eye amidst hundreds? That's the Von Restorff Effect in action - we remember things that stand out from the crowd.
a) Highlight Key Information
Got a limited-time offer? Make sure it stands out on your homepage. Use a different color, size, or even animation to draw attention.
b) Break the Pattern
If your website uses a lot of rectangles, try using a circle for an important call-to-action button. The shape difference will make it pop.
c) Use Contrast Wisely
A bright red "Sale" tag on a primarily blue website will definitely grab eyeballs. Just don't go overboard, or you'll end up with a visual circus.
Real-world example: Check out how Dropbox's homepage uses a vibrant blue "Sign up for free" button that stands out against the white background. It's impossible to miss, making it clear what action they want you to take.
7. Doherty Threshold: Speed Is King
Imagine you're at a coffee shop in London, and it takes 20 minutes to get your latte. Annoying, right? The same principle applies to your website. The Doherty Threshold states that productivity soars when a computer and its users interact at a pace (<400ms) that ensures neither has to wait on the other.
a) Optimize Load Times
Every second counts. Compress images, minify code, and use caching to speed up your site.
b) Provide Instant Feedback
When a user clicks a button, something should happen immediately, even if it's just a color change or a loading spinner.
c) Prioritize Above-the-Fold Content
Load the visible part of your website first, so users can start interacting while the rest loads in the background.
Real-world example: Google's search results appear almost instantly as you type. This rapid response keeps users engaged and coming back for more.
8. Peak-End Rule: First Impressions and Last Impressions Matter Most
Think about your last vacation. Chances are, you remember the highlights and how it ended more than the mundane middle bits. That's the Peak-End Rule - people judge an experience largely based on how they felt at its most intense point and at its end.
a) Create "Wow" Moments
Include unexpected delights in your user journey. Maybe a congratulatory animation when they complete a purchase?
b) Smooth Out the Rough Spots
Identify the most frustrating parts of your website (like checkout) and make them as painless as possible.
c) End on a High Note
After a user completes an action, don't just show a boring confirmation. Thank them, offer a small reward, or suggest a next step.
Real-world example: When you complete a course on Duolingo, you're greeted with a celebration animation and encouraging message. This positive ending keeps users coming back for more.
9. Aesthetic Usability Effect: Pretty Does Matter
You know how people tend to flock to the trendiest-looking café in Dubai, even if the coffee next door might be better? That's the Aesthetic Usability Effect - users often perceive aesthetically pleasing designs as more usable.
a) Invest in Good Design
A well-designed website isn't just pretty - it builds trust and credibility with your users.
b) Maintain Consistency
Use a cohesive color scheme and consistent styling throughout your site. It looks more professional and feels more usable.
c) Don't Sacrifice Function
Remember, beauty shouldn't come at the cost of usability. A gorgeous but confusing website won't do you any favors.
Real-world example: Apple's products and website are prime examples of the Aesthetic Usability Effect. Their clean, minimalist design is a big part of why people perceive their products as intuitive and easy to use.
10. Zeigarnik Effect: The Power of Unfinished Business
Ever had a song stuck in your head until you finally heard the end? That's the Zeigarnik Effect - people remember uncompleted or interrupted tasks better than completed ones.
a) Use Progress Bars
Show users how far they've come in a process. They'll be more likely to complete it if they can see the finish line.
b) Save Partial Progress
If a user starts filling out a form but doesn't finish, save their progress. They'll be more likely to come back and complete it.
c) Create a Sense of Achievement
Break long processes into smaller steps. Each completed step gives a sense of progress and motivates users to continue.
Real-world example: LinkedIn uses a profile completion bar, showing you how "complete" your profile is. This subtle nudge motivates users to fill out more information and engage more with the platform.
Remember, whether you're launching an e-commerce site in New York, a tech startup in Tel Aviv, or a consulting firm in London, these UX laws can help you create a website that not only looks good but also works effectively for your users. By understanding and applying these principles, you're not just building a website - you're crafting an experience that can turn visitors into loyal customers. And in today's competitive digital landscape, that can make all the difference.
Wrapping It Up
Look, I get it. As a business owner, you've got a million things on your plate. The last thing you need is to become a UX design expert overnight. But here's the thing – understanding these basic laws in fundamental of ux designs can make a world of difference to your website or app.
Think of it like this: if you were opening a physical store, you'd put thought into the layout, right? You wouldn't put the cashier in a hidden corner or stack your best products where no one can reach them. Your website is your digital storefront, and these UX laws are like the basic principles of good store design.
Remember, your website isn't just a pretty face for your business. It's often the first interaction potential customers have with you. Whether you're a cool tech startup in Tel Aviv, a boutique consulting firm in Manchester, or an e-commerce pioneer in Riyadh, your website needs to make a good first impression.
So, as you embark on your entrepreneurial journey, keep these UX laws in mind. They're not just for the big players – they can give your small business a professional edge right from the start. And hey, if all this still sounds Greek to you, don't sweat it. That's what UX professionals are for. Consider it an investment in your business's future.
After all, in the digital world, user experience isn't just nice to have – it's the difference between a website that works for your business and one that doesn't. So go ahead, apply these laws, and watch your digital presence transform from just another website to a user-friendly powerhouse that turns visitors into customers. Your future self (and your bank account) will thank you.
0 notes
Text


My manager said I can be a part of the UI/UX design process so I get to have more designing prototypes of the websites kind of tickets soon and I'm so happy~!
As much as I love coding, I also love designing stuff that might/might not be implemented later on~!
#xc: side note post#coding#codeblr#programming#progblr#studyblr#studying#comp sci#ui/ux design#work developments
82 notes
·
View notes