#continuing to learn photoshop!!
Text
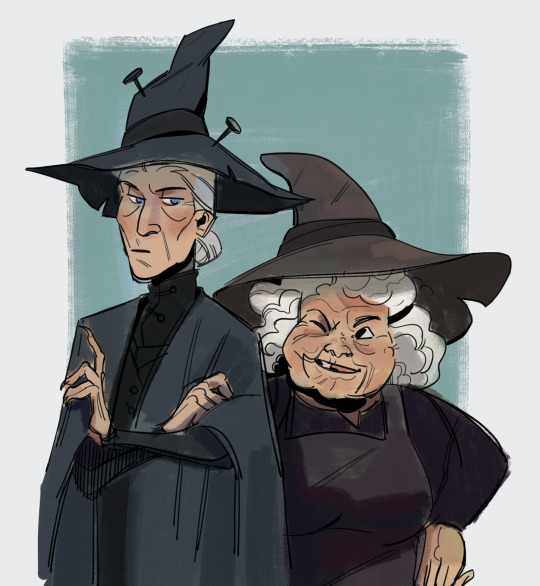
Granny Weatherwax and Nanny Ogg
ID: A digital drawing of Granny Weatherwax and Nanny Ogg from 'Wyrd Sisters'. They are two witches; Granny is on the left; she is a thin, elderly lady; her arms are crossed and she has a disapproving look on her face. Nanny Ogg is on the right; she is a small, plump old lady; she has one hand on her hip and is winking at Granny. They both wear pointy hats. end ID.
1K notes
·
View notes
Photo

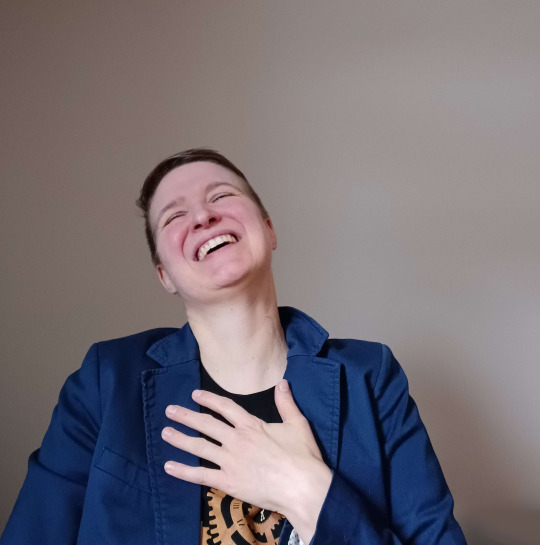


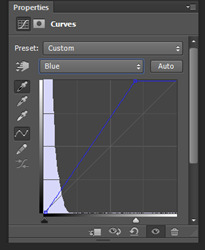
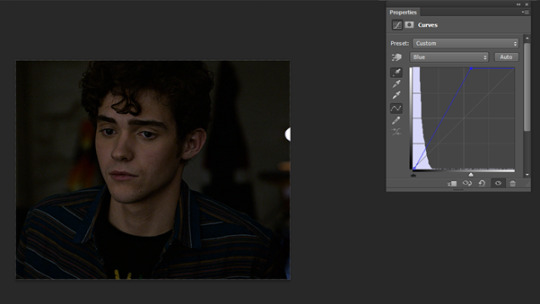
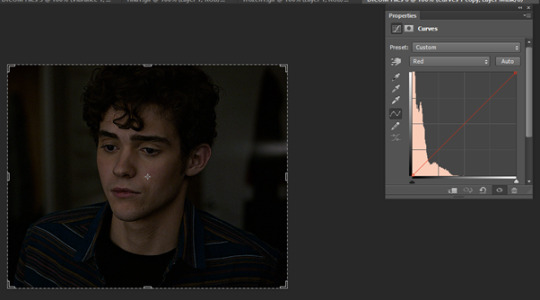
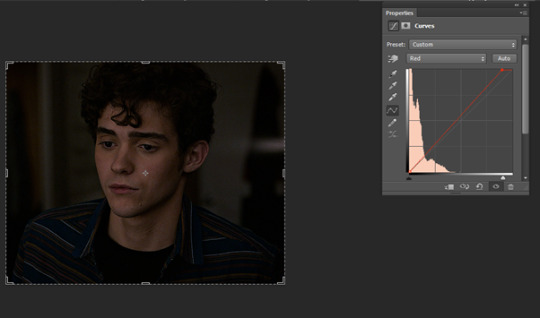
Well friends, I’m back at it with yet another Alex cosplay, because I simply couldn’t help myself. This one is modeled after the second tma2 kickstarter stream.
#my face#my cosplay#alexander j newall#look im having just so much fun#is this my 3rd cosplay? yes yes it is#and i dont care#ill continue to do so#i cant help it if we have a similar wardrobe#also i did some sneaky photoshop here#i think it looks pretty good#but if anyone guesses ill give you an internet cookie#and martyn if you see this here you are exempt because i learned the tricks i used from you#and your early photoshop streams#lololol
52 notes
·
View notes
Text
I FINALLY LEARNED HOW TO EDIT THOSE T*WITTER MEMES AFTER EONS!!!!! ✨😤 IM SO PROUD OF ME AND THANK U TO THE REPLIES ON THEYRE SAINTS I TELL YOU REALLY

#I’ve been stumped for WEEKS on how to edit them and was too nervous to ask ✨🤧 BUT I DID IT I YELLED IM SO HAPPY!#leg learns to photoshop the saga continues! 🤍#now I just gotta figure out the typing in text and drawing in them for filling things in and then im good! 🤍#I’ve always wanted to learn to make stuff with those templates and! I’ve figured it out!#(and I have a couple tags with them that I haven’t done bc i was stuck on how to work with them ✨🤧 IM SO SORRY AHH)#*personal#leg.txt
2 notes
·
View notes
Text
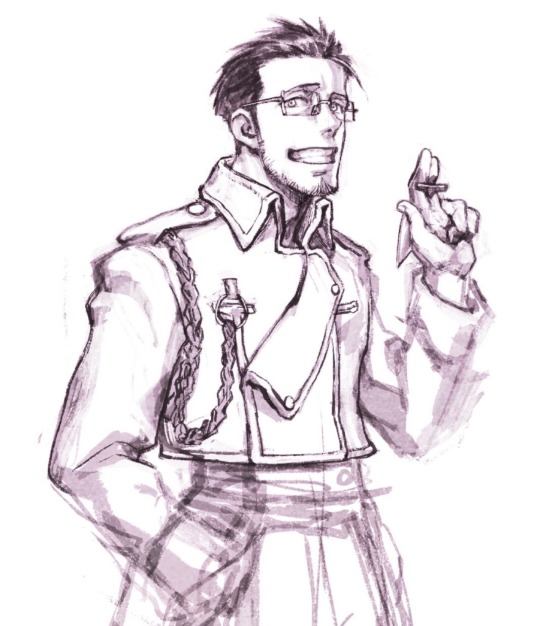
FMA sketches by Ace Attorney's character designer, Iwamoto Tatsuro
For the past week, Iwamoto-san has been posting sketches of FMA characters on his twitter as a part of his daily sketching challenge and they are absolutely BEAUTIFUL.
I really want to share his art over here and also translate his posts for you all because I think his commentaries are quite insightful for people who are interested in character design!
[Those who know their AA lore would recognize him as who voiced Edgeworth (Mitsurugi) in the games :3]
Anyways, below are his FMA sketches he's shared on twitter so far! (Contains: Ed, Hughes, Kimblee, Mustang, Breda) You can click on the dates to see their original post. I will add to this post if he shares any more sketches, it seems that he has been on an FMA roll xD
###
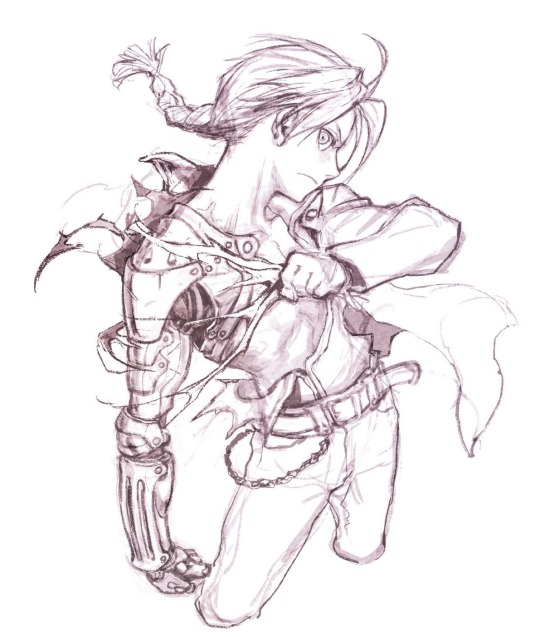
25/11/2023
If you draw your favourite things out you will know them better! So, this is Edward Elric from #FullmetalAlchemist.
Even if you have decided on the pose you want to draw, it is better to sketch out these three first:
the moment before the pose is struck
the pose itself
the moment after the pose is struck
then decide which image works better for your art. I learned this from a really great senior of mine, and it is very solid advice.

###
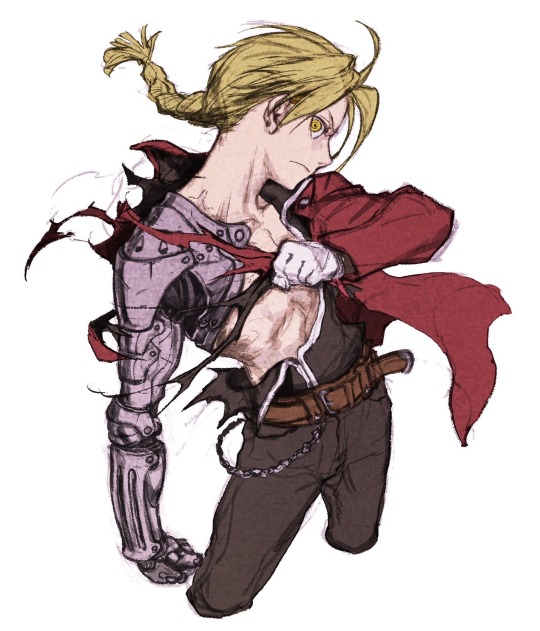
29/11/2023 (Translator's note: I decided to move this one to the top because it is my favourite. No I don't accept criticism.)
I have been drawing Ed's automail again.
I like it when the machine part has a distinctly different silhouette compared to the human body, so I added some original ideas to the design.
What design should I draw next? Perhaps I should draw the military uniform?

# (combined two posts because they’re the progression of the same piece.) #
26/11/2023
Again, it is the time of "drawing your favourite things to know them better!"
It feels so good to draw such great characters...
27/11/2023
My Photoshop has been crashing for mysterious reasons the whole morning, and I tried to troubleshoot in the afternoon and it was a PAIN. Computers are really difficuuuuuuuult--
###
28/11/2023
Iwamoto-style drawing Masterclass: Bonus!
It is the "Give the leather and metal items a bit of flare/shine to immediately make the drawing look more complete"-jutsu!

###
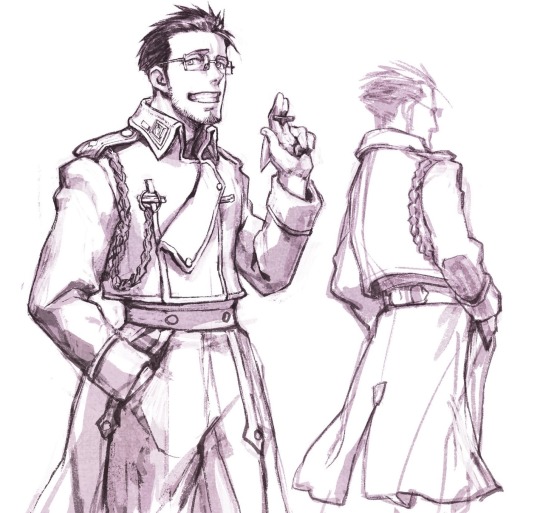
30/11/2023
I wanted the clothes to give off an oversized, loose impression.
Canon Hughes didn't seem to be wearing a shirt underneath... hmm.
03/12/2023
I am beginning to understand the structure of the military uniform better...
Realising the butt flap/cape didn’t actually connect to the upper jacket is a shocker to me.
###
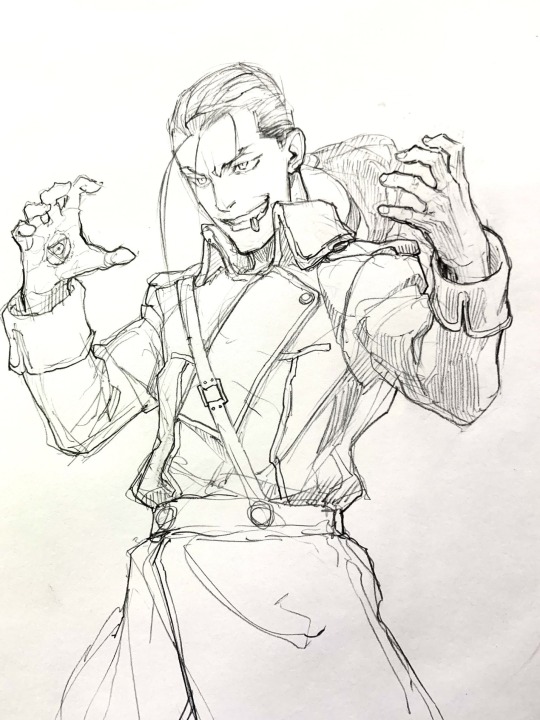
03/12/2023
A continuation of yesterday's sketch
...or so I thought, until I realized how King Bradley and Kimblee during the Ishval war had a different overcoat design, in which they actually wore a single long coat instead of a separated upper and bottom set.
###
04/12/2023
When his clothes were unbuttoned, there was something that looked like an additional button on his right chest... I wonder if it could be fastened from the back?
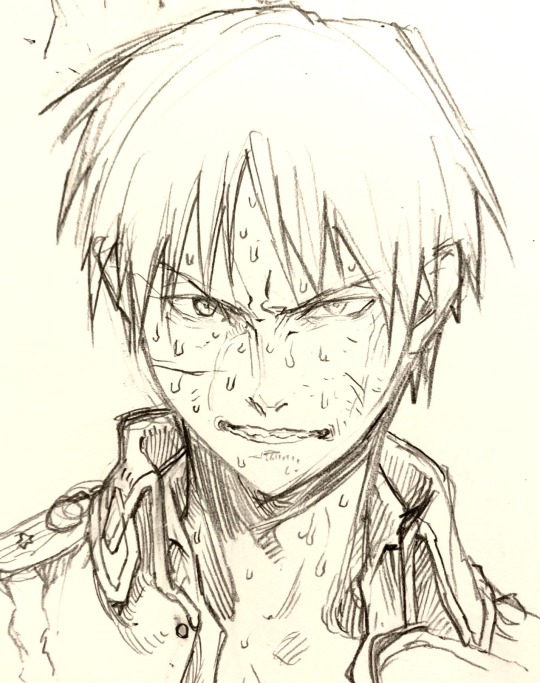
(Translator's note: sorry, I have no idea what button he's referring to here lol)
###
05/12/2023
I like how each character's personality was expressed through the way they dress. Contrary to his appearance, this person was very intelligent, which makes him such a great character.

#Lia translates#tweet translation#fma#fullmetal alchemist#fmab#fullmetal alchemist brotherhood#Fma translation#edward elric#roy mustang#solf j. kimblee#heymans breda#maes hughes#iwamoto tatsuro#ace attorney
916 notes
·
View notes
Text
a fine selection of bonker facades from the DC suburbs
Howdy folks! In honor of Halloween, here are some of the scariest houses currently for sale in the ever-cursed suburbs of Washington, DC. It's been awhile since I checked in on this particular hotspot, and once more, it did not disappoint.
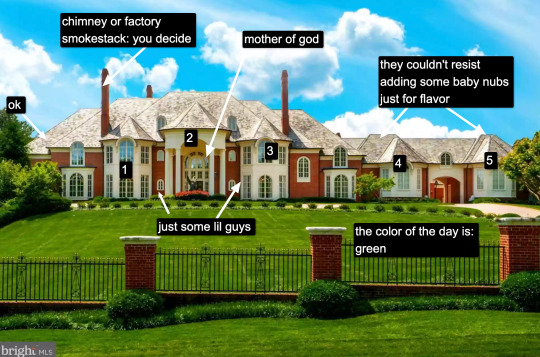
I'll just get this one out of the way. Long-time McMansion Hell-heads are well aware of this monster estate in Potomac, MD, once allegedly owned by a particular professional athlete who will not be named, because the house should suck on its own merit. The only nice thing I can say about this house is that the designers kept the materials and colors consistent, which adds some unity to what is, in reality, five turrets in a trench coat.
Some things, the economists tell us, are too big to fail. This is not one of them. Let's move on.
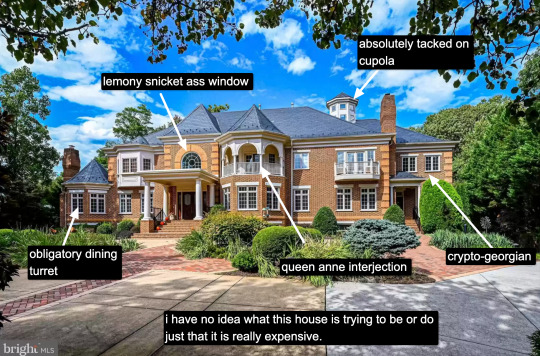
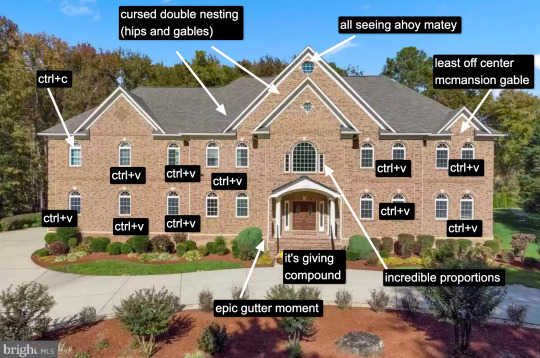
Many McMansions exist to mock the concept of architectural consistency and historical continuity. This is one of them. About every single type of expanded second-story window elaboration exists here: bay window, covered balcony, juliet balcony. None of them work. The house can't decide if its 19th century eclecticism or tony DC Georgian/Federal cocktail. The random cupola merely adds insult to injury.
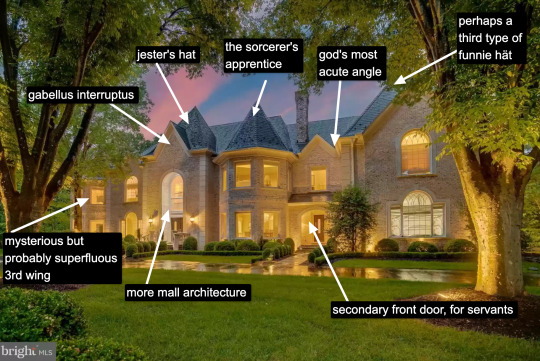
I don't know where realtors learned how to do photoshop, but whoever taught them should have their Adobe licenses revoked. There's a certain type of McMansion I call a "hat house" - which is exactly what it sounds like. It's a house with multiple bays or masses and each has its own special hat. This is one of the most egregious examples because all of the hats are different shapes and scales. Not even the most Disney Theme Park pink sky and fairy lighting can mitigate the controlling aesthetic influence of hät.

No compilation of Bad Facades would be complete without at least one Frankentudor™. Rich people in America really like to harken back to the days of feudalism, yet uglier, more drab, and using materials mostly derived from petrochemicals. The lighting is not helping this house, which is about as gloomy, hulking, and bloated as they come.
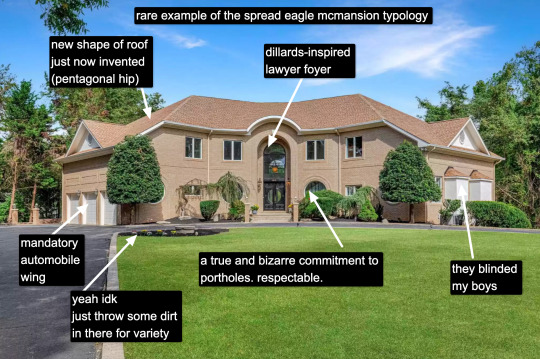
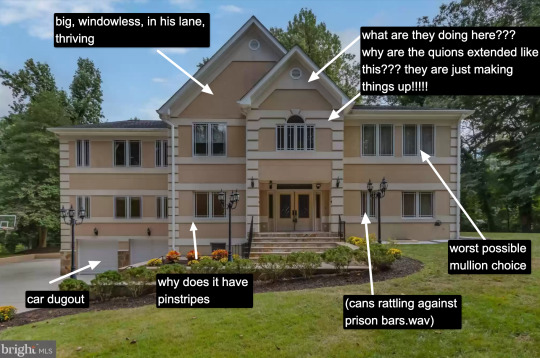
I have some fondness for houses that derive new, inventive forms of being ugly. The spread eagle McMansion is one of them, two oblique wings with no real core. A corner lot specimen. This one is especially weird, with the quadruple portholes, the windowless bays, the mall foyer, and the hipped roof that's not quite clipped, complete with tacked on gables. Kind of neat, sad to say.
I know most of you won't agree, but I actually believe this is the worst McMansion of the set. The absolute banality of it, the out-of-proportion everything, the compound-like demeanor, the nonsensical spacing of the mind-numbingly identical windows. The most infuriating part is that whoever designed this had some kind of order, continuity, proportion in mind and just failed utterly at it, like Sideshow Bob stepping on all those rakes. I hate it!!!!
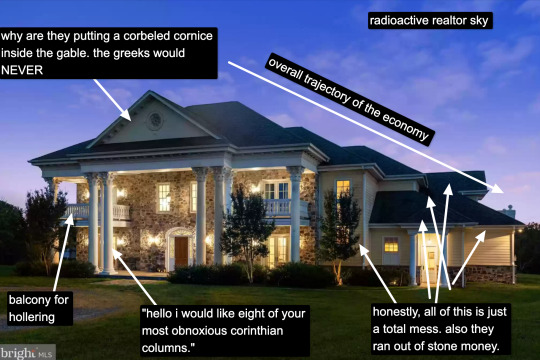
When rich people try to make overly-inflated temples to their dumb piles of money, it's deeply satisfying when they end up looking like this house, which is just a pile of roof and wall tacked on to the worst proportioned portico imaginable. Classic McMansion Hubris. Let us all laugh.
Now we're getting into the more eldritch horror part of the list. Some houses make me wonder if I have the same set of eyeballs and conceptions of what "a house" looks like as other people. This one is playing dress up games with foam stickers. It looks like Steve's shirt from Blues Clues. It abuses the prairie muntins, which is an insult to my chosen hometown of Chicago, Illinois. Bad house.

Not enough time is devoted on this blog to bad modernism, though it would be rather generous to call this house modern. It's more like postmodernism trying to remember what modernism looked like and tripping down a flight of stairs collecting random masses and windows on the way down. Houses like this give modern architecture a bad name. It's borderline libel. Also it looks like it was made out of cardboard.
This brings us to our final, and objectively worst house:
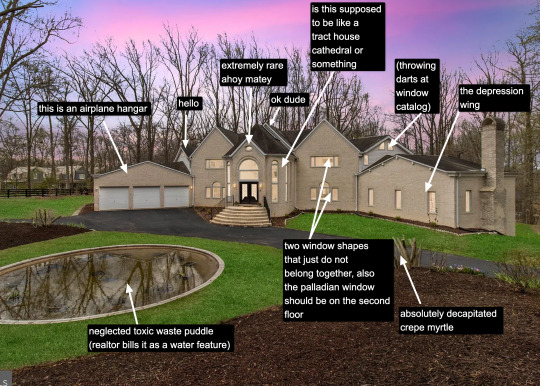
I don't even know what to say about this freak of architecture. I don't know how it came together or why. I don't know what it wants or even pretends to do. It is a horrorshow. Gables protruding from random places, stealth roof fragments, windows too small for the walls they're embedded in, a weird cathedral-like entrance, the mosquito-infested pond, the worst example of realtor sky I've ever seen, all of it is terrible. It's haunted. Trick or Treat, but without the treat.
Anyway, that does it for this installment. If you're curious about more McModern badness, this month's Patreon bonus post will be to your liking!
Happy Halloween and Día de Los Muertos!
If you like this post and want more like it, support McMansion Hell on Patreon for as little as $1/month for access to great bonus content including extra posts and livestreams.
Not into recurring payments? Try the tip jar, because media work is especially recession-vulnerable.
#architecture#design#mcmansion#mcmansion hell#bad architecture#ugly houses#dc suburbs#90s architecture#2000s architecture#y2k#urbanism#virginia#maryland
4K notes
·
View notes
Text
PEOPLE INTERESTED IN MUSIC LISTEN UP: go to reaper.fm right now & get yourself a trial copy of Reaper, the trial period is indefinite & functions like winrar where once it’s up it just pings you on startup to suggest purchasing & then let’s you continue using it in full. Reaper is a DAW (digital audio workstation) which is a type of program that lets you manipulate sound the same way that sai CSP & photoshop are programs to manipulate images. Audacity is technically a DAW but an extremely basic one, you want something powerful to really get in there ie you want Reaper. also if you eventually wanna purchase it & support the guys behind it it’s extremely reasonably priced, it’s like $60 bucks or something
SECOND you need VSTs (virtual studio technology), these are the audio equivalent of your brushes, or more like they’re both your guitar and your guitar pedals. there are some for pay but infinitely more excellent ones that are free & make all sorts of wacky noises, check out labs.spitfire.audio for the LABS virtual instruments, some completely gorgeous stuff there. you can tweak the shape of the sound in each & chain VSTs on top of each other to infinity to mangle your sound to your liking & you’re really only limited by your computer’s ability to handle it lol. also check out what’s going on at freakshowindustries.com cus they’re doing demented stuff, their VSTs are pay but all give you the option to “steal” them ie get the license for them in full for completely free
im planning on eventually doing a stream getting more in-depth on the little i know about Reaper functionality, so i highly recommend you familiarize yourself with the super basics! the learning curve is a bit rough compared to other DAWs but once you have the AHAH! moment it gets significantly easy to handle
883 notes
·
View notes
Text
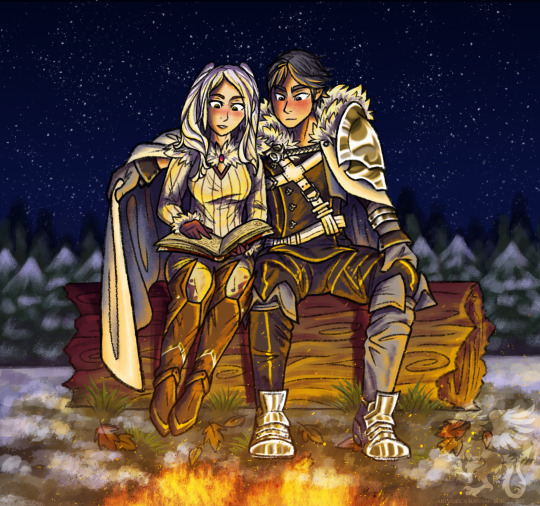
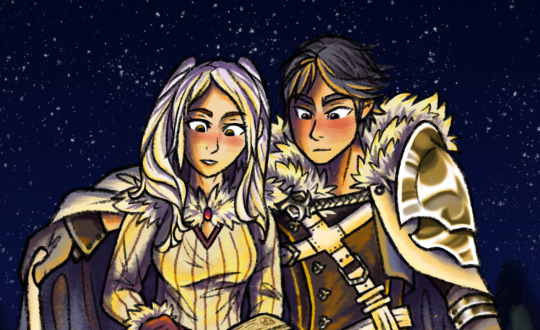
I missed Chrobin week sorry guys have a "winter" prompt anyway!
This was fun and hard and stupid I shouldn't have decided I was going to force myself to learn shading in a dang FIRELIT SCENE why do I torture myself
I love Chrobin very much, even though I can now confirm that yes Chrom's outfit is an absolute nightmare to draw. Why does Frederick let you out of the palace dressed like that? Why do you have so many random cuffs, onesie-boy? Also I stole some design elements from Legendary Chrom's outfit in FEH--I absolutely love the fur cloak and it seemed appropriately wintery for this scene.
Also also my endless war to force as much texture as possible into my photoshop work continues. I know I can get more crunchiness out of this program! Just absolutely trying to figuratively mash/smear a dry paintbrush into the crevices of my digital artwork. Blah.
#chrobin#chrom#robin#fire emblem awakening#fire emblem heroes#fire emblem#winter#art#my art#fe awakening#fanart#digital art#Your honor I love them#Chrobin is OTP no matter what gender Robin is#Chrom just needs a Robin any Robin#He's gotta keep his bird warm#cuddles#fe13#f!chrobin
197 notes
·
View notes
Text
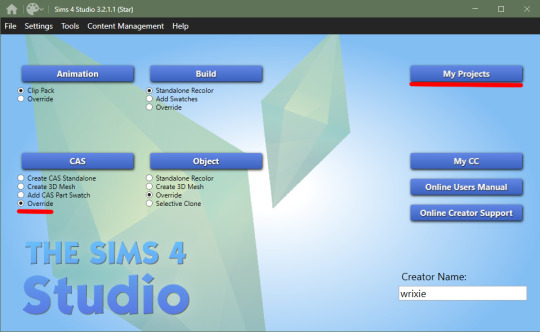
wrixie's guide to default eyes 🤩
welcome to my guide on making default eye colors for the sims 4
this'll be my first ever tutorial and it's a big one so please bear with me!
if you have any questions please don't be afraid to send me a message!
here you will hopefully learn how to: make defaults for humans, aliens and vampires as well as cats, dogs and mini goats and sheep!
-> i'm unsure about how to do cottage living animals anymore due to s4s changing and the foxes are currently bugged to be gray :( BUT i will provide my files so you can just recolor them and merge them back together down below
you will need a few things to start:
sims4studio, photo editing software such as gimp or photoshop to create and edit your textures, some meshes that i've provided + these body templates
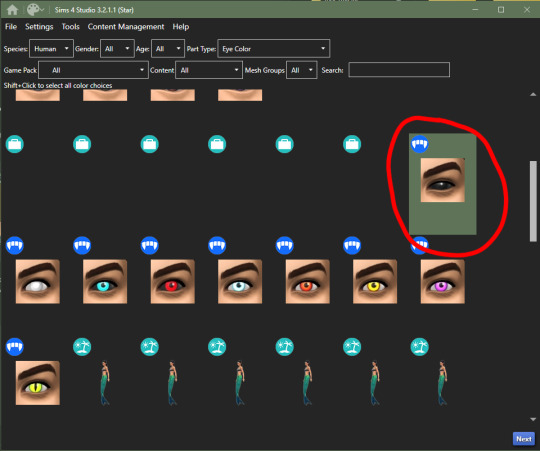
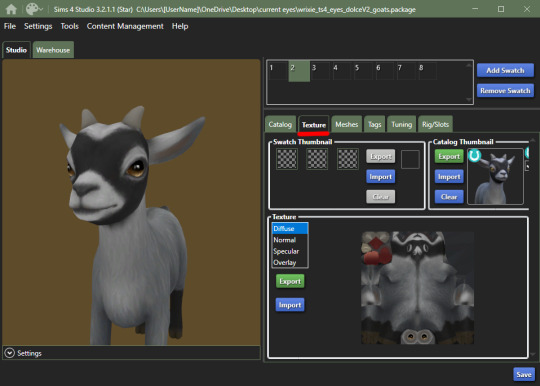
human defaults (and beginning steps):
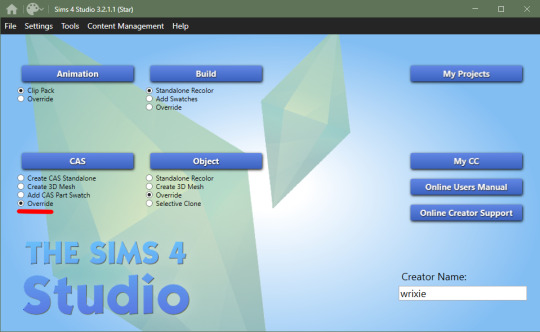
open up sims4studio, locate the CAS button, under that you should have 'override' ticked instead of the default 'create CAS standalone' then click the big CAS button to go to the next step
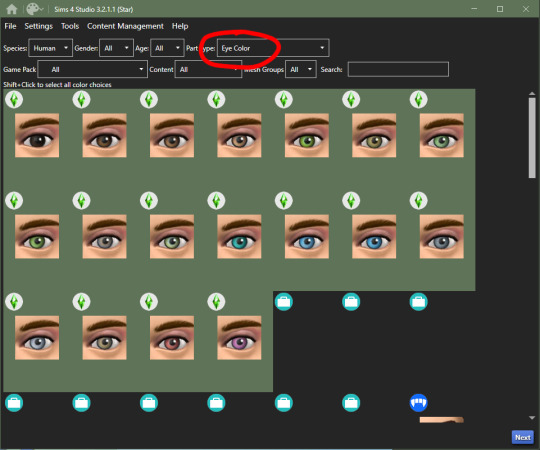
2. you'll see a few drop down menus, locate 'Part Type:', scroll down until you find 'Eye Color', we're doing human eyes so shift+click all of the base game default colors and click next
3. save your new .package file what ever you please i recommend something like -> yourname_eyename_default <- make sure to have it save into your mods folder or somewhere where you can easily access it (i saved mine into my mods folder)
4. this is where you'll import all your eye colors - assuming you've made your eye textures, locate the 'Texture' box in the 'Texture' panel, you'll see three maps: Diffuse, Shadow + Specular, import your eye texture in the 'Diffuse' texture for all of your eye colors, click on 'Specular' then click on the purple 'Make Blank' button to get rid of the cloudy shine on the default eyes (you'll have to do this manually for each swatch)


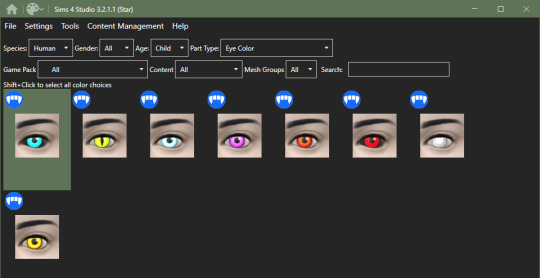
alien eyes:
you'll do the same as the human in terms of selecting 'override' in the CAS section then locate 'Part Type:', scroll down until you find 'Eye Color', but instead of selecting the human eyes, we'll select the all of the alien eyes with shift+click - they don't have previews for some reason

2. then you can follow the previous steps, save your file under yourename_eyename_aliens_default into your mods folder
3. same as the humans, import all of your alien eyes into their proper swatches but this time there's two more maps: Normal + Emission - you do not need to touch these for aliens as alien eyes do not glow and the emission map is for glowing textures (i have no idea how to do this)
4. make your 'Specular' maps blank and click save!
vampire eyes:
do the same as the others in terms of selecting 'override' in the CAS section of the main menu, locate 'Part Type:', scroll down until you find 'Eye Color', but instead of selecting the all of the human/alien eyes, we'll be selecting the black swatch for right now - this black swatch is for all ages
2. import your black swatch in 'Diffuse' and make the 'Specular' blank
3. this is where you can veer off and follow a different tutorial to get the glow of the vampire eyes or you can continue without it here; go into your photo editing software, create a 1024x2048 image and fill it in completely with black and save it as emission (this is what you'll use to lose the glow and make the eyes work)
4. in the 'Texture' panel, go to 'Emission' and import your black image you just made and save it as -> yourname_eyename_vampires_black < (or what have you)
5. now change the 'Age: All' to 'Adult', select the next eye color, save it as the color it is and follow steps 2 - 4
6. after completing all of your adult swatches, change 'Age: Adult' to 'Child' and repeat the steps you just took with each eye color you will have to do the same with toddler and infant eyes as well; save child files with _CU in the file name, _PU for toddlers and _infants for ya know... infants
7. once you have all your swatches done, make sure to test them before this next step (merging the files into one, this is an optional step but highly recommended) go back to the main menu and under 'Content Management' click 'Merge Packages..'

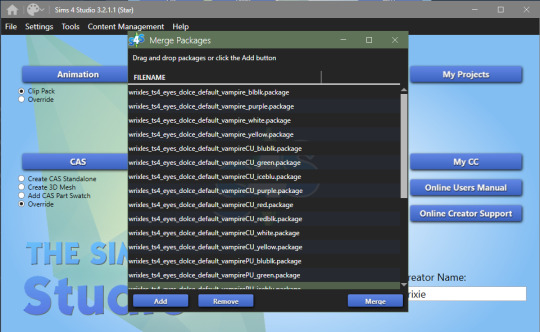
8. click 'Add' and select all of your vampire eye files, click 'Merge' and name it what you want
cats & dogs:
with sims4studio open, the CAS section should still have 'override' ticked, click CAS again and in the drop down menus, change 'Species: Human' to Large Dog, Small Dog, Cat, Foxes, or Horses; if you don't have the textures already, export the default texture so you have it as a base

2. import each of your textures in the 'Diffuse' map and make your 'Specular' map blank for each color and save
3. for heterochromia you can use these meshes - edit the textures to add your own, import your texture to the 'Diffuse' map and make your 'Specular' map blank for each color and save as _heterochromia
4. remember to test before merging - go back to the main menu and under 'Content Management' click 'Merge Packages..', add your files and merge them
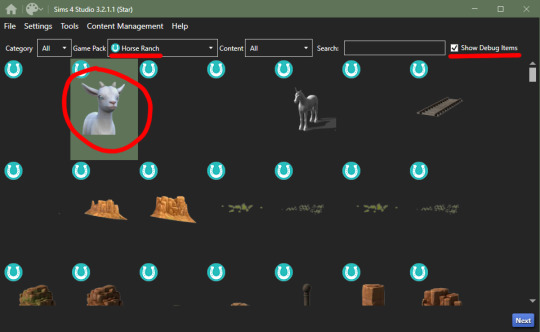
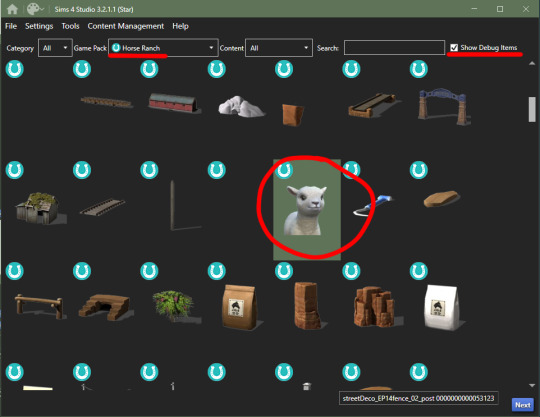
mini goats & sheep:
in the Object section of the main menu, tick 'override' and click the Object button

2. in the 'Game Pack' drop down menu, choose 'Horse Ranch' and tick 'Show Debug Items' and at the very top, you should see the mini goat, select this and click next save it as what you would like to
3. go into the 'Texture' tab and export all the goats textures if you haven't already made your eyes - when you have your textures done, import them into the 'Diffuse' map for each swatch and save
4. go back to the main menu and repeat steps 1 + 2 but instead of selecting the mini goats, scroll down until you see the mini sheep, should only be a tick or two down and then repeat step 3
cottage living:
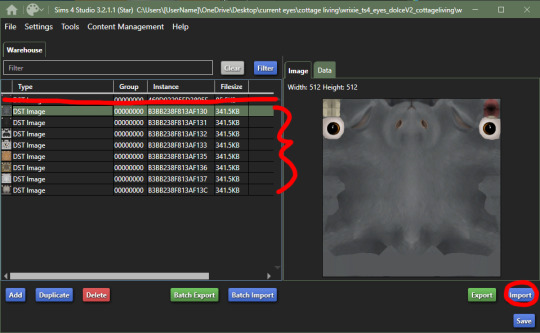
go to my folder and download the meshes you need here i'll go through recoloring each animal, we're going to start with the wild rabbits; open the rabbits file
ignore the top file you don't need to edit this
'Export' (not the batch export) each rabbit texture, open them up in your photo editor and add your own eye texture then 'Import' each of them in their proper swatch and save
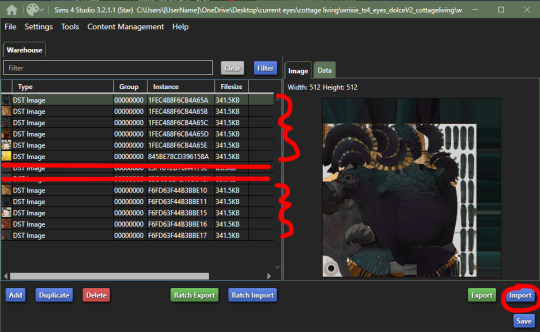
next will be the llamas, open up the file, you might be put into the 'Warehouse' tab, switch over to the 'Studio' tab
export all the 'Diffuse' textures of each swatch, open them up in your photo editor and add your own eye texture then 'Import' each of them in their proper swatch and save
cows are next, open up the file, ignore the top file and 'Export' the three textures then edit them in your photo editor to add your own eyes
'Import' each swatch in their proper place and save

lastly, for now, are the chickens, open up the file in sims4studio, 'Export' the first 6 image files, ignore the next 2, then export then last 5 and repeat editing and adding your own eye textures to them
once that's done, 'Import' all your swatches in their proper places and save
how to convert non-defaults/contacts to default:
1. open up sims4studio, locate the CAS button, under that you should have 'override' ticked instead of the default 'create CAS standalone'
2. before clicking on the CAS button, go to My Projects and open up the contacts you want to make default and 'Export' each color to save it on your computer
3. now you're going to basically follow the beginning steps again, go back to the main menu and click the big CAS button, then it's 'Part Type: Eye Color', shift+click all human eyes or vampire or alien eyes and hit next (i'll be doing human eyes) if you were put into the 'Warehouse' tab switch over to the 'Studio' tab.
4. 'Import' your textures to each swatch to the 'Diffuse' map and make the 'Specular' blank and save!
180 notes
·
View notes
Text
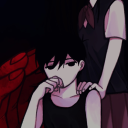
Behind The Screen
[TWST AU]: Self-Aware AU, but with logical takes.
[Synopsis]: In this timeline, MC/Yuu/[Y/N] was playing TWST one day and then something off-putting happens.
[TW]: Mild cursing
[(A/N)]: I know. This AU has been done multiple times with most of them being…possessive. I decided to try the concept, but with my own take on it. Also MC/Yuu/[Y/N] is around 16-18 years old in this AU.


MC/Yuu/[Y/N] is just your ordinary gamer who loves the game, Disney: Twisted Wonderland.
They played that game almost everyday ever since it was first released.
They get to experience everything from leveling up the characters (especially their favorites who may or may not be bias towards) to collecting items.
MC/Yuu/[Y/N] fell in love with the storyline and laugh at the humor whenever something ironic and sarcastic happens.
All fun and literal games until one day something happens.
As MC/Yuu/[Y/N] logs into TWST and expected a character greeting them with a gift each day, there wasn’t anybody on the screen.
They thought it’s probably a glitch. It happens.
Shrugging off the weird occurrence, they continue the game as usual, leveling up the characters and winning in battles.
As they were reading through a chapter, something slips up.
Ace Trappola, everyone’s favorite little bastard accidentally mentioned how MC/Yuu/[Y/N] look stupidly cute today with their new haircut.
They freaked out a little.
MC/Yuu/[Y/N]: Okay. I may need more sleep or did I hear Ace right about my looks for today?
Ace: *Sweatdrops*
Deuce: *Whispers* Ace, say your line. You’ll blow our cover.
Ace: *Whispers back* You too, Dunce-face. You’ll get us in trouble.
MC/Yuu/[Y/N]: …I’m not dealing with this shit.
Ace: No wait-
They exit out of the game and starts texting to a friend of theirs asking advice on what to do with a possibly possessed app game operated by the Japanese branch of the huge corporation.
[MC/Yuu/[Y/N]’s Bedroom]
MC/Yuu/[Y/N]: Okay, that’s it. I’m reporting this to the development team and possibly FBI because what kind of sick game is this?
Riddle: No wait! Prefect!
MC/Yuu/[Y/N]: Don’t “Prefect” me! I know how this shit goes, and it ends badly.
Lilia: Oh dear. You read too many Yandere fics, haven’t you.
MC/Yuu/[Y/N]: …How do you know that?
Ace: Duh! It’s obvious. We’re in your phone. We sometimes sneak into your search history.
Jack: I’m afraid to ask questions about your…free time.
MC/Yuu/[Y/N]: You don’t have to know, Jack.
Vil: You need a better wallpaper, honestly. Who edited this abomination?
MC/Yuu/[Y/N]: Uhh…I did the wallpaper.
Vil: …You need to work on your photoshop skills.
[MC/Yuu/[Y/N]’s Bedroom]
MC/Yuu/[Y/N]: You’re telling me you listened to everything I spoke about this past year?
Riddle: Unfortunately, yes.
Leona: You cursed at us for being “too handsome” and “how stubborn” we can be.
Azul: Let’s not forget you spilled some secrets nobody else would know. You still sleep with a stuffed dolphin after 4.
MC/Yuu/[Y/N]: Luckily nobody ask for my phone.
Kalim: Your world sounds a lot of fun to learn about. I always wonder what it’s like outside with no magic involved.
MC/Yuu/[Y/N]: Believe my words, it’s not pretty.
Vil: I heard you talked about some fashion brands. Louis Vuitton?
MC/Yuu/[Y/N]: Yeah…That and other brands are expensive as Hell here.
Idia: I was wondering about your Otaku culture…
MC/Yuu/[Y/N]: Oh! There is enough to talk about with new anime and manga coming out everyday.
Malleus: *Peeks into images of Gargoyles*
MC/Yuu/[Y/N]: Tsunotarou? What are you doing on Google Images?
Malleus: Oh. Forgive me, Child of Man. I was curious about your device.
MC/Yuu/[Y/N]: Nah, it’s fine. Just be careful when you’re searching for something.
[MC/Yuu/[Y/N]’s Bedroom]
MC/Yuu/[Y/N]: *Fanning over a character* Jesus Christ! I can’t with this guy!
[Insert an image of Yoru from Valorant.]
[(A/N): I couldn’t help myself.]

Deuce: Huh? Hey, isn’t he from-
MC/Yuu/[Y/N]: Oh, yeah. I sometimes dabble into Valorant and he’s one of my mains.
Ace: So your type is the edgy bad boy type~?
MC/Yuu/[Y/N]: Don’t even try, Ace.
Ace: *Threw his hands up in defense* What? It’s not like I can leave here.
MC/Yuu/[Y/N]: Touché.
✨[Reblogs helps creators and creates for more content]💫
#disney twisted wonderland#twisted wonderland#twst#twst au#TWST Self-Aware#Self-Aware AU#twisted wonderland mc#twst mc#twisted wonderland yuu#twst yuu#twisted wonderland headcanons#twst headcanons#twisted wonderland x reader#twst x reader
1K notes
·
View notes
Text
i wasn't going to rant about this but i'm gonna bc it has actually pissed me off. people are acting surprised it's cancer but were fully ready to believe the royals were using a body double, that william was having an affair and kate had left him, that she had a mental breakdown etc. etc.
did we learn nothing from chadwick boseman? people's cancer diagnoses are not public domain! kate had major surgery only two months ago, we were told then that she wouldn't be back before easter which is still a week away and still the whole fucking internet and the media decided "nah, we can't let her be" and so many people bought into mad conspiracy theories.
but they released a photoshopped picture? they do that all the fucking time as do all celebrities. and no, the picture was not meant to be "proof of life", it only became that to the people crazy enough to think she might actually be dead. if the palace had not released a picture, the rumours would also have just been going crazy and people would continue to speculate why she had not been seen. the conspiracy theories did not start with the picture, they were already running rampant before it.
at the end of the day, no matter how you feel about royals, then kate is a mother with young children. the fact that she didn't immediately run to the bbc to share "i have cancer" when she had to process the unexpected diagnosis herself, reassure her children, make a chemo plan etc. is absolutely understandable. it was not the palace's bad pr that did this, it was people buying into conspiracy theories instead of using logic. if someone has surgery and you hear nothing for a while then it's likely bad news and bad news is almost always cancer.
no matter how famous someone is, they are entitled to privacy especially when it comes to their health. we shouldn't force anyone to perform when they're coming to terms with a cancer diagnosis. i sincerely hope people have learned from this but considering the shit we went through with chadwick boseman then probably not.
54 notes
·
View notes
Text
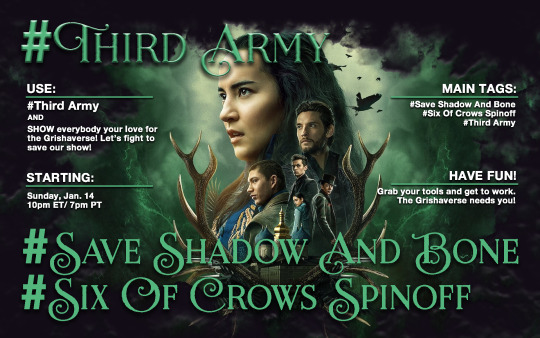
We’re back with our next round of prompts Third Army! This week (January 14th to January 20th) we want to talk all about “resilience”. The theme of always coming back, the theme of making things our own.
We will never give up, we will never die out. And to aid that we are going to give out prompts and boost content about our Grishaverse, and we need your help! Come join us, send us your fanfics, post your art, and make sure to use hashtag #Third Army so we can see each post!
Writing prompt: "Genya felt like a statue as she sat at the head of the council room's table. She felt marble and cold and distant, but David's hand was across the table and out of her reach. She was alone here as she prepared to give her speech, but she had to do her best. She had to make the Triumvirate proud and win over the councilmen of Ravka, lest they continue to claim Nikolai a monster."
Writing prompt: Why not make an “incorrect quotes” post for Shadow And Bone! It can be a modern social media AU or a text post from the canon era, whatever you prefer!
Writing prompt: It’s a staple in the fanfiction community, but for good reason. Take your favorite ship and throw them in a “flower shop right next to tattoo parlor business rivals” AU!
Art prompt: We've seen Dan Zollinger's art of the Saints, now draw your favorite Saint in your own style.
Art Prompt: Kaz says he will tear Pekka down “Brick by Brick” - let’s see that again, but with literal building bricks! Reenact a scene from Shadow and Bone/Six of Crows in lego form!
Photoshop challenge: Jesper says that maybe he likes Wylan’s stupid face - let’s photoshop that “stupid” face on all sorts of different things! The more bizarre the better!
Photoshop challenge: Let’s practice tailoring with Genya! Give the Shadow and Bone characters makeovers - maybe the Darkling is going through an emo/punk phase (it’s not a phase Baghra) or how about giving Alina a nice cottage-core makeover. Maybe even give Inej a kpop idol dream aesthetic!
Mixed Media challenge: Some of the iconic Crooked Kingdom book parts made it on screen, but not all of them! Why not draft up a gifsets/art/edit to show a Crooked Kingdom scene we haven't had on screen yet?
Video edit prompt: Compile together your favorite highlights and quotes for a "the Shadow and Bone cast once said…" video edit!
Question/Answer prompts: In the Lives of Saints, we learn to apologize and forgive - among other things. We also learn to stand our ground. Never apologize for campaigning for what you love, but maybe we should at the very least send an apology message to the poor Netflix social media managers who got caught in the crossfire of campaigning?
Every week I want to ask people to share happy/hopeful stories about Grishaverse and the campaign. Let’s talk about the friends we’ve made, the kindness in the fandom, and any moments of hope we can share to keep our spirits strong!
#six of crows#grishaverse#shadow and bone#netflix shadow and bone#netflix#soc#six of crows fandom#sab#soc and ck#saveshadowandbone#third army#character essay#save the grishaverse#save shadow and bone#six of crows spinoff#sixofcrowsspinoff#shadow and bone netflix#shadow and bone fandom#writing prompt#art prompt#netflix series#grishaverse fandom
69 notes
·
View notes
Text
My Pretty Girl ♡
Idol! Seungmin × afab reader (established relationship)

Seungmin comes home one day, exhausted from a full day of recording and tiring choreographies, to see y/n crying. Being the concerned boyfriend he is, of course he immediately approaches and asks her what's wrong...
CW: Mentions of insecurities, reader was a victim of bullying and is extremely insecure of their appearance, suggestive(???), fluff
Seungmin sighed in relief as he stepped into the apartment, the heated interior providing a pleasuring contrast to the chilly weather outside. After a long day of recording new tracks and learning vigorous dance choreographies, he was looking forward to coming home and spending time with you, his favourite person (not counting the 7 Idiots that he worked with on a daily basis).
He walked into the living room, surprised that the lights were off. Usually when he came home late from his idol job, you would be up watching a movie or playing video games, nevertheless awaiting his arrival home. He shrugged off his winter jacket, squinting through his brown fringe as he glanced around the apartment.
"Y/N? I'm home!"
Silence. Seungmin furrowed his eyebrows, clearly confused.
"Y/N?"
His sensitive ears perked up at a small sound coming from your shared room down the hallway. He quietly padded over to the entrance, and looked round the slightly ajar door. The confusion on his face turned to shock when he recognised your silhouette shaking underneath the covers on your shared king-sized bed, accompanied by muffled sobs. He immediately strided over to the bed, sitting down next to your hidden figure and bending over to hug the lump of blankets that was you. You, on the other hand, snapped out of your sobbing trance the moment you felt your boyfriend's familar weight on you. You quickly ducked out from under the blankets, subtly using the back of your hand to wipe at your face. You threw back the covers and came face-to-face with Seungmin's dark, puppy-like eyes.
"Seungie? You're home earlier than usual..."
"What d'you mean? It's nearly midnight. I always come home around this time on weekdays?"
Your breath hitched at his words. Have you been crying for that long? You unknowingly started fidgeting with your nails, which were short and chewed down. Seungmin noticed this, and lightly gripped your wrists to stop you. Your teary eyes met his once more.
"Y/N, did something happen? Why were you crying?"
"...I wasn't crying."
"Don't lie to me, pup. Your eyes are red and still teary, and I could hear you just now."
Your gaze dropped, and you continued to stare silently at your hands in his larger, warmer ones. Nothing could ever get past Kim Seungmin, you knew that. Yet you still tried to hide things from him. You were snapped out of your thoughts by Seungmin's voice again.
"Why were you crying?"
"I...I just happened to come across some old screenshots from high-school, while I was clearing my gallery storage...it was screenshots of some old messages and photos that these girls in my class had sent to each other...they were all making fun of me and trash-talking me..."
Hot tears sprouted at your eyes as you recalled the cruel text messages and crudely photoshopped images of you from nearly a decade ago. Seungmin was quiet. Did he think you were being oversensitive, or something? Your heart almost jumped to your throat when he spoke.
"What...what did they say about you?"
"I don't know...they were calling me ugly, and...and making fun of my appearance...whatever, its fucking stupid, I know I'm overreacting-"
"You're not ugly."
You looked back up at your boyfriend, tears already starting to slide down your face at the painful memories. He kept a firm grip on your wrists, moving one hand to your shoulder to pull you into his chest.
"What?"
"I said, you're not ugly, Y/N. I tell you that you're the most gorgeous and sweetest girl I've ever met, everyday. Even if people still say bad things about you now, I'll stick by your side and defend you, because I love you and cherish the person you are on the inside-out, okay? You may not see it that way, but I do. You may find it hard to accept, but that's why I'm here."
He leaned down to your eye-level, flashing his signature dorkily adorable grin.
"You're probably not feeling too good about yourself now, aren't you?"
"No, Seungie..."
"Okay. Then let me remind you that you're anything but ugly, and that whoever says otherwise, I'll find them and beat them into their senses."
"...Seungie, you don't work out."
"...okay, I'll call Changbin-hyung to deal with them."
Your pout spread into a smile as your laughter filled the room. Seungmin smiled in satisfaction and cupped your face.
"There's that smile. My pretty girl's smile."
A blush made its way to your already flushed face as his thumb swiped over the remaining tears on your face.
"Even if you want to cry, don't cry alone. You're too beautiful for that. Promise me whenever you feel down, you'll tell me right away. You know I'll do whatever I can for you, right, pup?"
You nodded at his words, and he leaned back. He seemed satisfied.
"So, is there anything else you'd like your amazing and loving boyfriend to do to cheer you up?"
"Could you...would you help me forget those girls from high-school?"
Seungmin raised an eyebrow, taking a second to realise what you were asking for. A cheeky smirk appeared on his face as he pushed you onto your back, leaning down to graze your ear with his teeth. You sighed in relief as he peppered reassuring kisses down your neck and your exposed collarbone under your unbuttoned collar. Memories of your bullies and your insecurities evaporated into thin air as Seungmin got to work on you...
Hahahshshshshs idk where I was going with this 💀😭 I wasn't feeling too well about a similar bullying situation in school that happened recently, and my therapist called to remind me to take my delulu pills 😻 (jokes...partially...I have terrible humor omg-) Just some light fluff,, hope it could cheer you up if u were feelin down 😭😭
#seungmin fluff#kim seungmin#skz#stray kids#seungmin#seungmin x reader#skz imagines#stray kids fluff
215 notes
·
View notes
Text
A text post for a change! tldr: There's some technical details re: Dayspa Squad which spills into discussion of the software & hardware used, and a few other thoughts.
Group pics are difficult with the limitations of the AI I'm using (SD 1.5, sdxl is better but my budget gaming laptop can't run it the way I use 1.5 without overheating), and people have noted that they often look like a row of clones. So this time (and last) I've found a suitable txt2img generation (top left) then re-run it through img2img and added variations in the prompt to produce different, still very similar looking groups, with many typical AI pic problems e.g. too many/not enough fingers & hands:
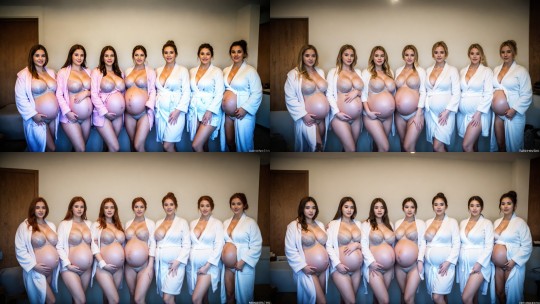
but from that I'll use Krita + the clone tool aligned to each pic and take parts of each that seem apt; hopefully between all the iterations there's enough non-freaky hands and other parts to go around!
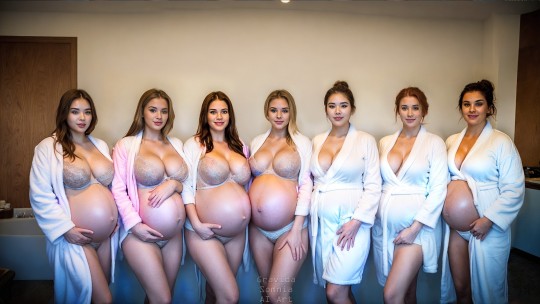
You can see I haven't done a perfect job - especially with the 2nd woman from the left's dressing gown and hand, and the breasts still look cloned. Such flaws and others are much less noticeable on IG with it's limited image resolution and most users having a small screen experience. My excuse is that the milestone came up sooner than expected and I rushed it (I only started after noticing I'd hit 8,995 followers and it took about 20 minutes all up, a few minutes before I hit 9k). But a little more time and scrutiny and even running a couple more iterations could have gone a long way.
Photoshop could just regenerate individual elements if you want it to but I'm not a pro user and can't justify the expense (such functionality wouldn't be available to unlicenced users). I'm more familiar with GIMP but I prefer Krita for simple clone tool operations because it loads quicker and the default brush is perfect for how I use it + the smart patch tool is also handy. I could also use the SD plugin within Krita/GIMP for similar functionality but I found the interface too clunky so I prefer to work manually for this sort of thing.
This method is the sort of thing I'd use earlier on to fix weirdness like mutant hands, multiple weird bellybuttons and other AI body horror. Or to get a striking individual image juuuust right, like this one or this one. Nowadays the raw outputs are often realistic enough that simple touchups can take care of aberrations. We're not far off having an app that laypeople can use that will make pics like this without a need for editing - but for now I'm happy in this niche.
Assets Used (All software free for personal use, mostly free for commercial use):
Software:
Stability Matrix with the Automatic1111 WebUI
Krita (has a learning curve but so does PS, amazing functionality that I've barely made use of because I'm not an actual artist)
Irfanview (free for personal use but I've licensed it so I can use it for work if needed, totally worth it)
AI Checkpoints/Loras/Embeddings:
Photosomnia Omega (my SD1.5 photorealism model blend)
Pregmix 2 Lora (will update eventually but it's not available yet, for now try Pregmix 1 or other pregnancy Loras on civitAI)
FreeU/FreeU webUI plugin
Negative photorealism embeddings used to help a lot but I don't need them so much now due to how far the model and Lora has come. They still deserve a mention as they have been very useful and will continue to be so with a variety of models:
fcneg
kkw-ph1-neg
Bad_NegAnatomy
Hardware:
2nd hand laptop with an i7, 16gb ram, 1G SSD, and 8gb rtx graphics.
4gb nvidia GTX graphics is considered the bare minimum but an RTX with 8gb is gonna be the minimum practical for working with HD resolutions & SDXL. Cheaper laptops will struggle with heat management, PCs will hit your power bills.
Radeon graphics can technically work, they're good for people who love fucking around with linux because things aren't working and want to apply that approach to AI artgen software. If you don't enjoy that sort of frustration don't bother.
Apple isn't supported for Stability Matrix yet but apparently many implementations of SD will work on a Macbook Pro with the M1/M2 chip and preferably at least 16gb of ram. Draw Things will run on an newish iphone/ipad but I found it too clunky to use for serious pics and it's not practical for high resolution work.
While reflecting on the artistic mediocrity of this otherwise pleasing pic, a paraphrase of T.K. crossed my mind, namely that the AI revolution has been an utter disaster for human art. It does have a place alongside real art but as an example I hate seeing AI garbage in advertisements knowing that it's not only deceptive garbage that pretends to be something it's not AND it's also more lost payments for working artists/photographers/models. But I also think that fake erotica photos people make for themselves or share freely are outside of that problem, as long as they don't depict actual identifiable persons. I will not do fakes without consent, maybe everyone has their price but mine hasn't even come close to being reached, which I'll admit isn't possible without some level of privilege.
I'd like to not be judgmental of people who do make AI fakes for $ but otoh AI users must have some level of privilege to be able to access and use the technology. What I have seen with technology and other things is that irresponsible use is likely to be met with irresponsible regulation and I do wonder (not worry) how much longer blogs like this will be legal. Anyway for now just enjoy the pics! There will be more to enjoy soon. If you've bothered to scroll through thanks for reading and thanks for being a fan!
73 notes
·
View notes
Text

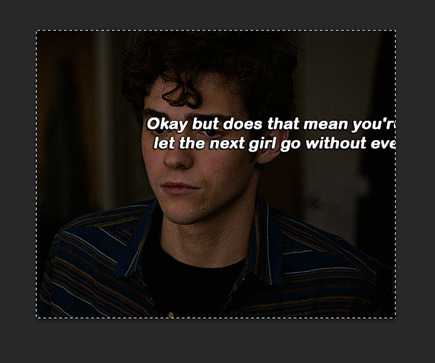
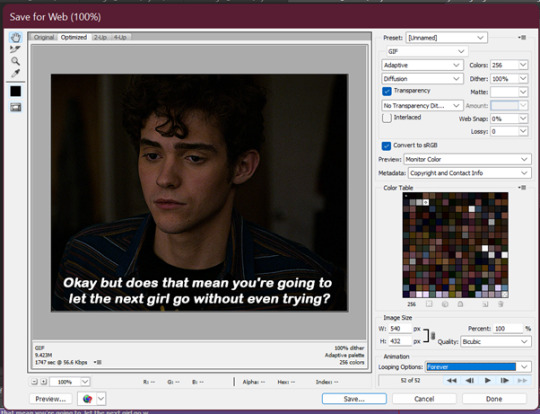
Hi so I’ve had a couple of anons asking me how I make my gifs (some specifically hsmtmts gifs lol) so I’ve decided to write up a tutorial of the basics of how I make my gifs. I’m going to try and make it as detailed and clear as possible - but I have been pretty busy with uni and stuff so if I miss anything or anything isn’t clear just lmk and I will do my best to clarify. I’m going to try and include any resources or other tutorials which may be useful as I go along. This is going to be quite long and detailed so tutorial follows under the cut. For some basic steps I know of good tutorials for - I will link tutorials rather than re-explaining :)
Before we begin with the tutorial part bear with me there are a couple of screencaps which I took out of sequence because I forgot to take them at the step I did it - and the final gif colouring result looks kind of different from the rest of the screencaps because when I was adding the gif to the gifset I was making it for I decided it needed to be brighter because the s3 scene was much brighter than the s2 gif I made for this tutorial (none of this really matters, just explaining the slight discrepancy in some of the caps).
1. SOFTWARE
To make all of my gifs I use Photoshop CS5 (this is the version I use). Any version of Photoshop should work with the methods in this tutorial and you can find a masterlist of cracked photoshops here
2. FINDING HQ VIDEO
When making gifs I always use 1080p video - but not all 1080p is created equally. Generally remux files and larger file sizes will produce better quality screencaps so this is what I search for when giffing. I know a lot of gifmakers who swear by using 4k, but personally I find 4k is more trouble than its worth in my opinion (screencaps always come out weird on my computer - like with a full on green tint, and they take forever to download). For HSMTMS in particular I like to use the release labelled 1080p SALT.
In terms of finding videos, this is a good guide on downloading.
3. SCREENCAPPING
I use mpv player to take screencaps for my gifs. This is a tutorial on how to use and install mpv. When taking your screencaps make sure you have continuous screencaps and no frames are skipped or duplicated. These missing/extra frames will make your gif look choppy and the animation won’t be smooth.
After finishing my screencaps I put them all in folders and move the folders to my desktop (but it can be anywhere you easily can access the folder) to import into Photoshop.
4. IMPORTING SCREENCAPS TO PHOTOSHOP
Open Photoshop. Open the Menu path "File > Scripts > Load Multiple DICOM files” and select the folder where the screencaps for your gif are.
5. CROPPING AND RESIZING GIFS
Click the ‘Crop’ button on Photoshop (the little button shown in the screenshot below). Typically I like to use a preset so that all the gifs in the set I make are the same size. For this set I used the 4x5 crop preset because that is what I typically use.

Position the crop where you want the gif (typically I like the character in the center).
Then push enter (or the tick next to the crop buttons) to confirm your crop.
Use the keyboard shortcut Ctrl + Alt + I to resize your image. This will bring up a little pop up like this:

Resize your gif accordingly based on the width. It is important to use the correct dimensions for the size of the gif you wish to make. These are summarized in the below image.

When you change the width to the correct size (e.g. in this case 540px) the height will automatically change as well.

Click Ok to resize.
6. ANIMATING YOUR GIF + SHARPENING
There are quite a lot of steps to turning your frames into a timeline animation. They are covered in detail in this amazing gif tutorial (which is the main one which helped me learn to gif).
It would be useful to have a read of how the process works, but to speed things up for myself I use a Photoshop action (shared here) I made that does all these steps for me plus my sharpening😊 (Here is a tutorial explaining how to create & install Photoshop actions)
I just highlight the word animate click the play sign and it does all the tedious steps in a couple of seconds. Note it is important to keep the reverse frames one unticked as shown in the screencap otherwise your gifs will move backwards

After that runs through we have our gif in timeline mode sharpened and ready to colour :)

7. BASIC COLOURING TECHNIQUE
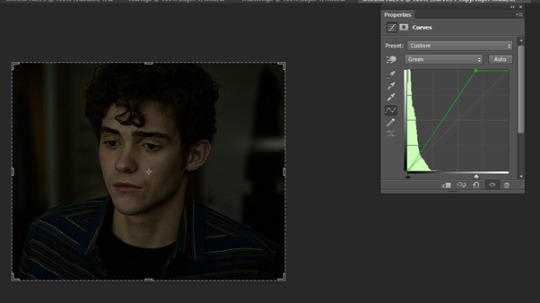
My basic colouring process is very simple and honestly it may shock some people but I primarily colour my basic scene gifs using only the curves and vibrance adjustment layers. There a few reasons for this – 1) The curves tool is a powerful tool and you can do a lot with it 2) Less adjustment layers = better quality gifs 3) This works for me and it is what I find easy. Essentially, I like to keep things simple where ever possible.
First I add a curves layer by clicking on the highlighted adjustment layer
This gives you a menu that looks like this:
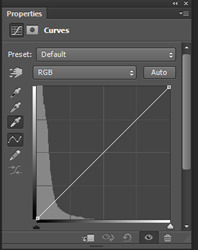
The great thing about Curves is that Photoshop will do a lot of the work for us if we use the eyedropper tools.
First I click the white eye dropper – then I pick a white point on the gif and see how it goes. This can take a few times to get right and often I will try a few times to see which I like best.
For this gif I selected the white light in the background but it looks a little green to me

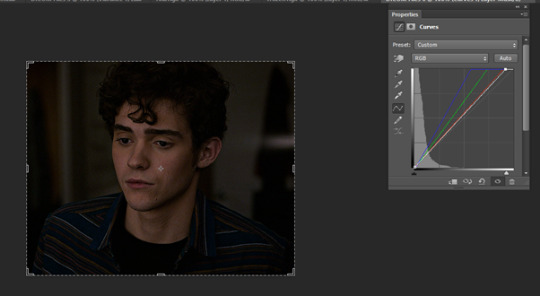
After I have selected my white point I will usually do the same thing except with picking a black point of the gifs. I don’t always pick a dark point it kind of depends on how much I like what Curves has done with the white point and if I think the gif needs more contrast.
For this gif I picked a black point of the area behind Ricky. This is what the gif looks like now with the dark point chosen:
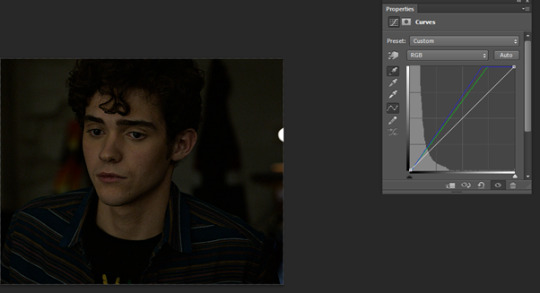
This looks a little better to me than just the white point – but the screencap still looks kind of yellowy and dark to me. So what I do now is I go into each colour channel for the curve and manually adjust it to my liking.
Since this gif is yellow I start in the blue channel and add more blue. I do this by changing the drop down menu on the curves screen from RGB to blue. This gives me something like this to work with:
Essentially I adjust the amount of blue in the gif by sliding the white arrow down the bottom up or down to add more or less blue to the gif. For this gif I am going to slide white arrow at the bottom to the left to make the gif more blue (i.e. neutralise yellow). If I think I have added too much blue I slide it back to the right to add yellow back in.
This is what I adjusted it to and it already looks a lot better
I am actually pretty happy with the overall colouring of this for the moment and I don’t think I need to go into the red and green curves. But I will briefly explain what they do/how they work by showing what some adjustments to these curves looks like.
Red curve – here is our starting point
Dragging the curve to the left will introduce more red into the image

Dragging it back to the right will take out red (the gif will become more cyan)
Green curves: this is our starting point

Dragging the green curve to the left will add more green to the image
Dragging it to the right will take green out (adding pink/magenta)

So after I am happy I have coloured the image in curves If I want the gif to be a little brighter I go back to the main RBG Curves screen and drag the white arrow a little up to the left to add some additional brightness
After colouring with Curves I add in a Vibrance layer (highlighted adjustment layer)

Typically I set the vibrance somewhere between 50 and 60.

This is what the gif looks like now:
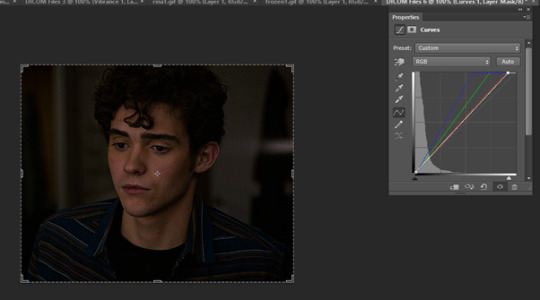
At this point I also have another quick look at the gif and see if I think I need to go back into curves and tweak the colouring a bit and add a bit of extra brightness. When I add in the Vibrance I find it easier to see if there is any underylying colours I want to go back and neutralise/adjust in my curves layer again.
This is what I end up with after making my adjustments post vibrance layer:

Another step I do sometimes is grabbing the black slider on curves and dragging it just a little bit to the right to add some depth and contrast to the gif. As s2 of hsmtmts is really dark I didn’t do it for this gif because I don’t think it needs it. But I will show an example of what this might look like:

This is basically it for my basic colouring. Of course there are a lot of different steps to making my colourful gifsets, but this is just a basic tutorial for the way I gif standard scenes so I will move on to subtitling gifs.
8. CAPTIONS
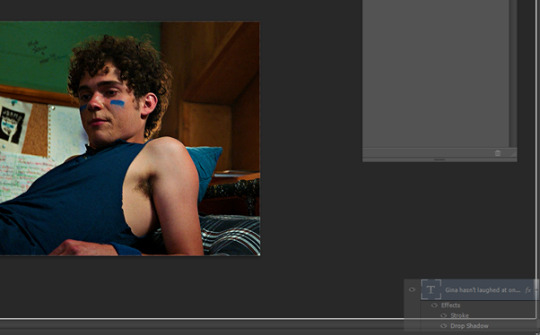
My go to subtitle font is Arial Rounded MT Bold. I have Faux Italic and Faux Bold Selected for this. I like bigger font sizes because I have bad eyesight so usually I will opt between 20 – 24 pt font size

I click the T button to add text then I type out my caption.
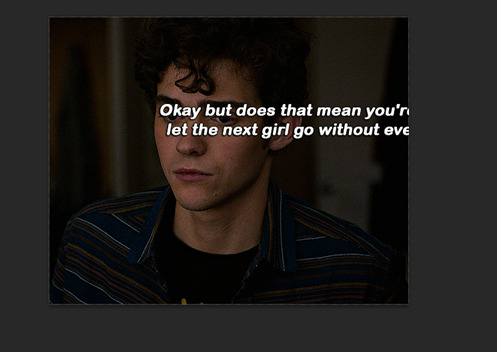
Obviously we don’t want our text here so I align it to the bottom and centre of the gif I do this by first selecting the move tool then going ctrl + a (this selects our gif as the boundary for our alignment). You will know this is done based on the border that comes around the gif (also please ignore that drop shadow and outline settings have already been applied here lol – I added this in because I forgot to screen cap/ explain this part initially)
Then I align my text using the following menu buttons:

Next I Ctrl +D to remove the selection (you need to do this to be able to nudge your text up for the next step). This is the result of the alignment:
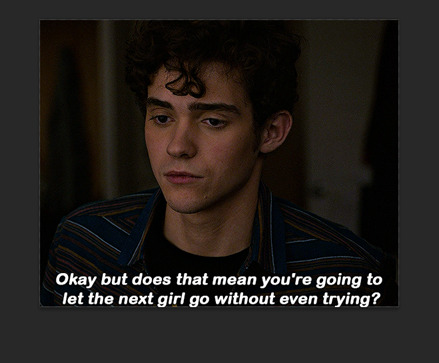
Now I nudge the caption up by selecting the text layer and pushing ctrl + shift + up
This is the result:

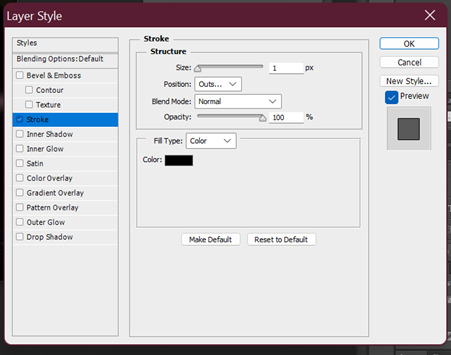
This looks ok, but I always add an outline and dropshadow to make the text more readable. To do this I go into the blending options for the text layer. You can do this by right clicking the layer and selecting blending options or by double clicking the layer (but not on the text).
First I add Stroke with these settings
Then I add Drop Shadow with these settings:

9. SAVING GIFS
To save your file use the keyboard shortcut Ctrl + Alt + Shift + S to open the save for web settings. You will get a screen like this. The settings shown in this screen are my typical save settings (except it should say ‘Forever’ on looping options)
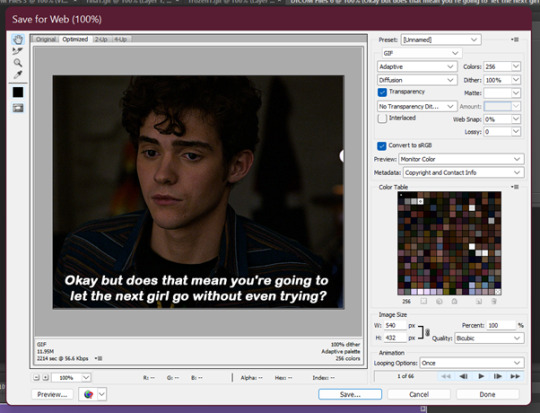
However, Tumblr’s gif limit is 10mb so the size of this gif is too big to upload (it is nearly 12 mb) so we have to go back in the timeline to shorten the gif a bit so we can upload it to tumblr.
I do this by dragging the red preview thingy (idk what else to call it) around till I find a point where I feel the gif has a natural end. Then I grab the timeline bar thingy (idk what it’s called but the silver gray bar at the end of the gif) to the red bar to shorten the gif.


Now press Ctrl + Alt + Shift + S again to save your gif and make sure you set the Looping Option to ‘Forever’. Sometimes I have to shorten the gif a few times to get it under 10mb - but luckily I got it first go this time :)
Now your gif is saved but there is still one step left to do. Photoshop has a glitch where it automatically sets gif speed to 0.7 after saving from the timeline function – we don’t want that! The gifs look very slow and are not very smooth.
So what we do is we open the gif that we just saved and this will open in the frame format. All we have to do is select all frames and set the gif speed to 0.5 – I also have this in my action so I go back to the actions and highlight the line that says ‘set frame speed’ and play the action through

Then we just save the gif again as we just did 😊
This is the end result:
and what the gif looks like without any colouring or text:

One other helpful tip:
If you are giffing from the same scene you can do your colouring and text manually as per the tutorial on the first gif for the set and then drag what you did across to the second (after cropping, resizing and animating it). All you need to do is drag the colouring outside to a different window then highlight your adjustment layers + text and drag them to the new canvas off of the gif (If you drag it on top of the gif it will place it where you put it. Make sure to go off the canvas to so it will keep you positioning/alignment of the text you made 😊)
Basically - you drag the text, curves, vibrance (and any other layers you need) to the gray area of your photoshop document and your colouring will be applied and your text will be placed in the same position as your source doc.
Ok so that is my super basic gif tutorial - if anyone has any questions feel free to ask!
#hsmtmtsedit#*mine#request#gif tutorial#resources#ps help#photoshop tutorial#usergif#allresources#yeahps#completeresources#resourcemarket#dailyresources#userelsbeth#usersavana#useraurore#userrobin#usersole#uservalentina#tuserheidi#okkk so this is kind of a weird choice of gif for the tutorial but I just followed my process as I made a gif request this morning#plus I do feel like its a really ugly screenshot so shows the results of the colouring quite well#but anyway i hope this helps someone
1K notes
·
View notes
Text
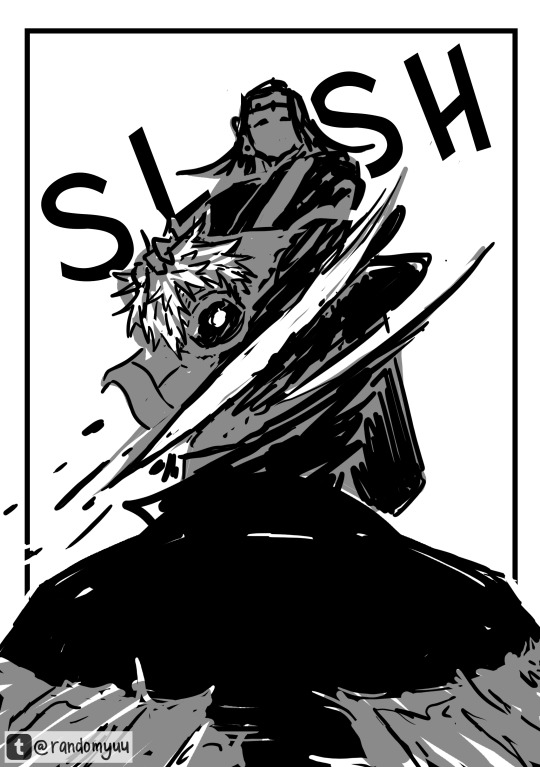
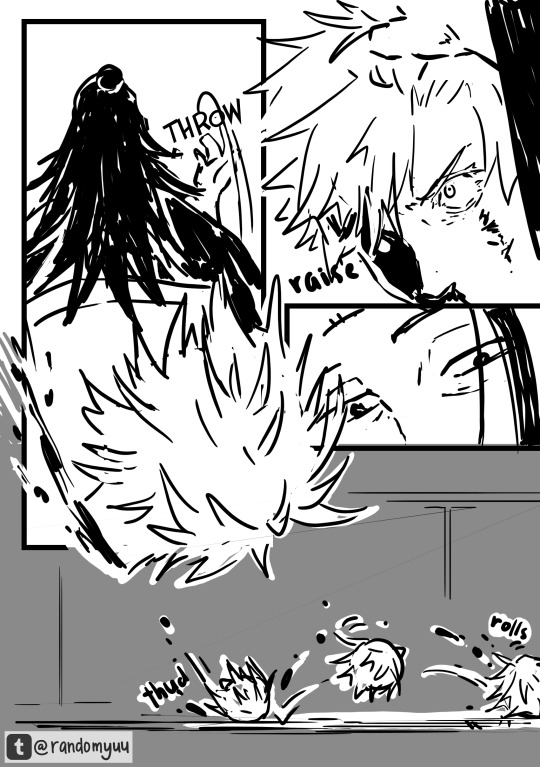
so hold my hand (consign me not to darkness) [1/4]
Ah, yes. The fic that made me realise I’m in desperate need of Cursed Spirit Gojou in my ever-growing favourite GoYuu tropes.
Content Warning!
Major Character Death. Other characters are disrespectful to the corpse.
I highly suggest you read the fic first, or just the fic, since I don’t think I was properly able to adapt it into drawings. While I managed to use roughly two weeks of on-and-off planning, researching, and storyboarding, I only had a full week to finish it. You can read more of my thoughts below the comic if you’re curious.
Title: so hold my hand (consign me not to darkness)
Author: qalb_al_louz
It’s ongoing, and as of this drawing, the fic is in its third chapter. While this is (sexually) SFW, always be mindful of the tags! Please keep yourself safe and sound.
Please read from right to left, and enjoy!


You can only upload 30 images in one post, huh
Damn, I gotta divide it into parts
Part 1 | Part 2 | Part 3 | Part 4
Alrighty, I'll put my watered down unhinged thoughts below. No extra drawings down there if you're curious haha (unless you want to see the storyboard and the characters' full body character sheet, lemme know). You can skip the stuff underneath the Keep Reading for all parts.
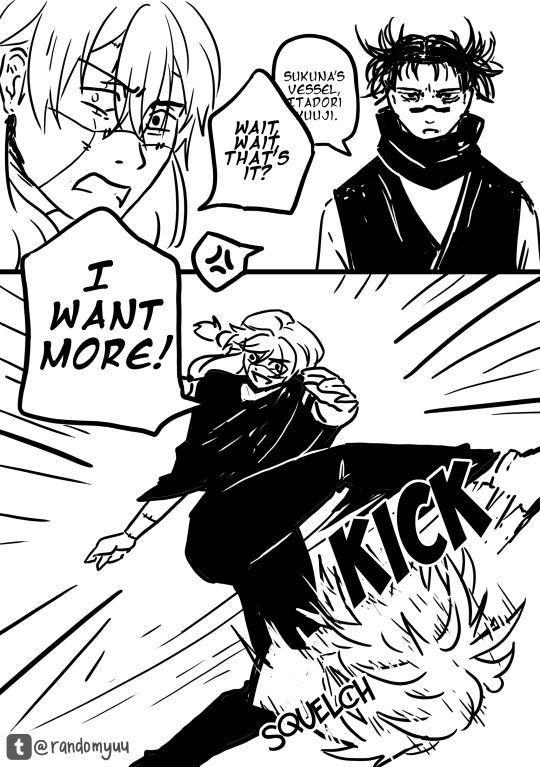
This fic had me grinning from ear to ear every time I read this. The atmosphere, how it goes from POV to POV—of pure fear and panic—and the peak excitement I got when Yuuji properly meets Gojou, like brooooo 😭
Gosh I cannot emphasise how much I love this fic. I’ve always been wanting to make a whole comic out of it, especially since it was 2 chapters and it doesn’t look like the author will update it, but it just… kind of forgotten ∠( ᐛ 」∠)_
But then the author posted a new chapter and I told myself this is a sign I should really start.
also goddamn I was so naive to think I can tackle 2 chapters as comic—no I was in fact cannot
The moment I laid my eyes on the first paragraph, things were portrayed very vividly in my mind. The panel, the angle, Gojou's head rolling down... I was like, hell yeah. Then I continued reading and I finally succumbed to my desire to draw this out.
At first I want to adapt this into a vertical format like those manhwas. However the longer I try to learn and storyboard it... I am simply not yet comfortable with it, especially for such a big project. Even the 1st storyboard starts vaguely vertical before the panels quickly crammed into that B4-B5 format lol. The first sketch estimated 69 (heh) pages for 90% of chapter 1.
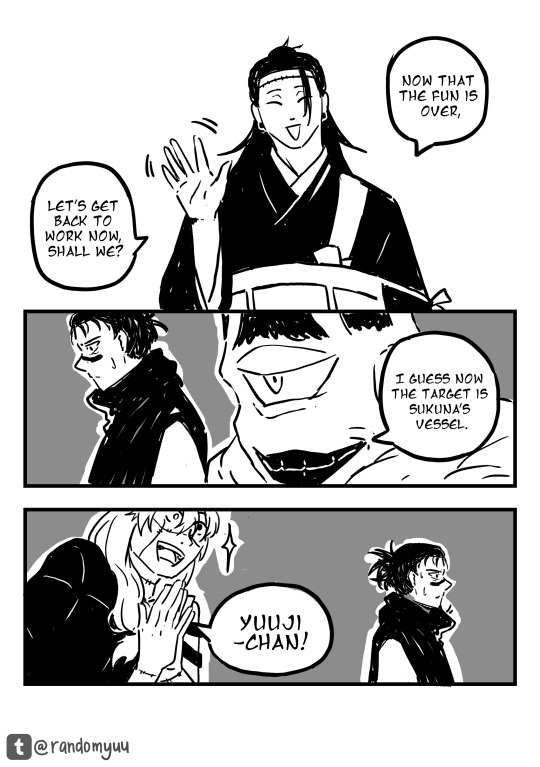
I said "no" for my own sanity and fully focused on the usual manga format and it was narrowed down to 60. Still a lot though, quantity and time-wise. So with a heavy heart, I can only do the majority of chapter 1 :”) I really really want to draw Sukuna talks back to Gojou—do you have any idea how good that scene was??? Gojou tried so hard to restrain himself, he’s so other I love him 😭
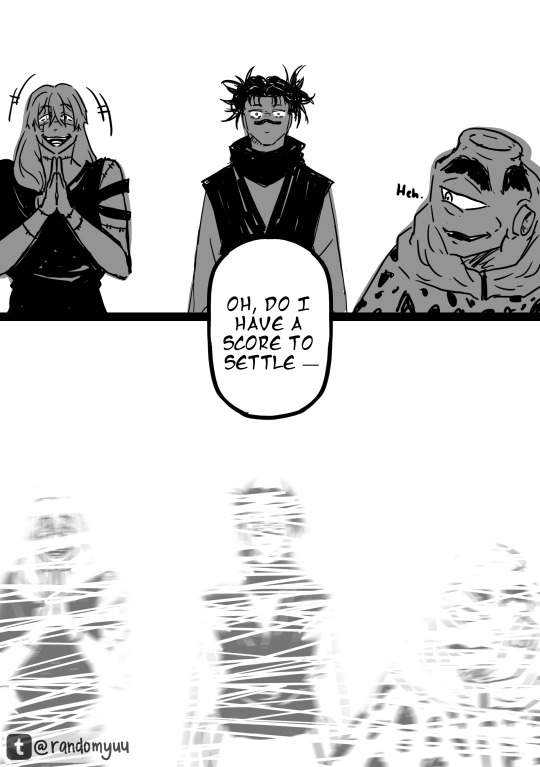
Due to the sheer length of this comic (I'm still in disbelief), I have limit lots of things, and that includes the drawing. If you've seen my other JJK fanarts, they are more rendered than this one. Well, this one is purely sketched with the help of the eraser to tidy up some lines. This is also the first fanart that I did purely on Photoshop, so I can control the typesets and drawings in one place. Usually, I use Photoshop for panels and typesetting and Krita for drawing.
I don't really like Photoshop's brush, but it did really well in curbing my perfectionist tendencies, so that's good.
It's also been quite a while since I draw in general (sobs) so... yeah, you might find differences, or not ¯\_(ツ)_/¯ But I hope you enjoy it nonetheless!
I know setting is important, but maaan I genuinely won't miss rereading chapter 83-93 with a heavy focus on background and character locations. I just want to read the action and dialogue😭 However continuity is really important. But my spatial intelligence is almost non-existent even GPS sometimes can't help me. All I'm saying is that if you find some silly drawing mistakes, do forgive me ∠( ᐛ 」∠)_I only drew all this in a week because otherwise I won't have another chance to complete this.
Well, lots of things I won't miss from this project, but haha let's talk about the characters instead because holy shit what was I thinking, starting this year drawing this many characters in the same project??? I have never drawn anyone here except for Yuuji, Gojou, Nanami and Megumi. I don't think I've ever drawn older Getou before. I already forgot how to draw my boy Yuuji and I gotta draw all these people???
This is what you call making a bad decision, kids. Don't do your "drawing warmup" after months of not drawing and tackling a project of a scale way bigger than you've ever tackled before.
Thank you for reading this far! I hope you find my complaint entertaining! But make no mistake, I genuinely still love the fic. Drawing this, even with all the headaches it gave me, only makes me adore this fic even more.
Thank you very much to each one of you who follows and leaves comments and tags on my silly art—it never failed to make my day :D
And I sincerely wish this one also made your day or even made your minute! I'll see you in the next part!
#yuu's art#jjk-fic-fanart#jjk-ship#五悠#goyuu#goyu#5u#gojou x yuuji#shibuya arc#shibuya arc canon divergence#lots of characters on this one#kenjaku#chousou#mahito#jogo jjk#gojo satoru
22 notes
·
View notes
Text
dtblr, my best friend, my lover, my enemy, what a ride these last two and a half years have been. i think my time here is running out and has been for awhile. since i’ve been here for so long and i’m one of the few people remaining from 2021 dtblr, i feel the need to give a proper goodbye of sorts.
this community has given me such comfort and joy throughout the years. i loved all the of florida truthing and the stupid tinfoil hats i gave you guys. making gifs has genuinely helped me improve as a photographer with editing and my photoshop knowledge. all of the fanfiction and fanart in this community is unmatched and genuinely rewired my brain forever. i hope all of the writers and artists continue to create in whatever form that takes. i’m so thankful for all of the people i’ve met and friends i’ve made here thank you for showing me kindness. i’ve gone through some of the hardest times in my life while existing here and dtblr has helped me through that so much. i’ll never regret the time i spent here and hope none of you grow to either. i met my roommate and best friend bc i was a dream smp stan so i could never regret it. this community became so much more than the content we were given or the people we loved.
at the end of day i need to move on for myself and my mental health because i don’t think it’s healthy for me to continue being so invested in all of this. as for my opinion on the situation, i think george majorly fucked up. we can debate all this forever but ultimately he hurt caiti and proceeded to deflect without acknowledging the pain he caused. he is going have to come to terms with that fact and learn from his mistake. i think he as well as dream both have some misogynistic tendencies based on their statements that they need to realize and work on. do i think george is a monster who doesn’t deserve to live? no absolutely not. i just don’t think i can stick around to wait and see if/when that happens. i don’t blame anyone who chooses to stay either. i hope that he does take this as a wake up call and changes for the better.
as for this blog, it will remain intact and unchanged. i’m not gonna delete any of my gifs or posts they’ll remain as they are. i won’t entirely abandon this blog i’ll stop by and check in every once in a while but for the most part i will be existing on @masterbaited posting about satosugu jjk and normal blogging for the first time in a while loll. anyways sorry for rambling thank you guys for everything. aj dreambaited out :’)
#sorry if this is cringe i just felt like i needed to do it for me#a nice book end to everything#i’ve never really been an essay andy on here so this is my one pass okay#i’ll be around for a bit if you guys wanna chat though !#aj rambles
24 notes
·
View notes
Last Seen Blogs
ogokokoball
You did it!
dragonnerd
The Dragonnerd!

cartoonavatars
cartoonavatars

experimentik
Experimentik
safetyobstacles
huh