#macOS tips
Explore tagged Tumblr posts
Visit Tumblr Blog
Explore Tumblr blogs with no restrictions, modern design and the best experience.
Last Seen Tumblr Blogs


Fun Fact
Tumblr Inc. is funded by 13 investors.
Text
Restart Laptop Saat Darurat: 5 Shortcut Keyboard yang Wajib Diketahui
Tips Menggunakan Shortcut Keyboard untuk Restart Laptop dengan Efektif Surau.co – Ketika laptop tiba-tiba membeku dan mouse tak bisa digerakkan, pengguna kerap panik mencari solusi. Dalam situasi kritis ini, kombinasi tombol di keyboard bisa menjadi penyelamat untuk melakukan restart sistem. Baik di Windows maupun macOS, ada sejumlah cara cepat yang memungkinkan pengguna memulai ulang perangkat…
#Alt F4#cara restart laptop#Ctrl Alt Del#komputer freeze#laptop hang#macOS tips#PowerShell restart#restart laptop#shortcut keyboard#Tips Teknologi#Windows 11
0 notes
Text
youtube
#macos 14#mac#macos#macosSonoma#sonoma#macOS Sonoma Beta2#macOS Sonoma Download#macOs Sonoma Install#macos tips#macos update#macapps#macos monterey#macos ventura 13.4#macos 12.4#macinstosh#macOS tips and tricks#macOS Sonoma tips#macOS Sonoma Tricks#macOS Tutorials#mac os 9#beste macos spiele#datahoarders#datahoarding#appledatahoarding#Youtube
0 notes
Text
Instead of typing a clear command, just press Ctrl+L to clear your terminal or shell screen on macOS, Linux, or Unix-like systems.
42 notes
·
View notes
Text
youtube
How to Install MACOS and Any PC Using a Windows Computer | COMPLETE GUIDE, Step by Step!
#education#windows 10#free education#hacking#windows10#youtube#How to Install MACOS and Any PC#hacking tips#Hackintosh#computer tips#Youtube
2 notes
·
View notes
Text
Hi! I got this and learned something.
The newest MacOS update is not compatible with these games, and you have to download/set up Boot Camp.
Also, if you have a MacBook Pro you CANT USE boot camp, it’s incompatible even though it comes pre installed.
The good news is that you can download them on any computer after purchase with these games which is very very nice (if I understood what the pop up said to me), so if you plan on getting a different laptop/pc that’s not macOS then definitely get it.
ANOTHER NOTE: the valve pack is only about $8 on sale. Go get em.


The Orange Box is now -95% off on Steam!

Until March 21st, you've got the chance to get Valve's infamous bundle which contains the following games, for less than a dollar!
Half-Life 2
Half-Life 2: Episode One
Half-Life 2: Episode Two
Portal
Team Fortress 2
Link to the Steam Page
2K notes
·
View notes
Text
Come visualizzare un elenco di Foto sul Finder di macOS con Quick Look e relative combinazioni da tastiera
Durante il mio ultimo viaggio di lavoro – a Milano per Fujifilm – ho trovato un problema e una soluzione nel corso della stessa giornata. Anzi, è più giusto dire che mi sono stati segnalati. L’amico Luca Petralia (qui il suo canale YouTube) ha iniziato ad usare un Mac mini e ha notato alcune carenze in macOS. È assolutamente normale quando si arriva da Windows e, più generale, quando si cambia…

View On WordPress
0 notes
Text
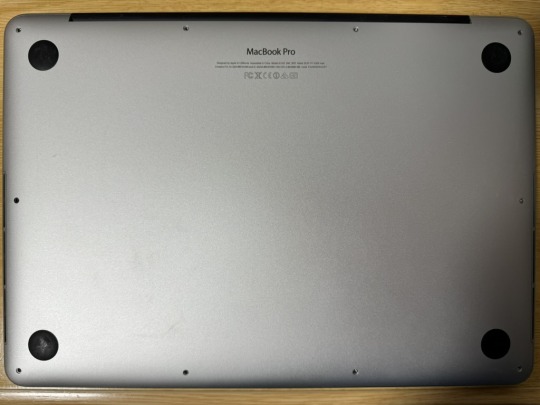
MacBook Pro (Retina, 13-inch, Late 2013) のSSDを換装して増量した話
普段使いのパソコンはiMac 2021(M1)の2TBモデルを中古で買ったものなのですが、昔からサブ機として掲題のMacBook Pro(Retina、13インチ、Late 2013モデル)を持っていました。
が、OSのアップデートもmacOS 11 Big Surを最後に打ち切られ、とうにビンテージを過ぎてオブソリート、要は修理も何もサポートは受け付けないよ、という状態にな��てしまい、SSD容量も当時は1TBの最上位を選んでいたのですが、iMacの2TBに上をいかれてしまったため、実質サブ機としての役目を終えていました。
……が、が、EFIブート(詳細な技術面は詳しくないので省略)をいじれば最新のmacOS 14 Sonomaをインストールできることや、比較的かんたんで廉価な手順でSSDを換装できる方法が確立しているとのことだったので、ググりつつSonomaを入れられることを確認し、SSDも持て余していた2TBのNVMe M.2に入れ替えることにしました。
以下、写真だらけの備忘録です。

(2TBの容量を認識してる!)
まずは先人の知恵を拝借。下記ブログを参考に必要機材を導入。
Macbook ProのSSDを安価で大容量なM.2 NVMe SSDに換装
工具としては対応したMacBookシリーズ向けのドライバーとスパッジャーがセットになったものを、SSDの接続用に専用の変換アダプタを購入。併せて3000円弱です。SSD自体は自作PCに余って刺さってたままになってた2TBのNVMe M.2を再利用したのでタダです。安上がり。
何はともあれ、専用のドライバーが届いていたのでネジを外していくのですが、先人曰く、ヒンジ近くのネジだけ短い(要は長さの違うネジが混ざってる)らしいので、
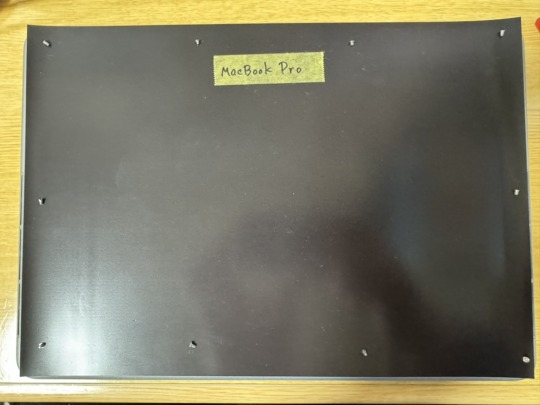
こんな感じでダイソーで買ってきたA4のマグネットシートを敷き、ネジの位置が分かるようにマスキングテープでヒンジ付近の「MacBook Pro」の位置をメモし、対応する箇所にネジを磁力で固定しました。13インチの場合はA4とほぼ同じ大きさなので、分かりやすくて便利。

ネジをどかしたら工具一式に付属のスパッジャーで裏蓋をこじ開けていきます。ヒンジ部分の両脇に大きな隙間があるので、そこからぐりぐり開けていきます。最初のうちは硬いけど、何度か開け閉めしているうちに開けグセがついて簡単に開くようになりました。

というわけでご開帳。

ロジックボード底面はこんな感じ。
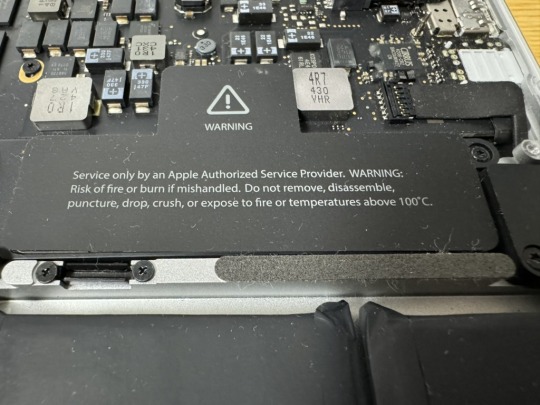
これも先人の知恵を借り、バッテリーから電気を供給するコネクタを外して感電を防ぎます。


凸型の「サービスマン以外は開けるな」シールを剝がすとこんな感じでコネクタがあるので、これもスパッジャーでグイグイ外していきます。写真上部から力を入れるのがコツっぽいです。(何度目かから外し忘れて作業してたのは秘密)

先人に倣い、さっき剝がしたシールをテキトーに置いて絶縁。
最初から付いていた、1TBの専用SSDとご対面。サムスンのチップが使われているようです。固定に使われているネジは普通のトルクスネジに見えましたが、念のため容易したセットに入っていた対応するドライバーで外します。

外し方はよくあるM.2 SSDと同じです。あらよっと。

取り外したSSDと、変換アダプタ+普通のNVMe M.2 SSDのセットを並べてみました。長さと幅が、最初から装着されていたやつの方がデカいです。この長さの隙間に変換アダプタを噛ますかたちになります。あ、使用するSSDはLexarの2TBモデル、NVMe Gen 3 × 4のものです。これしか余ってなかったので。(なんでSSDが余るんだ)
変換アダプタだけ先に取り付けた状態です。けっこう深くまで挿さないといけないため、取り外しの際はスパッジャーの平たい面で押し込む/押し出すのが良いと思います。

あとは変換アダプタめがけてよくあるSSDと同じような取り付け方をすればOKです。ネジを戻すのも忘れずに。
ひとまず取り付け完了。バッテリーのコネクタも逆の手順ではめ込み、シールも貼り戻しました。動作チェック時はネジ留めせず、裏蓋を置くだけにして電源を入れ、ネットワークリカバリを起動してみます。
……が、初期インストールされていたOSがMavericksだったのですが(ネットワークリカバリは出荷時のOSのバージョンを落とそうとする)、何を何度やろうとも2TBのSSDを認識することはありませんでした。しょうがないので別途USBメモリを作っていたMojaveやBig Surのインストーラーから起動することに。
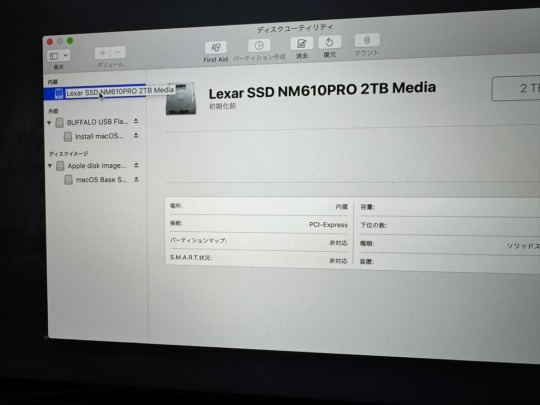
認識した!


MojaveとBig Surの両方を入れたいので、APFSでフォーマットし、コンテナ内にそれぞれ向けのボリュームを作成。

あとはつつがなくそれぞれのUSBメモリから各ボリュームにOSをインストールしたら、あっけなく作業は終了しました。裏蓋のネジも忘れずに締め戻します。
元のSSDからTime Machineでバックアップをとるために、その後なんどか開け閉めと付け外しをしましたが、問題なく動作しています。

Mavericksは何度やっても2TBのSSDを認識しなかったので、USBメモリにインストールし、Time Machineから旧環境を移植しました。どうしても古い環境で動かしたいアプリもあるんですが、そう頻繁でもないので速度は二の次です。
いっぺんだけSSDの読み書き速度を比較して測ってみたのですが、なんか上がってたような気もします。よくわかりません。
長くてグダグダですが、おしまい! 真似したい人はずっと上にあるAmazonへのリンクの箇所から道具を買ってください。対戦ありがとうございました。
0 notes
Text
iphone 14
Are you planning to make the most of the newest Continuity Camera feature that lets you use your iPhone as a Mac webcam? Here are the best mounts, and a few alternative solutions….

0 notes
Text
#smartphone#xiaomi smartphone#technical communication suite#samsung z fold 5 tips and tricks#technical communication#best at&t phones for 2020#speech translation#galaxy z fold 5 tips and tricks#macos tips and tricks#safari tips and tricks#s23 ultra unboxing and review#mac tips and tricks#z fold 5 tips and tricks#macbook tips and tricks#best settings for z fold 5#every samsung galaxy s official introduction#samsung galaxy s introduction
0 notes
Text
【Tips】Macでパスワードなしにして自動ログインする方法
Mac や PC、スマホなどを使っていると、起動時に毎回ログインのパスワードを要求されます。これはセキュリティ上の観点から必要ですが、それが面倒だと感じる方もいるでしょう。この記事では、macOS Ventura 以降でパスワードなしで自動ログインする設定方法をご紹介します。 自動ログインの設定手順 システム設定の起動 メニューバー左のアップルメニューから「システム設定」を開きます。 「FileVault」をオフに��る。 システム設定内で「プライバシーとセキュリティ」を選択します。「FileVault」のセクションで「オフにする」を選択します。 ※ FileVault…

View On WordPress
0 notes
Text
My GIF Making process: Screen capturing using MPV player, Organizing files, 3 Sharpening settings, Basic Coloring PSD + Actions set

This is a very long post so heads up.
I’ll try to be as thorough and true as much as possible to the way I make my gifs (I already use Photoshop Actions which I’ve long since set up but now for this tutorial I’m reviewing them to show you the exact steps I’ve learned to create my gifs 😃) and present them to you in a semi-coherent way. Also, please bear with me since English is my second language.
First things first. Below are the things and tools we need to do this:
Downloaded 4K or 1080p quality videos (let’s all assume we know where to get these—especially for high definition movies and tv series—so this post doesn’t get removed, okay? 😛)
Adobe Photoshop CC or the CS versions can work as well, but full disclosure I haven’t created gifs using the CS versions since 2020. I’m currently using Adobe Photoshop 2024.
mpv player. Use mpv player to get those frames/screenshots or any other video player that has a screen grabber feature. I’ve used adapter for the longest time but I’ve switched to mpv because the press to screenshot feature while the video is playing has been a game changer not to mention ultimate time saver for me. For adapter you need to play it in another video player (like VLC player), to get the start and end timestamps of the scene you want to gif which takes me ages before I can even open Photoshop.
Anyway! Please stop reading this post for a moment and head over to this amazing tutorial by kylos. She perfectly tells you how to install and use mpv player, both for Mac and Windows users.
One thing I have to share though, I had a tough time when I updated my MacOS to Sonoma since MPV is suddenly either duplicating frames or when I delete the duplicates the player seems to be skipping frames :/ I searched and found a solution here, though it didn’t work for me lol. My workaround for this in the meantime is decreasing the speed down to 0.70 then start screenshotting—it’s not the same pre Sonoma update but it works so I’ll have to accept it rather than have jumpy looking gifs.
Now, after this part of kylos’ tutorial:

you can continue reading the following sections of my gif tutorial below.
I want to share this little tip (sorry, this will only cater to Mac users) that I hope will be helpful for organizing the screenshots that MPV saved to the folder you have selected. Because believe me you don’t want to go through 1k+ of screenshots to select just 42-50 frames for your gif.
The Control + Command + N shortcut
This shortcut allows you to create a new folder from files you have pre-selected. As you can see below I have already created a couple of folders, and inside each folder I have selected screenshots that I want to include in one single gif. It's up to you how you want to divide yours, assuming you intend to create and post a Tumblr gifset rather than just one gif.

Another tip is making use of tags. Most of, if not all the time, I make supercorp gifs so I tag blue for Kara and red (or green) for Lena—just being ridiculously on brand and all that.
Before we finally open Photoshop, there's one more thing I want to say—I know, please bear with me for the third? fourth? time 😅
It's helpful to organize everything into their respective folders so you know the total number of items/frames you have. This way, you can add or delete excess or unnecessary shots before uploading them in Photoshop.
For example below there are 80 screenshots of Kara inside this folder and for a 1:1 (540 x 540 px) Tumblr gif, Photoshop can just work around with 42-50 max number of frames with color adjustments applied before it exceeds the 10 MB file size limit of Tumblr.

Sometimes I skip this step because it can be exhausting (haha) and include everything so I can decide visually which frames to keep later on. You'll understand what I mean later on. But it's important to keep the Tumblr 10 MB file size limit in mind. Fewer frames, or just the right amount of frames, is better.
So, with the screenshot organization out of the way, let's finally head over to Photoshop.
Giffing in Photoshop, yay!
Let’s begin by navigating to File > Scripts > Load Files into Stack…

The Load Layers window will appear. Click the Browse button next.
Find your chosen screenshots folder, press Command + A to select all files from that folder then click Open. Then click OK.
After importing and stacking your files, Photoshop should display the following view:

By the way, I'll be providing the clip I've used in this tutorial so if want to use them to follow along be my guest :)
If you haven't already opened your Timeline panel, navigate to Windows > Timeline.
Now, let's focus on the Timeline panel for the next couple of steps.
Click Create Video Timeline, then you’ll have this:

Now click the menu icon on the top right corner then go to Convert Frames > Make Frames from Clips

Still working on the Timeline panel, click the bottom left icon this time—the icon with the three tiny boxes—to Convert to Frame Animation
Select Make Frames From Layers from the top right corner menu button.
So now you have this:

Go and click the top right menu icon again to Select All Frames
Then click the small dropdown icon to set another value for Frame Delay. Select Other…

The best for me and for most is 0.05 but you can always play around and see what you think works for you.
Click the top right menu icon again to Reverse Frames.
I think Photoshop has long since fixed this issue but usually the first animation frame is empty so I just delete it but now going through all these steps there seems to be none of that but anyways, the delete icon is the last one among the line of feature buttons at the bottom part of the Timeline panel.
Yay, now we can have our first proper GIF preview of a thirsty Lena 😜

Press spacebar to watch your gif play for the very first time! After an hour and half of selecting and cutting off screenshots! 😛 Play it some more. No really, I’m serious. I do this so even as early (lol) as this part in the gif making process, I can see which frames I can/should delete to be within the 10 MB file size limit. You can also do it at the end of course 🙂
Now, let’s go to the next important steps of this tutorial post which I’ve numbered below.
Crop and resize to meet Tumblr's required dimensions. The width value should be either 540px, 268px, or 177px.
Convert the gif to a Smart Object for sharpening.
Apply lighting and basic color adjustments before the heavy coloring. I will be sharing the base adjustments layers I use for my gifs 😃.
1. Crop and Resize
Click on the Crop tool (shortcut: the C key)

I like my GIFs big so I always set this to 1:1 ratio if the scene allows it. Press the Enter key after selecting the area of the frame that you want to keep.
Side note: If you find that after cropping, you want to adjust the image to the left or another direction, simply unselect the Delete Cropped Pixels option. This way, you will still have the whole frame area available to crop again as needed and as you prefer.
Now we need to resize our gif and the shortcut for that is Command + Opt + I. Type in 540 as the width measurement, then the height will automatically change to follow the ratio you’ve set while cropping.
540 x 540 px for 1:1
540 x 405 px for 4:3
540 x 304 px for 16:9
For the Resample value I prefer Bilinear—but you can always select the other options to see what you like best.
Click OK. Then Command + 0 and Command + - to properly view the those 540 pixels.

Now we get to the exciting part :) the sharpen settings!
2. Sharpen
First we need to have all these layers “compressed” intro a single smart object from which we can apply filters to.
Select this little button on the the bottom left corner of the Timeline panel.


Select > All Layers
Then go to Filter > Convert for Smart Filters
Just click OK when a pop-up shows up.
Now you should have this view on the Layers panel:

Now I have 3 sharpen settings to share but I’ll have download links to the Action packs at the end of this long ass tutorial so if you want to skip ahead, feel free to do so.
Sharpen v1
Go to Filter > Sharpen > Smart Sharpen…
Below are my settings. I don’t adjust anything under Shadows/Highlights.
Amount: 500
Radius: 0.4
Click OK then do another Smart Sharpen but this time with the below adjustments.
Amount: 12
Radius: 10.0

As you can see Lena’s beautiful eyes are “popping out” now with these filters applied. Click OK.
Now we need to Convert to Frame Animation. Follow the steps below.
Click on the menu icon at the top right corner of the Timeline panel, then click Convert Frames > Flatten Frames into Clips
Then Convert Frames > Convert to Frame Animation
One more click to Make Frames From Layers
Delete the first frame then Select All then Set Frame Delay to 0.05

and there you have it! Play your GIF and make sure it’s just around 42-50 frames. This is the time to select and delete.
To preview and save your GIF go to File > Export > Save for Web (Legacy)…
Below are my Export settings. Make sure to have the file size around 9.2 MB to 9.4 MB max and not exactly 10 MB.

This time I got away with 55 frames but this is because I haven’t applied lighting and color adjustments yet and not to mention the smart sharpen settings aren't to heavy so let’s take that into consideration.
Sharpen v1 preview:

Sharpen v2
Go back to this part of the tutorial and apply the v2 settings.
Smart Sharpen 1:
Amount: 500
Radius: 0.3
Smart Sharpen 2:
Amount: 20
Radius: 0.5
We’re adding a new type of Filter which is Reduce Noise (Filter > Noise > Reduce Noise...) with the below settings.

Then one last Smart Sharpen:
Amount: 500
Radius: 0.3
Your Layers panel should look like this:

Then do the Convert to Frames Animation section again and see below preview.
Sharpen v2 preview:

Sharpen v3:
Smart Sharpen 1:
Amount: 500
Radius: 0.4
Smart Sharpen 2:
Amount: 12
Radius: 10.0
Reduce Noise:
Strength: 5
Preserve Details: 50%
Reduce Color Noise: 0%
Sharpen Details: 50%
Sharpen v3 preview:

And here they are next to each other with coloring applied:
v1

v2

v3

Congratulations, you've made it to the end of the post 😂
As promised, here is the download link to all the files I used in this tutorial which include:
supercorp 2.05 Crossfire clip
3 PSD files with sharpen settings and basic coloring PSD
Actions set
As always, if you're feeling generous here's my Ko-fi link :) Thank you guys and I hope this tutorial will help you and make you love gif making.
P.S. In the next post I'll be sharing more references I found helpful especially with coloring. I just have to search and gather them all.
-Jill
#tutorial#gif tutorial#photoshop tutorial#gif making#sharpening#sharpening tutorial#photoshop#photoshop resources#psd#psd coloring#gif coloring#supercorp#supercorpedit#lena luthor#supergirl#my tutorial#this has been a long time coming#guys. i'm BEGGING you. use the actions set - it was a pain doing all this manually again ngl LMAO#i've been so used to just playing the actions#so this has been a wild refresher course for me too 😆
750 notes
·
View notes
Text

COLORING + SHARPENING TUTORIAL
someone asked for a coloring tutorial and my sharpening settings, so here it is! there are also a few tips to achieve more HQ gifs. :)
tutorial under the cut!
FOR HIGH-QUALITY GIFS
FILE SIZES
it doesn’t matter what your sharpening settings are if the file you’re using to gif is too low quality, so i tend to look for the best that i can get when downloading stuff.
usually, movies (+2h) look better if they’re 5GB or more, while an episode (40 min/1h) can look good with even 1GB. the minimum definition i try to find is 1080p, but i gif with 2160p (4k) when available. unfortunately, not every computer can handle 4k, but don’t worry, you can gif with 1080p files just fine if they are big enough. contrary to popular belief, size does matter! which means sometimes a bigger 1080p file is better than a smaller 2160p one, for example.
SCREENCAPPING METHOD
this can too influence the quality of your gifs. as a gifmaker, i’ve tried it all: video frames to layers, directly opening video clips, loading files into stack, and i’ve finally settled down with opening screencaps as an image sequence. with bigger files, it doesn’t matter much what technique you use, but i’ve noticed with smaller files you can do wonders if you screencap (either by loading files into stack or opening as an image sequence) instead of using video clips. for example, this gif’s original video file was only 4GB (so smaller than i’ve usually go for), if you can believe it!

here’s a tutorial for setting up and screencapping with MPV, the media player i use to screencap. again, you can keep using video clips for bigger files, but you’ll find this useful when dealing with dire causes. i don't file loads into stack, though, like the video does. i open as an image sequence (open > screencap folder > select any image > click the image sequence button). just select OK for the speed. this will open your screencaps as a video clip (blue bar) in timeline mode (i'm a timeline gifmaker, i don't know about you). you will need this action pack to convert the clip into frames if you're a frames gifmaker. i suggest you convert them into frames even if you're a timeline gifmaker, just convert them into a timeline again at the end. that way you can delete the screencaps right away, otherwise you will delete the screencaps and get a static image as a "gif".

ATTENTION if you’re a Mac Sonoma user, MPV won’t be an option for you unless you downgrade your system. that is, if you have an Intel chip. if you have M1 Max chip (or even a better one), here’s a fix for MPV you can try while keeping that MacOS, because nowadays MPV is skipping frames in its latest build. or you can use MPlayer instead for less hassle. here are two tutorials for setting and using MPlayer. Windows users are fine, you can use MPV without trouble.
FOR EVEN MORE QUALITY
ADD NOISE
here’s a tutorial for adding noise as a way to achieve more HQ gifs if your original material is too low quality.
REDUCE NOISE WITH CAMERA RAW
instead of adding noise, you can reduce it, especially if your gif is very noisy as it is.
the path is filter > camera raw > detail > nose reduction. i do this before sharpening, but only my video file isn't great to begin with. because it’s a smart filter, you can reduce or increase its opacity by clicking the bars next to its name in the layers panel.
TOPAZ AI
i use Topaz Photo AI to increase the quality of my screencaps when i need to. it’s paid software, but there are… ways to find it for free, usually on t0rrent websites. if someone’s interested, i can make a tutorial solely about it in the future.
SHARPENING SETTINGS
here are my sharpening settings (filter > sharpen > smart sharpen). i sharpen things twice: 500% 0.4px + 10% 10px. here's an action for it, for more convenience. here's a tutorial on how to use Photoshop actions. for animated stuff, i use this action pack.

COLORING
here’s the gif i'm gonna use as a base. it’s already sharpened like the way i always do it.

LIGHTNING THE SHOTS
half of the secret of a good coloring is good lightning. i always useCurves (layers > new adjustment layer > curves) and Brightness & Contrast (layers > new adjustment layer > brightness & contrast). the settings depend on the scene you’re giffing, but i always try make my gifs bright and with high contrast to make the colors pop.
CURVES
besides lighting your scene, the Curves adjustment layer has four automatic options that will color-correct it for you. it’s not always perfect and it doesn’t mean you won’t need to do further coloring, but it’s a great start. it’s a lifesaver for most ridiculously yellow scenes. look at the difference! this gif uses the 3rd automatic option (the screenshot below isn't mine btw so that's why the fourth option is the chosen one), from top to bottom. what automatic option you need to choose depends on the gif.


sometimes i like to tweak my Curves layer. not everybody does that, it’s not that necessary and if you’re not careful, it can screw your gif up. to modify your layer by hand, you will need to click and drag points of that straight line in the position you desire. this is the concept behind it:

basically, the lower part of the line handles the shadows, while the upper part handles the highlights of the image. if you pull a highlight point up, the image’s highlights will be brighter. if you pull it down, it will make them darker. same thing for the shadow points. you should play with it to get a grasp of it, that’s what i did when i first started giffing.
BRIGHTNESS & CONTRAST
then i added a bit of brightness and contrast.

CHANNEL MIXER
the scene looked a bit too yellow, so i used the Channel Mixer (layer > new adjustment layer > channel mixer) adjustment layer. here’s a tutorial of how it works. not every scene needs the Channel Mixer layer though, i mostly use it to remove heavy overall tints. in this particular case, the Curves layer got rid of most of the yellow, but i wanted the gif to be just a bit more blue so the Channel Mixer tweaks are very minimal.

SELECTIVE COLOR
now, this adjustment layer i always use: Selective Color (layer > new adjustment layer > selective color). this is THE adjustment layer to me, alongside the Curves one. this is how it works:

ie, you can separately edit a color this way, giving it tints. for this gif, i wanted to make the colors more vibrant. to achieve that, i edited the selected colors this way:

for the reds, i added even more red in them by moving the first slider to the right, making the color more vibrant. for his hat to have a more warm tint, i added yellow to the reds (third slider, moving it to the right). finally, to make the reds stronger, i moved the last slider to the right (more black).
for the yellows, i made them brighter by adding white to them, thus making the tile wall and Paddington more bright as well.
for the cyans and the blues, i just added the maximum (+100) of black that i could.
i wanted for Paddington's nose to be brighter, so i added more white to the whites.
lastly, i added depth to the blacks by increasing their own blackness.
you should always play with the Selective Colors sliders for a bit, before deciding what you want or need. with time, you will automatically know what to change to correct the color grading. it all takes practice!
HUE/SATURATION
i don’t know if you noticed, but there are some green spots on the blue wall behind Paddington. to correct that, i added a Hue/Saturation adjustment layer (layer > new adjustment layer > hue/saturation) and made the saturation of the greens 0%, making that unwanted green disappear from the background.

while the green spots on the wall are specific for this gif, i use hue/saturation a lot to tweak, well, hue and saturation. sometimes someone’s skin is too yellow, i made it redder by tweaking the reds and the yellows, or vice-versa. the hue bar follows the rainbow bar, so the maximum settings (+100 and -100) give the selected color to change its hue to something more red or pink (the rainbow extremities). changing hue can give pretty whacky results, like turning someone’s skin tone to green, so you will need to play with it to get the hang of it. you can also tweak the opacity of your hue/saturation layer to further improve your gif’s coloring. i didn’t do it in this case, the opacity is still 100%. the reds and the blues had their saturation increased to make them pop just a bit more, without affecting the other colors.
COLOR BALANCE
the highlights of the gif still had a green tint to it due to the automatic correction of the Curves layer, so i used Color Balance. this is how it works: instead of giving specific colors some tints, you can give them to the shadows, highlights, and mid-tones. if your shadows are too blue, you counterbalance them with the opposite color, yellow. same thing with the cyan-red and magenta-green pairings. in my case, i added a bit of magenta.


B&W GRADIENT MAP
now, if this gif was a dish, it’s time for the salt and pepper. i always add a Gradient Map (layer > new adjustment layer > gradient map) (black to white gradient) with the Soft Light blending mode, thus giving my shadows more depth without messing with the mid-tones and highlights. it also doesn’t “deep fry” (you know those memes?) the gif too much by adding even more contrast. usually, the opacity of the layer is between 30% to 70%, it all depends on the gif. it always does wonders, though!

COLOR FILTER
finally, i like to add Color Filters (layer > new adjustment layer > color filter) to my gifs. it’s very handy when giving different scenes for the same minimalistic set because it makes them kind of match despite having completely different colors. in this gif’s case, i added a “deep blue” filter, opacity 50% density 25. you can change the density and the opacity of the layer for further editing, again, it all depends on the gif.

VIBRANCE
if i feel like it, i add a vibrance layer (layer > new adjustment layer > vibrance) to make the colors pop. this can ruin your coloring sometimes, especially when regarding skin color, so be careful. i didn't do it in this gif because i felt i didn't need it.
TA-DA! 🥳
AN OTHER EXAMPLE
the color grading of the original scene it’s pretty good as it is, to be honest. let’s see a worse scenario, a VERY yellow one:


no channel mixer this time because the automatic curves option dealt with the yellowness, but you can see it made the gif too green. i needed to correct that with the following adjustment layers:
curves (automatic option) (gif 2) >> same curves layer (tweaks) (gif 3) >> brightness & contrast (gif 4) >> hue/saturation (tweaked cyan+blue+green) >> selective color >> color balance (gif 5) >> b&w gradient map >> (sepia) filter >> vibrance (gif 6)
i added a hue/saturation layer to remove the blues & greens before my selective color layer because i thought that was more urgent than tweaking the tint of all colors. color balance (gif 4) was the real hero here, though, by removing the green tint. the selective color layer was meant to make the red pop more than anything else, because the rest looked pretty good, especially her skin tone (despite the green tint). you can notice that tweaking the curves layer (small gif 3) also helped A LOT with the green problem.
tl;dr 😵💫😵💫😵💫
here's a list of my go-to's while coloring and lightning gifs. it's not a rule, just a guide. there are gifs in which i don't use all these adjustment layers, or use them in a different order. it all depends!
1. curves (automatic option + tweaks) 2. brightness & contrast 3. channel mixer 4. selective color 5. hue/saturation 6. color balance 7. b&w gradient map 8. color filter 9. vibrance
i'll suggest that you study each adjustment layer listed for more info, either with other Tumblr tutorials or YouTube ones. the YouTube ones focus on images, but you can translate what they teach to gif making very easily. you can ask me to further explain any adjustment layer, too! i was brief to keep this short (which i kinda failed lol).
feel free to ask me for clarification or something else about gifmaking wise, i always like to help. ❤️
#*#*tutorials#gifmaker tag#resources#resource: tutorials#ps help#uservivaldi#tuserjen#userrin#userelio#useralien#userzaynab#userchibi#userbuckleys#usertj#userbess#tuserlucie#useraljoscha#userdavid#usershreyu#usernolan#userhallie#userisaiah#tusergio#tusergeo#userjesslynn
789 notes
·
View notes
Text
Unix philosophy

62 notes
·
View notes
Text
Twine/SugarCube ressources
Some/most of you must know that Arcadie: Second-Born was coded in ChoiceScript before I converted it to Twine for self-publishing (for various reasons).
I have switched to Ren'Py for Cold Lands, but I thought I would share the resources that helped me when I was working with Twine. This is basically an organized dump of nearly all the bookmarks I collected. Hope this is helpful!
Guides
Creating Interactive Fiction: A Guide to Using Twine by Aidan Doyle
A Total Beginner’s Guide to Twine
Introduction to Twine By Conor Walsh (covers Harlowe and not SugarCube)
Twine Grimoire I
Twine Grimoire II
Twine and CSS
Documentation
SugarCube v2 Documentation
Custom Macros
Chapel's Custom Macro Collection, particularly Fairmath function to emulate CS operations if converting your CS game to Twine
Cycy's custom macros
Clickable Images with HTML Maps
Character pages
Character Profile Card Tutorial
Twine 2 / SugarCube 2 Sample Code by HiEv
Templates
Some may be outdated following Twine/SugarCube updates
Twine/Sugarcube 2 Template
Twine SugarCube template
Twine Template II
Twine Template by Vahnya
Sample Code and more resources
A post from 2 years ago where I share sample code
TwineLab
nyehilism Twine masterpost
How to have greyed out choices
idrellegames's tutorials
Interactive Fiction Design, Coding in Twine & Other IF Resources by idrellegames (idrellegames has shared many tutorials and tips for Twine, browse their #twine tag)
How to print variables inside links
How do I create a passage link via clicking on a picture
App Builder
Convert your Twine game into a Windows and macOS executable (free)
Convert your Twine game into a mobile app for Android and iPhone (90$ one-time fee if memory serves me right) // Warning: the Android app it creates is outdated for Google Play, you'll need to update the source code yourself
249 notes
·
View notes
Text
Okay. So here's my current situation: I'm trying to get The Sims 3 to run on my Linux machine. The Sims 3 has a "Gold" rating on the Wine AppDb, so it should run fine. I can't even get in game to test anything because of this:
The game's brightness, by default, is extremely low. As a result, it's supposed to hijack your screen controls and make the brightness like 200% or something. I've seen this behavior on macOS. However, for some reason, on Linux it isn't doing that, and the window stays dark. The solution is to run it in windowed mode, which does fix it, but... then it's in windowed mode (ew). So I saw on Reddit that Lazy Duchess's Smooth Patch came force the game into a borderless window mode. Great! That'll fix all my problems. However.
In order to make the Smooth Patch run, you have to launch the game from TheSims3Launcher.exe
Problem: I don't have a disc drive on this computer. I backed up all my TS3 DVDs onto a 128 GB flash drive, and I installed the game from there. My usual method of playing is to bypass the launcher entirely and launch the game directly using the TS3.exe file. However, doing so will cause the Smooth Patch not to launch. If I do try to open the launcher, of course, I can't launch the game because I don't have the disc inserted.
So, like, wtf do I do? I can't use LD's Custom Launcher because it's for 1.69 only, and the disc version is 1.67. So, like, is there any way to launch the game from the launcher without a DVD? Like, are there cracked launchers or some way of bypassing the disc requirement. Idk.
I can use a USB disc drive, but digging that thing out every single time I want to launch the game is gonna be tedious. I'd be nice to just be able to launch it normally. So any tips would be appreciated.
I could also, in theory, try compressing my TS3 Base Game folder into a .iso file and seeing if that'll trick the game. Idk, though, because idk what the launcher is looking for when it's verifying the disc.
26 notes
·
View notes