#text formatting for table rows
Explore tagged Tumblr posts
Visit Tumblr Blog
Explore Tumblr blogs with no restrictions, modern design and the best experience.
Last Seen Tumblr Blogs


Fun Fact
Forty percent of Tumblr users are between the ages of 18 to 25.
Note
so ive seen quite a few different character profile templates but i was wondering if you knew of anything similar to those to help us organize the key relationships in our writing?
Organizing Character Relationships
Create a Character Relationship Chart
There are two main methods I use. For a story with a relatively smaller cast, I draw a kind of mindmap or family tree type diagram with my main character in the middle. All the other characters will be a web of relationships surrounding the main character:

made with Excalidraw
Vary the size of the character profile according to importance
Color-code the relationship type (family, friend, acquaintance)
Use different types of lines to denote different kind of relationships
Make use of icons (like a star) to mark people who belong to the same organization/school, etc.
You can use a group of people as one entity
Make it intuitive!
For stories where the cast list is long, or where all the side characters basically know each other (such as in a classroom setting where pretty much everyone knows everyone), I use a table format:
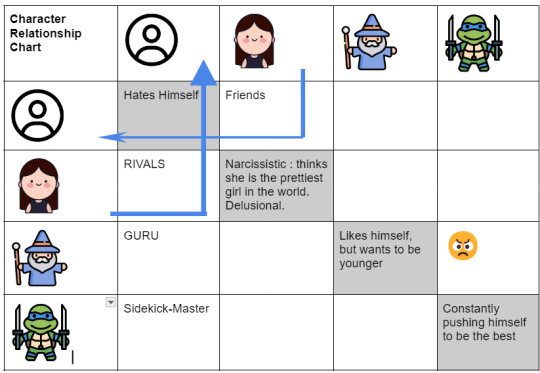
The table is two-way. Below the gray area is what the column character thinks about the row character, and above the table denotes what the column character thinks about the corresponding row character.
Color code important relationships
Use different types of font for love, hate, mutual rivalry, etc.
You can choose to insert intuitive icons instead of text!
Mapping out Character Development
The last step is to bring in the element of time between the characters, because their relationship is going to change/evolve over time.
You can just make a different bullet point for different stages of their relationship.
You can make two of the character relationship chart: one for the beginning and one for the end.
Or, you can denote to using relationship tropes, i.e. friends-to-enemies, friends-to-lovers, enemies-to-lovers, etc.
Hope this helps :)
If you like my blog, buy me a coffee☕ and find me on instagram! 📸
#writing#writers and poets#creative writing#writers on tumblr#creative writers#helping writers#let's write#poets and writers#writeblr#resources for writers#character development#character writing#writing practice#writing prompt#writing advice#on writing#writing inspiration#writing tips#writer#writing community#writerscommunity#writers#writers of tumblr#writers community#writers life#writer things#writer on tumblr#writer problems#writblr#writer community
194 notes
·
View notes
Text


I recently reorganized my library and in the process stumbled across the present tome which celebrates its 20th birthday in 2024: Philip Jodidio’s „Tadao Ando - Complete Works“, published by Taschen in 2004. It was the first edition of a book that to this day remains a staple in the publisher’s program. In oversized coffee table format that monograph features about forty of Ando’s most significant projects, among them early row and single-family houses, the Rokko Housing projects, the famous Church of Light and Water Temple or large-scale and unrealized projects like the Chikatsu-Atsuka and Calder Museums. Each project is accompanied by a concise text as well as large-format photographs, drawings and plans. The former convey the exceptional spatial qualities of Ando’s buildings but also demonstrate his sophisticated handling of concrete, a feature that obviously isn’t an end in itself but the sensible enclosing of space.
The book reminded me of my early admiration of Tadao Ando but also of the fact that many of the projects that came to life after the book’s initial release didn’t excite my on the same level as those contained in it.
86 notes
·
View notes
Text


favorite books 1/? » MAURICE by E.M. Forster
“The second dream is more difficult to convey. Nothing happened. He scarcely saw a face, scarcely heard a voice say, 'That is your friend,' and then it was over, having filled him with beauty and taught him tenderness. He could die for such a friend, he would allow such a friend to die for him; they would make any sacrifice for each other, and count the world nothing, neither death nor distance nor crossness could part them, because 'this is my friend.'” - E.M. Forster, Maurice
[ID: a picspam comprised of 12 images primarily in shades of brown, green, and white.
1: Adjacent rows of long wooden tables with lamps every few seats / 2: A thin, pale-skinned person wearing a white shirt, black suspenders, and black pants standing in a field / 3: Light and dark green italicized serif text reading "Maurice" on a black background / 4: A bed with a bronze-colored metal frame laid with white pillows and comforter / 5: A round neoclassical structure at the top of a grassy hill / 6: Several low wooden boats at their moorings / 7: The thatched roof of a building among lush trees / 8: A light-skinned person wearing a white shirt and putting on a black tie / 9: A hall of white stone and dark brown wooden panelling containing several statues / 10: Same format as Image 3, but the text reads "by E.M. Forster" / 11: Several arches of an ornate, coffered ceiling leading up to a central dome / 12: A painting by Henry Scott Tuke depicting a young person with light skin and dark hair sleeping peacefully, their face turned towards the viewer. They are wearing a white shirt with an open collar //End ID]
#maurice#e. m. forster#litedit#librarysource#pagesblr#litblr#bookedit#storyseekers#bookblr#edits with the wild hunt#brought to you by me#picspam#described#by hook or by crook i will continue apparently !#henry scott tuke was gay by the by. i would not do maurice + forster so dirty as to pick someone who wasn't!
40 notes
·
View notes
Text
𝐂𝐡𝐚𝐩𝐭𝐞𝐫 𝐄𝐢𝐠𝐡𝐭: 𝐈𝐭 𝐉𝐮𝐬𝐭… 𝐇𝐚𝐩𝐩𝐞𝐧𝐞𝐝
Parings → Peter Parker x Reader
Warnings → Healing themes, fluff, slow burn, mild angst, soft romance.
Summary → Group projects lead to study sessions, bonding, and finally Peter asking you out—gently, nervously, and hopefully.
Masterlist

It started with a sigh.
Your pen tapped against your notebook as Professor Mallory paced in front of the whiteboard, explaining the next group project. You didn’t hear most of it—you were too busy hoping he wouldn't say your name.
“And Parker and Y/L/N.”
Well, that hope died fast.
You blinked and looked over. Peter glanced up from his laptop, his brows raised in surprise before offering a small smile. It wasn’t smug, like you feared. Just… nervous. Like he wasn’t sure you’d be okay with it.
You weren’t not okay with it.
After that night—the night you saw his rawest self, the night you became more than just classmates—something shifted. You didn’t talk every day, and you weren’t suddenly best friends, but there was a familiarity. A comfort. He didn’t hide behind silence anymore. He greeted you when he passed by in the halls. Smiled when he saw you at your café. Sometimes lingered too long after paying for his coffee.
And now, fate—or Professor Mallory—decided to toss the two of you into academic co-dependence.
You walked over after class ended, backpack slung over one shoulder. “Hey.”
Peter shut his laptop. “Hey,” he said, voice soft. “So… guess we’re partners.”
“Looks like it,” you said with a slight smirk. “You think you can handle working with me?”
He laughed, just a little, the corner of his mouth twitching upward. “I think I’ll manage.”
-------------------------------------------------
You met at the library one day later.
Peter had already claimed a table by the window, sunlight filtering through and bouncing off the pages of the book he was reading. He looked peaceful like that—head bowed, lips slightly parted as he mouthed along with the words, one finger dragging across the line of text.
You hesitated, watching him for a beat before stepping forward and dropping into the chair across from him.
He startled, then grinned sheepishly. “Didn’t see you coming.”
“That’s kind of my thing,” you teased. “Stealth mode.”
“Oh yeah?” He said, eyes twinkling. “Are you secretly the superhero here?”
You shrugged, pretending to look smug. “Maybe.”
He chuckled, leaning back. “Okay, I’m convinced. You’re the one with powers now.”
You both dove into the project. At first, it was all business—research, outlining, figuring out who would write what. But then somewhere between debates over fonts and formatting, the conversation drifted.
“Do you ever feel like this—school, deadlines, papers—feels so small compared to everything else going on?” Peter asked, chewing on the cap of his pen.
You blinked. “Like the rest of the world’s on fire, but we’re here arguing about citations?”
“Exactly,” he sighed, looking out the window. “Sometimes I forget what normal feels like.”
You paused. “Do you want it back? Normal, I mean?”
Peter was quiet for a long moment. “I think I’m scared of it. Because when things are normal, I start waiting for it to get taken away.”
You didn’t know what to say to that. So you reached out instead—your fingers brushing his lightly on the table. He looked down at the contact, surprised. But he didn’t pull away.
-------------------------------------------------
You met again the next week. This time, you didn’t even bring the project.
“I figured we could just hang out?” Peter offered as he passed you a cup of your favorite coffee (which he remembered, the little nerd).
“In the library?” You raised an eyebrow.
He laughed. “Hey, it’s our thing now. Might as well embrace it.”
You found a quieter corner this time, away from the rows of study zombies. You sat cross-legged on a couch while he sprawled out with his back against the wall, one leg bent, the other stretched out across the floor.
“You ever think about the future?” He asked out of nowhere.
“All the time,” you replied. “Sometimes it terrifies me. Sometimes it feels like a blank page. Depends on the day.”
He nodded. “For me… I used to have this plan. Graduate, maybe work with Stark Industries, get an apartment in Queens. Maybe… be with MJ.”
You didn’t flinch. Not really. But Peter noticed the way your eyes flicked away.
He sighed. “But things change. People… forget you. And suddenly the plan doesn’t matter anymore.”
You leaned forward. “What about now? Do you have a new plan?”
Peter hesitated, eyes locked on yours. “Maybe I’m working on one. Day by day.”
You smiled. “Good. That’s a start.”
-------------------------------------------------
It happened the next Friday.
He showed up at your café just before closing, hoodie pulled up, hands shoved into his pockets like he didn’t want to be noticed. But when he saw you behind the counter, he relaxed.
“Closing soon?” He asked.
“Five minutes,” you said, wiping your hands on your apron. “You here for coffee, or…?”
“Actually,” he said, looking suddenly shy. “I was kind of hoping I could talk to you.”
You blinked, heart picking up pace. “Yeah. Of course.”
You locked the door, flipped the sign, and joined him at a table. The place was empty. Quiet. Just the hum of the cooler and the gentle tap of rain outside.
Peter fidgeted with a sugar packet. “I’ve been thinking about something. For a while.”
You tilted your head. “Okay…”
“I like talking to you. Like… really like it. I never thought I’d be able to connect with someone again. But with you, it’s been easy. Even when it wasn’t. You… saw me when I was a mess, and you didn’t run.”
You swallowed. “Why would I?”
“Most people would,” he said. “Or did.”
You were quiet for a beat before replying, “Well, I’m not most people.”
That made him smile. A real one.
“So,” he said, voice suddenly small. “Would you maybe want to go out with me sometime? Like, a real date. Not library hangouts or crying in my arms… although, y’know, those were important too.”
You laughed, a surprised, bright sound that made his face light up.
“I’d like that,” you said. “A lot.”
Peter let out a breath like he’d been holding it for days. “Okay. Cool. Cool. Yeah. Amazing. Just… warning, I haven’t dated in a while. I might be a little rusty.”
You grinned. “We’ll wing it together.”
And in that moment, it wasn’t Spider-Man sitting in front of you. It was just Peter—awkward, sweet, brave, hopeful Peter—taking a risk.
You reached across the table and took his hand. His fingers curled around yours, warm and steady.
Maybe things were finally looking up.
∗ ࣪ ˖༺ 𓆩☆𓆪 ༻˖ ࣪ ∗
#peter parker au#peter parker spiderman#peter parker fanfic#peter parker x reader#peter parker x y/n#peter parker x fem!reader#peter parker x you#peter parker#peter parker fanfiction#peter parker fluff#peter parker imagine#peter 1#tomholland2013#thollandsgirl2013#tom holland spiderman#spider man#tom holland#tom holland fanfiction#mcu!peter parker x reader#mcu!peter x reader#start of something new
29 notes
·
View notes
Text
Amateur Translation Programs
So I had a lot of imaginative and informative responses to my post about looking for an amateur translation program -- something where I could load in a foreign language and it would insert a box where I could add a translation every-other-line. The idea was that this way I could practice translation with more advanced texts, and texts I chose, and thus move away from Duolingo, which at this point is good for drilling and daily practice but not for more advanced learning.
I didn't find precisely what was needed but I did get some inspiration for further explanation, and I also learned that adding the term "glossing" (thank you @thewalrus-said) into my searches helped a great deal in terms of weeding out programs that were either "Let this AI translate for you" or just endless promotional links for Babbel and Duolingo and such. I thought I'd collect up the suggestions and post them here; at the end I'm including my best swing at designing what I wanted, and why it doesn't work yet.
Suggestion one, from many people, was various ways to generate a page that is simply fixed Italian text with space underneath each line to add in a translation. This is pretty simple as a process and there are sites that will do it for you, such as this one that @ame-kage suggested. However, most of these don't allow for movement in the Italian text, and many produce a PDF which you would need to print out in order to write on unless you're willing to open it in Acrobat (and deal with Acrobat). A good solution for some but not what I'm looking for purely because I'm trying to make this super frictionless so that (knowing myself as I do) I will actually do it.
I did find this version interesting, suggested by @drivemetogeek: Have one word doc saved as your "template" doc and set the line spacing as 2.0 or higher. Select your text from source and paste it into the template doc as text-only. Ctrl a, ctrl c to select all and copy, then open a new document and "paste special" as picture. Right click and set the "wrap text" as behind text. Now you have a document where you can, basically, type over the existing text because it's the background of the page. This seems like the most frictionless version, because you could set up a bunch of them ahead of time. If you wanted to move between desktop and mobile, however, you'd need to ensure that the pasted image was fairly narrow so that you don't have to sideways-scroll.
Relatedly, people suggested generating a document that is simply the Italian text with empty space beneath it for typing in of the translation. This can be done either semi-automated, using a macro or a language like Python, or find-and-replace on, say, the stops at the ends of sentences. It basically outputs the same as above but with a more digitally accessible format, without any more effort than above. If you were to do this in Google Sheets you could also fix the column width so that it didn't do anything weird when you opened it on your phone. But it is still very friction-y, and does not allow for easy shifting of the Italian as needed. There's high probability of the translation breaking weirdly across the page. Still a top option in terms of simplicity and access.
@smokeandholograms suggested another variation illustrated here where essentially you're converting the text to a series of tables, with each paragraph a row, and an empty cell next to it for the translation. I might play around more with this one eventually, since I think I could possibly make it a three-column and put the Italian in one, the translation in the next, and the auto-translate to let me know where I might be slipping in the third. (Not that I trust auto-translate but comparing a hand translation to an auto translation can be useful in terms of working out when I've messed up the way a tense or mood is read. I tend to read indirect verbs as automatically imperative because I'm a weirdo.)
@wynjara linked to an add-in for Word specifically designed for translators, known as TransTools; this appears to employ a macro to do the same thing, though it does have a format where you can place the translation next to each sentence directly rather than in a separate cell. The full suite of tools is only $45 which is reasonable for my budget, but for what I need I think I could also just create the macro.
Using LaTeX as a tool specially designed for glossing was an option on offer, but I don't know enough about LaTeX to figure out the pros of this one, which is in itself the major con -- there's a learning curve that I think varies widely by person but for me is unfortunately a wall. It came out of a discussion on Reddit about trying to find something like what I want; also in that discussion is a link to a code generator that allows you to…do something…to the initial language, but it's not entirely clear to me (I'm sure it's clear to people who understand coding) what you would then do with it that would allow it to be output in the way I'm hoping for. Like, I could turn a paragraph of text into HTML, I understand that far, but any Italian I find is already on a website.
Moving more into apps that might work, Redditors on the LaTeX discussion suggested SIL Fieldworks, which is a professional language tech tool. Fieldworks isn't a program I'd previously encountered but much as with the ones I had, it looks like the learning curve is fairly steep and it is definitely overkill generally for what I need, though it might also harbor within it the thing I want. It is free, so I may download and play around with it.
@brightwanderer suggested using note-taking or "whiteboard" apps such as Freeform or Nebo; these are generally a kind of "infinite canvas" in which you can drop objects, text boxes, or handwriting. I don't know that Freeform would be measurably different to just using Word and a macro, since I'd still have to input/format all the text and then be stuck with the same "fixed text" setup -- and it's also iOS only -- but for some folks it might be more helpful. Nebo is a similar infinite-canvas with unfortunately the same issues, though on the plus it's available for Android, which is where most of my mobile property resides.
@bloodbright suggested that I was looking for a CAT tool, a professional translation tool mainly used by translators working in the field. This was a concept I'd encountered, but I hadn't found a good starting place. They suggested Smartcat and OmegaT. Smartcat bills itself as an AI translation platform and is HARD pushing the "don't translate it yourself, hire a translator or let AI do it" angle, so it's difficult to tell what it offers in terms of actual tools for translators, and it's also cagey about pricing, so I can't really evaluate it. OmegaT is free and gives off big "some weirdo homebrewed this in their basement" vibe (which I am here for) but I also recognized it from screengrabs that were the reason I veered away from professional-grade software: it looked too complex. Realistically, the major downside of OmegaT is that I don't think I can put it on my phone. One thing I did find interesting is that once you translate a portion of the text, the original language goes away, though I assume you can turn that off if needed. I do kind of like that because it means my distractable brain is looking at Less Stuff.
So where did I end up?
Well, it looked like I was going to have to try a homebrew myself. I had the idea of trying some of the initial suggestions but in reverse -- designing a document where every other line was a single-cell table fixed to the page. You could paste in the Italian, which would wrap around the cells, and then enter the English in the cells.
You can fix a table in place in Google Docs -- you click on the table, then under Table > Style select Wrap Text, Both Sides, and Fix On Page. Getting the whole page set up is a little labor intensive but once you did that, you could just save it as a template and make a duplicate of it each time. And this actually works….on desktop.
Unfortunately, if you open it in the mobile Docs app, the app can't handle the fixed tables and automatically moves them all to after the text that's been pasted in. I tried redesigning it so that it's a table within a table -- one for the Italian, then within that a series of them for the English -- but when you nest a table in Google Docs, it doesn't let you fix the second table in place. And you are also still dealing with the wrap issue, although you can resize the page and add a large right-hand margin as a kludge of a fix for that.
You can build this same kind of document in Word, so I tried building one in Word and then uploading it to Drive, but when you open the Word file in Docs (or in Microsoft Word for Android), it still strips the fixed positioning -- there's just some functionality missing from both apps that doesn't allow them to handle fixed-position tables.
So, the design is sound, just not the final execution. If I could program an app, I could probably remedy the issues with it -- it's simply a series of text boxes nested inside one another with different formatting. I would imagine that's relatively basic to set up, although given that neither Docs nor Word can handle fixed tables in mobile, perhaps I've stumbled on a much bigger problem that everyone is ignoring because nobody actually needs or wants fixed tables in mobile. :D
Experimentation is ongoing, anyway. I might simply have to resign myself to the fact that my translation study is going to have to be in front of a computer, which might be for the best anyway when I inevitably want to compare my translation to an auto-translate to see where I might have read something wrong.
69 notes
·
View notes
Text
Announcing The Wroot of Romance Fic Collab.

Sign up on the Tolna's Vault Discord Server.
Show Your Love For Barcus Wroot By Participating In This Collaborative Fanfiction Series of Barcus Wroot Ships.
The Premise
The idea is that Barcus is going to go through the game timeline and meet a lot of different people. Some of these encounters will cause some canon divergence, but the game timeline will be mostly kept. There will be smut, fluff, friendship - whatever you want to write! Each chapter will focus on a single partnering, with a title relating to it in the format “The Wroot of _____” in which the blank relates to the partner or the relationship between them. Writers signing up can volunteer for a listed character or add a new character to the list that they want to write about, and after the sign up period we will check the assignments and decide an order together.
How To Sign Up
Join the Tolna's Vault Discord Server (invite link above) and follow the link to the sign up spreadsheet featured in the Wroot of Romance event description, and pinned in the #the-wroot-of-romance-collab channel.
You will also need to have an AO3 account and share your username with us - there is a second tab in the spreadsheet with a table to add your aliases!
The table should be pretty simple to use. If there’s a character not on the list that you’d like to add, put them in a new row! You can also add title suggestions if you think of something fun, and we’ll all agree on the final titles that fit best when the event starts. There’s a column to volunteer to write a character, and you’re welcome to add your name here as long as you don’t remove anyone else’s without their permission - for now keep it to your Discord username from Tolna’s so we know who you are! We will add a column for AO3 names and other aliases later.
Each character will get one chapter written by one writer (unless two or more agree to collab on a single chapter together), and if several people have interest in the same character we can work it out in the server together.
Event Timeline
Sign ups will end on the 1st May to allow us a day or so to ensure we have the writers set up with their pairing(s). Then we will work together on an order/structure together so we know the chronological story - and release - order of everyone’s works! The next deadline is the 10th May - by this date you will need a bullet point summary of your fic plan. That way, you can coordinate with the writers before and after you to ensure we have a cohesive story structure. We might also be able to reference - or even add foreshadowing! - from each others ideas so we can even have some real character development for Barcus as he goes on a very sexy adventure across the sword coast.
The first batches of submissions will be due in by the end of May, and the release schedule will be one chapter every few days through June/maybe July to stagger them for readers but also keep a nice steady flow until we reach the end.
It’s best to publish these as a Series on AO3 with each chapter as a new work (so your “chapter” can have multiple chapters if you need to, particularly if it runs long or you feel it needs a split in the middle to be more reader-friendly). This also means each person’s submission will have its own tags on it, and will be easier to find for those just looking for each individual pairing they like.
The Concept So Far
A chance encounter with Abdirak in act 1 will kickstart this fic series, as this crack ship sparked the idea. Abdirak (in his own unique way) will encourage Barcus to open himself up to new possibilities. And thus we begin Barcus' journey of self discovery and relationship building. Some of his encounters will be romantic, some platonic, some simply smutty. You get to write what you feel is best for the ship you choose.
The Rules
The main thing is to follow all the rules listed in Tolna’s server, make sure your works are tagged appropriately, but otherwise follow your hearts and dreams! Want to go full Dead Dove? Do it! As long as it fits the event, it’s fine. You can also go pure SFW fluff if you want, you don’t have to make it smutty at all unless you want to.
Do be mindful of the people following you directly in the series. You should be able to summarize the "important events" in your fic with as few triggers as possible so people can follow up from your story even if your content isn't to their taste. If you can summarize all your Dead Dove elements with "they had a wild night." you are free to write anything you'd like happening that night in the fic proper. Please try to stick close to the deadlines, but if you are struggling let someone know ASAP and we can work something out! Otherwise? Have fun!
#baldur's gate 3#barcus wroot#rare pair#rare char#fic collab#bg3 fic collab#bg3 discord server#tolnas vault#bg3 barcus#the Wroot of Romance#bg3
23 notes
·
View notes
Text
Show Me Your Moves! (Chapter 5)
AO3 STORY

Chapter 5: Baton Pass
Baton Pass switches out the user, passing all temporary stat stage increases and decreases on to the Pokémon that replaces it in battle. It also passes on all volatile status conditions.
Sandy was a joy to be with.
He had impeccable taste in tea, cats that won’t scratch the ever living hell out of you, and that calming aura that he gives off makes you comfy enough to just sob all your problems away.
“You’re a very empathetic person. You’re here in your own unfortunate circumstances, and all you’re worried about is your family.” Sandy exclaimed, carefully placing a hand on your back.
You leaned into his touch, wiping your eyes. “Yeah, I know. I can’t help it though.”
“That’s not the issue.” Sandy leaned back as he began explaining. He pointed up with a hand, as if pointing at something. If this was all on screen, there would definitely be some sort of text or image describing what he’s saying. “The issue is that your worries stem from your distrust. You don’t trust your family to be okay while you’re gone.”
“What? I do trust them!” You yell out, sniffling. Sandy hands you a tissue. “If you do trust them, then trust in yourself that they can take care of themselves. You don’t have to worry so much.”
You heaved a sigh before drinking the last of your tea. “This has been… nice, but I think I should head back. Still got that cleaning to do.”
Sandy looked at you worriedly. “Are you sure you don’t want my help?”
You wave his worries off as you leave. “I’ll be fine. I stress clean, so it’s all good. See you tomorrow!”
“Yep, see ya!” Sandy waved, still worried as he watched you rush off back to the shop.
Being a background character meant that you didn’t follow the episodic format the others did, so you could do whatever you wanted!
Instead of going back to the apartment like you said you would, you decided to check out one of the locations that MK and Mei frequented.
The Anti-Gravity arcade.
Being an ambivert had its ups and down, but today you were feeling adventurous, so you decided to steel your nerves and enter the arcade.
The arcade was much more grand looking in person than on screen. The dance floor took up the centre, with people already dancing in the air.
There were rows of arcade boxes on either side of the floor, with people winning a plethora of tickets.
One spot that hasn’t really been seen though, was a snack bar. The girl manning the counter was the same girl that worked at Macaque’s shadow play, so you walked up to the snack bar.
You got yourself a regular Soda before sitting at one of the tables in a corner.
The lights were bright and the music was loud, you could only imagine how terrible it would be when the Porty Clone takes over.
You were sipping your drink and minding your own business when someone popped up next to you.
“Hiya!” You jumped, almost choking on your drink, and you looked over to see… MK, with Mei next to him. It was Mei who greeted you with a smile.
A look of recognition passed MK’s face. “Yeah! It is you! I told you.” He smiled triumphantly, making Mei roll her eyes.
“Yeah yeah. You’re Sandy’s friend, right?” Mei asked excitedly, and you nodded, too nervous to speak.
While you thought that they might have been here, you weren’t expecting them to talk to you.
“Sandy talks about you all the time!” MK exclaimed.
That surprised you. “He does?”
“Yeah! He says you’re really nice, and helpful at his tea shop!” Mei said. “Wanna join us? We were gonna hit the dance floor!”
You awkwardly smiled, finished your drink and nodded, tossing the empty cup into the garbage can you passed on your way to the dance floor with the show's main characters.
~~~
<PREV ~ NEXT>
#lego#lego monkie kid#lmk mk#lmk sandy#lmk x reader#lego monkie kid x reader#x reader#reader insert#platonic relationships#platonic#gender neutral reader#gender neutral y/n#gender neutral post#cross posted on ao3#lady bone demon#lmk macaque#six eared macaque#lmk sun wukong#sun wukong#lmk wukong#lmk pigsy#lmk red son#lmk tang#lmk#lmk mei#lmk monkey king#lmk mayor
27 notes
·
View notes
Text
Let's understand HTML

Cover these topics to complete your HTML journey.
HTML (HyperText Markup Language) is the standard language used to create web pages. Here's a comprehensive list of key topics in HTML:
1. Basics of HTML
Introduction to HTML
HTML Document Structure
HTML Tags and Elements
HTML Attributes
HTML Comments
HTML Doctype
2. HTML Text Formatting
Headings (<h1> to <h6>)
Paragraphs (<p>)
Line Breaks (<br>)
Horizontal Lines (<hr>)
Bold Text (<b>, <strong>)
Italic Text (<i>, <em>)
Underlined Text (<u>)
Superscript (<sup>) and Subscript (<sub>)
3. HTML Links
Hyperlinks (<a>)
Target Attribute
Creating Email Links
4. HTML Lists
Ordered Lists (<ol>)
Unordered Lists (<ul>)
Description Lists (<dl>)
Nesting Lists
5. HTML Tables
Table (<table>)
Table Rows (<tr>)
Table Data (<td>)
Table Headings (<th>)
Table Caption (<caption>)
Merging Cells (rowspan, colspan)
Table Borders and Styling
6. HTML Forms
Form (<form>)
Input Types (<input>)
Text Fields (<input type="text">)
Password Fields (<input type="password">)
Radio Buttons (<input type="radio">)
Checkboxes (<input type="checkbox">)
Drop-down Lists (<select>)
Textarea (<textarea>)
Buttons (<button>, <input type="submit">)
Labels (<label>)
Form Action and Method Attributes
7. HTML Media
Images (<img>)
Image Maps
Audio (<audio>)
Video (<video>)
Embedding Media (<embed>)
Object Element (<object>)
Iframes (<iframe>)
8. HTML Semantic Elements
Header (<header>)
Footer (<footer>)
Article (<article>)
Section (<section>)
Aside (<aside>)
Nav (<nav>)
Main (<main>)
Figure (<figure>), Figcaption (<figcaption>)
9. HTML5 New Elements
Canvas (<canvas>)
SVG (<svg>)
Data Attributes
Output Element (<output>)
Progress (<progress>)
Meter (<meter>)
Details (<details>)
Summary (<summary>)
10. HTML Graphics
Scalable Vector Graphics (SVG)
Canvas
Inline SVG
Path Element
11. HTML APIs
Geolocation API
Drag and Drop API
Web Storage API (localStorage and sessionStorage)
Web Workers
History API
12. HTML Entities
Character Entities
Symbol Entities
13. HTML Meta Information
Meta Tags (<meta>)
Setting Character Set (<meta charset="UTF-8">)
Responsive Web Design Meta Tag
SEO-related Meta Tags
14. HTML Best Practices
Accessibility (ARIA roles and attributes)
Semantic HTML
SEO (Search Engine Optimization) Basics
Mobile-Friendly HTML
15. HTML Integration with CSS and JavaScript
Linking CSS (<link>, <style>)
Adding JavaScript (<script>)
Inline CSS and JavaScript
External CSS and JavaScript Files
16. Advanced HTML Concepts
HTML Templates (<template>)
Custom Data Attributes (data-*)
HTML Imports (Deprecated in favor of JavaScript modules)
Web Components
These topics cover the breadth of HTML and will give you a strong foundation for web development.
Full course link for free: https://shorturl.at/igVyr
2 notes
·
View notes
Text
MS Office - Introduction
Microsoft Office is a software which was developed by Microsoft in 1988. This Office suite comprises various applications which form the core of computer usage in today’s world.
MS Office Applications & its Functions
Currently, MS Office 2016 version is being used across the world and all its applications are widely used for personal and professional purposes.
Discussed below are the applications of Microsoft Office along with each of their functions.
1. MS Word
First released on October 25, 1983
Extension for Doc files is “.doc”
It is useful in creating text documents
Templates can be created for Professional use with the help of MS Word
Work Art, colours, images, animations can be added along with the text in the same file which is downloadable in the form of a document
Authors can use for writing/ editing their work
To read in detail about Microsoft Word, its features, uses and to get some sample questions based on this program of Office suite, visit the linked article.
2. MS Excel
Majorly used for making spreadsheets
A spreadsheet consists of grids in the form of rows and columns which is easy to manage and can be used as a replacement for paper
It is a data processing application
Large data can easily be managed and saved in tabular format using MS Excel
Calculations can be done based on the large amount of data entered into the cells of a spreadsheet within seconds
File extension, when saved in the computer, is “.xls”
Also, visit the Microsoft Excel page to get more information regarding this spreadsheet software and its components.
3. MS PowerPoint
It was released on April 20, 1987
Used to create audiovisual presentations
Each presentation is made up of various slides displaying data/ information
Each slide may contain audio, video, graphics, text, bullet numbering, tables etc.
The extension for PowerPoint presentations is “.ppt”
Used majorly for professional usage
Using PowerPoint, presentations can be made more interactive
In terms of Graphical user interface, using MS PowerPoint, interesting and appealing presentation and documents can be created. To read more about its features and usage, candidates can visit the linked article.
4. MS Access
It was released on November 13, 1992
It is Database Management Software (DBMS)
Table, queries, forms and reports can be created on MS Access
Import and export of data into other formats can be done
The file extension is “.accdb”
5. MS Outlook
It was released on January 16, 1997
It is a personal information management system
It can be used both as a single-user application or multi-user software
Its functions also include task managing, calendaring, contact managing, journal logging and web browsing
It is the email client of the Office Suite
The file extension for an Outlook file is “.pst”
6. MS OneNote
It was released on November 19, 2003
It is a note-taking application
When introduced, it was a part of the Office suite only. Later, the developers made it free, standalone and easily available at play store for android devices
The notes may include images, text, tables, etc.
The extension for OneNote files is “.one”
It can be used both online and offline and is a multi-user application.
3 notes
·
View notes
Text
Part 7 of A Treatise of Embroidery, crochet, and knitting with illustrations
By George C. Perkins, Anna Grayson Ford, and M. Heminway & Sons Silk co circa 1899.


Please note, this book was written in 1899, and as such uses a racist term to refer to the dyes that were used for the thread. If you'd like to read more about this period in time, the term, and the stereotypes that the Victorians had, I've actually linked the wikipedia article here that goes more in depth. It's not the end all be all of it, but it's a good starting place for anyone wanting to educate themselves on the topic.
The alt text for the page on the left containing the actual embroidery pattern is written below:
Page 30. M. Heminway & Sons.
This page contains the embroider by letters/numbers diagram and chart. I will be Posting the tables in the format of thread colour number and then shade number or letter.
Cherries. Berries: 08 is shade number 1, 011 is 2, 013 is 3, 015 is 4, 017 is 5, and 019 is 6.
Blossoms: 691 is 7. Unripe: 682 is 8. Pollen: 647 is 9.
Leaves and Stems.
Green: 428 is shade letter A, 429 is B, 429 1/2 is C, 430 is D, 437 is E, 438 is F, 439 is G, 439 1/2 is H.
Brown: 230 is I.
The diagram shows a drawing of the image from the colour plate, which is a sprig from a cherry tree. The branch begins in the lower right corner moving diagonally upwards before splitting and then running under two cherry blossoms, one above the other. It is done in the shade of D.
The cherry blossoms are 7 at the tip and 8 closer to the centre. The pollen is done in shade 9.
Beyond the upper blossom the branch continues into a set of three large leaves that are arranged with one facing diagonally upwards and the other two emerging at right angles from the base, one on either side.
Starting with the leftmost leaf, In rows from base to tip: D, D, D, C C, C B, A as the tip in which the leaf edge curls to reveal it.
Middle Leaf, in rows from base to tip: D, C D D, D, C, B C B, A B, A. The edges of the leaf have a soft serration and end in a delicate point facing upwards.
Rightmost Leaf, in rows from base to tip: G H, F, I H G, F E, E as the tip in which the leaf edge curls once again to reveal the underside.
From behind the Middle leaf 4 cherries emerge on stems.
Starting from the top left cherry and moving clockwise:
The stem is done in D and the cherry, moving clockwise from the top: 6, 6, 6, 5, 5, and 4.
Top right Cherry, the stem of which is done in B and C, with B being the part closest to the cherry:
Moving clockwise: 3, 2, 1, 1, 2, and 2.
Bottom right Cherry of which the stem is done in D: 6, 6, 5, 4, 5, and 6.
The bottom right cherry, with a stem done in C, is done in rows from left to right starting from the top: 1, 1, 1, 2, 1, 2, 3, 1, 4, and 4.
From behind the cherries we have a small sprig of something that looks like a different type of plant with tiny pointy leaves that have lots of pointy edges.
The stem is done in C and forks from the very beginning where it emerges. The right fork ends in two leaves, the bottom done in C, and the top done in D.
The left fork goes upwards and there is a leaf on the left done in C and B, and then the stem continues for a bit before having another three leaves, one on the left done in B, and two on the right, also in B. Then the stem goes up and waves a little bit before being topped with a final leaf. The stem and leaf for that portion are done in B as well.
Spray of Design No. 154.
Cherry Design (see Colored Plate).
Materials. — M. Heminway & Sons' Oriental Dyes. Japan and Spanish Floss
Frtut. — Red — Yellow: Red — 08, 011, 013, 015, 017, 019 Japan Floss. Yellow and Red— 645, 646, 648, 605, 606, 607, 011, 015, 017. Leaves. — 428, 429, 429 1/2, 430; also 436, 437, 438, 439, 439 1/2, 230. Scallop.— 691 Spanish, 682 Japan Floss.
Description. — First fill the cherry with Heminway & Sons' white Persian Floss. Always fill in a contrary direction to what you embroider. Keep the shape of the cherry round. Start with two strands of red, 08, on tip of lightest cherry, shading with one strand of on, 013. To vary them use 017 on tip, shading lighter with one strand of 015, 013. In the ox-heart and honey cherry use the yellow and red shades — 645, 646, 648, 605, 606, 607. In another use 646, 648, 607, on, 015, 017.
Blossoms. — See cut above.
Leaves. — On the outer edge of the leaf use two strands, shading with one, putting in brown, 230, for old leaves.
Scallop. — Button-hole in white, 691, Spanish Floss. In the scroll use 682 Japan Floss in the " long and short " stitch.
There is an illustration here of a doily captioned Design No. 154 — Cherry. 18 inch. See Colored Plate C 11.
The doily has the scalloping that is seen on the coloured plate repeated over and over in a circular formation. The bottom has several sprays of cherries, one of which is shown in the diagram and the others able to be improvised as again it's just cherries, blossoms, and leaves in different arrangements.
The top has random cherries, some with leaves still on them some not, and a few wayward blossoms decorating it.
--------
Once again I'm taking a short break and posting another pair sometime next week. It's easier for me to break up the dumps like this in order to be a bit more regular. We shall see if I can maintain it.

7 notes
·
View notes
Text
Inform Basics: practice with tables
Tables can be intimidating, but they are great for handling complex situations with text. Since writing and printing text is my whole jam, I've pushed myself to use tables as much as possible. My first ever table turned out to be the central tracking system for magic in Repeat the Ending!
I think I had some beginner's luck there--I never needed to change/fix it later. We'll use it as a model for the next few posts. I've made a couple of things nicer for this discussion, but the core functionality is unchanged.
Let's Make a Table!
A table, as a lot of you probably know, is a way to store and present information. It is a grid organized by rows and columns. If you've ever seen a spreadsheet program like Excel, you can visualize the way rows and columns can be used to arrange information sensibly.
In Inform 7, a table has very specific formatting conventions that must be followed:
It begins with the text "table of [insert your title here]" alone on a single line of code.
On the very next line, the names of the columns must be typed and separated by a single press of the TAB key.
The next line(s) contain(s) data. Once again, columns are separated by the TAB key. Note that actual empty entries are not permitted. Instead, populate so-called "blank" fields with two hyphen characters (without quotation marks).
Here's an image of a very paired-back version of the table from RTE:

In some cases, we need to tell Inform 7 what a column of data is. More on this next time. For now, just be aware that I've got this in my code to explain what the first column, "siphontype," contains.
siphontype is a kind of value. the siphontypes are defined by the table of diagnoses.
There's no magic to any of these names. They're just what seemed right at the time.
Some simple applications
What can we do with it? Without getting up to anything fancy, we can count the rows. Inform 7 will count almost anything if you use the phrase "number of [almost anything with a numbered quantity]". I'll make a custom action, frobbing, for these experiments.
frobbing is an action applying to nothing. understand "frob" as frobbing. carry out frobbing: say "The number of rows in the table of diagnoses is [number of rows in the table of diagnoses]."
Output:
>frob The number of rows in the table of diagnoses is 3.
We can also dump the entire contents of the table. "Repeat through," which we've used on lists, can also be used to apply an operation/action/etc. to multiple rows in a table.
repeat through the table of diagnoses: say "[siphontype entry]: [diagstring entry]"
OK. Since "siphontype" and "diagstring" are column names, Inform 7 will walk through each row, printing the relevant entries.
What does that look like?
>frob The number of rows in the table of diagnoses is 3. TInert: At the moment, I am not empowered by any sort of entropic magic.TPsychic: [REDACTED]TLucky: Feeling lucky?
Yikes. That's pretty ugly. Let's get that text cleaned up.
carry out frobbing: say "[bold type]The number of rows in the table of diagnoses is [number of rows in the table of diagnoses].[roman type][paragraph break]"; repeat through the table of diagnoses: say "[siphontype entry]: [diagstring entry][line break]"
The main features here are bold text for the first line, a blank line between the bold text and the table dump, and line breaks after every printed row. It winds up looking like this:
The number of rows in the table of diagnoses is 3.
TInert: At the moment, I am not empowered by any sort of entropic magic. TPsychic: [REDACTED] TLucky: Feeling lucky?
I think that's enough for today! Next time, we'll dig deeper into tables, using the same bit from RTE as an example. As always, feel free to AMA
Code used in this post:
#interactive fiction#inform 7#parser#i7 for beginners#i am not a programmer irl#tables#repeat the ending#AMA
6 notes
·
View notes
Text
Breath of Fire 2 - REVIEW
After playing Breath of Fire 1, I was very excited to see what the sequel brought to the table, and honestly, I am glad that I played this, despite not being exactly what I wanted out of it.
I'll skip the prelude to talk about the stuff that happens in the "current time".
The protagonist and his friend, Bow, are both orphans who became rangers when they grew up, but someone framed Bow for a crime he didn't commit, so he is forced to flee the village, and it's up to the protagonist to clear his name, You'll meet several characters along the way and discover something sinister brewing in the land.
In this game, characters are more fleshed out and move along the plot, unlike in the first game where it's only the bad guys showing up and you have to beat them up.
Characters still join you without much reason, but at least most of them get some spotlight, they still don't interact with each other but it is a step forward.
There's also a place where you can directly talk with them, and they will comment about what is going on, which I think is a neat detail even if the dialogue is shallow.
I wish they could have had dialogue for all of your party members every time the plot was progressing, but for the most part, they are as silent as the protagonist, the exceptions being when they are first introduced and when their time in the spotlight comes.
The plot is also a huge step forward, the introduction does a good job at building a specific type of atmosphere and some mystery, as well as having some pretty well-made cutscenes throughout the game.
It's still pretty simple, both the story and the characters, but it is a noticeable upgrade.
I also liked how in very few instances, the game used the battle screen to make a cutscene play, I thought it was pretty cool, and I wish the game used that trick more, it would have made some scenes even more impactful.
As much as I appreciate the work that was done in everything related to the writing, The translation work is kind of terrible.
There are multiple instances where the text will be badly formatted, sentences will have weird wording, pronouns will be wrong, and even options will do the opposite of what they say.
I like everything that the plot tried to do, but the horrible translation does bring it down a bit, thankfully it doesn't make the game unplayable, or make you unable to appreciate some of the stuff that it does.
But man, I wish they released a re-translation for it.
Now going into the combat.
Right off the bat, I think getting rid of the icons was a good choice for the UI, which felt kinda clunky in the first game.
On top of having an attack option and a special option, every character has a special skill unique to them.
The main character, for example, recovers HP depending on how low his HP currently is, the effect being stronger the lower it is.
I felt that overall they didn't influence the battles a lot, the one for the main character is nice but I felt all the others were disposable, but it is still cool that each character has unique stuff.
Also, you can defend and switch formations by pressing L or R.
Formations are kinda neat, it's a step above just making a character be in the front or back row, deciding the risk of a character being attacked in that way was interesting for me, and I found myself changing the formation multiple times during my time playing the game.
As for magic, there are points when it feels underwhelming, especially around the middle of the game, but at the start and the end, magic can pack a punch.
Which is a big upgrade compared to how it was in the first one, where the only worthwhile spells were the healing ones, weaknesses still feel like they are kind of an afterthought, but at least they exist.
I do have to say though that making bosses immune to all the status-inducing spells and debuffs is very lame, I don't mind bosses being immune to things like sleep or poison, but being immune to debuffs as well makes the debuffs feel completely worthless, you won't be needing them on random fights either, since they end very quickly.
Despite this, the combat feels like a huge step forward compared to the original game, bosses will have you managing resources and you will need to watch out for random fights towards the end of the game.
A lot of random encounters are still solved by pressing the auto-battle button though, but if you use it during the last dungeons of the game odds are one of your party members will be KO'd.
There's also another mechanic that impacts combat, and that is the shaman system.
You will encounter shamans along the way that can fuse with your characters to increase their powers, there's a total of 6 shamans in the game and you can unite a max of 2 shamans to any character.
The catch is that characters are only compatible with some of the shamans, some being able to unite with most, and others with only a couple.
Also, if you happen to discover a special combination the character's color will change and the effect of the bonus will be stronger, or even better, their form can completely change and get a bonus in all stats.
I have some problems with the system though, it's lame that you can't fuse the shamans with everyone.
Allowing that extra customization would have been very cool, of course rewarding the secret transformations but still giving a little bonus for a non-special fusion.
Another problem that I have is that the fusions come apart very easily, when a character reaches critical health, or passes out, the fusion comes apart, but it also happens after a lot of cutscenes, which is pretty lame and annoying.
It would be better if you could have access to the fusions everywhere, or even at safe spots, but they are restricted to only 1 city.
So if you lose it in a long dungeon it's either go all the way back or finish the dungeon as is, which makes them feel a little bit worthless.
The overworld abilities make a comeback, but like last time, they feel a little bit like an afterthought, I saw it being used mostly to force a certain character into the party.
It would have been better if some character interactions led to them being forced onto the party, since if they are not with you and you encounter the obstacle you need them for, you need to go all the way back for them, which is the same place the shamans reside after you find them.
This can be kind of annoying.
And the worst is that they were perfectly capable of just forcing them on your party.
There is this section where you need a specific character to be with you to talk to another character, you get transported into a dream world with some save points available where you can change your party, but the character you need can't be removed.
And there is nothing inside the dream world that requires them, they don't even get dialogue inside, it's a bit frustrating.
This is one of the only things I think were better in the first game, you could freely change your party from anywhere, and that type of backtracking didn't exist thanks to this.
And like I mentioned, if they forced characters into your party with some plot in the middle it wouldn't be a problem, it would even flesh out the characters more.
Breath of Fire 2 has a way lower encounter rate than 1, so at least the backtracking isn't as bad.
Moving forward though, there's another new mechanic.
As you advance through the game you get to build a town of your own, and there are a lot of factors that change quite a lot of stuff.
Depending on the carpenter the look of the town will change, and you get to recruit people from around the world to open shops, only 6 though, and once you invite them to your town they will remain forever, so choose carefully.
Some sell pretty good stuff and others are useless, by talking to them when you first find them you will be able to know what purpose they would serve in your city.
And you could just save, recruit them, and then check out what they do, I think it's a very neat feature.
With the main features out of the way, I want to talk about the rest of the details.
Like in the first game, the overworld feels pretty small and looks pretty similar all over the world, at least there's more variety in the locations you get to visit in the dungeons, but also, like in the first game, they are very short and have barely any puzzles, the reduced encounter rate makes them more enjoyable to me though.
I had a nitpick in the first game, in towns, whenever you entered a house, the town theme would fade out and a different song would start playing.
This bothered me very much, and I am happy to say that doesn't happen in this game, but I have a different nitpick related to the music now.
And is that almost every dungeon plays the same song, this also applies to the towns, and they are not even that good in my opinion.
I am very glad the last few dungeons had unique songs, I would have been pretty mad if they didn't, but outside of those 2 songs, I think the game has a pretty good soundtrack.
Not every song is that great, but there's a couple that are very remarkable in my opinion.
I'd say I would definitely recommend this game over Breath of Fire 1, you don't miss on much lore if you skip it, as stuff that you would need to know is explained in the main plot of the game.
Writing this review made me realize how much I appreciate this game, especially when comparing it to the first one, it's such a big improvement.
I wasn't very optimistic about the series after I played the first one, but after looking at all the improvements they made in 2, I am a bit hopeful about Breath of Fire 3, and what improvements they could make.
Like more character development, a tighter combat system, or better dungeons.
Unlike the first game, which I think only people who enjoy very simple RPGs with almost no plot would enjoy, this game feels a bit more accessible, and I think you lose nothing in giving it a try.
The horrible translation could make it difficult to get into it, but once you do it's pretty fun to see through, at least in some parts.
It still has some issues, especially for how optimized RPGs are these days, but I felt it was a genuine attempt at making a better game, even if it still falls short in a lot of things.
There's a lot of plot-lines and concepts that I wish were developed more, characters that had more screen time, and of course, a better translation.
I kind of wish Capcom would remake this game someday with the proper care put into it, I think it would be incredibly good.
They don't need to waste millions in giving it mind-blowing graphics, as long as they get good translators, polish some of the rough edges, add some QoL stuff, and maybe add the Game Boy advance portraits.
It could be a very good quality release, but I know that will never happen, I still can dream though.
#capcom#breath of fire#snes#super nintendo#rpg#jrpg#game review#retro games#trans#I'm the trans content in this post#long post
2 notes
·
View notes
Text
What is Structured Data and Why Do Lists Need It?
Structured data refers to information organized in a clearly defined format, such as tables with rows and columns. This structure allows software systems and users to efficiently search, analyze, and manipulate data. In contrast, a simple list—whether it's a bullet-pointed list in a document or a string of values—is not inherently useful without structure. For example, a list of names and phone numbers is just text until it’s divided into two columns labeled “Name” and “Phone Number.” This conversion gives meaning and order to the information, making it readable for both humans and machines. Lists are useful for brainstorming, capturing quick notes, or collecting raw input—but structured data unlocks their full potential.
Step-by-Step: Converting Lists to Tables in Excel and Google Sheets
One of the easiest ways to structure a list is by using spreadsheet tools like Excel or Google Sheets. Start by pasting your list into a column. If each item includes multiple parts (e.g., “John Doe, New York, 32”), you can use Excel’s ���Text to Columns” feature or Google Sheets’ SPLIT() function. These tools allow you to divide each entry into multiple columns using whatsapp data like commas, tabs, or spaces. After splitting, you can add headers to each column to define your dataset (e.g., Name, City, Age). This small step transforms your raw list into an organized data table. From here, you can sort, filter, and even create charts.

Using Online Tools to Convert Lists Automatically
There are many free online tools designed specifically to convert lists into structured formats such as CSV or JSON. These include platforms like CSVLint, TableConvert, or ConvertCSV.com. Simply paste your list, select your delimiter, and the tool instantly formats your input into a data table. Some tools even let you preview your data before downloading. These web-based utilities are perfect for users without spreadsheet software or coding experience. They’re especially handy for quick jobs like formatting data for reports, email campaigns, or import into databases or CMS platforms.
Tips for Clean and Accurate Data Transformation
Successful list-to-data conversion depends on consistency. Always check that each list item follows the same structure—no missing commas, extra spaces, or inconsistent formatting. Use functions like TRIM() in Google Sheets to remove unwanted spaces, or CLEAN() to get rid of hidden characters. Standardize formats for dates, phone numbers, or capitalization. If working with large lists, apply conditional formatting to highlight errors. Finally, always validate your converted data before using it—whether for analysis, uploads, or automations. Clean data is reliable data, and a little attention early on saves time down the line.
0 notes
Text
Excel Power Query vs. Power Pivot: Which Tool Should You Use?

If you’ve ever worked with large datasets in Excel, you’ve probably reached a point where basic formulas just aren’t enough. That’s where two of Excel’s most powerful features come in: Power Query and Power Pivot. Both tools are essential for data analysis, but they serve different purposes.
So how do you decide which one to use? In this guide, we’ll walk through the differences between them and help you figure out the right tool for your needs.
What Is Power Query in Excel?
Power Query in Excel is a tool designed to clean, transform, and prepare data for analysis. It allows you to import data from different sources, fix formatting issues, and shape the data exactly how you want it, all without changing the original files.
Key Benefits of Power Query:
Connects to many sources: Excel files, text files, databases, online sources, and more.
Cleans data efficiently: You can remove duplicates, split columns, filter rows, and convert data types.
No need for coding: Its visual interface makes data prep easy, even for non-programmers.
Keeps a clear log: Every step is recorded, so changes are easy to trace or undo.
If you regularly work with messy data from different departments or systems, Power Query is the tool that helps you get it all in one place and ready to go.
What Is a Power Pivot? A Practical Tutorial
Power Pivot is an advanced data modeling feature in Excel. Instead of just working with a single flat table, it lets you work with multiple related tables. You can create relationships, use calculated fields, and build powerful pivot tables from huge datasets.
What Power Pivot Does Best:
Handles big data: It can work with millions of rows without slowing down.
Creates relationships: You can link multiple tables without merging them.
Supports DAX formulas: These allow you to create advanced calculations that go beyond standard Excel functions.
Improves reporting: Helps build dynamic dashboards and pivot tables based on complex models.
If you’re building reports that need to pull information from several tables, Power Pivot will save you hours of work and improve the quality of your analysis.
Power Query vs Power Pivot: A Side-by-Side Comparison
Let’s break it down clearly:FeaturePower Query in ExcelPower Pivot TutorialMain Use Preparing and transforming data Modeling data and running advanced calculationsStrength Connecting and cleaning data from sources Creating relationships and custom measuresInterface Step-by-step visual editor Data model view with DAX supportIdeal For Standardizing messy input data Analyzing large structured datasets
So, Power Query is for cleaning and prepping. Power Pivot is for modeling and analyzing. Simple as that.
Using Both Tools Together
You don’t have to choose between them. In fact, combining both tools gives you the best results.
A Typical Workflow:
Start with Power QueryLoad the data, clean it, and apply all your transformations.
Move to Power PivotCreate relationships between the tables, define measures, and build your reports.
This combination is what makes Excel a real powerhouse for data analysis. It’s a workflow many professionals use daily.
When to Use Power Query
Here are situations where Power Query is the better choice:
You need to import data from multiple sources.
You’re dealing with messy or inconsistent data.
You want to automate data cleanup tasks.
You need a repeatable process that updates with fresh data.
If you find yourself repeating the same steps every time you get new data, Power Query can handle all of that with just one click.
When Power Pivot Is the Right Tool
Use Power Pivot when:
Your data is too large for regular Excel to handle efficiently.
You’re working with multiple related tables.
You want to build custom KPIs and metrics.
You need to create a dynamic dashboard with slicers and filters.
Power Pivot is perfect for business analysts who need to dive deep into data and build powerful reports without leaving Excel.
Final Thoughts
Understanding how Power Query in Excel and Power Pivot work, And how they work together can completely change the way you use Excel. They are part of a bigger trend of self-service BI tools, giving more power to users without relying on IT or external software.
Use Power Query to clean and organize your data.
Use Power Pivot to model and analyze it.
Use both tools to build a streamlined, automated workflow that saves time and improves accuracy.
If you’re serious about improving your Excel skills, learning both tools is a smart investment.
0 notes
Text
6 Best Custom Gutenberg Blocks Plugins for WordPress — Speckyboy
New Post has been published on https://thedigitalinsider.com/6-best-custom-gutenberg-blocks-plugins-for-wordpress-speckyboy/
6 Best Custom Gutenberg Blocks Plugins for WordPress — Speckyboy
One of the most promising aspects of the Gutenberg block editor is the ability to add your own custom blocks. They can consist of just about any type of formatted content or functionality you can imagine.
And while you can certainly build your own custom blocks, sometimes that’s a bit like reinventing the wheel. This is especially the case when you want to add a common element such as a testimonial, post listing, or timeline. Most likely, these blocks already exist and can be easily added to your website.
Since Gutenberg’s inclusion in WordPress core, the developer community has released a number of different block plugins. Most tend to include a collection of blocks that could come in handy while building your site.
Today, we’ll introduce you to some of the top custom block collections available for WordPress. Let’s get started!
WordPress.com vs. WordPress.org – What’s the difference?
We get this question all the time, and we’re happy to help.
WordPress.org is the most powerful website building software on the web. You will need to find a hosting provider if you want that site online.
WordPress.com is our preferred hosting provider for medium-large traffic websites.
If you want to know why WordPress.com is our preferred host for ambitious passion projects and large website projects, read our review:
Ultimate Addons for Gutenberg includes 20+ custom blocks that cover a wide range of use cases. When it comes to layout, the Advanced Columns block lets you create a highly customized multicolumn row.
There are also blocks for adding Google Maps, icons, CTAs, post carousels, and more. That’s just scratching the surface of what this free plugin can do.
Backed by GoDaddy, CoBlocks is a free WordPress plugin that supercharges Gutenberg. While it offers a number of handy custom blocks (accordion, alert, hero, logos, masonry gallery, pricing table, etc.), its big selling point is in page layout.
Offering a more page builder-like experience, rows, and columns can be dragged to size and customized for responsive layouts. Typography is also highly-tweakable as well.
EditorsKit is a bit different than the other plugins in this collection, as it’s more about extending the blocks already included in Gutenberg. The rich text formatting features allow you to further style your content or wipe out all custom styles with a single click. You can also control the visibility of blocks based on device, login state, or even custom field values.
In addition, there are a ton of productivity tweaks, like support for markdown, code editor syntax highlighting, and the ability to import or export specific blocks. With so many goodies, it may just make Gutenberg feel like a completely different experience.
Kadence Blocks offers a dozen custom blocks that cover common needs. Included are row layouts, advanced galleries, tabs, info boxes, and testimonials – among others.
It also aims to solve one of the more frustrating issues with Gutenberg – the editor’s width on the back end. The plugin contains preset widths that enable content creators to get a better representation of what pages will look like on the front end.
With an aim to both speed up content creation and add different content types, Gutenberg Blocks and Template Library is a compelling option. Much like Atomic Blocks above, the included Section block offers a number of pre-designed templates and layouts.
There are also several customizable elements such as Google Maps, post grids, author info, and a block for Font Awesome icons.
Sure, Advanced Gutenberg comes packed with several custom blocks (post sliders, WooCommerce products, advanced tables, advanced lists, etc.). Those are all nice and handy. But the really interesting feature here is the ability to create “edition” profiles, which allow you to turn blocks on or off for specific users or user roles.
For example, if you only want administrators to have access to the Column Manager block, you can easily set it up. This helps to ensure that lower-level users don’t wreak havoc on your designs.
Get Some New Building Blocks
The default blocks that come with Gutenberg are useful and are constantly being refined. But to create a true page-building experience, you’ll want to add some custom elements.
That’s where the plugins above can help take your website to greater heights. Not only can you add different types of functionality and content, but you can also take greater charge of the editor as a whole.
The bottom line is that if you’re going to use Gutenberg for complex page layouts, you might as well go all in. These plugins will help you do just that.
Related Articles
Related Topics
Written by Eric Karkovack
Eric Karkovack is a web designer and WordPress expert with over two decades of experience. You can visit his business site here. He recently started a writing service for WordPress products: WP Product Writeup. He also has an opinion on just about every subject. You can follow his rants on Bluesky @karks.com.
Read more articles by Eric Karkovack
#ADD#Articles#atomic#author#Building#Business#code#Code Editor#Collections#columns#Community#content#content creation#creators#custom elements#Design#Developer#Features#Google#google maps#grids#gutenberg#Hosting#hosting provider#icons#inclusion#issues#it#layout#lists
1 note
·
View note
Text
j
Swing is not thread-safe. Updating UI components from background threads (not the Event Dispatch Thread) causes race conditions, freezes, or crashes.
Use SwingUtilities.invokeLater() or SwingWorker to handle background tasks safely.
Component Overlap or Z-order Issues Components might overlap or not render correctly if layout and repainting aren’t managed properly.
revalidate() and repaint() are often needed after dynamic UI changes.
Scaling and DPI Conflicts On high-DPI displays, Swing apps can look blurry or improperly scaled if not configured.
Java 9+ supports HiDPI better, but older setups require workarounds.
Architecture Conflicts Mixing UI logic with business logic leads to spaghetti code and maintenance problems.
Not following patterns like MVC or separating concerns can make the design fragile.
Event Handling Conflicts Multiple listeners acting on the same component or event can cause logic errors.
Improper handling of key bindings or focus can result in unresponsive controls. // Updating a JTable in Java Swing can be done in a few different ways Using a DefaultTableModel (most common way)
Access the model:DefaultTableModel model = (DefaultTableModel) table.getModel(); Refreshing the UI If you're updating the model directly, the JTable usually updates automatically. But if needed:
java model.fireTableDataChanged();
// If you update the JTable (or any Swing component) from a non-EDT thread, you risk:
UI glitches
Random exceptions
Unpredictable behavior
The Fix: Use SwingUtilities.invokeLater() // Always wrap the JTable in a JScrollPane to handle large datasets.
Use BorderLayout.CENTER to make it fill the frame.
This design makes JTable the main UI element—perfect for apps like:
Inventory systems
Admin dashboards
// Custom Cell Rendering (How Data is Displayed) To change how a cell looks, implement a custom TableCellRenderer.
// Make Only Certain Columns Editable Override isCellEditable() in your model:
java Copy Edit DefaultTableModel model = new DefaultTableModel(data, columnNames) { @Override public boolean isCellEditable(int row, int column) {
//
Custom Cell Editors (How Data is Edited) To control how a user edits a cell, use a TableCellEditor.
Example: Use a combo box editor for a column java
String[] roles = {"Developer", "Designer", "Manager"}; JComboBox comboBox = new JComboBox<>(roles);
table.getColumnModel().getColumn(2).setCellEditor(new DefaultCellEditor // Format Displayed Values You can convert raw data (like timestamps, enums, booleans) into human-readable text using renderers or by overriding getValueAt() in a custom TableModel.
//
GridLayout Divides space into equal-sized rows and columns.
java
BoxLayout Aligns components vertically or horizontally.
GridBagLayout Most flexible, but also the most complex.
Allows fine-grained control over row/column span, alignment, padding. //
Optimized event-driven programming for efficient user interactions and system performance.
Implemented MVC architecture to ensure scalability and maintainability of Java Swing applications.
Enhanced multithreading in Swing applications to improve responsiveness using SwingWorker.
Debugged and resolved UI rendering issues, ensuring cross-platform compatibility.
Worked with Look and Feel (LAF) customization for a modern and branded UI experience.
//
ava Swing Application Works JFrame (Main Window) – The base container that holds all UI components.
JPanel (Layout Container) – Used to organize components inside the frame.
Swing Components – Buttons (JButton), labels (JLabel), text fields (JTextField), tables (JTable), etc.
Event Handling – Listeners (like ActionListener) handle user interactions.
Threading (SwingWorker) – Ensures UI remains responsive during background tasks.
Example Use Cases Point of Sale (POS) Systems �� Cashier interfaces for processing transactions.
Inventory Management – Applications for tracking stock levels.
Data Entry Forms – GUI forms for database input and management.
Media Players – Applications for playing audio/video with Swing UI.\
JFrame Main application window JPanel Container for organizing UI elements JButton Clickable button JLabel Display text or images JTextField Single-line input field JTextArea Multi-line text input JTable Displays tabular data JMenuBar Menu bar with dropdown menus JList List of selectable items
.. //
Use of Modern Look and Feel (LAF) FlatLaf – A modern, flat UI theme for Swing that provides a better-looking UI.
Improved Concurrency with CompletableFuture Handles long-running tasks without freezing the UI.
Example:
java
CompletableFuture.supplyAsync(() -> fetchData()) .thenAccept(data -> SwingUtilities.invokeLater(() -> label.setText(data)));
// Use a Layout Manager Java Swing provides various layout managers like:
BorderLayout – Divides the window into 5 regions (North, South, East, West, Center).
GridBagLayout – Flexible and customizable grid-based layout.
BoxLayout – Arranges components in a single row or column.
GroupLayout – Best for complex resizable designs (used in NetBeans GUI Builder).
Use JScrollPane to make JTable scrollable ✔ Use DefaultTableModel for editing rows ✔ Add event listeners to detect row selection ✔ Integrate with a database using JDBC
Performance Issues in JTable & How to Optimize When dealing with large datasets in JTable, performance can degrade due to factors like slow rendering, inefficient data models, excessive event handling, Large Dataset Causes UI Lag Issue: If the table has thousands of rows, JTable may slow down because it loads all rows at once.
Solution: Use pagination or lazy loading instead of loading everything upfront.
✅ Example: Paginated JTable (Loading 100 Rows at a Time)
java Copy Edit int pageSize = 100; // Load 100 rows at a time int currentPage = 0; List data = fetchDataFromDatabase(currentPage * pageSize, pageSize); // Load only a subset
DefaultTableModel model = (DefaultTableModel) table.getModel(); for (Object[] row : data) {
//
Slow Rendering Due to Default Renderer Issue: The default cell renderer calls Component.setOpaque(false), causing unnecessary painting.
Solution: Use a custom renderer with setOpaque(true).
✅ Example: Custom Fast Renderer
java Copy Edit class FastRenderer extends DefaultTableCellRenderer { @Override public Component getTableCellRendererComponent(JTable table, Object value, boolean isSelected, boolean hasFocus, int row, int column) { JLabel label = (JLabel) super.getTableCellRendererComponent(table, value, isSelected, hasFocus, row, column); label.setOpaque(true); // Prevents repainting issues
;;
Frequent Repainting & Event Listeners Cause Overhead Issue: JTable repaints everything after every update, even when unnecessary.
Solution: Temporarily disable auto updates, batch updates, then re-enable.
✅ Example: Batch Update with Table Locking
java Copy Edit DefaultTableModel model = (DefaultTableModel) table.getModel(); model.setRowCount(0); // Clear table without repainting table.setAutoCreateColumnsFromModel(false); // Avoid unnecessary updates
// Batch insert rows for (int i = 0; i < 1000; i++) { model.addRow(new Object[]{"ID " + i, "Name " + i, i + 20}); }
table.setAutoCreateColumnsFromModel(true); //
Using DefaultTableModel for Large Data Handling Issue: DefaultTableModel is inefficient for large datasets because it stores all data in memory.
Solution: Use a custom TableModel that fetches data dynamically.
✅ Example: Custom Lazy Loading Table Model
java Copy Edit class CustomTableModel extends AbstractTableModel { private final int rowCount = 1000000; // Simulating large dataset@Override public int getRowCount() { return rowCount;
Slow Sorting & Filtering Issue: Default sorting can be slow for large datasets.
Solution: Use RowSorter with custom sorting instead of sorting all rows at once.
✅ Example: Optimized Sorting
java Copy Edit TableRowSorter sorter = new TableRowSorter<>(table.getModel()); table.setRowSorter(sorter);
Use pagination or lazy loading for large datasets. ✅ Optimize cell rendering with setOpaque(true). ✅ Batch updates & disable auto updates temporarily. ✅ Use a custom TableModel instead of DefaultTableModel. ✅ Implement RowSorter for efficient sorting.
0 notes