#the rest is a combination of low and medium settings
Text
Got the headband that makes your character smart my days of failing 1/3 of all dialogue checks are through babey
#other highlights include#i finally discovered how to boost my preformance#and my graphics with it#when im below specs on the graphics catd#a big part is doing it windowed w task manager open#to close down every other process and gove bg3 highest priority#the rest is a combination of low and medium settings#things have never been more smooth and my tav has never looked better#the t-posing keeps happening though but to be fair thats funny#who needs a graphics card when u can have homosexual audacity ammirite
1 note
·
View note
Note
Idk what spiced honey cakes are but I would love to try one
Here’s the recipe!! Or I’ll drive to you one day with a fresh batch!

SPICED HONEY MEAD CAKES
INGREDIENTS
SPICED MEAD SYRUP
* ▢
1 cup mead
* ▢
½ cup sugar
* ▢
½ cup honey
* ▢
1 tsp lemon juice
* ▢
1 cinnamon stick
* ▢
8 whole cloves
SPICED MEAD HONEYCAKE
* 2 ½ cups flour
1 tsp baking soda
* ▢
½ tsp salt
* ▢
1 tsp cinnamon
* ▢
¼ tsp cloves
* ▢
¼ cup mead
* ▢
¼ cup plain yogurt
* ▢
1 cup butter, softened
* ▢
1 cup sugar
* ▢
½ cup honey
* ▢
1 tsp vanilla extract
* ▢
4 eggs
SPICED MEAD SYRUP
* In a small saucepan combine the mead, honey, sugar, lemon juice, cinnamon stick, and whole cloves. Bring to a simmer over medium heat. The syrup will begin to foam as it heats up. Use a small ladle to skim the foam off the surface. Turn off the heat just before the syrup starts to boil. Cover and let the syrup steep and cool down while you prepare the cake.
SPICED MEAD HONEY CAKE
* Preheat the oven to 330° F. Spray the honeycomb cake mold generously with non-stick spray. Alternatively, use a bundt pan or a 9" x 13" baking dish.
* In a mixing bowl combine the flour, baking soda, kosher salt, cinnamon, and cloves. Whisk together to combine and set aside.
* In a small bowl or measuring cup combine the yogurt and mead. Whisk until smooth and set aside.
* In the bowl of a stand mixer combine the softened butter and sugar. Beat using a paddle attachment until the butter and sugar are fully incorporated and creamy. Scrape down the sides as needed. Add the honey and vanilla and beat until combined.
* Add the eggs one at a time to the mixer, beating in between to ensure the egg is fully incorporated before adding the next egg. Scrape down the sides as needed. After all the eggs have been added beat the mixture on medium high to ensure the mixture is fully combined and is light and fluffy.
* Add one third of the flour mixture to the mixer and beat on low just until the flour is mostly incorporated. Add half of the yogurt mixture and beat just until it is mostly incorporated. Repeat with another third of the flour and the rest of the yogurt mixture. Add the last of the flour mixture and beat on low just until the batter is fully combined.
* Drop the cake batter into the honeycomb cake pan, making sure to fill in all the crevasses. Spread the batter evenly and tap the cake pan a few times on the counter to remove any air pockets. Bake at 330 deg F for 45 to 55 minutes until done and a toothpick inserted into the middle comes out clean.
* Let the cake cool in the pan for 5 to 10 minutes and then turn out onto a baking sheet. Remove the spices from the mead syrup. Slowly pour the syrup evenly over the cake, allowing it to absorb into the cake as you pour. Try not to let too much of the syrup spill over onto the baking sheet. Let the cake cool and then enjoy!
32 notes
·
View notes
Text
⋆𐙚₊˚ Mr.Chef
Taiju Shiba x Reader
warnings: usage of pet names(princess,brat), established relationship, female pronouns, female reader.

While (y/n) was at work, Taiju took it upon himself to do something special. That special thing just so happened to be making his girlfriend dinner. He waited for her to leave for the day and as soon as she had shut the door to their house he raced into the kitchen and laced up her medium-sized pink and white apron hung neatly in the kitchen, grabbed a metal pan from the cabinets below and started up the stove. Taiju paused for a moment when he realized he didn’t know what to cook—he began panicking quietly as he took to his phone to search online for some easy beginners recipes.
“Goddamn, Nothin’ good on this stupid site.”
Taiju’s grip on the phone tightened as he kept scrolling through the many recipes listed, growing more and more agitated as he found no recipe he deemed good enough for his girlfriend. His piercing yellow eyes scanned the phone screen religiously until he found the perfect recipe. A ‘One-Pan Pork Tenderloin’ with tomatoes,potatoes,and spinach. Taiju immediately rested his phone on a steady wooden knife-holder as he reached over into the large black refrigerator, pulling out vegetables of all colors and the main ingredient; the lovely pork tenderloin. Taiju carefully reached up into the spice rack above him and steadily pulled out all the spices he required, and began to combine the cumin, allspice, turmeric, paprika, salt and a generous amount of black pepper in a large bowl. He lazily slapped the pork tenderloin into the bowl and tossed it around evenly to coat it completely in the spice mixture.
After the pork was properly seasoned, Taiju threw some oil skillfully into the heated pan along with the pork settled in the middle. While the pork cooked he tossed the sliced potatoes and tomatoes, adding in some sliced lemon for some flavor. He wiped some sweat quickly off of his pale forehead and swept some baby hairs that were sticking to his skin due to the rising heat in the kitchen. He bent over to read the instructions once more before covering the pork and letting it cook on low. His large, veiny pale hand immediately untied the restricting apron off of his large scale, neatly placing it on the kitchen counter in a quaint fold. Taiju pulled one of the stools from his kitchen island over near the stove to watch the pork carefully, not wanting to mess up this surprise dinner for his beloved.
╭────── · · ୨୧ · · ──────╮
Taiju had gotten lost on his own devices and before he knew it the oven beeped, reminding him about his cooking dinner ready to be served. He immediately remembered about the meal and quickly swiped back to his tab saved with the recipe before standing up and lifting the pan lid off of the pan. He picked up some tongs sitting in a nearby cabinet before picking up the cooked pork and placing it on the cutting board carefully as to not ruin it. Taiju felt an unconscious smile creep up his face in pure satisfaction at how well the tenderloin had turned out. He picked up a sharp kitchen knife and was about to slice the meat perfectly when he heard the doorknob jiggle. Panic set in as he soon heard his beautiful girlfriend announce her arrival early from work, Taiju quickly ran to take the pan off of the stove so that the vegetables wouldn’t burn and hid the meat behind him as he watched (y/n) walk inside.
(Y/n) immediately picked up on the smell of the freshly cooked meat and smiled accordingly, “Oh wow, what is that? It smells great!” Taiju just stared her down silently as he watched her approach him into the kitchen. He eyed her gently for a moment before speaking out in his soothing deep voice, “It’s nothing, princess. Don’t worry your pretty little head off about it.” He attempted to try and lure her away from the kitchen so he could continue to prepare the meal in peace without his surprise being ruined.
As Taiju leaned in to wrap (y/n) into a bear-hug she sneakily peaked around his large figure, spotting the delicious dinner behind him. Realizing his surprise was found out he stepped to the side and bellowed out laughter, “Aw damn. You found me out. Should I not serve you for being so disobedient?” Taiju playfully teased her as he snuck a warm finger underneath her chin. He leaned in before connecting their lips together in a warm embrace, whispering in her ear right before, “Your welcome, brat.”

#tokyo rev#tokrev#tokyo rev x reader#tokyo revengers#taiju shiba#taiju x reader#tokyo revengers taiju#tr#x reader#reader insert#fem reader#fem#female reader#fluff#wholesome#fanfiction#drabble#oneshot#one shot
28 notes
·
View notes
Text

Dorayaki (Japanese Red Bean Pancake)
4 large eggs
⅔ cup + ½ Tbsp. (140g) sugar
2 Tbsp. honey
1⅓ cups all-purpose flour, weighed
1 tsp. baking powder
1–2 Tbsp. water (adjust to achieve the desired batter consistency)
neutral oil (for greasing the pan)
1.1 lb. sweet red bean paste
In a large bowl, combine 4 large eggs, 140g sugar, and 2 Tbsp. honey. Whisk well until the mixture becomes fluffy.
Sift all-purpose flour and baking powder into the bowl with the egg mixture and mix until combined. Put the bowl in the refrigerator to rest the batter for 15 minutes.
After resting, the batter should be relaxed and slightly smoother. Now, stir in half of the 1–2 Tbsp water and check the consistency. It should be similar to pancake batter. Add more of the water, as needed, until you achieve the right consistency. Depending on the size of the eggs and how accurate your flour measurement is, the water amount may vary.
Heat a large nonstick frying pan over the lowest heat setting for 5 minutes. It‘s best to take your time and heat the pan slowly. When it is thoroughly heated with no hot spots, increase the heat to medium low. Dip a paper towel in neutral oil and coat the bottom of the pan with oil. Then, use another paper towel to remove the oil completely. This is the key to evenly golden brown Dorayaki pancakes. With a ladle or a small measuring cup, pour 3 Tbsp. of the batter from 3 inches (8 cm) above the pan to create a pancake that‘s 3 inches (8 cm) in diameter. Cook one pancake at a time.
When you see the surface of the batter starting to bubble, flip the pancake over and cook the other side. When done, transfer it to a plate and cover it with a damp towel to prevent it from drying out. Grease the pan between batches, as needed. Continue making the rest of the pancakes; you can make about 12 pancakes.
Assemble the Dorayaki by making sandwiches using two pancakes and a scoop of the red bean paste as filling. Put more red bean paste in the center of the pancakes so the sandwich‘s middle is thicker than the edges and the Dorayaki's overall shape is curved. Wrap the Dorayaki with plastic wrap until ready to serve.
#angelkin#food#dessert#snack#cake#dairy free#vegetarian#egg#honey#flour#red beans#cloudkin#fallenangelkin#kitsunekin#plushkin#tricksterkin#winter
20 notes
·
View notes
Text
ok while cleaning out my backpack i found a recipe that a church teacher gave me for butter chicken. he supposedly makes the second best butter chicken in utah county (and it is very good) but he was also kind of transphobic and an asshole so heres his secret recipe if anyone wants to steal it and make delicious chicken out of spite:
seminary butter chicken
chicken:
1 lb boneless skinless chicken (thigh is best)
1/2 cup plain yogurt
2 tbsp lemon juice
1 tbsp ginger (paste or minced)
1 tbsp garlic (paste or minced)
1 tbsp red chili powder
1 tbsp salt
oil to pan fry
gravy:
2-3 tbsp oil
1 medium-large onion, roughly cut
2-3 medium tomatoes, roughly cut (or 1 28 oz can stewed tomatoes)
1/3 cup cashew nuts
1 tbsp garlic (paste or minced)
1 tbsp garam masala powder
4 tbsp granulated sugar
2 tbsp white vinegar
2 tsp chili powder (optional)
5 tbsp butter
3 tbsp heavy cream
salt to taste
2 tsp kasoori methi or fenugreek leaves (optional)
* if cooking on cast iron or skillet - cut chicken into bite size pieces. if cooking on bbq grill, leave chicken in large breast or thigh
* marinate chicken with yogurt, lemon juice, ginger paste, garlic paste, red chili powder and salt. set aside, overnight if possible.
* pan fry onions on high heat until caramelized, add tomatoes and cashews
* add garlic, garam masala powder, sugar, vinegar, and chili powder. mix evenly and let it simmer on medium-low heat for 10-15 minutes, stirring every few minutes until cashews are soft.
* blend onion/tomato/cashew into a fine puree
* cook the marinated chicken pieces until no pink appears. if using a skillet, cook in batches so meat does not boil in its own juices. otherwise, cook on bbq grill, let rest 5 minutes, then cut to small pieces
* add blended puree back into pan (strain to remove tomato seeds)
* combine puree, cooked chicken, butter, cream, and kasoori methi in large pan and let simmer for 8-12 minutes
* garnish with cilantro if desired
* serve with basmati rice and/or naan bread
74 notes
·
View notes
Note
tell me about a recipe that is good and tasty please (I want to bake something before it gets too hot again)
I don't know exactly what type of thing you're wanting to bake so ill give 3 options...
If you want something super chocolatey these brownies are good
Ingredients
1/4 cup Dutch process coca powder (20g)
5 ounces (142g) semisweet chocolate (preferably 64 to 68% cacao), coarsely chopped
6 tablespoons unsalted butter (3 oz / 85g), cut into pieces
1/4 cup neutral oil, such as vegetable or grapeseed (2 oz /56g)
1/2 cup granulated sugar (3.5 oz/ 100g)
1/2 cup packed dark or light brown sugar (3.5 oz / 100g)
1 large egg
2 large egg yolks
1 1/2 teaspoons vanilla extract (8g)
3/4 cup all-purpose flour (90g)
2 tablespoons malted milk powder (18g)
1/2 teaspoon Morton kosher salt (2.5g)
6 ounces (170g) milk chocolate, coarsely chopped
Method
Combine cocoa powder and 1/4c or 60g (per recipe) boiling water to bloom cocoa.
Add semisweet chocolate, butter, and oil. Melt over double boiler
Add sugar and brown sugar and whisk till well incorporated. Add eggs and vanilla and whisk thoroughly till very smooth
Add flour, salt, malted milk powder. Whisk for 45 seconds to develop a chewy texture
Fold in milk chocolate and pour into greased and lined 8x8 pan
Bake 350 for 25-30 minutes
Rest brownies on wire rack till completely cooled then cover and refrigerate till chilled through before serving (12-24 hours)
If you want something more citrusy and fresh these key lime pie bars are good
Ingredients
1 �� cups graham cracker crumbs (12 large rectangles)
2 tablespoons ground pecans
⅓ cup granulated sugar
¼ teaspoon ground cinnamon
1 stick (½ cup) unsalted butter, melted
3 egg yolks, room temperature
1 can (14 oz) sweetened condensed milk
4 teaspoons lime zest (about 3 limes)
½ cup key lime juice (regular limes are fine too)
Method
Position a rack in the center of the oven and preheat the oven to 350ºF. Spray an 8x8 square baking pan with cooking spray and line with parchment paper, set aside.
In a small bowl, stir together the graham cracker crumbs, ground pecans, sugar, and cinnamon. Add the melted butter and stir to combine. Make sure all the crumbs are moistened. Press the crumbs into the bottom of the baking pan and bake for 10 minutes. Remove from oven, leave the oven on.
In the bowl of an electric mixer fitted with the whisk attachment, whisk the yolks for 2 minutes. Add the condensed milk and continue to whisk for another 2 minutes. Stop the mixer, scrape down the sides, add the lime zest. With the mixer on low, drizzle in the lime juice, let the mixer run for 2 minutes once added. The pie mixture will be slightly thicker when done. Pour the filling into the crust and bake for 15 minutes.
Cool completely on wire rack. Filling will set as it cools. Refrigerate for at least 2 hours, and ideally overnight. Slice and serve chilled.
And if you want something just classic here's my chocolate chip cookie recipe (you can also like add anything else to these instead of chocolate chips and nuts to great success) (also this one has a bit more detail cause it is a recipe i developed)
Ingredients
2 Sticks Butter
100g (1/2 cup) Sugar
250g (1 1/4 cup) Brown Sugar
2 Eggs
4 g (1 tsp) Vanilla Extract
350g (2 cups plus 3 Tbsp) AP Flour
1 g (1/4 tsp) Cinnamon
6 g (1 tsp) Baking Soda
6g (1 tsp) Morton Kosher Salt (See note)
6 oz (3/4 cup) Chocolate
6 oz (3/4 cup) Chopped, Toasted Nuts (if desired)
Method
Melt butter in a pan over medium heat until the milk solids begin to brown and become fragrant. Allow to cool.
Whisk together dry ingredients(flour, cinnamon, baking soda, salt) in a bowl.
Add melted butter and sugars to bowl of a mixer. Cream butter and sugar until the ingredients are fully incorporated and the mixture has lightened slightly.
Add egg and vanilla extract 1 egg at a time until fully incorporated.
Add half your dry mixture and mix over low speed until combined before adding the next half.
Fold in your Chocolate chips and cooled, toasted nuts.
Divide the dough into 2 ounce balls (You can use a scale for this if you have it, but a 1/4 cup measuring cup works well too) and place on a cookie sheet. Cover tightly with plastic wrap and refrigerate for a minimum of 12 hours but up to 3 days.
After refrigeration cookies can be baked or placed in a sealed bag and frozen for up to 3 months.
Bake at 400f for 14-18 minutes (see note)
Notes:
All of the non weight measurements are pulled from conversion tables on the internet and are therefore untested. Should work fine but just be aware. I would highly recommend a scale for this recipe due to the complexity of the conversions.
Type of salt here is very important because salt can differ massively in grain size causing inconsistent measurements by volume. If using diamond crystal kosher salt use 1 3/4 tsp and if using table salt use 3/4 tsp
Your oven may require different time and/or temperature to achieve desired results so I've given a wide time range. I recommend experimenting after the first batch to see what works best for you!
Let me know if you have any questions!
8 notes
·
View notes
Text

I like a lot of battlemechs. Some of them look really cool, some of them play like absolute fiends, some of them are absolute piece of shit graft boxes. The Hammer isn't really ant of those, I like it because of its name.

Designed by Gibson Federated Battlemechs in Free Worlds League space and first rolling off production lines in 3053, the HMR-3M Hammer was intended to serve as a direct competitor to the Federated Commonwealth's popular Valkyrie battlemech in the light fire support role. It packs the same throw-weight in missiles, though it splits it into a pair of LRM-5s equipped with Artemis IV Fire Control and fed by a 2 ton ammo bin instead of a single LRM-10, drops the jump jets (though maintains a ground movement profile of 5/8), and carries slightly less armor than contemporary Valkyrie designs like the VLK-QD. It uses this saved weight for a fairly beefy set of sidearms- three medium lasers arranged in a vertical stack up the center torso and into the head. Interestingly, the arms of the design are free of any weapons, implying it has some want to be in melee which the missile racks really do not want it doing. As far as base models go, it's not super inspirint- as a Valkyrie competitor it lacks the mobility to quickly move to firing positions and as a fire support platform it basically serves as a budget Trebuchet, a mech that already sits firmly in Discount Dan's bin of mostly competent missile boats. It's biggest boon is likely its double ammo bins and low BV cost, which easily allows you to add weird LRM ammo like smoke and thunder rounds to a force without sacrificing an archer or something, and even then you waste the Artemis, tonnage which I think is kinda wasted on LRM-5s anyway.


Now, onto the thing that drew me to the Hammer, the variants. You see, each variant of the Hammer has a fun little nickname instead of just a variant code. That's character most mechs don't get outside customs and I think it's kinda cute. Anyway, the HMR-3S 'Slammer' is our first variant and by far the worst. This one pulls two of the medium lasers on favor of *another* 2 tons of LRM ammunition. This allows the Slammer to keep up its fearsome 10 damage barrage for 48 turns, long enough that someone else might have the sense to wander over and kill it dead.
Next, we've got probably the funniest variant, the HMR-3C Claw-Hammer. This is the compulsory 'oops all medium lasers' version of the design, pulling an LRM rack and its attendant ton of ammunition in favor of four more medium lasers. The heat sinks have been upgraded to double strength freezers to cope with the strain of being roughly 40% of a Nova, and to its credit it can more or less handle the heat of its guns.
Finally, we have the HMR-3P Pein-Hammer. Unlike the previous variants which had some long range firepower (even if it was only token like the Claw-Hammer), the Pein-Hammer is 100% a forward unit. It carries a pair each of ER medium lasers, small pulse lasers, and Streak SRM-4 launchers, along with a TAG laser designator for guided munitions and enough double heat sinks to more or less carry the load of its guns. This Hammer has a sort of annoying, weird anti-synergy with the rest of its ilk- despite being obviously a forward observing unit that LRM boats could benefit from, the TAG system it carries is wasted when combined with the Arty-IV every other model has. It does, however, pair fairly well with contemporary ANV-8M Anvil, spotting for the heavier mech's Arrow IV artillery piece.


I decided to get in on the action and make a pair of my own variants. The HMR-3ASC 'Sledge-Hammer' is an extremely low cost iteration on the 3M- rip off the expensive guidance systems of the LRM racks, along with a laser and a heat sink, and just add more missile tubes. 4 LRM-5s means that with Kerensky's blessing, you can deliver a knockdown at long range, while the lack of inbuilt guidance means special munitions are less feelbad.
The HMR-3AT Trench-Hammer is intended specifically for hunting battle armor. 4 jump jets keep it ahead of most of its prey. While the double SRM-6 rack can be loaded with Inferno munitions to make Toads die a firy death, or just regular missiles to soften them up before they get whacked by your force's bigger guns.

20 notes
·
View notes
Text
Recipe: Supernatural Devil's Trap Demon Proof Cherry Pie
Hello, tumblr family. Below is a repost of an article originally posted on adorpheus.com, and is being shared here for archival purposes. Original post date: Circa 2012.

You know what's pretty cool? Fandom food things. I came up with this Supernatural themed cherry pie a few years ago. Here's the recipe I came up with.

(sugar free, gluten free option, vegan) I make it up as I go along for this pie, so the measurements are approximate. Use your own discretion, you culinary genius, you!
For the crust we used Namaste Foods Biscuits Pie Crust and More Mix. We followed the directions for pie crust, except we substituted the butter with Earth Balance (the stick kind) and the egg with a flax "egg". You can use a pre-made pie crust if that behooves you.
For the filling
2 ten ounce bags of frozen pitted cherries, preferably organic (about 4-5 cups). Obviously you can use fresh cherries too, but do YOU wanna remove the seeds from 4 cups of cherries?
1 cup of water
1/2 tsp of sea salt
3 TBSP (or more to taste) of Stevia Baking Blend Powder, Coconut Sugar, or other dry sweetener
1 TBSP of organic cornstarch
For the Devil's Trap Again, I was winging it here. This also made way more chocolate than we needed (we ate the rest like fondue and dipped banana slices in it).
1/4 cup cocoa powder
2-3 TBSP coconut oil, melted
Stevia or other sweetener to taste
(You can also melt some vegan chocolate chips if you don't want to make your own chocolate sauce from scratch).
Method
Preheat the oven to 350f/176c. Make the pie crust according to the package directions if you're not using a pre-made crust. Put the bottom crust into a greased 8-inch pie pan.
instagram
To make the filling, combine the first 4 filling ingredients in a saucepan over medium heat. Cook until the stevia or other sweetener is dissolved and the cherries are defrosted, and the water is boiling a little. Add more water if necessary. Once its boiling, add in the cornstarch and whisk until thickened. Pour the cooked filling into the bottom crust and prepare the top crust while the mixture cools. Add the top crust when ready.
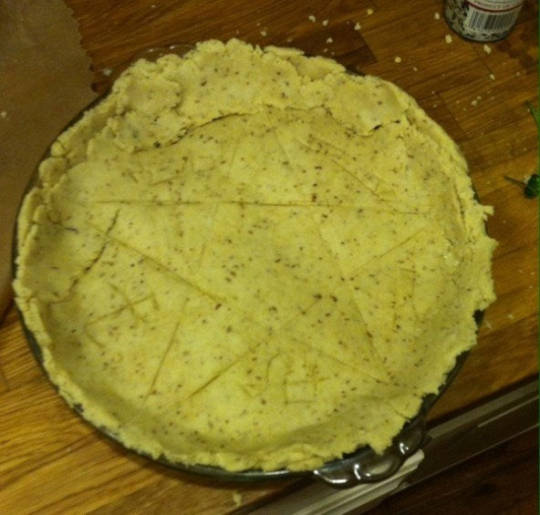
For the devil's trap, I etched it into the top crust with a knife prior to baking (above). We used this image from Super-Wiki as a reference.
Anyways, after that we put it in the oven until it looked done. Probably about a half hour, but I wasn't really paying attention. You bake it until the crust is browned a little and if you can see any of the filling, it should be bubbling. Before decorating with chocolate, set the pie aside to cool for at least 45 minutes. Especially if you're using coconut oil, you don't want the pie to be warm at all because it'll melt the chocolate. After the pie is cooled off, assemble all the chocolate ingredients in a saucepan and heat over low until the coconut oil is melted. Whisk them together to form a chocolate sauce. I used a knife to carefully (painfully) draw the design by dipping the tip of the knife in chocolate and drawing along the lines I had etched in the crust prior to baking. This was tricky and not that fun. If you have a better method for doing this, go ahead and try that. Let the chocolate cool. Eat.

4 notes
·
View notes
Text
Chicken and Corn Soup

This fragrant and hearty Chicken and Corn Soup make a simple yet deliciously comforting dinner on a rainy night!
Ingredients (serves 2):
2 tablespoons olive oil
2 beautiful chicken breasts
1 onion
1 heaped teaspoon Herbes de Provence
¼ teaspoon Red Chili Flakes
2 small garlic cloves, minced
1 cup sweet corn
3 Whole Peeled Tomatoes
½ teaspoon coarse sea salt
½ teaspoon freshly cracked black pepper
2 1/2 cups water
1 tablespoon olive oil
a small Green Onion
Heat olive oil in a large Dutch oven over medium-high heat.
Add chicken breasts and cook, a few minutes, until well browned on all sides. Transfer to a plate; set aside.
Peel and finely chop onion. Stir onion into the Dutch oven, and cook, a couple of minutes.
Stir in Herbes de Provence in the hot oil. Cook, 1 minute. Add Red Chili Flakes, and cook, 1 minute more. Then, stir in minced garlic; cook, 1 minute.
Add sweet corn, saving a couple of tablespoonfuls, and stir into the Dutch oven, coating in herbs and spices.
Roughly chop Whole Peeled Tomatoes, and stir into the corn mixture. Cook, a couple of minutes.
Return reserved chicken breasts, along with their resting juices, to the Dutch oven, and season with coarse sea salt and black pepper. Give a good stir, to combine.
Cover with water, and bring to the boil over medium-high heat. Once boiling, reduce heat to medium-low, cover with a lid, and simmer, 15 minutes.
Remove cooked chicken breasts, and pour corn mixture into a blende. Close tightly and blitz, until smooth. Return to the Dutch oven, and keep warm over a medium flame.
Cut chicken breasts into small chunks, saving a couple of larger chunks, and stir into the Dutch oven.
Heat olive oil in a small frying pan over medium-high heat. Add reserved chicken chunks, and brown well, a couple of minutes. Add reserved sweet corn, and cook, a couple of minutes more, until golden brown. Remove from the heat.
Finely chop Green Onion.
Pour Chicken and Corn Soup into two bowls, top with browned corn and chicken, and sprinkle with chopped Green Onion; serve immediately.
#Recipe#Food#Chicken and Corn Soup#Chicken and Corn Soup recipe#Corn Soup#Corn Soup recipe#Chicken Soup#Chicken Soup recipe#Chicken Breasts#Chicken and Poultry#Olive Oil#Onion#Herbes de Provence#Red Chili Flakes#Garlic#Corn#Sweet Corn#Tomatoes#Whole Peeled Tomatoes#Coarse Sea Salt#Black Pepper#Black Peppercorns#Water#Green Onion#Garden Green Onion#Soup#Soup recipe#Soup and Stew
5 notes
·
View notes
Text
Day 41: Low-FODMAP Gluten-Free Stuffed Peppers with Cajun Vibes

After the success I had with sort of Greek stuffed peppers, I thought I'd try my hand at sort of Cajun stuffed peppers. The trouble being that a low-FODMAP diet allows neither garlic nor onions, and both are a component in any given commercially available Cajun seasoning mix. So this recipe adds all the other seasonings in a Cajun mix, and it worked pretty well, I thought. Culinarily speaking, my native diet is about as far from Cajun you can get in the contiguous 48, so be aware that this is completely inauthentic Cajun fare. This is vibes-based cuisine all the way.

Low-FODMAP Gluten-Free Stuffed Peppers with Cajun Vibes
6 red, yellow, or orange bell peppers (not green)
1 lb ground pork
1 1/2 c diced tomatoes, or one 15 oz can petite diced tomatoes
1 tbsp Italian seasoning
1 tsp paprika
1/2 tsp dried oregano
1/2 tsp dried basil
1/2 tsp thyme
1/4 tsp black pepper
1/4 tsp cayenne pepper
1 1/2 c long grain white rice
3 cups water or broth
2 c shredded co-jack cheese
1 1/2 slices gluten-free bread
1/3 c grated Parmesan
2 tsp minced banana pepper rings, plus 2 tbsp of the brine
olive oil, salt & pepper
Preheat broiler and adjust oven rack 6 inches from broiler element. Line rimmed baking sheet with aluminum foil. Halve the bell peppers lengthwise through stem, removing the seed pods but leaving the stem. Arrange peppers cut side down, brush with olive oil, and sprinkle salt on peppers. Broil for 4-5 minutes, until beginning to spot brown but not mushy. Set aside to cool.
Turn the oven down to 400F. Cook sausage in big skillet over medium-high heat until browned, then add Italian seasoning and tomatoes and cook until the liquid is gone. Add the rest of the seasonings and rice, and cook until fragrant, 30 secs to a minute. Add water or broth, cover, and simmer for 20 minutes. Off heat, add 1 1/2 c shredded co-jack, and let cool for 10 minutes.
Meanwhile, pulse bread in food processor until crumby. (You should have about 1/2 c.) Combine breadcrumbs, Parmesan, and 1 tbsp oil in bowl. Take two of the bell pepper halves and chop up; you should have about a cup. Process chopped bell pepper, 2 tbsp breadcrumb mixture, banana peppers & brine, 2 tbsp oil, and salt to taste in blender until smooth, about 1 minute. Set aside sauce.
Arrange peppers on baking sheet cut side up, and fill with the sausage-rice mixture. You can really mound them up. Sprinkle with the rest of the co-jack, then divide the breadcrumbs over all the peppers, pressing lightly to flatten. Bake for 20-25 minutes, until well browned and heated through, and then let sit for 10 to cool a bit. Serve with sauce.

A note on various FODMAP concerns: broth is often a problem, because most commercially available broths have onions, garlic, celery, you name it. I went ahead and used the chicken-flavored Better Than Bullion, even though it has onions and garlic, because I'm of the opinion that it's a low-FODMAP diet, not a no-FODMAP diet. Otherwise water is fine, though you might want to add a little salt.
Green peppers aren't allowed, and you can have one serving of other colored peppers, which is one whole pepper. I found an Italian seasoning mix that didn't have garlic in it, but if you can't source such a thing, a mix of marjoram, oregano and thyme would work as a substitute. Tomatoes are similarly restricted, but the amount in any given stuffed pepper should be below the threshold.
Though decently spiced, this recipe could handle more seasoning, especially if you like hotter fare. The banana pepper sauce -- I used a yellow pepper in the mix, so it would be a bright yellow color -- was really cool, adding a note of sour brightness to the dish. You could probably use a hotter pepper, if you can find one without ubiquitous garlic.
The salad we had this with was just a garden salad with a simple oil and vinegar dressing: equal parts olive oil and an elderberry balsamic vinegar, and salt and pepper. The younger kid, who can be super picky, went back for seconds after asking, "Is this really low-FODMAP?" Which seems like pretty high praise.
This diet still sucks, but I'm kinda into how it's forced me to stretch my skills in the kitchen to compensate for all the things I'm missing. This is a weird analogy, but I have a background in poetry and prosody, and these restrictions are like the restrictions in writing a sonnet: it's easy to write a bad sonnet, but when you write a good one, it's sublime.
Disclaimer: I am no dietician. I'm doing my best to minimize FODMAPs in my diet, but it's possible for me to be misinformed or mistaken about various ingredients.
3 notes
·
View notes
Text
Summer Squash Pasta
Ingredients
A head of garlic
Olive oil
2 summer squash, quarted lengthwise
1/2 an onion, diced
A bell pepper
Around 10 button mushrooms, diced
Tarragon, rosemary, sumac, salt, and pepper (did not measure)
A splash of lemon juice
Cooked pasta and 1/2 a cup of pasta water
Parmesan cheese
A tablespoon of butter
Steps:
Cook pasta to al dente and set aside. Around 12-16oz of pasta is a good amount. Cut up vegetables.
take the head of garlic and either slice the cloves, or crush them in a garlic press. Put in pan on medium low heat with some oil and cool for a minute on it's own.
Add the rest of the vegetables and switch to medium-high. Add spices and stir occasionally until the squash is jammy and sticky. Lower heat.
Add in pasta water and Parmesan to vegetables until it forms an evenly distributed thin sauce. Add pasta, lemon juice, and butter. Stir until well combined. Add a bit more Parmesan and stir again.
#cipher talk#recipe#Someone at work grew squash this year and didn't know how uh. Productive. Squash and zucchini are#So I helped by taking two off their hands
3 notes
·
View notes
Text
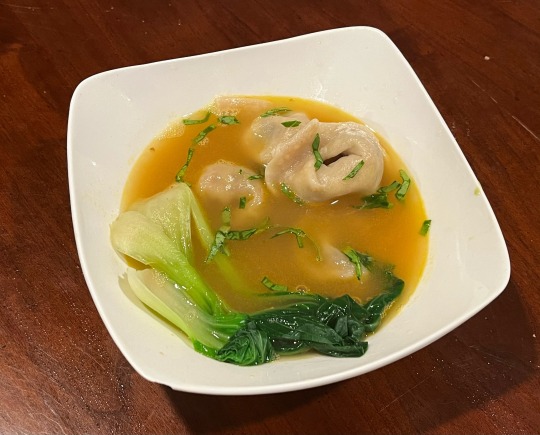
[ID: A bowl filled with a light orange-brown broth, several leaves of cooked bok choy, and four dumplings. End ID.]
Vegan Chinese wonton soup
Savory, tangy 'pork' and cabbage wontons are combined with a well-spiced, warming broth in this classic soup. Noodles and bok choy or other leafy greens may be added to create a complete meal. Best of all, the wontons can be made ahead and pulled out whenever you need a quick meal option.
Recipe under the cut!
Patreon | Tip jar
The wontons from this recipe can be made ahead in bulk and then frozen to add to soup a few at a time. This recipe makes about 15 dumplings (enough for 4 to 6 servings of soup) and enough broth for 2 servings of soup; if you're making the dumplings to serve all at once to a large group, double or triple the broth recipe.
To make the wontons:
Makes about 15 (serves 4-6).
INGREDIENTS:
For the dough:
1 cup (120g) all-purpose or bread flour
1/4 tsp salt
1 1/2 Tbsp vegetable oil
about 1/4 cup water
For the filling:
.2 lb (90g) vegan ‘pork’ sausage or ground pork substitute
OR 1/2 cup (45g) TVP + 1/2 cup (118mL) vegetarian ‘beef’ stock from concentrate
1/2lb (6 leaves) green cabbage, blanched and minced
1 small yellow onion, diced
3 cloves garlic, diced
3 dried red chili peppers, crushed, or 1 tsp red pepper flakes (optional)
3 Tbsp neutral oil
1/4 tsp salt
1/4 tsp white peppercorns, toasted and ground
Pinch ground cloves
Greens of 2 scallions, sliced thinly (reserve whites for the broth)
1 tsp light brown sugar
1/2 tsp sesame oil
1 tsp vegetarian oyster sauce, or soy sauce
1/2 Tbsp Shaoxing wine (or substitute with a mixture of mirin and apple cider vinegar)
INSTRUCTIONS:
For the dough:
1. Whisk flour and salt together in a medium mixing bowl. Add vegetable oil and mix until combined.
2. Add water, a little bit at a time, until the dough just comes together into a lumpy mass. You may need more or less than 1/4 cup. Avoid making the dough too smooth or wet, which may cause your wrappers to stick later.
3. Knead for about 5 minutes to create structure. Your dough should still not be perfectly smooth at this point.
4. Return dough to the bowl and cover with a kitchen towel. Allow to rest for at least half an hour while you prepare your filling.
For the filling:
1. To make our ground pork substitute, we're going to either grind a premade vegan pork product in a food processor until smooth, or hydrate some TVP. I hydrated my TVP in a stock made from Vietnamese vegetarian 'beef' broth concentrate (gia vị nấu phở) from Por Kwan brand, but some Western grocery stores also carry a vegetarian beef broth concentrate. If you don't have any, use vegetable broth and 2 tsp of dark soy sauce or vegetarian oyster sauce. Soak TVP in warm broth for 10 minutes until hydrated and soft.
2. Meanwhile, prepare the rest of your ingredients. Blanch cabbage leaves in a few inches of boiling water for a minute or two until vibrantly green; remove and dry thoroughly before mincing or shredding. Crush dried red peppers to a fine consistency.
3. Heat several Tbsp of a neutral oil in a large pan on medium high. Add onion and 1/4 tsp salt and sauté until onion is browned, 3-5 minutes. Push off to the side.
4. Add sausage to the center of the pan and sauté several minutes until browned.
5. Add garlic, crushed red chili, and spices (peppercorns and cloves). Sauté until fragrant.
6. Add cabbage and reduce heat to medium low. Cook for 10-15min until cabbage is very tender.
7. Add brown sugar, sesame oil, soy sauce, and Shaoxing wine and stir to combine. Stir in scallions. Remove from heat and allow to cool.

To make the wrappers:
1. Divide dough into halves and cover the one you're not working with. On a cornstarch-dusted surface, roll out half of the dough into a rectangle about 12" x 8" (30 x 20cm). Use a sharp knife to cut out six squares about 4" (10cm) wide. Place any scraps back into the covered bowl to rest.
2. Dust each wrapper on both sides with a bit of cornstarch and set aside on a covered plate. The wrappers should be able to be stacked on top of each other without sticking.
3. Repeat with the other half of dough. Allow scraps to rest before rolling them out again--they will probably be able to make another few wrappers.
You may also use a pasta machine to roll out your dough--roll it out so that it is as thin as possible without becoming translucent.
To assemble:
There are various methods of folding wontons--feel free to use whatever you're familiar or comfortable with. This method of folding produces a wonton with plenty of nice "pockets" for the broth to collect in!
1. Place about a tablespoon of filling in the center of a wrapper. Wet the edges of the wrapper and fold it, away from you, in half along the diagonal to produce a triangle.
2. Pull the two farthest points of the triangle together, so that one crosses over the other, and press to seal. If necessary, add a bit of water to the spot where they join to seal firmly.
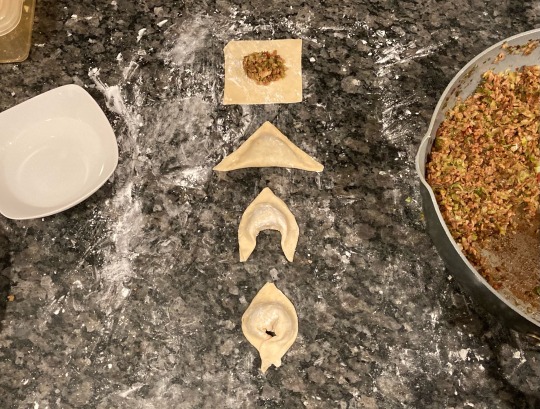
3. Set formed wontons aside on a plate lined with parchment paper and cover to avoid drying out. Repeat until your wrappers or filling run out, making sure that wontons are not touching each other as you set them aside.
Extra wontons may be frozen in a container lined with parchment paper. Make sure that they are not touching each other, and also use parchment paper between successive layers of wontons. Allow to freeze until solid--at this point they may be transferred to a smaller container or to a freezer bag, since they will no longer stick together if they touch.
To make the broth:
Makes about 2 cups of broth (serves 2).
Ingredients:
2 1/2 cups stock from vegetarian 'chicken' stock concentrate, or vegetable stock + 1 tsp soy sauce
1 cm chunk (3g) ginger, sliced
2 cloves garlic, crushed
Green of 1 scallion, thinly sliced, for garnish
Whites of 3 scallions
1 tsp sesame oil
1/4 tsp white pepper, or to taste
Salt to taste
Instructions:
1. Heat stock, ginger, garlic, and scallions in a small pot until boiling. Reduce heat to low and simmer 15 minutes.
2. Remove from heat and remove ginger, garlic, and scallions. Stir in sesame oil and white pepper. Taste and adjust salt and spices.
To assemble the soup:
1. Cook wontons for five minutes in just-simmering water until floating, tender, and slightly translucent. Remove into serving bowls.
2. Optional: blanch some bok choy, spinach, or another leafy green for a minute or two until tender. Boil noodles of your choice according to package directions. Drain and add to serving bowls along with the wontons.
3. Divide broth between serving bowls and top with scallion. Serve warm.
#this is appropriately at least three different recipes oh my goodness#cooking#vegan cooking#vegan recipe#wontons#Chinese#soup#pork#TVP#green onions#cabbage
75 notes
·
View notes
Note
Drop a dish recipe, and I can share my absolutely thrilling recipe for non-specific Scandinavian fish soup.* *I'll be honest, Idk if it's even in any way Scandi, but I cooked it here, so it counts... there's no banana. Fuck bananas.
Oh, Banana!anon! It's been a minute, how have you been?
Anywho...
Stew and Rice

2 pounds of fresh tomatoes
2 large red onions
2 cans of tomato sauce
1-2 pounds poultry (chicken, turkey, whathaveyou)
1-2 pounds beef (or goat or lamb)
1-2 pounds of a white fish (cod or pollock)
4-6 Habanero peppers
Maggi cubes
Curry powder
Thyme
Cooking Oil (either Canola or Olive)
Liquid Aminos to taste (more conventionally this would be salt, but my mother has high blood-pressure so I'm used to not using salt-to-taste anymore)
Rice (typically Parboiled rice but Jasmine or Brown work well too)
Optional:
Broccoli
Mixed Vegetables
Plantains
First, after rinsing them, cut the tomatoes into large chunks. Then blend them until smooth with a combination of ½ one of the tomato sauce cans and water. This may take several rounds due to having to pour out a full blender into a pot and starting over. However, when you're on your last round of tomato chunks, make sure to blend in the Habanero peppers as well.
At this point, the tomato/tomato sauce/Habanero mixture should be in a large pot. Cover it and set it to boil on low heat. Your main goal is to boil off the excess water.
While the tomato mixture is boiling down, cut your white fish into large portions. Place them on a baking sheet (or a baking pan lined with foil) and place them into the oven at 400°. The goal here isn't to make the fish crispy but to make it so that the fish won't fall apart when introduced to the stew, so keep an eye on it.
While that's going, chop up your red onions. Set them to the side.
At this point, cut your poultry and your beef/goat/lamb into chunks. Put them into a pot with a handful of your cut onions and 4-5 crushed Maggi cubes. Let them boil, covered, on medium heat until the proteins break down and the meat is tender (around an hour or so).
Check back in on your tomato/tomato sauce/Habanero mixture. It should have boiled down a bit but not all the way. Add in the rest of your tomato sauce (the leftover can and a half) and half of your onions. Stir before covering the pot back up.
NOTE 1: Whenever you uncover the pot, be wary because the mixture is volatile and will splash quite a bit. And the splashes burn no matter how experienced you are.
NOTE 2: Occasionally scrape the bottom with a rubber spatula to prevent any of the stew from catching and burning on the bottom of the pot.
By this point, your fish should be removed from the oven (remember, the goal is to firm it up, not to crisp it up). Once your poultry and beef/goat/lamb are tender enough, you can begin the process of putting everything together.
When the tomato/tomato sauce/Habanero mixture has boiled off all of the excess water, retrieve another pot (seriously, if your stove doesn't look like the Battle of Waterloo by the time you're done, you're doing it wrong) and pour in half a cup of cooking oil. Once heated, add in the rest of your chopped onions and cook until tender.
Then, pour your stew mixture into the pot with the oil and onions to essentially 'fry' the stew mixture (you're really just trying to temper everything to the same temperature and consistency). Carefully add in your fish, poultry, and beef/goat/lamb. Stir while adding in healthy amounts of curry powder and thyme. Depending on the consistency, you may have to add more cooking oil at this point.
Allow this to cook for a few minutes while you grind up more Maggi cubes (5-6). It's preferable to use a mortar and pestle, but if you unwrap several cubes, put them in a bowl, add a tablespoon or two of warm water, and wait for a few minutes for them to crumble, that works too.
Pour that into the pot and stir. Add in a few healthy splashes of Liquid Aminos (or a few pinches of salt-to-taste) and cover. Let this cook on it's own for ten minutes before cutting the heat.
Boil yourself a pot of rice (or use a rice cooker, they are better than sex after all). When the rice is up to snuff, plate out several scoops. Uncover your stew and ladle out one or two scoops (you don't want to drown your rice in stew; keep things balanced). Plate with cooked vegetables (broccoli is my preference but mixed vegetables are another option) and fried plantains.
Grab a glass of wine, a bottle of beer, or a responsible beverage and enjoy!
NOTE: Depending on what part of Nigeria someone's from, they may have a strong appreciation for Ponmo (otherwise known as Kanda). This is basically cow skin. And I fucking HATE IT because eating it is just constant chewing and cooking it is a neverending balancing act of 'if I don't cook it long enough, it's going to be hard and if I cook it too long, it's going to turn into jelly'.
I mention this because sometimes people like to add this to stew and rice as well.
And the adjustment to the recipe in that case would be as follows:
While your poultry and beef/goat/lamb are boiling, clean your Ponmo/Kanda (remove and stray bits of fur or unsavory bits). When your Ponmo/Kanda are clean, just before your poultry and beef/goat/lamb are done boiling, add in the Ponmo/Kanda to make sure it gets some good initial cooking time without going gummy.
#food#recipe#also even though I grabbed the picture from online#this is my individualize recipe#different Nigerians and Nigerian-Americans have their own takes on Stew and Rice
11 notes
·
View notes
Text

Vegan Flowering Chive and Garlic Dumplings
Dough:
1 cup wheat starch
¼ cup tapioca flour or starch
¼ cup rice flour
¼ tsp. salt
1 tsp. oil
1 cup vegetable broth
Filling:
6 cloves of garlic, minced
2 cups flowering chives, chopped and tips reserved
1 Tbsp. dark sesame oil
Sauce:
¼ cup mirin
1 Tbsp. soy sauce
1 Tbsp. fresh ginger, grated
1 tsp. sugar
½ tsp. rice vinegar
pinch of red pepper flakes
Place all of the wrapper ingredients, except for the boiling broth, into a stand mixer. Attach the flat beater and mix on low for a few seconds to combine. Heat the broth until it comes to a boil and then add it to the mixture and knead at a high setting for several minutes, until the dough is soft and pliable.
Roll the dough into one large ball, then separate them into four small balls. Roll each ball into a cylinder shape, about six inches long. Place three of them onto a greased plate and cover with saran wrap while you make the first four wrappers.
Divide the cylinder into four equal pieces. Take one piece in your hand and mold it into a flat circular shape. Place it in between two sheets of parchment paper, then use a roller to get them as thin as possible. They don’t need to be a perfect circle.
Place the finished wrappers under the saran wrap while you make the rest of the wrappers.
To make the filling, heat the sesame oil over medium low heat, then add in the garlic and chopped chives. Gently sauté for about 3 minutes, stirring frequently to ensure the garlic doesn’t burn. Remove from the pan to cool and set aside.
Make your sauce by combining all of the sauce ingredients together. Set aside and assemble your dumplings. Place a small amount of the filling into the center of one of the wrappers. Pull one side up to the center and continue with all sides to make a nice scalloped shape, then flatten them out between the palms of your hand. They don’t need to look perfect.
Heat about a tablespoon of vegetable oil in a large sauté pan over medium-high heat. Once the oil starts smoking, place as many dumplings as you can in the pan without having any of them too close or touching each other. Sear for about 3-4 minutes on each side, or until the bottom is nicely browned.
Now add about 1/4 to 1/2 cup water into the pan. Be really careful, because the water will sputter. Quickly cover the pan with a tight lid and reduce the heat to low. Let it steam for about 5 minutes. Remove the lid, flip the dumplings and dial the heat back up to medium and sauté until the water has all evaporated.
Repeat these steps until all of the dumplings have been fried, then serve immediately with the ginger dipping sauce and garnish with the reserved flowering chive tips.
#angelkin#food#appetizer#lunch#snack#dairy free#vegan#vegetarian#tapioca#rice#vegetable#garlic#chive#sesame oil#mirin#soy#ginger#vinegar#crushed red pepper#dogkin#dragonkin#kitsunekin#merkin#moutainkin#spring
8 notes
·
View notes
Text

Chicken Biriyani Indian at Chaskka Oslo
Chicken Biryani is a classic Indian dish known for its rich flavors, aromatic spices, and layers of perfectly cooked rice and marinated chicken. Here’s a detailed and easy-to-follow recipe for making delicious Chicken Biryani at home.
Chicken Biryani Recipe
Ingredients:
For the Chicken Marinade:
500g (1 lb) Boneless Chicken Thighs or Breasts, cut into medium pieces
1 cup Plain Greek Yogurt
2 tbsp Lemon Juice
1 tbsp Ginger-Garlic Paste (equal parts minced ginger and garlic)
1 tbsp Biryani Masala or Garam Masala
1/2 tsp Ground Turmeric
1 tsp Red Chili Powder (adjust to taste)
1 tsp Salt
For the Rice:
2 cups Basmati Rice
4 cups Water
2 Bay Leaves
4 Cloves
4 Green Cardamom Pods
1 Cinnamon Stick
1 tsp Salt
1 tbsp Ghee or Butter
For the Biryani:
3 tbsp Ghee or Vegetable Oil
2 Large Onions, thinly sliced
2 Green Chilies, slit (optional)
2 Tomatoes, chopped
1/4 cup Fresh Cilantro, chopped
1/4 cup Fresh Mint Leaves, chopped
1/4 cup Warm Milk (optional)
A pinch of Saffron threads (optional)
1/2 tsp Biryani Masala or Garam Masala
1/4 cup Fried Onions (for garnish, optional)
Instructions:
1. Marinate the Chicken:
In a large bowl, combine the yogurt, lemon juice, ginger-garlic paste, biryani masala, turmeric, red chili powder, and salt.
Add the chicken pieces and mix well, ensuring they are thoroughly coated.
Cover the bowl with plastic wrap and refrigerate for at least 1 hour, or preferably overnight for deeper flavors.
2. Prepare the Rice:
Rinse the basmati rice under cold water until the water runs clear to remove excess starch.
In a large pot, bring the 4 cups of water to a boil. Add the bay leaves, cloves, cardamom pods, cinnamon stick, salt, and ghee or butter.
Add the rinsed rice and cook until it's about 70-80% done (parboiled), which usually takes about 5-7 minutes. The rice should still have a bite to it.
Drain the rice and set aside.
3. Cook the Chicken:
Heat the ghee or oil in a large, heavy-bottomed pot or Dutch oven over medium heat.
Add the sliced onions and cook until golden brown and caramelized, stirring frequently (about 10-15 minutes).
Add the green chilies (if using) and the chopped tomatoes. Cook until the tomatoes soften and the oil starts to separate (about 5 minutes).
Add the marinated chicken pieces along with the marinade to the pot. Cook on medium-high heat for about 10 minutes, stirring occasionally, until the chicken is browned and cooked through.
4. Layering the Biryani:
Preheat your oven to 350°F (175°C) if you plan to bake the biryani. Alternatively, you can cook it on the stovetop.
In the same pot with the cooked chicken, sprinkle half of the chopped cilantro and mint.
Spread half of the partially cooked rice over the chicken evenly.
Layer the remaining chicken pieces and marinade, followed by the rest of the rice.
Sprinkle the remaining cilantro and mint on top.
5. Adding Saffron (optional):
Soak the saffron threads in the warm milk for a few minutes.
Drizzle the saffron milk over the top layer of rice for added flavor and color.
6. Cook the Biryani:
If using the oven, cover the pot with a tight-fitting lid or aluminum foil and bake for 25-30 minutes until the rice is fully cooked and the flavors meld together.
If cooking on the stovetop, cover the pot and cook on low heat for about 25-30 minutes, ensuring the bottom doesn’t burn (use a heat diffuser if necessary).
7. Serve:
Once cooked, gently fluff the rice with a fork to mix the layers without breaking the rice grains.
Garnish with fried onions if desired.
Serve hot with raita (yogurt sauce) or a side salad.
#ChickenBiryani#Biryani#IndianCuisine#IndianFood#Recipe#FoodLovers#Foodie#Delicious#HomeCooking#ComfortFood#DinnerIdeas#Flavorful#SpicyFood#chaskka#food photography#food recepies
2 notes
·
View notes
Text


Now that I'm all done my Christmas baking, I decided to share my go to Christmas cookie cutout recipes for anyone who wants em. These are my favourite cutout recipes I've been using for years. @mornington-the-crescent I know you asked about these like a year ago lol 😅👌
Gingerbread Cookie Cutouts
• 360g sugar (preferably raw)
• 232g softened butter
• 1/3 c molasses
• 1 egg
• 390g AP flour
• 160g whole wheat flour
• 2 tsp baking soda
• 2 tsp ground ginger
• 2 tsp cinnamon
• 1/2 tsp table salt
(Makes roughly 4 dozen cookies)
1. In large bowl, combine sugar and butter, beat until light and fluffy. Add molasses and egg; blend well.
2. In a separate bowl, sift the AP flour, baking soda, ground ginger and cinnamon. Mix in the whole wheat flour and salt. Add this entire dry mix into the large bowl with the other ingredients; mix well.
You may want to put the dough in the fridge for a bit for easier handling, simply cover with plastic wrap and place in fridge for an hour. (The dough can be prepared ahead of time for a day or two if covered and stored in the fridge.)
3. Turn on oven to 350°F and prepare baking sheets with parchment paper on them. On a lightly floured surface, roll out about a quarter of the dough and keep the rest in the fridge (you can roll out more, but the dough is not super forgiving when being handled, so just try to limit the amount of flour you use when rolling and cutting). Roll it out to about 1/4 in (too thin, becomes too crispy) and cut cookies as desired. Place the cookies on the baking tray about 1 inch apart.
4. Bake at 350°F for 6-9min or until set (my oven tends to run hot, so I do it for 6-6 1/2 min)*. Leave for 1 min on pan and then move cookies to cool on a wire rack for a minimum of 15 minutes. Ready to eat, store or decorate.
*When baking these cookies, you only want the shortest amount of time so they keep their chewy consistency (barely even brown), I would recommend baking a cookie or two on a separate baking pan first to see how long you want to bake your cookies.
Sugar Cookie Cutouts
• 452g sugar (preferably castor or raw)
• 115g softened butter
• 115g veg. shortening
• 236g sour cream
• 3 eggs
• 2 tsp vanilla
• 880g AP flour
• 2 tsp baking powder
• 2 tsp baking soda
• 1/4 tsp table salt
(Makes roughly 6 dozen cookies)
1. In large bowl, combine sugar, butter and veg. shortening, beat until well combined (no butter chunks visible). Mix in sour cream, eggs and vanilla; beat at medium speed on electric mixer until light and fluffy.
2. In a separate bowl, sift the AP flour, baking powder and baking soda. Mix in the salt. Add the dry flour mix into the sugar-butter mix a cup at a time, mixing each time at low speed until just mixed in (do not overmix). Repeat until all of it is mixed in and forms a soft dough. Cover with plastic wrap and chill in the fridge for 1-2hrs. (The dough can be prepared ahead of time for a day or two if covered and stored in the fridge. Split the dough, make them into crude discs and wrap in plastic wrap for easier rolling.)
3. Turn on oven to 350°F and prepare baking sheets with parchment paper on them. On a well-floured surface, roll out the dough to about 1/4 in and cut cookies as desired. Place the cookies on the baking tray about 2 inchs apart.
4. Bake at 350°F for 6-8min or until edges are just barely browned*. Leave for 3-5 min on pan and then move cookies to cool on a wire rack for a minimum of 15 minutes. Ready to eat, store or decorate.
*These cookies are best if they're baked lightly to maintain its soft and chewy interior, the bottom should only barely be browned as an indication it's done. You can use an icing spatula to take a peek at the cookie while cooling as it should be very very soft and cannot be lifted by hand.
35 notes
·
View notes
Last Seen Blogs

aoikoka
Xid

selwynparent
i am the whole circus.

hummingfox-upholstery
Hummingfox Upholstery

atis-luguzs
Atis Luguzs events

leptonmapsworld
lepton software