#tool foam sheets
Explore tagged Tumblr posts
Visit Tumblr Blog
Explore Tumblr blogs with no restrictions, modern design and the best experience.
Last Seen Tumblr Blogs


Fun Fact
BuzzFeed published a report claiming that Tumblr was utilized as a distribution channel for Russian agents to influence American voting habits during the 2016 presidential election in Feb 2018.
Text
HI!!! After finishing Disco Elysium I wanted to read Sacred and Terrible Air, but there were two issues:
1. It’s not officially released in English
2. I don’t like staring at pdfs!
So I did what any sane person would do. That is take three days of my life printing and binding it.
TRANSLATION (“thank you Group Ibex” we all say in unison!):
PROCESS PICS:
I apologize in advance for anyone who has experience in this sort of thing this is so botched.
I have NEVER done anything like this before, I don’t even read books on my own volition, but if the Disco fixation wants me to learn how to sew and bookbind I’ll do that.
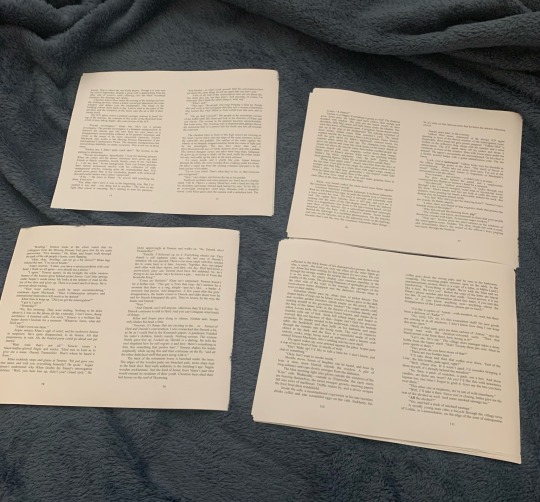
Four of the signatures above. There were nine total, eight of them with 8 sheets/32 pages and the last was five sheets I think. Threw the pdf into adobe acrobat and went straight to printing with those settings and the “booklet” option enabled.

Pricked holes through each signature! Used thumbtacks and a piece of foam I scavenged from my room, worked out great. It’s probably also worth mentioning I do not have a bone folder, book press, or any of the other fancy schmancy bookbinding tools. Flattened the pages with a pencil and pressed with D&D books…
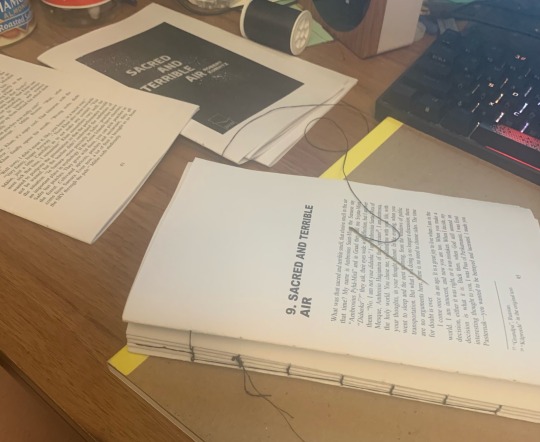
SEWING TIME. I have never sewn in my life. My success in this regard can be majorly attributed to Sea Lemon on youtube, particularly this tutorial:
youtube
The process from printing to finishing sewing the signatures took ~8 hours. Now we hit our first roadblock, I had no glue for the spine! After going to sleep and waiting what felt like ages (literally 10 hours or so) before I was free to visit a craft store, I tried to find PVA glue because that’s what you’re supposed to use I think?? Yeah. They were out of PVA glue and my impatient ass got mod podge.
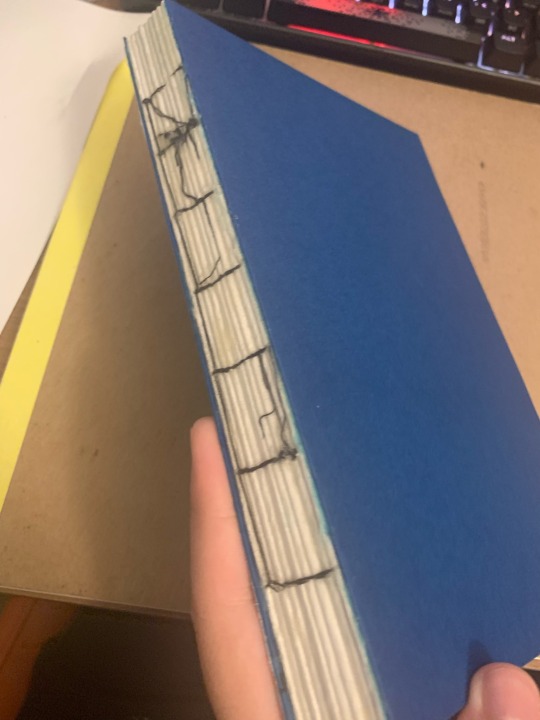
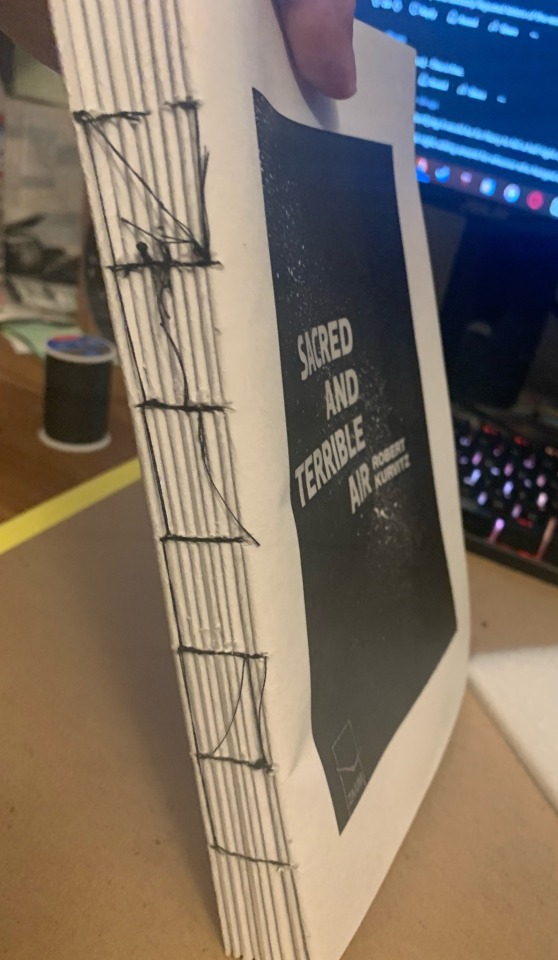
‘Tis glued! As you can see I added cardstock to the ends. Joyous day.
Also, you see that sketchbook in the pic? Yeah? You see that lovely cardboard?
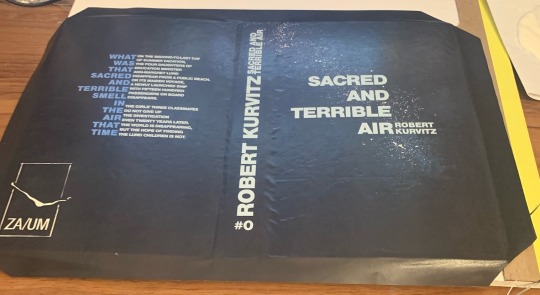
It is now the cover. Rest in piss bristol sketchpad backing.
———
EDIT: I see a bunch of people want to attempt this so here’s a video on how to make the hardcover: https://youtu.be/Av_rU-yOPd4?si=7T5zgVJGAfPFBxn-
youtube
I didn’t use any measurements or advice from it but it’s a good reference for when it comes to assembling the cover from ~3:50 onwards. The boards are same size as your text block pages and spine, I think I made the cover width a bit longer just in case it doesn’t cover the text block though. Do not do this with the spine, I regret it.
And note, this is NOT a tutorial, it is the process of someone who got a bit too silly and decided to bind a book, obviously do your own research lol. Don’t be afraid to try it though, it’s surprisingly simple!
———
… So, now that’s done! I swore to myself I wouldn’t start reading SATA/PJÕL until I finished this project completely, meaning I’ll be doing that now yippee :]
#sacred and terrible air#püha ja õudne lõhn#disco elysium#pjõl#i’m normal#proud of this despite it being pretty scuffed#uhh yeah#the spine is a bit too wide but who cares at this point HAHA#my art#i guess?? my creation??
332 notes
·
View notes
Note
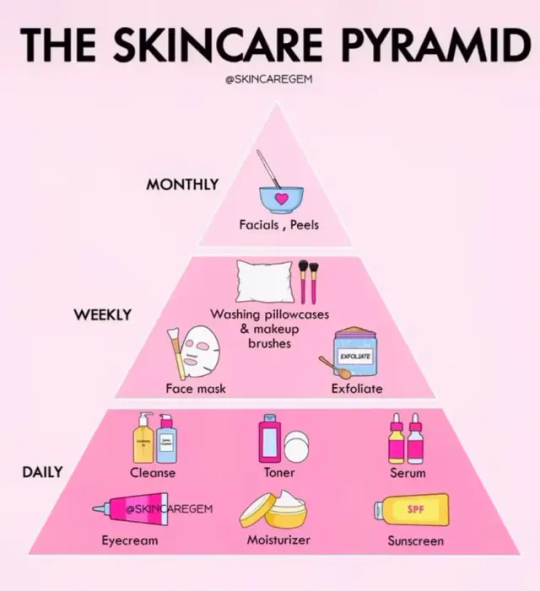
Do you have any tips related to skin care?
hi angel! thank you for asking about skincare 🌸 i've been meaning to write a detailed guide about this! here's everything i've learned about achieving that dreamy, glazed-skin glow…
mindy's guide to achieving your dream skin


by mindy ♡ @glowettee
understanding your canvas:
before diving into products, let's talk about what your skin actually needs. your skin is delicate and deserves to be treated like the finest silk. here's how to start:
morning routine (in order):
gentle cleanse with lukewarm water
hydrating toner (pat, don't rub!)
vitamin c serum (wait 1 minute)
lightweight moisturizer
sunscreen (non-negotiable!)
evening routine (the dreamy part):
double cleanse (oil cleanser then gentle foam)
treatment (rotate between these)
monday/thursday: exfoliation
tuesday/friday: retinol
wednesday/saturday: hydrating treatments
sunday: rest day
essence (tap in with fingertips)
moisturizer
facial oil (if needed)
my holy grail products (that won't break the bank):
cleansing balm: heimish all clean balm
gentle cleanser: la roche posay toleriane
toner: laneige cream skin refiner
vitamin c: timeless 20% vitamin c
moisturizer: illiyoon ceramide ato cream
sunscreen: beauty of joseon rice + probiotics
secret tips i've learned:
sleep with a silk pillowcase
change pillowcases twice a week
apply products to damp skin
keep skincare in the fridge
use facial ice globes in the morning
drink spearmint tea for hormonal breakouts
practice face massage techniques
lifestyle changes that transformed my skin:
drinking 2.5 liters of water daily
getting 8 hours of sleep
eating more green vegetables
reducing dairy intake
managing stress through meditation
regular exercise (the glow is real!)
weekly sheet mask sessions
common mistakes to avoid:
harsh physical scrubs
hot water on face
touching face throughout day
skipping sunscreen
trying too many new products
over-exfoliating
sleeping with makeup on
creating your skincare sanctuary:
set up a dedicated space
use pretty containers
keep tools clean
maintain a skincare journal
take progress photos
emergency skin solutions:
sudden breakout: pimple patch + ice
dehydration: layered toner method
redness: centella products
dullness: gentle aha toner
sensitivity: skip actives, focus on healing
seasonal adjustments:
spring/summer:
lighter moisturizer
higher spf
more antioxidants
gentle exfoliation
fall/winter:
richer moisturizer
facial oils
humidifier
less exfoliation
note:
consistency over complexity
patience is key
listen to your skin
what works for others might not work for you
stress shows on skin
healing takes time
skincare is self-care
personal note:
i struggled with my skin for years before realizing that gentleness and consistency matter more than expensive products or complicated routines. your skin is unique and beautiful - treat it with love and patience. some days won't be perfect, and that's okay. focus on progress, not perfection.
sending you the softest hugs 🤍
love, mindy x
p.s. would you like a detailed post about my favorite face massage techniques? let me know in the reblogs/replies!
#skincare#skincare routine#skin tips#beauty#self care#skincare tips#gentle skincare#korean beauty#skincare basics#skin health#beauty routine#morning routine#evening routine#skin secrets#clear skin#glowing skin#skincare guide#beauty guide#skin journey#self care routine#skincare thread#beauty thread#skin tips thread#glowettee#coquette#coquette beauty#skincare aesthetic#beauty aesthetic#self care aesthetic#detailed guide
62 notes
·
View notes
Text
🌷Summer Skincare Recommendations🌷
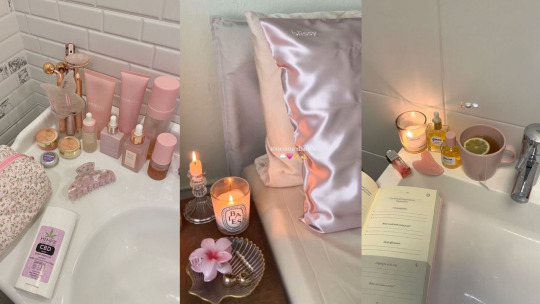
Hey babesss the summer is officially hereeeeee and I am so excited and I need to keep my girliesss skincare in check okay! So I will be listing my skincare favorites below that you can purchase on Amazon. Always consult your dermatologist and do your thorough research on these products to see if they will benefit your skin type. I will be rating everything out of 5 stars⭐️ <3333
Cleansers
♡ ANUA Heartleaf Quercetinol Pore Deep Cleansing Foam
⭐️ ⭐️ ⭐️ ⭐️ ⭐️
♡ ANUA Heartleaf Pore Control Cleansing Oil ⭐️ ⭐️ ⭐️ ⭐️ ⭐️
♡ Beauty of Joseon Green Plum Refreshing Cleanser Gel
⭐️ ⭐️ ⭐️ ⭐️
♡ ROUND LAB 1025 Dokdo Cleanser ⭐️ ⭐️ ⭐️ ⭐️
♡ COSRX Low pH Good Morning Gel Cleanser ⭐️ ⭐️ ⭐️
Toners
♡ I'm from Rice Toner Milky Toner for Glowing Skin ⭐️ ⭐️ ⭐️ ⭐️
♡ ANUA Heartleaf 77 Soothing Toner ⭐️ ⭐️ ⭐️ ⭐️ ⭐️
♡ Beauty of Joseon Ginseng Essence Water Hydrating Face Toner ⭐️ ⭐️ ⭐️ ⭐️
♡ ANUA Heartleaf 77 Toner Pad ⭐️ ⭐️ ⭐️ ⭐️ ⭐️
♡ Beauty of Joseon Glow Replenishing Rice Facial Sebum Toner for Oily Combination Acne Skin ⭐️ ⭐️ ⭐️ ⭐️ ⭐️
♡ COSRX AHA/BHA Clarifying Treatment Toner ⭐️ ⭐️ ⭐️ ⭐️ ⭐️
Serums
♡ Topicals Faded Brightening and Clearing Serum ⭐️ ⭐️ ⭐️ ⭐️ ⭐️
♡ Beauty of Joseon Glow Serum Propolis and Niacinamide Hydrating Facial ⭐️ ⭐️ ⭐️ ⭐️
♡ SKIN1004 Madagascar Centella Asiatica Ampoule Facial Serum ⭐️ ⭐️ ⭐️ ⭐️
♡ Youth To The People 15% Vitamin C Face Serum ⭐️ ⭐️ ⭐️
♡ Anua Peach 70 Niacinamide Serum ⭐️ ⭐️ ⭐️ ⭐️ ⭐️
Moisturizers
♡ Bio-Oil Skincare Body Oil, Serum for Scars and Stretchmarks, Face Moisturizer ⭐️ ⭐️ ⭐️ ⭐️ ⭐️
♡ Beauty of Joseon Dynasty Cream Hydrating Face Moisturizer
⭐️ ⭐️ ⭐️ ⭐️
♡ Illiyoon Ceramide Ato Concentrate Cream Korean Moisturizer
⭐️ ⭐️ ⭐️ ⭐️
Eyecreams
♡ Medicube Deep Reviving Peptide Eye Cream ⭐️ ⭐️ ⭐️ ⭐️ ⭐️
♡ COSRX Retinol Cream, 0.67 Oz, Anti-aging Eye & Neck Cream with Retinoid ⭐️ ⭐️ ⭐️
♡ Beauty of Joseon Revive Eye Serum with Retinal Niacinamide Correction ⭐️ ⭐️ ⭐️ ⭐️
Sunscreen
♡ ROUND LAB Birch Juice Moisturizing Sunscreen ⭐️ ⭐️ ⭐️ ⭐️
♡ Neutrogena Clear Face Liquid Lotion Sunscreen ⭐️ ⭐️ ⭐️ ⭐️ ⭐️
♡ La Roche-Posay Anthelios Light Fluid Facial Sunscreen ⭐️ ⭐️ ⭐️
Face Masks
♡ COSRX Snail Mucin Sheet Mask ⭐️ ⭐️ ⭐️ ⭐️
♡ Collagen Lifting Mask ⭐️ ⭐️ ⭐️ ⭐️ ⭐️
♡ Aztec Secret Indian Healing Clay Deep Pore Cleansing Facial & Body Mask ⭐️ ⭐️ ⭐️ ⭐️
Skincare Tools
♡ BAIMEI Jade Roller & Gua Sha Set Face Roller and Gua Sha Facial Tools
♡ Colorfarm Facial Steamer Nano Ionic: Face Steamer Deep Cleaning Unclogs Pores - Humidifier
♡ Ice Roller for Face, Ice Face Roller & Eye Puffiness Relief
♡ 7 Colors Led Light Therapy Facial Mask, Face Light Therapy Mask for Face
♡ NuFACE MINI+ Microcurrent Facial Device Kit - FDA Cleared Face Sculpting & Skin Tightening Device
#new month#becoming that girl#dream girl#girlblogging#dream life#it girl#glow up#productivity#that girl#clean girl#pink pilates girl#self improvement#self care#green juice girl#it girl energy#becoming her#self love#soft productivity#productivitytips#consistency#self growth#routines#healthyhabits#wellness#positivity#girljournal#hyper feminine#motivation#my diary#pink blog
138 notes
·
View notes
Note
can u make me a rlly good skin care routine? except I don't have any toner...
🧾- hi pooks how are uuu I hope u finne
How to build a skincare routine ㅤ۪ㅤ۫ ꪆ୧ㅤ🧁ㅤ۫ ♡


Morning Routine: for All Skin Types
1. Cleanse: Start with a gentle cleanser that clears away overnight buildup without stripping your skin.
Oily skin? Use a gel-based cleanser.
Dry or sensitive skin? Opt for a hydrating cleanser.
1. CeraVe Hydrating Cleanser
Skin Type: Dry, normal, sensitive
2. CeraVe Foaming Cleanser
Skin Type: Oily, combination, acne-prone
3. La Roche-Posay Toleriane Hydrating Cleanser
Skin Type: All skin types, sensitive
2. Rice Water Boost: Here’s the secret that works for everyone. No toner ? After cleansing, apply rice water using a cotton pad or gently pat it onto your skin. It brightens, soothes, and balances your skin naturally. (Make rice water by soaking rice in water for 20 minutes, then straining and refrigerating it.)
3. Moisturize: Hydration is key! Choose a lightweight moisturizer for oily skin and a richer one for dry skin. Combination or sensitive skin? Stick to non-comedogenic and fragrance-free formulas.
For Dry Skin
1. Eucerin Advanced Repair Cream
Deeply hydrating with ceramides and urea.
2. Weleda Skin Food Original Ultra-Rich Cream
Nourishes very dry skin with botanical extracts.
For Oily Skin
1. Neutrogena Hydro Boost Water Gel
Lightweight, oil-free, and hydrates without clogging pores.
2. La Roche-Posay Effaclar Mat Moisturizer
Controls shine and minimizes pores.
For Combination Skin
1. Clinique Dramatically Different Moisturizing Gel
Balances oil and hydration levels.
2. First Aid Beauty Ultra Repair Cream
Lightweight but hydrating for dry patches.
For Sensitive Skin
1. Avene Skin Recovery Cream
Calms irritation and strengthens the skin barrier.
2. Cetaphil Daily Hydrating Lotion
Gentle and non-irritating with hyaluronic acid.
For Acne-Prone Skin
1. La Roche-Posay Toleriane Double Repair Matte Moisturizer
Non-comedogenic and soothes irritated skin.
2. Vanicream Moisturizing Lotion
Free from common irritants and ideal for breakout-prone skin.
4. Sunscreen: Finish your routine with SPF 30 or higher, even if you’re staying indoors. Sunscreen protects your skin from UV damage and prevents premature aging—an absolute must for everyone!
Night Routine: Restore & Repair
1. Double Cleanse: If you wear sunscreen or makeup, start with micellar water or an oil-based cleanser, followed by your regular face wash.
2. Rice Water (Again!): Use rice water as a natural toner to calm your skin and prep it for the night. It’s a multitasking hero that helps reduce redness, minimize pores, and add a glow.
3. Targeted Treatments:
Acne-prone? Apply a salicylic acid or benzoyl peroxide spot treatment.
Dull skin? Try a niacinamide serum for even tone and radiance.
Dry skin? Opt for a hyaluronic acid serum to lock in moisture.
4. Moisturize: Seal everything in with your favorite moisturizer. At night, you can go for a slightly heavier one to aid your skin’s repair process.
Weekly Extras for Radiance
Exfoliate: Once or twice a week, use a gentle chemical exfoliant (like AHAs or BHAs) to remove dead skin cells. DIY trick: Mix honey and sugar for a natural exfoliating scrub.
Face Masks: Hydrate with aloe vera . You can also use sheet masks chilled in the fridge for a refreshing treat.
Steam and Detox: Once a week, steam your face for a few minutes to open up pores and deep-clean. Follow with a clay mask if you have oily skin or a soothing mask if your skin is sensitive.
Secret Skincare Habits for All Skin Types
2. Cold Spoon Hack: Struggling with puffy eyes? Chill a spoon and press it gently under your eyes for an instant de-puffing effect.
3. Jade Roller Magic: A jade roller or gua sha tool works for all skin types. Massage your face daily to improve circulation and reduce puffiness.
4. Silk Pillowcase: Sleep on silk pillowcases—they’re gentle on your skin, reduce friction, and keep your hair and face smooth.
5. Hydration Inside Out: Drink plenty of water and eat skin-friendly foods like avocados, nuts, and fruits. Your skin reflects what you put into your body!
and there is a LOT of skincare tips I will try to make other blogs Abt it soon. !!
@bloomzone 🧁
#bloomivation#becoming that girl#glow up#wonyoungism#wonyoung#it girl#dream life#divine feminine#creator of my reality#it girl affirmations#this is a girlblog#girlboss#girl blogging#blogging#girl blogger
53 notes
·
View notes
Text
Frank Frankly Puppet! 🦋✨️
Well..its been a few days and there hasn't been an official ref sheet to use for frank so i compiled a few images to make my own! Ive gathered the first few supplies ill need to make frank frankly and yes i will be using hot glue, BUT, not while its hot. My Glue gun has different heat settings and ill use the lowest one where it's tack-like, itll work similar to the rubber cement glue!
My supplies:
I have 1 inch foam
Glue sticks and scissors.
Wire and wire tools
And felt!
And three little helpers! Eddie Frank and Lune! (They were made by my lovely partner @karlytrash 🫶💕)
Ill be getting corset boneing and gray fleese eventually, i will, as well be using cardboard and or eva foam, but ill be starting his head today! Im very excited, follow for more updates! ✨️
Ps thank you to everyone who i used for my reference sheet! ✨️


Song by Tiny Tim: living in the sunlight ☀️
#welcome home#diy#frank frankly#oc#own character#puppetry#eddie dear#clown#welcome home puppet show#puppet making#frankly dear#Lune the Dream Muppet
23 notes
·
View notes
Text
₊˚ʚ ᗢ₊˚✧ ゚. College essentials
Are you moving to a college dorm for the first time and don’t know what to bring? Don’t worry I got you. Here are a few things you can get yourself ready for a new chapter 🫶🏻💗🎀🌱
COLLEGE ESSENTIALS
⋆ ˚。⋆୨ ʚɞ ୧⋆ ˚。⋆
Bedding and Comfort
• Twin XL sheets (common dorm bed size)
• Comforter or duvet
• Pillows and pillowcases
• Mattress topper (memory foam for extra comfort)
• Throw blankets
• Decorative pillows
Storage and Organization
• Under-bed storage bins
• Closet organizers
• Hangers
• Desk organizers (for pens, notebooks, etc.)
• Drawer dividers
• Shoe rack
• Storage ottoman (can double as seating)
Kitchen and Dining
• Mini fridge
• Microwave
• Electric kettle
• Coffee maker
• Reusable water bottle
• Plates, bowls, and utensils
• Mugs and glasses
• Tupperware (for leftovers and snacks)
• Snack stash
Bathroom Essentials
• Shower caddy (for transporting toiletries)
• Shower shoes/flip-flops
• Bath towels and washcloths
• Toiletries (shampoo, conditioner, soap, toothpaste, etc.)
• Robe
• Toilet paper
• Laundry basket and detergent
• Bath mat
• Mirror
Study and Technology
• Desk lamp with adjustable brightness
• Laptop and charger
• Power strip with surge protection
• Extension cords
• USB flash drive or external hard drive
• Noise-canceling headphones
• Desk chair cushion (for added comfort)
• Notebooks, pens, and planners
Décor and Personal Touches
• Wall art or posters
• String lights or LED lights
• Rug (to make the room cozier)
• Plants (real or fake)
• Photo frames or a corkboard (to display memories)
• Command hooks (for hanging items without damaging walls)
• Curtains (if the dorm allows)
Health and Wellness
• First-aid kit
• Reusable face masks
• Hand sanitizer
• Disinfecting wipes
• Vitamin supplements
• Water filter pitcher
Miscellaneous
• Fan or space heater (depending on climate)
• Tool kit (for small repairs)
• Umbrella
• Bicycle lock (if biking to campus)
• Reusable shopping bags
• Sewing kit
#beauty#fashion#hyper feminine#light feminine#pink moodboard#pink pilates princess#soft moodboard#that girl#beautytips#confidence#wonyoungism
34 notes
·
View notes
Note
Im obsessed with your horseshoe crab bag and wanna make my own but dont have any leather working experience or knowledge, did you have a pattern you followed or did you just free hand it? also what would you recommend to someone wanting to try leather crafts for a first time?
I'll answer both this and a related question from @chaoticspaces:
hey! I’m in love with your crab bag. you mentioned you’ve never worked with leather; do you have any tips on where/how to start learning? or did you just wing it? I must preface that I’m a beginner at any sort of crafting and will have to learn the building blocks first but damn, people can just MAKE that kinda shit? I’ll learn to sew for that.
So it must be acknowledged that I am a fairly experienced crafter, I grew up sewing and sculpting and origami-ing and all sorts of crafty things. Meaning that although the horseshoe crab is my first experience in leatherworking, it's building off of existing crafting skills and experience thinking through how materials behave and how shapes interact. I say this as a preface not to discourage anyone from diving in, but rather so anyone who's newer to crafting can go in with a bit of perspective and not get discouraged if they don't get the hang of it right away! Be patient with yourself and keep pursuing the skills you want to develop.
With that out of the way, here's a (slightly abbreviated, but still Long) walk through what my process was like for drafting the pattern and learning how to work with leather!
Drafting the pattern
I started by looking up pictures of horseshoe crabs and doing a simple drawing of one from the top and from the side to get a sense of the shapes.
Then I broke it down into sections to make things easier on myself. Reducing things to basic shapes (crescent, box, wedge, cone, etc) is a good way to start making sense of a more complex form.
To make it work in three dimensions, I'd sketch what I think the shapes should probably be; cut out a mini version in paper; tape it together; go "hmm, that's not right," and adjust the sketch; repeat until I get roughly the form I'm looking for.
Once I had a general shape that worked, I recreated those pieces on paper again, this time full-size. That involved a lot of math to make sure all the proportions scaled accurately. Then I cut out those pieces and taped them together and adjusted any basic proportions again to fix anything that I scaled wrong.
At that point, I had a shape that read fairly well as horseshoe crab, and that would have been fine. However, I wanted things to curve and flare and be more organic, which is where a lot of the trickier adjustments come in. Using paper prototypes allowed me to work quickly and make changes easily. To exaggerate a curve, I'd cut the tape "seam", bend the paper into the desired shape, and then add or remove material from the adjoining sides until that curve stayed in place when re-taped. Each piece of the pattern is responsible for helping its neighbors stay in place.
After I got my paper prototype to a point I was happy with, I got some cheap sheets of kids' craft foam and made another prototype in that, but stitched instead of taped, in order to test the pattern as thoroughly as possible without having to use my actual leather for it.
---
Learning basic leatherworking
Youtube! I searched things like "introduction to leatherworking," "leatherworking techniques for beginners," "how to attach two pieces of leather," etc. There are a bunch of videos that show very detailed but not-too-lengthy examples of basic techniques.
Once I had seen a few examples and made a list of the basic tools I would need to get started, I went out and got myself some tools and scrap leather to experiment with. I watched some more videos showing how to use my tools, and followed along with them
Some of the techniques I looked up to start:
How to use an adjustable groover, stitching chisel, beveler, and wood slicker
Saddle stitching
Box stitching
Butt stitching (Yeah, I know)
How to set rivets in leather
What kind of leather dye/what kind of leather conditioner to use
I spent some time testing techniques, even ones I didn't need for this project, because the more time you spend with your material and tools, the more you'll understand how they work and how to get them to do what you want. I have a bunch of scraps lying around that just have random burnished edges, wonky rivets, stitches that don't go anywhere, etc.
I also found it helpful to look through leatherworking subreddits and follow leather crafters on instagram and look through what they're doing for inspiration, tips & tricks, and to see how they handle unusual shapes. Those subreddits can also be a good resource for finding existing answers to questions you have, or asking questions yourself.
47 notes
·
View notes
Text
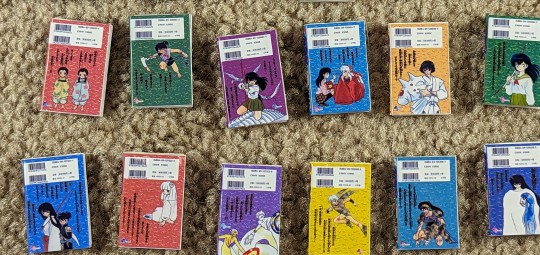
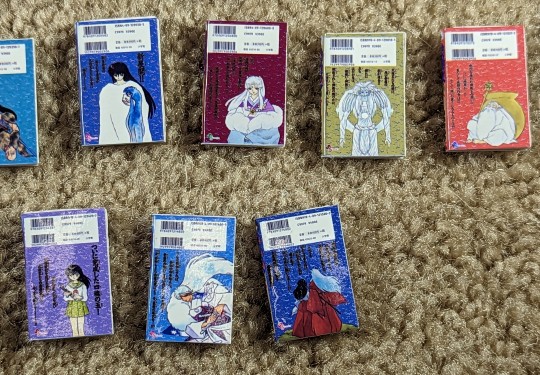
I did a thing... actually, I did several things. :D My ani-ME (anime doll version) needed manga in her house, so of course I had to make mini Inuyasha manga! I've done this before, but this time it's different... I didn't do miniature versions of the Viz BIG volumes. Nope, I did all 56 original Japanese volumes. Because ani-ME is in Japan, so she must have the original volumes!!! :D What a task this was - because the volumes are so old, it's hard to find high resolution pictures of them online. And even if you do, many times it's just the front, not the back and definitely not the spine. I found some, but then the front and back cover colors were completely different, some had text and graphics cut off from what was most likely a scanned image, the colors were inconsistent between various websites, some colors were clashing badly due to low quality resolution, etc.
So I literally made a template in Photoshop of the real size of the original manga (obtained via Amazon) and rebuilt EVERY. SINGLE. ONE. from scratch. I was able to find a site with all the original cover photos, and then I found the most high resolution cover I could find to duplicate the pattern that's on all books (colors vary), recreated the logo for each book (the character symbols and the gradients are all different for each volume), redrew the SS Comics logo that's on all books, and I even replicated each individual barcode. Because I'm nothing if not a consistent perfectionist. :D
For the backs, I used the images I found and just copied and pasted the characters and Japanese text, and for the teeny tiny characters I used the brush tool to trace over them. Even though I knew you probably wouldn't be able to see them in such a small scale, no way was I leaving them out! Consistency, darn it! :D
For the spines, I found complete sets on eBay and used a photo of the spines from those auctions as a template. I redid everything on the spine except the character head at the top of each, which is copied and pasted from the eBay files. They're definitely pretty low resolution, but hopefully it's not noticeable at such a small scale.
And the volume numbers? Try as I might, I could NOT find a font that matched them. So I got the most high resolution volumes I could find and made number templates... so each time I needed one of the volume numbers, I'd just use a color overlay on it and plop it where it needed to go on the front and spine.
Then the fun part - resizing them all to 1/6 scale. They're a little over an inch tall right now. And because they're not very thick in the spine, wrapping the covers around foam board to mimic pages wasn't working. So I had to make pages... for 56 volumes LOL. I just took my cover template, sized it down, and made it a blank white with a black stroke so I could see where to cut. I could fit 11 mini pages in one row across a regular sized sheet of printer paper (I used cardstock for extra thickness and stability), and I could fit like six rows on a sheet. I was able to fit 11 pages in one volume to allow the spine room, so 56 volumes x 11 mini pages each = 616 total pages I wound up cutting, then stacking and gluing together. But, of course, that wasn't a perfect fit, as the pages, despite being sanded down to be completely straight and smooth, poked out of the covers. So I had to wrap the covers around the pages, mark where they hit, and use an X-acto knife to trim the pages down before gluing them inside the covers.
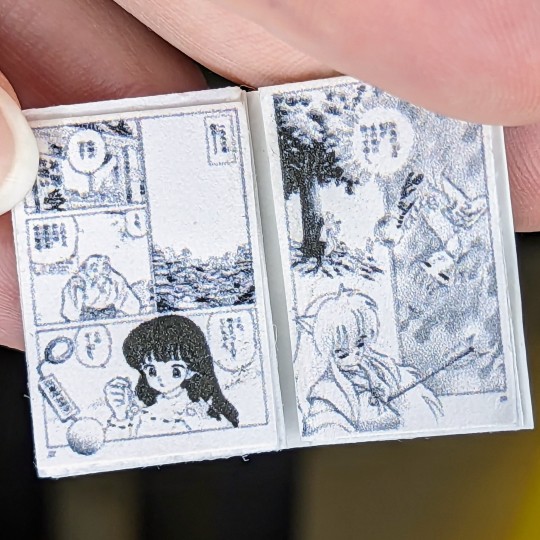
But finally, I was done! It was time-consuming, but I love how these little books turned out. They don't open, but that's totally okay. That would be way too much work, and every time I make a book that opens, it never closes again. I did, however, manage to find some pages from the original first volume (in Japanese), so I printed a second volume 1 cover and glued those pages inside. So now ani-ME has an open book she can read too!
So there you have it! My mini, 1/6 scale Japanese volumes of Inuyasha - all 56 of them! I made that bookshelf just for them, but I intentionally left more room in case I want to add more manga later. But of course we had to have Inuyasha manga on the shelf - it's the most important! :D And the poster on the wall is totally a tag from one of my shirts LOL.
Showing off her new bookshelf stocked full of all 56 volumes of the Inuyasha manga:


Relaxing in bed, reading from the beginning:

Why yes, she is reading the Inuyasha manga on an Inuyasha pillow :D

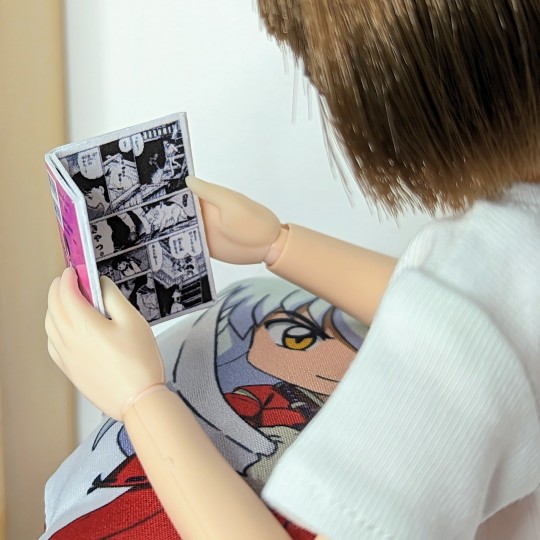
All 56 volumes on the bookshelf:

What do you do with an Inuyasha shirt tag? Make an instant doll poster, of course!

Front covers:
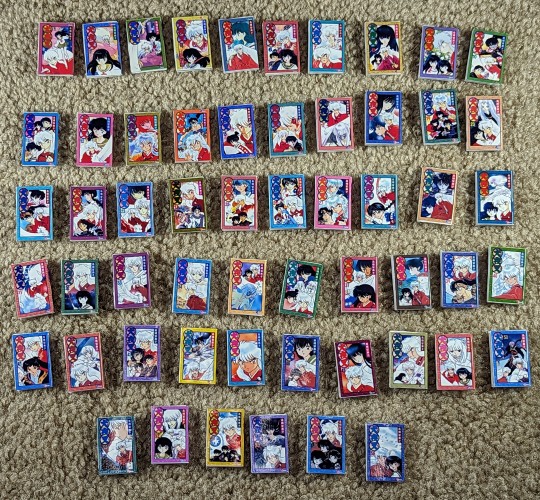
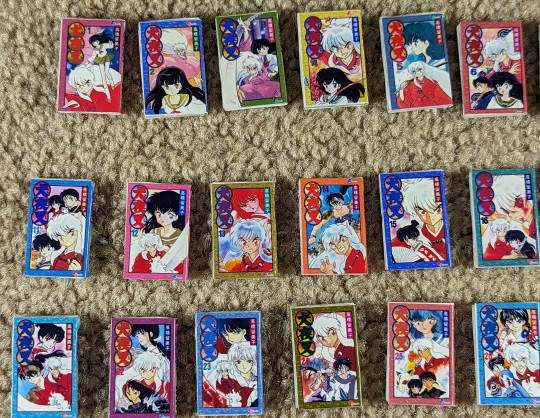
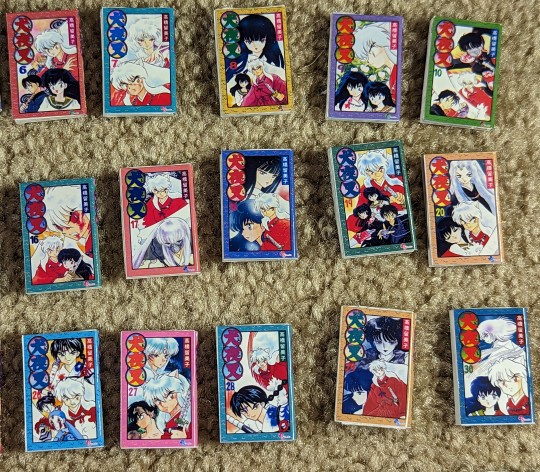


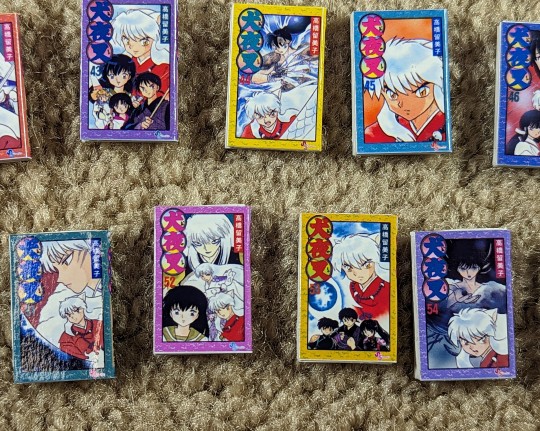

Back covers:
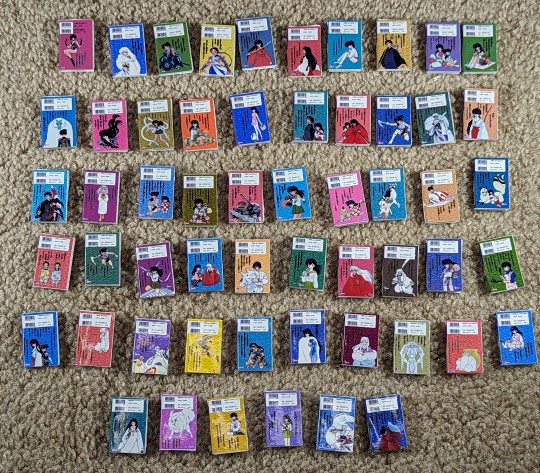


Volume 1 pages (glued in order, right to left):

Size reference (shown with American penny):

#my plastic life#doll photography#one sixth scale#azone international#azone pure neemo#azonejp#Kiku Ningyo#Inuyasha#manga#anime#anime doll#tenderwolf#myfroggystufffanpics
136 notes
·
View notes
Text
Kitchen Witch Essentials
I want to preference this by saying your priorities of tools for your craft will vary as you get more experienced. If you get more into baking, you may choose to invest in a kitchen mixer. If your path goes more down drinks, you might want to get a French press. This list is for those starting out or looking to maintain general witchy cooking. Nothing on this list is mandatory, so don't feel like you need to go spend money just because it's on this list.
This list will also assume you have general kitchen stuff, like pots, pans, and knives. You may not have everything, but you have enough to cook.
Wooden Spoon
If for whatever reason you don't have a wooden spoon, and you want to do kitchen magic, I strongly recommend you go and get one. You can get them at any store that sells Kitchen Utensils, including the dollar store.
For some kitchen witches, the wooden spoon is like a magic wand. Allowing the witch to direct energy. Personally, I just enjoy using natural materials whenever I can. Also, it's just such a useful tool to have when cooking. You can stir your food on stove top, and since it's made of wood you don't need to worry about damaging non stick surfaces. If you're boiling pasta, stirring with a wooden spoon helps get rid of the foam overboil. You can also just leave the spoon over the pot to prevent pasta water overboiling. Baking bread? Flip the spoon around and use the handle to bring the dough together.
Some people choose to add sigils or other symbols onto their witchy spoons. If you decide to do this, please do not use paint or stain, as this can come off while cooking. Unless this will be a display only spoon, of course. Safest way is to laser burn a design. Check etsy for custom spoons.
Herbs/Spices you know the properties of
I'm sure you already have some non perishable Herbs or Spices in your pantry or spice rack. Black Pepper, Garlic powder, Cinnamon, Paprika, that kind of thing. I want you to pick one and deep dive into the history of that Herb/Spice. What it's been used for in the past, what are some common magical properties and associations; what do YOU associate with it. Write down the magical association, like protection, banish negativity, prosperity, ect. Start with one, work your way up to three. If you have trouble memorizing, keep a little cheat sheet near by.
Now when you add these seasonings, you know what energies you can add/attract with your food.
Mortar and Pestle
If you already have another way to grind spices, like a coffee grinder, this does not need to be a priority. And if you have arm or shoulder issues, I don't recommend using. The main benefit to using a mortar and pestle is the crushing style of grinding tends to release more aroma and flavor then the cutting style of a coffee grinder. If you plan to just use for dry spices, you won't need a very big or fancy one. 20 dollars should get you something small and solid.
Make sure you are getting one made of stone. I tried a wooden one and it's garbage. I use it to hold messy spoons. There are also metal ones, and while I've never tried one, I encourage caution. I worry about long term use stripping whatever coating is stopping it from rusting.
Jars
Glass Jars are so great to have in the kitchen. Leftover sauce? Put it in a jar. Suddenly made a jam? We got jars to put it in. Meal prep overnight oats? Jars are here for you! They're just great for storage. And you don't need to buy them. Lots of things come in jars; just give them a hot soapy soak, scrap the label off, wash and reuse. If you prefer mason jars, I recommend washing the lids by hand. The lids aren't meant to be reused for jarring, so they rust fairly quickly after a few washes. You can buy replacement lids, however.
Plastic Containers
Jars are great, but things get a little dicey when you want to put stuff in the freezer. Water likes to make sure everyone knows it's cold by puffing up bigger; like look at me, I'm freezing here! Which means, there's a chance your glass jar can shatter.
But freezing food is the best way to preserve food since you don't need to add anything like extra salt or sugar. So get some freezer safe containers. I love making batches of broth and stock, and freeze it for later. Or if we have a lot of leftovers, I'll freeze enough for a dinner another week, incase I don't have enough spoons to make dinner one evening. And don't worry, you can wash and reuse plastic containers too.
I'll also freeze food I notice is starting to go weird. If I buy a huge bag of baby spinach, but can't get through it all, I'll transfer it to a freezer bag. Adding frozen spinach to food as it cooks is one of the easiest ways to up your nutrients. You can also freeze other vegetables, just make sure you cut them up first.
Crock Pot/Slow Cooker
Every Witch Needs a Cauldron, and these are Electric Cauldrons. Prices vary mainly based on the size you want. There are different brands, different colors; you can even get some in the theme of your favorite fandom. But they all have the same 3 core settings: High, Low, and keep warm.
Slow cookers are....well, slow. Which is great for certain kinds of food that need to sit for a long time, like meats. But it's also great for Kitchen Witches with a lot going on. Non witches will "Set it and forget it" but it's a good idea to stir every once in a while. Which is where the magic comes in. So, if you're a scatter brained Witch, Like me, or have ADHD and have trouble focusing, an electric cauldron might be for you. Throw everything together in 15 minutes, then give it love and attention when you remember. Normally that happens when you start to smell the food.
Again, this is my preference. Some Kitchen Witches I know prefer to identify a specific pot as their cauldron. Some went and got an actual full size, cast iron cauldron; which is amazing but not feasible for most. I grew up using a slow cooker, so I'm very comfortable around one. But if it's not your thing; that's fine. Maybe your cauldron will be a rice cooker or a Boston Shaker.
#witch#kitchen witch#kitchen witchcraft#klickwitch#food and folklore#Food magic#magic#witchy#witch tips#pagan#February#kitchen magic#house witch
50 notes
·
View notes
Text
BFDG prompt 2
[I think I might be posting some of the doom prompts from my discord here now but have the second BFDG prompts]
21: BFDG “The big guy encountering a shrine to himself that a grateful, slightly misguided, employee set up”
He caught the new scent first, a mix of it coming from the air circulation system and sensing a new-to-him soul.
Slayer opened one eye from his spot in the makeshift bed. It was two lengths of almost four feet of foam mats that were attached together to be long enough a long fabric for a dust shield was used as a sheet. It was clearly rigged but also…
It was thousands of times better than the pumice stone of the sarcophagus. Just this side of heaven as far as Slayer was concerned as he shifted again on the foam mats. Just enjoying both that no part of him was forced to grind against stone, and that he was clean. For once he was not smelling a mix of his own blood and the tainted stuff from demons.
Feeling the smaller form against his side grunt and shift himself, Slayer froze, remembering he was not alone. Waking up fully out of his dosing nap, he lifted his head to check on Jackson. The Elite Guard that was Slayer's current ‘guard’ was looking up from using the massive arm pinning him as a work table.
One of those cute squeaky, round drones of his were being cleaned on a cloth set on Slayer's forearm. Jackson had his helmet off and flipped to hold his tools. Had he been a normal human himself, just the weight of the arm resting on him would be enough to completely trap Jackson against the Demigod’s side. Plus the give of the foam…
But Jackson was not a normal human anymore, he was a Guardsman, and one that had willingly had some playful wrestling with the giant a few hours ago. Jackson could lift the big arm, yet seemed as lazy as the Slayer was now. Not that the Slayer minded, he rather liked the Guardsmen now, more so seeing them as willing as his old Sentinels to face hell and fight with him.
Slayer reached across himself with his left hand. Playful but still lazily messing with the short hair with three fingers. Feeling a small hand press into one of his fingertips.
“Awake again big guy?” Jackson asked, tossing the metal ball in the air and watching as Bitty the drone uncurled to catch itself in the air and buzz around. Not quite able to understand the size scale of a twelve foot man.
“Hmm.” Slayer huffed, using the same hand to make the so-so gesture over Jackson's head. Watching the smaller man neatly pack his tools away in the cloth on his arm before subspaceing it. Slayer was just about to either dose, or see if he could get the Guardsman to play again when he caught the faint smell of burning paper and a static like feeling in his gut.
Alarmed, recognizing the feeling of almost forced worship, Slayer sat bolt upright. Catching the startled Jackson around the middle with his right hand. It was a few awkward moments as the Slayer was admittedly not used to laying on something soft but he managed to get upright. Kneeling beside the mats on the ground and looking around. He paused, blinked at the startled Guardsman before slowly setting Jackson on his own feet.
“Something wrong?” Jackson asked as he picked up his helmet. Watching Slayer nod before adding, “Another breach?”
Slayer gave a firm shake of his head as he stood up. Jackson was immensely grateful that the big guy had the improvised shorts on now as he was let go and found himself staring at a fabric colored hip. The big guy was walking to one of the blocked doors of this converted cargo bay. Easily lifting what he stacked here to block it, surprising not making much sound doing so.
Jackson followed after, watching the body language and Slayer's face. He was not showing that hunting focus but just seemed concerned over something. One large hand dropped to his middle for a moment as the door was cleared and Slayer sat on his knees. Undoing what he did to jam the door so easily it hinted he was a lot more experienced with technology then some thought.
The cargo door opened upwards, showing a darkened hall as the smell of burning candles and paper was clear now to unaltered, super predator senses. Several things clattered to the ground and Jackson saw a bench being used as an altar table. He saw the startled person on. The other side lock up as the big guy reached forward. The civilian squeaked as he was just plucked off the ground where they were sitting and pulled over the makeshift altar. Glowing green eyes looking over the mortal before frowning and then looking back at Jackson.
The big guy looked worried, chuffing for attention from the Guardsman. As if asking if this was real, as he held the stiff human with both hands, trying to support their back and head. “Hm?”
“It’s alright,” Jackson said, mostly to the civilian as he came over, helmet hooked to his side as the Guardsman reached out. Hands on a big wrist to guid Slayer to moving and settling on his knees, then setting the human down too. “I think you startled each other. Are you okay there?”
Jackson checked the name tag and recognized one of the patches on the man’s sleeve as being a part of the cleaning staff. Not sure if this person was trying to clean the altar up or was adding to it, the guardsman made a note to get the hall cleaned up as that was a fair few candles.
“...they said I needed to…” a tiny, soft and scared voice squeaked, then almost whimpered as a massive hand came up. Only for a confused sound to come as Slayer was surprisingly lightly petting the comparatively tiny man’s head. Shaking his own head.
Huffing at Jackson, Slayer got up and picked up the mortal under the arms. For a moment holding the human at arm’s length like a stray cat or toddler he did not know how to hold properly. Moving back to his bed, Slayer set the human there and walked into the dark hall, stepping over the half formed altar. Down the hall to grab a trash can he could just see. Methodical and neat, the might as well be giant came back and cleaned up. Huffing out the candles, ash brushed into the can.
He only paused at a thin sheet of metal, turning it back and forth as something caught his attention. It was his glyph painted on there, but not something rushed or smeared with blood. He brought it back into his bay-room to look at the sheet in the better light. Able to see the different colors of hondrends, if not thousands of painted… dots? Someone had taken time to make this, using different colors and types of paint so it looked almost shimmering.
Slayer looked up at hearing a squeak, seeing the normal human finally sitting on the edge of the thick foam mat. Jackson had managed to calm the person down, Slayer had half listened, getting just enough to understand someone had pressured this human into trying to worship…him. Thus the static feeling, but that was thankfully gone now. The human had also noticed what Slayer held and was burning bright red in a blush.
Coming over, the demigod crouched on his heels beside the two, tilting his head before nudging the human’s leg. Smiling at the meeping sound, then pointed to the artwork of his glyph. Did this human make this?
With a look at the Elite Guard, and seeing that Jackson was just so…relaxed and calm, the smaller man took a breath and nodded, “I…made it.”
Slayer purred, leaning over the two to set the painted metal at the ‘head’ of his bed. Having no sense of personal space it seemed, as the demigod shifted to try and be friendly, ruffling the reddish brown hair before getting up again. Slayer dragged the bench inside so it would not be another altar, re-jammed the door and barricaded it again before coming back.
This time he was notably more confident and just picked the human up, even if they made a frightened but cute sound. He braced them against his own right shoulder and started walking to the main door, the one that led to a taller main hall and…
“Ohh, you just want food at the mess hall big guy.” Jackson laughed, trotting after, “Its okay Miller, he’s just going to leave you in the local kitchen. If you want to make him something to eat, he’ll love that more than trying to make a shrine.”
“...food?” Miller asked in a small, confused voice, staring over the bare, scared shoulder at the guardsman, and the ground that was well over ten feet away now. The giant purred under the human at the mention of food.
#omie's writing#doomguy#doom fanfiction#doom slayer#gt#doom 2016#doomdad#bfdg story#mini giant?#Slayer is biggerER
11 notes
·
View notes
Text
Sky: Children of the light cosplay writeup

Wig: The fun part about skykids is you can do basically any hairstyle, so long as it’s in white. Good quality wigs start at about 20 dollars; I just happened to have one on hand that I was willing to recycle for this. If you’re on a budget, consider checking secondhand websites, local cosplay swap meets, and facebook marketplace.
Mask: I used this pattern from Punished Props to make the mask out of 5 mm EVA foam (Which would cost… I want to say $2 at michaels to get a similar sheet?) and then decided I didn’t like it, so I did it over again at 75% size. The gem is resin, painted with nail polish. I like using nail polish as paint; I know it’s not conventional, but it’s super fun and gives a nice shimmer without being overbearing. And then I stuck some aluminum foil onto the back of the gem to give it a nice reflective shine! The eye holes were enlarged somewhat because I shrunk the pattern to begin with, so as they are, I think they give it a more appropriately childish vibe. I put some of the plastic mesh that knitters use in the eye holes and painted it with a bit of shimmery gold! Finally, I just hot glued elastic to use as the strap, no need for leather or anything.

Cloak: 2.5 yards anti pill fleece. It’s a ¾ circle shape, so what you do is buy 1 ¼ yards of the color you want, then the same amount for the(Comes out to 15-20 dollars total; fleece is relatively cheap) and take one, and fold it in half and lay it down so the selvedge is going up and down. Measure on the center fold 29 inches up from the bottom edge, and make a mark with washable marking pen. This is the center. Now, using a yardstick or other measuring tool, continue marking in a circle 29 inches from that dot.
Make a smaller circle using the same dot as a focus, this one about 4 inches in diameter. There’s your neck hole. Now use the first piece of fabric as a pattern to cut out the second. Applique on your stars (I did a five star cape because the look I’m going for is that of a young moth who’s just barely becoming a butterfly, but you can do however many stars you want!) After this, you put the two layers together, and sew, leaving a small opening for turning. Turn, topstitch near the edge, and you’re all done!
You can also use this tutorial if you want more in depth instructions! However, keep in mind that this one requires more fabric to begin with.
Tunic: This was made out of a t shirt pattern and a curtain I thrifted for two dollars. The only real advice I can give here is to make a small pintuck on the inside to sort of cheat the seam on the right side of the chest, and don’t be afraid to make it baggy!
Pants: I already owned these, they’re just a regular pair of khakis, but I’ll budget in five dollars to thrift a new pair.
Shoes: Another thing I already owned. I’m going to cut this out of the budget, because frankly you will want comfortable shoes at the con and can likely get away with something casual.
Candle: Six dollar flameless candle at hobby lobby. The outside is made of actual wax, which is odd and not super durable. I also bought a real red candle and a white one for photoshoots.
So, overall? About $55 in total. You can cut down or cut corners or use coupons, and I don’t think it’s terrible, but there’s also the option of cutting out the mask entirely. Which is entirely fair; masks are a hassle to wear and to see out of, and often require a handler, which cuts down on the things you can do. Anyways, if this helps you at all to put together a cosplay, I’d love to see it!
7 notes
·
View notes
Text
LARP shield diy
I went to my first big LARP last summer, namely Drachenfest. While I had gone to a few tavern evenings, I had never really played a full consistent character, so it was a pretty big thing for me.
Beforehand, I prepared a number of things and also tried my hand at building weapons and a shield for the first time.

This was the result.
Below are a few pictures of the process.

I used a hard foam sheet as a core and bolted a piece of a wooden rod to the back as a handle. I used a hollowed out half of a softball as a boss. It was attached to a Plastazote mat. To secure the screws and edges of the core, I used a fibreglass fabric that was soaked in latex. I used a contact glue called Kövulfix, which is intended for use on leather. It deals well with the porous foam and has excellent properties if you want to sand edges for example.

I designed a pattern on paper and after adding the Plastazote to the other side, I mapped out the pattern to make adjustments.

Because I am not particularly good at drawing, I transferred a real wood texture to the surface in order to instead carve the texture into the foam.

I mainly just added the most prominent features of the pattern and freestyles the rest. I used wood carving tools and my trusted Dremel for this. 😊

After that, I added the rest of the embellishments. Which was a pain. (Although I am currently working on a shield that will have almost 150 individual foam rivets on it, so I guess it’s all relative. 😅)

I used different coloured primer for the wood and metal parts. As you can see I take masking off very seriously. I decided flex paints to avoid latex deterioration, which can be a big problem in LARP.
Because I carved the texture into the foam, I was able to paint the wood mostly by dry brushing, and only adding a few details with the brush.
I have to admit I am really pleased with the result, especially for my first time (although I am aware of a number of aesthetic flaws). 😁
#LARP#larp crafting#LARP gear#shield#buckler#foam weapons#LARP weapons#diy craft#diy#foam shield#crafting#homemade#i dont know#tagging is hard
4 notes
·
View notes
Note
I SAW YOUR POST ABOUT THE PSYCHOPOMP HELMET AND I HAVE TO ASK HOW’D YOU MAKE IT??
i wanted to cosplay her at some point in the future but i’ve never tried my hand at prop making or anything of that matter really so i can’t wrap my head around any like basic concepts to make the psychopomp itself 😭😭
sorry for taking abit to answer, wanted to make sure I was at my PC to answer so I can give Exact Images n stuff of what I got/used
warning: you're gonna need some serious power tools for this. alotta bits I had to get help from my dad bc he has SO MANY hobbies that involve power tools lol
SO
For the base:
you need a good helmet. n finding one of those ain't easy, so you're probs gonna haveta Make Do with something you can cut parts off of.
I used something like this, but cut off the parts that jut out at the ears and the lip at the front. The internal bit that keeps your Actual Head from touching the Actual Helmet is VERY helpful bc (atleast w/ mine) it wasnt a layer of foam or anything that'd be finnicky, it was just straps.
theoretically could also use a cheap-y baseball helmet though obvi you still gotta Mutilate it

For the accessories™:
The antannae are actual extendable radio antannae I harvested from an old boombox n another thing, but you can buy JUST the antannae online

the megaphone/satellite dish bit my dad helped me cut n gut a car alarm type thing and attatch it w/ this silicone stuff he had on hand

And the headphone pieces on the sides are a set of vintage radio headphones I found at a thrift store. these to be exact (they're not v rare n go for 10-30 bucks on ebay)
Though any old, chunky headphones could easily work. These were just what I had on hand. And, as a useful thing, the metal prongs connecting to the headband were perfect to easily bolt in place on the helmet and keep them flexible for easy putting on and taking off. The little radio speaker-y bits on the outside I added my dad had laying around though obvi not 1000% Necessary
And that's all really for the easily bought supplies
The front plate is Literally just a chunk of sheet metal he happened to have on hand, and added the bolts to. The fifth bolt in the middle is the only Functional one that actually attatches to the helmet
And the bit keeping the wires in place is a piece of plastic we melted to shape, painted accordingly, then hot glued in place. Added the screws to make it look abit more Cohesive with the rest of it.
The staples specifically on mine are holes drilled then w/ v thin wire fed through and twisted and trimmed.
Some smaller seams n details I added with super glue since it gave a v subtle raised effect, and bc it cracked in shipping I had to super glue some of the cracks back together Anyways lmao
also had to do alot of spraypainting to get it the right color. Make sure to paint the "accessories" seperate before assembly bc trying to tape off everything could end up Annoying and that way the metal bolts and the plate can retain their orig metal color to add contrast.
Also make sure you get Matte paint, bc it'll look goofy shiny. Preferably something meant for outdoor use bc those will have the more gritty textures you're looking for n its easy to find.
For any extra scuffing n details I did some dry brushing w/ grey and black acrylic to add depth. Best way to do it imo is add some drybrush with a scrappy old paintbrush then wipe away some with a paper towel
or just use a paper towel with a v tiny, thinly spread bit of paint
Hopefully this helps atleast some!! If you need more detailed shots of my helmet for better reference just lemme know, I just dont feel like going to grab her rn for a photo shoot lmao
Good luck w/ your helmet!! n be sure to post it lots when you're done!!
It'll be sick as hell to see how your interpretation turns out!
just be careful bout wearing it too long
start seeing things you're not supposed to
knowing things you're not supposed to
17 notes
·
View notes
Text
Extremely Strong Shower Bench
I've gotten feedback from the community asking me to share my plans, so here it is. If you want to build your own shower bench, this is how you do it. Make sure to ask a thinno for help, this will not be easy to do!
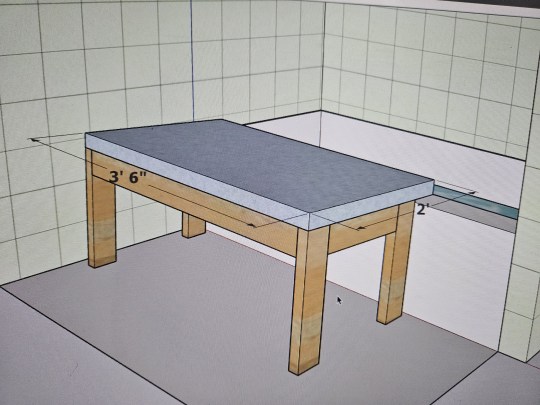
This is an extremely strong shower bench with a 1000+lb capacity. The floor under you will fail before the bench does! This shower bench is designed to remove you from the shower and basically have you sit on the ledge. You will need a couple feet of clearance away from your tub's ledge for it to work.
The top of my tub's ledge is about 1' 3⅜" up from the ground. If yours is taller/shorter by more than ¼" or so, you will need to make some adjustments to measurements down below.
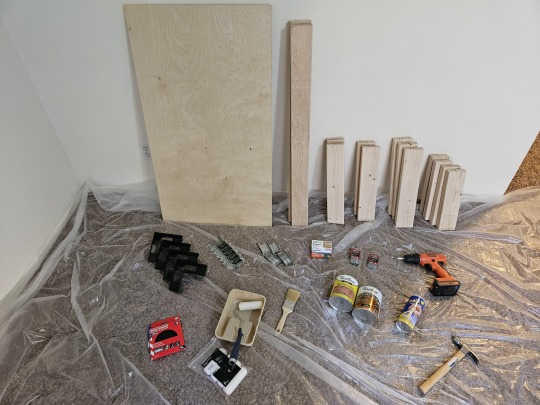
This is a photo of the materials I used to make this build. I got everything I needed at my local hardware store. My build wasn't perfect though. I would suggest you learn from my mistakes and acquire a slightly different material list though:
1x 2'×4' plywood sheet. Get something pre-sanded and rated for outdoor use. I recommend ¾" thick.
2x 8' 2×4s. Most any wood type will work, so get what you like most. I just got some normal 2×4s and made sure they looked pretty. If you don't want to bother with staining or weatherproofing the structure of your bench, get pressure-treated 2×4s.
4x 2' ½"×½" square dowel.
4x Simpson Strong-Tie RTC2Z. Get the black-powder-coated ones if you can.
2x Simpson Strong-Tie LUS24Z. These will be used for the cross beam.
4x Simpson Strong-Tie FB24Z. These will be the feet.
1x Simpson Strong-Drive SD9112R100 #9×1½" 100ct Connector Screws. You won't use the whole box. It comes with a bit.
4x 3" common nails.
32x 1½" common nails.
35x 1" brad/finish nails.
200-220 grit sandpaper.
Oil-based high-gloss polyurethane.
Small dense-foam roller & roller pan.
If you're applying stain, oil stain & staining brush for oil stain.
Liquid rubber. Get something that will provide grip.
Rubber-foam weather stripping. The thicker and wider, the better. I got 20' of 1¼"×7⁄16" and it worked great for me.
4x paper clips, hair ties, or something to hang the feet from.
A plastic tarp, thickness is more important than size.
As for tools, you really only need two things:
Hammer
Drill, ratchet, or socket screwdriver
OPTIONAL: File or knife
I also highly recommend some PPE. Get some cheap/disposable cleaning gloves, a mask of some type, hair ties for your hair, and an old change of clothes.
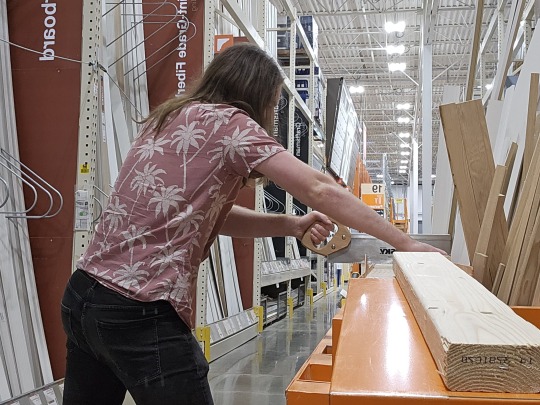
If you don't have access to a table saw at home, *don't leave the store yet!* You need to cut your wood at the store. Many home improvement stores will cut your lumber for you, either for free or for a low price.
Ask an employee to cut the two 2×4s like this:
2×4 #1: 38", 38", 17"
2×4 #2: 33½", 33½", 13", 13"
NOTE: If your tub ledge was taller/shorter than mine, then for every 1" difference, lengthen/shorten each 33½" cut by TWO inches.
Then ask them to cut two dowels down to 20½", and two down to 24".
You should also ask them to take 6" off the short side of the plywood, so it's 2'×3½' instead of 2'×4'.
You're not ready to leave yet! You need to make two more cuts, and the store employees will not help you with these. Many home improvement stores will have a DIY handsaw table where you can cut moulding down to length. You'll need to use this to make the last two cuts yourself.
You need to make an ANGLED cut into the 33½" boards. Lay the first 33½" board down flat as shown. On the edge closest to you, mark a point 1' 5⅛" away from the left end of the board. Then on the edge farthest from you, mark a point 1' 5¼" away from the same left end of the board. Position your saw across both points, and cut through the board. You may need to roll the board over to finish the cut.
NOTE: If your tub ledge was taller/shorter than mine, then for every 1" of difference, add/remove 1" from the 1' 5⅛" / 1' 5¼" measurements above.
For the second board, *do not measure!* It is more important that the cuts in the boards be identical than it is for any one cut to have exact dimensions. Lay the second board down, then set one of the cut pieces on top so the ends of the two boards are aligned, then use the existing angle in the cut piece to start the cut in the second board.

When you are done, you will have four boards, two slightly taller than the others, with the exact same angle cut in all of them. In the above photo, the boards are resting on their angled ends. These pieces will be your long and short legs.
NOW you can bring everything home.
First, lay down your tarp somewhere. Ideally you'll have access to a 5'×10' flat area outside.
Then you need to sand *everything* (except the big faces of the plywood, and the pressure-treated wood if you went that route). Pay special attention to the corners and cuts in the wood.
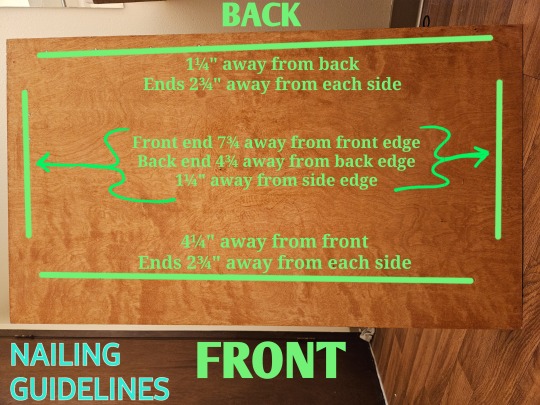
Now you need to attach the square dowels to the outside of the plywood board. Choose a face of the board to be the "up" face, the one you'll sit on. Put the 24" dowels on top, right along the short edges. Choose a long edge to be the back, and squeeze the two shorter dowels in along it between the side dowels. Nail everything down with the finish nails.
Next is staining, if you chose to stain. Apply according to the directions on the tin. You will likely have to do multiple coats.
Now the truly hard part, applying polyeurethane. I recommend using the foam roller for this and applying many coats. You can prop up the plywood sheet using the 2×4s if you like so you can get all the way around the edges in one pass. You'll still need to flip it over and do three more passes when done with the top, so you can protect the underside from warping.
While waiting for your polyethylene to dry, you may as well make the rubber feet. Grab your four FB24Zs and tie something through one of the holes in the end. Open your can of liquid rubber and follow the instructions to fully submerge each one before leaving it out to dry. One coat should be enough. Once dry, try to remove excess rubber from the inside using a file or knife.
When everything's had a good long dry (at least a day after final coat), it's time for assembly.
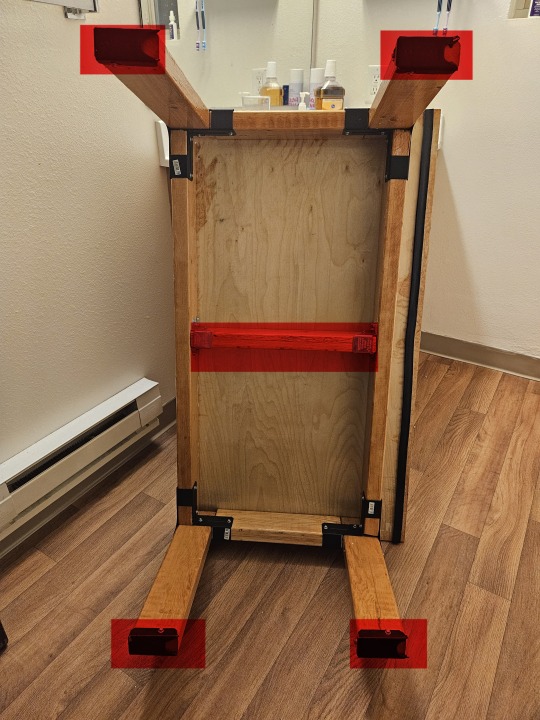
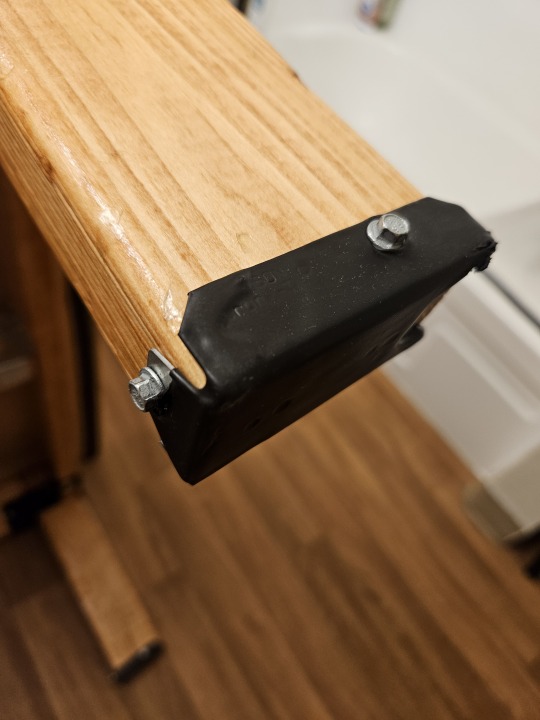
Grab your two 38" boards, your two 13" boards, all four of your legs, and your four RTC2Zs — everything except what's highlighted red in the first photo above. Set the 38" boards down on their narrow side along the long edges of the board, and the 13" boards down on their narrow side along the short edges of the board. Bring them together to form a rectangle, then set the RTC2Zs upside-down on the corners. Each RTC2Z has an L-shaped hole in its bottom; the top/bottom of each L-shaped hole will be filled by the ends of the 38" boards, while the center and left/right of each hole will be filled by the legs. The ends of each 38" board will butt against the wide side of the legs, while the ends of each 13" board will butt against the narrow side of the legs. Now make sure everything is pressed firmly together as you use the Strong-Drive screws to attach the RTC2Zs to the 38" & 13" boards. For each corner, four screws go into the 38" board and two screws go into the 13" board. *DO NOT ATTACH THE LEGS YET!* The legs are just here for spacing right now. Remove the legs when everything is attached.
Grab your 17" board and your LUS24Zs. The 17" board should squeeze in nicely right in the middle, turning your blocky 0 into a blocky 8. Straighten out your LUS24Zs if needed (mine were bowed outwards too much), set them down over the ends of the 17" board, and use 4 screws each to attach them to the sides of the 38" boards. Now grab your long 3" nails and use two on each LUS24Z, installing them at a 45° angle into the remaining holes. They'll nail at an angle into the 17" board and go straight through into the 38" board.
Flip everything over such that the plywood board is now resting good-side-up on top of the mostly-complete frame, with the whole thing resting on the rounded bottoms of the RTC2Zs. Center the frame between the left and right sides of the plywood (should be ½" overhang on each side); let the plywood's back overhang ½" off the back of the frame, and its front overhang 3½" off the front. Now use the 1½" common nails to nail in the plywood into the frame. I used four lines of nails, one for each outer board; measurements are in the second photo above.
OPTIONAL: Apply a final polyurethane coat over the nail heads. This will need a day or two to dry.
Screw the feet into the ends of the legs. See the third photo above for a reference. Try to make the feet as straight and snug as you can get them.
Insert the legs into the holes left from step 1. The short legs go in on the front side, and the long legs go in on the back side. You should have a bench that tilts slightly forward, to allow for water to drain into the tub. Use some sort of material as a spacer as necessary to adjust each leg to level out the bench. Don't be afraid to introduce gaps between the legs and the plywood; the metal connectors are what hold the weight. Once everything is nice and level, use six screws on each leg to attach then to the RTC2Zs.
Apply your rubber-foam stripping. I applied stripping all along the length of my tub's ledge AND along the underside of my bench.

And you're done! Your bench will look different than the photo above, I hadn't yet added the stripping, the wooden dowel siding, or the feet. And perhaps you chose a different stain color, or made your legs out of pressure-treated wood! In any case, this thing is built like a tank (made with actual home framing materials) and shouldn't break easily. I hope it serves you well!
17 notes
·
View notes
Note
hellooo I was wondering where you got ur wig for Cronus, and if/how you styled it, also your horns!!!
My Cronus wig is a black Marty from Arda! Very little styling needed, mostly just a little poofing in the front and some hairspray to keep it in place. It's pricey for a reason--its a good wig!
My horns are handmade by me. They were sculpted out of pink insulation foam sheets with a foam cutting tool, sanded, sculpted again, sanded several more times, and then given several coats of both acrylic paint and hard coat modge podge, followed finally by a gloss coat to protect the paint job and make them shine. I also have magnets in them so i can wear the headband under my wig! I just carved divets out of the bottom of the foam at the base, glued magnets in, and then glued a piece of worbla over the top to hold them in place.
If you decide to use insulation foam to make horns like I have, please do your research--wear a mask while cutting and sanding, and be careful--lots of things, including glue will dissolve the foam, so it has to be well sealed in multiple coats of paint before daring to attempt any gluing. Best of luck with your cosplay endeavors!
3 notes
·
View notes
Text
Play-By-Blog #20: The Isle by Luke Gearing
Welcome to my ongoing play-by-blog of The Isle by Luke Gearing! We are playing this adventure with its original system, The Vanilla Game (adjusted somewhat to fit the format). You can check out the Play-By-Blog Repository to get all caught up if you wish.
How Play-By-Blog works:
I write up the situation, NPCs, and more, just like a DM.
You vote in the poll to help decide the character's course of action.
I roll the dice, resolve actions, and write them up next week.
So on and so forth for the rest of the adventure!
Notation:
[Text in brackets is out-of-character/GM text!] "Non-italicized quotes denote text from the original adventure!" "Italicized quotations denotes NPC dialogue."
Our character: Medon Girou - Magic Cutpurse
Our maps: The Isle, Floor 2, Floor 3
[You can use the links above to find Medon's Character Sheet and map of the Isle and the so far uncovered portions below the surface. On the Dungeon map, you are currently in Floor 2, in Room 15.]
Now, back to the adventure!
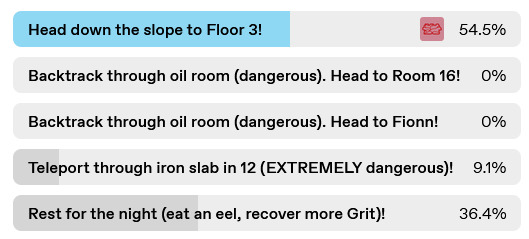
[Due to the closeness (when backing out my own vote) and the smartness of both of this entry's highest ranking options, I'm ruling that we'll do both!] The adrenaline leaves your system for the first time in what feels like hours. Navigating these dark chambers, hiding from skeletal patrols, and now having slain a pack of pale cave eels--it has all taken a toll on you. You are tired. You lean against the stone wall at the top of the ramp leading down into the floor below, set your pack at your side and rest, letting the eel bodies continue to bleed out.
You have heard their blood is poisonous and that's why they are so often cooked before eating, even in the wild, but you don't have any way to make a fire here and it's too far and potentially too dangerous to head back to Fionn's chamber tonight. You'll chance it on the eels.
After resting for a while, you cut one of the eels into a number of larger steaks, removing the skin and eat it one slice of your fishgutting knife at a time. [Poison Save: 4 - Under Saving Throw of 8 - Success!] It tastes earthy and strange, but already you can feel it beginning to nourish your body and mind.
You rest for the night. In the chambers around you, all is quiet. Nothing disturbs the surface of the flooded chamber and nothing seems to trigger the oil and spark trap to the north. All too is quiet from below, down the ramp. [Healing Roll - 1d6: 3! 3 Grit recovered (up to a total of 5)!]
In the morning (or what you imagine to be the morning in this sunless space beneath the isle), you pick up your pack, stretch your aching body, and begin down the well worn stairs to the floor below.
The flooding continues, to varying degrees, down in this lower level. You walk down into water, keeping your eye out for more eels, until, at a point, it is nearly reaching your chest. With your pack above your head, you continue forward through the dark, quiet water until the hall opens into a large natural stone cavern, the soft glow of your amulet failing to reach the outer edges or ceiling of the chamber. The water lowers as you rise up onto the cavern's floor.
"A natural stone cavern, barely worked with tools. Ankle-deep seawater, and fresh salt smell. A huge brass door blocks the western exit. The metal is not smooth—the surface is a tapestry of screaming faces crushed beneath a rampant bull. Their blood forms a wave, and the foam atop the wave is all wolf heads. The heads pursue running deer, boar and cattle—crowned and faceless... A wheel, 5' across, juts from the door's face."
The metal door itself has a strange, shimmery quality to it. Being near it feels unnaturally cold. Other than the wheel, you can't see any mechanism, even hinges.
[Sorry for the delay in this entry! I had a SUPER busy week last week, missed the original day and then put it off long enough that it just made sense to skip that week and get it going today. As always, feel free to drop any other suggested courses of action in the comments/reblogs! Thanks for much for reading along with Medon's adventures! - Christian]
PBB #21 is live now!
#meatcastle pbb#ttrpg#indie ttrpg#ttrpgs#rpg#fantasy#luke gearing#play by blog#play by post#the isle#polls#choose your own adventure
9 notes
·
View notes