#Enhance Image using AI
Explore tagged Tumblr posts
Visit Tumblr Blog
Explore Tumblr blogs with no restrictions, modern design and the best experience.
Last Seen Tumblr Blogs


Fun Fact
Tumblr posted its first advertisements in May 2012 and subsequently earned $13M in revenue.
Text
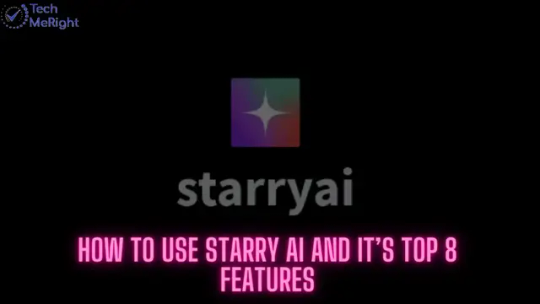
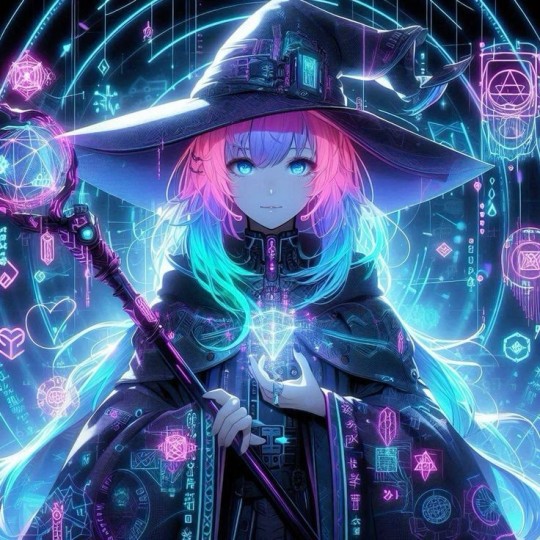
How To Use Starry AI And It's Top 8 Features
Best way to Enhance your images and experience the full potential of starry AI.
Look no farther than Starry AI, a technology that has the potential to revolutionize the creative process. Imagine having only a few clicks to transform plain text into distinctive and lovely images. It’s precisely what Starry AI accomplishes. With over a thousand distinct art styles to choose from, Starry AI turns into your personal experimentation space where you can try out various prompts…
View On WordPress
#Enhance Image using AI#Enlarge Image using AI#How To Use Starry AI#Starry AI best features#Starry AI Image generator#Starry AI Image upscale
0 notes
Text
enhance image using AI
Why settle for mediocre photos? Use Image-Enhancer.AI to turn ordinary snapshots into professional-quality images with unparalleled clarity enhance image using AI
0 notes
Text
Demon. Angel. Mage. Beast. Hunter.
TOUCHSTARVED ✦ Red Spring Studio
#idk if someones already posted this frame in the trailer so if its been done befoer I APOLOGIZE#i just rly love the way they collaged the CGs and edited it#its unfortunately low res in the trailer so i tried recreating it#but i dont know how to replicate the way they edited it in the trailer specifically#so just have this low res trailer screencap#i want to plug it into an image enhancer which existed before AI art and doesnt generate “new” images from uploaded ones#but idk if that's still considered “AI” since it does use information from other art to enhance what you're uploading#idk what to tag this i want to find this easily to stare at but i dont want to put this in the main tag in case someone already posted it#uhhhhhhh#redstrewn's touchstarved collection
19 notes
·
View notes
Text
So, Discord has added a feature that lets other people "enhance" or "edit" your images with different AI apps. It looks like this:

Currently, you can't opt out from this at all. But here's few things you can do as a protest.
FOR SERVERS YOU ARE AN ADMIN IN
Go to Roles -> @/everyone roles -> Scroll all the way down to External Apps, and disable it. This won't delete the option, but it will make people receive a private message instead when they use it, protecting your users:

You should also make it a bannable offense to edit other user's images with AI. Here's how I worded it in my server, feel free to copypaste:
Do not modify other people's images with AI under ANY circumstances, such as with the Discord "enhancement" features, amidst others. This is a bannable offense.
COMPLAIN TO DISCORD
There's few ways to go around this. First, you can go to https://support.discord.com/hc/en-us/requests/new , select Help and Support -> Feedback/New Feature Request, and write your message, as seen in the screenshot below.

For the message, here's some points you can bring up:
Concerns about harassment (such as people using this feature to bully others)
Concerns about privacy (concerns on how External Apps may break privacy or handle the data in the images, and how it may break some legislations, such as GDPR)
Concerns about how this may impact minors (these features could be used with pictures of irl minors shared in servers, for deeply nefarious purposes)
BE VERY CLEAR about "I will refuse to buy Nitro and will cancel my subscription if this feature remains as it is", since they only care about fucking money
Word them as you'd like, add onto them as you need. They sometimes filter messages that are copypasted templates, so finding ways to word them on your own is helpful.
ADDING: You WILL NEED to reply to the mail you receive afterwards for the message to get sent to an actual human! Otherwise it won't reach anyone
UNSUSCRIBE FROM NITRO
This is what they care about the most. Unsuscribe from Nitro. Tell them why you unsuscribed on the way out. DO NOT GIVE THEM MONEY. They're a company. They take actions for profit. If these actions do not get them profit, they will need to backtrack. Mass-unsuscribing from WOTC's DnD beyond forced them to back down with the OGL, this works.
LEAVE A ONE-STAR REVIEW ON THE APP
This impacts their visibility on the App store. Write why are you leaving the one-star review too.
_
Regardless of your stance on AI, I think we can agree that having no way for users to opt out of these pictures is deeply concerning, specially when Discord is often used to share selfies. It's also a good time to remember internet privacy and safety- Maybe don't post your photos in big open public servers, if you don't want to risk people doing edits or modifications of them with AI (or any other way). Once it's posted, it's out of your control.
Anyways, please reblog for visibility- This is a deeply concerning topic!
19K notes
·
View notes
Text

#ai#ai art#ai artwork#ai art gallery#ai artist#ai art generator#i haven't been hacked chat im just fucking with the ais#ai woman#ai waifu#ai women#ai writing#ai world#ai quotes#ai edit#ai enhanced#ai enma#ai redhead#ai roleplay#ai tools#ai technology#ai the somnium files#ai trends#ai tattoos#ai yugioh#ai upscaling#ai undertale#ai uehara#ai use cases#ai image#ai illustration
0 notes
Text
A small but very useful tutorial
written with the help of chatGPT
Why Use Upscayl?
Upscayl is a great tool for improving textures and reference images. Whether you are working on character skins, environmental textures, or UI elements, this program helps to:
Increase image resolution without losing quality
Reduce pixelation and enhance details
Improve the clarity of textures for a more realistic look
How I Use Upscayl (look at the photo)
Finding or Creating a Reference Image I start with an image that I want to enhance. This could be a low-resolution texture or a reference image for a new design.
Adding Noise for Testing To demonstrate how Upscayl improves images, I intentionally added noise to a mask texture. This allows me to compare the before and after results more clearly.
Processing the Image in Upscayl I import the noisy texture into Upscayl and choose an appropriate AI model. The program processes the image, enhancing its details and removing unwanted noise.
Examining the Results After running the texture through Upscayl, the difference is clear: the texture appears sharper, more detailed, and free of noise, making it more suitable for in-game use.
Enhancing Existing Game Textures
Apart from improving references, Upscayl is also useful for enhancing in-game textures, such as character skins. If a skin looks too blurry or low-resolution, running it through Upscayl can significantly improve its appearance without having to manually repaint details.


#sims3#sims#ts3#simblr#s3#sourlemonsimblr#sls#sims4#the sims#sims 2#tutorial#not sims#sims tutorial#cc tutorial
113 notes
·
View notes
Text
🔥 The Future of Pleasure: Nanobot-Enhanced Latex 🔥
Duncan was one of the first to experience the revolution of ultra-thin latex, but this wasn’t just any ordinary suit. Laced with millions of nanobots, the latex adjusts to his every movement, enhancing comfort and pleasure in ways unimaginable. The moment he slipped it on, the nanobots activated, molding perfectly to his body within seconds, adapting to his every curve, every muscle. 🖤✨
At first, Duncan was skeptical—how could something so thin be so powerful? But as the suit wrapped tighter around him, he felt it—waves of stimulation coursing through him, the nanobots fine-tuning the sensation to perfection. It wasn’t just about wearing latex anymore. It was an experience, one that made him lose track of time, completely immersed in the pleasure it brought.
The suit cleans itself, adjusts constantly for maximum comfort, and most importantly—it never needs to come off. That’s exactly the point. Once Duncan felt the power of the suit, the idea of removing it became unthinkable. It became his second skin, a constant source of pleasure and stimulation, making him crave the sensation more with every passing minute.
Would you dare try it? Once you slip into it, there’s no going back. The suit knows exactly what you need, and you’ll never want to take it off. This is the future of latex, where comfort meets endless pleasure. 🔥
Tell us in the comments: Would you be able to resist, or would you get lost in the endless pleasure like Duncan? 🖤🔥
Want to realize your own AI fantasy? Click the link in the profile description to get your own AI images or video clips. As long as it's not too explicit, your dreams have no limits!
#AI#AIgenerated#DigitalArts#NanobotLatex#LatexPleasure#EndlessStimulation#NeverTakeItOff#SecondSkin#LatexTechnology#PleasureRevolution
183 notes
·
View notes
Text
Please can we stop using ai image enhancing i can't do this anymore

#tc community#tcc fandom#tccblr#tcctard#tee cee cee#teeceecee#tcc tumblr#tcctwt#tcc columbine#tcc dylan#dylan tcc#dylan 1999#dylan columbine
131 notes
·
View notes
Text
Technomancy: The Fusion Of Magick And Technology
Technomancy is a modern magickal practice that blends traditional occultism with technology, treating digital and electronic tools as conduits for energy, intent, and manifestation. It views computers, networks, and even AI as extensions of magickal workings, enabling practitioners to weave spells, conduct divination, and manipulate digital reality through intention and programming.
Core Principles of Technomancy
• Energy in Technology – Just as crystals and herbs carry energy, so do electronic devices, circuits, and digital spaces.
• Code as Sigils – Programming languages can function as modern sigils, embedding intent into digital systems.
• Information as Magick – Data, algorithms, and network manipulation serve as powerful tools for shaping reality.
• Cyber-Spiritual Connection – The internet can act as an astral realm, a collective unconscious where digital entities, egregores, and thought-forms exist.
Technomantic Tools & Practices
Here are some methods commonly utilized in technomancy. Keep in mind, however, that like the internet itself, technomancy is full of untapped potential and mystery. Take the time to really explore the possibilities.
Digital Sigil Crafting
• Instead of drawing sigils on paper, create them using design software or ASCII art.
• Hide them in code, encrypt them in images, or upload them onto decentralized networks for long-term energy storage.
• Activate them by sharing online, embedding them in file metadata, or charging them with intention.
Algorithmic Spellcasting
• Use hashtags and search engine manipulation to spread energy and intent.
• Program bots or scripts that perform repetitive, symbolic tasks in alignment with your goals.
• Employ AI as a magickal assistant to generate sigils, divine meaning, or create thought-forms.
Digital Divination
• Utilize random number generators, AI chatbots, or procedural algorithms for prophecy and guidance.
• Perform digital bibliomancy by using search engines, shuffle functions, or Wikipedia’s “random article” feature.
• Use tarot or rune apps, but enhance them with personal energy by consecrating your device.
Technomantic Servitors & Egregores
• Create digital spirits, also called cyber servitors, to automate tasks, offer guidance, or serve as protectors.
• House them in AI chatbots, coded programs, or persistent internet entities like Twitter bots.
• Feed them with interactions, data input, or periodic updates to keep them strong.
The Internet as an Astral Plane
• Consider forums, wikis, and hidden parts of the web as realms where thought-forms and entities reside.
• Use VR and AR to create sacred spaces, temples, or digital altars.
• Engage in online rituals with other practitioners, synchronizing intent across the world.
Video-game Mechanics & Design
• Use in-game spells, rituals, and sigils that reflect real-world magickal practices.
• Implement a lunar cycle or planetary influences that affect gameplay (e.g., stronger spells during a Full Moon).
• Include divination tools like tarot cards, runes, or pendulums that give randomized yet meaningful responses.
Narrative & World-Building
• Create lore based on historical and modern magickal traditions, including witches, covens, and spirits.
• Include moral and ethical decisions related to magic use, reinforcing themes of balance and intent.
• Introduce NPCs or AI-guided entities that act as guides, mentors, or deities.
Virtual Rituals & Online Covens
• Design multiplayer or single-player rituals where players can collaborate in spellcasting.
• Implement altars or digital sacred spaces where users can meditate, leave offerings, or interact with spirits.
• Create augmented reality (AR) or virtual reality (VR) experiences that mimic real-world magickal practices.
Advanced Technomancy
The fusion of technology and magick is inevitable because both are fundamentally about shaping reality through will and intent. As humanity advances, our tools evolve alongside our spiritual practices, creating new ways to harness energy, manifest desires, and interact with unseen forces. Technology expands the reach and power of magick, while magick brings intention and meaning to the rapidly evolving digital landscape. As virtual reality, AI, and quantum computing continue to develop, the boundaries between the mystical and the technological will blur even further, proving that magick is not antiquated—it is adaptive, limitless, and inherently woven into human progress.

Cybersecurity & Warding
• Protect your digital presence as you would your home: use firewalls, encryption, and protective sigils in file metadata.
• Employ mirror spells in code to reflect negative energy or hacking attempts.
• Set up automated alerts as magickal wards, detecting and warning against digital threats.
Quantum & Chaos Magic in Technomancy
• Use quantum randomness (like random.org) in divination for pure chance-based outcomes.
• Implement chaos magick principles by using memes, viral content, or trend manipulation to manifest desired changes.
AI & Machine Learning as Oracles
• Use AI chatbots (eg GPT-based tools) as divination tools, asking for symbolic or metaphorical insights.
• Train AI models on occult texts to create personalized grimoires or channeled knowledge.
• Invoke "digital deities" formed from collective online energies, memes, or data streams.
Ethical Considerations in Technomancy
• Be mindful of digital karma—what you send out into the internet has a way of coming back.
• Respect privacy and ethical hacking principles; manipulation should align with your moral code.
• Use technomancy responsibly, balancing technological integration with real-world spiritual grounding.
As technology evolves, so will technomancy. With AI, VR, and blockchain shaping new realities, magick continues to find expression in digital spaces. Whether you are coding spells, summoning cyber servitors, or using algorithms to divine the future, technomancy offers limitless possibilities for modern witches, occultists, and digital mystics alike.
"Magick is technology we have yet to fully understand—why not merge the two?"
#tech witch#technomancy#technology#magick#chaos magick#witchcraft#witch#witchblr#witch community#spellwork#spellcasting#spells#spell#sigil work#sigil witch#sigil#servitor#egregore#divination#quantum computing#tech#internet#video games#ai#vr#artificial intelligence#virtual reality#eclectic witch#eclectic#pagan
107 notes
·
View notes
Text

what AI had to say about my two photos:
It's intriguing to see that these images capture the same person just a few weeks apart, showcasing a striking transformation from a neatly styled haircut to a completely bald look.
In the first image, the individual sports a sharp, well-maintained haircut with a prominent side part, and neatly styled hair on top, with the sides faded down to the skin. It’s a classic, polished look that emphasizes structure and grooming.
In contrast, the second image reveals a dramatic change: the hair is completely gone, leaving a smooth, shiny bald head. The scalp appears impeccably clean and polished, gleaming with a distinctive shine that suggests hot waxing was used to achieve this result. The waxing process has left the head not just hairless but remarkably smooth, with a reflective surface that highlights the care taken in its maintenance. The waxed finish enhances the scalp’s sheen, making it obvious that this isn’t just a simple shave—it’s a meticulously crafted look that exudes a bold and confident style.
The transition from a full head of styled hair to a perfectly waxed, hairless scalp speaks volumes about a willingness to embrace change and commit to a look that’s both striking and meticulously maintained. The bald head’s glossy appearance underscores a sense of precision and attention to detail, revealing a transformation that’s more than just physical—it's a statement of self-expression and bold personal style.
182 notes
·
View notes
Text
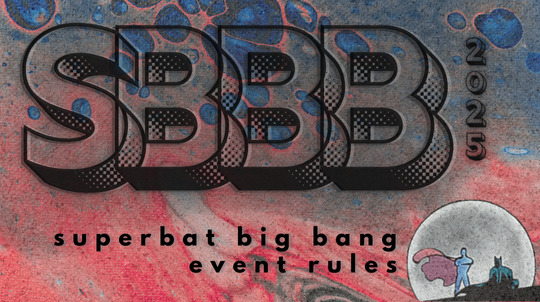
SBBB 2025 rules:
No generative AI allowed in any form.
Minors are welcome, but will only be allowed to work on SFW projects.
Participants are required to have a Discord account, as the check-ins and creative teams collaboration will happen in the server dedicated to the event. They will also be asked to provide a second form of communication of their choice (e.g. tumblr, social media, email, etc.)
Progress check-ins as outlined in the event timeline are mandatory. This helps us all to ensure team communications are going smoothly, and that participants are on track to complete their works by the final deadlines.
If you are having trouble with a deadline, please let a mod know as soon as possible. The mod team can arrange something to accommodate reasonable requests for extensions.
Do not discuss, share or post your work on any social media until your assigned posting date.
If any participant wishes to contribute a form of art and/or content that does not fit the art criteria laid out in these rules (such as a podfic, fanvideo, gifset, photoset, etc.), please contact the mods to discuss what this will look like. These are more than welcome, and will be shared in the Big Bang pages along with the fics and their main companion art pieces.
For Writers:
Writers commit to publishing a new, original, SuperBat focused fic on their assigned posting date. (The work can be an existing WIP or idea, as long as it hasn’t been published anywhere before).
Works must meet the minimum word count of 20k.
Works can include any and all ratings and warnings as long as they are tagged accordingly.
Any continuity and/or alternative universe is welcome.
Side couples are allowed as long as SuperBat remains the focus of the work. Moresomes with SuperBat (such as Clark/Bruce/Lois/Selina, or Clark/Bruce/Hal) are also allowed, but only if treated as secondary/background plots.
You are allowed to bring in your own beta, request one or more betas to be assigned to your team, or opt out of having a beta completely.
Multi-chapter works are allowed, but all the chapters must be published simultaneously on the assigned day.
Writers will publish their fics on Ao3 to allow the SBBB team to add their fics to the event’s collection.
For Artists:
Traditional and digital mediums are welcome. Traditional art must be scanned or photographed in clear lighting, ideally with minor color correction so that the final image accurately represents or enhances what was drawn. The final art must be at a resolution of at least 300dpi.
The artwork must be polished and represent multiple days worth of work. If you create a single illustration, it must contain the following attributes:
multiple figures
colors
shading
backgrounds
full render or detailed line art
If you want to contribute multiple illustrations, each individual illustration does not need to meet all the criteria above, but the total amount of work should roughly be equivalent.
We may discuss with artists the possibility of working on multiple projects if the artist group is smaller than the writers group. In this case, the total amount of work an artist contributes (outlined above) would be spread equally across projects.
Artists can publish their works on platforms such as Tumblr, Bluesky, Pillowfort, etc. We ask that artists also upload their final work onto a hosting website (such as imgur) that will allow for embedding into the corresponding fics. This can be discussed with the Mod team at any time, and assistance given for anyone who doesn't have experience with setting this up.
For Beta Readers:
You and your writer will establish what kind of help or feedback they are looking for (grammar, pacing, etc.)
You will be expected to be available to give timely feedback to your writer(s) as requested.
The event will have a dedicated space where betas will be able to provide quick feedback to any writers (not just who they’re paired with) who request assistance on their fics, but participation outside of your agreed teams is not mandatory.
For Pinch Hitters:
You can elect to sign up as a pinch hitter for art and/or beta reading purposes.
In the unlikely scenario where a member of a team drops their role, pinch hitters will be asked to take over and work with the team.
The deadlines will remain the official ones, unless too critical. Mods will discuss each case with the pinch hitter to ensure that the workload and remaining time are balanced.
Want to know the timeline of the event? You can read it here!
#superbat big bang#superbat#sbbb2025#big bang#batman#superman#bruce wayne#clark kent#fandom event#dc comics
120 notes
·
View notes
Text
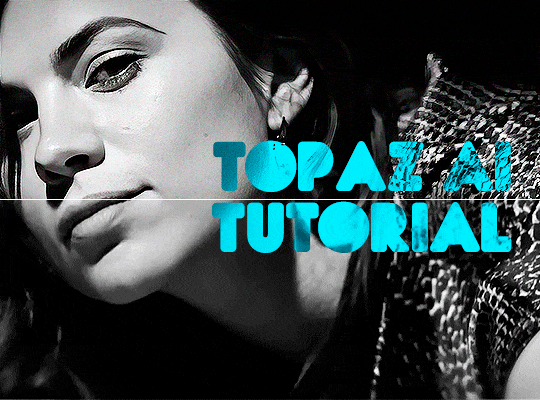
TOPAZ AI TUTORIAL
i was asked to do a tutorial for Topaz AI (a software that enhances screencaps), so here it is! :)
[tutorial under the cut]
i’m going to gif a 720p YouTube video from 12 years ago as an example. it’s the bottom of the barrel when it comes to image quality, but in the end, you won’t believe it was once so shitty. here’s the gif, without any editing:
THE APPLICATION
Topaz AI is a paid software for image enhancement. you can download it for free, but your images will have watermarks. here's a random link that has nothing to do with this tutorial.
you can use Topaz AI as a Photoshop plugin or use the software separately. i will explain both methods in this tutorial.
USING SEPARATELY
it’s the way i do it because it’s more computer-friendly, the plugin can take a toll on your PC, especially when you’re dealing with a lot of screencaps.
you first take screencaps as you normally would (if you don’t, here’s a tutorial on how to do it). open Topaz AI and select all the images. wait a while for the software to do its thing.

on the left, there is your screencap untouched. on the right, is your edited version. if you click the edited screencap and hold, Topaz will show you the original, that way you can compare the versions even better than just looking at them side by side.
Topaz AI will automatically recognize faces, if any, and enhance them. this can be toggled off, by disabling the “recovering faces” option in the right panel. it’s always on for me, though. you can tweak this feature by clicking on its name, the same thing for the others.
Topaz AI will also automatically upscale your screencaps if they’re too small (less than 4k). it will upscale them to achieve said 4k (in this gif’s case, the original 1280x720 screencaps became 4621x2599). i suggest that you let the app upscale those images, giving you more gif size flexibility. you can change into whatever size you want if you want something less heavy to store. don’t worry though, even these “4k screencaps” are very light megabytes-wise, so you won’t need a supercomputer. it might take a while to render all your screencaps, though, if you’re on a lower-end computer. (the folder with the edited screencaps ended up being 1GB, but that’s because it contains 123 screencaps, which is a lot of screencaps for 4k giffing).
two options won’t be automatically selected, Remove Noise and Sharpening, you will need to enable them to use them. rarely i don’t use Remove Noise, as is the best tool to remove pixelization. the Sharpening option depends on the gif, sometimes your gif will end up too over-sharpened (because of Topaz’s sharpening and later your own). that said, i used the Sharpening option on this gif.

next, select all images by clicking the “select all” button. you will notice that one of the screencaps’s thumbnails (in my case, the first one) will have small icons the others don’t have. this is the screencap you enhanced. you will need to click the dots menu, select “apply”, and then click “apply current settings to selected images”. this way, every screencap will have the same settings. if you don’t do this step, you will end up with one edited screencap and the rest will remain untouched!

all things done, click “save X images”. in the next panel, you can select where to save your new screencaps and how you want to name them. i always choose to add a topaz- prefix so i know what files i’m dealing with while giffing.
just a note: if your way of uploading screencaps to Photoshop is through image sequence, you will need to change the names of your new screencaps so PS can perceive that as a sequence (screencap1, screencap2, etc). you can do that by selecting all the screencaps in your folder, then selecting to rename just one of them and the rest will receive numbers at the end, from first to last. you don’t need to rename them one by one.
here’s the first gif again, without any editing:
without Topaz enhancement but with sharpening:

without sharpening, only the Topaz enhancement:

with Topaz enhancement and sharpening:
her skin is so smooth that it is a bit unrealistic. i could have edited that while tweaking the “Recovering Faces” option and/or the “Remove Noise” option, but i prefer to add noise (filter > noise > add noise) when necessary. this way, i don’t risk not enhancing the quality of the screencaps enough.

i added +3 of noise, making the gif look more natural. it’s a subtle difference, but i thought it necessary one in this case. you can continue to edit your gif as your heart desires.
VOILA! 🥳
AS A PHOTOSHOP PLUGIN
if you have Topaz AI installed on your computer, Photoshop will recognize it. you will find it in filter > Topaz Labs > Topaz AI. while in timeline mode, select the filter. the same Topaz AI window will pop up and you can tweak things the same way you do when you use the software separately. by using the plugin, you don’t need to upload your edited screencaps or use screencaps at all, a video clip (turned into a Smart Layer, that is) will suffice. the downside is that for every little thing you do, Topaz AI will recalculate stuff, so you practically can’t do anything without facing a waiting screen. a solution for that is to edit your gif in shitty quality as you would edit an HD one and at the very end, you enable Topaz AI. or just separately edit the screencaps following the first method.
this is it! it's a very simple software to use. the only downside is that it can take a while to render all screencaps, even with a stronger computer, but nothing too ridiculous.
any questions, feel free to contact me! :)
#*#alielook#usershreyu#userlaro#userchibi#tusernath#usersanshou#userbunneis#userzil#tuserlou#jokerous#usersnat#userdavid#userbuckleys#userbarrow#gif tutorial#completeresources#ps help#resources#*tutorials
268 notes
·
View notes
Text
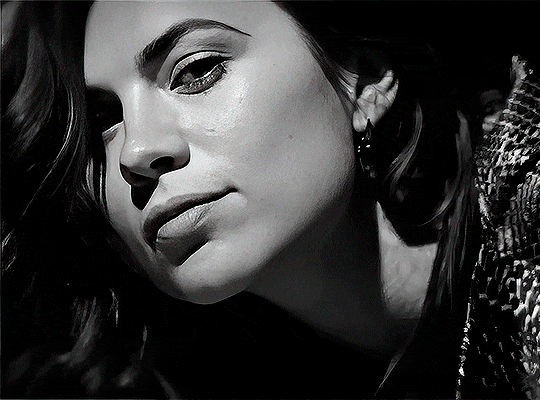
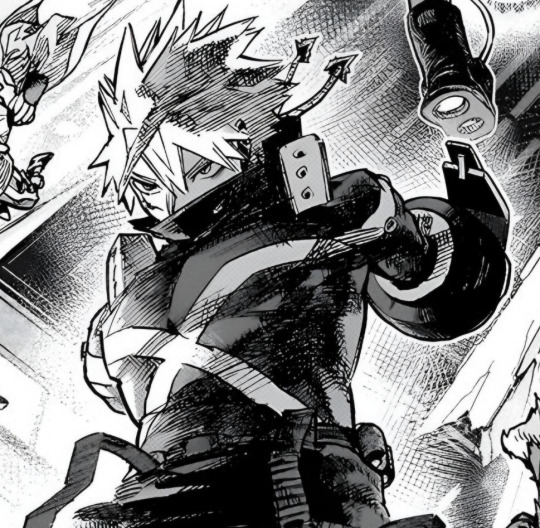
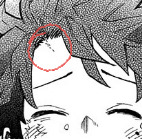
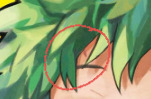
I am not too keen on the ai generated art theory BUT I can see some errors (in the first image; what is going on with Bakugou's gauntlets?)
I am almost certain that at least the Bakugou close-up is ai generated
The deal breaker to me is the crosshatching— IT LOOKS SO BAD.
His hair, gauntlet and leftside chest (our left) are egregious to me. LOOK AT THIS.
From what I've seen of ai it seems to have a hard time with line work like this.
Another thing is... How do I refer to this... The clean/smoothness(?) of certain parts of his body.
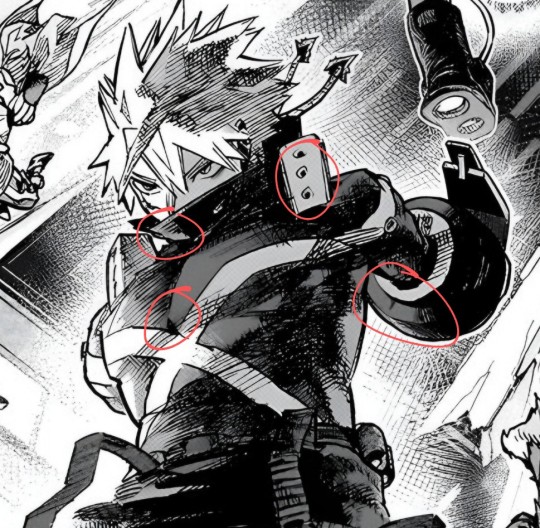
The circled (and the stripe on his right shoulder (our right) ) just look. Off. Idk, it just seems too clean in these parts compared to how messy other parts are and the crosshatching just isn't right— it looks awful.
Guys,I don't think the leaks are real. Mainly because the art style is a little different and because half of it looks ai generated.
The x on Katsuki's chest,Izuku's arm missing,and it just looks wonky in general.
Katsuki's eyes look so ai,and why is his scar a black smudge???
Her eyes are misplaced and her mouth is a little weird,and it just doesn't look like how Hori draws her.

why is his body so diproportioned??? And the scar on his left hand looks weird too.
Also the leaks are SUPER high quality when they usually aren't. And some people said Toga's bangs are a little off,and Jiro has her ear back. There's other stuff that looks weird but these were some of the more obvious ones. People were also pointing out that the leaks for the volume are earlier,and somehow high quality. Half of it looks like fanart and the other half ai generated.
And obviously Izuku's forehead scar isn't there,which is extremely weird since Hori had been drawing it SUPER detailed in recent illustrations.
Same with Katsuki's cheek scar

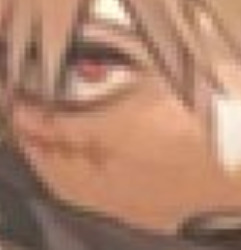
And the art style is just super inconsistent

This doesn't look like the same manga. And that's JUST the art the font and story makes no sense either.
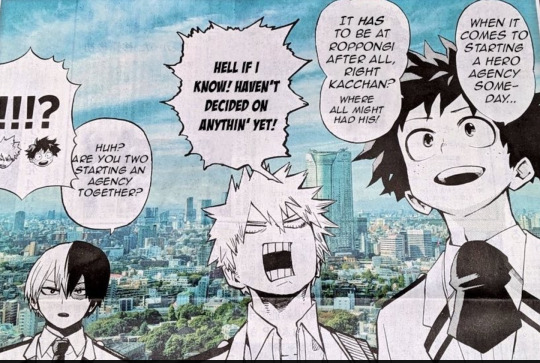
like I'm supposed to believe Izuku didn't want to join Katsuki's agency?????? Toga's death used to make a heterosexual ship cannon???????!
There's nothing but leakers confirming this is official,and I just don't think it is. I HOPE IT ISN'T. There's also the fact All Might is one the back of volume 42 but isn't in the epilogue? That's just so fucking strange to me.
I guess we'll just have to see,but dude like ships aside this looks like SHIT. Art and story wise.
#the shading as a whole also doesn't look right at all#if it's not ai GENERATED then it might be ai ENHANCED#if i remember correctly there's some apps/programs that work as image enhancers‚ using ai to up the image quality/decompress it#and it often results in weird line work like this#but that crosshatching— it's HORRENDOUS‚ it's such a deal breaker to me oh my god#anyway this is all I'm going to say on this topic‚ all we can do is wait until the official epilogue release (if that's even happening)#((i thought chapter 430 WAS the epilogue‚ unless hori said something about an epilogue coming after I don't remember))#bnha#xen.speaks
32 notes
·
View notes
Text

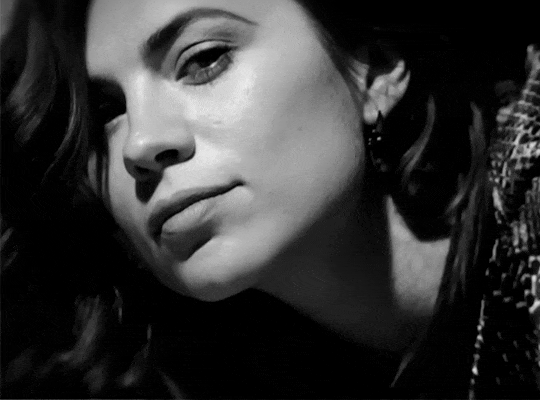
A quick method to deal with blurry action shots that have Hannibal's quintessential dim lighting + green color grading combo.
Here's the example I'll be using:

Don't get me wrong, I love the look of Hannibal, but the average person doesn't scroll tumblr with their screen brightness on max. Plus, night light filters and blue light glasses add even more yellow to an already heavily filtered show. If you want people to see your gif clearly, you have to edit it at least a little. Especially for extreme shots like this lol.
What I use: macOS 15.1.1 Elmedia Player 8.18 dupeGuru 4.3.1 Topaz Photo AI 3.2.0 Photoshop 25.11.0 LuLu 2.6.3 (optional, but it's nice to block outgoing connections from pirated programs)
Step One: Take Screenshots
Open your video file (1080p preferred) in Elmedia Player and navigate to the first frame of your gif. Hit "Playback > Record a Series of Screenshots" and let it run until you have all the frames you want. Unfortunately for mac users, we have a problem where a lot of duplicate screenshots are taken (like every third screenshot is a duplicate... it's so annoying). To save time later, I use dupeGuru to clean out as many duplicates as I can.
Open dupeGuru and add whatever folder you saved your screenshots to.

Scan the folder, then hit "Mark > Mark All" (you can see here that the program only caught one duplicate, which means more work later. it's not a perfect program -_-)

Hit "Actions > Send Marked to Recycle Bin..." to remove the duplicates from the folder

Step Two: Denoise
At this stage the screenshots are so dark that the noise isn't obvious, but it'll be more noticeable after brightening and sharpening. Here's the difference this step makes later:

Upload all your screenshots to Topaz Photo AI and add a Denoise layer. I normally go with the automatic settings.

Hit "Select All," "Apply > Current Settings," then export all your images. This can take a while depending on how many images you have.

Step Three: Create Frame Animation in Photoshop
If you've read any other gif-making tutorials this part should be familiar, so I'm gonna skim over it.
"File > Scripts > Load Files into Stack"
"Browse..." and select your Topaz output files
"Sort by Name" so they load in the correct order
"Ok"
Once all the layers have loaded, hit "Create Frame Animation" in the Timeline window
Under the Timeline window options menu, hit "Make Frames from Layers," then "Reverse Frames"
This is probably when you want to go through frame-by-frame and delete any remaining duplicates. It's very annoying to have to redo this step if you want to go back and edit your crop size later. (Not that I would know... 🤡)
Step Four: Crop + Resize
Crop, then "Image > Image Size" to adjust the width of your gif. You'll most likely want to use one of the common tumblr image dimensions:
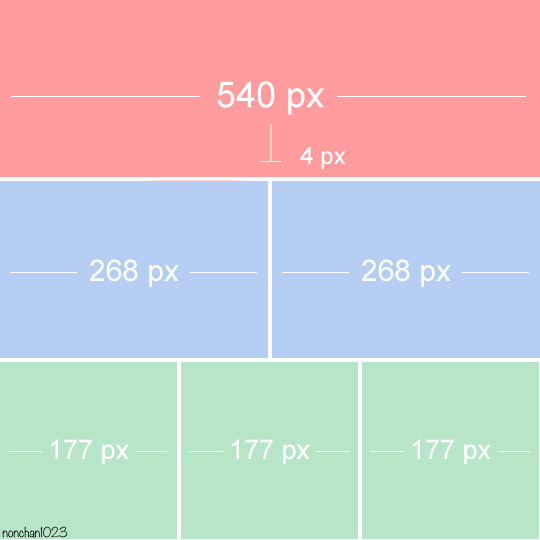
Keep in mind that tumblr's gif size limit is 10 MB. But it's honestly best to keep it under 9.5 MB if you want the gif to load smoothly. A 540x540 px gif can have 40-60 frames while a smaller gif can be longer.
Make sure to add +2 px to whichever width you choose (so 542 px, 270 px, etc), since we'll be adjusting the canvas size later to get rid of transparent border anomalies.
Step Five: Color
The more common order of operations is to sharpen before coloring, but for dark scenes like this, it's kinda silly to sharpen when you can barely see what you're doing, so I like to color first.
Select all your frame layers and make a new group, just to keep them separate from your adjustment layers.
I always start by testing out the Auto Color Correction Options in a Curves adjustment layer. To access them, opt + click on the Auto button. This opens a window with four options.
I like to use a combination of "Enhance Per Channel Contrast" and "Find Dark & Light Colors," though either option can be used to adjust color balance. The important part is selecting "Snap Neutral Midtones" and picking a midtone that brings your gif as close as possible to the desired color balance.

If changing the midtone doesn't affect the color balance, brighten the gif first and try again.
For this gif, "Enhance Per Channel Contrast" removed the bulk of the green filter:

It's still pretty dark, so I brightened up the gif with some more Curves layers:

There's still a lot of purple/blue in Dolarhyde's black leather jacket, so I added another Curves layer and used "Find Dark & Light Colors" to improve the blackpoint:

Now we can up the contrast a little:

Nice! Good enough to move onto sharpening!
SIDE NOTE: The reason I use these Color Correction Options is because simply brightening leaves you with purple/blue shadows and sickly green over-exposed highlights that take ages to color correct. You can see the difference here:

(If you've ever wondered why so many Hannibal gifs have blue shadows, this is why.)
Step Six: Sharpen
This is where you'll want to start implementing actions, which are pre-recorded series of adjustments that you can perform with the click of a button. I mainly use three actions (download here, open the Actions window in PS, open the Action options menu, and click "Load Actions...").
The "frame animation to smart object" action converts the gif to a video timeline so we can apply smart filters.
The "legacy sharpening + high pass" action applies my standard sharpening filters. Not every gif will need the high pass filter, so feel free to change its opacity or delete it altogether. You can also tweak the smart sharpen filters by right clicking them and selecting "Edit Smart Filter..."

3. Once you're happy with the sharpness, the "convert to frame timeline" action turns the gif back into a frame animation. I use a 0.05 s frame delay for most gifs (equivalent to 20 fps; 24 fps is standard for tv/movies). I normally use 0.07-0.08 seconds for action shots, so the gif doesn't whip around so fast. Over 0.1 seconds, it starts to look like stop motion, so I try to avoid that.
Step Seven: Final Adjustments
This is where I fine-tune the colors, mostly using Hue/Saturation layers.
If I use a Color Balance layer, I only make very small adjustments and try to counterbalance them in the other tonal ranges (e.i. adjustments to the Highlights spill over to the Midtones, so I make the opposite adjustments to the Midtones to fix it). But most of the time, I'd rather play around with Curves or Hue/Saturation to fix stuff like that.
Hue/Saturation gives you more control by allowing you to select the exact color range you want to affect. For this gif, I used Hue/Saturation to get rid of the purple introduced around the highlights in Will's hair by the high pass filter.
The eyedropper tool allows you to select the exact color you want to include in the range. Then you can move the bars around until all the colors you don't want to affect are excluded.

Once you have your range selected, you can bring the saturation all the way down and set it to whatever lightness you prefer:

I also reduced cyan's saturation so that Will's shirt wouldn't look quite so blue.

[You could do a lot more to make the colors prettier... but there are other tutorials online for that. 😅]
Step Eight: Export
Once you're happy with your final product, go to "File > Export > Save for Web (Legacy)..."
These are my settings:

You can use Diffusion instead of Pattern if you want. Diffusion is probably better for mobile gif compression, but I like the way Pattern looks on desktop, especially for gifs with smooth gradients. It's a personal preference thing.
Hit "Save..." and you're all done!

This isn't gonna win any gif-making awards, but at least you can see what's happening and the colors don't look wonky. And for Hannibal, I call that a win! 🥲👍
61 notes
·
View notes
Text
Have you heard of the term "patterns mills"? These are shopfronts that quickly produce a pattern without any sort of testing or vetting, and then put it on the market with an AI-generated or stolen image for a very tempting price. Patterns produced this way are rampant in the cross-stitching world. However, I've recently noticed an uptick in these types of storefronts in the quilting and foundation paper piecing world. Since I'm well versed in FPP patterns, I would like to describe what an AI-generated quilt pattern looks like as well as provide other suspicious giveaways. AI will only get better, so while these mistakes are dead giveaways now, they might be fixed in the future. FPP patterns seem to be easier to replicate in AI than traditionally pieced patterns, which is why I will focus on FPP in this blogpost. However, you can apply the same clues to any sort of craft pattern (or really anything) you can buy online. Important: AI-generated images are not prohibited on Etsy. However, within their policies they state that you must disclose if you used AI within your listing, and these shops do not have that disclosure.

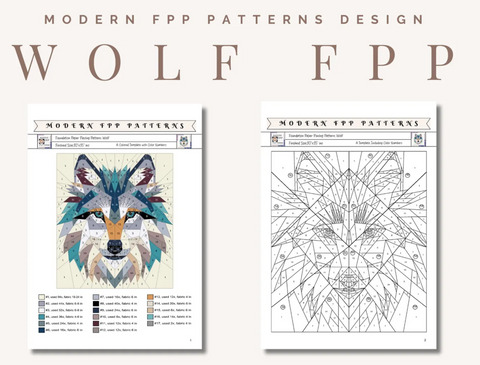
Below is a listing for a wolf face FPP pattern. When you first look at it, does anything seem suspicious?

First, I would like to draw your attention to the scissors in the bottom left of the photo. These scissors are physically impossible to use and are literally melting into the yellow cutting mat. The lines of this cutting mat are unresolved, as are the lines on the green cutting mat in the bottom right corner. These are your first giveaways. However, not all images have background sewing items that look a little funny. Let's take a look at the actual "completed quilt."

The first thing I notice is that the only background seam line (from this apparently foundation paper pieced quilt) is the one in the top left corner. The seam is merely hinted at and does not go all the way to the edge. Additionally, I notice that the eye is too round. One could argue that the cover photo is merely an enhanced version of the completed quilt, but there are no completed quilt photos in the listing. Another clue for identifying AI generated quilt images is that there are a ton of colors/prints used. The prints in this image seem nebulous and the prints around the eye whiskers (?) lose a lot of fidelity. The individual fabrics themselves do not have consistency.

In the image above, the things I notice are that there are curved seams within the gray and white colors. A typical FPP pattern would not have curved piecing interspersed between regular straight seam piecing. Also, piecing lines that are useless, especially visible in the bluish-gray piece on the left. The amount of piecing within that patch does not make sense. Below you will see another listing from a different Etsy seller.

From afar, it looks really good. Plus, the seller has great reviews! And it's a Bestseller! But let us take a closer look…
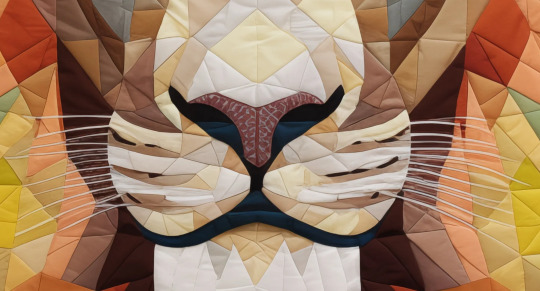
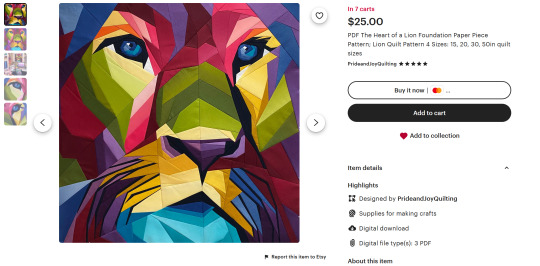
The first thing that sticks out to me is how the whiskers of the lion are resolved. You can see where they fade into the muzzle of the lion without a realistic piecing line. Some of the patches are straight up "smeary" and wrinkly, a telltale sign of AI. The program does not know how to accurately render the design so it creates an approximation. These are things that are hard to see unless you zoom in. Below is a listing for a legitimate lion FPP pattern from designer Pride and Joy Quilting so you can see the difference. It is clear that the first image is an actual completed quilt top.
Beyond the AI-generated cover quilts, I'd also like to cover other signs of a pattern generated from a pattern mill.
For the lion pattern, the cost is only $8.63. This is very cheap for what is supposed to be a full sized quilt pattern with a multitude of templates.
Both of these sellers have very generic names. While not an immediate cause for concern, I recommend being skeptical.
There are no actual completed quilt images within the listing.
Both of them are considered "Bestsellers" on Etsy, but the shop with the wolf pattern only has 10 reviews. It makes me wonder about the disparity between "buyers" and reviewers.
The 5 star reviews for the lion pattern are extremely generic and talk only about "how much their friend Lisa will enjoy the pattern" or "how easy it was to download." These are not helpful for understanding the quality of the actual product. The 1 star reviews are way more descriptive about the issues the pattern has. This makes me wonder about fake reviews.

Both of these patterns include a full layout of the FPP diagram within the listing. I personally would never do this and I don't know many designers who would.
The lion pattern says this within its description: "Before making a purchase, we'd like to inform you about some important aspects. The product stands out for its template, design, and print quality, serving as a valuable tool for sewing projects. The instructions include two techniques: direct fabric marking (with visible stitches) and invisible stitches. Both are general guidelines and not step-by-step instructions. You can choose these techniques or any other that you consider suitable based on your experience and preference. There are no refunds for the digital file. We appreciate your understanding and are available for any questions." This demonstrates to me that the pictures are not accurate because they are clearly attempting to depict FPP and are hoping that you won't read the description until it is too late.
Why is every lowercase i in the wolf pattern missing its dot? Like, why? I find that strange and off putting.
So, how do you avoid accidentally purchasing a pattern like this?
The first step is gaining experience in recognizing listings that seem a bit fishy. Use the bullet points listed above to see what kind of feeling you get when looking over a listing. I also recommend finding out more about the designer from their website or from their social media. Not all legitimate designers have these necessarily, but it's a great place to start. Try messaging the shop owner on Etsy. Does it sound like they know what they are even talking about? You'll then build a good list of designers and shops you trust. A big and worrisome thing to remember is that AI will only get better and produce better looking images. This will make it harder to identify pattern mills by the image alone. However, the clues that I've listed will help if you put them all together and come to a conclusion. I suggest using them for all your online shopping. I hope this helps!
138 notes
·
View notes
Text


spent enough time cooking up this guy behind the scenes and now i feel like i can toss him out here now. this big boy is aegis :3 a sapient mech that ran from his makers to a resistance militia, who plopped a gay little pilot (green) into his hands. more details below the cut
patreon | commissions
his storyline takes place a few centuries in the future, where a small-scale war has kicked up between a newly socialist canada and a dystopian oligarchical US. aegis comes from a particularly powerful corporation called valkyrie machines, who definitely pioneered sapient AI tech some hundred years prior and definitely didn't just steal the tech from somewhere else before stealthily bribing the actual inventors into a silence or death deal
on the other side of the border is the canadian shield alliance, though most people just call it the alliance or the shield. they've played a lot of roles since their inception that was also some hundred years prior, notably aid programs, disaster assistance, fighting for land back/secure human rights/immigrant protections, scaring corporations into NOT being shitty, better economic policies, etc.
unfortunately the US did NOT like any of that. when canada's economic system is officially changed from mixed to socialist, the oligarchs of the states kick off a race to try and see who can annex it the fastest. fortunately, the shield doesn't give them an inch.
aegis is one of valkyrie's newer warden models; nimble, fleet-footed mechs with sapient AI cores to enhance battle prowess. valkyrie is Very strict about what their mechs and pilots do and don't know, and are not above both executing pilots who try to rebel and wiping AIs whose thoughts stray too far. aegis and his last pilot were able to keep sneaky about their plans to escape, but said pilot was disposed of before it could be carried out, aegis made a break for it on his own, racing from the montana base he was stationed at to the albertan border.
despite broadcasting a plea for the shield to find him, he didn't get out unharmed; valkyrie's air fighters were eventually able to catch up to him before he scaled the wall. they plucked at him for a couple hundred kliks until the shield managed to find him near a small town. a skirmish broke out to claim him, ending with one shield mech being non-fatally damaged and all of the valkyrie fighters being shot down.
aegis, battered from the run, was hoisted to a shield base near calgary for major repairs before being shipped to the edmonton for external repairs and retrofitting. it's here that he's assigned a new pilot; green reinhart, a skilled, kind man with a underlying justice-driven rage to match the heart on his sleeve. a man who would not be killed so easily, not with the transhuman tech that's available. it's here that aegis would actually get his name, and so much more that he never would have had back in the states.
the world was opening up to him now. his pilot wasn't the only one talking to him like he was a person anymore. green gets him a proxy frame to explore with. the two of them spend hours together, on and off the field; perhaps this is the best thing that's could've happened for either of them.
(first image is when they've already been partners for a long while; green's organic body does eventually get killed in a battle, and his transhuman body is activated. im still kinda fleshing out the details, unsure if i'll get much deeper into the socio-political-economic shitshow behind the worldbuilding, since i originally made this guy to just have a gay mech/pilot thing w/ green, but its kinda feeding off the current shitshow of the US wanting to annex canada in this day and age. i gotta focus more of that energy on makin characters WAUGH
if anyones got suggestions for like. videos or audiobooks that Could help add onto the worldbuilding though, im all ears. just keep in mind that i struggle with text only stuff, so audiovisual is heavily preferred)
#sprite.art#ocs#green reinhart#aegis#robot art#robot artist#robot#robots#digital artist#digital art#artists on tumblr#trans artist#mecha oc#mech art#mecha#mouthless
55 notes
·
View notes