#OBS Software Guide
Explore tagged Tumblr posts
Visit Tumblr Blog
Explore Tumblr blogs with no restrictions, modern design and the best experience.
Last Seen Tumblr Blogs


Fun Fact
69% of Tumblr users are millennials.
Text
A Beginner's Guide to Streaming: Unveiling the Power of OBS Software and Hardware Encoding
Introduction In today’s digital age, streaming has become an increasingly popular way to connect, share content, and interact with a global audience. Whether you’re an aspiring gamer, a talented musician, or a knowledgeable creator, streaming allows you to showcase your talents and engage with viewers in real-time. To embark on this exciting journey, you’ll need the right tools and knowledge. In…

View On WordPress
#Best Streaming Practices#Encoding Methods Comparison#Hardware Encoding Benefits#Hardware vs. Software Encoding#How to Start Streaming#Live Streaming Essentials#Live Streaming Setup#OBS Features and Functions#OBS Scene Creation#OBS Software Guide#OBS Tutorial#OBS User Interface#Software Encoding Explained#Stream Quality Optimization#Streaming Equipment Guide#Streaming for Beginners#Streaming Platform Choices#Streaming Software Comparison#Streaming Tips and Tricks
1 note
·
View note
Text
Femme Fatale Guide: Products & Services Worth The Splurge
Fashion:
A great couple of bras in black/nude (your best skin-toned shade)
Comfortable, breathable, and seamless underwear
Outerwear (Coats, jackets, blazers)
The perfect pair of jeans
An LBD that works from day to night
Comfortable, sturdy, sleek, and timeless footwear (a versatile black boot, a black heel, white sneaker, and a black flat/loafer/sandal)
A timeless and versatile crossbody or shoulder bag (a larger one for the daytime/work or school and a smaller one for nighttime/events)
One or two well-made classic jewelry item(s)
A conversation-starting item or accessory
Beauty:
Sunscreen
Any skincare/skin cosmetic products that are game-changers for you
A quality hair brush, comb, and hair towel
Your signature scent
A quality razor/hair removal product
Vitamin C/Retinol serums
Reliable hair tools and sturdy nail tools
A quality hair heat protectant/scalp cleansing or conditioning spray
Makeup brushes and beauty tool cleaners
Home:
Lamps/lighting
Couch/desk chair
Everything for your bed: Bed frame, mattress/sheets/pillows, etc.
Knives
Dishwasher-safe and microwave-safe dishes & cups you love
A full-length mirror
Vacuum
Storage solutions/cedar blocks or moth balls
Quality holders for everything: Paper towels, shower storage, hooks, mailbox/key bowls
Name brand paper products/household cleaners
Electric toothbrush & Waterpik
Sound-proof headphones/Airpods
MacBook Air
Health & Wellness:
High-quality lettuce and/or sprouts
Organic frozen fruits and vegetables (if fresh is too pricey)
BPA-free canned goods
Potassium bromate & glyphosate-free grain products
Snacks free of artificial colors
Quality coffee
An at-home massage tool/heating pad
Fur products for skin/hair removal
Vitamin C/Retinol serums
Quality running shoes
Anything that goes near your vulva or into the vagina: Sex toys, lube, condoms, toy cleaners, pads/tampons/menstrual cups, cleansing wipes, etc.
A yoga mat, resistance band, and a pair of small ankle weights
Spotify subscription
Books and audiobooks
Services:
Therapy
A top-tier haircut
House cleaning (even if it's only once every couple of months)
Top-tier hair removal/brow maintenance services of your choice
Best doctors, dentists, OB/GYN, and dermatologists you can get
At least one personal training/styling session in your life
Professional/Social:
Ownership of the domain for your full legal/professional name and/or business name
A CPA/bookkeeper/fiduciary financial advisor
Automation workflow/content management system software
A lawyer for contract review/LLC services
Personalized stationery/"Thank You" cards
Memorable client gifting for the holidays/milestone successes
Niche skill-based certifications (Google, AWS, Hubspot, etc.) or courses made by trusted professionals in your field
Subscriptions in world-leading and industry-authority digital publications
#femmefatalevibe#girl talk#girl tips#girl advice#girl blogging#femme fatale#dark femininity#dark feminine energy#it girl#high value woman#dream girl#queen energy#female power#high value mindset#female excellence#the feminine urge#glow up#level up journey#high class#classy life#elegance#product recommendations#healthylifestyle#health & fitness#fashion and beauty#life advice#life tips#etiquette
2K notes
·
View notes
Text
How to record videos with Sims 2 in-game camera (HD, no UI, no lag, no file format issues)
I originally planned to include this information in the behind-the-scenes video about Bring Me To Life that I'm currently working on, but it's overly technical and not that interesting. It still might be useful to some people (mostly machinima creators), so I decided to make a separate post about it.
There are two ways to record videos in The Sims 2:
Using screen recording software
This is the most common and probably the easiest way. You just need a program like OBS that will capture whatever happens on your screen exactly as it happened. If this method works for you, it's perfectly fine. No need to follow this guide then.
Using the in-game video capture tool
This way involves capturing videos directly in the game by clicking the video camera icon or pressing V on your keyboard. This method is perfect for machinima creators. It automatically hides the UI, but more importantly, the video will always be perfectly smooth, regardless of the actual performance of your game, i.e. even if it runs like a literal slide show, any videos you capture this way will look perfectly fine.
Okay, so if this method is so great, why do we need a tutorial for it? Well, as is usually the case with this game, the feature works fine, it's just a little bit outdated.
To fix it, we need to do 3 simple* things.
*If you're a Sims 2 player, you're probably used to this kind of stuff anyway
Step 1: Installing a modern codec
In the Camera settings, the game lets you choose if you want the videos to be compressed. I highly recommend choosing that option, as uncompressed videos take up way too much storage space.
The codec that the game uses to handle compression is outdated and most video editing programs will not be able to edit such files. To fix this problem, we need to download and install x264vfw, which is a free an open source codec.
Once installed, open the Configure x264vfw app. No need to change anything there (unless you want to test different settings of course), except for this one small thing:
In the Debug section, go to Log level and change it to None. Otherwise the codec will display a pop-up window each time you record in the game, which is pretty annoying.

Step 2: Making the game use the codec
Locate the VideoCapture.ini file in the installation folder with your latest expansion pack. I have Ultimate Collection, so for me the path looks like this:
D:\Program Files (x86)\Origin Games\The Sims 2 Ultimate Collection\Fun with Pets\SP9\TSData\Res\UserData\Config
Back up your file and open the original version with Notepad. You can either replace the whole thing with my settings, or just update the highlighted parts.
While you're at it, make sure to update the LargeSettings value to 1920x1080 so that the videos are captured in HD (no need to worry about it if you're copying the whole thing):
[Config] PreferredCodec=x264vfw Folder is relative to Res/Userdata Folder=Movies FilenameBase=movie NoFillFrames=0 AudioStereoOutput=0 AudioRateDivisor=4 GlobalSettings = reset, vbr:1, fps:10, keyinterval:30, mode:1, datarate:0 SmallSettings = size: 128x128 MediumSettings = size: 320x240 LargeSettings = size: 1920x1080 LowQualitySettings = minq: 6, maxq: 16, mode:0 MediumQualitySettings = minq: 4, maxq: 10, fps:15, mode:0 HighQualitySettings = minq: 2, maxq: 8, fps: 30, keyinterval: 60 SmallLowSettings = datarate: 75 SmallMediumSettings = datarate: 150 SmallHighSettings = datarate: 300 MediumLowSettings = datarate: 150 MediumMediumSettings = datarate: 300 MediumHighSettings = datarate: 600 LargeLowSettings = datarate: 300 LargeMediumSettings = datarate: 600 LargeHighSettings = datarate: 1200 AllowAntialiasing=0 # some drivers have issues with capture when AA is enabled [Codecs] 0=VP61 # On2 VP6.1 1=VP62 # On2 VP6.2 2=VP60 # On2 VP6.0 3=x264vfw # x264vfw
Save your file.
When in game, go to Camera Options and make sure Video Capture Size is set to Large and Video Quality is set to High.
Also, you might want to change the Maximum Video Recording Time to something higher than 60 seconds.

Credit for this solution goes to this person who left the following comment under this video
Step 3: Changing the file format from avi to mp4
Before doing this step, test if everything works correctly when you try to capture videos in the game. The videos will go to the Movies folder in your Documents folder for TS2.
Try to import the videos into your editing software. If it doesn't work, e.g. the program does not recognize the file or the file appears to be corrupted, you'll need to change the file format from avi to mp4.
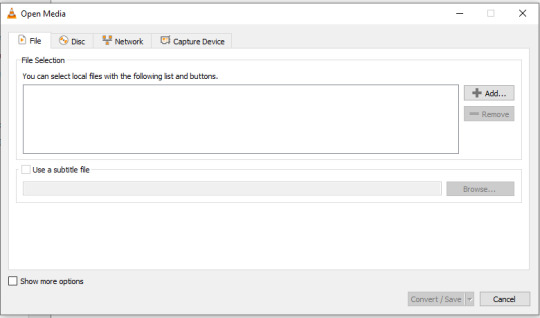
I personally use VLC media player for that, as it's free and open-source.
Go to Media > Convert / Save...
Drag your files into the File Selection section or select them by clicking the + Add button.
Select the Video - H.264 + MP3 (MP4) profile and click the wrench icon to edit its settings.

In the Video tab, make sure to check the box next to Keep original video track. Go to the Audio tab and check the analogous box.
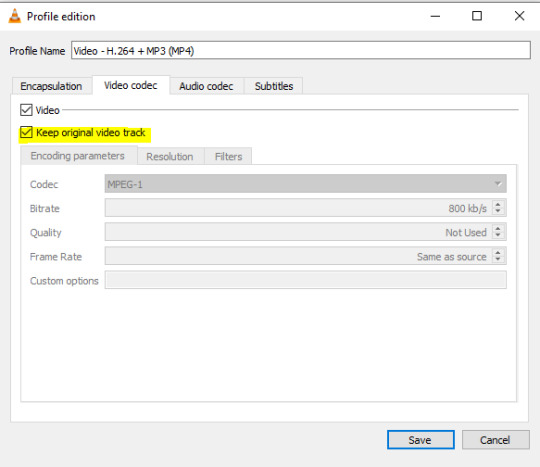
Save and in the next window specify the destination folder and click Start. VLC will go through each of the files you added.
IMPORTANT:
While Steps 1 and 2 only need to be done once, Step 3 needs to be done for every new video you record (unless, your video editing software doesn't struggle opening the avi files). The good news is, this step is really fast, no more than a second per a single video. This is because we're keeping the original video track intact. The only thing that is changed is the container. That's why this change is fast and does not affect video quality in any way. Ideally, this step wouldn't be needed if we figured out a way to force the game to use mp4 when saving those videos, but I'm not sure if this is possible.
Like I said, outside of machinima creation, it probably makes more sense to just record your screen with OBS. Especially if you want to capture videos in 4K, which I don't think would be possible with this method. But it works for me and as it took me a while to figure it all out, I just wanted to share all the info in a single post!
#sims 2 machinima#ts2#sims2#sims 2 tutorial#ts2 tutorial#sims 2 guide#ts2 guide#my stuff#ts2 simblr#machinima#ts2 machinima
11 notes
·
View notes
Text
How VHS to Digital Conversion Works: A Step-by-Step Guide for Alexander Heights Residents
In today’s digital world, many people in Alexander Heights still have old VHS tapes filled with treasured memories. However, VHS tapes are susceptible to deterioration, and VCRs are becoming obsolete. Converting VHS tapes to a digital format is the best way to preserve these precious moments for future generations. Here’s a step-by-step guide on how VHS to digital conversion works and why it’s beneficial.
Step 1: Assess Your VHS Tapes
Before starting the conversion process, gather all your VHS tapes and check their condition. Look for:
Signs of mold, dust, or physical damage.
Faded labels or missing information about the tape’s content.
Signs of tape degradation, such as warping or sticky residue.
If the tapes are in poor condition, professional restoration may be necessary before conversion.
Step 2: Choose a VHS to Digital Conversion Method
There are two primary ways to convert VHS to digital:
DIY Conversion Using VHS-Digital Equipment
Requires a working VCR, a capture device (USB video converter), a computer, and software.
The VHS tape plays on the VCR while the capture device records the video onto your computer.
Requires manual editing and file formatting.
Professional VHS to Digital Services
Professionals use high-quality equipment to ensure better video and audio quality.
They offer additional services such as video enhancement, noise reduction, and cloud storage options.
Ideal for those who lack the technical expertise or equipment.
Step 3: Preparing the Equipment
For DIY conversions, ensure you have:
A VCR in good working condition.
A USB video capture device that connects the VCR to your computer.
Conversion software (e.g., OBS Studio, Roxio, or Elgato Video Capture) to record the video.
Adequate storage space on your computer for digital files.
For professional services, you simply need to drop off or mail your tapes to the service provider.
Step 4: Connecting and Capturing the Video
For DIY conversions:
Connect the VCR to the Computer – Plug the RCA cables (red, white, yellow) from the VCR into the capture device, then connect the device to your computer via USB.
Launch the Capture Software – Open the software and set the video resolution and format (MP4, AVI, MOV, etc.).
Play the VHS Tape – Start playing the tape while the software records the footage in real-time.
Monitor the Process – Ensure the audio and video sync correctly and make adjustments if needed.
Step 5: Editing and Enhancing the Video
Once the video is recorded:
Trim Unwanted Sections – Cut out blank spaces or static noise.
Enhance Quality – Use software tools to adjust brightness, contrast, and color correction.
Remove Background Noise – Some software allows for noise reduction to improve sound quality.
Add Titles or Chapters – Organize videos into sections for easy navigation.
Professional services often provide these enhancements automatically for optimal quality.
Step 6: Choosing a Storage Format
After editing, save your digital files in a preferred format:
MP4 – Best for universal compatibility.
AVI – High quality but larger file size.
MOV – Ideal for Apple devices.
Consider multiple storage options:
USB Flash Drive – Portable and easy to share.
External Hard Drive – Suitable for storing large video collections.
Cloud Storage – Offers remote access and backup security.
DVDs – Traditional but may not be as future-proof as cloud storage.
Step 7: Organizing and Backing Up Files
Create folders labeled by event or year.
Store files in multiple locations for extra security.
Consider cloud services like Google Drive, Dropbox, or OneDrive for remote access.
Why Convert VHS to Digital?
Prevents Tape Degradation – Digital files do not degrade over time.
Saves Space – Eliminates the need for bulky VHS tapes.
Easier Sharing – Share videos with friends and family via email or social media.
Enhances Accessibility – Watch videos on modern devices like smartphones and smart TVs.
Final Thoughts
Converting VHS to digital is a crucial step in preserving your most treasured memories. Whether you choose DIY conversion or professional services in Alexander Heights, ensuring your tapes are digitized will keep your family’s history alive for generations. Don’t wait until your tapes deteriorate—future-proof your memories today!

youtube
#Vhs To Digital Perth#Vhsc To Digital Perth#Convert Vhsc To Digital Perth#Convert Vhs To Digital Perth#Transfer Vhs To Digital Perth#Vhs To Dvd Perth#Vhsc To Dvd Perth#Transfer Cassette To Digital Perth#Convert Audio Cassette To Digital Perth#Convert Audio Tapes To Digital Perth#Youtube
2 notes
·
View notes
Text
Lean vs. Waterfall Business Models: Choosing the Right Approach for Your Venture

When starting or scaling a business, one of the most critical decisions you’ll make is choosing the operational approach that aligns with your goals, resources, and industry demands. Two popular frameworks that often guide entrepreneurs are the Lean and Waterfall business models. Understanding their principles, advantages, and challenges can empower you to select the model that best suits your vision and market.
What is the Lean Business Model?
The Lean business model prioritizes efficiency, adaptability, and continuous improvement. It focuses on creating value for the customer while minimizing waste. Inspired by lean manufacturing principles, particularly those pioneered by Toyota, this model has become a cornerstone of modern startups and innovation-driven enterprises.
Key Principles of the Lean Model:
Validated Learning: Experimentation and customer feedback drive product and process development.
Build-Measure-Learn Cycle: Rapid prototyping allows for iterative improvements.
Customer-Centric Approach: Emphasis on understanding and addressing customer needs.
Waste Reduction: Eliminating activities and resources that don’t add value.
Advantages of Lean:
Cost Efficiency: By focusing on essential features and avoiding overproduction, businesses conserve resources.
Flexibility: Quick pivots are possible when market demands or customer preferences shift.
Speed to Market: Minimal Viable Products (MVPs) enable businesses to launch quickly and refine over time.
Challenges of Lean:
High Uncertainty: Iterative processes may result in unpredictability.
Resource Intensity: Constant feedback loops and adjustments require dedicated time and effort.
Scalability Issues: Lean is ideal for early-stage businesses but may need adaptation for large-scale operations.
What is the Waterfall Business Model?
The Waterfall business model, rooted in traditional project management, follows a linear and sequential approach. This model is structured around defined stages, where each phase must be completed before moving to the next. While it originated in industries like construction and software development, it’s also applicable to businesses requiring meticulous planning and execution.
Key Principles of the Waterfall Model:
Sequential Progression: Projects move from concept to completion in defined steps.
Detailed Documentation: Comprehensive plans, budgets, and timelines are created upfront.
Defined Deliverables: Clear milestones ensure all tasks are completed in order.
Stability: A fixed plan minimizes changes during the process.
Advantages of Waterfall:
Predictability: Clear timelines and budgets enhance planning and stakeholder confidence.
Quality Assurance: Extensive documentation ensures thorough testing and evaluation.
Ease of Implementation: Ideal for projects with well-defined requirements.
Challenges of Waterfall:
Rigidity: Limited flexibility to adapt to changing market conditions.
Delayed Feedback: Customer input often comes late, increasing the risk of misalignment.
Time-Intensive: Sequential phases may lead to longer development cycles.
How to Choose Between Lean and Waterfall
The choice between Lean and Waterfall depends on your business’s nature, goals, and industry.
Lean is Ideal For:
Startups and innovative ventures with evolving market demands.
Projects where customer feedback is essential.
Teams prioritizing speed and adaptability.
Waterfall is Ideal For:
Established businesses with fixed goals and budgets.
Industries like construction, healthcare, or manufacturing, where precision is critical.
Long-term projects requiring robust planning.
Conclusion
Both the Lean and Waterfall business models offer unique advantages and come with their own set of challenges. While the Lean model fosters innovation and flexibility, the Waterfall approach ensures stability and predictability. Entrepreneurs should carefully evaluate their project’s scope, resources, and objectives before committing to a framework. By aligning your operational strategy with your business’s needs, you set the stage for sustainable growth and success.
2 notes
·
View notes
Text
How to Stream on Kick : A Complete Guide
In the dynamic world of online streaming, Kick.com is quickly becoming a popular choice for content creators. If you're looking to join this growing community, you've come to the right place. This guide will walk you through the process of registering and starting your first stream on Kick.com. Plus, we'll share a valuable tip on how to log your channel's messages using kickchatlogs.com.

Step 1: Registering on Kick.com
Create an Account
Visit Kick.com: Open your preferred web browser and navigate to Kick.com.
Sign Up: Click on the "Sign Up" button typically located at the top right corner of the homepage.
Fill in Your Details: Enter your email address, create a username, and set a strong password. You may also have the option to sign up using social media accounts like Google or Facebook for a quicker process.
Verify Your Email: Check your email for a verification message from Kick.com. Click on the link provided to verify your account.
Complete Your Profile
Login: Use your new credentials to log in to your Kick.com account.
Profile Setup: Go to your profile settings and fill in any additional information such as your profile picture, bio, and social media links. A well-completed profile can attract more viewers.
Step 2: Setting Up for Streaming
Download Streaming Software
To stream on Kick.com, you'll need reliable streaming software. Popular options include OBS Studio, Streamlabs, and XSplit.
Download and Install: Choose the software that suits you best and follow the installation instructions.
Configure Settings: Open the software and configure your stream settings. You'll need to set your resolution, bitrate, and other preferences.
Get Your Stream Key
Access Your Dashboard: Log in to Kick.com and navigate to your creator dashboard.
Find Your Stream Key: In your dashboard, locate the stream settings section where you'll find your unique stream key.
Copy the Stream Key: Copy the stream key as you will need to enter it into your streaming software.
Step 3: Going Live
Configure Your Streaming Software
Enter Stream Key: In your streaming software, go to the settings and find the "Stream" tab. Paste your Kick.com stream key into the designated field.
Set Up Scenes and Sources: Create scenes and add sources such as your webcam, game capture, and microphone.
Test Your Stream: It's always a good idea to do a test stream to ensure everything is working correctly.

Start Streaming
Go Live: Once everything is set up and tested, click the "Start Streaming" button in your streaming software.
Monitor Your Stream: Keep an eye on your stream through your Kick.com dashboard to ensure everything is running smoothly.
Bonus Tip: Logging Your Channel's Messages
As a streamer, it's important to keep track of your chat messages for community management and content moderation. The best place to log your channel's messages is kickchatlogs.com. This platform provides an easy and efficient way to save and review all your chat interactions.
Sign Up on Kickchatlogs.com: Create an account on kickchatlogs.com.
Link Your Kick.com Account: Follow the instructions to link your Kick.com channel to kickchatlogs.com.
Start Logging: Once linked, your chat messages will be automatically logged and can be accessed anytime through your kickchatlogs.com account.
Conclusion
Starting your streaming journey on Kick.com is straightforward and user-friendly. With this guide, you now know how to register, set up, and start streaming on the platform. Remember to use kickchatlogs.com to keep track of your channel's messages and maintain a healthy, engaged community. Happy streaming!
For more detailed guides and streaming tips, stay tuned to our blog. If you have any questions or need further assistance, feel free to leave a comment below.
#streaming#kick#kick.com#tutorial#how to stream on kick#start streaming#self employed#twitch#youtube#youtube live#twitch live#livestream#twitch stream#kick stream#livestreamer#asian andy
3 notes
·
View notes
Text
Step-by-Step: How to Live Stream Your Ludo Matches

Gaming streams have developed to show the players’ activity, communicate with the audience, and sometimes even earn money. Ludo, a board game quite famous earlier and has even grown popular in this digital world, is no different. Live streaming is a great approach for a Ludo lover if you want to present your matches to the world.
This live stream guide will help you effectively go about live streaming your Ludo matches.
Why Live Stream Your Ludo Game?
Ludo is one of several gamers that are following the trend of live broadcasting. You can: by streaming your Ludo game in real time.
Build relationships with other Ludo players to create a community.
Real-time tips and strategies exchanged.
Acquire followers and earn money from your articles.
Engage viewers in conversation to improve your game experience.
Time to Get Started with Ludo Live Streaming
To live stream your Ludo real money earning games, you need to follow the below-mentioned steps carefully:
Step 1: Choose Your Platform
Before you start streaming, decide which platform you want to use. The most popular streaming platforms are:
YouTube: Known for its vast audience and easy-to-use interface.
Twitch: The go-to platform for gamers, offering extensive live-streaming features.
Facebook Gaming: Great for reaching your existing friends and followers on Facebook.
Instagram Live: Ideal for quick, casual streams with a more personal touch.
Each platform has its features and audience, so choose the one that best fits your needs and where you believe your audience is most active.
Step 2: Set Up Your Streaming Software
To stream your Ludo matches, you’ll need streaming software. The most popular ones include:
OBS Studio (Open Broadcaster Software): Free and open-source, OBS Studio is highly customizable and works on Windows, macOS, and Linux.
Streamlabs OBS: Built on OBS Studio, it offers a more user-friendly interface and additional features tailored for streamers.
XSplit: A paid option with a straightforward interface and powerful features for Windows users.
How to Set Up OBS Studio:
Download and Install: Visit the OBS Studio website, download the software, and install it on your computer.
Create a New Scene: Open OBS Studio and click the “+” button in the “Scenes” box to create a new scene.
Add Sources: Click the “+” button in the “Sources” box to add your sources. For streaming Ludo, you’ll primarily need a “Game Capture” or “Window Capture” source to capture the game window.
Configure Settings: Go to “Settings” > “Stream” and select your streaming platform. Enter the stream key provided by your chosen platform.
Step 3: Optimize Your Stream Settings
To ensure a smooth and high-quality stream, optimize your settings in OBS Studio or your chosen streaming software:
Resolution: Set your output resolution to 720p or 1080p, depending on your internet speed and computer capabilities.
Bitrate: Adjust your bitrate according to your internet upload speed. A 2500-3500 kbps bitrate is suitable for 720p, while 4000-6000 kbps is ideal for 1080p.
FPS (Frames Per Second): Set your FPS to 30 for a standard stream or 60 if you want a smoother experience and have sufficient bandwidth.
Step 4: Prepare Your Equipment
To create a professional and engaging stream, invest in some essential equipment:
Computer or Smartphone: Ensure your device can handle the game and streaming software without lag.
Webcam: A good quality webcam adds a personal touch and helps viewers connect with you.
Microphone: Clear audio is crucial for engaging with your audience. A dedicated microphone is recommended over a built-in one.
Stable Internet Connection: A wired connection is preferable for stability. Ensure you have sufficient upload speed for streaming.
Step 5: Create Engaging Overlays and Alerts
Overlays and alerts can make your stream more engaging and visually appealing. Use tools like Streamlabs or StreamElements to create custom overlays, alerts, and widgets. These can include:
Chat Box: Display viewer comments on your screen.
Alerts: Notify viewers of new followers, subscribers, or donations.
Overlays: Add a professional touch with borders, backgrounds, and other visual elements.
Step 6: Promote Your Stream
Promotion is key to building an audience. Here are some tips to get the word out:
Social Media: Share your stream link on your social media profiles before and during your stream.
Join Communities: Participate in gaming forums, Ludo groups, and other online communities to share your stream.
Collaborate: Team up with other streamers for joint streams, which can help cross-promote your channels.
Schedule Regular Streams: Consistency helps build a loyal audience. Let your viewers know when to expect your streams.
Step 7: Engage with Your Audience
Engagement is crucial for a successful stream. Here’s how to keep your viewers interested:
Interact: Respond to comments and questions in real time.
Be Entertaining: Keep your commentary lively and entertaining.
Encourage Participation: Invite viewers to play with you or suggest strategies.
Step 8: Analyze and Improve
After each stream, take time to analyze your performance:
View Metrics: Check viewer counts, engagement rates, and other analytics your streaming platform provides.
Gather Feedback: Ask your audience for feedback on what they liked and what could be improved.
Adjust Accordingly: Make necessary adjustments to your setup, content, and streaming schedule based on the feedback and metrics.
Step 9: Monetize Your Stream
Once you have built a steady viewership, you can start monetizing your streams:
Platform Monetization: Use built-in monetization features like YouTube’s Super Chat, Twitch’s subscriptions and bits, or Facebook Stars.
Sponsorships: Collaborate with brands for sponsored content.
Donations: Encourage your audience to support you through donations on platforms like Patreon or directly through your streaming service.
Conclusion
Live streaming your Ludo matches can be a fun and rewarding experience. Following this step-by-step guide, you can set up a professional stream, engage with your audience, and potentially earn money. Remember, consistency and engagement are key to building a loyal viewer base.
So, prepare your equipment, choose your platform, and start streaming your Ludo matches to the world.
#ludo money#real money ludo games#ludo real money#ludo real money games#play ludo with real money india#ludo apps#indian ludo earning apps#ludo earning apps#ludo gaming#ludo money withdrawal#live stream
2 notes
·
View notes
Text
How to Succeed on Twitch
In recent years, Twitch has risen to prominence as a leading platform for gamers, artists, and entertainers to share their content and engage with audiences worldwide. If you're looking to carve out your space as a successful Twitch streamer, here's a comprehensive roadmap to guide you on your journey:
Defining Your Niche and Strategy
Before diving into the world of Twitch streaming, take the time to identify your passion and expertise. Whether you're a gaming aficionado, an artist, a musician, or a versatile entertainer, defining your niche will help you craft a content strategy that resonates with your audience. Conduct research to understand trending categories and find your unique angle to stand out amidst the competitive landscape.
Establishing Your Presence
Creating a Twitch account is your first step towards establishing your presence on the platform. Customize your channel with an appealing profile picture, banner, and bio that reflect your brand identity. Pay attention to your stream layout, including overlays, alerts, and chatbots, to enhance the viewer experience and make your channel more inviting.
Investing in Quality Equipment
Ensure a smooth streaming experience by investing in essential equipment such as a high-quality microphone, webcam, and a reliable internet connection. A capable computer or gaming console is also crucial for seamless gameplay or content creation. Quality equipment not only enhances the technical aspects of your stream but also contributes to a more professional and engaging viewer experience.
Engaging Your Audience
Authenticity and interaction are key to building a loyal fan base on Twitch. Develop a streaming schedule to maintain consistency and reliability, allowing viewers to anticipate your broadcasts. Actively engage with your audience by responding to chat messages, involving them in discussions, and creating a welcoming community atmosphere. Building meaningful connections with your viewers fosters loyalty and encourages them to return for future streams.
Embracing Streaming Tools and Software
Familiarize yourself with streaming software like OBS Studio, Streamlabs OBS, or XSplit to customize your stream, manage scenes, and optimize video and audio settings. These tools offer a plethora of features that allow you to personalize your broadcast and deliver a professional-quality viewing experience to your audience.
Promoting Your Channel
Promotion is essential for growing your Twitch channel and expanding your reach. Utilize social media platforms, gaming forums, and online communities to promote your streams and engage with potential viewers. Collaborate with other streamers, participate in networking events, and explore cross-promotion opportunities to increase your visibility and attract new followers to your channel.
Striving for Excellence and Consistency
Consistency is key to building a successful Twitch channel. Strive to deliver high-quality content while maintaining a regular streaming schedule. Whether you're entertaining your audience with engaging gameplay, showcasing your artistic talents, or hosting interactive discussions, aim to captivate your viewers and keep them coming back for more.
Fostering Community and Relationships
Nurturing a positive and inclusive community is essential for long-term success on Twitch. Engage with your audience both on and off stream, host viewer games or events, and listen to their feedback to continuously improve your content and viewer experience. Building strong relationships with your viewers fosters loyalty and creates a sense of belonging within your community.
Exploring Monetization Opportunities
As your Twitch channel grows, explore various monetization options available on the platform, such as affiliate programs, subscriptions, donations, and sponsorships. Meet the eligibility criteria to become a Twitch Affiliate or Partner, unlocking additional revenue streams and opportunities for financial support from your audience and brand partners.
Adapting to Change and Innovation
The landscape of Twitch streaming is constantly evolving, with new trends, features, and viewer preferences emerging over time. Stay updated on platform updates and industry developments, and be prepared to adapt your content and strategies accordingly. Embrace change and innovation to remain relevant and keep your audience engaged in an ever-changing environment.
Learning and Growing Continuously
Continuous learning and self-improvement are essential for success as a Twitch streamer. Seek feedback from your viewers and peers, analyze your stream analytics, and iterate on your content to enhance the viewer experience and maximize engagement. Stay open to learning from successful streamers in your niche, attending workshops, and experimenting with new techniques to refine your craft and elevate your content.
Celebrating Milestones and Achievements
Acknowledge and celebrate your milestones and achievements with your audience. Whether it's hitting follower goals, reaching subscriber milestones, or achieving significant viewership milestones, involve your community in your success and express gratitude for their support. Celebrating milestones not only fosters a sense of achievement but also strengthens the bond between you and your viewers, reinforcing their loyalty and support.
Conclusion:
Becoming a successful Twitch streamer is a journey that requires dedication, creativity, and a genuine connection with your audience. By following these steps and staying committed to your goals, you'll be well-equipped to navigate the dynamic world of Twitch streaming and build a thriving channel and community that leaves a lasting impact on the platform.
2 notes
·
View notes
Text
OBS Studio Best Practices: Elevating Your Content Creation
As the world of content creation continues to evolve, OBS Studio (Open Broadcaster Software) has emerged as a powerful and versatile tool for live streaming and recording.
To achieve professional and engaging content, it is essential to adopt best practices when using OBS Studio.
In this comprehensive guide, we will explore a wide range of tips and recommendations to help you make the most of OBS Studio and elevate your live streams and recordings to the next level.

1. Plan Your Content
Before going live or recording, plan your content carefully. Consider the following:
Theme and Focus: Determine the theme and focus of your content. Whether you're streaming games, tutorials, or creative activities, a clear theme helps build a dedicated audience.
Storyboarding: Create a storyboard or outline to organize your scenes and sources, ensuring smooth transitions and a structured presentation.
Engaging Introductions: Start your streams with captivating intros that hook your audience and set the tone for the rest of the content.
2. Optimize Your Settings
Efficient OBS Studio settings are crucial for a seamless content creation experience. Consider the following optimizations:
Output Settings: Adjust output resolution, bitrate, and framerate based on your internet connection and desired video quality.
Hardware Acceleration: Enable hardware acceleration if your system supports it to offload some processing tasks from the CPU.
Use Scenes and Sources Wisely: Organize your scenes and sources to minimize clutter and confusion during your streams or recordings.
youtube
3. Audio Quality Matters
Audio is a critical aspect of content creation. Pay attention to the following audio best practices:
Microphone Quality: Invest in a good-quality microphone to deliver clear and crisp audio to your viewers.
Noise Suppression: Use OBS Studio's noise suppression filters to minimize background noise and enhance audio clarity.
Audio Balance: Ensure a proper balance between game audio, voice commentary, and background music.
4. Visual Appeal with Overlays
Engage your audience visually by using appealing overlays:
Custom Overlays: Create custom overlays that reflect your brand and add a professional touch to your streams.
Alerts and Widgets: Integrate alerts for followers, subscribers, and donations to acknowledge and appreciate your audience's support.
5. Master Transitions
Smooth scene transitions create a polished presentation:
Fades and Cuts: Use subtle fades or quick cuts between scenes for smooth transitions.
Stinger Transitions: Implement stinger transitions with dynamic video effects for a professional touch.
6. Engage with Your Audience
Building a connection with your audience is vital for content creators:
Interactive Elements: Add chat integration and interact with your viewers to create a sense of community.
Respond to Chat: Engage with your viewers by responding to their messages and questions during your streams.
7. Monitor Performance
Keep an eye on your OBS Studio performance to ensure a seamless streaming experience:
Performance Stats: Use OBS Studio's performance statistics to monitor CPU usage, dropped frames, and streaming bitrate.
Test Runs: Conduct test runs before going live to check the audio, video quality, and transitions.
8. Consistency is Key
Establishing a consistent schedule builds trust with your audience:
Regular Streams: Stick to a consistent streaming schedule to let your audience know when to expect your content.
Content Variety: Offer a mix of content to keep your viewers engaged and interested.
Conclusion
OBS Studio's best practices are fundamental to creating professional, engaging, and polished content.
By planning your content, optimizing settings, focusing on audio quality, using captivating visuals, mastering transitions, engaging with your audience, monitoring performance, and maintaining consistency, you can elevate your content creation game with OBS Studio.
Embrace these best practices and unlock the full potential of OBS Studio to connect with your viewers and build a dedicated community around your content. Happy streaming and recording!
3 notes
·
View notes
Text
Why Helldivers 2 Keeps Crashing And How to Fix It
If you’ve been jumping into Helldivers 2 only to have it crash mid-mission, mid-loading screen, or—worse—right as you're calling down an orbital strike, then yeah, we feel your pain. You're not the only one shouting into the void, "Why does Helldivers 2 keep crashing?" Whether you're on PC or PlayStation 5, this issue has been messing with countless players and turning galactic liberation into a game of tech roulette. In this guide, we're diving into the most common reasons Helldivers 2 crashes, from system compatibility issues and GPU driver drama to corrupted files, background software conflicts, and even problematic game patches. We’ll break down fixes step-by-step, offer pro tips, and help you figure out what’s nuking your game—without nuking your patience. Common Reasons Why Helldivers 2 Keeps Crashing Before diving into solutions, let’s understand what’s causing the chaos. Here are the top culprits: Outdated GPU drivers (especially on NVIDIA and AMD cards) Corrupted or missing game files Conflicts with overlays like Discord, Steam, or GeForce Experience RAM/memory overloads from background apps Unoptimized game patches or updates DirectX or Visual C++ runtime issues Hardware limitations or thermals (CPU/GPU overheating) Fixes for PC Players (Steam) 1. Update Your Graphics Drivers Outdated or buggy GPU drivers are a major crash trigger. Visit the NVIDIA or AMD website Download the latest driver for your card Clean install if necessary (using DDU if needed) 2. Verify Game Files on Steam Corrupted files = instant crash. Right-click Helldivers 2 > Properties > Installed Files > "Verify integrity of game files" 3. Turn Off Overlays Overlays can mess with performance. Disable Steam overlay (Steam > Settings > In-Game) Disable Discord overlay (User Settings > Game Overlay) Exit GeForce Experience while gaming 4. Close Background Apps Apps like Chrome, OBS, or VPNs eat up RAM and can cause stutters or crashes. Use Task Manager (Ctrl + Shift + Esc) to kill unused programs. 5. Run the Game as Administrator Sometimes permission issues block processes. Right-click game exe > Properties > Compatibility > "Run as administrator" 6. Reinstall Visual C++ and DirectX Runtimes Outdated or corrupted runtimes are sneaky culprits. Download and install the latest Microsoft Visual C++ Redistributables Update DirectX via Microsoft’s official site Fixes for PS5 Players 1. Rebuild Database PS5’s Safe Mode option helps clean up system junk. Turn off PS5 completely Hold power until second beep (enters Safe Mode) Select “Rebuild Database” 2. Check for Game & System Updates Outdated firmware can cause game-breaking bugs. Settings > System > System Software > Update Game tile > Options > Check for Update 3. Delete and Reinstall the Game Corrupted installation = constant crashing. Delete Helldivers 2 Reinstall from your library or disc Optional: Lower Your In-Game Settings (PC) Sometimes the game’s trying to do too much with too little. Try dialing these down: Texture Quality: Medium or Low Shadow Quality: Low V-Sync: Off Disable Ray Tracing This is especially important if your rig is older or running hot. 🔍 Pro Tips to Stay Crash-Free Monitor Temps – Overheating GPUs or CPUs = instant shutdowns. Use tools like HWMonitor or MSI Afterburner Avoid Beta Drivers – Stick to WHQL-certified versions Join the Community – Check Reddit or the official Discord for community-reported fixes and dev updates Backup Saves – Just in case you need to reinstall or reset Report Bugs – Devs can’t fix what they don’t know. Use the official support channels
0 notes
Text
How Much RAM Do You Really Need?

When building or upgrading a PC, RAM (Random Access Memory) is one of the most critical components that directly impact system performance. Whether you’re gaming, editing videos, or just browsing the web, having the right amount of RAM can make a huge difference in speed and efficiency. But how much RAM is enough? Do you really need 32GB, or will 8GB suffice?
This guide will help you determine how much RAM you actually need based on your usage and workload.
1. What is RAM and Why is it Important?
RAM is a temporary storage space where your computer stores data that is actively being used. Unlike a hard drive or SSD, RAM provides instant access to frequently used applications, files, and processes.
Having enough RAM ensures: ✔ Smooth multitasking – Run multiple applications without slowdowns. ✔ Faster performance – Programs load quickly and respond instantly. ✔ Improved gaming experience – Games run without stuttering or lag. ✔ Efficient workflow – Editing software, coding environments, and browsers perform better.
Without enough RAM, your system will struggle with performance, leading to freezing, lagging, and excessive reliance on slow storage devices like HDDs or SSDs.
2. How Much RAM Do You Need for Different Tasks?
The right amount of RAM depends on what you use your computer for. Here’s a breakdown by use case:
For Basic Tasks (Web Browsing, Office Work, Streaming) → 8GB RAM
Ideal for casual users who browse the internet, use Microsoft Office, watch Netflix, and send emails.
Handles light multitasking, but too many browser tabs or apps can slow things down.
Suitable for entry-level laptops and budget desktops.
For Gaming → 16GB RAM
Most modern games recommend 16GB RAM for smooth performance.
Prevents lag and ensures faster game load times.
Allows running background applications like Discord, OBS, and Chrome while gaming.
Works well for mid-range and high-end gaming PCs.
For Content Creation (Video Editing, 3D Rendering, Music Production) → 32GB+ RAM
Handles large files and complex projects without slowdown.
Great for Adobe Premiere Pro, After Effects, Blender, FL Studio, and similar applications.
Allows seamless multitasking with multiple high-performance apps open.
For Professional Workstations (AI, Data Science, Virtual Machines) → 64GB+ RAM
Needed for machine learning, 3D simulations, programming with large datasets, and running virtual machines.
Professionals working with CAD software, scientific computing, and AI models require a minimum of 64GB RAM or more.
3. DDR4 vs. DDR5 RAM: What’s the Difference?
When choosing RAM, you’ll come across DDR4 and DDR5 memory. Here’s how they compare:
DDR4 (Older, but still widely used) – More affordable, compatible with most motherboards, and offers speeds up to 3200-4000MHz.
DDR5 (Newer and Faster) – Higher bandwidth, improved efficiency, and speeds up to 6000MHz+, but requires a compatible motherboard and CPU.
For most users, DDR4 is still sufficient, while DDR5 is ideal for high-end gaming and future-proofing.
4. RAM Speed and Latency: Does it Matter?
RAM speed is measured in MHz (megahertz), and while higher speeds provide better performance, real-world differences are often minimal.
For gaming, 3200MHz – 3600MHz DDR4 RAM is ideal.
For heavy workloads, faster RAM (4000MHz+) can provide a slight boost.
Latency (CL timings) also affects performance, but it’s less noticeable for most users.
Unless you’re building a high-end system, don’t overspend on ultra-fast RAM—it won’t make a massive difference for everyday tasks.
5. How Much RAM Do You Need for Windows 10 & 11?
If you’re running Windows, you should consider the minimum recommended RAM:
Windows 10/11 (Basic Use) → 8GB (Absolute Minimum)
Windows 10/11 (Multitasking, Gaming, Editing) → 16GB – 32GB
Windows 10/11 (Professional Workstations) → 64GB+
Windows tends to use more RAM over time, so having extra memory ensures smooth performance and future-proofing.
6. Can You Upgrade RAM Later?
Yes! Most desktops and some laptops allow you to upgrade RAM. If you’re unsure how much RAM you need today, consider starting with 16GB and upgrading later if necessary.
🔹 Check your motherboard’s maximum RAM capacity and compatibility before upgrading. 🔹 Make sure RAM modules match (same size, speed, and brand) for the best performance. 🔹 Laptops often have limited upgrade options, so check if your model supports RAM expansion.
7. Conclusion: What’s the Best RAM for Your Needs?
8GB RAM → For light use (browsing, streaming, office tasks).
16GB RAM → For gaming and standard multitasking.
32GB RAM → For content creation, video editing, and demanding workloads.
64GB+ RAM → For professional-level computing, AI, data science, and virtual machines.
When choosing PC components, always consider RAM capacity, speed, and future upgrade options. If you’re looking for high-quality PC components, visit https://www.pcpartsuk.co.uk/. There are plenty of options available to build the perfect system.
1 note
·
View note
Text
How to Convert VHS to Digital in Geelong
VHS tapes were once the go-to format for recording life’s most memorable moments—from family gatherings and school plays to weddings and vacations. However, with technology rapidly advancing, VHS tapes have become obsolete, leaving many cherished memories trapped on aging, fragile tapes. If you’re in Geelong and wondering how to convert VHS to digital, you’re in the right place. This guide will walk you through the entire process, helping you preserve your memories for generations to come.
Why Convert VHS to Digital?
1. Protect Against Degradation
VHS tapes deteriorate over time. Exposure to heat, humidity, and dust can cause the magnetic tape inside to degrade, leading to color fading, distorted images, and eventually total data loss. Converting to digital ensures your videos remain intact and viewable for years.
2. Easy Access and Sharing
Unlike VHS tapes that require a VCR—an increasingly rare piece of equipment—digital files can be played on smartphones, computers, smart TVs, and tablets. Plus, you can effortlessly share digital copies with friends and family through email, social media, or cloud services.
3. Save Space
Stacks of VHS tapes take up significant storage space. Digital files, stored on a USB drive, hard disk, or cloud, declutter your home and make organizing your media library much simpler.
VHS to Digital Conversion Options in Geelong
When it comes to converting VHS tapes to digital in Geelong, there are two main options: professional services and DIY conversion. Each has its pros and cons, depending on your budget, technical skills, and the condition of your tapes.
1. Professional VHS to Digital Services
For the best quality and a hassle-free experience, professional conversion services in Geelong are highly recommended. Here’s why:
High-Quality Transfers: Professionals use advanced equipment to ensure the highest video and audio quality.
Video Restoration: Many services offer enhancements like color correction, noise reduction, and even tape repair.
Multiple Format Options: Whether you want an MP4 file, DVD, or a cloud-based link, professionals can tailor the output to your needs.
Time-Saving: Professionals handle everything—from cleaning the tape to final delivery—saving you hours of work.
Where to Find Professional Services in Geelong: A simple search for “VHS to digital Geelong” will reveal several trusted providers. Local camera shops, media stores, and specialized video transfer businesses often offer conversion services.
2. DIY VHS to Digital Conversion
If you’re tech-savvy and enjoy hands-on projects, DIY conversion is a viable option. Here’s what you’ll need:
Equipment Required:
VHS Player (VCR): Ensure it’s in good working condition.
VHS-to-Digital Converter: These devices connect your VCR to your computer, typically via USB.
Computer with Video Capture Software: Many converters come with their own software, but programs like OBS Studio or VLC Media Player can also be used.
Step-by-Step DIY Guide:
Set Up Your Equipment: Connect your VCR to the VHS-to-digital converter, then connect the converter to your computer.
Insert the VHS Tape: Place the tape into the VCR and rewind it to the starting point.
Open Video Capture Software: Configure the software to recognize the converter and set your desired recording format (MP4 is widely compatible).
Start the Conversion: Play the VHS tape and click “Record” in the software. The process happens in real-time—so a two-hour tape will take two hours to convert.
Save and Edit: Once the transfer is complete, save the file. You can also use video editing software to trim, enhance, or add effects.
Backup Your Files: Store your digital files on an external hard drive or cloud service for safekeeping.
Pros of DIY:
Cost-Effective: After the initial investment in equipment, there are no per-tape fees.
Full Control: You can edit and customize the final video to your liking.
Cons of DIY:
Time-Consuming: Each tape must be converted in real-time.
Technical Learning Curve: Setting up the equipment and troubleshooting issues may require some technical knowledge.
Tips for a Successful VHS to Digital Conversion
Clean Your Tapes: Dust and debris can interfere with playback. Gently clean your VHS tapes before converting.
Test Before Full Conversion: Run a short test to ensure your setup is working correctly before converting an entire tape.
Label Files Clearly: Once converted, name your digital files with dates or event names for easy future access.
Preserve Your Memories Before It’s Too Late
VHS tapes won’t last forever, but your memories can. Whether you choose a professional service in Geelong or opt for the DIY approach, converting your VHS tapes to digital is an investment in preserving your family’s history. Don’t wait until it’s too late—start digitizing your memories today and ensure they’re accessible for future generations.
Would you like me to include a list of local VHS-to-digital service providers in Geelong? 😊

youtube
#Vhs To Digital Geelong#Vhsc To Digital Geelong#Convert Vhsc To Digital Geelong#Convert Vhs To Digital Geelong#Transfer Vhs To Digital Geelong#Vhs To Dvd Geelong#Vhsc To Dvd Geelong#Transfer Cassette To Digital Geelong#Convert Audio Cassette To Digital Geelong#Convert Audio Tapes To Digital Geelong#Youtube
0 notes
Text
High CPU usage in OBS (Open Broadcaster Software) can lead to dropped frames, audio sync problems, or an overall sluggish system. This guide covers everything you need to know to identify and fix CPU-related performance issues for smoother streams and recordings.
0 notes
Text
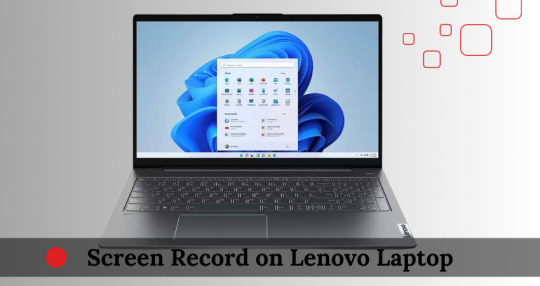
How to Screen Record on Lenovo Laptop – The Ultimate Guide
Screen recording has become an essential tool for professionals, students, gamers, and content creators. Whether you need to record an online meeting, capture gameplay, or create a tutorial, knowing how to screen record on a Lenovo laptop can be incredibly useful. Fortunately, Lenovo laptops offer multiple built-in screen recording solutions, as well as several third-party tools that provide additional functionalities.
In this comprehensive guide, we will walk you through the best methods to screen record on a Lenovo laptop, using built-in tools like Xbox Game Bar and Lenovo Vantage, along with third-party software like OBS Studio and Screencapture.com.
How to Screen Record on Lenovo Laptop Using Built-in Tools
If you own a Lenovo laptop running Windows 10 or Windows 11, you already have access to pre-installed screen recording tools, eliminating the need for additional downloads.
1. How to Screen Record on Lenovo Laptop Using Xbox Game Bar
The Xbox Game Bar is a built-in Windows feature that allows users to record their screen with ease. Although designed for gaming, it works well for any type of screen recording.
Steps to Screen Record Using Xbox Game Bar:
Press Windows + G to open the Xbox Game Bar
Click on the 'Capture' widget
Select the 'Record' button or press Windows + Alt + R to start recording
A small recording bar appears, displaying recording time
Press Windows + Alt + R again to stop the recording
The recorded file is saved in the Captures folder under the Videos directory
Quick Tips:
✅ Enable microphone recording if you want to record external audio ✅ Xbox Game Bar cannot record File Explorer or the desktop, so use alternative tools if needed
📌 Example Use Case: A Lenovo user recorded their online business meeting using Xbox Game Bar and shared it with colleagues for later review.
2. How to Screen Record on Lenovo Laptop Using Lenovo Vantage
Lenovo Vantage is a pre-installed Lenovo system optimization tool that allows users to manage their device and, in some models, provides a screen recording option.
Steps to Record Using Lenovo Vantage:
Open Lenovo Vantage from the Start Menu
Navigate to My Device Settings > Display & Camera
Enable Camera Privacy Mode
Open the screen you want to record
Press Ctrl + Shift + R to start recording
Press Ctrl + Shift + R again to stop recording
The video will be saved in the Videos folder
Limitations:
��� Not all Lenovo laptops have a screen recording feature in Vantage ❌ If unavailable, try alternative tools like OBS Studio
📌 Example Use Case: A Lenovo ThinkPad user recorded a step-by-step tutorial using Lenovo Vantage and uploaded it for a training session.
How to Screen Record on Lenovo Laptop Using Free Third-Party Software
For advanced recording options, third-party software provides additional features like custom resolutions, enhanced audio control, and editing capabilities.
3. How to Screen Record on Lenovo Using OBS Studio
OBS Studio is a free, open-source screen recording and live streaming software widely used by professionals.
Steps to Use OBS Studio:
Download & install OBS Studio from the official website
Open OBS Studio, then click + under Sources
Select Display Capture > OK
Adjust settings such as resolution and frame rate
Click "Start Recording"
Click "Stop Recording" when finished
Find the saved recording in the chosen file location
✅ Best for: Professionals who need high-quality recordings with customization
4. How to Screen Record on Lenovo Using Screencapture.com (Online Tool)
If you don’t want to install software, Screencapture.com is a web-based tool that allows users to record their screen online.
Steps to Use Screencapture.com:
Go to Screencapture.com
Set recording preferences (screen only, system audio, microphone input)
Click "Start Recording"
Click "Stop Recording" when finished
Download and save the recording
✅ Best for: Quick, one-time screen recording without downloads
Troubleshooting: What to Do If Screen Recording Is Not Working on a Lenovo Laptop?
🔻 Issue 1: Xbox Game Bar Won’t Open
✔️ Solution: Go to Settings > Gaming > Xbox Game Bar and toggle it ON
🔻 Issue 2: No Sound in Screen Recording
✔️ Solution: Ensure "Record system audio" is enabled in Xbox Game Bar or OBS Studio
🔻 Issue 3: Black Screen While Recording
✔️ Solution: Update your graphics drivers and restart your Lenovo laptop
Why Choose Lenovo Laptop Service Center in Delhi?
If you face technical issues while screen recording, contact the Lenovo Laptop Service Center in Delhi for expert assistance.
✔️ Benefits:
✔️ Certified Technicians – Lenovo-certified experts for software & hardware support ✔️ Genuine Parts – 100% original Lenovo components ✔️ Onsite Support – Doorstep repair service available ✔️ Affordable Pricing – Competitive rates with warranty support
📞 Need help? Call Now: +91-9891868324
Conclusion
Now that you know how to screen record on Lenovo laptop, you can easily capture gameplay, tutorials, and online meetings using built-in or free third-party tools.
📌 For troubleshooting and expert Lenovo support, contact our certified technicians today!
FAQs
1. Can I screen record on a Lenovo laptop without installing software?
Yes! Lenovo laptops with Windows 10/11 support built-in screen recording via Xbox Game Bar and Lenovo Vantage.
2. Where do screen recordings get saved on a Lenovo laptop?
Videos recorded with Xbox Game Bar are saved in File Explorer > Videos > Captures.
3. What is the best free screen recording software for Lenovo laptops?
For basic use, Xbox Game Bar is best. For advanced features, use OBS Studio.
#ScreenRecording#LenovoLaptop#HowToRecordScreen#TechGuide#Windows10#Windows11#XboxGameBar#OBSStudio#ScreenCapture#LenovoThinkPad#TechSupport#GamingVideos#OnlineMeetings#TutorialRecording#LaptopTips#DigitalLearning#VideoEditing#ProductivityTools#ContentCreators#ScreenRecordOnLenovo
0 notes
Text
How to Make Money on YouTube Without Showing Your Face
YouTube has become a lucrative platform for content creators, but not everyone is comfortable being on camera. If you’re shy, prefer privacy, or simply want to focus on content rather than personality, you can still upload your video on YouTube and earn money. Many successful YouTubers make six-figure incomes without ever revealing their identity. Whether you want to create educational content, animations, or automated videos, there are plenty of ways to generate revenue without showing your face.
In this guide, we’ll explore different types of faceless YouTube channels, how to create engaging content, and effective strategies to monetize your videos.
Why Start a Faceless YouTube Channel?
Starting a YouTube channel without appearing on camera comes with several advantages:
Privacy and Anonymity – You don’t have to worry about public attention or criticism.
Lower Production Costs – No need for expensive cameras, lighting, or makeup.
Time Efficiency – No need to rehearse or record multiple takes of yourself speaking.
Scalability – You can create multiple automated channels without personal involvement.
With the right approach, you can create a successful YouTube business while staying behind the scenes.
Best Types of Faceless YouTube Channels
There are countless ways to create engaging content without showing your face. Here are some of the most popular faceless YouTube channel ideas:
1. Animation and Whiteboard Videos
Animation videos are highly engaging and work well for storytelling, education, and explainer videos. You can use tools like:
Doodly – Whiteboard animation software.
Toonly – Cartoon animation maker.
Animaker – Drag-and-drop animation platform.
2. Compilation and Top 10 Videos
Many successful YouTube channels focus on compiling interesting clips, facts, or news stories. Popular niches include:
Top 10 lists (mysteries, sports, celebrities, history, etc.)
Fails and funny moments
Motivational speeches and quotes
3. Stock Footage and B-Roll Videos
You can create content using stock footage from websites like:
Pexels – Free stock videos.
Storyblocks – Paid stock footage for YouTube videos.
Envato Elements – A vast library of video assets.
Simply add voiceovers or captions to create engaging content.
4. Meditation and Relaxing Music Channels
Meditation, sleep, and relaxation music channels generate millions of views with minimal effort. You can create these videos by:
Using royalty-free music from sites like Pixabay or Epidemic Sound.
Combining calming visuals with relaxing soundscapes.
Uploading long-form videos (1-10 hours) for better watch time.
5. Podcast-Style and Voiceover Channels
If you enjoy talking but don’t want to show your face, podcast-style videos work great. You can:
Discuss trending topics, tech news, or self-improvement tips.
Use AI voiceover software like Speechelo or ElevenLabs.
Feature guest interviews without appearing on screen.
6. Screen Recording and Tutorial Videos
You can create valuable content by recording your screen. Popular topics include:
Tech tutorials (how to use software, coding, gaming guides).
Finance and investment tips.
Online courses and educational content.
Use tools like OBS Studio or Camtasia for high-quality screen recordings.
How to Create High-Quality Faceless YouTube Videos
Creating engaging content without showing your face requires a different approach. Here’s how to make your videos stand out:
1. Use High-Quality Editing Software
Editing plays a crucial role in keeping viewers engaged. Some top editing tools include:
Adobe Premiere Pro – Industry-standard video editing software.
Final Cut Pro – Great for Mac users.
DaVinci Resolve – A powerful free alternative for high-quality editing.
2. Optimize Video Titles, Thumbnails, and Descriptions
Since you won’t be on camera, your title, thumbnail, and description must capture attention. Follow these tips:
Use bold fonts and contrasting colors on thumbnails.
Write click-worthy titles with curiosity-driven hooks.
Use SEO-friendly descriptions and tags.
3. Add Subtitles and Captions
Many people watch YouTube without sound. Adding captions makes your videos accessible and improves watch time. Use tools like:
Rev.com – Human-generated captions.
Otter.ai – AI-generated captions.
YouTube’s auto-caption feature.
4. Use Engaging Background Music
Since there’s no face-to-face interaction, background music helps set the tone. Use royalty-free music from:
YouTube Audio Library – Free music for creators.
Epidemic Sound – Paid library with high-quality tracks.
Artlist – Premium background music selection.
How to Upload Your Video on YouTube and Earn Money
Once you’ve created high-quality content, it’s time to upload and monetize your videos. Here’s how to maximize your earnings:
1. Join the YouTube Partner Program (YPP)
To qualify for monetization, you need:
1,000 subscribers.
4,000 watch hours in the past 12 months.
Once approved, you can earn from Google AdSense ads displayed on your videos.
2. Use Affiliate Marketing
Affiliate marketing is a great way to earn extra income by promoting products related to your niche. Here’s how:
Sign up for affiliate programs like Amazon Associates or ClickBank.
Include product links in your video descriptions.
Earn commissions when viewers make purchases.
3. Get Sponsorships and Brand Deals
Many brands are willing to pay creators for sponsored videos. To attract sponsorships:
Create high-quality, niche-focused content.
Grow your audience and engagement.
Reach out to brands or join influencer marketing platforms like Grapevine or FameBit.
4. Sell Digital Products or Courses
If you create educational content, consider selling:
E-books and PDFs related to your niche.
Online courses on platforms like Teachable or Udemy.
Exclusive content via Patreon or YouTube Memberships.
5. License Your Videos
If you create high-quality footage, companies and media outlets may pay to use your content. You can list your videos on:
Storyblocks.
Shutterstock.
Pond5.
Tips to Grow a Faceless YouTube Channel Faster
Success on YouTube takes time, but these strategies can help you grow faster:
Upload consistently (at least 1-2 videos per week).
Engage with your audience through pinned comments and community posts.
Collaborate with other faceless YouTubers.
Use analytics to track performance and optimize content.
Conclusion
You don’t need to be on camera to succeed on YouTube. By focusing on high-quality content, smart monetization strategies, and SEO optimization, you can upload your video on YouTube and earn money without ever showing your face. Whether you choose animation, stock footage, or screen recordings, the opportunities for faceless YouTube channels are endless. Start today, experiment with different content types, and build a profitable channel while staying behind the scenes.
Related Articles:
For further reading, explore these related articles:
How to Upload Your Video on YouTube as an Independent Artist
How to Upload Your Video on YouTube Without a Label
How to Upload Your Video on YouTube with No Upfront Fees
Upload Your Video on YouTube Quickly – A Beginner’s Ultimate Guide
For additional resources on music marketing and distribution, visit DMT Records Private Limited.
1 note
·
View note
Text
In today's digital landscape, video content is a cornerstone of communication, creativity, and information sharing. One popular platform that allows users to create and share videos is Rednote, known for its appealing interface and diverse features. However, many users encounter the challenge of watermarking on downloaded videos, which can detract from their overall quality and professionalism. This guide aims to provide you with a comprehensive approach to downloading Rednote videos without watermarks, ensuring you can utilize the content effectively for personal or professional use. Step-by-Step Process for Downloading Rednote Videos The first step to downloading videos from Rednote is ensuring you have access to the content you wish to acquire. Once you have identified the video, navigate to the share options available on the platform. Rednote typically provides users with a “Download” button, but this feature may be accompanied by a watermark on the downloaded file. To bypass this, you can utilize screen recording or third-party applications that support video downloads without watermarks. Once you have selected a method, such as using a screen recorder like OBS Studio or a dedicated download manager, start the software and set up the recording parameters. For screen recording, ensure you select the area of the screen that the video occupies to capture it accurately. If you are using a download manager, simply paste the video URL into the application. This process will help you obtain the video in a high-quality format. After recording or downloading, the next step is to edit and trim the video as necessary. This may involve using video editing software to ensure that the final output is polished and professional. Always make sure to review the downloaded or recorded content for quality and clarity before using it in your projects or sharing it with others. Effective Methods to Remove Watermarks from Downloads Even after downloading videos from Rednote, users may still face the issue of watermarks appearing on their content. One effective method to address this is using video editing software, such as Adobe Premiere Pro or Final Cut Pro. These applications offer tools that allow users to crop or blur out the watermark, effectively eliminating its presence. While this method requires some technical skill, it empowers users to maintain the integrity of their content while ensuring it looks professional. Alternatively, another method to handle watermarking involves utilizing services that specialize in watermark removal. Several online platforms provide tools specifically designed to remove or minimize watermarks from videos. Websites like Apowersoft and Video Watermark Remover can help you upload your video and process it to eliminate the watermark. However, it is pivotal to use these services ethically and ensure you have the right to modify the content. Lastly, if you are consistently downloading videos for commercial or professional use, consider investing in a subscription or premium version of Rednote or the video services you utilize. Upgrading your account may provide you with additional features, including watermark-free downloads. Additionally, this investment not only enhances your experience but also ensures you are compliant with the platform’s policies, safeguarding your content's legal use. Navigating the world of video content creation and sharing can be challenging, especially when dealing with watermarks. By following the outlined step-by-step process for downloading Rednote videos and employing effective methods for watermark removal, you can enhance the quality of your content significantly. Whether for personal projects or professional endeavors, mastering these techniques will empower you to create and share unblemished videos that speak volumes. Always remember to respect copyright laws and the rights of content creators as you embark on your video-sharing journey. Read the full article
0 notes