#code tutorials
Explore tagged Tumblr posts
Visit Tumblr Blog
Explore Tumblr blogs with no restrictions, modern design and the best experience.
Last Seen Tumblr Blogs


Fun Fact
Tumblr has 411 employees.
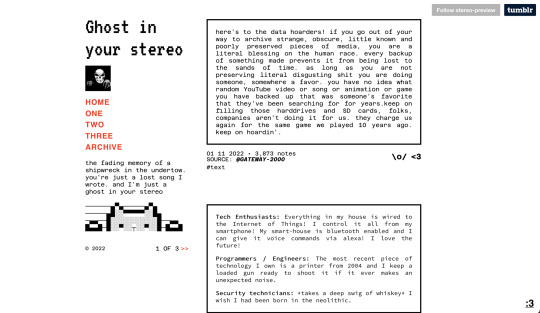
Text
New member added to the Theme Directory Network!
@nonspace
What is the Theme Directory Network?
A network of Tumblr theme creators. This is a blog that showcases a wide variety of tumblr themes. A great place to find new themes for your blog!
Theme creators - how to join:
Fill out this short form
Give me 2 days or so to add you
Perks
Consistent queued reblogs of your theme posts on this blog to over 100k followers who are looking for themes
You can submit posts to be published and sorted
Access to the private facebook group (coming soon)
Access to the public tumblr community
#theme#themes#theme maker#theme creator#tumblr theme maker#tumblr theme creator#tumblr themes#new tumblr themes#theme coder#tumblr theme coder#tutorials#code tutorials#coding#updates#new member
9 notes
·
View notes
Text
༄ ⭒ ☾ prompts
prompts
༄ ⭒ ☾ musings
musings
༄ ⭒ ☾ tutorials
tutorials
༄ ⭒ ☾ photoshop tutorials
photoshop tutorials
༄ ⭒ ☾ graphics tutorials
graphics tutorials
༄ ⭒ ☾ writing tutorials
writing tutorials
༄ ⭒ ☾ tumblr tutorials
tumblr tutorials
༄ ⭒ ☾ code tutorials
code tutorials
༄ ⭒ ☾ resources
resources
༄ ⭒ ☾ miscellaneous
miscellaneous
#༄ ⭒ ☾ prompts#prompts#༄ ⭒ ☾ musings#musings#༄ ⭒ ☾ tutorials#tutorials#༄ ⭒ ☾ photoshop tutorials#photoshop tutorials#༄ ⭒ ☾ graphics tutorials#graphics tutorials#༄ ⭒ ☾ writing tutorials#writing tutorials#༄ ⭒ ☾ tumblr tutorials#tumblr tutorials#༄ ⭒ ☾ code tutorials#code tutorials#༄ ⭒ ☾ resources#resources#༄ ⭒ ☾ miscellaneous#miscellaneous
2 notes
·
View notes
Text
We have many episodes on using Visual Studio and making games in C++, but how about setting up Visual Studio from scratch?
youtube
#shawnthebro#ue4#unreal#stb#tutorial#youtube#unrealengine#unrealtutorial#unrealengine4#programming#ue5#unreal engine#unreal engine 4#unreal engine 5#visual studio#vs#vs code#visual studio code#c++#code#ide#ide with unreal#visual studio with unreal#code with unreal#unreal code#c++ unreal#unreal c++#unreal engine tutorials#code tutorials#tutorials
0 notes
Text
🎮 HEY I WANNA MAKE A GAME! 🎮
Yeah I getcha. I was once like you. Pure and naive. Great news. I AM STILL PURE AND NAIVE, GAME DEV IS FUN! But where to start?
To start, here are a couple of entry level softwares you can use! source: I just made a game called In Stars and Time and people are asking me how to start making vidy gaems. Now, without further ado:
SOFTWARES AND ENGINES FOR PEOPLE WHO DON'T KNOW HOW TO CODE!!!
Ren'py (and also a link to it if you click here do it): THE visual novel software. Comic artists, look no further ✨Pros: It's free! It's simple! It has great documentation! It has a bunch of plugins and UI stuff and assets for you to buy! It can be used even if you have LITERALLY no programming experience! (You'll just need to read the doc a bunch) You can also port your game to a BUNCH of consoles! ✨Cons: None really <3 Some games to look at: Doki Doki Literature Club, Bad End Theater, Butterfly Soup
Twine: Great for text-based games! GREAT FOR WRITERS WHO DONT WANNA DRAW!!!!!!!!! (but you can draw if you want) ✨Pros: It's free! It's simple! It's versatile! It has great documentation! It can be used even if you have LITERALLY no programming experience! (You'll just need to read the doc a bunch) ✨Cons: You can add pictures, but it's a pain. Some games to look at: The Uncle Who Works For Nintendo, Queers In love At The End of The World, Escape Velocity

Bitsy: Little topdown games! ✨Pros: It's free! It's simple! It's (somewhat) intuitive! It has great documentation! It can be used even if you have LITERALLY no programming experience! You can make everything in it, from text to sprites to code! Those games sure are small! ✨Cons: Those games sure are small. This is to make THE simplest game. Barely any animation for your sprites, can barely fit a line of text in there. But honestly, the restrictions are refreshing! Some games to look at: honestly I haven't played that many bitsy games because i am a fake gamer. The picture above is from Under A Star Called Sun though and that looks so pretty
RPGMaker: To make RPGs! LIKE ME!!!!! NOTE: I recommend getting the latest version if you can, but all have their pros and cons. You can get a better idea by looking at this post. ✨Pros: Literally everything you need to make an RPG. Has a tutorial inside the software itself that will teach you the basics. Pretty simple to understand, even if you have no coding experience! Also I made a post helping you out with RPGMaker right here! ✨Cons: Some stuff can be hard to figure out. Also, the latest version is expensive. Get it on sale! Some games to look at: Yume Nikki, Hylics, In Stars and Time (hehe. I made it)
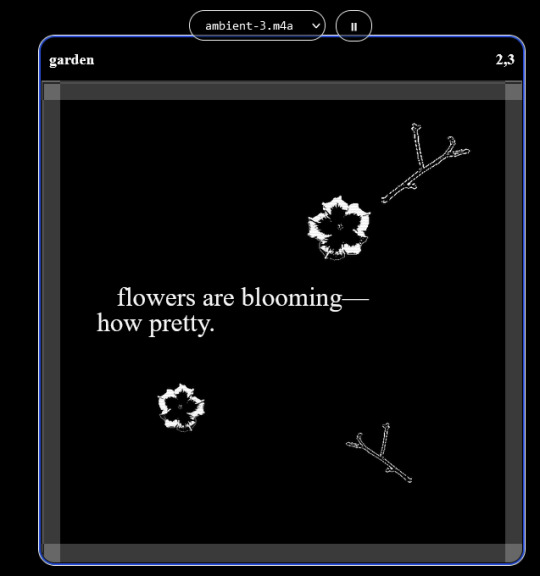
engine.lol: collage worlds! it is relatively new so I don't know much about it, but it seems fascinating. picture is from Garden! NOTE: There's a bunch of smaller engines to find out there. Just yesterday I found out there's an Idle Game Maker made by the Cookie Clicker creator. Isn't life wonderful?
✨more advice under the cut. this is Long ok✨
ENGINES I KNOW NOTHING ABOUT AND THEY SEEM HARD BUT ALSO GIVE IT A TRY I GUESS!!!! :
Unity and Unreal: I don't know anything about those! That looks hard to learn! But indie devs use them! It seems expensive! Follow your dreams though! Don't ask me how!
GameMaker: Wuh I just don't know anything about it either! I just know it's now free if your game is non-commercial (aka, you're not selling it), and Undertale was made on it! It seems good! You probably need some coding experience though!!!
Godot: Man I know even less about this one. Heard good things though!
BUNCHA RANDOM ADVICE!!!!
-Make something small first! Try making simple: a character is in a room, and exits the room. The character can look around, decide to take an item with them, can leave, and maybe the door is locked and you have to find the key. Figuring out how to code something like that, whether it is as a fully text-based game or as an RPGMaker map, should be a good start to figure out how your software of choice works!
-After that, if you have an idea, try first to make the simplest version of that idea. For my timeloop RPG, my simplest version was two rooms: first room you can walk in, second room with the King, where a cutscene automatically plays and the battle starts, you immediately die, and loop back to the first room, with the text from this point on reflecting this change. I think I also added a loop counter. This helped me figure out the most important thing: Can This Game Be Made? After that, the rest is just fun stuff. So if you want to make a dating sim, try and figure out how to add choices, and how to have affection points go up and down depending on your choices! If you want to make a platformer, figure out how to make your character move and jump and how to create a simple level! If you just want to make a kinetic visual novel with no choices, figure out how to add text, and how to add portraits! You'll be surprised at how powerful you'll feel after having figured even those simple things out.
-If you have a programming problem or just get confused, never underestimate the power of asking Google! You most likely won't be the only person asking this question, and you will learn some useful tips! If you are powerful enough, you can even… Ask people??? On forums??? Not me though.
-Yeah I know you probably want to make Your Big Idea RIGHT NOW but please. Make a smaller prototype first. You need to get that experience. Trust me.
-If you are not a womanthing of many skills like me, you might realize you need help. Maybe you need an artist, or a programmer. So! Game jams on itch.io are a great way to get to work and meet other game devs that have different strengths! Or ask around! Maybe your artist friend secretly always wanted to draw for a game. Ask! Collaborate! Have fun!!!
I hope that was useful! If it was. Maybe. You'd like to buy me a coffee. Or maybe you could check out my comics and games. Or just my new critically acclaimed game In Stars and Time. If you want. Ok bye
#reference#gamedev#indie dev#game dev#tutorial#video game#ACTUAL GAME DEVS DO NOT INTERACT!!!1!!!!!#this is for people who are afraid of coding. do not come at me and say 'actually godot is easy if you just--' I JUST WILL NOT.#long post
36K notes
·
View notes
Note
can u do a tut for sizing borders bc im rlly bad at coding in rentry


This is the code that I usually start out with, and it works most of the time without tweaking much. The thing I still tweak the most though is the CONTAINER_BORDER_IMAGE_OUTSET. I usually set it anywhere from 10px to 20px, and sometimes I will set two values to it if I want the outset to be diff for top+bottom and left+right
I prefer a more like bigger(?) Look to how my border are cut, so I do that by making the slice smaller (15% to 20%) or I make the width bigger (25px to 30px)
There are a lot of ways to playe around with the coding though like down below I set slice to 30% which I think I see a lot of people do idk. But to keep the bigger cut look I like I make the width 30px. I like to keep my widths at 20px to 25px though because of how much my outset is. My outset sometimes clips under the edit button when you save the code and view it normally, so I keep the width a bit smaller and use a smaller or equal slice. But there are a lot of ways to play around with this because it depends a lot on your rentry and what border you're using becuase there are out(?) Borders and in(?) Borders. Basically just play around with CONTAINER_BORDER_IMAGE_SLICE + CONTAINER_BORDER_IMAGE_WIDTH You can also have fun with the repeat options (round, repeat, space, and stretch iirc). I'll leave my code and examples below. I hope this helps Anon! I'm not sure if it's comprehensible or if I'm just yapping BS..


Above big slice big width, below big slice small width


Down below are what I call 'In borders' cause they're facing inwards. I usually have the outset on these a little bigger


CONTAINER_MAX_WIDTH = 300px
CONTAINER_BORDER_IMAGE = Your border image
CONTAINER_BORDER_IMAGE_SLICE = 20%
CONTAINER_BORDER_IMAGE_WIDTH = 25px
CONTAINER_BORDER_IMAGE_OUTSET = 10px
CONTAINER_BORDER_IMAGE_REPEAT = round
#rentry#rentry stuff#rentry decor#rentry inspo#rentry resources#rentry graphics#rentry pixels#sntry#stelluar#aesthetic#rentry tutorial#rentry metadata#metadata#tutorial#rentry border#borders#metadata border#rentry code#code#rentry help
689 notes
·
View notes
Text
programmed my oc into a game for the aesthetic
#i hope this gives off the vibe of an old game#2 days of modeling#1 day of following a coding tutorial#i felt so happy to draw the little gifs on the screen again#im so sick of 3d (i will do it again)#oc#oc animation#oc art
692 notes
·
View notes
Text

#I CRACKED THE CODE#JESUS CHRIST#DRAW THE GUAR#the elder scrolls#the trash talks#trash art tutorial#please reblog with your results. Please
230 notes
·
View notes
Text
Dank farrik 🙈 I tried to make a face by template concepting video à la Eobe and it turned out fun chaos so I have to show it! 😂🙏✨
I picked Crosshair, because he‘s got the most uncommon clone face shape in my opinion and because he got to few friendly attention from my side in the last time (only fun attention, poor kitty Croissant actually not sorry) AND OF COURSE he jinxed it 🖤💀
While drawing I collected my thoughts, fails and drawing frustrations and I drew little funny extras so that it‘s possible to read decipher the notes despite the rush of the timelapse 😀 And I already thought yeah, this is getting a messy thing… 👀
… AND THEN my screen bugged and crashed my brush!! 😱😂 Aaahh sweet chaos! But great, I go for it, let’s look how far I get before my drawing device starts burning or something 🤷🏽♀️
Is making ‚Fun drawing process à la Eobe‘ a thing? 👀 I giggled and definitely had fun like a child playing and hope you have fun with my weird and quite ADHD coded timelapse too! 😂 And also I hope besides fun, it’s maybe a bit inspiring to try out (what was the original intention before I noticed that it’s getting chaotic 😅)
The result is super messy speedy hatched Crosshair! And I kind of like it! It’s hiv vibe 🤷🏽♀️ So have a look:

The finished colored Crosshair get‘s his own posting, grumpy sniper deserves it and a hug 🖤✨I think he wrote the ALT text
Vod, vor entye for giving me the push to do this and sharing @wings-and-beskargam 💙✨🫶 This is the way!
Nix, here it is, have a ☕️ to that dry 🥐✨ @crosshairs-dumb-pimp-gf
Taglist: @eclec-tech @lonewolflupe @bixlasagna @returnofthepineapple @sunshinesdaydream @covert1ntrovert @general-ida-raven @vrycurious @dystopicjumpsuit @chaicilatte @groguandthebadbatch @justanotherdikutsimp @ladylucksrogue @spaceyjessa @morerandombullshit
#procreate timelapse#fun drawing process à la eobe#face drawing#fun drawing#à la eobe#drawing template#star wars#the bad batch#tbb crosshair#clint eastwood#he is it#snarky sniper#crispy croissant#crosscat#tbb#tcw#the clone wars#clones#star wars sniper#sw tbb fanart#star wars fanart#art#drawing tutorial#sketchy#adhd coded#creative chaos#artists on tumblr#my art#eobe
141 notes
·
View notes
Text
How I added "instant translation" to the non-english text on my fic: a very easy 3 step guide
Hello!
I recently posted a Wolfstar fanfic called Instance of Happenstance and received a lot of compliments on a small piece of code I used. Both @marigold-hills and @leavesthatarebrown suggested I share how I did it, so here I am, finally explaining it in a Tumblr post!
Before diving into the details, I want to clarify that I didn't write this code myself.
Initially, I tried following this tutorial, but I stumbled upon a better solution in the comments of that post. The code on the tutorial itself does work, but a) it's harder to use and b) it doesn't work as well if you're planing to have multiple paragraphs that you need to show the translation on the same fic.
The solution someone presented on the comments, however, is very simple and easy to use for as many paragraphs as you need, but the explanation there wasn’t too clear, so I decided to expand on it to make it easier for others to implement.
All credit to Ao3 users La_Temperaza (who wrote the orginal post) and Nikkie2571 (who posted this code on the comments).
What Does This Code Do?
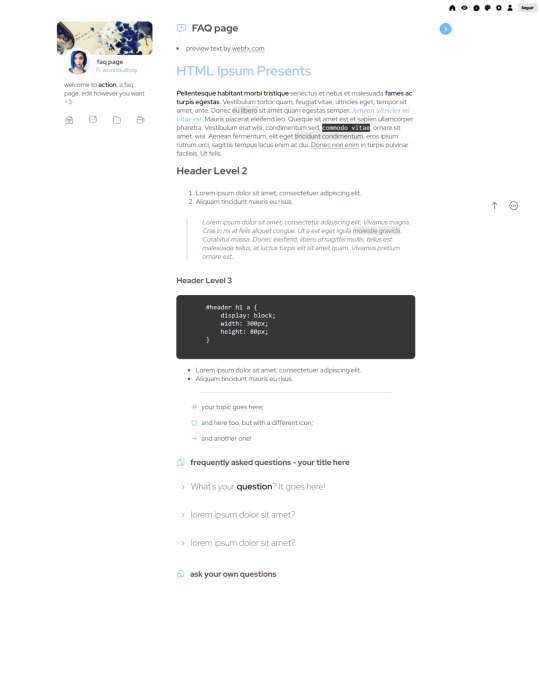
This code adds an interactive feature to your fanfic, allowing readers to hover over a specific paragraph (or tap on it if they’re on mobile) to instantly change the text to something else — also set by you.
While this can be used for various purposes, I think it's particularly useful to display instant translations of non-English dialogue/text directly in the story. The code offers a much smoother alternative to the clunky “see end notes for translation” thing—which, let's be honest, can be a pain for readers, especially in long chapters.
For example, in instance of happenstance, Sirius discovers an old journal written entirely in French. I wanted to maintain the sense of mystery and intrigue that would be lost if I simply said the journal was in French, but wrote the text in English.
This solution let me keep the best of both worlds—retaining the authenticity and the immersion of the French, while still making the story easy to follow for the readers.
Now, I know this sounds complicated, but I assure you, it's not!
Down bellow is a quick, 3 steps tutorial on how to do it. I hope this is helpful! (:
(I'm doing this on the computer, if you're doing it on mobile, the layout of the website might be different from my printscreens)
Step 1 - Create The Work Skin
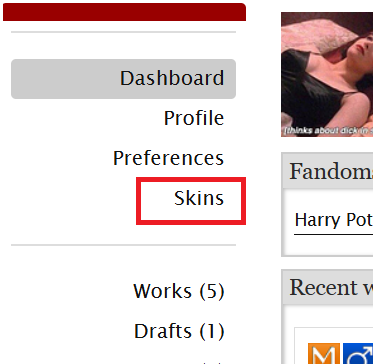
I'm gonna go right to the point here, but if you want to know about Work Skins in detail, I suggest this Ao3 Article.
On your Ao3 Dashboard, click on the fourth link on the sidebar, which is "Skins".
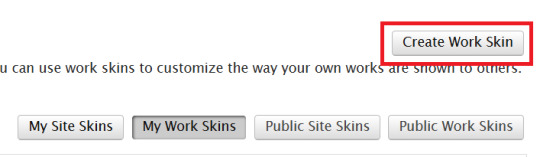
Then, on the page that opens up, click on "My Work Skins"

Then, on the top of the page, select "Create Work Skin"
Now, you'll see the form to create your skin, which looks like this:
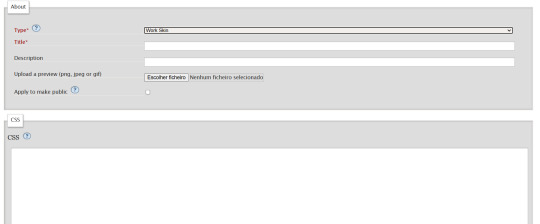
Leave the "Type" as "Work Skin". On the Title, you can give any name you want to your skin, but I suggest you choose the same title as your fic or something like "instant translation", so you'll know what it's about later.
You don't have to worry about any of the other fields, except for the CSS one, where you should copy and paste exactly what I'll put bellow:
#workskin .change_on_hover:not(:hover) .on, #workskin .change_on_hover:hover .off { display: none; }
So, now, you'll have something like this...
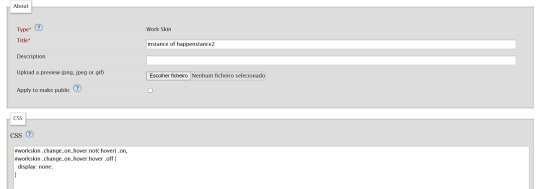
... and you just have to click "save" on the bottom of the page, and this step is done.
Step 2 - Apply the Skin you created to your fic
For a new work, click on "New Work" as usual. If it's a fic you're already posting, you can add this as well, just click the "Edit" button.
Now, on the form of your fic, on the "Associations" tab, right under the menu where you select the language of your fic, you'll see a "select a work skin" option.
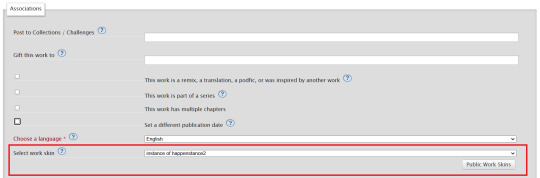
On this field, you should select the workskin you just created on the previous step, searching by the name you gave it on the "Title" field.
Step 3 - Insert the text
The code we're gonna use is this one:
<p class="change_on_hover"> <span class="off"> paragraph in foreing language </span> <span class="on"> paragraph in english </span> </p>
If you have no idea what this means, hold my hand, we're gonna get through it together!
First, copy your fic’s text into the AO3 text box as you normally would. Then, switch the text box to HTML mode so you can see the underlying code.

Now, scroll down until you find the paragraph you want to translate. After pasting, it will likely look something like this:

Note how each paragraph in HTML starts with <p> and ends with </p>. These tags indicate where a paragraph begins and ends.
Our goal is to modify that first <p> tag so it tells the browser, “Hey, this paragraph is different from those other ones. It should change when hovered over or clicked.”
To do this, we’ll change <p> to <p class="change_on_hover">. This marks the paragraph as special—one that should switch text when interacted with.

Now note how instead of having a single paragraph, we need two versions of the text:
In blue, the original (non-English) text, which will be shown by default.
In red, the translated (English) text, which will appear when the reader hovers over or clicks on it.
For the original text, wrap it inside a <span class="off"> tag, ending with </span> like this:
<span class="off"> insert here the whole text of the paragraph in the foreign language </span>
For the translated text, wrap it inside a <span class="on"> tag, also ending with </span>. This will replace the original text when hovered over or clicked:
<span class="off"> insert here the whole text of the paragraph in english </span>
And don't forget to end the whole thing again with </p>
Again, here's how it looks on my fic:

With the paragraphs that come before and after the translated text, just leave them as they are. They should still start with <p> and end with </p>. No changes needed!
You can use this method for as many paragraphs as you want, whether in the same chapter or across different chapters. As long as the Work Skin is active, the effect will work seamlessly throughout your fic.
#fanfiction#ao3#ao3 work skins#work skins#translation on text#ao3 fanfic#ao3 coding#tutorial#step by step#fanfic#wolfstar#marauders
78 notes
·
View notes
Text
Chifuyu thinking he broke you after giving you a shaking orgasm.

"Chifu'...fuck, a-ah!"
Chifuyu sat behind you with his knees planted on either side of your hips.
His blonde bangs fell across his forehead, tongue lolled out of his mouth as he rubbed his thumb faster and faster in circles on your engorged clit.
Two fingers slipped inside you with very minimal resistance due to how wet you were.
"You're so wet, baby. Couldn't wait for me to get off of work so I could come fuck you, huh?"
His aquamarine eyes settled on the juncture between your spread ass cheeks and the creamy translucent substance coating your inner thighs.
"Mmm, Fuyu...feels s-so good..."
You murmured with your cheek pressed against the cool silk of the pillow. Your bonnet had slid halfway off of your head, but Chifuyu fixed it for you and laid a soft kiss upon your tawny cheek.
It was almost embarassing how close you were to cumming just from Chifuyu's fingers playing with your swollen clit, but he was so good at it that he'd often make you come several times from his fingers alone before he even put his cock in you.
"That's right, baby. You close to cumming all over my fingers, aren't you?"
He sped up his actions, thrusting deeper with the two inside and pressing his thumb down directly on top of the little button, moving it from side to side.
Your thighs enclosed around his hand and began to quiver which made Chifuyu grin like a Chesire cat.
"Come on, open up for me, babe. Trying to get you there, sweet girl."
"'Fuyu, I can't! You're about to make me cum, you-!"
A soft gasp left your parted lips as a harsh shiver raked through your entire body. Chifuyu's hand was definitely stuck between your legs now as you shook and convulsed.
His eyes widened in shock. Usually, you might shiver a bit while cumming but you'd recover quickly.
Panic began to sink into his chest and he ripped his hand from between your legs like he'd been burned when you didn't stop shaking. Your head twisted to the side and you drew your knees up towards your chest.
"Shit! Oh shit...baby? You okay? Y/N?"
Baji often spoke to Chifuyu about all the women Baji himself had fucked with and how he always had them shaking and cumming all over themselves, but Chifuyu just took his words with a grain of salt, attributing it to simple "locker room talk."
He didn't actually think that a 'shaking orgasm' was a real thing, which is why he was so horrified at your body's reaction.
Poor thing was getting ready to grab his phone and call an ambulance when you opened your eyes and smiled up at him sweetly.
"Y/N! Are you alright?!"
"Mhm. That was amazing, 'Fuyu. Why are you looking so scared?"
He grabbed your hand and pressed a chaste kiss to the back of it.
"Because I was. You should have seen the way you folded in on yourself like you were in pain. I thought I hit the wrong thing and made you have a seizure or something."
You couldn't stop the giggle from leaving your lips as you looked up into his wide baby blue eyes.
"Oh, Bunny, you're so cute. I don't know if what you just said is possible but that was one of the best orgasms you've ever given me."
"Really?" He bit his lip shyly, cheeks warm and as red as cherry tomatoes.
"...Can I maybe try it again?"
#chifuyu matsuno#chifuyu smut#chifuyu x black reader#chifuyu x reader#tokyo revengers x black!reader#chifuyu x black!reader#chifuyu matsuno x reader#tokyo revengers x reader#black coded reader#black fem reader#x black reader#tr chifuyu#tokyo revengers chifuyu#divider made using cafekitsune's tutorial#bunny fufu🐰💚#chifuyu brainrot#𖢇rose.petals🌹🗒
613 notes
·
View notes
Text
New member added to the Theme Directory Network!
@wonhoutboy
What is the Theme Directory Network?
A network of Tumblr theme creators. This is a blog that showcases a wide variety of tumblr themes. A great place to find new themes for your blog!
Theme creators - how to join:
Fill out this short form
Give me 2 days or so to add you
Perks
Consistent queued reblogs of your theme posts on this blog to over 100k followers who are looking for themes
You can submit posts to be published and sorted
Access to the private facebook group (coming soon)
Access to the public tumblr community
#theme#themes#theme maker#theme creator#tumblr theme maker#tumblr theme creator#tumblr themes#new tumblr themes#theme coder#tumblr theme coder#tutorials#code tutorials#coding#updates#new member
5 notes
·
View notes
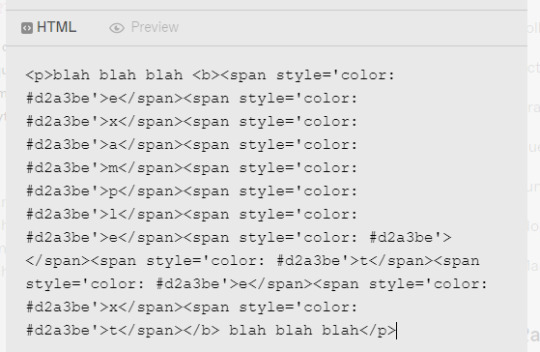
Note
how do you get your text that soft pink shade? tutorial?
BABY PINK TEXT TUTORIAL !
hi babe!! here's a short and hopefully easy to understand tutorial for the text i use in my posts ᥫ᭡
also, just a little disclaimer: the images on this post might not be visible because they exceed the limit of 10 images per post on mobile app. should be fine on a laptop or pc though!!

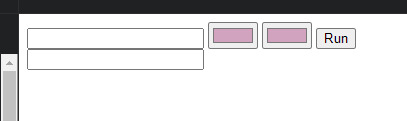
okay firstly, make sure you're using a laptop and open your post in one tab and in a seperate tab open jsfiddle.
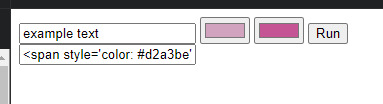
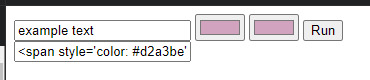
you should be able to see this coding somewhere on your screen:
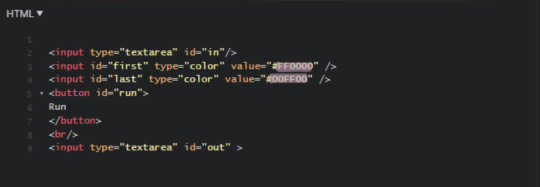
you're gonna replace the two hex-codes (highlighted text) with whichever colours you'd like. to do a gradient, like this, the two codes will be different, but i like to do a solid colour like this so my codes will be the same.
the hex code i use for the baby pink is D2A3BE, or you can use your own. if you don't have a hex code you like yet, you can use the colour picker on this site to find one!
just copy and paste the hex codes into the code so it looks like this:
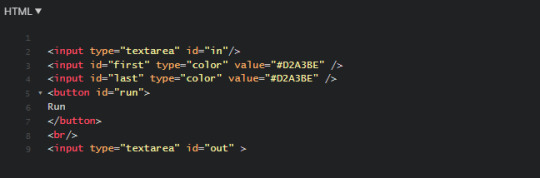
make sure it looks exactly like this. you still need all the spaces, quotations and other code. only change the hex codes.
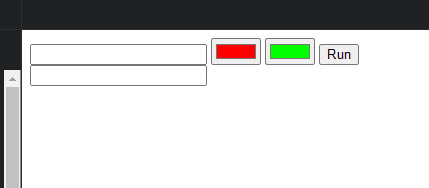
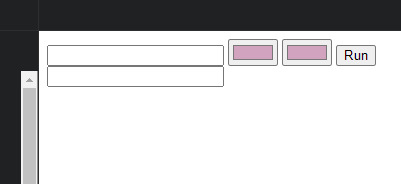
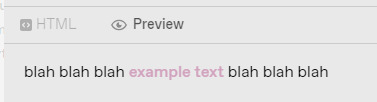
in the top left of your screen, there should be a "run" button, and when you press it, the colours in the bottom right should change from the default ones to the ones you chose.
next, you're going to open your tumblr post in your first tab.

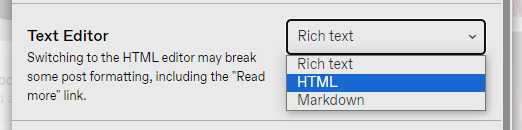
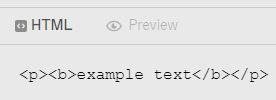
your post will start like this. you'll go to the settings button in the top right (circled) and change the post from rich text to HTML
this will enable coding on the post. you'll still have 'preview' where it will look normal and you can still type and edit the post as you usually would.
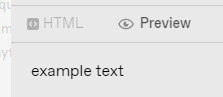
once you've typed something it will show it in the HTML option just in a different way:
you want to go to the preview page and make sure you've got the text looking exactly as you want it (bold, italic, small, etc.). also note that colours look especially good and show up well when the text is bold. i set mine to bold as an example.
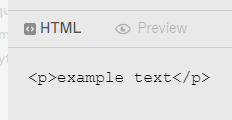
when you switch to HTML it will look something like it does above.
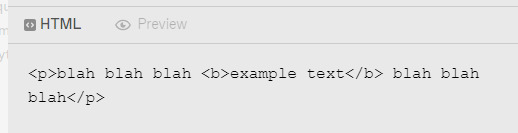
next, you'll copy the text between all the coding prompts (e.g. <p><b> and <b><p>). only copy the text you want to be pink or another colour!! don't highlight any of the coding. then paste it this top box on jsfiddle so it looks like this:
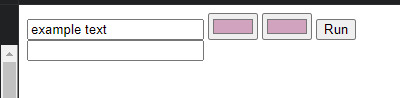
press "run" on the right, and it will spit out a line of code in the second box that will look something like this:
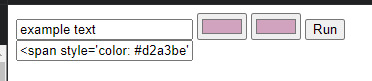
you're gonna copy that line of code and switch over to your tumblr tab. on your HTML version of your post, find the text you're changing and highlight it. then paste the code into that spot. make sure not to highlight any of the surrounding code - only the text you've written and want to change.
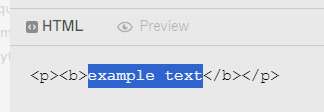
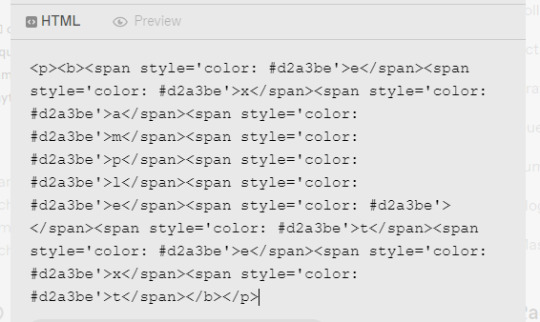
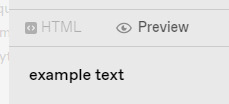
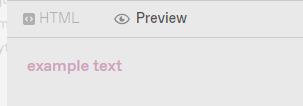
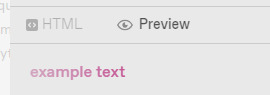
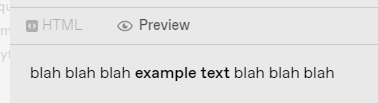
it will look super weird and long because it's colouring each symbol and letter, if you look closely, each letter of "example text" is separated and surrounded by code. when you switch to preview it will look like this:
for gradient, the process is the exact same, but on jsfiddle, when you're replacing the default hex codes with yours, the second hex code you plug in will be different to the one you start with. for example:
this second colour is C45494 btw!!
to do specific text in a paragraph as if bolding it (which i do in a lot of my posts), you just want to find that text in your HTML post, and copy and paste the specific word/s into your top box on jsfiddle, and then proceed as normal. example:

hopefully this helped!! let me know if you have any questions or need me to go over anything ( ˘³˘)
#coloured text tutorial#colored text tutorial#tumblr tutor#text tutorial#text tut#coloured text tut#colored text tut#colored text#coloured text#aesthetic#theme#aesthetic theme#pinterest#pink#hex codes#coding#jsfiddle#dodgesgirl helps#dodgesgirl answers#art donaldson#challengers#mike faist#challengers 2024#challengers movie#mike faist imagines#art donaldson fic#art donaldson smut#challengers smut#mike faist renaissance
229 notes
·
View notes
Note
what games did the units play originally? is there a video online with subs of them gaming?
Originally they all played first party nintendo switch games. Leoneed played miitopia, MMJ played clubhouse games, VBS played puyopuyo tetris, WxS played switch sports, and N25 played ringfit adventure. I found a playlist of subtitled videos here
#asks#one day i will get around to making tutorials of the official ln and mmj miis#i started it back when the videos dropped and never finished it 💀💀#i might still have the codes and turnarounds for the ones i recreated back then so maybe I'll try finish that this week
50 notes
·
View notes
Text
I knew I had my dads coding gene hidden within me
#feeling proud i could code a basic sanity system without following a tutorial#listen usually when i have a i want to make a game phase i can barely learn a thing about coding#but now i think it finally clicked & i'm happpy
76 notes
·
View notes
Text
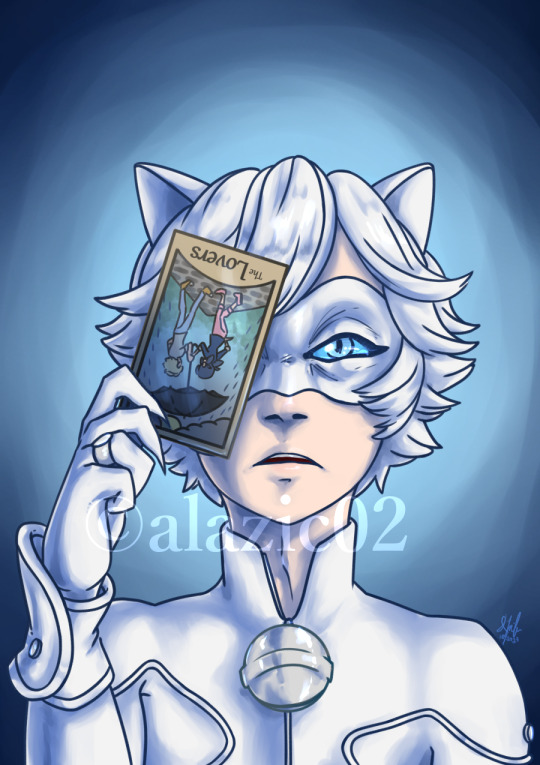

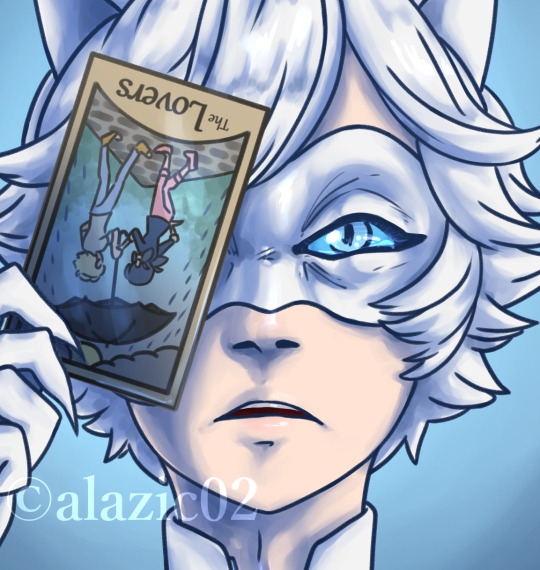
My full piece for the Le Blanc zine, a Chat Blanc Miraculous Ladybug zine hosted over at @leblanczine! I had a lot of fun working on this piece, playing with the shadows and saturations. Everyone's work looks amazing and it all came together so well!
The leftover sale runs through May 4, 2024 so make sure you grab what's available :)
Tumblr post || Shop
Artwork ©: alazic02 | buy me a ko-fi
Do not repost.
#miraculous ladybug#leblanczine#le blanc zine#chat blanc zine#zine#miraculous ladybug zine#chat blanc#art#my art#fanart#digital#alazic02#theres alt text on the first image that describes the full piece! the other two are closeups#idk if theres much left but theres a promo code 'leftovers' for 20% off your order#anyway i really enjoyed rendering this one actually and that took up most of the time i worked on it#i gotta look at more tutorials and stuff bc i feel like ive plateaued in terms of techniques for digital art and i wanna update my style
345 notes
·
View notes
Text
BG3 Photomode Tutorial #2.5: More Scene Manipulation
Chapter 0: Overview
Chapter 1: Script Extender Debug Console
Chapter 2: Scene Manipulation
Chapter 2.5: More Scene Manipulation
Chapter 3: Otis_Inf Camera Tools
Supplement: Mods and Resources
In continuing from the last tutorial, I wanted to talk about how you find and play cutscenes. There's a couple ways to do this but I will show you my way because I think it is the most thorough way if you need to figure out what flags you may need to edit in order to get this working. It'll also give you the tools you need to troubleshoot flag settings.

In the above screenshot, you can see a cutscene that is meant to be played in the Shadowcursed lands: The cutscene where you play the Lyre to summon Kar'niss. It is a complex scene with tags to resolve and multiple NPCs - some of which aren't humanoid.
I will show you how to find a scene based on a snippet of dialog, how to locate its name and UUID so you can plug it into this command:
Osi.QRY_StartDialogCustom_Fixed("SCL_Drider_Caravan_HalfOrcCaster_865adfae-1b72-1ed2-f961-d55abd4fb7b1","S_GOB_DrowCommander_25721313-0c15-4935-8176-9f134385451b",Osi.DB_Avatars:Get(nil)[1][1],"S_Player_Gale_ad9af97d-75da-406a-ae13-7071c563f604","S_Player_Astarion_c7c13742-bacd-460a-8f65-f864fe41f255", 1,1,-1,1)
Warning: Please keep in mind, this is still a very finicky process. Again, take it slowly. And please don't be afraid to ask for help if you're struggling. Once you get the hang of it, you can pull out scenes and troubleshoot them into playing with ease.
There's also a good chance I'm glossing over something and not explaining it clearly/accurately. Please send me an ask, DM, comment to clarify anything that's confusing!
BG3 Dialog Reader
In order to do this my way, you'll need to download BG3 Dialog Reader and generate HTML files that include all the dialog of the game. There's already a very lovely tutorial on how to do this, so I recommend you follow it. EDIT: Or download their parsed files from their Google Drive: BG3 - parsed dialogue (1.7).zip
You've probably seen posts in this format before:

So you should now have HTML files located somewhere on your system. You need to search for a line that you'll find in the cutscene you want. Now you need to ask yourself: What line can I search for that is unique to that cutscene so that if I search for it I will get exactly what I'm looking for?
In the Drider-Lyre scene I recall an NPC asking "Did you bring the lyre?" so that's what I searched for. I use the Everything search tool because it's awesome and search for the file like so:

You will need to take a look at this file later, but for now, just take note of the name: SCL_Drider_Caravan_HalfOrcCaster. This is the first half of what you need to complete the first parameter in the command at the beginning. And we are going to use this to find the UUID.
Finding the UUID
To find the UUID, you're going to need another tool. The BG3 Modder's Multitool. Go to their GitHub, look along the right column and click on the link in the Releases section.

After that, click on bg3-modders-multitool.zip to download it. Extract the files to a new folder somewhere handy and run bg3-modders-multitool.exe.
In BG3 Modder's Multitool, click on Configuration and set the bg3.exe location to your Baldur's Gate 3 executable (E:\Program Files (x86)\Steam\steamapps\common\Baldurs Gate 3\bin or something along those lines). The Documents folder should auto-populate but you may want to double check it.

Now click in Search Index. It's going to start a process where it searches through the BG3 files. This can take a while the first time, but will be instant after that.

Once it's complete, you can now take the name of the scene and pop it into the new Index Search window that popped up.

In the results on the left, there will be a lot of files that list it, but I generally look for ones that say Assets\Dialogs\[PAK] and end in _merged.lsf and click on it. Then click Convert & Open.
This should open in Notepad or Notepad++. Now search this file for "SCL_Drider_Caravan_HalfOrcCaster" - keep in mind there can be MULTIPLE results. Note that the first instance you will get is SCL_Drider_Caravan_HalfOrcCaster_AtTower. This is the wrong scene.
You are now looking in the code a couple lines above that string for a value that is an ID type and has a value that's a lot of letters and numbers. This is the UUID.

So you have what you need to create this first parameter. Combine SCL_Drider_Caravan_HalfOrcCaster with the string of letters and numbers separated by an underscore. Like so:
SCL_Drider_Caravan_HalfOrcCaster_865adfae-1b72-1ed2-f961-d55abd4fb7b1
Plugging into the StartDialogCustom Command
Note that this copies straight in to this command in the first parameter:
Osi.QRY_StartDialogCustom_Fixed("SCL_Drider_Caravan_HalfOrcCaster_865adfae-1b72-1ed2-f961-d55abd4fb7b1", "S_GOB_DrowCommander_25721313-0c15-4935-8176-9f134385451b", Osi.DB_Avatars:Get(nil)[1][1], "S_Player_Gale_ad9af97d-75da-406a-ae13-7071c563f604", "S_Player_Astarion_c7c13742-bacd-460a-8f65-f864fe41f255" ,1,1,-1,1)
Now on first glance this looks pretty much like other times I've shown you this command, except note that there's FOUR actors. When a cutscene doesn't play at first (after double checking the UUID), this is very often the reason why. This is the minimum because the roles for the half-orc and Karniss need to be filled. First position is Kansif the Half-Orc, second is Tav, third is Brawler Vez, and fourth is Kar'niss.
Note: Kar'niss CAN be played by a non-Drider NPC - they will float angrily around carrying the lantern. It's hilarious. Try it. Here's when I tried it with my Tav:

Setting and Clearing Flags
Now. Depending on where and when you play this scene, the scene may or may not play or it will quit early. There could be a few reasons for that. The UUID could be wrong, the number of actors could be wrong, or a flag could be set that's not supposed to be set.
Let's have a look at the BG3 Dialog Reader file for this scene to see what flags are in use.

By default you should be able to see checkflags (blue) and setflags (orange). Look at the top of the page for a reminder of what the colors mean. The blue check flags are checking to see if the flag is set or not. If SCL_Drider_HasMet_CaravanFirstTime = False then you have met the drider caravan yet and this line will play. You will notice that after that is the orange SCL_Drider_HasMet_CaravanFirstTime setflag. That means the game will NOW set the flag as you have now met the Caravan for the first time. There may be occasions where you need to change the flags to get a cutscene to play. Here's the good news: There's handy commands for that!
print(GetFlag("flag",Osi.DB_Avatars:Get(nil)[1][1]))
Osi.ClearFlag("flag", Osi.DB_Avatars:Get(nil)[1][1])
Osi.SetFlag("flag",Osi.DB_Avatars:Get(nil)[1][1])
The bad news is you will have to find the UUID for each flag! So we gotta go back into BG3 Modders Multitool and search for the flag SCL_Drider_HasMet_CaravanFirstTime
Thankfully, you'll only get one result and the big string of letters and numbers is the UUID you need.

Now you combine them like you did with the cutscene name and UUID before, separated by an underscore: SCL_Drider_HasMet_CaravanFirstTime_39e94029-84f7-418d-ddce-8947bcbb7688
So let's say the cutscene isn't playing because you're on a save where that scene has already played. Clear the flag on your Tav: Osi.ClearFlag("SCL_Drider_HasMet_CaravanFirstTime_39e94029-84f7-418d-ddce-8947bcbb76", Osi.DB_Avatars:Get(nil)[1][1])
And I think we will leave it at that. I realize this was a LOT to cover. Go through this very slowly. It will take time to understand what is happening here.
And as always, if you have something you're trying to do and you're struggling with the directions, I can try to help! Please send me a DM, Ask, whatever else and I'll gladly help you with whatever you're trying to do.
Thanks for reading and sticking through this so far!
#okay just... if you don't know coding#take a deep breath and tackle this one section at a time - this is a lot#bg3 photomode#bg3 photography#mog's bg3 virtual photography tutorial#bg3#bg3 virtual photography#baldur's gate iii#baldur's gate 3
53 notes
·
View notes