#how to make a dataframe in pandas
Explore tagged Tumblr posts
Visit Tumblr Blog
Explore Tumblr blogs with no restrictions, modern design and the best experience.
Last Seen Tumblr Blogs


Fun Fact
Tumblr was created by web developers David Karp and Marco Arment.
Text
DataFrame in Pandas: Guide to Creating Awesome DataFrames
Explore how to create a dataframe in Pandas, including data input methods, customization options, and practical examples.
Data analysis used to be a daunting task, reserved for statisticians and mathematicians. But with the rise of powerful tools like Python and its fantastic library, Pandas, anyone can become a data whiz! Pandas, in particular, shines with its DataFrames, these nifty tables that organize and manipulate data like magic. But where do you start? Fear not, fellow data enthusiast, for this guide will…
View On WordPress
#advanced dataframe features#aggregating data in pandas#create dataframe from dictionary in pandas#create dataframe from list in pandas#create dataframe in pandas#data manipulation in pandas#dataframe indexing#filter dataframe by condition#filter dataframe by multiple conditions#filtering data in pandas#grouping data in pandas#how to make a dataframe in pandas#manipulating data in pandas#merging dataframes#pandas data structures#pandas dataframe tutorial#python dataframe basics#rename columns in pandas dataframe#replace values in pandas dataframe#select columns in pandas dataframe#select rows in pandas dataframe#set column names in pandas dataframe#set row names in pandas dataframe
0 notes
Text
How much Python should one learn before beginning machine learning?
Before diving into machine learning, a solid understanding of Python is essential. :

Basic Python Knowledge:
Syntax and Data Types:
Understand Python syntax, basic data types (strings, integers, floats), and operations.
Control Structures:
Learn how to use conditionals (if statements), loops (for and while), and list comprehensions.
Data Handling Libraries:
Pandas:
Familiarize yourself with Pandas for data manipulation and analysis. Learn how to handle DataFrames, series, and perform data cleaning and transformations.
NumPy:
Understand NumPy for numerical operations, working with arrays, and performing mathematical computations.
Data Visualization:
Matplotlib and Seaborn:
Learn basic plotting with Matplotlib and Seaborn for visualizing data and understanding trends and distributions.
Basic Programming Concepts:
Functions:
Know how to define and use functions to create reusable code.
File Handling:
Learn how to read from and write to files, which is important for handling datasets.
Basic Statistics:
Descriptive Statistics:
Understand mean, median, mode, standard deviation, and other basic statistical concepts.
Probability:
Basic knowledge of probability is useful for understanding concepts like distributions and statistical tests.
Libraries for Machine Learning:
Scikit-learn:
Get familiar with Scikit-learn for basic machine learning tasks like classification, regression, and clustering. Understand how to use it for training models, evaluating performance, and making predictions.
Hands-on Practice:
Projects:
Work on small projects or Kaggle competitions to apply your Python skills in practical scenarios. This helps in understanding how to preprocess data, train models, and interpret results.
In summary, a good grasp of Python basics, data handling, and basic statistics will prepare you well for starting with machine learning. Hands-on practice with machine learning libraries and projects will further solidify your skills.
To learn more drop the message…!
2 notes
·
View notes
Text
How you can use python for data wrangling and analysis
Python is a powerful and versatile programming language that can be used for various purposes, such as web development, data science, machine learning, automation, and more. One of the most popular applications of Python is data analysis, which involves processing, cleaning, manipulating, and visualizing data to gain insights and make decisions.
In this article, we will introduce some of the basic concepts and techniques of data analysis using Python, focusing on the data wrangling and analysis process. Data wrangling is the process of transforming raw data into a more suitable format for analysis, while data analysis is the process of applying statistical methods and tools to explore, summarize, and interpret data.
To perform data wrangling and analysis with Python, we will use two of the most widely used libraries: Pandas and NumPy. Pandas is a library that provides high-performance data structures and operations for manipulating tabular data, such as Series and DataFrame. NumPy is a library that provides fast and efficient numerical computations on multidimensional arrays, such as ndarray.
We will also use some other libraries that are useful for data analysis, such as Matplotlib and Seaborn for data visualization, SciPy for scientific computing, and Scikit-learn for machine learning.
To follow along with this article, you will need to have Python 3.6 or higher installed on your computer, as well as the libraries mentioned above. You can install them using pip or conda commands. You will also need a code editor or an interactive environment, such as Jupyter Notebook or Google Colab.
Let’s get started with some examples of data wrangling and analysis with Python.
Example 1: Analyzing COVID-19 Data
In this example, we will use Python to analyze the COVID-19 data from the World Health Organization (WHO). The data contains the daily situation reports of confirmed cases and deaths by country from January 21, 2020 to October 23, 2023. You can download the data from here.
First, we need to import the libraries that we will use:import pandas as pd import numpy as np import matplotlib.pyplot as plt import seaborn as sns
Next, we need to load the data into a Pandas DataFrame:df = pd.read_csv('WHO-COVID-19-global-data.csv')
We can use the head() method to see the first five rows of the DataFrame:df.head()
Date_reportedCountry_codeCountryWHO_regionNew_casesCumulative_casesNew_deathsCumulative_deaths2020–01–21AFAfghanistanEMRO00002020–01–22AFAfghanistanEMRO00002020–01–23AFAfghanistanEMRO00002020–01–24AFAfghanistanEMRO00002020–01–25AFAfghanistanEMRO0000
We can use the info() method to see some basic information about the DataFrame, such as the number of rows and columns, the data types of each column, and the memory usage:df.info()
Output:
RangeIndex: 163800 entries, 0 to 163799 Data columns (total 8 columns): # Column Non-Null Count Dtype — — — — — — — — — — — — — — — 0 Date_reported 163800 non-null object 1 Country_code 162900 non-null object 2 Country 163800 non-null object 3 WHO_region 163800 non-null object 4 New_cases 163800 non-null int64 5 Cumulative_cases 163800 non-null int64 6 New_deaths 163800 non-null int64 7 Cumulative_deaths 163800 non-null int64 dtypes: int64(4), object(4) memory usage: 10.0+ MB “><class 'pandas.core.frame.DataFrame'> RangeIndex: 163800 entries, 0 to 163799 Data columns (total 8 columns): # Column Non-Null Count Dtype --- ------ -------------- ----- 0 Date_reported 163800 non-null object 1 Country_code 162900 non-null object 2 Country 163800 non-null object 3 WHO_region 163800 non-null object 4 New_cases 163800 non-null int64 5 Cumulative_cases 163800 non-null int64 6 New_deaths 163800 non-null int64 7 Cumulative_deaths 163800 non-null int64 dtypes: int64(4), object(4) memory usage: 10.0+ MB
We can see that there are some missing values in the Country_code column. We can use the isnull() method to check which rows have missing values:df[df.Country_code.isnull()]
Output:
Date_reportedCountry_codeCountryWHO_regionNew_casesCumulative_casesNew_deathsCumulative_deaths2020–01–21NaNInternational conveyance (Diamond Princess)WPRO00002020–01–22NaNInternational conveyance (Diamond Princess)WPRO0000……………………2023–10–22NaNInternational conveyance (Diamond Princess)WPRO07120132023–10–23NaNInternational conveyance (Diamond Princess)WPRO0712013
We can see that the missing values are from the rows that correspond to the International conveyance (Diamond Princess), which is a cruise ship that had a COVID-19 outbreak in early 2020. Since this is not a country, we can either drop these rows or assign them a unique code, such as ‘IC’. For simplicity, we will drop these rows using the dropna() method:df = df.dropna()
We can also check the data types of each column using the dtypes attribute:df.dtypes
Output:Date_reported object Country_code object Country object WHO_region object New_cases int64 Cumulative_cases int64 New_deaths int64 Cumulative_deaths int64 dtype: object
We can see that the Date_reported column is of type object, which means it is stored as a string. However, we want to work with dates as a datetime type, which allows us to perform date-related operations and calculations. We can use the to_datetime() function to convert the column to a datetime type:df.Date_reported = pd.to_datetime(df.Date_reported)
We can also use the describe() method to get some summary statistics of the numerical columns, such as the mean, standard deviation, minimum, maximum, and quartiles:df.describe()
Output:
New_casesCumulative_casesNew_deathsCumulative_deathscount162900.000000162900.000000162900.000000162900.000000mean1138.300062116955.14016023.4867892647.346237std6631.825489665728.383017137.25601215435.833525min-32952.000000–32952.000000–1918.000000–1918.00000025%-1.000000–1.000000–1.000000–1.00000050%-1.000000–1.000000–1.000000–1.00000075%-1.000000–1.000000–1.000000–1.000000max -1 -1 -1 -1
We can see that there are some negative values in the New_cases, Cumulative_cases, New_deaths, and Cumulative_deaths columns, which are likely due to data errors or corrections. We can use the replace() method to replace these values with zero:df = df.replace(-1,0)
Now that we have cleaned and prepared the data, we can start to analyze it and answer some questions, such as:
Which countries have the highest number of cumulative cases and deaths?
How has the pandemic evolved over time in different regions and countries?
What is the current situation of the pandemic in India?
To answer these questions, we will use some of the methods and attributes of Pandas DataFrame, such as:
groupby() : This method allows us to group the data by one or more columns and apply aggregation functions, such as sum, mean, count, etc., to each group.
sort_values() : This method allows us to sort the data by one or more
loc[] : This attribute allows us to select a subset of the data by labels or conditions.
plot() : This method allows us to create various types of plots from the data, such as line, bar, pie, scatter, etc.
If you want to learn Python from scratch must checkout e-Tuitions to learn Python online, They can teach you Python and other coding language also they have some of the best teachers for their students and most important thing you can also Book Free Demo for any class just goo and get your free demo.
#python#coding#programming#programming languages#python tips#python learning#python programming#python development
2 notes
·
View notes
Text
Python for Data Science: The Only Guide You Need to Get Started in 2025
Data is the lifeblood of modern business, powering decisions in healthcare, finance, marketing, sports, and more. And at the core of it all lies a powerful and beginner-friendly programming language — Python.
Whether you’re an aspiring data scientist, analyst, or tech enthusiast, learning Python for data science is one of the smartest career moves you can make in 2025.
In this guide, you’ll learn:
Why Python is the preferred language for data science
The libraries and tools you must master
A beginner-friendly roadmap
How to get started with a free full course on YouTube
Why Python is the #1 Language for Data Science
Python has earned its reputation as the go-to language for data science and here's why:
1. Easy to Learn, Easy to Use
Python’s syntax is clean, simple, and intuitive. You can focus on solving problems rather than struggling with the language itself.
2. Rich Ecosystem of Libraries
Python offers thousands of specialized libraries for data analysis, machine learning, and visualization.
3. Community and Resources
With a vibrant global community, you’ll never run out of tutorials, forums, or project ideas to help you grow.
4. Integration with Tools & Platforms
From Jupyter notebooks to cloud platforms like AWS and Google Colab, Python works seamlessly everywhere.
What You Can Do with Python in Data Science
Let’s look at real tasks you can perform using Python: TaskPython ToolsData cleaning & manipulationPandas, NumPyData visualizationMatplotlib, Seaborn, PlotlyMachine learningScikit-learn, XGBoostDeep learningTensorFlow, PyTorchStatistical analysisStatsmodels, SciPyBig data integrationPySpark, Dask
Python lets you go from raw data to actionable insight — all within a single ecosystem.
A Beginner's Roadmap to Learn Python for Data Science
If you're starting from scratch, follow this step-by-step learning path:
✅ Step 1: Learn Python Basics
Variables, data types, loops, conditionals
Functions, file handling, error handling
✅ Step 2: Explore NumPy
Arrays, broadcasting, numerical computations
✅ Step 3: Master Pandas
DataFrames, filtering, grouping, merging datasets
✅ Step 4: Visualize with Matplotlib & Seaborn
Create charts, plots, and visual dashboards
✅ Step 5: Intro to Machine Learning
Use Scikit-learn for classification, regression, clustering
✅ Step 6: Work on Real Projects
Apply your knowledge to real-world datasets (Kaggle, UCI, etc.)
Who Should Learn Python for Data Science?
Python is incredibly beginner-friendly and widely used, making it ideal for:
Students looking to future-proof their careers
Working professionals planning a transition to data
Analysts who want to automate and scale insights
Researchers working with data-driven models
Developers diving into AI, ML, or automation
How Long Does It Take to Learn?
You can grasp Python fundamentals in 2–3 weeks with consistent daily practice. To become proficient in data science using Python, expect to spend 3–6 months, depending on your pace and project experience.
The good news? You don’t need to do it alone.
🎓 Learn Python for Data Science – Full Free Course on YouTube
We’ve put together a FREE, beginner-friendly YouTube course that covers everything you need to start your data science journey using Python.
📘 What You’ll Learn:
Python programming basics
NumPy and Pandas for data handling
Matplotlib for visualization
Scikit-learn for machine learning
Real-life datasets and projects
Step-by-step explanations
📺 Watch the full course now → 👉 Python for Data Science Full Course
You’ll walk away with job-ready skills and project experience — at zero cost.
🧭 Final Thoughts
Python isn’t just a programming language — it’s your gateway to the future.
By learning Python for data science, you unlock opportunities across industries, roles, and technologies. The demand is high, the tools are ready, and the learning path is clearer than ever.
Don’t let analysis paralysis hold you back.
Click here to start learning now → https://youtu.be/6rYVt_2q_BM
#PythonForDataScience #LearnPython #FreeCourse #DataScience2025 #MachineLearning #NumPy #Pandas #DataAnalysis #AI #ScikitLearn #UpskillNow
1 note
·
View note
Text
How To Use Pandas For Analysis?
Pandas is a powerful Python library used for data manipulation and analysis. It provides two primary data structures: Series (one-dimensional) and DataFrame (two-dimensional), which are essential for handling structured data. To start using Pandas, first import it using import pandas as pd. You can then load data from various sources such as CSV, Excel, or SQL databases using functions like pd.read_csv() or pd.read_excel().
Once your data is loaded into a DataFrame, you can explore it with methods like .head(), .info(), and .describe() to get a quick summary. Cleaning data involves handling missing values (.dropna(), .fillna()), renaming columns, or changing data types. For analysis, you can use filtering (df[df['column'] > value]), grouping (.groupby()), and aggregation functions (.mean(), .sum(), .count()). Visualization libraries like Matplotlib or Seaborn can be used alongside Pandas to plot the data for deeper insights.
Pandas is essential for data analysts, making it easier to understand patterns and trends in datasets. If you're new to this, consider starting with a Python course for beginners to build a solid foundation.
1 note
·
View note
Text
Unlock Your Coding Potential: Mastering Python, Pandas, and NumPy for Absolute Beginners
Ever thought learning programming was out of your reach? You're not alone. Many beginners feel overwhelmed when they first dive into the world of code. But here's the good news — Python, along with powerful tools like Pandas and NumPy, makes it easier than ever to start your coding journey. And yes, you can go from zero to confident coder without a tech degree or prior experience.
Let’s explore why Python is the best first language to learn, how Pandas and NumPy turn you into a data powerhouse, and how you can get started right now — even if you’ve never written a single line of code.
Why Python is the Ideal First Language for Beginners
Python is known as the "beginner's language" for a reason. Its syntax is simple, readable, and intuitive — much closer to plain English than other programming languages.
Whether you're hoping to build apps, automate your work, analyze data, or explore machine learning, Python is the gateway to all of it. It powers Netflix’s recommendation engine, supports NASA's simulations, and helps small businesses automate daily tasks.
Still unsure if it’s the right pick? Here’s what makes Python a no-brainer:
Simple to learn, yet powerful
Used by professionals across industries
Backed by a massive, helpful community
Endless resources and tools to learn from
And when you combine Python with NumPy and Pandas, you unlock the true magic of data analysis and manipulation.
The Power of Pandas and NumPy in Data Science
Let’s break it down.
🔹 What is NumPy?
NumPy (short for “Numerical Python”) is a powerful library that makes mathematical and statistical operations lightning-fast and incredibly efficient.
Instead of using basic Python lists, NumPy provides arrays that are more compact, faster, and capable of performing complex operations in just a few lines of code.
Use cases:
Handling large datasets
Performing matrix operations
Running statistical analysis
Working with machine learning algorithms
🔹 What is Pandas?
If NumPy is the engine, Pandas is the dashboard. Built on top of NumPy, Pandas provides dataframes — 2D tables that look and feel like Excel spreadsheets but offer the power of code.
With Pandas, you can:
Load data from CSV, Excel, SQL, or JSON
Filter, sort, and group your data
Handle missing or duplicate data
Perform data cleaning and transformation
Together, Pandas and NumPy give you superpowers to manage, analyze, and visualize data in ways that are impossible with Excel alone.
The Beginner’s Journey: Where to Start?
You might be wondering — “This sounds amazing, but how do I actually learn all this?”
That’s where the Mastering Python, Pandas, NumPy for Absolute Beginners course comes in. This beginner-friendly course is designed specifically for non-techies and walks you through everything you need to know — from setting up Python to using Pandas like a pro.
No prior coding experience? Perfect. That’s exactly who this course is for.
You’ll learn:
The fundamentals of Python: variables, loops, functions
How to use NumPy for array operations
Real-world data cleaning and analysis using Pandas
Building your first data project step-by-step
And because it’s self-paced and online, you can learn anytime, anywhere.
Real-World Examples: How These Tools Are Used Every Day
Learning Python, Pandas, and NumPy isn’t just for aspiring data scientists. These tools are used across dozens of industries:
1. Marketing
Automate reports, analyze customer trends, and predict buying behavior using Pandas.
2. Finance
Calculate risk models, analyze stock data, and create forecasting models with NumPy.
3. Healthcare
Track patient data, visualize health trends, and conduct research analysis.
4. Education
Analyze student performance, automate grading, and track course engagement.
5. Freelancing/Side Projects
Scrape data from websites, clean it up, and turn it into insights — all with Python.
Whether you want to work for a company or freelance on your own terms, these skills give you a serious edge.
Learning at Your Own Pace — Without Overwhelm
One of the main reasons beginners give up on coding is because traditional resources jump into complex topics too fast.
But the Mastering Python, Pandas, NumPy for Absolute Beginners course is designed to be different. It focuses on real clarity and hands-on practice — no fluff, no overwhelming jargon.
What you get:
Short, focused video lessons
Real-world datasets to play with
Assignments and quizzes to test your knowledge
Certificate of completion
It’s like having a patient mentor guiding you every step of the way.
Here’s What You’ll Learn Inside the Course
Let’s break it down:
✅ Python Essentials
Understanding variables, data types, and functions
Writing conditional logic and loops
Working with files and exceptions
✅ Mastering NumPy
Creating and manipulating arrays
Broadcasting and vectorization
Math and statistical operations
✅ Data Analysis with Pandas
Reading and writing data from various formats
Cleaning and transforming messy data
Grouping, aggregating, and pivoting data
Visualizing insights using built-in methods
By the end, you won’t just “know Python” — you’ll be able to do things with it. Solve problems, build projects, and impress employers.
Why This Skillset Is So In-Demand Right Now
Python is the most popular programming language in the world right now — and for good reason. Tech giants like Google, Netflix, Facebook, and NASA use it every day.
But here’s what most people miss: It’s not just about tech jobs. Knowing how to manipulate and understand data is now a core skill across marketing, operations, HR, journalism, and more.
According to LinkedIn and Glassdoor:
Python is one of the most in-demand skills in 2025
Data analysis is now required in 70% of digital roles
Entry-level Python developers earn an average of $65,000 to $85,000/year
When you combine Python with Pandas and NumPy, you make yourself irresistible to hiring managers and clients.
What Students Are Saying
People just like you have used this course to kickstart their tech careers, land internships, or even launch freelance businesses.
Here’s what learners love about it:
“The lessons were beginner-friendly and not overwhelming.”
“The Pandas section helped me automate weekly reports at my job!”
“I didn’t believe I could learn coding, but this course proved me wrong.”
What You’ll Be Able to Do After the Course
By the time you complete Mastering Python, Pandas, NumPy for Absolute Beginners, you’ll be able to:
Analyze data using Pandas and Python
Perform advanced calculations using NumPy arrays
Clean, organize, and visualize messy datasets
Build mini-projects that show your skills
Apply for jobs or gigs with confidence
It’s not about becoming a “coder.” It’s about using the power of Python to make your life easier, your work smarter, and your skills future-proof.
Final Thoughts: This Is Your Gateway to the Future
Everyone starts somewhere.
And if you’re someone who has always felt curious about tech but unsure where to begin — this is your sign.
Python, Pandas, and NumPy aren’t just tools — they’re your entry ticket to a smarter career, side income, and creative freedom.
Ready to get started?
👉 Click here to dive into Mastering Python, Pandas, NumPy for Absolute Beginners and take your first step into the coding world. You’ll be amazed at what you can build.
0 notes
Text
From List to Data: A Beginner’s Guide to Data Transformation
In today’s data-driven world, transforming raw information into structured formats is a critical skill. One common task in data processing is converting a list—a simple, unstructured sequence of values—into structured data that can be analyzed, visualized, or stored. A “list” might be a shopping list, a sequence of names, or numbers collected from user inputs. “Data,” in contrast, refers to a structured format such as a table, database, or dataset. The goal of transforming a list to data is to make it usable for insights, automation, or further manipulation. Understanding this process helps beginners make sense of how information is organized in software systems, spreadsheets, or databases. It’s not just a programming task—it’s a foundational part of digital literacy.
Why Converting Lists to Data Matters
Lists are everywhere: in text files, spreadsheets, form submissions, or even copied from emails. But these lists often need structure before they can be used. Structured data can be sorted, filtered, analyzed, or even turned into charts. For example, if you receive a list of customer names and purchases, it’s just raw text until it’s organized into phone number data and columns—where each row is a customer and each column is a data point like name, item, or price. Without this transformation, automation tools, machine learning models, or even basic Excel functions can’t work effectively. Converting lists to structured data enables better decisions, reporting, and scaling of workflows.

Simple Tools for List-to-Data Conversion
You don’t need to be a coder to transform lists into data. Tools like Microsoft Excel, Google Sheets, or Notepad++ make this easy. For example, using the "Text to Columns" feature in Excel, you can split list items into cells. In Google Sheets, functions like SPLIT() and ARRAYFORMULA() help break down and reorganize text. Online tools like CSV converters also turn lists into structured CSV files. These steps make it easier for users to handle raw data without complex scripts. Beginners can start with drag-and-drop interfaces and learn basic data formatting.
Moving Beyond Basics: Automation with Python and Scripts
Once you’re comfortable with basic tools, learning to automate list-to-data conversions with scripting languages like Python is a powerful next step. Python libraries such as pandas make it simple to import a list from a file and convert it into a DataFrame—a table-like data structure. For example, if you have a list stored in a .txt file, Python can read it, parse it using string functions, and format it into rows and columns automatically. This is especially useful when handling large or repetitive data. Automating the process not only saves time but also reduces human error. It opens the door to building entire data pipelines, integrating APIs, or performing advanced analysis.
0 notes
Text
5/12/2025
Today I got hooked on the idea of taking the Gregtech New Horizons modpack for Minecraft and making a program that would combine a lot of different necessary calculators into it. Online I found a spreadsheet (https://docs.google.com/spreadsheets/d/1HgrUWh39L4zA4QDWOSHOovPek1s1eAK1VsZQy_D0zjQ/edit#gid=962322443) that helped with balancing how many coke ovens to water to boilers you need for steam production (something that involves an unnecessary amount of variables, but welcome to GTNH), and decided that I wanted to convert it as my first bite, along with a calculator for how many blocks I would need to build different tank sizes. Eventually I want to move it to a website, but for now it is hosted on my GitHub (https://github.com/lokon100/greghell) while I am starting it!
I haven’t worked in Python for a bit so it was great to come back to it and look at it with fresh eyes, especially for how I stored my variables! I stored my static variables in Pandas Series and Dataframes, which kept it pretty neat and organized.
The “new thing” I decided to look into was how to streamline having a user choose something from a list, and after some searching around I landed on this solution from StackOverflow (https://stackoverflow.com/questions/37565793/how-to-let-the-user-select-an-input-from-a-finite-list) that shows how to have a user choose from a dictionary index. I modified the code so that it would work from a list instead of an index, and it worked perfectly for inputting variables at the beginning of a run!
def selectFromList(options, name="option"): index = 0 print('Select a ' + name + ':') for optionName in options: index = index + 1 print(str(index) + ') ' + optionName) inputValid = False while not inputValid: inputRaw = input(name + ': ') inputNo = int(inputRaw) - 1 if inputNo > -1 and inputNo < len(options): selected = options[inputNo] break else: print('Please select a valid ' + name + ' number') return selected
Rereading my code a bit after I finished it I realized that not very much is different between the two “pressure types” of boilers, and I actually managed to knock a chunk of it off to streamline it which always feels pretty nice! Note to self- always check whether the only difference between your functions is one variable, because you can always just feed those in versus writing out a whole second function and using if loops!
I also noticed that three of the variables would probably never change, so I commented out the input lines and put in static values so that I could have ease of using it for now, but when I finish and publish the sets of calculators I can make it so that everyone can adjust it.
def boiler_math(pressure): boilerSize = uf.selectFromList(boilerVars['Shape'].tolist()) timeFrame = uf.selectFromList(timeTicks.index.to_list()) fuelType = uf.selectFromList(ovenProd.index.to_list()) numBoilers = int(input("How many boilers?")) numWater = int(input("How many water tanks?")) numOvens = int(input("How many coke ovens?")) rainMod = float(input("What is the rain modifier?")) if pressure == "high": solidWater, solidSteam, waterProd = boiler_high(boilerSize, timeFrame, fuelType, numBoilers, numWater, numOvens,rainMod) liquidWater, liquidSteam, waterProd = boiler_high(boilerSize, timeFrame, 'creosote', numBoilers, numWater, numOvens,rainMod) totalWater = waterProd-(solidWater+liquidWater) totalSteam = solidSteam+liquidSteam print("Total Water Difference: " + str(totalWater) + " Total Steam Production: " + str(totalSteam)) if pressure == "low": solidWater, solidSteam, waterProd = boiler_low(boilerSize, timeFrame, fuelType, numBoilers, numWater, numOvens,rainMod) liquidWater, liquidSteam, waterProd = boiler_low(boilerSize, timeFrame, 'creosote', numBoilers, numWater, numOvens,rainMod) totalWater = waterProd-(solidWater+liquidWater) totalSteam = solidSteam+liquidSteam print("Total Water Difference: " + str(totalWater) + " Total Steam Production: " + str(totalSteam)) def boiler_low(boilerSize, timeFrame, fuelType, numBoilers, numWater, numOvens, rainMod): tanks = boilerVars.loc[boilerVars['Shape'] == boilerSize, 'Size'].iloc[0] lpMod = boilerVars.loc[boilerVars['Shape'] == boilerSize, 'LP'].iloc[0] numTicks = timeTicks.loc[timeFrame] burnTime = fuelTimes.loc[fuelType] fuelConsumption = lpMod*numTicks/burnTime*numBoilers steamProduction = tanks*numTicks*10*numBoilers waterConsumption = steamProduction/150 ovenProduction = ovenProd.loc[fuelType]*numTicks*numOvens waterProduction = numWater*rainMod*1.25*numTicks fuelDifference = ovenProduction-fuelConsumption waterDifference = waterProduction-waterConsumption print("For " + fuelType + " use") print("Fuel Difference: " + str(fuelDifference) + " Water Difference: " + str(waterDifference) + " Steam Production: " + str(steamProduction)) return waterConsumption, steamProduction, waterProduction def boiler_high(boilerSize, timeFrame, fuelType, numBoilers, numWater, numOvens, rainMod): tanks = boilerVars.loc[boilerVars['Shape'] == boilerSize, 'Size'].iloc[0] hpMod = boilerVars.loc[boilerVars['Shape'] == boilerSize, 'HP'].iloc[0] numTicks = timeTicks.loc[timeFrame] burnTime = fuelTimes.loc[fuelType] fuelConsumption = hpMod*numTicks/burnTime*numBoilers steamProduction = tanks*numTicks*10*numBoilers waterConsumption = steamProduction/150 ovenProduction = ovenProd.loc[fuelType]*numTicks*numOvens waterProduction = numWater*rainMod*1.25*numTicks fuelDifference = ovenProduction-fuelConsumption waterDifference = waterProduction-waterConsumption print("For " + fuelType + " use") print("Fuel Difference: " + str(fuelDifference) + " Water Difference: " + str(waterDifference) + " Steam Production: " + str(steamProduction)) return waterConsumption, steamProduction, waterProduction
Vs
def boiler_math(): pressure = uf.selectFromList(["LP", "HP"]) boilerSize = uf.selectFromList(boilerVars['Shape'].tolist()) timeFrame = "hour" #uf.selectFromList(timeTicks.index.to_list()) fuelType = uf.selectFromList(ovenProd.index.to_list()) numBoilers = 1 #int(input("How many boilers?")) numWater = int(input("How many water tanks?")) numOvens = int(input("How many coke ovens?")) rainMod = 0.8 #float(input("What is the rain modifier?")) solidWater, solidSteam, waterProd = boiler_vars(boilerSize, timeFrame, fuelType, numBoilers, numWater, numOvens,rainMod, pressure) liquidWater, liquidSteam, waterProd = boiler_vars(boilerSize, timeFrame, 'creosote', numBoilers, numWater, numOvens,rainMod, pressure) totalWater = waterProd-(solidWater+liquidWater) totalSteam = solidSteam+liquidSteam print("Total Water Difference: " + str(totalWater) + " Total Steam Production: " + str(totalSteam)) def boiler_vars(boilerSize, timeFrame, fuelType, numBoilers, numWater, numOvens, rainMod, pressure): tanks = boilerVars.loc[boilerVars['Shape'] == boilerSize, 'Size'].iloc[0] lpMod = boilerVars.loc[boilerVars['Shape'] == boilerSize, pressure].iloc[0] numTicks = timeTicks.loc[timeFrame] burnTime = fuelTimes.loc[fuelType] fuelConsumption = lpMod*numTicks/burnTime*numBoilers steamProduction = tanks*numTicks*10*numBoilers waterConsumption = steamProduction/150 ovenProduction = ovenProd.loc[fuelType]*numTicks*numOvens waterProduction = numWater*rainMod*1.25*numTicks fuelDifference = ovenProduction-fuelConsumption waterDifference = waterProduction-waterConsumption print("For " + fuelType + " use") print("Fuel Difference: " + str(fuelDifference) + " Water Difference: " + str(waterDifference) + " Steam Production: " + str(steamProduction)) return waterConsumption, steamProduction, waterProduction
1 note
·
View note
Text
Pandas DataFrame Tutorial: Ways to Create and Manipulate Data in Python Are you diving into data analysis with Python? Then you're about to become best friends with pandas DataFrames. These powerful, table-like structures are the backbone of data manipulation in Python, and knowing how to create them is your first step toward becoming a data analysis expert. In this comprehensive guide, we'll explore everything you need to know about creating pandas DataFrames, from basic methods to advanced techniques. Whether you're a beginner or looking to level up your skills, this tutorial has got you covered. Getting Started with Pandas Before we dive in, let's make sure you have everything set up. First, you'll need to install pandas if you haven't already: pythonCopypip install pandas Then, import pandas in your Python script: pythonCopyimport pandas as pd 1. Creating a DataFrame from Lists The simplest way to create a DataFrame is using Python lists. Here's how: pythonCopy# Creating a basic DataFrame from lists data = 'name': ['John', 'Emma', 'Alex', 'Sarah'], 'age': [28, 24, 32, 27], 'city': ['New York', 'London', 'Paris', 'Tokyo'] df = pd.DataFrame(data) print(df) This creates a clean, organized table with your data. The keys in your dictionary become column names, and the values become the data in each column. 2. Creating a DataFrame from NumPy Arrays When working with numerical data, NumPy arrays are your friends: pythonCopyimport numpy as np # Creating a DataFrame from a NumPy array array_data = np.random.rand(4, 3) df_numpy = pd.DataFrame(array_data, columns=['A', 'B', 'C'], index=['Row1', 'Row2', 'Row3', 'Row4']) print(df_numpy) 3. Reading Data from External Sources Real-world data often comes from files. Here's how to create DataFrames from different file formats: pythonCopy# CSV files df_csv = pd.read_csv('your_file.csv') # Excel files df_excel = pd.read_excel('your_file.xlsx') # JSON files df_json = pd.read_json('your_file.json') 4. Creating a DataFrame from a List of Dictionaries Sometimes your data comes as a list of dictionaries, especially when working with APIs: pythonCopy# List of dictionaries records = [ 'name': 'John', 'age': 28, 'department': 'IT', 'name': 'Emma', 'age': 24, 'department': 'HR', 'name': 'Alex', 'age': 32, 'department': 'Finance' ] df_records = pd.DataFrame(records) print(df_records) 5. Creating an Empty DataFrame Sometimes you need to start with an empty DataFrame and fill it later: pythonCopy# Create an empty DataFrame with defined columns columns = ['Name', 'Age', 'City'] df_empty = pd.DataFrame(columns=columns) # Add data later new_row = 'Name': 'Lisa', 'Age': 29, 'City': 'Berlin' df_empty = df_empty.append(new_row, ignore_index=True) 6. Advanced DataFrame Creation Techniques Using Multi-level Indexes pythonCopy# Creating a DataFrame with multi-level index arrays = [ ['2023', '2023', '2024', '2024'], ['Q1', 'Q2', 'Q1', 'Q2'] ] data = 'Sales': [100, 120, 150, 180] df_multi = pd.DataFrame(data, index=arrays) print(df_multi) Creating Time Series DataFrames pythonCopy# Creating a time series DataFrame dates = pd.date_range('2024-01-01', periods=6, freq='D') df_time = pd.DataFrame(np.random.randn(6, 4), index=dates, columns=['A', 'B', 'C', 'D']) Best Practices and Tips Always Check Your Data Types pythonCopy# Check data types of your DataFrame print(df.dtypes) Set Column Names Appropriately Use clear, descriptive column names without spaces: pythonCopydf.columns = ['first_name', 'last_name', 'email'] Handle Missing Data pythonCopy# Check for missing values print(df.isnull().sum()) # Fill missing values df.fillna(0, inplace=True) Common Pitfalls to Avoid Memory Management: Be cautious with large datasets. Use appropriate data types to minimize memory usage:
pythonCopy# Optimize numeric columns df['integer_column'] = df['integer_column'].astype('int32') Copy vs. View: Understand when you're creating a copy or a view: pythonCopy# Create a true copy df_copy = df.copy() Conclusion Creating pandas DataFrames is a fundamental skill for any data analyst or scientist working with Python. Whether you're working with simple lists, complex APIs, or external files, pandas provides flexible and powerful ways to structure your data. Remember to: Choose the most appropriate method based on your data source Pay attention to data types and memory usage Use clear, consistent naming conventions Handle missing data appropriately With these techniques in your toolkit, you're well-equipped to handle any data manipulation task that comes your way. Practice with different methods and explore the pandas documentation for more advanced features as you continue your data analysis journey. Additional Resources Official pandas documentation Pandas cheat sheet Python for Data Science Handbook Real-world pandas examples on GitHub Now you're ready to start creating and manipulating DataFrames like a pro. Happy coding!
0 notes
Text
Level Up Data Science Skills with Python: A Full Guide
Data science is one of the most in-demand careers in the world today, and Python is its go-to language. Whether you're just starting out or looking to sharpen your skills, mastering Python can open doors to countless opportunities in data analytics, machine learning, artificial intelligence, and beyond.
In this guide, we’ll explore how Python can take your data science abilities to the next level—covering core concepts, essential libraries, and practical tips for real-world application.
Why Python for Data Science?
Python’s popularity in data science is no accident. It’s beginner-friendly, versatile, and has a massive ecosystem of libraries and tools tailored specifically for data work. Here's why it stands out:
Clear syntax simplifies learning and ensures easier maintenance.
Community support means constant updates and rich documentation.
Powerful libraries for everything from data manipulation to visualization and machine learning.
Core Python Concepts Every Data Scientist Should Know
Establish a solid base by thoroughly understanding the basics before advancing to more complex methods:
Variables and Data Types: Get familiar with strings, integers, floats, lists, and dictionaries.
Control Flow: Master if-else conditions, for/while loops, and list comprehensions through practice.
Functions and Modules: Understand how to create reusable code by defining functions.
File Handling: Leverage built-in functions to handle reading from and writing to files.
Error Handling: Use try-except blocks to write robust programs.
Mastering these foundations ensures you can write clean, efficient code—critical for working with complex datasets.
Must-Know Python Libraries for Data Science
Once you're confident with Python basics, it’s time to explore the libraries that make data science truly powerful:
NumPy: For numerical operations and array manipulation. It forms the essential foundation for a wide range of data science libraries.
Pandas: Used for data cleaning, transformation, and analysis. DataFrames are essential for handling structured data.
Matplotlib & Seaborn: These libraries help visualize data. While Matplotlib gives you control, Seaborn makes it easier with beautiful default styles.
Scikit-learn: Perfect for building machine learning models. Features algorithms for tasks like classification, regression, clustering, and additional methods.
TensorFlow & PyTorch: For deep learning and neural networks. Choose one based on your project needs and personal preference.
Real-World Projects to Practice
Applying what you’ve learned through real-world projects is key to skill development. Here are a few ideas:
Data Cleaning Challenge: Work with messy datasets and clean them using Pandas.
Exploratory Data Analysis (EDA): Analyze a dataset, find patterns, and visualize results.
Build a Machine Learning Model: Use Scikit-learn to create a prediction model for housing prices, customer churn, or loan approval.
Sentiment Analysis: Use natural language processing (NLP) to analyze product reviews or tweets.
Completing these projects can enhance your portfolio and attract the attention of future employers.
Tips to Accelerate Your Learning
Join online courses and bootcamps: Join Online Platforms
Follow open-source projects on GitHub: Contribute to or learn from real codebases.
Engage with the community: Join forums like Stack Overflow or Reddit’s r/datascience.
Read documentation and blogs: Keep yourself informed about new features and optimal practices.
Set goals and stay consistent: Data science is a long-term journey, not a quick race.
Python is the cornerstone of modern data science. Whether you're manipulating data, building models, or visualizing insights, Python equips you with the tools to succeed. By mastering its fundamentals and exploring its powerful libraries, you can confidently tackle real-world data challenges and elevate your career in the process. If you're looking to sharpen your skills, enrolling in a Python course in Gurgaon can be a great way to get expert guidance and hands-on experience.
DataMites Institute stands out as a top international institute providing in-depth education in data science, AI, and machine learning. We provide expert-led courses designed for both beginners and professionals aiming to boost their careers.
Python vs R - What is the Difference, Pros and Cons
youtube
#python course#python training#python institute#learnpython#python#pythoncourseingurgaon#pythoncourseinindia#Youtube
0 notes
Text
ETL Testing: How to Validate Your Python ETL Pipelines
In the world of data engineering, building a strong Extract Transform Load (ETL) process is only half the battle. Ensuring that your ETL pipelines are reliable, accurate, and efficient is just as crucial. When working with Extract Transform Load Python workflows, proper ETL testing is essential to maintain data quality, catch errors early, and guarantee trustworthy outputs for downstream applications. In this article, we'll explore why ETL testing matters and how to effectively validate your Python ETL pipelines.
Why ETL Testing Is Critical
ETL processes move and transform data between systems — often at massive scales. A small mistake during extraction, transformation, or loading can result in significant business consequences, from incorrect analytics to failed reporting. Especially when using Extract Transform Load Python pipelines, where flexibility is high and custom scripts are common, thorough testing helps to:
Detect data loss or corruption
Ensure transformations are applied correctly
Validate that data is loaded into the target system accurately
Confirm that performance meets expectations
Maintain data consistency across different stages
Without systematic ETL testing, you risk pushing flawed data into production, which could impact decision-making and operations.
Key Types of ETL Testing
When validating Extract Transform Load Python pipelines, several types of testing should be performed:
1. Data Completeness Testing
This ensures that all the expected data from the source system is extracted and made available for transformation and loading. You might use row counts, checksum comparisons, or aggregate validations to detect missing or incomplete data.
2. Data Transformation Testing
In this step, you verify that transformation rules (like calculations, data type changes, or standardizations) have been correctly applied. Writing unit tests for transformation functions is a best practice when coding ETL logic in Python.
3. Data Accuracy Testing
Data must be correctly inserted into the target system without errors. Validation includes checking field mappings, constraints (like foreign keys), and ensuring values match expectations after loading.
4. Performance Testing
An efficient Extract Transform Load Python pipeline should process data within acceptable timeframes. Performance testing identifies slow stages and bottlenecks in your ETL workflow.
5. Regression Testing
Whenever changes are made to the ETL code, regression testing ensures that new updates don't break existing functionality.
How to Perform ETL Testing in Python
Python provides a wide range of tools and libraries that make ETL testing approachable and powerful. Here’s a practical roadmap:
1. Write Unit Tests for Each Stage
Use Python’s built-in unittest framework or popular libraries like pytest to create test cases for extraction, transformation, and loading functions individually. This modular approach ensures early detection of bugs.
2. Validate Data with Pandas
Pandas is excellent for comparing datasets. For example, after extracting data, you can create Pandas DataFrames and use assertions like:
python
CopyEdit
import pandas as pd
3. Create Test Data Sets
Set up controlled test databases or files containing predictable datasets. Using mock data ensures that your Extract Transform Load Python process can be tested repeatedly under consistent conditions.
4. Automate ETL Test Workflows
Incorporate your ETL testing into automated CI/CD pipelines. Tools like GitHub Actions, Jenkins, or GitLab CI can trigger tests automatically whenever new code is pushed.
5. Use Data Validation Libraries
Libraries like great_expectations can make ETL testing even more robust. They allow you to define "expectations" for your data — such as field types, allowed ranges, and value uniqueness — and automatically validate your data against them.
Common ETL Testing Best Practices
Always test with real-world data samples when possible.
Track and log all test results to maintain visibility into pipeline health.
Isolate failures to specific ETL stages to debug faster.
Version-control both your ETL code and your test cases.
Keep test cases updated as your data models evolve.
Final Thoughts
Validating your Extract Transform Load Python pipelines with thorough ETL testing is vital for delivering trustworthy data solutions. From unit tests to full-scale validation workflows, investing time in testing ensures your ETL processes are accurate, reliable, and scalable. In the fast-paced world of data-driven decision-making, solid ETL testing isn't optional — it’s essential.
0 notes
Text
Random Forest

This graph shows the accuracy trend of my random forest model as the number of trees increases. The x-axis shows the number of trees, and the y-axis shows the test score. With just a few trees, the model achieves roughly 64% accuracy and rapidly improves. By the time you reach ~5 trees, accuracy exceeds 67%. Increasing the number to 10 to 15, the accuracy stabilizes. Adding more than 15 trees does not improve the performance. Therefore, a small number of trees, up to 15, is the best to get a near-optimal performance. Adding more than 15 has little effect, so it is not necessary. Overall, the graph indicates that no overfitting occurs since accuracy doesn't drop as more trees are added.
The above tree depicts the Random Forest model's decision trees. Each core node displays a decision rule based on the input variables, whereas the leaf nodes indicate classification results. Due to its depth and complexity, it might not be a good idea for human interpretation, but it does demonstrate how Random Forests incorporate numerous complicated decision boundaries. Here, I show a simplified version of the tree with a depth of 5. This tree alone is unreliable for interpretation, but the forest as a whole makes accurate predictions and emphasizes feature relevance via ensemble learning.
This is a more readable version (depth=3). I will interpret this tree together with a bar graph.
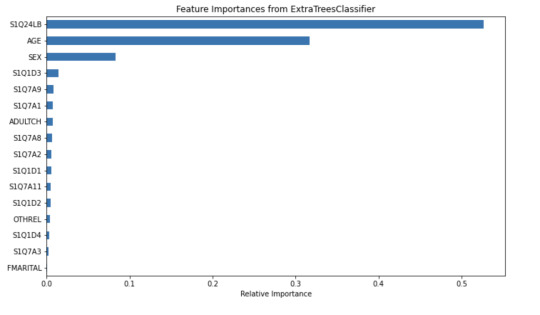
The tree helps visualize the process of classifying a frequent drinker and an infrequent drinker. The root node S1Q24LB(weight) indicates that weight is the most potent variable for splitting the data. Moreover, looking through the bar graph, S1Q24LB has the greatest relative importance. The bar graph confirms that S1Q24LB is the most powerful indicator (shown in the tree), as the model consistently picks them across many trees.
AGE and SEX also appear on the top of the tree, suggesting their importance in decision making. Looking through the bar graph, AGE has the second relative importance. Therefore, it can be concluded that AGE is a strongly predictive factor (but not as important as weight). It indicates that young and old people may have different drinking patterns.
On the other hand, SEX has the thrid relative importance but is much smaller than the AGE. Thus, SEX can be viewed as a moderate predictor. According to the tree, males (SEX=1) are slightly more likely to be classified as frequent drinkers compared to females. SEX is important in decision-making but does not have much separation power. However, it is still important and predictive since it appears in the early split.
Other variables are not that important and predictive.
In conclusion, weight and AGE are two of the most influential predictors in the process of classifying frequent drinkers. While SEX also has its predictive power, it is moderate as compared to weight and AGE. The results shown in the tree can be confirmed by the bar graph of relative importance. Thus, young males with higher weight are more likely to be frequent drinkers.
Code: This is the classifying process.
from pandas import Series, DataFrame import pandas as pd import numpy as np import os import matplotlib.pylab as plt from sklearn.model_selection import train_test_split from sklearn.tree import DecisionTreeClassifier from sklearn.metrics import classification_report import sklearn.metrics # Feature Importance from sklearn import datasets from sklearn.ensemble import ExtraTreesClassifier
#Load the dataset
data = pd.read_csv("_358bd6a81b9045d95c894acf255c696a_nesarc_pds.csv")
#Subset relevant columns
cols = ['S2AQ21B', 'AGE', 'SEX', 'S1Q7A11', 'FMARITAL','S1Q7A1','S1Q7A8','S1Q7A9','S1Q7A2','S1Q7A3','S1Q1D4','S1Q1D3', 'S1Q1D2','S1Q1D1','ADULTCH','OTHREL','S1Q24LB'] data = data[cols]
#Replace blanks and invalid codes
data['S2AQ21B'] = data['S2AQ21B'].replace([' ', 98, 99, 'BL'], pd.NA)
#Drop rows with missing target values
data = data.dropna(subset=['S2AQ21B'])
#Convert to numeric and recode binary target
data['S2AQ21B'] = data['S2AQ21B'].astype(int) data['DRINKFREQ'] = data['S2AQ21B'].apply(lambda x: 1 if x in [1, 2, 3, 4] else 0)
#Define X and y
X = data[['AGE', 'SEX', 'S1Q7A11', 'FMARITAL', 'S1Q7A1','S1Q7A8','S1Q7A9','S1Q7A2','S1Q7A3','S1Q1D4','S1Q1D3', 'S1Q1D2','S1Q1D1','ADULTCH','OTHREL','S1Q24LB']] y = data['DRINKFREQ']
pred_train, pred_test, tar_train, tar_test = train_test_split(X, y, test_size=.4)
pred_train.shape pred_test.shape tar_train.shape tar_test.shape
#Build model on training data
from sklearn.ensemble import RandomForestClassifier
classifier=RandomForestClassifier(n_estimators=25) classifier=classifier.fit(pred_train,tar_train)
predictions=classifier.predict(pred_test)
sklearn.metrics.confusion_matrix(tar_test,predictions) sklearn.metrics.accuracy_score(tar_test, predictions)
#fit an Extra Trees model to the data
model = ExtraTreesClassifier() model.fit(pred_train,tar_train)
#display the relative importance of each attribute
print(model.feature_importances_)
""" Running a different number of trees and see the effect of that on the accuracy of the prediction """
trees=range(25) accuracy=np.zeros(25)
for idx in range(len(trees)): classifier=RandomForestClassifier(n_estimators=idx + 1) classifier=classifier.fit(pred_train,tar_train) predictions=classifier.predict(pred_test) accuracy[idx]=sklearn.metrics.accuracy_score(tar_test, predictions)
plt.cla() plt.plot(trees, accuracy)
Code: Displaying the tree
from sklearn.tree import export_graphviz, plot_tree
#Pick one tree from the forest (e.g., the first one)
estimator = classifier.estimators_[0]
#Plot it using matplotlib
plt.figure(figsize=(30, 10)) plot_tree(classifier.estimators_[0], feature_names=['AGE', 'SEX', 'S1Q7A11', 'FMARITAL', 'S1Q7A1','S1Q7A8','S1Q7A9','S1Q7A2','S1Q7A3','S1Q1D4','S1Q1D3', 'S1Q1D2','S1Q1D1','ADULTCH','OTHREL','S1Q24LB'], class_names=['Not Frequent Drinker', 'Frequent Drinker'], filled=True, rounded=True, max_depth=3) plt.title("Random Forest - Tree #1 (Max Depth = 3)") plt.savefig("random_forest_tree_depth5.png") plt.show()
Code: Creating a bar graph
from sklearn.ensemble import ExtraTreesClassifier
#Train Extra Trees for feature importance
model = ExtraTreesClassifier() model.fit(pred_train, tar_train)
#Create DataFrame for plotting
feat_importances = pd.Series(model.feature_importances_, index=X.columns) feat_importances = feat_importances.sort_values(ascending=True)
#Plot as horizontal bar chart
plt.figure(figsize=(10, 6)) feat_importances.plot(kind='barh') plt.title('Feature Importances from ExtraTreesClassifier') plt.xlabel('Relative Importance') plt.tight_layout() plt.savefig("feature_importance_chart.png") plt.show()
0 notes
Text
Getting Started with Data Analysis Using Python

Data analysis is a critical skill in today’s data-driven world. Whether you're exploring business insights or conducting academic research, Python offers powerful tools for data manipulation, visualization, and reporting. In this post, we’ll walk through the essentials of data analysis using Python, and how you can begin analyzing real-world data effectively.
Why Python for Data Analysis?
Easy to Learn: Python has a simple and readable syntax.
Rich Ecosystem: Extensive libraries like Pandas, NumPy, Matplotlib, and Seaborn.
Community Support: A large, active community providing tutorials, tools, and resources.
Scalability: Suitable for small scripts or large-scale machine learning pipelines.
Essential Python Libraries for Data Analysis
Pandas: Data manipulation and analysis using DataFrames.
NumPy: Fast numerical computing and array operations.
Matplotlib: Basic plotting and visualizations.
Seaborn: Advanced and beautiful statistical plots.
Scikit-learn: Machine learning and data preprocessing tools.
Step-by-Step: Basic Data Analysis Workflow
1. Import Libraries
import pandas as pd import numpy as np import matplotlib.pyplot as plt import seaborn as sns
2. Load Your Dataset
df = pd.read_csv('data.csv') # Replace with your file path print(df.head())
3. Clean and Prepare Data
df.dropna(inplace=True) # Remove missing values df['Category'] = df['Category'].astype('category') # Convert to category type
4. Explore Data
print(df.describe()) # Summary statistics print(df.info()) # Data types and memory usage
5. Visualize Data
sns.histplot(df['Sales']) plt.title('Sales Distribution') plt.show() sns.boxplot(x='Category', y='Sales', data=df) plt.title('Sales by Category') plt.show()
6. Analyze Trends
monthly_sales = df.groupby('Month')['Sales'].sum() monthly_sales.plot(kind='line', title='Monthly Sales Trend') plt.xlabel('Month') plt.ylabel('Sales') plt.show()
Tips for Effective Data Analysis
Understand the context and source of your data.
Always check for missing or inconsistent data.
Visualize patterns before jumping into conclusions.
Automate repetitive tasks with reusable scripts or functions.
Use Jupyter Notebooks for interactive analysis and documentation.
Advanced Topics to Explore
Time Series Analysis
Data Wrangling with Pandas
Statistical Testing and Inference
Predictive Modeling with Scikit-learn
Interactive Dashboards with Plotly or Streamlit
Conclusion
Python makes data analysis accessible and efficient for beginners and professionals alike. With the right libraries and a structured approach, you can gain valuable insights from raw data and make data-driven decisions. Start experimenting with datasets, and soon you'll be crafting insightful reports and visualizations with ease!
0 notes
Text
Top 8 Data Science Tools Everyone Should Know

In the dynamic world of data science, having the right tools at your disposal is crucial for success. From handling massive datasets to building sophisticated AI models, the data science ecosystem offers a plethora of powerful software and platforms. Whether you're a budding enthusiast or an experienced professional, mastering these top 8 data science tools will significantly enhance your capabilities.
1. Python: The Versatile Workhorse
Category: Exploratory Data Analysis, Data Modelling, Scripting, Automation
Why it's essential: Python's simplicity, extensive libraries (NumPy, Pandas, Scikit-learn, TensorFlow, PyTorch), and strong community support make it the go-to language for most data science tasks. From data manipulation and statistical analysis to building complex machine learning models, Python's versatility is unmatched.
2. R: The Statistical Maestro
Category: Exploratory Data Analysis, Data Modelling, Statistical Computing, Data Visualization
Why it's essential: R's strength lies in its rich collection of packages specifically designed for statistical analysis, econometric modelling, and creating publication-quality visualizations. It's a favorite among researchers and analysts in academic and industry settings.
3. SQL: The Data Whisperer (Data Storage & EDA)
Category: Data Storage, Exploratory Data Analysis
Why it's essential: SQL (Structured Query Language) is the fundamental language for interacting with relational databases, where a significant portion of business data resides. Mastering SQL allows you to efficiently extract, filter, and manipulate data for analysis and model building.
4. Apache Spark: Big Data Powerhouse (Data Storage & Modelling)
Category: Data Storage (for large datasets), Data Modelling (scalable machine learning)
Why it's essential: With the exponential growth of data, Spark has become indispensable for processing and analyzing large, distributed datasets. Its in-memory processing capabilities significantly speed up ETL (Extract, Transform, Load) operations and enable scalable machine learning.
5. Pandas (Python Library): Your Data Manipulation Hub (EDA)
Category: Exploratory Data Analysis
Why it's essential: Built on top of Python, Pandas provides powerful and easy-to-use data structures (DataFrames) for data manipulation, cleaning, and analysis. It's a cornerstone for any data scientist working with tabular data.
6. Scikit-learn (Python Library): The Machine Learning Toolkit (Data Modelling)
Category: Data Modelling
Why it's essential: Scikit-learn offers a comprehensive set of efficient tools for machine learning tasks, including classification, regression, clustering, dimensionality reduction, and model selection. Its user-friendly 1 API makes it a popular choice for both beginners and experienced practitioners.
7. Tableau/Power BI: Visualizing Insights (Data Visualization)
Category: Data Visualization
Why it's essential: Transforming raw data into compelling and understandable visualizations is crucial for communicating insights effectively. Tableau and Power BI are leading business intelligence tools widely used by organizations to create interactive dashboards and reports.
8. Matplotlib & Seaborn (Python Libraries): The Art of Data Representation (Data Visualization)
Category: Data Visualization
Why it's essential: For more granular control over visualizations within the Python ecosystem, Matplotlib and Seaborn are essential libraries. They allow data scientists to create customized charts and plots for exploratory analysis and presentations.
Level Up Your Data Science Prowess with Xaltius Academy's Data Science and AI Program:
To truly master these essential data science tools and thrive in the data-driven landscape, consider enrolling in Xaltius Academy's Data Science and AI program. Our comprehensive curriculum is designed to equip you with the practical skills and theoretical knowledge needed to excel.
Here's how our program empowers you:
Hands-on Training: Gain practical experience using Python, R, SQL, and visualization tools through real-world case studies and projects.
In-depth Coverage: Develop a strong understanding of data storage solutions, exploratory data analysis techniques, and various data modeling algorithms.
Focus on Industry Best Practices: Learn to leverage these tools effectively to solve real business challenges.
Expert Guidance: Benefit from instruction by experienced data scientists and AI professionals.
Career Support: Receive dedicated support to help you launch or advance your data science career.
Conclusion:
Mastering these top 8 data science tools will significantly enhance your ability to extract meaningful insights from data and drive impactful decisions in today's rapidly evolving technological landscape. Embrace these tools, continuously learn, and consider the comprehensive training offered by Xaltius Academy's Data Science and AI program to arm yourself for a successful data science journey.
0 notes
Text
What is PySpark? A Beginner’s Guide
Introduction
The digital era gives rise to continuous expansion in data production activities. Organizations and businesses need processing systems with enhanced capabilities to process large data amounts efficiently. Large datasets receive poor scalability together with slow processing speed and limited adaptability from conventional data processing tools. PySpark functions as the data processing solution that brings transformation to operations.
The Python Application Programming Interface called PySpark serves as the distributed computing framework of Apache Spark for fast processing of large data volumes. The platform offers a pleasant interface for users to operate analytics on big data together with real-time search and machine learning operations. Data engineering professionals along with analysts and scientists prefer PySpark because the platform combines Python's flexibility with Apache Spark's processing functions.
The guide introduces the essential aspects of PySpark while discussing its fundamental elements as well as explaining operational guidelines and hands-on usage. The article illustrates the operation of PySpark through concrete examples and predicted outputs to help viewers understand its functionality better.
What is PySpark?
PySpark is an interface that allows users to work with Apache Spark using Python. Apache Spark is a distributed computing framework that processes large datasets in parallel across multiple machines, making it extremely efficient for handling big data. PySpark enables users to leverage Spark’s capabilities while using Python’s simple and intuitive syntax.
There are several reasons why PySpark is widely used in the industry. First, it is highly scalable, meaning it can handle massive amounts of data efficiently by distributing the workload across multiple nodes in a cluster. Second, it is incredibly fast, as it performs in-memory computation, making it significantly faster than traditional Hadoop-based systems. Third, PySpark supports Python libraries such as Pandas, NumPy, and Scikit-learn, making it an excellent choice for machine learning and data analysis. Additionally, it is flexible, as it can run on Hadoop, Kubernetes, cloud platforms, or even as a standalone cluster.
Core Components of PySpark
PySpark consists of several core components that provide different functionalities for working with big data:
RDD (Resilient Distributed Dataset) – The fundamental unit of PySpark that enables distributed data processing. It is fault-tolerant and can be partitioned across multiple nodes for parallel execution.
DataFrame API – A more optimized and user-friendly way to work with structured data, similar to Pandas DataFrames.
Spark SQL – Allows users to query structured data using SQL syntax, making data analysis more intuitive.
Spark MLlib – A machine learning library that provides various ML algorithms for large-scale data processing.
Spark Streaming – Enables real-time data processing from sources like Kafka, Flume, and socket streams.
How PySpark Works
1. Creating a Spark Session
To interact with Spark, you need to start a Spark session.

Output:

2. Loading Data in PySpark
PySpark can read data from multiple formats, such as CSV, JSON, and Parquet.

Expected Output (Sample Data from CSV):

3. Performing Transformations
PySpark supports various transformations, such as filtering, grouping, and aggregating data. Here’s an example of filtering data based on a condition.

Output:

4. Running SQL Queries in PySpark
PySpark provides Spark SQL, which allows you to run SQL-like queries on DataFrames.

Output:
5. Creating a DataFrame Manually
You can also create a PySpark DataFrame manually using Python lists.

Output:

Use Cases of PySpark
PySpark is widely used in various domains due to its scalability and speed. Some of the most common applications include:
Big Data Analytics – Used in finance, healthcare, and e-commerce for analyzing massive datasets.
ETL Pipelines – Cleans and processes raw data before storing it in a data warehouse.
Machine Learning at Scale – Uses MLlib for training and deploying machine learning models on large datasets.
Real-Time Data Processing – Used in log monitoring, fraud detection, and predictive analytics.
Recommendation Systems – Helps platforms like Netflix and Amazon offer personalized recommendations to users.
Advantages of PySpark
There are several reasons why PySpark is a preferred tool for big data processing. First, it is easy to learn, as it uses Python’s simple and intuitive syntax. Second, it processes data faster due to its in-memory computation. Third, PySpark is fault-tolerant, meaning it can automatically recover from failures. Lastly, it is interoperable and can work with multiple big data platforms, cloud services, and databases.
Getting Started with PySpark
Installing PySpark
You can install PySpark using pip with the following command:

To use PySpark in a Jupyter Notebook, install Jupyter as well:

To start PySpark in a Jupyter Notebook, create a Spark session:

Conclusion
PySpark is an incredibly powerful tool for handling big data analytics, machine learning, and real-time processing. It offers scalability, speed, and flexibility, making it a top choice for data engineers and data scientists. Whether you're working with structured data, large-scale machine learning models, or real-time data streams, PySpark provides an efficient solution.
With its integration with Python libraries and support for distributed computing, PySpark is widely used in modern big data applications. If you’re looking to process massive datasets efficiently, learning PySpark is a great step forward.
youtube
#pyspark training#pyspark coutse#apache spark training#apahe spark certification#spark course#learn apache spark#apache spark course#pyspark certification#hadoop spark certification .#Youtube
0 notes
Text
The Essential Tools and Frameworks for AI Integration in Apps

Artificial intelligence (AI) is no longer a futuristic concept; it's a transformative force reshaping how applications are built and used. Understanding the right tools and frameworks is essential if you're wondering how to integrate AI into an app. With many options, choosing the right ones can distinguish between a mediocre application and one that delivers a seamless, intelligent user experience. This guide will walk you through the most essential tools and frameworks for AI integration in app development.
1. Popular AI Frameworks
AI frameworks simplify the development and deployment of AI models, making them an essential part of the integration process. Below are some of the most widely used frameworks:
a) TensorFlow
Developed by Google, TensorFlow is an open-source framework widely used for machine learning and AI development. It supports a variety of tasks, including natural language processing (NLP), image recognition, and predictive analytics.
Key Features:
Robust library for neural network development.
TensorFlow Lite for on-device machine learning.
Pre-trained models are available in TensorFlow Hub.
b) PyTorch
Backed by Facebook, PyTorch has gained immense popularity due to its dynamic computation graph and user-friendly interface. It's particularly favoured by researchers and developers working on deep learning projects.
Key Features:
Seamless integration with Python.
TorchScript for transitioning models to production.
Strong community support.
c) Keras
Known for its simplicity and ease of use, Keras is a high-level API running on top of TensorFlow. It's ideal for quick prototyping and small-scale AI projects.
Key Features:
Modular and user-friendly design.
Extensive support for pre-trained models.
Multi-backend and multi-platform capabilities.
2. Tools for Data Preparation
AI models are only as good as the data they're trained on. Here are some tools to help prepare and manage your data effectively:
a) Pandas
Pandas is a powerful Python library for data manipulation and analysis. It provides data structures like DataFrames to manage structured data efficiently.
b) NumPy
Essential for numerical computing, NumPy supports large, multi-dimensional arrays and matrices and mathematical functions to operate on them.
c) DataRobot
DataRobot automates the data preparation process, including cleaning, feature engineering, and model selection, making it an excellent choice for non-technical users.
3. APIs and Services for AI Integration
For developers who want to incorporate AI without building models from scratch, APIs and cloud-based services provide an easy solution:
a) Google Cloud AI
Google Cloud offers pre-trained models and tools for various AI tasks, including Vision AI, Natural Language AI, and AutoML.
b) AWS AI Services
Amazon Web Services (AWS) provides AI services like SageMaker for building, training, and deploying machine learning models and tools for speech, text, and image processing.
c) Microsoft Azure AI
Azure AI provides cognitive services for vision, speech, language, and decision-making and tools for creating custom AI models.
d) IBM Watson
IBM Watson offers a range of AI services, including NLP, speech-to-text, and predictive analytics, designed to integrate seamlessly into apps.
4. Development Tools and IDEs
Efficient development environments are crucial for integrating AI into your app. Here are some recommended tools:
a) Jupyter Notebook
Jupyter Notebook is an open-source tool that allows developers to create and share live code, equations, and visualizations. It's widely used for exploratory data analysis and model testing.
b) Visual Studio Code
This lightweight yet powerful IDE supports Python and other languages commonly used in AI development. Extensions like Python and TensorFlow add specific capabilities for AI projects.
c) Google Colab
Google Colab is a cloud-based platform for running Jupyter Notebooks. It offers free GPU and TPU access, making it ideal for training AI models.
5. Version Control and Collaboration Tools
Managing code and collaboration effectively is essential for large-scale AI projects. Tools like GitHub and GitLab allow teams to collaborate, track changes, and manage repositories efficiently.
Key Features:
Branching and version control.
Integration with CI/CD pipelines for automated deployment.
Support for collaborative coding and reviews.
6. AI Deployment Platforms
Once your AI model is ready, deploying it efficiently is the next step. Here are some tools to consider:
a) Docker
Docker allows you to package your AI model and its dependencies into containers, ensuring consistent deployment across environments.
b) Kubernetes
Kubernetes is an orchestration tool for managing containerized applications. It's ideal for deploying large-scale AI models in distributed systems.
c) MLflow
MLflow is an open-source platform for managing the end-to-end machine learning lifecycle, including experimentation, reproducibility, and deployment.
Conclusion
Integrating AI into an app can be complex, but it becomes manageable and gratifying with the right tools and frameworks. Whether you're using TensorFlow for model building, Google Cloud AI for pre-trained APIs, or Docker for deployment, the key is to choose the solutions that align with your project's goals and technical requirements. You can create intelligent applications that deliver real value to users and businesses by leveraging these essential tools.
0 notes