#no easily accessible tutorials
Explore tagged Tumblr posts
Visit Tumblr Blog
Explore Tumblr blogs with no restrictions, modern design and the best experience.
Last Seen Tumblr Blogs


Fun Fact
US Tumblr user growth rate is estimated to slow down to 4.1%.
Text
now i’m thinking about hair. i never had black friends growing up. didn’t have a black classmate until freshman of high school, then moved to a different school with no black students in sophomore year. hell i didn’t even have black online friends. now i have more black online friends (i don’t leave the house so black irls is tricky) and even THEN im not very close to them.
so my experience with my blackness has been centered by my family. my dads side is the worst cause my grandma hated black hair (given she grew up when our hair was called nappy and messy). she always complained when i wore it naturally. insulted me and constantly questioned when i’d get it “fixed”. my mom is from the islands so she appreciates it. she doesn’t understand how americans do their afros tho (she kinda just wets the hair and add oil and call it a day. no shaping or anything). i think my sister and cousin are the only ones who know how to take care of our hair! they both keep theirs really short.
i really like color and longer hair. i despise wearing wigs and weaves aren’t for me. it’s either dying my natural hair or braided extensions/other styles like locs or twists etc. i prolly do have more options but my mom does my hair.
it’s so fascinating to think about how other people get their hair done. friends always tell me about how they got their hair cut, dyed and fixed up in salons and barbers. it’s so fascinating and it’s like. a few hour process!! or less!! mine is like a whole weekend thing. never is a one day thing. never. cut the braids shorter, take the braids out, detangle then wash well, and prepare to braid. that alone takes most the day for me. plus my mom does it alone 9/10 of the time. she works on her feet all day so she needs more breaks, we don’t have good spots to have us both sitting while she does it, and taking out my own hair is awful and nearly impossible. do you know how tiring it is to fiddle with the top of your head for hours? that’s a whole workout right there! i can only do so much!
by the time my hair is washed and detangled again i’m exhausted. so is my mom. we usually continue it for the next day. preparing my hair and then braiding. i never learned to braid when i was younger so learning now isn’t ideal on my own head. but my mom and sister help which im so grateful for. i used to be so tender headed when i was little but my mom stopped yanking my hair as hard and now i can handle it better. a lot of my memories are sitting in the chair in front of my mom, me sleeping or on my laptop/listening to music on my phone, while my mom watches her shows. i have thick tight curls and my hair is getting longer each time i take out my braids (which is good since my hair had grown super slow my whole life. i blame all the relaxing and straightening). so getting each braid in is hell.
of course it’s also being braided with the fake hair. whatever color i wanted, and now im getting more creative with the styles! making bangs or putting beads or leaving the ends open or braiding all the way down with charms and stuff. it’s the best way i can do to express myself! it’s my hair! it takes time and effort and work to get my hair done. i’m stuck with it for a while so i better like how it ends! having my hair braided makes my life so much easier, especially since i’ve had depression since 10 years old. it’s been a struggle to take care of myself at all, so having the huge HUGE possibility of my hair getting knotted and matted and dirty was also right around the corner. braiding has been my savior.
not sure what this post is but i like talking about my hair :3 don’t get a lot of chances too. i never realized how much my hair means to me.
#yeah#it’s 4am rn i’m just thinking a lot#flojouno#text#black hair#also learning to draw my hair has been AWFUL growing up#no easily accessible tutorials#if you didn’t have straight or wavy or curly you were fucked#tight curls? you better run cause no one’s helping you#braids? locs? good fucking luck#i’m happy there’s more resources now! plus there’s custom brushes!#also the different hairstyles you can do with black hair is amazing#i just never understand how other cultures take these hairstyles and act weird#like yeah they look cool but they mean something to us#it’s not a simple aesthetic thing.#anyways yeah i should go back to sleep gnnnn#4c hair
9 notes
·
View notes
Text
Jesus Christ Superstar is the most powerful musical out there, cause why am I suddenly into actually writing down fanfics instead of just keeping them in my head??
#jcs#beloved discord and my mooties def had an effect on pushing me there too#ive been motivated to start drawing more to like tf#also ive actaully fully watched it like 6 times? i think??#for context even when i am extremely in love with a musical i rarely watch it in full#like never watched a slime tutorial for hamilton before its relise on disney+ despite it being absolutely obsessed for a year before that#never ended up watching mor despite there being an easily accessible proshot#still havent watchet great comet or ghost quartet#but somehow ive watched jcs like 6 times since like october#wild for me
8 notes
·
View notes
Text
remote desktop via ssh tunnel...i can log into the admin server at work from home!!
#tütensuppe#i actually learned how to do this yesterday and luckily remembered it#very cool!#i wanted to go fix the computer that got deactivated last week first thing in the morning#but i forgot to do an important step first and im not sure if i have access to another computer for that there#so i quickly booted up my home computer logged into the server and easily did it!#the tutorial i read was for putty but of course the next thing i did was look up how to do it in the command line!
1 note
·
View note
Text
Are you new here? This is for you!

I've gotten a HUGE influx of new followers since the comic, so, first of all, welcome and thank you so much for liking my art!
If you happen to be totally new here, this is a blog where I post stuff about my nameless durge, DU drow (Dark Urge + "drow"), and theories/thoughts about the game and characters in general, because of that I happen to have a frankly insane backlog of asks that I have managed to tag to a fairly thorough degree, if you'd like to peruse through them!
You can find them all to be easily accessible through my archive (link only works on browser), but here is an index of the major ones/ ones I consider to USUALLY contain the most interesting information:
#DU drow lore #DU drow and astarion #DU drow and shadowheart #Bhaalist DU drow #Orin the red #companion du drow #ask compilations
I also have individual tags for each character if you look up #cazador szarr, #gale dekarios, #astarion, #du drow, #enver gortash, etc. I do suggest doing that in my archive page for easier sorting, rather than on my blog's main page.
You can also look up #advice, #tutorial, and #resources for stuff I've said about the more technical side of creating and posting my art.
If you'd like to read some of my fictional writing outside of ask responses, I have posted a couple of short stories in the #writing tag, and I have an ongoing fic on Ao3 called "A Novel Experience about the aftermath of the game!
Also please take a quick look at my pinned post for links and a couple of frequently asked questions!
Lastly, as a heads up, I get a lot of asks! This is not to discourage anyone from sending more in (I have some that are MONTHS old that I still plan or drawing something about, or character questions that I have replied to after weeks of them sitting in my inbox) but rather just a disclaimer that I cannot reply to all of them, nor would it be a very practical use of my time to 😅 so please don't think anything of it if you don't get an immediate response!
Anyways, thank you once again for the crazy response to the comic and welcome aboard, I hope you like it here!
892 notes
·
View notes
Text
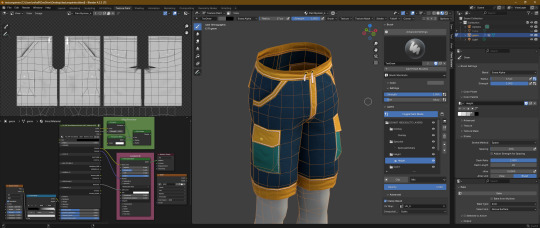
The Sims 3 Material Painter Final Version
UPDATE
I've updated the painter, and with it, included some new things as well as a fully interactive tutorial on how to use it.
NEEDED Prerequisites:
Blender 4.2+
Blender Paint System Addon - HERE (you can donate to the original creator, or get it for free, great little plugin!)
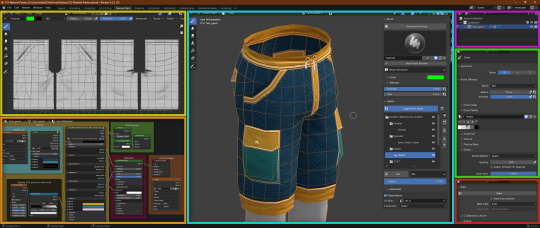
THE TUTORIAL
The tutorial is extensive, done in numbered steps, and is UI and workflow oriented, allowing you to click on any relevant UI element to learn more about it, and how it relates to the complete workflow. There's an additional, advanced chapter, for people who are interested in learning more about blender texture painter's functionality and techniques.
PAINTER ADDITIONS
The Painter has been slightly fixed, with multiplier's lines and depth shading being shifted to the correct depth, and with AO being more pronounced. This will make multiplier output even more accurate. Added some new minor tweaks to UI and Color Palettes to accommodate for the tutorial.
DOWNLOAD
Get updated templates with new files HERE!
If you only want to access the tutorial, you can do it HERE.
You can access the original post below:
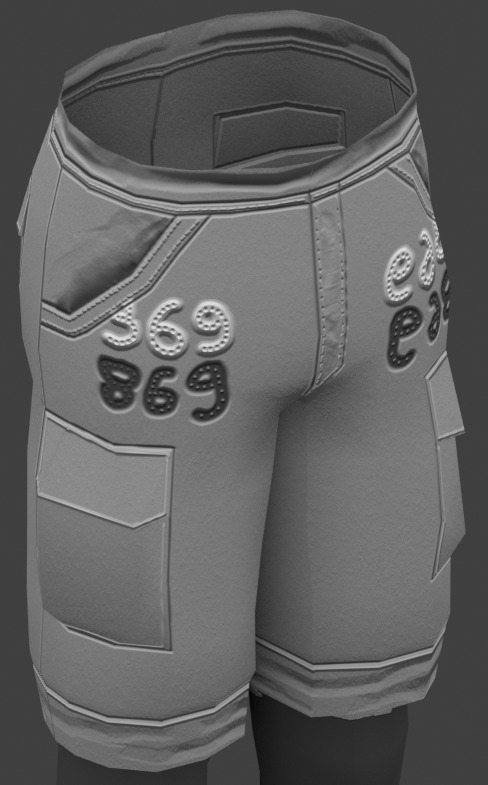
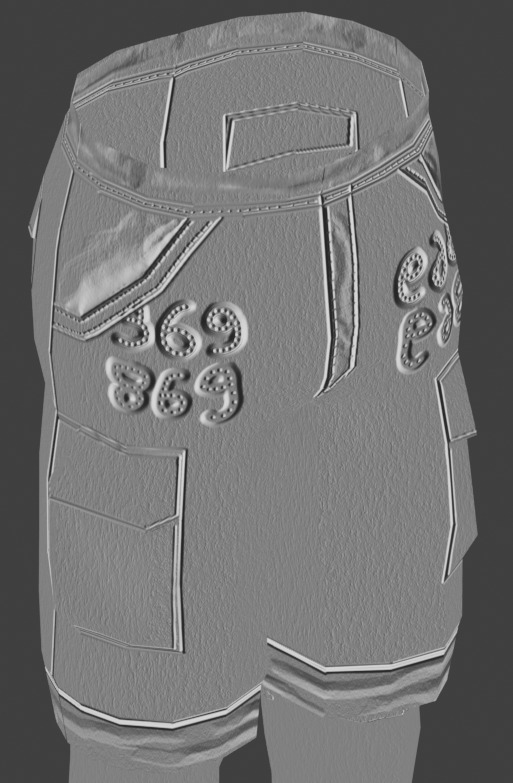
Been working on a tool that easily creates The Sims 3 material maps based only on a few texture layers, most of it derived from height data. This was done long time ago, but very sloppily, and it was not at all approachable.
Discovering THIS free blender add-on that lets you plaint layers in it, made me return to this project and finalize it for release.
The tool can export:
- Multiplier, RGB+A
- Normal Map, RGB+A
- CAST Map, RGB+A
- Specular Map
- Overlay, RGB+A


OLD VERSION BELOW!
//~~Get it HERE, and please, make sure to get THIS blender plugin, it's NEEDED for this to work. Blender 4.2+ is also needed for these to work together.~~//
#thesims3#thesims#sims3#thesims3cc#the sims 3#sims3mods#ts3#sims 3#sims3tools#thesimstools#simsc#simscreation#sims creator#blender#blender3d
206 notes
·
View notes
Text
Venus enters Taurus
*A good time to create comfort and stability in your home and relationships. It’s giving self-care, cozy vibes, and movie night energy.
*Potential to attract abundance through creativity, beauty or natural talents.
*Watch out for control issues around money, security and relationships.
*Wardrobe, space updates, self- care focused around pleasure and comfort are key.
Where is Taurus in your chart ? Ground yourself there for abundance and beauty in your life.
*Most affected*:
Earth sign placements ( Taurus, Virgo, Capricorn )
Libra rising
Strong 2nd house placements
Taurus in 1st House :
BIG potential for glo ups if you focus on what YOU are called to look like, or the styles you've 'always wanted' to embrace.
Aesthetics that enhance your natural features will give you increased confidence, unexpected compliments and access to different rooms.
2nd House :
Your talents, creative projects, and natural beauty/charm are magnets when you guard against scarcity mindsets and limiting beliefs; You may find yourself buying things of lasting value or feeling a stronger sense of self worth.
Make sure your personal space (especially floors, kitchen, entryway) is clean to avoid energetic blockage
3rd House:
Communication could be more meaningful or more sensual/flirty. Baecations, romantic gestures & I love you’s may be exchanged for the first time or more freely than before.
You and your siblings may be leaning on each other or spending more time.
4th House:
Customizing or decorating your home environment to your liking to be able to ground yourself more easily is a major investment.
Treating yourself by disappearing into your happy place for a bit , nesting , and redefining what it means to fill your own cup first can bring much emotional stability.
5th House:
The urge to create different looks/art forms and engage in fun leisure activities will be heavily present.
Take this time for things you genuinely enjoy, including making art/projects alone if necessary
6th House:
Refine your self care and beauty routines to get your desired results. Watch or launch tutorials for new ideas.
If you don’t make time for mindful sleeping, eating, and rest vs activity patterns, your body (nervous & immune systems) will do it for you…
7th House:
Work on building long lasting relationships through quality time and paying more attention to ways you choose to show up for others.
Side note: How is your appearance and attitude positively or negatively affecting your home and work life ?
8th House:
There may be a challenge to let go and embrace the vulnerability that comes with uncomfortable conversations to get to the peaceful place on the other side…
Are there any issues that were swept under the rug that you need to address to protect your peace ?
Avoid being too attached to “mine” or control in your relationships and money.
9th House:
Try to have back up plans in play and be flexible, not frustrated, when things don’t go as planned. Redirection is a blessing and protection.
Do not dismiss anyone’s experience just because it doesn’t match your own, instead be open to learning different ways of operating.
10th House:
Delays in moving up/securing “good” jobs and overall career path may make you feel stuck.
When you find work in environments that are aligned with your natural interests, values, and talents (instead of staying in positions you chose in survival mode) you will be more fulfilled.
11th House:
Take others’ perspective into account, especially when it differs from yours,not only to avoid unnecessary tensions but to grow. You can relate to more people than you may think.
If you are feeling discomfort with larger crowds, focus on building just a few good connections. Find the partnerships that refresh you and share your values and cling to those instead of unhealthy ones.
12th House:
Getting some ‘beauty’ rest and taking the time to recharge, whatever that looks like for YOU, is essential. Learn to embrace your solitude and dig deeper into yourself and what makes YOU feel good.
This is a good time for dreamwork and overnight beauty rituals as well.
Spicy take : Hidden desires and private romances may occur.
#astrology#taurus#venus#venus in taurus#astro calendar#astrology content#astrology notes#astro notes#astro observations
108 notes
·
View notes
Text
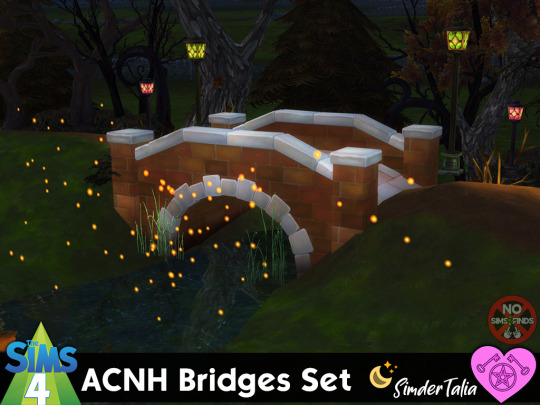


🌉 ACNH Bridges Set 🌉
Sims 4, base game compatible. 7 styles, 14 items. Some extra swatches added by me 💗
This is a set of ACNH bridges, made to be used with the terrain manipulation tools in TS4 in order to make them blend with their surroundings. The bridges are slotted, so will allow for deco sims with appropriate deco size to be placed on the bridges. If you want to easily change the deco size of any of the CC items you put in your game, there is a tutorial here.
Set contains: -Brick Bridge (2 items: regular and longer lengths) | 4 swatches each | 3300, & 3996 poly -Iron Bridge (2 items: regular and longer lengths) | 3 swatches each | 2656, & 4032 poly -Log Bridge (2 items: regular and longer lengths) | 3 swatches each | 3864, & 5408 poly -Stone Bridge (2 items: regular and longer lengths) | 3 swatches each | 3342, & 4143 poly -Suspension Bridge (2 items: regular and longer lengths) | 2 swatches each | 4832, & 5648 poly -Wood Bridge (2 items: regular and longer lengths) | 3 swatches each | 3074, & 400 poly -Zen Bridge (2 items: regular and longer lengths) | 5 swatches each | 3886, & 5946 poly
Type “acnh bridge" into the search query in build mode to find quickly. You can always find items like this, just begin typing the title and it will appear.
📁 Download all or pick & choose (SFS, No Ads): HERE
📁 Alt Mega Download (still no ads): HERE
📁 Download on Patreon
Will be public on January 25th, 2025 💗 Midnight CET
Happy Simming! ✨ Some of my CC is early access. If you like my work, please consider supporting me (all support helps me with managing my chronic pain/illness & things have been rough as of late):
★ Patreon 🎉 ❤️ |★ Ko-Fi ☕️ ❤️ ★ Instagram📷
Thank you for reblogging ❤️ ❤️ ❤️
@sssvitlanz @maxismatchccworld @mmoutfitters @coffee-cc-finds @itsjessicaccfinds @gamommypeach @stargazer-sims-finds @khelga68 @suricringe @vaporwavesims @mystictrance15 @moonglitchccfinds @xlost-in-wonderlandx @jbthedisabledvet
Other CC pictured: -Fireflies -Plants -Bare Trees -Green & Purple Lanterns -More Plants
#ts4cc#s4cc#sims 4 bridge#sims 4 bridges#sims 4 bridge decor#sims 4 object#sims 4 maxis match#simdertalia
149 notes
·
View notes
Text
I read this week that Instagram is pushing “overtly sexual adult videos” to young users. For a Wall Street Journal investigation, journalists created accounts that could belong to children, following young gymnasts, cheerleaders and influencers. The test accounts were soon served sexual and disturbing content on Instagram Reels, alongside ads for dating apps, livestream platforms with “adult nudity” and AI chatbots “built for cybersex”. Some were next to ads for kids’ brands like Disney.
This is something I’ve been trying to get across to parents about social media. The problem is not just porn sites. They are of course a massive concern. Kids as young as nine are addicted. The average age to discover porn is now 13, for boys and girls. And many in my generation are now realising just how much being raised on porn affected them, believing it “destroyed their brain” and distorted their view of sex.
But the problem is bigger than that. Porn is everywhere now. TikTok is serving up sex videos to minors and promoting sites like OnlyFans. The gaming platform Twitch is exposing kids to explicit live-streams. Ads for “AI sex workers” are all over Instagram, some featuring kids’ TV characters like SpongeBob and the Cookie Monster. And there’s also this sort of “soft-porn” now that pervades everything. Pretty much every category of content that kids could stumble across, from beauty trends to TikTok dances to fitness pages, is now pornified or sexualised in some way for clicks.
I think this does a lot of damage to Gen Z. I think it desensitises us to sex. I think it can ruin relationships. But beyond that, I also believe a major problem with everything being pornified is the pressure it puts on young girls to pornify themselves. To fit the sex doll beauty standard; to seek validation through self-sexualisation, and potentially monetise all this like the influencers they’re inundated with.
Which, of course, puts girls at risk of predators. Predators who are all over TikTok, Instagram and Snapchat. Predators whose algorithms helpfully deliver them more content of minors and steer them towards kids’ profiles. Predators who are taking TikToks of underage girls and putting them on platforms like Pornhub.
And this is even more terrifying because adolescent girls are especially vulnerable today. They are vulnerable anyway at that age—but today they have far less life experience than previous generations of girls did. They are extremely insecure and anxious, and much less resilient. Combine this with the fact that they are now more easily exposed to predatory men than ever before in history, and served to strangers by algorithms. And another thing: girls are also able to look way older now. They have AI editing apps to sexualise themselves. TikTok filters to pornify their bodies. And access to every kind of make-up and hair and fashion tutorial you can think of to look sexier and more mature. I don’t think enough parents realise how dangerous this situation is.
Which is why I find it so frustrating to see some progressives downplay the dangers of all this. Those that dismiss anyone concerned about the pornification of everything as a stuffy conservative. And somehow can’t see how the continual loosening of sexual norms might actually empower predatory men, and put pressure on vulnerable girls? That seems delusional to me.
Let’s just say I have little patience for those on the left who loudly celebrate women sexualising themselves online, selling it as fun, feminist and risk-free, but are then horrified to hear about 12 year-olds doing the same thing. C’mon. No wonder they want to.
But I also find it frustrating to see some on the right approach this with what seems like a complete lack of compassion. I don’t think it helps to relentlessly ridicule and blame young women for sexualising themselves online. I don’t think it’s fair either. We can’t give girls Instagram at 12 and then be surprised when as young women they base their self-worth on the approval of strangers. We can’t inundate kids with sexual content all the time and be shocked when they don’t see sex as sacred, or think sex work is just work! We can’t give them platforms as pre-teens where they are rewarded for sexualising themselves and presenting themselves like products and then shame them for starting an OnlyFans. We can’t expose them to online worlds where everything is sexualised and then be confused why some of Gen Z see their sexuality as their entire identity.
And again, on top of these platforms, girls are growing up in a culture that celebrates all of this. They are being raised to believe that they must be liberated from every restraint around sex and relationships to be free and happy, and many have never heard any different. Celebrities encourage them to be a slut, get naked, make/watch porn and make money! Mainstream magazines teach them how to up their nude selfie game! Influencers tell millions of young followers to start an OnlyFans, and pretend it’s about empowering young girls to do whatever they want with their bodies! I can’t say this enough: their world is one where the commodification and sexualisation the self is so normalised. It’s heartbreaking. And cruel that anyone celebrates it.
So sure, young women make their own choices. But when we have children sexualising themselves online, when girls as young as 13 are using fake IDs to post explicit content on OnlyFans, when a third of those selling nudes on Twitter are under the age of 18, I think it’s safe to say we are failing them from an early age.
I guess what I’m trying to get across is this: it’s tough for girls right now. It’s tough to be twelve and anxious and feel unattractive and this is how everyone else is getting attention. It’s tough to constantly compare yourself to the hyper-sexualised influencers that the boys you’re interested in are liking and following and thinking you have to compete. It’s tough to feel like the choice is sexualise yourself or nobody will notice you. The sad reality is we live in a superficial, pornified culture that rewards this stuff, and in many ways punishes you if you’re modest and sensitive and reserved, and a lot of girls are just trying to keep up with it.
We need serious cultural change. We need to wake up to how insane this all is, how utterly mental it is that we allow young girls anywhere near social media, and how we’ve let the liberalising of sexual mores escalate to the point where pre-teens are posing like porn stars and are lied to that it’s liberation. And where we need to start is with an absolute refusal from parents to let their kids on these platforms.
So please. If the relentless social comparison and obliteration of their attention span and confusion about their identity wasn’t enough, this has to be. Don’t let your daughters on social media.
949 notes
·
View notes
Text
The Why of Sewing 5: Avoiding Bad Tutorials
There are so many tips and tricks and tutorials online and some of them are handing out great advice, but not all the advice is good. Here are a few things that if you see happen in that video you should immediately take a larger grain of salt.
Red Flag #1: Sewing over pins
Sewing over pins is controversial. Some will tell you it is fine, and it almost never causes a problem. Which may be true, but what they don’t tell you is what actually happens if your needle hits a pin. The best case scenario of a needle hitting a pin is a bent pin and a damaged needle.
Sewing machine needles are not designed to hit metal, ever. At the very least every time the needle passes through the fabric it becomes less and less sharp. Hitting a pin will destroy the tip. It can also bend the needle. Or it can break the needle. It can cause the needle to jam up and disrupt the timing of the moving parts inside the machine. A machine with broken timing is generally repairable by a professional, but do you want to spend $100 and loose access to your hobby for a week because you didn’t want to remove a pin? That may be the worst case scenario to you - but remember that broken needle? If you are lucky, the thread through the eye keep all the bits of the needle in one place, but when the needle breaks fragments sometimes go flying. They can fly into your machine, causing damage (again $100 and a week of lost sewing time). Or they can fly out into your room, lurking to be stepped on by yourself, or your child, or your pet. OR they can fly into your face. Many a sewist has a tale of a needle fragment bouncing off their glasses or having to take a trip to the ER because they didn’t have glasses on. It isn’t how frequently a problem occurs when sewing over pins, it is how disastrous the outcome has the potential to be when it does occur.
When it comes down to it, sewing pins is a dangerously bad habit that can damage your machine and your person. If you see someone sewing over pins in the tutorial you can lay money down that they a) do not know better or b) know and do not value your safety.
Red Flag #2 Not Pressing Seams
If you are watching the tutorial and you never see the creator pressing, or see evidence that seams are pressed be wary. I see this most often in "tutorials" made by folks who have just learned a very little bit and want to monetize their new knowledge. If the seams in their final product look like they laid a hardcover book open on a table, that is a big red flag.
I saw something somewhere long ago that said “Sewing is just ironing with extra steps” and no truer meme has ever been made. Wish I could find it. No teacher worth your time is skipping the ironing. Look for the following things: ironing on camera, mentioning that pressing should be done at certain points, and of course nice flat seams.
Red Flag #3 Big Changes with an "Easy Method"
Beware of “easy” tutorials that make a significant change to a garment. Your jeans will not become high or low waisted from anything short of taking them apart and remaking them. They can become shorts rather easily. Yes it is possible to turn jeans into a skirt but I am old enough to know better. It won’t be easy and it will not be cute. Best case scenario you will look fundamentalist.
Making one garment into another kind of garment is usually more difficult than sewing from scratch.
Orange Flag #1 Unfinished Seams
I am calling this an orange flag, but ONLY an orange flag if the original tutorial was focused on costumes and cosplay. If the tutorial is teaching you to make anything that needs to survive more than a couple wears and washes this becomes a red flag.
It is common in cosplay to leave seams unfinished, as an item has limited wear and washing in its future. Unfinished fabric edges fray from washing and friction, some fabrics fray faster than others and leaving your seam allowances on a regularly worn garment as naked as a jaybird is a glaring mark of inexperience.
There are many types of seam finishes, and there are times when seams DON'T need extra finishing, but a good tutorial will either show the finishing, describe ways to finish the seams, or explain why they don't need to be finished. Some examples of seams that can be left to fly free are seams on the bias, most knit fabrics, and seams that will be enclosed in a lining.
Orange Flag #2 Gimmicks and "Hacks"
Lifehack has become code for a gimmicky trick that rarely works the way it is shown via television magic. If you see a nifty trick in a short video, look at the account it comes from. If everything they post is about gimmicks or shortcuts - using straws or cardboard contraptions to do things in sewing with no explanation of how they are normally done, be wary. It is one thing to show a tip, but if all they do are 30 second gimmick videos - it is unlikely that those tricks will actually work when you try them. Most will likely be no better or worse than a waste of your time.
Now that I've given you things to avoid, here are some youtube channels I personally watch and love and learn from.
If you do not know how to sew - start here https://www.youtube.com/@Evelyn__Wood Even if you are not into vintage style I think Evelyn Wood is one of the best at explaining how sewing is done to the beginner.
This is the only channel I actually tune in for live videos, but even if you don't catch it live Saremy has a wealth of knowledge and always goes into why things work the way they do. https://www.youtube.com/@SewSewLive
Sewing therapy is another channel where you can just watch someone go through the process of sewing from start to finish. She shares tips, and there is nothing better about learning the order of operations than just watching someone sew an item. https://www.youtube.com/@SewingTherapy
If you do not have or want a sewing machine start here. https://www.youtube.com/@sewncompany - Many years ago the creator and I lived in the same city and would occasionally cross paths. I don't think she knows me from Adam but I love her tutorials and she has been kind and gracious in every encounter we had. Her tutorials include both right and left handed instructions!
General tutorials from someone who knows what they are doing https://www.youtube.com/@ProfessorPincushion
Garment Sewing content that includes tips as well as styling ideas. Karina does a lot of pattern testing and I think does a really good job at showing how to incorporate the garments into everyday life. https://www.youtube.com/@LiftingPinsandNeedles
If you want to learn to quilt, start here https://www.youtube.com/@JustGetitDoneQuilts
and here https://www.youtube.com/@thelasthomelyhouse - this one is a lot more inspiration for me than a tutorial but its kind of a combination.
Stitch with Rachel has lots of quilting tutorials and inspiration and is really great for English and Foundation Paper Piecing tutorials. https://www.youtube.com/@stitchwithrachel
#quilting#sewing#sewing tutorial#fabric#textile art#sewing tips#sewing techniques#the why of sewing#fabric grain#Youtube
99 notes
·
View notes
Text

I love how people who say shit like this don't realize these are both easily learned skills.
Give that generation access to YouTube tutorials and 2 weeks and they'll be stick-shifting past your ass on the highway and writing you cursive notes that say, "Fuck you, now convert a Word document to PDF."
2K notes
·
View notes
Text
btw, if you see resources online that could potentially save your life or a friend's life in the future, i.e. info on access to potentially life-saving care for vulnerable groups- SCREENSHOT, print the webpage if you can or back up the file, keep it somewhere safe. slapping a "#saving for future reference" tag on there isn't enough
tumblr staff can and likely WILL delete it.
websites can always be taken down.
i'm genuinely not trying to sound like a doomer, data is sooo easy to lose forever with no way to get back.
honestly it's good to get into the habit of saving and backing up almost ANYTHING you wouldn't want to lose on the internet, such as music/videos/art/tutorials, because data can easily be lost forever when you least expect it. but it's especially important at a time like this when people's rights and access to care are in question.
save everything. set up a system that works for you to make saving things easier so you're more likely to do it. flash drives are pretty cheap. veracrypt is a fairly reputable source for password protecting folders if you share a computer or a space with people you don't trust. be mindful of your surroundings and safety. do your own research into sources to make sure they are not coming from people with ill-intentions. if this feels out of your scope, seek out communities that can help you parse it out. the most important tool at our disposal is each other.
this is the only post i'll make like this but if you have any other suggestions or corrections you're more than welcome to add on.
231 notes
·
View notes
Text
Tutorial on how to make patches, because DIY should be accessible and inexpensive, and u shouldn't have to turn to fast fashion websites
Materials Required:
An idea
Fabric
Paint
Needle and thread
How do I procure these items?
Idea
You're in luck, ideas are very easy to have, at no monetary expense. If you don't know exactly what you want to put on a patch, you can type "punk patches" into tumblr/pinterest/google/etc and note down anything you like
Fabric
This is where most people start to worry - most of us don't sew and don't have an arsenal of fabric at our fingertips. But fear not! There are 2 options here
If you have money, you can buy squares of fabric from a craft store. Joanns Fabrics has bundles of quarter-yards for $10. Just one quarter yard can yield you dozens of patches
If you don't have money, don't be discouraged! You don't need to spend anything if you don't want to. Do you have an old shirt you don't wear? Pants? Bandana? Underwear? Bedsheets? That's usable fabric right there!!
Paint
The real bust of the list. Unfortunately, getting paint isn't as easy as fabric can be. You don't need anything fancy, mind you, any type of fabric or acrylic paint will work.
Small tubes of paint and paint pens can fit in your pockets. I bring this up for no reason at all...
Alternatively, if you go to school, consider asking an art teacher if you can borrow some. You could also ask friends and family who may paint.
Needle and thread
Once you make a patch, you need something to attach it with. Really, you can use anything -- glue, safety pins, etc -- but if you're attaching it to clothing, sewing is your best bet. Consider these methods of getting the needed items
Go to a craft store. Small starter sewing kits, packs of needles, or spools of thread are typically pretty cheap. If you can't spend money, though, consider that these items are also small, and can fit easily in pockets
Ask a grandma or other family member who may sew to borrow some supplies. Grandmas love it when younger people sew
Again, if you go to school, ask an art or theater teacher if you can borrow supplies
You can also use dental floss instead of thread, and it's actually recommended by some punks due to it being more durable than thread.
If you don't know how to sew, there are lots of online tutorials on how to do simple stitches!
But what if I'm not good at DIY?
Ever heard the phrase "practice makes perfect"? No one is good at anything the first time they try it. Don't let amateur-looking attempts stop you from trying.
Additionally, DIY isn't a contest. If you go to shows or alternative spaces irl, no one will care if you're obviously new to it.
Now go make patches and have fun!!!
#punk#diy#baby punk#punk patches#punk tips#diy or die#made this on a whim cuz ive been thinking about it
141 notes
·
View notes
Text
USING RELIGHT FOR RESHADE - a tutorial by amoebae
[You can also find this tutorial over at imgur and patreon]
ReLight is a premium shader for ReShade made by Marty's Mods (Pascal Gilcher). It allows you to add four new lights to your scene that help illuminate, and create realism and drama. To download and use ReLight you need to subscribe to the Path Tracers tier on Gilcher's Patreon to get access to the iMMERSE Ultimate package of shaders. Once subscribed, you'll be prompted to link your Patreon account to discord, and then you'll be granted access to his discord server, and, most importantly, to the Path Tracers discussion channel and the Downloads Level 2 channel, which is where you will find ReLight (along with the other premium shaders included in that tier).
Be sure to also download the up-to-date free iMMERSE shader package, because you'll need the Launchpad shader and some of the other included files.
The following guide is for the older qUINT_relight.fx version of ReLight. The latest version of ReLight is MartysMods_RELIGHT.fx, released on 31st December 2023. Many of the settings have changed in the newer version, but you can still use this guide to help understand how to enable and position lights. The guide will be updated/rewritten once I've had time to properly play around with the new version. You can continue to use the older version if you'd prefer.
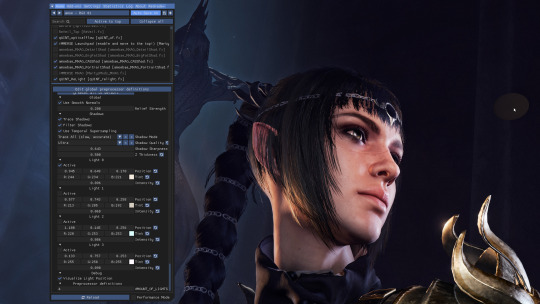
When you turn on ReLight in the ReShade menu you'll be greeted with these settings. Yours may look different because I've used it a lot and it remembers your last settings.
Take a look at the settings at the top.
Use Smooth Normals = On
Trace Shadows = On
Filter Shadows = On
Use Temporal Supersampling = On
Shadow Mode = Trace All
Shadow Quality = Ultra (change this if you get bad performance)
Shadow Sharpness = I have mine set around 0.65 but you can play around with whatever looks best
Z Thickness = Play around with this too. It controls how realistically shadows fall on and around objects
At the very bottom of the settings is Visualize Light Position. Turn this on so you can easily see where your lights are.
Now we can turn on one of our lights. Remember, it remembers your previous settings so yours will look different to mine the first time you use it.
Under Light 0 check the Active box.
You should see a big circle appear somewhere on the screen. If you have any object close enough to it, you should see them get brighter. If nothing is close to the circle you may not see any difference.
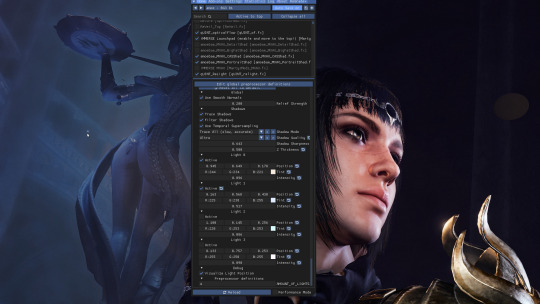
You can see a difference between this screenshot and the last - Shadowheart's face is brighter.
Now it's time to move the light where we want it and change it to a colour we like.
Under the Active box you'll see a row of 3 boxes containing numbers, next to the word Position. These control the coordinates of your circle of light in relation to the screen. You can place your mouse inside these boxes and move it while holding down left-click to change the value a little like a slider.
Left box = moves the circle left/right
Middle box = moves the circle up/down
Right box = moves the circle forward/back
In this shot I've moved the circle of light over to the right and a little further back so it better illuminates the front of Shadowheart's face.
Next you can choose the colour of your light.
In the row below Position you'll see it says Tint. Click on the coloured box next to Tint and it will bring up the colour picker you see in the screenshot. Choose your colour from here. Click anywhere in the main ReShade menu to close the colour picker.
I adjusted the position and the tint a little more until I had it exactly where I wanted it. You can see a darker circle now over in the top right of the screen (my mouse cursor is hovering over it to make it easier to see).
You can use the Intensity slider (directly below Tint) to control how bright the light should be.
You may need to go back and forth between the Position, Tint, and Intensity settings until you get just the right effect.

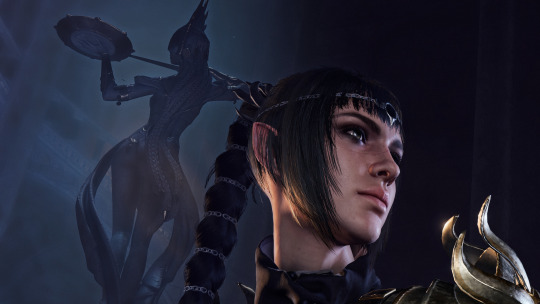
Here's a reminder of what the picture looks like without that added light. Compare it to the screenshot above to see how great our new little light has been at helping illuminate Shadowheart.
You can turn individual lights on and off whenever you want by checking or unchecking the Active box next to the light in question. It will save your settings.
Now I want to add a second light. I've moved my ReShade window over a little so I can see what I'm doing.
I turned on the Active box under Light 1, and positioned my new light where I wanted it. Look over to the left of the statue in the background. You'll see my mouse cursor, and directly above it is a tiny blue circle. That's our second light!
The further you move the light away from the camera (using the right-hand box under Position) the smaller the circle gets, because it's further away!
I made this light blue, and I turned the intensity up quite high. This has helped illuminate the statue and added nice shadows that help give it some depth.
Here's a screenshot to remind you what everything looks like without any of the ReLight lights I added.
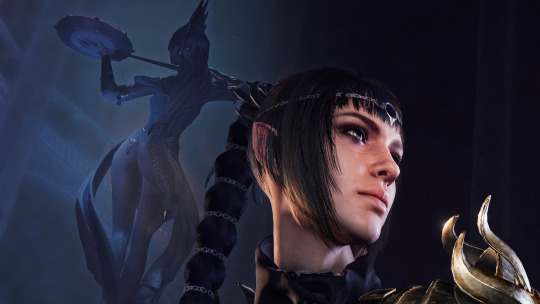
And here's a screenshot showing how everything looks with ReLight turned on and my two lights in action. I chose a subtle effect because I just wanted to draw attention to Shadowheart's face and to the statue behind her.
When you close the ReShade menu the circles that helped you know where your lights were will go away, but the light they cast will remain. Notice how you can't see the two circles in this shot?
You can also uncheck the Visualize Light Position box if you want to hide the circles while keeping the ReShade menu open. This can be helpful if they're obscuring parts of the scene that you need to see while you continue editing.
---
And that's it! You can add up to 4 lights and control them independently from one another. You can use them to just help illuminate a character for a portrait, to add drama with bold lighting, or to increase the realism of a scene with better shadows and light falling where you would expect it to. If you have a big fiery sword you can add a light to it that makes orange light cast onto the character who is holding it, which can look really cool. The only limit is your imagination.
(If I ever learn how to make videos I'll translate this tutorial into an easier format, but for now I hope this helps.)
951 notes
·
View notes
Text
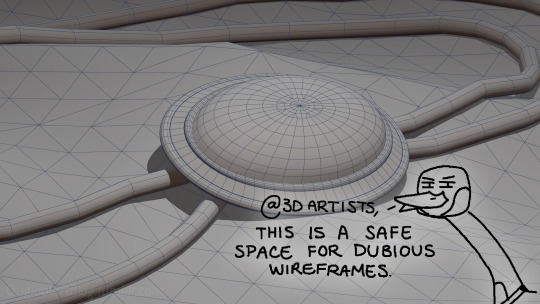
"Nawy what do you MEAN quick-ish 3D render it's got scratches and everything and I thought this was real for a minute!!"
Well, first, thank you very much that was the intention ❤, and second, you see, all speed is relative, and between finding my references, modeling, texturing and lighting, on top of having to learn how to make convincing gems, it still took me quite a few hours. I, however, cut corners everywhere for speed, and I wouldn't put this piece in a portfolio in its current state.
But! for the curious, I thought I could do a simple breakdown of how the witchcraft happens, without using too much specialized language to make it more accessible. In short,

In this case, I’m talking about a 3D model that was textured (colours and stuff) and then lit (lights on!) to make a pretty final picture. The objective is not to make a tutorial, but to put in simple terms what a 3D artist does to make something go from this, to that:

(people curious and/or trying to see if this interests them welcome)
I'm skipping the 3D modeling part altogether, since it isn't where most of the magic happens here. Just know that to be able to add colour and stuff on a 3D object, you have to go through the process or "unwrapping" it, which is like doing those foldable cubes in reverse
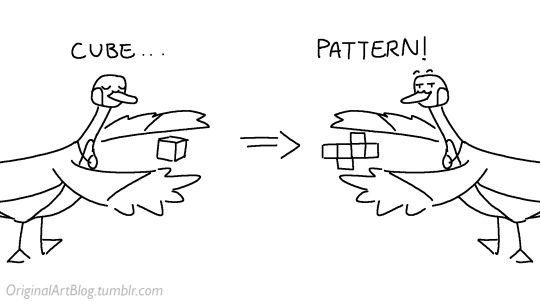
and then we can draw on it!!
Now, the good stuff:
Surfaces (metal, plastic, fabric, wood, skin, etc.) have different looks that make you able to differentiate them on sight. To make something look realistic, you have to try to replicate real life into the 3D world (duh.)
The software developers took care of the hard part (math and coding), so as artists we can play with the parameters available to make something pretty. What those parameters are depend on which "recipe" we're using. One of the most common "recipes" for realistic results is called PBR: Physically Based Rendering, named that way because it's trying to replicate real-life light physics. In this case, the 4 basic parameters are called albedo, roughness, metalness, and normal.
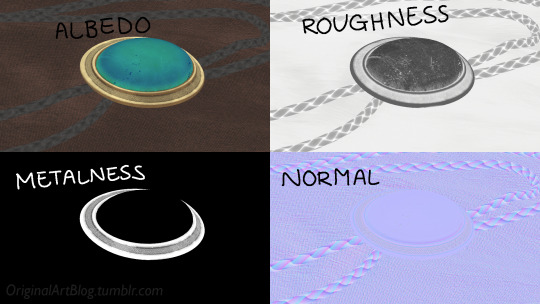
Albedo is the base colour of the surface (easy stuff). Roughness is to determine if a surface is rough or shiny. Metalness is to say if something is made out of metal or not. The normal is there to add all those tiny details you don't want to or can't sculpt on your 3D model (engravings, fabric bumps, etc.)
The roughness and metalness are black and white images because the information you're giving to the software is black = no and white = yes. It's easier to understand in the metalness image, where everything that is NOT a metal is black, and everything that IS a metal is white.
The normal is a bit more complex, but in short, it uses the colours green and red to know what is up/down or left/right, and will help the software fake relief on top of the model. You don't make it by hand; it's computer-generated from other stuff I'm not getting into.

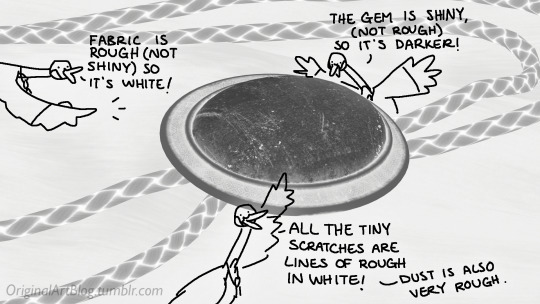
With the technical stuff out of the way, we can actually use these. There are specialized softwares that will let you preview the results of each parameter in real time, so you can see what you're doing easily. This is what I have.
That software comes with some types of surfaces that are already set up, like the fabric in my piece, which was already 85% good for me straight out of the box. Then, it's up to me to use the tools available to decide how shiny a surface is, if there's dust or scratches and where, what colours things are, if there's metal parts, etc. That's where you can see a 3D artist's skills.
And finally, you bring it all together into a specialized software that can render 3D stuff and use those images on the corresponsing parameters, and then light the scene.
Because it all comes down to this: the light! For something realistic, light is vital to get right. You can pour your heart and soul into those tiny scratches, but if you don't light the scene correctly, well...
So we carefully light the scene to get some nice highlights to make the textures look good and highlight our subject (it's basically a photography studio inside a computer)
And then we add some camera effects...

and voilà! pretty picture!!
... and if you somehow did notice something different with the bolo tie from my last post, I did find out while taking all these screenshots that I messed up my initial renders in a way that made everything darker than it was supposed to be and that's why my gold looked so muddy...

I hope this was interesting and that you learned a thing or two!
#welcome to nawy's 3d school for complete beginners#nawy's 3d#technically not art but... you know...
377 notes
·
View notes
Text

For someone who loves old Nintendo games and enjoys the comfort and convenience of an affordable handheld system, a Steam Deck running Emudeck is a godsend. Best of all, you don't have to join a Discord server for help; even a monkey (like me) can figure it out.
There's been a bit of discourse surrounding the Switch 2, especially regarding the price of the system and its games. Two additional issues include: (a) you can't own a game on this console, even if you buy a physical cartridge; and (b) you can only access a larger library of older games through a subscription service.
There's also the giant elephant in the room, which is that the general level of consumer income hasn't increased along with inflation. This makes the choice to buy a Switch 2 more financially painful than it needs to be, especially since Nintendo prides itself on providing "accessible" consoles and games.
No one asked, but my recommendation for anyone who's looking for an upgrade to the Switch but feels dubious about its successor is to get a Steam Deck, which is essentially a gaming PC in handheld form. The cheapest model is perfectly fine and plays contemporary AAA titles like Elden Ring and FFVII Rebirth with no problems at all.
Another selling point of the Steam Deck is that it runs Emudeck, which makes it easy to play an archived library of games for older systems ranging from the Game Boy to the Wii. Emulators for more recent systems (like the Wii U) may take a bit of extra effort, but there are plenty of easily accessible tutorials on YouTube and Reddit.
Thankfully, once you get everything running, Emudeck takes care of itself and lets you access your games through the main Steam Deck interface. It's surprisingly easy, even if you're bad with tech.
Setting up Emudeck can also serve as a good introduction to figuring out how to navigate the console's Linux desktop. What this means is that you'll be able to download and play interesting super-indie games from platforms like Itch.io. Many of these games are never published for an actual licensed gaming console; and, if they are, you can directly support the creators by circumventing storefronts.
Gaming PCs are expensive and not feasible for everyone. Meanwhile, handheld consoles are great for people with limited space, students who move a lot, and people who prefer "work" and "play" to be on separate screens. If you're interested in preserving your archive of games while enjoying them too, running Emudeck on Steam Deck is an easy and accessible solution that's worked well for me.
62 notes
·
View notes
Text
Become Your Best Version Before 2025 - Day 27
Hobbies & Passion Projects

Hi Goddesses! After exploring all those personal development tools yesterday, let's talk about something that adds real color to our lives, hobbies and passion projects. You know, those things that make us lose track of time and bring a spark to our eyes when we talk about them.
Have you noticed how some of the happiest people you know have interests outside of their daily responsibilities? There's something magical about having activities in your life that you do simply because they bring you joy.
One of the most beautiful things about hobbies is that they don't need to be productive or perfect. They're just for you, for your joy, for that feeling of losing track of time while doing something you love.
Some ways to reconnect with what lights you up:
Think about what you loved doing as a child
Notice what makes you lose track of time
Pay attention to what YouTube videos or social media content you naturally gravitate toward
Remember activities that make you feel energized rather than drained
Think back to when you were younger, what did you love doing just for fun? Maybe you spent hours drawing, built elaborate LEGO creations, or wrote stories in your notebook. Somewhere along the way, many of us let these joyful activities slip away, telling ourselves we're "too busy" or that they're not "productive enough."
Let's change that! Here's how to rediscover or start a hobby that lights you up:
Start Small and Simple
Try one new activity for 15 minutes this week
Use materials you already have at home
Join a free online community or workshop
Watch tutorial videos for inspiration
Finding Your Passion Project
What topics do you love learning about?
Which activities make you forget to check your phone?
What did you dream of doing "someday"?
What skills would you like to develop just for fun?
Making Time for Fun
Schedule short, regular "play dates" with yourself
Keep supplies easily accessible
Join local groups or online communities
Share your progress (only if you want to!)
Hobbies and passion projects aren't just fun, they're good for you! They can:
Reduce stress and anxiety
Boost creativity
Improve work-life balance
Create opportunities for new connections
Build confidence through skill development
Here's a secret: hobbies don't need to be Instagram-worthy or turn into a side hustle. They're valuable simply because they bring you joy and help you unwind.
Quick action step: Pick one hobby or passion project you'd like to explore. It could be something brand new or an old interest you'd like to revisit. Start with just 15 minutes this week.
What hobby or passion project are you curious about? Let's share ideas and inspire each other! Drop a comment below, I'd love to hear from you.
See you tomorrow for Day 28! Remember, making time for activities that bring you joy isn't selfish, it's essential for becoming your best self.
♡ ☆:.。 Keep glowing, babes! ♡ ☆:.。 With love, Goddess Inner Glow.
#self love#hobbies#personal development#self development#be confident#be your best self#be your true self#becoming that girl#becoming the best version of yourself#confidence#growth mindset#it girl#self confidence#self improvement#self care#it girl energy#self concept#self acceptance#self appreciation#dream life#lifestyle#become that girl#that girl#becoming her#glow up tips#glow up era#girl blog aesthetic#girl blogger#goddessinnerglowmagazine#goddessinnerglowblog
90 notes
·
View notes