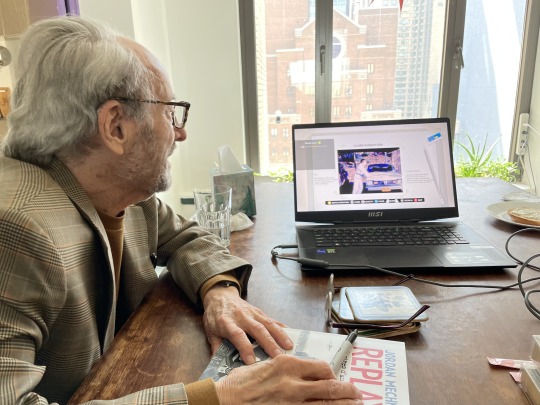
#not me downloading video capture and editing software just for this...
Explore tagged Tumblr posts
Visit Tumblr Blog
Explore Tumblr blogs with no restrictions, modern design and the best experience.
Last Seen Tumblr Blogs


Fun Fact
Tumblr is used by 21% of adults online aged 18-29 years.
Text
That gorgeous theme that plays when Polin kiss for the first time coming back as a jaunty little lick when Colin walks into the room at the next soiree...
#bridgerton#polin#bridgerton season 3#bridgerton spoilers#colin bridgerton#penelope featherington#not me downloading video capture and editing software just for this...
160 notes
·
View notes
Note
hi! i was wondering if you have any advice/certain programs or anything you use for making gifs, because there’s something i really want to make but i have zero experience 💔💔
hello hello!
ah, yes, I have a TON, let's hope this ADHD girlie can give a somewhat concise description lmao. I will answer this publicly, in case it's useful for anyone else.
Software I use:
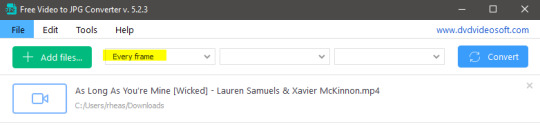
To make the screenshots: - for single scenes: KMPlayer 12.22.30 (the newer versions are trash) - for shorter videos, or something you want to get all the screenshots out of Free Video to JPG converter is awesome.
To make the gifs: - Adobe Photoshop 2021 (I don't recommend much later versions, because of the Cloud connection they have)
General gif-maker wisdom: "we spend more time on making sure that something looks serviceable, not pixelated, and good quality, than to get it moving and shit" - Confucius, probably
Useful stuff to make your life easy:
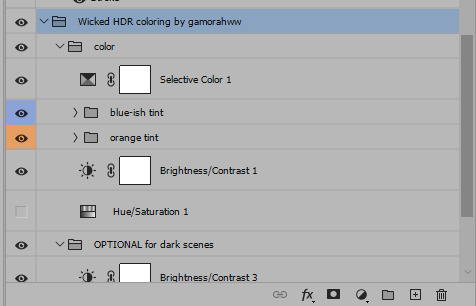
- Squishmoon's action pack for sharpening your screenshots. You can also find their detailed use explained here. - If you are planning to gif Wicked, some scenes are a bit tricky, ngl. But I have two PSDs that you can use, while you're perecting your own craft, and you can edit and update them to make them more "you".
A neutral PSD for mostly indoors and lighter scenes | download

A blue-enhancing PSD for darker scenes | download
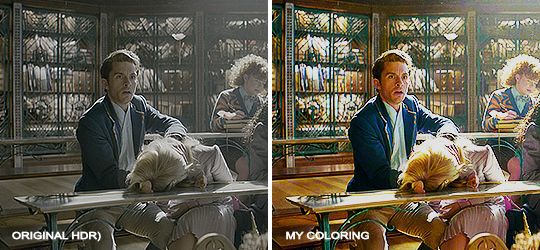
Some info on videos to use: - always, always (ALWAYS) use at least HD videos. Otherwise your gif will look like shit. This should be ideally at least 720p in resolution, but go with 1080p for the best results. Coloring gifs in 1080p is easy, but... - if you want to go pro *rolls eyes*, you could go for HDR (2160p) quality. However HDR is a mf to color properly and I would not recommend it for a beginner. When you extract frames from an HDR video, the image colors will end up being washed out and muddy so you will always have to balance those colors out for it to look decent, however, the quality and number of pixels will be larger. If you ar okay with making small/medium sized images, then stick with 1080p. (Storytime, I spent a lot of time making HDR screenshots, only for me to realize that I really hate working with them, so I'm actually considering going back to 1080p, despite that not being "industry standard" on Tumblr lmao. I'm not sure yet But they take up so much space, and if you have a laptop that is on the slower side, you will suffer.)
See the below example of the image differences, without any effects. You will probably notice, that HDR has some more juicy detail and is a LOT sharper, but well... the color is just a lot different and that's something you will have to calculate in and correct for.

The ✨Process✨
Screencaptures
I like to have all screenshots/frames ready for use. So as step one, you need to get the movie file from somewhere. This should definitely be a legal source, and nothing else (jk).
Once I have the movie. I spend a lot of time making and sorting screencaps. Since I mostly work in the Wicked fandom only atm, that means I will only need to make the frames once, and thats awesome, cause this is the most boring part.
For this, I let the Video to JPG Converter run the whole movie while I was aleep, and by morning, it created gorgeous screenshots for me and my laptop almost went up in flames.
You need to make sure you capture every single frame, so my settings looked like this:
Screenshots do take up a lot of space, so unless your computer has a huge brain, I suggest storing the images in an external drive. For Wicked, the entire movie was I think around 200k frames total. I reduced that to about 120k that I will actually use.
And then I spend some time looking through them, deleting the scenes I know I won't do ever (goodbye Boq, I will never gif you, I'm so sorry :((( ) and also, I like to put them into folders by scene. My Wicked folder looks like this:

If you don't want this struggle and you only need a few specific scenes, there is this great tutorial on how to make frames from KMPlayer. Note that some of the info in this tutorial on gif quality requirements and Tumblr's max allowance of size and # of frames are outdated. You are allowed to post a gif that is a maximum of 10 Mb and 120 frames (maybe it can be even more, idk, said the expert) on Tumblr. But the process of screencapturing is accurate. Also ignore the gifmaking process in this tutorial, we have a lot easier process now as well!
Prepping the images
I have a folder called "captures", where I put all of the specific screenshots for a set I want to use. Inside this folder I paste all the shots/scenes I want to work on for my current gifset, and then I create subfolders. I name them 1, 2, 3, etc, I make one folder for each gif file I want to make. Its important that only the frames you want to be in the gif are in the folder. I usually limit the number of images to 100, I don't really like to go above it, and usually aim to go lower, 50-70 frames, but sometimes you just need the 100.
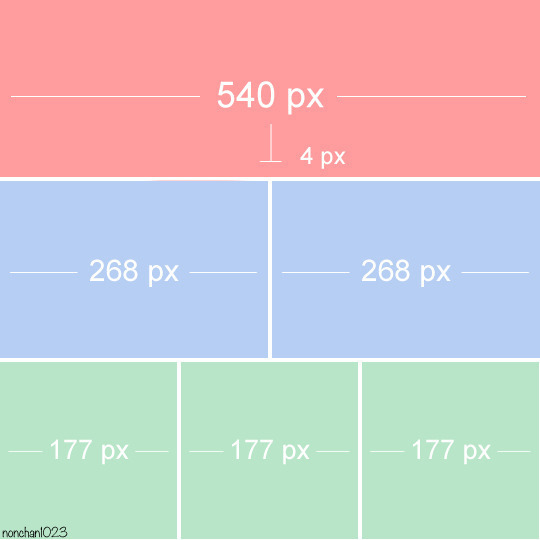
Sidetrack, but: Keep in mind that Tumblr gifs also need to be a specific width, so that they don't get resized, and blurry. (Source) Height is not that important, but witdth is VERY. But since there is a limit on Mb as well, for full width (540px) gifs you will want to go with less frames, than for smaller ones.
Once you have the frames in folders, you will open Photoshop, and go to: File > Scripts > Load files into stack.
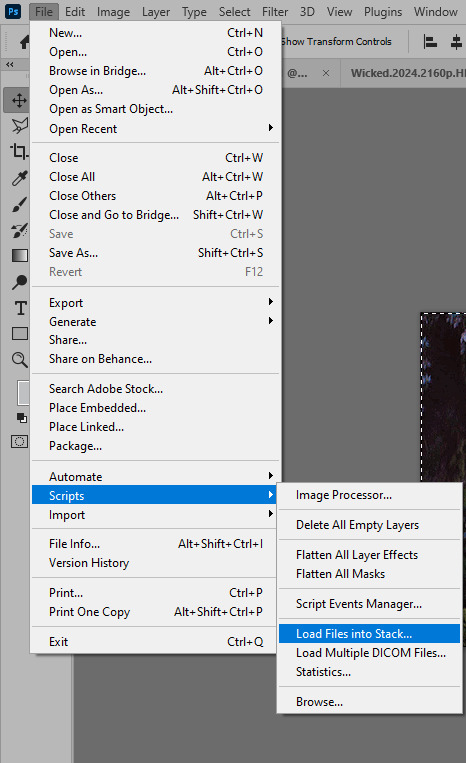
Here you select Folder from the dropdown menu, and then navigate to the folder where you put the frames for your first gif. It will take a moment to load the frames into the window you have open, but it will look like this:

You click "OK" and then it will take anther few moments for Photoshop to load all the frames into a file.
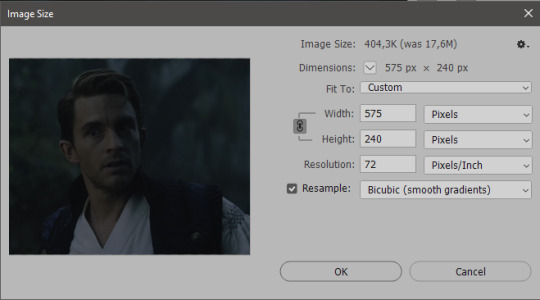
But once that's done, and you have the frames, you next have to resize the image. Go to Image > Image size... When you resize in Photoshop, and save as gif, sometimes you do end up with a light transparent border on the edge that looks bad, so, when you resize, you have to calculate in that you will be cutting off a few pixels at the end. In this example, I want to make a 268px width gif. I usually look at heights first, so lets say I want it to be a close-up, and I will cut off the sides, and it will be more square-ish. So I set height to 240px. Always double check that your width doesn1t run over your desired px numbers, but since 575 is larger than 268 (can you tell I'm awesome at math?), I should be good. I click OK.
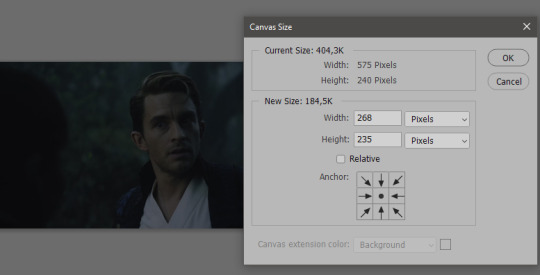
Next, you have to crop the image. Go to Image > Canvas size... At this point we can get rid of those extra pixels we wanted to drop from the bottom as well, so we will make it drop from the height and the width as well. I set the width to 268px, and the height to 235px, because I have OCD, and numbers need to end with 0 or 5, okay?
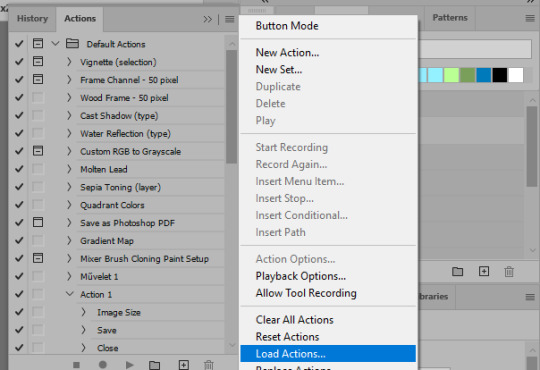
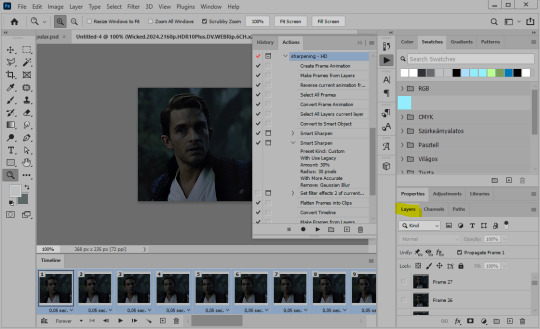
And now, the magic happens! First, go to Window > Actions to have the actions window show up. While you're at it, in the Window menu also select Timeline (this will be your animation timeline at the button) and also Layers. Once you have the Actions window showing up, on the menu in the upper right corner click the three lines menu button, and from the list select "Load Actions". I hope you downloaded the Squishmoon action pack from the start of this post, if not, do it now! So you save that file, and then after you clicked Load, you... well, load it. It will show up in your list like so:
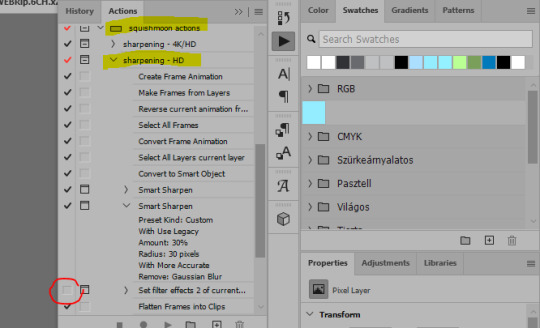
You will want to use the sharpening - HD one, BUT I personally like to go, and remove the tick from the spot I circled above, so leave that empty. This will result in the image having more contrast, which is very much needed for these darker scenes.
When you have that, you select the action itself like so, and click the play button at the bottom. The action will do everything for you, sharpen, increase contrast and also, create the gif and set the frame speed. You won't need to edit anything, just whatever window pops up, click "OK"

Now it should all look like something like this:
In the Layers window on the side, scroll all the way up to the top. The frame on the top is your last frame. Every effect you want to add to the gif should go to here, otherwise it won't apply to all frames. So at this point I open my PSD for darker scenes, and pull the window of it down, above the gif I'm working on like so:

And then I grab the folder I marked with yellow, left click, hold the click down, and drag that folder over to my current gif. And bamm, it will have the nice effect I wanted! You can click the little play button at the button to see a preview.

Once you have it sorted, now its time to extract it, but first, here's our before and after view:

Now, if you are happy with this, you can just save and close.
If you want to add subtitles, you can do that as well either manually with the text tool (remember, to add as the TOP layer as we did with the coloring) or you can use a pre-set PSD for that as well, here's mine.
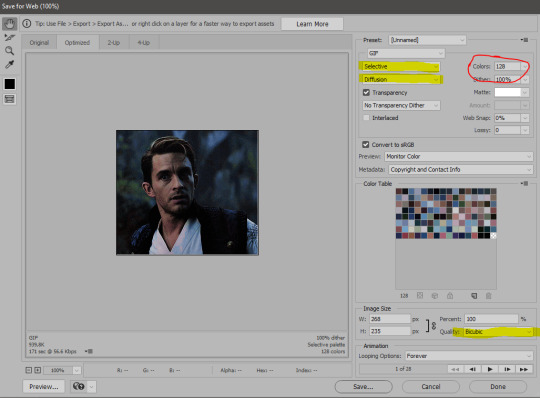
Now, we just need to export it. Go to File > Export > Save for Web (Legacy) and copy my settings here. Others may use other settings, but these are mine, so! I hope you are happy with them :3
In this case, for colors, I picked 128 colors, because on dark sscenes you can get away with using less colors, and the larger that number is, the bigger the filesize. If you use lighter images, you will need to bump that shit up to 256, but that will make your file larger. You can see at the bottom of the screen, how large your file will end up being. So long as you are under 9 Mb, you should be good :3
Conclusion
Look, Gif making and Photoshop in general is a bit scary at first. There are a lot of settings you can mess around on your own, a lot to play with, and also a lot can go wrong. This is a very basic tutorial, and also my current process and preferred coloring. However if you look at "gif psd" or "gif tutorial" or similar tags on Tumblr, you can find a LOT of great resources and steps, for many-many things. Usually people are not too antsy about sharing their methods either. You make 4-5 gifs, and you will have the steps locked down, and then it's all about experimenting.
After you have some muscle memory, your next step should be to explore what is inside a PSD coloring folder that you use. Open them up, try clicking around, click the little eye, to see what happens if they are turned off, and double click them, and play around with the sliders, to see what each does. Most people on Tumblr don't really know what each one does, we all just pressed a few buttons and got really lucky with the results, lol.
If anything is unclear, don't hesitate to ask, I'll gladly help!
Good luck <3
45 notes
·
View notes
Text
How to record videos with Sims 2 in-game camera (HD, no UI, no lag, no file format issues)
I originally planned to include this information in the behind-the-scenes video about Bring Me To Life that I'm currently working on, but it's overly technical and not that interesting. It still might be useful to some people (mostly machinima creators), so I decided to make a separate post about it.
There are two ways to record videos in The Sims 2:
Using screen recording software
This is the most common and probably the easiest way. You just need a program like OBS that will capture whatever happens on your screen exactly as it happened. If this method works for you, it's perfectly fine. No need to follow this guide then.
Using the in-game video capture tool
This way involves capturing videos directly in the game by clicking the video camera icon or pressing V on your keyboard. This method is perfect for machinima creators. It automatically hides the UI, but more importantly, the video will always be perfectly smooth, regardless of the actual performance of your game, i.e. even if it runs like a literal slide show, any videos you capture this way will look perfectly fine.
Okay, so if this method is so great, why do we need a tutorial for it? Well, as is usually the case with this game, the feature works fine, it's just a little bit outdated.
To fix it, we need to do 3 simple* things.
*If you're a Sims 2 player, you're probably used to this kind of stuff anyway
Step 1: Installing a modern codec
In the Camera settings, the game lets you choose if you want the videos to be compressed. I highly recommend choosing that option, as uncompressed videos take up way too much storage space.
The codec that the game uses to handle compression is outdated and most video editing programs will not be able to edit such files. To fix this problem, we need to download and install x264vfw, which is a free an open source codec.
Once installed, open the Configure x264vfw app. No need to change anything there (unless you want to test different settings of course), except for this one small thing:
In the Debug section, go to Log level and change it to None. Otherwise the codec will display a pop-up window each time you record in the game, which is pretty annoying.

Step 2: Making the game use the codec
Locate the VideoCapture.ini file in the installation folder with your latest expansion pack. I have Ultimate Collection, so for me the path looks like this:
D:\Program Files (x86)\Origin Games\The Sims 2 Ultimate Collection\Fun with Pets\SP9\TSData\Res\UserData\Config
Back up your file and open the original version with Notepad. You can either replace the whole thing with my settings, or just update the highlighted parts.
While you're at it, make sure to update the LargeSettings value to 1920x1080 so that the videos are captured in HD (no need to worry about it if you're copying the whole thing):
[Config] PreferredCodec=x264vfw Folder is relative to Res/Userdata Folder=Movies FilenameBase=movie NoFillFrames=0 AudioStereoOutput=0 AudioRateDivisor=4 GlobalSettings = reset, vbr:1, fps:10, keyinterval:30, mode:1, datarate:0 SmallSettings = size: 128x128 MediumSettings = size: 320x240 LargeSettings = size: 1920x1080 LowQualitySettings = minq: 6, maxq: 16, mode:0 MediumQualitySettings = minq: 4, maxq: 10, fps:15, mode:0 HighQualitySettings = minq: 2, maxq: 8, fps: 30, keyinterval: 60 SmallLowSettings = datarate: 75 SmallMediumSettings = datarate: 150 SmallHighSettings = datarate: 300 MediumLowSettings = datarate: 150 MediumMediumSettings = datarate: 300 MediumHighSettings = datarate: 600 LargeLowSettings = datarate: 300 LargeMediumSettings = datarate: 600 LargeHighSettings = datarate: 1200 AllowAntialiasing=0 # some drivers have issues with capture when AA is enabled [Codecs] 0=VP61 # On2 VP6.1 1=VP62 # On2 VP6.2 2=VP60 # On2 VP6.0 3=x264vfw # x264vfw
Save your file.
When in game, go to Camera Options and make sure Video Capture Size is set to Large and Video Quality is set to High.
Also, you might want to change the Maximum Video Recording Time to something higher than 60 seconds.

Credit for this solution goes to this person who left the following comment under this video
Step 3: Changing the file format from avi to mp4
Before doing this step, test if everything works correctly when you try to capture videos in the game. The videos will go to the Movies folder in your Documents folder for TS2.
Try to import the videos into your editing software. If it doesn't work, e.g. the program does not recognize the file or the file appears to be corrupted, you'll need to change the file format from avi to mp4.
I personally use VLC media player for that, as it's free and open-source.
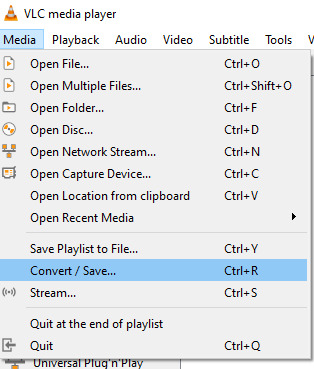
Go to Media > Convert / Save...
Drag your files into the File Selection section or select them by clicking the + Add button.
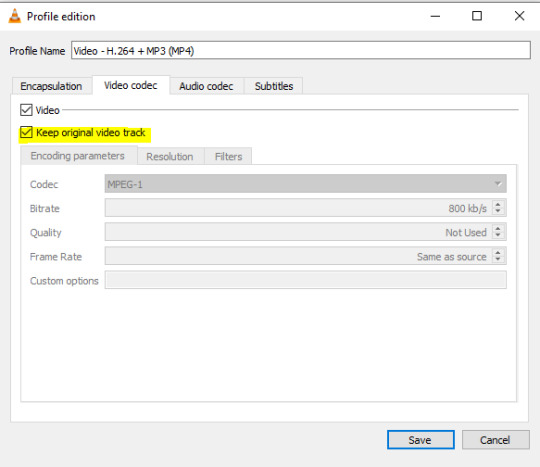
Select the Video - H.264 + MP3 (MP4) profile and click the wrench icon to edit its settings.

In the Video tab, make sure to check the box next to Keep original video track. Go to the Audio tab and check the analogous box.
Save and in the next window specify the destination folder and click Start. VLC will go through each of the files you added.
IMPORTANT:
While Steps 1 and 2 only need to be done once, Step 3 needs to be done for every new video you record (unless, your video editing software doesn't struggle opening the avi files). The good news is, this step is really fast, no more than a second per a single video. This is because we're keeping the original video track intact. The only thing that is changed is the container. That's why this change is fast and does not affect video quality in any way. Ideally, this step wouldn't be needed if we figured out a way to force the game to use mp4 when saving those videos, but I'm not sure if this is possible.
Like I said, outside of machinima creation, it probably makes more sense to just record your screen with OBS. Especially if you want to capture videos in 4K, which I don't think would be possible with this method. But it works for me and as it took me a while to figure it all out, I just wanted to share all the info in a single post!
#sims 2 machinima#ts2#sims2#sims 2 tutorial#ts2 tutorial#sims 2 guide#ts2 guide#my stuff#ts2 simblr#machinima#ts2 machinima
11 notes
·
View notes
Text
Weirdly Motivated to Write


Well, I did say that I have a new keyboard—to correct my posture and not look like a pretzel while I work remotely. Small victories, right?
Now, let’s talk about motivation. Because for some reason, I am absolutely buzzing with it today. Is it because of my keyboard? Most likely. Is that weird? Probably. But hey, I never claimed to be normal.
See, besides being a full-time student, I also have a job. And that job? Writing. Creating. Capturing life in words, pictures, and fleeting moments of inspiration. Filming, writing, photography—these are the things that make me absolutely happy. And honestly? Life is just too beautiful not to share.
There’s something about having the right tools that makes everything feel different. You could give me the exact same blank document yesterday, and I wouldn’t have been nearly as eager to write as I am today. But now? With my new keyboard? I feel like I could churn out a whole novel, rewrite history, or at the very least, write an unnecessarily long blog post about why I feel like writing.
Maybe it’s the clickity-clackity. (Yes, that’s a technical term.) There’s just something deeply satisfying about hearing each keystroke, like a tiny round of applause with every word I type. It’s hypnotizing. Encouraging. Addictive, even. Without it, I don’t think I’d be half as motivated to write.
And that brings me to a very important question:
Could this mean my iPad will replace my laptop?
Ha! Not a chance. Never. Not in a million years.
As much as I love this setup, there are things my iPad just cannot do. And honestly, those things make a huge difference in my daily workflow. Don’t get me wrong—iPads are fantastic. They’re lightweight, portable, and perfect for quick notes, reading, or sketching. But when it comes to serious work? My Windows laptop remains irreplaceable.


Why My Windows Laptop Wins Every Time
Multitasking Like a Pro iPads have some multitasking capabilities, but let's be real��nothing beats having multiple windows open, side by side, without limitations. On my laptop, I can have a research paper in one window, my notes in another, a video playing on the side, and Spotify running in the background. Try doing that on an iPad without constantly swiping between apps. It’s just not the same.
File Management That Actually Makes Sense The Windows file system is superior. Hands down. Drag-and-drop functionality, proper file explorer, external drive support—it’s just easier. iPads, on the other hand, have a clunky file system that often makes me want to scream into the void. Copying files? Moving them? Finding them again? It takes way longer than it should.
Software Compatibility & Heavy-Duty Programs This one’s a dealbreaker. There are so many professional-grade applications that just don’t run on iPads. Things like:
Adobe Premiere Pro for serious video editing (iPad versions are limited)
Photoshop & Illustrator (yes, they have mobile versions, but they’re nowhere near as powerful)
Microsoft Excel with Macros (because let's be honest, the iPad version is lacking)
Programming software & full IDEs (if I ever decide to code, my iPad will just sit there, useless)
Mouse & Keyboard Freedom Yes, iPads can connect to a mouse and keyboard, but do they truly function like a laptop? Nope. There are still weird limitations. Right-clicking? Custom shortcuts? The precision of a real trackpad or external mouse? Windows just does it better. Period.
Downloading Anything Without Jumping Through Hoops iPads don’t let you download everything you want, especially if it’s outside the App Store. Need a program that isn’t on Apple’s list of approved software? Too bad. Meanwhile, on Windows? I can download whatever I want, whenever I want, however I want. No restrictions.
Serious Writing & Formatting Writing on an iPad is fine for quick drafts, but when it comes to formatting long documents, citations, and exporting files in different formats? My laptop is my best friend. Whether it's proper PDF editing, running reference managers like Zotero, or managing multiple Word documents with complex layouts, iPads just don’t cut it.
Gaming & Emulation Okay, maybe not work-related, but still important! iPads have mobile games, sure. But do they run full-fledged PC games? Nope. Can I use them for game modding? Nope. Can I play older games with emulators? Again, nope. My Windows laptop, on the other hand? Unlimited possibilities.
The Verdict?
As much as I love the convenience of my iPad + keyboard combo, it will never replace my laptop. Ever. My laptop is where the real magic happens—the deep work, the serious projects, the things that actually require a proper computer.
But will I still use my iPad for writing on the go? Absolutely. Because nothing beats the clickity-clackity joy of my new keyboard. And if that keeps me weirdly motivated to write, then hey—I’ll take it.
So if you ever see me typing away somewhere, looking ridiculously focused, just know—it’s not me. It’s the keyboard.
#book#books#bookstore#new books#book review#booklr#books and reading#bookworm#book quotes#book blog#old books#bookblr#books & libraries#read#reading#reader#currently reading#long reads#library#literature#classic literature#english literature#book lover#english#classic#classics#bookshelf#bookshelves#productivity#ipad
10 notes
·
View notes
Note
hello! I have a quick question -- I'm a Botanical Land member and I usually like to try and save the archives of Wakana's livestreams (such as the after-talk event from last week) for my own personal use, but lately the extension I've been using to do so hasn't been working for me. would you happen to know of any alternatives or other ways to save the archives? hopefully this makes sense. have a lovely day :)

Hello there, anon!
I struggle with similar issues.
Back in the day, I used the Chrome extension "Video Downloader for Vimeo" which worked perfectly fine since pretty much all the Wakana videos are hosted on Vimeo. Unfortunately, the extension has stopped working quite a while ago so I had to switch back to my old extension called "Stream Recorder". This one has two modes, a "normal" one and a "screen capture" one. The normal method is very convenient since it just reads the video file and creates a download link for the whole thing. Alas, this option doesn't work all the time, in fact, it works very rarely (I have not been able to figure out the reasons behind that). The screen capture mode is basically just a screen recording. A pretty reliable method but it requires you to leave the video playing and that can often result in issues if you have a connection break or an unstable connection in general. The video will end up being split into multiple files and a new recording sequence will start. That sucks of course. With short videos, I usually fall back on this method but everything that's close to 2hrs or longer is a hassle. My most recent extension is "Vimego", I currently use it for longer videos. The only downside is that you have to download the video and audio file separately and join them by yourself. This means extra work and requires an additional editing tool/software.
If you couldn't already tell from my answer, I am rather clueless when it comes to stuff like this and constantly have to learn new things/find new methods. The struggle is REAL.
If anyone has any good suggestions, please leave them in the comment/reply section. Thank you!
14 notes
·
View notes
Text
I've been thinking about this since I answered the ask about gifmaking a little while back, and I've been kind of unsettled about it since. Not because I don't like sharing my process, nothing could be further from the truth, but because I realized that that process isn't entirely accessible. So here I am again with an alternative way to make gifs that's infinitely easier, way more accessible, and just as valid as the other way. I wanna stress that. Anything you put time and effort into is valid and worthwhile. No time spent on doing something you enjoy is ever wasted, not least of all anything creative
That said, this method is considerably more limited. I made gifs this way for years before my brain was quite literally hijacked by an idea I could not get out of my head and I had to learn to do it the fancy way. I was also intensely annoyed at having to rely on my shitty internet to make gifs, and I probably would have made the switch at some point regardless just for that lol
I would also like to stress that this is not necessarily a tutorial any more than the other post was, it's simply a couple of resources and more or less how to use them. Like I said in the other post, never download and install anything to your device without doing your own due diligence first!
details under the cut
So first, you need to get the video. If you're on mobile, your device should have a screen recorder built in. Use that, and be sure to turn on Do Not Disturb so you don't accidentally capture any notifications! Once you've recorded your video, you can use your device's native editing ui to trim and crop the video and adjust color. If you want effects like slow motion, I like Splice on iOS. The big thing is that it doesn't watermark your videos, but it's also just a pretty good app overall for video editing. If you're willing to pay for it, it'll also allow you to make gifs right there in the app, but it's subscription based and the price is absolutely outrageous, so I don't recommend doing that when you could just use a free online converter
Which brings me to the next step: ezgif. You probably know this one, most everyone does, I think, but if you don't, here's the basic gist of it. Select Video to Gif and upload your video there. Be sure to trim it down to seven seconds or less, or else you'll never be able to get it down below 10mb. On the next page, change the size of the gif to 540xAUTO (for Tumblr), then change the frame rate to 20 or 25. More frames means a smoother gif, but it also means a bigger gif, so play around with it to see how the frame rate affects your gif. I don't think there's really a huge difference between 20 and 25, so 20 should be sufficient. If your gif is still too big, you can select optimize and try to compress it a little. The lowest compression level is 5, so start there and go up by fives until you're satisfied. If you get the gif below 10mb and it looks bad, then you should go back and trim your video length down further and try again. After that, simply save the gif to your device and upload it wherever!
PC is more or less the same, you just need to get a third party screen recorder. You can actually use ffmpeg to screen record if you'd like (I don't have the command line for that, however, and at that point, you should just go ahead and use yt-dlp instead to get a high quality video). If the command prompt is too much, you can just use a screen recorder app instead. I like 2-Click Screen Recorder. Again, you can actually use ffmpeg on that video to create frames and then upload those to ezgif, but if you'd still rather go from video to gif, then use CapCut or a similar video editing software to trim down your video to seven seconds or less. From there, the process with ezgif is exactly the same as it is on mobile
And there you have it! Easy mobile gifs! While I do really encourage you to try the "fancy" method of making gifs, this is still a great alternative, and you can make some pretty good gifs this way. Here are some of mine I made this way before I switched:


8 notes
·
View notes
Note
Dear Nicefieldsfm,
I hope you are doing well. My name is [Your Name], and I am an aspiring animator and a huge fan of your work. Your "Life is Strange" animations have deeply inspired me, and I would love to create my own.
Could you please share some advice on the following:
Software and Tools: What do you use for your animations?
Workflow: How do you go from concept to final render?
Character Design: Tips for designing and rigging expressive characters?
Scene Composition and Lighting: Key techniques for capturing the series' emotional tone?
Thank you for your time and inspiring work. I look forward to your response.
Hello Jim-Chen!
Thank you, glad you like my stuff! I haven't made videos in a while, but I used to make them in Source Filmmaker. For my last few videos I moved over to Blender which is way more advanced, which I'd definitely recommend. Both are free to download.
As for workflow for my animations, I'd just start animating at the beginning and see where it goes from there. I'm a very visual thinker so I always know what I want it to look like in my head. When I'm done I export my animations as an image sequence and import them into Adobe Premiere Pro where I edit them, add sound and export the final video.
In case you're not aware, all models are extracted from those Life is Strange video games. I didn't design them. 😬 I don't even have to rig them, other people in the community have already done that, I just download them ready to go. I always use the same models and locations so I'm always good to go.
I've always liked studying cinematography in movies and TV, I'd suggest studying your favorite movies and art. One common trick is to keep the background dark and to light up your actors to make them stand out in the scene. I usually have some backlight too, to make the edges of characters pop. A lot of my pics and videos can have up to 4 light sources per character. I would also recommend having some volumetric lighting. Lighting is key.
To give them a "film look" I make my videos 24 fps which I think is pretty rare in the online 3D community, a lot of animators make them 30 or 60 fps for the smoothness.
I will usually have a shallow field of view with some depth of field. I also sometimes add a little bit of film grain. This is all personal preference to go for that "film look".
Thanks for the question, I hopes this helps somewhat!
11 notes
·
View notes
Text
Weirdly Motivated to Write


Well, I did say that I have a new keyboard—to correct my posture and not look like a pretzel while I work remotely. Small victories, right?
Now, let’s talk about motivation. Because for some reason, I am absolutely buzzing with it today. Is it because of my keyboard? Most likely. Is that weird? Probably. But hey, I never claimed to be normal.
See, besides being a full-time student, I also have a job. And that job? Writing. Creating. Capturing life in words, pictures, and fleeting moments of inspiration. Filming, writing, photography—these are the things that make me absolutely happy. And honestly? Life is just too beautiful not to share.
There’s something about having the right tools that makes everything feel different. You could give me the exact same blank document yesterday, and I wouldn’t have been nearly as eager to write as I am today. But now? With my new keyboard? I feel like I could churn out a whole novel, rewrite history, or at the very least, write an unnecessarily long blog post about why I feel like writing.
Maybe it’s the clickity-clackity. (Yes, that’s a technical term.) There’s just something deeply satisfying about hearing each keystroke, like a tiny round of applause with every word I type. It’s hypnotizing. Encouraging. Addictive, even. Without it, I don’t think I’d be half as motivated to write.
And that brings me to a very important question:
Could this mean my iPad will replace my laptop?
Ha! Not a chance. Never. Not in a million years.
As much as I love this setup, there are things my iPad just cannot do. And honestly, those things make a huge difference in my daily workflow. Don’t get me wrong—iPads are fantastic. They’re lightweight, portable, and perfect for quick notes, reading, or sketching. But when it comes to serious work? My Windows laptop remains irreplaceable.


Why My Windows Laptop Wins Every Time
Multitasking Like a Pro iPads have some multitasking capabilities, but let's be real—nothing beats having multiple windows open, side by side, without limitations. On my laptop, I can have a research paper in one window, my notes in another, a video playing on the side, and Spotify running in the background. Try doing that on an iPad without constantly swiping between apps. It’s just not the same.
File Management That Actually Makes Sense The Windows file system is superior. Hands down. Drag-and-drop functionality, proper file explorer, external drive support—it’s just easier. iPads, on the other hand, have a clunky file system that often makes me want to scream into the void. Copying files? Moving them? Finding them again? It takes way longer than it should.
Software Compatibility & Heavy-Duty Programs This one’s a dealbreaker. There are so many professional-grade applications that just don’t run on iPads. Things like:
Adobe Premiere Pro for serious video editing (iPad versions are limited)
Photoshop & Illustrator (yes, they have mobile versions, but they’re nowhere near as powerful)
Microsoft Excel with Macros (because let's be honest, the iPad version is lacking)
Programming software & full IDEs (if I ever decide to code, my iPad will just sit there, useless)
Mouse & Keyboard Freedom Yes, iPads can connect to a mouse and keyboard, but do they truly function like a laptop? Nope. There are still weird limitations. Right-clicking? Custom shortcuts? The precision of a real trackpad or external mouse? Windows just does it better. Period.
Downloading Anything Without Jumping Through Hoops iPads don’t let you download everything you want, especially if it’s outside the App Store. Need a program that isn’t on Apple’s list of approved software? Too bad. Meanwhile, on Windows? I can download whatever I want, whenever I want, however I want. No restrictions.
Serious Writing & Formatting Writing on an iPad is fine for quick drafts, but when it comes to formatting long documents, citations, and exporting files in different formats? My laptop is my best friend. Whether it's proper PDF editing, running reference managers like Zotero, or managing multiple Word documents with complex layouts, iPads just don’t cut it.
Gaming & Emulation Okay, maybe not work-related, but still important! iPads have mobile games, sure. But do they run full-fledged PC games? Nope. Can I use them for game modding? Nope. Can I play older games with emulators? Again, nope. My Windows laptop, on the other hand? Unlimited possibilities.
The Verdict?
As much as I love the convenience of my iPad + keyboard combo, it will never replace my laptop. Ever. My laptop is where the real magic happens—the deep work, the serious projects, the things that actually require a proper computer.
But will I still use my iPad for writing on the go? Absolutely. Because nothing beats the clickity-clackity joy of my new keyboard. And if that keeps me weirdly motivated to write, then hey—I’ll take it.
So if you ever see me typing away somewhere, looking ridiculously focused, just know—it’s not me. It’s the keyboard.
#book#books#bookstore#new books#book review#booklr#books and reading#bookworm#book quotes#book blog#old books#bookblr#books & libraries#read#reading#reader#currently reading#long reads#library#literature#classic literature#english literature#book lover#english#classic#classics#bookshelf#bookshelves#productivity#ipad
3 notes
·
View notes
Text
youtube
So, here's some simple thoughts I had about Sonic x Shadow Generations. I was trying to push this one out real fast, but ended up with some technical problems and other stuff you can read about below the cut.
This video was a small technical nightmare to put together because I'm experimenting with new stuff. I capture a lot of my own footage when I can, and when I can't, I go out of my way to find the cleanest, highest quality version of what I'm looking for. That in itself can take a lot of time, but then I usually have to download it off of Youtube. For years, I've used a suspicious website called Keepvid (don't go there) to download Youtube videos, but recently I saw someone recommend a piece of software called "Stacher".
Stacher is basically a front end for another piece of software called "yt-dlp", which was the subject of a lawsuit a couple years ago -- basically, Youtube (Google) was claiming it was illegal to download Youtube videos, and was specifically targeting yt-dlp in the hopes of getting rid of it. A judge ruled that downloading Youtube videos is in fact totally reasonable and legal, and yt-dlp was allowed to keep existing. All of this is because yt-dlp is the best way to download Youtube videos, but it's command line software. I'm no stranger to command line (I've used FFMPEG), but I do tend to prefer having an interface to work with, which Stacher provides.
I picked up Stacher because Keepvid was starting to not work so well. Youtube is implementing new video formats and Keepvid was consistently only detecting 720p30 downloads. Stacher on the other hand will grab the absolute maximum possible resolution, which in this case was 4K60. Which is great! Even though I am downsampling to 1080p60, it still means I'm getting very sharp, very clean source footage. Except Vegas doesn't really like whatever 4K60 format Youtube is using, so I have to transcode it using Handbrake, which for even a 10 minute video can take upwards of an hour.
And then there's editing. My poor little 2015 CPU (Intel Core-i5 4690K) really struggles to work with 4K footage, which probably doubled the length I spent in Vegas putting this together. On top of the hours spent transcoding. So you can really start to see how all this adds up and delays what should have been out by, like, the 12th.
And if I couldn't get it out fast... I do wish I'd spent maybe a little longer explaining some of my opinions. I get the gist across but in particular when talking about what I think is cool about this level design, I think I could have explained a bit more.
Sonic games make you feel so railroaded and there are little hints in this footage of breaking free of that. There's a bit in the footage we've seen where Shadow runs around inside of a tube. This is interesting because:
This is a level design feature that makes total sense with Sonic style physics
This is a level design feature they barely ever use
There's an alternate path where, if you're fast enough on the draw, you can take a grind rail on top of the tube.
Not only would most Sonic games never have this tube section at all, if they did, they would not let you skip the tube and run on top of it. And if you go on top of the tube, there's more than just one grind rail up there, to boot!
So I see something like that, and it gives me a different vibe than most 3D Sonic games typically get. And that makes me excited!
As always I think these work best when I take a step back and think a little. Better Late Than Never is my brand.
#sega#sonic the hedgehog#sonic team#sonic x shadow generations#sonic generations#remaster#shadow the hedgehog#video#youtube#reaction#Youtube
9 notes
·
View notes
Text
gif making tutorial for the inimitable @snowysobsessions
disclaimer: this is exactly how i do it, but im basically just winging it tbh. there may be other methods that are quicker and/or look way better. this is just the way to which i have become accustomed. i am not a fancy ass gif maker who does colouring and sharpening or uses photoshop whatever, those folks are the real pros. i just like to get the job done :) if you wanna make really fancy gifs other tutorials may be more appropriate. ok lets get into it under the cut!
step 1:
select your source. for the purposes of this tutorial im going to stay on-brand and use this video of weird al on 30 rock (aka the original Milf Weird Al).
youtube
step 2:
either download the video (i dont have a good recommendation for a website for that unfortunately, they all seem virus-ridden these days) or screen-record the part of the video you want to turn into a gif. for me, thats the part with al in it.
my computer runs windows something - 11 maybe? and it comes with screen recording software built in that saves into a folder called "captures" in the video folder, which can be activated with the keyboard shortcut Windows Key + Alt + R. most phones also have screen recording functions, you could record it on your phone and transfer it to your computer? (for the record the website i use works on mobile too, but its very slow and annoying so i much prefer to use my laptop.)
step 3:
use video editing software of your choice to cut the clip down to just the part you want giffed. i use microsoft clipchamp because thats whats on my computer. it can also be used to crop away any black bars around any video clip, which is useful, because a properly cropped gif will probably be better quality. export the clip in as high quality as possible.
tip: try to keep the gif 3 seconds or under. this keeps the filesize down. tumblr gif size limit is 10MB, but i keep all my gifs 5MB or below because otherwise the loading time/storage burden is painful, and like i said, im not making fancy ones here, i dont mind them being a bit lower quality.
here is my clip. i saved it muted because its filesize is smaller that way.
step 4:
go to https://ezgif.com/video-to-gif which looks like this.
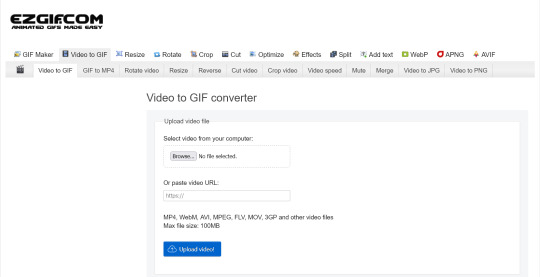
note that ezgif has tools for cutting, cropping and resizing videos if you dont have access to any video editing tool. its quicker if you do it in advance, though, i find.
upload your video and you will see this type of screen appear.
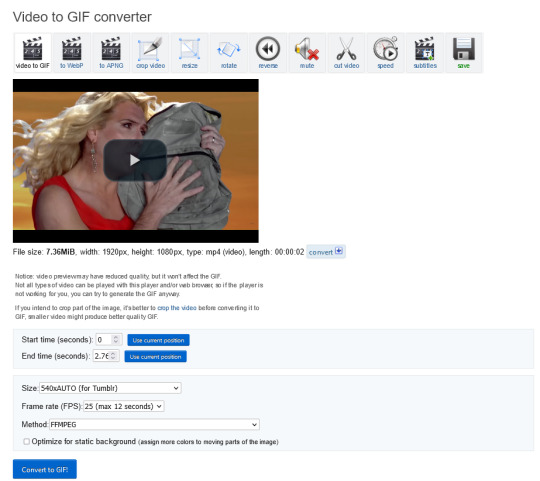
if youre uploading it to tumblr, the 540xAUTO size option is the one i go for by default, but it also has the following size options.
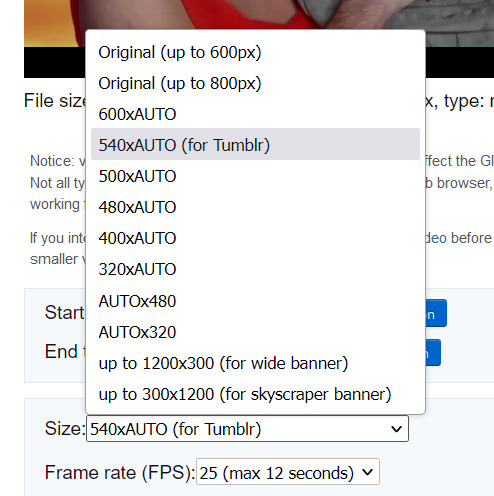
smaller size = smaller filesize, and you want the filesize as small as possible within reason. i sometimes make a gif smaller in dimensions if i'm really struggling to get the filesize below 5MB.
next is the frame rate: i set it to 25 because thats closest to the oriignal frame rate of most recorded video, but in order to make savings on filesize, it can be selected to 20FPS or 12FPS. i wouldnt recommend lower than that unless you want it to look weird and choppy, in which case, go ahead, and i wouldn't recommend higher unless you literally need the animation to be smooth as silk - for making it slowmo, for example.
i don't mess with the "method" drop down bc idk what it means.
the "Optimise for static background" tickbox is useful for if someone is doing something on a totally still background, because it reduces filesize by not animating every single bit of background in every frame. it could be helpful here as our background is not moving at all, just our heroine Alfina. i'm going to tick it.
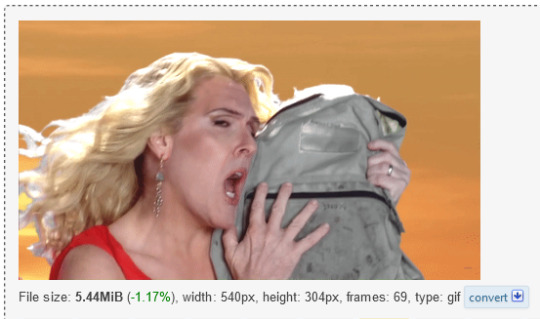
now you can click "Convert to GIF". you should see something like this - itll be animated of course, this is just a screenshot.
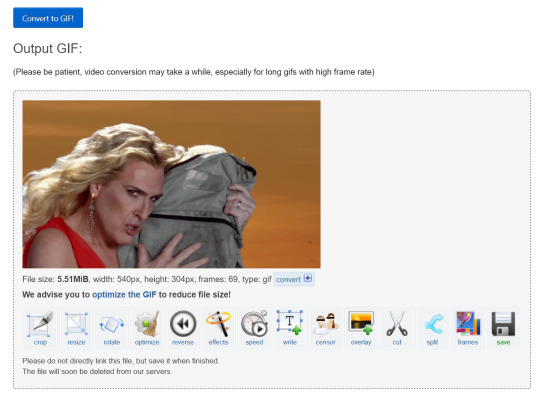
our gif looks crispy fresh (and has 69 frames - NICE), but its filesize is 5.51MB which is more than id like it to be, but first we're gonna look at Effects, so I'm not going to click the "Optimise" option yet.
step 5:
clicking effects will provide the following options
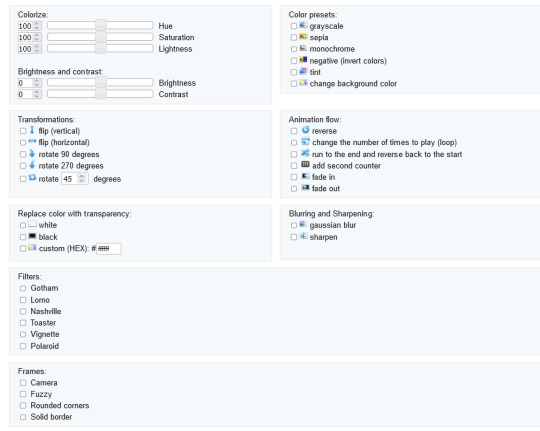
if the video was sort of dark and hard to see, for example if it was live footage, it can be helpful to increase the brightness. changing the brightness and contrast makes our gif look like this, and makes it pop a little more.
you can keep playing with the settings and clicking "Apply selected" until it looks about right to you, or not add any effects at all - it's up to you. I hit the back button in my browser to go back to the gif before i added the effects, then I went to Optimise.
step 6:
the Optimise screen is like this
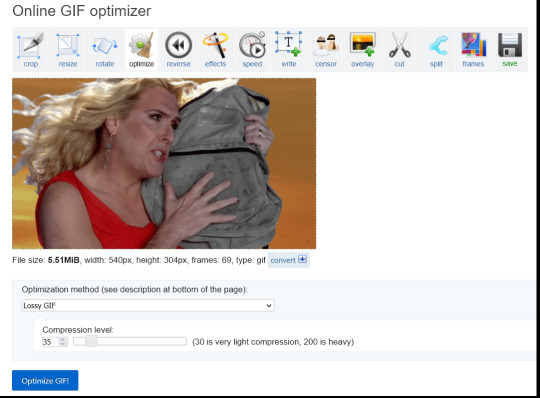
i tend to stick with the Lossy GIf optimization method. I put the compression level down to 30, and press Optimise GIF and see what happens.
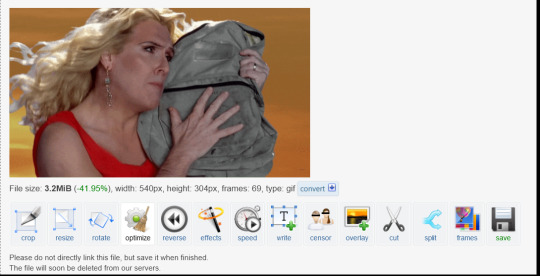
as you can see, the filesize has been reduced by 41.95% to 3.2MB without a super noticeable drop in quality.
if you set the compression level to 200, this is what it looks like
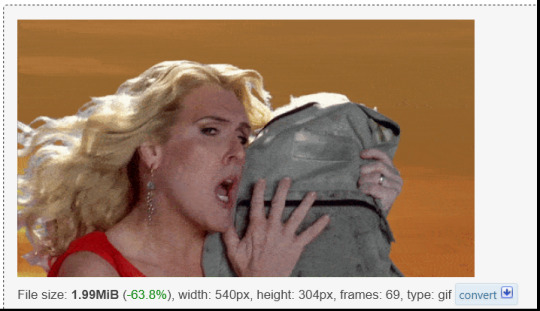
much more pixely, and not much further reduced in size, so i stick to the lower end of the compression scale.
this is our finished gif! isnt she beautiful. i just right-clicked and hit save on it on the webpage after generating - on mobile, i guess you'd long-press on it to download it.

hope that helps!!! lmk if you need help with any other aspect like changing speed or overlays or anything but honestly it's pretty intuitive once you know how to do these bits.
17 notes
·
View notes
Text
Karateka Climbs Again

When the Digital Eclipse team told me they wanted to give my early game Karateka "the Criterion treatment" and re-release it in a deluxe remastered edition, I couldn't quite picture exactly what they had in mind. Their enthusiasm and evident passion for video game history inspired confidence, so I said yes. I never in my wildest dreams imagined how far they'd take it.
The photo above captures my dad's reaction as (age 92) he watches himself climbing up onto the hood of our family car forty years earlier. He's wearing a karate gi at my request, in a Super 8 film I shot at age 18 to create rotoscoped animation for Karateka. (This was three years before I pressed my 15-year-old brother into service as the model for my next game, Prince of Persia.)
Digital Eclipse has reconstructed my Super 8 rotoscoping process — from film to pencil tracings to pixelated game character — in their interactive, hands-on "Rotoscope Theater." And that's just one element of "The Making of Karateka." It's packed with audio and video interviews with me, my dad, and game-industry luminaries; a podcast about Karateka's music (which my dad composed); rare original design documents; excerpts from my journals; and 14 playable games — including not only the final Apple II, Commodore, and Atari versions of Karateka, but also work-in-progress builds I submitted to Broderbund along the way, tracking its development from prototype to gold master. All the games are playable on a choose-your-own nostalgic menu of period monitors and TVs, with optional audio commentary and a "watch/play" mode that the Dagger of Time would envy.

As a bonus, they've salvaged and resurrected my never-before-published arcade shoot-em-up Deathbounce (the game I made before Karateka, which teenage me hoped would be my ticket to software success in 1982)… and the one I did before that, an unauthorized Apple II clone of the arcade hit Asteroids. Incredibly, they've not only remastered Karateka, but also remade Deathbounce, using today's technology to reimagine my 1982 prototype as a jazzy twin-stick shooter. All these are included and playable in "The Making of Karateka."
If "The Making of Karateka" were an interactive exhibition in the Strong Museum of Play (from whose collection many of the archival materials came), it would require several rooms and a full afternoon to explore. Now, you can download, play and discover it at your leisure, on your favorite platform. Details and links are on the Karateka page on my website.
With this release, Digital Eclipse has set a new bar for game-development history preservation. I'm touched and honored that they chose Karateka as the first title in their planned Gold Master series. I can't wait to see what comes next.

#retro gaming#atari#retro games#arcade#game development#gamedev#indiegamedev#indiedev#gaming history#video games#apple ii#playstation#nintendo switch#xbox#steam#1980s#1980s nostalgia#programming#coding#programmer#graphics#animation#2d animation#rotoscoping#c64
13 notes
·
View notes
Photo
Periodically this posts nukes my notifs and I wonder if giving additional info would even be worth it, but I figure it doesn’t hurt to add, I’m not forcing anyone to read it. Maybe archivists will like it. The way things for the web were built are done differently due to the changes in technical limitations— details nobody would realize unless you were from that time. But, maybe fan motivations could be similar? Hah, idk. It was normal for anime fandom online to go to a lot of trouble for our content— as my best friend puts it, “We all fucking walked 15 miles uphill in the snow for anime fandom, that was standard!” and a lot of people who have been online as anime fans since the 90s know each other or at least know each others’ work. (Hey everyone— I’m PIMoSDL from the Ranma ML. Anyone still alive? Hahaha.)
This gif was inspired by an even older dancing Lum gif (transparent background, Lum facing forward, the dance from the Lum’s Love Song ending from Urusei Yatsura, I can’t seem to find that gif anywhere and have no idea who made it), which was on a buddy’s Ranma site that’s long gone. As a new webmaster I wanted an animated gif on my anime site too, because animated gifs were cutting edge, but it HAD to be one I made myself! From OUR fandom! It HAD to have a transparent background because that was more immersive, and I wanted everything on my anime site to be content I produced (it was the first English Ranma and Akane shipper shrine ever; even back then my first foray was into fandom because of ship wars, hahaha. I had a whole fucking career as a web designer because I shipped Ranma and Akane.)
I had to jam the card onto the motherboard with my foot (don’t do this) because it was too hard for me to push in. My boyfriend (who bought me the card after I asked how to get screencaps onto a computer “like those college kids do”) bought it at a computer show; we were still mostly limited to local options for many specialty purchases. Also, I married that guy and we have two kids now 🤍
The first adapter (A/V adapter) didn’t work, so he brought me a coax adapter (hence— static on the screen caps)
You could not just hit “print screen” to get screenshots of video back then. I had to export screen caps from the capture software and use the pause on my VCR if I wanted specific frames. I was lucky enough to have a frame-by-frame feature on my VCR but it left even more lines and static on the frames compared to just playing video and hitting the “capture” button in my software. There was no choice but to redraw everything.
The version of Photoshop that I had was 4.0. It didn’t even have a tool to make rounded corners or rounded corner vector paths, so it sure as hell didn’t have an animation panel/animated gif export 😆
The frames were made in Paint Shop Pro. It was saved to .gif in a separate program (forgot which) where I had to manually enter the hex values for the color palette because I didn’t understand why t f it was messing around with my colors and adding “dots.” I freaked out a bit and had to manually fix all the “dots” that were added from dithering
This was my first gif. I tried my best to make it as small as I knew how to (which was already a relevant professional skill back then, since most people downloaded graphics over a 14.4 modem; 14kb a second. A web page that took up 1mb was about the most you wanted to make— I was working as a fledgling web dev after school for a local company and was learning all this stuff at the time, using my Ranma site as a test grounds for any new tech I was learning. The site’s still up and the last time I edited it was when frames were still in vogue, it’s been a minute lol)
This gif helped make, and outlived, my entire career as a web designer. Companies always change their web presence, so it’s survived past anything I ever made professionally, and it’s loved more than any stupid corporate junk I made, hahaha
THANK YOU BING IMAGE SEARCH. Thought I lost this! 8D
I made this in 1996. To make it back then was a million times harder than it would have been today: screen capped each frame in the loop by hooking up my VCR to my TV capture card (it was this external monstrosity with a separate power cord XD). The screen caps had bad color, were blurry, and full of static so I redrew each frame pixel by pixel with a mouse (wasn’t so good at image editing programs back then). XD;;
Of course, it got lost over time because I made that thing like 203498203489 computers ago, so I’m glad people jacked it from my site back in the day. XD
35K notes
·
View notes
Text
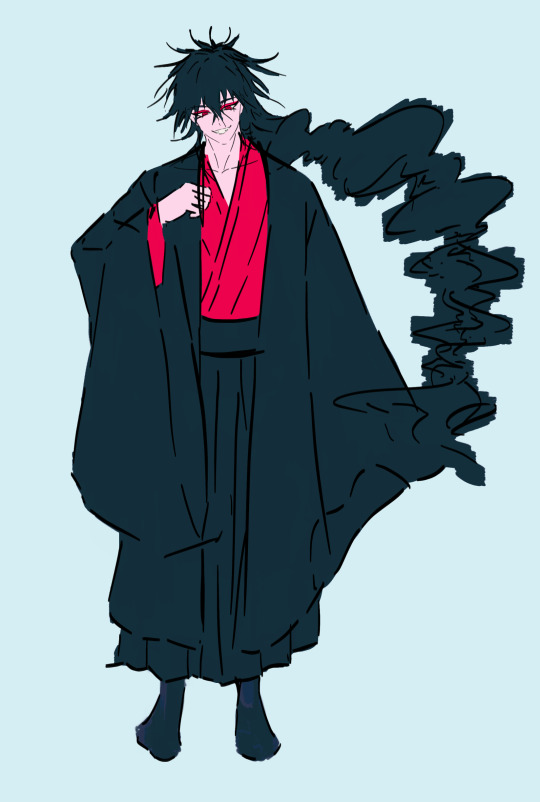
【Magi】 Judar in hanfu 🖤❤️🐈⬛
Doodles

Speedpaint
Intro Rambles
Judar skrunkly (rough colour draft) 🖤❤️🐈⬛
Judar Speedpaint 🖤❤️🐈⬛
Music: Mass Destruction (Persona 3 - Battle Theme)
Original time: 16 minutes
Sped up by 8x
It's just me filling in the base colours for now
Judar Colour Edit
Btw the colour edit of the Magi anime's Judar concept arts were done by me! The purple toned one, specifically. It has nice colours...
I love using teal/cool toned black + red combo in my arts 💗 So I used more blue tones instead
I like doing colour edits cuz it helps me harmonize colours and see how colours work together on the actual design itself. Love playing around with colours
I do love the teal toned black hair the Magi anime uses for him, but I tend to shift colours by saturating the colours more (shifting to cooler tones and saturating reds)
When I refine and redraw the rest of the drawing, I'll redraw the hair and clothes and add more patterns onto the clothes
Misc Rambles
Didn't feel like starting a new sketch so I'm just playing around with rough colour drafts. I think teal/cool toned black + red combo looks so nice!
I want to do more rough coloured sketches 🙏
Like the Douman doodle WIP turned out super nice. I think doing rough colour drafts is nice cuz I get to play around with colours
Also, I actually recorded me filling in the rough base colours through OBS, which is a free software that records monitor footage and streams well
But the video editor program I'm using, OpenShot, is usually ok but it's so doodoo with speeding up clips, it constantly stutters and skips frames so I'm gonna have to find a better free video editor first before I post it
It's been a long time since I recorded something!
Wanna doodle JuAli again soon… I miss them 🥺🖤❤️💛
Speaking of which, I haven't seen KuroEne fanarts with Kuroha's Manga Route 2 design, so I will deliver 🫡 Hopefully soon
Oh another thing I forgot to mention
I love using saturated red and hot pink~ Technically if you eyedrop pick the colour, the colour of the red ru (top of the hanfu) is red~ish hot pink. But cuz of the contrast against the cool colours, the teal/cool toned black daxiushan (coat jacket), the colour reads as red
I love picking colours. Sketching and picking colours are my fave part of the art process
Persona 3: OST
I love Lotus Juice and Yumi Kawamura's voices!!!
Recorded this last night as an excuse to shill my fave Persona OST~~
Lotus Juice (P3's main rapper) and Yumi Kawamura (P3's main singer) are my fave singers!!! I love P3's OST sm
Mass Destruction is my fave P3 track
Yumi's "Ooh yeah~ Baby, baby~ Dada-dada!" It's so catchy!!!
A song with singing parts that are just "Ooh yeah, baby baby, dada-dada~~" sounds amazing
Yumi has a very unique voice quality and really strong singing voice. I love how Yumi's "Dada-dada" sounds like "Dada-dadao" and "Baby, baby" sounds like "Babeh, babeh"
Art Rambles
I love picking colours 🥰 My fave part of the art process is sketching and picking colours
I use CSP's Oil Paint Flat Brush to line! I've been using CSP since 2016. The first thing I drew on CSP was a KuroEne comic page attempt on CSP back in 2016
It's a free brush. CSP updated the Oil Paint brush with a new one so you can find CSP's old brushes on the CSP Assets store
Ever since 2022, I prefer using textured brushes to sketch/line compared to soft opaque brushes and hard pen brushes
Makes it easier to control line weights for me
This brush has a flat edge so the newer Oil Paint brush makes it easier to draw sharper lines, but I have better control over this brush and I'm just used to it. It works with my art style well. I love weighted inky brushes.
Also dawg I just realized that I recorded Display Capture on OBS so it shows my tablet's button presses on screen and me opening folders and files oops 😭
I'll record just the CSP window next time with Window Capture
I downloaded ShotCut, a free video editor this morning and it's already better than OpenShot tbh. It can speed up the video without stuttering and skipping frames, and has more features too
If I was filling in the base colours for real, I'd use a hard brush to fill in the base colours (cuz as you can see in the video, the Oil Paint brush is slightly translucent so it'll create lighter spots and won't fill in the base colours completely)
So I duplicated the layers multiple times. Since it's just a rough sketch, I filled in the base colours manually since it's fine for it to be messy. I'm just getting an idea of colours so it doesn't need to be clean
But if it was more refined with a cleaner refined sketch/lineart, then I'd use lasso tool and magic wand by selecting the outside of the lines and inverting the selection
I like using the old Oil Paint Flat brush for sketching and lining, but just keep in mind it has a flat edge (so if you need something that makes sharper lines use the new Oil Paint Flat brush) and it can't blend for shading/rendering.
1 note
·
View note
Text
Empowering Gamers with AI Clipping Software: Powder Unleash Your Gaming Highlights with Powder In the fast-paced world of gaming, capturing and sharing your most epic moments is a top priority. Whether you're an aspiring streamer or just want to relive your finest gaming achievements, Powder has got you covered. Designed by gamers, for gamers, this AI clipping software is revolutionizing the way you record and edit your gameplay. AI Magic: Turning Streams into Viral Clips With Powder, you can transform your entire gaming session into a treasure trove of social media-ready clips. Our cutting-edge AI tool automatically identifies the most thrilling moments, creating highlights and montages in a matter of clicks. Say goodbye to hours spent sifting through footage—Powder streamlines the process. Tailored Editing: Quick Customization Crafting the perfect clip has never been easier. Powder offers intuitive vertical and horizontal templates, allowing you to swiftly customize your content. Not only does this save you time, but it optimizes your content for various social platforms. Seamless Sharing: Reach a Wider Audience Powder makes sharing your gaming achievements effortless. Easily distribute your clips and montages across social media platforms such as TikTok, Twitter, Instagram, and YouTube. Your epic plays will reach a wider audience, catapulting your gaming fame. Cost-Saving Solution Forget about hiring a video editor or investing in pricey video editing software. Powder provides an affordable alternative, ensuring that every gamer can produce captivating content. Powder Studio: Game-Changer for Content Creators Join the ranks of content creators who are raving about Powder: "It's game-changing for content creators and gamers." – Slyasf_ (42.7K followers) "I love Powder's automatic highlights—it's like having a personal editor who knows exactly what to clip." – Luki (47.5K followers) "Powder saved me tons of time editing!" – Shipbroman (161K followers) Unlock Your Gaming Potential with Powder If you're looking to save time, create engaging content, and grow your gaming audience, Powder is the ultimate solution. Download now and experience a new era of gaming content creation. Subscribe to Powder Pulse Stay ahead in the gaming world with gaming content insights and time-saving tips. Subscribe to Powder Pulse and take your gaming journey to the next level.
0 notes
Text
A Love Letter To Content Creation
Recently, on my main channel, I released a video after a four month hiatus due to school, and after I released that video, I soon after got a comment that said
“Man you make the best genshin related content. please never quit”
And like that’s definitely not true; there are some amazing content creators in the lore circle, and even better content creators outside of that small circle, but that doesn’t change the fact that this comment, and ones similar, are the prime examples of why I make content. It’s not because people look up to me, it’s not because it makes me feel “famous,” it’s because, the fact that somebody thought to write a comment like that, something so positive and encouraging, means that they enjoyed the thing that I made. I made somebody’s day just a little bit better. And that means everything to me.
I have been making content online for the majority of my life. I remember recording Minecraft Lets Plays when I was in the fourth grade. Granted, they never actually made it online, but they were recorded with the express intention of ending up there. And I remember recording those not because I wanted to be famous like my favorite Let’s Players, I recorded those because I wanted to make others feel the same joy and wonder and warm comfort that my favorite Let’s Players made me feel.
I remember making little dumb improv-skits with my friends in the basement of one of their houses. We recorded these little skits on my old iPod touch. Obviously they were dumb and filled with the humour of elementary schoolers, but we still made them because they were so endlessly entertaining for us, especially when we captured something that got us keeling over in laughter for minutes on end. And it was the idea of spreading this laughter, making somebody chortle, or even making somebody smirk imperceptibly, made me want to make and record even more, dumber skits with my friends.
I remember, when I was in fifth grade, trying to start a channel that is lost to the currents of the internet where I uploaded a video welcoming hypothetical viewers to my channel. My parents found out quickly, because I didn’t realize YouTube emailed you when a video successfully went up. They, rationally, did not like that their very young child was uploading his own face to the internet, and told me to take it down. I cried because I “wanted to make people smile.” I took the video down.
I remember figuring out how to edit in Windows Movie Maker. I cut together a crude minecraft let’s play over the course of a few hours. It wasn’t good, but I learned that I enjoyed editing. There was something cathartic and relaxing about sifting through footage and cutting together the interesting parts. I learned that making a video is almost like writing a book, where you have to properly pace the video to where your viewer won’t get bored, and you can’t just show the viewer what’s happening. You have to do more to the video, just like in writing you have to do more to the prose to make it good. Those things I couldn’t do with Windows Movie Maker, so I observed the things you could do with good editing software from the content creators I watched at the time, and internalized it.
I remember when I was first getting into watching people livestream, and I thought to myself that I could do the same thing. I tried to download streaming software onto my computer that could barely play most of the games that I was into at the time, much less process and encode video at the same time, and attempted to stream. It didn’t work out, obviously, and that made me very sad. I wanted to play games with people, and my computer didn’t enjoy that. So I told myself that in the future I would stream once I had a computer that was powerful enough.
And when I finally was old enough for my parents to be okay with me putting content on the internet, when I had access to slightly better video editing software, when I finally bought a computer that was able to record and livestream games, I felt so free. I was finally able to do what I wanted. So I got to recording and streaming right away. I learned how to use OBS, I learned Davinci Resolve, I learned how to use Twitch, and I was always looking to play games with friends so I could record or stream, and when we were done playing, I practiced editing my vods down in a way that was funny or highlighted the stuff that we did.
And so I did that for a while. Played stupid games with my friends, did stupid things, sometimes recorded it, and edited the vods down. My goal was to emulate people like SovietWomble, trying to use subtitles for comedic effect. I got okay at it, it was just the fact that pacing the videos wasn’t really my strong suit. And I had fun. A lot of fun.
Then Covid hit. Lockdown was hard on all of us, and while I had practically no work to do in any of my classes, I decided that I wanted to make some more videos. The first idea I came up with was to do a game review of a random free game I got on steam, called Deiland. Really, that video is what started it all for me and the content that I make now, but it was kind of my soft start, because that video was still bad, my voiceover was uncomfortable and quiet with little expression, and the visuals were nonexistent. I wasn’t really passionate about that video. So I kept throwing things at the wall, waiting for something to stick.
That’s where I made my longest scripted video to date, BDG Unraveled, where I went through every BDG video in sequence because he’s a creator I look up to, and I love his work, and I saw a few tentative connections throughout his work that I thought would make an interesting video. So I did, and it’s then that I really figured out my style of scripting and narration. Shortly after that I did another video about critical role, and then I started playing a weird little game called Genshin Impact.
And from here the story is quite simple. I made a dumb video presenting a theory I thought had a little bit of ground, but not a whole lot, and then put it together and threw it out there. I made this video because I had always wanted to get into a game that had that certain style of storytelling that’s perfect for theories. Slowly drip-feeding you information to where you slowly build up an understanding of the world of the story, while also being engineered to constantly leave you with question after question for more and more theories. I grew up watching Game Theory and the Five Nights at Freddy's theories (pretty much where that style of storytelling got its most substantial level of awareness) and so I’ve always wanted to involve myself in a community that had a story like that. When I started playing Genshin, I soon started to learn that’s what this game had, and I also learned that I was very early in. At the time, really the only person that I knew that was doing any sort of lore on the game was Teyvat Historia. It was an untapped market. So I made the video, and it was successful.
I found a game I loved with a story that I loved where I could make content in a form that I loved. It was the perfect combination at the perfect time. And now I’m at a point where I have been making genshin content for two years now. I have done seventy-five Sunday streams, where I get to hang out with my viewers, and I get to see the thing I have always dreamed of doing: making people’s day. Entertaining people. Making people’s lives that much better and more comfortable. I have gotten to make some amazing videos, I have gotten to go crazy over a game that has had twist after twist in its story. I have gotten to make some amazing friends in the form of the people that make the same content as I, as well as the people that chill in my streams and watch regularly.
But I think content creation has had a much bigger impact on my life, beyond what I just listed, and that’s really why I wrote this letter. Content creation has become a constant in my life. It has become something I can always turn to when I am bored, or struggling with something in life, or when I want to feel accomplished in something. It’s something that I can always do. It’s something that will never go away. Whenever I upload a video, or press “go live,” I know that somebody will see it, or somebody will tune in, and I can entertain, even if it’s one person. And that alone makes my day, and it makes me feel better.
And because of that positive feedback loop, content creation has helped me become much more confident in myself. I am much more verbose, articulate in my points, confident with myself both online and in real life, whereas before I was shy both to introduce myself to real people, or to start talking in online communities and insert myself into one. I have become a much better leader, writer, organizer, and I can carry a conversation because that’s what streaming is at its core. It’s one person carrying a one-sided conversation, which requires a very strong stream of consciousness, and streaming has helped me develop that stream of consciousness. It’s a skill a lot of people don’t have.
That’s really why I wanted to write this letter–because two years later, I have become a better person just because I decided to make videos about a funny game, and because people decided to watch me talk about a funny game. It has changed my life.
Thank you guys for two years of Genshin Content :)
2 notes
·
View notes
Note
hi sorry stupid question, i love ur dndads animatics and i was thinking of doing one but also where and how do u get the audio downloaded?? i cannot for the life of me work it out skddkfjd anyway ur super cool and i love ur arttt
aw thanks ;u; <3 I'm so glad you want to take a shot at an animatic!! (my schemes are working :3)
for most of my stuff I've downloaded the audio directly off the patreon. If you're a patron, every ad-free episode post as an mp3 link right below it.
before I realized that, though (when I made the Tower of Terry animatic) I did this roundabout thing where I used OBS (a free streaming/screen-capture software) to capture just the audio off of my tablet, not recording my mic, while playing the episode audio I needed. There are... probably better ways to go about it?? not sure what kind of hell that might have wreaked on the audio quality of if I pulled that off on a fluke lol. Also it's been a few years, there might have been a step in there where I did have to record the video of my screen as well and then had to remove the audio from that video? It's been (terrifyingly) almost 2 years since I did that one so I'm not sure.
once I have the audio, I do the audio editing in Audacity (also free) and duct tape everything together in a copy of Windows Movie Maker that I downloaded off the internet cause they don't actually give that out with their computers anymore cause it's a lil bit ancient.
if anyone has other good methods for non-patrons, feel free to add on here! I'm almost certainly missing some sort of very obvious option ^u^'
4 notes
·
View notes