#the question is how do i say that nicely
Text
.
#sorry but i hate sudden yelling and loud noises#slamming hands on tables and screaming#i grew up like that and it was traumatizing. no thanks#the question is how do i say that nicely#without being super hurtful about it?#'hey my abusive parents used to also do that. can you not please' is a little too blunt i fee#feel*#maybe 'hey#i'm triggered by sudden loud noises and screaming. is there something else you can do to let out your frustration?#like maybe i dunno going to therapy and working through your clear inability to express your anger properly#this is what happens when you don't model emotional regulation to your sons. they think it's okay to act like a child when they're upsey#*upset#frustrated#personal
1 note
·
View note
Text

i think the barbie movie would have a profound psychological impact on hua cheng
prev comic / next comic / follow for still more hualian barbie movie content because i am not done
bonus angsty version 🎉 i hate love expressions just a couple tiny lines on the mouth and eyebrows and it goes from silly to sad
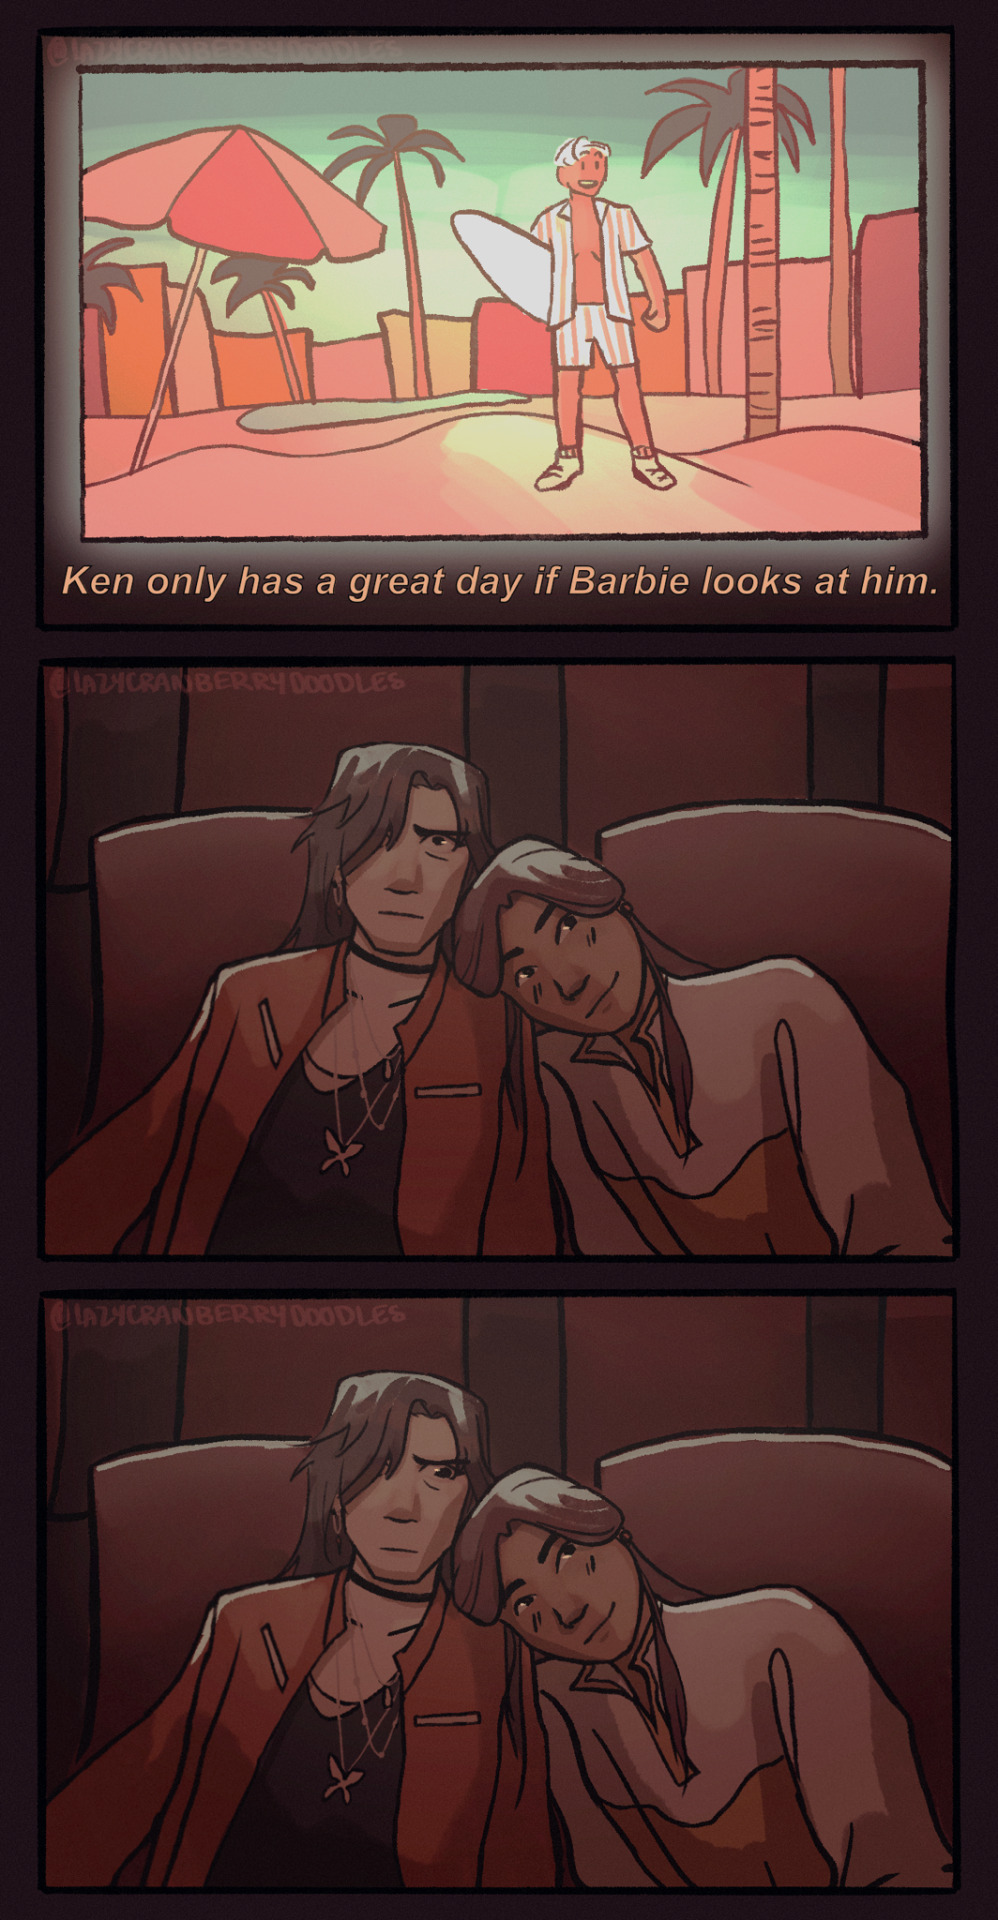
:(
#this is a haha hua cheng devoted joke but idk it’s nice to think about how much of his identity and self worth is placed on xie lian#obviously since he was 10 most of his major life choices were to serve the crown prince#but in the interval time he became one of the most dangerous men in the world and decided it was his responsibility to create a ghost haven#he works on artistic mastery and alternatively brokers deals with and evades assassination attempts by heaven#if asked i think he would say he only does good for dianxia’s sake (What Would Dianxia Do) and is actually a bad person#and similar stuff about his combat and art skills#theres a question here about how much of his success is due to being such a determined person and how much#of it is luck from ‘the savior’ reversing the star of solitude#how much hua cheng is left when you take away xie lian?#he would say nothing#xie lian would say a billionaire genius playboy philantrophist etc#tgcf looooooves to talk about destiny and free will and so do i#all this to say if it was in character for hua cheng to cry at a movie hed be sobbing#this can be read as pre or post confession btw#the poll decided which version of the comic was the ‘main version’ above the cut#tgcf#art#comic#hualian#hua cheng#xie lian#tian guan ci fu#heaven official's blessing#hob#mxtx#my art#barbie#barbie movie#tgcf meme#lmao
2K notes
·
View notes
Text


#sam reid#interview with the vampire#iwtvedit#iwtv#*#im hmm ehh that this question was even asked#it puts actors in a difficult position because what are they supposed to say#sam reid was very nice with his answer VERY GENEROUS but they should not bring these questions to actors#it wont change anything#one peek over at twitter/x and some people are already being nasty about this#ANYWAY#this is how i do fandom too sam reid!!#one peek at fandom during s1 and i had to just ignore it#i want to enjoy the show
208 notes
·
View notes
Text
Bungou Stray Dogs: Dead Apple and how “ability users” (opposite to “normal people”) learning to accept themselves through the acceptance of their own abilities is a queer metaphor of acceptance of own's sexual orientation and gender: an essay by me
#bsd#bungou stray dogs#About: Dead Apple. Watched this a while ago with a friend and it was a lot of fun!!!#If you're reading this: thank you so much for hanging out with me I had such a good time (ㅅ´ ˘ )♡#Next to general considerations: wow they were right that Bungou Stray Dogs movie sure can Bungou Stray Dogs#It's always nice to see the detailed animation and elaborate backgrounds of movies. The animation quality compared to the manga is–#definitely noticeable and it's nice to see. That said... I still like the season 2 art style more? And I'm speaking strictly of art style.#The s2 one looks more soft and smooth while the da one is so much more rough.#The plot is... Very bsd-esque I don't think there's anything to add.#In my opinion Kyouka's arc is the one that turned out best tbh. I really like her narrative development and personal growth in this movie.#I like the complexity of her state of mind. how full of contradiction she is. I especially appreciate the recurring small changes of–#expression that indicate how she thinks differently from Atsushi even if she doesn't voice them. The fight between her cynicism and her–#kind nature. It's all very interesting.#Atsushi's development is interesting too. Although all the open questions about his ability we still have kind of leave me frustrated#I don't feel very strongly about Akutagawa in this movie? I mean‚ he's there. The ss/kk scenes are always great and in character and a joy–#to witness no matter what they do. He just doesn't shine particularly? Or at least personally I dont find the “proving my strength against–#myself” narrative arc to be particularly interesting. Imo it was a lot better flashed out in the da stage play! With the complexity that–#the dialogues with Chuuya added to the character. Dazai attacking him. And especially Aktgw understanding that Rashomon wasn't testing Aktg#but rather only expressing that unstoppable rage that is also Aktgw's own. About that I checked out the play and I really liked it!!#I only watched highlights (aka: ss/kk and chuu/aku scenes) but there's some stuff I really like. I like the conflict between Aktgw and–#Chuuya and how Chuuya messes up with Aktgw at first maliciously and then amiably. It's interesting how Atsushi himself observes that Kyouka#and Akutagawa get along. And especially the sskk almost-handholding and Atsushi saying Akutagawa has a nice profile were cute akjdhbsawhjb#Next. Da really is shipping paradise (╥﹏╥) Sorry but... It is. oda/zai. daz/atsu. ss/kk. s/kk. fuku/mori. chuu/aku. It really has everythin#and the moments are so good!!!! What else. Wish we'd see more of Tsujimura. And Christie. And women in general tbh.#Also‚‚‚‚‚ Atsushi's tiger form in this movie is ATROCIOUS. I've said it before but it's crazy how a franchises that relies so heavily on–#fanservice came up with something this hideous. Man the movie overall was pretty but Atsushi sure wasn't. Firmly stand by the belief–#that only Akutagawa would find that form attractive.#Oh last note. honestly if we're ready to accept a movie where an antidote has effect AFTER the person has effectively died then we really–#can't complain about any kind of insanity the manga brings up#random rambles
109 notes
·
View notes
Text
im quite tired of talking about totk, like im sure you all know by know just how frustrated i am, but something i still strongly believe was the logical, and best thing to do in a sequel.. -
while botw was about you feeling lost in a strange world with neither you nor link knowing anything and both discovering it as you go, the theme of lonelyness and isolation, freeing the spirits of dead friends you need toremember again, in the end finally reuniting with one of the only friends still alive, after a 100 years
totk should have been about community, about working together with zelda at your side, as a companion, after having been seperated for so long, and seeing nothing of the time between titles, this should have been her travelling alongside you, after botw you'd WANT to spend time with her and get to know her more, her being the diplomat, the archtitect, the scientist, the translator of old texts, a historian trying to find out the truth about what her fathers kingdom was built on, to right old wrongs perhaps, for a better future- theres so much that she should have been, so much of her character was primed to go into this direction- and instead she is a pretty prize with no personality you get at the end like this is an 80s cartoon still
(this is disregarding the whole fact that ganondorf, AS WELL, should have been a giant factor in all this, in the history of it all, to explore his character and his actions, to have zelda research and find out about histroy clearly written by the victors- theres so much potential depth here that it dirves me crazy, botw was such a set up for more that was wasted, utterly wasted, for something i wouldnt even want to call paper thin bc even paper has more depth than anything in totk)
#ganondoodles talks#zelda#totk#ganondoodles rants#do not come to argue with me#im done trying to sound all nice about it#im angry and frustrated about this#tin foil hat me is convinced they shipped the “writing” for totk off to some mobile games company bc they wanted to focus on that movie#since the success of the mario movie made them prob more money thant botws sales did#i know it might no line up#which is why i said tin foil hat me thinks that#with the situation of the games industry as a whole and zelda being my thing of interest#its soemthing i wont let go ever#and i have zero faith there will be any good stories to come out of the franchise again#dare i say satoru iwatas presence is dearly missed#espeically knowing how the other main guys think about what games should be#i know miyamoto always had a questionable approach to games#pretty sure it was aounoma who said the “why would you wanna go back to linearity lolol nostalgia blindet idiots lololol”#not a direct quote but you know what i mean#anyway#wont be taking about totk in length anymore#im just tired at this point#getting better at ignoring its existence but it still hurts like a sore spot you forgot you had whenever i hear anythign about it
114 notes
·
View notes
Text
as I am replaying origins -- a game which, to be clear, I love very VERY much -- I can't help but feel that people do don the rose coloured glasses on it a bit specifically when it comes to the range of dialogue options you're actually given to work with at any given time (something I've seen my fair share of silent vs. voiced protagonist discourse about over the years *smokes tired cigarette in survivor of a decade of DA tumblr*). like... there are a couple of situations where you're given a decent range of responses, but the vast majority of the time you have about three dialogue options, and often they're presented sort of like 'polite/bland/unprovoked near-cartoonish levels of assholery'. arranged like, y'know:
I am [BLANK]. It's an honor to make your acquaintance.
You can call me [BLANK].
How dare you speak to me. Fuck you and your family back five generations. I'm going to rob your mother's grave before your eyes.
(sometimes if you're real lucky you get the secret extra 'Something else/I'm bald/but I'm a dwarf!' option)
I'm not at all saying it's worse in that aspect than the other games (Dalish Inquisitor 'Who's Mythal' just entered the chat), but I do think it's worth considering that this might be a bit of a franchise original sin that has been present since the beginning, as indeed it is in most rpgs because making rpgs is real hard, and you notice it more with the dialogue wheel format than when the responses and questions you can ask are all laid out in a list together
#sometimes you also have 'sane and relatively polite' and then two different flavours of cartoonish assholery haha#or 'three barely rephrased versions of the same sentiment'. listen. It's hard to make a game sometimes you just need to get the player#through to the next part of the conversation I understand that perfectly haha#dragon age#I personally like the clarity the dialogue wheel gives you as to what is a question that'll loop you back#to uh the trunk of the conversation tree as it were and what responses move the conversation along and make those unavailable#you basically just have to feel the vibe on that in origins sometimes and it stresses me out even now#(also nice to know when you've flirted with a companion it's always sad to ninjamance someone and then have to crush their dreams lol)#but I absolutely see how some people might prefer the list layout and see the whole line their character will be saying#the dialogue options you get before facing uldred especially are. fucking wild tho#I think they're trying to do a whedonesque deadpan comedy exchange with the crazy guy (which like sure it was a different time)#but especially if you're a mage and just witnessed the devastation of everyone and everything you've ever known... weird vibe!
21 notes
·
View notes
Text
The trans experience of getting lucky with a new primary care provider who doesn't care about your transness or transition so long as you're getting the proper care
Manifesting this for every trans person because I finally felt like a normal human being going to a doctor
#trans#transgender#lgbt#lgbtq#ftm#mtf#nonbinary#transphobia#transphobia tw#i have avoided doctors for like... four years now because of how awful they are toward trans people 🤩 (sarcastic star-eyes emoji)#i thought i didn't have anxiety anymore until i made a first appointment with this new primary care provider i have...#...and when they were doing my vitals and got to the blood pressure screen i was shaking (which i normally am tbf)#i will be fair and say i have had more negative experiences with mental health providers though#but since i've avoided doctor-doctors i haven't had the time TO have negative experiences#my dad was actually really kind and asked if my doctor tried being transphobic and i realized... NO! he didn't even try!#my dad's first question was if dr. [redacted] tried to talk me out of testosterone and i was like shit... no he didn't!!#and i felt like a normal person seeing the doctor albeit with a lot of anxiety but i was treated normally :)#it feels SO nice after feeling like a lab rat or like in the movies where a psychiatrist comes out to explain what transsexuality#explain what transsexuality is*
243 notes
·
View notes
Text
I'M BAAAAAAAAAAAAAAAACK!!!
Okay so honestly I have been very very inconsistent over the years with just disappearing for periods of time due to various things 😂 So it probably seemed pretty normal to most people.
But it felt different on my side, so I'm excited to be back in business.
I took a month long hiatus! 31 days of not drawing digital art.
Its not something I talk about on here? But I've been suffering from some serious long term Art Burnout for.... a really really long time. Long enough that I should've taken a break probably years ago. It finally got so bad that I could barely draw. I was scared to do it (cause it always looked "bad" in my eyes [i'll come back to that]) and doing it was exhausting and disheartening.
I talked it over with somebody and realized that the fear and anger and frustration I felt towards my own artwork was uh. Not Normal or Healthy. And I finally committed to taking a real break for once.
I still drew a little bit by hand? Traditional art has always felt like it has lower stakes for me (i don't often share it online, and sometimes I don't even share it with friends) so I did some of that when I felt like it. But Digital art was completely off the table.
I had put such an immense pressure on myself to make my digital art perfect, to make as much of it as quickly as possible to satisfy something. It wasn't fun anymore. I'm proud of what i've made over the years! But for a long time now the stuff I've been making was made while hating every second of making it. With some rare exceptions.
I hated my art! It was a combination of Perfectionism, taking in too many external expectations, and the burnout. If you hate doing something its kinda hard to love it even when you want too lol. It wasn't "Bad" in the sense that the quality was low and it was ugly! It was "Bad" in the sense that it was unhealthy for me to keep doing it at that point in time.
I'm glad to report though, that with my hiatus officially over as of Wednesday last week: I am once again. In Love. With doing art, and being an artist :)
I put off taking a break for years cause I was scared that taking a break would mean that I would never achieve all the things I wanted to do with art. I was scared it was a stupid and lazy thing to do that would mean I'd never achieve my dreams. And Also even though I kinda hated drawing, I also loved making art. Its a weird duality that I can't even really explain??? I hated it but I also loved it. I wanted it but I also wanted to run from it. It wasn't until I was more mature and had more clarity and insight (and unfortunately also until the problems got worse) that I was finally able to let go of those fears and just do it.
And I'm really really glad I did. It was everything I needed. And I hope to strike a better balance in the future with art. Taking more breaks when I need them, or just when other things have my attention like reading or Video games (Some star rail got played during this time xD)
From the outside things probably aren't going to be that different?? At this point I don't really have any sure plans to post anything I've been drawing since my Hiatus ended. I might or I might not xD I'm still a hobbyist artist taking things at her own pace, but I hope that it shows how much happier I am :)
Whumptober 2023 is being officially put to rest by this post btw! I was in major burnout when that event started, and I'm ready to just, move on from all the past expectations I'd shoved on my shoulders. If I feel like filling any of the prompts or going back to any of the ideas I'd come up for it I will! But I'm not going to worry about doing it unless the desire sets in.
Thanks to everybody who's been so kind to me throughout my time on here as an artist! Ya'lls tags and screaming and kind words, the fanfic, the asks and the responses? Its been fantastic :) You guys have made me laugh, smile, and cry tears of joy. I hope from here that things only get better and sweeter! And if I have bad days again, that's okay too.
Here's to 2024 and whatever it may bring ya'll :D 🎉🎉✨✨🧡💜
#isa screams#long post#gif#flashing#i think? Lemme know if I'm incorrect on that one alksdjfLKSJDJDSG#I don't normally talk this much so its kinda strange?#its kinda nice to be more honest about this stuff though#I'm a bit more of a private person so its hard to find the balance between wanting to discuss things openly and honestly#but with the fact that I don't owe the entire world an explanation for everything I do#its a tricky thing#but today I felt like doing this and I think that's okay#if i regret it I just won't do it again alsdjLSDJLFJSGSDG#thanks if you read this! I appreciate it!#I'm a pretty smalltime artist relatively. So sometimes it feels as though it doesn't mater what i say or express.#But hm. I doubt its really that simple or bleak#And if I don't respect myself then well. Who will right?#And I want to learn how to be happy with how little or how much I get#part of the reason I've done so poorly mentally as an artist is chasing numbers and outside praise instead of asking the harder questions#am i happy with what i do? what I make? Who I am#I'm going to probably be working on those questions and problems for the rest of my life.#But thats okay. Thats not a bad thing :)
58 notes
·
View notes
Text
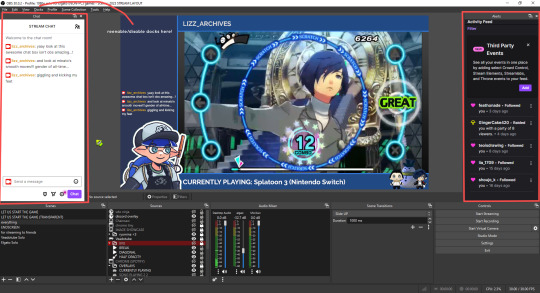
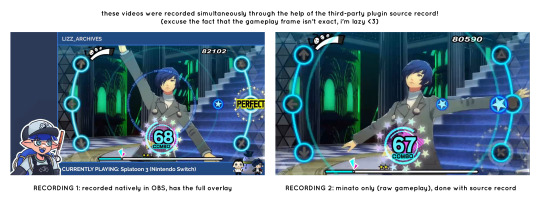
so you want to use OBS
hello! i’ve decided to compile information on my OBS setup and some resources that have helped me along the way. this is mostly for personal reference, but maybe others can make use of this information!
some notes before i get into it:
i use OBS for both offline recording and (twitch) streaming. any footage i record is edited using DaVinci Resolve 18, which is free.
most of my OBS captures are of video games (through a USB capture card, specifically elgato), and the occasional screen/application capture (like clip studio paint, and sometimes PC games).
as such, the information here is reflective of these experiences. this post is not comprehensive to all of OBS’s features- this is just an overview of the settings and configurations that are most relevant to me.
with that out of the way, all the information will be under the cut!
Basic Setup
file format:
how to change: settings -> output -> recording -> recording format -> press “apply” once finished!
I save most of my recordings as .mkv files- it supports multi-track audio! i prefer .mkv over .mp4 because if your power goes out, you still have a recording to work with.
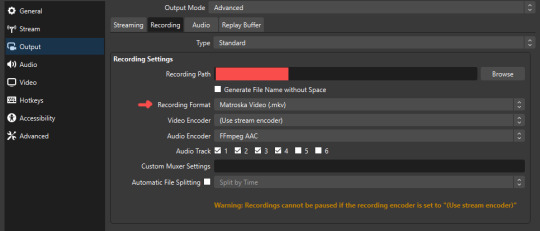
.mkv files can be read by DaVinci Resolve without an issue- but for Adobe software, they'll need to be remuxed to .mp4 within OBS! (file -> remux recordings -> press the … to select a file -> press the “remux” button)
video resolution and framerate:
how to change: settings -> video -> output (scaled) resolution
my obs canvas is @ 1920 x 1080p (16:9)
i switch between 720p and 1080p as needed! if you're concerned about space, you can probably just go for 720p. i also record at 30 fps, simply because that’s what my capture card supports.
video bitrate:
how to change: settings -> output -> encoder settings (located in both the streaming and recording tab) -> press “apply” once finished!
bitrate is a bit of a doozy to explain, but the most important thing to know is that bitrate affects your video’s quality. lower numbers = lower quality, while higher numbers = higher quality.
generally speaking, you'll want higher bitrate when you're recording things with high depth of information (e.g. you’d want a higher bitrate for something fast-paced like splatoon, compared to a slower-paced game like animal crossing).
my video bitrate is either set to 3000 or 4000 kbps! and here's some of my other (related) settings while i'm at it:
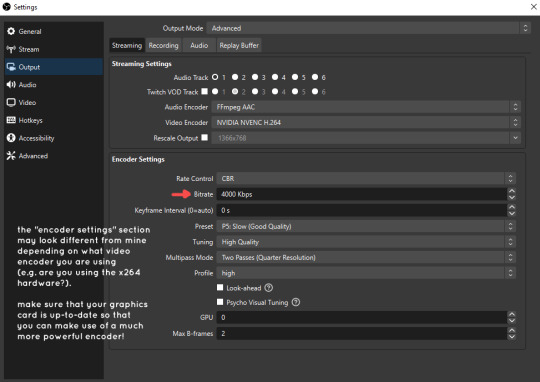
you can put your bitrate at much higher values than me if you're a stickler for quality- but keep in mind that a higher bitrate means:
bigger file size
more information to upload (when streaming)
your computer will need to encode more
i’d recommend reading twitch’s guidelines on encoding, bitrate, resolution, and framerate to get an idea of what values to pick. for people who are doing offline recording or streaming on a different platform, i suggest googling the appropriate resources!
multi-track audio:
this is mostly applicable to anyone looking to do video editing!
multi-track audio basically allows you to separate your audio sources (e.g. discord, game audio, and your own microphone) into different tracks.
this is an immensely helpful tool because it lets you adjust audio levels in post-production (editing). some examples of how this can be used:
increasing someones microphone volume if they speak too softly
increasing/decreasing game audio
muting swear words/sensitive information
completely muting voice call + microphone if you want to upload a no commentary video
and more!
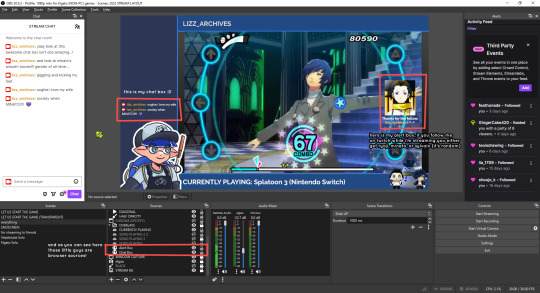
to set this up, take a look at your audio mixer panel, and press the ⚙ icon. this will bring up advanced audio properties.
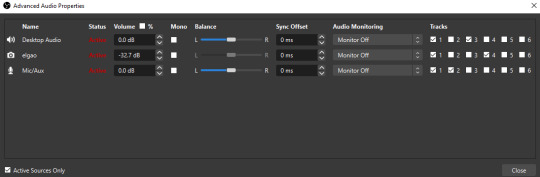
by checkmarking a track box, it puts the audio on that track. to make the above screenshot easier to digest:
track 1 consists of ALL three audio sources- desktop, elgato, and microphone.
track 2 only has the microphone audio.
track 3 only has desktop audio (i use this for voice calls)
track 4 only has the elgato capture card audio (game audio). the volume has also been lowered so that any speaking voices can be heard clearly.
tracks 5 and 6 are unused.
you might be wondering, “why do all three of these have 1 checked off?” this is what i call the universal audio track. i recommend having a universal audio track for a few reasons:
when you stream from OBS onto twitch/youtube- you have to select ONE audio track.
it’s also a nice backup in case you didn’t separate your audio correctly.
if for whatever reason you need to move around your individual audio tracks in editing, the universal track acts as a nice reference point.
mark off your audio tracks for each audio source as you see fit! once you’re finished with the advanced audio properties, go to settings > output.
for the streaming tab, you’ll want to have the number of your universal audio track selected. in my case, that will be audio track 1.
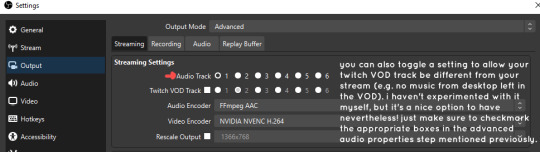
for the recording tab, checkmark all the audio tracks that are applicable to you (in my case, audio tracks 1, 2, 3, and 4). by default, only audio track 1 is selected.
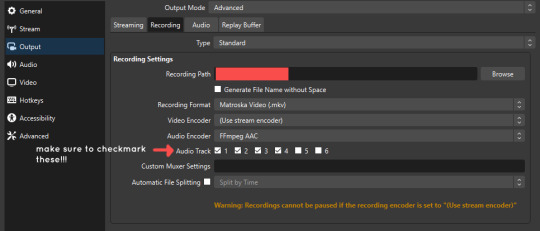
if you don’t check off the additional audio tracks in the output > recordings section, you will not have access to those audio tracks in editing, and you won’t be able to edit your audio tracks independently of each other. so don’t forget to do this! 👍
custom browser docks
custom browser docks are a great tool for when you’re streaming and want to have access to your twitch chat and/or activity feed! (or if you wanted to have some other web browser on OBS).
to create one, go to docks -> custom browser docks.
you’ll be given a table interface that asks you to put the dock name and URL. for streamers who want to have chat and alerts available, do the following:
on twitch’s homepage, go to the upper right and click your icon
then, click creator dashboard
once you’re on your dashboard, go to stream manager
click the vertical “...” on my chat OR activity feed.
press “pop-out chat” OR “pop-out activity feed”
copy and paste the link into the table back into OBS
press apply once you’re done
click and drag the docks around at your leisure to put them where you like!
if you ever decide you don’t want to have something on your OBS dock (or want to bring something back), go to the toolbar, click “docks,” and click the appropriate dock!
third party things
a section of optional things that you may enjoy having.
streamlabs alerts
this is basically for anyone who streams and wants to have their chat and/or follower notifications visualized on screen!
streamlab alerts can be added to OBS by adding a browser source into your scene, and the specifics can be customized on streamlabs itself. it’s pretty self-explanatory, so i’ll just leave a link to streamlabs website, where you can log in using the streaming platform of your choice: https://streamlabs.com/
discord overlay
this is a browser source that can be set up to show people who are in a server's voice chat and who speaks. i recommend this to people who make multiplayer content- it can help viewers distinguish who is who but also it can be helpful in editing.
to set this up, go to https://streamkit.discord.com/overlay, click “install for OBS,” and after logging in with discord, go to “voice widget” and click the server and voice channel you want.
you are able to apply CSS if you'd like more control over the visuals, but the standard layout tends to work fine for me! a search of “discord overlay css” on youtube can help you get more information.
veadotube mini
this is a pngtuber software that a friend recommended to me! no webcam is required- mouth opening and closing is based on your microphone input!
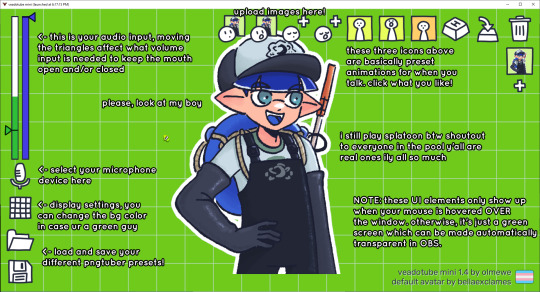
you can download it here (it’s pay what you want!): https://olmewe.itch.io/veadotube-mini
for a proper tutorial on how to use it, i recommend checking out the app's documentation, which you can read here: https://veado.tube/help/
source record
have you ever wanted to stream something with a chat overlay/layout, but wanted your recording to ONLY be the gameplay? or maybe you wanted to record BOTH your gameplay AND your webcam so that you can have a crisp zoom-in on your webcam!
source record is a third party plugin that can help you with that!
the general gist of source record involves applying the “source record” filter on either a scene or source, and customizing the encoding settings accordingly. the exact details of how to set it up is beyond the scope of this post, so I'll just direct people to this video instead (it was very helpful to me):
youtube
⚠ a quick note about source record: this plugin can be intense for your computer. be sure to do test recordings and the like to see what your computer can handle (and see if the recordings come out the way you like). it took me a few tests before i settled onto something i liked!
you can download and install source record here: https://obsproject.com/forum/resources/source-record.1285/
vdo.ninja
have you ever wanted to do a collaborative video or stream where you feature someone else’s video on your stream? or maybe you’re doing a multi-person streaming event! vdo.ninja is the perfect tool for you!
vdo.ninja turns your OBS virtual camera into a browser source link- which your collaborator can add on their stream! this is a new tool that i’ve added to my arsenal recently- since my friend and i are planning to stream a side order challenge together! i’ve still got to iron it out a bit more, but i like what i’ve used of it so far.
try it out for yourself at their website here (with documentation and demos available on the homepage!): https://vdo.ninja/ (no downloads required!)
ok! i’m set up! what now?
and with that, that’s all of the settings and tools that i thought would be worth mentioning! while most of my setup was written with video games in mind, some of these plugins and setups may be applicable to other types of videos (e.g. tabletop gaming with a physical camera)!
now that i’ve outlined all these settings, i have one more thing i have to say: regardless of what you're using OBS for, do a test recording before doing anything “official” with it. this recording can be as short as 30 seconds. it’s a good habit to develop that can make sure your streams/recordings turn out the way you want them to!
here are the kinds of things i like to check! it’s not an exhaustive list, but this can be a starting point:
video:
does my video look the way i want it to (and can my computer handle that)?
can my computer handle the load of encoding? - OBS will note in the bottom if the encoding is overloaded. if it can’t handle it, turn down your bitrate or adjust other encoding settings (e.g. i had to toggle psycho visual tuning OFF because it was causing lag)
this is especially the case if you're recording PC games- you don’t want to have slowdown on either your game or the recording!
audio:
are my audio sources (e.g. desktop audio and microphone) correct? - if you plug/unplug devices a lot, be sure to check this (settings -> audio).
are any of my audio sources muted? - make sure you don’t have anything on 🔇 if you don’t want it to be muted! otherwise the audio will be lost forever… (i lost my friend’s VC audio once… it was sad)
are my audio tracks separated properly? - requires you to boot up your editing software, but it's worth doing! for the test recording, just have something from all your sources playing at once, and see if your editor has things separated into tracks.
can i hear the voices clearly? or does the music and/or game overpower them?
if for whatever reason your OBS crashes, or you want more information on anything “critical” or “warning” worthy in your set-up, you can go to help > log files > upload current log file > analyze. crash logs currently can’t be analyzed by the log analyzer- but they’re a valuable tool when asking for help on the OBS forums!
and that’s all! for real, this time. i hope that some of these tools and settings can help anyone wanting to get more out of OBS. there’s definitely other things i didn’t touch upon (e.g. audio filters for noise compression, suppression, etc.), so i suggest doing your own research and trying things out!
happy recording/streaming, and thanks for reading! ✨
#lizzy speaks#this was a fun little write up!! i've been slowly getting some of my friends into video making teehee and its SO FUN!!!#(digital) video is like one of my other passions next to art. everyone say thank you splatoon for getting me back into it again <3#i've been using obs since like 2018 so i wanted to share some of the things i learned for funsies... i really love video...#but also i like having reference posts like this in the case people have questions they want to ask me...#because i don't always remember what video tutorials i watched and it's nice to document that somewhere...#warning to anyone who reads it this is like 2.1k words. i do want to stress that this isn't comprehensive but there's still a lot of info#that i wanted to put for this post...! that said topics like designing your own stream layout + assets for it are NOT in the scope of this#post and nor is this a beginner's guide to obs (i wrote this with the assumption that you know how to record and/or stream and that-#people already have an idea of how to use scenes and the different types of sources obs can use).#i hope everyone's had a lovely march 5th! i would love to look at the fanart but im still not done with reload...#but im hoping to finish it by the end of the month!!! yipee!!!#Youtube
47 notes
·
View notes
Note
Nasty I have a question about basement wife I’ve been thinking of for a while 🤔 apart from not trying to escape and not fighting against crocodile, what counts as her being on her “best behavior”?
At his core, I think that yandere/dark Crocodile is a wife guy. He wants that "wife experience" without the hassle of you running and threatening his operations in any way whatsoever. He did say he never trusted anyone from the start - and you're no exception to that. But who needs trust in their partner when they're unable to do anything against him? Crocodile wants to have his cake and eat it, too. (Not to mention that being a real threat to someone makes them awfully compliant and sweet, no?)
You playing pretend, being nice and giving him a warm lap to rest his head on after a hard day's work is 'best behavior'. No fussing, no going stiff, no claws, no apathy, nothing. Just you being his good, little (or not-so-little) stepford wife. Our man is tired, overworked, always tense... he just wants an outlet at home; someone to spoil and decorate, to take the edge off. Of course, you're only human and not perfect, he can live with that. But you being affectionate out of your own volition, addressing him with a pet name, a kiss pressed to the hand that holds you at night... That is best behavior. And always rewarded.
In my mind, this whole spiel goes on for years and years - at least a good while before Robin appears. It has the potential to morph into a weird neither-here-nor-there dynamic, one that makes him a little softer, to the point that he drags you with him after the Summit War. After all, he could have simply ditched you, without a base and unsteady as he is. But you're well and truly his spouse by then. You belong by his side, are a part of the look like the fur he likes to wear. And with the years (and fear, wrongly perceived as loyalty), he really finds himself loving you. A little backwards, that one.
#the thing with him is... hmmm how do i say this#he isn't really in love in that classic yandere sense. awfully possessive and full of ideas. yes. but not in love#but you grow on him like a fucking fungus. and fast!#i hope that answers your question... he has high standards for sure haha. 'oh i am going to be an asshole and terrifying but you need to#play nice are we clear??' but he's nothing compared to kaido or doffy. i think basement wife's fate is lowkey livable#/crocodile#/one piece#tw.yandere
27 notes
·
View notes
Note
All these TDDK art you're reblogging is giving me nostalgia of when I first follow you. It nice to see them again on my Dash. 🥹
WAUGHH MOOD! When I was queuing up all the art for Repostober and looking at all my Tododeku AU art. I started to really miss them…..
Also speaking of tddk have you SEEN the preview for the new fantasy AU art because HOLY shit

I’m going absolutely fucking BONKERS over the designs ESPECIALLY Todo’s. His HAIR and the EAR PIECE and the SMIRKKKK I’M DYING
I wanna draw these designs so bad *clenches fists*
Anyway thank you for the kind words I appreciate it!! 💕
#Shima answers questions#BNHA#Tododeku#I miss my kiddos…#They are SO how you say. In love????#I’m sure I’ll be back to doing Tddk art soon ;)#Nice things#kitsunefyuu
142 notes
·
View notes
Text
Ouhhhh friendship I love friendship……..
#I’m reading volumes 14-16 of the ouran manga OOUGHHH MY HEART#I love this weird little friend group so much its unreal#like u have this charming sweeps you off your feet prince but he’s actually a huge lovable idiot with a kind heart and his friends#who are all misfits that he reached out to and drew in because of his kindness and own weirdness like that shits TIGHT BRO#and the trauma part where he has some deep seated issues with love bc he thinks that itll break a family apart like with his mom#how his family isnt allowed to be together because his mom and dad fell in love and how he says he wants to build a big house#so that way one day everyone will get along as a family like. all he wants is not to lose everyone and the only way to do that is#by maintaining a certain order.. he both wants a complete family so bad and doesnt want anything to sour between anyone#so he assigns each of his friends a family role based on how he sees them and YEAH its mostly played for giggles and tamakis#already weird so its his way of showing theyre close to him but. god damn this boy has LAYERS#it also feels kinda meta towards how found family tends to get thrown around to assign characters as 'siblings' or family roles instead of#using it to describe characters who are close enough to be each others family. cuz tamakis doing that EXACT THING in a way tht#ties in with his character and i have to say its fascinating using that within the story itself and its completely plausible#theres a lot of things i can say about ouran that are good bad and questionable but. god i love it when characters are niceys to each other#i remember i really liked the mall episode bc kyoya and haruhi got to spend time together and their relationship isnt very close#but it was really nice to see their personalities bounce off each other. i think i also wouldve liked to see haruhi alone with kaoru#i also firmly believe all of the hosts are at least a little in love with haruhi and this can be anything like endearing romantic cuz like#who DOESNT love haruhi. kyoya i think would want to study her under a microscope like his fascination with her draws him in#but im fucking obsessed with whatever haruhi and tamaki have going on because YES hes obsessed with her YES he jumps at the chance to#put her in a cute costume but haruhi? she just fucking goes with it because she knows hes fun to be around even if hes a little wacky abt i#theyre all so. NNGGHHHH#ouran#ohshc#yapping
34 notes
·
View notes
Text
I've noticed that Stansas take criticisms towards themselves as "hate" towards Sansa, they're really never beating the self-insert allegations 😭
#anti sansa stans#/why do people hate Sansa so much/ about a post that's talking about how stansas act in fandom oh they're so delusional#also the amount of times I've been told my blog is full of Sansa hate but I've only ever talked about her stans lol#but are we actually surprised about that? all they know how to do is play the victim so acknowledging the terrible behavior#on their side is out of the question...it's everybody else who has the problem clearly 🙄#also really annoying how we're expected to tip-toe around Sansa and never criticize anything even tangentially related to her#or else we have to be called delusional and misogynistic by her stans#good thing I stopped caring about being nice and fair in this fandom I WILL be saying what I want and they can cry about it 🫶🏾
68 notes
·
View notes
Note
im brazilian and i've always pronounced Iraq as ih rack and i always get corrected😭 i just can't pronounced it like EYE RACK
Noooo that makes me so annoyed bc you’re literally doing it right!! Eye-rack is so aggressive and for what 😭😭
I’ve been thinking about why people don’t know even the faintest details about Iraqi culture (like these simple pronunciations), and I think a big reason is bc we don’t really have any Iraqi representation yet in mainstream media. It’s not like there’s an Iraqi main pop girl or an Iraqi model or an Iraqi actress who’s getting any Emmys rn, and as unfortunate as that is, western culture does tend to be synonymous with the global zeitgeist in a way other cultures aren’t. People just haven’t been incentivized to dig into Arab culture in general bc of this “deficiency,” for the lack of a better term.
I feel like a lot of other ethnicities have had their turn in terms of being at the top of pop culture, but I haven’t seen that happen yet w any Arabs. If a prominent Arab celebrity (let alone an Iraqi one!! I’d legit just be happy w an Arab one) existed, maybe Arab culture would be of more interest to the GP (or just less of a lightning rod for unfounded criticism and ridicule) 🤷♀️
#and before someone goes into my inbox mentioning the hadids. I have no qualms w them. as an arab girl its nice to see they’re a thing#but I wouldn’t say they’re prominent enough to make people question their arab prejudice. (my opinion)#if we had an arab pop princess (just an example) I do think it would’ve caused ppl to be more interested in the culture. but an arab figure#just doesn’t exist rn. so people are none the wiser / think arab people are incredibly homogenous in how they conduct themselves. and no#you did NOT sign up for this social commentary anon but the whole Iraq pronunciation thing rly did get my brain gears going lmao#ask
31 notes
·
View notes
Text
i watched a compilation of other youtubers complaining about DnP, and when the complaints weren't just "the phandom is annoying," they boiled down to:
DnP are both nice but are aloof/weird/insert other trait that makes talking to them at gatherings difficult.
Phil is nice but Dan's a Bitch who Doesn't Let Phil Talk To Other People (which... Phil is a grown ass man but okay. Maybe he just doesn't want to talk to you but whatever, sure.)
DnP are nice but they queerbait (ig now they're the ultimate queerbaiters since they own a house together lmfao)
DnP are nice but Phil is nicer and Dan is hotter (which,,, I honestly don't know why these clips were included but I'm going to take it as "They're both nice but Dan is more aloof" which is funny because that's a character trait he's said he has for years and as a fellow aloof bitch its very funny to me when people complain about it lmfaooooo)
I'm ngl, the amount of people who were in the compilation just because of the Phandom, or who's complaints boiled down to "DnP are both very nice but very awkward/aloof/stick to themselves" makes me think that they're generally nice and other people just don't understand that not everyone likes talking all the time lmfao
#dnp#phan#this was a pointless post but it is interesting to see people actually dislike dnp#because i feel like 90% of other youtubers say they're incredibly nice#so seeing people say ''phil is nice but dan is a bitch who doesn't let other people talk to phil grrr''#and seeing that come from people other than charlieskies#is interesting#it does raise the question of ''how much power over phil do these people think dan has''#because if they genuinely thought dan was ruining phil's friendships and controlling him then they should have actual concern#but instead they just seem bitter that phil doesn't talk to them at meetups and have decided to blame dan for whatever reason#queue#if i'm using queue it just means i hit my post limit#not that i think the post is particularly special or anything#dan and phil#danisnotonfire#amazingphil#danisnotinteresting#lessamazingphil#i saw these comps as a kid but i refused to watch anything that insulted dan or phil so i never watched them#and honestly? having watched them now? they are 99% about the phandom being annoying lmfao#which good for us
42 notes
·
View notes
Note
the pics of morgan and joel are from travis sanheim's wedding this weekend!
^^^me experiencing the one-two knockout punch of “oh they WERE each other’s wedding date” followed by the realization that sanny finally got married 🥹😭 cheers indeed!!!
#have i ever told you all how i have the best anons in the world because i do. you’re all so nice to me and whenever i just. yell things#you come here and answer my questions and i love you for that thank you anon. i love you. 💕💕💕#also yes i KNOW i said finally and sanny’s like what twenty five however that is a) an old bachelor by most hockey standards b) he and alex#are high school sweethearts/been together forever and are disgustingly in love thank you they’ve been married in spirit if not reality#for years now. this has no bearing on my actual personal opinions on when you should or if you should be married or how long it should take#anyway. truly deeply madly obsessed with the joel/morgan of it all now because did they have to conform to a blue suit theme and if so#joelle why were u not wearing a belt. were all the flyers in blue suit uniform because that’s what our beautiful sensible sanny could trust#them to do &if so which ones were at the wedding i WILL be investigating post-haste. i have to update my tags 1st bc i’m the future me rn#who is currently dealing with them potentially being matching wedding dates & dunking my head in tinfoil to say morgan broke up with his gf#and ohhhhh if i don’t have a five weddings fic floating around SOMEWHERE for them. god knows i have the comment marriage fic AND fantastic!#liv in the replies#travis sanheim#<- in spirit i guess because it’s about his wedding so i felt like he should be included#philadelphia flyers#joel farabee#morgan frost#<- for my own sorting purposes#ANYWAY CONGRATS SANNY HAPPY MARRIAGE WE <3 U (do have to mention that i laugh so hard every time about that post calling him a rpf void i-)#also also bc i keep adding p.s. to this i was very pleased with myself to have flat fuck tk in the reply so that the travii were present 🫶
11 notes
·
View notes
Last Seen Blogs

marwankheireddine
Marwan Kheireddine

decadentenemyturtle
Zeruby - Fics under the table
saintmichale
I Cant Tell You This Story Without Being In It

you-i-and-potatoes
what's me without you? very irrelevant