#Custom Software Boxes
Explore tagged Tumblr posts
Visit Tumblr Blog
Explore Tumblr blogs with no restrictions, modern design and the best experience.
Last Seen Tumblr Blogs


Fun Fact
Tumblr Inc. has $15.1M in annual revenue.
Text
so mercury retrograde is a pet peeve of mine. i grew up in new age circles and now work in a related industry, and so for most of my life people have been blaming “mercury retrograde” every day of the year for normal technology problems like not knowing how to use a computer. cut to this month when i’ve had a dozen bizarre and unprecedented technical failures seriously impeding my ability to do my job, and a coworker said “mercury retrograde!” and ooooh i hate it. i hate it. because she was RIGHT. i looked at my sent mail to find the first IT support request that started with “well folks this might be a new one…” and it was six hours after mercury went into retrograde god damn it astrology confirmation bias strikes again.
#as if i haven’t suffered enough now i’m dealing with logitech#i literally cannot express how bad logitech support is#webcam out of the box is tuned so bad that when i’m in front of a navy blue wall i literally can’t be seen#download link on the box is 404 not found#support bot confirmed my product webcam and then sent me to a warranty page for an ipad keyboard#i found the product page and the download software specs say it’s only for keyboard and mouse#human customer support says it’s also for webcams so i download it#now it’s also out of focus as well as badly colored and the manual sliders can only make things worse#is it because my office has natural lighting?#is this because gamers only come out at night?#technologies
17 notes
·
View notes
Text
Pizza delivery drivers of Reddit, what are some of the craziest reasons people have ended up on the “no delivery list”?
gameryamen
I worked for a pizza place that was near a very large software company. Deliveries to the neighborhoods or offices where all the tech workers lived was usually pretty awesome because they'd tip rather well. But there was one apartment that started to become a concern for us drivers. The man ordering was always polite, always paid, always tipped $4, and he would have been a perfect customer. He'd order breadsticks and a salad twice a week, and sometimes he'd include a bottle of root beer. Except when he opened his door, you could see an alarming amount of our breadsticks boxes stacked everywhere inside. Not like a few on the counter and a couple by the trash, stacks and stacks of them. Even worse, it was only our boxes in there. He wasn't just ordering from us often, we were the only place he was getting food outside of work. Now, I've worked in some of those tech offices myself, I know that there's enough decent food options just hanging out in the break rooms that this guy was probably not malnourished, but the way his living space was a shrine of greasy cardboard was a clear sign that this guy didn't have a healthy relationship with our food. Our manager was a really cool dude though, and he heard the drivers joking about the boxes and asked a couple of us "Is this like a messy guy or a guy who needs help?" We agreed it was probably the latter. So on his day off, the manager went to the guys apartment with an envelope that had gift cards for several other restaurants that delivered in that area and chatted with him. Manager found out that the guy was an immigrant on a Visa who was struggling to find American food he liked, and too socially awkward to ask anyone. So he talked with him through a few menus and helped him with some recommendations. Then he helped the guy load all the old boxes into his truck to take to the dump, in exchange for a promise not to order from us more than once a week. For a little while, the manager had a note on the calendar showing the last time the guy had ordered, and a couple times he had to hold his ground and refuse the guy's order. But after that chat, I never saw the stacks of boxes again, and the guy would boast about the different meals he'd had.
what the fuck dude, this is so sweet.
26K notes
·
View notes
Text
Writing Tools for Planning Your Story
I've tried tons of writing apps and sites, so you don't have to. Here's a list of free sites to plot out your novel, with my review and some images of how I use it.
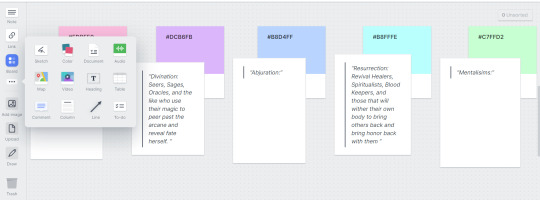
Milanote
Milanote is like having a giant pinboard with folders. You can upload anything onto it [yes even your main doc] and then draw over it or connect things with lines and arrows
Milanote lets you add up to a hundred things for free, not including drawing. This is one of the downsides of the site as I've found myself reaching that limit recently.
For me, the best part is being able to draw over stuff, and the color swatches.
Milanote is a lot less structured than other sites I've used, and personally, I don't think their templates are worth using.
8/10 overall, Milanote is what I mainly use. Here are some pics of how I use it:
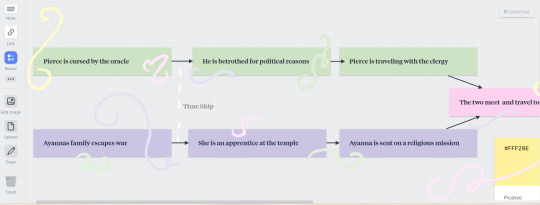
Miro
Miro is a flowchart website mainly used for corporate jobs, however, it can be a great plotting tool for that reason
Miro has a lot of great starter templates if you are looking for a more structured freeform experience. It also comes with a blank page as well.
Unfortunately, I'd argue that it's a bit of a hard tool for beginners to use without a template, I've learned copy-paste is my best friend with Miro the hard way.
It's much better than most platforms at making timelines though.
It has a limit of three boards which is a bit disappointing but overall, I think it's worth the try.
5/10 Miro is very middle of the road for me due to the limited ability to customize things and the free limit. Here are some pics:

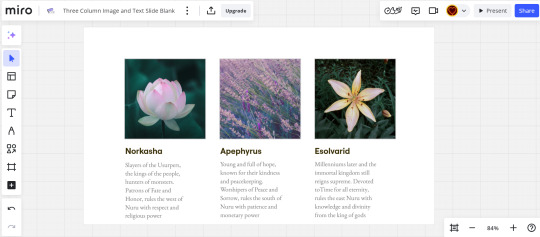
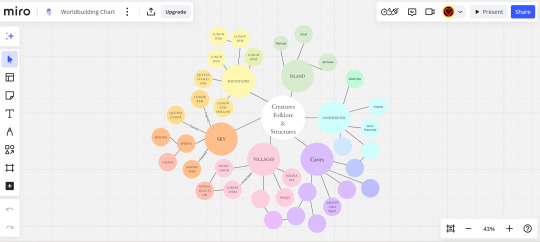
[I wrote that part weeks ago, I am now fully using Miro and believe it's the best for making timelines and charts, I just wish it let me make more boards 8/10]
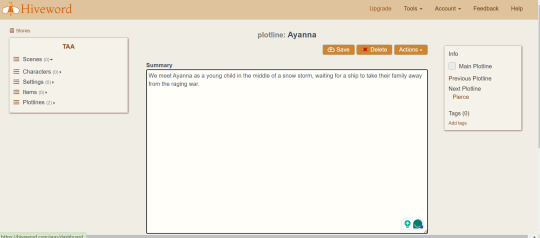
Hiveword
This might be someone's jam, I can't really say it's mine though.
First off, the unpaid version is really just a few boxes saying "Write a summary here." which makes it just not worth it in my opinion
There really isn't any way to customise things which is my favorite part of most of these softwares
I've barely used this, so maybe there's something I'm missing but
1/10, Just use Google Docs at this point, here's a couple pics

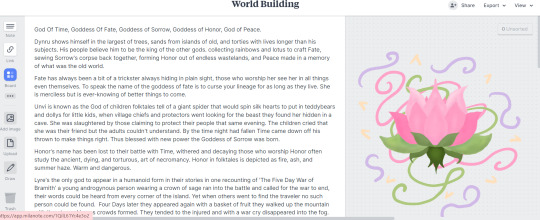
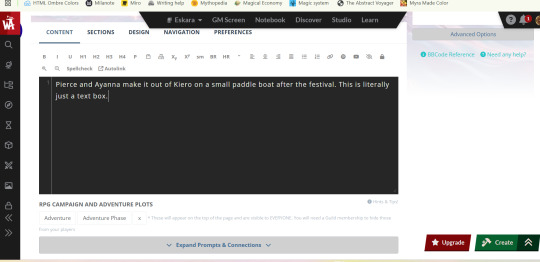
World Anvil
People like this software, it's mainly used for tabletop, which is just a different way of writing adventure, and I've seen it recommended by authors.
Unfortunately, I'm going to disagree with a lot of people and say it's hard to use and isn't even really good at plotting.
I may be biased on this one as every time I've tried to use it in the past I've struggled. However, it seems like another just write it in a document and create a folder.
I'd say it's closer to an organizing tool, but even then just use something else.
3/10, I have nothing to say about it but maybe you'll enjoy it, all here are two photos

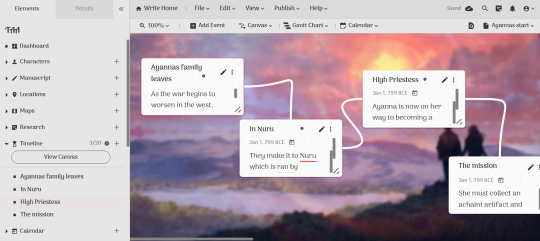
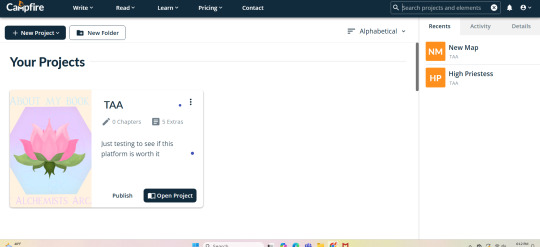
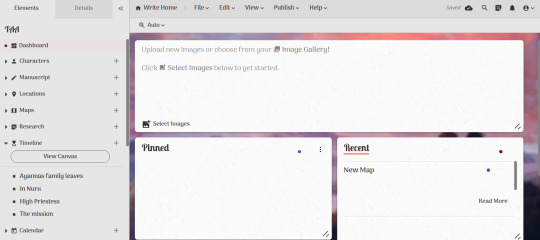
Campfire
This is the one I think I've heard the most about, but have never actually tried.
right off the bat, I'm going to say this is 100% worth it, you'll see at the end with the photos but this is like if Miro and World Anvil had an organization baby.
It's extremely easy to understand, and it makes timelines, it's more for writing your whole book but idk about that yet.
7/10, its themes are really pretty but it limits how much you can do to 20 I believe. Here are the photos
That's all for now, honestly, I think you should use Miro if you are looking to plot things out, and Milanote if you want to collect and organize your thoughts for writing, as that's what I do. Obviously what I like won't be for everyone, but hopefully, this helped you see some options
#writeblr#writers on tumblr#creative writing#worldbuilding#plotting#writing advice#writing tool#writing#writers#writing plans
1K notes
·
View notes
Text
How to customize shapes with loops | A box modeling tutorial for beginners
Box modeling is a fundamental technique in 3D modeling that allows you to create complex shapes by manipulating simple geometric primitives. In this tutorial, we will explore how to customize shapes using loops, a technique that adds additional edge loops to control the shape and add detail. By following this step-by-step guide, beginners will learn the basics of box modeling and how to effectively use loops to create more intricate and customized shapes using SelfCAD, a user-friendly 3D modeling software. Let's get started on this exciting journey!
youtube
What is Box Modeling?
Box modeling is a technique where you start with a basic geometric shape, such as a cube or a cylinder, and gradually refine and modify it to create more complex forms. By adding edge loops, you can control the shape, smooth out surfaces, and add detail to your model. It's a versatile technique used in various industries, including game development, product design, and animation.
Step 1: Setting up the Project
To begin, make sure you have SelfCAD installed on your computer. If you haven't already, visit the SelfCAD website (www.selfcad.com) and download the software. Once installed, launch the application and create an account or log in if you already have one.
Step 2: Creating the Base Shape
Now that we have the software set up, let's create a simple base shape that we can customize using loops. Follow these steps:
Launch SelfCAD: Open SelfCAD and familiarize yourself with the interface. You'll find the main toolbar on the left-hand side, various editing tools on the right-hand side, and the canvas in the center.
Create a primitive shape: On the left-hand toolbar, click on the "Primitives" menu. Choose a basic shape, such as a cube or a cylinder, to serve as the starting point for your model.
Customize the shape: Use the transformation tools in SelfCAD to adjust the size, rotation, and position of the shape. This will serve as the foundation for your customization.
Step 3: Adding Edge Loops
Now, let's add edge loops to the shape to create more control and detail. Follow these steps:
Select the shape: Click on the shape to select it. You can use SelfCAD's selection tools to ensure precise selection.
Access the Loop Cut tool: On the right-hand side toolbar, click on the "Edit" tab. Locate the "Loop Cut" tool and select it.
Add edge loops: Hover your cursor over an edge of the shape. Left-click to add an edge loop. Move your cursor along the edge to adjust the position of the loop. Left-click again to finalize the position. Repeat this step to add multiple edge loops as needed.
Customize the edge loops: Select the edge loops individually and use the transformation tools to adjust their position, scale, or rotation. This will help you control the shape and add desired detail.
Step 4: Refining and Customizing the Shape
With the added edge loops, you now have more control over the shape. Use SelfCAD's editing tools to refine and customize the model further. Here are some suggestions:
Extrude and bevel: Select faces, edges, or vertices of the shape and use the extrusion and bevel tools to create additional geometry and add depth to the model.
Smooth the surface: Apply a smoothing modifier to the model to create a more organic and polished appearance. Experiment with different levels of smoothing to achieve the desired result.
Sculpt and detail: Use SelfCAD's sculpting tools to add fine details and refine the shape further. Sculpt
ing tools allow you to manipulate the surface of the model, adding texture and intricacy.
Conclusion
Congratulations! You've successfully learned how to customize shapes using loops in SelfCAD. By following this box modeling tutorial for beginners, you've gained the basic skills needed to create more complex and customized 3D models. Remember to experiment with different shapes, edge loops, and editing tools to further enhance your skills and unleash your creativity.
For more in-depth tutorials and inspiration, consider subscribing to the 3D_Modeling_101 YouTube channel and exploring the features and capabilities of SelfCAD. Happy modeling!
#selfcad#youtube#3d modeling software#3ddesignsoftware#box modeling tutorial for beginners#3dprinting#how to customize shapes with loops#3d_modeling_101#Youtube
0 notes
Text
StreamBuilder: our open-source framework for powering your dashboard.
Today, we’re abnormally jazzed to announce that we’re open-sourcing the custom framework we built to power your dashboard on Tumblr. We call it StreamBuilder, and we’ve been using it for many years.
First things first. What is open-sourcing? Open sourcing is a decentralized software development model that encourages open collaboration. In more accessible language, it is any program whose source code is made available for use or modification as users or other developers see fit.
What, then, is StreamBuilder? Well, every time you hit your Following feed, or For You, or search results, a blog’s posts, a list of tagged posts, or even check out blog recommendations, you’re using this framework under the hood. If you want to dive into the code, check it out here on GitHub!
StreamBuilder has a lot going on. The primary architecture centers around “streams” of content: whether posts from a blog, a list of blogs you’re following, posts using a specific tag, or posts relating to a search. These are separate kinds of streams, which can be mixed together, filtered based on certain criteria, ranked for relevancy or engagement likelihood, and more.
On your Tumblr dashboard today you can see how there are posts from blogs you follow, mixed with posts from tags you follow, mixed with blog recommendations. Each of those is a separate stream, with its own logic, but sharing this same framework. We inject those recommendations at certain intervals, filter posts based on who you’re blocking, and rank the posts for relevancy if you have “Best stuff first” enabled. Those are all examples of the functionality StreamBuilder affords for us.
So, what’s included in the box?
The full framework library of code that we use today, on Tumblr, to power almost every feed of content you see on the platform.
A YAML syntax for composing streams of content, and how to filter, inject, and rank them.
Abstractions for programmatically composing, filtering, ranking, injecting, and debugging streams.
Abstractions for composing streams together—such as with carousels, for streams-within-streams.
An abstraction for cursor-based pagination for complex stream templates.
Unit tests covering the public interface for the library and most of the underlying code.
What’s still to come
Documentation. We have a lot to migrate from our own internal tools and put in here!
More example stream templates and example implementations of different common streams.
If you have questions, please check out the code and file an issue there.
5K notes
·
View notes
Text
An adversarial iMessage client for Android
Adversarial interoperability is one of the most reliable ways to protect tech users from predatory corporations: that's when a technologist reverse-engineers an existing product to reconfigure or mod it (interoperability) in ways its users like, but which its manufacturer objects to (adversarial):
https://www.eff.org/deeplinks/2019/10/adversarial-interoperability
"Adversarial interop" is a mouthful, so at EFF, we coined the term "competitive compatibility," or comcom, which is a lot easier to say and to spell.
Scratch any tech success and you'll find a comcom story. After all, when a company turns its screws on its users, it's good business to offer an aftermarket mod that loosens them again. HP's $10,000/gallon inkjet ink is like a bat-signal for third-party ink companies. When Mercedes announces that it's going to sell you access to your car's accelerator pedal as a subscription service, that's like an engraved invitation to clever independent mechanics who'll charge you a single fee to permanently unlock that "feature":
https://www.techdirt.com/2023/12/05/carmakers-push-forward-with-plans-to-make-basic-features-subscription-services-despite-widespread-backlash/
Comcom saved giant tech companies like Apple. Microsoft tried to kill the Mac by rolling out a truly cursèd version of MS Office for MacOS. Mac users (5% of the market) who tried to send Word, Excel or Powerpoint files to Windows users (95% of the market) were stymied: their files wouldn't open, or they'd go corrupt. Tech managers like me started throwing the graphic designer's Mac and replacing it with a Windows box with a big graphics card and Windows versions of Adobe's tools.
Comcom saved Apple's bacon. Apple reverse-engineered MS's flagship software suite and made a comcom version, iWork, whose Pages, Numbers and Keynote could flawlessly read and write MS's Word, Excel and Powerpoint files:
https://www.eff.org/deeplinks/2019/06/adversarial-interoperability-reviving-elegant-weapon-more-civilized-age-slay
It's tempting to think of iWork as benefiting Apple users, and certainly the people who installed and used it benefited from it. But Windows users also benefited from iWork. The existence of iWork meant that Windows users could seamlessly collaborate on and share files with their Mac colleagues. IWork didn't just add a new feature to the Mac ("read and write files that originated with Windows users") – it also added a feature to Windows: "collaborate with Mac users."
Every pirate wants to be an admiral. Though comcom rescued Apple from a monopolist's sneaky attempt to drive it out of business, Apple – now a three trillion dollar company – has repeatedly attacked comcom when it was applied to Apple's products. When Apple did comcom, that was progress. When someone does comcom to Apple, that's piracy.
Apple has many tools at its disposal that Microsoft lacked in the early 2000s. Radical new interpretations of existing copyright, contract, patent and trademark law allows Apple – and other tech giants – to threaten rivals who engage in comcom with both criminal and civil penalties. That's right, you can go to prison for comcom these days. No wonder Jay Freeman calls this "felony contempt of business model":
https://pluralistic.net/2023/11/09/lead-me-not-into-temptation/#chamberlain
Take iMessage, Apple's end-to-end encrypted (E2EE) instant messaging tool. Apple customers can use iMessage to send each other private messages that can't be read or altered by third parties – not cops, not crooks, not even Apple. That's important, because when private messaging systems get hacked, bad things happen:
https://en.wikipedia.org/wiki/2014_celebrity_nude_photo_leak
But Apple has steadfastly refused to offer an iMessage app for non-Apple systems. If you're an Apple customer holding a sensitive discussion with an Android user, Apple refuses to offer you a tool to maintain your privacy. Those messages are sent "in the clear," over the 38-year-old SMS protocol, which is trivial to spy on and disrupt.
Apple sacrifices its users' security and integrity in the hopes that they will put pressure on their friends to move into Apple's walled garden. As CEO Tim Cook told a reporter: if you want to have secure communications with your mother, buy her an iPhone:
https://finance.yahoo.com/news/tim-cook-says-buy-mom-210347694.html
Last September, a 16-year old high school student calling himself JJTech published a technical teardown of iMessage, showing how any device could send and receive encrypted messages with iMessage users, even without an Apple ID:
https://jjtech.dev/reverse-engineering/imessage-explained/
JJTech even published code to do this, in an open source library called Pypush:
https://github.com/JJTech0130/pypush
In the weeks since, Beeper has been working to productize JJTech's code, and this week, they announced Beeper Mini, an Android-based iMessage client that is end-to-end encrypted:
https://beeper.notion.site/How-Beeper-Mini-Works-966cb11019f8444f90baa314d2f43a54
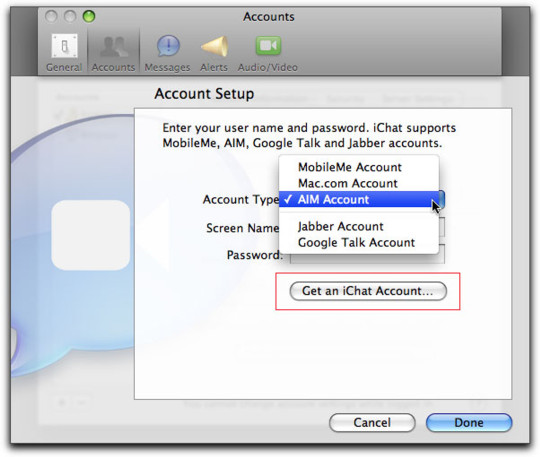
Beeper is known for a multiprotocol chat client built on Matrix, allowing you to manage several kinds of chat from a single app. These multiprotocol chats have been around forever. Indeed, iMessage started out as one – when it was called "iChat," it supported Google Talk and Jabber, another multiprotocol tool. Other tools like Pidgin have kept the flame alive for decades, and have millions of devoted users:
https://www.eff.org/deeplinks/2021/07/tower-babel-how-public-interest-internet-trying-save-messaging-and-banish-big
But iMessage support has remained elusive. Last month, Nothing launched Sunchoice, a disastrous attempt to bring iMessage to Android, which used Macs in a data-center to intercept and forward messages to Android users, breaking E2EE and introducing massive surveillance risks:
https://www.theverge.com/2023/11/21/23970740/sunbird-imessage-app-shut-down-privacy-nothing-chats-phone-2
Beeper Mini does not have these defects. The system encrypts and decrypts messages on the Android device itself, and directly communicates with Apple's servers. It gathers some telemetry for debugging, and this can be turned off in preferences. It sends a single SMS to Apple's servers during setup, which changes your device's bubble from green to blue, so that Apple users now correctly see your device as a secure endpoint for iMessage communications.
Beeper Mini is now available in Google Play:
https://play.google.com/store/apps/details?id=com.beeper.ima&hl=en_US
Now, this is a high-stakes business. Apple has a long history of threatening companies like Beeper over conduct like this. And Google has a long history deferring to those threats – as it did with OG App, a superior third-party Instagram app that it summarily yanked after Meta complained:
https://pluralistic.net/2023/02/05/battery-vampire/#drained
But while iMessage for Android is good for Android users, it's also very good for Apple customers, who can now get the privacy and security guarantees of iMessage for all their contacts, not just the ones who bought the same kind of phone as they did. The stakes for communications breaches have never been higher, and antitrust scrutiny on Big Tech companies has never been so intense.
Apple recently announced that it would add RCS support to iOS devices (RCS is a secure successor to SMS):
https://9to5mac.com/2023/11/16/apple-rcs-coming-to-iphone/
Early word from developers suggests that this support will have all kinds of boobytraps. That's par for the course with Apple, who love to announce splashy reversals of their worst policies – like their opposition to right to repair – while finding sneaky ways to go on abusing its customers:
https://pluralistic.net/2023/09/22/vin-locking/#thought-differently
The ball is in Apple's court, and, to a lesser extent, in Google's. As part of the mobile duopoly, Google has joined with Apple in facilitating the removal of comcom tools from its app store. But Google has also spent millions on an ad campaign shaming Apple for exposing its users to privacy risks when talking to Android users:
https://www.theverge.com/2023/9/21/23883609/google-rcs-message-apple-iphone-ipager-ad
While we all wait for the other shoe to drop, Android users can get set up on Beeper Mini, and technologists can kick the tires on its code libraries and privacy guarantees.

If you'd like an essay-formatted version of this post to read or share, here's a link to it on pluralistic.net, my surveillance-free, ad-free, tracker-free blog:
https://pluralistic.net/2023/12/07/blue-bubbles-for-all/#never-underestimate-the-determination-of-a-kid-who-is-time-rich-and-cash-poor
#pluralistic#multiprotocol#interoperability#adversarial interop#beeper#reverse engineering#blue bubbles#green bubbles#e2ee#end to end encrypted#messaging#jjtech#pypushbeeper mini#matrix#competitive compatibility#comcom
1K notes
·
View notes
Text
Halloween Spirit
Mortimer didn't think much of video games and the like. Like social media, he blamed them for the dumbing down of the population and the success of populist parties. And if proof were needed, his cousin Dylan was proof. Dumb as a bag of
Since he couldn't find a hotel anymore, Mortimer had been forced to stay with Dylan during a conference. They hadn't talked much, Dylan was usually out with his “bros.” At the gym, at the sports bar, at the football game. Mortimer had used the evenings accordingly and cleaned the apartment, which was quite a mess. And when he came home in the evening, he was glad when a little of that cleanliness and order remained. Today he was lucky: the apartment was almost in the same condition as when he left it in the morning. There was only a PSP with a note on the dining room table. In Dylan's clumsy handwriting it said, “Bro, can you help me with the Halloween quiz? I always fail on the first I'll be back at eight, let's go for a steak then.” Mortimer was a vegan. Of course Dylan knew that. Mortimer sighed, took the PSP and sat down on the sofa.

“What is the etymology of the name Halloween?“ Good heavens, thought Mortimer! Is this going to continue at this level? He typed in ‘All Hallows’ Eve.” “Who does the custom of carving and lighting jack-o'-lanterns commemorate (last name, first name)?” Did Dylan really not know that, Mortimer wondered and typed in “Jack Oldfield.” “Wrong” lit up on the display. “The correct answer would have been 'Oldfield, Jack'.” Out of the blue, Mortimer had to burp. Stupid software, he thought. A good AI would have recognized that he had only mixed up the order. He took a sip of cola from the can on the coffee table. ‘On which day do children in Germany traditionally go from door to door collecting sweets?’ Mortimer scratched his head. That was on St. Martin's Day. But when was that again? He typed in “November 11th.” Again, “Wrong! The correct message would have been November 10th.” Mortimer burped again. Hehehe, that was a good one. Came from the chili today. He took a slice of cold pizza out of the box next to him and moved on to the next question. “What is a zombie brain hemorrhage?” Mortimer had no idea. He just wrote “a TV series”. “Wrong, a zombie brain haemorrhage is a cocktail made of peach schnapps, mint liqueur, Bailey's Irish cream and a dash of grenadine.” Mortimer farted. Damn, the chili had been really good. But something else stank too. Mortimer raised his arm. No, that wasn't it. That was honest man sweat. Just the way a man had to smell. Mortimer pushed up his undershirt and scratched his stomach. This game was really boring. “What is the most popular Halloween costume of 2024?” Mortimer didn't feel like it anymore. He would put on his football gear like every year. With that, he could get any guy into bed. Especially the little nerds. They weren't so bad, usually made a real effort in bed… Shit, what was the question again? Okay, so “football player”. “Wrong, the correct answer would have been ‘Shrunken Head Bob’.” Was there another beer in this pigsty, Mortimer wondered. He looked at what other games Dylan had on the PSP. When was the idiot finally coming home? They were supposed to go out for a steak with the guys. Mortimer could definitely use some protein. He flexed his biceps. Yes, the babies needed feeding.

“Bruh, im still stucc in traffic. Ill b home in about a quarter of an hr. Get ready fo' an epic dinner!” Mortimer knew what that meant. He wouldn't need his best buddy Dylan for the next hour. Enough time to play another round of Peace Walker. And then there was finally meat, almost raw, just how Morty liked it best. Hehehe, rare is also good for Halloween. His favorite holiday. But who could come up with such a stupid quiz with smart-aleck questions about it was a mystery to him.
#male tf#muscle tf#reality change#tank top#ai image#smart to dumb#getting dumber#jock tf#jockification#nerd to jock#halloween tf
272 notes
·
View notes
Text

This has been a long time coming, I've been wanting to make something like this for ages and I finally had some time over the weekend to get it done - I dunno how useful this will be for anyone else, but hopefully at least a few other people might find this template handy!
Here's a full size picture of what the blank template looks like:

I made a couple examples of what it can look like edited over screenshots - as you can see you can just resize the boxes & text as you like to get the ideal final product:


Instructions for use:
This is a .psd file, and as such it needs to be opened in an editing tool that allows that file format - I personally use photopea which is a free online alternative to adobe photoshop - Disclaimer: I haven't tried using it any other editing software like photoshop / gimp but it'll probably work in there too, if you have any problems in those apps lmk and I'll try and fix it!
Each section of the template is separated into folders, open these up and you can edit the text / image elements for each section, you'll need to hide and unhide layers to be able to do this (the little eye icon next to a layer toggles it to be hidden / unhidden)
If you need to resize the boxes, make sure to hold down the shift-key so that you're able to do it more precisley
I have included icons for every career in the sims 3 including all of the expansion packs, however I have not included the skill images you might need as that would be a bit too extensive
For the skill images, I recommend downloading this ultimate icon collection from ModTheSims, as it'll almost definetly have everything you could possibly need to use :)
Terms of Use:
Please don’t claim as your own or reupload without my permission, I’d love to see you use them in your game if you do choose to tag me - but that's totally optional :) Alter and customize the templates literally however you want, but if you’re gonna reupload a downloadable variation of them I’d appreciate a link back to my blog
Download Here (Simfileshare, .psd file)
The font used for this template is DM Sans, it can be found in all variations here - I only used 'bold' & 'bold italic'
Credits: Heavily inspired by the gorgeous Clean UI created by JustMiha, as well as these promotion templates for TS4 by CupidJuice - and thanks to TheSpiritRealm on MTS for compiling all the icons I used - and total credit goes to EA / Maxis for the icon designs as well I did not make those lol
154 notes
·
View notes
Note
So, about Linux. Do you have a phone that uses Linux? Is there one out there that can access tumblr and be reasonably usable? I'm just sick of Apple and Google's BS and want an opinion from someone in the know.
technically: android is built on linux
less pedantically: i personally have a google pixel with stock android because it's the least bloated and i don't trust most other manufacturers to not put dumb bullshit on my phone.
if you want a linux phone then i've heard good things about the pinephone. here are the operating systems it supports: https://pine64.org/documentation/PinePhone/Software/Releases/. note that a lot of the OSes don't have full support for all of the device features like bluetooth, and there won't be android app support out of the box. you'll have to use something like waydroid and idk how good the compatibility is.
if you want something closer to the normal android experience, grapheneOS might be up your alley. caveat: there is very limited device support; they basically only have official support for google pixel devices: https://grapheneos.org/faq#device-support. google play is disabled by default but you can enable the sandboxed version of it to install tumblr.
if you see other custom ROMs or AOSP-based OSes, you should do some research to make sure you're comfortable with the developers and the security for them. grapheneOS is generally well regarded and most other projects don't have anywhere near the level of focus on security. (less pussyfooted answer: i wouldn't use them.)
86 notes
·
View notes
Text


Tattoo Parlor Decor Set for The Sims 4
This set was inspired by my personal experience getting tattoos. Some of the signs are those I remember from my friend’s tattoo parlor. While I was excited about getting tattooing in the Business & Hobbies Pack, I did want more in terms of décor objects. I did my best to keep the items as low poly as possible, but be sure to check the poly counts for what your computer can handle.
The building in my screenshots is one I downloaded from the gallery and made modifications so it resembled my friend's tattoo parlor. The username is MickeySimmers and the original build is a NY Pizzeria uploaded on 4/7/25.
When appropriate, objects are available in English and Simlish versions. Simlish font credit to Franzilla: https://modthesims.info/ For new meshes made by me, textures from Blenderkit were used.
SexyIrish7 Phoenix logo credit: © Liliia Marchuk via Dreamstime.com
All items are base-game compatible.
This set includes:
· Tattoo Counter
· Supply Cabinet
· Salty Signs – Small, Medium, and Large
· Tattoo ink bottles
· Tattoo ink cups – empty ink cup and cups with ink colors
· Tattoo ink cup holder
· Sharps container – Wall-mounted and counter versions
· Tattoo Coil Machine
· Foot switch
· Power Supply
· Stencil Machine
· Autoclave
· Non-sterile Nitrile Glove Boxes
· Portfolios
· Consent form
· Tip Jar
You may view an Imgur album with 31 screenshots of the set here
Creations by SexyIrish7
DOWNLOAD for FREE: SFS
OR at Patreon*
*You must be over 18 to access my Patreon page.
These cc objects are new 3d meshes created using Blender and Sims 4 Studio.
All CC have:
*Ability to search catalog using search terms: sexyirish7 and si7
*Customized thumbnail
*******
CREDITS:
Software credits:
Sims 4 Studio v. 3.2.4.3 (Star): https://sims4studio.com
Blender 4.0: https://www.blender.org/download/
GIMP v. 2.10.34: https://www.gimp.org/
Inkscape v. 1.2: https://inkscape.org/
Thank you to the creators and moderators producing tutorials and answering questions!
*******
TOU:
Do not re-upload and claim as your own
Do not re-upload and hide behind a paywall
Mesh and Image Credits along with descriptions of each item are below:
Tattoo Counter
I was dissatisfied with the number of slots and their placement on the tattoo counter that came with the Business & Hobbies pack, so I modified EA’s The Ultimate Nightstand so that it served as a larger counter and added décor slots to it. There are a total of 3 large slots, 9 medium slots, and 27 small slots. I made some minor modifications to the EA texture for The Ultimate Nightstand but did include all 20 swatches.
Polygon Count: 162
Supply Cabinet
I have long been disappointed with the lack of deco slots in various displays. For this object, I modified EA’s Carina Dining Hutch so that it would serve as an appropriate supply cabinet. I made some minor modifications to the EA texture but did include all 9 swatches. There are a total of 2 large slots, 15 medium slots, and 140 small slots.
Polygon Count: 114
Salty Signs
There are 3 files of what I call “salty” signs. The large signs are not as salty, but I wanted to stick with my theme overall. What do I mean by salty? Well, these are signs that are not for the faint of heart and for those with a darker sense of humor. They were inspired not only by signs that I saw at my friend’s parlor, but also by things he and his colleagues would say frequently.
Large Signs: 7 designs (11 total swatches)
Medium Signs: 9 designs (18 total swatches)
Small Signs: 10 designs (20 total swatches)
Polygon Count: 4
The following were used in several textures in all three files:
Caution/Warning Sign Templates by kenshinstock via Freepik https://www.freepik.com/free-vector/blank-label-warning-caution-sticker-template-set_30903862.htm
Large Sign Image Credits:
Swatches 1-2: Original Artist Unknown. Image from https://razorbacktattoosupply.com/tattoo-studio-feel-the-burn-wrapped-canvas-graphic-art/
Swatches 3-4: Original Artist Unknown. Image from https://www.creativefabrica.com/product/funny-tattoo-artist-hourly-rate-cut-file/
Swatches 5-6: Original Artist Unknown. Image from https://www.pinterest.com/pin/tattoo-artist--218917231881445322/
Swatch 7-8:
Hands, Soap, and Ointment Icons by rawpixel.com via Freepik https://www.freepik.com/free-vector/coronavirus-prevention-icon-set-vector_30086831.htm
Do Not Touch Icon Image by Myshopsigns https://all-free-download.com/free-vector/download/18_warning_signs_47669.html
No Swimming Icon by Fitri Handayani via Vecteezyhttps://www.vecteezy.com/vector-art/51936014-no-swimming-sign-illustration
Bathtub Icon by Fitri Handayani via Vecteezy https://www.vecteezy.com/vector-art/51406319-bathroom-icon-with-bubbles-and-soap
Sun and Breeze Icons Images by Freepik https://www.freepik.com/free-vector/weather-icons-set_709126.htm
Talking on Phone Icon by Mungujakisa Edmond via Vecteezy https://www.vecteezy.com/vector-art/25410803-do-not-talk-on-mobile-cell-phone-icon-sign
Swatches 9-10: Tarot Card Images designed by Eight (Elian-James Showell) https://www.eightco.in/
Swatch 11: Original Artist Unknown. Image from https://www.amazon.com/Tattoo-Artist-Tarot-Card-Sweatshirt/dp/B0D8JBHBFZ
Medium Sign Image Credits:
Background images for Swatches 5-8 by All-Free-Download.com https://all-free-download.com/free-vector/download/advertising_sign_templates_retro_shapes_sketch_6849470.html
Swatches 1-2 and 13-14: Tattoo Gun Image from IMGBIN https://imgbin.com/png/ZNRSzcqv/tattoo-machine-tattoo-ink-tattoo-artist-png
Swatches 3-4: Original Artist Unknown. Image from https://www.amazon.ca/Artist-Tattoo-Artist-Kitchen-Vintage/dp/B0B6DRXFZN
Swatches 5-6: Tattoo Gun Image from IMGBIN https://imgbin.com/png/36i2fKAG/tattoo-machine-body-piercing-tattoo-artist-old-school-tattoo-png
Swatches 7-8: Bullhorn image by All-Free-Download.com https://all-free-download.com/free-vector/download/megaphone_312061.html
Swatches 9-10: Border by Rawpixel.com via Freepik https://www.freepik.com/free-vector/vector-set-vintage-elements_3139397.htm
Picture by EA from Business & Hobbies release video
Swatches 11-12: Cheese Grater Image by Macrovector via Freepik https://www.freepik.com/free-vector/cooking-food-icons_1530806.htm
Saw image by EA
Swatches 15-16: Images by EA
Small Sign Image Credits:
Swatches 1-2, 5-12, 19-20: Caution/Warning Sign Templates by kenshinstock via Freepik https://www.freepik.com/free-vector/blank-label-warning-caution-sticker-template-set_30903862.htm
Swatches 3-4: Tip jar image by Freepik https://www.freepik.com/free-vector/jar-background-with-hand-drawn-money_1148170.htm
Swatches 13-14: Image by Printable Designs https://free-printable-signs.com/
Swatches 15-16: Image by by Mungujakisa Edmond via Vecteezy https://www.vecteezy.com/vector-art/25410803-do-not-talk-on-mobile-cell-phone-icon-sign
Swatches 17-18: Crying Emoticon Image from CLEANPNG https://www.cleanpng.com/png-smiley-emoticon-crying-clip-art-no-whining-clipart-546524/
Tattoo Ink Bottles
Due to file sizes, I split these up into 2 separate files. One file has all of the bottles in English, and the other has all of the bottles in Simlish. I modified the EA debug glue bottle. There are a total of 24 swatches.
Polygon Count: 126
Tattoo Ink Cups
There are 2 files for this object. One is an empty ink cup. The other has all of the ink colors as different swatches. There are a total of 24 swatches for the filled ink cups. I modified the water glass object to create these items.
Empty Cup Polygon Count: 107
Filled Cup Polygon Count: 162
Tattoo Ink Cup Holder
When an artist is using a few different inks for a piece, they can sometimes use a holder for the ink cups so the cups do not get knocked over or spilled. This is an original mesh made by me. I have the object set up so that the ink cups (full or empty) will snap to the holes in the holder. Once the ink cups are in, you can move the entire holder to where you want it and the ink cups will go along. Or you can place the holder and then add the cups. While the holders I tended to see were plastic, I decided to make mine a metal version with slight ink stains.
Polygon Count: 208
Sharps Containers
I created 2 versions of sharps containers for this set. I originally was only going to create the wall-mounted one, but then decided to add the counter version of it as well. These are original meshes made by me.
Biohazard symbol is a public domain image
Wall-Mounted Sharps Container Polygon Count: 268
Counter Sharps Container Polygon Count: 106
Tattoo Coil Machine
There are different types of tattoo machines available, but I find the coil machine to be the most recognizable and therefore wanted this version in my game. This is an original mesh made by me. There are a total of 5 swatches.
Polygon Count: 640
Foot Switch
I created a foot switch to operate the tattoo machine with. This is an original mesh made by me. There are 11 swatches.
Design inspired by FK Delta Foot Switch https://www.fkirons.com/products/delta-foot-switch-cosmic-storm
Polygon Count: 57
Power Supply
For this object, I modified the EA Retro Rock of Ages Stereo mesh and texture to create the power supply. I used a few other EA textures to make adjustments to the components of the object.
Polygon Count: 336
Stencil Machine
Unless you allow your artist to freely draw on your skin before tattooing, many use a stencil machine to create the stencil so you can make sure that your tattoo is placed correctly and looks correct before beginning. This is an original mesh made by me. There are a total of 6 swatches (3 designs in English, 3 designs in Simlish).
Design inspired by Vevor Tattoo Stencil Printer https://www.vevor.com/tattoo-machines-c_12593/
Phoenix Image: © Liliia Marchuk via Dreamstime.com
Claddagh Image: http://clipart-library.com/clipart/8iGbR5bbT.htm
Wolf Image: https://freepngimg.com/png/2674-tattoo-wolf-png-image
Polygon Count: 62
Autoclave
No tattoo parlor is complete without the sterilization equipment, namely the autoclave. For this object, I modified the EA The Schmapple Micro Microwave mesh.
Design inspired by Tuttnauer Valueklave 1730 https://tuttnauer.com/us/veterinary-practices/tabletop-sterilizers/manual/valueklave-1730
Polygon Count: 346
Non-sterile Nitrile Glove Boxes
For this object, I modified EA’s Softy Brand Tissues object. There are 2 box colors available, black and gray. There are a total of 12 swatches.
Non-Sterile symbol is a public domain image
Polygon Count: 40
Portfolios
A detail that I thought was missing was a display of the tattoo artist’s work. In real shops, they can be wall displays or portfolios. I decided to make a portfolio with different tattoo designs. There are 3 swatches of different tattoos. This is an original mesh made by me.
Polygon Count: 262
Image Credits:
Swatch 1: EA
Swatch 2:
Snake and Flying Swallow Images by dgim-studio via Freepik https://www.freepik.com/free-vector/new-style-tribal-tattoo-collection_1168313.htm and https://www.freepik.com/free-vector/colorful-flying-swallow-template_8136770.htm
Colorful Old School Images by Freepik https://www.freepik.com/free-vector/old-school-funny-tattoo-collection_1165044.htm
Tribal, Achor, Ship’s Wheel, Skulls, Roses, Dice, Cards Images by Macrovector via Freepik https://www.freepik.com/free-vector/tattoo-black-white-icons-set_9398078.htm
Tribal Images by Freepik https://www.freepik.com/free-vector/new-style-tribal-tattoo-collection_1168313.htm
Swatch 3:
Colorful Images on Left Page by Freepik https://www.freepik.com/free-vector/collection-hand-drawn-decorative-tattoos_1175499.htm
Colorful Vintage Images on Right Page by Freepik https://www.freepik.com/free-vector/pack-vintage-hand-drawn-tattoos_1194571.htm
Crossed Swords, Anchor, Skulls, Scorpion Images by Macrovector via Freepik https://www.freepik.com/free-vector/attoo-studio-flat-icons-collection_4430574.htm
Consent Form
I created a consent form on a clipboard. This is only available in Simlish. I modified some EA textures to create the form. The clipboard is an original mesh made by me.
Polygon Count: 90
Tip Jar
Tipping is heavily encouraged for getting tattoos, at least in the U.S. As such, I decided I wanted to make a tip jar for my parlor. I modified the EA debug jar and some different debug simoleon meshes. The result is a tip jar with both coins and bills inside.
Polygon Count: 579
#tattoo#inked#tattoo parlor#tattoo decor#tattoo studio#sims 4#the sims 4 cc#the sims 4#sims 4 cc#ts4cc#wall decor#ts4#sims 4 custom content#tattoo shop decor#build/buy#sexyirish7
65 notes
·
View notes
Note
Wow the twine version looks gorgeous! I had no idea it was possible to do so much with twine, do you need to know a lot of code to be able to pull that off? May I also ask what map program you're using?
Hi there, thanks so much!! And to make a standard Twine game, you don't really need to know any code at all; the native, out-of-the-box version that you can download from twinery.org makes it very easy to make an interactive game, especially with the many free visual templates that creators put out there to help others get started!
However, to make a lot of what's in the ShoH Twine version now, that did unfortunately take a lot of code, none of which I knew at all at first! 😅 Figuring out CSS (to make the general UI, make it mobile-friendly, etc.), JavaScript (to create custom behaviors like the store, codex, and interactive maps), and twee (to code the game itself) ends up adding to a lot of work, let alone figuring out a good workflow system so that you can actually compile and test all of your progress. But resources like the Sugarcube wiki were invaluable when it came to getting started! Hope that all makes sense!
And I actually didn't use any map software for Shepherds: I drew the maps from my mind's eye on a tablet (which looked awful) and sent it to map artists I commissioned (who are listed in the credits) to bring my sketches to life! They did an amazing job (because my doodles looked horrible)!! However, if you're looking for good map-making software in general, I really enjoy Inkarnate, which I used more recently to map out the locations in my current novel!
72 notes
·
View notes
Note
I am just a tired 30 something geek...I am loving those haircuts. Can you direct me to the barbershop you got them at? I'd love a fresh cut in a style to make me look good.
"Andrés?"
Raoul was worried. His customer was frozen.
"Andrés, ¿va todo bien?"
Andrés looked in the mirror. Yes, actually everything was fine… But somehow not. He was supposed to be a 30-year-old nerd working on a hotline solving software problems for stupid users. But Andrés knew nothing about software. He usually solved problems with his fists. And if necessary, also with a firearm. But most of the time he didn't even need his fists. It was enough if he just hinted that he was about to strike. Anyone could imagine what a blow from Andrés would mean for him.

"Sí, todo está muy bien, Raoul!" Andrés replied. "¿La misma paga de siempre?"
Raoul stood in front of Andres and opened his fly. Raoul's cock jumped out of his pants like a jack-in-the-box. And Andres, the colossus, went down on his knees.
75 notes
·
View notes
Text

The Artisul team was kind enough to send me their Artisul D16 display tablet to review! Timelapse and review can be found under the read more.
I have been using the same model of display tablet for over 10 years now (a Wacom Cintiq 22HD) and feel like I might be set in my ways, so getting the chance to try a different brand of display tablet was also a new experience for me!
The Unboxing
The tablet arrived in high-quality packaging with enough protection that none of the components get scratched or banged up in the shipping process. I was pleasantly surprised that additionally to the tablet, pen, stand, cables and nibs it also included a smudge guard glove and a pen case.
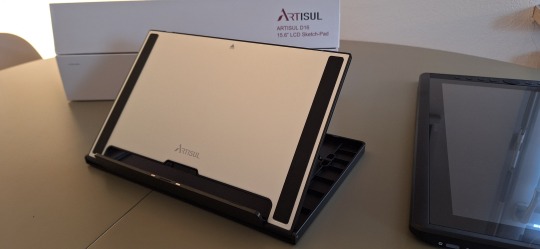
The stand is very light-weight and I was at first worried that it would not be able to hold up the tablet safely, but it held up really well. I appreciated that it offered steeper levels of inclination for the tablet, since I have seen plenty other display tablets who don’t offer that level of ergonomics for artists. My only gripe is that you can’t anchor the tablet to the stand. It will rest on the stand and can be easily taken on or off, but that also means that you can bump into it and dislodge it from the stand if you aren’t careful. It would require significant force, but as a cat owner, I know that a scenario like that is more likely than I’d like.
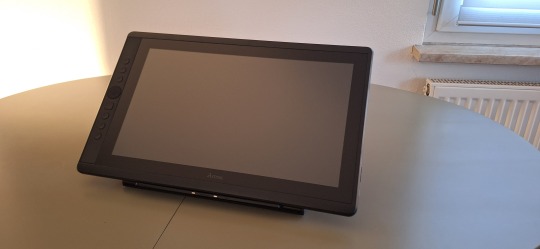
Another thing I noticed is how light the tablet is in comparison to my Cintiq. Granted, my Cintiq is larger (22 inches vs the 15.8 inches of the Artisul D16), but the Artisul D16 comes in at about 1.5kg of weight. While I don’t consider display tablets that require a PC and an outlet to work really portable, it would be a lot easier to move with the Artisul D16 from one space to another. In comparison, my Cintiq weighs in at a proud 8.5kg, making it a chore to move around. I have it hooked up to a monitor stand to be able to move it more easily across my desk.
The Setup
The setup of the tablet was quick as well, with only minor hiccups. The drivers installed quickly and basic setup was done in a matter of minutes. That doesn’t mean it came without issues: the cursor vanished as soon as I hovered over the driver window, making it a guessing game where I would be clicking and the pen calibration refused to work on the tablet screen and instead always defaulted to my regular screen. I ended up using the out of the box pen calibration for my test drawing which worked well enough.
The tablet comes with customizable hot-keys that you can reassign in the driver software. I did not end up using the hot-keys, since I use a Razer Tartarus for all my shortcuts, but I did play around with them to get a feel for them. The zoom wheel had a very satisfying haptic feel to it which I really enjoyed, and as far as I could tell, you can map a lot of shortcuts to the buttons, including with modifier keys like ctrl, shift, alt and the win key. I noticed that there was no option to map numpad keys to these buttons, but I was informed by my stream viewers that very few people have a full size keyboard with a numpad anymore.
The pen comes with two buttons as well. Unlike the hot-keys on the side of the tablet, these are barely customizable. I was only able to assign mouse clicks to them (right, left, scroll wheel click, etc) and no other hotkeys. I have the alt key mapped to my pen button on my Cintiq, enabling me to color pick with a single click of the pen. The other button is mapped to the tablet menu for easy display switches. Not having this level of customization was a bit of a bummer, but I just ended up mapping the alt key to a new button on my Razer Tartarus and moved on.
The pen had a very similar size to my Wacom pen, but was significantly lighter. It also rattled slightly when shook, but after inspection this was just the buttons clicking against the outer case and no internal issues. The pen is made from one material, a smooth plastic finish. I would have liked for there to be a rubber-like material at the grip like on the Wacom pen for better handling, but it still worked fine without it.
Despite not being able to calibrate the pen for the display tablet, the cursor offset was minimal. It took me a while at the beginning to get used to the slight difference to my current tablet, but it was easy to get used to it and I was able to smoothly ink and color with the tablet. The screen surface was very smooth, reminding me more of an iPad surface. The included smudge guard glove helped mitigate any slipping or sliding this might have caused, enabling me to draw smoothly. Like with the cursor offset, it took me a while to get used to the different pressure sensitivity of the tablet, but I adapted quickly.
So what do I think of it?
Overall, drawing felt different on this tablet, but I can easily see myself getting used to the quirks of the tablet with time. Most of the issues I had were QoL things I am used to from my existing tablet.
But I think that’s where the most important argument for the tablet comes in: the price.
I love my Cintiq. I can do professional grade work on it and I rebought the same model after my old one got screen issues, I liked it that much. But it also costs more than a 1000 € still, even after being on the market for over 10 years (I bought it for about 1.500 € refurbished in 2014, for reference). The Artisul D16 on the other hand runs you a bit more than 200€. That is a significant price difference! I often get asked by aspiring artists what tools I use and while I am always honest with them, I also preface it by saying that they should not invest in a Cintiq if they are just starting out. They are high quality professional tools and have a price point that reflects that. You do not need these expensive tools to create art. You can get great results on a lot cheaper alternatives! I do this for a living so I can justify paying extra for the QoL upgrades the Cintiq offers me, but I have no illusion that they are an accessible tool for most people.
I can recommend the Artisul D16 as a beginner screen tablet for people who are just getting into art or want to try a display tablet for once. I wouldn’t give up my Cintiq for it, but I can appreciate the value it offers for the competitive price point. If you want to get an Artisul D16 for yourself, you can click this link to check out their shop!
AMAZON.US: https://www.amazon.com/dp/B07TQLGC81
AMAZON.JP: https://www.amazon.co.jp/dp/B07T6ZT84V
AMAZON.MX: https://www.amazon.com.mx/dp/B07T6ZT84V
Once again thank you to the Artisul team for giving me the opportunity to review their display tablet!
105 notes
·
View notes
Text
Apropos of nothing
If you are the techiest person in the house (and for many of you, this is not techy at all), today is a good day to build a pihole thanks to Google's new TLDs.
For the record, this straight up stopped Dad from getting computer viruses when coupled with the Ublock browser extension, so I will volunteer my time to get you set up. We will find an evening and do a Zoom call. I am serious.
Prerequisities:
Before you start, this will be way way easier if your router has a magic way to:
Set static IP addresses
Set a custom DNS server
If you can't do this, I'm not saying you're stuck, but there's some non-obvious failure modes and maybe it's time to buy a better router.

Parts:
Raspberry Pi 4B. 2GB if you just want to set and forget, 8GB if you want to do more things on this than just your pihole (Coughs in a MarioKart box) -> https://www.raspberrypi.com/products/raspberry-pi-4-model-b/
Spare USB-C charger if you don't have one already. I'm a fan of https://www.amazon.com/Argon-USB-C-Power-Supply-Switch/dp/B0919CQKQ8/ myself
A microSD card at least UHS class 3 or better. 32 is fine for just a pihole, I have a 512 in some of mine that I use for more stuff. https://www.tomshardware.com/best-picks/raspberry-pi-microsd-cards
Some method of flashing the card if you don't have one (Some come with SD to micro-SD adapters, if not a USB to SD/micro-SD adapter is about $10 off Amazon)
If you really feel like going nuts, go buy yourself an Argon case and then very very carefully never ever install the software for the fan that does nothing. The value is entirely in having a big giant brick that is self-cooling. If you want to play MarioKart, I would consider this a requirement. https://www.amazon.com/Argon-Raspberry-Aluminum-Heatsink-Supports/dp/B07WP8WC3V
Setup:
Do yourself a favor and ignore all the signs telling you to go get Raspbian and instead go grab an ISO of Ubuntu 64-bit using RPi Imager. Because Raspbian cannot be upgraded across version WHY U DO THIS
Download Rpi Imager, plug the microSD card into your computer,
Other General Purpose OS -> Ubuntu -> Ubuntu 22.04 LTS
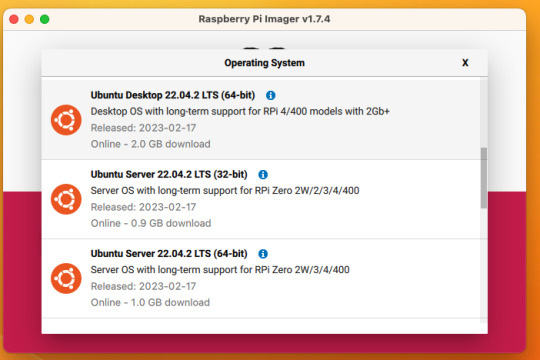
So now you have an operating system on an SD card.
Assemble the case if you bought one, plug in the SD card, power supply, ethernet cable if you have one or mouse and (mini) HDMI cable if you don't. If you bought that Argon case, you can just plug a keyboard (server OS means no mouse gang; In this house, we use the Command Line) and HDMI cable into the Pi. Turn it on.
Gaining access
The end state of this is that your pi is:
Connected to the internet by cable or wifi
You can SSH to it (Also not scary)
If you plugged in an ethernet cable, once it's done booting (1-2 minutes?), you should be able to ssh to "ubuntu@<the IP of the system>". Look it up in your router. It may make sense to give the static IP NOW to keep it stable.
If you've never used SSH before, I think the standard is Putty on Window or you can just open a terminal in Mac. (And if you know enough Linux to have a Linux computer, why are you reading this?)
If you didn't plug it in, and need to setup the wifi, there's magic incantations to attach it to the wifi and to be quite blunt, I forget what they are.
Your username is ubuntu, your password is ubuntu and then it will ask you to make a new password. If you know the meaning of the phrase "keypair-based access", it may make sense to run `ssh-copy-id` at this point in time.
Router settings (part 1)
Give your new Pi a static IP address, and reboot your pi (as simple as typing in `sudo reboot`).
Open a new SSH session to the pihole on the new address.
Installing pihole
Open up an SSH session and
curl -sSL https://install.pi-hole.net | bash
This is interactive. Answer the questions
When it's done, on your other computer, navigate to <the ip>/admin
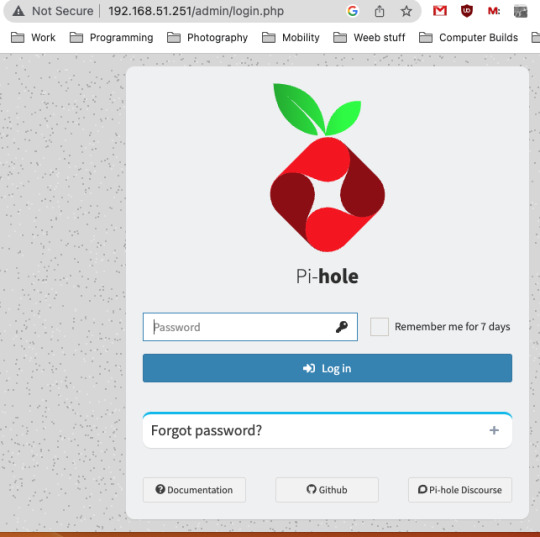
Login with the password you just set. Router settings part 2
Give your new Pi a static IP address then point your router at that address
Set the DNS servers to the static IP
Then ensure you're blocking something. Anything.
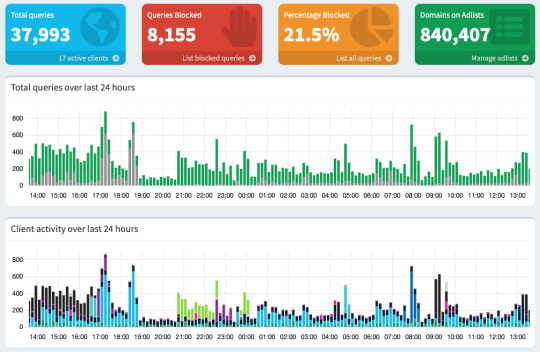
Then do what you want to do. You'll probably need to whitelist some sites, blacklist some more, but the main thing is going to be "Adding more list of bad sites". Reddit has some lists.
And... enjoy.
/But seriously, there's some stuff to do for maintenance and things. I wasn't joking about the pair setup.
2K notes
·
View notes
Text
tech enthusiasts, even when often working towards good and respectable goals, just keep forgetting the non-tech aspects of things --- like, yes, i'd love to get a repairable ethical smartphone, but no i cannot afford to throw 600€+ at one; especially when i can get an used pixel or oneplus for like 100€ or less and use it for 5-10 years, and part availability is about the same since i'd need to get the stuff from ebay/aliexpress anyways yes, i'd love to switch to matrix, but nobody else is willing to use it because the UX is atrocious and it keeps imploding in on itself yes, it would be lovely if i could switch my grandparents over to Linux and open source software, but no, they will not be able to use even the easiest of DEs, so macOS it is yes, i'd absolutely find it great if i could use Inkscape on Linux instead of Affinity on Windows as my vector graphics tool; but that is in fact not the case because Inkscape's UX is too horrible for me to figure out (tried several times) --- especially FOSS circles need to learn that there is more to tech than just the pure technical aspects, and that the technical aspects are actually one of the least important things to most people because most people aren't nerds willing to spend 2 days installing a custom OS on their phone while losing the ability to use banking apps they're just your average jane who wants a device that they take out of the box and have work and that average jane is also not particularly concerned with repairability, because the average jane will at best attempt to replace a removable battery on a laptop; so unless you can make repairs as seamless as that then the audience for repairability is tiny in consumer electronics
77 notes
·
View notes
Text
digital notes guide part 2/5: taking effective lecture notes (but make them cute!) 🎀


1st post
posted by: glowettee
hey study butterflies! ♡ mindyyyyy hereeeee
welcome back to our digital notes series! today i'm going more into the actual note-taking process during lectures/classes. this is important, since you can swap out notebooks for a digital notebook which becomes a lot more seamless.

♡ pre-lecture prep
because being prepared changes everything:
night before setup:
review previous notes (refresh your memory!)
pre-read lecture slides
create note template
set up quick-access tools
prepare questions
charge all devices
quick-access toolbar:
highlighting shortcuts
screenshot tool ready
recording software open
reference materials linked
custom stickers folder
favorite templates
♡ the actual note-taking method
this changed my whole study game:
(SUPER IMPORTANT) the butterfly method (my signature system):
main points in center
supporting details on left wing
examples on right wing
questions in antennae section
vocabulary in body section
connections in trail section
active engagement tricks:
use different colors for different types of information
create mini mind maps as you go
add little drawings for visual memory
insert voice memos for complex topics
flag confusing points with cute markers
leave space for post-lecture additions
♡ making it aesthetic but effective
because why not have both?:
visual organization:
use boxes for definitions
clouds for main concepts
stars for important points
hearts for memorable examples
arrows for connections
flowers for chapter markers
color coding system:
pink for main concepts
lavender for examples
mint for definitions
peach for formulas
baby blue for dates
gold for important warnings
♡ dealing with fast-paced lectures
because professors/teachers love to speed-talk:
shorthand system:
create cute abbreviations
use symbols for common words
develop personal code system
quick bullet points
voice record if allowed
flag for later review
quick capture methods:
screenshot important slides
quick sketch diagrams
voice memo key points
type keywords only
mark confusion points
flag for detailed review
♡ post-lecture enhancement
because the real magic happens after:
immediate review:
fill in gaps while fresh
add pretty headings
organize messy sections
insert relevant images
complete examples
link related concepts
enhancement techniques:
create summary boxes
add practice questions
insert related resources
make concept connections
highlight key points
add memory triggers
effective notes aren't just about capturing everything - they're about creating a resource you'll actually want to review! think of it like creating your own aesthetic textbook that speaks your language.
pro tip: don't try to make everything perfect during the lecture. focus on capturing information first, make it pretty later! i usually spend 15 minutes after each lecture prettifying my notes.
xoxo, mindy 🎀
#studynotes#lecturenotes#studywithrme#studentlife#studygram#notetaking#studying#digitalnotes#studytips#productivity#organization#girlblog#girlblogger#girlblogging#that girl#dream girl#it girl#self care#self love#glow up#becoming that girl#self help#self improvement#self development#study#studyblr#college#rory gilmore#study blog#studyspo
63 notes
·
View notes