#Long Life Tips
Text
👑 to live a long life ✨

i havent been able to draw much this year (which makes me sad) but i have to churn something new for danmeshi...
7K notes
·
View notes
Text

bedtime story with my love !!
#mine#cats#oooooooooogh im so cold....bath time bath time :3 !#i hope everyone is hvaing a good week i am now DONE with work !!!!! hehe !!!!!!!!!!#i might not do any drawing for a little while . maybe just felt tips#also. cannnot for the life of me decide what 2 read...am like 30% way thro assassins fate but Um its . a little intense so im taking a brea#idk what im in the mood for....something....fun... but isnt bad#i feel like all 'light' books r bad. maybe i will just reread the goblin emperor. as i always do when all else fails#also. am going ice skating tomorrow i am SO excited . i hvent been in so so long its so exciting !!!!!!!!!!!!!!!!!!!!#mwah. hve good evening :3
4K notes
·
View notes
Text

#How to Dragon Your Train#tips#tricks#life hacks#helpful hints#advice#dragon#train#I can’t believe it’s taken us this long to get to this
597 notes
·
View notes
Note
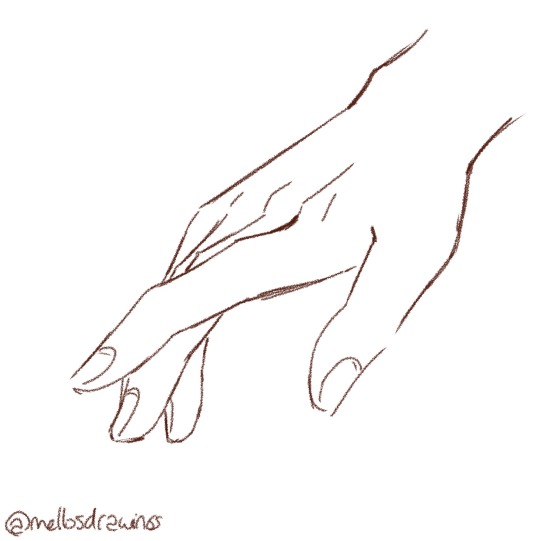
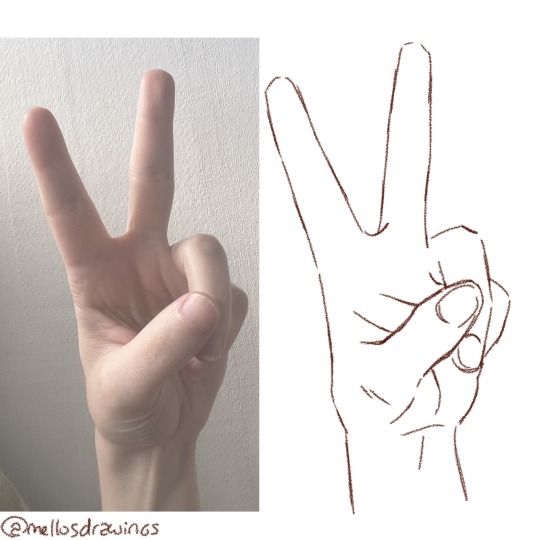
How do you do hands so well!?💀
I cheat lol
Ok, so that's a half truth half lie. Here's a few tuto, one about hand composition, one to teach you how to make a hand from scratch, and one to tell you that sometimes, in art, you gotta simplify your life.
First, hand composition:
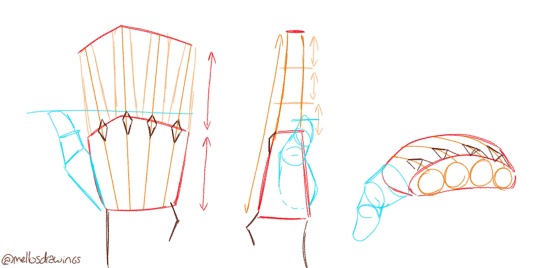
Red: palm shape and fingers size
From above, the palm will look like a pentagon, a bit wider towards the fingers, with the middle finger being the peak higher than the others. You can replicate that little knuckles hill at the end of the fingers. Fingers' size depends wildly on the person, some have palms longer than their fingers, others have fingers longer than their palms. For a base ref, make palm and fingers as long as each other and move the fingers' length from there.
From the side, the palm will look like a trapeze, base wider than the top.
From the front, the palm will never be completely flat! At rest, it will curve inward slightly. Draw a lump for the general shape.
Orange: fingers
From above, fingers tend to fan out at rest.
From the side, keep following the line of the top part of your hand. The inner side of the fingers will be straighter though. Fingers are composed of three mostly equal parts (the last one might be shorter depending on the person).
Blue: thumb
People tend to forget the thumb is surprisingly mobile! Unlike fingers that can only close and spread, thumbs can move forward and backward, up and down, and make actual rotations!
The base of the thumb will take at least half of the palm's side, but extra skin to allow movement will make it look like it take more space. Just like other fingers, it's actually composed of three parts. The thumb will usually be just a tad longer than the base knuckles of the other fingers (but as said before, fingers size change depending on the person).
Brown: knuckles and wrist
For the knuckles, you can make little elongated pyramids at the top of your palm shape. They will always follow the line of the fingers.
The inner part of the wrist will be mostly straight or curved inward, but the outer side should have a bump due to the ulna bone. Sometimes I place it as a hill, sometimes as a circle.
Second, the messy tuto:
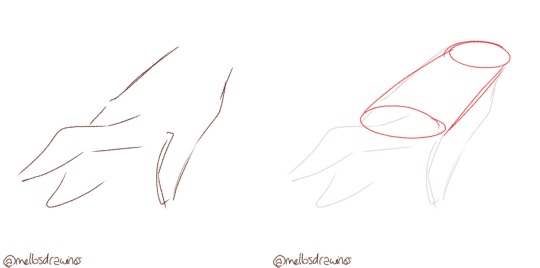
1. Movement
First you should always draw a shitty shape indicating the general position and movements of your hand. Don't bother with proportions or details, you just wanna be able to tell what you want your hand to be doing.
2. Palm shape
Start by detailing your palm. Try to highlight where the fingers and the wrist will be. Refer to the hand composition above for the general shape.
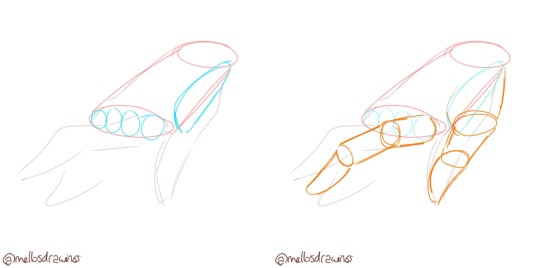
3. Fingers implantation
Separate the top of your hand in four mostly equal circles for the base of your fingers, and the side of your palm in a roughly rounded triangle for your thumb. Once more, refer to the hand composition above.
4. Fingers
Place the three parts of all your fingers more or less following the initial shape/movement you wanted to go for. Fingers should be roughly the same size as your palm, but you can vary the length as no two people have the same hands.
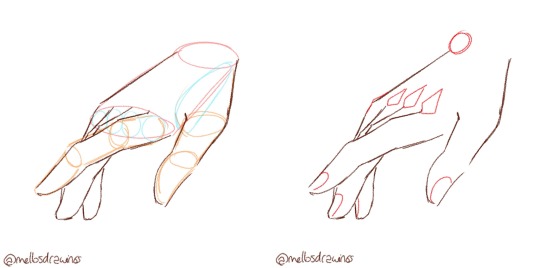
5. General shape
Once you have placed all your finger parts, you will be able to draw them and connect them to your palm. Don't hesitate to start making adjustments starting from this step.
6. Details
Nails are, just like fingers, very different depending on the person. Globally you can put either an oval or a rounded rectangle on top of your fingers. You can make them longer after the finger for effeminate or well kept nails.
Add pyramids at the base of your fingers to place your knuckles and a circle or a pyramid on the outer side of your wrist to place your ulna bone.
7. Finish
Add details, adjust sizes, remove extra lines, and you have a hand.
Ok. Now, that technique I just showed you? Don't use it. No, I'm serious. Don't use it for hands that are part of the main focus. Do it for background characters or doodles or training or comics panels where hands aren't that important.
For illustration and panels with a focus on your character's hands, use the following technique instead.
Third, how to make your life easier as an illustrator:
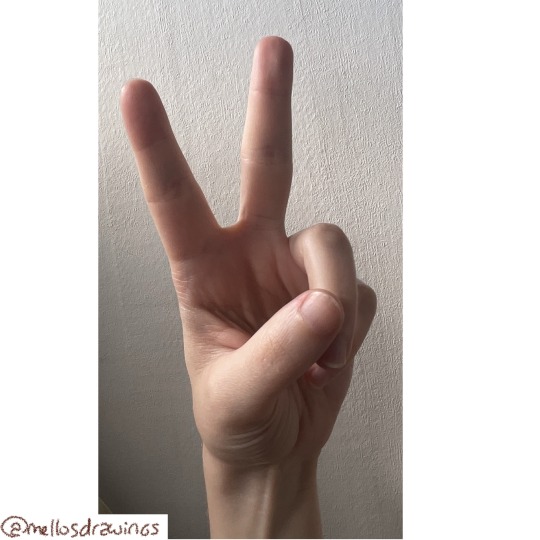
1. Reference
Yes. That's how you make good hands. You take a pic of your own hand doing the pose you want to use as reference.
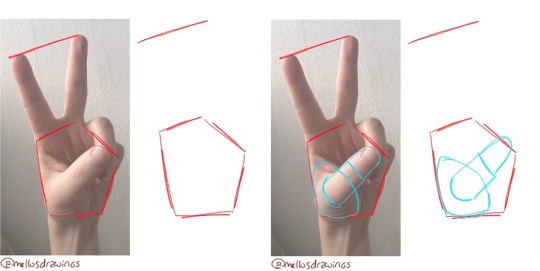
2. Palm
Just as the tuto explained before, you start by finding the shape of your palm on the pic and try to replicate it. It might be a bit difficult at first to copy proportions properly, but doing it again and again will make it easier in time. (Also refer to the last part of this post*)
3. Thumb
Usually I'd go for the fingers first, but since the thumb is on the foreground I started with it here. First the implantation with the palm, then the two last parts. (As you can see I have tiny potato hands so I tend to artificially elongate the fingers compared to my reference to have prettier hands).
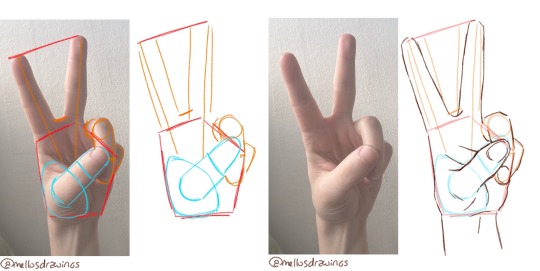
4. Fingers
Find the general movement of your fingers. Straight lines for fingers in tension and connected cylinders for fingers flexing.
5. Once you are able to place the general shapes, you will have an easier time copying your own hand. Doing it without the previous steps is feasible when you are used to copying, but if you are new to this I would suggest deconstructing your hand to train your brain into remembering every detail.
6. Corrections, details, add a little movement if you are into dynamic-art, keep it realistic if you are into realism.
You now have a pretty hand.
Remember : You can (and you should) use references! Normal humans aren't made to remember every single details about everything, especially when those things are as complex as hands (or Gods forbid it buildings and cars and whatever else).
If you struggle with drawing hands, take a pic of your own hand to help. Try to find the big shapes composing your own hand so it'll be easier to yolo another time.
References are your friends! Don't think you're any less of an artist because you need to have your own shoe on your drawing table so you can draw your character's feet!
(*For new artists : TRACE! I'm sure you've heard everywhere that tracing is diabolical and you should never do it. It's FALSE. Tracing helps with your hand-eye coordination. 80% of art is reflex! I no longer need to think about all these steps because I have been drawing for more than 15 years. I started by tracing Winx Club stickers I had one my windows! It helped me have a sense of movements, proportions, and fluid lines.
What you shouldn't do with tracing is post it as your own art! You are free to trace as training, but you should never claim it is your own art.
Other than that, please, trace. Trace your own hands pic to get used to the shape. Trace your favorite artists to understand what you like in their lines or proportions. Trace that damn building because you don't have time to create a whole background from scratch for your webcomic.)
Art is cheating. Always. Don't feel bad for making your life easier.
#i cannot stress enough how much I am serious about making your life easier#art should be fun#you shouldn't suffer because you want to do anything from scratch#and tracing is healthy as long as you DON'T REPOST IT AS YOUR OWN ART#for hands in focus I use my own hands as ref#for standard hands I yolo with the first tuto#for doodles I just stop at the step 1 of the first tuto#it depends on how much attention your hand will get#also I do the same with feet#take pics of my feet when I somehow decide a foot should be the focus of my art#(doesn't happen a lot lol)#and I take my own shoes and move them around to draw the angles right#also SKETCHFAB is a perfect place if you can't get your head angles right#you have a lot of 3d skulls and heads you can rotate at will there#art#my art#helps me when I'm stuck on a kissing pose#ask me anything#step by step#hands#mello's drawings#art tips
109 notes
·
View notes
Text
Tips for hair growth

Massage your scalp for 5 minutes a day. This increases the blood flow in the scalp. Your hair follicles derive their nourishment from the blood which delivers oxygen and hair-building nutrients, so the more blood circulation their is, the more nutrients the hair gets, which leads to hair growth👌👌👌.
Regularly oil your hair. Sebum is a natural oil that is produced from the sebaceous glands in our scalp that helps maintain our hair health. Sebum is meant to help by moisturising and lubricating hair as a natural conditioner. But when it’s not produced in balanced amounts, hair feels extra greasy or super dry and flaky. This is where hair oiling can be helpful. A quality hair oil will mimic the effects that natural sebum provides. Because we all produce sebum, hair oiling works for all hair types. When you coat the strands, it seals in the moisture instead of having it evaporate. This properly nourishes the hair deep within the strands and scalp.
Consistently eat pumpkin seeds. Pumpkin seed extract is a gentle yet effective ingredient that has been scientifically proven to block the 5-alpha reductase enzyme that produces DHT, a byproduct of testosterone that causes hair loss.
Don't wash your hair with hot water. Hot water in the shower can contribute to over-stripping the scalp and hair of natural oils, which can make hair feel brittle and scalp dry.
Remember that you won't see hair growth results immediately, it takes a few months to a year, just remember that consistency is the key!
#long hair#hair#self care#self love#tips#life hacks#life skills#girlblogging#healthcare#self improvement#glow up#tumblr girls#beauty#woman#pretty#haircare#hair routine#healthyfood
87 notes
·
View notes
Text
Do you know this (noncanon) ADHD character?

Evidence below the cut!
can be pretty hyperactive, forgets things regularly (even important things, forgot he turned into a heartless in kh1), distractable, later on he seems to have some problems with emotional dysregulation. hes constantly called lazy by his friends but as soon as hes doing something he likes he has all the energy in the world, and also tends to dismiss his own intelligence despite actually being pretty smart, both of which are things that i think are decently common with undiagnosed adhd
#poll#noncanon adhd character#kingdom hearts#kh#sora#kh sora#sora kh#kingdom hearts sora#sora kingdom hearts#THIS IS GOING TO BE A LONG TAG RAMBLE#ok first sora even getting posted is like a saga#originally i was going to post him myself but had trouble verbalizing evidence#so i asked my discord friends#and then i forgot to write down what they said and lost it#then he got submitted in the initial submissions right when the blog started#but the only evidence was 'look at him lol'#so he was unpostable#then he finally got submitted again during the recent spike with actual evidence!! so i can post him now#sora is so important to me#kingdom hearts is how i found playframe and that community is a huge part of my life now#and also i spent multiple years playing a weekly ttrpg campaign in a completely homebrew kh system#and it was the most fun ive ever had in my life and i am not exaggerating#there was only one other non dm player so three of us in all#and we had such a great dynamic we are such close friends now and the dm even looked up tips for dming for adhd players#and gave my character the ability impulsiveness which turned out to be one of our most powerful abilities#(i say our bc later we got the 'sisterly bond' ability which allowed us to use some of our coplayer's abilities and impulsiveness was one)#it let me take an action during someone else's turn at the cost of one less action on my next turn. basically taking it early#making her adhd one of our most powerful tools#and my character ended up very much a sora parallel despite not living in the time of the main kh games#so yeah. kh and adhd sora specifically. very important to me
52 notes
·
View notes
Note
Any tips for a newbie trying to write a comic?
maybe...
Start now!!! Perfect will never come. A year from now you'll have learned more than you ever would have by waiting to be good enough to let yourself start in the first place.
Starting small is generally good advice, but really you should start with the story you're actually excited to make.
Every scene is there to accomplish a specific goal, and that goal CAN be accomplished in more than one way. Don't go ahead with a scene you don't love because you "need" it. Plan ahead, and edit with a machete.
If you don't love a scene, your readers won't love it either.
You have to be your number one fan, keep your number one critic to yourself. Putting yourself down doesn't make anyone want to read your comic.
The process that works for you is NOT what will work for others! Be patient with yourself as you figure out what does work, it takes a long time.
Clarity is far more important than anything else. Your comic doesn't need to be gorgeous, what it NEEDS to be is clear, direct, and effectively show the reader what they need to know.
Characters need to show their emotions and actions
Backgrounds need to tell us where we are
Paneling needs to show us which order to read things in
Using photos, 3d models, or copy/pasted assets is all perfectly fine and acceptable. As long as you own the rights to use the images or models, you're allowed to use them however you see fit. It's not cheating.
Do not start making comics for money
Don't start making comics for fame
Comics aren't a stepping stone to adaptations. If you want an animation, make an animation.
Get into comics because you love comics and you've got a story that you simply can't go another day without telling.
Make comics!
#writing advice#tips#writing tips#comic advice#I love talking about this stuff. I've got plenty more tips but this is getting long already lol#there's so much to comics#theyre so wonderful#make them#learn#and in a year you'll have something wonderful#comics changed my life.#make comics!!!#asks#writing rambles
323 notes
·
View notes
Text

#words#lit#poetry#literature#quotes#writing#quote#books#Love#love quotes#self love#lovers#feelings#longing#about him#quotations#quoteoftheday#life quotes#soulmate#life lessons#life#good advice#advice#life tips#note to self#spilled words#words words words#feeling
53 notes
·
View notes
Text
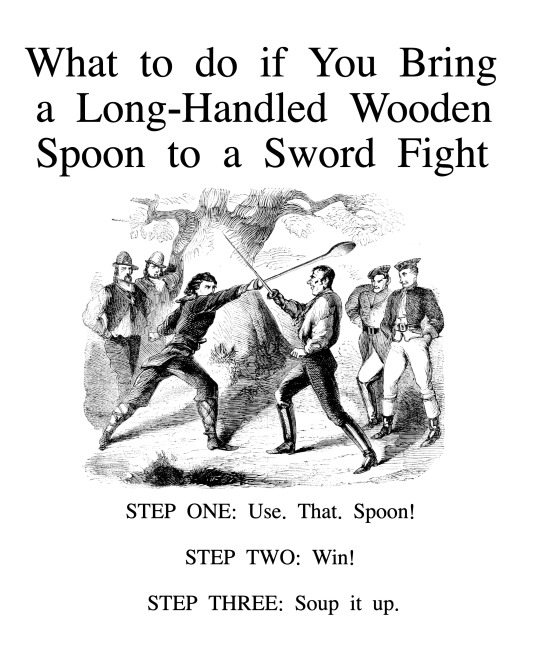
#What to do if You Bring a Long-Handled Wooden Spoon to a Sword Fight#tips#tricks#life hacks#helpful hints#advice#cooking
529 notes
·
View notes
Text
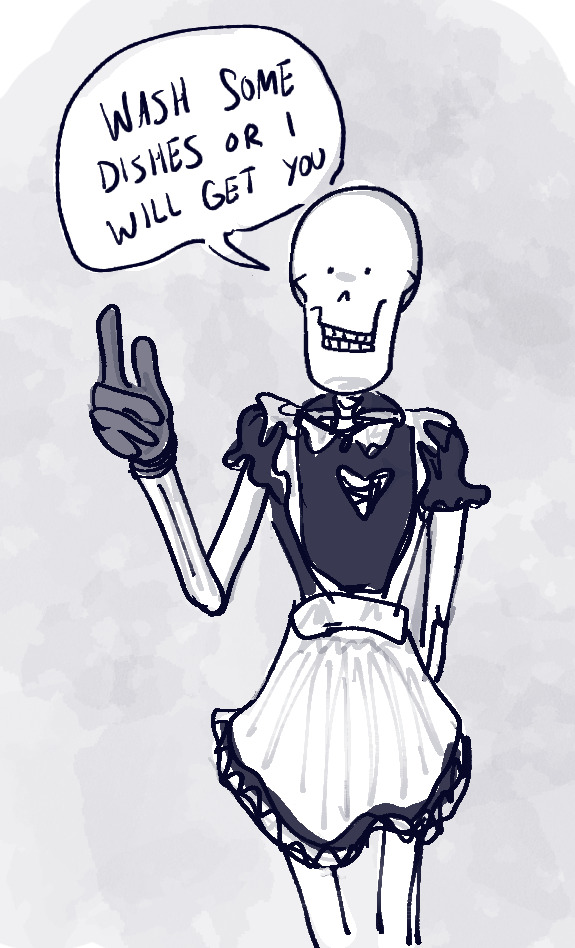
dishes are forever
#I MISSED HAVING A TABLET!!!!#ht papyrus#a gentle touch when you're sad#a menacing touch when it would be funny#he can do it all#LITTLE PRO TIP LIFE HACK THOUGH: IF WASHING DISHES MAKES YOU WANT TO LIVE ON A DIFFERENT PLANET#MAYBE YOU HAVE TOO MANY DANG DISHES#BEING IN A SITUATION WHERE I HAVE 80% FEWER DISHES THAN BEFORE MEANS I DO DISHES MORE OFTEN BUT IT'S SO EASY#AND NOT SOUL SUCKING AT ALL#JUST MY EXPERIENCE!!!!!! THAT'S ALL#I'm sure when i am reunited with my other dishes i will languish in bed staring at this psyching myself up to the task#but i like keeping random jars from food i bought and dishes that i picked up in different places.#they physically remind me of everywhere I've been and sometimes i just look at them and remember where I've been#my favorite is the old ratatouille jar i bought at carrefour in Chengdu#that jarred ratatouille was the nastiest food to grace this earth#i bought it in case it would make a quick easy meal (you don't really find those at the grocery store in China at least not back then)#but even my cheap lazy self couldn't eat it#so no one ever consumed that ratatouille but the jar was pretty big so i put other stuff in it and now it's my dish#and somehow the label is glued on PERMANENTLY it has never washed off after all these years#actually idk maybe it eventually did it isn't here for me to look at but it lasted a long time i know that
50 notes
·
View notes
Text
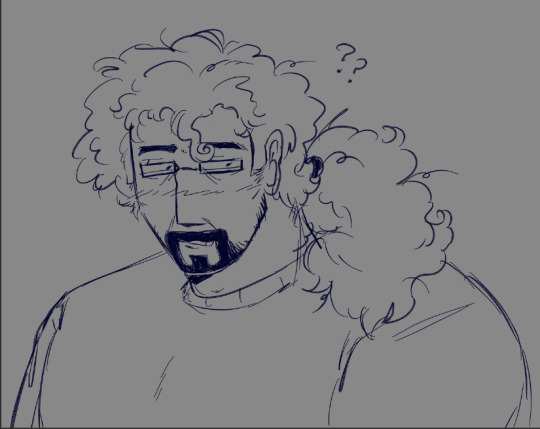
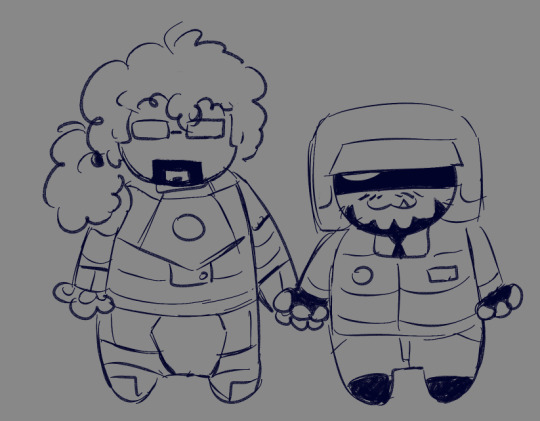
#benrey#half life vr ai#hlvrai#my art#half life vr but the ai is self aware#gordon feetman#gordos feetman#benry#frenrey#beard benrey best benrey sorry guys#i also Love drawing gordos hair its so. Mmm#his hair gets looser at the tips bc that shit is definitely ruined from all the wrong shampoo he keeps buying#0 haircare from this man#we dont even talk about benry he just shaves his head clean off when its too long and purposefully makes his bald ass head shine#with hand cream.#the funny thing is he doesnt even need to shave he just does it#headcanon time over
235 notes
·
View notes
Text
if you sit on someone's lap while they get head it is basically like you are getting head and you both get to have your fingers in the hair of the person going down on them and you get to control how they do it and it is so incredible
#OH MY GOD#about my sex life#big house#sit in my friends lap while he got a bj and it was the most gender-affirming thing omg#he asked if i wanted my cock sucked and then I sat in his lap straddled while he got head but I was obvi the one in control omg#one of those times where its like omg this probably shouldn't be as gender affirming as it is but ahhhh#v specific stone top vibe but wow !#Also I was in like a long white dress so you could just see the dress and tip poking out like omg that really was my cock & it was pretty#At the end we all cuddled and they both asked if I felt safe!! Needed that fr fr I'm probably cured now fr !!!#Omg wait also he was sitting there smiling to himself and went do we have girlcock now? Like omg egg!! Soo good genders time
23 notes
·
View notes
Text
One of the best advice in my life so far.


Fruit Basket — chapter 46
#life hacks#fruit basket#shigure sohma#tohru honda#フルーツバスケット#Manga panel#manga#scans#mangacap#manga caps#manga page#manga screencap#manga art#shojo#chores#tips#long post
16 notes
·
View notes
Text
letters | 023
𝓭𝓮𝓪𝓻, 𝓵𝓸𝓿𝓮 𝓸𝓯 𝓶𝔂 𝓵𝓲𝓯𝓮
Should I even call you that, I mean you aren't even in my life right now and you might never be again. When I see someone that does something you would've done like balance a pencil on their mouth I feel my eyes start to water but I blink them away because I shouldn't be feeling like this when I broke up with you. Your eyes that were always filled with love and happiness would look at me with anger and hurt but I would do anything to even see your face. I still love you and I get flashbacks when anything reminds me of you, it feels like we are back to that exact moment and talking about anything. When in reality, we don't even speak and you aren't even in my life. I want more than anything to just see you even from a distance a glimpse anything to even know that you are okay that this didn't break you. I'm telling myself that if it's meant to be we will see each other again and we will have a second chance that it means we truly are meant to be but realistically, it won't happen. We live in different states and live completely different lives there's no way for us to bump into each other. I want to pick up the phone call you and just hear your voice, if you sound mad, nervous, or even sad I just want to hear your voice. You mean everything to me but, I might mean nothing. This sounds harsh but I want you to hate me because that means there is no going back that you truly hate me that we truly are done. In some messed up way, I have no way to heal because you aren't here but it's like you never even existed. I miss you more than I need oxygen. I love you more than my body needs water. But I don't have you and I feel like I might be dirt on the floor for you. I love you but we aren't anything. I'm sorry for breaking this off but it was the only option for you to move on and be happy and have someone to be there for you. There's one song that reminds me of you called "De ti me enamore?", I love you. I wish I could send everything that reminds me of you instead of making it into a folder on my phone that just says love these instead of just sending them to you. I love you so much. I'm sorry.
𝔂𝓸𝓾𝓻𝓼 𝓽𝓻𝓾𝓵𝔂,
𝓷𝓸𝓽 𝔂𝓸𝓾𝓻 𝓰𝓲𝓻𝓵 𝓪𝓷𝔂𝓶𝓸𝓻𝓮 :(
#blog#talk#about my life#i miss her#my girl#tips#i love her#long distance relationship#long distance romance#love#learning#love of my life#lit#life#literature#life quotes#spotify#music#musica#exes#situationships#breakup#trust issues#i'm sorry#i love you#i miss you#love letters#letters#beautiful words#words
26 notes
·
View notes
Text
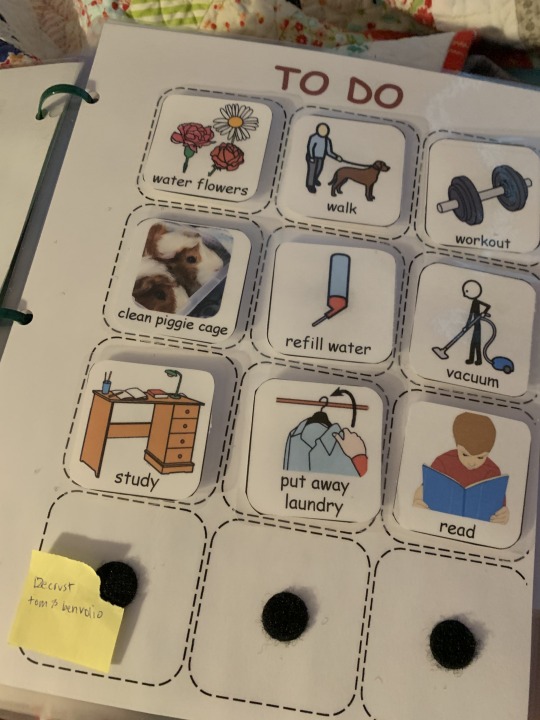
this is my new visual schedule:


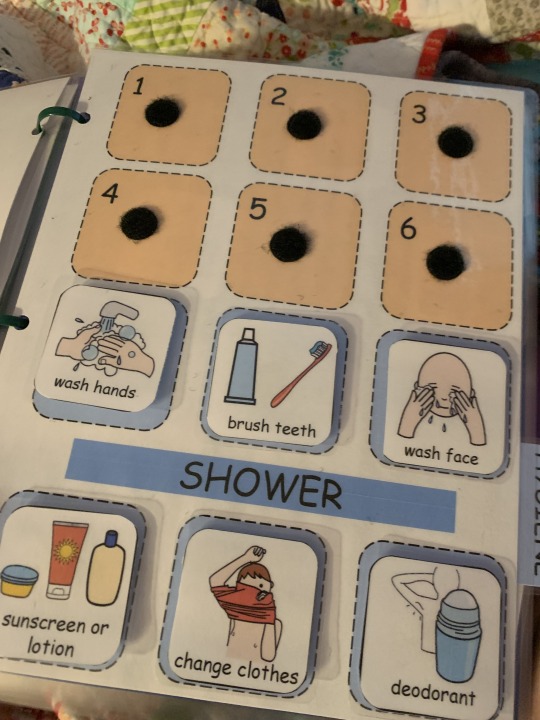
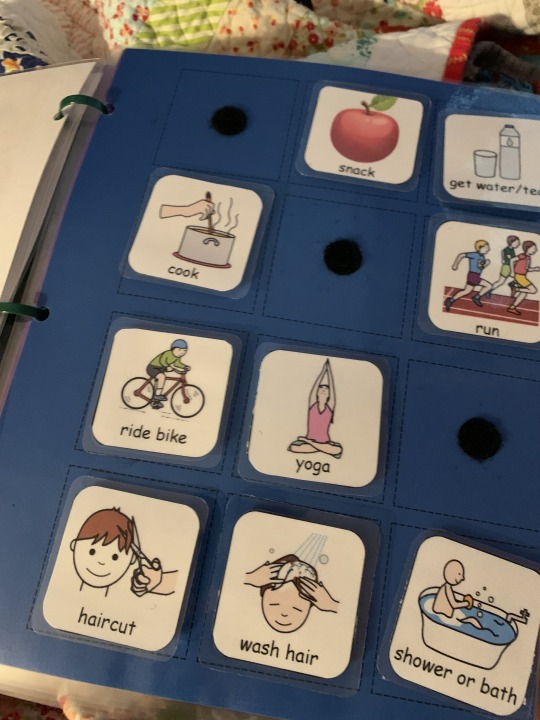

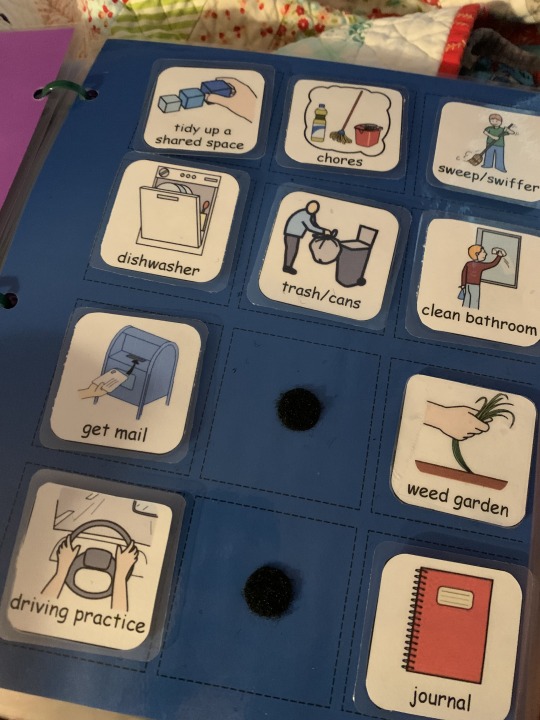

i have no idea how to image describe pictures with so many things in them, so I'm sorry I have no image description, but I will do my best to explain the purpose of each page (left to right top to bottom)
the cover (keeps pieces from falling off if I put the flipbook in my backpack or something) the cover also has my name on it but I cropped this out
'first next then after' page (the main page I use, has my soonest upcoming tasks- I take pieces from the 'to do' page and put them here)
'to do' (at the morning I fill up this page with my tasks like cleaning, chores, and studying- I do have cards for other fun activities and eating but I only ues them on the first page in between tasks from this page)
'done' (when I finish a task on the 'first next then after' page I move it here- it gives me dopamine to see everything I finished that day and makes me less stressed about the amount of things I need to do)
hygiene page- this page is actually so so good its like a cheat code- If you take nothing else from this post at least take this idea: the top (orange) section is for the morning, the bottom (blue) section is for the evening. in the morning all the cards will be in the morning section, when I finish a task I get to move it to the evening section (repeat this for all 6 tasks). in the evening I do the tasks again but the cards get moved to the morning section this time. (if there's a day where I didn't finish then I just move them anyways the next morning as a "reset") this page is in my book but it's probably more helpful just to leave it in the bathroom on the counter or mirror or something (without systems like this I cannot take care of my basic needs, even with these supports and the additional supports in my home i cannot reliably take care of my basic needs)
images 6-9 show some of the word storage pages, I have a total of 10 of these pages
if you're curious at all how i made it let me know and i will post the steps i did to make it and where I got all the pictures!! (I want everyone to be able to access systems like these if they need them, so I am very open to sharing this)
something i really really like about this flip book is that its very tactile and very visual- it does not require very much brain power to use- I really like to just move around the pieces on the pages with the velcro as a stim
i was promted to do this because recently a teacher told me I just need to manage my schedule better and that I should be trying harder (little does she know I'm trying my hardest already)
ive tried so many types of schedules and routines and I just cant stick to them (this is one reason I suspect adhd in addition to my autism but idrk and it probably doesnt matter), but then after she said that I was like okay I guess this is a good excuse to try a visual schedule so I made one (very time consuming but also fun) and then am still disapproved of for some reason... I think she thinks its "too childish/I'm not disabled enough" which I disagree because if it helps and they need it then they should use it regardless of sterotypes- i think this is true for all adaptive tech and disability aids
my point in showing this is to let other autistc adults know that you can use visual schedules if they help you and to boost someone else's confidence for them to use an aid they are afraid to because its stigmatized (also yes mine looks kind of simple/etc but I chose to do it this way because it works good for my brain like this- not because its how all visual schedules should/need to look)
#actually autistic#autism#visual schedule#visual schedules#tactile stim#accessibility#schedules#autism spectrum disorder#disability#probably adhd#actually neurodivergent#neurodivergent#nemo bros life#nemo bros tips#long post#colored text#day in my autistic life
13 notes
·
View notes
Note
Love what youre doing in this blog <3
Do you have any tips of staying organised, specifically keeping a tidy wardrobe and desk? Usually it takes me a long time to clean but normally whenever I finally tidy the things they never stay that way for long..
Thank you o2studies ♥️
I’m always really happy to hear that people are enjoying my stuff and it’s helpful to them!
I also really relate to struggling to keep your space organized as I used to struggle with that a lot when I first moved out. So I collected some tips that helped me and I hope they will do so for you too.
General tips:
Find a place for everything: The most important step in staying organised is to create an organization system that works for you. I think the things you need to keep in mind are 1. where do you need your things? 2. where is it easy to grab your things from? If you found a place that accomplishes both these points, try to keep your things in
Containers!: Putting things in containers prevents them from just laying around and thus reduces visual clutter. You can also just have a bucket where you put things that you need to put away later -> makes the tidying-up-process less overwhelming. This works both with containers for pencils and papers on your desk and for organizers in your closet
Put things away after using them: This is ofcourse one of the most basic tips, but it can be very helpfull to keep your place tidy. If you put things away after using them they don’t pile up.
Take time every day to de-clutter: If the last tip doesn’t work for you try this instead. For me this time used to be after coming home from school and now its in the morning before I start studying. Instead of taking a lot of time to clean everything, take a little time each day to for example put away the papers you worked on or the clothes you wore yesterday
Desk organization tips:
Keep only what you need on you desk: A cluttered workspace can be distracting and make it difficult to focus on the task at hand. It’s also helpful too keep open desk space, so you have space to work.
-> Keep things you need often nearby: Keeping the things you need most near your dominant hand makes it easier to grab them. This also makes it easier to put them back where they belong and you don’t have to shuffle things around because they’re hard to reach
Utilize your wall space, the space under your desk and stack vertically: A floating shelve/a pegboard or drawer organizers can be helpful to have more storage space and stacking things vertically is a more efficient use of space
Organize your desk according to your work process: Again if things already are where you need them to be, you don’t need to put them back and it’s also just more efficient. For example; a lot of people work from left to right, so they put documents they need to work on on the left of their desk and the documents they finished working on on the right
Wardrobe organization tips:
Clean out your closet: It can be hard to keep your wardrobe organized, when it’s overflowing so start off with downsizing and decluttering. Selling some off your stuff on websites like Poshmark or eBay or donate it to give it a second live
-> Make future clean outs easier: Place a distinct (i.e., brightly colored) hanger at the front of each section of your closet. Every time you wear something and wash it, hang it up in front of that hanger. After a few months, it’ll be pretty easy to see what got worn and what didn’t
-> Pack away seasonal clothing: Try to store the clothes you don’t need at the time somewhere else (like in another storage space/boxes or vacuum packs) to make place in your wardrobe
Create Zones: You could divide items by type, by color or based on how frequently you use them. Put high-use items in the front so they’re easy to grab and you don’t have to go through all your things. Zones also help to get an overview of everything you have so you again don’t have to go through everything
=> Hope that helped, thanks for the question!
#sorry this took so long#I had some personal stuff going on with my roommate#ask#ask blog#organization#organizing#cleaning#tidying#tidyup#life tips#house cleaning#studyblr#student life#becoming that girl#it girl#self improvement#that girl
31 notes
·
View notes
Last Seen Blogs

juice-reward
I don't know what I'm doing


spicy-wallpapers
Mexican wallpapers para todo el mundo

sakrebleu
Sakshi Writes!

coofwork
Consequence Of Work