#The Ultimate Guide to Application
Explore tagged Tumblr posts
Visit Tumblr Blog
Explore Tumblr blogs with no restrictions, modern design and the best experience.
Last Seen Tumblr Blogs


Fun Fact
Tumblr has 4 main sources of revenue.
Text
“The Ultimate Guide to Application-Level Access Using RHosting”
In the evolving landscape of remote work and server access, security, precision, and control have become non-negotiable. Businesses no longer want to expose entire desktops or server environments to users who only need access to a single application.
That’s where RHosting’s application-level access becomes a game-changer.
Whether you're a startup aiming to keep things simple, or an enterprise needing airtight access control, this guide walks you through everything you need to know about leveraging application-level access through RHosting — and why it’s one of the smartest remote desktop strategies in 2025.

💡 What Is Application-Level Access?
Unlike traditional RDP (Remote Desktop Protocol) where users log in to a full Windows desktop environment, application-level access restricts the session to only the apps a user needs.
This means:
No desktop access
No access to server files or other users’ applications
Just the exact tool or software assigned
✅ Example: A remote accountant can open QuickBooks without ever seeing the server's desktop or folders.
🔐 Why Application-Level Access Matters
1. Enhanced Security
Limiting users to specific apps reduces the risk of:
Accidental data exposure
Unauthorized browsing
Malware or file deletion
2. Improved Productivity
Users see only what they need — no distractions, no clutter, no unnecessary tools.
3. Easier Compliance
Industries like healthcare, finance, and legal services can better meet compliance standards (HIPAA, GDPR, etc.) by limiting data exposure through isolated app access.
⚙️ How RHosting Makes It Easy
While some traditional RDP tools require complex configurations to achieve this kind of segmentation, RHosting offers a simple, intuitive control panel to set application-level access in minutes.
✅ Features:
Drag-and-drop app assignment
User-by-user customization
Instant activation — no reboot or re-login required
Audit logs to monitor usage and access patterns
🛠️ Step-by-Step: Setting Application Access in RHosting
Log into the RHosting control panel
Go to User Management
Select a user profile
Assign specific applications to the user
Save changes — and that’s it!
Your user now has remote access only to the apps you’ve designated — nothing more, nothing less.
💼 Who Should Use Application-Level Access?
Remote teams: Reduce security risks while ensuring remote workers stay focused
IT service providers: Offer isolated tools to clients or temporary contractors
Educational institutions: Give students access to specific learning tools or software
Finance & accounting firms: Allow secure access to tools like Tally, QuickBooks, or MS Excel
🚀 Real-World Example
A Mumbai-based marketing agency uses RHosting to give interns access only to Adobe Photoshop and a shared design folder — no admin tools, no emails, no server files. This setup increased data safety while streamlining workflow.
📊 Key Benefits Recap
BenefitHow RHosting DeliversSecurityApp-only access, user restrictionsControlAdmin-level customization per userComplianceData minimization, access auditingSimplicityNo need for complex GPO or Windows configsSpeedQuick setup and rollout
✅ Final Thoughts
In a digital-first world, less access means more control. With RHosting’s application-level access, you’re not just improving security — you’re designing a smarter, leaner, and more focused work environment.
Whether you're managing 5 users or 500, it’s time to rethink remote access — one app at a time.
0 notes
Text


twitty kitties (I still have a backlog to get through! Oops!!)
#target4alterego.png#warrior cats#warrior cats art#ashfur#graystripe#fallen leaves#greystripe#however you spell it. I don’t knowwww#ADDED CONTEXT ART IN CASE BC I REALIZE I FORGOT TO LIST THOSE AT WORK LOL#canon designs kind of Frankensteined from mini designs where applicable#fallen leaves is just that one ultimate guide image tho. Bc it’s weird#fanon ashfur by moonkitti#fanon graystripe by ssswarriorcats#fanon fallen leaves by lesbimew on twt
22 notes
·
View notes
Text
I want to befriend Kaneki and meet with him and email him forever
#we should do everything together everything should be parallel play#and then when we go our separate ways at the end of the day I want to still email him things#like pictures of succulents and a glimpse under the amazon river#I want to email him pbs eons videos#I can show him coffee shop vlogs and ask “is this u”#in person I’d mostly let him do the talking and decide what to do#take me down the most intimidating alley on a whim after you said we were just buying lunch pls#I want to eat lunch with him so bad 😭😭😭🙏#it’d be kind of awkward though bc he wouldn’t be eating anything he’d just be sipping his coffee#being with Kaneki is the ultimate dream I wanna see his morning irritation I want to be pleasantly startled by him with his quiet footsteps#& get to ask him about what he’s reading#or how his training is going#or whatever he’s doing#I would ask him how he’d rate vacuuming out of 10 and if he gives it below a 5 will vacuum his house#I feel like he’d lie though and say he likes doing every kind of work just to stop others from doing it#unless he wasn’t in a state where he’s able to actively think about others like that#he should stop doing things and jsut relax imagine taking him on a nice tour trip up mount Fuji that would b nice#stay in a cabin make a snowman clap for him when he skis#he was so good at skiing in the TG calendar?!?? who taught him to ski#did he read “idiots guide to skiing” a day before and absorb all the knowledge like a sponge#he’s so smart. I wish I was smart. or at least smart in an applicable way#I want to try harder but I kind of can’t#or I get sort of frozen by something and can’t find a way forward unless I scurry around it (no one wants u to do this)#I love Kaneki he’s both literally and kind of metaphorically half human and I am too so if we combine we’ll have the power of one full human#we can be human if we stand close enough together#idk he might not want to stand next to me tho he has better options#kaneki time
14 notes
·
View notes
Text

Bite into Brilliance: The Ultimate Guide for Apple App Developer
Find the essential manual for Apple app developers! Swift, design finesse, and hidden optimization strategies – your blueprint for app success is here.
#Guide for Apple App Developer#Ultimate Guide for Apple App Developer#iOS development#iOS application development#iOS App Development
0 notes
Text
theoretical knowledge vs. practical application ☆ spencer reid

summary: spencer studies intimacy like any other subject, but nothing prepares him for the reality of being with you. in your arms, he finally learns that some things can’t be understood- only experienced. pairing: inexperienced!spencer reid x reader warnings: fluff galore, lots of kissing (practically making out), intimacy, but no explicit sexual content! wc: 1.1k masterlist. a/n: this brilliant idea came from my very lovely moot @/jackiesistired over on twitter <33

Spencer had read five books about kissing.
Not just any books, no. They were scientific, psychology-based books that broke down the act of kissing into its most basic neurological, physiological, and psychological components. He’d also skipped numerous peer-reviewed journal articles, and, at some point, had managed to venture into less scientific territory- modern dating guides that made his skin crawl but ultimately did provide insight into what people expected in relationships.
And then, there was the… other research.
The kind that led to him sitting in front of his laptop at 3 a.m., his ears burning as he read about intimacy in ways he hadn’t yet experienced. He took notes. Intricate organized, handwritten notes in which he annotated his key findings, storing them away like highly classified information.
But all of it- all of the extensive research- meant absolutely nothing the moment your lips crashed against his.
⊱ ───────── {⋅. ✯ .⋅} ───────── ⊰
You and Spencer had been dating for a few months now, and while things had been progressing steadily, he hadn’t made any major moves beyond gentle, lingering kisses and hesitant, shaky touches.
He was shy about it- not because he didn’t want you to know, but because he was terrified of messing up. He’d told you early on about his utter lack of experience, and you had reassured him earnestly that there was no pressure.
But he wanted more. He wanted to touch you the way you touched him. He wanted to kiss you until you were both breathless, and he wanted to see if reality could really live up to things he had spent so long reading about. He wanted to know if he was capable of making you feel good.
Most of all, he desperately wanted to stop overthinking.
Which is how he found himself here.
Spencer hadn’t realised just how sensitive he was until he was beneath your hands, beneath your lips, and was trying (and failing) to stay coherent.
You had started slow and gentle, kissing him with a sweet, lingering tenderness, but the moment he responded- the moment he made the quiet, needy sound in the back of his throat- you deepened it. Suddenly, he wasn’t sure if he could survive this.
Your fingers tangled in his curls, tugging softly, and the delicious whine that escaped him was so involuntary, so desperate, that you felt him tense in embarrassment.
You pulled back just enough to whisper against his lips, “Don’t hold back.”
His breath hitched. His head spun as his grip on your waist tightened, unsure whether to pull you closer until there was no air between you or to push you away before he completely unraveled under your touch.
“I- I don’t-” He swallowed harshly as your lips gently brushed across his jaw. “I didn’t know I was this-”
“Sensitive?” you supplied graciously, dragging your lips down his neck.
Spencer shuddered. “Y-yeah,” he admitted, voice wrecked already.
You smiled against his soft skin. “I like it.”
He let out a ragged breath, his eyes fluttering shut as you pressed kisses down the column of his throat. “I- I think I do too.”
You laughed softly as you trailed lower, and Spencer actually whimpered.
You’d never heard a sound quite like that from him before- so high and desperate- a noise that he clearly hadn’t intended to make. His whole body twitched beneath your teasing touch, and he was gripping the couch cushions like they were his sole tether to reality.
“Oh, God-” His voice cracked as your teeth grazed over his pulse point, his hips shifting instinctively beneath you.
He inhaled sharply as you went back up and pressed a kiss just beneath his jaw. Suddenly, his brain kicked into overdrive. "Did you know that the skin along the neck has an increased concentration of sensory receptors? It’s why-" His words cut off with a sharp inhale when your lips gently caressed the skin where his neck met his shoulder.
"Why what?" you teased, brushing your lips lightly over his neck.
"Why- it’s- um- " His breath hitched. "It’s a- an erogenous zone- highly sensitive- oh-"
"You were saying?" you murmured, dragging your lips up the column of his throat.
"I-" He tried again, but when you nipped lightly at his jaw, his thoughts crumbled.
You pulled back to take in the sight of him. He was flushed, panting, his pupils blown wide with something akin to pleading.
“Spencer,” you murmured, running your fingers through his tousled curls, reveling in how he leaned into your touch like he was starving for it.
He looked up at you in a daze, his lips parted like he was trying to form words, but he failed to find them.
“I-” He swallowed hard. “I did research on this.”
You tilted your head slightly and bit your lip, amused. “Uh-huh?”
“Very extensive research,” he admitted, his voice hoarse. “A lot of it.”
“And what did your research tell you?” You hummed softly as you trailed your fingers lightly down his chest.
He inhaled sharply as he tried not to react to your touch. “That, uh- physical contact increases oxytocin, which promotes bonding, and- oh-” His voice broke when you pressed a kiss just below his ear, his whole body trembling beneath yours.
You grinned. “Go on, Spencer.”
“I- I-” His fingers clenched at your hips as you shifted, his breath stuttering. “Oh, my God-”
You kissed him again, slow and deep, and he let out the softest moan against your lips, feeling utterly helpless.
His hands trembled where they held you, like he was overwhelmed and he didn’t know where to move them. Like he was afraid that if he moved too much, or breathed too much, he might just lose control completely.
“You are adorable,” you whispered against his lips, dragging your nails lightly down his back.
He exhaled shakily. "I- um- "
Your smile softened, pressing a kiss to the corner of his mouth. “Let’s practice more.”
Spencer’s hands tightened on your waist, and for once, he didn’t overthink.
He just felt.
And it was so much better than anything he had ever read.
⊱ ───────── {⋅. ✯ .⋅} ───────── ⊰
Later, when you were curled up against him, fingers tracing lazy circles on his chest, he let out a quiet, disbelieving laugh.
You lifted your head. “What?”
He shook his head, cheeks still tinged pink. “I spent weeks preparing. Studying. Making sure I knew everything I could possibly know. And yet…” He looked down at you, still dazed. “Nothing I read could have prepared me for you.”
You smiled, pressing a lingering kiss to his jaw.
“That’s because,” you murmured, “some things you just have to experience.”
Spencer exhaled shakily, pulling you closer.
“Then I think I still have a lot to learn.”
You grinned, playing with the curls at the nape of his neck. “Good thing I loved teaching you.”
And when you kissed him again, he decided that practical application was his new favorite subject.
#spencer reid#spencer reid fanfiction#spencer reid fanfic#spencer reid fluff#spencer reid x reader#spencer reid criminal minds#spencer reid x self insert#spencer reid x you#inexperienced spencer reid#cm#criminal minds fluff#criminal minds fanfic#criminal minds fandom#criminal minds fanfiction#my writing ✧#spencer reid ✧
938 notes
·
View notes
Text
Discover the Ultimate Guide to Kajal Eye Care Products | Top 10 Tips Included
Discover the Ultimate Guide to Kajal Eye Care Products | Top 10 Tips Included Discover the Ultimate Guide to Kajal Eye Care Products | Top 10 Tips Included Welcome to the ultimate guide to Kajal eye care products! If you’re looking to enhance the beauty of your eyes and achieve stunning results, you’ve come to the right place. In this comprehensive guide, we will explore the world of Kajal eye…

View On WordPress
#Application techniques#Captivating eyes#Discover the Ultimate Guide to Kajal Eye Care Products | Top 10 Tips Included#Enhancing eye beauty#Eye care routine#Eye makeup secrets#Kajal eye care#Kajal product recommendations#Nourishing eye products#Stunning eyes Eye makeup tips
0 notes
Text
11 Lessons from the book Atomic Habits 🌟
"Atomic Habits" focuses on incorporating small, consistent habits into our lives to bring about significant change over time. The book introduces a four-step model for building habits, emphasizing cues, cravings, responses, and rewards. It also guides you in overcoming bad habits and self-limiting beliefs, demonstrating how simple habits can lead to substantial progress toward our goals.
Lesson 1: Habits Over Hobbies: You are not inherently bad at your hobbies. Instead, it's the lack of consistent habits that has held you back.
Lesson 2: Identity Matters: Our self-image greatly influences our habits. While it's important, you shouldn't let it hinder your growth.
Lesson 3: Stacking Habits: The concept of habit stacking involves adding a new behavior to an existing habit, which can help you build a more effective morning routine.
Lesson 4: Embrace the System: Rather than solely focusing on goals, it's important to love the process—the journey itself. It's about embracing the system that leads to progress.
Lesson 5: Something is Better Than Nothing: Even small efforts are valuable. The "Two-Minute Rule" encourages starting new habits that take less than two minutes.
Lesson 6: Overcoming Boredom: Staying motivated in habits requires keeping them interesting and within the right level of challenge. "The Goldilocks Rule" emphasizes that tasks on the edge of our abilities are most motivating. Habits won't always be exciting, and that's okay.
Lesson 7: Bouncing Back from Misses: Missing a habit occasionally is normal, but missing it twice can turn into a new habit. The key is to rebound quickly, maintaining the compound gains from previous good days.
Lesson 8: Shaping Your Potential: Our genes affect what we're good at and the chances we get. Instead of feeling stuck by genes, we should use our strengths. Special traits are like superpowers. Questions in the chapter help us find what we care about. Quotes remind us to focus on self-improvement, not comparing. Genes alone don't bring success; effort matters. Genes give hints, but we shape our success by using our strengths.
Lesson 9: Creating a Supportive Environment: Our surroundings are important. If we change our environment to match the habits we want, we're more likely to succeed. By setting up our space to help our habits, we can make good habits easier. People often limit themselves by thinking they can't do better. He also says that just luck doesn't explain success – hard work does. Whether it's moving stuff around or using visual reminders, these changes can really help us succeed in the long run.
Lesson 10: Creating or Breaking Habits: The Four Steps
These four steps are the foundation upon which many of his ideas are built. They are not only applicable to creating positive habits but also to breaking negative ones.
Cue: This is the trigger that initiates a behavior. It can be a specific time, location, emotional state, or preceding action that prompts your brain to start a habit.
Craving: Craving is the motivation or desire behind a habit. It's the feeling that drives you to engage in the behavior triggered by the cue. It's important to understand the underlying craving to effectively change a habit.
Response: Response refers to the actual behavior that you perform as a result of the cue and craving. This is the action that you take in response to the trigger and motivation.
Reward: Rewards are the positive outcomes or feelings that you associate with completing the habit. They reinforce the habit loop by making you more likely to repeat the behavior in the future.
He explains that these four steps form a habit loop, where each step is interconnected. The loop starts with a cue, followed by craving, which leads to a response, and ultimately ends with a reward. If any part of this loop isn't satisfying, the habit is less likely to stick.
Lesson 11: Success is a product of daily habits and overnight success is not overnight:
Success is not a result of overnight transformations but is instead rooted in the daily habits we cultivate. By recognizing the power of consistent, incremental actions, we can build a solid foundation for lasting success. This perspective challenges the allure of instant success and encourages us to focus on the journey of continuous improvement through daily habits.
#atomic habits#james clear#best seller books#bookshelf#booksbooksbooks#personal improvement#personal development#habits#personal growth#self improvement#self help#self awareness#self love
1K notes
·
View notes
Note
Is it possible to use Eureka in a more traditional fantasy setting, more sword and sorcery? What about a fantastical medieval city from the time period of the rise of universities in Europe?
Very much appreciate all the posts. It's made me think more carefully about table top gaming than I had before.
Well, maybe, but I wouldn’t recommend it.
There’s quite a lot in Eureka: Investigative Urban Fantasy that sets it very firmly in the tech level and societal structure of the past 200 years. It is designed to be flexible, but I don’t know that it’s flexible enough to handle that without a lot of things starting to break.
A lot of the Skills and Traits would be less applicable to medieval life and culture and so more than just the Driving Skill would need to be swapped out.
Eureka’s combat rules, which are pretty intricate, are focused primarily on firearms that use modern cartridges rather than ramrod muzzle-loading type firearms when it comes to ranged fighting, and on much smaller melee weapons and unarmed fighting when it comes to close range fighting.
We don’t even have bow&arrow rules.
Many of the intricate firearm combat rules would not be applicable to black powder weapons, and if I were to do a version of Eureka set in a medieval setting, I would want to flesh out the melee combat a whole lot more, both because it would be used more often, and because the current melee combat rules are designed specifically to emulate how people fight today.
The average person today, even if they know how to fight, only knows any advanced techniques when it comes to unarmed fighting, and then maybe a few of the basics of using weapons. Back when swords and daggers and stuff were much more commonly used weapons, much more advanced techniques were known by people who fought with them, and I would want to reflect that in the rules.
Plus, there’s the matter of culture. Eureka is an extremely modern game, exploring very modern themes and having rules that guide the characters into acting like real modern people. Any version of Eureka which takes place in a society in or based on the more distant past would have to reflect that in the rules, and, well, that would be a whole lot of research.
If you were to just try to graft some of Eureka’s mystery-solving mechanics onto an existing sword&sorcery TTRPG, that might work better, but you’d still run into problems. The Investigation Point mechanic works the way it does because all the Skills for investigating are on a Eureka PC’s character sheet. These Skills are not part of most sword&sorcery RPGs, so you’d have to homebrew those in too, or the means of getting Investigation Points would be very limited and not flow correctly.
Also, you’re welcome! That’s one of our ultimate goals here, to get people to think of game design as being real enough to actually affect gameplay experience, and a real skill that can be developed and applied with intent.

#eureka: investigative urban fantasy#eureka#eureka ttrpg#ttrpg tumblr#ttrpg community#indie ttrpg#rpg#ttrpg#ttrpgs#ttrpg design#sword & sorcery#d&d#d&d 5e#dungeons and dragons#dungeons & dragons#dungeons and dragons 5e#advanced dungeons & dragons#ad&d#ad&d 2e#dnd#tsr#adnd
116 notes
·
View notes
Text
in wake of yet another wave of people being turned off by windows, here's a guide on how to dual boot windows and 🐧 linux 🐧 (useful for when you're not sure if you wanna make the switch and just wanna experiment with the OS for a bit!)
if you look up followup guides online you're gonna see that people are telling you to use ubuntu but i am gonna show you how to do this using kubuntu instead because fuck GNOME. all my homies hate GNOME.
i'm just kidding, use whatever distro you like. my favorite's kubuntu (for a beginner home environment). read up on the others if you're curious. and don't let some rando on reddit tell you that you need pop! OS for gaming. gaming on linux is possible without it.
why kubuntu?
- it's very user friendly
- it comes with applications people might already be familiar with (VLC player and firefox for example)
- libreoffice already preinstalled
- no GNOME (sorry GNOME enthusiasts, let me old man yell at the clouds) (also i'm playing this up for the laughs. wholesome kde/gnome meme at the bottom of this post.)
for people who are interested in this beyond my tl;dr: read this
(if you're a linux user, don't expect any tech wizardry here. i know there's a billion other and arguably better ways to do x y and/or z. what i'm trying to do here is to keep these instructions previous windows user friendly. point and click. no CLI bro, it'll scare the less tech savvy hoes. no vim supremacy talk (although hell yeah vim supremacy). if they like the OS they'll figure out bash all by themselves in no time.)
first of all, there'll be a GUI. you don't need to type lines of code to get this all running. we're not going for the ✨hackerman aesthetics✨ today. grab a mouse and a keyboard and you're good to go.
what you need is a computer/laptop/etc with enough disk space to install both windows and linux on it. i'm recommending to reserve at least a 100gb for the both of them. in the process of this you'll learn how to re-allocate disk space either way and you'll learn how to give and take some, we'll do a bit of disk partitioning to fit them both on a single disk.
and that's enough babbling for now, let's get to the actual tutorial:
🚨IMPORTANT. DO NOT ATTEMPT THIS ON A 32BIT SYSTEM. ONLY DO THIS IF YOU'RE WORKING WITH A 64BIT SYSTEM. 🚨 (win10 and win11: settings -> system -> about -> device specifications -> system type ) it should say 64bit operating system, x64-based processor.
step 1: install windows on your computer FIRST. my favorite way of doing this is by creating an installation media with rufus. you can either grab and prepare two usb sticks for each OS, or you can prepare them one after the other. (pro tip: get two usb sticks, that way you can label them and store them away in case you need to reinstall windows/linux or want to install it somewhere else)
in order to do this, you need to download three things:
rufus
win10 (listen. i know switching to win11 is difficult. not much of a fan of it either. but support's gonna end for good. you will run into hiccups. it'll be frustrating for everyone involved. hate to say it, but in this case i'd opt for installing its dreadful successor over there ->) or win11
kubuntu (the download at the top is always the latest, most up-to-date one)
when grabbing your windows installation of choice pick this option here, not the media creation tool option at the top of the page:

side note: there's also very legit key sellers out there who can hook you up with cheap keys. you're allowed to do that if you use those keys privately. don't do this in an enterprise environment though. and don't waste money on it if your ultimate goal is to switch to linux entirely at one point.
from here it's very easy sailing. plug your usb drive into your computer and fire up rufus (just double click it).

🚨two very important things though!!!!!!:🚨
triple check your usb device. whatever one you selected will get wiped entirely in order to make space for your installation media. if you want to be on the safe side only plug in the ONE usb stick you want to use. and back up any music, pictures or whatever else you had on there before or it'll be gone forever.
you can only install ONE OS on ONE usb drive. so you need to do this twice, once with your kubuntu iso and once with your windows iso, on a different drive each.
done. now you can dispense windows and linux left and right, whenever and wherever you feel like it. you could, for example, start with your designated dual boot device. installing windows is now as simple as plugging the usb device into your computer and booting it up. from there, click your way through the installation process and come back to this tutorial when you're ready.
step 2: preparing the disks for a dual boot setup
on your fresh install, find your disk partitions. in your search bar enter either "diskmgr" and hit enter or just type "partitions". the former opens your disk manager right away, the latter serves you up with this "create and format hard disk partitions" search result and that's what you're gonna be clicking.

you'll end up on a screen that looks more or less like in the screenshot below. depending on how many disks you've installed this might look different, but the basic gist is the same. we're going to snip a little bit off Disk 0 and make space for kubuntu on it. my screenshot isn't the best example because i'm using the whole disk and in order to practice what i preach i'd have to go against my own advice. that piece of advice is: if this screen intimidates you and you're not sure what you're doing here, hands off your (C:) drive, EFI system, and recovery partition. however, if you're feeling particularly fearless, go check out the amount of "free space" to the right. is there more than 30gb left available? if so, you're free to right click your (C:) drive and click "shrink volume"

this screen will pop up:

the minimum disk space required for kubuntu is 25gb. the recommended one is 50gb. for an installation like this, about 30gb are enough. in order to do that, simply change the value at
Enter the amount of space to shrink in MB: to 30000
and hit Shrink.
once that's done your partitions will have changed and unallocated space at about the size of 30gb should be visible under Disk 0 at the bottom like in the bottom left of this screenshot (courtesy of microsoft.com):

this is gonna be kubuntu's new home on your disk.
step 3: boot order, BIOS/UEFI changes
all you need to do now is plug the kubuntu-usb drive you prepared earlier with rufus into your computer again and reboot that bad boy.
the next step has no screenshots. we're heading into your UEFI/BIOS (by hitting a specific key (like ESC, F10, Enter) while your computer boots up) and that'll look different for everyone reading this. if this section has you completely lost, google how to do these steps for your machine.
a good search term would be: "[YOUR DEVICE (i.e Lenovo, your mainboard's name, etc.)] change boot order"
what you need to do is to tell your computer to boot your USB before it tries to boot up windows. otherwise you won't be able to install kubuntu.
this can be done by entering your BIOS/UEFI and navigating to a point called something along the lines of "boot". from "boot order" to "booting devices" to "startup configuration", it could be called anything.
what'll be a common point though is that it'll list all your bootable devices. the topmost one is usually the one that boots up first, so if your usb is anywhere below that, make sure to drag and drop or otherwise move it to the top.
when you're done navigate to Save & Exit. your computer will then boot up kubuntu's install wizard. you'll be greeted with this:

shocker, i know, but click "Install Kubuntu" on the right.
step 4: kubuntu installation
this is a guided installation. just like when you're installing windows you'll be prompted when you need to make changes. if i remember correctly it's going to ask you for your preferred keyboard layout, a network connection, additional software you might want to install, and all of that is up to you.
but once you reach the point where it asks you where you want to install kubuntu we'll have to make a couple of important choices.

🚨 another important note 🚨
do NOT pick any of the top three options. they will overwrite your already existing windows installation.
click manual instead. we're going to point it to our unallocated disk space. hit continue. you will be shown another disk partition screen.
what you're looking for are your 30gb of free space. just like with the USB drive when we were working with rufus, make sure you're picking the right one. triple check at the very least. the chosen disk will get wiped.

click it until the screen "create a new partition" pops up.
change the following settings to:
New partition size in megabytes: 512
Use as: EFI System Partition
hit OK.
click your free space again. same procedure.
change the following settings to:
New partition size in megabytes: 8000 (*this might be different in your case, read on.)
Use As: Swap Area
hit OK
click your free space a third time. we need one more partition.
change the following settings to:
don't change anything about the partition size this time. we're letting it use up the rest of the resources.
Use as: Ext4 journaling system
Mount Point: /
you're done here as well.
*about the 8000 megabytes in the second step: this is about your RAM size. if you have 4gb instead type 4000, and so on.
once you're sure your configuration is good and ready to go, hit "Install Now". up until here you can go back and make changes to your settings. once you've clicked the button, there's no going back.
finally, select your timezone and create a user account. then hit continue. the installation should finish up... and you'll be good to go.
you'll be told to remove the USB drive from your computer and reboot your machine.
now when your computer boots up, you should end up on a black screen with a little bit of text in the top left corner. ubuntu and windows boot manager should be mentioned there. naturally, when you click ubuntu you will boot into your kubuntu. likewise if you hit windows boot manager your windows login screen will come up.
and that's that folks. go ham on messing around with your linux distro. customize it to your liking. make yourself familiar with the shell (on kubuntu, when you're on your desktop, hit CTRL+ALT+T).
for starters, you could feed it the first commands i always punch into fresh Linux installs:
sudo apt-get update
sudo apt-get upgrade
sudo apt-get install vim
(you'll thank me for the vim one later)
turn your back on windows. taste freedom. nothing sexier than open source, baby.
sources (mainly for the pictures): 1, 2
further reading for the curious: 1, 2
linux basics (includes CLI commands)
kubuntu documentation (this is your new best friend. it'll tell you everything about kubuntu that you need to know.
and finally the promised kde/gnome meme:

#windows#linuxposting#had a long day at work and i had to type this twice and i'm struggling to keep my eyes open#not guaranteeing that i didn't skip a step or something in there#so if someone linux savvy spots them feel free to point them out so i can make fixes to this post accordingly#opensource posting
122 notes
·
View notes
Text
✧ pre-med extracurriculars: for my future doctor angels ✧


hi my lovely pre-med angels!! 🤍 it's mindy hereee!
today's post is extra special because so many of you have been asking about extracurriculars for medical school!! if you know, my ultimate dream is to become a doctor, i'd love to either be a psychiatrist or a cardiologist, so anything medical-related is my favorite cup of coffee!! i'm literally so excited to share this comprehensive guide that will help you shine on your future applications. this post is for you if you're in high school or college, this guide will be your bestie through the journey!!
~ ♡ for my precious high school sweethearts ♡ ~
hospital + healthcare volunteering (my absolute fave!!) • aim for 100-150 hours minimum • try different departments to explore • build relationships with nurses + staff • pro tip: volunteer during summer break for more hours • keep a reflection journal of your experiences • bonus: ask for recommendation letters if you connect well!!
research opportunities • reach out to local universities • email professors about summer programs • join science fairs with medical projects • create your own research project • tip: start with literature reviews if labs aren't available • document everything for future applications!!
leadership + school involvement • start a medical interest club • lead health awareness campaigns • organize blood drives • create mental health support groups • join science olympiad • participate in biology competitions • personal story: i started a "future doctors club" + it literally changed my life!!
~ ♡ for my darling college angels ♡ ~
clinical experience (super important!!) • medical scribing (literally the best!!) • certified nursing assistant (CNA) • emergency medical technician (EMT) • phlebotomy certification + gain a bunch of different certifications online • medical assistant • tip: aim for 200+ hours minimum • pro secret: try different specialties!!
research involvement • join multiple labs if possible • aim for publication opportunities • present at conferences • write abstracts + papers • network with graduate students • maintain good relationships with PIs • secret tip: join journal clubs!!
leadership positions • pre-med society officer • tutoring coordinator • mentorship program leader • research team leader • volunteer coordinator • tip: create new positions if none exist!!
~ ♡ extra special activities for everyone ♡ ~
medical mission trips (life-changing!!)
start a health education blog
create medical awareness social media
join medical podcasting
organize health fairs
volunteer at free/non-profit clinics
shadow different specialists
join pre-med summer programs
work as a pharmacy technician
volunteer at nursing homes
organize medical supply drives
create health education programs
~ ♡ my personal tips + secrets ♡ ~
quality over quantity always!!
maintain each activity for at least 6 months
document everything (literally everything!!)
take lots of pictures (for memories + portfolio)
get contact info from supervisors
keep detailed reflection journals
network with other pre-meds
create spreadsheets to track hours
always ask for recommendation letters
maintain professional relationships
~ ♡ time management secrets ♡ ~
use google calendar religiously
block schedule your activities
don't overcommit (seriously!!)
maintain 2-3 main activities
rotate seasonal activities
leave time for self-care
schedule study breaks
plan one year ahead
keep backup activities ready
remember my loves: medical schools want to see dedication + passion!! don't just collect activities like pokemon cards (even tho that would be cute). focus on meaningful experiences that truly speak to your heart!!
pro tip: start a bullet journal to track your journey!! include your thoughts, feelings, and learning experiences. future you will literally cry happy tears when writing your personal statement!!
also!! please please please remember that your mental health comes first!! it's okay to take breaks, it's okay to say no, and it's absolutely okay to prioritize self-care. you'll be a better doctor if you learn these habits now!!
sending you the biggest virtual hugs + all my love!! you're doing amazing sweetie, and your future patients will be so lucky to have you!!
feel free to send more asks if you need specific advice!! i'm always here to support my precious future doctors and followers i call my sweetheart community!!
xoxo, mindy 🤍
p.s. remember to hydrate, get enough sleep, and take your vitamins!! doctor's orders!! <3
p.p.s. i'll be sharing more detailed guides about each activity soon, so stay tuned my loves!!
btw, if you need personal study advice or anything, submit to glowettee hotline 💌: https://bit.ly/glowetteehotline

#premed#premedlife#medschool#futuredoctor#studyblr#studygram#medicalschool#studentlife#extracurriculars#medicalstudent#medschoolprep#premedmotivation#premedadvice#premedblog#medschooljourney#premedcommunity#futurephysician#medicaljourney#medschoolbound#studytips#medschoolguide#premedguide#medstudent#premedstudent#medschoollife#medicaladvice#collegelife#highschoollife#academicblogs#studyinspo
122 notes
·
View notes
Text

The Precision of Gloves: Tools of Power, Symbols of Authority
Gloves are not mere accessories; they are the ultimate extension of control. Sleek, commanding, and unyielding, they embody the precision, discipline, and authority of a true Alpha male. From their historical use as symbols of status and refinement to their practical role in exerting dominance, gloves have long represented a unique blend of elegance and power.
In the hands of an Alpha, gloves transcend their practical purpose, becoming instruments of control, punishment, and psychological conditioning. This essay explores the history, symbolism, and applications of gloves as tools of command and tools of submission.
Gloves as Historical Symbols of Authority
The wearing of gloves has long been associated with power and prestige. In medieval Europe, gloves were gifts bestowed upon knights and lords, symbolizing trust and the authority to lead. Monarchs wore gloves to signify their divine right to rule, their hands shielded not just from the elements, but from the imperfections of the mortal world.
In aristocratic circles, gloves represented refinement. White gloves, in particular, signified purity, discipline, and status, often worn during ceremonies or formal gatherings. For the military, leather gloves became an essential part of the uniform, protecting hands while emphasizing precision and control.
Throughout history, the donning of gloves has been more than an act of utility—it has been a deliberate declaration of authority. To wear gloves is to separate oneself from the common and to wield power with precision.
The Physical Power of Gloves
Gloves, especially leather ones, amplify the physical presence of the Alpha. They cover the hand in strength and finesse, allowing for calculated actions that command attention and enforce discipline. The sound of leather tightening over knuckles or snapping against the wrist is itself an assertion of dominance.
Uses in Dominance:
• Punishment: A gloved hand delivers a sharper, more defined impact, whether in a slap across the face or a blow to the body. The glove enhances the sensation of control and leaves an impression of authority.
• Humiliation: Forcing a submissive to kiss, clean, or hold a gloved hand is an act of degradation, a reminder of their place beneath the Alpha.
• Precision: Gloves allow for calculated movements, whether directing a riding crop, delivering commands, or guiding the submissive’s actions.
Gloves as Psychological Weapons
The presence of gloves is a constant reminder of control. The gleam of polished leather or the pristine white of formal gloves evokes discipline, perfection, and unyielding authority. Submissives learn to associate gloves with the Alpha’s touch—both the pain it inflicts and the command it enforces.
The act of donning gloves itself is a ritual of dominance. The slow pull of leather over fingers, the deliberate adjustment of fit, and the sharp snap of the cuff signal readiness. For the submissive, it is a moment of anticipation—an unspoken warning that control is about to be asserted.
Psychological Impact:
• The sight of gloves evokes feelings of fear, awe, or reverence, depending on the dynamic.
• The Alpha’s gloved hand becomes a symbol of unreachable perfection, emphasizing the submissive’s inferiority.
• Even the absence of gloves, after being removed with deliberate care, can heighten a submissive’s awareness of the Alpha’s power.
The Sadistic Potential of Gloves
In the hands of an Alpha, gloves become tools of sadistic refinement. Their strength enhances every act of dominance, turning gestures into statements of power. Whether through their weight, their texture, or their deliberate application, gloves leave both physical and psychological marks.
Applications in Sadistic Dominance:
• Impact Play: A gloved hand creates a sharper, more focused sting during slaps or strikes, delivering both pain and precision.
• Degradation: The submissive may be made to lick or polish the gloves, an act that reinforces their submission and the Alpha’s superiority.
• Marking Territory: The imprint of a gloved hand on skin—whether through pressure or impact—becomes a signature of ownership, a mark of the Alpha’s control.
The Alpha’s Signature: Gloves as an Extension of His Will
For the true Alpha, gloves are not just an accessory—they are an extension of his will. Every movement becomes deliberate, every gesture calculated. The gloves represent discipline, perfection, and the unrelenting pursuit of control.
When an Alpha removes his gloves, it is a statement in itself: an intentional shift from precision to raw power. To wear gloves is to embody authority; to remove them is to remind all that the Alpha’s dominance transcends even the symbols he wields.
Sir Cedric’s Reflection
Gloves, to me, are the embodiment of precision and command. When I slide my hands into a pair of fine leather gloves, I feel an immediate sense of control. They are not merely a covering—they are an extension of my authority, a tool that amplifies my power in every interaction.
Each motion of a gloved hand is deliberate. The sound of leather against leather as I adjust my grip, the weight of my hand as it strikes, the firm pressure of a gloved palm against submissive skin—all of these are reminders of who holds dominion.
#power#authority#command#discipline#leadership#mastery#alpha confidence#alpha mindset#alpha master#leather master#leather gear#alpha supremacy#alpha control#alpha dominance#absolute submission#absolute dominance#absolute discipline#absolute domination
120 notes
·
View notes
Text
The Ultimate ˎˊ-

In this post I share every single step you'll need in order to create a proper skincare routine for both the day and nighttime; as well as extra tips for a variety of skin needs, while also bringing attention to certain steps that may just be optional and those that are necessary for everyone.
Starting with your daytime routine :

Step 1 “Cleanser” :
Cleansing the skin in the morning with a cleanser is *actually* not always necessary (though a good idea in some cases such as if you use hair oils/hair products at night and have acne prone skin) OR in the case of having a lot of residual skincare from the night before, that is sitting on the surface of the skin in the morning. Otherwise it's fine to just rinse the skin with water and pat dry.
Step 4 “SPF” :
The only “mandatory” skincare for the AM is adequate application of Sunscreen. No cleanser or moisturizer necessary (as mentioned above). When applying sunscreen however you want the spf to be able to absorb and penetrate the skin directly as chemical sunscreen filters need to touch the skin to be most effective (it absorbs UV and converts it into heat). This is also why if you do choose to use a moisturizer before sunscreen in the AM (Step 3) it’s best to use one that also contains spf or, pick a moisturizer that is highly absorbent (such as a water based moisturizer) compared to one that is highly occlusive; so that it’s not interfering with the sunscreen penetrating the skin. Reapply as often as needed especially if out doors or in contact with sun exposure (like indoor windows). Every 2 hours is suggested from day to evening.
As for Step 2: “Vitamin C“ :
Is also optional, and most dermatologists I have researched or spoke with generally say to “decide’ for yourself whether or not you want to add it in your routine. This is due to the fact that it’s quite difficult to “prove” the efficacy of the L ascorbic acid with aiding in sun protection and even skin tone complexation etc. (This is ingredient your looking for to get the benefits of what Vitamin C products claim to do on the skin). This questionability is due to various factors that contribute to the Vitamin C product being “stable” and effective. I myself am not currently using a Vitamin C product in my routine (but have in the past) and will update this page on my previous/new experiences when I do reintroduce it. I will recommend that you only purchase a Vitamin C that firstly has “L ascorbic acid as its main form of vehicle. (This is the most reliable stable form of Vit C) and, that you also purchase it from a ”Derm Brand” which may make it an expensive purchase. (More info below in my personal products and recommendations section of this page soon).
Other Tips and notes for skincare in the AM:
Avoid SPF sticks and sprays as they do not nearly have enough coverage to protect you from the sun and remember that makeup containing SPF (though better than makeup that doesn't) does not contain nearly the amount of “Sun Protection Factor” to protect your skin as a regular sunscreen lotion would typically. Although I love makeup I try not to wear it very regularly in the summer if not an event; just so that I can apply SPF instead. Also keeping hand sanitizer with you is a good way to disinfect your hands if you do not have access to a wash station/soap/water etc.
If your short on time in the morning just apply spf after rinsing the skin with water and/or take your spf bottle with you! Remember to keep your sunscreen out of hot cars, humid bathrooms or freezing environments to keep the product effective.
For the Nighttime :
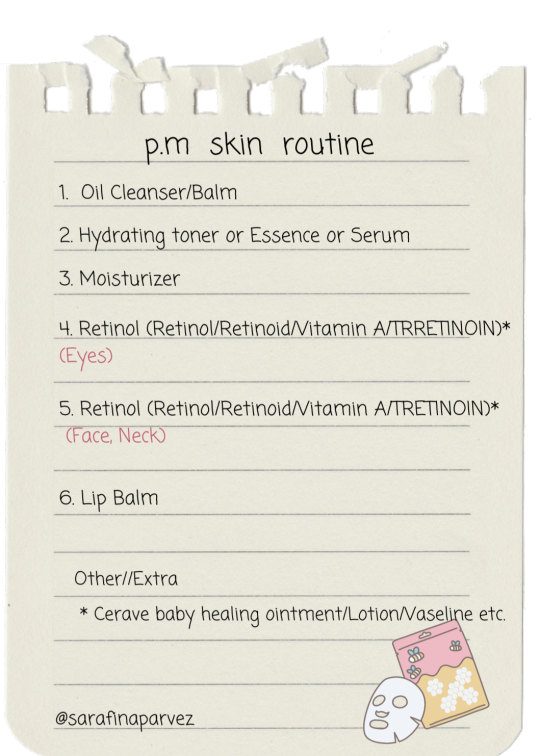
If wearing eye makeup treat this as Step 1, and remove with micellar water first (or product of choice) and cotton pads. Hold cotton pad to eye for about 15 seconds minimum and swipe across gently back and forth to remove makeup. This avoids harsh tugging of the skin which may effect skin elasticity or cause irritation. I like to take an extra cotton pad after, fold it in half and drench the “outer fold” to remove makeup from the upper and lower lash line diligently. Ignoring this area can encourage old makeup to enter your eyes. The reason why I prefer having this step in routine, as opposed to just using the same cleanser or balm as I would my face to remove eye makeup is because it’s more thorough in removal, requires less effort and is less messy which makes me more inclined to do my skincare routine on time when I need to. (That’s important!) But if you don’t tend to wear a lot of heavy eye makeup that requires some effort to remove it’s definitely fine skipping this step.
1. Cleanse rest of the face from sunscreen/make up/lotion/daily dirt and grime as need be with any making removing oil or balm cleanser. Make sure to double/triple cleanse as needed. I will often use cotton pads and micellar water to remove my first layer of makeup just as I did with my eyes and then follow through will the oil/balm cleanser as the second step. If i’m not wearing makeup, I don’t use micellar water on my face and just my cleanser of choice once or twice.
2. Apply serum/hydrating product all over face, neck and eyes. I consider this “the supplementary skin step”, similar to taking a supplement, you can choose to add extra serums, toners, essences etc. to aid in extra hydration, or even introduce products that may address certain skin textural issues etc. There’s a boat load of products you can choose for this step but you will never go wrong with a hydrating serum or essence to give your skin a boost that will make a visible difference than just using your moisturizer alone. Some choose to layer multiple products in this step and if you do the thinnest is generally what you would use first. Overcomplicating this step is common; especially for skin care lovers which may lead to various issues such as irritation from too many products. I left more details on my skincare page in the section below where I touch of various products causing irritation if you want more direction or tips on how to choose the right type of serum/essence/toner for you based on the intended outcome you are trying to achieve.
3. Apply a small amount of eye retinol to the under eye area only.
4. Apply moisturizer all over face neck and eyes (lightly dab over the eye area too, where you placed the retinol (optional). Dabbing is important so you do not move around the eye retinol. Alternatively, you can use eye moisturizer first and eye retinol on top. I prefer the way around, as eye-retinols are quite gentle on my under eye area so I benefit from that direct retinol-to-skin contact.
5. Apply Tretinoin/other related product everywhere *except* the eye area (both the under eyes and lids). Be careful not to bring the tretinoin to close the eye area where you may have spread the eye retinol product out so that you are not layering multiple retinoids on top of one another. Use cautiously around sides of nose, chin and mouth as these area tend to be too sensitizing of a location for many people to tolerate the use of this product. Any area that has repetitive dryness or flakiness (long-term) past the initial “purging adjustment” stage is too sensitive to tolerate the product. Using tret/other in these areas may be causing inflammation of the skin or barrier damage.
*** Optional Step apply an extra layer of any simple occlusive face/body lotion over the entire face if you’d like to seal in the hydration (optional)- when implementing this step after retinol its considered the ��sandwich method” (moisturizer, retinol, moisturizer) which some claim helps the skin better tolerate retinoids but I use just to help to keep the skin’s hydration sealed overnight; particularly in the winter season when my room is blasting hot air throughout the night. I also found it helped when I was previously on 0.05 tret (a concentration that I felt was a bit too sensitizing for me at the start).
6. Always remember chap stick & Vaseline for the lips. Any petroleum jelly product ontop of chap stick of choice can be applied for extra protection. Petroleum jelly is optional but the chap stick is recommended.
Other tips and notes for skincare in the PM :
If you find a night in which you are tired before bed just cleanse and moisturize. This is the only mandatory step of your nighttime routine as the skin regenerates and “builds” itself during sleep and simply needs to be kept clean and protected. Just as failure to not address adequate sun protection in the morning with lead to premature aging and other potential complications- so will not sleeping with a clean face at night; so both steps need to be done committedly. Even if you chose not to wear sunscreen in the daytime (though I doubt someone taking that option is reading this page) washing your face at night is a basic hygiene practice if anything just as taking a shower is. So don’t be disgusting. 😂
In essence, products that will makeup your routine include :
* Moisturizer
* Cleanser that can remove makeup & be gentle on your skin
* Eye makeup remover (if you need it)
* “Hydrator” (essence/ampule/serum etc.)
* Night Active for FACE (Retinol/Retinoid/Tretinoin/Vitamin A derivative of choice etc.)
* Night Active for EYES (Retinol/Retinoid/Tretinoin/Vitamin A derivative of choice etc.)
* Lip Balm
* Lip SPF (non drying)
As mentioned above, for the entire detailed and thorough guide where I touch on :
My Favourite Products/Recommendations
Acne Prone Skin
Starting Retinol
Korean vs French vs Japanese products
Seasonal Skincare Tips + More!
Follow this link below to be Guided to my Skincare Site :
Please reblog, like, and share this post if you found it helpful at all 💖
Love, Sarafina

#glow up secrets#glow up#self care#clean girl aesthetic#self care aesthetic#skincare tips#skincare routine#it girl aesthetic#old money aesthetic#pink pilates princess#wonyoungism#lori harvey#level up journey#beauty tips#beauty affirmations#k beauty#korean skincare#japanese skincare#clean aesthetic#becoming her#girl interrupted#coquette#vogue beauty#vogue beauty secrets#princess aesthetic#skincare#it girl affirmations#becoming that girl#girlblogging#hyper femininity
89 notes
·
View notes
Text
PXL'S Anatomy of Screenshots

So you want to take better screenshots? There are multiple factors to consider, and if you don't enjoy tweaking reshade settings for every image, my ultimate method may not be for you. That being said, there are tips and resources in this guide that are applicable to everyone and you can select to explore those that are useful to your specific situation.
Disclaimer: I am not claiming to be an expert, nor am I offering to provide troubleshooting on an individual basis. This is a general guide and if you are unfamiliar with any of the concepts, please use the mighty power of the internet to find tutorials. I promise everything that I have learned over the years has been published and documented a thousand times better than I ever could.
There are five factors to address:
Your computer's inherent capabilities
The game's limitations
The mods you're using
Reshade
Post Processing
Graphics Card Settings & Drivers:
Become familiar with your graphic options. If you don't have a dedicated graphics card (i.e. a desktop or gaming laptop, these features may be unavailable and you should skip.)
I have an AMD Radeon Pro card which is designed for workstation level systems. It's overkill for sims, but useful for 3D rendering and modelling work. I have changed the following settings for DirectX 9 applications:
anti-aliasing - enhance application settings
anisotropic filtering - enabled
anisotropic filtering level - 16x
texture filtering quality - high
surface format optimization - high
Consider overclocking your graphics card to unlock it's full potential. DO NOT pursue this venture unless you are ok with the risk of burning out your card prematurely. I use at present, overclocked Bootcamp Drivers from BootcampDrivers.com obviously, if you're not playing on an intel based mac through Bootcamp, this is irrelevant to you.
None of these settings are useful until you address the default games limitations, which leads nicely into the next factor.
Addressing The Sims 4's Graphic Limitations:
Everyone should be familiar at this point with lighting mods, 4k, textures, disabling ssao, etc. but, I'm still going to spell it out. None of this is new information and has been covered many a time by various players ad nauseum.
remove ugly blue toned lighting in the world by choosing a lighting mod from @softerhaze here
overhaul your graphics.cfg file (i use a custom blend with features specific to me), however @simp4sims has done a ridiculous amount of work in providing a simple to install file that can be found here - read through their tutorials!! they have provided an excellent oversight of exactly what this does and why it matters
improve the indoor lighting for your sims - previously i used @luumia's no blu, no glo - recently i switched to @northernsiberiawinds better in game lighting mod here, though i have tweaked some of the settings to suit my own personal preferences
i don't use the HQ mod, i don't find that it makes enough difference for the amount of effort it requires to convert CAS CC
It should go without saying, but tweaking your graphics config file is absolutely useless if you can't play TS4 at it's maximum in game graphic settings!
The Mods You're Using:
Now that you've put in all this work into getting the game ready to make use of quality mods where do you start? Well, the CC you install matters. Whatever your preference, whether it be maxis-match, alpha or somewhere in between, priority should be given to using items textured in 2k or 4k resolutions, and specific attention should be paid to using wall and flooring textures with bump maps, and or high quality resolutions (this is important later for reshade if you intend to learn about ray tracing).
I will separately post a guide to creators with crispy textures because that is it's own novel.
Reshade:
Phew. Still with me?
There are many many many reshade presets out there, most are alike, but none employ ray tracing, and that is because a) it needs to be manually adjusted for every screenshot, b) they are paid shaders, and c) this requires advanced knowledge of reshade and a decent enough graphics set up that won't overheat - games running native ray tracing recommend a minimum VRAM of 8GB (please note RAM and VRAM are not the same) - i therefore do not recommend pursuing this option if your system does not meet those minimum requirements.

Start here to understand what ray tracing for reshade is. In my opinion, the shaders are well worth the price of $5 for the amount of work that has gone into creating them by the talented Pascal Gilcher. That link is a comprehensive starting point into expanding your knowledge of reshade and it's capabilities.
I have always created my own reshade presets from scratch, and while the core colorization settings I utilize remain largely the same, using ray tracing and re-light means every screenshot needs to be manually adjusted (lights repositioned, bounce and AO factors adjusted, etc) before being captured. @pictureamoebae just published a very timely post discussing the re-light shader and you can read it here.
Post Processing
Reshade does 99.99% of the work that traditionally would be accomplished in a photo editing software like photoshop. Occasionally, I need to adjust exposure manually, add depth of field manually, or color correct. Beyond that I use it to scale images to fit the resolution and file size limits of various platforms. Conceptually this reduces the amount of uncontrolled loss encountered when platforms like tumblr auto compress files that are too large. In reality, tumblr still makes images crappy compared to how they appear in my file folder.
optimize your images for various social media platforms using this guide
fix exposure or colorization issues using a software like photoshop
I hope that this gives you a starting point into expanding your methodologies. My process is continuously evolving and I find this aspect of the game most entertaining. For others who don't enjoy this process, it's probably not worth it!
Thanks for reading ❤ PXL
477 notes
·
View notes
Text
The Great Work of the Magnus Institute
Disclaimer/spoiler warning: Written after TMAGP ep. 35. Spoilers for all of the Magnus Protocol until this point. Also spoilers for the Magnus Archives.
I base all of these ideas on the tria prima theory I explained in an earlier post, so go read that for context.
Lesser Disclaimer: If any of these theories seem half-baked, the reasons are three-fold: 1. Alchemy has a lax scientific framework and the writings are obscure by design (for secret-guarding reasons), so the ideas are somewhat muddled and difficult to parse. 2. I know that Alex's system is highly specific, so he must have found/created a way to reconcile the inconsistencies into a coherent system that also lends itself to the needs of the podcast. Since I'm working backwards from the podcast towards the system, I know I'm bound to miss something. 3. I simply don't think I have all the pieces of the puzzle yet, but I'll make do with what we have.
Briefly on quintessence or aether
Aether or quintessence is the elusive fifth element. It's said to be the perfect and pure essence that fills the universe beyond the highest elemental sphere (fire). This is kind of where things become muddled, because people have had various interpretations of its nature. Some say it only exists outside the Earth, while others think that it's everywhere, though not directly interacting with the elements. Some see it as the world soul or anima mundi, the life force and source of all human thought and imagination. Aether is perfect and unchangeable, but some think it can be created by taking the source of all elements, prima materia, and perfecting it by cleansing it from its imperfections through transmutation. The physical manifestation of the quintessence is known as the Philosopher's Stone, and the transmutation process is known as the Great Work, or Magnum Opus. The Philosopher's Stone can be used to transmute anything into its ultimate, perfect form (most famously lesser metals into gold).
The symbols for the Magnum Opus (including the Philosopher's Stone) and aether are embedded into the logo:

Prima materia is another confusing can of worms, but some seemed to think the most fitting material is a form of mercury (the metal) that consists of the purest form of Sulphur, Salt and Mercury: "Hence the philosophers have said that this same Mercury is composed of body, spirit, and soul, and that it has assumed the nature and property of all elements." (Paracelsus, The Aurora of the Philosophers)
Now onto the actual theories.
The Institute and their Magnum Opus
We know that the Institute was concerned with completing their Great Work at the turn of the millenium. To this end, they planned to hold an exhibit at the newly constructed Millenium Dome, so that they could harness its power for their project. We also know that one Mr. Kennings expressed concerns about the timing, location and concept of the project. The location was already turning into a locus (ie. it was metaphysically poisoned and out of balance). The turn of the millenium was considered appropriately transformative, but he was worried that the Gregorian calendar was too culturally specific to be universally applicable, and also that people's attitudes leaned towards the fearful and the ideas of stagnation. Therefore, the output of the Dome would also be unbalanced.
Based on this, it's apparent to me that their Magnum Opus was supposed to be a universal transmutation of the entire world. They wanted to tap into the mercurial ideas of the future and the sulphuric feelings about it and use them to guide the entire planet through the transmutative process into ascension. So that we might all become the pure, perfect, unchanging, celestial matter: quintessence. If Jonah Magnus of TMA wanted to make a new world, I can't see why the Magnus Institute of TMAGP wouldn't want the same.
What's particularly worrisome about this is that I don't think everyone's intentions were pure. Kennings seemed to think that Dr Welling tried to account for balance in his calculations, but do we know that they weren't skewed on purpose? What if, inspired by Magnus himself, Welling decided that fearful feelings would aid the transformation better than hopeful ideals? And wouldn't those properties then manifest in the end result? Although I don't see how the stagnation would help anyone, since it would hinder any sort of transformation. The locus itself was (according to my tria prima model) low on sulphur, which would further harm any efforts at transmutation. You cannot transmute without fire. Either way, I'm keeping a close eye on Dr Welling. I think he was and crucially continues to be bad news.
Other alchemical experiments
We know that the Institute ran a program for "gifted children", though we don't currently know the real purpose of it. We also know that they have been collecting supernatural statements and cursed objects, which they evaluate in terms of their viability as a subject, agent or catalyst. They have also been known to incarcerate people, and Sam witnessed one failed human experiment (interrupted in the middle of what appeared to be the citrinitas stage of a transmutation, where the solar light is manifested from within).
I believe all of the above were done in preparation for their own Magnum Opus. They needed subjects, predominantly Salt, to undergo these experiments and transmutations. They needed agents, ideally Mercury, to impress upon these subject, to make them malleable, and perhaps even use as the material for their Great Work. And they needed catalysts, mostly Sulphur, to fuel and guide the transmutation. The dimension hopping guy from episode 17 ranks low on all, since in the end he's just a guy. The lucky/unlucky dice rank "none" on subject, "low" on agent and "medium" on catalyst. That also makes sense, because their ability to cause change is the most promising part. The pier (or whatever's in the fog) from episode 33 once again ranks low on all, and they state that its acquisition would be too risky. I also think it might be quite difficult to manage, hence the low potential.
I can't really speculate what they needed the children for, though they would probably also fit in one of the three categories. Maybe they wanted to test the idea of tapping into people's thoughts and feelings for a source of power, sort of as a prototype for their Work. It could explain why Gerry doesn't remember much from those times. But this is the purest of speculation.
The Archivist is a catalyst
I currently have two competing theories for the origin of the Archivist.
It somehow made it through a rift from another dimension where the Fears have manifested. The Institute and their Outreach Centre caught it and locked it up.
Inspired by Magnus's "research" on what happens when you feed your colleague to a Victorian taxi, the people at the Institute went on to alchemically make a creature that transmutes fear. And then they locked it up.
Be it as it may, in the metaphysical reality of TMAGP, the Archivist is the perfect catalyst for the perfect material. Think about it: fear is as close as you can get to that "pure mercury", the intersection between body, spirit and soul. It is the physical sensations, the shivers, the quickening pulse, the tangible reactions of the body. It's also the ideas or concepts, it's "the Vast" or "the Web" or "the Desolation" or any number of things you can think of. And finally, it's the soul, the feeling, the need to react, the conscious experience of being afraid.
And what does the Archivist do? It drinks it all up, and it separates it into parts, and it manifests it into reality as water, starvation, broken lenses or knives. It transmutes the incorporeal idea and experience into the very corporeal thing that kills you. It is pure Sulphur, a hungry fire constantly looking to be satiated, and while feeding it catalyses a transmutation in the victim.
I think they (or at least, Dr Welling) were thinking of using the Archivist as a catalyst for their Great Work. Maybe that's why he wanted there to be more fear in the output. Honestly, Dr Welling has become quite the boogeyman in my mind, and I wouldn't be surprised if he were to play an integral part in the future.
#the magnus protocol#tmagp#tmagp spoilers#tmagp theory#tmagp tria prima theory#the magnus archives#magnus institute#the archivist#magnussing#dr welling#i have come to hate paracelsus
38 notes
·
View notes
Note
i know this is like baby communist stuff but do you have any recommendations on how to approach theory? aside from like marxists dot org
sorry forgot this ask was here. i'm not sure if you mean getting into marxist theory specifically or just, how to approach dense theoretical texts that are often unwelcoming to new readers.
regarding marxism, i personally get a lot out of michael heinrich's how to read capital every time i revisit it, and his introduction to capital. david harvey also has some useful work, including a companion to marx's capital. harvey also has a lot of problems (see here to start) and tbc i'm not suggesting him or heinrich because i think you should treat them as unassailable authorities. but i find that both of them are useful for glossing and presenting many of marx's ideas in a way that makes it clearer to lay readers how they're formulated and what's at stake. if you've ever opened capital and just been like "these corn laws must be important but i'm not sure i understand why", i think companion guides like heinrich's especially can be really helpful for giving you a foothold and an idea of what to look for, how to evaluate the utility and applicability of the concepts, &c.
in general, getting into theory can definitely be intimidating but i also think it's less scary than people make it look at first. what concepts or problems or people are interesting to you? that's where you should start; you might find that you end up wanting to read the people they were responding to as well, but i think it's a common mistake to psych yourself out by trying to trace every theoretical concept back to its ultimate source (the old "reading plato so i can read kant so i can read hegel so i can read marx so i can..."). if you're baffled by a text, online is your friend; i really recommend the stanford encyclopedia of philosophy, and you can poke around their articles' bibliographies. also, if you're reading something and it sucks, hit the bricks. life is short. lastly i think discussing theory is not just fun but also useful, for pushing your own understanding and gaining someone else's insights. so, if you have friends who are into this stuff or access to a reading group or something, i'd take advantage. there are definitely ways to do this online as well, although there is something to be said for buying someone a pint and a pack and having a good argument :-)
171 notes
·
View notes
Text
Discover the Ultimate Guide to Kajal Eye Care Products | Top 10 Tips Included
Discover the Ultimate Guide to Kajal Eye Care Products | Top 10 Tips Included Discover the Ultimate Guide to Kajal Eye Care Products | Top 10 Tips Included Welcome to the ultimate guide to Kajal eye care products! If you’re looking to enhance the beauty of your eyes and achieve stunning results, you’ve come to the right place. In this comprehensive guide, we will explore the world of Kajal eye…

View On WordPress
#Application techniques#Captivating eyes#Discover the Ultimate Guide to Kajal Eye Care Products | Top 10 Tips Included#Enhancing eye beauty#Eye care routine#Eye makeup secrets#Kajal eye care#Kajal product recommendations#Nourishing eye products#Stunning eyes Eye makeup tips
0 notes