#Web developers
Explore tagged Tumblr posts
Visit Tumblr Blog
Explore Tumblr blogs with no restrictions, modern design and the best experience.
Last Seen Tumblr Blogs


Fun Fact
Users from the US are the majority of Tumblr visitors.
Text
Essentials You Need to Become a Web Developer
HTML, CSS, and JavaScript Mastery
Text Editor/Integrated Development Environment (IDE): Popular choices include Visual Studio Code, Sublime Text.
Version Control/Git: Platforms like GitHub, GitLab, and Bitbucket allow you to track changes, collaborate with others, and contribute to open-source projects.
Responsive Web Design Skills: Learn CSS frameworks like Bootstrap or Flexbox and master media queries
Understanding of Web Browsers: Familiarize yourself with browser developer tools for debugging and testing your code.
Front-End Frameworks: for example : React, Angular, or Vue.js are powerful tools for building dynamic and interactive web applications.
Back-End Development Skills: Understanding server-side programming languages (e.g., Node.js, Python, Ruby , php) and databases (e.g., MySQL, MongoDB)
Web Hosting and Deployment Knowledge: Platforms like Heroku, Vercel , Netlify, or AWS can help simplify this process.
Basic DevOps and CI/CD Understanding
Soft Skills and Problem-Solving: Effective communication, teamwork, and problem-solving skills
Confidence in Yourself: Confidence is a powerful asset. Believe in your abilities, and don't be afraid to take on challenging projects. The more you trust yourself, the more you'll be able to tackle complex coding tasks and overcome obstacles with determination.
#code#codeblr#css#html#javascript#java development company#python#studyblr#progblr#programming#comp sci#web design#web developers#web development#website design#webdev#website#tech#html css#learn to code
2K notes
·
View notes
Text
“I Need Your Support to Continue My Studies and Build My Future from Gaza🍉🍉

My name is Mahmoud Naeem Abu Hatab, from Gaza.
I am a university student majoring in Software and Databases at Al-Azhar University. Since the beginning of my academic journey, I have been passionate about User Experience (UX) and User Interface (UI) design, as well as website development. These fields inspire me, and I dream of advancing my skills and building a professional career in them.
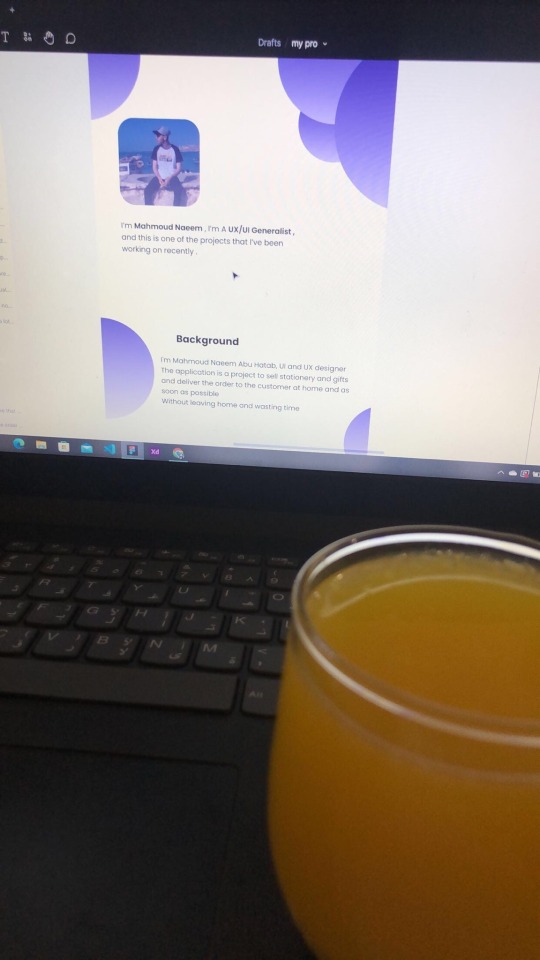
Unfortunately, during the recent war, I lost my laptop, which was essential for both my studies and work. I was forced to flee my home and relocate to southern Gaza due to the difficult circumstances. Despite my efforts to replace my laptop, the financial situation has made it impossible to afford a new one.

Without a laptop, continuing my studies or seeking job opportunities in programming and design has become extremely challenging. This directly affects my academic progress and future career.
Today, I am reaching out to ask for your support to help me purchase a new laptop. Having a laptop would allow me to resume my studies and work on programming and design projects that are crucial for improving my skills. It is a vital step towards completing my education and pursuing my dream of becoming a professional in programming and UX/UI design.
I know that the situation in Gaza is difficult, but I believe education is the only path to building a better future for myself and my family. If you are able to contribute any amount to help me get a new laptop, it would be a real opportunity for me to get back on track academically and professionally.
I am determined to keep learning and working despite the challenges, but I need your support to achieve this goal. Every donation or act of help, no matter how small, will make a significant difference in my life.
If you’d like to support me, you can donate through:
GoFundMe
OR
USDT

If you can assist in any way, please don’t hesitate to reach out to me.
Thank you for your support and kindness! 🌿
@gaza-evacuation-funds @appsa @nabulsi27 @palestinegenocide @orblesbian @palebluebutler @pallasisme @fallahifag-deactivated20240722 @vakarians-babe @sayruq @ @plomegranate @riding-with-the-wild-hunt @queerstudiesnatural @tamamita @apollos-boyfriend @riding-with-the-wild-hunt @queerstudiesnatural @palestinegenocide @sar-soor @akajustmerry @annoyingloudmicrowavecultist @feluka @marnosc @flower-tea-fairies @flower-tea-fairies @tsaricides @tsaricides @belleandsaintsebastian @ear-motif @brutaliakent @raelyn-dreams @troythecatfish @4ft10tvlandfangirl @90-ghost @paper-mario-wiki @nabulsi @prisonhannibal @beepiesheepie @walcutt @schoolhater98 @commissions4aid-international @sar-soor @zigcarnivorous@tododeku-or-bust@turtletoria @brutaliakhoa @flower-tea-fairies @schoolhater @baby-girl-aaron-dessner @sayruq @omiteo777 @malcriada @neptunerings @bat-luun @kaneverse @nightowlssleep @staretes @friendshapedplant @soon-palestine @aria-ashryver @heritageposts @magnus-rhymes-with-swagness-blog @khangerinedreams @kordeliiius @mazzikah @feluka @dlxxv-vetted-donations @girlinafairytale @a-shade-of-blue @vakarians-babe @babygoatsandfriends @self-hating-zionist @mangocheesecakes @dlxxv-vetted-donations @gazaboovintage @gazavetters @wellwaterhysteria @sar-soor @applebunch @irhabiya @sayruq @xxx-sparkydemon-xxx @junglejim4322 @reptilianspecies @dr-lapdance @tamamita @cantsayidont @fairweathermyth @dear-indies @eruthiawenluin @katealot @lenasai @stalinistqueens @ayeshjourney @gaza-evacuation-funda @el-shab-hussein @irhabiya @nabulsi @ibtisams @dlxxv-vetted-donations @tododeku @a-shade-of-blue @gaza-relief-fund @catnapdreams @northgazaupdates @buttercuparry @stuckinapril
#voic of gaza#gaza#free palestine#palestine#free gaza#save gaza#save palestine#help gaza#help palestine#programming#studying#uxdesign#ui ux design#uidesign#ui#ux#user interface#user experience#figma#xd#web design#web development#web developers#mobile design#html#css#js#javascript#java#front end development
296 notes
·
View notes
Text
Introduction To HTML
[Note: You need a text editor to do this. You can use Notepad or Text Edit. But it's so much better to download VS Code / Visual Studio Code. Save it with an extension of .html]
HTML stands for Hyper Text Markup Language
It is used to create webpages/websites.
It has a bunch of tags within angular brackets <....>
There are opening and closing tags for every element.
Opening tags look like this <......>
Closing tags look like this
The HTML code is within HTML tags. ( // code)
Here's the basic HTML code:
<!DOCTYPE html> <html> <head> <title> My First Webpage </title> </head> <body> <h1> Hello World </h1> <p> Sometimes even I have no idea <br> what in the world I am doing </p> </body> </html>
Line By Line Explanation :
<!DOCTYPE html> : Tells the browser it's an HTML document.
<html> </html> : All code resides inside these brackets.
<head> </head> : The tags within these don't appear on the webpage. It provides the information about the webpage.
<title> </title> : The title of webpage (It's not seen on the webpage. It will be seen on the address bar)
<body> </body> : Everything that appears on the webpage lies within these tags.
<h1> </h1> : It's basically a heading tag. It's the biggest heading.
Heading Tags are from <h1> to <h6>. H1 are the biggest. H6 are the smallest.
<p> </p> : This is the paragraph tag and everything that you want to write goes between this.
<br> : This is used for line breaks. There is no closing tag for this.
-------
Now, we'll cover some <Meta> tags.
Meta tags = Notes to the browser and search engines.
They don’t appear on the page.
They reside within the head tag
<head> <meta charset="UTF-8"> <meta name="viewport" content="width=device-width, initial-scale=1.0"> <meta name="description" content="Website Description"> <meta name="Author" content="Your Name"> <meta name="keywords" content="Websites Keywords"> </head>
Line By Line Explanation:
<meta charset="UTF-8"> : Makes sure all letters, symbols, and emojis show correctly.
<meta name="viewport" content="width=device-width, initial-scale=1.0"> : Makes your site look good on phones and tablets.
<meta name="description" content="Website Description"> : Describes your page to Google and helps people find it.
<meta name="author" content="Your Name"> : Says who created the page.
<meta name="keywords" content="Website's Keywords"> : Adds a few words to help search engines understand your topic.
_____
This is my first post in this topic. I'll be focusing on the practical side more than the actual theory, really. You will just have some short bullet points for most of these posts. The first 10 posts would be fully HTML. I'll continue with CSS later. And by 20th post, we'll build the first website. So, I hope it will be helpful :)
If I keep a coding post spree for like 2 weeks, would anyone be interested? o-o
#code#codeblr#css#html#javascript#python#studyblr#progblr#programming#comp sci#web design#web developers#web development#website design#webdev#website#tech#html css#learn to code#school#study motivation#study aesthetic#study blog#student#high school#studying#study tips#studyspo#website development#coding
98 notes
·
View notes
Text
omw to hyper-push all my single commits to yr git repo
#the simpsons#web developers#version control#github#90s#homer simpson#tv#satire#adult cartoon#matt groening#video#u
30 notes
·
View notes
Text
what do you want in a system app?
What apps and tools do you use for being a system and why?
What do you like about the apps and tools you use for being a system
Is there anything you dislike about the apps and tools you use for being a system
What would you like to see in a sys app?
#endos dni#cdd system#did system#dissociative system#polyfrag system#system stuff#system things#traumagenic system#polyfrag did#actually did#did osdd#did alter#osdd#osddid#app development#app developers#app design#web development#web design#website design#web developers
84 notes
·
View notes
Text
Do you need to build a static website for fun or profit?
Try the Simple.css Framework. It is a CSS framework that makes semantic HTML look good.
A good-looking sans-serif local font stack.
Typographic best practices.
Automagic flipping to dark mode.
Fully responsive.
Sensible defaults that format standard + HTML elements.
Super lightweight (10k css).
Give it a try @ https://simplecss.org/ (my home page https://vivekgite.com for live demo).
44 notes
·
View notes
Text
Progress:
Okay so the authentication for spotify is hard for me to understand and requires user authentication, then making a token request that while expire in an hour. So i focused on what I did know how to do and what I had access to token wise. The Spotify developer home page has a temporary access token for demos. I took that token and made a function to make get request to the API and two functions for top tracks and top artists. Then made some functions to print them in my terminal. Here is what my end product looked like in the terminal.


The data for tracks is proving to just show a years worth of listening even though I specified long_term in my get request.
Here is my code:

I tried just doing track.artist but Spotify handles that as multiple artists so I had to handle them as such.
Next Steps: Tackling the user authentication and token requests and including it in this code.
(Also yes I know that is a concerning amount of My Chemical Romance tracks. I had my MCR phase strike up again with a passion last October and I am still balls deep in it.)
#coding#baby coder#web developers#spotify api#software engineering#web development#javascript#nodejs#node-fetch#terminal app#visual studio code#vs code#backend#frontend#my chemical romance#the weakerthans#u2#modern baseball#pup the band#oasis#wilco#misfits#descendents#programmer#programming#github#developers
11 notes
·
View notes
Text
DOES ANYONE KNOW HOW TO MAKE A WEBSITE I HAVE AN IDEA
IVE BEEN THINKING FOR LIKE THE PAST FEW MONTHS A WEBSITE WHERE YOU CAN UPLOAD HEADCANONS OF A CHARACTER.ITS LIKE PRONOUNPAGE BUT LIKE.FOR CHARACTERS.AND YOU CAN LOOK FOR OTHER PEOPLE'S HEADCANONS ok.let me explain when you log into the website and create a profile, you can submit a headcanon for a character you'd have to specify what character from what media/fandom it is since theres also like.a discovery screen with a search bar where you can look up any character/media and see headcanons for that character/media [you can also look up people's profiles to look through all their headcanons] when you create/look at a headcanon page for a character it shows a screen that looks smth like this [i made this in april so its a little outdated]
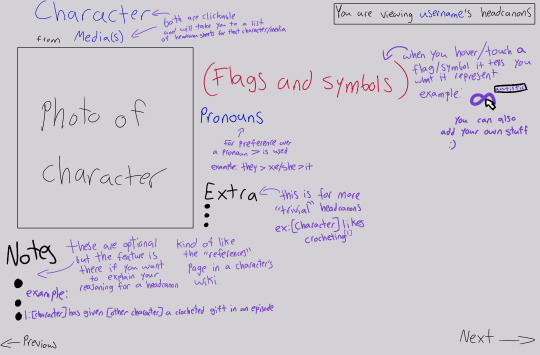
you can add more that one photo btw.it makes like a little album and you can scroll through the images.since ik people like to make alternate designs of characters [same i do it too] you can make your headcanon pages for each character private or public, privating a headcanon page would be the same as "unlisting" a video on youtube, making it only accessible to the headcanon page's creator and anyone who has the link to it. also if you're making a headcanon page and its not finished then the draft saves as a private headcanon page and you can edit your pages whenever you want [even if theyre already public] the original name i had for the website was something along the lines of "headcanon headcount" because both abbreviate to hc so it could be called something like hc2 or smth [like how archive of our own is abbreviated to ao3] but i am very open to better ideas cuz i think that name kinda sucks PLEASE HELP THIS WOULD BE SO AWESOME IF IT WAS REAL
#thief talks#um what the fuck do i tag this#web designing#website developer#website developing#headcanon#headcanons#web developers#website design
26 notes
·
View notes
Text
!!!!PLEASE READ!!!! Hello dear friends, my name is Angel and I'm a freelance artist trying her best.
My goal, while developing my own world and stories, is to bring you great communication and quick quality work!
Now:
I have officially launched my website on Carrd with the help of my good friend Imumcoeli. I am so thankful for her so please bury her in love and support!
I'm so happy with how it looks and works so you should check it out if you would like to work with me on achieving your goals for your characters and worlds!
PLEASE SHARE!!!!
#original art#artwork#illustration#digital art#illustrator#illustrative art#original character#sketch#sketches#painting#website#user experience#web design#web developers#url change#media#social#internet#computers#lists#open commissions#commission#commission art#commission work#art commisions#commisions open#digital commisions#taking commisions#freelance artist#small artist
6 notes
·
View notes
Text

Welcome back, coding enthusiasts! Today we'll talk about Git & Github , the must-know duo for any modern developer. Whether you're just starting out or need a refresher, this guide will walk you through everything from setup to intermediate-level use. Let’s jump in!
What is Git?
Git is a version control system. It helps you as a developer:
Track changes in your codebase, so if anything breaks, you can go back to a previous version. (Trust me, this happens more often than you’d think!)
Collaborate with others : whether you're working on a team project or contributing to an open-source repo, Git helps manage multiple versions of a project.
In short, Git allows you to work smarter, not harder. Developers who aren't familiar with the basics of Git? Let’s just say they’re missing a key tool in their toolkit.
What is Github ?
GitHub is a web-based platform that uses Git for version control and collaboration. It provides an interface to manage your repositories, track bugs, request new features, and much more. Think of it as a place where your Git repositories live, and where real teamwork happens. You can collaborate, share your code, and contribute to other projects, all while keeping everything well-organized.
Git & Github : not the same thing !
Git is the tool you use to create repositories and manage code on your local machine while GitHub is the platform where you host those repositories and collaborate with others. You can also host Git repositories on other platforms like GitLab and BitBucket, but GitHub is the most popular.
Installing Git (Windows, Linux, and macOS Users)
You can go ahead and download Git for your platform from (git-scm.com)
Using Git
You can use Git either through the command line (Terminal) or through a GUI. However, as a developer, it’s highly recommended to learn the terminal approach. Why? Because it’s more efficient, and understanding the commands will give you a better grasp of how Git works under the hood.
GitWorkflow
Git operates in several key areas:
Working directory (on your local machine)
Staging area (where changes are prepared to be committed)
Local repository (stored in the hidden .git directory in your project)
Remote repository (the version of the project stored on GitHub or other hosting platforms)
Let’s look at the basic commands that move code between these areas:
git init: Initializes a Git repository in your project directory, creating the .git folder.
git add: Adds your files to the staging area, where they’re prepared for committing.
git commit: Commits your staged files to your local repository.
git log: Shows the history of commits.
git push: Pushes your changes to the remote repository (like GitHub).
git pull: Pulls changes from the remote repository into your working directory.
git clone: Clones a remote repository to your local machine, maintaining the connection to the remote repo.
Branching and merging
When working in a team, it’s important to never mess up the main branch (often called master or main). This is the core of your project, and it's essential to keep it stable.
To do this, we branch out for new features or bug fixes. This way, you can make changes without affecting the main project until you’re ready to merge. Only merge your work back into the main branch once you're confident that it’s ready to go.
Getting Started: From Installation to Intermediate
Now, let’s go step-by-step through the process of using Git and GitHub from installation to pushing your first project.
Configuring Git
After installing Git, you’ll need to tell Git your name and email. This helps Git keep track of who made each change. To do this, run:

Master vs. Main Branch
By default, Git used to name the default branch master, but GitHub switched it to main for inclusivity reasons. To avoid confusion, check your default branch:

Pushing Changes to GitHub
Let’s go through an example of pushing your changes to GitHub.
First, initialize Git in your project directory:

Then to get the ‘untracked files’ , the files that we haven’t added yet to our staging area , we run the command

Now that you’ve guessed it we’re gonna run the git add command , you can add your files individually by running git add name or all at once like I did here

And finally it's time to commit our file to the local repository

Now, create a new repository on GitHub (it’s easy , just follow these instructions along with me)
Assuming you already created your github account you’ll go to this link and change username by your actual username : https://github.com/username?tab=repositories , then follow these instructions :


You can add a name and choose wether you repo can be public or private for now and forget about everything else for now.

Once your repository created on github , you’ll get this :

As you might’ve noticed, we’ve already run all these commands , all what’s left for us to do is to push our files from our local repository to our remote repository , so let’s go ahead and do that

And just like this we have successfully pushed our files to the remote repository
Here, you can see the default branch main, the total number of branches, your latest commit message along with how long ago it was made, and the number of commits you've made on that branch.

Now what is a Readme file ?
A README file is a markdown file where you can add any relevant information about your code or the specific functionality in a particular branch—since each branch can have its own README.
It also serves as a guide for anyone who clones your repository, showing them exactly how to use it.
You can add a README from this button:

Or, you can create it using a command and push it manually:

But for the sake of demonstrating how to pull content from a remote repository, we’re going with the first option:

Once that’s done, it gets added to the repository just like any other file—with a commit message and timestamp.
However, the README file isn’t on my local machine yet, so I’ll run the git pull command:

Now everything is up to date. And this is just the tiniest example of how you can pull content from your remote repository.
What is .gitignore file ?
Sometimes, you don’t want to push everything to GitHub—especially sensitive files like environment variables or API keys. These shouldn’t be shared publicly. In fact, GitHub might even send you a warning email if you do:

To avoid this, you should create a .gitignore file, like this:

Any file listed in .gitignore will not be pushed to GitHub. So you’re all set!
Cloning
When you want to copy a GitHub repository to your local machine (aka "clone" it), you have two main options:
Clone using HTTPS: This is the most straightforward method. You just copy the HTTPS link from GitHub and run:

It's simple, doesn’t require extra setup, and works well for most users. But each time you push or pull, GitHub may ask for your username and password (or personal access token if you've enabled 2FA).
But if you wanna clone using ssh , you’ll need to know a bit more about ssh keys , so let’s talk about that.
Clone using SSH (Secure Shell): This method uses SSH keys for authentication. Once set up, it’s more secure and doesn't prompt you for credentials every time. Here's how it works:
So what is an SSH key, actually?
Think of SSH keys as a digital handshake between your computer and GitHub.
Your computer generates a key pair:
A private key (stored safely on your machine)
A public key (shared with GitHub)
When you try to access GitHub via SSH, GitHub checks if the public key you've registered matches the private key on your machine.
If they match, you're in — no password prompts needed.
Steps to set up SSH with GitHub:
Generate your SSH key:

2. Start the SSH agent and add your key:

3. Copy your public key:

Then copy the output to your clipboard.
Add it to your GitHub account:
Go to GitHub → Settings → SSH and GPG keys
Click New SSH key
Paste your public key and save.
5. Now you'll be able to clone using SSH like this:

From now on, any interaction with GitHub over SSH will just work — no password typing, just smooth encrypted magic.
And there you have it ! Until next time — happy coding, and may your merges always be conflict-free! ✨👩💻👨💻
#code#codeblr#css#html#javascript#java development company#python#studyblr#progblr#programming#comp sci#web design#web developers#web development#website design#webdev#website#tech#html css#learn to code#github
94 notes
·
View notes
Text
Fanfiction Tracker
I love fanfic and I read a lot of it, and lately I’ve been trying to find ways to track what I’ve read, sort the fics I like and loved, etc., but nothing has proven to be 100% effective.
So, I was thinking of making a fanfic tracker site in which I could track my fics and sort them out, and automate that process a bit; kinda like a letterboxd, anime-planet, goodreads, etc. but for fics. It’d be mostly ao3 based, but I do plan for users to be able to add fics of other sites like ff.net, livejournal and even wattpad.
The thing is, I don’t know to code a site like that. I know a bit of coding but mainly on the design side, and even then it’s not much. So I’m here to recruit a team haha.
This would be a passion project, I have no money to pay you and I intend to keep the site as free as possible, following ao3 footsteps. However, if we do end up making money out of it, with the support of the users or whatnot, I’d share the profit. Either way, I believe this could be fun to make and I’m excited about it.
So, if you like fanfic as much as I do and/or are interested in the project, please hmu! :)
#fanfiction#fanfic#fic#ao3#ao3 fanfic#ao3fic#archive of our own#fanfiction net#livejournal#wattpad#coding#website#web development#web developers#web design#programming#programmer#fic tracker#fanfic tracker
9 notes
·
View notes
Text
Day 6 [Forms In HTML]
Introduction To HTML
Day 2 [Multimedia Elements In HTML]
Day 3 [Table in HTML]
Day 4 [Link Tag In HTML]
Day 5 [Lists In HTML]
Forms are basically used for collecting user information. And they are really important to learn. Here's a simple form in HTML:
Code:


Line By Line Explanation:
<form>: Used for creating forms. All the form elements go in this tag. Action: When submitted, data is sent to this file or URL [index.html] Method="post": Sends data
<label> : This describes the input tag for="___": Connects the label to the input with id="name" id : gives a unique identification to the tag <input>: It's used to make the form elements
<input> Type Elements :
type="text" : A simple text box is created.
type="email" : A box to input email.
type="checkbox" : A small square that users can tick. Can select multiple options using this.
type="radio" : A small circle, you can only select one option.
type="submit" : A button that submits the data to the server.
<textarea>: Accepts multiple lines of text. rows="4": It creates 4 lines cols="30": It creates 30 characters
<select> : Creates a drop-down list <option>: Creates an item in the dropdown. value="colorname": This is the data sent to the server if chosen.
Output For The Code:

_______________________
Hope This Helps !!
#code#codeblr#css#html#javascript#python#studyblr#progblr#programming#comp sci#web design#web developers#web development#website design#webdev#website#tech#html css#learn to code#school#study motivation#study aesthetic#study blog#student#high school#studying#study tips#studyspo#website development#coding
32 notes
·
View notes
Text
At Marketing Eye Webtech, we specialize in creating custom websites tailored to your business needs. Whether you’re a small local shop or a growing enterprise, we craft WordPress, Shopify, WooCommerce, and eCommerce websites that leave a lasting impression!
🚀 Why Choose Us? ✅ 7+ Years of Experience ✅ Responsive Designs ✅ SEO-Ready Websites ✅ Affordable Pricing
8 notes
·
View notes
Text
Tips for New Web Developers: Building a Strong Foundation
Tips for New Web Developers: Building a Strong Foundation
As a beginner in web development, it's important to focus on the fundamentals before diving into complex projects. Here are a few key tips to help you build a strong foundation:
Learn HTML & CSS: These are the building blocks of web development. Mastering them will allow you to create basic, functional websites.
Understand JavaScript: This language brings your websites to life by enabling interactivity. Start small and work your way up to more advanced concepts.
Responsive Design: Ensure your website looks great on all devices by learning responsive web design principles. Mobile-first design is crucial today.
Version Control (Git): Use Git for tracking changes to your code and collaborating with others. GitHub is a great platform to showcase your projects.
Focus on Clean Code: Write clean, readable code that is easy to maintain. It’ll help you and your future collaborators down the line.
Remember, the journey may be challenging, but with consistency and practice, you’ll become proficient and confident in web development. Keep coding! 🚀
#design#etsy#html#technology#website#web design#web developers#web development#html css#html5#htmltemplate#htmlcoding#frontenddevelopment#code
4 notes
·
View notes
Text
First Steps:
So I want to learn how to get access to the spotify api and my data first in my terminal. So I want to:
Get my top albums in terminal
Get my top artists in terminal
Get my top songs in terminal
If I figure it out really quick:
Add that json data into an xbar project on my Macbook
If that is easy then I'll add more stuff for when you click on xbar
#programmer#software engineering#software#code#coding#codeblr#website development#web developers#web design#baby coder#I know how to do nothing I just learned how to access APIs and make crude Ruby on Rails apps#ruby on rails#ruby
8 notes
·
View notes