#ADS tips
Text
A Short Guide to Helldivers 2
Welcome to the action-packed world of Helldivers 2, where the battle for democracy spans across hostile exoplanets teeming with alien threats. At first glance, Helldivers 2 might seem like your typical co-op shooter: drop into enemy territory, unleash havoc on alien foes, and extract before the peril overwhelms you. Yet, delve a bit deeper, and you’ll discover a complex game ripe with strategies,…

View On WordPress
#ADS tips#air drops#alien enemies#alien planets#alien warfare#ammo management#armor boosts#Automatons#battle for democracy#battle pass#battle tactics#battle tips#blitz missions#bug enemies#co-op shooter#combat guide#cooperative play#creative kills#crew weapons#democracy defenders#dive mechanic#enemy resistance#enemy weaknesses#environmental effects#environmental storytelling#explosive damage#extraction tactics#fire modes#fire rate#friendly fire
0 notes
Note
Tbh at this point you should just make your own webcomic app/website because it would probably be 100 times better than whatever going on with webtoon right now.
hahaha it wouldn't tho, sorry 💀
Here's the fundamental issue with webcomic platforms that a lot of people just don't realize (and why they're so difficult to run successfully):
Storage costs are incredibly expensive, it's why so many sites have limitations on file sizes / page sizes / etc. because all of those images and site info have to be stored somewhere, which costs $$$.
Maintenance costs are expensive and get more so as you grow, you need people who are capable of fixing bugs ASAP and managing the servers and site itself
Financially speaking, webcomics are in a state of high supply, low demand. Loads of artists are willing to create their passion projects, but getting people to read them and pay for them is a whole other issue. Demand is high in the general sense that once people get attached to a webtoon they'll demand more, but many people aren't actually willing to go looking for new stuff to read and depend more on what sites feed them (and what they already like). There are a lot of comics to go around and thus a lot of competition with a limited audience of people willing to actually pay for them.
Trying to build a new platform from the ground up is incredibly difficult and a majority of sites fail within their first year. Not only do you have to convince artists to take a chance on your platform, you have to convince readers to come. Readers won't come if there isn't work on the platform to read, but artists won't come if they don't think the site will be worth it due to low traffic numbers. This is why the artists with large followings who are willing to take chances on the smaller sites are crucial, but that's only if you can convince them to use the site in favor of (or alongside) whatever platform they're using already where the majority of their audience lies. For many creators it's just not worth the time, energy, or risk.
Even if you find short-term success, in the long-term there are always going to be profit margins to maintain. The more users you pull in, the more storage is used by incoming artists, the more you have to spend on storage and server maintenance costs, and that means either taking the risk at crowdfunding (ex. ComicFury) or having to resort to outsider investments (ex. Tapas). Look at SmackJeeves, it used to be a titan in the independent webcomic hosting community, until it folded over to a buyout by NHN and then was pretty much immediately shuttered due to NHN basically turning it into a manwha scanlation site and driving away its entire userbase. And if you don't get bought out and try your hand at crowdfunding, you may just wind up living on a lifeline that could cut out at any moment, like what happened to Inkblazers (fun fact, the death of Inkblazers was what kicked off the cultural shift in Tapas around 2015-16 when all of IB's users migrated over and brought their work with them which was more aimed towards the BL and romancee drama community, rather than the comedy / gag-a-day culture that Tapas had made itself known for... now you deadass can't tell Tapas apart from a lot of scanlation sites because it got bought out by Kakao and kept putting all of its eggs into the isekai/romance drama basket.)
Right now the mindset in which artists and readers are operating is that they're trying way, way too hard to find a "one size fits all" site. Readers want a place where they can find all their favorite webtoons without much effort, artists wants a place where they can post to an audience of thousands, and both sides want a community that will feel tight-knit. But the reality is that you can't really have all three of those things, not on one site. Something always winds up having to be sacrificed - if a site grows big enough, it'll have to start seeking more funding while also cutting costs which will result in features becoming paywall'd, intrusive ads, creators losing their freedom, and/or outsider support which often results in the platform losing its core identity and alienating its tight-knit community.
If I had to describe what I'm talking about in a "pick one" graphic, it would look something like this:
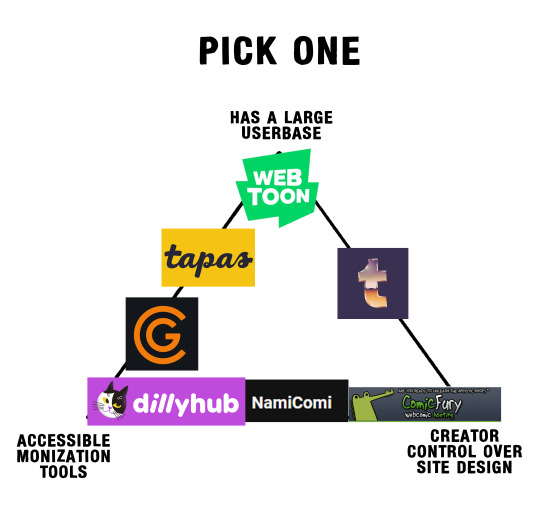
(*note: this is mostly based on my own observations from using all of these sites at some point or another, they're not necessarily entirely accurate to the statistical performance of each site, I can only glean so much from experience and traffic trackers LMAO that said I did ask some comic pals for input and they were very helpful in helping me adjust it with their own takes <3).
The homogenization of the Internet has really whipped people into submission for the "big sites" that offer "everything", but that's never been the Internet, it relies on being multi-faceted and offering different spaces for different purposes. And we're seeing that ideology falter through the enshittification of sites like Twitter, Facebook, Instagram, etc. where users are at odds with the platforms because the platforms are gutting features in an attempt to satisfy shareholders whom without the platforms would not exist. Like, most of us aren't paying money to use social media sites / comic platform sites, so where else are they gonna make the necessary funds to keep these sites running? Selling ad space and locking features behind paywalls.
And this is especially true for a lot of budding sites that don't have the audience to support them via crowdfunding but also don't have the leverage to ask for investments - so unless they get really REALLY lucky in EITHER of those departments, they're gonna be operating at a loss, and even once they do achieve either of those things there are gonna be issues in the site's longevity, whether it be dying from lack of growing crowdfunding support or dying from shareholder meddling.
So what can we do?
We can learn how to take our independence back. We don't have to stop using these big platforms altogether as they do have things to offer in their own way, particularly their large audience sizes and dipping into other demographics that might not be reachable from certain sites - but we gotta learn that no single site is going to satisfy every wish we have and we have to be willing to learn the skills necessary to running our own spaces again. Pick up HTML/CSS, get to know other people who know HTML/CSS if you can't grasp it (it's me, I can't grasp it LOL), be willing to take a chance on those "smaller sites" and don't write them off entirely as spaces that can be beneficial to you just because they don't have large numbers or because they don't offer rewards programs. And if you have a really polished piece of work in your hands, look into agencies and publishing houses that specialize in indie comics / graphic novels, don't settle for the first Originals contract that gets sent your way.
For the last decade corporations have been convincing us that our worth is tied to the eyes we can bring to them. Instead of serving ourselves, we've begun serving the big guys, insisting that it has to be worth something eventually and that it'll "payoff" simply by the virtue of gambler's fallacy. Ask yourself what site is right for you and your work rather than asking yourself if your work is good enough for them. Most of us are broke trying to make it work on these sites anyways, may as well be broke and fulfilled by posting in places that actually suit us and our work if we can. Don't define your success by what sites like Webtoons are enforcing - that definition only benefits them, not you.
#my favorite out of these is comicfury because it gives you the most control out of all of them#and you can offer monetization tools like ads and patreon links#it also offers super easy tools to help build your own site if you're new to that#it's as close to “running your own site” as comic hosting can get#but you can also learn how to run your own site if you want undeniably full control without fear of the platform host shuttering#also look into collectives like SpiderForest!#they basically operate as a co-op where people host their work with them and get ad opportunities#but you have to apply to get in#ama#ask me anything#anon ama#anon ask me anything#webcomic tips
6K notes
·
View notes
Text
Comment Bingo: Old Fic Edition
Very simple rules: connect 5 squares in a line by commenting on fics that suit the task in each square
Very simple goals: encourage readers to comment on older fics; encourage fandom writers to KEEP WRITING

STEPS:
Download Bingo Card HERE (png) or HERE (jpg) or HERE (pdf)
Complete the tasks on the card, marking off each as you go, until you've completed 5 in a line (vertical, horizontal, or diagonal; NO double-dipping; center ♥️ is a free space)
POST your winning card (or list your filled squares) and tag @feedthefandomfest! Glory in your victory.
SEARCH TIPS:
This card requires some familiarity with AO3's search filters. Once you've narrowed your results according to fandom/ship/additional tags, certain squares require you to sort the results by Date Updated, which is the default. Other squares require you to search for fics posted within a certain range of years, which you can do by scrolling on the search menu to More Options:


Note that to enter a date range, you must format the date as shown.
REWARD:
✨ victory badges ✨
New badge for this card, but here are examples from previous cards:


Tag me when you earn a bingo (or double, triple, quadruple... FULL CARD bingo) and I'll reblog a shiny badge with your name on it to commemorate the win.
FAQ:
Can I comment on tumblr or only on AO3?
Either one is great! This card especially is more designed with AO3 in mind, but some can be adjusted to suit tumblr as well, so I say go for it. Tumblr fics deserve love, too.
Can one comment count toward multiple squares if the fic fits more than one category?
Since the goal is for as many fics to receive comments as possible, try to comment on a different fic for each square.
Is there a time limit?
Nope! Take your time or set your own deadline, whatever works for you. This blog is still in its early experimental stage, so feedback welcome. Play around and let me know what you like and what might be added/changed—including ideas for squares on future cards!
Do I have to record progress on the actual card?
Nope! If it’s easier to keep track in a different way, that’s fine. This is all very honor system, so if you say you earned a Bingo, we’ll call it a win 🎉
Some people have been tracking not just completed tasks, but the fics they read along the way, so that when they post a bingo, they can also promote the fics/authors in a little rec list. Not required, but definitely cool to see!
Can I adjust the task in a particular square to suit my comfort level?
Of course! If you deliver something in the spirit of the task, then it’s all good. Use your best judgement in constructing a comment that will make the author smile, and you can consider it a job well done.
In general, so long as each square has produced at least one comment, you’re golden and I salute you 🫡
Happy commenting!!
#comment bingo#old fic edition#feed the fandom fest#this one is for the ambitious#more of a scavenger hunt than other cards#please note that you can narrow your search field however you wish before sorting according the task in the square!#i've added searching/filtering tips under the cut
2K notes
·
View notes
Text

who had dadow on they 2024 bingo card
#sonic the hedgehog#<- heres a tag i thought id never use lol#shadow the hedgehog#silver the hedgehog#dadow#parou sketches#watching gg for 7 years made me a sonic fan via osmosis i think#and it all came to a tipping point like 2 months ago ajkcskdj#for the record im not switching fandoms or smth im just adding to my joy#my blog i get to do what i want
774 notes
·
View notes
Text
here's a tip if you struggle with being too scared to write bc you want it to be perfect and you don't know where to start:
try opening a new document, copy paste what you have so far, and start writing from there. it takes SO MUCH pressure off knowing it's just a separate doc where you can experiment and do whatever you want, trust me
but also just write what you love, even if it turns out "bad." write that scene you daydream about or want to read, even if it comes later in the story or you're not going to share it with anyone. let yourself have fun with it
#writing#ad writes#writing tips#writing advice#writer problems#writeblr#writerscommunity#writers on tumblr#ao3#fanfic writer#fanfic#fanfiction#creative writing#writers block#writing hacks
3K notes
·
View notes
Text
Low level/continuous pain tips for writing
Want to avoid the action movie effect and make your character's injuries have realistic lasting impacts? Have a sick character you're using as hurt/comfort fodder? Everyone has tips for how to write Dramatic Intense Agony, but the smaller human details of lasting or low-level discomfort are rarely written in. Here are a few pain mannerisms I like to use as reference:
General
Continuously gritted teeth (may cause headaches or additional jaw pain over time)
Irritability, increased sensitivity to lights, sounds, etc
Repetitive movements (fidgeting, unable to sit still, slight rocking or other habitual movement to self-soothe)
Soft groaning or whimpering, when pain increases or when others aren't around
Heavier breathing, panting, may be deeper or shallower than normal
Moving less quickly, resistant to unnecessary movement
Itching in the case of healing wounds
Subconsciously hunching around the pain (eg. slumped shoulders or bad posture for gut pain)
Using a hand to steady themself when walking past walls, counters, etc (also applies to illness)
Narration-wise: may not notice the pain was there until it's gone because they got so used to it, or may not realize how bad it was until it gets better
May stop mentioning it outright to other people unless they specifically ask or the pain increases
Limb pain
Subtly leaning on surfaces whenever possible to take weight off foot/leg pain
Rubbing sore spots while thinking or resting
Wincing and switching to using other limb frequently (new/forgettable pain) or developed habit of using non dominant limb for tasks (constant/long term pain)
Propping leg up when sitting to reduce inflammation
Holding arm closer to body/moving it less
Moving differently to avoid bending joints (eg. bending at the waist instead of the knees to pick something up)
Nausea/fever/non-pain discomfort
Many of the same things as above (groaning, leaning, differences in movement)
May avoid sudden movements or turning head for nausea
Urge to press up against cold surfaces for fever
Glazed eyes, fixed stare, may take longer to process words or get their attention
Shivering, shaking, loss of fine motor control
If you have any more details that you personally use to bring characters to life in these situations, I'd love to hear them! I'm always looking for ways to make my guys suffer more write people with more realism :)
#voidrambles#writing#whump#does this count as that? whatever those folks will probably enjoy it at any rate#this is honestly mostly for my own reference but i hope it can maybe help some other people too :)#I'm so pulled in by books that write pain in a human and detailed way and not just when it's dramatic or intense#would love to see more of that and incorporate it into my own writing#oh i should have added. distraction seeking to that list#like writing a really long post about.#...yes i may be chronically ill and having a flare today and yes i may be farming myself for writing tips for Future Me hdgfhfhsjs#but hey gotta do your research somewhere babeyyy it all goes in the creativity soup#tw injury#tw illness
9K notes
·
View notes
Text
Love it when a modern "progressive" show makes all the evildoers physically disabled.
Larys has a Clubfoot, Aemond gets his eye cut out, and now Aegon is burnt and missing appendages.
Isn't it convenient that we can immediately tell a person is bad because their body looks different?
And of course, we don't explore any discrimination against these characters because they're horrible, and we shouldn't feel bad for horrible people.
People were mean to Larys because of his Clubfoot? But don't you know he has a gross foot fetish?
Aemond has impaired vision? But his eyepatch looks cool, and he is still a good fighter, so what is he even complaining about?
Aegon has been severely burnt? But he is a rapist and so let's make jokes about his dick burning off, lol.
#adding Helaena as neurodivergent and Alicent as an SA victim makes it even more fucking jarring that all these characters are on TG#Because of the obvious moral whitewashing of TB and Rhaenyra specifically#it is really gross how when you put the 2 factions next to each other you have the morally superior side all be pretty able-bodied people#and the other side is full of disabled people and victims who handle their trauma in unpalatable ways#in f&b this was less of an issue because no side was morally superior and the TG disabilities made an interesting sort of balance#book!Rhaenyra had to struggle because of her gender book!Aegon and Aemond because of their disabilities#but by tipping the scales the show created ruin their chance to create compelling disabled characters#they could have had their version of Tyrion Jaime and Bran instead they wrote a bunch of gross stereotypes#house of the dragon#ableism#hotd critical#anti hotd#aemond targaryen#larys strong#aegon ii targaryen
236 notes
·
View notes
Text
current favorite detail about humans is that for people who have problems swallowing pills, it is real and logical medical advice to wrap your meds up in food before swallowing. just like you would trick a dog into swallowing a pill. i love that
8K notes
·
View notes
Text
smartdraw.com - A cool website I found!
I wanted to do a blueprint of a scene and searched for a free online tool. This website has more than just house plans and mind maps, and I think it could really come in handy if you want to make some settings more approachable.


You can choose to start from scratch or use one of the many templates. The latter is probably easier in the beginning, to try out the different ways to arrange and color the objects. After getting used to the interface (it is similar to PowerPoint) you can use the result as a way to plan your scenes or give your readers a visual aid to follow the plot.
The symbols (or rather objects) for the floor plans, timelines, family trees, crime scenes etc. are sorted in many subcategories, e.g. Floor Plans -> Furniture -> Kitchen. No matter which type of diagram you pick, you can also use the objects from the others, so if you want an endoplasmic reticulum in your bathroom blueprint, go for it.

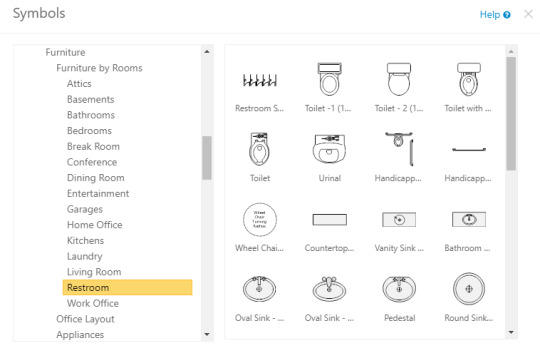
I think that for whump purposes you should especially check out the Crime Scene category for blood, drugs, weapons and so on.
I do have to say that I experienced some bugs and long loading time, but that could just be my ancient computer going wild. Also, the graphics are certainly not the prettiest. As someone who would have had to draw everything themself instead, it's still a great option.
TLDR: It's like Picrew but for locations.
#smartdraw#writing tips#writing advice#whump#whumpblr#creative writing#look at me doing free ads on here smh#i dont know why this makes me so exited lol#writing tool#design tool#free#online#i cant draw at all#this could be very useful for schoolwork too
1K notes
·
View notes
Text
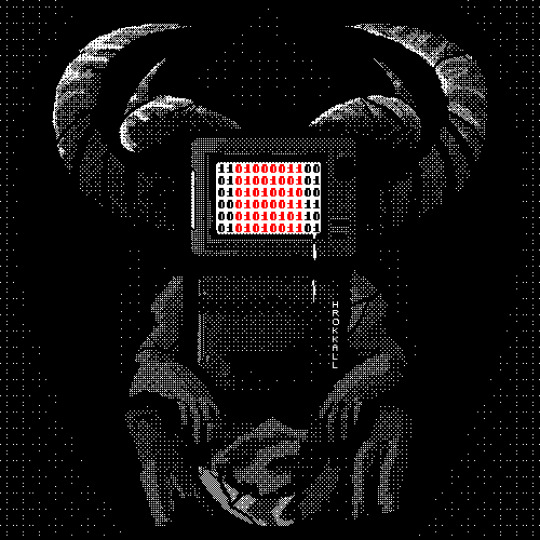
panda panda circus circus
#Panda Circus#Daniel Mullins Games#Pony Island#<- Does that tag apply??? No idea.#Found a slightly quicker way to do this. Emphasis on slightly though it... doesn't work 100% of the way </3#The process was blocking out the sections with the lasso tool and then using the dithering brushes I have instead of just.#Doing it pixel-by-pixel. Then I added random black and white pixels everywhere for weirdness because it looked too uniform otherwise.#Anyway pro tip don't do this when you have a migraine. You will regret it. Quickly.#Hrokkall Art
563 notes
·
View notes
Text
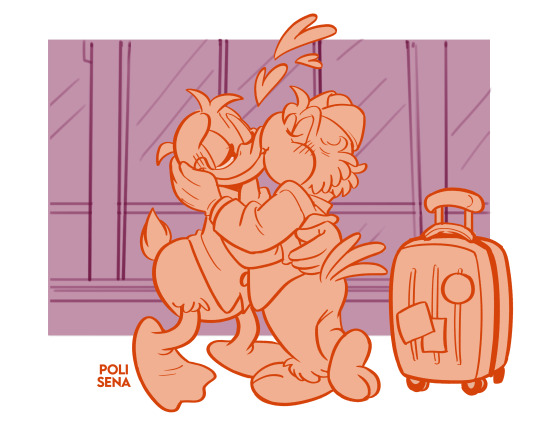
@donze-trash asked for DonZé airport kisses so this one request goes as a special Christmas present to them!! Thank you so much for your tip and Happy Holidays!!!
✨Ko-fi✨
#the three caballeros#donald duck#josé carioca#donzé#donald x josé#ducktales 2017#duckverse#polisenaart#requests#T is a special little guy who tipped WAY more than a doodle's worth so they get *drum rolls* an added simple background!!!
514 notes
·
View notes
Note
Hello,
My name is Mohammed from Gaza. I am not a robot or a scammer. Due to the war in Gaza, I lost my mother, father, and brothers, and I sustained severe injuries to my leg. I appeal to you to protect my children and take them out of Gaza and help me complete my treatment abroad because my leg is at risk of amputation due to the lack of necessary treatment 😭. My wife is suffering from uterine cancer and hasn't received a chemotherapy session since the beginning of the events in Gaza. I humbly request a donation of €5 or more to treat my leg, my wife, and my innocent children.
Every passing minute threatens me with losing my leg, my wife, or my children.
My campaign has been documented and my data verified, and you can verify my story by requesting any information you need. Please donate and share my story.
My wife, children, and I are waiting for your donations.
Thank you very much. 🙏🙏
I really wish I could but I can't donate any money at this moment but I will post your gfm link so you can get the help that you need.
PLEASE HELP THIS FAMILY IN NEED!!!!!!!!!!
#free palestine#free gaza#go fund them#all eyes on rafah#palestinian genocide#save gaza#save rafah#i stand with palestine#palestine news#satoru gojo x reader#please boost#adding random tags to boost the post#real#girlblogging#i’m not a waiter but i can take his tip#rodrick heffley#hiro hamada x reader#yandere earth 42 miles morales#fnaf#michael afton x reader#geto suguru#nanami x reader#jjk fanart#israel is committing genocide#stop the genocide#jjk x reader#sukuna#x yn
174 notes
·
View notes
Text
learning to spin on a drop spindle: a beginner’s lengthy yet comprehensive guide
I put this monograph together for a friend, but many other people wanted to read it as well, so here it is !
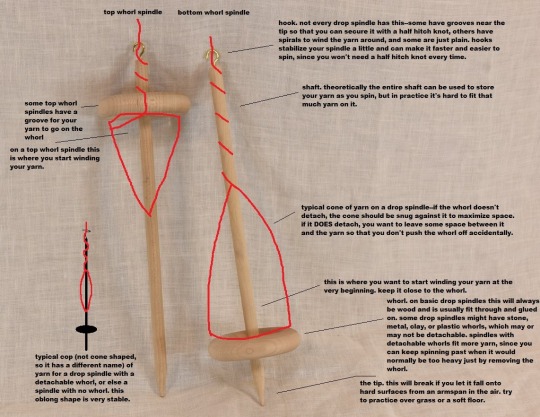
Fig A: Parts of a Drop Spindle. (image source. notes are mine. Click for higher res !). Apologies in advance for the lack of image descriptions--for the most part I use images because I can’t figure out how to describe the thing in words, so describing the images is kinda the whole issue. If anyone wanted to write them for me I’d add them to the original post in a heartbeat !
How to Get Started Drafting and Spinning
So, you have your fiber and your spindle--now what ?


Friendly pre-tutorial reminder that radfems can fuck right off if they think I’m writing any of this for their benefit. I’m not. I hope they all choke on their spindles <3. This is a safe space for trans people first and foremost.
(Check out this post that goes into picking a spindle and your first fiber, if you don’t have one yet)
First, you might wish to practice drafting a little. Drafting is the process of drawing the fibers out from, for example, a strand of roving or a rolag, into a thinner, airy length. To draft, loosely hold your fiber in your dominant hand, and pinch the very tip of the fiber with your thumb and forefinger of your non dominant hand. Then gently pull. If you pull all the way, you should notice that your fiber detaches from the fiber source eventually. For yarn, we want very very long lengths, so we don’t want that to happen. To get a continuous length of drafted fiber, simply change where you’re pulling from as you go. For example, you can draft out 2 centimeters/1 inch of fiber, and then move your fingers 2 cm/1 in back toward your fiber supply, and draft again.
The thinner you draft (or pre-draft*), the thinner that fiber will spin up. Once we start spinning, you’ll see how adding twist immediately compacts the fiber quite a bit, so you need to draft much thicker than you actually want your yarn to be. When pre-drafting specifically, if in doubt--draft thicker. You can always draft it out a little more as you’re spinning.
Figuring out how to draft smoothly can be one of the harder parts of learning to spin, but even before knowing how to do it perfectly you can still create good yarn.
Check out The Joy of Handspinning website to see drafting in action, as well as several different types of drafting.
Also check out this video explaining pre-drafting roving. 1:00-2:30 is especially helpful. If it’s not clicking from this video, search youtube for “pre drafting fiber for spinning” and watch til you have a better understanding.
*pre-drafting just means drafting before spinning--so it’s the same type of thing as drafting while spinning, but without having to wrangle your spindle at the same time. I’d recommend pre-drafting at least a bit of your fiber until you feel comfortable doing it. Then you can spin with your pre-drafted fiber, and it’ll be easier than if you hadn’t pre-drafted.
Tips: If you have a bottom whorl spindle, you may also want to practice spinning the spindle before it has any fiber on it, just to get a feel for how it moves. You could do this with the bottom point in a bowl or on a flat surface like a book or table. Try rolling the top of the shaft between your thumb and index finger. Don’t worry about it toppling over frequently--your spindle will be suspended by the yarn that you’re spinning, so it won’t topple !
If you have a top whorl spindle, you might have a harder time getting it to spin without being suspended, because the center of gravity is so high. Instead, try tying a piece of thread or scrap yarn to the hook (if it has one) or below the whorl (look for figure B below) and secure it with a half hitch knot. Then try spinning it like that, and let it hang freely to unwind itself whenever it has too much twist before you try again.
You can also try spinning a bottom whorl suspended by scrap yarn or thread. The advantage of trying it while it’s suspended is it can allow you to watch twist being added and see what it does without messing with your handspun, as well as letting you get a feel for how it moves while suspended. If you have a bottom whorl, I’d give both a try !
---
Now that you can draft, you’re gonna want to attach your fiber to your spindle. Some people use a leader to do this--it’s a pre-spun loop of yarn that you tie to your spindle. Then you loop some pre-drafted fiber through the loop of the leader, add twist til it holds, and off you go.
Another way to do it is without a leader. I’m much more familiar with this method, and I find it way easier, so I’ll go into more depth on this one:
1. Take the end of your pre-drafted fiber (you will need enough pre-drafted fiber to go from the underside of the whorl to the very top of the spindle, and then back again. If you’ve pre-drafted way more, don’t worry. We’re just working with this short amount for now, but it can stay attached). Make a slip knot at the end. You can roll the fiber between your fingers to add some twist if you’re having trouble making a slip knot with it. (Tip: if you’re having trouble getting the fibers to roll, wet them slightly with water or spit and it will be much easier)
2. Put the slip knot on the bottom point of your spindle, and slide it up so that it’s at the whorl.
3. Gently wind the pre-drafted fiber up the spindle shaft, until you are at the hook or top. Wind it over the hook (or do a half-hitch knot at the top--if there’s a groove near the top your half hitch should sit in there, otherwise it should sit as close to the top as possible while still being secure. You may drop it a few times while learning where the perfect spot is--such is life). Be careful with pre-drafted fiber--depending on staple length and fiber type, it can pull apart quite easily. The trick to keeping that from happening is to keep it a little slack and loose until you have added twist to it.
4. Pinch your pre-drafted fiber between your thumb and forefinger on your dominant hand, about 1 hand’s width from the top of your spindle. Turn the spindle in the direction you intend to spin your yarn (usually this will be clockwise, or to the right). Spin the spindle until you have the desired amount of twist. You should notice that all the fiber above the hook/half-hitch has twist, while the fiber below it has none. You need all of it to have twist, so let’s even it out--pop the half-hitch off with your thumb/unwind the yarn from the hook, unwind the yarn from the shaft so that the entire length you’ve worked with so far is stretched out. This will allow the twist to equalize. Now wind it all back up and put the half-hitch back/wind around the hook again. You may need to repeat this a couple times to get your starting fiber fully twisted (don’t worry though--you only need to do this at the very start. From here on you shouldn’t need to equalize twist like that until the next time you start from an empty spindle).
You’re done attaching the fiber--now you can spin !
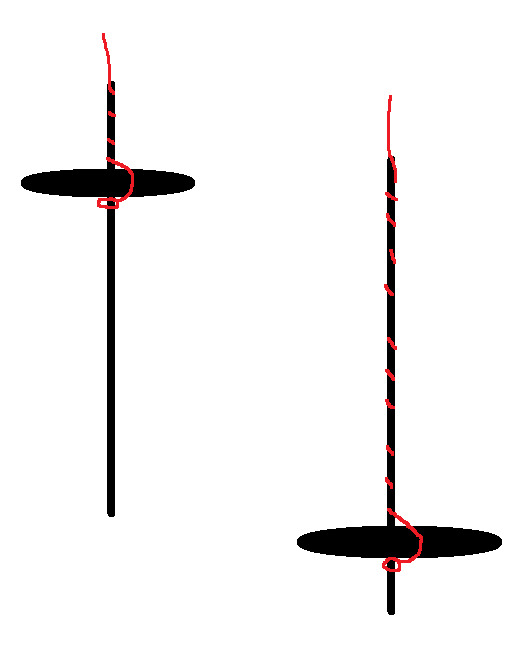
Fig B: How your yarn should sit on a spindle, both top and bottom whorl
If that doesn’t make sense, here’s a video showing how to attach it with and without a leader. If that doesn’t help either, search youtube for “how to attach leader to drop spindle” and keep looking until you have a better understanding.
---
So you know how to draft and your fiber is attached to your spindle--now it’s time to spin ! There are 3 different parts to spinning a singles on a drop spindle.
1. Adding twist. This can be done with just your hands, but the spindle makes it a whole lot faster. This is the purpose of a spindle--to add twist very quickly (and as a bonus, it’s a handy place to store the yarn as you spin it !). All you have to do is spin the spindle, and the only trick is to make sure you always spin in a consistent direction--don’t start a project spinning clockwise and end it spinning counterclockwise ! You’ll have an impossible time plying it then. There are a lot of different ways to spin a spindle--you’ll see a few watching the videos here, and more if you search out videos of drop spindling yourself. Whatever method is comfortable and practical for you is what you should do.
2. Drafting the fiber. You already know how to do this part !
3. Winding the yarn on. When your yarn is long enough that adding more length will make it hard to work with, you’ll want to wind it onto the spindle so that you can get back to spinning. To do this, pop the half hitch knot off the top/unwind from the hook, unwind along the shaft, and wind it near or at the base of the whorl, in the orientation seen in the very first picture. Always wind in the same direction that you’re spinning, to stop your yarn from flying off.
I would highly recommend starting with the method known as “park and draft” while you learn. In this method, you first add a ton of extra twist (usually as much as you can) and then put the spindle down and draft until that extra twist is used up. Then you wind on, and repeat. This isolates the actions of spinning so that you are only doing one at a time, which makes it a lot easier. Most people move on from this technique once they’ve figured it out, but you don’t have to--the drawback is that it’s typically slower, but hey, spinning is a slow craft anyway. There is no wrong way to spin, and everyone’s hands and bodies have different needs and work in different ways.
How to Park And Draft
First, use your dominant hand to pinch your pre-drafted fiber a few inches/6 cm above the top of the spindle.
Now just spin the spindle clockwise, until it won’t really spin any more. (Don’t try to get ~the most twist ever achieved~ or anything like that--your yarn can potentially snap from too much twist. Take your cue from the spindle--when it stops wanting to spin, you’ve got enough twist.) Don’t let the twist advance beyond where you’re pinching it off.
This is important--if the twist gets into your fiber, it becomes much harder to draft it. But don’t worry, you can undo this by pinching just above where the twist has entered your fiber, and with the other hand just below (pinching the actual yarn here). Now (with the hand that’s pinching the yarn) roll in the opposite direction that you’re spinning in. This will move the twist down into the rest of your yarn. Let go of where you’re pinching the fiber, slide your yarn-pinching hand to where it usually is as you’re spinning, and get back to it.
Your leader/yarn should be very kinked up and wiry. Now put the spindle between your thighs (or between your knees, under one knee, or under something heavy that won’t damage your spindle. Thighs are convenient, but if it’s uncomfortable, try putting the spindle somewhere else. It needs to be held firmly in place and not move around). This is the “park” part of “park and draft”.
Now, you want to be pinching the twist off at the same spot, but using your other hand instead. I usually pinch right above where I’m already pinching and let go with the lower hand.
First we’re going to just bring the twist up the pre-drafted fiber by sliding your pinching hand up the fiber, slowly and gently. You should see the twist follow behind your hand as it enters the fiber. If you have lots of pre-drafted fiber, you might wind on, add more twist, wind on again, etc. You could also draft out your pre-drafted fiber (this is what the majority of more experienced spinners who pre-draft do) while you go.
The “draft” part of “park and draft” is just like pre-drafting, but one end is attached to a spindle. This gives you something to lightly pull against, if you want. Draft slowly and with purpose.
At a certain point, you will run out of excess twist. At this point, wind on. If you’ve only done a short length, you can also add more twist, park it again, and go back to drafting.
If you’ve run out of armspan but still have lots of excess twist, unpark your spindle (let it hang free) and allow it to untwist a little, monitoring it closely. If this happens often, try to put less energy into twisting your spindle, or allow it to twist for less time.
The amount of twist that your yarn has matters a lot--it will impact your finished yarn hugely. A yarn without enough twist will be very limp and might even fall apart as you handle it. A yarn with too much twist will be wiry and inelastic. You want to find a middle ground where it’s got just the right amount for what you intend to use it for--a hard, inelastic wool yarn can make a good bag, but not a very good hat.
To see how much twist you’ve added to your singles as you spin, try a plyback test ! This is really quick to do on spindles--just relax the distance between your fiber supply and the top of the spindle. When the yarn is no longer taut, the live twist will cause it to twist back on itself. With too little twist, you may just get a few sad loops (or no loops, if it’s super undertwisted). With too much twist, you may get tons of tight little curls of yarn. With a good amount of twist, you should have a few good curls (just one if it’s a short length of yarn, or several if it’s your armspan) that aren’t too tight. Those curls are what your yarn will look like once 2 plied, so it’s a great litmus test for whether you’re adding the correct amount of twist or not.
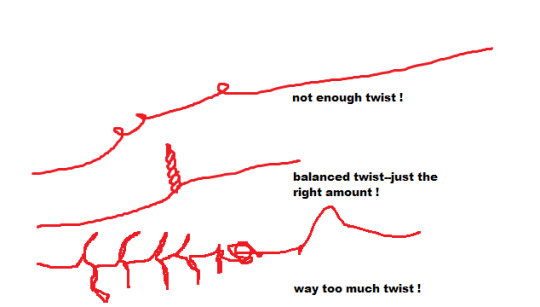
Fig C: What different amounts of twist looks like in your singles.
To fix too little twist, just spin the spindle a little extra until it looks right. To fix too much twist, either draft more fiber or else let the spindle untwist a little.
You can and should do this before winding each new length on, at least while you’re still learning the motions.
Check out this video of how to spin with the park and draft method ! 0:00-4:45 is intro and attaching the leader. 4:46-9:00 is the method itself (note to friend: don’t watch past 9 mins). If this video doesn’t work for you, search “drop spindle park and draft” on youtube.
A few interim tips
1. It’s critical to hold your fiber supply loosely. If you find that you have put a lot of force into drafting, then you are either holding your fiber way too tight or your hands are too close together (or potentially both). Drafting should not require force. If it is requiring force, adjust your grip and your hand placement continually until it gets better, and refine from there.
2. Try to put some tension on the yarn as you wind it on. This will make it sit a little neater and flatter, so that you have a more stable cone of yarn and can fit more on it.
3. If you draft out your fiber so much that it runs thin and just sort of disintegrates, just pull off the most wispy parts from your yarn and the fiber supply, then hold the two together again, making sure to overlap by several inches/6-10cm. Gently draft out a little and add twist before putting that join under the weight of your spindle, or it will fail again. You can join from one fiber source to the next one (necessary with rolags, hand combed top, and strips off of batts) in a similar way; make sure to leave a little unspun fiber for a good join, and overlap the end of the first fiber source with the beginning of the second by about an inch/2.5 cm.
4. If your yarn snaps (rather than your fiber running thin as you draft), it’s because it was A) twisted way too much B) spun too fine for the drop spindle you’re using C) both A and B or D) your spindle has become heavy enough that it can no longer spin as fine as you were spinning.
For A, B, and C: remove as much twist as you can from either end of the snapped yarn, then put both ends in your upturned palm, overlapping them over the whole width of your palm. Add enough either water or spit to get them good and wet (not dripping, but they do need to be wet). Now place your other palm down on top, and rub vigorously for about 30 seconds until the ends have joined together. If necessary, you can also just tie the ends in a knot, although it’s not invisible and you can usually feel it in the finished yarn.
For D: is your whorl removable ? If so, remove the whorl and continue spinning. If not (and for the vast majority of beginner’s drop spindles it won’t be), your spindle is full ! Even if there’s still room, it’s too heavy to continue spinning on for that project. You could keep going spinning a thicker yarn, but that means your yarn will randomly get thicker somewhere near the end, which works for very few projects. If this happens to you when there’s still tons and tons of room on your spindle, that means in general you ought to spin thicker yarn on that particular spindle if you want to fill it up all the way.
Okay, I spun yarn, now what ?
So at the moment, you have what we call a singles (some people just say “single”). That can be used as is, or it can be plied--that is, held together with more strands of singles and twisted in the opposite direction. But either way, you need to get it off your spindle !
If you’re going to leave it as a singles, then you’ll be winding it into a skein (we’ll get into that later). If you want to ply it though, you’ve got a lot of options. (I’ll get to how to actually ply later, this is just discussing those options.)
Many Methods of Plying
Plying Straight Off The Spindles
First, if you’ve got multiple spindles capable of spinning the same weight of yarn, you could just set your full spindle aside and spin another one. You’d need at least 3 spindles (the third, ideally, a bigger plying spindle) to get a 2 ply yarn, and 4 spindles to get a 3 ply with this sort of setup. This is what I do with supported spindles, since I have many, and I can attest that it saves a lot of winding time and is terribly convenient.
But it’s also probably not doable for many people, and it’s ridiculous to buy 3 drop spindles when you’re just getting into it !
Wind And Store
Second, you can wind your singles onto something for storage, and then use your now-empty spindle to spin another singles. Two great things to store yarn on are small rocks and empty toilet paper (loo) rolls.
Winding it around a small rock is better than just winding it into a ball for plying, since the rock will weight it and stop it from flying up in the air once you start plying. A big pebble works great. With this setup, you’d want to put all your balls of singles in a bowl or container of some kind, hold the ends of each, attach it to your spindle, and let them roll around as you ply.
They can tangle (mine usually don’t, but it can happen), so the toilet paper rolls might be an upgrade--these can be put on a stick, and the stick can be put on something (or you can poke two holes in a cardboard box, put the stick through one hole, load the rolls onto it, then put it through the other hole as well) to keep it stationary so that the rolls... well, roll. This requires some storage space (usually if you do this often, you don’t wanna make a new one every time, so keeping it is preferable) and is honestly not a huge upgrade... unless you have a ball winder that can wind the yarn onto the TP rolls for you, in which case this is a big time saver. If you don’t have one and don’t have issues with tangling, the rocks will probably work just as well and take up a lot less space.
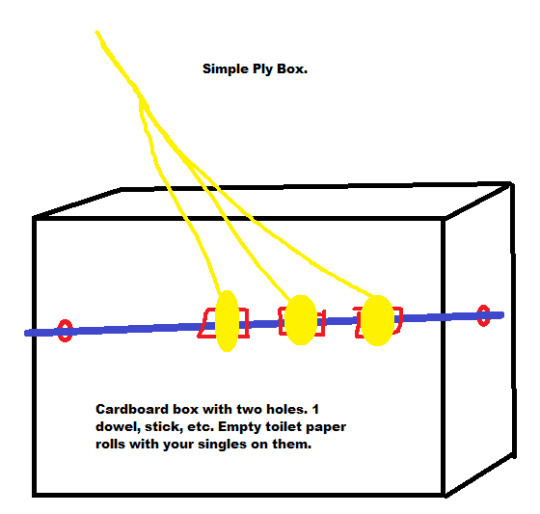
Fig D: Diagram of a Simple Ply Box
Ply Bracelet
Thirdly, if you want a 2 ply yarn specifically, you could wind it onto your hand and make something called an Andean Plying Bracelet. Here’s a link to a page that goes into it in detail. I highly, highly recommend learning how to do these. They look a little complex, and I couldn’t tell you the motions if my life depended on it, but I can do them with my eyes closed while not paying a whit of attention. They rely entirely on muscle memory, so once you learn them, they’re easy as pie.
The whole point of a plying bracelet is to get 2 strands of yarn out of 1 singles. You could of course wind a singles into a ball, then wind half of it onto another ball, and then ply from there. But a plying bracelet is a lot faster, and will always match up exactly.
One downside of a plying bracelet is that, as the name implies, it goes on your wrist. So if you keep needing to put your spindle down to take care of other things, you’ll need to pull off the plying bracelet as well (or carry the whole thing with you). They can be stored on a cylindrical object that’s smaller than your wrist, or sometimes also draped on hooks or put on the spindle shaft itself. I don’t usually encounter problems when pulling on or off my plying bracelets--it doesn’t seem to tangle them--but if you’re plying while cooking or watching a child or something else that might require you to stop immediately and hurry over to whatever needs tending, then you might want to save the ply bracelet for another day.
Chain Plying
Fourth, you could wind your singles into one ball, and then chain ply it. Chain plying is a way to turn one singles into a 3 plied yarn. It also preserves stripes in your singles (we’ll talk about this in more detail later), so it can be perfect for a very colorful singles.
Chain plying is simple. Do you know how to tie a slip knot ? Of course, because you needed one to start spinning ! (Although here’s the link to how to tie a slip knot again, if you need it.) So that means you basically know how to chain ply as well.
Step one: tie a slip knot at the end of your singles (you want a very short tail, since that’s basically waste). Make the resulting loop nice and big, and lay it over your singles. Pull the singles through the loop--now you have a new loop ! Make it nice and big as well. Lay it over your singles. Pull the singles through. Repeat until you’re at the end of your singles (try to have your last loop be a very small one). To finish, place the end through the loop, and then just pull on it until it tightens the loop. Note that you typically are adding ply twist and winding on as you do this, but you can also just chain ply an entire single and wind it into a ball as you go, then add twist once you’re done. That can be a lot easier to wrangle, if you’re having difficulties.
You might notice that this is basically a really open crochet chain. Yep ! It needs to be open so that the twist can enter the yarn, but you can do very big or somewhat smaller loops--although no matter what, you need to keep the loops large enough to at least hook a couple fingers through them so that you can make the next loop. Note that sometimes, the bump at the start of each loop can be felt and/or seen. Also note that chain plying is best done with smooth singles that can slide against each other. It can be done with a bumpy, lumpy yarn that sticks to itself, but bumps and lumps will catch as you try to chain, and if the yarn sticks to itself then it won’t slide nicely, which can really slow you down.
You may find that you prefer holding the ball of singles as you chain, or you may want it in a container on your lap/on the floor. You could also make a little wrist pouch to hold it, although take friction into account--if you make it out of wool yarn, choose a smooth one.
Ply Ball
Fifth is a sort of hybrid of a few of the others I’ve already mentioned, called a ply ball. To make a ply ball, simply wind two or more singles together into a ball (I’d suggest winding them around a small rock for a ply ball, too). The number of singles you wind in your ply ball will be the number of plies your yarn will have. A chain plied single wound into a ball is also functionally a ply ball.
Ply balls are extremely portable--you only ever need to work with one at a time, so you can just keep it in your pocket without worry of tangling, and it’s not attached to you or a box or another spindle. The downside is that it generally requires you to either have multiple spindles (ex: fill up two spindles, wind both off into one ply ball) or do extra winding (ex: fill up your spindle, wind it off to a rock for storage, fill up your spindle again, now wind from the spindle and the rock to get your ply ball. Add more winding for more plies).
However, you can also wind a ply ball from plying bracelet (yes, that’s more winding--but now it’s portable, and you’ve just turned one singles into a 2 strand ply ball) or even chain a singles, but wind it into a ply ball instead of plying it then and there to get a 3 strand ply ball (this also might let you play around with really long or really short chains without having to think about ergonomics as much, since your spindle isn’t involved).
Ply balls can also be helpful if you’re having issues wrangling your singles while you try to ply, since they’re laid together already--so they’re worth an attempt if you are having trouble keeping your yarn in line while plying.
There’s a short (but full of tips) article on ply balls here.
There’s even more ways to ply--look into "plying from a center pull ball” (similar to a plying bracelet, but requires a ball winder or a nostepinne) and “ply on the fly” (chain plying at the same time as spinning the singles--highly portable instant gratification). There may also be others that I’ve forgotten or not heard of, hopefully mentioned by others in the notes !
So Many Ways to Ply--How to Choose ?
So, every plying method and every number of plies has its own effects on the finished yarn, and you can use those effects to get the yarn you’re after.
By the way, if you’re not familiar with yarn weights such as lace weight and worsted weight, you should read this first !
A singles is great for your soft, fluffy, luxury stuff--cowls, hats, mittens that won't get a lot of wear, or shawls. It also preserves the colors that you spun exactly--so if you spun a beautiful perfect rainbow singles and the most important thing to you is that it stays a rainbow, you could leave it as a singles ! You can knit, crochet, weave, and nalbind with them like normal (I actually really prefer them for nalbinding--they felt easier so the joining is quicker), although because they haven’t been plied, they’re a lot weaker to abrasion and snapping. So they’re not ideal for things that need to be durable, and if you’re spinning short and/or fine fibers, you may find that even with some care they still don’t last very long, so keep in mind that stuff made from singles probably won’t be passed down or anything like that. But still, I’ve knit several small pouches from singles that have held up just fine being tossed around my room. One advantage to note is that you have the most yardage and the least spinning time this way, so it’s a very ‘time cheap’ yarn--you spin 100 yards/90 meters of singles, and you get 100 yards/90 meters of yarn. No time spent plying. However, it is as thin or thick as you spun it, and however consistent or inconsistent your spinning is, that’s your end result ! A lot of spinners (me) balk at this.
2 ply is next. I use 2 ply for almost everything besides socks--it’s quick, it’s fairly durable, and it looks very pretty (and an error correction: is ideal for lace). A 2 ply halves the amount of yarn you end up with--if you spin 100 yards/90 meters and 2 ply it, you’ll end up with 50 yards/45 meters. It also has a distinct ‘handspun’ look--2 ply knits up to a messier fabric. I really love that effect, but if you want a neat, uniform fabric, don’t do a 2 ply ! I’m not sure how it affects crochet or weaving, unfortunately, but do I suspect it’s similar with crochet. It also bulks up your yarn--it’ll be a little bit less than double the thickness of your singles, usually. 2 ply holds up alright to gentle/moderate daily wear, and is great for hats, gloves that don’t need to be hard wearing, scarves, and bags that won’t need to bear a huge amount of weight. It’s a workhorse yarn--you can use it for almost anything, and it’ll probably be okay. The only thing I would never use it for is socks--that’s a 3 or 4 ply project.
Let’s talk 3 ply ! 3 ply can be achieved either through chain plying or else as a traditional 3 ply--meaning 3 separate singles all plied together. You’ll get very different effects from these two methods in terms of both color and even-ness. If your singles had any stripes of color, with chain ply they will remain as stripes (this could be an alternative to your rainbow singles !). With a traditional 3 ply, your stripes will all blur together, and you’ll get a varied and multicolored yarn. You will get 1/3 of the yardage/meterage of your original singles, so a 3 ply yarn takes longer to make than a singles or a 2 ply. But it is also about 3 times thicker than your singles, so if you’re struggling to spin thick singles but want a thick yarn, 3 ply is a great option.
If your singles are very even, you’ll see no real different between chain ply and traditional 3 ply (except for the bumps at the start of each loop--they are usually visible as well). However, if your singles are kind of all over the place, chain plying magnifies this. On the other hand, a traditional 3 ply really evens out any inconsistencies. Even though I’ve got a few years under my belt, I am not a very consistent spinner, simply because I can neither visualize nor remember the weight I ought to be spinning, so it’s always a total guess (damn aphantasia). Beginners are also often inconsistent spinners, just due to lack of muscle memory. Either way, a traditional 3 ply can be really helpful in creating a fairly smooth, even yarn from really wild, inconsistent singles.

Fig E: comparisons of chain ply and traditional 3 ply, in terms of consistency
Lastly, 4 ply. 4 ply will turn your heavy laceweight singles into a light worsted, if it puffs up in blocking enough. I love 4 ply for my supported spindles mostly, since those spin very fine yarn and I don’t have a use for anything finer than sock weight yarn. It’s also very durable, and a laid 4 ply (like a traditional 3 ply--just 4 strands held together) make good socks. A cabled 4 ply (take two 2 ply yarns and ply them again) makes terrible socks, but is still very durable and has an interesting rope like appearance and texture. 4 ply in general is great for socks, bags, blankets, and especially sweaters, as it doesn’t pill much and will stand up to heavy wear. However, you have to spin 4 times the singles to get your finished yarn--a 100 yard/90 meter 4 ply skein requires 400 yards/360 meters of singles, and then more time for plying. So these are rather slow. They’re an awesome option for a fiber that refuses to spin up to anything other than the finest lace, and they will make great objects and garments that will last for a good long while.
Past 4 ply, you kind of just get rope. I haven’t ventured past 4 ply much--give it a shot if you’re curious !
The Why of Ply is a great article on the different aspects of different plies, and touches on some stuff I don’t mention (like stitch definition and cables) if you want to know more ! Highly recommend it.
How to Ply
So... you know at least a few methods of plying now, know how many plies you want your finished yarn to have, and you may have even already wound a ply ball or filled all of your spindles. Which means it’s finally time to ply everything.
To start, you need to attach all your plies to your spindle. For the methods that I’ve discussed (with the exception of chain plying), you’re going to do the following: gather the ends of your plies together, and make one slipknot with all of them. Then put the slipknot on your spindle below the whorl, the same way you would when spinning singles (and when not using a leader).
For chain plying: chain your singles until you’ve got about a foot or a third of a meter. Now you want to attach it to your spindle. Take the very first slip knot loop and slip it onto the spindle, below the whorl.
Now, secure your yarn by wrapping it around the hook or else with a half hitch knot, and spin the spindle counterclockwise (anticlockwise). You should immediately see the plies twisting together to form plied yarn.
From here, you will proceed basically the same way as you did when spinning singles--you’ll add twist to your plies, then wind on. This can be a really great opportunity to practice doing things while the spindle is in motion; you won’t be drafting, but depending on the type of plying you’re doing, you may be chaining, pulling from a ply bracelet, or simply letting the plies slide through your fingers (you do want to tension them and keep the twist from getting past your hand). If that requires too much coordination, feel free to park and ply--that is, spin the spindle to add excess twist, park it and let it into your yarn, then wind on.
If you try to ply your yarn the same direction that you spun it, you’ll notice that it doesn’t really turn into a cohesive yarn, and instead becomes wiry and the plies don’t slot neatly together. If you notice this happening, turn your spindle in the other direction. A yarn that is both spun and plied in the same direction won’t be stable or strong, and will tangle the second you try to work with it.
This is why it’s helpful to be consistent in which direction you choose to spin your singles, by the way--if you always spin wool clockwise, then you can know with certainty that it will be plied counterclockwise.
We refer to yarn as having either Z twist or S twist (this refers to whatever the finished twist is, so a singles that you’re never going to ply, or a 3 ply yarn, for example). This just makes it a little easier to talk about and recognize what we’re doing.
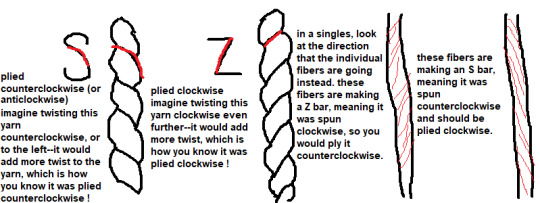
Fig F: S and Z Twist in plied and singles yarn
It’s essentially a mnemonic device that allows you to glance at your yarn and go “Oh! I spun these three singles counterclockwise, so I should ply them all together clockwise.” I often have to draw an S or Z in the air (just like I sometimes have to draw an L in the air to pretend I can reliably tell left from right), but it is pretty foolproof and will prevent you from, for example, trying to ply an S twist singles with a Z twist singles and then wondering what on earth went wrong.
By the way, this page has a really helpful chart on what direction you might want to spin in based on what you intend to do with the finished yarn. For example, crocheting (right handed style) with S twisted yarn will remove the twist as you work, but knitting in continental or English style (or crocheting left handed style) with that same yarn will add twist. Most spinners spin their singles to have Z twist and ply them with S twist--but if you’re a crocheter or knit Eastern style this will unply your yarn as you work, and you are encouraged to try reversing things to have better results with your handspun projects. The more you know !
Now, back to your plying. You may be wondering how you’re supposed to know how much ply twist to add, which is a great question, because plyback tests don’t work when you’re actually plying. Those are for when you’re spinning your singles. Instead, I do what I call a “hanging test”. Just hold out a length of plied yarn between your hands and let it hang (not pulling it taut--the yarn should have a nice downturned curve). A balanced yarn--that is, a yarn that has equal and correct amounts of spin and ply twist--will just hang nicely. An underplied (or underspun) yarn will usually also hang nicely, but you will see gaps inbetween the plies. This is no good at all. Gaps won’t just make your yarn look bad, they'll also make it split when you work with it, and will be less durable and more prone to pilling, felting, and eventual disintegration after much use.
On the other end of the spectrum, an overplied yarn (which may have both too much spin and ply twist, or may be underspun and then overplied in an attempt to fix ones mistake--which won’t work, by the way. You need to go back and add more spin twist to your singles) will twist in the middle instead of hanging. If it only twists a tiny bit, you’re fine. But if it twists a lot, there’s problems. Overtwisted 2 ply yarns tend to be aggressively smooth--this is only relevant for 2 ply, since those have a sort of pearled silhouette. If your 2 ply is smooth, then you’ve most certainly overplied it. 3 and 4 ply are always smooth, however, so a smooth profile for one of those is to be expected.
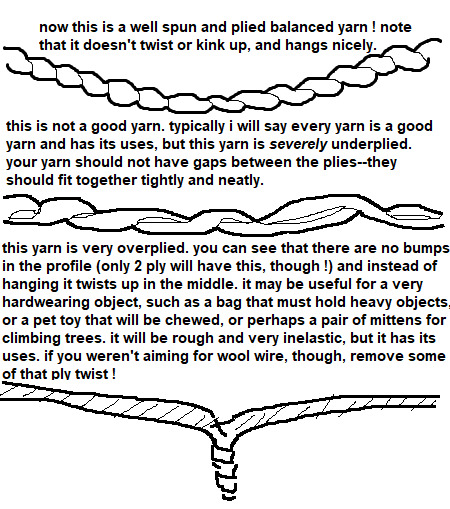
Fig G: Ply twist in 2 ply yarns. Do these yarns have S or Z twist ?
Don’t worry if your first yarns aren’t perfectly spun or plied (really--they won’t be). Every spinner is striving for something different with their yarn. Some are aiming for total technical perfection, some aim for exquisite fineness, some aim for beautiful colorways and for finding the softest and most lovely breed of sheep. Some just want to spin, some just want usable yarn, some just want a pair of socks that last on their feet and find commercial sock yarn to be about as durable as wet paper (that would be me). You certainly don’t have to know what you want to get out of spinning right away, but the point is that every single spinner has their own standards that they hold themself to, and you don’t need to (and shouldn’t !) try to meet others standards. Especially when still learning, but also just all the time and forever.
I’ve Plied My Yarn, Now What ? OR I Just Want Singles, Now What ?
Now your yarn needs to come off the spindle ! But not the way we’ve been taking singles to ply off the spindle--we need to make what’s called a hank. A hank is basically a loop of yarn that’s been tied so that it’s nice and secure. These loops can be pretty big (mine are all 2 yards/1.8 meters) or as small as the distance around your hand--it all comes down to what you wind your yarn onto.
I have already made a tutorial that goes into quite a bit of depth (and has pictures, even), so I’m gonna speed through this part a little bit.
1. Find something to wind your yarn around. A Niddy noddy is the preferred tool for the job here, and will make it much faster to wind and thoughtlessly simple to calculate the yardage/meterage of your yarn (I’ve seen people use yarn swifts as well, and they certainly look very speedy), but they are by no means required. Substitutes include: a large hardcover book, the back of one or two chairs, your hand (ideal for very small amounts of yarn), your forearm (for smallish amounts of yarn--wrap between the thumb and forefinger and go down to the elbow, then back up), or anything else that won’t deform with pressure and is holding relatively still.
2. Wind your yarn around that thing. You may need to start with a slipknot to attach it to whatever it is you’re winding on, or else a piece of tape. If you’re using your forearm or hand, you can simply pinch the end to hold it in place. Unlike when winding your yarn onto your spindle, when winding your yarn into a hank, you want to use as little tension as possible so that you can get a more accurate measurement of length later on. Also try to keep your winding tidy--in an ideal world, the yarn should be traveling almost the same path every time, not a few inches to the left one time, then wildly skewed to the right the next time.
3. Tie off your hank. Once you’ve finished winding, you need to secure your hank so that it doesn’t tangle. You can use either scrap yarn or else the ends of the yarn you just made (I prefer the latter, since the ends tend not to be very good anyway, so at least they don’t go to waste. In this case, snap off or cut both ends--the length you should cut depends on how thick your hank is). Find where both ends are--you will need to tie knots near the ends so that you can attach the ends to them. Tie an overhand knot a few inches/5cm below the first end, and then hold that end alongside one of your strands of knot-tying yarn, and tie another overhand knot. Repeat this with the other end. Make sure you haven’t overlooked any strands of yarn and left them out of the tie--that’s a very easy way to get tangles.
4. Remove your hank. Gently push your hank off of whatever you wound it on. Put it to the side--now we want to measure. Use soft measuring tape (or a piece of inelastic string or yarn, if you don’t have one--you will then need to measure that against a rigid measuring tape) to span the entire path that your yarn traveled. Write down that number, and now count the number of strands in your hank. Multiply the two numbers together. Now convert your inches or centimeters into yards or meters, and you have your yardage or meterage !
Ex: You wrapped your yarn around your palm, which measures 10 inches. There are 41 strands. 10x41=410. 410 inches is roughly 11 yards. Or: You wrapped your yarn around a small book, which measured 21 cm. There are 50 strands. 21x50=1050. 1050 cm is of course 10.5 meters.
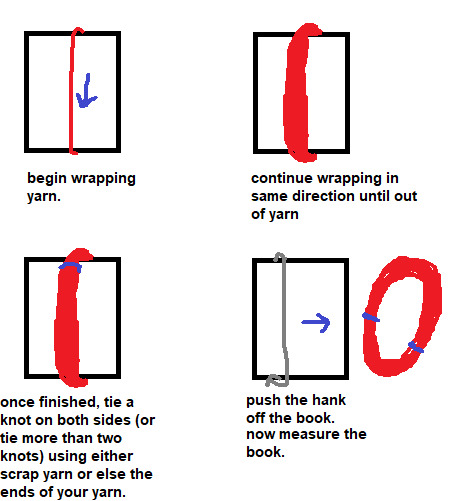
Fig H: Winding a hank on a hardcover book.
It can be very helpful to label your handspun yarn. The yardage/meterage is critical information when it comes to using patterns, less so if you don’t use patterns. But there’s other info that you might still find handy to know later on, such as what the fiber is, where and when you got it, when you spun it, how you plied it, any info on the dye job, what the yarn weight is, what spindle you spun it on, whether it is part of a set, how much it weighs, etc.
Some of my really verbose labels might look like this:
Avocado dye and copper mordant hand dyed in the fleece 2020
Cormo
Bought 2019
Spun for 2020 TDF
2 plied on wheel
210 yards
3.4 oz
light worsted weight
But most of my labels just have the yardage and breed, if I label them at all. I tend to document things online and also remember spinning my yarn better than I remember anything else going on in my life, so I’m a little lazy about labeling. Your labels should include the information that you think you’ll find helpful in the future, or that you know you won’t have another way to recover if you end up forgetting.
Blocking your yarn
Don’t attach that label just yet--we aren’t totally done with our yarn. It has one or two more steps before it’s ready to be used, and that first step is called blocking. There’s a few ways to block yarn--wet blocking, steam blocking, and resting.
Wet blocking: Get your hank of yarn wet, using anything other than very hot water (this could start felting your yarn). You could run it under the tap for a minute or else let it sit in a bowl of water with a little hair conditioner for about half an hour, if you wanted your yarn to be a little softer, then rinse the yarn. Squeeze as much water out as you can, then hang it to dry. You can (and should) also snap or thwack it--but I've gone into detail on that in a link below.
Steam blocking: Get a source of steam going--like a pot of water simmering or a very hot tap running. Using tongs or a long wooden spoon, hold your yarn over the steam and slowly rotate it until the whole skein has been steamed. Don’t let the yarn touch the water.
Resting: If neither option above is possible, you can also just let your yarn sit for at least a week. This lets the twist settle down, so it’ll be a lot easier to work with. However, it doesn’t do anything else that blocking does, so it won’t really show you your “finished” yarn, and may lead to problems down the road.
So--why did we just do that stuff ? Well, we blocked our yarn to reset the fibers, basically. During the spinning, we put the fibers under tension, and they more or less stay in that slightly stretched state. But it’s not really stable--the next time they get wet, they’ll spring back into the natural crimp that the wool wants to have (this changes drastically depending on breed and even individual sheep), and will often puff up. The hank might lose a little length and your yarn’s weight (not as in ounces or grams, but as in lace, dk, or bulky weight) often increases some. So if you’ve made your yarn into something before blocking it, with the perfect gauge and nice drape, the first time you wash it you’ll find that it’s thicker and a little smaller and has less drape. It might not fit anymore, or the seams might be messed up.
This is all entirely avoidable if you just block it before you do anything with it, so I highly recommend that you do.
The other thing that blocking does is set the twist, so your yarn won’t kink up as you work with it--even a perfect, balanced yarn can kink up as you work if the twist is live--which makes it a lot more pleasant. Resting sets the twist as well, as mentioned above.
I’ve gone into blocking in more detail in this post here, if you’d like to know more--I’d especially recommend reading the last section about snapping and thwacking your yarn.
Once it’s fully dry (and remember--wool can hold a lot of water and still feel dry, so give it a little extra drying time just to be sure) it only needs to be wound into a ball before you can use it ! Congratulations on your handspun yarn--that’s a real achievement.
Storing your yarn
If you don’t plan on using it right away, you may want to skein your hanks up to keep them compact and tidy. To do this, put your thumbs on the inside of your hank, and pull it taut. Then, one thumb at a time, twist in the opposite direction that you plied in. Your hank should start to kind of look like rope. Once it has a lot of twist (enough that you’re struggling to add more), find the center point of the hank, and fold it. With 2 yard hanks I tend to fold it over my knee, but a doorknob or something else would work just as well. It should immediately look like an oversized piece of yarn--that’s because we just twisted it one direction, and then folded it in two and let the excess twist twist it in the other direction, which is the same way you ply yarn ! There should be a loop at each end where your thumb was--take your thumbs out and put one loop through the other. Now you can attach your label and you’re good to go !
If it’s a very small hank (one that’s been wound around the palm, especially) you’ll probably just want to wind it into a ball instead. You could do this with any length of yarn--it’s not an ideal way to store wool yarn ultra long term, since staying wound into a ball can stretch out the fibers again, which means you’d need to wind it into a hank and re-block it if you wanted to make an accurate gauge swatch or something. Short term (a year or less) it’s just fine.
If you’re wondering how to wind up a big hank into a ball without tangling, just sit down with your knees up, and put your knees inside the hank, then move your knees apart until the hank is taut. Now you can wind in relative peace, free from tangles. You can also use a yarn swift, if you’ve got one.
I would recommend, by the way, using up some of your first skeins as soon as possible (you might want to keep your very first skein so that later you can see how far you’ve come--I really wish I kept mine). You won’t know how your spinning is until you’ve used it, so to prevent you from getting to skein #40 thinking you’ve been doing great, only to discover that your yarn is actually unusable... use your early yarn ! Evaluate it, make judgements, and learn from it. Does it need more twist ? Is it very lumpy ? Are there lots of spots where it went thin ? Do you like how the colors turned out with the plying method you chose ? These are all good questions to ask yourself as you use your yarn.
Moving On From Park and Draft
Once you’re comfortable with the park and draft method, you might want to try moving on to true suspended spinning. As I said earlier--it may not be for you, and that’s fine, but you won’t know if you don’t try. True suspended is quite a bit faster than park and draft, so if you want to speed up a little, you should give it a shot.
In park and draft, you first add twist, then park the spindle to draft your fibers into yarn. In true suspended spinning, you set the spindle going and draft while the twist is being added. This eliminates the whole ‘standing/sitting there with your arm outstretched, waiting for your yarn to accumulate twist’ section.
The easiest way to get into true suspended spinning is to work your way up to it--try drafting just a little bit while your spindle is building up twist during park and draft. To give yourself more time, set the spindle spinning slower. Then try drafting a bit more. The goal is to draft at the same rate that twist is added, meaning that you can wind on pretty much as soon as the yarn is too long to keep spinning.
The trick here is to adjust the speed at which your spindle spins rather than the speed at which you draft. You can only draft so fast before your technique gets sloppy, and past that you’ll be focused far more on keeping pace with the twist being added than on drafting evenly.
So if I find that I spun my spindle too aggressively, I still it immediately and try again, but slower this time.
I answered an ask about this a while ago where I went into a little bit more depth, if you’re interested.
And if you haven’t seen it, the pinned post on my blog is a lot of stuff like that all collected into one post for easier perusal. Some of them I’ve already linked to earlier in this post, but others I haven’t.
Small Projects, Scrap Projects, and Big Projects: Tips for All
You may be wondering, What the hell am I supposed to do with this yarn ? This isn’t even enough for a pair of fingerless gloves !
Which is a fair concern--endlessly accumulating small skeins of yarn can be frustrating if you don’t know how to use them up.
Drop spindles are limited in how much yarn you can make on them, and while you can make huge skeins by joining smaller skeins together, they may not all be the same weight ! Or they may not match. Or it may just be really boring.
You may also be doing a lot of experimenting, and ending up with 30 yard/meter skeins that you can’t even make something tiny with.
Small Skeins: For single skeins that are too small for gloves, hats, etc, you may still be able to make things like pouches (for yarn, crochet hooks, dice, coins, etc), baby socks or hats, coasters, or other small items. My spinning wheel oil holder is a little basket crocheted out of some handspun, and I have a mini tape measurer on my keys with a cover crocheted over it from handspun as well. You might have to invent things to do with your handspun, but using items that you made enriches your life--I promise.
Scrap Projects: What about tiny skeins ? Or maybe you’ve already made all the coasters and baby socks and spinning oil holders that you could possibly need, and now the small skeins are piling up again. I humbly submit the Scrap Yarn Project--my favorite type of project by far. I’ve been slowly working on a handspun scrap blanket for about 2.5 years, using tiny scraps, small skeins, and leftovers from projects alike. I knit 5x5 inch stockinette squares (some have colorwork, some have different stitch patterns, but mostly I let the yarn be the star) and for the most part just try make squares that are thick enough to stay warm but thin enough to have a little drape. It’s an incredibly satisfying project.
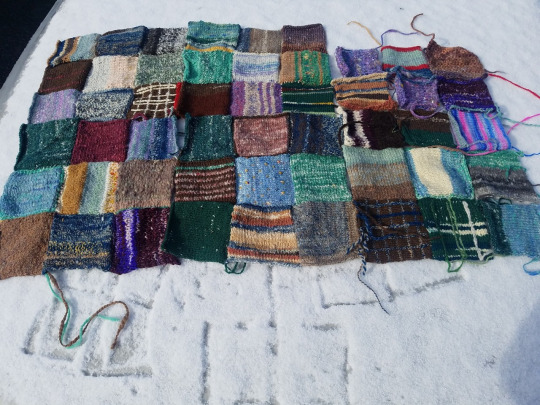
Fig I: An older image of the author’s handspun scrap blanket in progress. The yarns used range from fingering weight to super bulky, and are spun in all sorts of different ways. But it still feels very cohesive.
I like the square approach (and of course if you wanted to crochet granny squares, that would work perfectly too) because it’s modular, so you can decide halfway through that you don’t want a sweater, you want a bag--and then just sew the squares into a bag, instead. But it doesn’t need to be squares by any means--you could also make scrap yarn sweaters, hats, socks, scarves, etc., that are constructed normally.
The only thing to look out for is yarn weight--in some cases, you might want the weights to all be very similar. Socks, for instance, won’t do well if you have parts that are bulky weight and parts that are light fingering weight. You could hold yarns together to get similar weights if necessary, or just only add to the project when you’ve got another scrap skein of worsted weight or whatever. For squares you can use any weight of yarn if you want, but you should change your hook or needle size to get a fabric that’s a similar density, so your stitch count will change from square to square.
Big Projects: These can be difficult even for experienced spinners, because consistency is key to ending up with an even fabric. Not from armspan of yarn to armspan, but from skein to skein--if the weight changes, things can suddenly get much more complicated while you try to correct for the skeins that are too thick or too thin.
One way to try and mitigate that is to not ply anything until you’ve finished spinning all the singles--that is, if you need 10 skeins of 2 ply, spin 20 spindles worth, then go through and pair off your stored singles, thin with thick and average with average. It can definitely be more tedious to do it this way, but if you’re worried about consistency, it might be a good idea.
It also might not be necessary. Try to let your mind stretch back over the whole course of human history--as a species, we’ve been spinning yarns for pretty much all of it, and until very recently, what you spun was what clothed you. If the skeins you spun for your new cloak were all different weights, well... you probably either repurposed those skeins (IF you could, and that’s a pretty sketchy IF) or you shrugged, wore a lumpy cloak, and got on with life. Perfection isn’t everything, my friend. Either way, do what’s going to make you happy. For me, I’d be just fine with a lumpy cloak.
Out Of The Basics: A Few Further Pushes Into The World of Spinning
There’s many, many techniques out there, and an infinite variety of yarns to be spun. Some require tools, some don’t. Some are very advanced, and some quite simple. There are many other tools to spin on besides drop spindles. There’s also processes related to spinning--such as dyeing, fiber prepping, and wool washing--which can greatly enhance your spinning enjoyment and variety. I can’t teach them to you today, but I can certainly tell you about them so that you can look into them yourself !
Changing Up Your Fiber or Techniques to Get Different Effects
We touched on this earlier in the section about the number of plies--a 2 ply yarn will knit up into a bumpy, slightly irregular fabric, and a 3 or 4 ply will be very regular and neat. But that’s not the extent of what you can do to change your yarn up (without buying anything new). I’m going to throw some terms around now--you’ll need to google them, because this is already absurdly long.
For one thing, if you have roving, you can try splitting it lengthwise and fractal plying your yarn for a very beautiful self-striping but marled effect. You can also try spinning it from the fold on multicolored roving, which keeps the colors separate instead of muddied, which can happen otherwise.
With any fiber, you can always mix and match, or add pops of color ! If you’re spinning a bunch of gray rolags, for instance, you can occasionally detach the rolag, spin a tiny bit of blue roving, reattach the rolag, and go back to spinning. Depending on how you ply it, this could produce almost specks of blue or else slips and streaks.
Speaking of plying, the way you make a 2 ply can really change the colorway of the yarn if your fiber is a gradient or multicolored. Say you’ve got roving that’s a gradient from white to purple--if you do a plying bracelet, your yarn will be part barberpole, part gradient: a purple ply with a white ply at one end, and then gradually transition to the midpoint of lavender-pink in the middle, with both plies the same color. But if you plied it the other way, by wrapping your singles onto storage rocks and then plying from those, you’d get a yarn that’s got one pink ply and one white ply at one end, and one pink ply and purple ply at the other.
Chained 3 ply versus traditional 3 ply will make a huge difference as well. If your fiber has stripes, chain plying it will preserve them perfectly (as long as you’re careful to start a loop at the color change--or if you wanted it to fade in a little, you could start partway through a color change), whereas a traditional 3 ply will always marl them, no matter how careful you are about evenly splitting your fiber into 3 sections.
If you like really colorful and bright yarns, you might enjoy cabled 4 ply (where you ply two 2 plied yarns together). If your starting 2 plies are already colorful, you’ll get super colorful yarn with a cabled 4 ply--to me it always looks like dashed lines in different colors.
A laid 4 ply can also make some interesting color combinations, and is perhaps the ideal candidate for mixing random singles together, since it has 3 other plies each singles can hopefully be tempered by. And a yarn that has 3 plies of one color and 1 ply of another color can be interesting indeed !
It’s not just color that you makes an exciting new yarn, though--you can also try making boucle, or thread plying or autowrapping, or spinning beehives, spinning beads into your yarn, spinning thick and thin yarn... the possibilities are almost endless. I’d highly recommend giving “The Spinner’s Book of Yarn Designs” by Sarah Anderson a read if you can--she discusses all of these and many more, and shows how to do them. Other good books that’ll show you how to make lots of different kinds of yarn, or how to tailor your yarn to your needs, are: “Yarnitecture”, by Jillian Moreno, “Spin Art” by Jacey Boggs, and “Yarn Spinning With A Modern Twist”, by Vanessa Kroening. Your library may well have copies, and if not you could likely request they buy it.
You Don’t Have to Drop Your Spindles
...Because there’s other kinds of spindles ! And things that aren’t spindles, but on which you can also spin !
There are Turkish Spindles, which are functionally almost identical to drop spindles (and you can drop them, to be fair), but you wrap your yarn around two detachable interlocked arms that also function as the whorl. When you remove the arms and spindle shaft from the turtle (not cone) of singles, you can then 2 ply with it immediately using both ends. Turkish spindles are great if you love 2 ply and hate winding.
There are Supported Spindles, which come in many forms but are essentially fancy sticks with pointy tips that you spin in bowls. These have more winding than drop spindles because you spin in very short lengths at a time and wind onto a temporary cop that’s just below the tip (it’s much faster than if you wound all the way down to the cop near the bottom). However, you use them while sitting or even (with a bit of wrangling) laying down, and your arms stay in a comfortable, much more relaxed position while spinning. It also spins, as a default, finer yarn than your average drop spindle (I can achieve a very fine and consistent laceweight on any supported spindle, but have only managed that on my tiniest and lightest drop spindle). And they are very fast tools--with proficiency, they can be much faster than drop spindles. Supported spindles are great if you find drop spindles painful, if you have low energy, if you’re mobility impaired, or if you want to spin finer yarn.
There are Spinning Wheels, which come in many shapes and sizes but are the fastest way to make yarn by hand. There are a few objects which could fall under the umbrella of a spinning wheel (namely Walking Wheels, Charkah Wheels, and Electric Wheels) which do not have treadles, but the majority of spinning wheels are powered by foot treadles and can spin faster than you can spin a drop spindle. They also remove winding from your list of duties (for the most part), since the flyer will wrap your newly spun yarn onto the bobbin as you go. New spinning wheels can be prohibitively expensive, but you can also find used ones for ludicrously cheap on craigslist, at estate or garage sales, at antique shops, or other places where old items might be sold. (You can also often find them at affordable but not cheap prices at fiber festivals). Be sure to research the parts of a spinning wheel before you try to buy a used one from a non-spinner--there are many SWSO’s (Spinning Wheel Shaped Objects) out there that will fool you. Spinning wheels are great if you want to make larger amounts of yarn, or want to make yarn faster.
There are Electric Wheels, which are small machines that will add twist and wind the yarn onto the bobbin for you, so all you have to do is draft. New low end models are much cheaper than new spinning wheels, and they take up far less space. They also remove the element of treadling, so if you are intrigued by spinning wheels but have weak legs in any capacity, these can save you a lot of pain. I have a spinning wheel and can’t spin on it much anymore, because my knees and hips dislocate almost immediately. I switched to supported spinning primarily, but an electric wheel would be a good substitute as well. Electric wheels are great if you want to make more yarn faster, but can’t afford a spinning wheel or don’t have the space for them. They are also one of the more accessible tools for those with severe mobility impairments.
And there’s still more, although I can’t do a pitch for all of them xD. There’s Tahkli Spindles for spinning cotton, Navajo Spindles that are long thigh-spinning tools, Medieval Spindles that are easy to whittle replacements for if you break your spindle a lot, and even more beyond that. Many cultures have their own traditional spinning tool, each with their own techniques and strengths, and if drop spindles aren’t doing it for you but you still want to spin, I implore you to check out other kinds of spindles !
From Sheep To Sweater (Washing and Processing A Raw Fleece)
Most people learn to spin from roving (even if it might not be a very good beginner’s preparation), although there’s also rolags, batts, top (both commercial and hand combed), sliver, and cloud. But what if you could start with a raw fleece (unwashed, with vegetable matter and lanolin and who knows what else) and make things out of that ?
There’s some immediate advantages to starting with a raw fleece (even over a washed fleece). For one, raw fleeces tend to sell very cheap. This will depend on where you live, but the vast majority of fiber that I buy these days is raw fleece, and I’ve never spent less on fiber. At a fiber festival, I once paid $10 USD for 2 pounds (slightly under 1 kilo) of raw Shetland fleece. So--they’re cheap. As soon as someone starts putting work into a fleece, like washing it or dyeing it, the price immediately jumps.
Second, if you’re looking for the most bang for your buck, starting from a raw fleece is the way to go. You need to wash it, skirt it (take out the really terrible or gross bits), perhaps sort or grade it if it’s multicolored or there’s clear variation in fiber quality, dye it (if desired--I only dye my white fleeces, as I quite like brown and gray and black), process it into spinnable fiber, spin it, ply it, and then knit/crochet/nalbind/weave/do whatever else your heart desires with it. A single raw fleece can last me a month even if I work on it tirelessly, and I might have paid $20 USD--a little over an hour of wages for me.
It also brings you a lot closer to your work. I can’t say I felt very attached to my fiber when I worked exclusively with roving, but sorting through a pile of hand washed Southdown Babydoll locks while I comb them into top to spin into sock yarn on supported spindles that I whittled myself--I can tell you, I feel pretty damn connected to my work, to the ridiculous little sheep whose wool I have, to my socks, and to the wool itself. It adds a lot of depth, both to the experience, and to my understanding.
It’s also honestly pretty easy. To wash a fleece, you need a dedicated wool pot (as in, don’t cook in it again), a bit of dish soap, and some time. Put the fleece in--don’t crowd it, just work in batches if your pot can’t easily fit all of the fleece--add cold water and a squirt of dish soap, and let it cook on the stove for about 45 minutes, without a lid. Don’t let it boil--ideally it should be steaming but not quite simmering. You can use a dedicated wool spoon/tongs to gently and infrequently stir the wool. The water should get pretty gross. After 45 minutes, start the tap running (you need to rinse the wool in very hot water--if you let temperature shock happen, it could felt), drain the water, and rinse the fleece. Then repeat--filling up the pot with hot water now--until the water stops looking dirty at the end of the 45 minute cooking time. Rinse it one more time, and then let your wool dry, ideally on a clothesline but over a vent/spread out flat on a towel is fine too.
Yes, it really is that easy. If you’re worried about felting or otherwise ruining the entire fleece, you can always start by washing just a handful, so that way if you ruin it there’s not much waste. But I’ve washed at least a couple dozen fleeces that exact way, and I’ve never ruined one.
After washing and drying your fleece, you need to prepare it. I typically prepare enough to spin for a day at a time, but you could also do it all at once if that’s more your style. There’s many ways to prepare wool, and I’ll discuss most of them at least in brief, but we’ll start with teasing. This is where you take a lock in your hands, and tease it open. Let any VM (vegetable matter) fall out or pick it out yourself, and open the lock up to the point that you can no longer see any lock structure. It’s now spinnable, just like that ! This is a pretty slow method, but if you start out your raw fleece journey buying just a few ounces/50ish grams of fleece, it’s perfectly doable to tease it all open by hand.
If you have money to put into the endeavor, a humble pair of hand cards (70 TPI will card most wools), or you can kind of make do with two pet brushes like these (although at that point, spend $10 USD more and you have a pair of hand cards, so idk what the point of that is, unless you already have them) is a very good place to start. Load the fiber onto one card, card it until it’s uniform, roll it into a rolag, and it’s spinnable !
You also have hand combs, which are a lot more expensive than hand cards, but which can process very long fibers and can get out all the vm. Cards don’t remove a lot of vm, so combs is the way to go for super vm-y fleeces. They also produce hand combed top, which spins up into a very compact, strong, and abrasion resistant yarn--great for socks.
Past that are drum carders, which are machines in the way that spinning wheels are machines--manual, but they certainly automate the processing of fiber for you. These can be expensive indeed, but process fiber very quickly and are a great choice if you plan to sell the fiber, if you want to start with raw fleece but haven’t the dexterity to do it by hand (and there are electric drum carders as well--otherwise, you are turning a hand crank), or if you want to process high volumes of fiber because you just go through it that fast.
Honorable mentions include flick carding (both cheaper and slower than hand cards--you work with a couple locks at a time and open them up by flicking them with a tined brush), blending boards (these don’t process raw fiber, but they turn already processed fiber into batts--so you can blend many wools very easily for different textures or colors. These are like painting with wool--so fun !), and willowing (I haven’t tried this one yet, but you lay out your wool and repeatedly hit it with willow branches or other bendy sticks, which opens the fiber and also sends it flying all over the place. It looks very fun, and rather slow, and is also free as long as you can find a willow tree).
This website describes some of those methods (and one I didn’t get to) if you’d like to check it out.
Colors to Dye For
Wool takes dye very readily, and you probably come into contact with several natural dye materials every day--onion skins, avocado pit and peel, daffodils, coffee, black tea, thyme, even grass ! You don’t have to be working with fleece to dye it (although dyeing fleece gives you so much color variation and is very fun)--you can also dye roving very easily. Batts, rolags, and top less easily, although it’s possible with a lot of care.
For most natural dyes, you need to collect quite a lot of it, and then let it cook overnight on low heat. Boiling (sometimes even simmering) can kill the color, so you’ve got to be patient. Crock pots on low or medium are great for this. If you can cook it two days, all the better. Let it sit and cool for at least 12 hours, then strain it. (Tip: you can store natural dyes in jars in cool, dark places for at least a year without any ill effects--so you don’t need to use the dye immediately)
The majority of dyes need something called a mordant (I go into more detail about mordants in this post if you’re interested). There are many mordants, but some easy household ones are alum, baking soda (bicarb), copper (put a few bits of copper pipe in a jug of white wine vinegar, let sit for a few weeks at least before using), or iron (same as copper, but with rusty nails. Use a plastic jug !!! Metal will rust and glass can break). Most people mordant their wool by putting it in their dedicated wool pot with some water, adding the mordant, and letting it cook on low for an hour. Then drain the water and add the dye.
Natural dyes need to cook for a while to set--I usually let them cook overnight at least.
For batts, rolags, and top, you can do something called solar dyeing--carefully mordant your wool as usual, then place it in a jar with the dye, and put the dye outside in the sun. Over time (at least a week--often months, especially if you don’t live somewhere warm and sunny) the heat from the sun will warm the water and dye the wool. You could also try storing the jar somewhere you know will be warm, such as near the stove or fireplace.
You don’t have to use natural dyes either--there are also acid dyes, or food coloring, kool-aid (sugar-free), etc. I’m a lot less familiar with those, so I can’t go on at length. They can be a good choice if you don’t have the time for natural dyes, or if you want to get specific colors and not guess what your wool will turn out as. Look into them if you have any interest !
Dyeing your own wool is immensely satisfying, and can be a very cheap (or free, in the case of many natural dyes if you’ve collected or grown them yourself) way of obtaining more color, if you find that you keep ending up with a lot of white wool.
Endless Breeds of Sheep
There are many breeds of sheep on there (not endless, sorry--although there will always be new breeds being developed, so endless in a way !), and they all have different qualities, both in terms of the sheep themselves, and the wool they produce.
Do you want your wool to be very hard wearing ? Down breeds such as Southdown (one of my absolute favorites), Shropshire, or Dorset can be quite durable, and are resistant to felting. You could also go for stronger, coarser wools such as Jacob or Romney--coarser means stronger with wool, and softer tends to mean weaker.
Do you yearn for a softer wool ? Cormo is fantastically soft, as are Rambouillet, Debouillet, and Merino. Many lambswools (meaning the fleece from a lamb--the older a sheep gets, the coarser its wool tends to be) can be softer than their breed standard, so seeking out lambswools even from breeds like Jacob or Rya (both usually strong wools) can lead to soft fleeces.
Of course, there are more considerations than just soft and hard wearing, but there’s pretty much a breed for everything. If you’re interested, “The Fleece & Fiber Sourcebook” by Carol Ekarius and Deborah Robson is an incredible resource, and covers just about every breed under the sun (with pictures, samples, notes, recommendations, and interesting bits of history), as well as most non-sheep fiber producing animals as well ! Speaking of...
There’s Not Just Wool
There’s also many non-sheep fibers, and plant fibers too !
Animals with easily usable fiber include: alpaca, llama, angora rabbits, goats, camels, musk ox, and more ! Their properties are usually different from wool--all of the fibers from the animals above have little to no crimp in their fiber, meaning that they aren’t elastic like wool is. They’re also varying degrees of warm (cashmere--the undercoat fibers that come from many different breeds of goats--are extremely warm, but still not as warm as musk ox down), and some are unbelievably soft. If you can, I highly recommend getting a little cashmere, a little camel down, or whatever other exotic fiber strikes your fancy. They’re very fun to experiment with, and small amounts can easily be worked into projects to add warmth, drape, or softness.
We can’t forget about silk, either--produced mainly by certain species of silkworms, although most insects undergoing complete metamorphosis produce silk of varying quality as well. Silk is a very interested fiber to spin--but it can also be reeled instead of spun, which is how you can get extremely thin silk pieces without even needing to spin thread-weight yarn.
But in early human history, before we domesticated sheep and bred them to have better wool than they started out with, we spun things like inner tree bark, flax, nettle, and cotton. These all require very different techniques than wool, but most of them can be spun on the same tools (and all but cotton can be hand twisted into cordage instead, if that’s more up your alley). They are also inherently cooling--fabrics made from linen will keep you very cool indeed--so if you live somewhere hot where having wool objects is mostly pointless, don’t despair ! There’s still stuff for you to spin.
Connect With Others !
I’m about done with this monograph, but there’s a few last things I want to share.
First is the existence of Fiber Festivals--you may or may not have some in your area. They’re extremely fun, and you can meet many spinners there. They’re also usually a very cheap source of fiber, as prices are often a lot lower at festivals.
Second is the existence of Spinning Guilds--again, you may or may not have one locally, but if you do, you might want to join ! There are also spinning clubs and groups, which might be a little lower-key and more welcoming to beginners.
Then there’s TDF, or Tour De Fleece. You may have heard of the biking tournament called Tour de France which happens in July--well, every year a lot of us spinners do a tournament ourselves, but it’s generally not competitive (except on Ravelry--there are teams and points and everything). For the most part, participating in TDF just means setting a spinning goal for yourself from July 1st to July 23rd (the end of the race) and then trying to achieve it. For a lot of people, this means spinning every day. Some set goals like “get through this whole fleece I bought 10 years ago” or “spin a sweater’s worth of yarn” or “learn how to spin flax, finally” (that’s what I did last year). Or maybe it is just spinning every day--even if just for 20 minutes. On tumblr you can see other’s work and post your own under the tag #TourDeFleece2023, or #TDF2023 (there’s many variants as well)--we’d love to have you !
Lastly, there’s International Spin In Public Day ! To be honest, nobody can really agree on what day that is--allegedly, it’s the 3rd Saturday of September. (For me, it’s literally every day that I leave my house, but I digress). But I’ve also seen posters for October, for September 10th or earlier, and just generally lots of different dates. I’d say play it safe--if you see someone say it’s International Spin in Public Day, go spin in public just in case :D. The purpose of a day like this is to bring spinning back into public knowledge--let’s face it, most people in the western world have zero clue how yarn is made, and couldn’t differentiate a spindle from a spatula. This sucks ! Spinning is such a great activity--it can be meditative, calming, fun, exciting, or a background motion to other activities that allows you to actually pay attention (if you have ADHD). And I think a lot more people would spin, and would enjoy it, if only they were exposed to the idea. You certainly don’t have to act as Spinning’s public outreach officer, or anything like that... but when people ask what you’re doing, explaining it patiently and encouraging them to look into it does everyone a favor.
In Conclusion
I hope this has been helpful and not too confusing ! It’s really important to note that I’m just one guy--I don’t know everything, and I might not always have the best techniques. Looking for information on spinning from multiple sources is a good way to get a well-rounded understanding, and to correct common misconceptions that you might have already learned. Perhaps more importantly, there’s pretty much an infinite number of ways to do almost every single step I’ve described here, and if the way I showed you--or the video I linked to showed you--isn’t working, don’t despair ! There’s nothing wrong with you, you probably just need to do it a different way. I must have watched 3 dozen videos of people drop spindling before it finally clicked with me.
I hope I’ve opened up the world of spinning to you at least somewhat ! There are many things I didn’t touch on, and lots of stuff I wish I could talk more about, but at the end of the day I mostly wanted to 1) show you how to make yarn and 2) pique your curiosity about the whole rest of it. If you have questions, I’ll try to answer them (Purple, I will of course answer all your questions and also attempt to mind read your questions before you’ve even asked them so that I have a 10 million slide power point done by the time the question is out of your mouth), but check the comments and replies first ! Someone else might have answered it already.
Thanks for reading, and happy spinning !
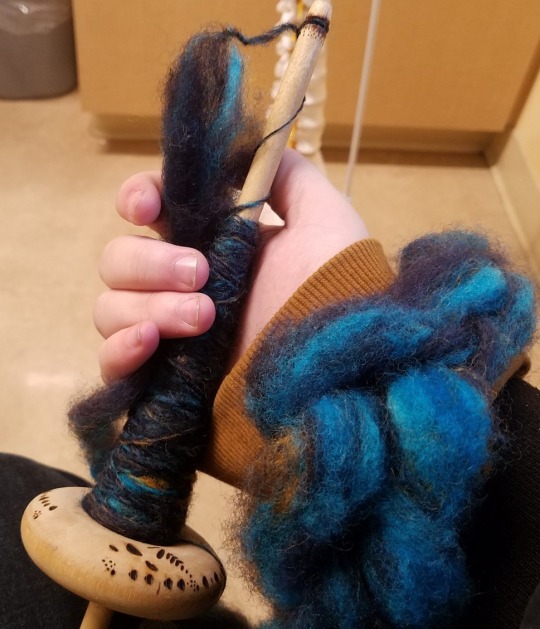
Fig J: The author holding his old drop spindle, spinning at a doctor’s appointment. The spindle now belongs to the friend for which this monstrosity of a tutorial was written ! :D
#spinning#drop spindle#beginner spinning#tutorial#handspinning#handspun yarn#fiber arts#i truly have no idea how to tag this#its over 13k im so sorry#swords i did end up adding tipping to this blog bc of your recommendation thank you !#i cant seem to add tips to posts that i made after tipping was enabled tho. which is very annoying. so its just on all my posts for now#hopefully will fix that later#this did take about a week of writing ! so if anyone#(BESIDES PURPLE FOR SEVERAL OBVIOUS REASONS THIS WAS A GIFT FOR YOU <3)#wants to show some appreciation if it helped you at all#i would be very thankful as i am so goddamn broke lol
2K notes
·
View notes
Text
some tips for writing flow
i've had a lot of comments complimenting my writing style, most of which don't know how to explain or describe what they like about it. i never really knew either, but i've been paying more attention to the way i write things lately, in the hope of being able to understand and explain it.
a lot of this is "based on feel" with no hard and fast rules, but there's also very tangible techniques you can hopefully work into your own writing, if that makes sense? idk is this anything—
1 - sentence beats, and alternating them.
this is probably the biggest thing in my writing. i've realised my sentences can be measured in beats, based on their length and how many sections they can be broken into. the pattern changes often, and i don't have a concrete rule in how i fill a paragraph (again, i've only just put words to any of this), but it's probably the most important part of my flow. let's have a look:
1 beat:
• this is probably the biggest thing in my writing.
2 beats:
• i've realised my sentences can be measured in beats
• based on their length and how many sections they can be broken into.
3 beats:
• the pattern changes often
• and i don't have a concrete rule in how i fill a paragraph
• but it's probably the most important part of my flow.
it looks like a favour certain patterns, the only real "rule" i use is to construct a paragraph with various beats, and never put two side by side. whenever i'm struggling with my flow, it's usually because i've put two of the same beats next to each other and everything feels either stiff or crowded. i rarely put two side by side, unless it's for specific emphasis.
the other exception are paragraph breaks: these are a pause for breath, and allow us to reset the pattern. i often start and end my paragraphs with single beat sentences, and it doesn't feel like they're running on because there's that lovely breath between them.
2 - short paragraphs
the rule we learn in school is that new paragraphs are for new ideas. convert this to prose, and we can consider "ideas" to include the character's thoughts, new narrative tangents, and physical movement around a scene.
one of my biggest struggles reading "bad" fanfic is when paragraphs are too lumped together. crowley will walk into the bookshop, see aziraphale across the way, wander over to a shelf, select a book, then pour himself a drink all in one big chunk. i can't parse that. there doesn't have to be a new line break for every new action, but grouping the relevant ones together and breaking in between broad motions (i.e. walking across a room, acknowledging a character) can help ease readers through the scene.

paragraphs are a breath, not only for sentence flow, but for processing the action within a story. similarly, purposefully keeping multiple actions confined to a single paragraph can make them feel quicker, while breaking them up into multiple paragraphs will slow down the pacing (even if the amount of detail describing each action is the same). included some examples because i'm struggling to explain this one
3 - mixing metaphors
this might sound less flow related, but i used to struggle with it a lot as a young writer, and paying more attention to it has definitely helped clean up my flow and writing overall.
i love a good analogy, but it can be easy to get carried away, and this can bog down the prose. my personal rule is that i can get silly with my metaphors (see: the mon chéri magnet), but i can only use one at a time. no talking about the magnet in aziraphale's chest and the angel and demon on his shoulder within the same scene.
if i'm getting silly and long winded with a metaphor, i also try to limit the length of it to one or two paragraphs. paragraph 1: set up the metaphor, establish the analogy. paragraph 2: come back to the reality of the scene, then mention the metaphor once more to link it all together. if i'm feeling cheeky, then i mention the metaphor again ONCE in passing, a couple of paragraphs or even chapters later
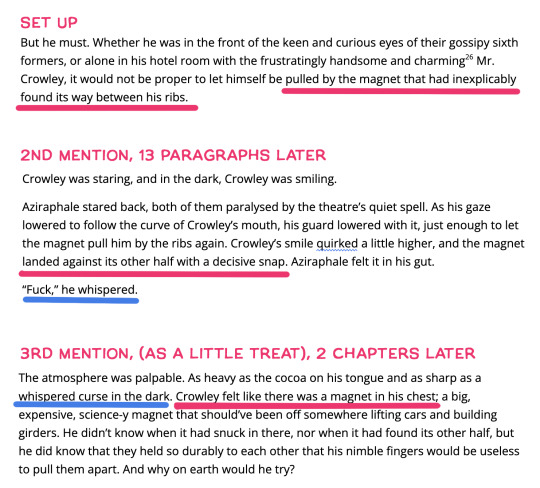
the magnet was a fun one, because i kind of flipped how i would usually present a metaphor, with the long winded tangent coming last instead of being the set up. and even though i used the metaphor 3 times, it felt like 2 because the set up was really just a planted seed for what i'd be mentioning later in the theatre. referencing the "whispered curse in the dark" also helped tie the scenes together and keep the analogies neat and tidy in our heads
meanwhile i got a little more carried away with the space metaphor in postcards (i feel like there's probably a 4th and maybe even 5th mention during the bookshop scene), but each one was blink-and-you'll-miss-it brief that didn't slog down the prose.

4 - avoiding repetitive pronouns
we're all going to struggle with this, and i don't have a secret hack for avoiding a wall of "he this, he that, he then," and i honestly try not to beat myself up over it too much. but there are two things i check to make sure it's not getting too repetitive:
1. looking within a paragraph
apparently everything revolves around paragraphs and the breath between them lmao. i don't have a strict rule like "use the character's name once per paragraph, then 'he' for the rest" or anything like that, but it's in that kind of vein. i simply pay attention to one paragraph at a time to watch for too much repetition, and if i notice it's been one or two whole blocks without switching from 'he' to a name, i'll chuck one in to break it up.
2. paragraph starters
this is so picky. and i don't know if it does ANYTHING, but it bugs me when i'm writing and i notice every paragraph starts the same way. maybe it has no effect on the flow at all. but i like to make sure my paragraphs aren't starting with the same "he" "he" "he", and that forces me to go back and switch around the pronouns in recent sentences, so the next paragraph can flow on more smoothly.
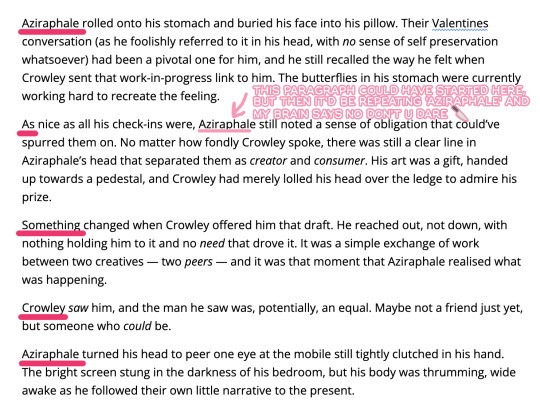
5 - use interruptions appropriately
edit: sneaking this one in here as a final thought! i just want to mention the use of em-dashes, semicolons, footnotes, and parenthesis mid-sentence. it's common to favour one in particular, but each have spectacular uses and can add miles to the pacing and flow of your prose.
em-dash (—)
interruptions, cutting off dialogue—
pausing to make a point — like this — in the middle of a sentence.
semicolon (;)
helps with making lists and continuing a compound sentence that doesn't really link with 'and' or 'but'; when you want to pause, but a new sentence would break the flow of things.
footnotes (¹)
these should be optional additions to the text imo. you should be able to keep reading without looking at the footnotes and not lose an ounce of story. they're additive, not necessary.
parenthesis ( () )
a great way to interrupt yourself (less sharply) than with em-dashes, include longer pieces of information (like what you might put in a footnote, except more crucial to the narrative that you don't want people to miss!) and adding sass (lol) and tone to your prose.
#*taps mic* IS THIS ANYTHING#includes some bnf teasers :)#note: ADDED A 5TH POINT AT THE END AT THE LAST MINUTE#writing tips#writing process#fan fic#fan fiction#fic#rat writes#good omens fic
427 notes
·
View notes
Text

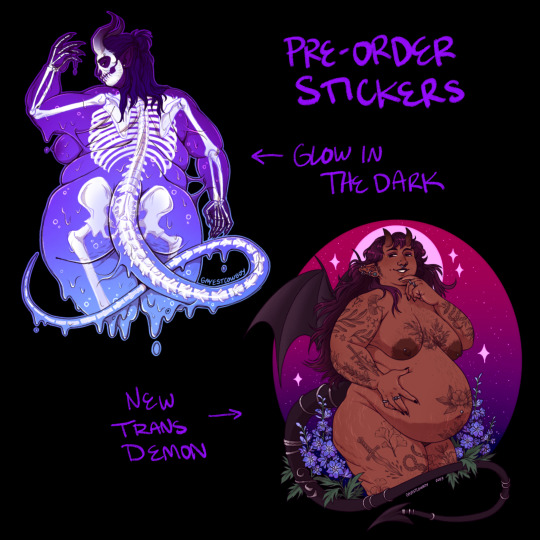
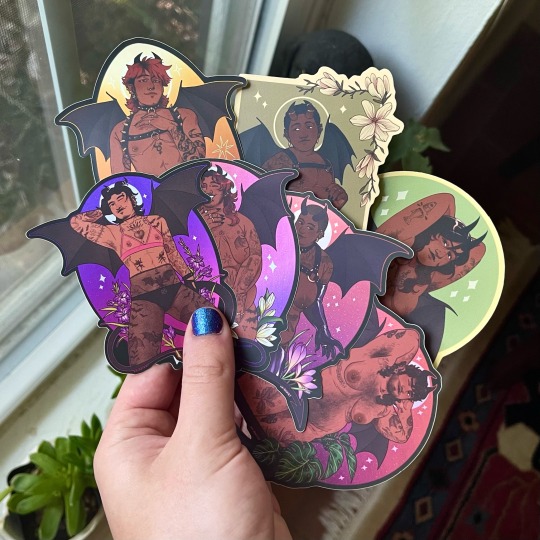

store is open!
happy pride month! my store is open for the summer— there are new designs and some restocks! 20% of profits from now until september 5th will be donated to the PCRF. get some fun stickers!
#store#pride month#stickers#trans#trans artist#queer artist#small business#queer art#trans art#trans demon#i also finally added a tip jar#if you do the tip jar then you’ll get extra tiny linocut stickers#im working on restocking some linocut stickers too#and im thinking about finally offering prints. no guarantees but i know people want my lino prints#if i get a better printing press for my birthday then perhaps :3#it’s hard to get good prints consistently with my current setup
246 notes
·
View notes
Text

Teach Me Tonight - Part 4
[Part 1] [Part 2] [Part 3] [Deleted Scene] Part 4: [Part 5] [Part 6] [Part 7] [Deleted Scene] [Part 8]
Reader x Carmy Berzatto (The Bear FX)
Rating: Explicit (4k)
Tags: Smut, Set sometime after the opening of The Bear, Porn with a little plot, Virgin!Carmy, Sex Toys, P in V sex, Mutual Masturbation, Bondage but they're really tame about it, Both Carmy and Reader have a bit of a praise kink
Summary: Carmy's eyebrows arched in surprise once he saw the contents of the box, accompanied by a pink colored brochure with more options of toys, and big, bold slogans about thrusting and G spots. "Oh. That's intense," he said, not repulsed but definitely taken aback.
A couple of boxes had arrived at the store early in the morning. You were sorting their contents when Carmy walked in through the back door.
"I'll be with you in a minute, babe," you said, leaving a peck on Carmy's cheek.
"Take your time," Carmy eyed the new merch, his tattooed fingers running over the wool of a blue sweater - one you had picked out for his Christmas present knowing it would make his eyes look stunning. You bit your bottom lip to contain a satisfied smile.
"What's this one? Jewelry?"
When you turned around, Carmy was holding a small cardboard box, shaking it lightly by his ear. Your heart started racing when you realized what it was.
"Um, actually, that's a surprise," you cleared your throat. "For you. Well us. But we'll open it later, okay?"
"Now I'm curious," he grabbed you by the waist, pulling you away from the counter and closer to him. You ran your fingers through the hair on the nape of his neck.
"Well, if you weren't so damn nosy..." you said playfully.
"Fuck off," he said without bite. "You like my nose."
You nuzzled against it, then kissed him sweetly.
"I do," you admitted. "Now come on, I'll see you tonight."
He left begrudgingly, but not before he gave you a bruising kiss.
~
When Carmy arrived home, you took him to the bedroom and placed the cardboard box on his lap. He smirked. While he was opening it, you started getting nervous and second-guessing yourself. Men could get very defensive when it came to sex toys.
"This isn't, like, a jab or anything," you said quickly. "It's just something new to try for fun, you know?"
You didn't lack novelty in the bedroom. Maybe it was because Carmy was new to sex but he was willing to try most things. You had to squeeze your thighs at the memory of him fucking you against the bathroom wall, angled precisely so you could both see your reflection in the mirror as he buried himself deep inside you.
Carmy's eyebrows arched in surprise once he saw the contents of the box, accompanied by a pink colored brochure with more options of toys, and big, bold slogans about thrusting and G spots.
"Oh. That's intense," he said, not repulsed but definitely taken aback.
"So I didn't know what you'd like, I'm guessing you don't know either," Carmy hummed in agreement. "So, uh, I bought a couple of things I wanted to try. You can choose next time, if you want," you offered sheepishly, taking out one of the two gifts you had ordered and handing it to Carmy.
"It's a ring," he said, his Adam's apple bobbing as he felt it buzz on his palm. "And that's-"
"A vibrator, uh, for me... It's got a remote and everything so you can, uh, you know, control it too," you had seen the way Carmy's eyes darkened when he made you come before he did. It was that selflessness you loved but also something hungry and dark that made your knees buckle. "That is if you want..."
"Jesus, yes!" Carmy replied, flustered.
"Okay," you sighed with relief and grinned. "Okay! And, uh, if we like it, you can pick the next one."
"I'd like that," Carmy took a quick look at the brochure, slightly less intimidated than when he had just opened the box. "Just a quick question," he stared at the section dedicated to rabbits and dildos. "That goes inside you?"
You laughed. "Yeah, I thought it was pretty self explanatory."
He chuckled and covered his face, probably the reddest you had ever seen him. "No, yeah, I know. It's just- Does it, you know, fit?"
You took the brochure from his hands and squinted to see the measurements.
"It's not that much bigger than your cock, Carm." you flirted.
"Really?"
"Really," you knelt next to him on the mattress, a hand on his upper thigh and your lips ghosting over his ear. "So..."
"Uh- can I watch?" he asked, his voice quiet as he handed you the smooth vibrator. "Just for a little while. Then, I'd like to try that," he pointed at the remote, a little quiver in his voice.
It was thrilling, knowing he desired you and your pleasure that much.
"Yes."
He started kissing and undressing you, hands kneading on your ass and thighs, lips kissing your chest. Once he got rid of your jeans he looked up at you expectantly.
You placed the vibrator over your underwear, teasing with the lowest setting, going around your whole pussy, feeling yourself get wet as you stared into Carmy's eyes - he licked his lips. You nudged your underwear lower and lower, halfway down your thighs, clicking the vibrator one notch harder.
"Oh," you moaned and arched your back, something red and hot boiling in your veins.
Carmy's hands caressed the inside of your legs and thighs, taking your underwear off completely, opening you wide. "Can I?"
You handed him the controller, your heart racing. His fingers hovered over the buttons.
"Be nice," you pleaded - though a secret part of you wanted to see how bad he could actually be. If his dark eyes were any indication he was toeing that line between loving and feral that made sex with him so delicious. "Actually, no. Don't be nice. Just have fun with it," you let out a breathy laugh.
"Let me know if you don't like something, anything," he asked softly.
"Yeah," you exhaled.
"Okay," he turned it up for a moment and then turned it off. You let out a needy whine. He kissed the inside of your calf, soothing. "I want it to last. You look so good, sound so good."
He went back to teasing, then slowly to a rhythm that made you roll your eyes and hips, and just to the edge of your release and back down.
You let out a frustrated noise, desperate as you ground against the now perfectly still vibrator.
"I can't believe you're edging me without me teaching you what that is," you complained half-heartedly, wiping beads of sweat from your forehead.
Carmy was giving you a moment to catch your breath while he undressed, staring at you hungrily the whole time. His cock was hard and leaking in his boxer briefs.
"You're so good," he said softly, sitting back in front of you, turning the vibrator back on, up and up, making you writhe against the sheets and moan loudly. Your jaw was slack and your free hand was grabbing at the sheets. "My good girl," he said, ears pricked up for the drawn out moan he knew would follow.
"Please, please," you met his eyes. "Please."
"Good girl," he repeated, going up a notch and watching you come, legs shaking and high-pitched screams leaving your lips. Your hips thrust with a will of their own as you rode it out, trembling with pleasure. Carmy's eyes were on you as you started breathing normally again and took the vibrator off your clit.
"Shit," you sighed. Your fingers grazed over your hard nipples, finding electricity wherever you touched. You would need a little while to be functional again.
"D'you like it?" you mumbled, eyes half-lidded.
"Did I like it?" Carmy repeated then moved on top of you, strong arms holding him up as he kissed you senseless. His curls had become loose and they tickled your forehead. "I loved it so fucking much. So much."
He kissed the side of your face vehemently, like a man starved and you hummed contentedly. He ground into your hips a little.
"Give me a minute," you said softly. You were definitely wet enough to do just about anything Carmy could want but the world was still spinning a little. "I'll fuck you in a second," you joked breathily.
"Sorry," he chuckled into your neck. "Be right back," he kissed your temple and padded out of the room.
He returned with a glass of water and condoms.
"My hero," you teased, drinking eagerly while you watched him take off his boxers and pump himself a couple of times. The sight made you wetter if that was even possible - the prospect of fucking Carmy making you wild with need. "Your turn. Put that condom on," you said, reaching over for the cock ring.
"Oh," Carmy frowned once the toy was on him. "Feels weird."
"Bad weird?" you asked.
"Weird weird," he laughed, moving awkwardly to turn it on. "Fuck, never mind," he exhaled, eyes rolling back.
You caressed him - his shoulders, his chest. "Too much?" you asked after a moment of him being very still and quiet.
"No, it's good, it's good," he replied dreamily, going back to his place above you, lowering himself into your pussy. You moaned loudly at the immediate feeling of fullness, the easy glide of his cock inside you, and the vibration against your clit.
"Fuck, that's perfect," he slurred, overwhelmed. His brow furrowed in concentration as he was overcome with pleasure. "Shit. I can't move," he admitted.
"Wanna switch?" you offered gently.
"Yes. Yes, please. Fuck," he pulled out of you, falling on the mattress, that same stunned expression returning to his face as you lowered yourself on his cock.
"Shit," you keened. The angle made the ring hit exactly on the perfect spot of your clit, your thighs were shaking and you hadn't even begun to ride him. "I'm not going to last, Carm."
"Neither am I," there was a sense of relief as he said it and chuckled. His hands squeezed at your hips with desperation. "Please."
You started moving back and forth, making Carmy squeeze his eyes shut, his breath coming in heavy exhales as you let out needy noises.
"Holy fucking shit," he said, finally opening his eyes, following your breasts as they bounced up and down while you rode him harder and harder.
"You're ruining me," he managed, his hand reaching for yours, calloused fingers keeping you grounded. "Ruining me completely."
You couldn't speak; every coherent thought was replaced with Carmy - his face, his voice, his tattoos, his smell, his body...
You felt him growing tense underneath you, his muscles taut as his cock twitched inside you. You could hear Carmy panting and growling, his chest rising quickly under your palms. Exhausted, you stopped riding him and leant forwards, into Carmy's chest and open arms, your pussy directly on the cock ring.
"Oh my- Oh my God," you gasped and trembled through a blinding orgasm while Carmy held you tight. Everything was white and hot and your ears were buzzing. You kept rutting into his hips, shaking with ecstasy for what felt like a very long time. Carmy's hands went from your spine down your ass and back up, then gently caressed the curve of your waist.
After a while you winced at the vibration underneath you. Carmy rolled you to your side, sliding his softening cock out of you. You saw him take off the ring and discard the condom in a haze.
"You okay?" he asked. His eyes were back to that soft, blue worry you loved so much. You cupped the side of his face.
"I'm perfect," you replied, out of breath. "You?"
"I'm good," he smiled. "That was-"
"Amazing," you supplied.
"I was going to say fucking insane but amazing works."
You giggled into his shoulder. He took your hand and held it close to his chest. You could feel his pulse still racing.
~
The walk to Carmy's apartment was more quiet than usual. His arm was around you, warm but a little tense.
"You okay?" you asked, raising your hand to interlock with his.
"Yeah," he exhaled, "can't wait to get home is all."
You leaned deeper into his side. "Bad day?"
Carmy let out a chuckle. "Actually it was fine," he cleared his throat. "No, I got something in the mail this morning."
"Okay," you waited but he didn't say anything else. You stared as he got the keys out and opened the door.
You walked in, and as soon as the door closed, he started kissing your neck, hugging you from behind, breathing heavily into your hair.
"What's gotten into you?" you giggled, turning around to return his kisses, pressing against him greedily.
"Can you stay the night?" he asked instead.
"Of course, yeah," you replied against his lips. You practically lived there but he was always nice enough to ask when sex might be on the table.
"Good," he sighed, his forehead to yours.
He swayed you both slowly to the couch. On the coffee table there was a package.
"Open it," he said with a faint smile, fingers tapping nervously on his knee.
"Is this-?" you arched your eyebrow. He nodded.
Carmy hadn't taken you on the offer to let him pick your next toys... Until now, it seemed.
You rummaged through the box and touched metal and leather. Handcuffs. You had never fantasized about being tied up but you could be persuaded - maybe. You studied them in the light, they seemed sturdy and there was padding to stop you from getting hurt. Still...
"We'll have to talk about this, Carm. I trust you. Completely. It's just-" you started, watching him tilt his head in confusion as you talked.
"Oh, no. I mean, we can definitely talk about it," he said gently, "but those are for me."
You stared at him with wide eyes, something warm settling inside your belly.
"Is that okay?" he asked when you were quiet for a moment too long.
You pictured him, toned arms above his head, pupils dilated, writhing on the bed as you had your way with him...
"Yeah," you replied breathily. "That would be- fuck- I think I would be into that."
He smiled.
"This one's for you," he said then, handing you a pink rabbit vibrator. You recognized it as the one Carmy had asked about weeks ago - it was bigger than him but only a little. "I don't know how it works exactly but, uh-"
You tested a few of the buttons and found the vibration settings for the dildo and the clit bit. You were already biting on your lip at the thought of using it when you found out the dildo moved on its own.
"Shit," you said.
"It can fuck you," Carmy added, his voice low.
Your mind started racing at the prospect of having the toy inside you while you sucked Carmy off. Something to think about for later.
"Do you, uh, do you have anything planned for tonight?" you asked.
"Uh, kind of," he hesitated.
"Tell me."
Carmy loved having a plan. You closed your thighs in anticipation.
"I want you to cuff me to the bed."
"Okay." Pretty straightforward.
He gestured at the vibrator. "And I want you to fuck yourself with it. I want you to enjoy yourself and cum as many times as you want. And I want to watch."
Your throat went dry at his confident delivery. When you had started fucking Carmy, what felt like ages ago, he was the one blushing at things, going along with the plan. This was different - he was telling you what he wanted, he was in charge. Even if he wasn't going to be able to touch you.
"How will you-?"
"Cum?" Carmy ended for you.
"Well, yeah. I want you to enjoy yourself too, Carm." You loved the plan so far but you weren't sure it was a fair deal.
"That's what you're worried about?" he asked incredulously. "I don't think you know the effect you have on me. The times I've had to stop myself from enjoying too much when I hear you or see you while we fuck," your stomach fluttered. He wasn't always so open. It felt like you had stumbled into something very intimate, except he had taken you there willingly. "Baby, I'll be fine."
You got closer to him. You didn't really know what to say in return so you just caressed him, his face, his hair, his shoulders. You searched for his eyes and found something fierce, something so like love...
"Tell you what," he said after a while. "If I haven't finished by the time you want to untie me, we can fuck and call it even?"
It seemed almost silly, to have him offer that, like you were haggling, like he was appeasing you, but you agreed nevertheless.
"Deal," you gave him a little peck to settle it. "I still think I'm fucking scamming you but whatever."
That made him chuckle.
"Come on," he pressed another kiss on your lips and started walking to the bedroom, his silhouette undressing beckoning you like a siren's song.
You found him shirtless, laying on his back, his jeans half unbuttoned.
"Fuck," you said softly, your hands fidgeting with the handcuffs. "Are we doing safe words and shit?"
"Sounds like a good idea," he agreed.
"We can do green, yellow and red, you know? Green if everything is fine, red if you want me to stop and untie you," you had read about it ages ago, probably in Cosmo magazine or some shit like that but it was better than nothing.
Carmy nodded and offered his wrists to you.
You bit your lip in concentration as you tightened the right cuff. "Yeah?"
"A little tighter," Carmy said. His Adam's apple bobbed when you pulled on the strap. "Mhmm, that feels better."
You secured the chain to the bed, your heart racing all the while.
"Hey, you okay?" Carmy asked, his blue eyes searching for yours. You realized your hands were shaking.
"Nervous," you admitted. "Never done this before."
Carmy used his free hand to cup your face. "Bad nervous? We can stop right now."
You leaned into his touch - he was warm.
"Good nervous, I think," your underwear was damp from you talking about it, you had to at least give it a go. "I'll tell you if it gets too much."
Saying that, you kissed his palm and secured the left cuff.
You started undressing, there, sat by Carmy. His eyes followed every move. You stared right back - the strain on his arms, the tiny wrinkle between his eyebrows, his soft mouth agape. He looked beautiful, straight out of a painting, except he was breathing heavily. He shivered when your cardigan grazed his skin as you threw it out of the way.
You stopped at your bra, then discarded your boots and jeans. The vibrator was on the other side of the bed, so you leaned over Carmy to reach it, your hair tickling at his stomach. He hummed.
You leaned in to kiss him: hot, full of tongue, then stopped and moved out of his reach.
"Like that," he said softly, some reassurance that this was exactly what he wanted. You smiled and turned the vibration on.
You moved it over your body, on your stomach, over the inside of your thighs. You were taking your sweet time. You took off your bra and caressed your nipples with the tip of it, a drowned out moan leaving your lips.
"Yes," Carmy said, his voice was close to that feral growl that made you curl your toes.
Finally, you placed it between your legs.
"Fuck," you hummed, getting rid of your underwear as quickly as you could, wetting the toy with your arousal. Carmy probably had lube on his bedside table but you didn't want to move, not when he was looking at you like that. His eyes were wide open and you knew that if he wasn't tied up he would be on top of you already, pounding into your pussy hard and fast. You bit your lip - you wanted it.
You shifted on the mattress until you were in full display in front of him and aligned the toy with your entrance.
"Eyes on me," Carmy said, his voice hoarse. A shiver went down your body. You got that delicious fullness while looking at Carmy; it felt right and good.
Once the dildo was inside you, it all became a blur. You let yourself lose control, selfishly seeking your pleasure. You got even more turned on by the sight of Carmy tied up, arms flexing.
"Is this what you want?" you said between gasps, searching the blue of his eyes, feeling your first orgasm approaching rapidly. "Oh, fuck, fuck- Carmy..."
You drew out his name into a moan, one hand pushing the dildo into you, the other playing with your nipples. You kept going, staring at him, the delicious V of his stomach as he thrust his hips into nothing.
"Pleeeease," he keened. He was desperate, his neck strained when he arched into the bed.
The room was hot, filled with sweat and moans from the two of you. You came and you muffled the cry that followed into your forearm.
"Let me hear you," Carmy asked with urgency once it was over. "Please, come again and let me hear you."
You climbed up the bed and gave him the sloppiest kiss, drunk with pleasure, licking into his mouth.
"Yes, anything you want," you said, your lips on the side of his face. Then, you leaned back, just out of his reach, and started thrusting against the dildo, there, still straddling his torso, making a mess of arousal and sweat on his abs. You could feel the rhythm of him fucking into nothing just behind you. Your moans came almost in unison.
"You look so beautiful, so beautiful," he mumbled, his eyes glassy.
You went quicker, emboldened by his praise, feeling your pussy flutter against the dildo. "I feel so good."
"Cum, baby, please," he blurted out.
And you did. And you kept going. Your moans turned into whines and then quiet sobs as the orgasm went on and on. You squeezed your eyes shut, overwhelmed.
"You're doing so good," you could hear Carmy through a fog of lust. "Sound so beautiful. I could die here, I swear..."
Slowly, the waves of pleasure became gentler, the vibration inside you just a soft hum, and you opened your eyes to Carmy's bessoted face. He stared like you were a beautiful work of art or a stunning sunset. It was everything.
You leaned forward, kissing his face, licking the salt off his skin, running your hands up his muscular arms, moaning softly as you took the dildo out.
"Did you finish?" you slurred into his ear.
"It doesn't matter," he said earnestly, his tone soft.
And you smiled, kissing the side of his face, less lust drunk and more devoted as you went. You left kisses on every tattoo you could find. You loved him so much.
"Can I touch you? Please," you begged.
"Yeah," he exhaled into your hair.
You reached down, between your legs, under his jeans and boxers, and started caressing his cock. It was tenting his clothes and leaking with precum.
"You're so hard, Carm," you whispered. "You've been so good. Let me take care of you."
He groaned at your gentle touch.
"Baby..."
"Carmy," you called, your free hand caressing his chest, lightly pinching his nipple.
"Oh, fuck," his jaw went slack. "Keep doing that."
You slid downwards, started kissing on his chest, licking at his nipples, and raking your nails down his ribs.
"Jesus, fuck!" he thrust into your hand forcefully and shook the chain of the handcuffs. "Take these off. Please. Jesus."
You straightened up and stopped touching him, making him whine in response.
"You sure?" you asked.
"Yes! Red or whatever the fuck we said," he panted. "I need to hold you."
You freed him from the handcuffs as fast as you could. Once the first one was off, he rushed to help you, throwing them across the bedroom when he was done.
"Thank fuck!" he said and immediately brought you down to hold you close, lying back with you on top.
He kissed you hungrily, tongue first, mouth open. He ran his hands up your spine, squeezed your ass, caressed your legs, worshipping every inch of skin he could touch. You went back to pumping his cock, grinding into his jeans, your forearm grazing on your pussy and sending little shocks of pleasure as you went.
"Fuck," he moaned into your mouth. "I'm so fucking in love with you. Love you so fucking much."
"I love you. I love you," you said right back.
Your hand pumped faster and faster, he was close.
You made him lose control with one nipple in your mouth and the other held tight in your free hand.
"Son of a bitch," he cursed and came in his stomach and your hand. You kissed his chest one last time.
"That's new," you said, pumping his cock a couple of more times then letting go. You settled next to him on the bed, wiped your hand on the bedsheets and made yourself comfortable on his pillow.
"What is?" Carmy asked, breathless.
"You don't say 'son of a bitch'. You're more of a 'jesus christ' and 'fuck' kind of guy," you said smiling.
Carmy chuckled. "Yeah, you're right."
"And," you emphasized, "you like nipple play."
"I didn't know that about myself either," he exhaled. He turned on his side to have a better view of you. He was sweaty and gorgeous. You held his hand in between the mess of sheets you had both made.
"I can't believe I was right about you," you said after what felt like a long time. Carmy was only half awake by now.
"Mmm?" Carmy rubbed your knuckles, soothing.
"You do like kinky shit."
He hid a sleepy grin behind his hand and brought you closer.
"Fuck off," he said into your hair, sweetly, the rhythm of his breath lulling you to sleep.
[Deleted Scene]
[Part 5]
#this smut is brought to you by bellesa's instagram page 🥵🥵🥵(completely unhinged and sex positive confessions/tips/ads for toys 10/10)#also that gq photoshoot with jeremy allen white in the crop top jesus fucking christ 🥵#carmen berzatto x reader#carmy x reader#carmy berzatto x reader#carmen berzatto fanfiction#carmen berzatto x you#carmy berzatto x you#carmy x you#carmy berzatto smut
397 notes
·
View notes
Last Seen Blogs

doomed-cinnamonroll
Love.

skinnyazn
Azn

stars-of-interpol-blog
Starbound's Dumbest Secret Organization

roosingels-blog
Roos Ingels

naamasworld
Spirit Love and Happiness