#R tutorial free
Explore tagged Tumblr posts
Visit Tumblr Blog
Explore Tumblr blogs with no restrictions, modern design and the best experience.
Last Seen Tumblr Blogs


Fun Fact
Tumblr is available in 18 languages.
Text


guys we have a little problem
#stardust speaking !#person who doesnt read sidestories is dearly paying for it right now#BJKADBJKBJKADKABJDBJKDABJKDBAD HHHHHHH ILL READ THEM THEN ILL READ THEEEEMMMMMMMM#the stan & aliza is just 5 chs right....................#BJKADBJKADBJKADBJKADBJKAD THE LAST ONE IS THE TALES OF COLLAB LMFAOOOOO?????????????#was that the one they didnt translate when it happened or am i dreaming....its tiny too i should get thro it#anyway if anyone was interested in gbf anytime from now is an excellent time cuz these tutorial missions gives u a lot of early weapons +#1 character from each element who r fun to use imo (+ water lily is like sooooo helpful)#and then a free katalina/io/rosetta/eugen/rackam/dark ferry which is happy birthday to mainstory<333333#going thro my sidestories while writing this help I PROMISE NEXT HALF-OFF TREASURE IM FINISHING ALL OF THIS UP. maybe.....the issue is that#i always end up doing other stuff during halfoff....and i SHOULD be in the sandbox mines.............#shaking everyone i love granblu fantasy. no rain no rainbow is added to sidestories in the next couple days and its like. one of the best#events to exist. i can give u a reading list depending on what u like in stories (will list the same 3 events for everyone)#IM JOKING but no rain no rainbow & ranger sign bravo IS amongst the most endearing events
6 notes
·
View notes
Text
youtube
this is so completely offtopic but genuinely such a well thought out video ive always hated 'social media detox' but the way qrbits talks about really needing to find what u want and gain and removing the things that do not help with that forward momentum . like just watch
#txt#the extension used r so helpful too#i dont use twitter but i can see that being helpful#i just spent an hour completely flushing out my yt and subscriptions that ive had since i was like 12#and using the yt distraction free extension#godly ive been super enjoying watching godot engine tutorials/crochet videos/stuff i need to watch specifically for smth im doing#and honestly this video kinda like agrees w that sentiment and i have felt ive been doing better learning skills lately#than when i sit and have j/erma on in bg for 940324 hours JLFKSKLFD#does that make sense ?#srry im ranting this is basically what i needed 2 hear with the direction ive been moving in lately#that college -> work transition . its hitting expeditiously#Youtube
2 notes
·
View notes
Text
#sexxnb#lawsy#free lawsy type beat#90s rnb#jssr#texako#free texako type beat#free 90s rnb type beat#free jssr type beat#free che x jssr type beat#che#pluggnb#kplugg#free 90s rnb x jssr type beat#pluggnb type beat#sexxnb type beat#lawsy type beat#sexnb#type beat#rnb#how to make beats for lawsy#how to make sexxnb#plugg#rnb lawsy type beat#jssr type beat#plugg type beat#r&b type beat#90s rnb type beat#sexnb type beat#sexxnb tutorial
1 note
·
View note
Text
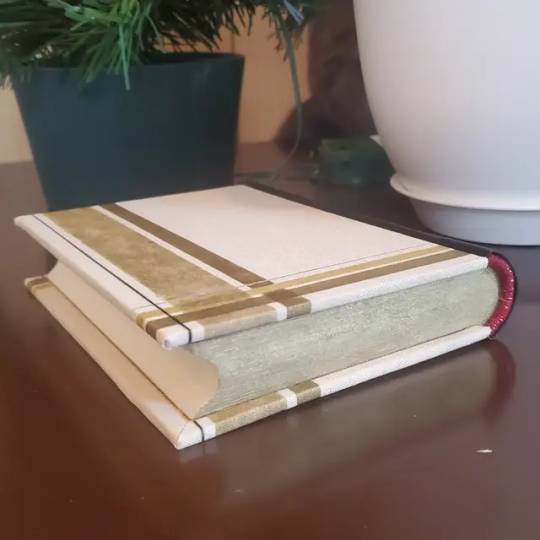
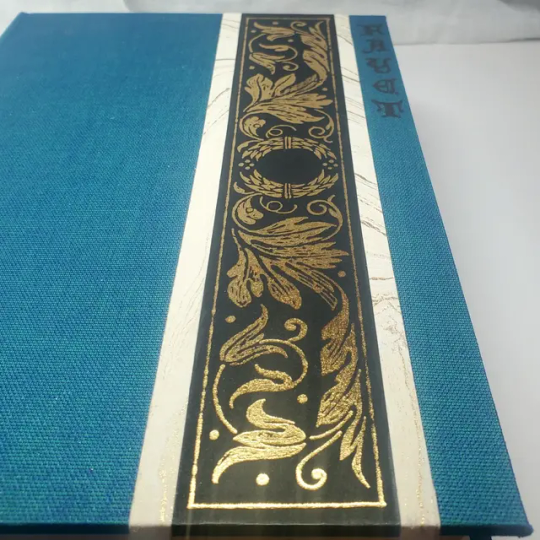
Book Decoration: AKA All The Ways I Don't Use a Cricut
(this post is for people who don't want to buy an expensive cutting tool, or for those that do have an expensive cutting tool that would like to mix things up a little)
1. Print That Shit
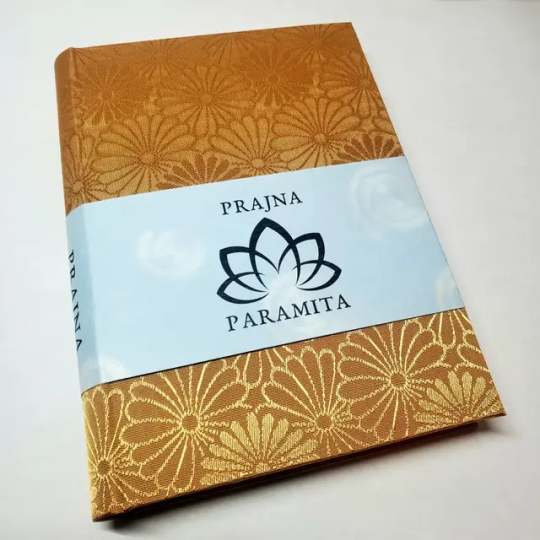
If you're already printing your own textblocks, an easy step for titles is to print them. Above is a title printed onto an "obi" of decorative paper. I measured out where I wanted things on the finished book and laid it out in Affinity, then printed it on a full sheet & trimmed it down to wrap around the book. A more simple method is to print & glue on the label into a slight indent in the cover (to protect it). A third option is to do the spine in bookcloth, while you print on paper for the cover and then glue that paper onto the boards (this usually looks even better when it is a three-piece bradel bind).
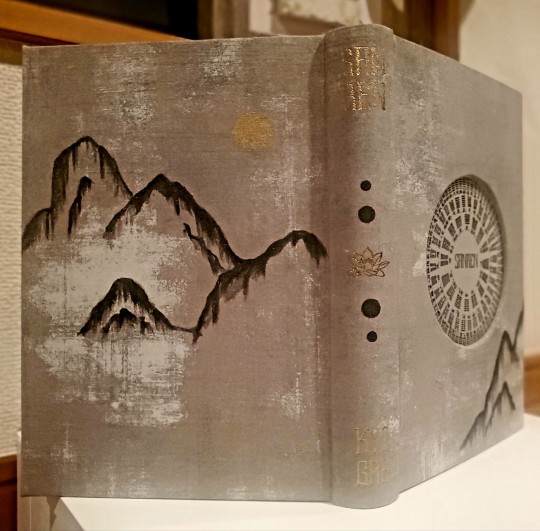
2. Foil Quill / Heat Pens
The heat pen is one of my go-to tools, but it can be a bit touchy about materials. The most popular version is the We R Memory Keepers' Foil Quill (which is one of the most ergonomic), but other pens exist that can get you to a higher heat temp, finer lines, or more consistent foil. For example, I have a pen created by a local Japanese bookbinding studio that fares way better on leathers than the WRMK quill & with a finer tip, but it's hell to control. Best results in general are on paper or smooth bookcloth (starched linen, arrestox, colibri - even duo will work but its less solid). The fuzzier a bookcloth is, the less your foil quill wants to deal with it. This means the heat n bond method of making bookcloth does not play nice with a heat pen usually, but there are two solutions: 1) use this tutorial on paste + acrylic medium coated bookcloth instead that will get you a perfect surface for the heat pen, or 2) use the pen on paper & then glue onto the cloth. I did a video tutorial for both foil quill use and this type of homemade bookcloth for @renegadeguild Binderary in 2023.
You get the most consistent results by tracing through a printed template that is taped in place, as I do in the video above.
3. Paint That Shit
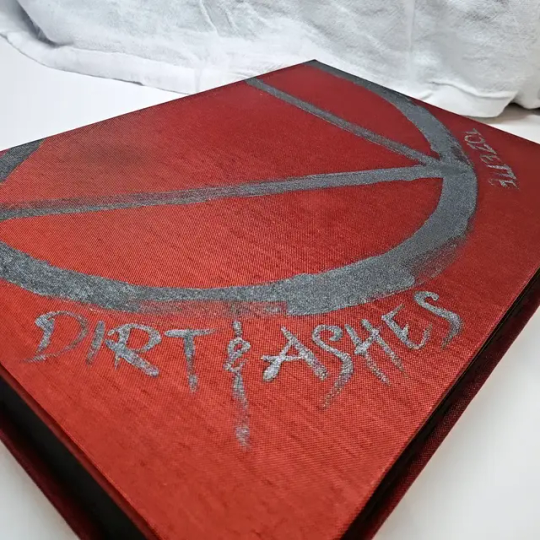
Acrylic paints will do you fine! The above is free-handed with a circle template, because I wanted that vibe. If you need straight lines that won't seep, lay them down with tape first & then paint over it first with a clear Acrylic medium, then your color. Same goes for stencils. Two more examples of painted bookcloth:
4. IT'S GOT LAYERS

By using layers of thinner boards, you can create interesting depths & contrasts on your cover. You can also make cutouts that peep through to the decorative paper behind. The most important part to this technique is the order in which each edge is wrapped. To get a good wrapped inside edge, you will split the turn in into tabs to get them to conform to a curve. You can also layer multiple colors of bookcloth without multiple layers of board, as seen below left, so long as you mind your cut edges for fraying.
5. Inlaid... anything
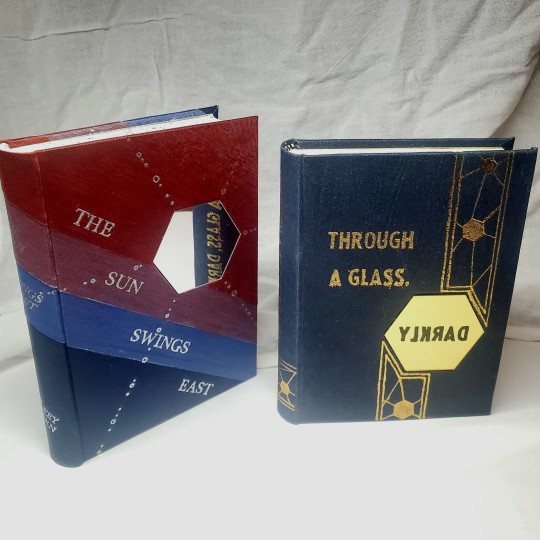
Mirrors! Marbled paper! I saw someone do a pretty metal bookmark once! The key is creating a little home for it to live in, which is pretty similar to the above layering method. On one layer you cut the shape, & glue that layer onto the bottom solid board before covering. You can do the top layer as an entire 1 mm board (like I did for the mirrors) or a sheet of cardstock, like I would use for inlaid paper.
6. Decorative Paper
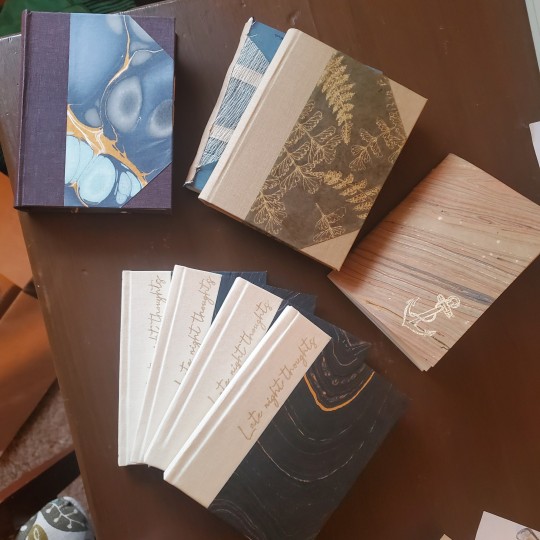
Decorative paper is always helpful & adds to the paper hoard... & its effects can be layers with other techniques, as below. Marbles, chiyogami, momi, or prints & maps of all kinds can be great additions. Some papers may need a protective coating (such as wax or a sealer).
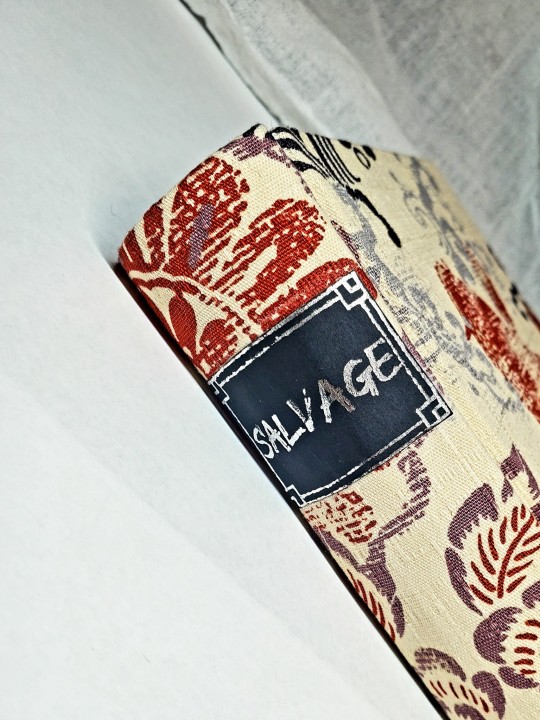
7. Stamps (with optional linocut)
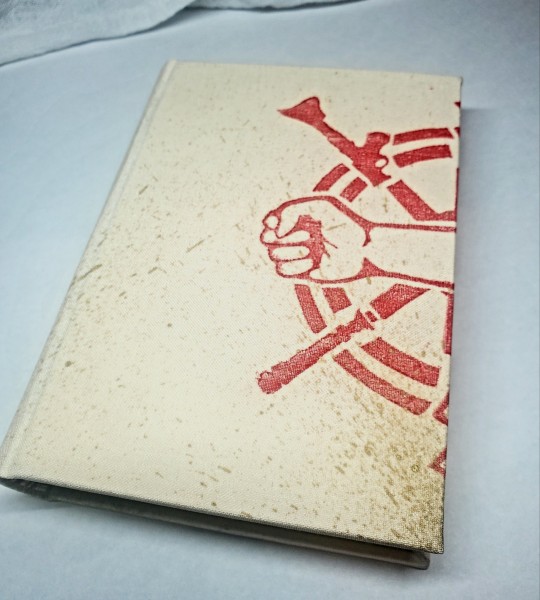
While I've not used many more regular rubber stamps, I do know some who have, successfully! And I've used one once or twice with embossing powder (see photo 3 up, the gold anchor on the little pamphlet bind). What also works is to carve your own linocut or stamp, & then use block printing ink to ink it onto your fabric (as i did above). A bit time intensive, but it was nice how easily reproducible it was, and I liked the effect I got for this particular bind.
These methods are not exhaustive, just ones I've used, and there are of course many others. I haven't gone too into detail on any of these for the sake of length (& post photo limits) but feel free to ask about more specifics. Usually I'm using them in combination with other options.
#fanbinding#bookbinding#celestial sphere press#ficbinding#in progress review#bookbinding how to#i am not particularly anti-cricut or anything#it's just a very expensive tool#and its prevalence sometimes makes new binders think they HAVE to get one#when they absolutely do not#you can make pretty books without it
1K notes
·
View notes
Text
A quick-ish guide to the culture of The Sims 2 modding community.
Are you new to The Sims 2 community? Are you coming from more modern games, either in The Sims franchise itself or other contemporary games? Are you excited to start your #brand and become a #simfluencer and post your #earlyaccesscontent to support your #sidehustle?
Have a seat, then! Let's chat.
Hello, friend! My name's Pooklet. I've been playing since 2004 and creating since 2007. I'm by no means an expert in most forms of content creation itself, but I've been around since the heyday of The Sims 2, I've watched how community opinions have shifted (or not) since practically the beginning, and I'm hoping to give you a basic outline of the community culture that you can expect to encounter as a newcomer.
A very brief history of Sims 2 content monetization:
People have been trying to monetize content since there has been content to monetize, all the way back in the days of The Sims 1. We tend to call them "pay creators" and their websites "paysites." Some big names in this arena include The Sims Resource (their free-with-ads model is a relatively recent development, which is why you will find people to this day calling them T$R), PeggySims, Newsea, and many others that you can find on this handy website:
Paysites Must Be Destroyed
Now, if you have a glance at that website, you might be saying to yourself:
"But, that's illegal! I own the copyright to my custom content!"
Alas, no! Due to the wording of the End User License Agreement for The Sims 2, no custom content creator owns their creations for this game (or The Sims 1, or 3, or 4, for that matter, but we're talking about 2 right now). It all belongs to EA at the end of the day, and by installing and playing the game, you have agreed to these terms. Which means you have no individual, protected copyright, and it is perfectly legal for someone to download your paywalled content and then reupload it for free for others to enjoy. And they will!
Furthermore,
You are not making anything alone.
Everything from modding resources, to tutorials, to the mods required to fix disastrous glitches in the game code and make it playable at all, to the third party programs used to make any and all custom content, such as SimPE—all of these have been provided to you for free by other creators, many of whom have a usage policy that asks that people not use their freely-provided tools to make a profit. Although no one can be forced to follow a creator's policy, it is generally considered good manners to not try to make a profit off of someone else's free work. And if you are using these tools to make paywalled content, that's exactly what you're doing.
Pay creators have been ignoring these policies since the beginning of time, and so free creators likewise ignore their policies against sharing their paywalled content. Pay creators have also tried lots of different ways to keep their content exclusive, everything from trying to track leaks with slightly altered files to actively filling their content with malicious code. It has never worked.
Free creators have always found a way around these barriers. In fact, it's taken as something of a challenge to undermine monetization efforts. As you can see from Paysites Must Be Destroyed, there are entire teams of players devoted to reuploading paywalled content for free.
A culture of sharing.
The Sims 2 is something of a time capsule. At 20 years old, it predates a lot of the hyper-capitalist hustle culture that has infested every creative hobby. It is from a time when monetization was an outlier rather than the norm, and a much maligned outlier at that. This attitude has persisted for 20 years. Believe me when I say, you won't be the combo breaker. Especially now, given that The Sims 2 is not the most contemporary in the series and the community has shrunk considerably, down to the people who have either been here for a very long time, or newcomers that understand the community culture.
Also, it's just kind of not a great idea in general to try to make money off of a 20-year-old game with a pretty small community?
Like, I get that The Sims 4 is really saturated with pay creators and it's hard to get a foot in the door. I get that you might look at The Sims 2 and think that the small pond will give you room to be a big fish. It won't. You might get a handful of people willing to pay for your content, but at least one of those people will be resharing it for free.
Paywalls vs. optional donations.
Okay, so hopefully you now understand why people don't like it when you put content behind a paywall. But what about those Ko-fi and Paypal donation links you sometimes see at the bottom of people's downloads? Why is that okay, but a locked Patreon tier isn't? Well, because they're voluntary. No one is obligated to pay for that content to be able to download and use it. It's just a way for someone who does have a little extra cash to basically "tip" a creator whose content they like. You have no way of knowing whether the person who posts those links is actually receiving any donations. And that's kind of the point. Whether or not they receive any donations, they are still sharing their content, because they enjoy the hobby of making and sharing content.
"I can't make a living off of that!"
No, you can't. Because that's not what we do here. That is not part of our community culture for all the above reasons. If you want to make a reliable income off of your hobby, you're going to need to get a different hobby. Try Second Life! That is a community that actively encourages monetization. The Sims 4 allows for "early access" monetization. There's options out there for you, if what you want is to make a profit off of your creations for a game.
"Fine, what about monetized link forwarding services?"
Link forwarding services historically have malicious trackers or viruses embedded. People will also strip those and provide direct links to each other. Or they just won't download your content.
"What if I want to make YouTube videos of someone else's written tutorials and I enable ad revenue on them?"
Personally, I still think that's a dick move. I love video tutorials, I'm a very visual learner myself, and although you might feel entitled to compensation for reciting the steps of someone else's tutorial into a microphone and then editing and uploading the video, you're still monetizing someone else's freely-provided content. I would consider this an 'ask permission' scenario, one in which you tell the person, explicitly, that you will be making ad revenue off their work. If they're fine with that, then you're good! (For the record, I'm not fine with that.)
edit: more of of my thoughts on monetized youtube videos over here.
"What if—"
Look, no one can stop you from trying to monetize your content, or worse, someone else's content. But you will have the exact same arc as every pay creator who came before you: your efforts will be undermined at every turn, your reception in the greater community will be chilly at best, and it will become a battle between you and the folks resharing free reuploads of your content until any fun you initially had making content is gone.
"The steady erosion of every known social safety net beneath the crippling weight of end-stage, line-goes-up capitalism and the yawning abyss of poverty over which I am dangling has imbued me with such anxiety that I cannot engage with a hobby that precludes monetization. I am exhausted. I know no other way."
I get it, friend! I have lived in poverty all my life. I do not begrudge the impulse to find a way to make passive income off of your every waking moment. Increasingly, it seems like that is the only way to survive! Unfortunately, you will not be able to do that with this specific community. We know that we have something special here, having resisted monetization's encroach for so long, which makes us fight all the more viciously to maintain it. You are entitled to try to find ways to supplement your income, just not here. Personally, I consider that a feature, not a bug.
Bonus Round: Remember, That's Not Just Yours!
I said it earlier, but I want to reiterate: you are not making any TS2 CC alone. You are making it with tools, resources, knowledge and code that people have provided on the condition that they not be used for pay content.
To use myself as an example, "my" hair textures are a blend of resources provided by other creators. Namely, Nouk's original hair texture was edited by Vintage D, which I then further edited over the years, using parts by the creators Ephemera and Helga. It would be extremely shit of me to say "well, I think that the time that I put into my edit is worth money, so I'm charging for it" when the edits that I made would not exist without the work of those people. And it continues on down the line with edits that other people have made of my texture blends and color actions, and the content they make with them.
(If you see someone charging for these, btw, lemme know. I'd love to have a talk with them.)
In closing,
The knowledge base, the resources, the coding required to make any and all working content for The Sims 2 has been compiled for 20 years. Please understand, I'm not trying to denigrate anyone's creativity when I say: you cannot bring anything wholly "new" to TS2 CC-making, something that uses no one else's resources or programs, something you can point to and say "no one helped me with that. I did it all on my own. It is my property." Nor should you aspire to! The fun of The Sims 2 community is to share and share alike, to credit each other for our contributions, to hype each other up and iterate on shared works and resources. We've been doing it for 20 years, and hopefully we'll be doing it for many more! Wanting to be a #simfluencer is utterly antithetical to the community culture. No one is influencing anyone else. You need to leave that shit at the door if you want to be invited in.
TL;DR:
Don't show up to the commie circle-jerk trying to charge for handjobs. We're already giving them to each other for free, and nothing about your wrist technique is special enough to justify the cost.
#sims 2#the sims 2#ts2#long post#like yes this post did come from a place of frustration but i do hope it is genuinely helpful to folks who are new to ts2#and maybe don't quite understand how we operate as a community.
450 notes
·
View notes
Note
can we please have yn reacting to the drivers learning how to braid hair because they know hers is kinda long and is always getting in the way. thanks queen
LUSCIOUS LOCKS!
FORMULA ONE DRIVERS X READER

Summary: You have long hair and it’s always getting in the way. Your boyfriend surprises you by learning how to braid it!
Warnings: Reader is described with long hair, Y/N usage, not proofread
Featuring: MV1, DR3, LN4, CL16, LH44, CS55, GR63, OP81
MAX VERSTAPPEN - MV1
Your boyfriend had been on the sim all day. You didn’t mind, you were just… Slightly worried for his health. Certainly it couldn’t be good for you to just sit down all day, drinking only RedBull. It was a wonder how he managed to be a pro-athlete without having a heart attack.
Either way, you wanted to make sure he stayed healthy and satisfied, so you cooked up a nice dinner for him, filled with nutrients to balance out the excess caffeine he was taking in all day. As long as he was happy.
You walked over and set the plate down on the sim’s little table. He straightened up, pausing it to look over at you, all while you planted a firm kiss to his forehead. He smiled gratefully.
“Do you want to try?” He’d have to stop to eat anyway, so there was no harm done. You seemed hesitant, but when you nodded he climbed out, grabbing his plate to take with him.
You climbed into the cockpit of the simulator, getting situated. It was a little awkward, but after adjusting some of the settings, you were ready to do some fake racing. He smiled, munching on his food while he watched.
Once he finished, he took note of how you kept brushing your hair aside and away from your face, which was taking your racing down a notch. Max stood up, his hands collecting your hair behind your back, separating it into three sections.
“What are you doing?” You questioned, shivering at the sensation of his hands plating with your hair.
You could feel his hands moving deftly, a slight tug here and there. “Braiding your hair,” He answered so nonchalantly.
“You know how to braid?” He hummed with confirmation, and you slightly shrugged. It was nice to have it out of the way, that’s for sure.
Later, when you were both done using the simulator, you went to the bathroom. Seeing your reflection in the mirror, you couldn’t help but laugh.
It looked awful.
—
DANIEL RICCIARDO - DR3
He noticed it a lot. Your hair seemed to really bug you, constantly getting in the way. You could put it up, but then you’d always complain about how it looked sloppy compared to the rest of your outfit, especially when you guys went on fancy dates.
You always had hair in your face, mouth, or food when eating. It was obviously frustrating to you based on the constant groans of annoyance and overall frustration through the night. He wanted to help, but didn’t know how.
It was late one night, and you were already asleep next to him, your hair thrown into a messy bun that would eventually fall out in your sleep. He went to scouring the internet with tutorials on how to braid and style long hair.
The next day, you seemed angry as you stood in front of the mirror, getting ready for work. You couldn’t get your hair to cooperate in the ponytail like you wanted. Daniel approached from behind, gently massaging your soldiers before pulling it free from the hair tie.
“What?” He didn’t respond, just gave you a big grin in the mirror, and you couldn’t help but grin back. His joy was always contagious like that.
He gathered all of your hair and then split it into three sections. You realized immediately he was braiding it, something you were never able to do because of the awkward angle. It was too long for you to braid it yourself.
When it was done, he took his phone out and captured a picture of his handiwork to show you. You smiled, pressing a kiss to his cheek. “When did you learn that?” It looked surprisingly good.
“Last night.” He replies, chasing after you for a real kiss on the lips. “I know how frustrating it is to do your hair.”
The real definition of if he wanted to, he would.
—
LANDO NORRIS - LN4
Lando had been itching for the opportunity to prove himself to you. When you guys first started dating, he predicted that he’d need a skill such as braiding. Your hair was ridiculously long, after all. Except, you never did. Never did you really need a braid.
Until now.
He was sitting on the couch while you got ready to go out with friends. He didn’t care, you were a free woman and he quite liked your friends anyway. Lando was anything but controlling— Just clingy.
You came out of the bathroom, all dressed to perfection with your makeup done nicely. He smiled, immediately complimenting your appearance. You thanked him, and then turned around to show the back, as well as your hair. “I’m just not sure how to style it-”
“A braid!” He replied instantly, sitting up straight. You blinked in confusion, taken aback by his sudden response.
His leg was shaking, foot rapidly tapping against the carpeted floors. You giggled softly, and shook your head.
“I don’t know how to braid my own hair. Only other people’s.”
Again, he replied instantly, “I can do it.”
Silence, and then you smiled. Even if it looked bad, you could tell he felt passionate about this. You agreed, and sat on the floor in front of him.
His hands were gently as he pulled your hair together into a braid. When he was done, he clapped his hands. “There! Looks great.”
You went to check yourself out in the mirror, and surprisingly… He had done it perfectly.
—
CHARLES LECLERC - CL16
Charles loved more than anything to take you on motorcycle rides when the two of you went on dates. It was so freeing, and it felt nice to have you clinging to him with your arms around his waist, enjoying the breeze.
The only problem was, it hadn’t been fun for you since your hair grew out longer, and he respected that. It always flung around everywhere and made it nearly impossible to see. It was unfortunate because before that, motorcycle rides were fun for you as well.
He scoured the internet for a solution to his issue, even asking a forum anonymously on advice. Charles felt stupid when wise women on the internet politely informed him that a braid would fix everything. Of course! But then, he had to ask… How to braid one’s hair, which earned a few laughs from these wise women.
He approached you one day after you both came home from work. You were lazily sprawled out on the couch, wearing an old t-shirt and patterned pajama pants as your comfy attire. “Do you want to go for a ride?” He mused, a slight smirk.
“Mmm��” He looked so eager, it was hard to say no. You hummed. “I suppose.” It was good to do things your boyfriend loved, even if you didn’t.
“Okay, but sit up first.” You did, your back pressed against the cushions on the back of the couch. He went behind, grabbing your hair to begin braiding it. You were pleasantly surprised at his hidden skill, rewarding him with a kiss afterwards.
“Genius, Charles.” You jested, taking the helmet to put over your head, your hair now secure in a braid.
“Thank you, mon ange.” It looked like shit, but it’s okay. Comfort over style.
—
LEWIS HAMILTON - LH44
Every morning when you woke up, your hair looked like a giant bird’s nest. You went to sleep feeling clean and silky, and then you’d wake up and everything was frizzy and sticking out everywhere. It was annoying.
At first, Lewis laughed at the sight, and would help you brush it out. But then, he began to realize your frustrations were serious and you had yet to find the right solution, so he went on a hunt to gather the proper materials for your new hair care routine.
You were both getting ready for bed. As you were brushing your teeth, Lewis came into the bathroom and silently started to braid your hair. You continued with your teeth brushing, but after rinsing your mouth out with mouthwash, you decided to question him.
“I’m braiding your hair,” he replied before pressing a kiss to the back of your neck, now exposed with your hair out of the way. “I bought you a silk pillowcase too. Tomorrow, when you take the braid out, it should remain smooth.”
The action made you emotional, to say the least. You went to bed quietly after showing him your thorough thanks!
—
CARLOS SAINZ - CS55
Carlos always maintained great care of his hair. He had some of the best hair on the entire F1 grid, making sure it stayed healthy and rid of any gray strays. Having you there to help him through the stressful times was part of that.
Your hair, as result, became well cared for as well. You both took pride in having such healthy hair, flaunting it on the paddock together. The problem was that with hair as long as your own, it got to become an issue. You couldn’t swim without it getting in the way, you couldn’t eat, you couldn’t go on runs.
You were sitting by the side of a pool— It belonged to one of your boyfriend’s friends, and you liked the company that came with. However, swimming wasn’t your favorite. Your hair got everyone and usually ended up tangled from the water. A bun could barely hold it up, especially without looking ridiculous.
“Amor, won’t you get in the water?” Carlos asked as he walked over to you, grabbing a towel to dry himself off. “It’s hot.” He sat in the chair beside you, drying his hair off. It fluffed up quickly.
“Mm… No,” You shrugged softly, pushing your sunglasses up. He looked nice— Always something you could appreciate. “My hair just gets everywhere.”
He felt bad that you couldn’t enjoy the cool water on a day like this, especially since he was the one to drag you out there. “Do you have a hair tie?” You nodded, and handed it to him. He gestured for you to sit up, and when you did he began to section your hair.
When it was done, he tied the braid off at the end and cleared his throat. “There… Looks, uh… Good.”
You didn’t care how it looked. It was the effort that made you smile, and you were happy to be able to enjoy swimming with him.
—
GEORGE RUSSELL - GR63
George was an absolute diva. This was no surprise to anyone. He took many things very seriously— The rules, racing, you… His skincare. He took it very seriously, valuing the health of the organ more than anything. When the two of you started dating, you both began to do skin care routines together.
Or, well… You tried. But when it came to the face masks, you always found yourself accidentally tearing hair out. It’s get stuck in the mask and then you’d have a real issue to deal with. Overall, very frustrating to deal with.
Tonight was no different. You started with the water and lotion, and some cream to help clear the stray pimples. George stood beside you, starting to apply his mask. You huffed, staring down at it with a sense of dread. He took note of your quiet rage and moved behind you to begin braiding your hair, his touch tender and gentle.
“George?” You questioned softly, staring at his focused expression in the mirror. He’d probably be a lot cuter if he wasn’t wearing a bright pink face mask.
He looked up at you and smiled, tying the braid off with a tie. “Now it won’t get stuck in the mask, right? Here.” You handed him the mask when he gestured for it.
He helped you finish up the routine by applying your face mask and tucking you into bed for the night. How considerate.
—
OSCAR PIASTRI - OP81
Dating Oscar was a breeze. He rarely picked a fight, was very open minded, and overall was very sweet and caring. The only challenge was how often he exercised. He never forced you to go with him, but you felt somewhat obligated to join him on his journeys.
Running was never easy. Your hair was whipped around in the wind, making it nearly impossible to go for a jog without either inhaling your own hair or having it cover your entire face. You never voiced your concerns, because you were worried he’d feel pressured to stop because of you.
Finally, Oscar just noticed it himself. He was running alongside you, taking note of how you were constantly trying to brush the strands behind your ears or flipping it aside. He stopped his pace, and out of confusion you did too.
“Is your hair bothering you?” He asked upfront, taking a few steps to catch up as you had stopped a few seconds after him.
“Yeah, but it’s not a big deal.” You shrugged, but he shook his head.
He spun his index finger in a circle. “Turn around.” You hummed and nodded, and without even be asked to, Oscar began to braid your hair.
“Where’d you learn to style hair?” You asked. You could practically hear his smile, especially when he began to talk.
“I have three sisters. No way they didn’t make me braid their hair when we were little…” He trailed off in silent focus, and then snapped his right fingers. “Done.”
You jogged a few steps to test it out, and then turned around with a grin. “Perfect! Thank you.”
IF HE WANTED TO, HE WOULD.
#mv1#dr3#ln4#cl16#lh44#cs55#gr63#op81#max verstappen x reader#daniel riccardo x reader#lando norris x reader#charles leclerc x reader#lewis hamilton x reader#carlos sainz x reader#george russell x reader#oscar piastri x reader#max verstappen#daniel ricciardo#lando norris#charles leclerc#lewis hamilton#carlos sainz#george russell#oscar piastri#f1 x reader#formula 1#f1#formula one#f1 fluff#f1 fanfic
569 notes
·
View notes
Text


𖠿 ‣ ⧉ ﹙𝒩﹚ 𓂃 join my discord! ( scroll down )
𓏴⠀⠀⠀༝༝⠀NANA⠀𓌔𓌔 discord layout
𓏴⠀⠀⠀𓊆ྀི⠀RB + LIKE⠀ 𓊇ྀི
𓏴⠀⠀ ۫ ◟ ͜ ᳝᳜᳝ ᶜᵒ⠀𓂂⠀to USE.
𐔌 𓏏𓏏 ˙ Daily 🇵🇸 Clicks

꒰ ͡ˑ͜ ྀི ͝◟⠀⠀DM TO BE A STAFF! : 4 currently⠀⠀◞ ͝ ྀིˑ͜ ͡꒱
◞◠︶ ͜ ◟ join my server if you want : ‿︵ ◜ ͡ ⫘ Tutorials, filters, transparent images, discord layouts, rentries, tumblr layouts, etc. ﹪ and you can request all of it!
◞◠︶ ͜ ◟ Share your original characters (OCs) in channels like OC Introductions, OC x Canon, and OC Art 🫶🏼
KEEP IN MIND THAT I RETHEMED A SMALL SERVER SO THE CHANNELS R EMPTY, so plspslspp apply to be an uploader and staff..

Tags : @lavendergalactic @dollsciples @drblacula @sweetellia
@phaea @puppysplit @sunkupng @sunearis @dollicous @vvincian
@vampteiga @wl1llies @abyslita @angelesse @awpples @sqwuigly
@sweetellia @luctus-flos @frilliette @theleverethiding
#nana manga#nana hachi#nana osaki#anime#dividers#rentry recourses#tumblr layouts#banners#rentry graphics#carrd resources#honkai star rail#hsr#genshin impact#hoyoverse#.°˖✧ ꒰ DISCORD LAYOUT ꒱ ⊹₊ ✰ ⋆
938 notes
·
View notes
Text
My little Kobold is all finished! What a cutie!! I put so much love into this and I am so proud of how it all came together. Sculpted by hand with @monsterclayusa and cast in urethane. You can preorder a blank cast kit to finish your own lil goober this Friday at 2pm PDT and a second batch will drop next Friday, same time. There are new tutorials available on the free tutorial page in my shop. You can also check out my process for creating these masks by supporting my p a t r e o n ❤️🐉 #missmonster #missmonstermel #sculpture #dragon #mask #monsterclay #kobold #dnd
828 notes
·
View notes
Text
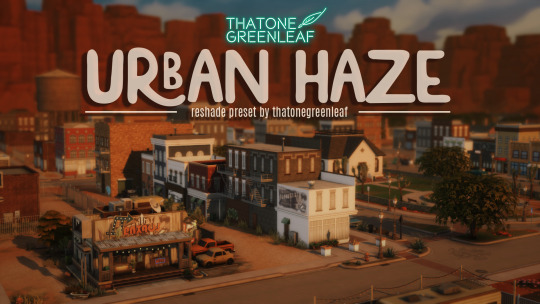


~urban haze~ reshade preset!
I've been using this preset on my twitch for a bit now, and i've finally gotten around to releasing it!! I'm very happy with it and I currently use it for everything😅
Urban haze has a focus on realistic lighting with a slight hazy and warm feel. Less blue in shadows, darker nights, deeper afternoon shadows, saturated sunsets, balanced greenery. Use it in any world, I've tested them all :)
__________________________________________
How to download:
♥ Download Reshade: (I use reshade 5.7.0, I can't say how this preset will behave with other versions of reshade, or G-shade.)
♥ During Reshade Installation, select The Sims 4, choose DirectX9 as the rendering API.
♥ Effect Packages to install: standard effects, sweetFX by CeeJay, qUINT by Marty McFly, color effects by prod80, and Legacy effects.
♥ Download urban haze below, drop it in your Sims 4 installation's "Bin" Folder
♥ Open the Sims 4, Disable edge-smoothing in your graphics settings if it's not already, In the reshade menu, set RESHADE_DEPTH_INPUT_IS_REVERSED= to 0 in global preprocessor definitions if it's not, and MXAO_TWO_LAYER= and MXAO_SMOOTHNORMALS= both to 1 in qUINT_mxao's preprocessor's definitions.
♥ If you're struggling with installation, I suggest you check out @kindlespice's installation tutorial! It was made for reshade 4.9.0 but the instructions remain the same.
__________________________________________
Notes:
♥ Both Depth of field shaders are off by default, you can enable them using their shortcuts: ctrl + Q (MagicDOF), ctrl + W (MartyMcFlyDOF) or enable them manually.
♥ MXAO.fx also has a shortcut (ctrl + R) bc sometimes the DOF blur makes the shadows weird, most of the time it's fine!
♥ Could potentially be gameplay friendly, depending on your GPU! The MXAO and DOF shaders will be the most performance heavy, feel free to adjust to your liking.
♥ The pictures above were taken with this preset and no further editing, but I do use a few lighting mods that will affect how my game looks:
♥ NoBlu by Luumia
♥ NoGlo by Luumia
♥ twinkle toes by softerhaze
URBAN HAZE RESHADE PRESET ↠ download on sim file share!
Follow me on twitch!
Support me on patreon!
TOU: do not redistribute, reupload, or claim my cc/CAS rooms/presets as your own! recolour/convert/otherwise alter for personal use OR upload with credit. (no paywalls)
1K notes
·
View notes
Text
𐔌 . ⋮ not enough for you .ᐟ ֹ ₊ ꒱
☓┆Idia Shroud x gn! reader
𓏵 857 words
ᝰ.ᐟ 3rd person POV, no pronouns used, established relationship with reader, angst, hurt/comfort
feel free to like, reblog, or leave a comment!
ᝰ.ᐟ masterlist

Idia didn’t feel like he was worth your time—your love, your affection—any of it. He was just some pathetic, introverted otaku, a guy who barely scraped by in real-life interactions and spent more time talking to NPCs than actual people. Why would someone like you, someone with so much potential, choose to get close to someone like him?
It ate at him, this gnawing doubt. He could brush it off with self-deprecating humor in the moment, but when he was alone with his thoughts, the weight of it settled in his chest like a heavy stone. Maybe it was shame, or maybe it was fear— fear of admitting that you were the only thing, besides Ortho, keeping him tethered to the outside world. The only reason he’d even consider speaking to others beyond his hyperfixations on games, anime, and the endless sea of glowing screens.
And yet, here you were. You had so many other options, so many other things you could be doing with your time. But instead, you were sitting cross-legged on the floor of his room, surrounded by controllers and snack wrappers, laughing softly as you beat him for the third time in a row.
He didn’t get it. He didn’t understand why you stayed.
“You okay?” you asked, snapping him out of his thoughts. You paused the game, tilting your head to look at him, concern flickering across your face. “You’ve been kind of quiet. Did I go too hard on you this time?”
He shook his head quickly, pulling up his hood like it could somehow hide the flush creeping up his neck. “N-No, it’s not that,” he mumbled, voice barely above a whisper.
“Then what’s wrong?” you pressed gently, setting the controller aside. You scooted closer to him, your expression softening in a way that made his chest ache.
Idia hesitated, his fingers fidgeting with the hem of his hoodie. He didn’t want to say it. Didn’t want to ruin this, whatever this was. But the words slipped out anyway, quiet and trembling. “I just… I don’t get why you’re here. With me. I mean, you could be anywhere else, with anyone else, doing something actually… I dunno, meaningful.”
Your heart sank at his words. You reached out, placing a hand on his knee, grounding him before he could spiral further. “Idia, why would you think this isn’t meaningful?”
He let out a bitter laugh, avoiding your gaze. “Because it’s not. Look at me! I’m R-rank material at best, and you… you’re SSR. Top-tier. S-tier, even. You could speedrun life and still 100% it without breaking a sweat, and I’m just here struggling through the tutorial. Why would you waste your time on a noob like me?”
You blinked at his outburst, startled by how much he seemed to believe his own words. He laughed again, bitter and self-deprecating, pulling his hood further over his face like he wanted to disappear. “I mean, seriously. You could be out there living your best life, but instead, you’re in a shut-in’s room, playing games with someone who can’t even grind for basic social skills. It doesn’t make sense. I’m not—” He stopped himself, biting his lip. “I’m not enough for you.”
His voice cracked on the last part, and it broke your heart. You squeezed his knee gently, leaning in closer. “Idia,” you said softly, “you’re not a noob, and you’re definitely not R-rank. You’re so much more than that.”
He didn’t respond, his shoulders hunching as he tried to make himself smaller, but you weren’t about to let him retreat into his shell. “I’m here because I want to be here. I could be anywhere else, sure, but none of those places would make me as happy as this. As you do.”
His eyes widened slightly, finally flickering up to meet yours. You smiled, brushing a strand of blue flame-like hair out of his face. “I don’t care if you think you’re ‘just some otaku.’ You’re thoughtful, smart, and funny— yeah, you are,” you added quickly when he opened his mouth to argue. “You make me laugh. You make me feel safe. And honestly, I love spending time with you, whether it’s gaming until dawn or just sitting here, talking.”
Idia’s lips parted slightly, but no words came out. He looked stunned, like he didn’t quite believe you but wanted to so badly.
“You don’t have to be perfect, Idia,” you continued, your voice barely above a whisper. “You don’t have to be anyone but yourself. That’s enough for me. You’re enough for me.”
For a moment, the room was silent, save for the faint hum of his computer monitors. Then, Idia let out a shaky breath, his eyes glistening as he quickly wiped at them with his sleeve. “…You’re like, ridiculously OP, you know that?” he muttered, his voice thick with emotion.
You grinned, reaching for the controller again. “Yeah, well, someone’s gotta keep you in check when you’re feeling down, right? Now, come on, rematch. I’m not going easy on you this time.”
For the first time that night, he smiled—a small, timid thing, but a smile nonetheless. “You’re on.”

#۶ৎ qka daydreams!#twst#twisted wonderland x reader#disney twst#disney twisted wonderland#twisted wonderland#twst x you#twst x reader#twisted wonderland x you#idia shroud#idia shroud x reader#idia shroud x you#twst idia#twst idia x reader#idia x reader#idia x you#angst#hurt/comfort#light angst
236 notes
·
View notes
Text

Hello everyone! With the poll on my main blog, many ppl have voted for a psd tutorial so here it is! Here are some things to note:
✦ ・ There is NO fixed way on making psds and this is simply my way of going through it.
✦ ・ this will be a in depth tutorial so it'll show u my whole process! Skip to step 3 for actual process.
✦ ・ there are other tutorials on tumblr that i def recommend! Such as @/canarysage and @/imbermagnvs
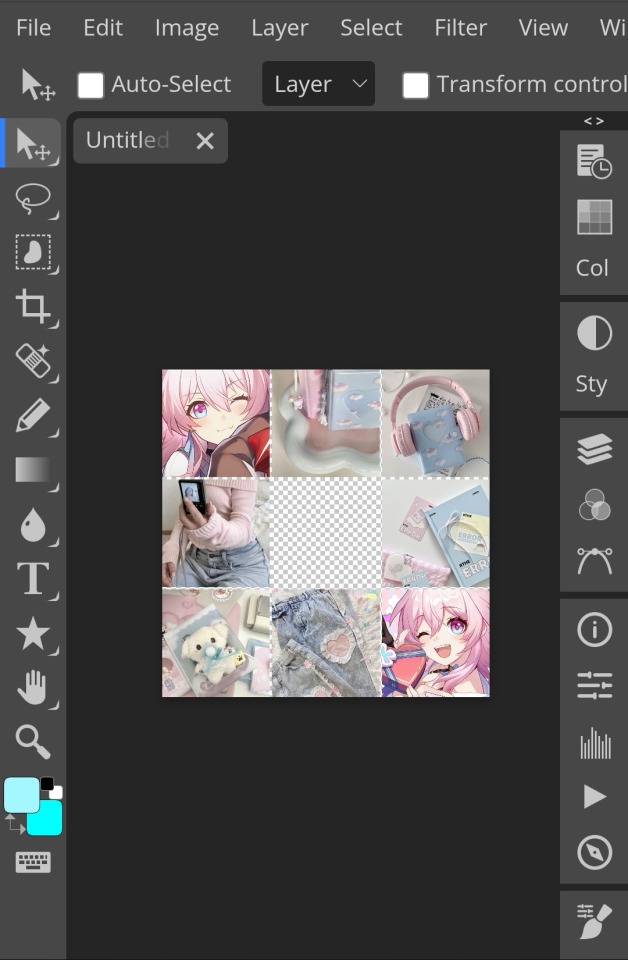
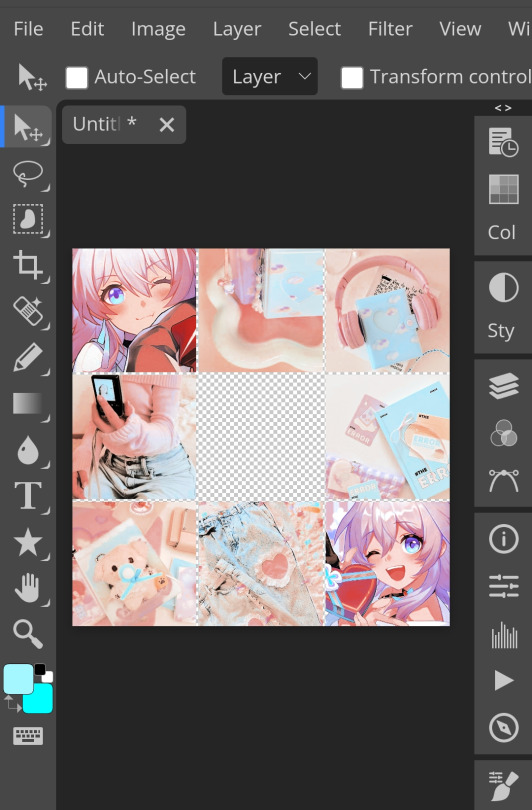
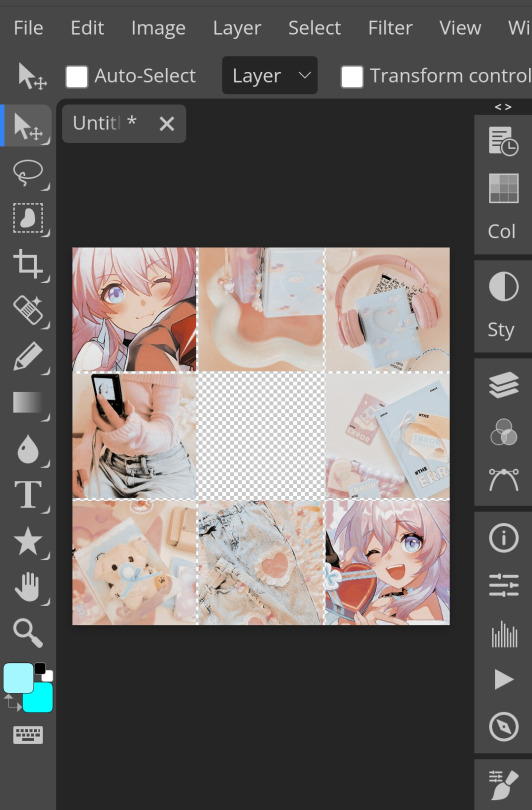
1. Lets get straight to the point! Choose the image(s) you want, i often make a moodboard first but thats optional and you can just choose ur image. (not sure if anyone needs this but to import or place images, press file -> open)
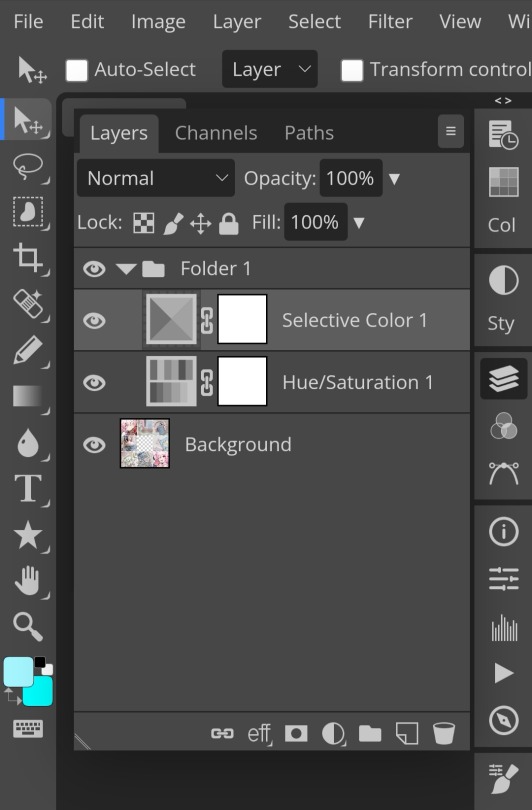
2. Next, make a folder by pressing the layer button (the 5th button the right based on my image)
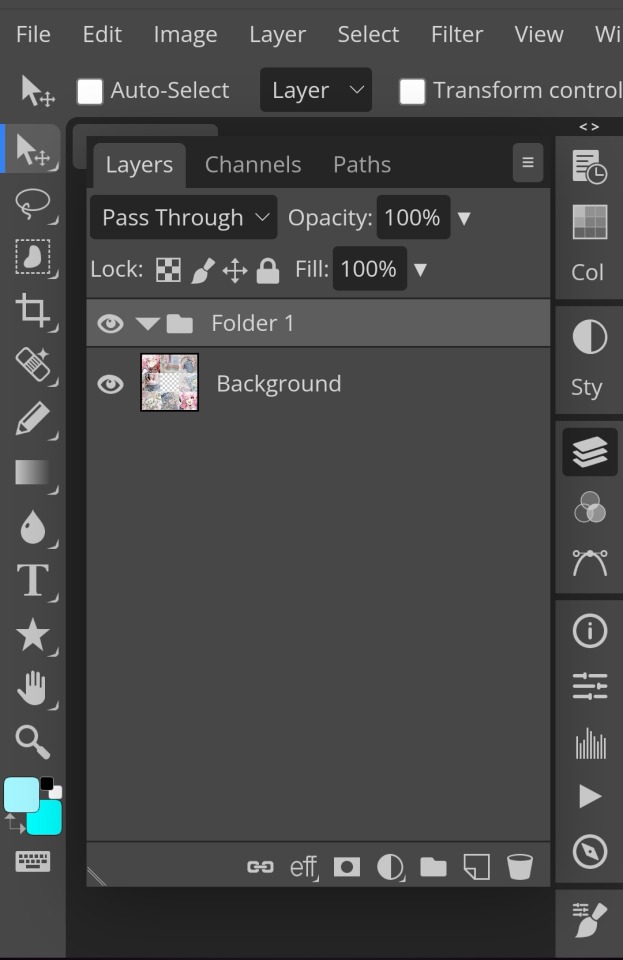
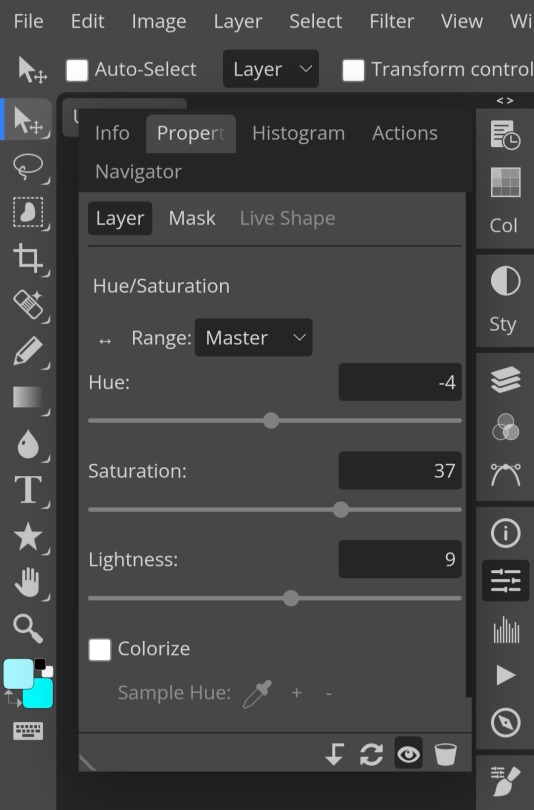
3. Firstly, i use hue/saturation to make her a lil more vibrant so my colours can be more uhhh vibrant or vivid.
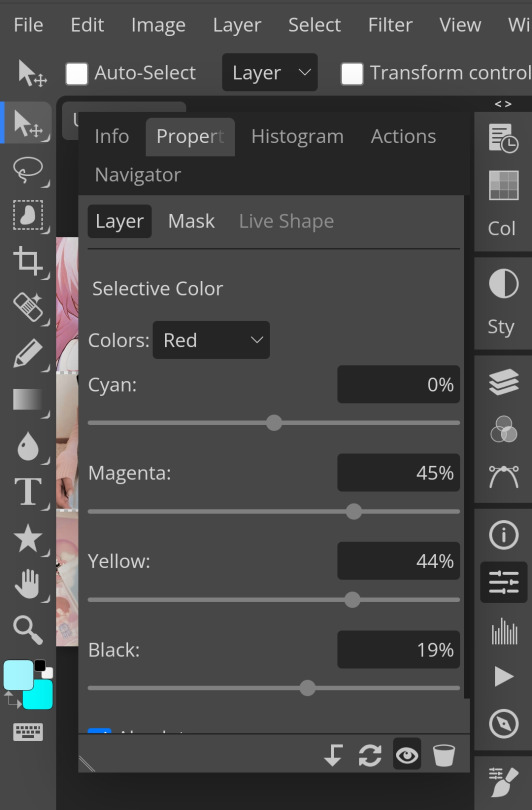
4. Now, every editors fav! Selective colour 💓 I'm not really good at explaining so pls visit canarysage to see what it is! It's good to tweak some colours without affecting the other colours.
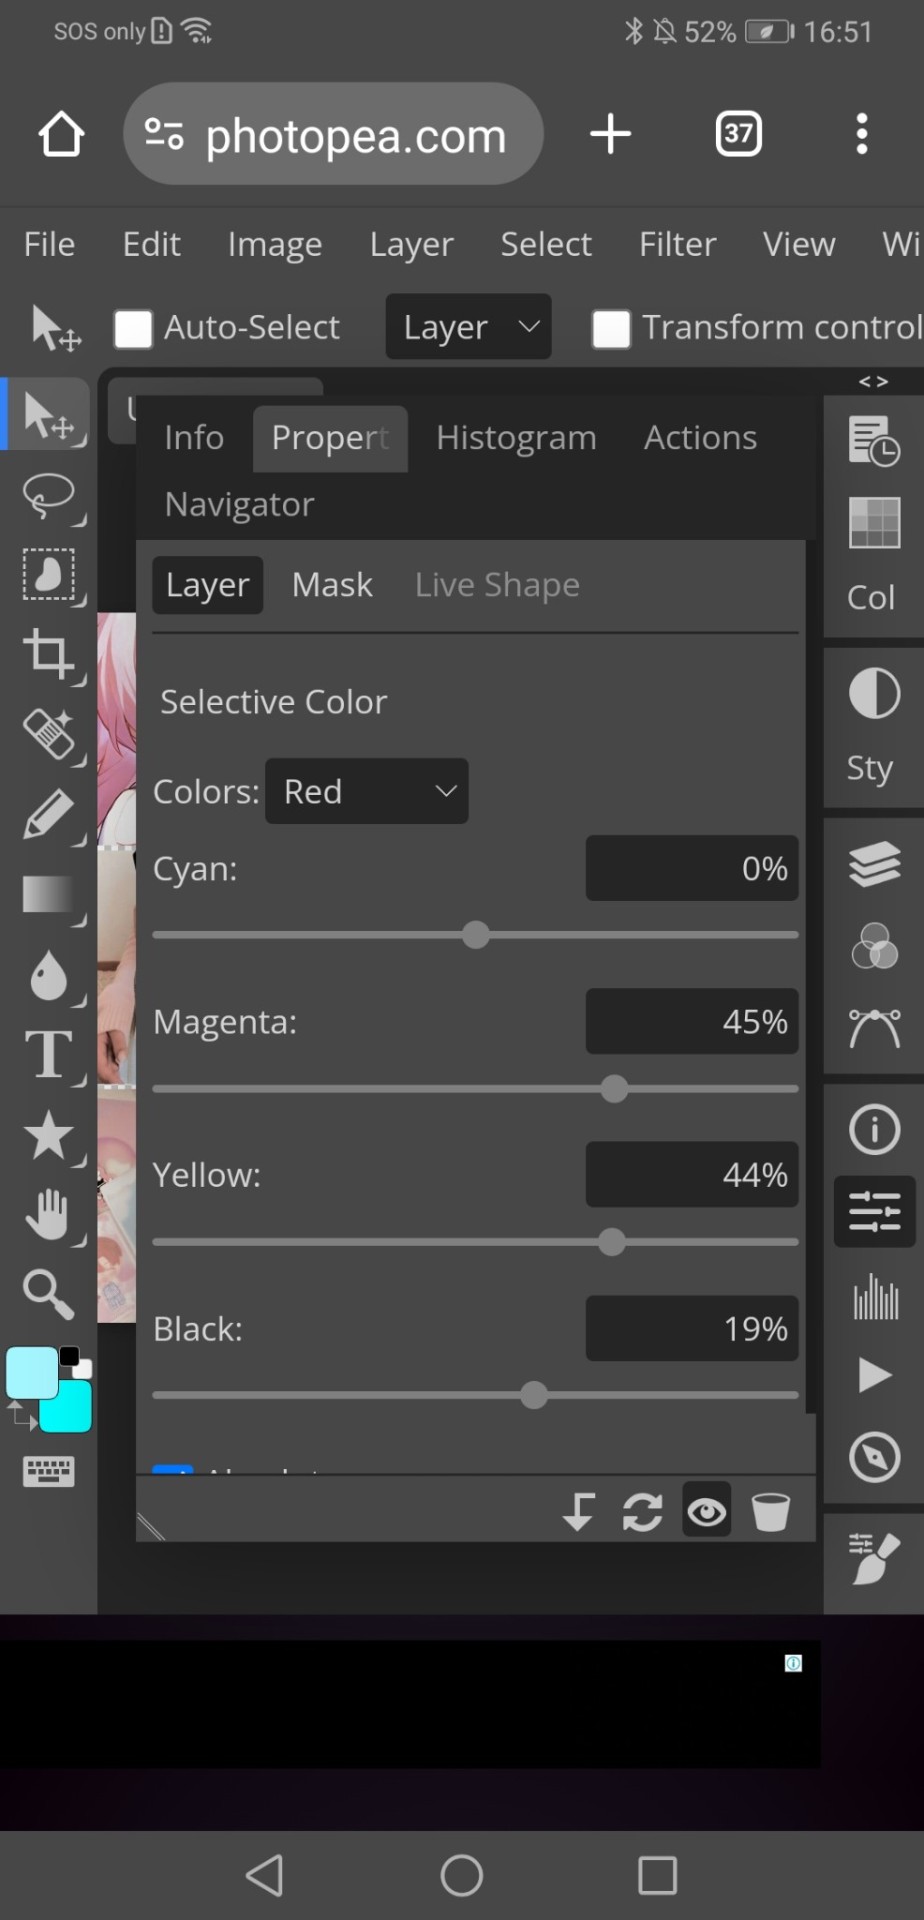
5. I recommend adding more selective colours as i added few more but cuz of the limit i can't show u help but i recommend adding 2-3 anyways! This is the psd so far which seems okay but to me it doesn't pop out so I'll be adding on
7. So i decided to add hue/saturation w the same reason as point 3.
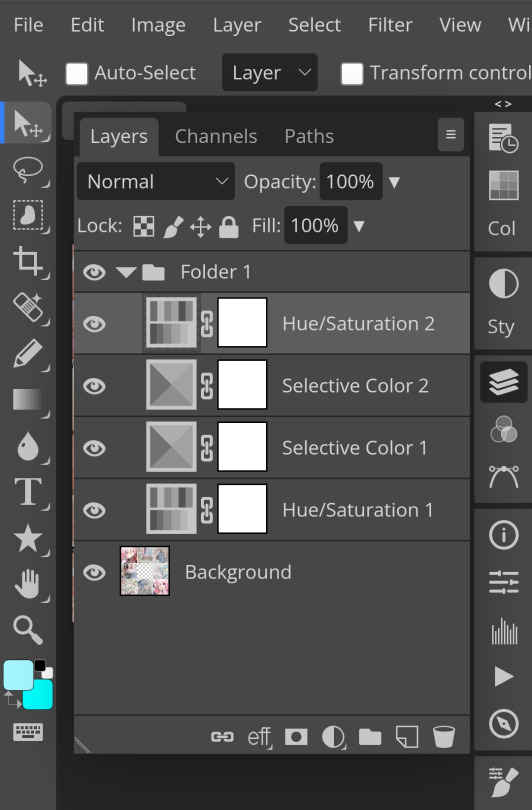
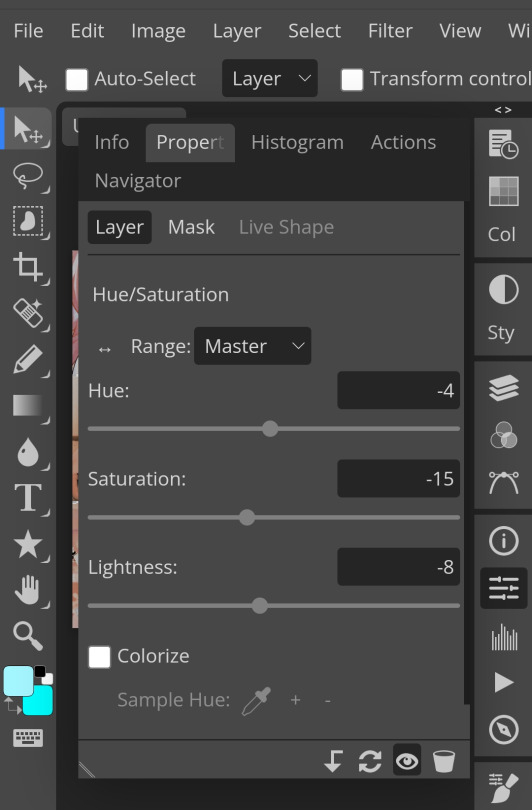
8. Next, i use vibrance to not oversaturate the image.
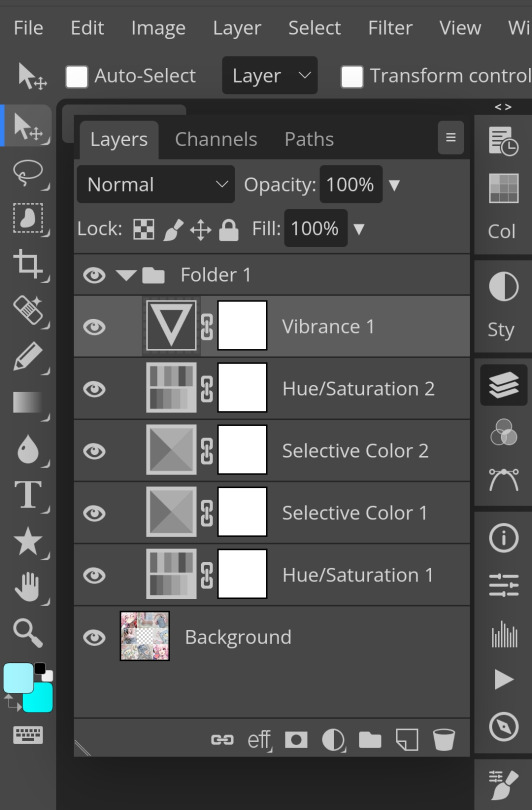
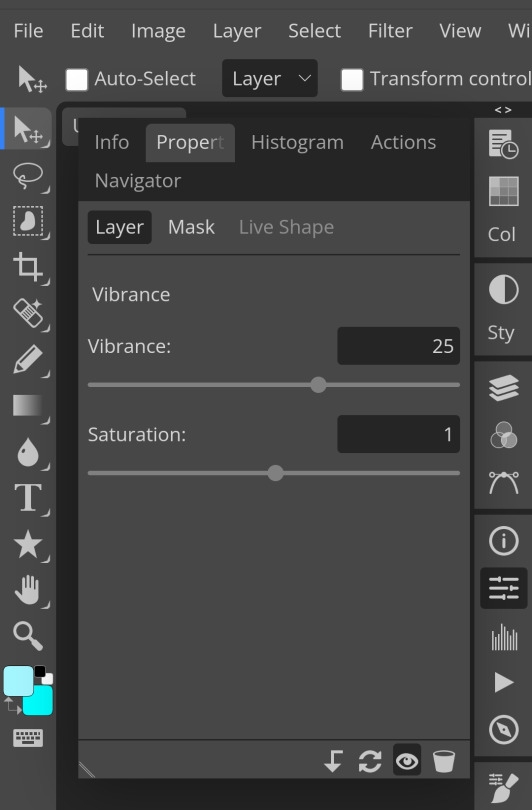
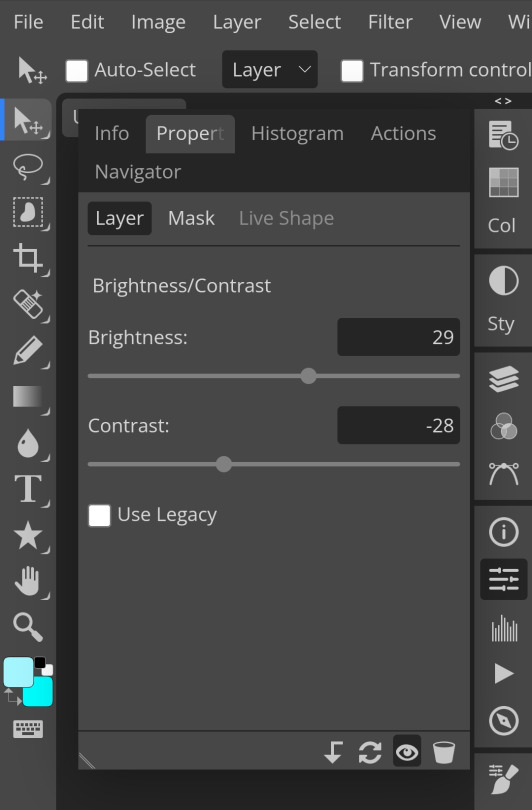
9. Now i use brightness and contrast, It’s often used for quick n straightforward edits to enhance visibility.
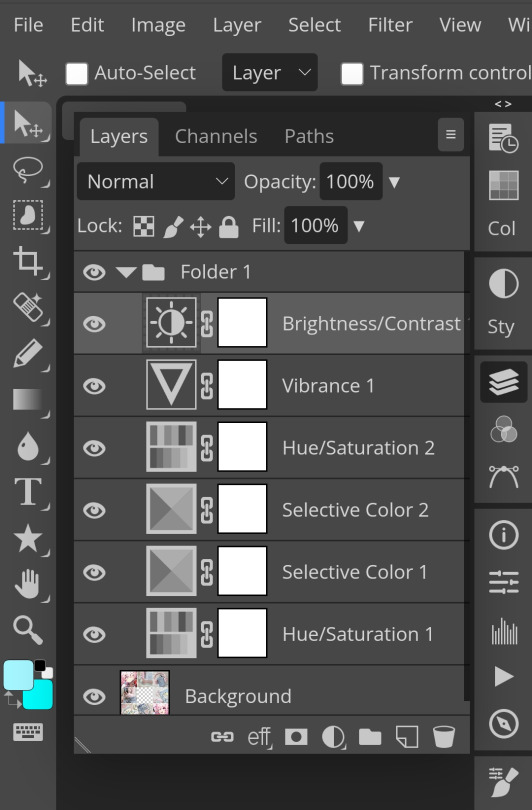
10. Let's add another hue/saturation layer cuz why not! Please remember to experiment w what u do since this is how you can have your own "style" of making ur edits.

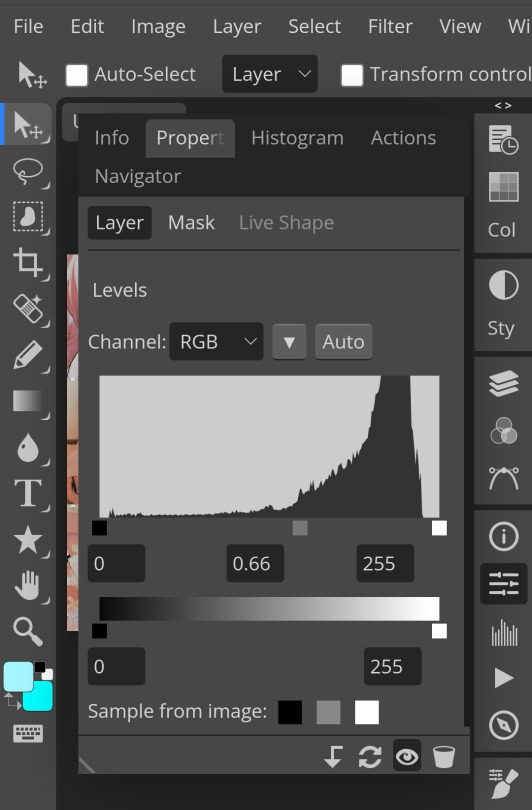
10. Next, let's add levels! I recommend checking out canarysage since they explained it better than i ever could.

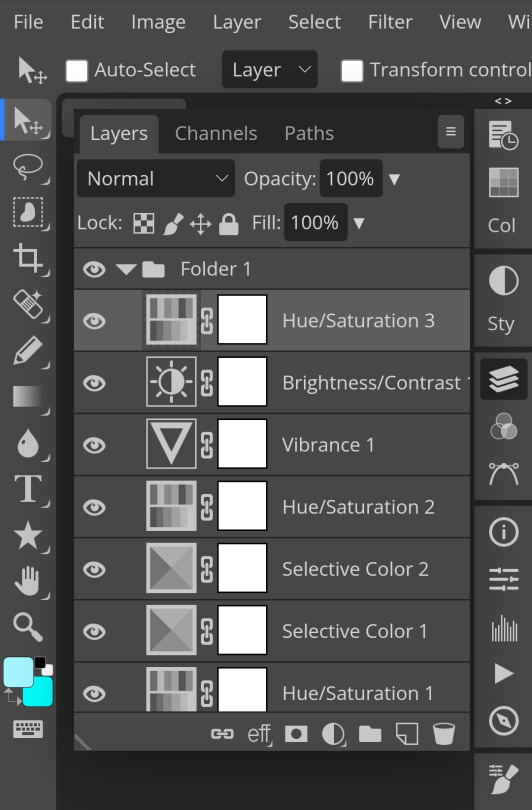
11. Now, another layer of selective colour
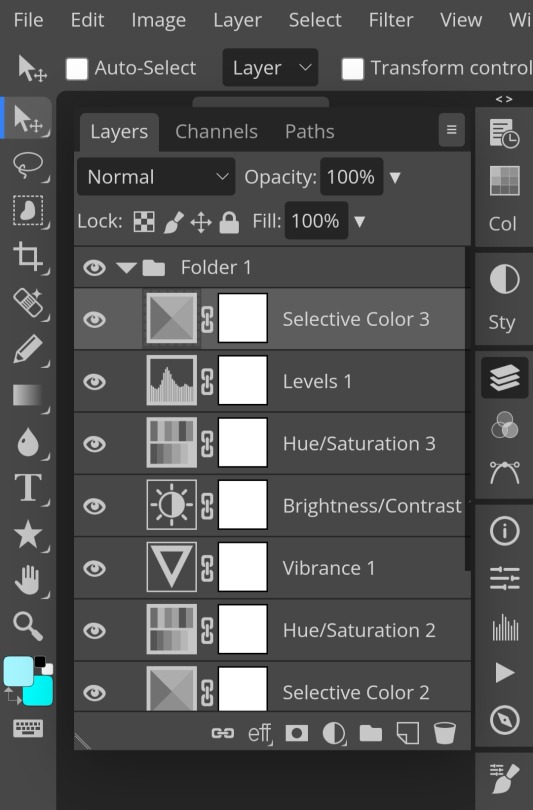
and tada! This is my psd so far but i love those psds that r bright so I'll add on but this is optional!
12. Now let's add a channel mixer to create some custom effects <3
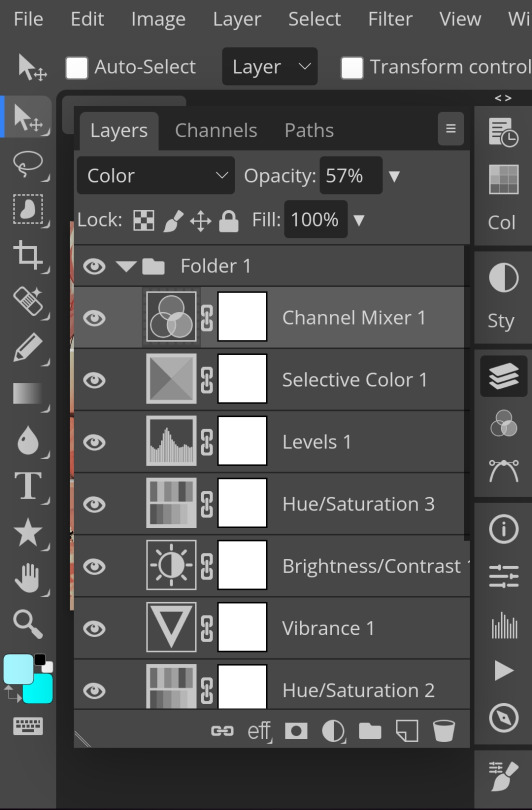

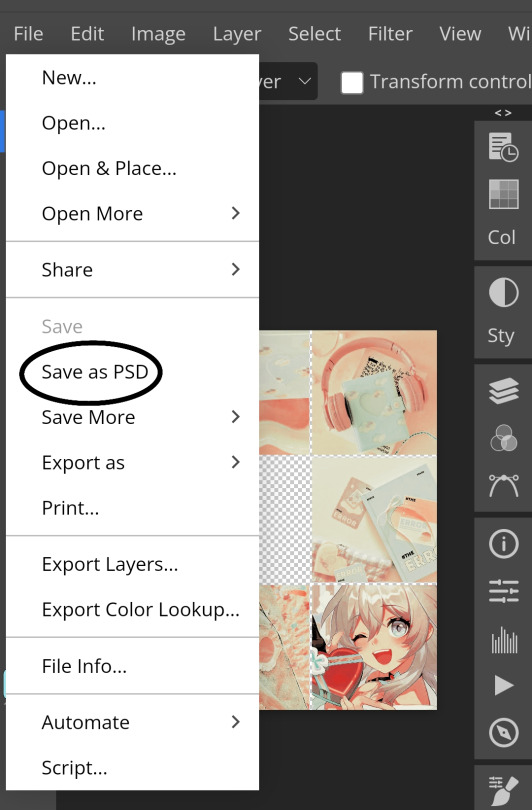
And here's the psd outcome! You'd wanna save it as save as psd (i HIGHLY recommend you put ur psd on a 100x100 canvas w a pic so it doesn't take much space)
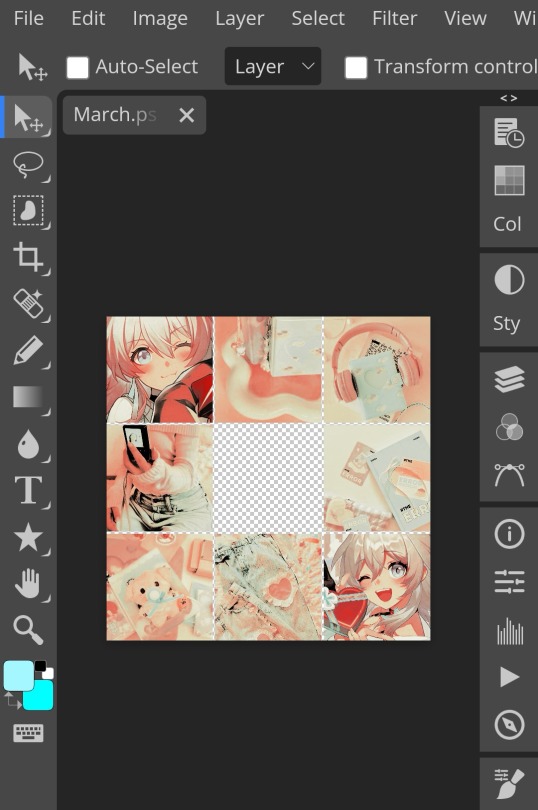
ANOTHER NOTE!! i always test my psd on dark skin characters afterwards and made adjustments when needed i realised my selective colours made em abit red so feel free to adjust if ur using this tutorial! If u made it this far drop a follow 😈
191 notes
·
View notes
Text
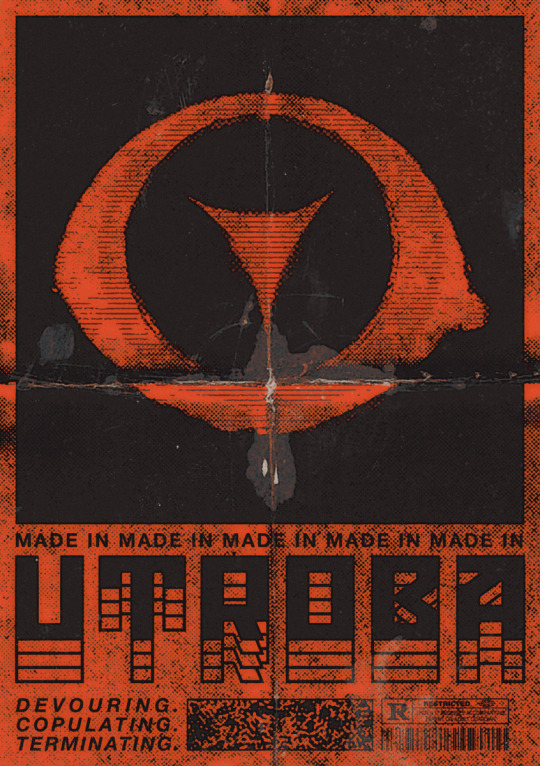
[BOOTING SYSTEM…] [INCOMING TRANSMISSION DETECTED] [SOURCEː MÆTERS 🔻 / STATUSː ENCRYPTED] >>> IDENTIFIEDː Illustrators and co-creators of UTROBA — a dark world of entropy, monstrous beauty, and human fragility. >>> INITIALIZING COREː ART / CHARACTERS / DESIGN >>> TRANSMITTING CONCEPTSː Biopunk / Horror-body resonance / Decay aesthetics. [SIGNAL WARNING — DATA CORRUPTION] >>> Fragments scatteredː "Mon.sters-LoV>R?ed..dreams_r-f.e.a.r." >>> Decrypting lost essenceː Love... Monsters. Horror. Red. Untold stories. [SYSTEM STABILIZING] >>> Awaiting connection... >>> END OF TRANSMISSION. /// morE oF uSː linktr.ee/maeters
?.. ?.. ?..
F.A.Q
— You both run this account? How do you split the work? How do you draw together? Exactly. Just imagine a small art studio of two people drawing in the same style and working on the same work. Share tasks, collaborate on steps like sketching for example, but also create individual pieces. Sometimes it feels like we share one brain... One big elder brain.
— What brushes you use? Where can I find more about your work process? What program do you use for drawing? Brushes, materials about our drawing process, tutorials and other similar content are available on our [Patreon]. We also regularly upload step by step materials and PSD-files. We’re drawing in both SAI and Photoshop.
— Do you do commissions? Can I get one? Yes, we draw commissions, but currently they are closed. We'll drop a post about the slots as soon as we free up time for new work. You can find all the details about working with us in the links.
[ERROR]: ████ ██ █████

295 notes
·
View notes
Text
#sexxnb#rnb#lawsy#sexxnb type beat#plugg#pluggnb type beat#lawsy type beat#free lawsy type beat#pluggnb#jssr type beat#texako#jssr#90s rnb#summrs#free 90s rnb type beat#free che x jssr type beat#sexxnb tutorial#free#free texako type beat#rb#r&b type beat#90s rnb type beat#how to make sexxnb#free jssr type beat#kankan type beat#sexnb#rnb lawsy type beat#texako type beat#how to make a lawsy type beat#coco lee type beat
0 notes
Text


New free pattern from me: Blocked Out Hexagon! Full pattern on my blog or grab the PDF from my Ravelry shop! Both links are in my bio! 🌈💕👏
Check out the IG reel here!
Check out the tiktok here!
#yarn#fiberartist#crochetersofinstagram#crocheting#crochetcrew#crochetpattern#crochetpatterns#freepattern#freepatterns#freecrochetpattern#free#freecrochetpatterns#ravelry#smile#ravelrypatterns#crochetcreations#diy#howtocrochet#love#craft#crafting#crafty#handmade#handmadegifts#crochetblog#happy#patternrelease#create#hexagon#new
83 notes
·
View notes
Note
Hi, I've only just got into solarpunk and find it really cool.
I was wondering, what sort of simple lifestyle changes would you suggest to start with when trying to live in a more solarpunk/sustainable way?
Hi! So glad you're getting into solarpunk! We think it's pretty cool, too, and we're happy you're looking for ways to integrate it into your life. Since you haven't included anything specific about your situation or what you're interested in, this list is pretty general - if you want more specific ideas, feel free to send in another ask!
In the meantime, here are a few recommendations for getting started:
Grow something. Depending on your situation, you may not be able to put in a huge outdoor garden. But there are many plants that will be perfectly happy in a pot on a windowsill, and still others that are happy to grow in low-light situations. Find something that works for your space and get some hands-on experience with growing things. (If you have a window, I highly recommend herbs - many of them are happy in pots and there's something incredibly satisfying about eating things you've grown.)
Compost. Unless your space is extremely tiny, you probably have room for a small composting system. Some can even go under a sink or in a closet. See this post for a general discussion, this post for vermicomposting ideas, and this one for info on bokashi composting. Also check out our #compost tag.
Mending. Mending is a great skill to have. The life of most clothing (and a lot of non-clothing fabric items) can be extended dramatically with some basic sewing skills. I've made entire dresses and quilts and I still find most of my sewing is repairing and mending other stuff. We have a mending tag, but I also love YouTube for this. Searching "how to mend X" (e.g. "how to mend hole in crotch of jeans") gives you a bunch of awesome tutorials. You can get even more use out of things if you're willing to embrace visible mending.
Reduce energy use. Try to use natural light where you can. Set your thermostat high in summer and low in winter and use the principle "heat/cool the person, not the space." Flush the toliet with graywater by removing the p-trap from your sink and dumping the collected wash water into your toilet tank (or directly into the bowl if you have an American-style greedy cup siphon toilet). Experiment with solar energy. What you can do depends on your situation, but see what kind of options you have.
Integrate the 7 R's: There are more R's to sustainable living than just "Reduce Reuse Recycle". See this post for a primer.
Build community: One of the foundations of solarpunk is that it's about community. Even if you start out doing it by yourself, eventually you need a community to do bigger things. My favorite way to start is by meeting the neighbors. Taking over some food (cookies are great) and introducing yourself is a great way to open a relationship. We also have a community building tag for more ideas.
You can find even more ideas in these tags, depending on what you specifically want to do:
#apartment solarpunk
#dorms and small spaces
#community building
#activism
#fiber crafts
#diy
There's also some additional tips in this post and this post, which are earlier responses to similar asks.
I hope this helps! Followers, feel free to chime in with your best tips!
- Mod J
472 notes
·
View notes
Text

HOW TO: Make Animated Neon Text
Hi! No one asked for this tutorial, but this is one of my favorite typography effects as of late — so I thought I'd share how I do it. You can see this effect in the first gif of this *NSYNC Celebrity set and the last gif of this Anthony Bridgerton set. Disclaimer: This tutorial assumes you have a basic understanding of gif-making in Photoshop. It's also exclusively in Timeline and uses keyframes for the fading effect seen on the blue text.

PHASE 1: PREP YOUR BASE GIF
1.1 – Choose a dark scene. This effect looks best contrasted against a dark background. You can definitely do it with a bright background, but just like a neon sign irl, you only turn it on in the dark/at night — so keep that in mind!
1.2 – Determine the length of your clip. Depending on how much you want your text to flash or fade in, you'll want to make sure you have a scene long enough to also allow the text not to flash — reducing the strain it takes to actually read the text. For reference, my gif is 48 frames.
1.3 – Crop, color, etc. as you would. New to gif-making? Check out my basic tutorial here!
PHASE 2: FORMAT YOUR TEXT
Before we animate anything, get your text and any vectors laid out and formatted exactly as you want them!
2.1 – Finding neon sign fonts. It's easy as going to dafont.com and typing "neon" into the search bar!
2.2 – Fonts I used. Neon Glow by weknow | Neon by Fenotype | Neon Bines by Eknoji Studio

And to not leave my fellow font hoarders hanging, the font for "tutorial by usergif" is Karla (it's a Google font) 🥰
2.3 – Group your text layers. (Conditional) If you plan on having multiple text layers like I did and you want them to appear connected (like how the last letters of "NEON" and "sign" intersect with the wand icon), I suggest putting the layers into groups according to color (the shortcut to group layers is Command+G). If you don't group your text and just apply the outer glow settings to each individual layer, you'll end up with something like this:

—where you can see the glow overlap with the line, instead of the smooth connection you see in my final example gif. I'm using 2 colors for my text, so I made a group for red and a group for blue.
2.4 – Apply Outer Glow. Right-click your text layer (or your group if you have several layers) and select "Blending Options" to open the Layer Style menu. Check "Outer Glow" and feel free to play around with the settings until you like the way your text looks!
Your outer glow color should be darker and more vibrant than the color of the text itself. The text should be within the same color family but much brighter and, sometimes, almost white (see Step 2.2 again for my text colors).
Here are the settings for the Red Glow (the glow color is #FF3966) and Blue Glow (#00F0FF):

These aren't always my exact settings but they're pretty close to my standard. I always set the blend mode to Hard Light and usually have the opacity at 100%.
For every gif I use this effect on, I like to play around with Spread and Size. Spread will make the glow look denser and "expand the boundaries" (source: Adobe) and Size will diffuse the glow and blow it out so it covers a larger area (Adobe says it "Specifies the radius and size of blur").
2.5 – Duplicate your text layer/groups and remove glow. We're only going to be animating the glow on our text, and since doing this affects its opacity/visibility, we want to preserve the base text by creating a duplicate.
I just hit the Command+J shortcut to duplicate my groups and delete the Outer Glow effects, making sure that the "No Glow" version is above the "Glow" version:

I also put all these groups into one group called "Text" for organization and so I could apply a drop shadow to all the elements for better visibility.
PHASE 3: CREATE THE FLASHING EFFECT
This is for the effect you see on the RED text in my gif!
3.1 – The 0.03-Second Rule If you've read any of my animation tutorials before, you're probably already familiar with this rule. In my experience (and for reasons I can't explain), Video Timeline pauses every 0.03 seconds (try clicking the forward button a few times, you'll probably find a "duplicate" or paused frame). So, keep all your layers a duration of 0.03-second increments (e.g. 0.06 or 0.09 seconds can also work) and align them on the Timeline at 0.03-second intervals. If you don't follow this rule, you'll get duplicate frames when you export, resulting in a choppy final gif.
3.2 – Trim and arrange your text layers. Only on the layers/groups WITH the Outer Glow effect, trim them into several segments of varying lengths where the glow will be "on" (visible) and leaving spaces where the glow should be "off."
Typically, I'll have a mixture of 0.06 and 0.03-second text. That's when the glow will be visible. Between each "flash" of visibility, I've got a 0.03-second blank space, baby *pen clicks* and I'll write your name:

The layers shown above are arranged with a few flashes and two long segments of no flashing. This is the order and duration of each segment shown above (purple = visible segments):
0.06 blank, 0.06 visible, 0.03 blank, 0.03 visible, 0.03 blank, 0.03 visible, 0.03 blank, 0.24 visible (the long bit where "FLASHING" doesn't flash at all), 0.03 blank, 0.03 visible, 0.03 blank, 0.12 visible
(I only did this for the text that says "FLASHING" to give it a glitching effect. The other red text keeps the glow visible starting at the first long segment.)
PHASE 4: CREATE THE FADE-IN EFFECT
This is for the effect you see on the BLUE text in my gif!
4.1 – Animate using the Opacity Keyframe. Again, we're only touching the layers/groups WITH the glow effect. If you only have one layer of text, you'll find the Opacity Keyframe by clicking the film reel icon:

If you're working with groups like me, you'll find it in the Timeline panel under the group when it's expanded:

As you can see, I already added my keyframes (lil diamond babies). And luckily, it's super easy to do!
4.2 – Add the ending Keyframe first. We're starting at the end because our layers/groups are already at 100% opacity. Drag the playhead (the blue arrow attached to the red vertical line) to a spot where you want the glow to be 100% opaque — this is where the glow will be fully "on" or visible. [Again, follow the 0.03-Second Rule. You will get duplicate frames regardless when using keyframes (this will be explained in the note in Phase 5), but abiding to the rule will mitigate the amount of dupes you get.]
Then, click the clock icon by "Opacity" to place a keyframe:

4.3 – Add the starting Keyframe. Go backward from the ending Keyframe you just placed (I went back 0.12 seconds — but you can play around with the duration of the fade, just keep it a multiple of 0.03):

And drop another keyframe, this time by clicking the diamond icon by "Opacity":

4.4 – Reduce the opacity on the starting Keyframe. Keeping that keyframe you just placed selected, go to the layers panel and reduce your layer's/group's opacity to 0%:

Now, this Outer Glow will slowly fade from 0% to 100% opacity.
And just for a visual aid, here's where my fade-in keyframes are in relation to my flashing segments:

To refresh your mind, the 0% Opacity Keyframe starts when "FLASHING" is visible for 0.24 seconds (the first long segment of visibility).
With these keyframes, you'll get a smooth fade-in à la ✨light switch with a dimmer✨
PHASE 5: EXPORT
Yay, we're finished! Convert from Timeline back to Frames and export your gif!
NOTE: If you only did the flashing effect and followed my 0.03-Second Rule, you shouldn't have any duplicate gifs. BUT if you included the fade-in effect using keyframes, you WILL have duplicate frames. 'Tis the nature of keyframes. 🤷♀️ I had 4 extra frames where the fade-in starts, which I deleted. So, as always, I recommend checking your frames when you convert from Video Timeline back to Frame Animation — and manually delete any duplicate frames.
Sorry this tutorial is so long 🙈 I over-explain so you're not just mechanically copying steps, but understanding the WHY behind each step! Thanks for bearing with me
If you have specific questions about this tutorial, feel free to send a message to usergif and I'll try my best to help! :)
More USERGIF tutorials • More resources by Nik • USERGIF Resource Directory
#typography#gif tutorial#completeresources#usershreyu#useryoshi#userelio#userzaynab#userives#usertreena#usercim#userrobin#userkosmos#usersalty#userhella#alielook#uservalentina#uservivaldi#*usergif#*tutorial#by nik#flashing gif
830 notes
·
View notes