#System Configuration Check
Explore tagged Tumblr posts
Visit Tumblr Blog
Explore Tumblr blogs with no restrictions, modern design and the best experience.
Last Seen Tumblr Blogs


Fun Fact
Tumblr has been banned in Indonesia for providing people with access to pornographic content.
Text
How to upgrade Veeam Backup & Replication to version 12.2
Veeam has recently released an update to the Veeam Data Platform on the 27th of Auguest, 2024. This release introduces new features and integrations. This release significantly expands the capabilities of the Veeam Backup and Replication platform. In this article, we will discuss How to upgrade Veeam Backup & Replication to version 12.2. Please see how to Set up Veeam Backup for Microsoft Azure,…
0 notes
Text

Formidable
Pairing: Oscar Piastri x Felicity Leong-Piastri (Original Character)
Summary: Andrea Stella figures out that Felicity Piastri is more than “just” Oscar’s wife.
Notes: Big thanks to @llirawolf , who listens to me ramble and checks my science-y mumbo jumbo 😂
(divider thanks to @saradika-graphics )

It started the way most breakthroughs did—not with a groundbreaking discovery, but with a tired engineer holding a half-wrinkled printout and a hopeful expression.
“Boss,” James said, hovering just inside the doorway of Andrea’s office. “I think you should read this.”
Andrea looked up from his laptop. “If it’s another CFD model from that Reddit forum, I swear—”
“It’s not. It’s from a paper. Academic. Legit. Published in Race Systems & Applied Motion last month.”
Andrea raised an eyebrow. “Obscure.”
“Very. It has like 20 readers,” the engineer agreed. “But I think it’s real. It’s clean. It’s sharp. It’s…” He hesitated. “We might want to test it.”
That got Andrea’s attention.
He took the paper and began to skim.
Title: Redefining Compliance: Adaptive Suspension Geometry Under Load-Sensitive Parameters for Mid-Field Chassis Configurations.
Andrea kept reading. It was dense—academic, yes—but it was also practical. It spoke the language of someone who knew exactly what they were doing. There were no ego traps. No unnecessary complexity. Just hard math and hard-earned insight.
Andrea flipped the page. Then another. His eyes caught a note referencing flex dynamics in chassis response curves and passive recovery lag.
It was correct. More than correct. It was insightful.
The author wasn’t spitballing ideas from afar—this was the work of someone who had lived in the theory and understood the application. Who referenced real-world tolerances. Racing examples. The math was sound. The diagrams were better than half the ones their CFD team managed.
Andrea flipped back to the byline.
Dr. F. Piastri.
Piastri.
James grinned. “Fun coincidence in the name, right? He’s smart.”
Andrea didn’t correct him.
Because yes—coincidence. Probably. But something about it stuck in his brain, like a whisper he couldn’t quite place.
He read the essay in full that night—twice. It was elegant, sharp, and frustratingly precise in the way only truly experienced voices ever were. The type of clarity that came from years of not just understanding a concept, but translating it into reality.
The next morning, Andrea sent out an internal email.
Subject: Additional Works by Dr. F. Piastri If anyone has access to prior publications by this author, please forward them to me.
By the end of the week, his inbox was full.
One essay became three. Three became eleven. Eleven became twenty.
Each one published under the name F.Piastri, buried in obscure journals and small-circulation engineering reviews that didn’t get traffic unless someone was either deeply curious or incredibly desperate.
Andrea was both.
Each article was smarter than the last—strange, elegant engineering thought-pieces published across the most obscure academic mechanical journals Andrea had ever encountered. Niche ones. The kind that only the most obsessive minds contributed to, with names like Thermoelasticity in Microstructured Materials and Lateral Load Adaptation Quarterly.
F.Piastri had written:
An article about Load-dependent understeer in transitional corners (with math that Andrea double-checked twice because it was too clean).
A 2019 think-piece on long-run stability under thermal degradation.
An essay about Aerodynamic oscillation buffering for short-track endurance vehicles.
An article about the economic viability of 3D printed carbon struts under rotational shear (he actually flagged that one for McLaren Applied).
A thesis that corrected a widely accepted torque model—buried in a conference archive.
A published rebuttal in Journal of Vehicle Design so politely worded it read like a love letter—until you realized she’d rewritten the reviewer’s assumptions line by line.
There was even one article on fluid dynamics that had been cited in a grad-level textbook from ETH Zurich.
Andrea devoured them all.
He—She?—wrote like someone who saw the car before it was built. Who understood not just how suspension worked, but how it felt. How energy passed through a chassis not as force but as intent.
The writing style was sharp. Practical. Absolutely ruthless in its logic. There was clarity there—an elegance—that reminded him of only a few people he’d ever worked with.
It was revolutionary. It was poetic.
By the time he tracked down the doctoral thesis from Oxford, Andrea wasn’t breathing properly.
Reinforcement Through Flexibility: Dynamic Adaptation in Composite- Structured Performance Environments.
By: F. Piastri.
Submitted: December 2022
Andrea stared at the name.
F. Piastri.
He stared for so long his tea went cold beside him.
His hands were shaking—not because of nerves, but because he already knew.
He opened the PDF. Skimmed past the table of contents. Scrolled through diagrams that made his heart stutter.
There was no photo. No biographical section. Just a clean Oxford University seal, 284 pages of dense, brilliant theory, and then—
A dedication.
To Oscar: For believing in a future that didn’t exist yet, and building it with me anyway. Every lap, every choice, every time—you’ve been my constant.
And to Bee: For reminding me that softness and strength aren’t opposites. You are the best thing I’ve ever helped create.
Andrea sat back in his chair like he’d been physically shoved.
Bee.
Oscar.
F. Piastri.
Felicity Piastri.
Felicity.
Oscar’s wife.
Dr. F. Piastri wasn’t some reclusive academic or distant uncle with a gift for simulation modeling.
She lived in Oscar’s house.
She packed his lunchbox.
She raised their daughter.
And she had published papers on suspension theory that half of F1 would kill to understand. Quietly. Efficiently. Correctly.
Andrea leaned back in his chair, stared at the ceiling for a long moment, and whispered:
“…Of course it’s his wife.”
Of course the quiet, composed driver who rarely raised his voice and always had one hand on the bigger picture had married someone brilliant. Of course she wasn’t just talented—she was a published expert with a doctorate from Oxford.
Not a coincidence.
Not a mystery engineer.
Not some guy.
But Oscar’s wife.
Oscar Piastri—quiet, methodical Oscar—had married a genius.
A doctor of mechanical engineering from Oxford who wrote better technical documentation in a margin note than most engineers did in a year. Who published under initials. Who could probably solve half their handling inconsistencies while holding a toddler on her hip.
Andrea sat in silence for a full minute.
Then he exhaled. “...of course he did.”
He opened a new tab.
Email draft:
To: Technical Team
Subject: URGENT – Reference Reading Required Attached: Every single thing Dr. F. Piastri had ever published.
***
The meeting was meant to be quick.
Just a routine Monday touchpoint—debrief, run through media notes with Sophie, talk sponsor appearances, maybe discuss Oscar’s upcoming comms obligations.
Zak had rolled in with a protein shake.
Lando was lounging sideways in a chair like he’d melted into it.
Oscar had a protein bar and an expression of polite mildness, as usual.
Andrea, meanwhile, had not slept.
Not because of the race.
Because he’d spent the entire weekend reading Dr. Felicity Piastri’s entire body of work. Every published paper. Every obscenely niche journal article.
And her doctoral thesis.
He hadn’t meant to do it all in one sitting. He just couldn’t stop.
By 2 a.m. he was muttering things like “Of course she used Euler-Bernoulli assumptions, she’s too smart for non-parametric bullshit.”
By 4 a.m., he’d highlighted her proposed solution to dampen micro-vibration load in corner exits.
By 6 a.m., he had a headache, an existential crisis, and a desperate need to know: Why had Oscar Piastri never mentioned this?!
So at the end of the meeting—just as Sophie was wrapping up and Lando was aimlessly spinning a pen like a propeller—Andrea set down a file on the table.
Calmly. Casually. Like he hadn’t just had his entire mechanical worldview rattled by a woman who wasn’t even on the payroll.
“Oscar,” Andrea said, voice deceptively neutral. “Why didn’t you ever mention that your wife holds a doctorate in mechanical engineering?”
Oscar, halfway through eating his protein bar, blinked. “What?”
Andrea gestured vaguely, as if the thesis were still radiating brilliance from his desk. “Felicity. Doctorate. Thesis. Dozens of published papers. Half of them useful to our current car design issues. Why didn’t you say anything?”
Oscar blinked once. “Oh. Yeah. She gets bored sometimes.”
Andrea blinked back.
Lando stared like he’d been smacked with a front wing. “Wait—she got a doctorate?!”
Oscar nodded, chewing. “Yeah. Finished it in 2022. She was stuck in that horrible flat in Enstone while I was back and forth with Alpine, and she got bored. Wrote most of it at the kitchen table while Bee napped.”
Andrea just… stared.
He had read the thesis. Studied it. The mathematical modeling alone had kept him awake at night—and she had apparently written it during toddler nap times, while stuck in a damp shoebox flat in Oxfordshire.
Zak looked up slowly from his tablet. “Your wife was bored. So she got a PhD in mechanical engineering.”
Oscar shrugged. “She already had the research mostly done before Bee was even born in 2020. She just had to write it up. Bee was napping a lot anyway.”
Sophie blinked. “She wrote a 200-page dissertation with a toddler in the house?”
Oscar just shrugged. “It helped that Bee liked the sound of the keyboard.”
Andrea turned to Zak, still stunned. “She predicted the kind of high-frequency oscillation we’re seeing this season. Two years ago. In a footnote.”
Lando leaned forward like he was watching a live feed of someone discovering aliens. “She’s just, like, a genius?” he asked, voice too loud, too incredulous. “And you never brought it up?”
Oscar just sighed. “She hates that word.”
Andrea just stared at him. “Oscar, she’s not just good. She’s formidable. Has she ever applied anywhere formally?”
Oscar looked genuinely confused. “Why would she apply anywhere?”
Andrea stared. “To work. In engineering. In motorsport. Academia.”
Oscar blinked. “She does work. She manages our lives, Bee, the house, and the chickens.”
Lando leaned toward Andrea, wide-eyed: “I’ve never felt dumber in my entire life.”
Andrea sighed. “Join the club.”
***
The kitchen smelled like vanilla and wood polish and faintly like chicken coop — which meant Felicity had mopped and baked and wrangled Mansell, the escape artist hen, all while probably rebalancing one of their stock portfolios.
Oscar dropped his bag by the door and leaned against the kitchen entryway.
Felicity was sitting at the table in her old university hoodie, feet bare, Bee curled up under her arm asleep with Button the frog as a pillow. There were spreadsheets open on one side of her laptop screen, a half-watched nature documentary on the other, and one of Bee’s plastic toy bulls standing solemnly in the middle of the table for reasons unknown.
He smiled.
God, he loved her.
“Hey,” he said softly.
Felicity glanced up. “Hey. Dinner’s in the oven. Bee passed out mid-pie crust.”
“Excellent,” Oscar said, dropping into the chair beside her. “Because I need carbs.”
She raised an eyebrow, equal parts amusement and curiosity. “Bad day?”
“No. Just... intellectually humbling.”
Felicity made a low amused noise and went back to her laptop. “Did Lando try to explain crypto again?”
Oscar snorted and reached over to carefully lift Bee into his lap, her curls warm against his hoodie. She barely stirred.
He could have let it sit. Saved it for later. But it was buzzing under his skin.
“Stella read your papers.”
That got her attention.
Felicity paused, her fingers stilled mid-scroll. “Which one?”
“All of them,” Oscar said. “Apparently it started with one of the engineers, who brought an article in from Race Systems & Applied Motion. Then he spiraled.”
“Ah,” Felicity murmured, unsurprised. “That one had a good diagram.”
“He found your thesis,” Oscar added.
This time she didn’t answer right away.
He reached for one of Bee’s crayons and twirled it idly in his fingers, watching her.
“He read the dedication,” he said, voice quieter now.
Felicity’s eyes softened in that way that always undid him a little. Always had.
“Did he say anything?” she asked.
Oscar smiled faintly. “He said you’re formidable.”
There was a beat of silence.
Then Felicity laughed—not loud, not startled, just warm and wry and a little disbelieving.
“God help the man,” she said. “He must have hit the rebuttal piece from the Vehicle Design Journal. That one made a few engineers cry.”
Oscar grinned. “Yeah, well. He was halfway to building you a shrine by the end of the meeting. I also told him you got bored in Enstone and wrote your PhD while Bee was napping.”
Felicity gave him a look. “You make it sound like I was scrapbooking.”
“Weren’t you also doing that at the time?”
Felicity blinked. “...Okay, fair.”
Bee stirred slightly in his lap, a tiny sigh escaping her lips as she nuzzled deeper into his hoodie sleeve.
Oscar looked down at her—this tiny human they somehow made and raised—and then back at the woman across the table.
Her hair was messier than usual, strands escaping her braid, and there was a faint flour smudge near her temple. She hadn’t bought herself a new pair of jeans in two years. She sometimes forgot to eat when she was buried in simulations. She once fixed the bathroom plumbing at midnight because she didn’t like how the guy from the hardware store spoke to her.
She was the smartest person he knew.
Oscar knew most people wouldn’t think it when they first met her. She smiled too easily. She didn’t correct anyone. She let others assume things—that she was just the girlfriend, just the wife, just the mother.
But she had a doctorate from Oxford, and more published academic papers than most career professors. She could hold court with race engineers and theoretical physicists in the same breath, then go home and teach Bee how to build a pulley system out of Lego and twine. She spoke in quiet, exact terms, and when she challenged people, she did it so gently they sometimes didn’t notice until it was too late.
He’d long since stopped being surprised by her. He’d just—normalized it. Integrated it. Felicity being a genius was like oxygen to him: invisible, essential, and easy to take for granted until someone else nearly passed out from the realization.
She was just Fliss to him.
The woman who sold her designer bags to pay rent when her family cut her off. The mother of his child. His fiercest critic and his most devoted supporter. The one person he trusted without hesitation.
She didn’t want headlines or praise. She wanted quiet mornings and clever puzzles. She wanted Bee to grow up confident. She wanted Oscar to remember to eat something green.
She was the smartest person he knew — and she hated being called smart. So he didn’t. He just came home.
“He called you formidable,” he repeated. “And I agree. For what it’s worth.”
Felicity smiled then—slow and quiet, the kind that reached all the way to her eyes.
She leaned across the table and kissed his temple. “Thanks,” she said. “But if he asks me to consult, I’m charging him triple.”
Oscar laughed softly and ran a hand through Bee’s curls. “Deal.”
And he meant it. Because maybe it was easy for him to forget sometimes, tucked into the quiet rhythm of their life, that the world hadn’t caught up to how brilliant she was.
But he never stopped being proud of her.
Not for a second.
#formula 1#f1 fanfiction#formula 1 fanfiction#f1 smau#f1 x reader#formula 1 x reader#f1 grid x reader#f1 grid fanfiction#oscar piastri fanfic#oscar piastri#Oscar Piastri fic#oscar piastri x reader#oscar piastri imagine#op81 fic#op81 imagine
974 notes
·
View notes
Text
5 Essential Tips for Maintaining Top-Notch Salesforce Org Health
Introduction: Salesforce has become an indispensable tool for businesses to manage customer relationships, streamline operations, and drive growth. However, just like any other complex system, your Salesforce organization requires regular attention and care to ensure it remains efficient, effective, and aligned with your business objectives.
In this blog, we'll explore five essential suggestions to maintain a top-notch Salesforce Org health, helping you get the most out of your investment.
Best Tips for Managing Salesforce Org Health
Regular Data Cleanup and Maintenance: A cluttered and disorganized Salesforce Org can lead to decreased user productivity, slower system performance, and inaccurate reporting. Regularly conduct data cleanup exercises to eliminate duplicate records, outdated information, and irrelevant data. Implement validation rules, workflows, and data governance processes to ensure that data entered into the system is accurate and consistent. Consider archiving or purging old records that are no longer needed, which can significantly improve system responsiveness.
Optimize User Training and Adoption: Even the most powerful tools are only as effective as the users who operate them. Invest in comprehensive user training programs to ensure that your team fully understands the features and functionalities of Salesforce. Regularly assess user adoption rates and address any issues or challenges they might face. Encourage the use of best practices and provide ongoing training as Salesforce releases updates and new features
Govern Customization and Configuration: Salesforce offers an array of customization options to tailor the platform to your specific business needs. While customization is valuable, an excessive amount can lead to complexity, slow performance, and difficulties during upgrades. Establish a clear governance framework for customization and configuration. This includes guidelines for when to use declarative tools (like Process Builder) versus custom code, as well as regular reviews of custom objects, fields, and processes to ensure they remain relevant and effective
Implement Robust Security Practices: Data security and privacy are paramount in today's business landscape. Regularly review and update your Salesforce security settings to ensure that only authorized personnel have access to sensitive information. Implement strong password policies, multi-factor authentication (MFA), and role-based access controls to minimize the risk of data breaches. Regularly audit user permissions and deactivate accounts for employees who no longer require access to the system
Stay Informed About Salesforce Updates: Salesforce continuously releases updates, enhancements, and new features to improve the platform's functionality and security. It's crucial to stay informed about these updates and assess their potential impact on your organization. Create a process for reviewing and testing new releases in a sandbox environment before rolling them out to your production Org. This practice helps identify any potential compatibility issues with your existing customizations and allows for adjustments before affecting users.
Conclusion:
Maintaining a top-notch Salesforce Org health requires a proactive approach that involves regular cleanup, user engagement, customization governance, security measures, and staying updated on platform developments. By following these five essential tips, your organization can ensure that Salesforce remains a powerful tool that contributes to your business success, helping you drive growth, streamline processes, and deliver exceptional customer experiences.
#Salesforce Org Health#Org maintenance#CRM optimization#Data integrity#Performance tuning#System health check#Data hygiene#Configuration management#Best practices#User adoption#Customization management#Security audit#Data governance#Automation tools#Regular updates#User training#Scalability#Backup and recovery#Compliance measures#Analytics and reporting
0 notes
Text
I had a straight up delightful moment at work yesterday when a new member of the management team asked me how we were tracking warranties and I explained that we kind of aren't and he asked why we aren't and that meant he got a 30-minute rundown of how top-to-bottom fucked the procurement process is here.
First I explained the process for sending a quote (i am assigned a ticket in system A1, I create an opportunity in system A2, from the opportunity i can generate a quote in system B - if I start with the quote I can't associate it back to the opportunity or the ticket, if we need to change the quote after it was approved we need to generate a new quote from the opportunity to overwrite the old one - and send the quote from system B.)
Then I explained the process of getting approval (system B sends the quote and receives the approvals but does not communicate that to system A, so until it is manually updated system A sends a daily reminder about the quote to the client and after three days with no response will close the ticket even if the client approved the quote in system B. System B will send an email if a quote is approved but it comes from our generic support email so to make sure that I don't miss approvals I have filtering rules set up and a folder I check twice a day. Because there are 4 people who use this system I also check twice daily in system B to see if anyone else's quotes were approved).
Then I explained how I place the orders (easy! I'm a pro! We have a standardized PO pattern that tracks date, vendor and client, it's handy)
Then I explained how I document the orders (neither system A nor B has a way of storing information about orders in progress, only orders that are complete; as such I have created a PO Documentation spreadsheet that lists the PO number, vendor, line of business, client, items ordered, order total, order date, ETA, tracking numbers, serial numbers, delivery confirmation, ticket number for install, ticket title for install, shippong cost, and close confirmation, which all have to be entered individually and which require a minimum of three visits to the spreadsheet per order: entering initial info, entering tracking and SN info, then once more to get that info to close the opportunity)
Then I explained how we close an order (confirm hardware delivery or activate software, use system A2 to code hardware/software/non-taxable products appropriately, run wizard to add charges from A2 to ticket in A1; because the A2 charges were locked by approval in system B, use system A3 to add shipping or other fees or to remove any parts that were approved but not actually needed or ordered - THIS WEEK I got permission to do this bit on my initial A1 procurement ticket instead of generating an A1 post-procurement ticket for fees and shipping. Once all of that is done it's moved into system A4 and is no longer my problem).
If there is a warranty involved it *should* automatically have the expiration tracked in system C, but system C doesn't have any way to pull order info so there's no way it can track warranty *start* dates without somebody manually entering it or without using API data from the manufacturer, which some manufacturers don't provide (fuck you, Apple).
But me and my trainee are happy to add the start date to the configuration once a tech tells us that the device is enrolled in system C. If the techs will tell us that we can add that info no problem.
Until then, I have unfortunately been forced to start a spreadsheet.
The manager was appalled, it was great. I got to say the words "part of the reason things sometimes fall through the cracks is because we have so many cracks" and his response was "no shit." I'm talking to vendors about a procurement system now :) :) :) :)
579 notes
·
View notes
Text
Taxes & Benefits Mod + New Active Career - DOWNLOAD
One of my sims was earning a little too much money and somehow this spiralled into me developing this mod. Introducing a very configurable tax and benefit system alongside an all new active career!


The tax and benefit system is modelled after the system we have here in England. All tax and benefit options are configurable and sims will only be opted in if you want them to. See the included documentation for a proper feature breakdown.
There are three types of taxes:
Council Tax (a property tax)
Business Tax
National Insurance (an income tax)
Register sims for each type of tax through the city hall.

There are four types of benefits:
Universal Credit
Housing Benefit
Child Benefit
Job Seekers Allowance
Register sims online, through social interactions with the all new Civil Servant, or at a HSRC communications booth.
Civil Service Career
Work for the HSRC in this fully functional active career.

There are 36 jobs which can be completed: 27 are custom career opportunities (like in the private eye career), 9 of them are custom active jobs (like in the interior decorator or firefighter career).
Jobs include: checking benefit eligibility for sims around town, attending job fairs, auditing, community outreach, responding to council house repair requests, and things of that nature.

Communication Booth
Civil Servants are given communication booths which can be placed anywhere in the world. This object has 2 geostates and can be set up or packed down when not needed.

Council Houses
Properties that are not owned by a sim are council houses. There are some unique interactions for these homes. For one, they can be more susceptible to pests (if enabled in the tuning, that is).
Complain to the Council
Depending on the type of property the sim lives in, they can complain to the council about housing issues such as overcrowding, broken facilities, or vermin.

Social Interactions
There are 12 new social interactions found under Friendly, Funny and Mean.
Help Understand Welfare System – Civil Servant Only
Complain About Taxes
Accuse of Benefit Fraud
Suggest Part Time Job – Civil Servant Only
Joke About Fraud
Talk About Benefits
Talk About Career History
Hand Out HSRC Leaflet – Civil Servant Only
Warn About Fraudulent Behaviour – Civil Servant Only
Offer Council House Repairs – Civil Servant Only
Including 2 autonomous only interactions:
Talk About Shared Career History
Talk About Shared Benefit Claims
Some interactions are only visible after doing things such as paying taxes. Some interactions are specific to the Civil Service career.

Required
Ambitions EP
University EP
Optional
Seasons EP – adds tax refunds, tax fluctuations and council house scenarios
Showtime EP – adds extra interaction to communications booth
World Adventures EP- adds extra active job
My Boutique Mod, Hairdressing Mod, Go to Court Mod – adds extra work opportunities
My social clubs mod – adds extra work opportunity and some optional integration with Bronzo banking
My functional printer mod – makes use of buff
Olomaya Smoking & Private Clinic (optometry module) mod - illness buffs taken into account with trying to claim some benefits.
Uninstallation
You can use cheat ‘uninstallTaxesBenefits’ in order to remove all mod related objects and data before uninstalling.
Download: Simblr.cc - Taxes & Benefits Mod
If you would like to donate as thanks, please feel free to do so at my ko-fi! :)
ps modders: this code for this mod is up on GitHub, plus a WIP active career tutorial (emphasis on the WIP but I hope it's helpful). Link included on the last page of the documentation.
Please enjoy all!
~ Phoebe <3
301 notes
·
View notes
Text
How I ditched streaming services and learned to love Linux: A step-by-step guide to building your very own personal media streaming server (V2.0: REVISED AND EXPANDED EDITION)
This is a revised, corrected and expanded version of my tutorial on setting up a personal media server that previously appeared on my old blog (donjuan-auxenfers). I expect that that post is still making the rounds (hopefully with my addendum on modifying group share permissions in Ubuntu to circumvent 0x8007003B "Unexpected Network Error" messages in Windows 10/11 when transferring files) but I have no way of checking. Anyway this new revised version of the tutorial corrects one or two small errors I discovered when rereading what I wrote, adds links to all products mentioned and is just more polished generally. I also expanded it a bit, pointing more adventurous users toward programs such as Sonarr/Radarr/Lidarr and Overseerr which can be used for automating user requests and media collection.
So then, what is this tutorial? This is a tutorial on how to build and set up your own personal media server using Ubuntu as an operating system and Plex (or Jellyfin) to not only manage your media, but to also stream that media to your devices both at home and abroad anywhere in the world where you have an internet connection. Its intent is to show you how building a personal media server and stuffing it full of films, TV, and music that you acquired through indiscriminate and voracious media piracy various legal methods will free you to completely ditch paid streaming services. No more will you have to pay for Disney+, Netflix, HBOMAX, Hulu, Amazon Prime, Peacock, CBS All Access, Paramount+, Crave or any other streaming service that is not named Criterion Channel. Instead whenever you want to watch your favourite films and television shows, you’ll have your own personal service that only features things that you want to see, with files that you have control over. And for music fans out there, both Jellyfin and Plex support music streaming, meaning you can even ditch music streaming services. Goodbye Spotify, Youtube Music, Tidal and Apple Music, welcome back unreasonably large MP3 (or FLAC) collections.
On the hardware front, I’m going to offer a few options catered towards different budgets and media library sizes. The cost of getting a media server up and running using this guide will cost you anywhere from $450 CAD/$325 USD at the low end to $1500 CAD/$1100 USD at the high end (it could go higher). My server was priced closer to the higher figure, but I went and got a lot more storage than most people need. If that seems like a little much, consider for a moment, do you have a roommate, a close friend, or a family member who would be willing to chip in a few bucks towards your little project provided they get access? Well that's how I funded my server. It might also be worth thinking about the cost over time, i.e. how much you spend yearly on subscriptions vs. a one time cost of setting up a server. Additionally there's just the joy of being able to scream "fuck you" at all those show cancelling, library deleting, hedge fund vampire CEOs who run the studios through denying them your money. Drive a stake through David Zaslav's heart.
On the software side I will walk you step-by-step through installing Ubuntu as your server's operating system, configuring your storage as a RAIDz array with ZFS, sharing your zpool to Windows with Samba, running a remote connection between your server and your Windows PC, and then a little about started with Plex/Jellyfin. Every terminal command you will need to input will be provided, and I even share a custom #bash script that will make used vs. available drive space on your server display correctly in Windows.
If you have a different preferred flavour of Linux (Arch, Manjaro, Redhat, Fedora, Mint, OpenSUSE, CentOS, Slackware etc. et. al.) and are aching to tell me off for being basic and using Ubuntu, this tutorial is not for you. The sort of person with a preferred Linux distro is the sort of person who can do this sort of thing in their sleep. Also I don't care. This tutorial is intended for the average home computer user. This is also why we’re not using a more exotic home server solution like running everything through Docker Containers and managing it through a dashboard like Homarr or Heimdall. While such solutions are fantastic and can be very easy to maintain once you have it all set up, wrapping your brain around Docker is a whole thing in and of itself. If you do follow this tutorial and had fun putting everything together, then I would encourage you to return in a year’s time, do your research and set up everything with Docker Containers.
Lastly, this is a tutorial aimed at Windows users. Although I was a daily user of OS X for many years (roughly 2008-2023) and I've dabbled quite a bit with various Linux distributions (mostly Ubuntu and Manjaro), my primary OS these days is Windows 11. Many things in this tutorial will still be applicable to Mac users, but others (e.g. setting up shares) you will have to look up for yourself. I doubt it would be difficult to do so.
Nothing in this tutorial will require feats of computing expertise. All you will need is a basic computer literacy (i.e. an understanding of what a filesystem and directory are, and a degree of comfort in the settings menu) and a willingness to learn a thing or two. While this guide may look overwhelming at first glance, it is only because I want to be as thorough as possible. I want you to understand exactly what it is you're doing, I don't want you to just blindly follow steps. If you half-way know what you’re doing, you will be much better prepared if you ever need to troubleshoot.
Honestly, once you have all the hardware ready it shouldn't take more than an afternoon or two to get everything up and running.
(This tutorial is just shy of seven thousand words long so the rest is under the cut.)
Step One: Choosing Your Hardware
Linux is a light weight operating system, depending on the distribution there's close to no bloat. There are recent distributions available at this very moment that will run perfectly fine on a fourteen year old i3 with 4GB of RAM. Moreover, running Plex or Jellyfin isn’t resource intensive in 90% of use cases. All this is to say, we don’t require an expensive or powerful computer. This means that there are several options available: 1) use an old computer you already have sitting around but aren't using 2) buy a used workstation from eBay, or what I believe to be the best option, 3) order an N100 Mini-PC from AliExpress or Amazon.
Note: If you already have an old PC sitting around that you’ve decided to use, fantastic, move on to the next step.
When weighing your options, keep a few things in mind: the number of people you expect to be streaming simultaneously at any one time, the resolution and bitrate of your media library (4k video takes a lot more processing power than 1080p) and most importantly, how many of those clients are going to be transcoding at any one time. Transcoding is what happens when the playback device does not natively support direct playback of the source file. This can happen for a number of reasons, such as the playback device's native resolution being lower than the file's internal resolution, or because the source file was encoded in a video codec unsupported by the playback device.
Ideally we want any transcoding to be performed by hardware. This means we should be looking for a computer with an Intel processor with Quick Sync. Quick Sync is a dedicated core on the CPU die designed specifically for video encoding and decoding. This specialized hardware makes for highly efficient transcoding both in terms of processing overhead and power draw. Without these Quick Sync cores, transcoding must be brute forced through software. This takes up much more of a CPU’s processing power and requires much more energy. But not all Quick Sync cores are created equal and you need to keep this in mind if you've decided either to use an old computer or to shop for a used workstation on eBay
Any Intel processor from second generation Core (Sandy Bridge circa 2011) onward has Quick Sync cores. It's not until 6th gen (Skylake), however, that the cores support the H.265 HEVC codec. Intel’s 10th gen (Comet Lake) processors introduce support for 10bit HEVC and HDR tone mapping. And the recent 12th gen (Alder Lake) processors brought with them hardware AV1 decoding. As an example, while an 8th gen (Kaby Lake) i5-8500 will be able to hardware transcode a H.265 encoded file, it will fall back to software transcoding if given a 10bit H.265 file. If you’ve decided to use that old PC or to look on eBay for an old Dell Optiplex keep this in mind.
Note 1: The price of old workstations varies wildly and fluctuates frequently. If you get lucky and go shopping shortly after a workplace has liquidated a large number of their workstations you can find deals for as low as $100 on a barebones system, but generally an i5-8500 workstation with 16gb RAM will cost you somewhere in the area of $260 CAD/$200 USD.
Note 2: The AMD equivalent to Quick Sync is called Video Core Next, and while it's fine, it's not as efficient and not as mature a technology. It was only introduced with the first generation Ryzen CPUs and it only got decent with their newest CPUs, we want something cheap.
Alternatively you could forgo having to keep track of what generation of CPU is equipped with Quick Sync cores that feature support for which codecs, and just buy an N100 mini-PC. For around the same price or less of a used workstation you can pick up a mini-PC with an Intel N100 processor. The N100 is a four-core processor based on the 12th gen Alder Lake architecture and comes equipped with the latest revision of the Quick Sync cores. These little processors offer astounding hardware transcoding capabilities for their size and power draw. Otherwise they perform equivalent to an i5-6500, which isn't a terrible CPU. A friend of mine uses an N100 machine as a dedicated retro emulation gaming system and it does everything up to 6th generation consoles just fine. The N100 is also a remarkably efficient chip, it sips power. In fact, the difference between running one of these and an old workstation could work out to hundreds of dollars a year in energy bills depending on where you live.
You can find these Mini-PCs all over Amazon or for a little cheaper on AliExpress. They range in price from $170 CAD/$125 USD for a no name N100 with 8GB RAM to $280 CAD/$200 USD for a Beelink S12 Pro with 16GB RAM. The brand doesn't really matter, they're all coming from the same three factories in Shenzen, go for whichever one fits your budget or has features you want. 8GB RAM should be enough, Linux is lightweight and Plex only calls for 2GB RAM. 16GB RAM might result in a slightly snappier experience, especially with ZFS. A 256GB SSD is more than enough for what we need as a boot drive, but going for a bigger drive might allow you to get away with things like creating preview thumbnails for Plex, but it’s up to you and your budget.
The Mini-PC I wound up buying was a Firebat AK2 Plus with 8GB RAM and a 256GB SSD. It looks like this:

Note: Be forewarned that if you decide to order a Mini-PC from AliExpress, note the type of power adapter it ships with. The mini-PC I bought came with an EU power adapter and I had to supply my own North American power supply. Thankfully this is a minor issue as barrel plug 30W/12V/2.5A power adapters are easy to find and can be had for $10.
Step Two: Choosing Your Storage
Storage is the most important part of our build. It is also the most expensive. Thankfully it’s also the most easily upgrade-able down the line.
For people with a smaller media collection (4TB to 8TB), a more limited budget, or who will only ever have two simultaneous streams running, I would say that the most economical course of action would be to buy a USB 3.0 8TB external HDD. Something like this one from Western Digital or this one from Seagate. One of these external drives will cost you in the area of $200 CAD/$140 USD. Down the line you could add a second external drive or replace it with a multi-drive RAIDz set up such as detailed below.
If a single external drive the path for you, move on to step three.
For people with larger media libraries (12TB+), who prefer media in 4k, or care who about data redundancy, the answer is a RAID array featuring multiple HDDs in an enclosure.
Note: If you are using an old PC or used workstatiom as your server and have the room for at least three 3.5" drives, and as many open SATA ports on your mother board you won't need an enclosure, just install the drives into the case. If your old computer is a laptop or doesn’t have room for more internal drives, then I would suggest an enclosure.
The minimum number of drives needed to run a RAIDz array is three, and seeing as RAIDz is what we will be using, you should be looking for an enclosure with three to five bays. I think that four disks makes for a good compromise for a home server. Regardless of whether you go for a three, four, or five bay enclosure, do be aware that in a RAIDz array the space equivalent of one of the drives will be dedicated to parity at a ratio expressed by the equation 1 − 1/n i.e. in a four bay enclosure equipped with four 12TB drives, if we configured our drives in a RAIDz1 array we would be left with a total of 36TB of usable space (48TB raw size). The reason for why we might sacrifice storage space in such a manner will be explained in the next section.
A four bay enclosure will cost somewhere in the area of $200 CDN/$140 USD. You don't need anything fancy, we don't need anything with hardware RAID controls (RAIDz is done entirely in software) or even USB-C. An enclosure with USB 3.0 will perform perfectly fine. Don’t worry too much about USB speed bottlenecks. A mechanical HDD will be limited by the speed of its mechanism long before before it will be limited by the speed of a USB connection. I've seen decent looking enclosures from TerraMaster, Yottamaster, Mediasonic and Sabrent.
When it comes to selecting the drives, as of this writing, the best value (dollar per gigabyte) are those in the range of 12TB to 20TB. I settled on 12TB drives myself. If 12TB to 20TB drives are out of your budget, go with what you can afford, or look into refurbished drives. I'm not sold on the idea of refurbished drives but many people swear by them.
When shopping for harddrives, search for drives designed specifically for NAS use. Drives designed for NAS use typically have better vibration dampening and are designed to be active 24/7. They will also often make use of CMR (conventional magnetic recording) as opposed to SMR (shingled magnetic recording). This nets them a sizable read/write performance bump over typical desktop drives. Seagate Ironwolf and Toshiba NAS are both well regarded brands when it comes to NAS drives. I would avoid Western Digital Red drives at this time. WD Reds were a go to recommendation up until earlier this year when it was revealed that they feature firmware that will throw up false SMART warnings telling you to replace the drive at the three year mark quite often when there is nothing at all wrong with that drive. It will likely even be good for another six, seven, or more years.

Step Three: Installing Linux
For this step you will need a USB thumbdrive of at least 6GB in capacity, an .ISO of Ubuntu, and a way to make that thumbdrive bootable media.
First download a copy of Ubuntu desktop (for best performance we could download the Server release, but for new Linux users I would recommend against the server release. The server release is strictly command line interface only, and having a GUI is very helpful for most people. Not many people are wholly comfortable doing everything through the command line, I'm certainly not one of them, and I grew up with DOS 6.0. 22.04.3 Jammy Jellyfish is the current Long Term Service release, this is the one to get.
Download the .ISO and then download and install balenaEtcher on your Windows PC. BalenaEtcher is an easy to use program for creating bootable media, you simply insert your thumbdrive, select the .ISO you just downloaded, and it will create a bootable installation media for you.
Once you've made a bootable media and you've got your Mini-PC (or you old PC/used workstation) in front of you, hook it directly into your router with an ethernet cable, and then plug in the HDD enclosure, a monitor, a mouse and a keyboard. Now turn that sucker on and hit whatever key gets you into the BIOS (typically ESC, DEL or F2). If you’re using a Mini-PC check to make sure that the P1 and P2 power limits are set correctly, my N100's P1 limit was set at 10W, a full 20W under the chip's power limit. Also make sure that the RAM is running at the advertised speed. My Mini-PC’s RAM was set at 2333Mhz out of the box when it should have been 3200Mhz. Once you’ve done that, key over to the boot order and place the USB drive first in the boot order. Then save the BIOS settings and restart.
After you restart you’ll be greeted by Ubuntu's installation screen. Installing Ubuntu is really straight forward, select the "minimal" installation option, as we won't need anything on this computer except for a browser (Ubuntu comes preinstalled with Firefox) and Plex Media Server/Jellyfin Media Server. Also remember to delete and reformat that Windows partition! We don't need it.
Step Four: Installing ZFS and Setting Up the RAIDz Array
Note: If you opted for just a single external HDD skip this step and move onto setting up a Samba share.
Once Ubuntu is installed it's time to configure our storage by installing ZFS to build our RAIDz array. ZFS is a "next-gen" file system that is both massively flexible and massively complex. It's capable of snapshot backup, self healing error correction, ZFS pools can be configured with drives operating in a supplemental manner alongside the storage vdev (e.g. fast cache, dedicated secondary intent log, hot swap spares etc.). It's also a file system very amenable to fine tuning. Block and sector size are adjustable to use case and you're afforded the option of different methods of inline compression. If you'd like a very detailed overview and explanation of its various features and tips on tuning a ZFS array check out these articles from Ars Technica. For now we're going to ignore all these features and keep it simple, we're going to pull our drives together into a single vdev running in RAIDz which will be the entirety of our zpool, no fancy cache drive or SLOG.
Open up the terminal and type the following commands:
sudo apt update
then
sudo apt install zfsutils-linux
This will install the ZFS utility. Verify that it's installed with the following command:
zfs --version
Now, it's time to check that the HDDs we have in the enclosure are healthy, running, and recognized. We also want to find out their device IDs and take note of them:
sudo fdisk -1
Note: You might be wondering why some of these commands require "sudo" in front of them while others don't. "Sudo" is short for "super user do”. When and where "sudo" is used has to do with the way permissions are set up in Linux. Only the "root" user has the access level to perform certain tasks in Linux. As a matter of security and safety regular user accounts are kept separate from the "root" user. It's not advised (or even possible) to boot into Linux as "root" with most modern distributions. Instead by using "sudo" our regular user account is temporarily given the power to do otherwise forbidden things. Don't worry about it too much at this stage, but if you want to know more check out this introduction.
If everything is working you should get a list of the various drives detected along with their device IDs which will look like this: /dev/sdc. You can also check the device IDs of the drives by opening the disk utility app. Jot these IDs down as we'll need them for our next step, creating our RAIDz array.
RAIDz is similar to RAID-5 in that instead of striping your data over multiple disks, exchanging redundancy for speed and available space (RAID-0), or mirroring your data writing by two copies of every piece (RAID-1), it instead writes parity blocks across the disks in addition to striping, this provides a balance of speed, redundancy and available space. If a single drive fails, the parity blocks on the working drives can be used to reconstruct the entire array as soon as a replacement drive is added.
Additionally, RAIDz improves over some of the common RAID-5 flaws. It's more resilient and capable of self healing, as it is capable of automatically checking for errors against a checksum. It's more forgiving in this way, and it's likely that you'll be able to detect when a drive is dying well before it fails. A RAIDz array can survive the loss of any one drive.
Note: While RAIDz is indeed resilient, if a second drive fails during the rebuild, you're fucked. Always keep backups of things you can't afford to lose. This tutorial, however, is not about proper data safety.
To create the pool, use the following command:
sudo zpool create "zpoolnamehere" raidz "device IDs of drives we're putting in the pool"
For example, let's creatively name our zpool "mypool". This poil will consist of four drives which have the device IDs: sdb, sdc, sdd, and sde. The resulting command will look like this:
sudo zpool create mypool raidz /dev/sdb /dev/sdc /dev/sdd /dev/sde
If as an example you bought five HDDs and decided you wanted more redundancy dedicating two drive to this purpose, we would modify the command to "raidz2" and the command would look something like the following:
sudo zpool create mypool raidz2 /dev/sdb /dev/sdc /dev/sdd /dev/sde /dev/sdf
An array configured like this is known as RAIDz2 and is able to survive two disk failures.
Once the zpool has been created, we can check its status with the command:
zpool status
Or more concisely with:
zpool list
The nice thing about ZFS as a file system is that a pool is ready to go immediately after creation. If we were to set up a traditional RAID-5 array using mbam, we'd have to sit through a potentially hours long process of reformatting and partitioning the drives. Instead we're ready to go right out the gates.
The zpool should be automatically mounted to the filesystem after creation, check on that with the following:
df -hT | grep zfs
Note: If your computer ever loses power suddenly, say in event of a power outage, you may have to re-import your pool. In most cases, ZFS will automatically import and mount your pool, but if it doesn’t and you can't see your array, simply open the terminal and type sudo zpool import -a.
By default a zpool is mounted at /"zpoolname". The pool should be under our ownership but let's make sure with the following command:
sudo chown -R "yourlinuxusername" /"zpoolname"
Note: Changing file and folder ownership with "chown" and file and folder permissions with "chmod" are essential commands for much of the admin work in Linux, but we won't be dealing with them extensively in this guide. If you'd like a deeper tutorial and explanation you can check out these two guides: chown and chmod.

You can access the zpool file system through the GUI by opening the file manager (the Ubuntu default file manager is called Nautilus) and clicking on "Other Locations" on the sidebar, then entering the Ubuntu file system and looking for a folder with your pool's name. Bookmark the folder on the sidebar for easy access.

Your storage pool is now ready to go. Assuming that we already have some files on our Windows PC we want to copy to over, we're going to need to install and configure Samba to make the pool accessible in Windows.
Step Five: Setting Up Samba/Sharing
Samba is what's going to let us share the zpool with Windows and allow us to write to it from our Windows machine. First let's install Samba with the following commands:
sudo apt-get update
then
sudo apt-get install samba
Next create a password for Samba.
sudo smbpswd -a "yourlinuxusername"
It will then prompt you to create a password. Just reuse your Ubuntu user password for simplicity's sake.
Note: if you're using just a single external drive replace the zpool location in the following commands with wherever it is your external drive is mounted, for more information see this guide on mounting an external drive in Ubuntu.
After you've created a password we're going to create a shareable folder in our pool with this command
mkdir /"zpoolname"/"foldername"
Now we're going to open the smb.conf file and make that folder shareable. Enter the following command.
sudo nano /etc/samba/smb.conf
This will open the .conf file in nano, the terminal text editor program. Now at the end of smb.conf add the following entry:
["foldername"]
path = /"zpoolname"/"foldername"
available = yes
valid users = "yourlinuxusername"
read only = no
writable = yes
browseable = yes
guest ok = no
Ensure that there are no line breaks between the lines and that there's a space on both sides of the equals sign. Our next step is to allow Samba traffic through the firewall:
sudo ufw allow samba
Finally restart the Samba service:
sudo systemctl restart smbd
At this point we'll be able to access to the pool, browse its contents, and read and write to it from Windows. But there's one more thing left to do, Windows doesn't natively support the ZFS file systems and will read the used/available/total space in the pool incorrectly. Windows will read available space as total drive space, and all used space as null. This leads to Windows only displaying a dwindling amount of "available" space as the drives are filled. We can fix this! Functionally this doesn't actually matter, we can still write and read to and from the disk, it just makes it difficult to tell at a glance the proportion of used/available space, so this is an optional step but one I recommend (this step is also unnecessary if you're just using a single external drive). What we're going to do is write a little shell script in #bash. Open nano with the terminal with the command:
nano
Now insert the following code:
#!/bin/bash CUR_PATH=`pwd` ZFS_CHECK_OUTPUT=$(zfs get type $CUR_PATH 2>&1 > /dev/null) > /dev/null if [[ $ZFS_CHECK_OUTPUT == *not\ a\ ZFS* ]] then IS_ZFS=false else IS_ZFS=true fi if [[ $IS_ZFS = false ]] then df $CUR_PATH | tail -1 | awk '{print $2" "$4}' else USED=$((`zfs get -o value -Hp used $CUR_PATH` / 1024)) > /dev/null AVAIL=$((`zfs get -o value -Hp available $CUR_PATH` / 1024)) > /dev/null TOTAL=$(($USED+$AVAIL)) > /dev/null echo $TOTAL $AVAIL fi
Save the script as "dfree.sh" to /home/"yourlinuxusername" then change the ownership of the file to make it executable with this command:
sudo chmod 774 dfree.sh
Now open smb.conf with sudo again:
sudo nano /etc/samba/smb.conf
Now add this entry to the top of the configuration file to direct Samba to use the results of our script when Windows asks for a reading on the pool's used/available/total drive space:
[global]
dfree command = /home/"yourlinuxusername"/dfree.sh
Save the changes to smb.conf and then restart Samba again with the terminal:
sudo systemctl restart smbd
Now there’s one more thing we need to do to fully set up the Samba share, and that’s to modify a hidden group permission. In the terminal window type the following command:
usermod -a -G sambashare “yourlinuxusername”
Then restart samba again:
sudo systemctl restart smbd
If we don’t do this last step, everything will appear to work fine, and you will even be able to see and map the drive from Windows and even begin transferring files, but you'd soon run into a lot of frustration. As every ten minutes or so a file would fail to transfer and you would get a window announcing “0x8007003B Unexpected Network Error”. This window would require your manual input to continue the transfer with the file next in the queue. And at the end it would reattempt to transfer whichever files failed the first time around. 99% of the time they’ll go through that second try, but this is still all a major pain in the ass. Especially if you’ve got a lot of data to transfer or you want to step away from the computer for a while.
It turns out samba can act a little weirdly with the higher read/write speeds of RAIDz arrays and transfers from Windows, and will intermittently crash and restart itself if this group option isn’t changed. Inputting the above command will prevent you from ever seeing that window.
The last thing we're going to do before switching over to our Windows PC is grab the IP address of our Linux machine. Enter the following command:
hostname -I
This will spit out this computer's IP address on the local network (it will look something like 192.168.0.x), write it down. It might be a good idea once you're done here to go into your router settings and reserving that IP for your Linux system in the DHCP settings. Check the manual for your specific model router on how to access its settings, typically it can be accessed by opening a browser and typing http:\\192.168.0.1 in the address bar, but your router may be different.
Okay we’re done with our Linux computer for now. Get on over to your Windows PC, open File Explorer, right click on Network and click "Map network drive". Select Z: as the drive letter (you don't want to map the network drive to a letter you could conceivably be using for other purposes) and enter the IP of your Linux machine and location of the share like so: \\"LINUXCOMPUTERLOCALIPADDRESSGOESHERE"\"zpoolnamegoeshere"\. Windows will then ask you for your username and password, enter the ones you set earlier in Samba and you're good. If you've done everything right it should look something like this:

You can now start moving media over from Windows to the share folder. It's a good idea to have a hard line running to all machines. Moving files over Wi-Fi is going to be tortuously slow, the only thing that’s going to make the transfer time tolerable (hours instead of days) is a solid wired connection between both machines and your router.
Step Six: Setting Up Remote Desktop Access to Your Server
After the server is up and going, you’ll want to be able to access it remotely from Windows. Barring serious maintenance/updates, this is how you'll access it most of the time. On your Linux system open the terminal and enter:
sudo apt install xrdp
Then:
sudo systemctl enable xrdp
Once it's finished installing, open “Settings” on the sidebar and turn off "automatic login" in the User category. Then log out of your account. Attempting to remotely connect to your Linux computer while you’re logged in will result in a black screen!
Now get back on your Windows PC, open search and look for "RDP". A program called "Remote Desktop Connection" should pop up, open this program as an administrator by right-clicking and selecting “run as an administrator”. You’ll be greeted with a window. In the field marked “Computer” type in the IP address of your Linux computer. Press connect and you'll be greeted with a new window and prompt asking for your username and password. Enter your Ubuntu username and password here.

If everything went right, you’ll be logged into your Linux computer. If the performance is sluggish, adjust the display options. Lowering the resolution and colour depth do a lot to make the interface feel snappier.

Remote access is how we're going to be using our Linux system from now, barring edge cases like needing to get into the BIOS or upgrading to a new version of Ubuntu. Everything else from performing maintenance like a monthly zpool scrub to checking zpool status and updating software can all be done remotely.

This is how my server lives its life now, happily humming and chirping away on the floor next to the couch in a corner of the living room.
Step Seven: Plex Media Server/Jellyfin
Okay we’ve got all the ground work finished and our server is almost up and running. We’ve got Ubuntu up and running, our storage array is primed, we’ve set up remote connections and sharing, and maybe we’ve moved over some of favourite movies and TV shows.
Now we need to decide on the media server software to use which will stream our media to us and organize our library. For most people I’d recommend Plex. It just works 99% of the time. That said, Jellyfin has a lot to recommend it by too, even if it is rougher around the edges. Some people run both simultaneously, it’s not that big of an extra strain. I do recommend doing a little bit of your own research into the features each platform offers, but as a quick run down, consider some of the following points:
Plex is closed source and is funded through PlexPass purchases while Jellyfin is open source and entirely user driven. This means a number of things: for one, Plex requires you to purchase a “PlexPass” (purchased as a one time lifetime fee $159.99 CDN/$120 USD or paid for on a monthly or yearly subscription basis) in order to access to certain features, like hardware transcoding (and we want hardware transcoding) or automated intro/credits detection and skipping, Jellyfin offers some of these features for free through plugins. Plex supports a lot more devices than Jellyfin and updates more frequently. That said, Jellyfin's Android and iOS apps are completely free, while the Plex Android and iOS apps must be activated for a one time cost of $6 CDN/$5 USD. But that $6 fee gets you a mobile app that is much more functional and features a unified UI across platforms, the Plex mobile apps are simply a more polished experience. The Jellyfin apps are a bit of a mess and the iOS and Android versions are very different from each other.
Jellyfin’s actual media player is more fully featured than Plex's, but on the other hand Jellyfin's UI, library customization and automatic media tagging really pale in comparison to Plex. Streaming your music library is free through both Jellyfin and Plex, but Plex offers the PlexAmp app for dedicated music streaming which boasts a number of fantastic features, unfortunately some of those fantastic features require a PlexPass. If your internet is down, Jellyfin can still do local streaming, while Plex can fail to play files unless you've got it set up a certain way. Jellyfin has a slew of neat niche features like support for Comic Book libraries with the .cbz/.cbt file types, but then Plex offers some free ad-supported TV and films, they even have a free channel that plays nothing but Classic Doctor Who.
Ultimately it's up to you, I settled on Plex because although some features are pay-walled, it just works. It's more reliable and easier to use, and a one-time fee is much easier to swallow than a subscription. I had a pretty easy time getting my boomer parents and tech illiterate brother introduced to and using Plex and I don't know if I would've had as easy a time doing that with Jellyfin. I do also need to mention that Jellyfin does take a little extra bit of tinkering to get going in Ubuntu, you’ll have to set up process permissions, so if you're more tolerant to tinkering, Jellyfin might be up your alley and I’ll trust that you can follow their installation and configuration guide. For everyone else, I recommend Plex.
So pick your poison: Plex or Jellyfin.
Note: The easiest way to download and install either of these packages in Ubuntu is through Snap Store.
After you've installed one (or both), opening either app will launch a browser window into the browser version of the app allowing you to set all the options server side.
The process of adding creating media libraries is essentially the same in both Plex and Jellyfin. You create a separate libraries for Television, Movies, and Music and add the folders which contain the respective types of media to their respective libraries. The only difficult or time consuming aspect is ensuring that your files and folders follow the appropriate naming conventions:
Plex naming guide for Movies
Plex naming guide for Television
Jellyfin follows the same naming rules but I find their media scanner to be a lot less accurate and forgiving than Plex. Once you've selected the folders to be scanned the service will scan your files, tagging everything and adding metadata. Although I find do find Plex more accurate, it can still erroneously tag some things and you might have to manually clean up some tags in a large library. (When I initially created my library it tagged the 1963-1989 Doctor Who as some Korean soap opera and I needed to manually select the correct match after which everything was tagged normally.) It can also be a bit testy with anime (especially OVAs) be sure to check TVDB to ensure that you have your files and folders structured and named correctly. If something is not showing up at all, double check the name.
Once that's done, organizing and customizing your library is easy. You can set up collections, grouping items together to fit a theme or collect together all the entries in a franchise. You can make playlists, and add custom artwork to entries. It's fun setting up collections with posters to match, there are even several websites dedicated to help you do this like PosterDB. As an example, below are two collections in my library, one collecting all the entries in a franchise, the other follows a theme.

My Star Trek collection, featuring all eleven television series, and thirteen films.

My Best of the Worst collection, featuring sixty-nine films previously showcased on RedLetterMedia’s Best of the Worst. They’re all absolutely terrible and I love them.
As for settings, ensure you've got Remote Access going, it should work automatically and be sure to set your upload speed after running a speed test. In the library settings set the database cache to 2000MB to ensure a snappier and more responsive browsing experience, and then check that playback quality is set to original/maximum. If you’re severely bandwidth limited on your upload and have remote users, you might want to limit the remote stream bitrate to something more reasonable, just as a note of comparison Netflix’s 1080p bitrate is approximately 5Mbps, although almost anyone watching through a chromium based browser is streaming at 720p and 3mbps. Other than that you should be good to go. For actually playing your files, there's a Plex app for just about every platform imaginable. I mostly watch television and films on my laptop using the Windows Plex app, but I also use the Android app which can broadcast to the chromecast connected to the TV in the office and the Android TV app for our smart TV. Both are fully functional and easy to navigate, and I can also attest to the OS X version being equally functional.
Part Eight: Finding Media
Now, this is not really a piracy tutorial, there are plenty of those out there. But if you’re unaware, BitTorrent is free and pretty easy to use, just pick a client (qBittorrent is the best) and go find some public trackers to peruse. Just know now that all the best trackers are private and invite only, and that they can be exceptionally difficult to get into. I’m already on a few, and even then, some of the best ones are wholly out of my reach.
If you decide to take the left hand path and turn to Usenet you’ll have to pay. First you’ll need to sign up with a provider like Newshosting or EasyNews for access to Usenet itself, and then to actually find anything you’re going to need to sign up with an indexer like NZBGeek or NZBFinder. There are dozens of indexers, and many people cross post between them, but for more obscure media it’s worth checking multiple. You’ll also need a binary downloader like SABnzbd. That caveat aside, Usenet is faster, bigger, older, less traceable than BitTorrent, and altogether slicker. I honestly prefer it, and I'm kicking myself for taking this long to start using it because I was scared off by the price. I’ve found so many things on Usenet that I had sought in vain elsewhere for years, like a 2010 Italian film about a massacre perpetrated by the SS that played the festival circuit but never received a home media release; some absolute hero uploaded a rip of a festival screener DVD to Usenet. Anyway, figure out the rest of this shit on your own and remember to use protection, get yourself behind a VPN, use a SOCKS5 proxy with your BitTorrent client, etc.
On the legal side of things, if you’re around my age, you (or your family) probably have a big pile of DVDs and Blu-Rays sitting around unwatched and half forgotten. Why not do a bit of amateur media preservation, rip them and upload them to your server for easier access? (Your tools for this are going to be Handbrake to do the ripping and AnyDVD to break any encryption.) I went to the trouble of ripping all my SCTV DVDs (five box sets worth) because none of it is on streaming nor could it be found on any pirate source I tried. I’m glad I did, forty years on it’s still one of the funniest shows to ever be on TV.
Part Nine/Epilogue: Sonarr/Radarr/Lidarr and Overseerr
There are a lot of ways to automate your server for better functionality or to add features you and other users might find useful. Sonarr, Radarr, and Lidarr are a part of a suite of “Servarr” services (there’s also Readarr for books and Whisparr for adult content) that allow you to automate the collection of new episodes of TV shows (Sonarr), new movie releases (Radarr) and music releases (Lidarr). They hook in to your BitTorrent client or Usenet binary newsgroup downloader and crawl your preferred Torrent trackers and Usenet indexers, alerting you to new releases and automatically grabbing them. You can also use these services to manually search for new media, and even replace/upgrade your existing media with better quality uploads. They’re really a little tricky to set up on a bare metal Ubuntu install (ideally you should be running them in Docker Containers), and I won’t be providing a step by step on installing and running them, I’m simply making you aware of their existence.
The other bit of kit I want to make you aware of is Overseerr which is a program that scans your Plex media library and will serve recommendations based on what you like. It also allows you and your users to request specific media. It can even be integrated with Sonarr/Radarr/Lidarr so that fulfilling those requests is fully automated.
And you're done. It really wasn't all that hard. Enjoy your media. Enjoy the control you have over that media. And be safe in the knowledge that no hedgefund CEO motherfucker who hates the movies but who is somehow in control of a major studio will be able to disappear anything in your library as a tax write-off.
1K notes
·
View notes
Text

Ladies, gentlemen, friends, foes, earthlings and other interested parties...
Desktop Buddy! Peter is officially out on Itch.io
I'm finally confident that the Beta version of of the Your Boyfriend Desktop Buddy is good enough to share. The link is here, and details are under the cut! It's a free game, but your comments and feedback mean everything to me, so please drop em, even if they're short. Thank you so much for your support everyone - I'm so proud of my first game, and so excited to share it <3
Features:
Idle Dialogue: Peter will say random things while idling on your desktop, with his dialogue evolving based on how you interact with him. If you'd prefer peace and quiet, you can also mute him.
Interactions: You can kiss Peter by moving your mouse over his head (without clicking) or hit him by double-clicking his face. His reactions will change based on how often you do each action.
Standard Functions: Peter can:
Set images as your wallpaper
Empty your recycle bin
Display your computer’s stats
Check for new emails (if you've configured your POP settings in SSP)
Relationship System: Peter tracks how you treat him, adjusting his dialogue and reactions accordingly. You can check your status with him or reset his memory to start fresh if you want.
Dialogue Depth: While Peter may not talk much at random, his menus contain a lot of dialogue. You can ask him questions on various topics, and his responses will vary based on your interactions. Even familiar questions might lead to unexpected answers.
Gifts: You can give Peter gifts, and what he accepts may change depending on your relationship status.
This is a beta version of the desktop buddy, with more content and updates to come. But please do leave a comment or reach out if you encounter any bugs, weird-looking sprites, or just anything that seems off. This is my first game, and there'll be kinks to work out!
#your boyfriend#your boyfriend game#peter yb#yandere#ybfg#fanart#peter dunbar#desktop buddy#ghost#peter ukagaka ghost#fan creations#itch.io#beta release
367 notes
·
View notes
Text

How to use DXVK with The Sims 3
Have you seen this post about using DXVK by Criisolate? But felt intimidated by the sheer mass of facts and information?
@desiree-uk and I compiled a guide and the configuration file to make your life easier. It focuses on players not using the EA App, but it might work for those just the same. It’s definitely worth a try.
Adding this to your game installation will result in a better RAM usage. So your game is less likely to give you Error 12 or crash due to RAM issues. It does NOT give a huge performance boost, but more stability and allows for higher graphics settings in game.
The full guide behind the cut. Let me know if you also would like it as PDF.
Happy simming!
Disclaimer and Credits
Desiree and I are no tech experts and just wrote down how we did this. Our ability to help if you run into trouble is limited. So use at your own risk and back up your files!
We both are on Windows 10 and start the game via TS3W.exe, not the EA App. So your experience may differ.
This guide is based on our own experiments and of course criisolate’s post on tumblr: https://www.tumblr.com/criisolate/749374223346286592/ill-explain-what-i-did-below-before-making-any
This guide is brought to you by Desiree-UK and Norn.
Compatibility
Note: This will conflict with other programs that “inject” functionality into your game so they may stop working. Notably
Reshade
GShade
Nvidia Experience/Nvidia Inspector/Nvidia Shaders
RivaTuner Statistics Server
It does work seamlessly with LazyDuchess’ Smooth Patch.
LazyDuchess’ Launcher: unknown
Alder Lake patch: does conflict. One user got it working by starting the game by launching TS3.exe (also with admin rights) instead of TS3W.exe. This seemed to create the cache file for DXVK. After that, the game could be started from TS3W.exe again. That might not work for everyone though.
A word on FPS and V-Sync
With such an old game it’s crucial to cap framerate (FPS). This is done in the DXVK.conf file. Same with V-Sync.
You need
a text editor (easiest to use is Windows Notepad)
to download DXVK, version 2.3.1 from here: https://github.com/doitsujin/DXVK/releases/tag/v2.3.1 Extract the archive, you are going to need the file d3d9.dll from the x32 folder
the configuration file DXVK.conf from here: https://github.com/doitsujin/DXVK/blob/master/DXVK.conf. Optional: download the edited version with the required changes here.
administrator rights on your PC
to know your game’s installation path (bin folder) and where to find the user folder
a tiny bit of patience :)
First Step: Backup
Backup your original Bin folder in your Sims 3 installation path! The DXVK file may overwrite some files! The path should be something like this (for retail): \Program Files (x86)\Electronic Arts\The Sims 3\Game\Bin (This is the folder where also GraphicsRule.sgr and the TS3W.exe and TS3.exe are located.)
Backup your options.ini in your game’s user folder! Making the game use the DXVK file will count as a change in GPU driver, so the options.ini will reset once you start your game after installation. The path should be something like this: \Documents\Electronic Arts\The Sims 3 (This is the folder where your Mods folder is located).
Preparations
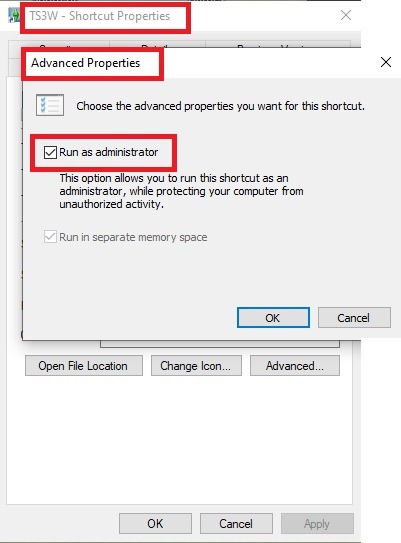
Make sure you run the game as administrator. You can check that by right-clicking on the icon that starts your game. Go to Properties > Advanced and check the box “Run as administrator”. Note: This will result in a prompt each time you start your game, if you want to allow this application to make modifications to your system. Click “Yes” and the game will load.
2. Make sure you have the DEP settings from Windows applied to your game.
Open the Windows Control Panel.
Click System and Security > System > Advanced System Settings.
On the Advanced tab, next to the Performance heading, click Settings.
Click the Data Execution Prevention tab.
Select 'Turn on DEP for all programs and services except these”:
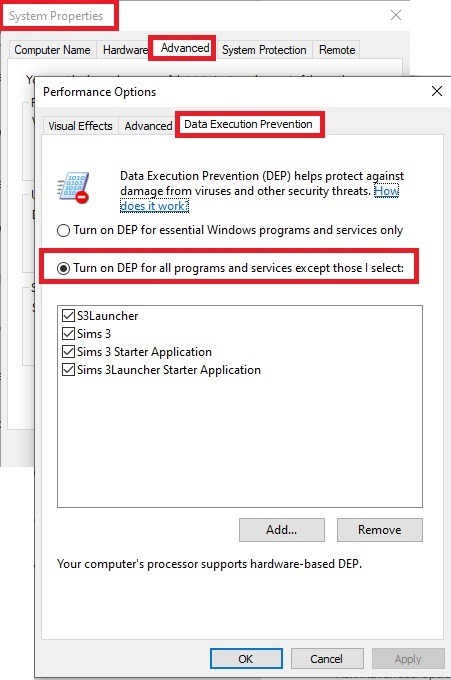
Click the Add button, a window to the file explorer opens. Navigate to your Sims 3 installation folder (the bin folder once again) and add TS3W.exe and TS3.exe.
Click OK. Then you can close all those dialog windows again.
Setting up the DXVK.conf file
Open the file with a text editor and delete everything in it. Then add these values:
d3d9.textureMemory = 1
d3d9.presentInterval = 1
d3d9.maxFrameRate = 60
d3d9.presentInterval enables V-Sync,d3d9.maxFrameRate sets the FrameRate. You can edit those values, but never change the first line (d3d9.textureMemory)!
The original DXVK.conf contains many more options in case you would like to add more settings.

A. no Reshade/GShade
Setting up DXVK
Copy the two files d3d9.dll and DXVK.conf into the Bin folder in your Sims 3 installation path. This is the folder where also GraphicsRule.sgr and the TS3W.exe and TS3.exe are located. If you are prompted to overwrite files, please choose yes (you DID backup your folder, right?)
And that’s basically all that is required to install.
Start your game now and let it run for a short while. Click around, open Buy mode or CAS, move the camera.
Now quit without saving. Once the game is closed fully, open your bin folder again and double check if a file “TS3W.DXVK-cache” was generated. If so – congrats! All done!
Things to note
Heads up, the game options will reset! So it will give you a “vanilla” start screen and options.
Don’t worry if the game seems to be frozen during loading. It may take a few minutes longer to load but it will load eventually.
The TS3W.DXVK-cache file is the actual cache DXVK is using. So don’t delete this! Just ignore it and leave it alone. When someone tells to clear cache files – this is not one of them!
Update Options.ini
Go to your user folder and open the options.ini file with a text editor like Notepad.
Find the line “lastdevice = “. It will have several values, separated by semicolons. Copy the last one, after the last semicolon, the digits only. Close the file.
Now go to your backup version of the Options.ini file, open it and find that line “lastdevice” again. Replace the last value with the one you just copied. Make sure to only replace those digits!
Save and close the file.
Copy this version of the file into your user folder, replacing the one that is there.
Things to note:
If your GPU driver is updated, you might have to do these steps again as it might reset your device ID again. Though it seems that the DXVK ID overrides the GPU ID, so it might not happen.
How do I know it’s working?
Open the task manager and look at RAM usage. Remember the game can only use 4 GB of RAM at maximum and starts crashing when usage goes up to somewhere between 3.2 – 3.8 GB (it’s a bit different for everybody).
So if you see values like 2.1456 for RAM usage in a large world and an ongoing save, it’s working. Generally the lower the value, the better for stability.
Also, DXVK will have generated its cache file called TS3W.DXVK-cache in the bin folder. The file size will grow with time as DXVK is adding stuff to it, e.g. from different worlds or savegames. Initially it might be something like 46 KB or 58 KB, so it’s really small.
Optional: changing MemCacheBudgetValue
MemCacheBudgetValue determines the size of the game's VRAM Cache. You can edit those values but the difference might not be noticeable in game. It also depends on your computer’s hardware how much you can allow here.
The two lines of seti MemCacheBudgetValue correspond to the high RAM level and low RAM level situations. Therefore, theoretically, the first line MemCacheBudgetValue should be set to a larger value, while the second line should be set to a value less than or equal to the first line.
The original values represent 200MB (209715200) and 160MB (167772160) respectively. They are calculated as 200x1024x1024=209175200 and 160x1024x1024=167772160.
Back up your GraphicsRules.sgr file! If you make a mistake here, your game won’t work anymore.
Go to your bin folder and open your GraphicsRules.sgr with a text editor.
Search and find two lines that set the variables for MemCacheBudgetValue.
Modify these two values to larger numbers. Make sure the value in the first line is higher or equals the value in the second line. Examples for values: 1073741824, which means 1GB 2147483648 which means 2 GB. -1 (minus 1) means no limit (but is highly experimental, use at own risk)
Save and close the file. It might prompt you to save the file to a different place and not allow you to save in the Bin folder. Just save it someplace else in this case and copy/paste it to the Bin folder afterwards. If asked to overwrite the existing file, click yes.
Now start your game and see if it makes a difference in smoothness or texture loading. Make sure to check RAM and VRAM usage to see how it works.
You might need to change the values back and forth to find the “sweet spot” for your game. Mine seems to work best with setting the first value to 2147483648 and the second to 1073741824.
Uninstallation
Delete these files from your bin folder (installation path):
d3d9.dll
DXVK.conf
TS3W.DXVK-cache
And if you have it, also TS3W_d3d9.log
if you changed the values in your GraphicsRule.sgr file, too, don’t forget to change them back or to replace the file with your backed up version.
OR
delete the bin folder and add it from your backup again.
B. with Reshade/GShade
Follow the steps from part A. no Reshade/Gshade to set up DXVK.
If you are already using Reshade (RS) or GShade (GS), you will be prompted to overwrite files, so choose YES. RS and GS may stop working, so you will need to reinstall them.
Whatever version you are using, the interface shows similar options of which API you can choose from (these screenshots are from the latest versions of RS and GS).
Please note:
Each time you install and uninstall DXVK, switching the game between Vulkan and d3d9, is essentially changing the graphics card ID again, which results in the settings in your options.ini file being repeatedly reset.
ReShade interface
Choose – Vulcan
Click next and choose your preferred shaders.
Hopefully this install method works and it won't install its own d3d9.dll file.
If it doesn't work, then choose DirectX9 in RS, but you must make sure to replace the d3d9.dll file with DXVK's d3d9.dll (the one from its 32bit folder, checking its size is 3.86mb.)
GShade interface
Choose –
Executable Architecture: 32bit
Graphics API: DXVK
Hooking: Normal Mode
GShade is very problematic, it won't work straight out of the box and the overlay doesn't show up, which defeats the purpose of using it if you can't add or edit the shaders you want to use.
Check the game's bin folder, making sure the d3d9.dll is still there and its size is 3.86mb - that is DXVK's dll file.
If installing using the DXVK method doesn't work, you can choose the DirectX method, but there is no guarantee it works either.
The game will not run with these files in the folder:
d3d10core.dll
d3d11.dll
dxgi.dll
If you delete them, the game will start but you can't access GShade! It might be better to use ReShade.
Some Vulcan and DirectX information, if you’re interested:
Vulcan is for rather high end graphic cards but is backward compatible with some older cards. Try this method with ReShade or GShade first.
DirectX is more stable and works best with older cards and systems. Try this method if Vulcan doesn't work with ReShade/GShade in your game – remember to replace the d3d9.dll with DXVK's d3d9.dll.
For more information on the difference between Vulcan and DirectX, see this article:
https://www.howtogeek.com/884042/vulkan-vs-DirectX-12/
745 notes
·
View notes
Text


So, I make all of my devices look like old windows operating systems, usually Win7 cuz I'm a big fan of Aero Glass. I've got my Win11 laptop looking like XP, My Linux Dual Boot on pink Win7, My Linux Tablet on Blue Win7, and now my Win 11 desktop on pink Win7.
Here's how I do it.
For windows 10/11 there are a few ways. WindowBlinds 11 (WB11) is a good resource for this, but it's a paid program. Which kinda sucks. If you can't afford it you can find my sympathies in a button on my neocities. In an unrelated note, there's a github user named Discriminating who does some pretty cool windows styling programs. WB11 is how I style my two windows devices. The aero glass styling is done through WindowBlinds and also Start11, another Stardock program. The style I used for that is Aero 11 (set to blush :3) For the XP system (and older if you want it) I use RetroBar to style the taskbar and OpenShell to style the start menu. The WB11 style I use is eXperience11, but there are others as well. Of course, for MSN/Windows Live Messenger I use Escargot but if you're more into AIM or Yahoo! Messenger then you can check out their companion project Nina. You'll of course have to fiddle around with settings but eventually you'll get it looking good. If you want to go crazy with customization there is also Customizer God, however I've had no success getting it to work on Windows 11.
Linux is the easiest to configure to make look retro. Specifically you want to use some kind of KDE Plasma version of Linux. I use Kubuntu. Basically all you have to do for these is dig around in the app store for themes relating to "aero" "aero glass" and "windows 7" and apply them until you're happy. I don't really have any specific suggestions for that but it's very easy to do if you install Kubuntu or any KDE Plasma Linux. Basically you can find anything and everything you need in it.
There's one other thing I've not yet been able to set up but it's on my radar for my campus computer: ReactOS. I'll make another post when I'm able to try it out but if you're curious go nuts, install it in a virtual box or on a usb or directly over your main drive. God is your oyster.
One last thing, Space Cadet Pinball still runs perfectly on Windows 11
Edit: Suggested by @tetrachromacy4 (thx~!!!) GadgetPack offers a windows 7 sidebar. It is listed as 7/8/10 compatible so it will likely work on windows 11 but I have not yet tested it.
#oldweb#old web#old internet#internet nostalgia#old tech#old graphics#windows xp#windows 7#y2k nostalgia#y2kcore#y2k aesthetic
229 notes
·
View notes
Text
"If it helps, one of the many scenarios my brain likes to twist around is imagining Sonic's perspective of No Cracks In A Closed Loop (and I adore Tails getting to be a badass and pulling off the impossible, too- my brain just likes to spin on the angst sometimes)" - @manynerdthings
A/N: So I was inspired...
I think it's safe to say this helped a lot xD Thank you, manynerdthings!
This is a continuation of my fic "No Cracks in a Closed Loop"
No Cracks in a Closed Loop — Sonic's Side
"Sonic."
That single word—no, just the voice alone—was enough to cut through the adrenaline rush as pure chaos energy sang through his veins and ignited every nerve with its spark. In a flash of light and sound, Super Sonic punched a hole through the Starfall-titan-wanna-be by using his own body as a projectile. A cocky grin cut across his muzzle as it wobbled in place, setting its sights on him instead of the city it had been about to level; its laser cannons aimed directly at the fault line.
This fight wouldn't last twenty seconds. They'd already won.
"What's up, partner?" Sonic said into the comm as he shot skyward.
The streak of gold drew the mech's cannon higher, until it cleared the tips of skyscrapers and nearby mountaintops by the time it shot at him. The laser's heat didn't even singe his fur, firing at full power into the stratosphere instead of drilling deep into the crust of the planet. It zinged past the satellite Tails was communicating from, but Super Sonic's gaze didn't linger on it for more than half a second—already more than certain it was out of the laser's range. Speeding through the air, he whirled around towards the mech for his next move. He was going to cyloop Eggman's newest addition to his junk pile right off its feet.
Swerving down in a sharp arc, Super Sonic avoided the next blast while he swung around to try and circle it. It's clawed hand swiped at him before he could complete his first circuit. He shot straight up before it could catch him, homing attacking it in the face instead.
The comm was still quiet. Tails must've swapped to their own channel. Super Sonic flew backwards, putting both the titan and the distant satellite in his line of sight. Whatever he had to say, he didn't want anyone else to hear it.
Super Sonic's brow furrowed as a barrage of bullets opened up on him. He weaved between the hundreds of projectiles glinting dangerously in the sunlight, but his chaos energy and speed worked in tandem, as fluidly as a dance, while he searched for another opening to try the cyloop again.
He could beat this thing without it, sure, but it was the fastest way to take it down.
"Tails? Still with me, bud?" Super or not, Sonic still spared a second to check in, static ringing in his ears as he burst through the center of the mech's chest plate for a shortcut.
"I'm here," Tails answered, but his voice sounded faint, like the feedback was drowning him out. "Sorry, I…" Super Sonic started his cyloop. "I just wanted to—" He was halfway around. "I'm sorry—"
Sonic closed the loop. A burst of chaos energy swelled up with a deafening boom. The air rippled with the force of it in great gusts of wind that rocked the trees and the grass of the nearby hills. Waves rose up in the bay, their white caps scraping the bottom of the golden bridge that marked the edge of the sea. The fake titan lifted into the air, sparks crackling off its metal casing as its system overloaded. Super Sonic didn't give it a second to recalibrate itself.
Faster than anyone could see, he smashed into it on all sides. A tiny mote of golden light against the towering behemoth, but it struck every weak point, fried every circuit, as the chaos energy pressed in on it from the outside. Metal crunched and caved it on itself, contorting into a twisted configuration until it no longer resembled a machine.
A cheap imitation of the ancients' attempts to defend themselves, designed only to destroy instead of protect.
Super Sonic grabbed onto mech's arm—or maybe its leg, it was hard to tell at this point—as the cyloop's effect faded, catching it before it crushed Westopolis. He swung it around and around, gritting his teeth as he built up momentum and set his sights on the ocean out ahead of them. Whoosh, whoosh, whoosh—
Super Sonic let go.
The mech's remains were flung through the air, over the coastline and beyond the bridge that cut off the bay from the sea. It crashed into the water, the ocean spray shooting up into the air in a tower of mist once it hit the surface. The waves rolled aggressively towards the coastline, but ultimately broke apart in the bay before they could do too much damage. Some millionaires might have to replace a yacht or two, but that wasn't Sonic's problem.
As he dusted his hands off, he could finally acknowledge the warning bells Tails's last words to him had set off. "Hey, what was that, bud? I didn't catch—"
Super Sonic turned towards the satellite, addressing it like he would Tails, but it was gone. Instead a cloud of smoke filled the space where the satellite had been not ten seconds ago. Metal shards and fire rained upon the bay. Everything in pieces. Everything gone.
His comm was in chaos. Unintelligible voices shouted over one another in a cacophony of white noise that was already fighting a losing battle to the ringing in his ears. But he still noticed one voice was missing. He couldn't hear it.
He hadn't heard any of it.
Over the sonic boom of his cyloop and the screeching of metal as he demolished the titan, Sonic hadn't heard the satellite explode.
The satellite his little brother was on.
He'd been trying to tell him something.
He'd been trying to tell him something before a satellite exploded with him on it.
"I'm sorry."
Tails.
Super Sonic shot off like a bullet, speeding towards the black cloud of smoke and smoldering debris like there was even a chance—
No. There had to be a chance—
"I just wanted to—I'm sorry—"
Why? What happened? What did you do, Tails?
He hadn't even properly seen him off before he left. Tails had been trying to hack into Eggman's satellite remotely while Sonic was out chasing after the faux titans. He told them all about his plan to board the satellite and everyone agreed it sounded like the right call, so long as he could do it quickly. They needed to disrupt the signal, after all, and Tails was their best shot.
That was what he'd said, wasn't it? "You're our best shot, Tails. I believe in you, partner."
Their best shot, but not the only one. Not if it meant this.
Nothing was worth this.
Sonic didn't need to breathe while super, but his lungs still burned twin holes in his chest as his own nervous system caught fire. Golden sparks flicked off his quills as he raced through the air. Fiery eyes frantically scanned each scrap of metal that fell, but they must've already been irritated from the smoke because they burned and blurred with the rest of the world around him—
"—onic, wait! Come back! Sonic!"
One voice.
Super Sonic stopped. He stopped so fast and so suddenly, it felt like his own soul completely missed the memo. Like everything inside him continued to hightails it towards where Tails had been without him, leaving him empty. Hollow. Cold.
A vacuous space in the center of himself where there'd once been something.
The chaos energy inside him didn't know what to do with that.
With so much… nothing.
Stunned, he could only float in place for a stupid second until he remembered he'd stopped for a reason. With a sharp turn, his stare locked onto a splash of orange amidst the blotchy colors of the rest of the world bleeding into one another. Like he was still moving too fast to see clearly. Like he couldn't catch up to himself.
"Sonic…" Tails's voice broke like it had on the comm, but it wasn't with pain guilt fear regret static.
Vision clearing, Sonic could see him now. At the edge of one of the hills overlooking Westopolis and the bay. Tails just rubbed at his nose with a sheepish sort of grin, like the explosion was a minor miscalculation. A hiccup. My bad, he could hear him saying, like he was standing in the middle of his workshop, covered in soot and singed fur, one hand on his hip and a fire extinguisher at his feet.
Like he was fine.
Like he hadn't been incinerated in the fiery inferno smoldering above them.
Tails lowered his hand, eyes shining as they looked up at him, reflecting the very sky Super Sonic was caught in as the satellite's remains fell all around him. He'd been on that satellite. Just seconds ago, Sonic had been so sure of it.
He'd been so sure he'd lost him…
Then Tails opened his arms to him and laughed.
All at once Sonic crashed back into himself, chest heaving with a sharp inhale as his heart lurched forward.
Faster than a blink, Super Sonic barrelled into Tails and sent them toppling down the hillside. They smacked hard against the ground, but Sonic took the brunt of the fall even with the world spinning around them. His arms encircled Tails tightly, one hand protecting the back of his head while the other braced the small of his back as they tumbled and whooped like a pair of idiots. Pure joy radiated through him, burning brighter than the chaos energy coursing through his quills. It knocked the emeralds right out of him. The seven gems fell into the grass around them as the two mobians eventually rolled to a stop.
Sonic clutched Tails to him, shaking with breathless laughter as he felt his little brother hug him back just as tightly. "I'm here," Tails was saying, and it took a minute to realize he'd been repeating the words while Sonic's hands were trembling. "I'm here. It's okay, big bro. I'm here. I’m here."
"And you say I'm the one that's gonna give you a heart attack," Sonic wheezed, not bothering to give himself room to breathe if it meant letting go for even a second.
"Can't let you have all the fun." Tails smoothed his hands over Sonic's spines to try and settle him, his touch purposeful and grounding. "Deep breaths, big bro. You're gonna pass out."
"Nuh-uh," he argued, but filled his lungs with his next inhale anyway, then let all the air ease out of him.
"That's it. There ya go," Tails encouraged, but Sonic couldn't help his snort of indignation at being coddled and pushed away from him.
Except Tails just tightened his grip; fingers curling in his fur like they'd be forced apart if he didn't. He hid his face in the crook of Sonic's neck, his breaths coming only a little too fast. But his hands were shaking, too, and his twin tails wound around them both as if they were enough to protect them from the next threat.
Sonic didn't pull away. He just sat back, the eleven-year-old practically in his lap, and rested his hand atop Tails's head.
"Gave me a real scare there, pal," he said, voice low and gentle as he smoothed out his fur, picking at the grass and brambles they were both covered in.
"…Scared me, too."
Sonic's heart clenched, the open admission like a bludgeon to his protective instincts, even if his pride assured him Tails could handle it. After all, the proof had all but climbed into his lap. But now that he was looking at him—really looking at him—he could see his fur was mussed up from more than just a tumble at supersonic speed. A streak of blood stained his fur on his shoulder and there was a lump near the center of his back that filled Sonic with an angry fire hot enough to burn through the atmosphere when he so much as brushed against it with his fingers.
Tails didn't flinch when he grazed it, but his muscles gave an involuntary spasm that rippled beneath his fur and his hold on Sonic tightened. It was enough to quell the roiling rage to a simmer. Something he could stick a lid on without worrying it would boil over if left unchecked. It wasn't what Tails needed from him right now.
But Sonic still wanted some answers.
"What happened up there?" he asked.
Tails shook his head. "Just a bit of a closer call than I thought it'd be. But I'll be okay. I am okay."
Sonic instinctively bristled, prepared to be shut out of whatever it was he'd gone through. "Tails—"
"I'll tell you someday," he promised, pressing his paw over Sonic's heart. "I mean it. But right now we've got a lot of Eggman's mess to clean up. There's still six other titans out there and I'm sure everyone else is worried."
Sonic sighed, as exasperated as he could manage when he was still just glad this kid was alive. "Gonna hold you to that," he threatened, ruffling his fur to muss it up on purpose. "You owe me. Nearly shocked the Chaos Emeralds right outta my system."
"Says Mr. Guy-Who-Loves-Adventure," Tails teased as he pushed himself up to stand. "You should be used to it by now."
Sonic snorted when he was offered a hand up, but he took it nonetheless. "When I go gray early, I'll know exactly who to blame."
"Don't worry. I'll help you dye your quills, old man," Tails snickered, but it broke off with a wince as a sharp twinge ran through his back.
Sonic was quick to lay a supportive hand at his hip to steady him. "Look who's talking. At this rate, you're gonna be right there with me setting the record for the world's youngest old timers."
Tails sent him a look, but accepted the help nonetheless as he leaned his weight against him. "Did you really have to knock us all the way down the hill like that?"
"Heh. Well, in my defense, wasn't exactly thinking straight." Sonic scratched at his nose, giving him a not-so-subtle onceover. "Didn't bang ya up too bad, did I?"
"Nah. I'll bounce back," Tails assured him, giving him a pat on the back.
"You always do," Sonic agreed warmly as they took a few steps in tandem so they could start collecting the Chaos Emeralds on their way back up the hill while Tails alerted everyone to their status on his comm and checked in on everyone else as well.
Sonic just listened, taking in the rise and fall of his voice, his steady assurances and sighs of relief to hear that the world hadn't fallen apart in his absence. Even if it very nearly did. As far as Sonic was concerned, anyway.
But he was okay now. That was what mattered. And whatever it was that happened on that satellite—whatever reason Tails had for calling him seconds before disaster—he would trust that his little brother would come to him when he was ready. Because he'd be there for him. No matter what.
Keeping his arm looped around Tails’s waist even after they made it back up the hill, Sonic looked up at the smoke still fading from the sky. He tightened his hold on him. It felt like another lifetime, like another him had first seen the explosion and feared the worst. Tails followed his gaze, quiet again with all the calls taken care of and winded from the uphill climb. Through his labored breaths, there was the slightest tremor that traveled from his chest to where he stood pressed against his brother.
"…Scared me, too."
"Hey, whatever happened up there," Sonic broke the silence, his voice drawing Tails back down beside him. "Whatever you did, I'll bet it was seriously way past cool." He glanced over at him, waiting to catch his eye before giving him a wink.
All too easily, Tails grinned up at him, the shape of his smile the spitting image of his brother's. "Way past is definitely one way to put it."
———
Five years later…
———
"You've been quiet all day, partner. Something going on in that big brain of yours?"
Everyone else had split off for the night. Team Dark vanished sometime after lunch, after Rouge once again tricked Shadow into accompanying her, and Team Chaotix had an appointment for their next case. Amy took Cream back home to Vanilla while Tangle and Whisper left to help Jewel out with some Restoration business.
Which left just Sonic and Tails lounging on the couch; the former picking up where Vector had left off in the game he'd been playing, tapping away at the controller while the latter watched.
Tails hummed in acknowledgement, so Sonic let him have a minute of quiet to collect his thoughts. He picked at one of Whisper's cinnamon muffins, crumbs scattering across the coffee table, but he didn't eat any of it. He hadn't had much of an appetite since slinking out of his lab earlier that afternoon.
It probably had something to do with the quiet and the way he'd been kinda clingy. Sonic had planned on going for a run as soon as Tails retreated back to his lab to tinker with whatever gadgets he had tucked away back there, but he seemed pretty content to stay curled up on the couch beside him. Still, Sonic could adapt. He kicked his feet up onto the coffee table and slumped back into the cushions as he wandered aimlessly around in a game he couldn't remember owning.
"Do you remember that time you went up against Eggman's seven fake titans?"
Sonic let out a low whistle. "Boy, is that a blast from the past. What about it?"
When Tails didn't immediately continue, Sonic pressed the pause button, then shifted against the cushion to sit up and face his not-so-little-anymore bro. The sixteen-year-old fox tore his gaze from the screen to watch him instead, eyes bright from television's glow. Looking at him like that, for a split second, Sonic could still see the insecure, little fox kit he used to be in the way his shoulders hunched up as if to make himself smaller. To take up less space in the world.
Sonic draped one arm along the back of the couch, leaving space for him to lean into if he wanted it. No matter how big he got, there'd always be space for him.
Tails scooted closer and rested his head against Sonic's arm. "I needed to disrupt the satellite signal powering the Chaos Emerald vaults, but Eggman locked me out of the remote connection so I had to access it directly—"
"On the actual satellite," Sonic interjected, fingers drumming against the back of the couch. "I remember."
Tails released a long exhale. "Well, he set a trap. A way to slow me down so I wouldn't be able to unlock the emeralds for you in time. The same code that would disrupt the satellite's signal would also cause it to self-destruct. Eggman banked on me having enough self-preservation that I wouldn't engage it without trying to disable that function first."
"But you set it off anyway."
"I set it off anyway," Tails confirmed with a decisive nod. "It was the outcome with the highest percentage of saving people. The fastest way to help you guys. I thought I could get out in time. I should've gotten out in time," his voice lowered, eyes distant as if he was reliving the moment right there on their couch. "But I couldn't. Not on my own. I needed… help."
Sonic tried to follow him there, even if he didn't much like to relive that day in his waking hours. "So you called me."
"Not… exactly." Tails sat up straighter so he could look him in the eye. "I knew you'd come get me if I asked, but then countless lives would've been lost if the titans had gone on unchecked, even if just for a couple of seconds. Sometimes that's all it takes…" Tails's fist clenched as he dropped his hardened gaze to his lap. "I made the call to initiate the self-destruct in order to save people. I couldn't take that back. I couldn't take you away from them. Not again."
A younger Sonic would've snapped at him—would've argued over the value of his life with him until he wasn't the only one blue in the face. But at twenty-three, Sonic had fought more of these battles than he cared to count and never once walked away a winner. So he sat back, held his tongue, and let Tails explain himself.
"I called you to say goodbye," his voice lowered to a whisper, "I wanted to give you that, at least.”
He'd had a feeling. It wasn't one he dwelled on freely, but sometimes the thought wandered in uninvited. Moreso during the first couple of months after the incident, when everything was still fresh and closer to their present.
Before Sonic could respond, Tails pressed forward. "But then an older version of myself traveled through time with two Chaos Emeralds to save me. He said it was the only way. Because at the time, only the two of us knew what transpired on the satellite. We created a temporal paradox, a loop without a proper origin, but as long as it was contained between the two versions of me, nothing could disrupt it. That's why I couldn't tell you before. I wasn't sure… I didn't know if the future version of myself had told you what happened and if that would open up possibilities in the time stream that would botch the encounter entirely." Tails lifted his gaze to seek out Sonic's again, and he could see the eleven-year-old sitting in front of him like it was that very same day. "I'm sorry. I wanted to tell you."
"Nothing to apologize for, bud. I get it. I wouldn't want to mess up the time stream for that particular moment either." Sonic shifted the arm draped along the couch so he could cup the back of Tails's head, idly ruffling the fur there. "But if you're telling me all this now…" he drawled, moving to scritch behind Tails's ear. "Charmy wasn't the one who swiped Shadow's Chaos Emerald earlier, was he?"
Tails shrugged, muzzle quirking up on one side. "When he showed up with it today, I just had this feeling that it was time to make my move…" Tails explained. "I've been feeling it for a couple weeks now, to be honest. I had all the equipment I'd had on me that day and I looked close enough to how I remembered. I knew I probably had to go back soon. Just needed everything to align so no one would interfere. Today seemed good…"
Sonic tilted his head as Tails trailed off, his eyes still a little distant. "Well, you made it back in one piece, didn't you? Mission accomplished."
"Yeah. Mission accomplished," he echoed, but whatever was on his mind continued to fester. "I thought I made a mistake."
"Hm?"
"There were only three seconds left," Tails whispered. "I thought I messed it all up. I thought I killed us both—"
"You—"
"I was so sure it would work because it already had, but there was still the possibility I could've gotten it wrong. I could've caused a split in our realities. Created two timelines where I ceased to exist, except in this one no one would've known what happened to me and two of the Chaos Emeralds would be lost to time. How would any of you have known where to look?" Tails rambled, pressing his hands over his face. "I estimated the time of day with a standard deviation of a couple of seconds, but those seconds could've been what killed us—"
"Hey, hey, hey," Sonic hushed, shifting to wrap both arms around his little brother as he slumped against him. "You didn't. You're here. You're right here with me, see?" He gave him a firm squeeze, smile tugging at his muzzle as Tails hugged him back tightly. "Atta boy."
"Stupid…" he mumbled into Sonic's shoulder. "Why does this still work so well?"
"Heh. What're big brothers for?" Sonic huffed out a chuckle. "Listen, you can't live a life of what-ifs, bud. It'll drive you outta your mind. I should know. And I know you know that, too." He felt Tails's nod against his cheek. "You did exactly what you set out to do. And heck, you used the Chaos Emeralds to travel through time! When did you learn how to do that, huh? Holding out on your big bro?"
Tails snorted, but it got him to relax enough to pull back. "Figured if I could use Chaos Control, time travel was just an added boost. Like adding a supercharger to the Tornado's engine."
"Tch. You figured." Sonic rolled his eyes, but the warmth in them was nothing but fond. "Give yourself a little more credit. You did something incredible today, Tails. You defied time and space to save yourself. And not only that, you gave yourself a future to look forward to. Because who wouldn't want to turn out to be like you?"
It was Tails's turn to roll his eyes, though it was his own chuckle that betrayed him. "That's what I told me."
"And wiser words were never spoken," Sonic assured him as he gave his knee a firm pat.
"I dunno. Could make a case for the consequences of rewriting timelines and creating unsustainable permutations of past and future events." Tails grinned.
"Now you’re just being smart," Sonic snorted.
"Well, I am a genius." Tails bumped his shoulder to Sonics. "But I also learned from the best. Even eleven-year-old me picked up on that."
"Well, he's a genius, too. He knows what's up." Sonic slung his arm around Tails’s shoulder, this time his turn to watch as his brother picked up the video game controller to continue where Sonic left off.
He let him, taking his turn to be content as he watched Tails figure out the game faster than he did and go farther than Sonic could. They said nothing for a few minutes, Tails working out the rest of his pent up feelings through the game while Sonic quietly processed what he'd just been told. He wasn't a stranger to time travel, not by a long shot, but even so, it wasn't what he thought the answer to that day had been. As much faith he had in his best friend, his self-sacrificial tendencies were something he couldn't help but take notice of. After all, he'd learned from the best, hadn't he?
But it wasn't with bitterness or disdain when he set his gaze on the teen beside him. That wasn't possible; not when he saw every age at once. Not when he was in absolute awe of how far his kid had come.
"Tails."
"Sonic," Tails answered instinctively, matching his tone with the hint of a crooked smile.
"Thanks for saving him."
Tails blinked and paused the game so he could look at Sonic. In the light from the television screen, green eyes glimmered with a depth that took him back to a younger version of his big bro, who was trying to do everything in his power to be there for him. Because he wanted to be. Because he needed to be.
One tail curled around Sonic's back and draped over his lap, giving back the same reassurance he always gave so freely.
"Anytime, big bro."
#manynerdthings#don't know if this is anything like how you envision - but the idea possessed me and I wanted to try and see how it'd go!#love an excuse to make sonic suffer~#sorry not sorry sonic#sonic the hedgehog#miles tails prower#sonic and tails#they're brothers your honor#unbreakable bond#sonic fanfiction#the picket fence timeline#skimmilk stories#super sonic#hurt/comfort#light angst#brothers bonding#brotherly love#found family#time travel#long post#wholesome sonic and tails wednesday#because it's wednesday and I'm feeling wholesome in this chili's tonight#~4500 words#this thing's almost as long as the original wtf happened
193 notes
·
View notes
Text
Increased Original Resin Cap and Optimized Artifact Custom Configurations | Developers Discussion 05/22/2024
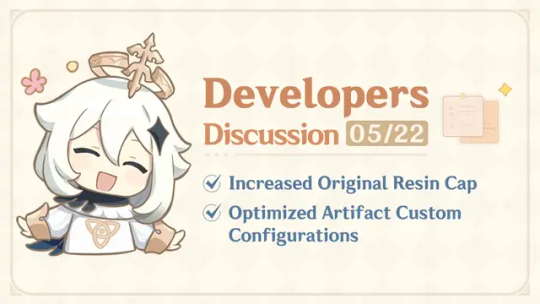
Dear Traveler,
The latest Developers Discussion has arrived~ Today, we'll be introducing the optimizations that will be released in Version 4.7. To improve your gaming experience, we've raised multiple caps and updated existing systems. Let's check them out!
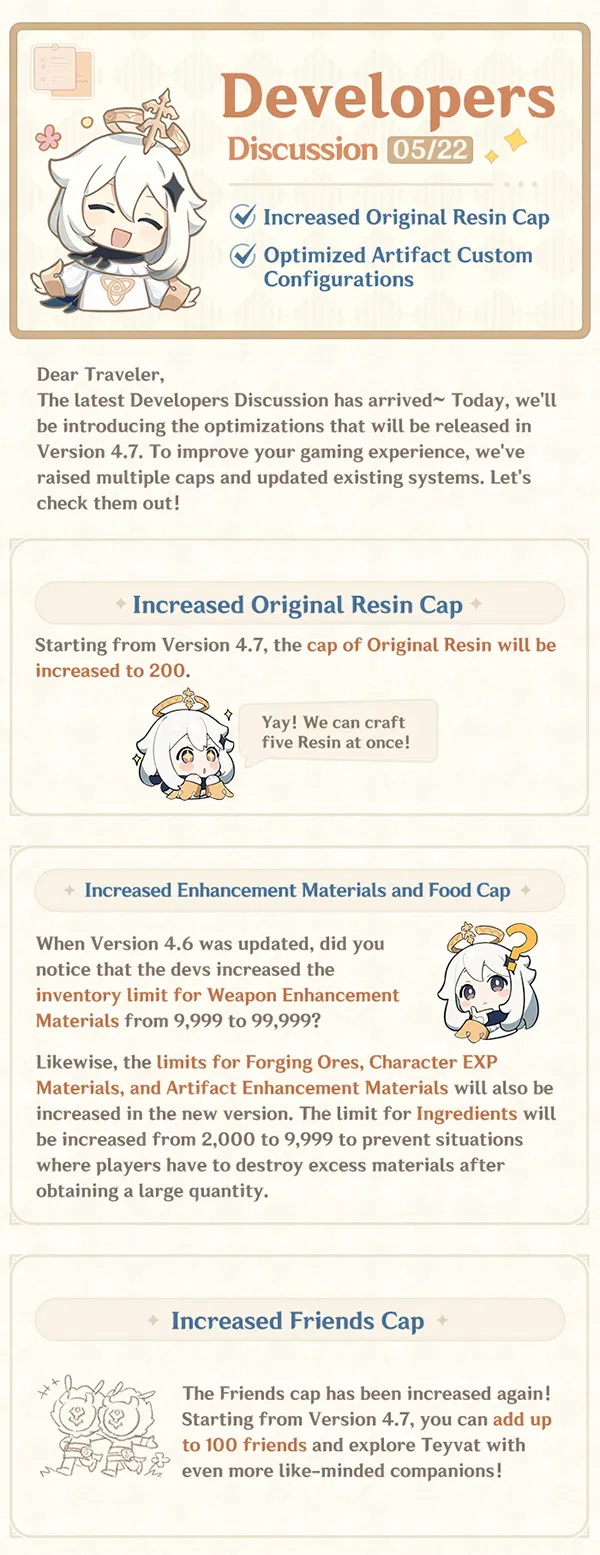

#genshin impact#genshin impact updates#genshin impact news#official#developers discussion#rejoice‚ people who have time and energy to grind frequently!
422 notes
·
View notes
Text
How To Find Cool Games: On Itch.io!
As I drift into a reduced posting schedule, I figured I’d give everyone a peek behind the screen for how I cultivate ttrpgs for recommendations! Some of these tips might even help you find your next favourite game.
This is a long read so let's put most of this beast under a read-more. Keep in mind that many of these strategies work best when you're checking itch.io a little bit every week, and when you're engaging with the platform as more than just a store page. There's a lot of features that you can choose to engage with if you want to find the game for you!


browsing physical game recent releases. This helps me see what’s new and happening, and it helps with a number of things. First of all, I get to see new games pretty much every time I browse recent releases. Secondly, I get a good sense of what’s currently popular in the design space. Thanks to my weekly browsing, I recognize Cy_Borg, Shadowdark and Mausritter as games whose content shows up rather regularly - if you see a lot of products attached to one game at once, that’s a good sign that there’s a related game jam going on (in this case, Shadowdark), or that a game is really resonating with its player base.


sorting games into collections. I personally organize by genre, system, player configuration and (in Games That Intrigue Me) games that I’m personally really hyped about. This works for me because of the nature of my work, but a few collections sorted according to level of interest or game style might work better for you.
Depending on the need, I might have a collection that works specifically for the request - Neon Lights & Cyber Nights is perfect for cyberpunk games, but I might also reference this folder for combat, inventory mechanics, resistance themes, or interesting tech rules. LUMEN is great for folks who want fast-paced games, folks who are looking for certain kinds of video games, or folks who want to feel powerful. If you follow other people on Itch, you'll probably also be able to see their collections, which is a great place to browse.


searching game tags. I don’t typically use the regular search feature, although recently the website did update the toggles to restrict your results to physical games, video games, etc. Instead what I usually do is type what I’m looking for into the url: so in this case, [deck-building]. I might use a couple different wordings, such as [deck-builder] and [deckbuilding] (no spaces). You’re not going to find everything that includes the thing you’re looking for, but you’ll definitely find places to start.


Game Jams! I find these either by looking at the “Jams” tab (although you'll have to wade through video games here) or by noticing that a number of games being published recently have the “for the _” jam in the description. Alternatively, I might be reading the page for a game and see the little “Submission” badge in interaction buttons. There’s game jams for specific systems, game jams for various themes, game jams with special restrictions, and game jams that are titled things like “finish your damn game jam.”


Bundles. I typically buy big-ass bundles and then sort through the games in my downtime. These games are sorted into collections for future reference, and if a game really pops out - into the Intrigue Me folder it goes! And the best part is that I already own it, so if I want to learn more, I can just download it and start reading.


following game designers that I like. This way I’ll get notifications if they release a new game, update an old game, rate someone else’s game, or sort games into their own collections. I also get to see what other folks in the space are excited about - on the day I was browsing, Plasmodics by Will Jobst was really hot.
If you follow me on Itch, you’ll get a notification every time I add a game to one of my non-private folders! Also - you can interact with designers on Itch by liking their updates, and even commenting on their posts, which is a great way to get involved in the design community - and also just make a designer’s day!
#how to#tabletop games#indie ttrpgs#itch.io#mint speaks#I don't think I can over-emphasize how much you can contribute to the game scene#simply by leaving a comment on a game or an update post#interaction on an itch page indicates that there's interest#which motivates designers to design#it tells us that our game is resonating with someone
300 notes
·
View notes
Text


A Galaxy Within II 24 x 18 inches, Oil on Panel, 2022 We are each a little galaxy of our own. It's a mind-bending exercise trying to comprehend the 100 billion stars found in a typical galaxy. Yet, each of us has roughly the same number of neurons in our own brain, performing a symphony of consciousness. We are a staggeringly complex and unique collection of natural components, come together for a short, precious moment.
If you’re disappointed by the realization that we are “just” collections of atoms, then you may want to consider more deeply the unfathomable multitude of those atoms, how intricately organized they are to facilitate life, and the oceans of time it took for evolution to shape them into that configuration. The average human body is comprised of more atoms than there are stars, not just in our galaxy, but in the visible universe. These 7 octillion atoms are arrayed in astonishing complexity to create 500 trillion cells of numerous types, each with its own suite of exquisite molecular machines, precisely folded proteins, and ordered genetic code. It’s hard to comprehend how long it took for this intricate system to evolve. If that time were the Atlantic ocean at it’s narrowest crossing, then all of human history would represent the first 13 feet from the shore. Just to get back to the point where our ancestor was some kind of fish is roughly 185 million generations that had to survive and pass on their genes so that you could experience this world, with all its heartache, and its wonder. I highly recommend checking out the animations of Drew Berry and WEHI to help visualize the amazing molecular processes happening inside you at all times. https://youtu.be/WFCvkkDSfIU?si=ImQQrt3gaca3ELLF&t=113 Prints: https://robrey.storenvy.com
85 notes
·
View notes
Text

Welcome back, coding enthusiasts! Today we'll talk about Git & Github , the must-know duo for any modern developer. Whether you're just starting out or need a refresher, this guide will walk you through everything from setup to intermediate-level use. Let’s jump in!
What is Git?
Git is a version control system. It helps you as a developer:
Track changes in your codebase, so if anything breaks, you can go back to a previous version. (Trust me, this happens more often than you’d think!)
Collaborate with others : whether you're working on a team project or contributing to an open-source repo, Git helps manage multiple versions of a project.
In short, Git allows you to work smarter, not harder. Developers who aren't familiar with the basics of Git? Let’s just say they’re missing a key tool in their toolkit.
What is Github ?
GitHub is a web-based platform that uses Git for version control and collaboration. It provides an interface to manage your repositories, track bugs, request new features, and much more. Think of it as a place where your Git repositories live, and where real teamwork happens. You can collaborate, share your code, and contribute to other projects, all while keeping everything well-organized.
Git & Github : not the same thing !
Git is the tool you use to create repositories and manage code on your local machine while GitHub is the platform where you host those repositories and collaborate with others. You can also host Git repositories on other platforms like GitLab and BitBucket, but GitHub is the most popular.
Installing Git (Windows, Linux, and macOS Users)
You can go ahead and download Git for your platform from (git-scm.com)
Using Git
You can use Git either through the command line (Terminal) or through a GUI. However, as a developer, it’s highly recommended to learn the terminal approach. Why? Because it’s more efficient, and understanding the commands will give you a better grasp of how Git works under the hood.
GitWorkflow
Git operates in several key areas:
Working directory (on your local machine)
Staging area (where changes are prepared to be committed)
Local repository (stored in the hidden .git directory in your project)
Remote repository (the version of the project stored on GitHub or other hosting platforms)
Let’s look at the basic commands that move code between these areas:
git init: Initializes a Git repository in your project directory, creating the .git folder.
git add: Adds your files to the staging area, where they’re prepared for committing.
git commit: Commits your staged files to your local repository.
git log: Shows the history of commits.
git push: Pushes your changes to the remote repository (like GitHub).
git pull: Pulls changes from the remote repository into your working directory.
git clone: Clones a remote repository to your local machine, maintaining the connection to the remote repo.
Branching and merging
When working in a team, it’s important to never mess up the main branch (often called master or main). This is the core of your project, and it's essential to keep it stable.
To do this, we branch out for new features or bug fixes. This way, you can make changes without affecting the main project until you’re ready to merge. Only merge your work back into the main branch once you're confident that it’s ready to go.
Getting Started: From Installation to Intermediate
Now, let’s go step-by-step through the process of using Git and GitHub from installation to pushing your first project.
Configuring Git
After installing Git, you’ll need to tell Git your name and email. This helps Git keep track of who made each change. To do this, run:

Master vs. Main Branch
By default, Git used to name the default branch master, but GitHub switched it to main for inclusivity reasons. To avoid confusion, check your default branch:

Pushing Changes to GitHub
Let’s go through an example of pushing your changes to GitHub.
First, initialize Git in your project directory:

Then to get the ‘untracked files’ , the files that we haven’t added yet to our staging area , we run the command

Now that you’ve guessed it we’re gonna run the git add command , you can add your files individually by running git add name or all at once like I did here

And finally it's time to commit our file to the local repository

Now, create a new repository on GitHub (it’s easy , just follow these instructions along with me)
Assuming you already created your github account you’ll go to this link and change username by your actual username : https://github.com/username?tab=repositories , then follow these instructions :


You can add a name and choose wether you repo can be public or private for now and forget about everything else for now.

Once your repository created on github , you’ll get this :

As you might’ve noticed, we’ve already run all these commands , all what’s left for us to do is to push our files from our local repository to our remote repository , so let’s go ahead and do that

And just like this we have successfully pushed our files to the remote repository
Here, you can see the default branch main, the total number of branches, your latest commit message along with how long ago it was made, and the number of commits you've made on that branch.

Now what is a Readme file ?
A README file is a markdown file where you can add any relevant information about your code or the specific functionality in a particular branch—since each branch can have its own README.
It also serves as a guide for anyone who clones your repository, showing them exactly how to use it.
You can add a README from this button:

Or, you can create it using a command and push it manually:

But for the sake of demonstrating how to pull content from a remote repository, we’re going with the first option:

Once that’s done, it gets added to the repository just like any other file—with a commit message and timestamp.
However, the README file isn’t on my local machine yet, so I’ll run the git pull command:

Now everything is up to date. And this is just the tiniest example of how you can pull content from your remote repository.
What is .gitignore file ?
Sometimes, you don’t want to push everything to GitHub—especially sensitive files like environment variables or API keys. These shouldn’t be shared publicly. In fact, GitHub might even send you a warning email if you do:

To avoid this, you should create a .gitignore file, like this:

Any file listed in .gitignore will not be pushed to GitHub. So you’re all set!
Cloning
When you want to copy a GitHub repository to your local machine (aka "clone" it), you have two main options:
Clone using HTTPS: This is the most straightforward method. You just copy the HTTPS link from GitHub and run:

It's simple, doesn’t require extra setup, and works well for most users. But each time you push or pull, GitHub may ask for your username and password (or personal access token if you've enabled 2FA).
But if you wanna clone using ssh , you’ll need to know a bit more about ssh keys , so let’s talk about that.
Clone using SSH (Secure Shell): This method uses SSH keys for authentication. Once set up, it’s more secure and doesn't prompt you for credentials every time. Here's how it works:
So what is an SSH key, actually?
Think of SSH keys as a digital handshake between your computer and GitHub.
Your computer generates a key pair:
A private key (stored safely on your machine)
A public key (shared with GitHub)
When you try to access GitHub via SSH, GitHub checks if the public key you've registered matches the private key on your machine.
If they match, you're in — no password prompts needed.
Steps to set up SSH with GitHub:
Generate your SSH key:

2. Start the SSH agent and add your key:

3. Copy your public key:

Then copy the output to your clipboard.
Add it to your GitHub account:
Go to GitHub → Settings → SSH and GPG keys
Click New SSH key
Paste your public key and save.
5. Now you'll be able to clone using SSH like this:

From now on, any interaction with GitHub over SSH will just work — no password typing, just smooth encrypted magic.
And there you have it ! Until next time — happy coding, and may your merges always be conflict-free! ✨👩💻👨💻
#code#codeblr#css#html#javascript#java development company#python#studyblr#progblr#programming#comp sci#web design#web developers#web development#website design#webdev#website#tech#html css#learn to code#github
91 notes
·
View notes
Text
FOUR OR MORE 2024 FICATHON

[Image description: A polyam flag with the words “four or more fic-a-thon” on it. End description.]
AO3 COLLECTION
[CLOSED] THIS EVENT HAS FINISHED. WE ARE NO LONGER TAKING PROMPTS BUT OUR COLLECTION WILL REMAIN OPEN FOR LATE ENTRIES.
It is here! The inaugural event for FOUR OR MORE is live. A ficathon designed to get more fic featuring relationships with four or more people out into the world! Inspired by the Rarest of Rairpairs ficathon, this first event will run from August 15th to October 20th.
GUIDELINES
- Any medium! Any rating! As long as your work focuses on a relationship with 4 or more people, it's allowed! - No minimum or maximum but fills must be complete. - You don’t have to fill something to leave a prompt. The more prompts, the merrier! - Prompts must be for relationships featuring 4 or more people. - You may link to the fill if it is posted elsewhere. Warnings are not mandatory, but you're free to include them if you wish to do so. - You may combine these with other events, as long as the other event allows it. - Small fandoms welcome! - Don't forget to comply with the community guidelines.
Prompts can be found in the comments of the official DW announcement.
FAQ
Q: What kind of works am I allowed to submit? A: All type of fanworks are welcome! Fics, art, podfic, meta, you name it. As long as the main relationship features 4 or more people, it's allowed.
Q: I don't have a Dreamwidth account. Can I join? A: Of course! You don't even need an AO3 account if you wish to post only on tumblr.
Q: My work contains [INSERT WARNING HERE]. Can I still participate? A: Yes. This is a CNTW (Choose Not To Warn) space. Feel free to tag us in your posts #fourormore or @/fourormore and we will reblog your post.
Q: I don't want to see [X] content, can you please remove it? A: No. The only content that will be removed will be that that does not comply with the rules. You can ask us to tag a certain topic for blacklisting purposes and you are more than encouraged to do so, but remember that you can always unfollow if some content upsets you.
RULES
ALL works must feature a relationship with 4 or more people as its focus. All configurations are allowed.
NO LIST
The following posts/comments will be removed from the collection, as they're outside of its scope. - Monogamous relationships (I think this is obvious) - Works that focus on OT3s (may I suggest sharing it with @polyamships instead? - RPF featuring non-famous minors (I will not be checking this because I simply do not have the time, so it'll be on the honor system. Please don't abuse the honor system. I don't want to be removing works just because)
#OT4#polyshipping#polyships#poly shipping#polyamships#polyam ships#polyam shipping#polyamorous ships#polyamory#OT5#OT6#OT8#writing event#fandom event#ficathon#admin post#fourormore
152 notes
·
View notes
Text
BG3 Photomode Tutorial #2.5: More Scene Manipulation
Chapter 0: Overview
Chapter 1: Script Extender Debug Console
Chapter 2: Scene Manipulation
Chapter 2.5: More Scene Manipulation
Chapter 3: Otis_Inf Camera Tools
Supplement: Mods and Resources
In continuing from the last tutorial, I wanted to talk about how you find and play cutscenes. There's a couple ways to do this but I will show you my way because I think it is the most thorough way if you need to figure out what flags you may need to edit in order to get this working. It'll also give you the tools you need to troubleshoot flag settings.

In the above screenshot, you can see a cutscene that is meant to be played in the Shadowcursed lands: The cutscene where you play the Lyre to summon Kar'niss. It is a complex scene with tags to resolve and multiple NPCs - some of which aren't humanoid.
I will show you how to find a scene based on a snippet of dialog, how to locate its name and UUID so you can plug it into this command:
Osi.QRY_StartDialogCustom_Fixed("SCL_Drider_Caravan_HalfOrcCaster_865adfae-1b72-1ed2-f961-d55abd4fb7b1","S_GOB_DrowCommander_25721313-0c15-4935-8176-9f134385451b",Osi.DB_Avatars:Get(nil)[1][1],"S_Player_Gale_ad9af97d-75da-406a-ae13-7071c563f604","S_Player_Astarion_c7c13742-bacd-460a-8f65-f864fe41f255", 1,1,-1,1)
Warning: Please keep in mind, this is still a very finicky process. Again, take it slowly. And please don't be afraid to ask for help if you're struggling. Once you get the hang of it, you can pull out scenes and troubleshoot them into playing with ease.
There's also a good chance I'm glossing over something and not explaining it clearly/accurately. Please send me an ask, DM, comment to clarify anything that's confusing!
BG3 Dialog Reader
In order to do this my way, you'll need to download BG3 Dialog Reader and generate HTML files that include all the dialog of the game. There's already a very lovely tutorial on how to do this, so I recommend you follow it. EDIT: Or download their parsed files from their Google Drive: BG3 - parsed dialogue (1.7).zip
You've probably seen posts in this format before:

So you should now have HTML files located somewhere on your system. You need to search for a line that you'll find in the cutscene you want. Now you need to ask yourself: What line can I search for that is unique to that cutscene so that if I search for it I will get exactly what I'm looking for?
In the Drider-Lyre scene I recall an NPC asking "Did you bring the lyre?" so that's what I searched for. I use the Everything search tool because it's awesome and search for the file like so:

You will need to take a look at this file later, but for now, just take note of the name: SCL_Drider_Caravan_HalfOrcCaster. This is the first half of what you need to complete the first parameter in the command at the beginning. And we are going to use this to find the UUID.
Finding the UUID
To find the UUID, you're going to need another tool. The BG3 Modder's Multitool. Go to their GitHub, look along the right column and click on the link in the Releases section.

After that, click on bg3-modders-multitool.zip to download it. Extract the files to a new folder somewhere handy and run bg3-modders-multitool.exe.
In BG3 Modder's Multitool, click on Configuration and set the bg3.exe location to your Baldur's Gate 3 executable (E:\Program Files (x86)\Steam\steamapps\common\Baldurs Gate 3\bin or something along those lines). The Documents folder should auto-populate but you may want to double check it.

Now click in Search Index. It's going to start a process where it searches through the BG3 files. This can take a while the first time, but will be instant after that.

Once it's complete, you can now take the name of the scene and pop it into the new Index Search window that popped up.

In the results on the left, there will be a lot of files that list it, but I generally look for ones that say Assets\Dialogs\[PAK] and end in _merged.lsf and click on it. Then click Convert & Open.
This should open in Notepad or Notepad++. Now search this file for "SCL_Drider_Caravan_HalfOrcCaster" - keep in mind there can be MULTIPLE results. Note that the first instance you will get is SCL_Drider_Caravan_HalfOrcCaster_AtTower. This is the wrong scene.
You are now looking in the code a couple lines above that string for a value that is an ID type and has a value that's a lot of letters and numbers. This is the UUID.

So you have what you need to create this first parameter. Combine SCL_Drider_Caravan_HalfOrcCaster with the string of letters and numbers separated by an underscore. Like so:
SCL_Drider_Caravan_HalfOrcCaster_865adfae-1b72-1ed2-f961-d55abd4fb7b1
Plugging into the StartDialogCustom Command
Note that this copies straight in to this command in the first parameter:
Osi.QRY_StartDialogCustom_Fixed("SCL_Drider_Caravan_HalfOrcCaster_865adfae-1b72-1ed2-f961-d55abd4fb7b1", "S_GOB_DrowCommander_25721313-0c15-4935-8176-9f134385451b", Osi.DB_Avatars:Get(nil)[1][1], "S_Player_Gale_ad9af97d-75da-406a-ae13-7071c563f604", "S_Player_Astarion_c7c13742-bacd-460a-8f65-f864fe41f255" ,1,1,-1,1)
Now on first glance this looks pretty much like other times I've shown you this command, except note that there's FOUR actors. When a cutscene doesn't play at first (after double checking the UUID), this is very often the reason why. This is the minimum because the roles for the half-orc and Karniss need to be filled. First position is Kansif the Half-Orc, second is Tav, third is Brawler Vez, and fourth is Kar'niss.
Note: Kar'niss CAN be played by a non-Drider NPC - they will float angrily around carrying the lantern. It's hilarious. Try it. Here's when I tried it with my Tav:

Setting and Clearing Flags
Now. Depending on where and when you play this scene, the scene may or may not play or it will quit early. There could be a few reasons for that. The UUID could be wrong, the number of actors could be wrong, or a flag could be set that's not supposed to be set.
Let's have a look at the BG3 Dialog Reader file for this scene to see what flags are in use.

By default you should be able to see checkflags (blue) and setflags (orange). Look at the top of the page for a reminder of what the colors mean. The blue check flags are checking to see if the flag is set or not. If SCL_Drider_HasMet_CaravanFirstTime = False then you have met the drider caravan yet and this line will play. You will notice that after that is the orange SCL_Drider_HasMet_CaravanFirstTime setflag. That means the game will NOW set the flag as you have now met the Caravan for the first time. There may be occasions where you need to change the flags to get a cutscene to play. Here's the good news: There's handy commands for that!
print(GetFlag("flag",Osi.DB_Avatars:Get(nil)[1][1]))
Osi.ClearFlag("flag", Osi.DB_Avatars:Get(nil)[1][1])
Osi.SetFlag("flag",Osi.DB_Avatars:Get(nil)[1][1])
The bad news is you will have to find the UUID for each flag! So we gotta go back into BG3 Modders Multitool and search for the flag SCL_Drider_HasMet_CaravanFirstTime
Thankfully, you'll only get one result and the big string of letters and numbers is the UUID you need.

Now you combine them like you did with the cutscene name and UUID before, separated by an underscore: SCL_Drider_HasMet_CaravanFirstTime_39e94029-84f7-418d-ddce-8947bcbb7688
So let's say the cutscene isn't playing because you're on a save where that scene has already played. Clear the flag on your Tav: Osi.ClearFlag("SCL_Drider_HasMet_CaravanFirstTime_39e94029-84f7-418d-ddce-8947bcbb76", Osi.DB_Avatars:Get(nil)[1][1])
And I think we will leave it at that. I realize this was a LOT to cover. Go through this very slowly. It will take time to understand what is happening here.
And as always, if you have something you're trying to do and you're struggling with the directions, I can try to help! Please send me a DM, Ask, whatever else and I'll gladly help you with whatever you're trying to do.
Thanks for reading and sticking through this so far!
#okay just... if you don't know coding#take a deep breath and tackle this one section at a time - this is a lot#bg3 photomode#bg3 photography#mog's bg3 virtual photography tutorial#bg3#bg3 virtual photography#baldur's gate iii#baldur's gate 3
53 notes
·
View notes