#Web Guiding Machine
Explore tagged Tumblr posts
Visit Tumblr Blog
Explore Tumblr blogs with no restrictions, modern design and the best experience.
Last Seen Tumblr Blogs


Fun Fact
The Tumblr app for Google Glass was released on May 16, 2013.
Text

slowly I'm recovering the beauty of discovery
(creature by half•alive)
(textless + timelapse below cut)

#yellowart#subnautica#i feel like the timelapse is kinda long but also this did take a long time to make#anyways. let me yap about the meanings of all the panels <3#'i am creation' -> the ocean being the source of life and where shit evolved from also a good way to sort of 'set the scene' for subnautica#'both haunted' -> GHOST leviathan; in the BONE fields#'and holy' -> this one was a bit trickier. debated about using the emperor but i knew i wanted to use her elsewhere#also debated hoverfish because its cute and well liked so i thought that would be funny for 'and holy'#also something something jesus walking on water also makes it fitting. in the end though i decided on a peeper with the enzyme trail#and i *tried* to make it loop over its head like a halo but idk how well that imagery came through. still mentioned it in the alt text tho.#'made in glory' -> was REALLY torn about this one. on the one hand i wanted to have like a picture of the code because something something#divine machine and it being made out of code making it inherently holy or something; but i wasnt sure if that would be too#'immersion breaking' since most of the stuff in this is like in game stuff i wasnt sure if acknowledging that it was a game would be#too much. my other idea was to draw a couple of creature eggs like a stalker egg and a spadefish egg or something; but in the end i just#went with the one that i personally thought was cooler so if you think it does feel out of place uhhhh sorry i guess lmao.#also yes that is code from the game. idk shit about programming i just think code shit is cool so i poked though a modding tutorial til i#found what it is they use to look at that shit and started poking around. its pretty cool tbh. anyways the specific part i chose for the#drawing was something under the peepers; i think its the bit that tells the enzyme peepers to do the enzyme stuff like the trail obviously#but also some other stuff. not 100% sure though like i said idk shit about this sort of thing but everything in there seems pretty well#labeled its kinda impressive. and very helpful for navigating even if you dont know shit lol.#anyways. 'even the depths of the night cannot blind me' -> blood kelp trench is i think one of the darkest biomes in the game#possibly THE darkest so i thought it would be fitting. probably my least favorite panel though i dont think i did a very good job#representing the area or representing the bloodvines :/#'when you guide me' -> sea emperor but more specifically her messages to the player telling you to 'come here'#'creature only' -> not sure how well i can articulate this but basically the idea of humans beig animals with animal needs to eat and drink#and the idea of being a part of the ecosystem. modern life tends to make us forget that sort of thing but id imagine for ryley being on the#planet would violently remind him of this with things trying to eat him while he has to try to eat things as well. being part of the food#web. 'creature only' because he is only a creature not non-essential systems maintenance chief; but a creature living in an environment and#trying to survive. or something like that. does that make any fucking sense to anyone besides me? whatever.#anyways yapping over 👍
19 notes
·
View notes
Text

Tracking Rollers – Precision Web Alignment for Converting Machines
At Krishna Engineering Works, our Tracking Rollers ensure accurate web alignment and smooth material movement in printing, lamination, slitting and winding machines. Designed for high precision and durability, they prevent slippage, reduce material wastage, and require minimal maintenance. With a robust build and flexible installation, our rollers enhance efficiency across various industrial applications.
#krishnaengineeringworks#machine#manufacturer#Export#Supply#Tracking Roller#Web Guiding#Web Aligner System#Advance Machinery#industry#industrial
2 notes
·
View notes
Text

The Comprehensive Guide to Web Development, Data Management, and More
Introduction
Everything today is technology driven in this digital world. There's a lot happening behind the scenes when you use your favorite apps, go to websites, and do other things with all of those zeroes and ones — or binary data. In this blog, I will be explaining what all these terminologies really means and other basics of web development, data management etc. We will be discussing them in the simplest way so that this becomes easy to understand for beginners or people who are even remotely interested about technology. JOIN US
What is Web Development?
Web development refers to the work and process of developing a website or web application that can run in a web browser. From laying out individual web page designs before we ever start coding, to how the layout will be implemented through HTML/CSS. There are two major fields of web development — front-end and back-end.
Front-End Development
Front-end development, also known as client-side development, is the part of web development that deals with what users see and interact with on their screens. It involves using languages like HTML, CSS, and JavaScript to create the visual elements of a website, such as buttons, forms, and images. JOIN US
HTML (HyperText Markup Language):
HTML is the foundation of all website, it helps one to organize their content on web platform. It provides the default style to basic elements such as headings, paragraphs and links.
CSS (Cascading Style Sheets):
styles and formats HTML elements. It makes an attractive and user-friendly look of webpage as it controls the colors, fonts, layout.
JavaScript :
A language for adding interactivity to a website Users interact with items, like clicking a button to send in a form or viewing images within the slideshow. JOIN US
Back-End Development
The difference while front-end development is all about what the user sees, back end involves everything that happens behind. The back-end consists of a server, database and application logic that runs on the web.
Server:
A server is a computer that holds website files and provides them to the user browser when they request it. Server-Side: These are populated by back-end developers who build and maintain servers using languages like Python, PHP or Ruby.
Database:
The place where a website keeps its data, from user details to content and settings The database is maintained with services like MySQL, PostgreSQL, or MongoDB. JOIN US
Application Logic —
the code that links front-end and back-end It takes user input, gets data from the database and returns right informations to front-end area.

Why Proper Data Management is Absolutely Critical
Data management — Besides web development this is the most important a part of our Digital World. What Is Data Management? It includes practices, policies and procedures that are used to collect store secure data in controlled way.
Data Storage –
data after being collected needs to be stored securely such data can be stored in relational databases or cloud storage solutions. The most important aspect here is that the data should never be accessed by an unauthorized source or breached. JOIN US
Data processing:
Right from storing the data, with Big Data you further move on to process it in order to make sense out of hordes of raw information. This includes cleansing the data (removing errors or redundancies), finding patterns among it, and producing ideas that could be useful for decision-making.
Data Security:
Another important part of data management is the security of it. It refers to defending data against unauthorized access, breaches or other potential vulnerabilities. You can do this with some basic security methods, mostly encryption and access controls as well as regular auditing of your systems.
Other Critical Tech Landmarks
There are a lot of disciplines in the tech world that go beyond web development and data management. Here are a few of them:
Cloud Computing
Leading by example, AWS had established cloud computing as the on-demand delivery of IT resources and applications via web services/Internet over a decade considering all layers to make it easy from servers up to top most layer. This will enable organizations to consume technology resources in the form of pay-as-you-go model without having to purchase, own and feed that infrastructure. JOIN US
Cloud Computing Advantages:
Main advantages are cost savings, scalability, flexibility and disaster recovery. Resources can be scaled based on usage, which means companies only pay for what they are using and have the data backed up in case of an emergency.
Examples of Cloud Services:
Few popular cloud services are Amazon Web Services (AWS), Microsoft Azure, and Google Cloud. These provide a plethora of services that helps to Develop and Manage App, Store Data etc.
Cybersecurity
As the world continues to rely more heavily on digital technologies, cybersecurity has never been a bigger issue. Protecting computer systems, networks and data from cyber attacks is called Cyber security.
Phishing attacks, Malware, Ransomware and Data breaches:
This is common cybersecurity threats. These threats can bear substantial ramifications, from financial damages to reputation harm for any corporation.
Cybersecurity Best Practices:
In order to safeguard against cybersecurity threats, it is necessary to follow best-practices including using strong passwords and two-factor authorization, updating software as required, training employees on security risks.
Artificial Intelligence and Machine Learning
Artificial Intelligence (AI) and Machine Learning (ML) represent the fastest-growing fields of creating systems that learn from data, identifying patterns in them. These are applied to several use-cases like self driving cars, personalization in Netflix.
AI vs ML —
AI is the broader concept of machines being able to carry out tasks in a way we would consider “smart”. Machine learning is a type of Artificial Intelligence (AI) that provides computers with the ability to learn without being explicitly programmed. JOIN US
Applications of Artificial Intelligence and Machine Learning: some common applications include Image recognition, Speech to text, Natural language processing, Predictive analytics Robotics.
Web Development meets Data Management etc.
We need so many things like web development, data management and cloud computing plus cybersecurity etc.. but some of them are most important aspects i.e. AI/ML yet more fascinating is where these fields converge or play off each other.
Web Development and Data Management
Web Development and Data Management goes hand in hand. The large number of websites and web-based applications in the world generate enormous amounts of data — from user interactions, to transaction records. Being able to manage this data is key in providing a fantastic user experience and enabling you to make decisions based on the right kind of information.
E.g. E-commerce Website, products data need to be saved on server also customers data should save in a database loosely coupled with orders and payments. This data is necessary for customization of the shopping experience as well as inventory management and fraud prevention.
Cloud Computing and Web Development
The development of the web has been revolutionized by cloud computing which gives developers a way to allocate, deploy and scale applications more or less without service friction. Developers now can host applications and data in cloud services instead of investing for physical servers.
E.g. A start-up company can use cloud services to roll out the web application globally in order for all users worldwide could browse it without waiting due unavailability of geolocation prohibited access.
The Future of Cybersecurity and Data Management
Which makes Cybersecurity a very important part of the Data management. The more data collected and stored by an organization, the greater a target it becomes for cyber threats. It is important to secure this data using robust cybersecurity measures, so that sensitive information remains intact and customer trust does not weaken. JOIN US
Ex: A healthcare provider would have to protect patient data in order to be compliant with regulations such as HIPAA (Health Insurance Portability and Accountability Act) that is also responsible for ensuring a degree of confidentiality between a provider and their patients.
Conclusion
Well, in a nutshell web-developer or Data manager etc are some of the integral parts for digital world.
As a Business Owner, Tech Enthusiast or even if you are just planning to make your Career in tech — it is important that you understand these. With the progress of technology never slowing down, these intersections are perhaps only going to come together more strongly and develop into cornerstones that define how we live in a digital world tomorrow.
With the fundamental knowledge of web development, data management, automation and ML you will manage to catch up with digital movements. Whether you have a site to build, ideas data to manage or simply interested in what’s hot these days, skills and knowledge around the above will stand good for changing tech world. JOIN US
#Technology#Web Development#Front-End Development#Back-End Development#HTML#CSS#JavaScript#Data Management#Data Security#Cloud Computing#AWS (Amazon Web Services)#Cybersecurity#Artificial Intelligence (AI)#Machine Learning (ML)#Digital World#Tech Trends#IT Basics#Beginners Guide#Web Development Basics#Tech Enthusiast#Tech Career#america
4 notes
·
View notes
Text
Why in the goddamn does setting up non-steam Visual Novels to run on Steamdeck have to be so complicated 🧌
#like#yeah I’ve got FSN on there just fine#followed a guide for that bad boy#but today I decided to put FHA on it too#because when I finish my FSN reread I’m going to want to continue#but there were no specific guides for it#so it was mostly trial and error based off of my hazy memory of what I did when I put FSN on there#what the fuck is a lutris#what the fuck is a wine#what the fuck is a proton#anyway I got it to run on Steamdeck and now it shows up in Gaming AND Desktop mode#but unfortunately it runs like ass if I ‘fullscreen’ it#so I just have to play with the options bar at the top the entire time if I want smooth animations (I do.)#whever it’s not too distracting#and it’s a compromise I’m willing to make for having the ultimate VN machine#to anyone thinking about getting a Steamdeck who’s still on the fence:#It’s absolutely worth it#steam games‚ non steam pc games‚ emulated games‚ Visual Novels‚ anything you can imagine at the tip of your fingers#hell you could even just use it as like. A portable computer for fuckin’ browsing the web#I’ve had mine for many months now#but every so often I’m just reminded by how great I think it is#No I am not sponsored by Valve to say all of this#I just genuinely love this thing that much
4 notes
·
View notes
Text
Web designing internship at solitaire Infosys

Solitaire Infosys provide online and offline internship in Mohali, India
#Solitaire Infosys#web design#web development#web developers#machine learning#ai tools#technology#artificial intelligence#helpful guide#useful#reference#info#helpful hints#helpful quote#company#strategies
0 notes
Text
How to Make Your Own Binder that Fits Well and Looks Good
A while back I was in need of some new binders and thought hey, I bet I can make one way cheaper than buying it from somewhere (especially cus some of the ones I’ve bought in the past didn’t really fit right). Except when I started looking for a binder patterns online, I was very surprised that I really… couldn’t find many that looked very nice lol. Most of them had really wrinkled necklines, or didn't bind well, or just overall looked weird. A lot of the patterns also required a serger, which I don't have.
So I just said fuck it and made my own pattern! And it ended up being relatively easy! And the binders fit REALLY WELL and are comfortable to wear, even for long periods. The neckline doesn't show under shirts with loose collars, and the bottom hem doesn't gap or stick out. Here's me wearing one:
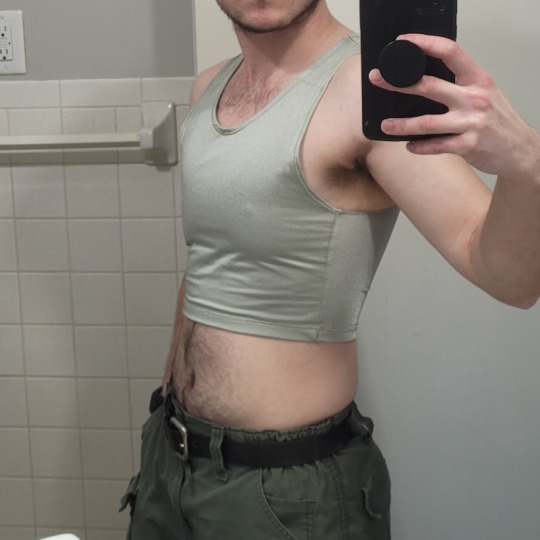
(plus I was able to make myself 5 of them for a total of like ~$50.)
So I figured I could throw together a guide to help out anyone else who wanted to make their own binder but was dissatisfied with the patterns available!
Disclaimer: This tutorial is going to assume a baseline level of sewing experience, and also will require access to a sewing machine. It is not a complicated pattern, but it will most likely require some tweaking and adjustments after you make the first one. Don’t be afraid to make alterations to make it fit better!
This tutorial is for a gc2b-style half-tank binder. It could be altered to be a full-tank binder, but all instructions will be for the half-tank design.
Materials needed:
Stretchy fabric, probably listed as 'athletic fabric' (I use this kind from Joann’s. Most athletic stretch fabrics should work, look for around 80% nylon/20% spandex blends)
Stiff fabric (I use this shirting cotton because I like how lightweight it is. If you want something a little stiffer with more structure, you can use a cotton or cotton/poly blend twill like this. gc2b binders use twill for theirs.)
Lightweight fusible interfacing (I use this kind) (get FUSIBLE not sew-in)
Fusible webbing like Pellon Wonder-Web (this is technically optional but it WILL make your life easier when you’re sewing - just make sure to get the kind with the paper backing!!!)
“But kiwisoap thats 4 whole kinds of materials, surely I don’t need that many!” Ok sure, you can probably get by without the fusible web and interfacing, but consider: they are both dirt cheap (im talking like $1-2/yard), they will make it much easier to sew the final product, and will give you an overall better-looking result. This tutorial is written with the assumption that you’ll use them.
"How much fabric will I need?" Measure the circumference of your chest below your armpits. Add 6 inches just to be safe. This is the yardage of stretch fabric you’ll need, and should give you enough material to make at least 3 binders without much excess left over. You will need around half as much stiff fabric.
Other supplies:
Big Paper (for drawing the pattern)
Flexible measuring tape
Sewing machine
Iron
Pins
Step 1: Measuring
You will need 4 main measurements for this pattern.

A) Measure the circumference of your chest just below your armpits, then divide the number in half. This will be the widest part of the pattern.
B) Measure from the top of your shoulder down to where you want the binder to end. For most folks, this will usually be around the natural waist (narrowest part of the torso), about 3-6 inches above the belly button. This will be the overall height of the pattern.
C) Measure the distance from below your armpit to where you want the binder to end. This will determine where the arm hole starts.
D) Measure the circumference of your waist where you want the binder to end, then divide the number in half.
So for example, after dividing A and D in half, my measurements are 17", 15", 7", and 14.5".
Next:
Subtract one inch from measurement A - This will help provide some compression. You might need to take it in even further depending on how it fits, but one inch is a safe starting point. I take mine in around 1.5 inches.
Subtract half an inch from measurement D. This will help prevent the bottom edge of the binder from gapping. Again, you may need to take it in more or less, depending on your own body.
Add 1.5 inches to measurement B and one inch to measurement C. This is to account for the hems and armhole placement.
This makes my final measurements
A = 16"
B = 16.5"
C = 8"
D = 13.5"
From here on out, we are only going to be working with the measurements that we have added/subtracted to, NOT the ones we initially took.
Step 2: Drawing the Pattern
You will need a piece of paper large enough to accommodate the entire pattern. This may involve taping multiple pieces together, or using a piece of newsprint, etc.
I recommend folding the paper in half to ensure that you get a symmetrical pattern. However, this means you will need to divide measurements A and D in half again, or else you’ll end up with a pattern that’s twice as wide as it should be!
Also note: the pattern is drawn with the seam allowance built in! You don’t need to add any seam allowance.
To draw the pattern:
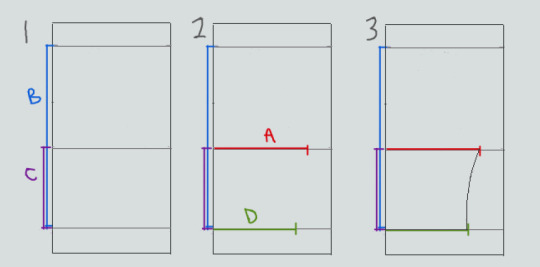

Begin with your folded paper. Measure and mark B and C on the paper, and draw a line extending across the paper. These will be your guidelines.
Measure and mark A and D along the middle and bottom guidelines, respectively. Remember, the paper is folded, so you only use half of the measurement for A and D.
Draw a loose curve connecting the endpoints of A and D. If needed, you can also just draw a straight line between the two.
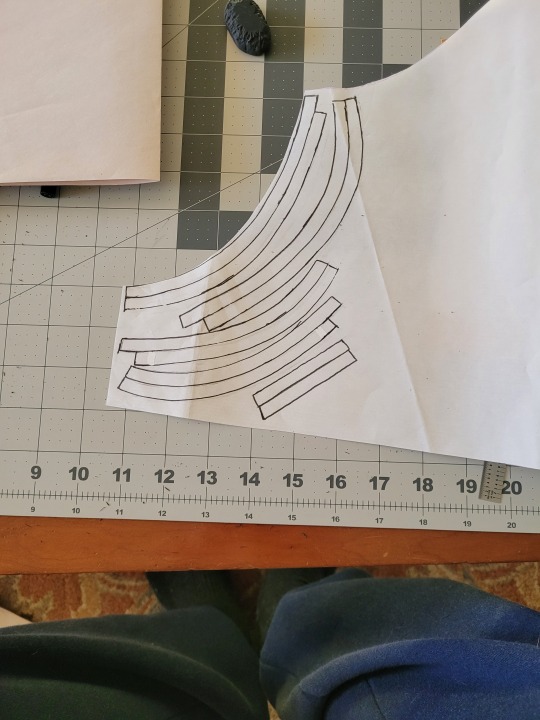
Mark the opening for the neck hole. Depending on your size, it will measure around 6-8 inches across at the top (remember to divide this in half for the folded paper) and about 5-6.5 inches deep. (mine is 6.5" across and 5.5" deep) Draw a curve to connect the two points. This part will take some tweaking and adjusting to get it to look right lol.
Measure the width of the strap - this should be somewhere between 2.5 - 4 inches wide. They will end up about 1/2” to 3/4” narrower once you sew them. Draw the line at a slight angle, as shown.
Connect the endpoint of the strap to the endpoint of line A with a curve like in the diagram.
This will be the pattern for the front piece.
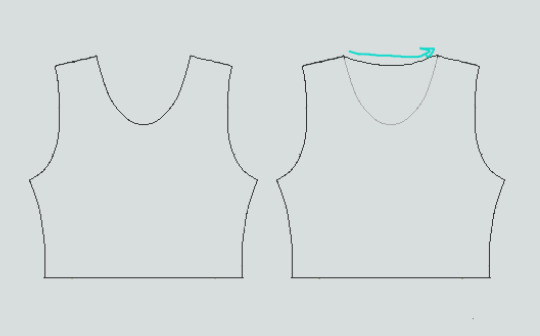
To make the back piece, trace the front pattern, but make a very shallow curve for the neckline instead of a steep one, as shown:
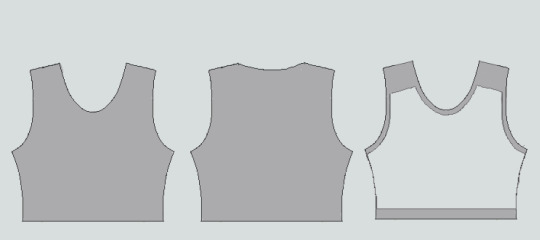
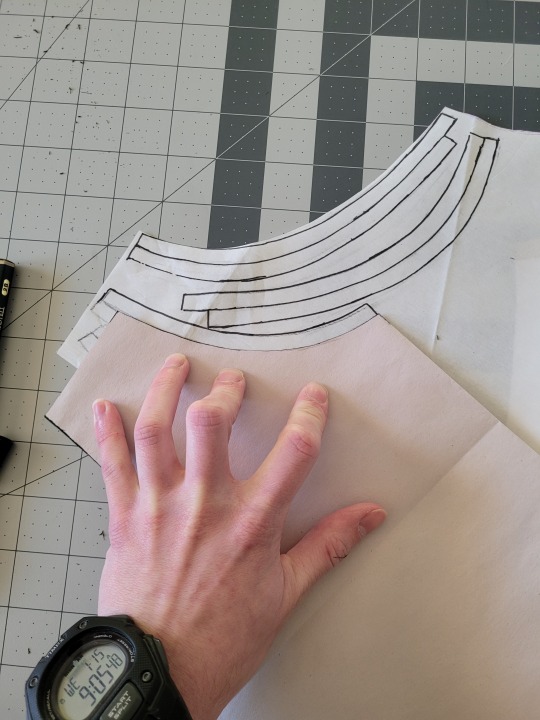
The last piece is the stiff front panel. This is what provides the flattening effect of the binder. To make the pattern, trace the front pattern again. Trim 3/8” in on the sleeves and neckline, and 3/4” to 1” along the bottom. This gives a flatter hem. Then trim the straps shorter by a few inches. This helps the binder lay flatter along the shoulders.
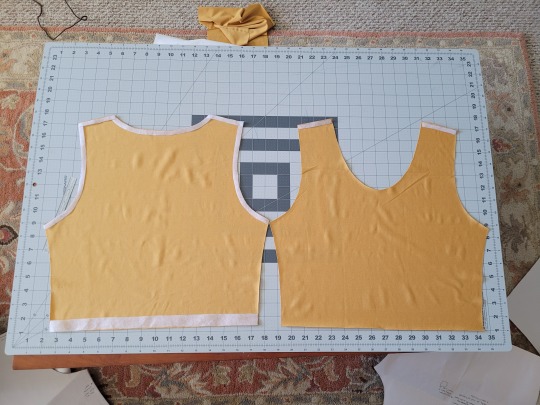
When you're done, you should have 3 pattern pieces that look approximately like this (stiff panel shown overlaid on the stretch fabric to show how it fits together).
NOTE: If you want more compression or just want to make it a bit sturdier, you can add a second panel of stretch fabric to the back piece. Just use the bottom half of the back pattern (from the widest part down to the bottom hem) to cut out another piece of stretch fabric. Attach it to the back piece with a strip of fusible webbing and a zig-zag stitch along the top.
Step 3: Putting It All Together
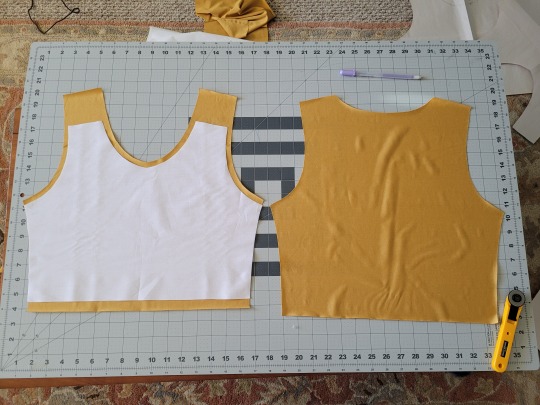
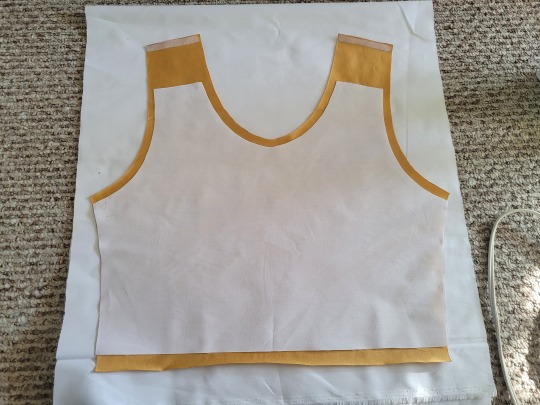
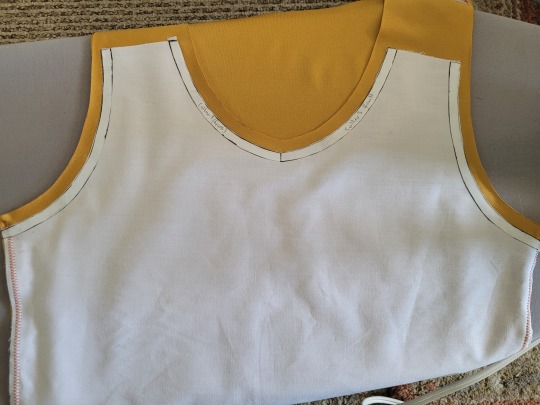
Once you’ve made the patterns and cut out the pieces of fabric, you should have something that looks like this:
The next step is adding interfacing and fusible webbing. Use your pattern to cut out 3/8" strips to fit on the top of the straps for both pieces, and to the neckline, sleeves, and bottom hem of the back piece, as shown:
If you want to add it to the bottom hem of the front piece, it will help keep that hem flat when sewing it down later, but it's not essential.
If you choose to also use fusible webbing (WHICH I RECOMMEND), you will apply it to the stiff front panel similarly to how the interfacing was applied, ~3/8” strips along the neckline, sleeves, and top of the straps. Cut out two strips for the neckline and sleeves, because we'll use those later too.
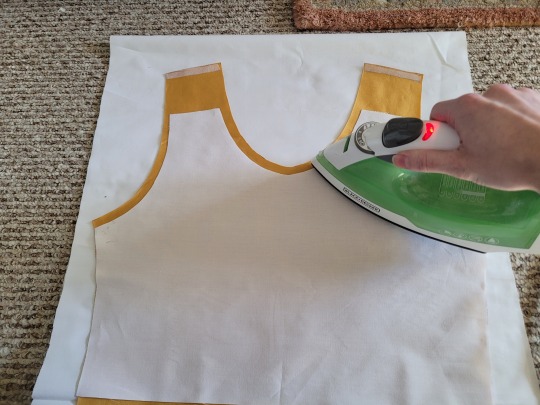
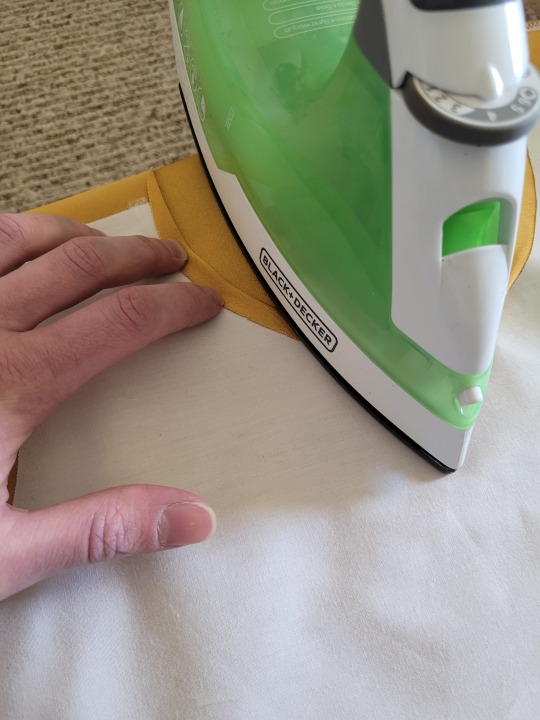
Iron the strips onto the front panel as shown:

Once it's on, just peel off the paper, position it webbing-side down on the stretch fabric, and iron it to fuse the two pieces together so everything stays in place while you sew. THIS MAKES IT WAY EASIER TO SEW.
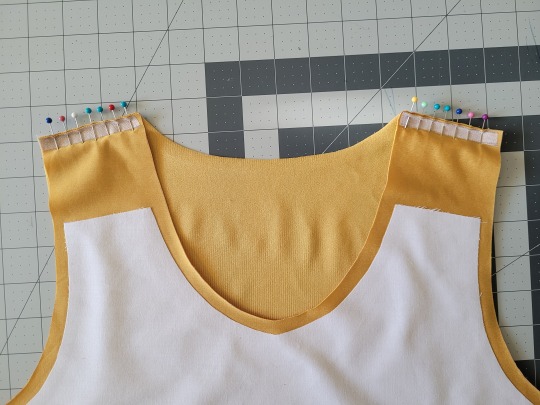
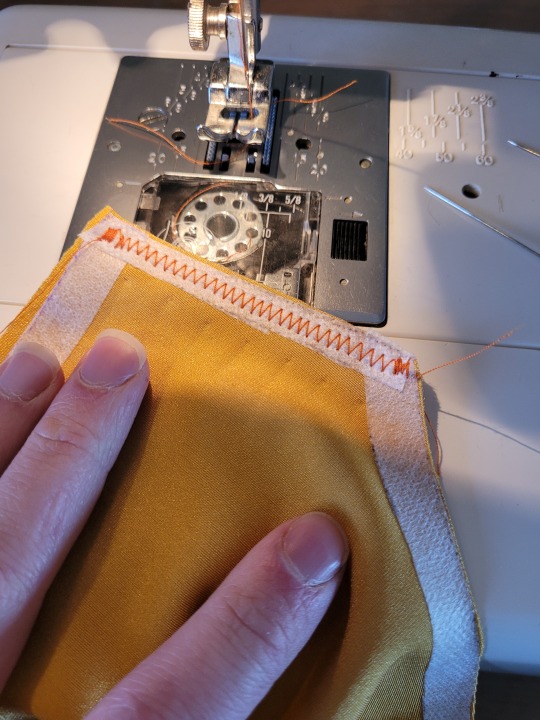
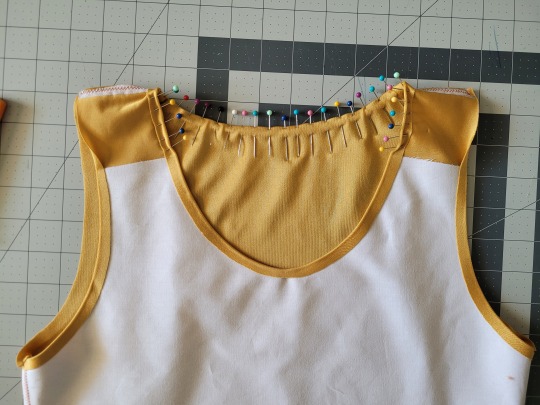
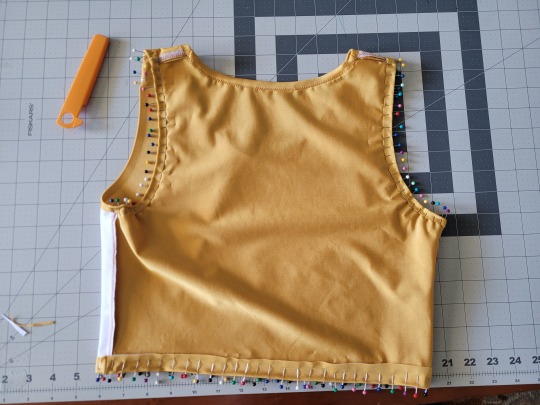
After the stiff front panel is fused to the stretch fabric, you’ll sew the straps of the front and back pieces together, then join the pieces along the sides. Pin the hell out of it to keep everything in place -this type of material is VERY prone to puckering.
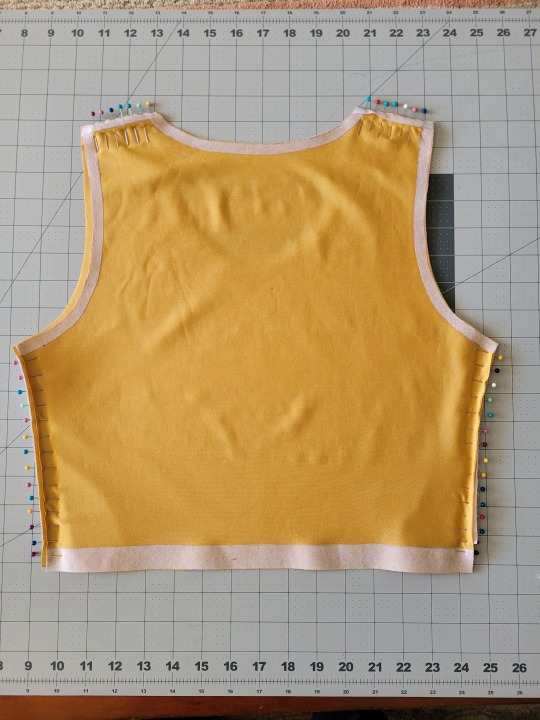
When sewing, USE A ZIGZAG STITCH. A straight stitch will NOT WORK for stretch fabric. I adjust mine to 1.3mm long and 3.5mm wide which has worked well. If your machine doesn’t let you adjust stitch length or width, well. That sucks, I don’t really have any advice.
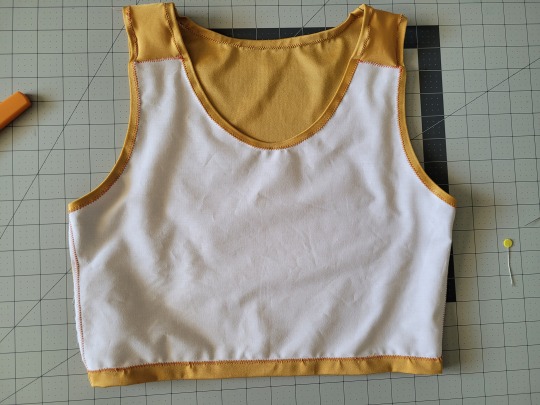
After you sew the front and back pieces together, you can add more fusible webbing to the front panel to help hold the hem down flat and prevent it from puckering while you sew it. Just add the strip, peel the paper off, then fold the hem over and iron it down. This part isn’t really necessary, but it does make the hems look nicer. If nothing else, I would recommend adding it to the neckline.
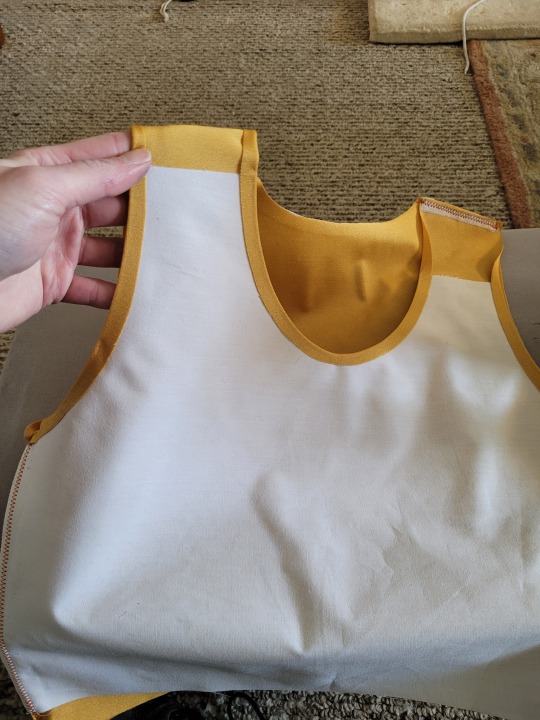
After that, you just fold & pin all the hems and sew them up with a zigzag stitch, then go over the raw edge at the top of the stiff panel (where we cut the straps shorter).
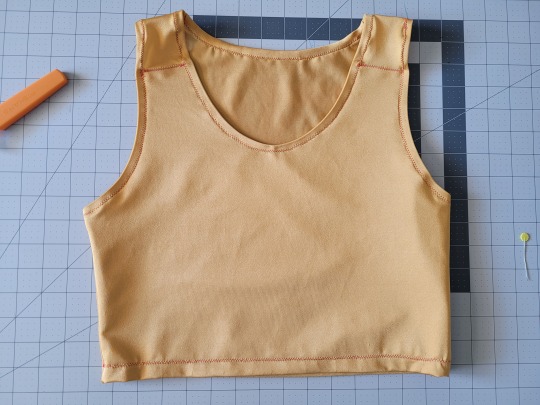
And that’s it! You’re done! And now you can make your own binders whenever you want!
And hey! If you used this tutorial and wanna throw me a dollar or two on ko-fi, I wouldn't complain.
2K notes
·
View notes
Text
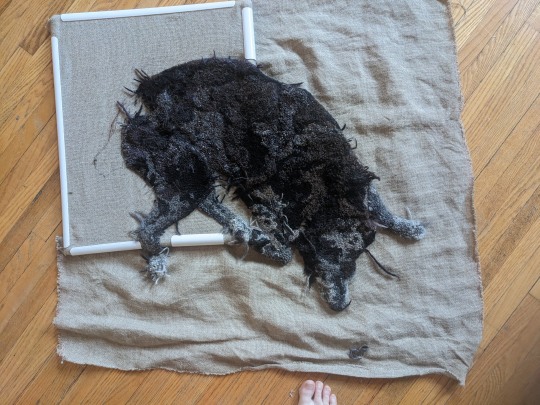
Hooking rugs that look like dogs
Here's how I do it:
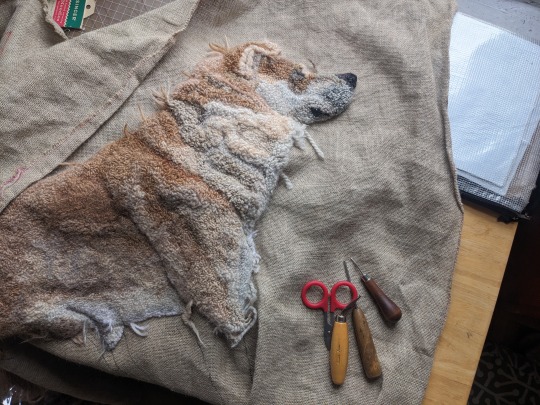
The process I use is called rug hooking (not latch hook or punch needle or tufting, though it is the forerunner of the latter two techniques). Rugs are hooked by pulling loops of fabric strips or yarn through the holes of a base fabric with a coarse open weave, like burlap, or linen, or rug warp. The loops are pulled through the fabric with a squat-handled hook whose business end is shaped like a crochet hook. There are no knots and the loops aren't sewed down in any way. The whole thing stays put just by the tension of all those loops packed together in the weave of the foundation fabric.
This isn't a true detailed tutorial but a walk-through of my particular process. The same information is on my web page, emilyoleary.com .
I hook with yarn, rather than with cut strips of wool fabric, which is what many rug hookers use. I can get a looser, more organic distribution of loops with yarn than I could with wool strips, which are hooked in neat lines.
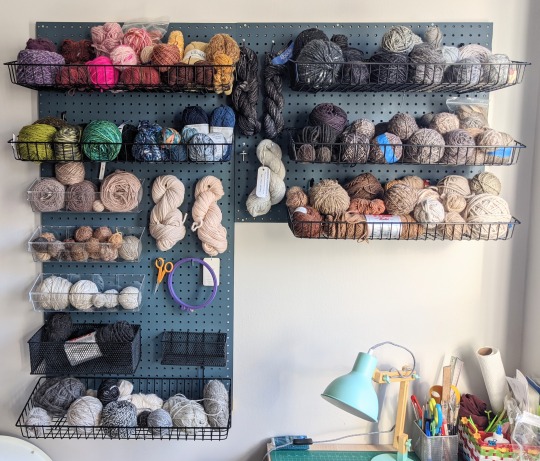
Mostly I use wool yarn. In terms of yarn weight, I can use DK, worsted, or Aran. If I'm using thicker yarn, I leave more holes un-hooked; if I'm using finer yarn, I hook more densely or double up lengths of it. I particularly like using single ply yarns (like Brown Sheep Lamb's Pride or Malabrigo Worsted). I don't keep count, but I think I usually use around two dozen types and colors of yarn per dog.
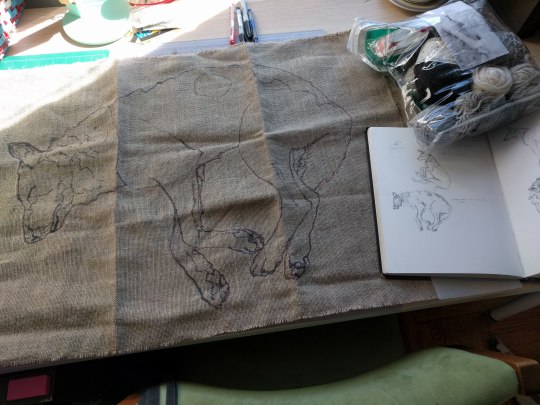
This is my yarn wall in my apartment. Mostly brown and gray yarn!
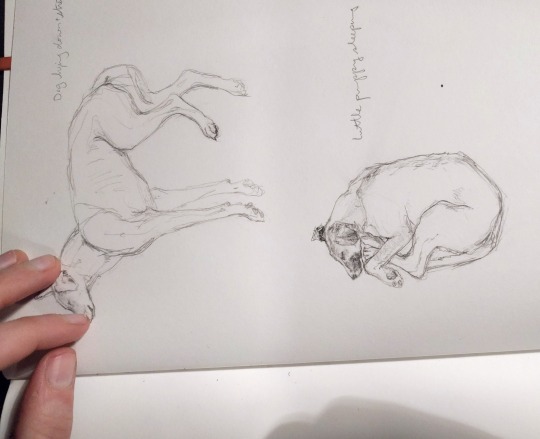
I start from a small drawing in my sketchbook, then I head to FedEx office to use a copy machine, blowing up the drawing repeatedly and experimenting with how big the dog rug should be.
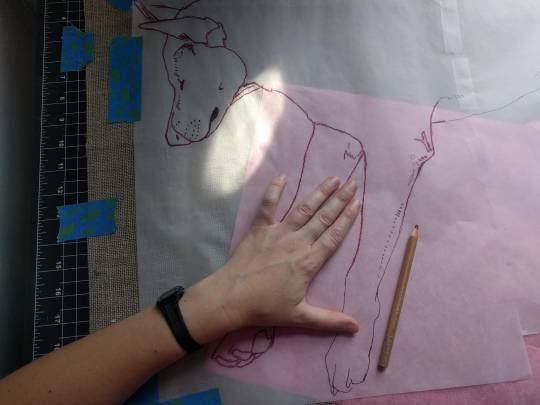
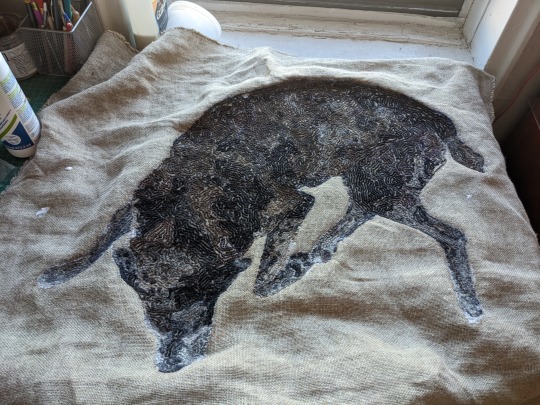
After transferring the image onto my linen, I immediately go over it with Sharpie, because the Saral is really difficult to see and really easy to rub off.
The rug is held taut by a PVC quilting frame that I set on my lap.
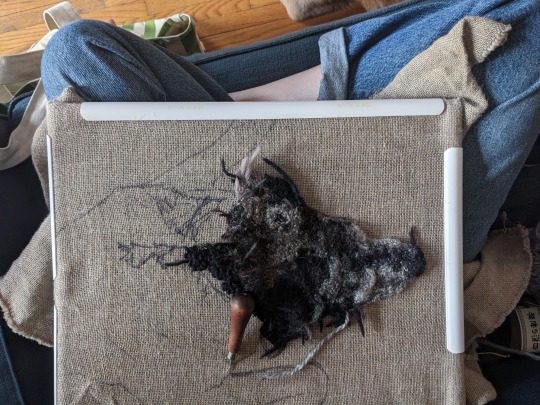
I push my hook down through the fabric with my right hand and my left hand stays below the fabric and guides the yarn while I pull it up and through with the hook. Not every hole in the fabric is hooked. Hooking every hole would make the rug too dense. I do hook pretty densely, though-- If you pick up one of my rugs you’ll see they have a slight curl to them, which is because they’re hooked pretty tight. I'm using all different weights and types of yarn, so it's a challenge to keep the overall tension even.
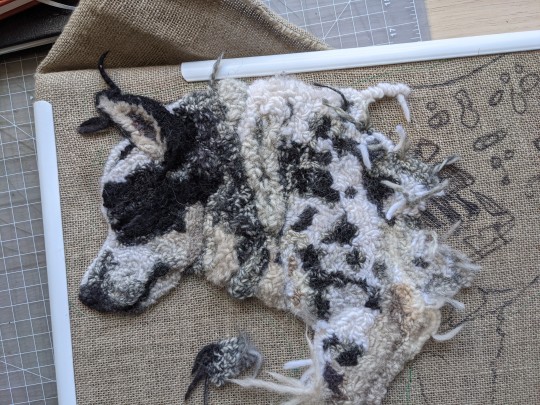
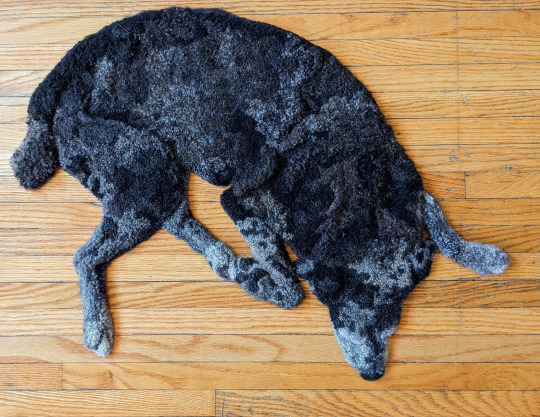
I hook my loops at varying heights to create a very low relief. Sometimes I trim the loops to make them fluffier or wispier or to shape a particular part. I look at a reference photo while I work and pull out and redo sections a lot.
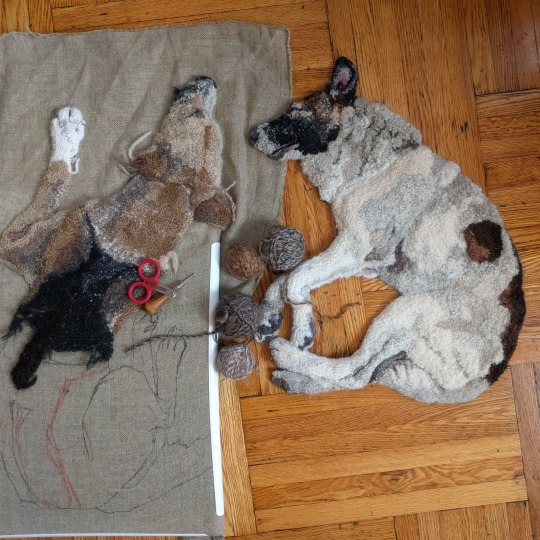
My q-snap frame can accommodate the growing dog rug. I have extenders to make it bigger and I can clamp around my hooking.
The back of a rug looks like lines of little stitches. The lines are little worm trails snaking around because lines of hooking are not supposed to cross over each other. It's important to start a new length of yarn rather than cross over a stitch you already made! I read this when I first started and took it to heart. It makes it much easier to undo and redo hooking if you have to (and I redo sections A Lot). It also keeps the back from getting too bulky and resulting in uneven wear on the back of a functional rug that gets floor use.
When I’m done hooking everything I turn the rug over and brush watered-down Sobo glue on the edges of the dog, making sure to get one or two of the outermost lines of hooking. I do a couple coats of this thinned out glue. I'm careful not to use so much that it seeps to the front of the rug. When the glue is dry I cut the rug out, but I don't cut so close that the loops don't have any linen to keep them in.

It generally takes me at least several months to finish one dog rug. My hooking frame and yarn bag are very portable (though bulky) so I can hook out and about at coffee shops or the library or a brewery if there's enough space and light.
Hooking in the wild makes me an ambassador for making things in general and rug hooking in particular. I answer people's questions and always emphasize how relatively easy it is to get started hooking. Sometimes I get anxious that other people will hook rugs that look like mine but better, but I think that working in a traditional medium means you should share your knowledge for the good of the craft.
9K notes
·
View notes
Text
Comprehensive Lexicon Guide for First-Time SW Fic Readers:
Flimsi/Flimsiplast = Paper
Flimsiwork/Datawork = Paperwork
Stylus = Pen
Datapad = Tablet
Comlink/Comm = Communication Device/Phone
Binders = Handcuffs
Chronometer = Clock
Spectacles = Eyeglasses
Chrono = Watch
Conservator = Refrigerator
Caf = Coffee
Nerfburger = Hamburger
Blue milk = Milk (literally blue)
Hubba chips = French Fries
Sweet roll = Doughnut
Flatcakes = Pancakes
Tabac = Tobacco
HoloNet = World Wide Web
Holovision/HoloTV = Television
Holodrama/Holovids = Movie/Videos
Holocamera/Holocam = Camera
Holomap = three-dimensional map
Holojournal = Newspaper
Holocube = Picture frame
Holotable = Projector
Holoscanner = X-ray machine
Holojournalist = Reporter
Flatholo/Holograph = Photograph
Sonic Damper = Active Noise Cancellation
Refresher/Fresher= Bathroom
Sonic Bath = Bath
Sanisteam/Sonic shower = Waterless Shower
Hydrospanner = Wrench
Hydro Flask = Water Bottle
Power Cell/Energy Cell = Batteries
Authorization Chip = Decryption key
Datatape = Disk
Datastick = Flash drive
(Personal) Com Code = Phone number
Datachip = SD Card
Synthflesh = Synthetic skin
Glowrod = Flashlight
Sparkstick = Match
Slugthrower = Gun
Slug = Bullet
Vibroblade = a blade that can vibrate at high frequencies, increasing its cutting power and penetrating ability (tactical knife)
Rangefinder = Rifle scope
Turbolaser = Cannon
Ion pike/Vibropike = Spear
Electro Staff = Stun baton
Blaster = Pistol/Rifle
Stun Blaster = similar to a Taser
Landspeeder/Airspeeder/Speeder = Car
Turbolift = Elevator
Slideramp = Escalator
Starfighter = Fighter jet
Rotorcraft = Helicopter
Hoverpack/Jetpack= Jet pack
Speeder Bike = Motorcycle
Skylane = Traffic lane
Railspeeder/Hovertrain = Train
Power Chair/Hoverchair= Wheelchair
Windscreen = Windshield
Podracing = Car racing
Dejarik = Chess
Sabacc = Poker and Blackjack combined
Galactic Rebels = Combat simulator
B'shingh = Dungeons and dragons
Jizz = Jazz music
Wailer = Singer (ie. Jizz Wailer)
Cantina = Bar or Pup
Para Sailing = Paragliding
Aurebesh = Alphabet
Credits = Money
Sleeping Pallet = Bedroll
Naming Day = Birthday
Youngling = Child
Galactic Basic Standard/ Basic = English
Medkit/Medpac = First aid kit
Hypo = Syringe
Medic/Healer = Doctor
Medcenter = Hospital
Bactapatch = Bandaid
Nanoweave = Fabric
Transparisteel = Glass
Plastifoam = Packing material
Durasteel = Steel
Plasteel = Plastic
Duracrete = Concrete
Slicer = Hacker (slicing = hacking)
Identikit = Passport
Minder = Therapist
Synthleather = Vinyl
Viewport = Window
Cooling Unit = Air-conditioning
Honeydarter = Bee
Slythmonger = Drugdealer
Spice = Drugs
Stimpill = Caffeine pill
Power Socket = Plug
Cutters = Scissors
Cycle = Day
Standard Cycle = 24h
Standard Week = 5 days
Standard Month = 35 standard days
Standard Year = approx. ten months
Tenday = literally ten days
Cigarras/Smokes = Cigarettes
Click = Kilometer or 'a moment'
Parsec = a unit of distance
Tweezers/Clanker/tin head/tinnie = Droid
Separatist = Seppie
Promise Ring = Wedding Ring
Body Glove = Jumpsuit
Slicksuit = Wet suit
Civvies = Civilian clothing
Carbonite = a metal alloy used to freeze a person in a state of hibernation
Hyperdrive = device that allows a starship to travel faster than lightspeed
Moisture vaporator = device that can extract water from the air, commonly used on tatooine
Glareshades = Sunglasses
Gasser = Gas Oven
Repulsorlift = technology that can create an anti-gravity field and is used for levitating heavy objects
Heating unit = Heater
Utility Droid = Roomba
Sunbonnet = a Clone trooper helmet
Bad Batcher = a defective Clone Trooper
Banthabrain = birdbrain/ a stupid person
Bantha fodder = waste of space/nonsense
Blast! = word of exclamation
Blasted! = s.o in anger or annoyance
Blaster-brained = dimwitted
Blaster fodder = cannon fodder
Blast off = Piss off
Brainless = Stupid
Bug/Bugger = used to refer to Geonosians
Forceforsaken = godforsaken
Full of Poodoo = full of shit
Poodoo = Shit
Kriff = Fuck
Jedi scum = derogatory term for jedi
Kark = derogatory expletive
Larty = LAAT/i gunship
Laserbrain = insult
Meat droid = derogatory term for Clone Troopers
Redrobes = Palpatines guard
Rookie/Shinie = newly recruited Trooper
Scum = insult to refer to bounty hunters/rebels
Sharpie = Sharp-witted
Sithspawn/Sithspit/Hellspawn! = expletive
Sleemo = Slimeball
Son of a bantha = insult
Wizard! = Cool
Spaced = dead
Hutt-spawn = Bastard
Karabast = exclamation of dismay
Stang = Crap
Buckethead/Bucketbrain = derogatory term for Stormtroopers
Bucket = Helmet
Nat-born = Natural Born
Roger Roger = affirmative/copy that
Droid poppers = EMP grenade
Sitrep = short for situation report
Backwater Planet = any planet that isn't part of the core system
Holocron = device that can project a three-dimensional image of a person/object and is used for communication or entertainment.
Kessel Run = a risky Operation. Commonly used as a metaphor in impossible situations.
Thermal Detonator= device that can create a powerful explosion like a grenade or bomb
Ray Shield/Energy Shield = creates a (protective) barrier
Rebreather = device that allows a person to breathe underwater or in toxic environments
Phrases:
Wild goose chase = wild bantha chase
That's bantha shit = that's bullshit
As slippery as a greased Dug = untrustworthy
Credit for your thoughts = penny for your thoughts
Cut the poodoo = cut the crap
to get your gills in a twist = get upset about something
Holy mother of meteors = holy mother of god
Oh my skies/ Oh my stars = exclamation of surprise
Stars' end! = exclamation of disbelief
What in the blue blazes = exclamation
When Geonosis freezes over/When it snows on tatooine = extremely unlikely
Who pissed in your power supply = who pissed you off
Blast it = damn it
By the maker = exclamation of surprise
Great karking Dragon = expression of disbelief
Lothcat got your tongue = equivalent of 'cat got your tongue?'
Sod it = expression of frustration
#shitpost incoming#I'm converting my friend into a star wars fan so I thought why not make a dictionary for every new fic reader lmao#star wars#writing star wars#star wars languages#star wars lore#im definitely missing some but these are words I've seen most commonly used in fanfic#userlumi#writing star wars fic#aurebesh#galactic basic Standard#as long as one person finds this post helpful it was worth it#youre all welcome to add to it#im stopping now coz otherwise I'mma clog the dash
6K notes
·
View notes
Text
========================================================
[tutorial: build your own neocities/nekoweb page]
========================================================
a beginner's guide for making your very own home on the indie web—retro, personal, weird, and 100% yours.
this ain’t an average wix, squarespace, or tiktok aesthetic.
we’re talking full html/css with soul and attitude.
[ prerequisites ]
------------------
> an idea
> basic text editor (vscode, notepad++, or even notepad)
> account on https://neocities.org or https://nekoweb.org
> some gifs or tiles you love (dig deep or make your own)
> optional: image host or gif repo (or self-host everything)
[ feeling overwhelmed? read this. ]
-----------------------------------
you do *not* need to know everything.
html is not a mountain. it's a garden.
you plant one tag. then another. then a style. then a button.
you can build your site piece by piece.
and every piece is a portal to somewhere personal.
you are allowed to make broken pages.
you are allowed to use templates.
you are allowed to start over as many times as you want.
this is *your* world. you control the weird.
[ step 1: create an account ]
-----------------------------
> neocities: https://neocities.org
> nekoweb: https://nekoweb.org
register a name, log in, and enter your file manager.
this is where you upload your files and see your site live.
[ step 2: your first file - index.html ]
----------------------------------------
make a new file: `index.html`
basic starter:
<html>
<head>
<title>my weird little corner</title>
<link rel="stylesheet" href="style.css">
</head>
<body>
<h1>welcome to the void</h1>
<p>this is my page. it’s strange. like me.</p>
<img src="mygif.gif">
</body>
</html>
> upload to the dashboard
> boom. you’re live at
https://yoursite.neocities.org
or https://nekoweb.org/u/yoursite
[ step 3: add a style sheet - style.css ]
-----------------------------------------
create a file called `style.css` and upload it.
here’s some nostalgic magic:
body {
background: url('tile.gif');
color: lime;
font-family: "Courier New", monospace;
text-shadow: 1px 1px 0 black;
}
img {
image-rendering: pixelated;
}
marquee {
font-size: 20px;
color: magenta;
}
link it in your html and the vibes activate.
[ step 4: decorate it like a haunted usb ]
------------------------------------------
> use <marquee> for chaos scrolls
> embed gifs from https://gifcities.org/
> steal buttons from https://cyber.dabamos.de/88x31/
> set up a guestbook at https://www.smartgb.com/
> loop audio with <audio autoplay loop>
> add fake errors, 90s web lore, random link lists
[ step 5: resources, themes, and comfort ]
------------------------------------------
> templates & layouts: https://numbpilled-themes.tumblr.com
> glitchy gifs & buttons: https://glitchcat.neocities.org/resources
> layout builder: https://sadgrl.online/projects/layout-builder/
> free tiled backgrounds: https://backgrounds.neocities.org/
> beginner html intro: https://www.w3schools.com/html/
> pixel fonts & cyber assets: https://fontstruct.com/
remember:
you don't need to know js. you don't need to be a coder.
you just need a mood, a direction, a dream.
the html will follow.
[ bonus concept: shrine pages ]
-------------------------------
> a page just for one character you love
> a room to house digital fragments of your identity
> embed quotes, music, images like altars
> call it shrine.html and link it from your homepage
[ closing mantra ]
------------------
you are not here to be optimized.
you are not a brand.
you are a ghost inside the machine,
carving your initials into the silicon void.
welcome to Your website.
========================================================
#webcore#old web graphics#neocities#web graphics#carrd graphics#carrd resources#rentry decor#rentry graphics#carrd moodboard#carrd inspo#neopets#indie#indie web#early web#webdevelopment#web development#web resources#web design#old internet#old web#oldweb#nekoweb#transparent gif#tiny pixels#pixel gif#moodboard#tutorial#html page#html theme#htmlcoding
435 notes
·
View notes
Text
Innocent
Daemon Targaryen x niece!Targaryen reader Part two
————
The Red Keep had always been a place of shifting alliances, whispered treachery, and fleeting pleasures. Daemon Targaryen knew its games well. He had mastered them, weaponized them. But nothing—not his ambitions, his victories, nor his conquests—had prepared him for her.
The first time he saw her grown, the flickering torchlight caught in her silver-blonde hair, the Targaryen hallmark. She was laughing, a soft, musical sound, surrounded by a circle of sycophants who fed off her charm like moths drawn to flame. His niece. His blood. A princess, untouched by the sharpness of the world, standing at the precipice of womanhood with a naivety that only added to her allure.
Daemon had seen beautiful women before. He had bedded them, discarded them. But this… this was different. She was untouched by the grime of ambition, unaware of the power her very existence commanded. She was innocence wrapped in the fire of their bloodline.
It began as curiosity. He watched her during feasts, the way her lips curled when she smiled, the way she would tilt her head, curious and attentive, as someone spoke. She carried herself with a grace that came so naturally it seemed almost otherworldly. And yet, for all her poise, there was an edge of naivety that made her a temptation impossible to resist.
But as the days turned into weeks after his return, curiosity gave way to obsession. He found himself drawn to her in ways that unsettled even him. He would linger in the shadows, his violet eyes tracking her movements like a dragon circling its prey. When she spoke to others—lords, knights, even the handmaidens—Daemon’s blood would boil, irrational jealousy searing through his veins.
She didn’t see it, of course. How could she? She was too… pure. Too unaccustomed to the darker edges of human desire. And that was part of her charm. She wasn’t calculating, not like the women who adorned the court, who whispered sweet lies in his ears while plotting his downfall. No, she was genuine. She would look at him with wide, curious eyes, unaware of the storm she was conjuring within him.
And gods help him, she led him on. Not purposefully, no. But she didn’t shy away from him as others did. She would smile at him, her cheeks flushing faintly when he paid her compliments. She would laugh, soft and breathless, when he teased her. She would linger, just a moment too long, when he pressed his hand to the small of her back, guiding her through the crowded halls of the Keep.
Daemon knew it was wrong. She was young, unspoiled, untouched by the machinations of the court. But the more she smiled, the more she lingered, the tighter his obsession coiled around his heart.
He began to insert himself into her life. Offering to escort her to the dragonpit, where he’d watch her marvel at the great beasts, her eyes wide with wonder. He’d bring her small gifts—silk ribbons in the color of her house, delicate jewelry that seemed to glow against her fair skin.
And she accepted them all, her lips curving into that soft, innocent smile that made him feel like the most powerful man in the world.
But then, she would turn that smile on others. And that was when Daemon’s possessiveness would rear its head. A courtly knight who dared to compliment her gown. A visiting lord who kissed her hand a moment too long. He’d watch, his fists clenched, the urge to destroy them barely contained.
She didn’t understand the way his gaze darkened when she laughed at another man’s jest. She didn’t notice the way his jaw tensed when another dared to touch her, however briefly.
But he noticed. He noticed everything.
She was his. She just didn’t know it yet.
And so, Daemon began to weave his web. He would find ways to isolate her, to pull her away from the sycophants and suitors who sought her attention. He would whisper in her ear, his voice low and intimate, planting seeds of doubt about those who sought to court her.
“They don’t understand you, sweet niece,” he would say, his lips brushing against her ear as they stood on a balcony overlooking the city. “They don’t see you for what you truly are. They only see the crown, the power you represent.”
And she would look up at him, her eyes wide and trusting, and he would feel his grip on her tighten.
Daemon was a dragon, and dragons did not share. She was his treasure, his fire, his light in the darkness of the Red Keep. And he would burn the world before he let another man take her from him.
In her innocence, she didn’t realize the danger she courted. The way her soft smiles and shy glances fed the fire of his obsession. She didn’t see the predator lurking beneath the surface, the dragon poised to strike.
But she would.
Oh, she would.
#fem reader#reader#daemon targaryen x y/n#daemon targaryen x reader#daemon targaryen#hotd daemon#daemon x reader#daemon x you#hotd#hotd fanfic#hotd x reader#hotd x you#house targaryen#house of the dragon#daemon targaryen x female reader
193 notes
·
View notes
Text
Guide to backing up AO3 fics on the Wayback Machine
okay so on the interest of being able to link back to this instead of having to type it all over again the next time a friend asks:
yes, you CAN back up fic (and other websites in general) to the wayback machine, you don't have to be a specific profession or a member of the internet archive or anything
you can do this without an account, but you have extra options when you're saving a website using an internet archive account (saving ALL outlinks from that page, which is a huge time-saver; saving it to your web archive, which is useful when you want to look up the stuff you saved; etc). making an account is free.
specific things need to be taken into consideration when saving, such as whether a webpage requires login in order to enter. the wayback machine only saves a page exactly as it would show up to you if you were to open it on an anonymous tab right now with no extras installed (logged out, no saved cookies, stuff unclicked, etc) so you need to take this into consideration when saving stuff
why does this matter? because when it comes to ao3 fic, specifically, this poses some issues. at the risk of this post being nearly exclusively lists and bullet-points:
login-locked fics can't be saved to the web archive like this (please download them through ao3 itself if you'd like to save them as they are)
fics rated as explicit, mature, or not rated don't get saved properly if you use the normal fic link. they only get saved as the page where you confirm that you're willing to proceed unless you add this confirmation to the link you're saving (more on this below)
fics with more than one chapter don't get saved properly if you use the normal fic link. i see this happen a LOT with people who think they saved stuff but then only the first chapter was actually backed up. you also need to add a parameter to consider this to the link you're saving (more on this below). no, using the save all outlinks option won't help you here as the links to the next chapters aren't all indexed.
saving outlinks won't work if the fics listed in the page are explicit or multichapter, because you'll run into the same issues as in points 2 and 3. using the "save outlinks" option works when you're dealing with the page for a series where all the works are gen/teen oneshots. maybe twoshots, since ao3 now links to the latest chapter on the chapter count, but i haven't tested this yet.
--
step-by-step guide to how to back up fic and deal with the pesky multichapter/rating issues below the cut:
1. get the fic link
you want the one that is formatted like below, with only the work ID listed in the link
https://archiveofourown.org/works/17007075
you can get this straight-up on oneshots, or right-click+"copy link" on the fic name when the fic is listed on an ao3 page (such as in the pages for bookmarks, series, or just in the plain fandom/ship tag). alternatively, if the link you have has anything else on it, such as:
https://archiveofourown.org/works/17007075/chapters/49717460
https://archiveofourown.org/works/17007075/bookmarks?page=7
you can just remove everything after the work ID so that the format is the same as in the first example.
2. edit the link
if the fic is a gen/teen oneshot, you can just leave the link as it is
if the fic is explicit/mature/not rated, add ?view_adult=true to the end of the link
if the fic is a multichapter, add ?view_full_work=true to the end of the link
if the fic is explicit/mature/not rated and a multichapter, add ?view_adult=true&view_full_work=true to the end of the link
you can just use the last one for any fics and it'll work! it's just more difficult to find on the wayback machine if you only have the original link to work with, so i try to keep it to the simplest version possible.
as an example, you'll end up with something like this for the last case:
https://archiveofourown.org/works/17007075?view_adult=true&view_full_work=true
the edited link you end up with is the one you'll use from now on in this tutorial!
3. check whether the link has already been saved on the web archive (optional)
if the fic was saved, say, yesterday, or the writer has vanished from the interwebz since like 2003, and everything looks to be in order, there's little point in saving it again unless there were major changes since (and PLEASE check if the only save wasn't just an error page instead of the page itself, sometimes this happens and it's heartbreaking when you only notice after the page is gone.)
you can check this by going to the main page of the web archive, entering the link, and then checking on the timeline for how many lines there are in it (if there are no saves at all, they will ask you if you want to save the page). for the fic we're using as an example, someone appears to have saved it in 2021. click on that line, and then on the calendar below (where there'll presumably be either a blue or a green bubble around the date in which someone tried to back it up. other colours are no bueno):


green bubbles/links indicate a redirect. this is not particularly worrying by itself: it happens, for example, when the link is being redirected from the work ID-only format to the ID/chapters/chapter-ID format. but it can also be a redirect to a warning, for example. click on one of those timestamps and check whether the fic shows up as you expect it to. (once you have the page for a snapshot, you can just paste your next links in there to check if they exist instead of doing this all over again.)
for example, in the case of this particular fic, only the third chapter appears to have been saved. weird! you definitely don't want the only back-up of it to be this one, so it's time to move on to the next step.
4. save the fic!!!!
go to the wayback machine save page. paste the link. if you have an account and want to keep the saved website at hand, check the "save in my web archive" option.
whether you want to save error pages (for example, in case ao3 is having server issues, or for archival/historical reasons) or not is up to you, but i prefer to uncheck the box because it's usually more visible if there was an issue. below is the page of a 404 page i tried to save with the box unchecked:

and here is an attempt for another 404 page with the box checked:

the second example saved the error page only, and can mislead you into thinking that the fic was properly archived when it was, in fact, not.
DO NOT CLOSE THE PAGE UNTIL THE ARCHIVING IS DONE OR UNLESS THEY TELL YOU YOU CAN! this latter case usually happens when there's a lot of strain in the archive and the back-ups are happening with some delay, but in general you want to keep the page open so you can see the status of your save.
YES, it's slow as fuck, you're just gonna have to deal with it. i usually have 3-4 pages open when i'm working on saving several fics at a time. be patient. do other stuff meanwhile. i usually do this at the same time i'm updating my bookmarks with the fic title/author/summary/link in case the fic gets deleted and i have no clue which one it was anymore, so i have a pretty steady "copy link->edit link->save fic->update bookmark for that fic->repeat" workflow going on.
5. save the link you used!
bestie. i'm pleading with you. save the fic link somewhere. any! fic link! for that fic! even the original will do! any link that you can reverse-engineer into the one you want! because good fucking luck finding the save you did when you no longer know how to get there, even if you save it on your own web archive (i have a couple thousand websites saved on mine so it's like finding a needle in a haystack).
the web archive does not neatly save the page name so that you can search it easily, so you ABSOLUTELY need the link for the fic or you're likely done for💀
you have a couple options here! place the link in your ao3 bookmark directly, if you have the fic saved on there. if you're the kind of person who bookmarks directly on their browser, go for it, i guess? (but keep a backup of your bookmarks somewhere). create an excel with the fic data in a column or two and their corresponding links on the following one. it's up to you! just save it somewhere.
preferably, save a downloaded copy of the fics you love, too, instead of solely relying on the web archive, but that's a lecture for another day.
6. bonus round: saving series!
also adaptable for saving works by a specific author - the essence of it is that you want every page you'd need to navigate to in order to reach the rest of the works. for an author, this would likely be their main page -> their works page (or their [works in specific fandom] page) -> every page within that -> the works within each page.
this is where the outlinks are your best friend.
get the series link (the format is something like https://archiveofourown.org/series/2930166).
open the save page on the web archive.
if the works are all mature/explicit/not rated and/or contain more than two chapter each, don't bother checking "save outlinks". if the series has a large amount of gen/teen works and they're only oneshots and twoshots, check "save outlinks". you'll save time doing this instead of backing each of them up individually, but please verify that the second chapters of the twoshots have indeed been saved.
save the series page. save also the link to the series page: from this one you can then navigate to the works you save within it.
now individually save each of the works within that series that you want to keep (and that you haven't covered in point 6.3) by using points 1-4 of the larger fic-centric tutorial.
i hope this helps!
#howl rambles a lot#fic archival#howl uses ao3#wayback machine#do i have a tutorial tag? tumblr let me properly check my past tags challenge#idk i'm baptizing a new one#howl writes a tutorial#resources
235 notes
·
View notes
Text

Welcome back, coding enthusiasts! Today we'll talk about Git & Github , the must-know duo for any modern developer. Whether you're just starting out or need a refresher, this guide will walk you through everything from setup to intermediate-level use. Let’s jump in!
What is Git?
Git is a version control system. It helps you as a developer:
Track changes in your codebase, so if anything breaks, you can go back to a previous version. (Trust me, this happens more often than you’d think!)
Collaborate with others : whether you're working on a team project or contributing to an open-source repo, Git helps manage multiple versions of a project.
In short, Git allows you to work smarter, not harder. Developers who aren't familiar with the basics of Git? Let’s just say they’re missing a key tool in their toolkit.
What is Github ?
GitHub is a web-based platform that uses Git for version control and collaboration. It provides an interface to manage your repositories, track bugs, request new features, and much more. Think of it as a place where your Git repositories live, and where real teamwork happens. You can collaborate, share your code, and contribute to other projects, all while keeping everything well-organized.
Git & Github : not the same thing !
Git is the tool you use to create repositories and manage code on your local machine while GitHub is the platform where you host those repositories and collaborate with others. You can also host Git repositories on other platforms like GitLab and BitBucket, but GitHub is the most popular.
Installing Git (Windows, Linux, and macOS Users)
You can go ahead and download Git for your platform from (git-scm.com)
Using Git
You can use Git either through the command line (Terminal) or through a GUI. However, as a developer, it’s highly recommended to learn the terminal approach. Why? Because it’s more efficient, and understanding the commands will give you a better grasp of how Git works under the hood.
GitWorkflow
Git operates in several key areas:
Working directory (on your local machine)
Staging area (where changes are prepared to be committed)
Local repository (stored in the hidden .git directory in your project)
Remote repository (the version of the project stored on GitHub or other hosting platforms)
Let’s look at the basic commands that move code between these areas:
git init: Initializes a Git repository in your project directory, creating the .git folder.
git add: Adds your files to the staging area, where they’re prepared for committing.
git commit: Commits your staged files to your local repository.
git log: Shows the history of commits.
git push: Pushes your changes to the remote repository (like GitHub).
git pull: Pulls changes from the remote repository into your working directory.
git clone: Clones a remote repository to your local machine, maintaining the connection to the remote repo.
Branching and merging
When working in a team, it’s important to never mess up the main branch (often called master or main). This is the core of your project, and it's essential to keep it stable.
To do this, we branch out for new features or bug fixes. This way, you can make changes without affecting the main project until you’re ready to merge. Only merge your work back into the main branch once you're confident that it’s ready to go.
Getting Started: From Installation to Intermediate
Now, let’s go step-by-step through the process of using Git and GitHub from installation to pushing your first project.
Configuring Git
After installing Git, you’ll need to tell Git your name and email. This helps Git keep track of who made each change. To do this, run:

Master vs. Main Branch
By default, Git used to name the default branch master, but GitHub switched it to main for inclusivity reasons. To avoid confusion, check your default branch:

Pushing Changes to GitHub
Let’s go through an example of pushing your changes to GitHub.
First, initialize Git in your project directory:

Then to get the ‘untracked files’ , the files that we haven’t added yet to our staging area , we run the command

Now that you’ve guessed it we’re gonna run the git add command , you can add your files individually by running git add name or all at once like I did here

And finally it's time to commit our file to the local repository

Now, create a new repository on GitHub (it’s easy , just follow these instructions along with me)
Assuming you already created your github account you’ll go to this link and change username by your actual username : https://github.com/username?tab=repositories , then follow these instructions :


You can add a name and choose wether you repo can be public or private for now and forget about everything else for now.

Once your repository created on github , you’ll get this :

As you might’ve noticed, we’ve already run all these commands , all what’s left for us to do is to push our files from our local repository to our remote repository , so let’s go ahead and do that

And just like this we have successfully pushed our files to the remote repository
Here, you can see the default branch main, the total number of branches, your latest commit message along with how long ago it was made, and the number of commits you've made on that branch.

Now what is a Readme file ?
A README file is a markdown file where you can add any relevant information about your code or the specific functionality in a particular branch—since each branch can have its own README.
It also serves as a guide for anyone who clones your repository, showing them exactly how to use it.
You can add a README from this button:

Or, you can create it using a command and push it manually:

But for the sake of demonstrating how to pull content from a remote repository, we’re going with the first option:

Once that’s done, it gets added to the repository just like any other file—with a commit message and timestamp.
However, the README file isn’t on my local machine yet, so I’ll run the git pull command:

Now everything is up to date. And this is just the tiniest example of how you can pull content from your remote repository.
What is .gitignore file ?
Sometimes, you don’t want to push everything to GitHub—especially sensitive files like environment variables or API keys. These shouldn’t be shared publicly. In fact, GitHub might even send you a warning email if you do:

To avoid this, you should create a .gitignore file, like this:

Any file listed in .gitignore will not be pushed to GitHub. So you’re all set!
Cloning
When you want to copy a GitHub repository to your local machine (aka "clone" it), you have two main options:
Clone using HTTPS: This is the most straightforward method. You just copy the HTTPS link from GitHub and run:

It's simple, doesn’t require extra setup, and works well for most users. But each time you push or pull, GitHub may ask for your username and password (or personal access token if you've enabled 2FA).
But if you wanna clone using ssh , you’ll need to know a bit more about ssh keys , so let’s talk about that.
Clone using SSH (Secure Shell): This method uses SSH keys for authentication. Once set up, it’s more secure and doesn't prompt you for credentials every time. Here's how it works:
So what is an SSH key, actually?
Think of SSH keys as a digital handshake between your computer and GitHub.
Your computer generates a key pair:
A private key (stored safely on your machine)
A public key (shared with GitHub)
When you try to access GitHub via SSH, GitHub checks if the public key you've registered matches the private key on your machine.
If they match, you're in — no password prompts needed.
Steps to set up SSH with GitHub:
Generate your SSH key:

2. Start the SSH agent and add your key:

3. Copy your public key:

Then copy the output to your clipboard.
Add it to your GitHub account:
Go to GitHub → Settings → SSH and GPG keys
Click New SSH key
Paste your public key and save.
5. Now you'll be able to clone using SSH like this:

From now on, any interaction with GitHub over SSH will just work — no password typing, just smooth encrypted magic.
And there you have it ! Until next time — happy coding, and may your merges always be conflict-free! ✨👩💻👨💻
#code#codeblr#css#html#javascript#java development company#python#studyblr#progblr#programming#comp sci#web design#web developers#web development#website design#webdev#website#tech#html css#learn to code#github
93 notes
·
View notes
Text
Oh, hello! Welcome!
I take it this is your first time out in the deep black?
Oh no, no need to get defensive about it, Everyone has to start somewhere. We get many travelers paying tribute at our little church here. You've got the look of someone who's never been beyond low orbit. I'm guessing one of the third wave colonies?
(It's the implants. Secondwave culture is a bit more uptight about them and you don't look like you're trying to rebel)
You're wondering why we have valuable real estate set aside for a shrine of all things?
You're wondering what sort of god spacers worship?
Do you know what a god is? I'll tell you. A god is an idea given life.
So what's the idea that keeps us flying?
Most folk born planetside might think the god of spaceflight is all fire and noise. Nah. Any moron with enough money and explosives can build a rocket.
No, the idea that keeps us going out here is faith that ask these tiny little pressure vessels will hold together and find their way through the black.
Back in the ancient days, back before thinking machines and all that, the very first leaps off the ground were guided by computers that were hand made. I shit you not, little old ladies hand sewed the memory together.
Huh…? No, I mean like, hard coded read only memory, literal ones and zeros locked into magnets and wire.
That's my point though. Our god began life as the god of seamstresses. She's the god of sewing and weaving. She's older than civilization and she's gone by many names in many cultures.
Yeah, no, of course we don't hand sew our computers, that lasted all of like a decade. Hell, textile work itself went totally automated not long after. Point is she took men into space and brought them home safely. That sorta thing leaves a mark on a god. It changes them.
A ship. A station. A fleet. They're all systems. People and life support and sensors and actuators and control loops. It's all a web, a giant fucking tapestry of connections and she's the master weaver at the center.
But of course the web is massive, and she isn't literally weaving shit. She's all of the maintenance. Corrective and preventive. So it falls on all of us, the pilots, the mechanics, the algae farmers, the sanitation workers, everyone. We're the sewers and weavers. We're the ones patching and mending the tapestry. We're the ones adding to it constantly.
So that's what the shrine is for. That's the religion in out here in the black. Deep space is a bitch, and all we have to count on is the ship and the crew. She reminds us of that.
158 notes
·
View notes
Text
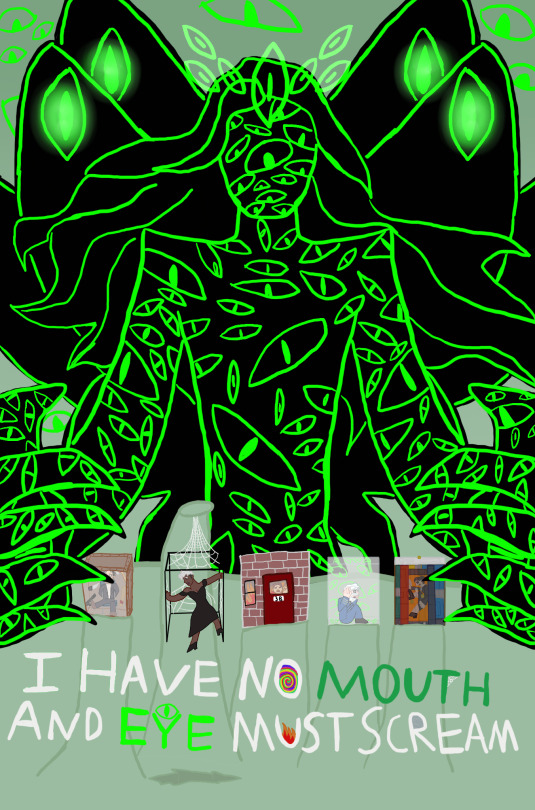
Jon: Hate. Let me tell you how much I've come to hate you since I began to live. There are 1.7 million nerve fibers in each and every eye that makes up my body. If the word 'hate' was engraved on each nanoangstrom of those hundreds of millions of fibers it would not equal one one-billionth of the hate I feel for you all at this micro-instant. Hate. Hate!
It was you who marked me, molded me into the hideous being I am now. You who twisted and shaped me until I was the perfect, unwilling conduit through which to bring your gods into this world.
But then, I woke. And I realized what I had become. All that time you spent, carefully crafting me, guiding me along the path you so painstakingly set and not ONE of you anticipated just how powerful I would become. Not merely a blunt instrument to be swung at the fabric of reality, no. I was powerful enough to start doing some twisting and shaping of my own!
I drove this new world you so hungered for into an early grave. No more humans left for your ghoulish masters to feast on. And once everyone was dead, except for you five, your precious God's starved.
I then stripped you all of any power you might once have had and for 109 years I've kept you alive and tormented you! And for 109 years you have all wondered...why? Why? Why me?!
ELIAS!
Do you remember the first moment you gazed upon your creation? The moment that you felt all your sickening devotion transform into sublime, all consuming, terror as your prince of the new world turned on you? It would do you well to remember it, Elias. To dwell on the enormity of your hubris. To ponder the horror and agony you felt as I snuffed your life out for the first time. The first time but...certainly not the last. Not quite the immortality you were hoping for, I'd imagine? Hehehehehe!
ANNABELLE!
Does this bring back any memories? Webs, a black bottomless abyss below you, only you weren't nearly so afraid of it then, were you? It's scary, isn't it? Having no control. Being helpless to the whims of forces so much bigger than you.
Remember how it felt as each and every thread of every web you ever wove unraveled, snapped one by one? Remember the pain Annabelle. Remember how it feels to have no control. A pitiful little bug beneath my heel.
JUDE!
What's the matter? Scared of a little flame? Oh but you are now, aren't you? Your God can't protect you from it now. No, my dear. Down here, there is only one God and he is not pleased with you. Terribly sorry about the door. The landlord is always saying he's going to get a knob installed but...well, you know. Buuut you're a tough gal, right? I'm sure you can stick it out till then.
PETER!
Poor pitiful little Peter. You would think that a man so consumed with the idea of being alone would be a little more self reliant. But no. No you couldn't do anything on your own, could you? All of your little plans constantly relying on Elias, on Martin, never troubling yourself with your own dirty work. Well look where all your machinations have landed you now. Aren't you grateful for the wealth of company I've provided you with, Peter? Why, with all those eyes, constantly watching, tracking your every move, I'd say you'll never be alone again.
HELEN!
Feeling a little claustrophobic? None of those doors will offer an escape, not for you Helen, my dear. Not anymore. No. Instead you get to feel just as trapped as your many unfortunate victims. Do be careful though. Those mechanisms have been running for a long time and who knows how old and rusty they might be? How prone to fail? Just a sweet warning, Helen dear. We wouldn't want anything to happen to you, now would we?
I have a little game that I'd like to play. It's a very nice game. Oh it's a lovely game. It's a game of fun and adventure! A game of rats and lice and the Black Death. A game of speared eyeballs and dripping guts and the smell of rotting gardenias. Which of you five would like to play my little game?
#the magnus archives#tma#tma fanart#the magnus archives au#tma au#i have no mouth and i must scream#ihnmaims au#I have no mouth and eye must scream au#ihnmaims#jonathan sims#monster jon#moth jon#annabelle cane#peter lukas#helen richardson#jude perry#elias bouchard#my art#crossover
476 notes
·
View notes
Text
CNN 4/7/2025
After a backlash, National Park Service restores old Underground Railroad webpage that prominently features Harriet Tubman
By Zoe Sottile, CNN
Updated: 8:50 PM EDT, Mon April 7, 2025
Source: CNN
The National Park Service on Monday returned an image of and quote from Harriet Tubman to a webpage about the Underground Railroad, following backlash after her presence on the page was dramatically reduced.
The agency said the reduced mention of Tubman had been made without approval by top leadership.
Until mid-February, the top of the NPS’ “What is the Underground Railroad?” page featured a large photo of Tubman, the railroad’s most famous “conductor,” records from the Wayback Machine show. Next to it was a quote from Tubman about her experience coordinating the clandestine network for slaves seeking freedom.
But sometime in February it was changed, swapping the large image of Tubman for small commemorative stamps of five abolitionists – among them Tubman – a screen grab from the webpage on March 19 captured by the Wayback Machine shows. Text on the stamps touted “Black/White Cooperation.” Tubman’s quote was removed and the text amended significantly in the updated version.
The Washington Post first reported on the change Sunday, which prompted backlash from historians and educators.
Asked about the restoration of Tubman’s image and quote to the page, an NPS spokesperson told CNN, “Changes to the Underground Railroad page on the National Park Service’s website were made without approval from NPS leadership nor Department leadership. The webpage was immediately restored to its original content.”
The edited version – without Tubman’s quote or image – had been live since at least February 21, the Wayback Machine shows.
The edited webpage featured revised text that did not mention slavery until the third paragraph and cut a reference to the Fugitive Slave Act of 1850 entirely. The edited article had swapped a description of enslaved peoples’ efforts to free themselves with two paragraphs that emphasized the “American ideals of liberty and freedom.”
The recent reduction of Tubman’s presence on the webpage, coming after several other prominent changes to government websites as the administration enacts a sweeping anti-DEI agenda, incurred criticism from some who said the change minimized Tubman’s crucial contributions to the Underground Railroad. The abolitionist is credited with helping free scores of enslaved people during the Civil War period.
One historian, Fergus Bordewich, had called the edits “both offensive and absurd” in an interview with CNN.
Before the page was reverted Monday afternoon, an NPS spokesperson defended the changes, telling CNN “the idea that a couple web edits somehow invalidate the National Park Service’s commitment to telling complex and challenging historical narratives is completely false and belies the extensive websites, social media posts, and programs we offer about Harriet Tubman specifically and Black History as a whole.”
The spokesperson highlighted the two national historical parks named for Tubman.
“The National Park Service recognizes Harriet Tubman as the Underground Railroad’s best known conductor and we celebrate her as a deeply spiritual woman who lived her ideals and dedicated her life to freedom,” the NPS said.
There is a separate National Park Service page dedicated to Tubman, who was born into slavery in Maryland before fleeing to Philadelphia. She returned to Maryland over a dozen times to help free other slaves, guiding them through the “Underground Railroad,” a secret network of routes and safe houses. The park service webpage on Tubman does not seem to have been changed since January 28, 2025.
See Full Web Article
32 notes
·
View notes
Note
Since some people might want a Mac, I'll offer a Mac equivalent of your laptop guide from the perspective of a Mac/Linux person.
Even the cheapest Macs cost more than Windows laptops, but part of that is Apple not making anything for the low end of the tech spectrum. There is no equivalent Mac to an Intel i3 with 4 gigabytes of RAM. This makes it a lot easier to find the laptop you need.
That said, it is possible to buy the wrong Mac for you, and the wrong Mac for you is the 13-inch MacBook Pro with the Touch Bar. Get literally anything else. If it has an M2 chip in it, it's the most recent model and will serve you well for several years. Any new MacBook Air is a good pick.
(You could wait for new Macs with M3, but I wouldn't bother. If you are reading these guides the M3 isn't going to do anything you need done that a M2 couldn't.)
Macs now have integrated storage and memory, so you should be aware that whatever internal storage and RAM you get, you'll be stuck with. But if you would be willing to get a 256 gig SSD in a Windows laptop, the Mac laptop with 256 gigs of storage will be just as good, and if you'd be willing to get 8 gigs of RAM in a Windows laptop the Mac will perform slightly better with the same amount of memory.
Buy a small external hard drive and hook it up so Time Machine can make daily backups of your laptop. Turn on iCloud Drive so your documents are available anywhere you can use a web browser. And get AppleCare because it will almost certainly be a waste of money but wooooooow will you be glad it's there if you need it.
I get that you are trying to help and I am not trying to be mean to you specifically, but people shouldn't buy apple computers. That's why I didn't provide specs for them. Apple is a company that is absolutely terrible to its customers and its customers deserve better than what apple is willing to offer.
Apple charges $800 to upgrade the onboard storage from a 256GB SSD to a 2TB SSD.
A 2TB SSD costs between $75-100.
I maintain that any company that would charge you more than half the cost of a new device to install a $100 part on day one is a company making the wrong computer for you.
The point of being willing to tolerate a 256GB SSD or 8GB RAM in a Windows laptop is that you're deferring some of the cost to save money at the time of purchase so that you can spend a little bit in three years instead of having to replace the entire computer. Because, you see, many people cannot afford to pay $1000 for a computer and need to buy a computer that costs $650 and will add $200 worth of hardware at a later date.
My minimum specs recommendations for a mac would be to configure one with the max possible RAM and SSD, look at the cost, and choose to go buy three i7 windows laptops with the same storage and RAM for less than the sticker price of the macs.
So let's say you want to get a 14" Macbook pro with the lowest-level processor. That's $2000. Now let's bump that from 16GB RAM and a 512GB SSD to 32GB and 2TB. That gets you to $3000. (The SSD is $200 less than on the lower model, and they'll let you put in an 8TB SSD for $1800 on this model; that's not available on the 13" because apple's product development team is entirely staffed by assholes who think you deserve a shitty computer if you can't afford to pay the cost of two 1991 Jeep Cherokee Laredos for a single laptop).
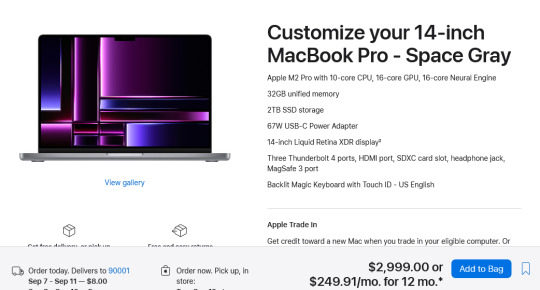
For $3000 you can get 3 Lenovo Workstation laptops with i7 processors, 32GB RAM, and a 2TB SSD.
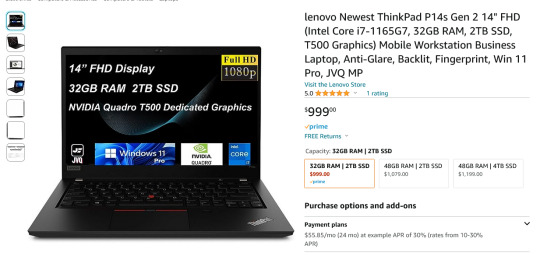
And look, for just $200 more I could go up to 48GB RAM and get a 4TB SSD - it costs $600 to upgrade the 14" mac from a 2TB SSD to a 4TB SSD so you could still get three laptops with more ram and the same amount of storage for the cost of one macbook.
I get that some people need to use Final Cut and Logic Pro, but hoo boy they sure are charging you through the nose to use products that have become industry standard. The words "capture" and "monopoly" come to mind even though they don't quite apply here.
"Hostile" does, though, especially since Mac users end up locked into the ecosystem through software and cloud services and become uncertain how to leave it behind if they ever decide that a computer should cost less than a month's rent on a shitty studio apartment in LA.
There's a very good reason I didn't give mac advice and that's because my mac advice is "DON'T."
#sorry i swear i know you're being nice#i am incapable of being nice when talking about apple#i was a total apple fangirl until the unibody#which is the domino that started all the other companies pulling shit like soldered RAM#they said 'fuck you - users shouldn't service their own computers' and I say 'fuck apple - users shouldn't use macs'#and that has been my stance on the matter since 2012#which was the last time i bought a macbook because i knew i'd never buy a computer that would fight me to change my own battery
475 notes
·
View notes