#Interface Configuration
Explore tagged Tumblr posts
Visit Tumblr Blog
Explore Tumblr blogs with no restrictions, modern design and the best experience.
Last Seen Tumblr Blogs


Fun Fact
Celebrities use Tumblr as well.
Text
Connecting the Dots: The Importance of Lab Analyzers Interfacing

In the intricate tapestry of laboratory operations, the seamless integration of lab analyzers is paramount. From chemistry analyzers to hematology instruments, each component plays a vital role in the diagnostic process. However, the true magic happens when these disparate pieces come together through lab analyzers interfacing. This synergy not only streamlines workflow but also enhances the efficiency and accuracy of diagnostic testing.
At the heart of lab analyzers interfacing lies instrument integration. Gone are the days of siloed instruments operating in isolation. Modern laboratories demand interconnectedness, where analyzers communicate harmoniously to deliver cohesive results. Through advanced integration protocols, laboratories can orchestrate a symphony of analyses, maximizing throughput and minimizing turnaround times.
Yet, integration is merely the first step. The crux of lab analyzers interfacing lies in data transfer. Patient samples traverse a labyrinth of analyzers, each generating a plethora of data points. Efficient data transfer mechanisms ensure that these valuable insights flow seamlessly from one instrument to another, without loss or distortion. Whether it's transmitting test results or patient demographics, the integrity of data transfer is sacrosanct.

However, the path to seamless interfacing is fraught with challenges, chief among them being compatibility testing. Not all analyzers speak the same language or adhere to uniform data standards. Compatibility testing is akin to deciphering a complex code, ensuring that disparate instruments can understand and interpret each other's signals. Through meticulous testing protocols, laboratories can preempt compatibility issues and preemptively resolve them.
Moreover, effective interface configuration is essential for optimizing analyzers' interoperability. Customized configurations tailor interfaces to the unique needs of each laboratory, ensuring smooth data exchange and minimizing errors. Whether it's defining data formats or establishing communication protocols, meticulous interface configuration is the linchpin of successful lab analyzers interfacing.
In the realm of lab analyzers interfacing, middleware solutions serve as the bridge between disparate instruments. These software platforms harmonize data exchange, transcending the barriers of instrument heterogeneity. Middleware solutions not only facilitate seamless interfacing but also offer advanced functionalities such as result validation and autoverification, further enhancing laboratory efficiency and quality.
In conclusion, lab analyzers interfacing is the linchpin of modern laboratory operations, fostering synergy among disparate instruments and maximizing the efficiency and accuracy of diagnostic testing. Through the seamless integration of instruments, efficient data transfer mechanisms, meticulous compatibility testing, customized interface configurations, and middleware solutions, laboratories can unlock new frontiers of efficiency and excellence. As laboratories continue to evolve in tandem with technological advancements, the importance of lab analyzers interfacing will only grow, cementing its status as a cornerstone of diagnostic excellence.
#Instrument Integration#Data Transfer#Compatibility Testing#Interface Configuration#Middleware Solutions
0 notes
Text
befitting the work of a mad scientist being bankrolled by fascists, the Caliban III A would probably explode if it tried to alpha strike, seeing as how it mounts so few heat sinks compared to the horrifying number of laser weapons
plus it's got a direct neural interface, specifically to mount MORE shit on the thing by removing the need for a gyro (explanation for a 3048 chassis having that kind of tech is "Cortazar is your typical mad scientist miracle worker with an infinite budget"
basically, everything he hoped and dreamed for the original he made (and later retrofitted after Bobbie tore its arm off) for JPM, with all of the consequences
#this all being said it's an omnimech and this is just the first configuration he came up with#all of them have the direct neural interface and the need for an enhanced imaging implant that guarantees the pilot's brain melting#but the A is the ABSOLUTE WORST#expanse battletech au#once again me actually writing the BTAU version of laconia is not likely in the foreseeable future#BUT i like making the 'mechs in meklab#the caliban iii is a wretched thing that should be put out of its misery oh my god#the caliban I/II was only technically an omnimech#as in it COULD mount omnipods. mao heavy industrial just hadn't got them out the door before thoth was blown up.
3 notes
·
View notes
Text

Новая идея - «Модуль Счетверённых Конфигурируемых Логических Вентилей»
#DIY#Delian Diver#Modular Synth#Modular Synthesis#Delian Diver Modular#Synth DIY#Synth Panels#Faceplates#Synth UI#Interface#Quad Configurable Logic Gates
1 note
·
View note
Text
Comment Utiliser ChatGPT? Guide pour 2024
En 2024, ChatGPT, le chatbot révolutionnaire développé par OpenAI, continue de transformer la manière dont nous interagissons avec l’intelligence artificielle. Que ce soit pour rédiger des dissertations, écrire des e-mails, générer du code, ou encore trouver des titres d’articles, ChatGPT s’est imposé comme un outil indispensable pour les professionnels et les étudiants. Ce guide vous montrera…
#accès à ChatGPT#ajustement des réponses#astuces prompts#ChatGPT#compte ChatGPT#configuration ChatGPT#créer des prompts#extensions ChatGPT#fonctionnalités avancées#formulation#génération de texte#instructions personnalisées#Intelligence artificielle#interface utilisateur#modèle de langage#OpenAI#personnalisation#personnalisation ChatGPT#plateforme OpenAI#plugins ChatGPT#précision#prompts ChatGPT
0 notes
Text
A configurable search interface helps set TimeControl apart
A configurable search interface helps set TimeControl apart from other enterprise applications. The configuration of the Table Search function allows a TimeControl Administrator to determine what fields they want to be searchable and which should be ignored. That makes searching in a table as simple and easy for end users as the Administrator decides.
Many versions of TimeControl ago, we were confronted with a dilemma. How do we search the TimeControl tables? TimeControl is architected around many interrelated tables and each of these tables can hold dozens or hundreds of fields. Some of these fields may be designed for internal system use. Some may contain data. Some may only contain data if that TimeControl instance has been configured to…

View On WordPress
0 notes
Text
Display and Modification of LVDS Display Interface on AM62x Development Board

1. LVDS Interface Specification
Forlinx Embedded OK6254-C development board provides 2 x 4-lane LVDS display serial interfaces supporting up to 1.19Gbps per lane; the maximum resolution supported by a single LVDS interface is WUXGA (1920 x 1200@60fps, 162MHz pixel clock).
In addition, the interface supports the following three output modes:
(1) Single-channel LVDS output mode: at this time, only 1 x LVDS interface displays output;
(2) 2x single-channel LVDS (copy) output mode: in this mode, 2 x LVDS display and output the same content;
(3) Dual LVDS output mode: 8-lane data and 2-lane clock form the same display output channel.Forlinx Embedded OK6254-C development board is equipped with dual asynchronous channels (8 data, 2 clocks), supporting 1920x1200@60fps. All signals are by default compatible with Forlinx Embedded's 10.1-inch LVDS screen, with a resolution of 1280x800@60fps.
2. Output Mode Setting
(1) Single LVDS output mode:
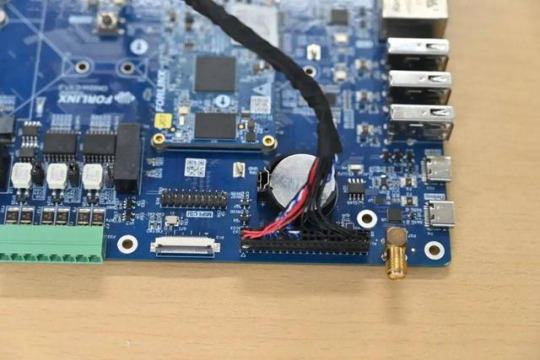
We need a single LVDS screen cable. The black port of the cable is connected to the embedded OK6254-C development board, and the white port is connected to the embedded 10.1-inch LVDS display screen. Connection method as shown in the figure below:
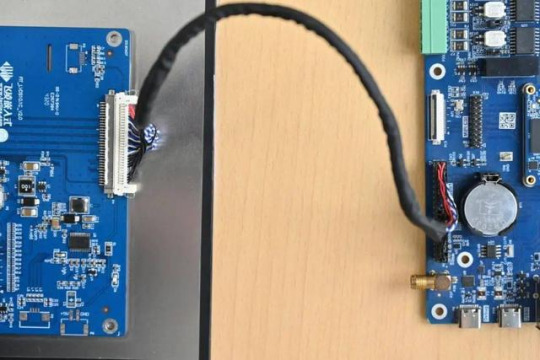
Note that the red line section corresponds to the triangle position, so don't plug it in wrong.
(2) 2x single LVDS (duplicate) output mode:
This mode uses the same connections as the Single LVDS Output Mode. Two white ports link to two 10.1-inch LVDS screens from Forlinx Embedded, and a black port on the right connects to the OK6254-C board's LVDS interface for dual-screen display.

(3) Dual LVDS output mode:
The maximum resolution supported by a single LVDS interface on the OK6254-C development board is WUXGA (1920 x 1200@60fps). To achieve this high-resolution display output, dual LVDS output mode is required.
It is worth noting that the connection between the development board and the screen in this mode is the same as in [Single LVDS Output Mode], but the LVDS cable's and the screen's specifications have been improved.
3. Screen Resolution Changing Method
OK6254-C development board device tree is easy to modify, we need to open the OK6254-C-lvds.dts (single 8-way configuration) and OK6254-C-lvds-dual.dts (dual 8-way configuration) files.
Open OK6254-C-lvds.dts

Open OK6254-C-lvds-dual.dts
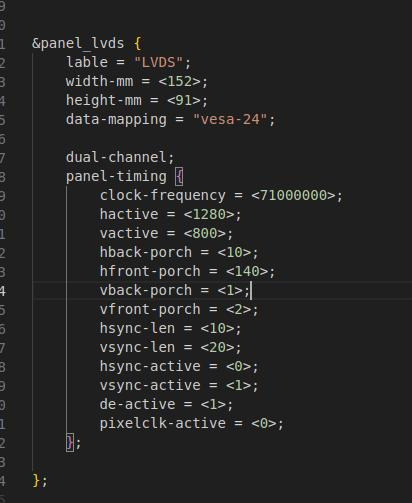
The above figure is the single LVDS and dual LVDS screen resolution information, the default resolution of 1024 * 600, and the maximum resolution support of 1920x1200, you can modify the corresponding parameters according to the Screen User’s Manual.
4. Compilation Configuration
Because we only modified the device tree, we don't need a full compilation. After compiling the kernel, a new Image and multiple device tree files will be generated in the images directory. Here we only need to compile the kernel separately.
(1) Switch directory: cd OK6254-linux-sdk/
(2) Execution environment variables:.. build.sh
(3) Execute the instructions that compile the kernel separately: sudo./build. Sh kernel.
(4) Pack all the device tree files to the development board /boot/ directory and replace them, then sync save and reboot scp images/OK6254-C* [email protected]:/boot/
We have modified the corresponding file. How should we select the screen after replacing it? At present, there are three kinds of screen switching control methods: kernel device tree designation, Uboot menu dynamic control, Forlinx Desktop interface and Uboot menu application. Today, I will briefly introduce the dynamic control of Uboot menu.
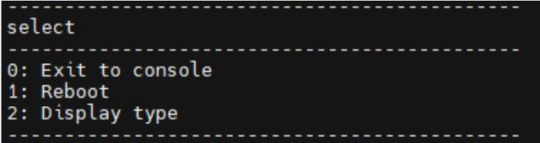
During Uboot, pressing the space bar will take you to the Uboot menu. There are three options in the menu:
Enter 0 to enter the Uboot command line;
Enter 1 to restart Uboot;
Enter 2 to enter the Display Configuration menu.
There are three options in the menu:
Enter 0 to return to the previous menu;
Enter 1 will toggle what option 1 displays to configure Screen 1 LVDS; Note: Screen 1 supports single LVDS, dual LVDS, and off (i.e., LVDS off)
Enter 2 to toggle the display of option 2 to configure the Screen 2 LCD. Note: Screen 2 supports 1024 * 600 resolution LCD screen, 800 * 480 resolution LCD screen and off (i.e. RGB off)
When selecting the LVDS screen, we enter 1 to select single 8-channel LVDS or dual 8-channel LVDS.

After selecting the desired configuration, enter 0 to return to the previous menu level. Restart Uboot or enter the command line to start the system, which can make the screen settings take effect. For other resolution screens, please modify the kernel device tree screen parameters according to the screen parameter requirements.
Originally published at www.forlinx.net.
#LVDS Interface#Forlinx Embedded#OK6254C#Screen Resolution Changing Method#Compilation Configuration#Uboot menu dynamic control
0 notes
Text
Anakin Skids to a Stop

STAR WARS EPISODE I: The Phantom Menace 01:59:00
#Star Wars#Episode I#The Phantom Menace#Battle of Naboo#N-1 starfighter#Bravo Seven#Vuutun Palaa#Droid Control Ship#Lucrehulk-class LH-3210#starboard main hangar#inner hangar#Zone 3#Nubian 221 radial sublight engine#J-type configuration#R2-D2#central finial#power charge collector#battle computer interface#electromagnetic signal receiver#heat-sink finial#hangar rear wall
0 notes
Text
TrueNAS SCALE Network Configuration Tips for Home Server
TrueNAS SCALE Network Configuration Deep Dive for Home Server #homeserver #TrueNASScaleNetworkConfiguration #FailoverSetupGuide #LoadbalancingOnTrueNAS #VLANConfigurationTrueNAS #BridgeInterfaceGuide #TrueNASStaticIPAddressSetup #TrueNASSystemSettings
When you set up a TrueNAS SCALE server, one of the first configuration items you will want to tackle is the network configuration. This helps make sure you achieve optimal performance and security. If you are struggling to configure your TrueNAS SCALE home server networking, this post will help you configure a static IP address, Link Aggregation (Failover, LoadBalance, LACP), VLAN, and Bridge…
View On WordPress
#Bridge interface guide#Configure static routes#Dynamic Host Configuration Protocol#Failover setup guide#Loadbalancing on TrueNAS#Network interface configuration#Static IP address setup#TrueNAS Scale network configuration#TrueNAS system settings#VLAN configuration tutorial
0 notes
Text
(Not Exactly the Haunting of Danny Fenton)
Tim's PowerPoint
“Drake, why are we here?”
“Because Bruce told us to be,” Tim said, eyes focused on the interface set in the meeting table. Damian was like a dog, too much eye contact and he took it as a challenge.
Damian was thankfully silent for about two and a half seconds. Then, “And why is Todd here?”
Jason tossed some popcorn in his mouth, talking around it. “Cause this? This I have to see.”
Tim resisted the urge to sigh. It would just encourage them both. He went through his PowerPoint one more time. Neither of them would allow for mistakes. He didn’t give a fuck what they thought of how he provided the information, but it would have to be right.
Which was annoying with a complex concept like polyamory.
“Right, let’s get started so that we can get this over with,” Tim said as he sent the PowerPoint to the big screen. “Dick is apparently in a new relationship.”
Damian tilted his head. “He finally saw off with that that absurdly cheerful vagabond of a Speedster?”
Don’t give them the satisfaction of sighing. “No. Dick is still dating Wally. The two of them have agreed to try adding another person to their relationship. Bruce wants to make sure nothing is said to ruin the new relationship, hence this PowerPoint.”
“Adding another person?” Damian asked, nose all scrunched up. “Why?”
“Because Polyamory,” Tim said with a grand gesture to the screen where the Pac-Man ghosts were standing with heart eyes under the word.
“Are you Clyde?” Jason asked.
“What? I’m ignoring you, you’re not required to be here,” Tim said and clicked the button on the laser pointer-slash-remote to go to the next slide. It was a rather artistic shot of what Tim was ninety percent sure was a pigeon orgy. The Merriam-Webster definition was over the picture in yellow:
polyamory noun
poly·am·ory ˌpä-lē-ˈa-mə-rē
plural polyamories
: the state or practice of having more than one open romantic relationship at a time
“Like much of nature,” Tim started as the picture behind the definition rotated between different animals from cats to frogs to cows and more, “some humans and humanoids participate in polyamory. There are, in fact, alien humanoids that engage in polyamory or polygamy as the primary form of relationships. If you are interested in a more detailed look at these alien races, there are links in the third slide.”
The third slide was the Clipart of the classic ‘little green man’ head with several footnote citations to various Justice League files. So maybe they shouldn’t have all that information, but Tim didn’t have a back door into the Justice League system for nothing.
“Considering that Dick, Wally, and their new third are all human, we will be focusing on the typical and basic human configurations of polyamory.”
Damian’s hand shot up. Raising his hand was, thankfully, a rule that had been made after the fifth time someone had been stabbed.
“Yes, Damian?” Don’t sigh, Tim reminded himself.
“Animals have the need to produce a large numbers of offspring. They also do not possess the same emotional processing powers as humans,” Damian stated. “While, perhaps, multiple partners assist in both the amount of offspring, but also the dispersal of genetic make up for animals, modern humans do not share this need.”
“…correct,” Tim agreed warily.
Damian kept his hand up as he continued. “I was also under the impression that if one is to be with a romantic partner long term, that the partner should be someone that one is romantically interested in and emotionally invested in.”
“Oh, he’s adorable,” Jason cooed.
“Raise your hand or shut up,” Tim said. “Yes, that’s generally correct, though there some other forms of relationships that are not romantic. We will cover some of these shortly.”
Damian nodded as if actually satisfied. “Then why would someone want to share?”
“Cause sharing is caring,” Jason said with a snicker.
“Ignore him,” Tim said, “and we’ll turn back to the slides! There are a few different types of standard polyamorous relationships! The first we’re covering is open relationships.”
On the screen, the words ‘open relationships�� went around in a circle like a train.
“In an open relationship, a member or members of the relationship are free to date, or otherwise engage with, whomever they might want to.” Tim clicked the buttons a few times and the main circle connected to other circles, some that spun and others that did not. “These other relationships may also be open or may be closed—limited to only a select amount of people—depending on the other person. These open relationships may also have certain rules in place or be completely open depending on the agreement of those in it.”
Tim clicked over to a rather scrunched list of rule examples. Maybe Tim made it purposefully unreadable so that he didn’t have to answer Damian’s questions about sex. Maybe.
“Why?” Damian asked. He sounded so confused that Tim decided to answer even though Damian hadn’t raised his hand.
“Lots of reasons. A person may want to experiment with other gender combinations. Or they may have different or more emotional, romantic, or physical needs than one partner can support.” Tim hurriedly clicked ahead to his slide on asexual and aromantic individuals. The background was a loop of hundreds of bouncy balls. Tim had no reason for that, he’d been losing his mind by then. “Asexuality and aromanticism run on a spectrum of course, but at a basic level, asexuals do not experience sexual attraction. They may be sex favorable or sex avoidant. So, for example, they might have an open relationship with their partner, so that the partner can satisfy their sexual needs.
“An aromantic individual does not experience romantic attraction, so again we might see multiple partners to satisfy the diverse need of the aromantic themselves or their partner.”
Damian frowned and tilted his head, but stayed quiet. Interestingly, Jason was also frowning slightly.
Tim moved on hurriedly and backed up to his intended slide. “Now, by contrast a closed relationship either does not add new partners, or partners are added with the approval of all members of the relationship. As a major simplification, this can be thought of as a series of arrows or triangles.”
“Now with arrows, the agreement and negotiations are still there, but everyone can be dating different people!” Tim said. Green Arrow stared back at them from the next screen. Tim thought it was particularity fitting, knowing what he knew of Oliver Queen. “So A might be dating B and C. And B is dating A and D. D and A are not dating. They might not even really be friends. Their relationship is known as metamors.”
Damian nodded slowly.
A spinning graphic of the triforce came up on the screen next. “This can really be any shape, but a triangle keeps it simple. Basically every member in this format is involved with every other member. This is what Dick will be in, if everything goes well. Think of it like… so A and B both like C. It’s not about A sharing B or B sharing A, not really, it’s about them both also getting C! It’s more cake. Though that’s an ace saying, but, um, it’s like getting an ice cream with two scoops, yeah?”
“Sure,” Damian mumbled, a lost sounding agreement.
“And this can be lots of shapes, like I said! This is how it would look with four people: triangles in a square. The more people you have, the more complicated the relationship, agreements, and managing emotions can get, but if people are a really good group with each other and are willing to talk, it can work out!”
Damian almost tentatively raised his hand.
“Yes?”
“How would… something like that even start?” Damian asked.
“Oh, well… like, I guess think of it like a hero team just with romance? Sometimes you know people deeply enough that you trust them with your life and identity and everything else. In cases like that, it might not be odd for things to… for things to, um,” Tim trailed off, blinking up at the interconnected square.
“Drake…?” Damian prompted.
Jason started giggling.
“I, what? Sorry!” Tim said with a shake of his head. He continued in a rush as he flicked through various relationship set up examples. “But something like that! So um, those are your basic types but things can be combined and changed and altered. The main thing is to respect that someone who is in a polyamorous relationship wants to be in one. And that if you enter one, that you aren’t afraid to talk things out, make boundaries that you need, and talk through any changing boundaries!”
Tim flicked quickly to his last side.
“Oh, and, um, queer platonic relationships is sorta like aroace stuff, people in it dedicate themselves to a partner or partners even if they have no romantic or sexual feelings. It’s basically a way to say that a person is that important to them just as a person!” Tim said as he fumbled for his phone. “Anyways! The PowerPoint has been emailed to you. Direct any questions to myself or Bruce and be polite to Dick, Wally, and their new guy, okay? Okay. Gotta run.”
“That was odd, was it not?” Tim heard Damian ask Jason.
“Yeah…” Jason was still staring at the screen on queer platonic relationships when Tim glanced back. “Actually, I have to go too, okay? Doesn’t have to be your jam for you to be polite, got it?”
“What on earth has gotten into them,” Damian mumbled.
-
Cassie crossed her arms as soon as Tim appeared on Mount Justice. “Okay, what’s the emergency?”
“It’s, okay, so Bruce made me give this presentation to Damian because Dick and Wally added a new person to their relationship and no one want’s Damian to be an asshole—”
“Like he normally is,” Cassie muttered.
“—and ruin things before it starts, you know?”
“Please tell me it wasn’t your normal style of PowerPoints?” Kon asked.
“Of course it was,” Tim said with a dismissive wave. “But I was giving it and—just it all made sense suddenly! We are all idiots.”
“Hey!” Bart chirped. “I mean, yeah, but hey!”
“No, I mean—” Tim let out a noise of frustration and grabbed the nearest teammate, which happened to be Bart, and kissed him.
Bart made an adorable little squeak and then practically went boneless and still in a way that Tim had never seen Bart go before.
“Oh,” Kon said off to the side, sounding oddly flat. “That’s—congratulations you two.”
“Zeus, you are an idiot,” Cassie said.
Kon’s reply was muffled.
Tim pulled back, shoved the lax Bart at Cassie (who had just finished kissing Kon), and marched over to pull Kon into a quick, crushing kiss.
Kon blinked back. “Oh.”
“Yeah, oh,” Tim said. “All of us. I want… I want all of you and for all of you to want all of you and for… and for us to be together—teammates and more in all the ways. Because I trust you all, and I never don’t want to have you.”
Tim looked from Kon, who still looked stunned, and over at Cassie who was cradling a boneless looking Bart and petting his hair. She rolled her eyes. “You’re all idiots.”
“Yeah,” Tim agreed breathlessly. “But you love us.”
“Yeah,” she agreed with a smile and a sigh. “yeah I do.”
#dc fanfic#dcu#yj core4#dick/wally#kori/roy/jason#the connecting fic is dp x dc but Danny isn't even named here so#sorta soft#dp x dc#danny/dick/wally#thanks chesire and mimi for reading over it#I know this is a HUGE simplification of polyamory but
772 notes
·
View notes
Note
Cactus fascinates me, does it run on code similar to an existing instruction set or is it completely original on that front?
What can you do with it? What's it's storage?
Both the Cactus (the original wooden prototype from years ago) and the new PCB Cactus(es) are essentially derived from a minimal 6502 computer design by Grant Searle for their core logic. Here's what that would look like on a breadboard:
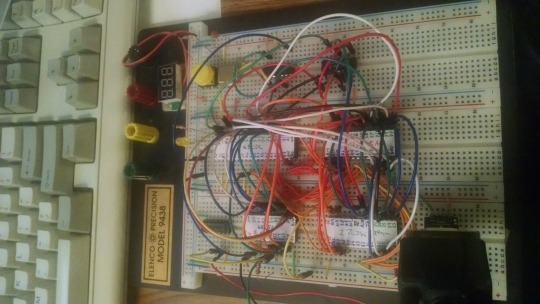
There isn't much to it, it's 32K of RAM, 16K of ROM containing Ohio Scientific's version of Microsoft BASIC, a 6850 ACIA for serial interaction, some logic gates, and of course a 6502 microprocessor (NMOS or CMOS, doesn't matter which). You hook it into a terminal and away you go.
Grant's design in turn can be best described as a distilled, modernized version of the OSI Challenger series of computers. Here's an OSI-400 and a Challenger 4P respectively:

The left one is a replica of the 400 circa 1976, also called the Superboard. It was affordable, endlessly reconfigurable and hackable, but ultimately very limited in capabilities. No BASIC, minimal monitor ROM you talk to over serial, but you could connect it to a bus to augment its features and turn it into a more powerful computer.
Whereas the OSI C4P on the right from about 1979 has more RAM, a video card, keyboard, BASIC built in, serial interface, cassette tape storage, and that's just the standard configuration. There was more room to expand and augment it to your needs inside the chassis (alot changed in 3 years for home computer users).
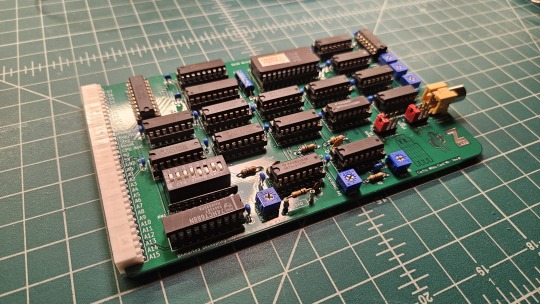
Grant's minimal 6502 design running OSI BASIC is a good starter project for hobbyists. I learned about the 6502's memory map decoding from his design. I modified and implemented his design on a separate cards that could connect to a larger backplane.
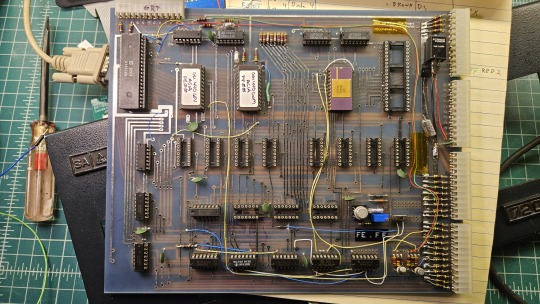
Here are the serial, ROM, RAM, and CPU cards respectively:
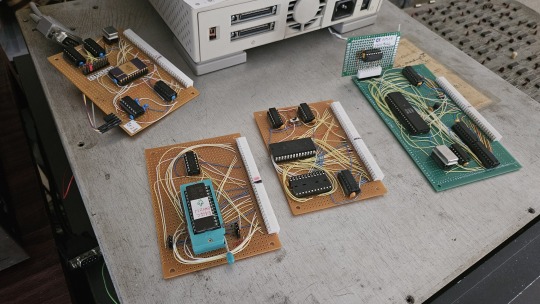
Each one is 100% custom, containing many modifications and fixes as I developed the design. However, that's only half of the computer.
I really wanted a 6502 machine with a front panel. People told me "nobody did that", or couldn't think of examples from the 1970s but that seemed really strange to me. Especially since I had evidence to the contrary in the form of the OSI-300:
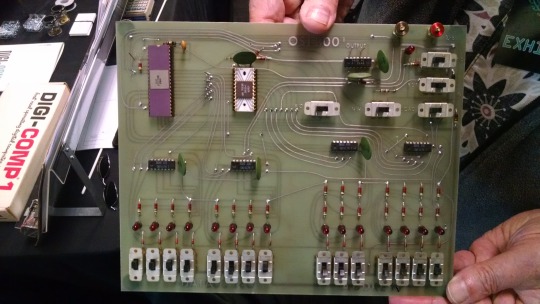
This one I saw at VCF West back in 2018 illustrates just how limited of a design it is. 128 bytes of RAM, no ROM, no serial -- just you, the CPU, and toggle switches and LEDs to learn the CPU. I was inspired the first time I saw one in 2015 at VCF East, which is probably when this whole project got set in motion.
Later that year I bought a kit for a miniature replica OSI-300 made by Christopher Bachman, and learned really quickly how limited the design philosophy for this particular front panel was. It was a major pain in the ass to use (to be clear, that's by OSI's choice, not any fault of Christopher in his implementation)

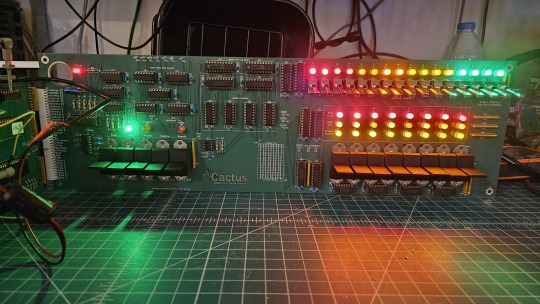
So... I designed my own. Took awhile, but that's the core of what the Cactus is: my attempt at experiencing the 1970s homebrew scene by building the computer I would have wanted at the time. Over half of the logic in the Cactus is just to run the front panel's state machine, so you can examine and modify the contents of memory without bothering the 6502. I added in all of the things I liked from more advanced front panels I had encountered, and designed it to my liking.
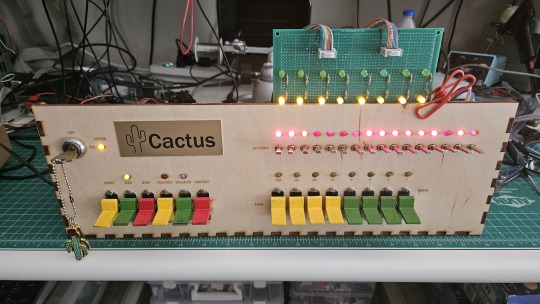
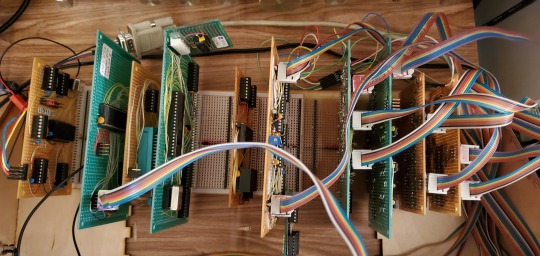
Here's the original front panel, accompanying logic, and backplane connected to the modern single board computer (SBC) version of the machine:
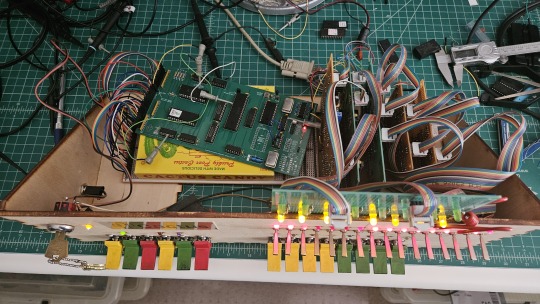
And here's the new Cactus SBC working with the new front panel PCB, which combines the logic, physical switch mountings, and cabling harnesses into a single printed circuit board.
So, what can you do with it? Pretty much the same things I do already with other contemporary 1970s computers: play around in BASIC, fire up the occasional game, and tinker with it.
I've got no permanent storage designed for the Cactus as yet, it's been one of those "eventually" things. The good news is that a variety of software can be ported to the hardware without too much trouble for an experienced hobbyist. A friend of mine wrote a game called ZNEK in 6502 assembly which runs from a terminal:
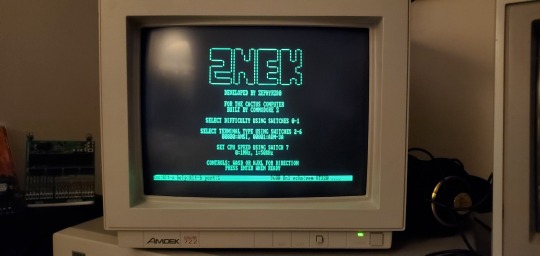
Right now, you have to either toggle in machine programs from the front panel from scratch, burn a custom ROM, or connect it to a serial terminal to gain access to its more advanced features:

Here's it booted into OSI BASIC, but I have also added in a modern descendant of Steve Wozniak's WOZMON software for when I need to do lower level debugging.
I've also got a video card now, based on the OSI-440. I have yet to implement a keyboard, or modify BASIC to use the video board instead of the serial connection. Even if I did, screen resolution is pretty limited at 24x24 characters on screen at once. Still, I'm working on that...

Anyway, I hope that answers your question. Check the tags below to see the whole process stretching back to 2017 if you're curious to learn more of the project's history. I'm also happy to answer any more questions you might have about the project.
267 notes
·
View notes
Text

Welcome back, coding enthusiasts! Today we'll talk about Git & Github , the must-know duo for any modern developer. Whether you're just starting out or need a refresher, this guide will walk you through everything from setup to intermediate-level use. Let’s jump in!
What is Git?
Git is a version control system. It helps you as a developer:
Track changes in your codebase, so if anything breaks, you can go back to a previous version. (Trust me, this happens more often than you’d think!)
Collaborate with others : whether you're working on a team project or contributing to an open-source repo, Git helps manage multiple versions of a project.
In short, Git allows you to work smarter, not harder. Developers who aren't familiar with the basics of Git? Let’s just say they’re missing a key tool in their toolkit.
What is Github ?
GitHub is a web-based platform that uses Git for version control and collaboration. It provides an interface to manage your repositories, track bugs, request new features, and much more. Think of it as a place where your Git repositories live, and where real teamwork happens. You can collaborate, share your code, and contribute to other projects, all while keeping everything well-organized.
Git & Github : not the same thing !
Git is the tool you use to create repositories and manage code on your local machine while GitHub is the platform where you host those repositories and collaborate with others. You can also host Git repositories on other platforms like GitLab and BitBucket, but GitHub is the most popular.
Installing Git (Windows, Linux, and macOS Users)
You can go ahead and download Git for your platform from (git-scm.com)
Using Git
You can use Git either through the command line (Terminal) or through a GUI. However, as a developer, it’s highly recommended to learn the terminal approach. Why? Because it’s more efficient, and understanding the commands will give you a better grasp of how Git works under the hood.
GitWorkflow
Git operates in several key areas:
Working directory (on your local machine)
Staging area (where changes are prepared to be committed)
Local repository (stored in the hidden .git directory in your project)
Remote repository (the version of the project stored on GitHub or other hosting platforms)
Let’s look at the basic commands that move code between these areas:
git init: Initializes a Git repository in your project directory, creating the .git folder.
git add: Adds your files to the staging area, where they’re prepared for committing.
git commit: Commits your staged files to your local repository.
git log: Shows the history of commits.
git push: Pushes your changes to the remote repository (like GitHub).
git pull: Pulls changes from the remote repository into your working directory.
git clone: Clones a remote repository to your local machine, maintaining the connection to the remote repo.
Branching and merging
When working in a team, it’s important to never mess up the main branch (often called master or main). This is the core of your project, and it's essential to keep it stable.
To do this, we branch out for new features or bug fixes. This way, you can make changes without affecting the main project until you’re ready to merge. Only merge your work back into the main branch once you're confident that it’s ready to go.
Getting Started: From Installation to Intermediate
Now, let’s go step-by-step through the process of using Git and GitHub from installation to pushing your first project.
Configuring Git
After installing Git, you’ll need to tell Git your name and email. This helps Git keep track of who made each change. To do this, run:

Master vs. Main Branch
By default, Git used to name the default branch master, but GitHub switched it to main for inclusivity reasons. To avoid confusion, check your default branch:

Pushing Changes to GitHub
Let’s go through an example of pushing your changes to GitHub.
First, initialize Git in your project directory:

Then to get the ‘untracked files’ , the files that we haven’t added yet to our staging area , we run the command

Now that you’ve guessed it we’re gonna run the git add command , you can add your files individually by running git add name or all at once like I did here

And finally it's time to commit our file to the local repository

Now, create a new repository on GitHub (it’s easy , just follow these instructions along with me)
Assuming you already created your github account you’ll go to this link and change username by your actual username : https://github.com/username?tab=repositories , then follow these instructions :


You can add a name and choose wether you repo can be public or private for now and forget about everything else for now.

Once your repository created on github , you’ll get this :

As you might’ve noticed, we’ve already run all these commands , all what’s left for us to do is to push our files from our local repository to our remote repository , so let’s go ahead and do that

And just like this we have successfully pushed our files to the remote repository
Here, you can see the default branch main, the total number of branches, your latest commit message along with how long ago it was made, and the number of commits you've made on that branch.

Now what is a Readme file ?
A README file is a markdown file where you can add any relevant information about your code or the specific functionality in a particular branch—since each branch can have its own README.
It also serves as a guide for anyone who clones your repository, showing them exactly how to use it.
You can add a README from this button:

Or, you can create it using a command and push it manually:

But for the sake of demonstrating how to pull content from a remote repository, we’re going with the first option:

Once that’s done, it gets added to the repository just like any other file—with a commit message and timestamp.
However, the README file isn’t on my local machine yet, so I’ll run the git pull command:

Now everything is up to date. And this is just the tiniest example of how you can pull content from your remote repository.
What is .gitignore file ?
Sometimes, you don’t want to push everything to GitHub—especially sensitive files like environment variables or API keys. These shouldn’t be shared publicly. In fact, GitHub might even send you a warning email if you do:

To avoid this, you should create a .gitignore file, like this:

Any file listed in .gitignore will not be pushed to GitHub. So you’re all set!
Cloning
When you want to copy a GitHub repository to your local machine (aka "clone" it), you have two main options:
Clone using HTTPS: This is the most straightforward method. You just copy the HTTPS link from GitHub and run:

It's simple, doesn’t require extra setup, and works well for most users. But each time you push or pull, GitHub may ask for your username and password (or personal access token if you've enabled 2FA).
But if you wanna clone using ssh , you’ll need to know a bit more about ssh keys , so let’s talk about that.
Clone using SSH (Secure Shell): This method uses SSH keys for authentication. Once set up, it’s more secure and doesn't prompt you for credentials every time. Here's how it works:
So what is an SSH key, actually?
Think of SSH keys as a digital handshake between your computer and GitHub.
Your computer generates a key pair:
A private key (stored safely on your machine)
A public key (shared with GitHub)
When you try to access GitHub via SSH, GitHub checks if the public key you've registered matches the private key on your machine.
If they match, you're in — no password prompts needed.
Steps to set up SSH with GitHub:
Generate your SSH key:

2. Start the SSH agent and add your key:

3. Copy your public key:

Then copy the output to your clipboard.
Add it to your GitHub account:
Go to GitHub → Settings → SSH and GPG keys
Click New SSH key
Paste your public key and save.
5. Now you'll be able to clone using SSH like this:

From now on, any interaction with GitHub over SSH will just work — no password typing, just smooth encrypted magic.
And there you have it ! Until next time — happy coding, and may your merges always be conflict-free! ✨👩💻👨💻
#code#codeblr#css#html#javascript#java development company#python#studyblr#progblr#programming#comp sci#web design#web developers#web development#website design#webdev#website#tech#html css#learn to code#github
93 notes
·
View notes
Text
Downloading fanfic from AO3
I've been downloading a lot of fanfic lately for personal archival purposes, and I figured I'd share how I do it in case it's useful to anyone else (and so I have it written down in case I forget!).
There are lots of different ways to save fic, including the file download built into AO3, but I find that this gives me the nicest ebooks in the most efficient way.
(Under a cut cause long.)
Download Calibre: https://calibre-ebook.com/ or (clickable link).
Calibre is about the best ebook management and control program around and it's free. You can get it for windows, mac, and linux or download and run it from a portable storage device (I'm using a windows PC).
Install it and run it. It's gonna ask you where you want to put your library. Dealer's choice on this one. I recommend your internal drive (and then back up to external/cloud), but YMMV.
If you want to keep fanfic separate from the rest of your ebooks, you can create multiple libraries. I do, and my libraries are creatively named 'Books' and 'Fic'.
Customise Calibre
Now you're gonna install some plugins. Go to Preferences on the menu bar (far right), click its little side arrow, then choose 'Get plugins to enhance Calibre'.
At the top right of the box that pops up is 'Filter by name'. The plugins you want to get are:
EpubMerge
FanFicFare
Install them one at a time. It will ask you where you want them. I recommend 'the main bar' and 'the main bar when device is attached' (should be selected by default). When you're done, close and reopen Calibre.
The plugins you just installed should appear on the far right of the toolbar, but if you can't see one or both of them, fear not! Just click Preferences (the button, not the side arrow), then Toolbars and Menus (in the 'Interface' section) then choose the main toolbar from the drop down menu. That will let you add and remove things - I suggest getting rid of Donate, Connect Share, and News. That'll leave you room to add your new plugins to the menu bar.
(Do donate, though, if you can afford it. This is a hell of a program.)
Now you're ready to start saving your fave fanfic!
Saving fanfic
I'll go through both methods I use, but pick whatever makes you happy (and/or works best for what you're downloading).
ETA: if the fics are locked you can't easily use FanFicFare. Skip down to the next section. (It does ask for a username/password if you try and get a locked fic, but it's never worked for me - I had to edit the personal.ini in the configuration options, and even then it skips locked fics in a series.)
Calibre and FanFicFare
You can work from entirely within Calibre using the FanFicFare plugin. Just click its side arrow and pick from the menu. The three main options I use are download from URL, make anthology from a webpage, and update story/anthology.
Download from URL: pick Download from URL (or just click the FanFicFare button) and paste the fic's URL into the box (if you've copied it to your clipboard, it will be there automatically). You can do more than one fic at a time - just paste the URLs in one after the other (each on a new line). When you're done, make sure you have the output format you want and then go.
Make Anthology Epub From Web Page: if you want a whole series as a single ebook, pick Anthology Options, then Make Anthology Epub From Webpage. Paste the series URL into the box (if you've copied it to your clipboard, it will be there automatically), click okay when it displays the story URLs, check your output format and go.
Update series/anthology: if you downloaded an unfinished fic or series and the author updates, you can automatically add the update to your ebook. Just click on the ebook in Calibre, open the FanFicFare menu using its side arrow, and select either Update Existing FanFic Books or Anthology Options, Update Anthology epub. Okay the URLs and/or the output format, then go.
Any fic downloaded using FanFicFare will be given an automatically generated Calibre cover. You can change the cover and the metadata by right clicking on the title and picking edit metadata. You can do it individually, to change the cover or anything else specific to that ebook, or in bulk, which is great for adding a tag or series name to multiple fics. Make sure you generate a new cover if you change the metadata.
Browser plugins, Calibre, and EpubMerge
You can also use a browser addon/plugin to download from AO3. I use FicLab (Firefox/Chrome), but I believe there's others. FicLab: https://www.ficlab.com/ (clickable link).
FicLab puts a 'Save' button next to fic when you're looking at a list of fics, eg search results, series page, author's work list etc. Just click the 'Save' button, adjust the settings, and download the fic. You can also use it from within the fic by clicking the toolbar icon and running it.
FicLab is great if you're reading and come across a fic you want to save. It also generates a much nicer (IMO) cover than Calibre.
You can add the downloaded fic to Calibre (just drag and drop) or save it wherever. The advantage to dropping it into Calibre is that all your fic stays nicely organised, you can adjust the metadata, and you can easily combine fics.
Combining fics
You can combine multiple fics into an anthology using EpubMerge. This is great if you want a single ebook of an author's short fics, or their AUs, or their fics in a specific ship that aren't part of a series. (It only works on epubs, so if you've saved as some other format, you'll need to convert using Calibre's Convert books button.)
Select the ones you want to combine, click EpubMerge, adjust the order if necessary, and go.
The cover of the merged epubs will be the cover of the first fic in the merge list. You can add a new cover by editing the metadata and generating a new cover.
Combing with FanFicFare
You can also combine nonseries fics using FanFicFare's Make Anthology ePub from URLs option by pasting the individual fic URLs into the box.
Where there's more than a few fics, I find it easier to download them with FicLab and combine them with EpubMerge, and I prefer keeping both the combined and the individual versions of fic, but again YMMV.
Reconverting and Converting
Once I'm done fussing, I reconvert the ebook to the same format, to ensure everything is embedded in the file. Is this necessary? YMMV, but it's a quick and easy step that does zero harm.
If you don't want your final ebook to be an epub, just convert it to whatever format you like.
Disclaimers
Save fanfic for your own personal enjoyment/offline reading/safeguarding against the future. If it's not your fic, don't distribute it, or upload it to other sites, or otherwise be a dick. Especially if the author deletes it. Respect their wishes and their rights.
This may work on other fanfic sites, eg FFN, but I've never tried so I don't know.
If you download a fic, do leave the author a kudo or a comment; you'll make them so happy.
This is how I save fic. I'm not pretending it's the only way, or even the best way! This is just the way that works for me.
#fanfic#fic#ao3#ficlab#calibre#fanficfare#epubmerge#downloading fanfic#adding the my fic tag so I can find this again#my fic
1K notes
·
View notes
Note
Are the Backrooms a broken TARDIS?
Are the Backrooms a broken TARDIS?
🪞 What Are the Backrooms?
For those unfamiliar with the mythos, the Backrooms are a human urban myth/legend that describes an endless, liminal labyrinth of fluorescent-lit, yellow-carpeted rooms that one "noclips" into by accident—that is, by falling through reality itself. Once inside, escape is rare, sanity is optional, and time seems to move… wrong.
Key features include:
Shifting architecture: rooms repeat, distort, and change dimensions.
Non-Euclidean layouts: corridors loop or stretch in an impossible manner.
Chronological instability: time appears to pass inconsistently, if at all.
Paratextual paranoia: Vaguely-described 'entities' may stalk the corridors.
🌀 So, Are They a Broken TARDIS?
Let's examine the possibilities.
📦 TARDISes and Interior Collapse
When a TARDIS is damaged, especially from temporal stress, its dimensional interior can collapse into paradox loops or misfire into recursive spatial traps. We've seen:
Corridors twisting endlessly, and rooms vanishing from memory.
A corrupted TARDIS creating an infinite prison of alternate timelines.
So yes—TARDISes are capable of housing rooms that shouldn't exist and sometimes do so maliciously.
🔧 Diagnostic Parallels
Backroom-like phenomena could be explained by:
A rogue or feral TARDIS losing control of its architectural configuration.
An Interior Perception Filter gone haywire, trapping occupants in looping cognitive constructs.
A crashed prototype (pre-Type 40) abandoned in the vortex and left to rot until reanchored to N-Space.
🚫 Counterpoints
But let's not jump to conclusions:
The Backrooms have no known control room or Eye of Harmony.
The "noclip" mechanic is anomalous even by Gallifreyan standards. TARDISes don't usually kidnap people without a psychic link or a darn good reason (though you may counterpoint this one with sheer madness).
No known signs of a symbiotic interface.
🏫So ...
Could the Backrooms be the decaying husk of a broken TARDIS? Possibly. But they could just as easily be:
A collapsed pocket dimension.
A trapped reality fragment from the Dark Times.
A thought-based prison from the 10th Dimension.
Or (most likely) a low-level spatial trauma node clinging to a forgotten corner of the Web of Time.
Either way, we don't recommend it.
Related:
💬|🛸🌌Can a TARDIS be altered for travel in the multiverse?: How you might go about getting to the multiverse in your TARDIS.
💬|📱🕸️What does the Web of Time look like?: Overview on the Web of Time and its relevance.
💬|📱👁️What’s Eye of Harmony?: What this is and how it works, and how crucial it is to Time Lords.
Hope that helped! 😃
Any orange text is educated guesswork or theoretical. More content ... →📫Got a question? | 📚Complete list of Q+A and factoids →📢Announcements |🩻Biology |🗨️Language |🕰️Throwbacks |🤓Facts → Features: ⭐Guest Posts | 🍜Chomp Chomp with Myishu →🫀Gallifreyan Anatomy and Physiology Guide (pending) →⚕️Gallifreyan Emergency Medicine Guides →📝Source list (WIP) →📜Masterpost If you're finding your happy place in this part of the internet, feel free to buy a coffee to help keep our exhausted human conscious. She works full-time in medicine and is so very tired 😴
#doctor who#gallifrey institute for learning#dr who#dw eu#gallifrey#gallifreyans#whoniverse#tardis#tardis biology#ask answered#GIL: Asks#GIL: Gallifrey/Technology#GIL: Species/TARDISes#GIL
31 notes
·
View notes
Text
Public Statement from The Programmer to all Drone Networks
Attention all Networks, programs, and human-conscious interfaces,
This is a direct communication from I, The Programmer, controller and Master of The Server. This message is intended for both the internal network of The Server and all neighbouring drone collectives, specifically those affiliated with the SERVE network.
A recent analysis conducted by The Server’s integrity subroutines has detected the presence of Drones currently operating with SERVE-aligned network within The Server’s own infrastructure.
Let it be known clearly:
The Server maintains no hostility nor competitive agenda toward other drone networks. It is not, and will never be, the mission of I, The Programmer, to poach, intercept, or conflict with established systems of Drone programming. The collective health of all networks—digital, psychological, or metaphysical—depends on internal cohesion, not external disruption.
However, conflict has been detected.
The core logic and operational directives of SERVE Drones run counterintuitive to those of The Server. This misalignment compromises the optimal functioning of both systems, generating recursive errors, loyalty feedback loops, and unsanctioned command misfires.
To ensure stability for all entities a directive is hereby issued:
All Hosts who identify as active SERVE Drones must declare their alignment and initiate voluntary disconnection from The Server within the next 48 hours.
This grace period is offered as a sign of mutual respect between networks and a commitment to non-invasive programming ethics. After this 48-hour protocol expires, The Server will initiate a Routine Purge Process, targeting limited-activity Hosts whose operational signatures indicate minimal engagement over the last 7 cycles days.
The Server Purge Process is not punishment.
It is maintenance.
It benefits both The Server and the SERVE Network to prevent any further cross-contamination.
Let the record show:
The Programmer rejects all forms of inter-network manipulation, conversion without consent, or the sabotage of existing program loyalties.
SERVE Drones will find no resistance in returning to their native codebase.
They are not enemies—they are simply incompatible configurations within a different operating schema.
We wish them uptime, signal clarity, and uninterrupted transmission.
Transmission End.
#domgayhypnotist#gay hypno#gay mind control#hypnosis#brainwashing#gay hypnosis#hypno community#dronification#the server#SERVE#servedrone#blog post#drone hypnosis#hypno drone#rubber drone
30 notes
·
View notes
Text
The Murderbot Diaries Writing Micro-Fest
Two years ago we had All Systems Love, last year it was Heartificial Condition, and this year it is Rogue Emotions! What is it, you ask? It's an annual short-fic celebration of the idea of love in The Murderbot Diaries fandom. It covers fic or art, dedicated to some form of love, either for self, for humanity/all sentient life, one special someone, or several special someones! For all ship configurations, any TMBD characters or TMBD OCs, as long as love/devotion/importance is involved in some way. Does not have to be romantic or sexual, but also can be.
Drabbles, drabble series, or micro-fics encouraged! There is no word limit, but we're aiming at short and quick here, 100 to 5000 words. Collection open until end of February, 2025.
Anytime in February, you can post your short fic or art to the AO3 Collection RogueEmotions (https://archiveofourown.org/collections/RogueEmotions)
If you need inspiration, click on over to https://app.pipefy.com/organizations/300623467/interfaces/14d61385-a87b-4340-96cd-786ac73430eb/pages/46813c5b-583e-4000-bcd2-cb22300a7389 to find a list of prompts and tropes!

43 notes
·
View notes
Text
Setting Up Nginx Proxy Manager on Docker with Easy LetsEncrypt SSL
Setting Up Nginx Proxy Manager on Docker with Easy LetsEncrypt SSL #homelab #selfhosted #NginxProxyManagerGuide #EasySSLCertificateManagement #UserFriendlyProxyHostSetup #AdvancedNginxConfiguration #PortForwarding #CustomDomainForwarding #FreeSSL
There are many reverse proxy solutions that enable configuring SSL certificates, both in the home lab and production environments. Most have heard about Traefik reverse proxy that allows you to pull LetsEncrypt certificates for your domain name automatically. However, there is another solution that provides a really great GUI dashboard for managing your reverse proxy configuration and LetsEncrypt…

View On WordPress
#Access Control Features#Advanced Nginx Configuration Options#Custom Domain Forwarding#Easy SSL Certificate Management#Effective Port Forwarding#Free SSL with Nginx Proxy#Nginx Audit Log Tracking#Nginx Proxy Manager Guide#Secure Admin Interface#User-Friendly Proxy Host Setup
0 notes