#It was a tutorial on Google that I found in the pictures
Explore tagged Tumblr posts
Visit Tumblr Blog
Explore Tumblr blogs with no restrictions, modern design and the best experience.
Last Seen Tumblr Blogs


Fun Fact
Premium Tumblr themes are available from anywhere between $9 to $49.
Text
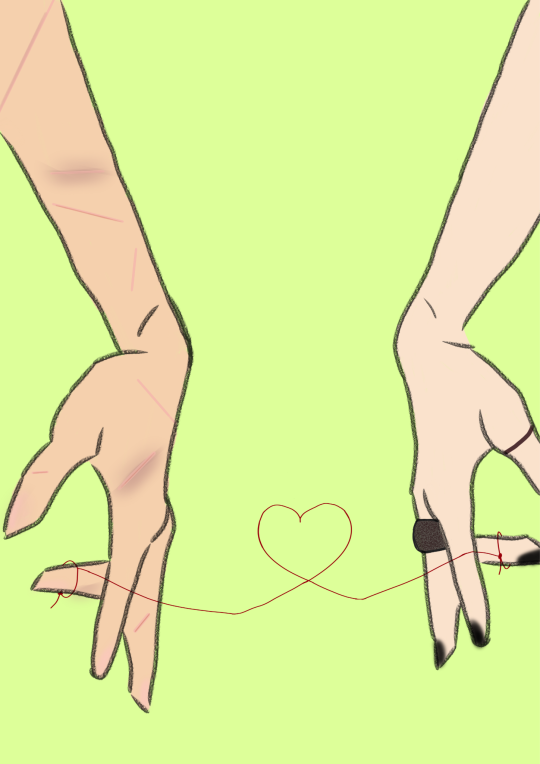
"For the Japanese, who know so much and intuit more, human relations are predestined by a red string that the gods tie to the pinky fingers of those who find each other in life. Legend has it that the two people connected by this thread will have an important story, regardless of the time, place or circumstances."
#disclaimer#i had this idea for a while#and didn't see anyone do it#So I looked for tutorials to draw hands and drew this in someone else's style#It was a tutorial on Google that I found in the pictures#I unfortunately wasn't able to find it again tho#so just note that#that aside#I thought this was so wolfstar coded#marauders#remus lupin#remus x sirius#sirius black#wolfstar#the marauders#james potter#peter pettigrew#fanart#wolfstar art#love#I'm no artist btw#this is my first attempt at making anything#I'm so anxious about posting it too#lol
23 notes
·
View notes
Note
ohh but they are so prettyyyyy!! i really liked them and they are very creative! how did you make the beads fit in like that?? i want to try and make bracelets sometime too!
Thank youuu😭❤️❤️ i’m happy you like them <33333
They’re really easy so i definitely recommend it if anyone just wants some simple crafts to occupy them :) they’re simple enough that i’ve been making them while watching subbed anime like they are a very good low-focus sit and multitask craft
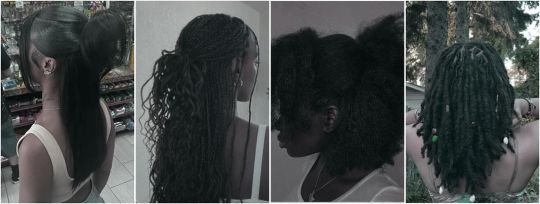
They’re made with this kind of set-up! Two long strands folded in half and knotted together so you’re working with four strands - two in the middle and one on either side. You just sort of weave the two on the sides around the two in the middle to make the bracelet and to add beads you just string them onto the middle two strands and put them in between your ties as you go :)

#asks#i tied up a new one for that picture before realizing i probably could have just found a picture on google oops🙃#i can probably find and link an actual tutorial if anyone wants one! or just make one myself since it’s pretty simple!#i was taught by my dad growing up so i don’t actually know any like resources for it off the top of my head lol#but im sure they can’t be hard to find😤#oh! and if you’re planning to go buy things for them keep in mind that the beads go on two strands of hemp which can be pretty thick!#so the beads you use gotta have bigger holes#(yeah yeah i said big holes insert laugh track etc etc)#🍀🍀🍀 <- sending luck for if anyone decides to try it out :)
3 notes
·
View notes
Text
Cantina Collection

Straight from Oga's Cantina comes this cobbled together industrial set.
A bit later than planned but finally here. All items are very low poly as they are all frankenmeshed from the original bar back counters.
The textures are all composites and rearrangements of the originals, as a result they are not seamless - but we'll say it just adds to the look that they've just been made from whatever scrap metal was around!
Also as the cabinet doors all have the same rust pattern, it looks odd/repetitive on very big kitchens but works fine for small spaces.
There is only one swatch for all items except the seating, which comes in the same colours as the originals.
All items are base game compatible, except the resized bar backs which require Journey to Batuu.
See below for further details, pictures and download links.
Comfort (5 items):


Industrial Bar Stools x 2 - Low Back & No Back
Industrial Dining Chairs x 2 - Low Back & No Back (shown with original JtB high back chair)
Metal Dining Chair (shown with original JtB bar stool)
Surfaces (16 items):


Kitchen Counters & Islands


Bar Table
Dining Tables x 2


Coffee & End Tables
Console Tables x 3


Smaller Replicas of the original Cantina Barbacks x 5 - resized to match the height of regular counters NOTE: You'll need to use bb.moveobjects on to align these properly. JOURNEY TO BATUU PACK IS REQUIRED.
Industrial Shelf
Decor (2 items):
Metal Splashbacks x 2
Activities & Skills (3 items):


Oga's Bars x 2
Sabacc Game Table NOTE: BGC but JOURNEY TO BATUU is required in order to change the game type to Sabacc. Without this it will function as any other base game card table.
Download All (Downloads ZIP file from Google Drive)
Pick and Choose (Opens Google Drive folder)
If there's any problems with any of these items or you have any constructive feedback, suggestions or questions, please just get in touch, I'm still learning every day!
My TOU
Credits
All textures and meshes are edited or frankenmeshed from in-game EA assets.
@myshunosun - for their gorgeous sona dining chair which I cloned in order to have an object with the necessary transparency for the chair and bar stool - can be downloaded here.
Lizbot3000 - for their base game bar tables, which I cloned for my bar table and can be found here.
@ravasheencc - for her Crop It Like It's Hot Backdrops which I used to take some preview photos and can be downloaded here.
CC created using Blender, Sims 4 Studio & GIMP. Preview images using Canva Pro.
Everyone on the S4S forums and the Creator Musings discord group for all the tutorials and advice/help.
#always free cc#alwaysfreecc#custom content#download#journey to batuu#maxis match#my cc#sims 4#sims 4 buy mode#sims 4 cc#sims 4 custom content#sims 4 futuristic cc#sims 4 industrial#sims 4 industrial cc#sims 4 futuristic#sims 4 journey to batuu#sims 4 maxis match#sims 4 star wars#sims 4 star wars cc#star wars cc#star wars sims#star wars sims 4#the sims 4#ts4 cc#ts4#ts4 bb#ts4 buy cc#ts4 custom content#ts4 download#ts4 futuristic cc
220 notes
·
View notes
Note
how do you make your userboxes? i've gone looking for tutorials before but the only one i found didn't work for me .::(
I use ibis paint x to make them! I also use this template

I usually get my images from pinterest and/or google, depending on what the request is for.
let me show an example:
I get my subject and my 2 pictures. the left one is for the icon, and the right one is for the background (credit to this post for the pet dreaming flag!)

I then import the template as a new piece.

I use the selection tool to select the icon box, and then insert the icon picture I want.


for the smaller rectangle, I select that rectangle and then fill it in with whatever colour fits the userbox (you can also lower the opacity to 80-90% if you want)


I then insert the background WITHOUT selecting the background. you do not need to select the background, but you can if you want. IF YOU DO, you’ll end up with a thin white line around where the template is.
this is what the layers should look like once you’re done the designing part
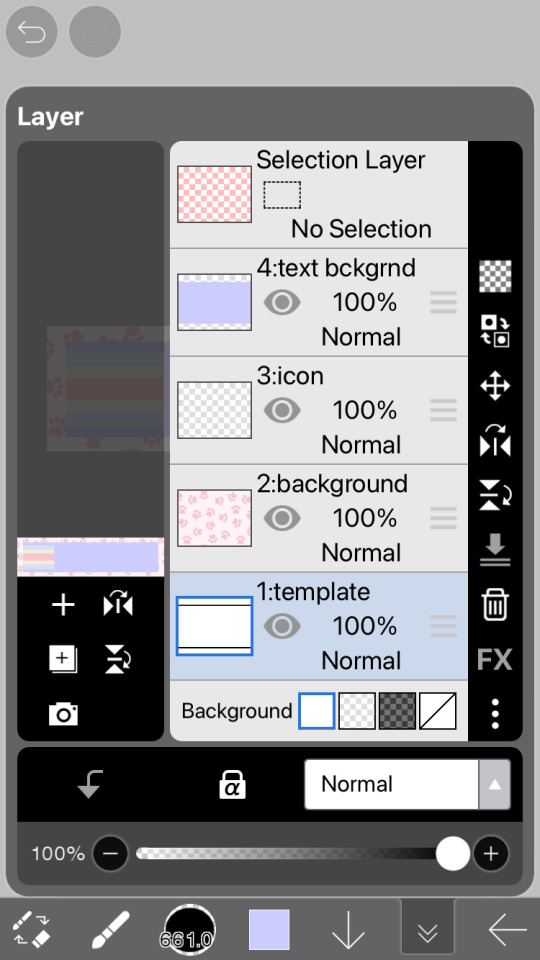
now you just gotta insert the text! just go to the text option, select “add text” and put in the text you want for your userbox. you can also change the font and size if you want (highly recommend this because the default font kinda sucks and you want the text to be big enough to read). if you want to have that little white border around the letters, just go to style and change the stroke colour/thickness (the FIRST slider, not the second one!!)


and there you go! you now have your userbox! just save it, and bam! here’s the finished product of the example.

hope this helps! feel free to leave any questions below; I’m free to answer any questions if anything was confusing or unclear :3

#alterhuman#nonhuman#otherkin#therian#my userboxes#custom userboxes#userboxes#art tutorial#tutorial#how its made#kin stuff#kin request#open requests
194 notes
·
View notes
Text
Slater's Basic Writing Tips
A post on how I began writing, how I try to improve my writing, and how I describe my own writing!
This post was written per request by an anonymous ask. Refer to this post for the specific question.
A question from an anonymous writer:
"i was wondering if you could give us some insight on how you found your writing style? You have a way to make it still feel complex and full of emotion but also like the reader is right there with all the senses being touched upon. I don't know how to write about it without gushing, but my question is how did you learn to do this and what would you describe your writing style as? (as well as any hacks or tips)"
How did I begin to write?
It's hard to remember, but I really just jumped into the deep end. When I first began writing, I had no plans to do anything more than write short, 1k stories about frivolous things. I did no research, took no classes, read up on no advice.
I just started.
Of course, back then, I had no expectations for myself. I wasn't writing for a specific audience, nor was I looking to take myself seriously, and I think that helped in a lot of ways. Having fun with it, letting yourself make mistakes, and not being afraid to jump into the deep end definitely helped. In the end, all that mattered was that I was putting words down on the page.
I think that this works for a lot of hobbies. Like drawing for example. Say that you wanted to learn how to draw, but read no books on the subject, looked up no tutorials, and didn't take anyone's advice. Even without any instruction, if you drew a picture every day for 100 days straight, there would still be improvement in your ability to draw. In the end, it doesn't entirely matter whether you thought the drawings were good on a day to day basis, but rather the act of drawing that's important.
Writing is similar in many ways. And while I think that learning to write in a formal environment is great and should be encouraged for all people, practicing your writing without any rules or structure shouldn't be looked down upon either!! They're two sides of the same coin, and they contribute to your goal in their own individual ways.
Let yourself write shitty things. Let yourself write meaningless, stupid things. Trust me, it'll make your life better.
-
How do I try to improve my writing?
a. Read!
I've thought A LOT about what kind of advice I might give you, and while I don't have any concrete "hacks" to writing well, I think there are some things that every writer can do to expand upon their own abilities!
I know this is common advice, but it's true advice:
If you want to write well, you need to read well.
For a long time, I (like an idiot) assumed that I didn't really read that much, so when people were always saying that writers need to read, I was kind of like "huh well I guess I'm behind on the game lmao"
But, in actuality, I realized that that it was the complete opposite 💀 I guess it just didn't register in my mind because I don't consider reading reading....like, I just considered it me having fun alkdfjlkaf 💀
Like, reading is basically on the same level as playing video games and going to parties for me aldskjfaklj It's not a task so much as it is something I am actually viscerally addicted to lmao
I read at least 2 hours every day, usually more. I read for about an hour when I wake up and about an hour when I go to bed, mostly fiction novels. I read news articles every day at lunch for the large part of my break, which is about an hour. I read academic journals and nonfiction for class, and I also read other academic journals just in my free time 💀 that sounds dorky but it's not really serious reading as it is so much me looking up a question on google and then getting sucked into a journal about evolutionary biology LMAO
Basically, reading is like doing crack to me, and like a dumbass, I read so much that I actually thought I didn't read at all because everyone was talking about it like it was some big chore or something 💀
But honestly, it's great advice.
Read a lot. Enjoy reading a lot. Don't read just for the sake of reading, or because you have to do it. Read because you just fucking love reading! Read stupid novels that have bad reviews. Read short articles that don't mean anything. Read highly academic works for your studies, or read a journal about a topic you can barely understand purely because you're curious!
Don't let those haughty literature people tell you that you're only reading if you're reading something like Dostoevsky.
Reading is a skill and there are different levels to it. Maybe dense literature is too much for you. Doesn't mean you're worse than someone who can choke down the Iliad like it's nothing. Maybe it just means you want to spend time on things like Percy Jackson or Harry Potter instead!
b. Analyze the media you consume!
Now, this is definitely more difficult to do than just picking up a book and reading it. Admittedly this skill takes awhile to develop, and if you haven't done higher level reading in a formal setting before, you might find it kind of hard. However, if you're looking to take writing more seriously, then this is what I recommend. Here's a few things you should consider when analyzing a piece of media.
Just because you criticize something doesn't mean you can't love it, too. No piece of media is perfect. In fact, search for things you think a great piece of media could improve upon, and it'll help identify flaws in your own writing. For example, in the newest season of Severance (no spoilers), I thought that the time spent on establishing the scenery and atmosphere of some episodes was too long, and that that it lost the focus of the plot after a certain length of time.
There is no objective morality. There is no one set of beliefs that is entirely correct in the world. Claiming that one certain belief is entirely true is kind of like telling someone God exists: you really can't prove it. If a piece of media goes against your own views, consider what points the author makes that supports their thesis. Do you have to agree with them? No. Do you have to support them? No. But should you recognize that such a view point exists? Yes. It's important to always keep yourself aware of different points of view. Don't allow yourself to exist in an echo chamber.
If a piece of media leaves you confused, ask yourself why you're confused about the story. Is it because of the length of the piece? Is it because you don't recognize all of the words the author used? Is it because it's a view point you've never considered before? Or is it because the knowledge was presented in a bad way, making it hard to understand? If so, how could the author have presented it to make it more comprehensible?
Okay okay before this starts sounding like your high school English textbook, let's take a step back. You don't need to get out your college rule notebook and have your pencil at the ready to analyze a book you're reading. You can do it in small and meaningless ways!
If you're at the theater watching a movie, tell your friends what you thought about the movie! Listen to what they thought about the movie! Things like "I liked the story, but that one guy's acting kinda ruined the message" is a totally valid criticism, too. Same thing goes for books and movies! Like, "I really liked this book, but I didn't understand the words the author used in this scene, and it made the story hard to understand."
c. Take Grammar Into Consideration
Okay...this might be kind of an unpopular take when it comes to fan fiction, but grammar does matter. When it comes to short pieces, not using capital letters or commas might not seem like a big deal. However, at a certain point, trying to read something without proper grammar transforms from an innocent writing choice into an incomprehensible mess, especially when you're writing long form documents.
If you're considering writing longer pieces, please take the time to learn the rules of grammar. I promise it will help you get your point across so much smoother! Also, there are many readers who simply won't take a chance on your writing if they see that it's not properly formatted, and then they'll be missing out! Make sure to put your best foot forward for the sake of yourself and to give your readers the story experience they deserve!!
d. Find examples of writing styles you like!
This kind of goes hand in hand with my point about reading. While you're doing your reading, find examples of stories and media that you like the style of! Try to identify characteristics of that style that you're attracted to.
What kind of imagery is there? Is it metaphorical? Is it literal?
Do they use a lot of complex sentences? Maybe they like simple sentences, like getting straight to the point?
What's their tone? Are they blunt? Are they flowery?
When you're doing your own writing, you can try to incorporate these characteristics into your own pieces! Here's an example.
One of my favorite pieces of writing and media is the video game Disco Elysium. It's written so well. I really love the style of the author, specifically how he incorporates personification into his description of objects. I also like how he relies on fairly simple sentences to create visual description. In fact, if you pay close attention to Chapter 12: Glass Cut of Texas Red, you'll probably be able to see the influence from Disco Elysium peeking through my own writing style there!
e. Don't be afraid to sleep on it!
This.
This is my best writing advice.
You can read every book in the library, take every course at your local college on writing, and you'll still sit down one day and write something that you're just not sure about. Is it bad? Is it good? Is it some monstrous type of in-between that you can't even describe?
Fuck if you know.
And that's okay.
Not everything you write will be amazing. But instead of giving up on a piece that's halfway written when you get frustrated, close your computer and re-read what you wrote in the morning. Go do something else, clear your mind, sleep well in the evening, and give it some fresh eyes in the morning!
9 times out of 10 you'll be able to come to a conclusion on it in the morning.
The way I personally like to do it is this: Stare at my word document until I'm about to rip my hair out, slam my laptop closed, go play some mindless game for wayyyyy too long, and then sleep until my alarm physically cannot ring any more obnoxiously. Then, before I do anything else, I'll open my phone and squint through my exhaustion to reread what I wrote.
Idk how to describe it, but somehow, it works like a charm LMAO
-
How would I describe my own writing?
Oh god......this one I actually might not know 💀 anon you've got me
Okay, I guess here's how I would describe my style. It's highly...emotional for me. I think that's how I live my life, and I think my writing reflects that. For example, when you think about description in a novel, you often think of describing how objects and people look. But over the years in my personal life, I've discovered that I really just...don't care about the visuals of a person or place. For me, I rely heavily on how that person or objects makes me feel, not what my opinion on its appearance is.
If you read my story Indigo, you might have noticed that I never truly described what Simon looks like beyond small details of his person. Particular scars that were important to the story, what color his hair was, what clothes he was wearing--those were the only things I ever really described about his appearance, and even then, they were only written into the story when it was important to what was going on.
But, in actuality, Simon's appearance was incredibly important to Indigo. In fact, the entire premise relies on his fixation with his own appearance. But the way that I approached it wasn't from the visual standpoint, but rather his perception of himself, how his appearance made him and other people feel.
Is Simon ugly? Are his scars hideous? Are they so grotesque he should cover his face at all times? Or, even, abstain from love at all costs?
I don't know. I don't care what he looks like. But that's what Simon believes himself to be, that's how he feels, and that defines his perception of the entire world, regardless of what the true visuals of his story actually are.
That's partially why I like the emotional type of writing instead of just visual description, because it doesn't really rely on any objective truth to convey a message. That....and I honestly just don't think about how things look that much lmao
Like, once a friend of mine asked me what my ideal boyfriend looked like and I legit couldn't answer her. Because like??? I don't have an ideal man. I've dated men from all different backgrounds, different heights, different weights, different styles---I just don't really care about someone's body. I care about the feeling they evoke in me.
Texas Red is a bit of a different game though, and there's a story reason for that. Basically, the basis of Jinx and Simon's relationship is physical attraction. It's not emotional in the beginning. Jinx feels weird about Simon, not because he's nice to her, but because she thinks he's hot lmao
All in all, I think I prioritize the emotional experience of it above all else, and that's about the only defining characteristic I can commit to when it comes to my writing lmao
-
And there you have it! A few tips on how I approached my own writing, as well as how you can improve your own! I hope you guys enjoyed my (completely unwarranted) gushing on the subject lmao
Thank you so much to the anon who sent the original request! I hope that this little guide helps you out!
Until next time!
#slaterbabyasks#archive of our own#fanfic#fanfiction#writing#indigo#call of duty modern warfare 2#creative writing#writing community#writers of tumblr#writerscommunity#writers#ao3#ao3 writer#fanfic author#ao3 author#fanfics#ao3 fanfic#call of duty#art#writing guide#writing advice#writing tips#writing resources#texas red#writing tutorial
63 notes
·
View notes
Text
Leon and Your Hair
a/n: I haven't written in years so this is very experimental 💀 I'm open to constructive feedback!
Also, I wrote this with the reader having type 4 hair in mind but I tried to make it as texture-inclusive as possible :)

General:
Leon himself takes pride in his hair and appearance in general which is one of many ways you guys relate to each other.
I imagine your shared bathroom would be full of hair products and tools more than anything else, though most of it is yours.
Leon isn't ignorant, he knew how important hair is to your culture way before you got together. Because of this, he respects how much effort your maintenance requires.
RE2:
This man 100% uses all your stuff every time he comes over. You start wondering if these containers have a hole at the bottom of them or something. Eventually, Leon just starts buying the shampoo/conditioner combo you use for himself at home because it's doing wonders for his hair. Plus the scent reminds him of you, it's a win-win.
Leon had nice hair before, but your presence in his life introduces him to products like deep conditioner, hair oils, etc that just elevate it further.
When you get your hair braided or styled Leon always wants to be the first person to see it! He even goes out of his way to pick you up from the salon so he can shower you with compliments right after.
If he has time I can see Leon sitting in the salon with you for however many hours it takes the stylists to be done. He sits there flipping through the hair magazines he took from the waiting area, turning the pages over to you every couple of minutes. "Babe, you should try this next time." with the most genuine smile on his face. Even if it was some atrocious 90's editorial style, you smile and nod at every single one.
RE4:
Once Leon starts going on long missions he's unable to be your personal chauffeur 24/7, so he'd definitely want you to text him pictures every time you get your hair done. He always sets them as his phone wallpaper to have an updated photo of you everywhere he goes.
During his training I doubt he'd have the luxury of technology though, instead opting to get a Polaroid of you every now and then in the mail. He always makes sure to compliment you on something in the letters he sends back and keeps the latest Polaroid somewhere in his pockets while the older ones are tacked to his wall. (poor guy misses you so much)
When he's home with you he realizes how much he missed your silk pillowcases and bed sheets. He didn't think they were actually helping his hair and skin until he had to sleep in crazy locations during training/missions and noticed the difference. he silently thanks you for that.
RE6/ID/DI:
After so many years of being together, Leon knows about all your hair preferences, favorite styles, and even things he hasn't seen you in yet. (our boy is educated 👏🏾).
Sometimes you ask him to help pick what you'll do with your hair next which either ends with him saying "You look beautiful no matter what" or showing you very specific photos he found on Google.
It's been years since you've paid for your own hair because Leon insists on taking care of that for you. It doesn't matter how much it costs, he has no problem with it as long as you are happy.
He'd go into the beauty supply store with you and know exactly where to go and what to get, even reminding you not to forget some things along the way.
Leon has a huge soft spot for your natural hair, whatever texture it may be he's whipped for it. Loves being able to touch your hair (with permission) and probably asks to help you on wash days so he has an excuse to do so.
speaking of which, I can see wash days becoming an intimate thing for you two as you get older. He'd help you shampoo in the shower as a form of affection, or you're sitting in his lap while he helps you detangle when your arms get tired.
If you have locs I can see Leon looking up a tutorial on how to do retwists to help you out. Even if you tell him time and time again that you'd rather have your loctician do it he insists you give him a chance. Turns out he's not half bad at it and you let him do it a few times a year.
#leon kennedy#leon kennedy x reader#leon kennedy x you#black reader#leon s kennedy#resident evil#fanfic#x reader#x black reader#leon x black reader
204 notes
·
View notes
Note
Hii- I...☝️🥹 um, I don't actually quite know what to say to my idol. But believe me when I say I am absolutely besotted by your art 🫶💐
I actually got introduced to your page via your COD Valentine's Day cards, and have been stalking your account consuming your art like a hungry fella since then.
Did you know: You actually inspired me and my IRL friends to do art? :3 If you don't mind, any tips for self-learning beginners? 📝
And, sorry if this is a whole lot to read—just wanted to let you know that you are such a great artist! And I hope you know that. Great is an understatement, though 🙂↕️
omg??? thank you so much qwq it seriously means a lot to me!! <3
a small heads up, i'm not a pro or an art teacher, so these tips are just based on my own experience as a self-taught artist:
just draw. sounds simple, but practice really does make perfect. i always struggle with motivation at the beginning of a drawing, but trust me, the flow state kicks in once you get started
references are your best friend! omg, they make such a difference, especially for bigger pieces or anything you're unsure about
learn from other artists, but don’t just copy. figure out how they do things and put your own spin on it. for me, studying comic artists helped a lot with simplifying anatomy in a way that makes sense (im still learning though xD)
don’t overwhelm yourself! focus on one thing at a time. if you’re doing a composition study, don’t get too caught up in tiny details or textures—focus on the big picture first
listen to your body and mental health. take breaks, stretch, and don’t be afraid to step away for a bit. sometimes a quick walk can clear your mind and recharge you
dont compare yourself to anyone but your past self and if you post stuff/have art blog - dont pay that much attention to likes/reblogs n etc, they dont define you or your art
more under the cut!
i also recommend to check out these: again, dont overwhelm yourself with new information, this section is more of an archive/compilation of where you can find some different stuff
YT channels
Sinix Design - I LOVE HIS TUTORIALS SO MUCH.
Ethan Becker - art tips and critisism
Adam Duff LUCIDPIXUL - honestly i dont really know how to describe his content. it feels like an art podcats but more..personal? just check his channel out and you'll see it for yourself
moderndayjames - more animation based but still a lot of helpful tutorials
Dan Beardshaw - found him through anatomy tutorials but he has A LOT MORE than just them, please check him out!!
Videos
this specific video helped me understand that light is not that complicated
in this video, the author shares how they learned art, and i think they nailed the 4th tip perfectly
another lighting video
part 1 of a "how to splash art" series which goes over almost everything you need to know. this series more of a guide cause you still need to go into a depth for each topic but i just have to share it anyways, other parts can be found in the description
Books / Libraries (google drive links)
anatomy for sculptors - helps a lot with anatomy simplification and understanding
a big library with art books and other resources
another library with some books
MORPHO BOOKS!!!
Constructive anatomy by George B.Bradgman
lmk if something doesnt work or you have something else to add!! :]

30 notes
·
View notes
Text
Wendy's Plush Making Starter Pack
Hello! I'm far from an expert at plushie making, but it's been a super fun journey for me and I've seen some folks express interest in learning to do this themselves. Now, that said, this is not actually really a guide to how to make plushies. This is a starter pack of resources that I found helpful to get me started! The most important thing is being willing to go look for resources, but it is intimidating at first because...where do you even start? That's the question I aim to answer!
youtube
This was one the first videos I watched - this will help you understand what it takes to get started. There's also an entire playlist with even more details associated! I only watched the intro vid because I was raring to go. Because of this video, I decided to work with anti-pilled fleece initially, due to the fact that minky is stretchy and that complicates matters. Fleece is also cheaper and in my experience easier to find in a store.
Next up, I thought it was best to start with a simple, free pattern for a few reasons.
if you start too complex, you're likely to be hit with catastrophic failure, and that can be really disheartening! Simple patterns can be completed relatively quickly, so if you mess up and it isn't how you want, it's a lot less painful than failure after two weeks of work or more. And trust me, you will fail and learn a LOT from those failures at the start! Do not expect perfection at first.
Free is a good place to start because if you try this out and find out you hate it, it's nice to not have spent a lot of money. That said, patterns are also often pretty cheap, so it's probably not unreasonable to go buy a pattern if you can't find a free one you like. It's up to you and your budget.
The pattern I first started with was this Poke'mon tsum tsum one!
youtube
It even comes with a free download of the pattern. This is a great one because it's very simple to start with. I had to make adjustments to the patterns due to using fleece (pikachu's ears wouldn't stay up straight the way the felt would), and ultimately I made large edits to the pattern to make my favorite characters. I also added embroidery because that was also something I wanted to learn.
My only other comment about this vid is that while the stitch they use is fine, I've since switched to using a straight stitch or a back stitch which I think are a bit more standard and useful long term. You can find out how to do those by searching for them on youtube! They're very standard and simple so I'm not including any specifics videos on them. My understanding is the back stitch is better when you need something to be a little extra sturdy, but again the internet can guide you better than I can there.
One other stitch that I wish I had known sooner is the ladder stitch, or invisible stitch.
This is a great tutorial that I found easily by googling. it includes a video (REALLY HELPFUL) as well as written instructions with pictures. This is great for closing up your plushies at the end, or for attaching pieces like hair or maybe accessories to the main plushie without using glue or having an ugly seam. That said, I did use glue for many of my tsum tsums because of how small they were, and in some cases I personally feel like that's still the correct choice, but this is REALLY good to have in your arsenal.
Once you're satisfied with a simpler pattern, you can make it more complex by adding details or modifying the pattern, or by moving on to a new pattern!
Okay, phew, so that's sewing! Let's talk about embroidery. You CAN make plushies without embroidery - you can glue on bits like in the Poke'mon tsum video, or depending on your fabric you can draw a face on, or maybe something else I haven't thought of, but I'm me and I like a challenge and detail oriented work so I opted for embroidery.
youtube
The most important of these for plushies in my experience has been what is called "stem" here, but I've also seen it referred to as "outline". Secondly, there's "satin" and "long and short" for filling, but I actually have another video with even more details on filling.
youtube
Satin stitch is what I used for all the fills on my tsum plushies. Thread saver is great because it really does save a ton of thread, and guess what? We don't care how the back looks because it's, you know, going to be inside a plushie. I'm currently learning the long and short methods, both blend and brick, and there's a bunch of other neat ones here.
What I'd really like to do next is link the amazing 20cm plushie embroidery video I learned from - but unfortunately, it's gone because yt terminated the account. So a quick summary of the points I recall:
Do an outline stitch for each part, in the color you are going to fill with. To fill it, go from the outside of the outline stitch, across, and to the outside again. Repeat.
Instead of filling by going directly next to the previous stitch, it can be easier to go halfway through the unfilled space. Then, go halfway again. Then, halfway again. Eventually your stitches will be directly next to each other, and it will be filled. This is less thread efficient but this is mostly what I do because it's easier for me to understand.
Use 1, 2, or 3 strands of embroidery thread depending on your fabric and what you're doing. If you don't know, embroidery floss comes in 6 threads that are all wrapped together, and you are able to separate them. For my fleece, if I'm doing an outline that isn't part of a fill, so for example the mouth which is just a curve for a smile, I tend to do 3 strands. For my outlines and fills, I tend to do 2 strands. You can then use single strands to cover in gaps in your fill, though I'm usually too lazy do this and just use 2 strands the entire time.
That'll about cover it. If you go on youtube, you can search "20 cm doll" or "cotton doll" if that's the specific type of doll you want to make. You can also experiment and try things out! I think that's pretty key to learning myself.
As for my own tips, in general:
Embroidery paper is the best thing ever. It's sticky, but water soluble, and you can write or print on it. So basically, put your pattern on the embroidery paper, stick it on your fabric, and them embroider over it. This helps stabilize the fabric in the hoop, and also helps you make nice neat lines. Life saver.
There are cheaper alternatives to embroidery paper, like water or air soluble pens and pencils, or like transfer sheets (you draw on top of them over the fabric, and the ink transfers to the fabric, and then can be washed off). Lots of options for different budgets! I've only used embroidery paper so I can't speak to the effectiveness.
Embroidery hoops - big ones look cool and tempting but will be hard on your hands and wrists. A friend told me you don't want the hoop to have a radius longer than your fingers if you can avoid it.
THIMBLES! Sometimes it is hard to push the needle through, and thimbles help prevent you from stabbing yourself or in some cases make it possible at all. For my fleece + embroidery paper, I need a thimble or the back of the pin will pierce my skin. I use some cheap rubber thimbles because they feel better to me than metal, but I might invest in some less cheap ones soon.
If you can draw on the back of your fabric, trace the patterns on that way and then cut them. While you can cut by pinning the pattern to the fabric, I've definitely found that harder and my impression from watching vids is that most plush artists draw the pattern on the back and cut it out.
PROTOTYPE, PROTOTYPE, PROTOTYPE! When trying something new, use scrap or other cheap/plentiful fabric to try it out first. You don't want to do all your embroidery only to realize once you've sewn everything up that your pattern needed modifications. Yikes! (I've been there and it sucks) It may feel like a waste of time, but you'll thank yourself when you didn't waste time and potentially more expensive materials only to find you did it wrong.
Embroidery floss - I use DMC, but you can use any brand really! I've heard satin can be a bit harder to use, but haven't had that experience myself.
Lastly: LOOK STUFF UP!!! There's so many resources out there. Find a cool video but you don't need it yet? Save it somewhere so you can watch it when you do! Example, I nabbed a resource on making plushie clothes during a sale from a small artist late last year. I haven't used it yet, but I will be, so I keep it in a resources folder for when I need it! Similarly, I'm about to start embroidering on minky, so I plan to go on youtube and look for tips on how to do that since it's a bit different than fleece
secretly lastly, GO FOLLOW PLUSH MAKERS YOU ADMIRE! It will be inspirational and a lot of them time they sell patterns or how-to guides and then you can support an artist while also getting something super valuable for yourself!!!
Have fun! Make stuff! I'm not an expert but I'm living my best life! Feel free to add your own tips if you want!
#embroidery#plush art#plushblr#plushie#tutorial#references#sewing#again I am not an expert so this is resources from OTHER PEOPLE primarily!#Youtube
25 notes
·
View notes
Note
Hi, I was wondering if there are any updated tutorials on how to make themes? Also, if you publish this message, maybe some might suggest tutorials, base codes? Thank you, have a great one *hug*
hello hello nonny! sorry it took me days to reply but basically:
start with the tumblr documentation and familiarize yourself with the post blocks. then, you can choose base codes. the most updated ones are by eggdesign which are:
npf based template (this one supports new posts)
and this basic base one
if you opt to build your own, it is important that you have these scripts:
unnested captions by magnusthemes and neothm
npf fix by glenthemes
lightbox tutorial by shythemes
then, there's the designing parts:
google fonts for fonts of any kind
learn html x learn css by w3schools
phosphor icons. or you may browse glen's collection of icon fonts.
flex-box tutorial to make your designing easier
and on the advanced side, learn how to make anything responsive/mobile friendly
additional tutorials maybe found in w3schools and css-tricks.
idk if you'd like modals/popups but this is the tutorial that i use. and as for multiple tabs, i use this script too.
and shamelessly advertising my credits page because it's a masterpost of some sort that helped me with my coding journey
also just a tip, when coding anything, picture the lines that u input as a language of its own and picture how it wants to portray a div ^^
14 notes
·
View notes
Note
I just saw ur biker!simon insta post, and price not having a profile picture is so canon im fucking dead 😭😭😭
HEHHAEF RIGHT??
luv thinking it could either have been johnny who made his account — "sir, please, people are thirsty for you!" — or it was john himself who made it and he was following a tutorial he found in google <33
his account, or his lack thereof, was even brought up when reader was asking the squad their handles so she can follow them! kyle had to explain why johnny's called suddyboy (or why they all playfully call him as 'soap') while john goes, "what account...?"
(what are the chances he was thinking reader meant his bank account?)
98 notes
·
View notes
Text
How we decorate our simply plural profiles!
Also I won't be showing how to input the markdowns into simply plural! If you want to see them, they can be found here! If you've ever made a rentry, simply plural uses most of the same ones!
If you want any other tutorials or have any questions linked to this then feel free to ask! With this out of the way, here is our tutorial!
Step one: Figure out a template for the information
This is the hardest step- Personally because we are polyfragmented we use the same template for all alters on pluralkit and simply plural.
Making a template can be a pain, however there are many blogs on tumblr who make templates! Just search 'simply plural templates' and you should find accounts that do them! If you want to request, be sure to check their request status and be patient.
However, if you want to make your own, I would recommend this website for finding symbols to use and this one for emoji combos. I would also say that you may want to have your template link to your system name(s) or headspace (ie if your system has links to forest maybe a nature themed template) but obviously it's up to you what you do.
Personally we have a 'basic' template which we copy and paste but change the emoji's/decor of depending on what the alters likes.
-
Step two: Choose a profile picture.
This will help us decide what colors to change certain assets to and/or which ones will look best with the profile. My recommended sites fir finding icons are: Google images, Pinterest, Tumblr.
Searching things like: '[aesthetic/theme/character] icons' or '[aesthetic/theme/character] [color/aesthetic/theme] icons' does tend to bring up results.
But if you don't know what you want '[anime/aesthetic/theme] icons' or '[twitter/tumblr] icons' will bring up results as well.
In the end we settled on making an icon because there was nothing that fitted our alters needs.
-
Step three: Find decor
This can be very hard to do due to the fact that typing in different names for the same assets will give you different results and recourses are constantly being deleted. However, tumblr and personal websites such as carrd and rentry, are good for finding them.
However, if the website (including carrd, rentry or neocities) gets deleted then the image will become blank and won't exist. Discord also now deletes images after 24 hours, so it's not a usable site anymore. Personally, we use tumblr because if the blog gets deleted the assets remain for some reason. We've tested this a few times so far none of the images have broken and we have some from over 6 months ago- But this is subject to change.
Another thing to note is that size does matter, and some images may be too big to fit into the boxes provided by simply plural.
-
These are our recommended ideas, of course this is different for everyone, and we didn't go in depth about certain topics. However I d hope this is useful.
49 notes
·
View notes
Text
Dank Farrik ☝️
Welcome to a glimpse of AuDHD everyday chaos 🦉Scroll on or get rambled 😅☕️
Today is draft day, but not a lucky one 😭🫠
Do you know those days, when it’s so tempting to abandon every securing structure and just cave in the lurking chaos? 👀
I’ve got a really great picture in my mind and it’s so clear and beautiful, but I can’t realize it, because lack of drawing skill. This sucks so much! 😭
How to draw walking people? Top view walking towards, something around dimetric perspective? I want to screech and hide under my blanket! 🦉Frustration tolerance depleted.
And the worst: Either I lost my ability to google properly or there are no drawing tutorial, studies or templates for this specific motion perspective and if I found some, they were always not the motion I look for or the angle doesn’t fit or aaargulklkjjfhfgdkk! 😱 Kriffin‘ details
I‘m barely an inch from going insane with tempting solutions my brain offers which were absolutely able to ruin me 🤯
I can almost see myself litering caf, green tea and energy drinks through the night, digging myself into 3D modelling only to build my figures and my scene to get that karking epic perspective palpable and out of my head where tempting and sparkling ideas like this tend to 💣 because it’s so beautiful and out of my reach yet aaah 😩
… and oooh I can see where this would lead, I know myself! 👻 After I learned Blender I‘d render that scene into life after some weeks or even months of no sleep welcome to adhd hyperfixation and hyperfocus phases where eating, sleeping and other human things are absolutely overrated. Not that there would be a choice naah and then after all not even recognizing myself anymore I’d realize I could do magic now … 😱 By accident because I only wanted to see the scene … 🙈 I only wanted to draw … 🦉☕️☕️☕️ Lost. Out of energy. But badass. But out of energy. This is so stupid 😂 It would be badass to do 3D and animation aaargdfkljd 😱
👀
So, quiet now brain☝️ It’s highly probable, that there’s a really simple solution for this. I‘ve got a feeling that I find something tomorrow after I got some sleep. Something I can’t see at the moment, because I‘m stuck and tired 🧘🏽♀️✨
… 🤪 Or I learn Blender, ZBrush, Animate, After Effects, Premiere and everything else to realize every missing scene I ever wanted to see and I can die happliy dopamining ✨aaaaah ☕️☕️☕️😂🫠
… No ☺️ I‘m a reasonable adult, I‘ll deal with it tomorrow 😅
Sigh 🤣🤷🏽♀️
#eobe rambles#how to draw walking people dimetric#artist struggles#eobe go sleep now you‘re owling#hoo 👀🦉#star wars cursing#star wars#karabast#dank farrik#audhd#kriffing#hyperfixation#karking#hyperfocus#i blame the brain rain#alternate operating system#artists on tumblr#i process data differently#sigh
13 notes
·
View notes
Text
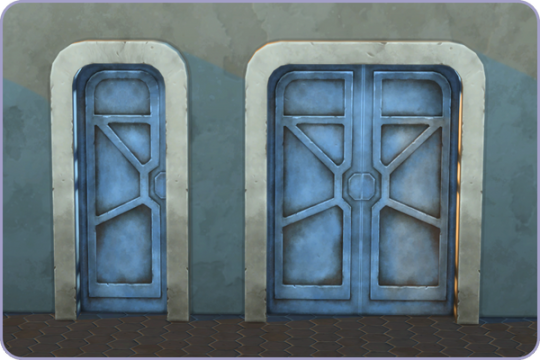
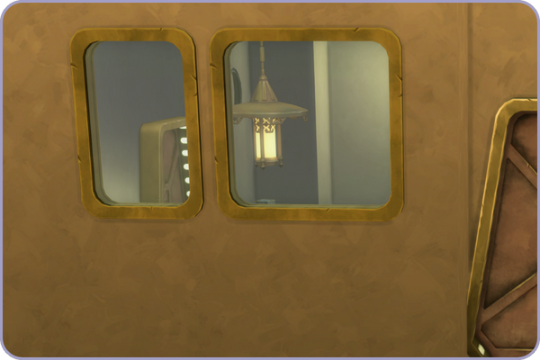
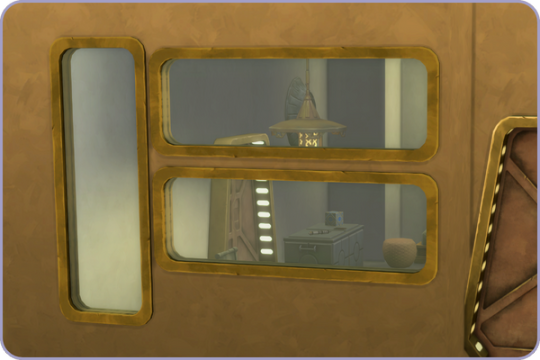
Batuu Bonus Buildmode

When I started some star wars builds I found it very limiting only having the wide doors provided in the Batuu pack so this was really one of the first things I worked on. They are far from perfect but I feel they're good enough to share in case anyone else finds them helpful.
See below for further details, pictures and download links.
Two doors - smaller versions of the resistance and First Order blast doors. Same six swatches as the original doors. Journey to Batuu game pack is REQUIRED.
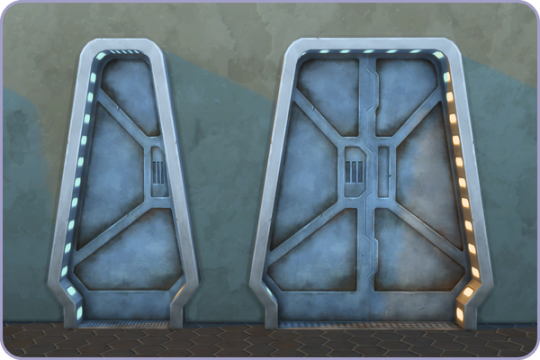
Four arches - created from the original and smaller versions of the resistance and First Order blast doors. Come in the original swatches only. Journey to Batuu game pack is REQUIRED.

Four perforated windows - The first is a stand-alone recolour of the original square window by EA, using colours mostly taken from the EA blast doors, the other three are mesh edits of these for a wider range of sizes. Twelve swatches. Journey to Batuu game pack is REQUIRED.
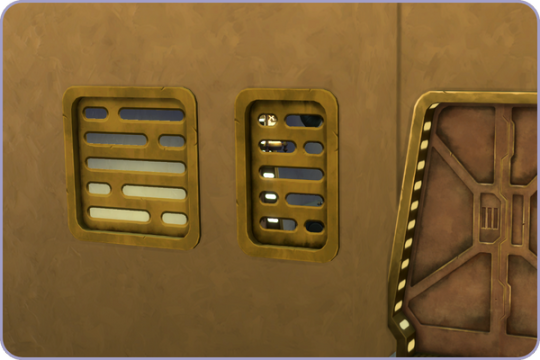

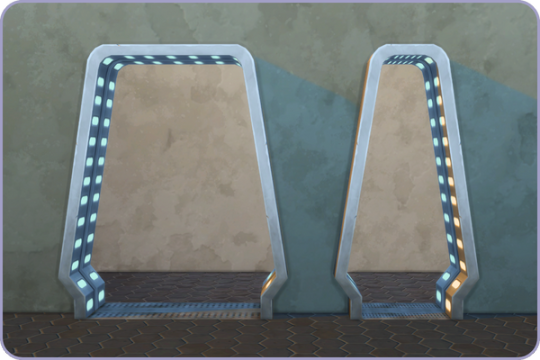
Four glazed windows - These BG glazed windows use the frames from the all metal perforated windows above so should fit in with the style of the other items. Twelve swatches. BG compatible.
Download All (Downloads ZIP file from Google Drive)
Pick and Choose (Opens Google Drive folder)
If there's any problems with any of these items or you have any constructive feedback, suggestions or questions, please just get in touch, I'm still learning every day!
Credits
All textures and meshes are edited or frankenmeshed from in-game EA assets.
CC created using Blender, Sims 4 Studio & GIMP. Preview images using Canva Pro.
Everyone on the S4S forums and the Creator Musings discord group for all the tutorials and advice/help.
#sims 4#ts4#ts4cc#sims 4 custom content#ts4 download#my cc#journey to batuu#star wars sims 4#ts4 cc#the sims 4 custom content#the sims 4 cc#sims 4 cc#ts4cyberpunk#ts4 star wars#ts4 star wars cc#ts4 simblr#ts4 scifi#ts4 bb#alwaysfreecc#free cc#sims 4 star wars cc#cc
277 notes
·
View notes
Text
Garmin Venu SQ2
I suspect this thing is being discontinued, but I got one. The Garmin site shows the newer ones as big and round and version 3. I am out of the fitbit ecosystem (Google). The old fitbit lasted 6 years, but die it did.
I like that it is relatively small and not one of those huge round beasts. Well the picture is kinda big.
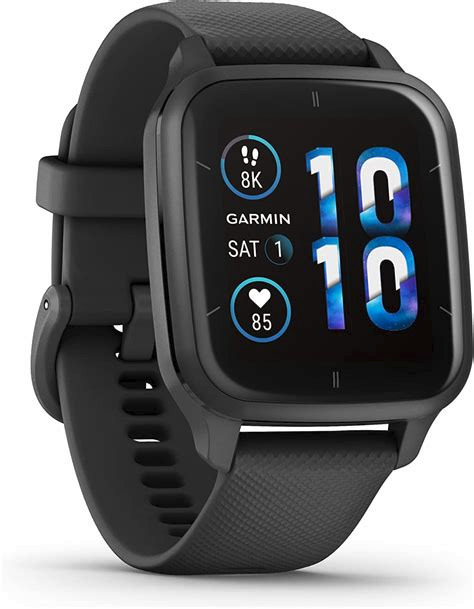
The instructions for using the Venu are poor to actually bad. It has an amazing range of functions. But accessing them without a full tutorial is not simple. If you get a copy of the manual there are instructions that if you follow precisely, simply do not work. Going to the garmin support page there are waves of complaints of people with the same experience.
The trap is there is a touch screen where you can scroll down to icons for various functions, but those do not let you access the functions. There is another screen for that. If you find that path then the instructions in the manual work. The manual leaves out those steps.
I flailed about the internet until I found that DC Rainmaker guy who did a review (favorable) and explained all this crap.
This is typical of the digital toy world. Manuals should be written and edited by people who have never seen this stuff before and have been frustrated.
Now that this out of the way it is a really good watch. I like that I used it for 30 hours and the battery was still over 90%. Last night I had it do my Pulse Oxygen test while I slept. That is supposed to be a battery killer. Still 88% this morning.
It does sleep monitoring, and everything the fitbit did and more. It will duplicate all the functions of my bike computer too. I will have to think about pairing all the bike sensors and duplicating the stuff. I cannot be the only person with a Garmin Bike computer and a garmin watch. But redundancy may lead to confusion.
I got my wife an Apple Watch for Xmas. It is over double the price, and actually aside from the user interface they have similar capabilities. At least for fitness things that is true. I do not use my thing for music or entertainment.
As I get experience with using it with my workouts I will report.
4 notes
·
View notes
Text
Graphics tutorial requested by anonymous
All made with adobe photoshop 2023 (you can find free downloads of cracked versions on here occasionally, photopea.com is also good I've heard) I'm assuming basic knowledge of photoshop/similar editing platforms and their tools, but you can always message me or comment if you are confused about anything!
Also, I used keyboard shortcuts sometimes to change the size of a brush or toggle the brush options, I'm not going to annotate this because it's a lot but here is a resource for basic photoshop keyboard shortcuts
Firstly, the sizing of your edit matters! Max sizing for best quality on Tumblr is 1280 x 1920. If you want to put to put two images next to each other sizing should be 640 x 960.
Next, always try to find the highest quality picture of whatever you're using. Good resources include taylorpictures.net, 4k Taylor Swift, and if I can't find them here I do a google image search of my photo to see if any other websites have a bigger/hq file.
This video is a couple clips I screen recorded for you to see my process and demonstrate a few different tools I use regularly. I added timestamps for you to follow along as you read the rest of this.
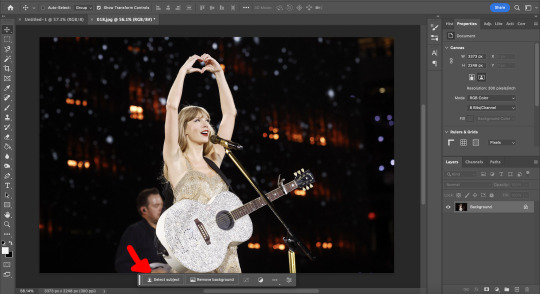
Here's a photo of my workspace I am working with and what I will do first is cut out Taylor from this photo and move her to my correctly sized canvas. There are multiple ways to cut out an image in photoshop, the easiest I've found is the select subject function and using the quick selection tool (see toolbar beneath the photo). Other tools include the magic wand tool, lasso tool, and quick selection tool which I will show later.
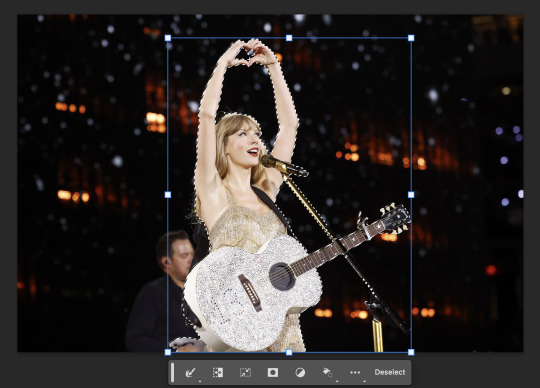
Now you will see that my selection isn't perfect, so I will use the quick selection tool to fix a few areas that I'd like to manually select/correct. This isn't totally necessary at this stage as you can always perfect your cutout in the next few steps, but it does help save some time.
This is where I'll use the quick selection tool to either subtract or add to my selection. There are keyboard shortcuts to toggle between + and - to make this quicker.
See my screen recording of the process from 0:00-1:07
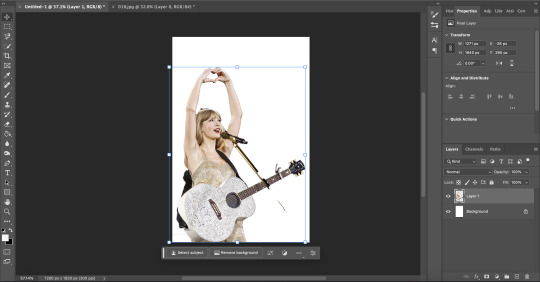
Now that we have our image selected and cut out, I copy and paste it to my canvas I want to work with (size 1280 x 1920) and this is what I've got:
As you can see there's a few spots that need cleaning up in order to make our cutout perfect. You can do this with the eraser tool, magic wand, quick selection, or lasso tool.
See my screen recording of the process from: 1:08-3:50
Now that we're happy with our cutout, we can play around with it in any ways we want! Typically you're gonna do things like change the background color/texture, add elements with the square/circle tool to create what you're looking for, overlay elements and/or textures, and finally recolor it to your preferences.
This part is where you can try new techniques and play around to find what you like. I recorded some of my process of playing with different ideas and elements until I got to something I was happy with! The video explains the tools I was using as well
See my screen recording of the process from: 3:51 - the end
I hope this helps you with creating graphics in the future! The fun thing about photoshop is there are multiple ways to get what you want done. I showed you my way but there's plenty of other techniques and methods out there to try if you're unable to achieve what you want!
Best of luck and feel free to reach out to me if you are struggling/have questions! <3
#Tessa talks#requested#my tutorials#this took forever pls share!!!#photoshop tutorial#graphics tutorial#photoshop
46 notes
·
View notes
Note
this is so random, but i read in your bio that you like to crochet and id love to learn, what are some of the basics and how did you start? 😭😭💞💞
YES okay so
my mom knew how to crochet and tried to teach me but i didnt really get it then
so then i kinda just watched a couple youtube videos (look up something like “how to crochet for beginners”)
youre gonna want to start with acrylic/cotton yarn (cotton is better but acrylic is usually easier to find so its really up to you)
do NOT start with any sort of fuzzy/fluffy yarn — it makes the stitches harder to see
i like using 2.5, 3.0, and 3.5 hooks — really anything in that range
hooks also might be labeled with letters so youll prob need to google the size if so
some basic stitches are: single crochet, double crochet, half double crochet, triple crochet, increase, decrease
learn how to do INVISIBLE DECREASES!! theyre really easy and you cannot see that they are there at all (usually you can see where you did a regular decrease)
single crochets are what you will use the most for amigurumi (stuffed animals basically), so if that is what you want to make, make sure you practice those a lot
speaking of stitches— there is a difference between US TERMS and UK TERMS— i dont really know how to explain it so i would look it up. make sure you know what terminology the creator of a pattern is using
do NOT buy pattern books unless theres a bunch in there you really want — look up free patterns, youtube tutorials, or even go to a craft store and find a book and take pictures of patterns you like
it took me a while to get the hang of crocheting, but after a bit i found it really easy!! it just takes a bit of practice. i was really frustrated at first, but i promise it gets wayyy easier
sorry that this was scattered😭 also theres prob some typos in here somewhere but idrc
if u wanna know anything else about crocheting ask me :D
3 notes
·
View notes