#Optimizing Your Workflow
Explore tagged Tumblr posts
Visit Tumblr Blog
Explore Tumblr blogs with no restrictions, modern design and the best experience.
Last Seen Tumblr Blogs


Fun Fact
Kazakhstan’s Minister of Communications and Informatics has blocked the Tumblr site because it contained 60 sites of terrorism, extremism, and pornography in 2015.
Text
Optimizing Your Workflow: Essential Tech Tools for the Modern Professional
Do you ever fantasize about a school week that feels effortless? Imagine a world where deadlines transform from all-nighters into manageable milestones, research material magically organizes itself at your fingertips, and complex essays flow freely from your pen (or keyboard). This might sound like wishful thinking for a busy student, but the power of workflow optimization can make it a…

View On WordPress
0 notes
Text
Unlock Your Potential: The Ultimate Guide to HugeTools.net
In today’s fast-paced digital world, having access to the right tools can make all the difference in boosting productivity, saving time, and achieving success. Enter HugeTools.net , your ultimate toolkit designed to simplify even the most complex tasks. Whether you're a developer, marketer, student, or entrepreneur, this platform has everything you need to get things done efficiently.
Welcome to our comprehensive guide where we’ll explore what makes HugeTools.net so special, highlight its key features, and show you how it can transform the way you work. Let's dive in!
What Is HugeTools.net?
HugeTools.net is an innovative online platform offering a vast array of free tools tailored to meet the needs of modern professionals and hobbyists alike. From text manipulation and image optimization to data conversion and SEO utilities, HugeTools.net provides solutions for almost every task imaginable.
Our mission is simple: empower users by delivering powerful, user-friendly tools that save time, reduce effort, and deliver high-quality results. No matter your skill level, you'll find something here to help you achieve your goals.
Key Features of HugeTools.net
Let’s take a closer look at some of the standout features available on HugeTools.net:
1. Text Tools
Manipulating text has never been easier with our collection of text tools:
Convert case (uppercase, lowercase, sentence case).
Remove extra spaces or duplicate lines.
Generate Lorem Ipsum for testing purposes.
Perfect for writers, developers, and anyone working with large amounts of text.
2. Image Optimization Tools
Optimize your images effortlessly with these handy utilities:
Resize images for web or print.
Convert file formats (JPEG to PNG, etc.).
Add watermarks for branding purposes.
Ideal for designers, bloggers, and photographers who need optimized visuals without compromising quality.
3. Data Conversion Tools
Transform data into different formats quickly and easily:
CSV to JSON converter.
XML to HTML transformer.
Base64 encoder/decoder.
Great for developers and analysts handling complex datasets.
4. SEO & Marketing Tools
Enhance your online presence with our suite of SEO and marketing tools:
Meta tag generator.
URL shortener.
Keyword density checker.
Helps marketers and content creators improve website performance and visibility.
5. Developer Utilities
Streamline coding tasks with specialized developer tools:
Color picker and palette generator.
Regex tester.
QR code generator.
Saves time for developers and simplifies common coding challenges.
Why Choose HugeTools.net?
Here are just a few reasons why HugeTools.net stands out from the competition:
User-Friendly Interface: Our tools are intuitive and require no technical expertise to operate.
Free to Use: Access all our tools without any hidden fees or subscriptions.
Constant Updates: We regularly update our platform with new features based on user feedback.
Reliable Performance: Trust us to deliver accurate results every time.
At HugeTools.net, usability, reliability, and accessibility are our top priorities. That’s why thousands of users worldwide rely on us to simplify their workflows.
How to Get Started
Ready to try HugeTools.net? Follow these simple steps:
Visit https://hugetools.net and browse through the categories.
Select the tool that matches your needs.
Follow the on-screen prompts to input your data or upload files.
Download or copy the output as needed.
Explore additional options within each tool for advanced functionality.
It’s that easy! Within minutes, you’ll be up and running with one of our powerful tools.
Tips and Tricks
To get the most out of HugeTools.net, consider these pro tips:
Combine multiple tools for enhanced productivity (e.g., optimize an image and then add a watermark).
Bookmark frequently used tools for quick access.
Check the "Help" section for tutorials and FAQs if you encounter any issues.
Share your experience with others—your feedback helps us improve!
Success Stories
Don’t just take our word for it—here’s what real users have to say about HugeTools.net:
"As a freelance graphic designer, I rely heavily on HugeTools.net to compress my images before sending them to clients. It saves me hours of work every week!" – Sarah M., Graphic Designer
"The CSV-to-JSON converter saved my team during a tight deadline. We couldn’t have completed the project without it." – John D., Software Engineer
These testimonials speak volumes about the impact HugeTools.net can have on your workflow.
Conclusion
HugeTools.net isn’t just another collection of tools—it’s a powerhouse designed to revolutionize the way you work. With its diverse range of functionalities, commitment to user satisfaction, and constant innovation, there’s no reason not to give it a try.
Start exploring today and discover how HugeTools.net can transform your productivity. Who knows? You might just find your new favorite tool!
Call to Action
Ready to boost your productivity? Head over to HugeTools.net now and start using our free tools! Don’t forget to leave a comment below sharing your favorite tool or suggesting new ones we could add. Happy tooling!
#Secondary Tags (Specific Features)#Text Tools#Image Optimization#Data Conversion#SEO Tools#Marketing Tools#Developer Utilities#CSV to JSON Converter#QR Code Generator#Regex Tester#Meta Tag Generator#Tertiary Tags (Audience & Use Cases)#For Developers#For Marketers#For Students#For Entrepreneurs#For Designers#Work-from-Home Tools#Remote Work Tools#Digital Marketing Tools#Content Creation Tools#Graphic Design Tools#Long-Tail Tags (Specific Phrases)#Best Free Online Tools#Tools for Boosting Productivity#How to Optimize Images Online#Convert CSV to JSON Easily#Free SEO Tools for Beginners#Quick Text Manipulation Tools#Enhance Your Workflow with HugeTools.net
0 notes
Text

AI tools optimize every video to help you earn passive income effortlessly! 💸✨ From smarter SEO to targeted recommendations, these tools ensure your content reaches the right audience. Turn your creativity into a steady revenue stream today! 🚀🎥 Click this link : https://tinyurl.com/3tyr7c8x
#ai powered#passive income#video optimization#youtube success#smart tools#content creation#digital marketing#boost your channel#monetization made easy#channel growth#ai for creators#efficient workflows#digital#youtube tips#ai#tech tools#creator community#youtube growth#content strategy
0 notes
Text
Introduction
In our fast-paced world, time is a precious commodity. Whether you’re a student, professional, or entrepreneur, finding ways to streamline your daily tasks can significantly boost productivity. Enter ChatGPT, an AI language model that can assist you in automating various aspects of your work. In this article, we’ll explore nine ChatGPT prompts that can revolutionize the way you tackle your busy schedule.
1. Calendar Management
ChatGPT prompts: “Schedule a meeting for next Tuesday at 2 PM.”
ChatGPT can interact with your calendar application, whether it’s Google Calendar, Outlook, or any other platform. By providing clear instructions, you can effortlessly set up appointments, reminders, and events. Imagine the time saved when ChatGPT handles your scheduling!
2. Email Drafting
ChatGPT prompts: “Compose an email to my team about the upcoming project deadline.”
ChatGPT can draft professional emails, complete with subject lines, body text, and even attachments. Simply describe the purpose of the email, and let ChatGPT do the rest. It’s like having a virtual assistant dedicated to your inbox.
3. Code Generation
ChatGPT prompts: “Write a Python function that calculates Fibonacci numbers.”
Whether you’re a programmer or a student, ChatGPT can generate code snippets for various programming languages. From simple functions to complex algorithms, ChatGPT can save you hours of coding time.
4. Content Summarisation
ChatGPT prompts: “Summarise this 10-page research paper on climate change.”
Reading lengthy documents can be daunting. ChatGPT can analyse and condense large texts into concise summaries, allowing you to grasp essential information quickly.
5. Social Media Posts
ChatGPT prompts: “Create a tweet announcing our new product launch.”
Crafting engaging social media content is essential for businesses. ChatGPT can generate catchy posts for platforms like Twitter, LinkedIn, or Instagram, ensuring your message reaches your audience effectively.
6. Language Translation
ChatGPT prompts: “Translate this paragraph from English to Spanish.”
Whether you’re communicating with international clients or learning a new language, ChatGPT can provide accurate translations. Say goodbye to language barriers!
7. Data Analysis
ChatGPT prompts: “Analyse this sales dataset and identify trends.”
ChatGPT can process data, create visualisations, and extract insights. Whether it’s sales figures, customer behavior, or market trends, ChatGPT can help you make informed decisions.
8. Creative Writing
ChatGPT prompts: “Write a short story about time travel.”
Beyond practical tasks, ChatGPT can unleash creativity. From poems to fictional narratives, ChatGPT can be your muse when inspiration strikes.
9. Personalised Recommendations
ChatGPT prompts: “Suggest a book based on my interests in science fiction.”
ChatGPT can recommend books, movies, restaurants, or travel destinations tailored to your preferences. It’s like having a knowledgeable friend who knows your tastes.
Conclusion:
These nine ChatGPT prompts demonstrate its versatility. By integrating ChatGPT into your workflow, you can automate repetitive tasks, enhance communication, and free up valuable time. So, next time you’re swamped with work, turn to ChatGPT—it’s like having a digital assistant that works tirelessly to simplify your life.
In addition to ChatGPT, there are several other powerful AI tools designed to automate various tasks. Let’s explore some of them:
ACCELQ: A codeless AI-powered tool that seamlessly tests software across multiple channels (mobile, desktop, etc.). It offers continuous test automation and minimizes maintenance efforts1. You can find more information on their website.
Katalon: An AI tool for test automation that provides a complete solution for testing mobile applications and websites. It features a robust object repository, multi-language support, and efficient test results1. Check out Katalon’s website for details.
Selenium: An open-source AI tool for automating web and application testing. It’s commonly used for regression testing, functional testing, and performance testing1. You can explore more about Selenium on their official website.
Appium: Specifically designed for mobile app automation, Appium supports both Android and iOS platforms. It’s an excellent choice for mobile testing1.
Cypress: Known for its fast execution and real-time reloading, Cypress is an end-to-end testing framework for web applications. It provides a great developer experience1.
Parasoft: Offers comprehensive testing solutions, including static analysis, unit testing, and API testing. It’s widely used in the industry1.
Cucumber: A behavior-driven development (BDD) tool that allows collaboration between developers, testers, and non-technical stakeholders. It uses plain text specifications for test cases1.
TestNG: A testing framework inspired by JUnit and NUnit, TestNG supports parallel execution, data-driven testing, and test configuration flexibility1.
LambdaTest: A cloud-based cross-browser testing platform that allows you to test your web applications across various browsers and operating systems1.
Robot Framework: An open-source test automation framework that uses a keyword-driven approach. It’s highly extensible and supports both web and mobile testing1.
TestCraft: A codeless automation platform that integrates with popular tools like Selenium and Appium. It’s suitable for both manual and automated testing1.
Watir: A Ruby library for automating web browsers, Watir provides a simple and expressive syntax for testing web applications1.
Remember that each tool has its strengths and weaknesses, so choose the one that best fits your specific needs. Whether it’s testing, content creation, or workflow automation, these AI tools can significantly enhance your productivity and efficiency.
#generate-a-random-password#convert-a-pdf-to-a-text-file#create-a-qr-code-for-a-url#calculate-income-tax#convert-a-video-to-gif#extract-text-from-an-image#merge-multiple-pdf-files#generate-a-summary-of-a-long-text#find-duplicate-files-in-a-directory#ChatGPT prompts#Automate busy work#Blog writing workflow#Content creation#Keyword research#SEO optimization#Productivity hacks#Time-saving tools#Streamline workflow#9 ChatGPT Prompts to Automate Your Busy Work
1 note
·
View note
Text
youtube
Seamless Workflow: Copy to Clipboard and Paste to the Timeline in Green Screen by DoInk
Unlock a world of efficiency in your Green Screen by DoInk projects with this game-changing tutorial. In this blog post, we'll guide you through the step-by-step process of copying content from any website and seamlessly pasting it onto your timeline. Whether you're a teacher curating educational resources or a content creator pulling in diverse elements for your videos, this tutorial will elevate your workflow and make the most out of the Copy to Clipboard and Paste features.
What you will learn:
Introduction to the Copy to Clipboard and Paste to the Timeline features in Green Screen by DoInk
Step-by-step guide on copying content from any website
Demonstrating the seamless process of pasting content onto the timeline
Real-world examples for inspiration and application
Enhancing your projects with a diverse range of online resources
Copy to Clipboard and Paste to the Timeline features in Green Screen by DoInk open up new possibilities for your creative journey. Whether you're a teacher or a content creator, harness the power of seamless workflow integration and elevate your projects.
#Green Screen by DoInk#Copy to Clipboard and Paste to the Timeline Tutorial#Seamless Workflow Integration#Diverse Online Resources for Projects#DoInk Tutorial for Educators and Content Creators#Creative Asset Integration#Time-Saving Features in Green Screen by DoInk#Enhance Your Projects with Copy-Paste Efficiency#Optimize Workflow in Video Editing#Pulling Content from Websites into Green Screen Projects#Do Ink#DoInk#How to use DoInk#How to use Do Ink#Youtube
0 notes
Text
youtube
A Customer Testimonial for SimpleDay, Your Trusted Monday.com Authorized Partner | Unlocking Success
n this insightful customer testimonial, Tom Nelson from American Tank in Windsor, California, shares his experience with SimpleDay's expert solutions. Discover how we transformed American Tank's management and production systems, providing them with unparalleled efficiency and reducing stress, errors, and production time by over 80%. If you're seeking production efficiencies, management oversight, quality controls, and a comprehensive history archive, join us in exploring the impactful collaboration between American Tank and SimpleDay. Ready to elevate your business with Monday.com? Trust the experts at SimpleDay to be your Chief Engineers on the path to success. Subscribe now for more success stories and valuable insights!
#business efficiency#manufacturing success#american tank#productivity boost#collaboration success#production efficiency#customer acquisition#procurement success#business management#testimonial video#a customer testimonial for simpleday#your trusted monday.com authorized partner | unlocking success#Tom Nelson#Monday.com Authorized Partner#monday.com#custom implemention#tara horn monday.com#monday.com tutorials#monday.com quick tutorial#optimize your workflow#Youtube
1 note
·
View note
Text
7 Steps to Doubling Your Time Off: The Secret of Work-Life Balance
In a fast-paced world where work often seems to consume our lives, the quest for achieving a healthy work-life balance has become more crucial than ever. Many of us find ourselves caught in the relentless cycle of deadlines, meetings, and never-ending to-do lists. However, what if there was a way to double your time off without compromising productivity? In this blog, we will explore seven…

View On WordPress
#delegation#double your time off#establishing boundaries#exercise#grow business#meditation#personal development#prioritization#productivity tips#saying no#self-care#sleep hygiene#technology tools#time blocking#time management#tips for work-life balance#unplugging#work-life balance#workflow optimization
0 notes
Text
Was macht den unterschied zwischen Erfolg haben und einfach Wissen vermitteln? https://www.dings-da.com/setzte-dein-wissen-sinnvoll-ein-fuer-mehr-erfolg-dein-wissen-ist-dein-kapital/?_thumbnail_id=3526
0 notes
Text
Jinlai | Domineering CEO Simulator
You play as jinlai - an heir(ess) to a massive conglomerate in the fictional country of Toswana. Scheming relatives, millions in cold crypto drives, parties with the movie stars, totally legal lobbying of the politicians and everything else that comes with big numbers in your bank account.
Fight a succession war to gain control of one of the biggest companies in the world - will you remain just as ‘wealthy’ or will you become filthy rich?
Invest in companies, manage them, take over. ‘Optimize’ their workflows, squeeze every penny of profit or be a decent human being.
Curry favor with the powers that be, threaten your competitors, bribe whoever it is you need to bribe. Or, you know, don’t. Remaining an upright and honest citizen is always an option.
Steal your uncle’s fiance for a beneficial marriage, date a movie star living next door, seduce your loyal, slightly older bodyguard, get involved with a single mother (your own mother definitely doesn’t approve), discover something daunting about your casino-owning loan shark friend or (and) sleep around with a bunch of random people.
All ROs are heterosexual.
DEMO LINK
WORD COUNT:
Chapter 1 - 53k Chapter 2 - in progress
#interactive fiction#interactive story#text based game#story rich#character customization#romance#dating sim#contemporary romance#business#choicescript#choices matter#male protagonist#female protagonist
235 notes
·
View notes
Text
Femme Fatale Guide: 15 Essential Business Skills Everyone Should Master
Articulate, confident communication
Crafting effective, compelling pitches
Operating and communicating through a solution-oriented framework
Research of all types (Google, market research, studies, polls, interpersonal conversations, etc.)
Learning how to streamline, edit, and organize information in a clear and logical way
Accumulating high-level working knowledge/proficiency in all tools and programs directly related to your type of work/industry
Budgeting and financial optimization (investment, tax benefits, etc.)
Reading and interpreting legal contracts/documents
Setting rates, boundaries, and learning when/how to delegate
Good posture, direct eye contact, and a firm handshake
Building streamlined systems for onboarding, different repeat project scopes/workflows, and KPI measuring
The art of following up, listening to (potential) clients' needs, asking thoughtful questions, and benefit-oriented salesmanship
Consistently reading, learning, and studying current events/cultural platforms/industry and field-related knowledge
How to spot customer/client/business partner red flags
Self-management, task/project prioritization, and optimization of your personal energy clock + levels
#femmefatalevibe#business tips#career advice#career path#career goals#professionalism#women business#female writers#female entrepreneurs#professional development#personal development#relationship advice#people skills#social skills#life lessons#higher self#personal growth#boundaries#self esteem#self confidence#conflict resolution#communication skills#interpersonal communication
2K notes
·
View notes
Note
How to stay patient and finish drawing A painting♥️
There are a few things to consider
1. Optimize your workflow
This one is more of a preventive measure. There are tons of ways to optimize your workflow to make it more time efficent. Starting with using shortcuts, to using lasso tool cleverly, practicing stroke economy (say more with less brush strokes), using outline layer property for lineart, drawing on 1-2 layers, 3D bases and many more.
2. Split it into multiple sessions
Not every artwork has to be done within one drawing session. In fact most of mine are split into 2-3 days. Reduces burnout and helps you see mistakes the next day
3. After long painting do something quick
Sometimes when I finish a 30h painting, the thought of jumping right into the next 30h painting is demotivating. Switch things up once in a while. Do a low stakes sketch or simple painting after a long one. Helps keeping up morale in general.
4. Hang in Discord calls or listen to podcasts
Something that keeps you engaged but doesn’t detract from your focus too much. Streaming your art in Discord calls also helps beating your ass.
5. Get better (duh)
A lot of frustration in art comes from lacking skills. Every artist experiences it, I do too. Sadly there’s not much help besides practicing the stuff I struggle with and getting tons of references for it. But once you stop struggling with fundamentals, art gets so much less frustrating and the process can be enjoyed from start to finish.
6. Don’t be too much of a perfectionist
Don’t zoom too much into your art. People can’t see the details anyways. Parts that are not the focal point can be less detailed and rougher. And sometimes you just have to let go of an art piece and move on to the next one.
348 notes
·
View notes
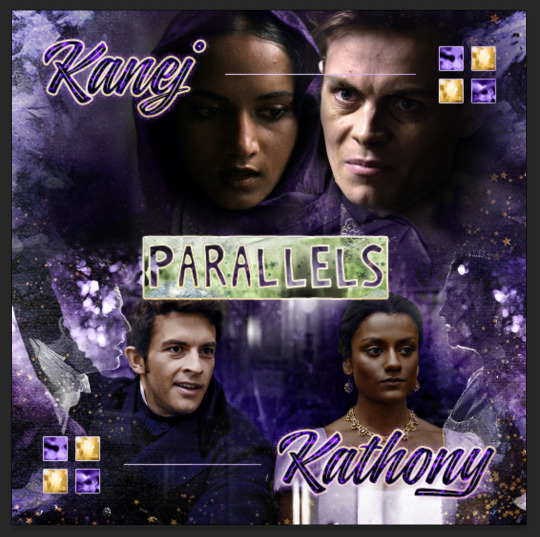
Note
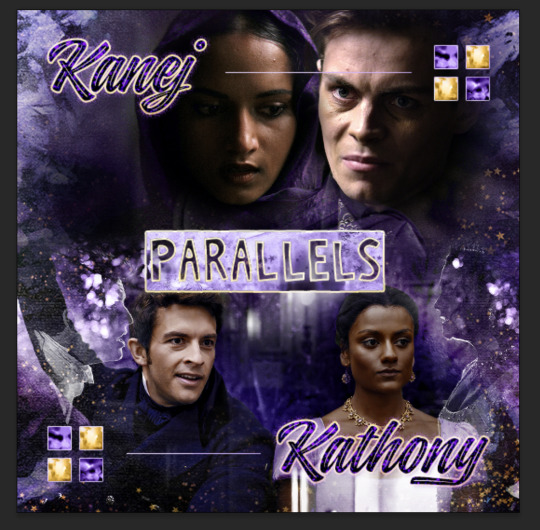
Oh I’m sorry I have GOT to ask! How did you do the text animation in the first gif of 718688291365502976/pscentral-event-15-favourite-ships-kanej?? It’s just. It’s so beautiful
Hi anon! I've used After Effects to create the text animation in the first panel of this post. I'll show you the basic idea of how I've created the animated text effect here :D

What you need:
A cutout font (the font that I've used is Trouble Child Outblack by @justlikethistrain)
Adobe Photoshop with Video Timeline feature
Adobe After Effects
Supplementary files: gif prep action pack / golden outline layer style / assorted textures
Difficulty: advanced; knowledge in gifmaking with the video timeline interface assumed
Note: This tutorial assumes that you're working with all of the composite gifs in a Photoshop composition file and using the video timeline interface
Other useful tutorials to refer to: Text overlay effect / After Effects text animation / clipping mask vs layer mask
Tutorial under the cut. Like / reblog if you find this useful!
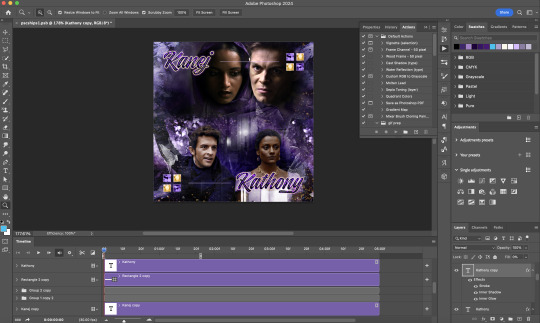
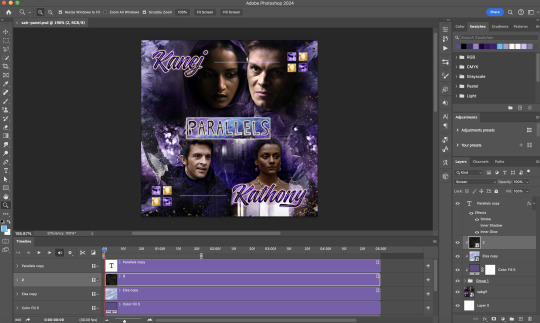
1) Photoshop: Preparing your gif panel
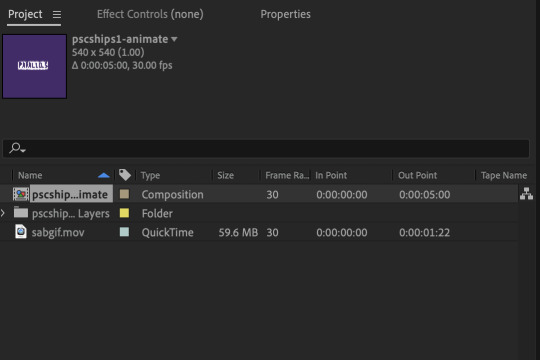
Setting up your PSD composition panel: Create a blank PSD file and set it to Tumblr dimensions (540px x 540px in this particular gifset)
Enable Video Timeline and drag all of the component gifs from your folder to the PSD composition file. Resize / move these gifs around until you're happy with the placements.
Trim the timeline work area so it's the same length as the shortest component gif you've added to the PSD composition file. You can also add some textures & additional adjustment onto this panel.
2) Photoshop: Exporting your base gif
I highly recommend exporting the base gif right now, to ensure a smoother experience scrubbing through the video timeline when adding finishing touches later on in the workflow.
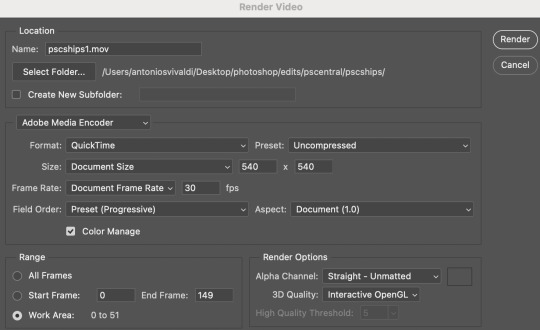
My preferred method is to render the composition as a video clip from File > Export > Render video.
To get the optimal export quality, I use the following settings:
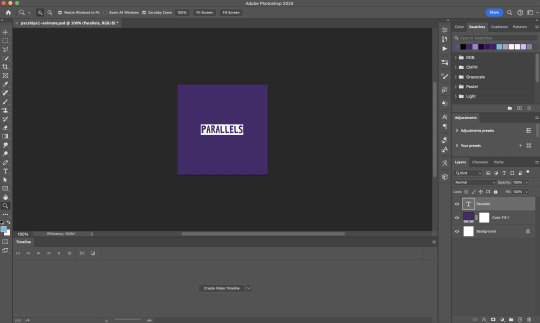
3) Photoshop: Preparing your text layer
Make a new Photoshop composition file of Tumblr dimensions

Drag in the video clip that you've just rendered (the base gif) to this composition file
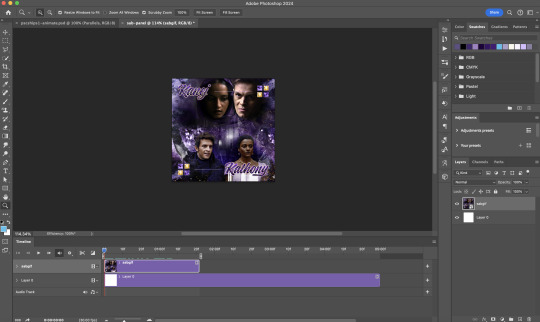
Add a new text layer in your PSD composition file and set the colour to white then tweak this layer until you're happy with the text placement.
For performance optimisations on After Effects, I duplicate the PSD composition file and delete all other layers. This PSD file contains only the text layer that will be animated.
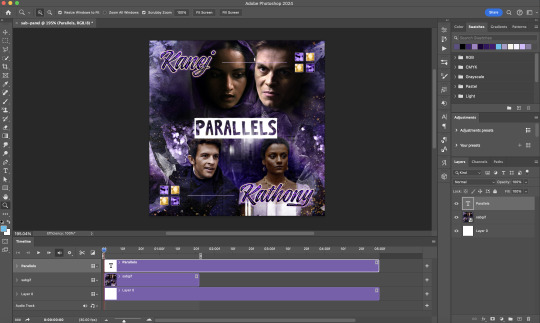
4) Photoshop: Adding overlays & decorations on the text layer
This step allows you to preview the text effect without the animations (i.e. allows you to tweak the texturings & colourings)
Duplicate the text layer. Set the bottom layer's (highlighted in red) blend mode to Exclusion and apply the gold outline layer style to the top layer (highlighted in green). Make sure the Inner Shadow is disabled!
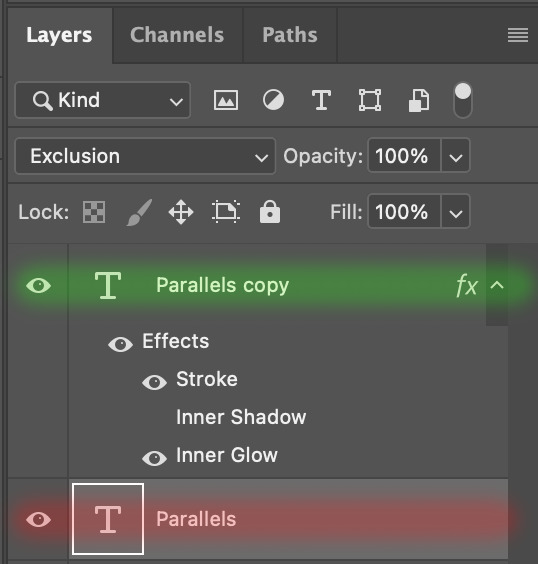
The panel now looks like this
I want to have the liberty to use different colours & textures on the bottom text layer with animation, so the next thing I do is to right click on the bottom text layer and select "Group from Layers"
To change the colour of the filled text layer to purple:
Collapse the Group that you've just created
On top of the collapsed Group a purple Colour Fill layer,
Set the Fill layer's blend mode to "Colour"
Right click on the Fill layer and select "Create Clipping Mask"
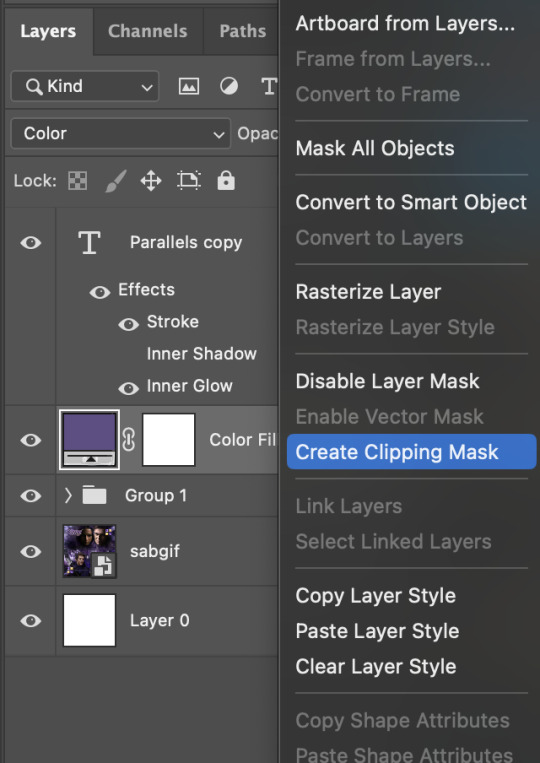
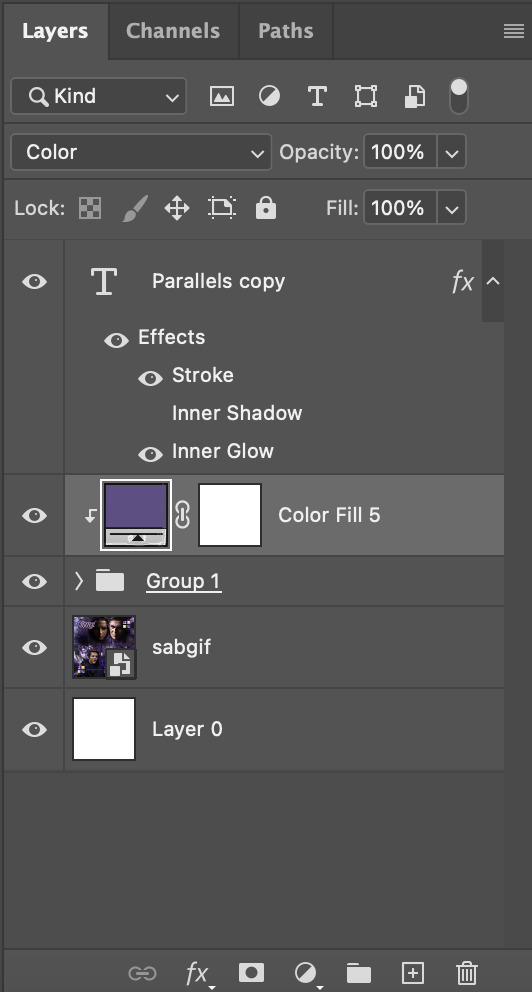
Now the colour of the filled text layer is purple
After adding more textures & decorations on the text layer (with photo negative effects) I get the following:
5) Photoshop: Adding overlays & decorations on the text layer
To avoid performance issues on After Effects, I make a new PSD file of the same dimension. With both the PSD files open, I select the text layer (highlighted in red) while holding Shift, I drag this to the blank PSD file (see the green arrow)
Holding Shift ensures that the layer's placement is preserved when it's copied to a separate PSD file.

In the new PSD file, I set the text layer's blend mode to "Normal"
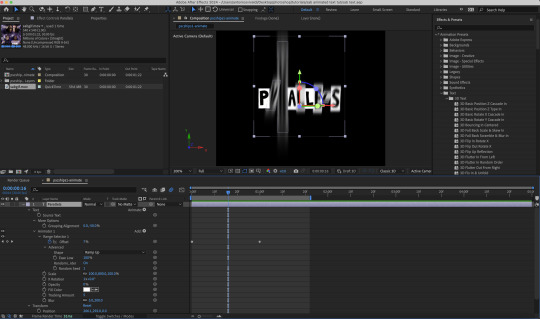
6) After Effects: Animating your text layer
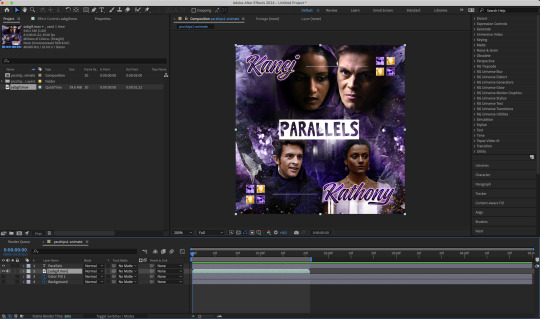
Make a new project on After Effects and drag in the text layer PSD file. Import this file as a Composition

Also drag in the base gif video clip to the AE project.
While we won't be exporting anything with the base gif visible, having this file in the project file is useful if you want to have a better picture of how the animation will look in tandem with the gif.
Double click on the composition. Hide the colour fill and background layers. Then right click on the text layer, go to Create > Convert to Editable Text
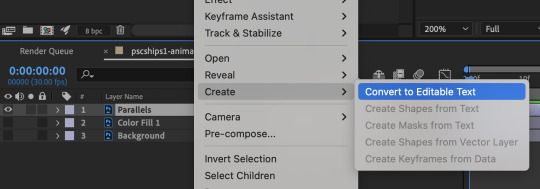
To be able to preview the animation with the base gif, drag the video clip to the composition file and below the text layer. The visibility of the layer can be toggled on / off anytime in the After Effects workflow
Now we prepare the text layer to be animated. Because the final animated effects is 3D & has motion blur, right click on the text layer and select "3D layer" (highlighted in green) and Switches > Motion Blur (highlighted in red)

Go to Animation Presets > Text to browse through some presets that you could use to animate the text layer. For this gifset, I've used a preset within the 3D Text folder called "3D Random Spike Tumble in".
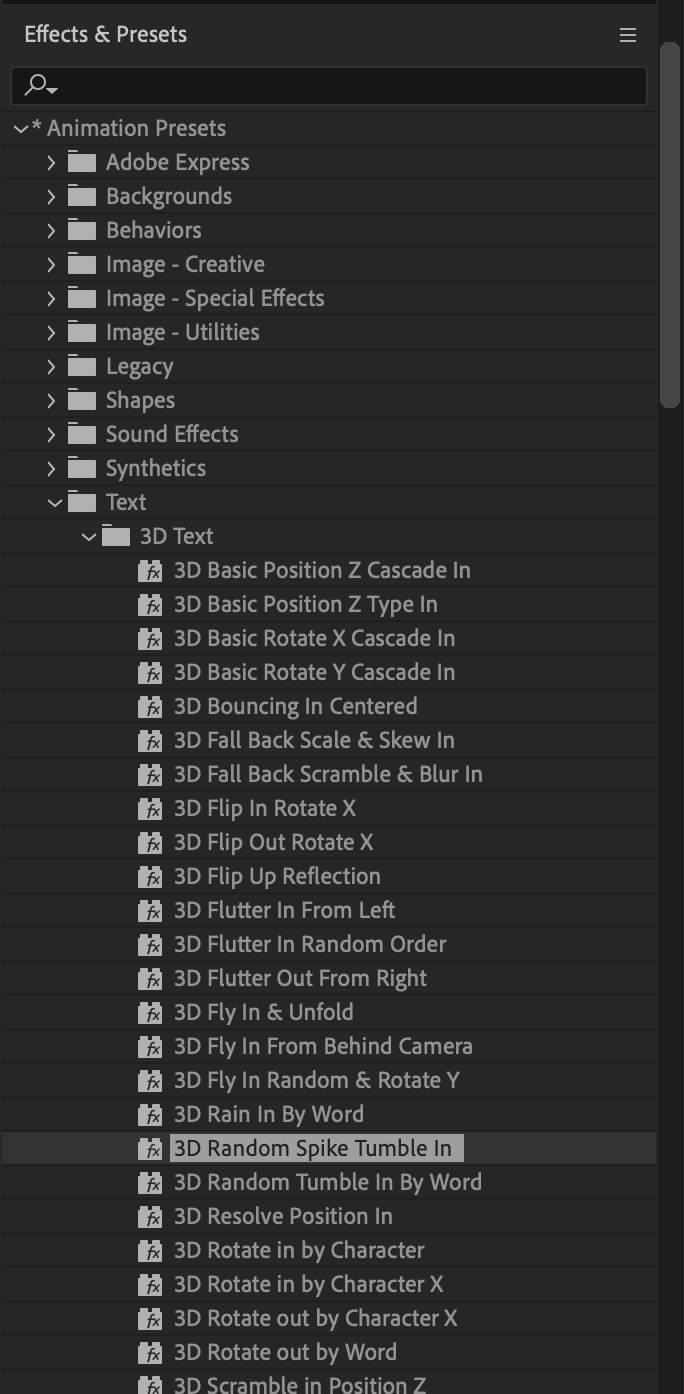
While selecting your text layer, press U to view the keyframes and you can adjust the position of these keyframes until you're happy.
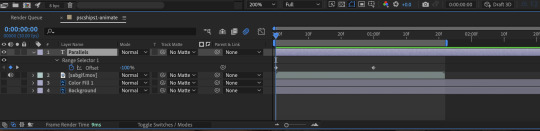
For more finishing touches, press U again to tweak more options in this preset. In this case, I do to Animato 1 > Range Selector and changed the Colour Fill to #fff (the default colour is light yellow)
Then do you File > Export > Add to Render Queue
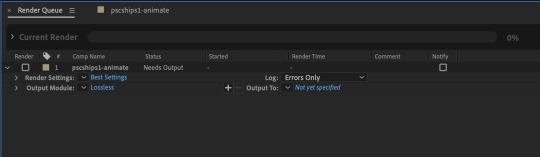
Click on the Output Module and use the following settings to render the text layer as a video file with transparency
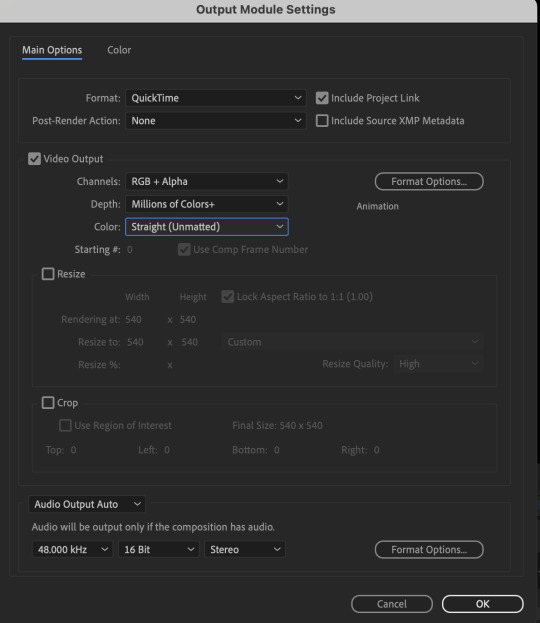
Then after specifying the folder in which you'll export the video to, click "Render" to render the video file containing your animated text layer.

7) Photoshop: Adding the animated text & finishing touches
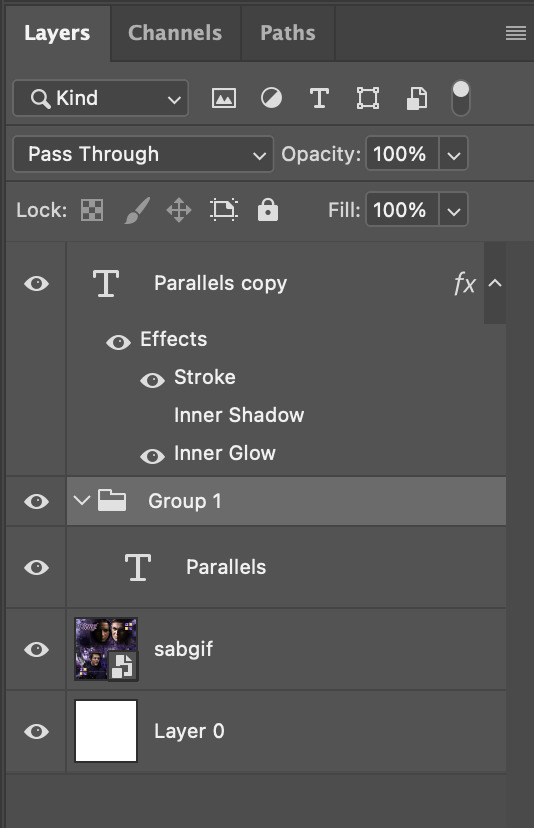
On Photoshop, drag the rendered clip containing animated text, to the PSD composition file with the static text layers.
Duplicate the animated text video layer
Drag one of the layers inside Group 1 and set the blend mode to "Exclusion" (Highlighted in green)
Move the other layer to the top and apply the gold outline layer style with Inner Shadow disabled (highlighted in red)
Hide both text layers (highlighted in yellow)

By scrubbing through the timeline, I've noticed that the animation didn't look clean enough, so I'll add some finishing touches
By selecting the upper text layer containing layer styles, go to the timeline and add opacity keyframes going from opacity 0% to 100% a few frames apart

Once you're happy with the finishing touches, flatten / render your PSD composition file, change the frame delay to 0.05s and export your gif and voila!

I hope this helps 💖
#tutorial#gif tutorial#photoshop tutorial#after effects#chaoticresources#dearindies#userriel#useralien#userraffa#usershreyu#user.tee#useryoshi#usernik#userjoeys#usersole#arthurpendragonns#userhallie#*#my tutorials#my resources
152 notes
·
View notes
Text

Boost your content today with simple AI tools that deliver big results! 🚀✨ From editing to analytics, these tools make creating, optimizing, and growing your content easier than ever. Start your AI-powered journey now! 🎥💡 Click this link : https://tinyurl.com/3tyr7c8x
#ai powered#content boost#smart tools#content creation#youtube growth#digital innovation#creator tools#efficient workflows#ai for creators#content optimization#boost your channel#creative success#digital#youtube tips#content strategy#tech tools#creator community#channel growth#ai#digital marketing
0 notes
Note
can i inquire generally what your twine stories look like in editing format? like with the different connected squares that contain text blocks. im writing smth rn but i fear my organization in twine is not optimal at all. how did you manage for as big of a story as you have?
I figured out something that makes sense to me. I'm the only person developing this game, so it's optimized for my own systems and workflow. What I do may not work for anyone else.
A few things: I don't try to pre-plan my branches in Twine itself. It doesn't really matter what the tree even looks like until I'm coding it, and the main thing the visual editor helps with is seeing the overall flow of the game, how everything connects together, and finding sections where something got overlooked.
Because of the lag in the Twine editor and also to help with compartmentalizing the game into different sections, I split it into multiple stories that are then compiled with Tweego. So, there is no overarching editing tree for the whole game that I actually use.
This post and this post goes more into that process.

This is my current library, with each chapter file labelled. WAYFARER is the start of the game (CC, Prologue, the first bit of Episode 1), Chapter_1.1 is the Route A Count fight and end of the episode, Chapter_1.2 through to Chapter_1.6 is Route B of Episode 1, Chapter_2.1 to Chapter_2.3 is Episode 2, so on and so forth).

This is what one of the files in the editor looks like. I colour code some passages to make it easier to see major events (yellow is autosave, green is the start of a major branch/choice, red is combat). This story file corresponds to the fight with the Crimson Count on Route B in Episode 1.
I use an old version of the Twine editor because I didn't like some of the newer updates, so I reverted to the last version I like (that's why my library and story files may look a bit different from what's current).
I don't use VSCode with Twee plugins since I didn't like it, though that is probably a better way to make a large game than what I'm doing. I have a system that works for me; I don't really see the point in updating it to something else when what I do makes a functioning game and I already have a lot on my plate with writing new content.
I've heard of people taking Wayfarer's HTML file and attempting to upload it into the Twine editor to code dive, but this is not going to be useful because:
The size of the compiled game will make the editor non-functional due to lag. It will probably break it.
Twine overlays all of the compiled story files on top of the other so you can't even see what's going on.
What is helpful for me is to make sure that every passage has a unique label. I never name my passages the same thing as their link text (for example, if I have a link that reads "1. Attack", the title of the corresponding passage is never "1. Attack").
Instead, I label passages according to what story file they are in along with a single word referencing my internal notes so I don't get lost, and then a letter + number combination for tracking splits. So, a link that reads as "1. Attack" to the player may end up having a passage title as something like CHAPTER 3.4 ATTACK 01. And then if it divides into three choices at the end of the passage, the titles for those passages could end up as something like CHAPTER 3.4 ATTACK 01A, CHAPTER 3.4 ATTACK 01B, CHAPTER 3.4 ATTACK 01C.
24 notes
·
View notes
Text
5 Days of Helping You Outline Your Next Novel

Day 5: Obsidian for Outlining
Find all 5 installments of the mini series: helping you outline your next novel
*I have added a layer of “static” over my screenshots so they are distinctive enough to stand apart from the surrounding text
did you miss this series? here you can find all posts here: [day 1] [day 2] [day 3] [day 4]

Do you use Obsidian?
What is Obsidian?
A note-taking and knowledge management tool that allows you to create and connect notes seamlessly.

Uses a local-first approach, meaning your data is stored on your computer, not the cloud (unless you choose to sync).
Features bidirectional linking, which helps create a non-linear, networked way of organizing ideas—great for brainstorming and outlining.
Why should you use Obsidian?
Flexible & Customizable – Unlike rigid writing apps, you can design your own workflow.
Distraction-Free Writing – Markdown keeps the focus on text without extra formatting distractions.
Ideal for Outlining & Organization – Connect story ideas, characters, and settings effortlessly.
Obsidian for Writing
Outlining
Creating a One Pager
Create a single markdown note for a high-level novel summary.
Use headings and bullet points for clarity.
Link to related notes (e.g., character pages, theme exploration).
Here’s an example of an outline I’m currently using. This is what my website will have on it (and what goals I hope to achieve w my website)

Using the Native Canvas Tool
Use Obsidian’s native Canvas tool to visually outline your novel. (Best on PC)
Create a board with columns for Acts, Chapters, or Story Beats.
Drag and drop cards as the story evolves.
Writing
Why Write Directly in Obsidian?
Minimalist interface reduces distractions.
Markdown-based formatting keeps the focus on words.
No auto-formatting issues (compared to Word or Google Docs).
Why is Obsidian Great for Writing?
Customizable workspace (plugins for word count, timers, and focus mode).
Easy to link notes (e.g., instantly reference past chapters or research).
Dark mode & themes for an optimal writing environment.
Organization in Obsidian
Outlining, Tags, Links
Each chapter, character, important item, and setting can have its own linked note.
Below, for example, you can see the purple text is a linked page directly in my outline.

Use bidirectional linking to create relationships between (story) elements. Clicking these links will automatically open the next page.
Tags can be used for important characters, items, places, or events that happen in your writing. Especially useful for tracking.
Folders for Efficient Storage
Organize notes into folders for Acts, Characters, Worldbuilding, and Drafts.
Use tags and backlinks for quick navigation.
Creating a separate folder for the actual writing and linking next (chapter) and previous (chapter) at the bottom for smooth navigation.
You can also create and reuse your own internal templates!
Spiderweb Map Feature (Graph View)
Visualize connections between characters, plot points, and themes. Below you’ll see the basic mapping of my website development project.

This view can help you spot disconnected (floating) ideas and create bridges to them.
Exporting
Why Export?
Ready to format in another program (Scrivener, Word, Docs, Vellum, etc).
Need a clean version (removing tags, notes, etc) for beta readers or editors.
Creating a backup copy of your work.
When should you export?
Personally, I like to export every 5 chapters or so and update my live version on Google Docs. This allows my family, friends, and beta readers to access my edited work.
After finishing a draft or major revision.
Before sending to an editor or formatting for publication.
Where should you export?
Personally I copy and paste my content from each chapter into a google doc for editing. You may also want to make note of the following export options:
Markdown to Word (.docx) – For editing or submitting.
Markdown to PDF – For quick sharing
Markdown to Scrivener – For those who format in Scrivener.
To Conclude
Obsidian is an invaluable tool for novelists who want a flexible, organized, and distraction-free writing process.
Try setting up your own Obsidian vault for your next novel! Comment below and let me know if this was helpful for you 🫶🏻

your reblogs help me help more ppl 💕
follow along for writing prompts, vocabulary lists, and helpful content like this! <333
✨ #blissfullyunawaresoriginals ✨
#writeblr#writers on tumblr#creative writing#writerscommunity#fiction#character development#writing prompt#dialogue prompt#female writers#writer blog#blissfullyunawaresoriginals#blissfullyunawares#writing life#fiction writing#writers#writer life#tumblr writers#writing inspiration#writing#writerslife#writer stuff#writing community#writer#obsidian for writing#obsidian#writers life#writing tool#writing tips#writer moots#tumblr moots
20 notes
·
View notes