#how to install text editor
Explore tagged Tumblr posts
Visit Tumblr Blog
Explore Tumblr blogs with no restrictions, modern design and the best experience.
Last Seen Tumblr Blogs


Fun Fact
The Tumblr office adopted Tommy, an 11-year-old Pomeranian.
Note
Hello! An update on the babies!

Their feathers are coming in and they are starting to be more vocal. We've started holding them to get them used to human touch and they all passed their most important milestone: shitting on a human
One of them has a slightly malformed leg due to uneven bedding... We brought him to the vet and now he's wearing "tape pants" to correct the position. The vet told us to put him in a cup so he stays upright

He is NOT happy about it lol. He tries to escape often, but if everything goes well on next tuesday we can remove everything. We call him fancypants, I think we will keep him :> Anyway, that's all for now! Kisses
!!!
Such good little borbs! Is one of the blue ones going om nom nom on sibling in the first pic?
Glad to hear the little ones are being taught the right way to perceive humans - as chairs. What do baby birds feel like? Are they soft?
It's a tragedy that fancypants has already been imprisoned at such a young age. My best wishes for birb recovery!

Thank you for keeping me updated on these little guys! They're always the highlight of my day :)
#not a face#earthling specimens#baby bird time#sorry for taking so long to respond#i figured getting this out sooner was more important than matching the tone of my earlier posts#i am still very excited about bird news - i just don't know how to express that trough text#the procrastination is real#replying to this is the third thing i get to cross out on my to-do list today#the second thing was a very short email that i finally got around to sending at like 8 pm#and the first thing was buying blue tack#which ended up being done by my mom#but i don't need to buy blue tack anymore and i did help her install a text editor#on the bright side i've also patched a hole in a wool sock and reattached the tassel to my winter hat
19 notes
·
View notes
Text
I don't know why I'm the way that I am, but I am. (Felt like I just came back from a battlefield tryna understand what this shimeji thing is).
#aria rants#by which i mean... how to make one. yea i was hit with the impulsive thought of: what if i make a shimeji of my own oc for myself#and i was fighting for my life getting the editor of the website to work cuz it wont work in firefox#then i went to chrome but its still blank and i was like: okay. lets just search this in google#then i got redirected to reddit. and i had to install java cuz turns out the one my pc had was outdated#and then i downloaded a shimeji which was a lil blob dude. and then i was like: okay. but how do i change that#so i went back to the website. in firefox. cuz the first time it didnt work wasnt enough for me apparently#so i went back to chrome again cuz well it obvs didnt work. then i was like: okay. its an extension for chrome only.#so i went to the extensions to get it. then i went back to the site. the editor is finally working but wait#thats only apparently for the window. so i went back to the file i downloaded. finally read a very obvs text literally named#''readme'' and then i finally partially understood what i had to do to create my own shimeji but i still dont understand it well#so i went back to the reddit faq of it. and finally... understood what i need to do and mygod...#ill... ill get to that someday... it felt like im gonna end up biting more than i can chew with this thing rn like gayum
6 notes
·
View notes
Text
I wanted to make a cleaner summary of last week's classes and also review the classes I have this week since the material is already uploaded beforehand but I was feeling so horrible throughout the day that when I sat down I was just gonna look at the ones for tomorrow but I think I'm just gonna go to bed because I just gave my little numbers game a few tries and not even the joy of tribial elementary school-level math games is bringing my brain cells and/or full sentience back
#diary#accessing it through the CMD thing and not just running it from the IDE made me realize a few things about it though so I'll hav#I'll have to maybe jot them down somewhere when I'd normally just be rly excited and try to fix them straight away like I am truly fucked r#I do wanna make an eng version of it sometime soon so I can share it even tho it's literally the simplest little thing. it's fun if you're#an easily amused nerd that loves playing with numbers in a truly useless manner. if that makes sense#also very obviously text-only I am NOT torturing myself with any graphics of ANY kind rn#it closes immediatly as they do and also when it comes to having double/triple digit starting numbers it becomes a lot less fun I think tho#though I haven't used it much with those yet#I still wanna figure out a way of making it better when it comes to 2/3 digit starters. and my original idea included maybe keeping track#keeping track of how many steps you took even between different rounds but I made the simplest version for now. I also think making like a#''this was the least amount of steps possible!'' type thing would be very very cool but that is FAR too big brained for me rn#cause I can figure out how to do the record keeping thing but that last one is like. let's stop talking for a little while.................#oh but adding an actual interface sounds so fun even though I have very little clue on how to do that rn I could probably STOP typing becau#because I can feel my stupid ass self start getting excited about this which will make it so I start working on it instead of going to bed#NO. DOWN !!!!!!!!!!!!!! auhgh............ oh man I had a lame joke to make but I completely forgot what it was#I have coding class tomorrow in which I normally just do the exercises as fast as possible before playing around but the only Python editor#I could find installed on the school computers was Visual Studio Code and I have no clue how to use that shit like I don't need so many#so many buttons. probz. OKAY GOODNIGHT
3 notes
·
View notes
Text
A QUICK GUIDE TO AO3 CUSTOMIZATION FROM SOMEONE WHO KNOWS NOTHING ABOUT CODING

ft adding pink to everything and my secret to writing long comments
note: I originally posted this to twt but if that place burns in a fiery pit I spent too long on this for it to disappear, so I'm putting it here too :)
so many people know way more about this than I do, but this is a step-by-step walkthrough of the changes *I've* made, and hopefully it works as an introduction people can build from for whatever they'd like to do
There are a lot of images in this post! (click to enlarge)
to start, AO3 skins
site skins change how the AO3 website appears when logged in (even on mobile), mine is pink and blue!

I'll have my skin turned off throughout the post so the guides appear as they will for you
to create, edit, and view skins, go to the "skins" tab from the left-hand menu. you can also view public site skins from there or from the button in the preferences.


public site skins are made by other users. i would really encourage previewing and exploring them to become familiar with the possibilities (maybe you just want to use one of them and now you're done!)
to create your own skin
on the skins page, click "create site skin"
if you don't know CSS (same), use the wizard! clicking on the "?" will give more information about each option
I only use the colours section you'll see a link right there for hex codes I use pink as a header colour and bue for accent but lots of people change the background colour and that looks really cool!
submit


The next step (optional!!!) is to add CSS from a public skin to your own. I use "ByLine" by Branch. this separates the tag categories and adds spacing to make them easier to read.
here is a before and after using the fic "Landslide" by @roosterbruiser as an example


to see the CSS of a skin, click the title
copy all the text below the CSS heading
in the skin creator/editor press the custom CSS option and paste all the text into the CSS box


you can have both wizard and custom CSS settings, in mine you can see the header and accent colours as well as the CSS

level up: USERSCRIPTS
userscripts are small pieces of code that modify a website. for AO3, this may involve adding shortcuts and buttons or even advanced tagging functions (computer people, I'm so sorry if this is wrong, I'm trying). I use Greasy Fork and Tampermonkey.
This is how I write long and formatted comments!
Greasy Fork is an archive of userscripts and Tampermonkey is a browser extension and userscript manager. You don't need to use these two in particular. please use your common sense when downloading anything or adding permissions to your browser.
Greasy Fork guide on installing scripts
Install Tampermonkey on Chrome
there are TONS of user scripts for AO3. This is another good opportunity to explore all the possibilities. there are lots of more complicated options I haven't explored.
scripts for AO3

i use this floaty review box
and this comment formatting
EDIT: if you use chrome you might need to turn on developer mode in your chrome extension manager - you can google "tampermonkey developer mode" and it should explain that :)
to install (once you have Tampermonkey installed):
open the script you want in Greasy Fork and press install
Tampermonkey will open, press install again


clicking the Tampermonkey extension will let you toggle scripts on and off, and opening the dashboard will let you view, edit, and delete scripts


i find i can only have a few turned on at a time before they cancel each other out, but that depends on which ones you're using and someone more savvy might be able to fix that
how to use the floaty review box - write more comments!
there will now be a "floaty review box" button at the top of the work, it will open a floating text box you can move anywhere on the page. highlighting any text and pressing the insert button will paste the text with italics into the box


anything you type in the review box will appear in your comment at the bottom of the page!
if you have also installed the comment formatting script, you'll be able to highlight any text in your comment and use the new buttons above the comment box to format it

thats all ive got! Hopefully this is a good starting point to get familiar with some of the terms and basics for skins and scripts <3
if you want some inspo for how to comment on fics i made a whole fic rec list on twitter based on comments I've left, it's here. i have a masterlist of recs there mostly for darklina/reylo and similar ships.
the tag #reading with ru has cod recs and me talking about books
:)
#please no one follow me from this im never helpful otherwise#ao3 skins#ao3#fanfic#ao3 community#fandom#ao3 resources#im sorry if the image quality is awful lmk if I should clarify any of the text!#floating comment box#floating review box#ao3 guide
772 notes
·
View notes
Text
How To Get Started Making Visual Novels
Wanna make a visual novel? Or maybe you've seen games like Our Life, Blooming Panic, Doki Doki Literature Club, etc. and wanna make something like that? Good news, here's a very basic beginners guide on how to get started in renpy and what you need to know going in! Before you start, I highly recommend looking at my last post about writing a script for renpy just to make it easier on you!
LONG POST AHEAD
Obviously, our first step is downloading it from their website

thankfully, its right on the home page of their site. Follow basica program installation steps and run the program. I highly recommend pinning it to your task bar to make it easier to access.
From there, you're met with the renpy app, it's a little daunting at first but let's talk about what all these buttons are for.

Projects
This part is simple, it just lists the current projects in the chosen directory. You probably won't have any in there of your own. You should still see Tutorial and The Question!
Both of those default projects are super helpful in their own ways, i highly recommend testing out the tutorial and playing around with it just to get comfortable with some of the basics.
Create New Project
The first step to actually making your game into a game!
You'll be met with a prompt letting you know that the project is being made in English and that you can change it. You can click Continue.
From here, you'll be asked to input a project name! Put in your games title, or even a placeholder title since this Information can be changed later! (this is also the title the folder will be in your file browser, be sure to name it something you won't overlook)

Now we get to choose our resolution!
If you have no idea what to choose, go for 1920x1080! This is the standard size for most computer monitors and laptops, but it will still display with moderately decent quality on 4k monitors too!
You can choose 3840x2160 as well. This is 2x the measurements of the default, with the same ration. These dimensions are considered 4k. Keep in mind, your image files will be bigger and can cause the game to have a larger size to download.

Now we get to choose our color scheme!
Renpy has some simple default options with the 'light mode' colors being the bottom two rows, and the 'dark mode' colors being the toop two rows.
You can pick anything here, but I like to choose something that matches my projects vibes/colors better. Mostly because depending on how in depth you go with the ui, it minimizes the amount of changes I need to make later.

Click continue and give it a minute. Note: If it says "not responding" wait a moment without clicking anything. It can sometimes freeze briefly during the process.
Now we should be back at our home screen, with our new project showing. Let's talk about allll that stuff on the right now.
Open Directory
This just opens that particular folder in your local file explorer!
game - is all the game files, so your folders for images, audio, saves, and your game files like your script, screens, and more.
base - this is the folder that the game folder is inside of. You can also find the errors and log txt files in here.
images - takes you to your main images folder. This is where you wanna put all of your NON gui images, like your sprites, backgrounds, and CGs. You can create folders inside of this and still call them in the script later. EX: a folder for backgrounds , a folder for sprites for character a, a seperate folder for spirtes for character b, etc.
audio - Takes you to the default audio folder. This is empty, but you can put all your music and sound effects here!
gui - brings up the folder containing all of the default renpy gui. It's a good place to start/ reference for sizes if you want to hand draw your UI pieces like your text box!
Edit File
Simple enough, this is just where you can open your code files in whatever text/code editor you have installed.
Script.rpy - where all of your story and characters live. This is the file you'll spend most of your time in at first
Options.rpy - Contains mostly simple information, like project name and version. There aren't a ton of things in here you need to look at. There is also some lines of code that help 'archive' certain files by file type so that they can't be seen by players digging in code however. Fun if you want to hide some images in there for later or if you just dont want someone seeing how messy your files are. We've all been there
Gui.rpy - where all of the easy customization happens. Here you can change font colors, hover colors, fonts, font sizes, and then the alignment and placement of all of your text! Like your dialogue and names, the height of text buttons, etc. It more or less sets the defaults for a lot of these unless you choose to change them later.
Screens.rpy - undeniably my favorite, this is where all of the UI is laid out for the different screens in your game, like the main menu, game menu, quick menu, choice menu, etc. You can add custom screens too if you want, but I always make my own seperate file for these.
Open Project - this just opens all of those files at once in the code editor. Super handy if you make extra files like I do for certain things.
Actions
last but not least, our actions.
Navigate Script - This feature is underrated in my honest opinion, it's super handy for help debugging! In renpy you can comment with # before a line. However, if you do #TODO and type something after it, it saves it as a note! You can view these TODO's here as well as easily navigate to when certain screens are called, where different labels are (super great if your game is long, and more. It saves some scrolling.
Check Script (Lint) - also super duper handy for debugging some basic things. It also tells you your word count! But its handy for letting you know about some errors that might throw up. I like using it to look for sprites I may or may not have mispelled, because they show up in there too.

Change/Update GUI - Nifty, though once you start customizing GUI on your own, it isn't as useful. You can reset the project at any point and regenerate the image files here. This updates all those defaults we talked about earlier.
Delete Persistent - this just helps you delete any persistent data between play throughs on your end. I like to use it when making a lot of changes while testing the game, so that I can reboot the game fresh.
Force Recompile - Full disclosure, as many games as I've made and as long as I've been using Renpy, i have never used this feature. I searched to see what it does and this is the general consesus: Normally renpy tries to be smart about compiling code (creating .rpyc files) and only compiles .rpy files with changes. This is to speed up the process since compiling takes time. Sometimes you can make changes that renpy don't pick up on and therefore won't recompile. In these cases you can run force recompile to force it. Another solution (if you know what file is affected) is to delete that specific. rpyc file.
The rest of your options on this right hand side are how you make executable builds for your game that people can download to extract and play later!

Sorry gang! that was a whole lot of text obviously the last button "Launch Project" launches an uncompiled version of the project for you to play and test as you go! Hang in tight because my next post is about how to utilize github for renpy, so you can collaborate easier!
611 notes
·
View notes
Text
How to use DXVK with The Sims 3
Have you seen this post about using DXVK by Criisolate? But felt intimidated by the sheer mass of facts and information?
@desiree-uk and I compiled a guide and the configuration file to make your life easier. It focuses on players not using the EA App, but it might work for those just the same. It’s definitely worth a try.
Adding this to your game installation will result in a better RAM usage. So your game is less likely to give you Error 12 or crash due to RAM issues. It does NOT give a huge performance boost, but more stability and allows for higher graphics settings in game.
The full guide behind the cut. Let me know if you also would like it as PDF.
Happy simming!
Disclaimer and Credits
Desiree and I are no tech experts and just wrote down how we did this. Our ability to help if you run into trouble is limited. So use at your own risk and back up your files!
We both are on Windows 10 and start the game via TS3W.exe, not the EA App. So your experience may differ.
This guide is based on our own experiments and of course criisolate’s post on tumblr: https://www.tumblr.com/criisolate/749374223346286592/ill-explain-what-i-did-below-before-making-any
This guide is brought to you by Desiree-UK and Norn.
Compatibility
Note: This will conflict with other programs that “inject” functionality into your game so they may stop working. Notably
Reshade
GShade
Nvidia Experience/Nvidia Inspector/Nvidia Shaders
RivaTuner Statistics Server
It does work seamlessly with LazyDuchess’ Smooth Patch.
LazyDuchess’ Launcher: unknown
Alder Lake patch: does conflict. One user got it working by starting the game by launching TS3.exe (also with admin rights) instead of TS3W.exe. This seemed to create the cache file for DXVK. After that, the game could be started from TS3W.exe again. That might not work for everyone though.
A word on FPS and V-Sync
With such an old game it’s crucial to cap framerate (FPS). This is done in the DXVK.conf file. Same with V-Sync.
You need
a text editor (easiest to use is Windows Notepad)
to download DXVK, version 2.3.1 from here: https://github.com/doitsujin/DXVK/releases/tag/v2.3.1 Extract the archive, you are going to need the file d3d9.dll from the x32 folder
the configuration file DXVK.conf from here: https://github.com/doitsujin/DXVK/blob/master/DXVK.conf. Optional: download the edited version with the required changes here.
administrator rights on your PC
to know your game’s installation path (bin folder) and where to find the user folder
a tiny bit of patience :)
First Step: Backup
Backup your original Bin folder in your Sims 3 installation path! The DXVK file may overwrite some files! The path should be something like this (for retail): \Program Files (x86)\Electronic Arts\The Sims 3\Game\Bin (This is the folder where also GraphicsRule.sgr and the TS3W.exe and TS3.exe are located.)
Backup your options.ini in your game’s user folder! Making the game use the DXVK file will count as a change in GPU driver, so the options.ini will reset once you start your game after installation. The path should be something like this: \Documents\Electronic Arts\The Sims 3 (This is the folder where your Mods folder is located).
Preparations
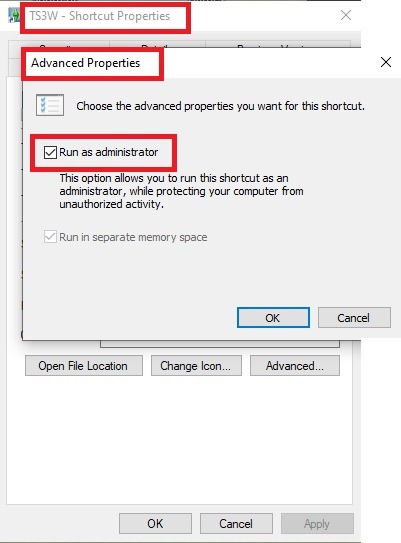
Make sure you run the game as administrator. You can check that by right-clicking on the icon that starts your game. Go to Properties > Advanced and check the box “Run as administrator”. Note: This will result in a prompt each time you start your game, if you want to allow this application to make modifications to your system. Click “Yes” and the game will load.
2. Make sure you have the DEP settings from Windows applied to your game.
Open the Windows Control Panel.
Click System and Security > System > Advanced System Settings.
On the Advanced tab, next to the Performance heading, click Settings.
Click the Data Execution Prevention tab.
Select 'Turn on DEP for all programs and services except these”:
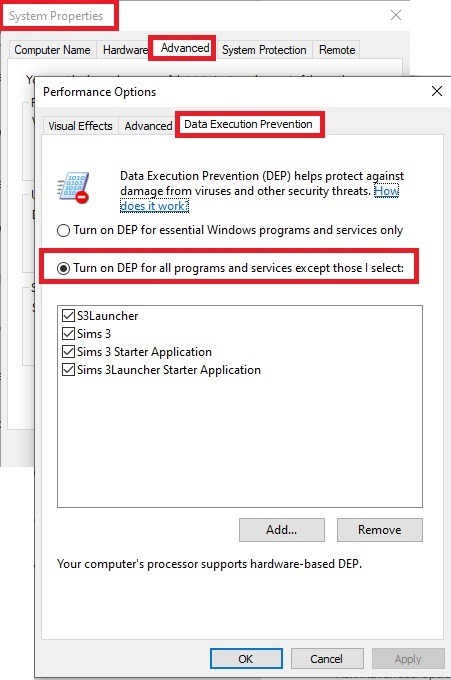
Click the Add button, a window to the file explorer opens. Navigate to your Sims 3 installation folder (the bin folder once again) and add TS3W.exe and TS3.exe.
Click OK. Then you can close all those dialog windows again.
Setting up the DXVK.conf file
Open the file with a text editor and delete everything in it. Then add these values:
d3d9.textureMemory = 1
d3d9.presentInterval = 1
d3d9.maxFrameRate = 60
d3d9.presentInterval enables V-Sync,d3d9.maxFrameRate sets the FrameRate. You can edit those values, but never change the first line (d3d9.textureMemory)!
The original DXVK.conf contains many more options in case you would like to add more settings.

A. no Reshade/GShade
Setting up DXVK
Copy the two files d3d9.dll and DXVK.conf into the Bin folder in your Sims 3 installation path. This is the folder where also GraphicsRule.sgr and the TS3W.exe and TS3.exe are located. If you are prompted to overwrite files, please choose yes (you DID backup your folder, right?)
And that’s basically all that is required to install.
Start your game now and let it run for a short while. Click around, open Buy mode or CAS, move the camera.
Now quit without saving. Once the game is closed fully, open your bin folder again and double check if a file “TS3W.DXVK-cache” was generated. If so – congrats! All done!
Things to note
Heads up, the game options will reset! So it will give you a “vanilla” start screen and options.
Don’t worry if the game seems to be frozen during loading. It may take a few minutes longer to load but it will load eventually.
The TS3W.DXVK-cache file is the actual cache DXVK is using. So don’t delete this! Just ignore it and leave it alone. When someone tells to clear cache files – this is not one of them!
Update Options.ini
Go to your user folder and open the options.ini file with a text editor like Notepad.
Find the line “lastdevice = “. It will have several values, separated by semicolons. Copy the last one, after the last semicolon, the digits only. Close the file.
Now go to your backup version of the Options.ini file, open it and find that line “lastdevice” again. Replace the last value with the one you just copied. Make sure to only replace those digits!
Save and close the file.
Copy this version of the file into your user folder, replacing the one that is there.
Things to note:
If your GPU driver is updated, you might have to do these steps again as it might reset your device ID again. Though it seems that the DXVK ID overrides the GPU ID, so it might not happen.
How do I know it’s working?
Open the task manager and look at RAM usage. Remember the game can only use 4 GB of RAM at maximum and starts crashing when usage goes up to somewhere between 3.2 – 3.8 GB (it’s a bit different for everybody).
So if you see values like 2.1456 for RAM usage in a large world and an ongoing save, it’s working. Generally the lower the value, the better for stability.
Also, DXVK will have generated its cache file called TS3W.DXVK-cache in the bin folder. The file size will grow with time as DXVK is adding stuff to it, e.g. from different worlds or savegames. Initially it might be something like 46 KB or 58 KB, so it’s really small.
Optional: changing MemCacheBudgetValue
MemCacheBudgetValue determines the size of the game's VRAM Cache. You can edit those values but the difference might not be noticeable in game. It also depends on your computer’s hardware how much you can allow here.
The two lines of seti MemCacheBudgetValue correspond to the high RAM level and low RAM level situations. Therefore, theoretically, the first line MemCacheBudgetValue should be set to a larger value, while the second line should be set to a value less than or equal to the first line.
The original values represent 200MB (209715200) and 160MB (167772160) respectively. They are calculated as 200x1024x1024=209175200 and 160x1024x1024=167772160.
Back up your GraphicsRules.sgr file! If you make a mistake here, your game won’t work anymore.
Go to your bin folder and open your GraphicsRules.sgr with a text editor.
Search and find two lines that set the variables for MemCacheBudgetValue.
Modify these two values to larger numbers. Make sure the value in the first line is higher or equals the value in the second line. Examples for values: 1073741824, which means 1GB 2147483648 which means 2 GB. -1 (minus 1) means no limit (but is highly experimental, use at own risk)
Save and close the file. It might prompt you to save the file to a different place and not allow you to save in the Bin folder. Just save it someplace else in this case and copy/paste it to the Bin folder afterwards. If asked to overwrite the existing file, click yes.
Now start your game and see if it makes a difference in smoothness or texture loading. Make sure to check RAM and VRAM usage to see how it works.
You might need to change the values back and forth to find the “sweet spot” for your game. Mine seems to work best with setting the first value to 2147483648 and the second to 1073741824.
Uninstallation
Delete these files from your bin folder (installation path):
d3d9.dll
DXVK.conf
TS3W.DXVK-cache
And if you have it, also TS3W_d3d9.log
if you changed the values in your GraphicsRule.sgr file, too, don’t forget to change them back or to replace the file with your backed up version.
OR
delete the bin folder and add it from your backup again.
B. with Reshade/GShade
Follow the steps from part A. no Reshade/Gshade to set up DXVK.
If you are already using Reshade (RS) or GShade (GS), you will be prompted to overwrite files, so choose YES. RS and GS may stop working, so you will need to reinstall them.
Whatever version you are using, the interface shows similar options of which API you can choose from (these screenshots are from the latest versions of RS and GS).
Please note:
Each time you install and uninstall DXVK, switching the game between Vulkan and d3d9, is essentially changing the graphics card ID again, which results in the settings in your options.ini file being repeatedly reset.
ReShade interface
Choose – Vulcan
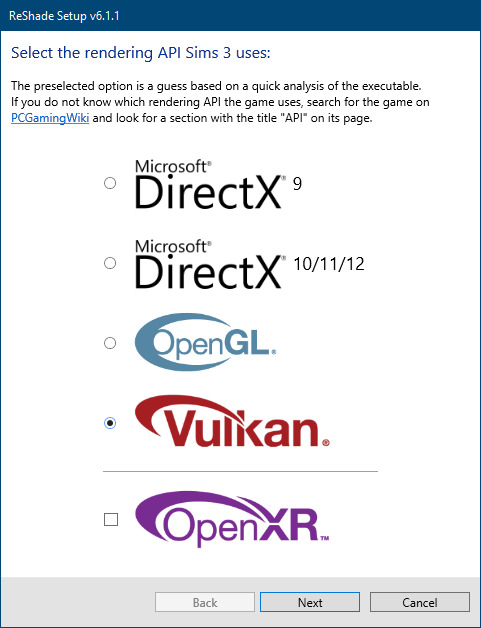
Click next and choose your preferred shaders.
Hopefully this install method works and it won't install its own d3d9.dll file.
If it doesn't work, then choose DirectX9 in RS, but you must make sure to replace the d3d9.dll file with DXVK's d3d9.dll (the one from its 32bit folder, checking its size is 3.86mb.)
GShade interface
Choose –
Executable Architecture: 32bit
Graphics API: DXVK
Hooking: Normal Mode
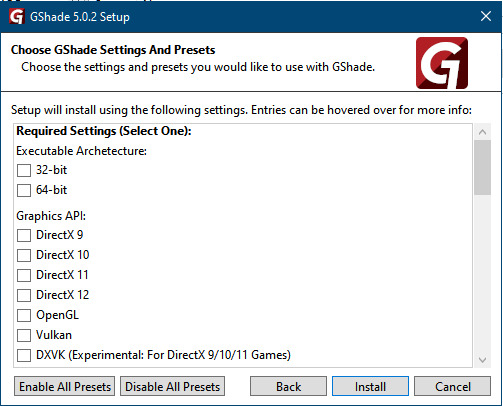
GShade is very problematic, it won't work straight out of the box and the overlay doesn't show up, which defeats the purpose of using it if you can't add or edit the shaders you want to use.
Check the game's bin folder, making sure the d3d9.dll is still there and its size is 3.86mb - that is DXVK's dll file.
If installing using the DXVK method doesn't work, you can choose the DirectX method, but there is no guarantee it works either.
The game will not run with these files in the folder:
d3d10core.dll
d3d11.dll
dxgi.dll
If you delete them, the game will start but you can't access GShade! It might be better to use ReShade.
Some Vulcan and DirectX information, if you’re interested:
Vulcan is for rather high end graphic cards but is backward compatible with some older cards. Try this method with ReShade or GShade first.
DirectX is more stable and works best with older cards and systems. Try this method if Vulcan doesn't work with ReShade/GShade in your game – remember to replace the d3d9.dll with DXVK's d3d9.dll.
For more information on the difference between Vulcan and DirectX, see this article:
https://www.howtogeek.com/884042/vulkan-vs-DirectX-12/
750 notes
·
View notes
Text
Enhancing Sims Thumbnails 🖼️🔍👀
So I have received some questions regarding this post and had another look at the ThumbnailConfig.ini file to see if there is anything else worth tweaking to enhance sims thumbnails.
I also decided to share my settings (though not sure if this is a good idea, I'll see how it goes). Disclaimer, that what works well for me/on my screen, might not be the best solution for you and you might be better off with the default settings. Also remember that generating higher resolution thumbnails can slow down your game. I think that visually the settings (only) make a big difference if you play on a larger screen and/or with an upscaled UI (game accessibility settings).
You can try my settings or use the info shared below (I might update it in the future) to experiment with the settings yourself. You can find examples on how to edit the file in my previous posts here and here and you can use any text editor like Notepad or Notepad++ to do so.


Download and details below the cut ⤵️
Below you can see what I changed (marked in green) and for what purpose as well as what resolution settings there are in general. I only looked at sims thumbnails and ignored everything else. I also think some settings should not be messed with, like the ones affecting pictures that are uploaded to the Gallery (exception is if you wanna extract these pictures for editing purposes) and there are a few settings that are not relevant for gameplay. Some settings I'm not sure about (feel free to share any info).


📥Download:
Sim File Share Last updated: February 27th, 2025
📒How to install:
This override does NOT go into your mods folder. Instead, you need to replace the original game file with it which you should find somewhere along a path like this:
C:\Program Files (x86)\Origin Games\The Sims 4\Game\Bin\res

The path might be slightly different for you and depends on where the game is installed on your computer. You can check the location in the EA app. To do so, select The Sims 4 -> “Manage” -> “View properties” (there should be a similar option on Steam):

Locate the file ThumbnailConfig.ini as described above.
Save a copy of the original file somewhere on your computer in case you need to go back. (However, you can also run a game repair to restore the settings if needed.)
Replace the original file with the override (either with my file or with your own version).
Delete the file localthumbcache.package (see info here), so that the game can generate new thumbnails, then restart the game.
Note that you will need to repeat the steps/redo the changes whenever this file is overriden or updated or by the game.
Current game bug (not a mod/config issue):
It seems that the game currently is regenerating thumbnails each time you restart the game, even when the thumbnails already exist in the file localthumbcache, thus unneccessarily slowing down the game and bloating up this file. I tested this with no mods, with basegame only, in a fresh save, with the thumbnail config file reset to factory settings and it’s still happening. Also added my findings to this bug report. If you noticed the same issue, please hit “me too”.
418 notes
·
View notes
Text
Fixing Windows 11 - A Masterpost
Windows 11 is absolute crap for a good bunch of stuff so yeah, have a masterpost with most of the things I've found around to fix it haha (they're not all here because I did stuff around and I don't remember what)
YES, I KNOW at this point Linux would be a better alternative, however some here can't use Linux due to some proprietary programs that are not on Linux. This Masterpost is for the people in the same situation as I, aka those who have to have Windows or they can't do their job.
I am currently unemployed and haven't worked enough for the government to help me. I have a ko-fi if ever you want to help.
Stopping W11 from making you create an account/setting up your computer without internet (with a way to create gpedit.msc if your version doesn't have it)
Fixing the Taskbar (in case you also don't like the grouped Battery/internet/sound or the way the windows look)(there's more to it, check the settings)
There is the chance that Windows can't update because of this, you just have to uninstall it and reinstall it afterwards. They also completely nuked the Windows 10 look in the 24H2 update, so use the "Windows 10 (Explorer Patcher)" option instead of the plain "Windows 10".
Removing the rounded windows (since ExplorerPatcher doesn't do it anymore on 24H2)
https://github.com/valinet/Win11DisableRoundedCorners
How to move the volume and luminosity pop ups (so you can finally see those sweet sweet subtitles)
In case ModernFlyouts doesn't automatically start up, possible solution
Fixing the Start Menu (ExplorerPatcher can do that too, btw)
How to show all options right away
A way to bring back the Calendar
https://github.com/matej137/OutlookRemover
MICROSOFT FULLY NUKED THE CALENDAR!!! Possible fix is to downgrade the app (which is fine if you don't use the Mail), but do use the OutlookRemover to stop the automatic installation of the new version.
https://github.com/matej137/OutlookRemover/issues/15
Your Bluetooth suddenly doesn't work???
It happens sometimes for no clear reasons so here are a few things you can do:
Check if the icon is in the Taskbar. If not, verify if it is available in the pop up menu (the one from the gear icon)
If it's not here, check your parameter to see if you have the option to turn it on.
If it's still not here, reboot your PC.
If it's STILL not working, update your Bluetooth driver. You can do so by looking for "driver" in the menu and opening the Device Manager, then right click on the right Bluetooth component and update its driver.
If Windows says that the driver is up to date, try checking out this helper: https://support.microsoft.com/en-us/windows/fix-bluetooth-problems-in-windows-723e092f-03fa-858b-5c80-131ec3fba75c
If really nothing help, download and install a recent Bluetooth Driver. Be careful of what you download and from where.
Someone who stumbled on this post fixed it by downloading the Bluetooth Driver 5.0.1.1500 from Softonic (https://www.softonic.nl/download/bluetooth-driver/windows).
How to remove Copilot if you have it (I don't, but it might be because I'm in Europe??)
Archive
Apparently Copilot is being forced on people so hummm
Other stuff not specifically related to the shit W11 did
Changing the size of the scroll bars
How to fully remove Cortana
Website with tools to fix W10 and W11
2K notes
·
View notes
Text
on the topic of writing software
I want to ramble at you about some writing software options. 98% of the time I'm perfectly content with LibreOffice Writer (and previously I used Word, back when Microsoft products were less shitty). But every now and then when I have a new project (like now - more on that later) I start looking for something shiny and new to try. And I fell down into another research rabbit hole lol
I usually don't talk a lot about this bc my needs are very simple, and not sure how useful my opinion is to others, but I enjoy the topic. It's an intersection of creative writing and tech nerdiness and I like both of those things. Also what writing software you prefer really depends on the type of writer that you are, and everyone has a slightly different writing process and I find that fascinating.
Now, as I said, I'm coming at it from a slightly tech-nerd angle. I don't care if the installation is clunky, I'm happy to see the words open-source, and the need to create an account will already mildly piss me off (:
Don't worry, I'm not as intense as the guy writing his novel in Vim. Though fucking respect. And I can't say I'm not tempted to try it even with the steep learning curve lmao (Seriously, if you don't know Vim is notorious among software developers.)
Anyway, things I've tried so far:
Manuskript: this was listed as an open-source Scrivener alternative (though I haven't tried Scrivener. so.). I gave it a go when I was writing heart worth the trouble and it was pretty nice. It helped me when I had to move scenes and chapters around. But overall I think it was made with plotters in mind bc it wants you to enter a lot of information upfront. I'm not a planner/architect type of writer so this type of software is a bit overwhelming for me. Still, the fact that it's open source and works on Linux gets kudos from me.
Wavemaker: I recently played around with this, and I actually surprisingly like the features it has. You can put multiple books in a project, which is very nice if you like to work on different things, like fanfic, novels, etc. The mindmap is a feature I liked, though it's a bit clunky bc it collapses the text fields when you exit, and once I added an image field by accident that I could never remove lol I do like a bit of a snowflake method, so that feature is cool, and the cards are pretty straightforward too. Usually, my problem with these apps is that I don't even want to touch half of the features so they are pointless to me, but the features of Wavemaker were kind of nice. It's a web app that you can download and use offline but it's still working from your browser if that makes sense. That was what I didn't really appreciate. Also, it doesn't give you a lot of options to back it up. You either save the wavemaker file, export it into a document (which is fine, but it adds an extra step to the backup process) or you sync with Google Drive *shudders*
Things I want to try out:
Calmly Writer: now this is just purely a text editor that focuses on being very zen, streamlined, distraction-free, etc. It's pretty and it has typewriter sounds. (Yeah, I'm not immune to a pretty UI and harmless fun features alright? I can contain multitudes :P) It has an online version, but you can also download it, and works on Windows, Mac, and Linux. On paper, the desktop app requires a license, but the way they put it is that you can evaluate it for free and the evaluation doesn't have an enforced time limit... So. As good as free. (Though if I really like it, I would totally consider buying a license for 20usd that I can use on 3 computers, that seems fair. I appreciate a license over a subscription model for sure.) Honestly, I think this is the one I'm going to try next bc it just integrates perfectly into my writing process. That being: a multitude of messy, hand-written notes and notebooks + a document editor + backups on hard drive and GitHub (yes, really) ^^"
Shaxpir: This is on the opposite end of the spectrum basically, but out of the "fancy" ones, I kind of like the look of this the most. I like the statistics part in particular. But honestly, I probably won't try it bc it doesn't have a Linux version which would be a pain in the ass for me, and is cloud-based. I kind of don't really trust them, which is my biggest issue with these companies. (Although the creator's heart seems to be in the right place when it comes to AI. Basically, some of their features are based on machine learning and language models. For example, it will recognize passive voice, if it's an adverb with "-ly" or the emotion of a word. Which I think is all cool and fine and shouldn't be lumped in with generative AI. But he also had a website that did this analysis for already published works, and when people pointed out that it was sketchy, he took that down and I can respect that. I'm not sure how much it influenced the actual features of the app, maybe I'll just take a peek out of curiosity. The whole thing does make me have trust issues though lmao) If anyone has experience with it though, I'm interested to hear about it.
Obsidian: not a dedicated writing software, but rather an elaborate note-taking app. I heard good things about it from smart people lol If I really wanted to access my writing on my phone, I would probably use this bc it works on every platform and has end-to-end encrypted sync with version control. I heard you can also integrate it with GitHub which is always music to my ears lol But the setup probably takes a bit of time and I'm not particularly motivated to do that right now.
So yeah, those are the options that appeal to me right now. If anyone used these and has opinions, I'm all ears :D
137 notes
·
View notes
Text
Writing Notes: The Master Fiction Plot

Lester Dent's "Master Fiction Plot", often referred to as the "Lester Dent Formula" is a widely circulated guide to writing a saleable 6,000-word pulp story.
This is a formula, a master plot, for any 6000-word pulp story.
It has worked on adventure, detective, western and war-air. It tells exactly where to put everything.
It shows definitely just what must happen in each successive thousand words.
The business of building stories seems not much different from the business of building anything else.
Here's how it starts:
A DIFFERENT MURDER METHOD FOR VILLAIN TO USE
A DIFFERENT THING FOR VILLAIN TO BE SEEKING
A DIFFERENT LOCALE
A MENACE WHICH IS TO HANG LIKE A CLOUD OVER HERO
One of these DIFFERENT things would be nice, two better, three swell. It may help if they are fully in mind before tackling the rest.
A different murder method could be--different.
Thinking of shooting, knifing, hydrocyanic, garroting, poison needles, scorpions, a few others, and writing them on paper gets them where they may suggest something.
Scorpions and their poison bite?
Maybe mosquitos or flies treated with deadly germs?
If the victims are killed by ordinary methods, but found under strange and identical circumstances each time, it might serve, the reader of course not knowing until the end, that the method of murder is ordinary.
Scribes who have their villain's victims found with butterflies, spiders or bats stamped on them could conceivably be flirting with this gag.
Probably it won't do a lot of good to be too odd, fanciful or grotesque with murder methods.
The different thing for the villain to be after might be something other than jewels, the stolen bank loot, the pearls, or some other old ones.
Here, again one might get too bizarre.
Unique locale? Easy.
Selecting one that fits in with the murder method and the treasure--thing that villain wants--makes it simpler, and it's also nice to use a familiar one, a place where you've lived or worked.
So many pulpateers don't. It sometimes saves embarrassment to know nearly as much about the locale as the editor, or enough to fool him.
Here's a nifty much used in faking local color.
For a story laid in Egypt, say, author finds a book titled "Conversational Egyptian Easily Learned," or something like that.
He wants a character to ask in Egyptian, "What's the matter?"
He looks in the book and finds, "El khabar, eyh?"
To keep the reader from getting dizzy, it's perhaps wise to make it clear in some fashion, just what that means.
Occasionally the text will tell this, or someone can repeat it in English.
But it's a doubtful move to stop and tell the reader in so many words the English translation.
The writer learns they have palm trees in Egypt.
He looks in the book, finds the Egyptian for palm trees, and uses that.
This kids editors and readers into thinking he knows something about Egypt.
Here's the second installment of the master plot.
Divide the 6000 word yarn into four 1500 word parts. In each 1500 word part, put the following:
FIRST 1500 WORDS
First line, or as near thereto as possible, introduce the hero and swat him with a fistful of trouble. Hint at a mystery, a menace or a problem to be solved--something the hero has to cope with.
The hero pitches in to cope with his fistful of trouble. (He tries to fathom the mystery, defeat the menace, or solve the problem.)
Introduce ALL the other characters as soon as possible. Bring them on in action.
Hero's endevours land him in an actual physical conflict near the end of the first 1500 words.
Near the end of first 1500 words, there is a complete surprise twist in the plot development.
SO FAR:
Does it have SUSPENSE?
Is there a MENACE to the hero?
Does everything happen logically?
At this point, it might help to recall that action should do something besides advance the hero over the scenery.
Suppose the hero has learned the dastards of villains have seized somebody named Eloise, who can explain the secret of what is behind all these sinister events.
The hero corners villains, they fight, and villains get away. Not so hot.
Hero should accomplish something with his tearing around, if only to rescue Eloise, and surprise! Eloise is a ring-tailed monkey.
The hero counts the rings on Eloise's tail, if nothing better comes to mind.
They're not real. The rings are painted there. Why?
SECOND 1500 WORDS
Shovel more grief onto the hero.
Hero, being heroic, struggles, and his struggles lead up to:
Another physical conflict.
A surprising plot twist to end the 1500 words.
NOW:
Does second part have SUSPENSE?
Does the MENACE grow like a black cloud?
Is the hero getting it in the neck?
Is the second part logical?
DON'T TELL ABOUT IT***Show how the thing looked.
This is one of the secrets of writing; never tell the reader--show him.
(He trembles, roving eyes, slackened jaw, and such.)
MAKE THE READER SEE HIM.
When writing, it helps to get at least one minor surprise to the printed page.
It is reasonable to to expect these minor surprises to sort of inveigle the reader into keeping on.
They need not be such profound efforts.
One method of accomplishing one now and then is to be gently misleading.
Hero is examining the murder room.
The door behind him begins slowly to open.
He does not see it.
He conducts his examination blissfully.
Door eases open, wider and wider, until--surprise!
The glass pane falls out of the big window across the room.
It must have fallen slowly, and air blowing into the room caused the door to open.
Then what the heck made the pane fall so slowly?
More mystery.
Characterizing a story actor consists of giving him some things which make him stick in the reader's mind. TAG HIM.
BUILD YOUR PLOTS SO THAT ACTION CAN BE CONTINUOUS.
THIRD 1500 WORDS
Shovel the grief onto the hero.
Hero makes some headway, and corners the villain or somebody in:
A physical conflict.
A surprising plot twist, in which the hero preferably gets it in the neck bad, to end the 1500 words.
DOES:
It still have SUSPENSE?
The MENACE getting blacker?
The hero finds himself in a hell of a fix?
It all happens logically?
These outlines or master formulas are only something to make you certain of inserting some physical conflict, and some genuine plot twists, with a little suspense and menace thrown in. Without them, there is no pulp story.
These physical conflicts in each part might be DIFFERENT, too.
If one fight is with fists, that can take care of the pugilism until next the next yarn.
Same for poison gas and swords.
There may, naturally, be exceptions.
A hero with a peculiar punch, or a quick draw, might use it more than once.
The idea is to avoid monotony.
ACTION:
Vivid, swift, no words wasted.
Create suspense, make the reader see and feel the action.
ATMOSPHERE:
Hear, smell, see, feel and taste.
DESCRIPTION:
Trees, wind, scenery and water.
THE SECRET OF ALL WRITING IS TO MAKE EVERY WORD COUNT.
FOURTH 1500 WORDS
Shovel the difficulties more thickly upon the hero.
Get the hero almost buried in his troubles. (Figuratively, the villain has him prisoner and has him framed for a murder rap; the girl is presumably dead, everything is lost, and the DIFFERENT murder method is about to dispose of the suffering protagonist.)
The hero extricates himself using HIS OWN SKILL, training or brawn.
The mysteries remaining--one big one held over to this point will help grip interest--are cleared up in course of final conflict as hero takes the situation in hand.
Final twist, a big surprise, (This can be the villain turning out to be the unexpected person, having the "Treasure" be a dud, etc.)
The snapper, the punch line to end it.
HAS:
The SUSPENSE held out to the last line?
The MENACE held out to the last?
Everything been explained?
It all happen logically?
Is the Punch Line enough to leave the reader with that WARM FEELING?
Did God kill the villain? Or the hero?
Excerpts from Marilyn Cannaday's biography of Lester Dent, "Bigger than Life: the Creator of Doc Savage" (Bowling Green State University Popular Press, c1990), transcribed by Jason A. Wolcott, 1995.
Sources: 1 2 ⚜ More: Notes & References ⚜ Plot ⚜ Character ⚜ Worldbuilding
#plot#lester dent#writeblr#writing reference#spilled ink#on writing#dark academia#fiction#writing inspiration#writing ideas#creative writing#writing advice#writing prompt#literature#writers on tumblr#poets on tumblr#poetry#writing resources
119 notes
·
View notes
Text
Tutorial for making "Open with..." work on Fedora with Windows programs (and installing Sims/Lots via CleanInstaller that way)
sorry for the convoluted title, but I didn't know how else to name this.
Anyway, you know how on Windows you can simply double click on .Sims2Pack files and CleanInstaller will automatically open them? Same with .package files and SimPE.
This doesn't work on Linux out-of-the-box, because both SimPE and CleanInstaller are Windows programs. However, there is a way to make it work just like that.
I will be writing this tutorial for CleanInstaller, but you can do the same with SimPE. You'll then be able to install lots and sims by simply double clicking those install files, just like how you'd do it on windows.
What we need to do is to create a .desktop file for our program, which will make it available in the list of programs when selecting "Open with...".
Go to /home/[PC name] Then hit ctrl+h to show hidden folders. From there, go to .local/share/applications.
Inside that folder, create a new file and name it CleanInstaller.desktop
Open your new file with a text editor like KWrite or Kate.
In the file, write the following:
[Desktop Entry] Type=Application Name=CleanInstaller Icon=[add a path to the .ico file you want to use, this is optional] Exec=WINEPREFIX="/home/[insert PC name]/Games/the-sims-2/" "/home/[insert PC name]/.local/share/lutris/runners/wine/wine-ge-8-26-x86_64/bin/wine" "[insert path to CleanInstaller.exe]" %U Categories=Game
If for whatever reason your runner for the Sims 2 is different (meaning it is NOT wine-ge-8-26-x86_64), then change it in the text above! It needs to be the same runner as the game is using.
Save your file.
To test, go download a sim or house, right click the file, select "open with..." and see if CleanInstaller is in the list.
Tip for people who use KDE plasma: Right click on a .sims2pack file, select "Properties". In the new window, click on "Change..." or "Add..." next to "Open With". Another window will open. At the bottom under "Applications preference Order", click on "+Add..." and select CleanInstaller. Apply the change and now you can simply double-click .sims2pack files to open them in CleanInstaller automatically.
/EDIT: Some people have reported that they couldn't get this to work on Mint and SteamDeck. I'm not really sure why that is, but in this case I'll just mark that this tutorial is for Fedora specifically.
136 notes
·
View notes
Text
Sims2Tools Config Changes
I've changed the start-up process for all of my apps to no longer read the SimPe configuration file to locate the Base, EP and SP sub-directories. This has required a major change to how the apps are configured.
The config dialog has been simplified for apps that do NOT require this information.

The simplified config applies to the following apps
BHAV Finder
DBPF Compare
DBPF Viewer
HCDU Plus
Hood Exporter
Log Watcher
SceneGraph Plus
What Caused This
For these apps, there is no need to do anything after downloading the new version(s).
The config dialog has been EXTENDED for apps that do need to locate Maxis files.

This extended config applies to the following apps
BSOK Editor
Object Relocator
Outfit Organiser
Repository Wizard
Entering the install path enables the "Select EP & SP Paths…" button.


If the SimPe config had been previously set, these paths will be pre-populated with those values. Otherwise, they will be "best-guessed".
After downloading a new version of BSOK Editor, Object Relocator, Outfit Organiser or Repository Wizard you will need to open the config dialogs, check the paths, and then click OK. As the configuration is shared by all my apps, you only have to do this once.
Tool-tips have been added to the main config dialog. Hovering the mouse over a ? (before the text entry areas) will display an explanation of what is expected in the associated text area.
54 notes
·
View notes
Text
YouTube Downloads through VLC: Step by Step
[EDIT: I've been receiving reports for some time now that this method no longer works. I suspect something about the switch to YouTube Music as a separate app, and/or YouTube's ongoing attempts to force Chrome use, broke the compatibility with the Github version of youtube.luac -- I haven't managed to look into whether there's an updated working version out there yet. Sorry!]
So this guide to easily downloading off YouTube is super helpful, but there's enough important information hidden in the reblogs that (with the permission of OP @queriesntheories ) I'm doing a more step-by-step version.
Please note: these downloads will be in YouTube quality. My test video download is coming through at 360p, even though the video I'm starting from is set to 720p. They're legible, but they won't look great on a TV. For high visual quality, you'll want to seek out other methods.
This guide is written for Windows 10, since that's what I can test on. It's been tested on Firefox, Chrome, and Edge (which is a Chromium browser, so the method should work in other Chromium browsers too). So far, I haven't tracked down a way to use this download method on mobile.
BASIC KNOWLEDGE:
I'll try to make this pretty beginner-friendly, but I am going to assume that you know how to right-click, double-click, navigate right-click menus, click-and-drag, use keyboard shortcuts that are given to you (for example, how to use Ctrl+A), and get the URL for any YouTube video you want to download.
You'll also need to download and install one or more programs off the internet using .exe files, if you don't have these programs already. Please make sure you know how to use your firewall and antivirus to keep your computer safe, and google any names you don't recognize before allowing permission for each file. You can also hover your mouse over each link in this post to make sure it goes where I'm saying it will go.
YOU WILL NEED:
A computer where you have admin permissions. This is usually a computer you own or have the main login on. Sadly, a shared computer like the ones at universities and libraries will not work for this.
Enough space on your computer to install the programs listed below, if you don't have them already, and some space to save your downloaded files to. The files are pretty small because of the low video quality.
A simple text editing program. Notepad is the one that usually comes with Windows. If it lets you change fonts, it's too fancy. A notepad designed specifically to edit program code without messing it up is Notepad++, which you can download here.
A web browser. I use Firefox, which you can get here. Chrome or other Chrome-based browsers should also work. I haven't tested in Safari.
An Internet connection fast enough to load YouTube. A little buffering is fine. The downloads will happen much faster than streaming the entire video, unless your internet is very slow.
VLC Media Player, which you can get here. It's a free player for music and videos, available on Windows, Android, and iOS, and it can play almost any format of video or audio file that exists. We'll be using it for one of the central steps in this process.
If you want just the audio from a YouTube video, you'll need to download the video and then use a different program to copy the audio into its own file. At the end of this post, I'll have instructions for that, using a free sound editor called Audacity.
SETUP TO DOWNLOAD:
The first time you do this, you'll need to set VLC up so it can do what you want. This is where we need Notepad and admin permissions. You shouldn't need to repeat this process unless you're reinstalling VLC.
If VLC is open, close it.
In your computer's file system (File Explorer on Windows), go to C:\Program Files\VideoLAN\VLC\lua\playlist
If you're not familiar with File Explorer, you'll start by clicking where the left side shows (C:). Then in the big main window, you'll double-click each folder that you see in the file path, in order - so in this case, when you're in C: you need to look for Program Files. (There will be two of them. You want the one without the x86 at the end.) Then inside Program Files you're looking for VideoLAN, and so forth through the whole path.
Once you're inside the "playlist" folder, you'll see a lot of files ending in .luac - they're in alphabetical order. The one you want to edit is youtube.luac which is probably at the bottom.
You can't edit youtube.luac while it's in this folder. Click and drag it out of the playlist folder to somewhere else you can find it - your desktop, for instance. Your computer will ask for admin permission to move the file. Click the "Continue" button with the blue and yellow shield.
Now that the file is moved, double-click on it. The Microsoft Store will want you to search for a program to open the .luac file type with. Don't go to the Microsoft Store, just click on the blue "More apps" below that option, and you'll get a list that should include your notepad program. Click on it and click OK.
The file that opens up will be absolutely full of gibberish-looking code. That's fine. Use Ctrl+A to select everything inside the file, then Backspace or Delete to delete it. Don't close the file yet.
In your web browser, go to https://github.com/videolan/vlc/blob/master/share/lua/playlist/youtube.lua
Click in the part of the Github page that has a bunch of mostly blue code in it. Use Ctrl+A to select all of that code, Ctrl+C to copy it, then come back into your empty youtube.luac file and use Ctrl+P to paste the whole chunk of code into the file.
Save the youtube.luac file (Ctrl+S or File > Save in the upper left corner of the notepad program), then close the notepad program.
Drag youtube.luac back into the folder it came from. The computer will ask for admin permission again. Give it permission.
Now you can close Github and Notepad. You're ready to start downloading!
HOW TO DOWNLOAD:
First, get your YouTube link. It should look something like this: https://www.youtube.com/watch?v=abc123DEF45 If it's longer, you can delete any extra stuff after that first set of letters and numbers, but you don't have to.
Now open VLC. Go to Media > Open Network Stream and paste your YouTube link into the box that comes up. Click Play. Wait until the video starts to play, then you can pause it if you want so it's not distracting you during the next part.
(If nothing happens, you probably forgot to put youtube.luac back. coughs)
In VLC, go to Tools > Codec Information. At the bottom of the pop-up box you'll see a long string of gibberish in a box labeled Location. Click in the Location box. It won't look like it clicked properly, but when you press Ctrl+A, it should select all. Use Ctrl+C to copy it.
In your web browser, paste the entire string of gibberish and hit Enter. Your same YouTube video should come up, but without any of the YouTube interface around it. This is where the video actually lives on YouTube's servers. YouTube really, really doesn't like to show this address to humans, which is why we needed VLC to be like "hi I'm just a little video player" and get it for us.
Because, if you're looking at the place where the video actually lives, you can just right-click-download it, and YouTube can't stop you.
Right-click on your video. Choose "Save Video As". Choose where to save it to - I use my computer's built-in Music or Videos folders.
Give it a name other than "videoplayback" so you can tell it apart from your other downloads.
The "Save As Type" dropdown under the Name field will probably default to MP4. This is a good versatile video format that most video players can read. If you need a different format, you can convert the download later. (That's a whole other post topic.)
Click Save, and your video will start downloading! It may take a few minutes to fully download, depending on your video length and internet speed. Once the download finishes, congratulations! You have successfully downloaded a YouTube video!
If you'd like to convert your video into a (usually smaller) audio file, so you can put it on a music player, it's time to install and set up Audacity.
INSTALLING AUDACITY (first time setup for audio file conversion):
You can get Audacity here. If you're following along on Windows 10, choose the "64-bit installer (recommended)". Run the installer, but don't open Audacity at the end, or if it does open, close it again.
On that same Audacity download page, scroll down past the installers to the "Additional resources". You'll see a box with a "Link to FFmpeg library". This is where you'll get the add-on program that will let Audacity open your downloaded YouTube video, so you can tell it to make an audio-only file. The link will take you to this page on the Audacity support wiki, which will always have the most up-to-date information on how to install the file you need here.
From that wiki page, follow the link to the actual FFmpeg library. If you're not using an adblocker, be careful not to click on any of the ads showing you download buttons. The link you want is bold blue text under "FFmpeg Installer for Audacity 3.2 and later", and looks something like this: "FFmpeg_5.0.0_for_Audacity_on_Windows_x86.exe". Download and install it. Without this, Audacity won't be able to open MP4 files downloaded from YouTube.
CONVERTING TO AUDIO:
Make sure you know where to find your downloaded MP4 video file. This file won't go away when you "convert" it - you'll just be copying the audio into a different file.
Open up Audacity.
Go to File > Open and choose your video file.
You'll get one of those soundwave file displays you see in recording booths and so forth. Audacity is a good solid choice if you want to teach yourself to edit soundwave files, but that's not what we're here for right now.
Go to File > Export Audio. The File Name will populate to match the video's filename, but you can edit it if you want.
Click the Browse button next to the Folder box, and choose where to save your new audio file to. I use my computer's Music folder.
You can click on the Format dropdown and choose an audio file type. If you're not sure which one you want, MP3 is the most common and versatile.
If you'd like your music player to know the artist, album, and so forth for your audio track, you can edit that later in File Manager, or you can put the information in with the Edit Metadata button here. You can leave any of the slots blank, for instance if you don't have a track number because it's a YouTube video.
Once everything is set up, click Export, and your new audio file will be created. Go forth and listen!
#reference#vlc media player#youtube downloader#youtube#uh what other tags should i use idk#how to internet#long post
230 notes
·
View notes
Note
Hiii if it's not too much trouble, could you share a bit more about how you managed to extract the banter text from the Rogue Trader game files? I would really like to write a paper on it as an example of Russian-English and English-Russian localization, but for that I'd obviously need a lot of text material at hand!
Oh, for sure! For text in Rogue Trader there are three main sources/tools I pull from -
The localization file (found in "[game install folder]\WH40KRT_Data\StreamingAssets\Localization", ex for me it's "C:\Program Files (x86)\Steam\steamapps\common\Warhammer 40,000 Rogue Trader\WH40KRT_Data\StreamingAssets\Localization\enGB.json") which is just a giant list of all the text strings in the game. For looking at translations, you can compare any string by searching for the same UUID between the enGB and ruRU files. Ex:


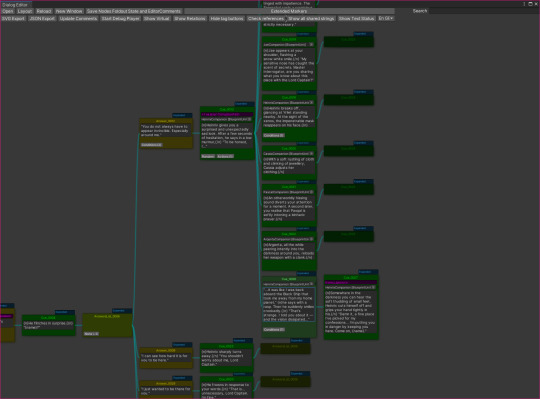
The WhRtModificationTemplate, which is the Rogue Trader modding tool Owlcat published. Instructions for how to set it up are here. I mostly use it for the dialogue view tool (Design > Dialog Editor) which shows conversation trees. Sometimes there are dev comments in Russian though which could be useful for you:
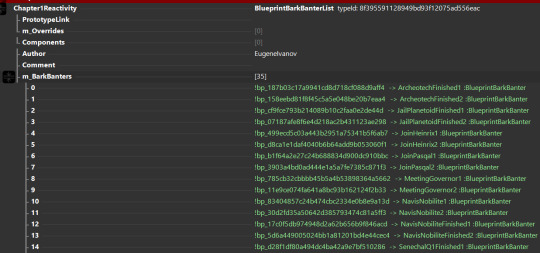
BubblePrints, which is a tool for more easily viewing Owlcat game data, found here. Searching for "t:barkbanterlist" gives you all the party banter lists, and so I just went through those one by one copy pasting the strings for the banter spreadsheet. This one looks like it does all the filtering to English, so you may have to jump back to the modification template to get the full localization for any given string. It gives an output like this:

Hope this helps! I'd be interested to read your paper too :>
30 notes
·
View notes
Note
Should I learn emacs I've been coding in nano
@perl-official
I always recommend emacs. But depending on your use case you might want to learn something else first.
If you hop between different servers a lot and can't expect to have access to your favourite editor on there, I recommend learning the basics of vi/vim since that is preinstalled pretty much everywhere. Also, most bigger IDEs you might use in the future have a setting or extension to use vim-keybinds.
If you just want to program on your own machine, I recommend trying out a few different text-editors and then decide on one.
To learn emacs, I recommend using the built in tutorial. You can access it using C-h t (thats CTRL-h followed by t) while beeing in emacs.
To learn vim, you can use the vimtutor. I think it is automatically installed with vim on most distros, but may have to be installed separately on some. Also neovim/nvim is way better in term of extensibillity to regular vim
Other Editors you could try:
- VS Codium (Visual Studio Code fork that removed most Microsoft Stuff)
- helix - a Vim like Editor
- zed - way too fucused on AI features for my taste but I heard it has some other nice features
If you want some more infos on why emacs is great: here two semi serious posts I made in the past:
Pingin some people who also might have something to say:
@vim-official @helix-editor @emacs-evil-mode
25 notes
·
View notes
Text
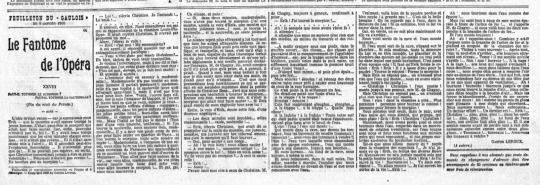
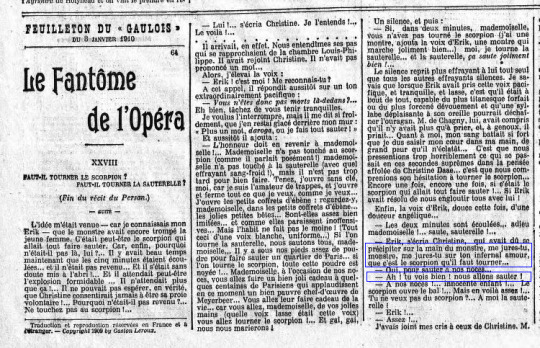
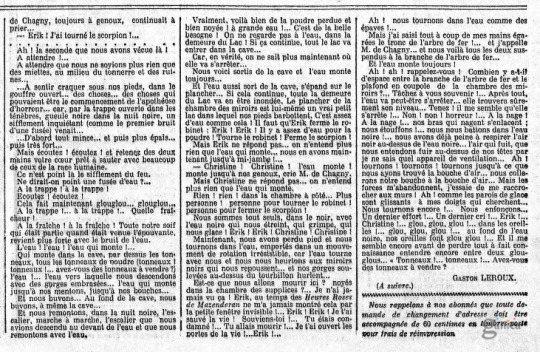
Welcome to the 64th installment of 15 Weeks of Phantom, where I post all 68 sections of Le Fantôme de l’Opéra, as they were first printed in Le Gaulois newspaper 115 yeas ago.
In today’s installment, we have Part III of Chapter 27, “Faut-il tourner le scorpion ? Faut-il tourner la sauterelle ?” (Shall You Turn the Scorpion? Or Shall You Turn the Grasshopper?).
This section was first printed on Monday, 3 January, 1910.
For anyone following along in David Coward's translation of the First Edition of Phantom of the Opera (either in paperback, or Kindle, or from another vendor -- the ISBN-13 is: 978-0199694570), the text starts in Chapter 27, “I had been struck by the thought, for I knew Erik all too well, that he might have tricked her once more” and goes to the Persian’s line, “And before losing consciousness, I seemed still to hear a voice calling above the swish and boil of water: any old barrels!… barrels!… any old barrels for sale?”
There are some differences between the Gaulois text and the First Edition. In this section, these include:
1) Chapter XXVII was printed as Chapter XXVIII. This numbering error was made in Chapter VII, and was not corrected, so it was propagated throughout the Gaulois publication.
2) Each chapter in the Gaulois publication is one number ahead of the chapters in the First Edition, due to the inclusion of “The Magic Envelope” chapter in the Gaulois.
3) Minor differences in punctuation.
NOTE: Leroux and the editors at Pierre Lafitte & Cie. must have been satisfied with this section, because there are no other textual changes that appear in the First Edition.
TRANSLATOR’S NOTE I:
The text highlighted in blue in the first half-panel above indicates the only instances in the novel where Christine switches from using 2nd person plural (formal “you”) to using 2nd person singular (informal “you”) to address Erik. Christine is at her breaking point with Erik here, and this switch from vouvoyer to tutoyer is intended to be condescending.
This text translates as:
“Erik,” cried Christine, who must have rushed towards the monster’s hand, “swear to me, monster, swear to me on your infernal love, that it is the scorpion that I must turn…”
“Yes, to go off to our wedding…”
“Ah, you see! We are going to go off!”
TRANSLATOR’S NOTE II:
In designating the grasshopper (sauterelle) as the switch that will ignite the gunpowder, Erik is making a pun on the French word “sauter,” which means both “to jump” and “to explode.” It can also mean “to go off,” which is how I translated it above when Erik says, “go off to our wedding,” and Christine thinks he is making a horrible pun on “go off/explode” to trick her into turning the switch that will ignite the gunpowder.
But there is another, more derogatory meaning to “sauterelle,” as well. “Sauterelle” is French slang for a prostitute, as well as French slang for a picky woman who examines items in a shop without buying anything, as we can see from Albert Barrère's French-English dictionary of Argot and Slang from 1889:
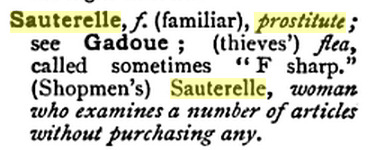
So, in addition to telling Christine that she will blow everyone up if she turns the grasshopper, Erik is also telling her that if she doesn’t agree to marry him, she is a picky whore.
Christine once again shows herself to be a pinnacle of restraint and dignity. Erik deserves far worse than to have Christine belittle him, tutoyer him, and call him a monster.
Because Christine is right — Erik has shown himself to be a monster here. Not because of his face, and she doesn’t mean it that way, but because of his terrible actions. And his redemption at the end is a redemption of his character, of his soul.
Le Fantôme de l’Opéra is Leroux’s retelling of the Beauty and the Beast myth. Erik’s transformation is that he lives out his remaining days as a man, and he dies and is buried a man.
Erik's appearance does not change, but his heart does. His life has been anything but fair — for instance, in Leroux’s novel, Erik helped design and build the Opera House, yet he is given little “official” pay, and he receives no recognition for his work. But because of Christine, he learns that this doesn’t give him the right to impose his will on others in a way that harms or kills them.
The tragedy of Erik’s story is that, in an ideal world, he would have been able to use those revelations in his life for many years to come — as Leroux writes, “Il avait un coeur à contenir l’empire du monde” (”He had a heart that was great enough to have ruled the world”).
But Leroux reminds us that Erik does not live in an ideal world, and neither do we. However, just because Erik doesn’t get a traditional “happily ever after,” that does not negate the importance and power of his transformation, and that’s a lesson that we can all take to heart. We might not get a “happily ever after,” but we can still make a great difference to the people in our lives.
Click here to see the entire edition of Le Gaulois from 3 January, 1910. This link brings you to page 3 of the newspaper — Le Fantôme is at the bottom of the page in the feuilleton section. Click on the arrow buttons at the bottom of the screen to turn the pages of the newspaper, and click on the Zoom button at the bottom left to magnify the text.
#phantom of the opera#poto#gaston leroux#le fantôme de l’opéra#le gaulois#phantom translation#sauterelle#saute joliment bien#15 weeks of phantom#phantom 115th anniversary
20 notes
·
View notes