#how to make a website shortcut
Explore tagged Tumblr posts
Visit Tumblr Blog
Explore Tumblr blogs with no restrictions, modern design and the best experience.
Last Seen Tumblr Blogs


Fun Fact
130K people were victims of a chain letter scam that affected Tumblr in May 2011.
Text
youtube
#how to make a website for my business#how to make a website a desktop icon#how to make a website blog for free#how to make a website business#how to make a website in wordpress#how to make a website qr code#how to make a website link#how to make a website landing page#how to make a website my homepage#how to make a website portfolio#how to make a website that makes money#how to make a website for a business#how to make a website for free on google#how to make a website godaddy#how to make a website for a business for free#how to make a website shortcut#how to make a website to sell products#how to make a website show up on google#how to make a website to sell stuff#how to make a website domain#how to make a website game#how to make a website on squarespace#how to make a website google sites#how to make a website https#how to make a website in github#how to make a website online#how to make a website with google sites#Youtube
0 notes
Text
Networking/Knowing A Guy: A Guide
This is the autism website. Now, as an extension of the power of love and friendship, there are few things more useful than Knowing A Guy. Knowing A Guy means you have a support network. Knowing a plumber, or a tax accountant, or just that one dude that's really fucking good at finding the information you need when you're really overwhelmed, can be the difference between being able to pay rent and having a fun party with friends to fix your shit.
How does one end up Knowing A Guy? It's a skill you can develop called Networking and it is one of the foundations of society. Unfortunately making those connections with people is fucking hard and nobody makes a tutorial for it. So, here you go:
The golden rule is you scratch my back and I scratch yours
It is necessary for survival to seek out useful people
Great news! Everyone is useful in some form or fashion - including you! When given the opportunity to learn about someone, do it! Extroversion does not come naturally to some people and that's okay. Just take whatever falls in your lap.
Types of usefulness: trade skills, connections of their own, personality you jive with, pleasant to talk to, niche interest in shared hobby, security - the list is pretty much endless. I know a guy that lives in the metro area - no job, no major hobbies, inoffensively annoying to me personally, kinda ignorant, not attractive to me, but you know what? He knows how the fuck to get around the city by foot. My rural-raised ass APPRECIATES the guide.
Remember important information: general personality, background, skillset, likes and dislikes. You can find this information by making smalltalk about their life. There is no such thing as pointless conversation. (Yes, even the annoying smalltalk)
The more people you know, the higher the likelihood that one of them will be useful in a given situation - or will know someone who is.
It is overwhelming. In a given clique/community/workspace/whatever, there is A Guy Who Knows The Other Guys. This Guy is a shortcut. Find them. They're often elderly, extroverted, a little bit annoying, a secretary or in some otherwise forward-facing position. Look for people that are gossipy/talk about other people a lot but not in negative ways. If they constantly talk shit, they'll talk shit about you too. They're still useful but be careful with the information you share
You do not have to like someone for them to be useful.
You do not have to like someone for them to be useful.*
If you have low self esteem, you're going to feel like you're using people. You're not. That's the devil talking. People like feeling valued and the connections you are making are the threads holding community together. Recognize people for their talents. It's only a problem when you're taking advantage of people
So: don't feel scummy about it. You're an animal. You have to claw out your right to survive and people will respect you more for it.
Luckily mutualism is the name of the game in the animal kingdom. Offer something back. The foundation of a Know A Guy relationship is Mutual Benefit
Sometimes that Mutual Benefit is just spreading news of the The Guy far and wide. My plumber friend is my actual friend and I love her to death, but I'm maintaining our backscratch relationship by pimping out her plumbing business to anyone that'll listen
Food is a good Mutual Benefit. People across cultures for all of human history have bonded over food. I have good success asking people for a favor and then offering to buy them lunch in return **
General compensation is also good. Offer a service in return and always do your best to offer financial compensation as appropriate. Having your plumber friend take a look at your drain: doable with a case of beer. Having your plumber friend redo the pipes in your entire house? You need to pay for that.
Being transactional is not necessarily a bad thing. I would advise against keeping an itemized list of things owed, but fish don't seek out cleaner shrimp just because they enjoy their company. Everyone gets something
Unfortunately being extroverted and generally personable is a huge benefit here, but that's the value of the Guy That Knows A Guy. There's someone out there that has consolidated All The Guys so you don't have to be the local expert. Always remember nobody can do everything and you don't need to master every skill
* This is the foundation of a functioning community. I have many acquaintances that I find incredibly annoying. They include doctors, welders, artists, social workers, lawyers, construction crew and random fuckers at the grocery store. I do not hang out with them. I do not have to in order to maintain a civil Know A Guy relationship. I can drop them useful tidbits and fuck right off so I don't have to spend any more time than necessary with them
** People may assume romantic intent. Be prepared for that. I generally denote that it's a friendly/work lunch by calling them bro at some point if they're my age. Otherwise my general demeanor is sufficient to show that I do this with everyone
Source: personal experience, mother's teachings of crime, booth vending and poverty
10K notes
·
View notes
Note
hey @pukicho i saw your art and i thought it was super cool! you improved so quickly (really impressive btw), and i was wondering what resources used to study art? and what app/website you digitally draw on? and your brushes if your okay with sharing them? and literally ANY other information you had because i would love to learn how to draw?
i feel like a victorian street rat asking for more bread
I use an XP-Pen Pen Tablet and Clip Studio Paint as my program of choice, but any pencil and notebook will suffice for learning, and may even be better. As for learning, I use books, baby!!! BOOKS! I'll even be nice and tell u which ones, because I am a lover of shared knowledge:
How To Draw by Scott Robtertson - deceptively complex book on perspective. It tells you how to draw a box, I then suggest you draw a fuck-load of boxes in correct perspective before moving forward. Having a strong grasp on planes and perspective allows you to properly grasp the volumes and shape of almost anything. It's the baseline principle to visualizing what u wanna draw. Without simple forms understood in perspective, you merely lack the skills necessary to draw from imagination.
Carlson's guide to landscape Painting - A good book, even if u don't intend to draw landscapes. Tons of clever explanations on lighting and value. Tons of useful relational shortcuts to understand complex scenery in smarter ways. I like the way he explains things, it makes me go ohhhh.
TACO point character drawing 1 & 2 - Two NEAT anatomy reference books. It's mostly just a collection of simplified, anime-esque proportional figure drawings. They're a great reference, but I absolutely wouldn't use it as my only set of books on anatomy. It's still useful to use and learn, but in a more general way - and I can't currently apply everything the book tells me yet, because I haven't learned the forms in more detail first.
The Human Figure by Jon H Vanderpoel - this is a short, but VERY useful anatomy reference book. The Author is from the early 1900s - real oldschool, which is good. He has a very useful, matter-of-fact writing style. This is the better starter book to use in order to remember the proportional relationships of the human body (even then, it's still not enough)
The Practice of Oil Painting & Drawing by Solomon J. Solomon - I'll be honest, this one makes sense to me conceptually, but I cannot fucking execute some of his practices. This dude is from the victorian era, his paintings are in museums and they're too good. It only makes sense that his views and approach to art are headier than some of the other suggestions on this list. The book is still useful, and I presume will only grow in usefulness as I learn. It does still have some cool ideas in the first-half of the book that you can easily apply to your art studies! But the second half is a series of master-derived schools of learning that I have yet to dare touch.
(also check out loomis books. I hear they are good)
ENJOY
1K notes
·
View notes
Text
VPNs do not make you more secure
here's how they work!
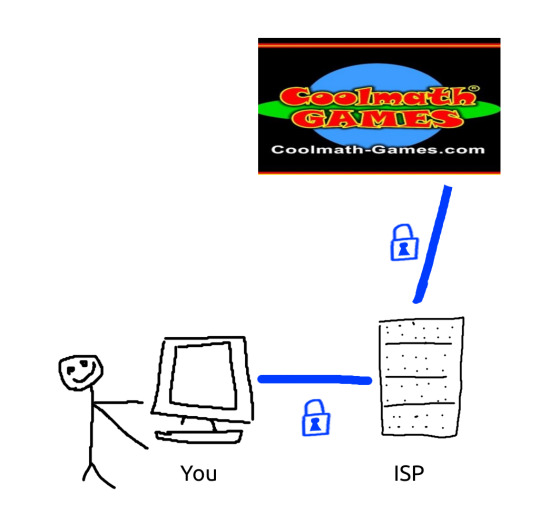
first of all, most of your internet traffic is already encrypted via TLS (Transport Layer Security). Things that aren't encrypted are usually videogames or less important applications.
a VPN encrypts traffic between your computer and the VPN server you're using.
your Internet Service Provider (ISP) sits in the middle of that transaction.
cue the MS paint diagram
Without a VPN:
With a VPN:
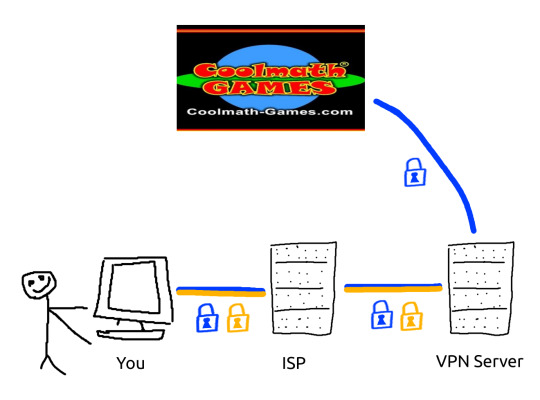
the traffic between your VPN server and the rest of the internet is not encrypted any further.
things that VPNs are good for:
bypassing geo-blocking
bypassing website blocks set up by your ISP
obscuring network traffic from your ISP
things that VPNs are not good for:
browsing the internet without having your activity logged. every company that gives internet service logs the activity, it's half of how they make sure they're not being hacked.
hiding information from the government. VPN providers WILL bend to subpoenas, they WILL turn over logs of your network activity.
cybersecurity. VPNs can't save you once the traffic is between them and the final destination. they don't analyze your traffic to detect and stop hackers, they don't add any encryption where it matters.
VPNs are not a shortcut to security. you cannot pay 15 dollars a month to forgo all responsibility for your own digital privacy. do your research, use a password manager, stay safe.
my friends i hope you find this information useful. you have been sold a lie. remember to show extreme skepticism to youtube sponsorships and journalism websites which sing their praises.
sources: i have a certificate iv in cybersecurity
2K notes
·
View notes
Text
A QUICK GUIDE TO AO3 CUSTOMIZATION FROM SOMEONE WHO KNOWS NOTHING ABOUT CODING

ft adding pink to everything and my secret to writing long comments
note: I originally posted this to twt but if that place burns in a fiery pit I spent too long on this for it to disappear, so I'm putting it here too :)
so many people know way more about this than I do, but this is a step-by-step walkthrough of the changes *I've* made, and hopefully it works as an introduction people can build from for whatever they'd like to do
There are a lot of images in this post! (click to enlarge)
to start, AO3 skins
site skins change how the AO3 website appears when logged in (even on mobile), mine is pink and blue!

I'll have my skin turned off throughout the post so the guides appear as they will for you
to create, edit, and view skins, go to the "skins" tab from the left-hand menu. you can also view public site skins from there or from the button in the preferences.


public site skins are made by other users. i would really encourage previewing and exploring them to become familiar with the possibilities (maybe you just want to use one of them and now you're done!)
to create your own skin
on the skins page, click "create site skin"
if you don't know CSS (same), use the wizard! clicking on the "?" will give more information about each option
I only use the colours section you'll see a link right there for hex codes I use pink as a header colour and bue for accent but lots of people change the background colour and that looks really cool!
submit


The next step (optional!!!) is to add CSS from a public skin to your own. I use "ByLine" by Branch. this separates the tag categories and adds spacing to make them easier to read.
here is a before and after using the fic "Landslide" by @roosterbruiser as an example


to see the CSS of a skin, click the title
copy all the text below the CSS heading
in the skin creator/editor press the custom CSS option and paste all the text into the CSS box


you can have both wizard and custom CSS settings, in mine you can see the header and accent colours as well as the CSS

level up: USERSCRIPTS
userscripts are small pieces of code that modify a website. for AO3, this may involve adding shortcuts and buttons or even advanced tagging functions (computer people, I'm so sorry if this is wrong, I'm trying). I use Greasy Fork and Tampermonkey.
This is how I write long and formatted comments!
Greasy Fork is an archive of userscripts and Tampermonkey is a browser extension and userscript manager. You don't need to use these two in particular. please use your common sense when downloading anything or adding permissions to your browser.
Greasy Fork guide on installing scripts
Install Tampermonkey on Chrome
there are TONS of user scripts for AO3. This is another good opportunity to explore all the possibilities. there are lots of more complicated options I haven't explored.
scripts for AO3

i use this floaty review box
and this comment formatting
EDIT: if you use chrome you might need to turn on developer mode in your chrome extension manager - you can google "tampermonkey developer mode" and it should explain that :)
to install (once you have Tampermonkey installed):
open the script you want in Greasy Fork and press install
Tampermonkey will open, press install again


clicking the Tampermonkey extension will let you toggle scripts on and off, and opening the dashboard will let you view, edit, and delete scripts


i find i can only have a few turned on at a time before they cancel each other out, but that depends on which ones you're using and someone more savvy might be able to fix that
how to use the floaty review box - write more comments!
there will now be a "floaty review box" button at the top of the work, it will open a floating text box you can move anywhere on the page. highlighting any text and pressing the insert button will paste the text with italics into the box


anything you type in the review box will appear in your comment at the bottom of the page!
if you have also installed the comment formatting script, you'll be able to highlight any text in your comment and use the new buttons above the comment box to format it

thats all ive got! Hopefully this is a good starting point to get familiar with some of the terms and basics for skins and scripts <3
if you want some inspo for how to comment on fics i made a whole fic rec list on twitter based on comments I've left, it's here. i have a masterlist of recs there mostly for darklina/reylo and similar ships.
the tag #reading with ru has cod recs and me talking about books
:)
#please no one follow me from this im never helpful otherwise#ao3 skins#ao3#fanfic#ao3 community#fandom#ao3 resources#im sorry if the image quality is awful lmk if I should clarify any of the text!#floating comment box#floating review box#ao3 guide
686 notes
·
View notes
Text
shortcuts/tricks that have saved me a lot of time ⋆⋅☆⋅⋆
specifically computer shortcuts. i'm putting this here in case it helps anybody else <3


1. Paste into a new tab to clear formatting
Don’t you hate it when you’re copying and pasting something and the formatting just copies directly from the page that you copied it from? And then, when you hit the “clear formatting” option, it just reverts the whole thing back to Arial point 11 font? Well, here’s an easy solution:
Select the text that you want to copy. Cntl + c to copy.
Then, before you go into your document, control v into a new tab’s search bar.
Then, hit cntrl + A to select everything in the search bar.
Cntrl + X to cut the selected text.
Now, when you paste the copied text into your google document using cntrl + v, it will copy the formatting of your document. Now, you don’t have to go and change the font size, then the font color, and then the font itself.
Hooray!
2. For organizing tabs:
Cntrl/Cmd + Shift + D - groups all your open tabs in the window into one bookmarked folder
Cntrl/Cmd + W - closes the tab that you are on
The best way to use cntrl + W is to group tabs, especially if they’re all in one big cluster that you want to delete:
Click the top of the first tab, hit shift, and then hit the top of the last tab you want to select. Do it just like how you select text on a website: from the beginning of the sentence/paragraph, to the end.
What you just did was select every tab from the first tab to the last tab. Kind of like selecting text on a website, again.
Then, just press cntrl + W and every one of the selected tabs will be deleted.
Clean google chrome browsers await you!
–--–--–--–--–---⋆
These are all the tricks I’ve compiled from my years of chronically being on my laptop. I hope you found these tips helpful in some way and will use it to make your life easier in this digital age.
Wishing you all the best, q’s playlist
#qs playlist#gaslight gatekeep girlblog#girlblogger#girly things#just a girlblog#girlblogging#live laugh girlblog#dream girl#becoming that girl#glow up#it girl energy#self love#self improvement#tips#tips and tricks#practical
177 notes
·
View notes
Text
curating reading lists (without social media)
a guide to finding stuff to read, for @divorceblogger. this is a guide specifically for avoiding things like goodreads/storygraph etc which aggregate books that are popular without being all that helpful for finding things on niche/specialist topics.
a bit of housekeeping before getting to the actual list-making tips:
i mostly read nonfiction targeted at both academic and popular audiences. i also read a mixture of classic lit, genre fiction, zines & conceptual/artists’ books, and playtexts & poetry. i read traditional print books, non-traditional print publications, PDF and ePub ebooks on an iPad/iPhone, and listen to audiobooks and audio dramas.
i have a infinite number of books i want to read. the discovery process of new & interesting outstrips my capacity to read them all, so i have to be extremely selective. this also means i never tolerate a book i’m not enjoying. it can have weak points, but i have to be getting something out of the experience, or else i am wasting my one wild n precious life, ya feel?
my goal is to read for quality, not for quantity. i tend to dislike a lot of online reading communities for their focus on metrics (number of books, page count, word count, etc). i bristle at tools that try to push my reading into this direction. i have a reading practice, in the same sense that one would have an artistic practice. thinking of my reading as a practice — rather than a project, a thing to be completed and checked off the checklist — helps orient me towards patterns of thinking that serve me better
i work in the arts industry, so fiction and non-fiction books are reference tools. when I finish reading a book, I put it back on the shelf, like returning a tool to the toolbox until it is time to use it again. i live in a bachelor flat, so obvs i have to resist the incessant pressures of consumerism, but it doesn’t bother me that i have not read every book that i own. they are there for when i get to them. similarly, i would not be bothered by owning a kitchen fire extinguisher that i have not used.
where do I keep my reading lists?
Obsidian: for organising to-read lists on specific topics, genres, eras, locations, etc. i repeat books across multiple lists where appropriate. i don’t keep a single master list of everything I want to read because it would simply be too unwieldy to manage. Small focused lists of no more than ~25 books on the topic are best, imo.
TinyCat: for cataloguing physical books that i own. i have a shortcut to the website on my phone so i can easily pull it up if i can’t remember what books in a series i already have. i can tag anything unread with my “antilibrary” tag. for my own amusement, i also insert library pockets and circulation cards into my books and stamp them with the date completed (using my beloved rotary date stamp). i can also stamp the date a friend who borrowed the book completed it. i like seeing the signatures add up over time.
Zotero: for academic bibliographic citations. useful habit to get into if you transcribe lots of quotes from yr readings into yr notes.
how do i develop my reading lists?
i usually develop my reading lists through a combination of concerted effort to research a topic & ambient browsing. this isn’t Abt How to rigorously conduct research though so im gonna focus more on ~letting books organically find me~
when i have a book that i enjoy, i see if the author has written any more books on topics that interest me. incredibly basic 101 advice but somehow people still miss this one.
check the bibliographies & acknowledgements. if something comes up in bibliography after bibliography, its usually a good sign its worth checking out. also, authors usually thank other authors in their acknowledgements, its a great way to start building an idea
i love when artists talk abt their influences in interviews, like this interview abt what influences and easter eggs there are in disco elysium (i screamed at the Einstürzende Neubauten reveal!!!). i love when fans come up with their own reading lists for media, like my list speculating what daniel molloy would have read and watched in 1973.
when i am travelling somewhere i try to read something related to the to place I am going. Wikipedia is a first easy point of reference to find out if yr destination is famous for being the birthplace of X poet or Y film is set there.
tertiary sources. secondary sources are about a primary source, whereas tertiary sources aim to provide an overview of the major debates in those secondary sources on a specific topic rather than to generate their own new ideas/arguments. the oxford university press “a very short introduction” series varies in quality but its often a very useful starting point.
recs from friends/gifts. my loved ones know i like books, and books are usually a cheap & easy gift for holidays & special occasions. i gift books that i want to read myself, so we can talk abt the book together.
what physical locations do I browse?
Local library, university library. You might be even be able to get a specialist library card to an archive or museum reading room. Some public libraries also have special collections like the Seattle Zine Library.
For-sale section in the local library. proceeds usually go to supporting the library
local secondhand bookshop. there are several in walking distance, i usually hit them up quarterly, especially as i gift a lot of secondhand books
local independent bookshops. several local independent bookstores host an annual bookstore crawl where if you get a stamp from all of them in one weekend u enter a draw to win $1000 gift card :)
thrift store/charity shop/antique markets. there is usually a section with books even if the main focus is clothes/furniture
book events. author talks, staged readings of new plays, poetry readings, book/lit mag launch parties, Writers Festivals, small/independent press fair, rare book fair, zine fests, international library day, conferences
bookshelves at house parties. im 100% the person checking out yr bookshelf at a house party. great place to get yr flirt on.
travel. basically any new place im going, i look-up in advance the local library, second hand bookstores, charity shops, antiques stores etc. and save them in my maps on my phone. if i can conveniently pop into one while im there, neat! i particularly like municipal libraries bc the big ones are usually architecturally interesting (like the Vancouver Public Library) and the small ones are usually really charming and full of specific local history, leaflets to interesting local stuff, etc.
what online locations do I browse?
navigating the online catalogue to yr local & academic libraries is a whole skill unto itself. i was very fortunate be born in the late 90s and to have a specific local librarian teach me boolean operators before i could tie my shoelaces, ride a bike, or, frankly, do most human being things (shoutout to Miss T yr a real one). your library very likely has something like a workshop or at the very least a help desk that can help u with this if needed.
mailing lists of small/independent presses.
publishers websites (academic and general audience).
wikipedia. u can look at the footnotes section on wikipedia. its free. its legal.
looking up university syllabi. some are on profs’ websites, some are available through the university library. there is also the Open Syllabus website which aggregates the most often mentioned books in submitted syllabi, organised by discipline or through a visual map.
what’s available on libby/borrowbox.
Archive dot org and google books/google scholar to read the previews and judge if the book is worth following up on.
i didn’t actually include any selections of my personal reading lists, but if you would like to know more you can always shoot me an ask with a specific topic in mind.
156 notes
·
View notes
Text
you don't need an AO3 app - round 2!!!
"AO3 is ugly and I hate the formatting!" -> you can download site skins. very gorgeous ones. and you can use them to change the aesthetics and visuals of AO3. just search 'AO3 skin' on Tumblr or even on google and you will be in A Whole New World. (and those searches should yeild tutorials on how to install the skins as well - it's not something I know a lot about, because I used to primarily use Quizilla and FFN, so I am more than used to Ugly Website. AO3 is very aesthetic and pretty compared to those.)
"AO3 is too bright!!! it hurts my eyes!!!" -> there is a dark mode. scroll down to the bottom. there is a heading that says 'customize'. under this heading, hit the button that says 'reversi'. that is their version of dark mode. and again, you can look for site skins that you like that have a darker background.
"I want to be able to make reading lists!" -> you can make bookmark collections on AO3. In your bookmarks, there is a button that says 'add to collection' beside each work. have fun. go ham. (Also, you can make private bookmarks if you are reading something with more controversial content that you don't really want others to know about - and please know, that any bookmark comments you make on public bookmarks can be seen by the author.)
(this last one made me laugh - because it seems like people are just coming up with bullshit excuses to 'need' an AO3 app when there is literally nothing that an app can go that AO3 can't.)
"my memory is really bad because of reasons sooo I remember to use things better by having them on my homescreen like an app!!!" -> create an AO3 shortcut on your homescreen. most mobile browsers have the capability to put a shortcut to a specific link or a specific website on your homescreen so that you can go straight there - like you would with opening an app. and it can be labelled 'the AO3 app' while simply having the icon of that browser. you can even do this with a link to a specific fic that you are in the process of reading (even down to the specific chapter that you were on). there is literally 0 reasons to have or use an AO3 app.
and remember kids!!! any and all apps with AO3 in their title are not associated with the real archiveofourown in any way, shape, or form - they are unofficial, and technically, they are illegal. and using them is putting all fanficition writers at risk legally (even if there is no active lawsuits right now) - just don't fucking use them. it is a threat to the entire fanfiction hobby just because you want 'the app experience'.
the archive is a non-profit website with 0 ads for a reason, and those apps are scummy scammers who put ads on our stories to make fast easy money when none of the people who made those stories ever consented to it.
#god#seeing people on tiktok say that they use ao3 apps drives me wild#sundrop speaks#archive of our own#ao3#fanfiction#spencer reid x reader#psa#daryl dixon x reader#ellie williams x reader#eddie munson x reader
464 notes
·
View notes
Note
hi nic!! do u have a tutorial on making gif packs?? i've been trying to look for tutorials and i think i just overwhelmed myself so i dont know where to start :((
omg hi!! i know a tutorial for this method exists, but i cannot seem to find it 😭 i'll go ahead & make one for you ! beneath the cut, you'll find my gifmaking process + all my favorite gif resources. i think something good to note is that every gifmaker i know does it a little differently, so you may prefer other methods like screencap clipping or video-to-layers. i think these tutorials by pochunts would be super helpful if you wanted to explore other options <3 here's the gif i made in the tutorial btw :p

how to make gifs using photoshop's video timeline (+ extra resources):
(if you want to follow along directly, i'm using this video.)
1) download your video. i use this website (cobalt). for the cleanest final product, try to use videos that are 1080p or higher.
side note: if you're downloading something other than mp4 files, you'll need a file converter- i use handbrake for this. this tends to come up if you're downloading tv shows!!
2) open your video in photoshop. (not import, just regular file > open)
this is what mine looks like now. our layouts may look a little different because mine is tuned to my job too.
if you're new to photoshop, go ahead & pinpoint a few things: your toolbar (yellow), actions panel (pink), adjustments panel (green), layers panel (blue), and video timeline (red). if you don't see these panels, go to window in your topbar & click the names.

general photoshop tip... go to photoshop > settings > preferences and 'up' your number of history stats. this will give you more 'undos' if you mess up rather than hitting a wall :p i have mine set to 75!!

3) convert to smart object. with your base layer protected, right click > convert to smart object, or go to layer > smart objects > convert to smart object. this basically allows you to make changes while keeping the base properties in tact!! you'll notice your timeline change from blue to purple.
bc i use this so often, i made the shortcut cmd+f. you can do the same by going to edit > keyboard shortcuts if you'd like :p


let's focus on that timeline for a moment... get familiar with the split button (red), zoom buttons (yellow), work area (green).
the split button is how we'll divide the video into clips, which will become our gifs. the length of your clip will vary. i just try to fit a completed action into one clip if that makes sense!!
the zoom buttons allow you to move through the video a little easier. this will end up being a personal preference thing. i usually zoom until frames are broken up by 2's (02:00f / 04:00f / etc - shown 2 pics down) but it also depends on the length of the video
the work area defines what will export when you hit save. later on, you'll want to make sure your adjustment layers cover the entire work area.

4) clip your video. skim through your video and pick a scene you'd like to gif. split at the beginning and end by clicking the scissors, so you have something like this. i'll pick three clips for the tutorial.
as a general note, i will clip the entire video in one go, save as a psd, then move onto sizing/coloring/sharpening/etc

go ahead & delete the layers you won't be using as clips. i would rec saving as a psd at this point to save urself the grief of any photoshop crashes since u have now clipped a video to your heart's content!!

5) now, onto sizing your gifs.
first you'll use the crop tool (pink, toolbar). you can input your desired size to keep the scene in ratio (in the pink squared boxes). this is up to personal preference again, i use 260x150.
once you choose a size, you can click the menu the green arrow is pointing to, scroll down, and define a new crop preset.

adjust image size. go to image > image size and type the size you decided. make sure it's set to pixels and that you have the in-ratio button (pink) clicked.

6) next, sharpen your gif.
as you're just starting out, i would suggesting using an action. i have my favorite options in this tag! to keep us on the same pace for this tutorial, i'll use this one by svgarboo.
using an action: click into your actions panel (red), click the options button (yellow) and choose 'load action', use the arrow (green circle) to open your action's folder and choose the playable option (green box). with your layer selected, click the play button (pink).
NOTE: if your play bar isn't over your active layer it won't apply
your video should look a little better & your layer should now look like this over in the layers panel:

if you want to make adjustments, double click the options buttons (pink) and adjust opacity to your liking.
7) coloring your gif. i could not begin to make a coloring tutorial bc i hate how mine turn out 90% of the time </3 BUT there are some beautiful tutorials in here ... I WILL SHOW U HOW TO PLACE THE LAYERS STILL !!!
add a new group (pink) & drag it above video group 1. it will float above your clips on the timeline. this is where your adjustment layers will go! i'm including a screenshot of my adjustment layers so you have an idea.


8) exporting your base gifs. adjust your working area bars to the beginning and end of each clip. go to file > export > save for web. i'll attach a screenshot of my export settings.

WHEN MAKING ADDITIONAL GIFS, REPEAT STEPS 5-8 AS NEEDED. because you used smart objects, you can use ctrl+t/cmd+t on your gif layers to resize instead of cropping each time.
9) adjusting gif speed. open your exported base gifs. you'll see that your video timeline has changed to a frames timeline.
go to options (pink) > select all frames. with all frames selected, click the dropdown arrow (yellow) and adjust your time.
timing will depend on a case-by-case basis. i usually go 0.05, 0.07, or 0.09. play around with speeds until the motion seems fluid and natural. my gif is around 110 frames long so i'm doing 0.05.
10) export again, using the same settings as step 8.
YOU CAN SET UP ACTIONS TO HANDLE STEPS 9 & 10 IN BATCHES. lmk if u would want a tutorial on that :p
now i have 3 finished gifs!!


11) uploading your gif packs. i think hosting directly on tumblr is going to give you the best loading time. and by that i do mean, just uploading gifs to a tumblr page 🙂↕️ if you choose to use alternate hosting sites like imgbb or gifyu, make sure you back your gifs up with a zip file on google drive.
79 notes
·
View notes
Note
hi yes hello I read Yield Under Great Persuasion last night from beginning to end in one sitting, which I haven’t done with a book in years, and… look. it’s do good. it’s so good. i cried so much because… yeah. tam’s inner struggle is. unfortunately extremely relatable.
but like… i remember seeing one of your posts about how you can have “cozy” and “low stakes” without it being like… nothing’s happening, and you absolutely nailed it. the inner journey that tam goes on is, in the grand scheme of things, SO low stakes. but that doesn’t make it any less important or gripping.
i don’t know. i’m still wading through my feelings. but yeah, between this and A Taste of Gold and Iron i’m a little mad at how beautifully well you depict what it’s like to have these personal mental struggles from the inside, and how the journey through them isn’t pretty, and it’s so so so hard, but there is hope. god, there’s hope for everyone, isn’t there.
anyway. thank you.
Thank you so much, this really means a lot to me. <3 I have spent (and continue to spend) a lot of time and energy and heartache trying to grow and to be a better person and to be kinder to myself. I think a lot of the time we as a society talk about that work as if it's effortlessly easy, but it's not. Being Good (ACTUALLY Good, HONESTLY and HONORABLY Good, not just mundanely well-meaning or vaguely decent enough to get a few brownie points from the people around you) is so, so, so hard. You have to give up so many things that feel great, like pride and pettiness and pointless snark and sometimes (frequently) personal gain. Even growing through mental health struggles requires sacrifice of some of those personal illusions -- like the idea that you're the exception to every rule: "Yes, other people might deserve good things and kind treatment and consideration, but it's different for me, I'm special (but like in a bad way)."
So yeah, just as you said -- the external stakes in Yield Under Great Persuasion are incredibly low. Tam's not out there saving the world or saving lives or overthrowing the dark lord. But when we take the journey of growth really fucking seriously, his internal stakes become sky-high, just as they are sky-high for each of us as individuals when we're going through something really, really hard. It's an EXISTENTIAL struggle -- "Will I survive this, as the me-that-I-am-now? Or will that version of me die in this process of metamorphosis? Who will I be on the other side of this?" Those questions are real and SCARY and important, and there aren't any shortcuts or cheat codes. But yeah, there is hope, because the next version of you is going to be sadder-but-wiser, but also probably happier at the same time, and stronger either way. The work is hard, but it's worth it.
ANYWAY. Thank you for the very kind message, I'm so glad you liked my books! If you need other folks to talk to about them, there is an official fandom discord server linked on my website. :)))
#yield under great persuasion#a taste of gold and iron#alexandra rowland#books#mental health#therapy
70 notes
·
View notes
Text
New Year’s resolution ideas that you’ll actually be able to keep:
-Delete as many unused online accounts as you can
-say no to website cookies
-Do something you’ve always wanted to do
-unsubscribe from email chains
-read more books than last year
-Watch more movies than last year
-help someone in need
-try a new recipe
-Say what you think and think what you say
-Recycle more
-Delete tiktok
-stop arguing with strangers online
-don’t hold back from giving compliments (online and irl)
-be patient with yourself
-take frequent walks
-de-clutter your room/house
-discover a new art/artist
-smile to strangers
-count how many puppies you pet in a year
-eat more plant-based proteins
-try a new fruit or vegetable
-do something your afraid of doing
-learn new words
-make a list of your favourite things
-be sillier
-pet as many street cats as you can
-take detours not shortcuts
-learn or perfect a craft
-start a collection
#New year’s resolution#except they’re realistic#and fun#and useful#new year#2025 resolutions#add more in rb’s
64 notes
·
View notes
Text
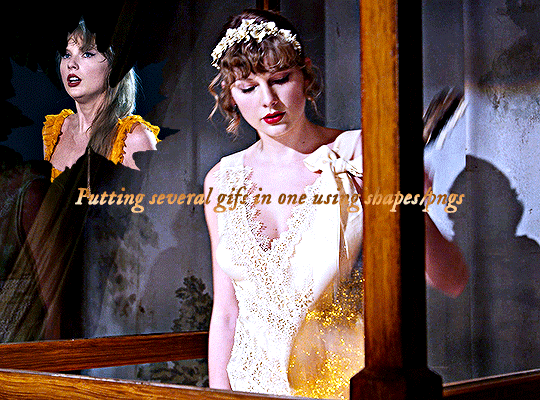
Hi, everyone! @reputayswift asked me how I made this gif where I put several gifs in one using shapes, so I thought I'd write a quick tutorial. Under the cut, just a heads up, this is very screenshot-heavy!
Difficulty level: Easy, basic gifmaking skills are required
Software being used: Photoshop CC 2020, but any version is fine, and I'm sure this can also be adapted to Photopea.
Firstly, you have to pick which shape/png you want to use. For this gifset, I used this maple leaf png that I got from cleanpng.com , a website that I highly recommend for getting transparent pngs.
After picking the png, make your gifs. Just remember that the smaller gif and the base gif need to have the same number of frames. And that the shape/png and the smaller gif need to have the same dimensions.
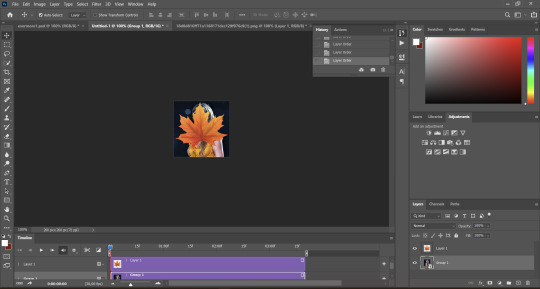
Okay, so after you've made both gifs, go to the smaller gif and convert it to a smart object. It will make it easier to put it inside the shape, since it will convert all the layers into one. Just follow these steps: select > all layers > filter > convert to smart filters:

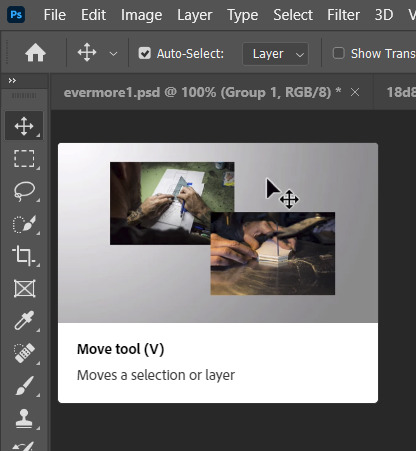
Okay, now open the png you've picked on Photoshop and resize it, so that its dimensions are the same as the smaller gif's. After you've resized the png, select the move tool (shortcut: V key in your computer keyboard), drag the png and drop it on top of the smaller gif:
Now, drag the png layer underneath the gif layer:

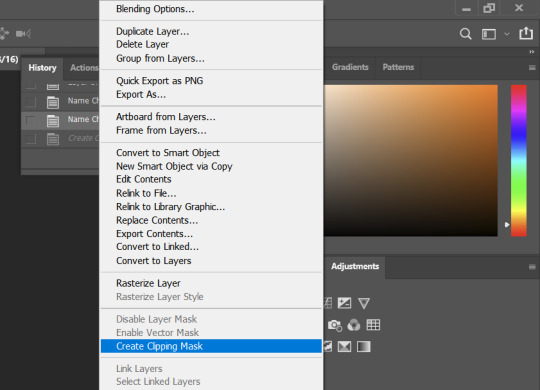
After that, right-click on the gif layer (not the png layer) and then select "create clipping mask":
And here's what we're left with:

Now, it's time to put the smaller on the base gif, which is pretty simple. Select the move tool (shortcut: V key on your keyboard), drag the smaller gif and drop it on the top of the base gif:

And here's our final result:

I hope this helps! Feel free to reach out if you have any questions <3
54 notes
·
View notes
Text

Journal entry on the official website. [source]
"Introducing The Veilguard Welcome back to Thedas"
--
"Hey everyone, It’s been too long since we last spoke! We’re happy to bring back our community blog series, where we can chat with you about our next adventure - Dragon Age: The Veilguard. If you’re joining us just now, earlier this week we released a blog detailing how we renamed the game to better represent what makes it special - it’s about you and your companions – not your enemies – that are at the heart of this new experience. Check that out alongside our Official Reveal Trailer which premiered at the Xbox Showcase on June 9th, where you first meet your seven companions. We’re also excited to open the official BioWare Discord server. You can expect news drops, giveaways, activities, and more planned between now and launch. This is our new dedicated home where we look forward to bringing this one-of-a-kind community together with a space to engage more frequently and celebrate your favorite stories and characters from Dragon Age: The Veilguard and others in the franchise. But that’s not all. We know what you value the most is seeing the game as it is, exactly how you’ll play it. So, we’re happy to provide you with a look from the opening moments of the game. Grab some snacks as we have 15+ minutes to explore Dragon Age: The Veilguard together."
--
"Are you the hero Thedas needs? This video from the first moments of the game is just the tip of the iceberg, and there’s so much more to discover on this epic journey. You’ll explore Thedas, uniting a cast of (yes, romanceable!) companions as you fight against ancient elven gods. In this crafted character-driven RPG, you’ll visit meticulously crafted biomes and beautiful regions, some that you’ve only heard whispers about in Dragon Age lore, including Rivain, Weisshaupt, Arlathan, Minrathous, and the Deep Roads - to name a few. We’ll have a lot more coming this summer as we fully detail what’s in store. You’ll begin by diving into the Character Creator. You’ll choose your class, lineage, gender, overall appearance and more. Choosing which faction Rook is part of will unlock different narrative, dialogue, and gameplay interactions. Combat is another area that has a lot of depth to it - both in how you choose to defeat your enemies and its progression throughout the game. The game will support various skill levels, but at its core, Dragon Age: The Veilguard has fluid moment-to-moment combat where you can choose between three classes - Warrior, Mage, or Rogue – each having their own advanced specializations. There's also a layer of tactical depth for those who want to dig in, which we really didn't get to cover in the video. Our new customizable ability wheel will help you turn the tide of battle at any time. It will allow you to pause the action, issue commands to your followers, use abilities, and unleash devastating combos. As you become more powerful, you can start to see the potential in how much fun (and hectic) things can get. We're also giving the option to use some of your abilities via a shortcut. Giving you these different kinds of options is something we thought a lot about and wanted to provide so you can find the playstyle that best fits you. Alright, that’s it for now as we’ll dive deeper into this and all things Dragon Age: The Veilguard through the Fall." Before we go, if you haven’t seen this yet, we wanted to provide an overview of what we have upcoming. As we’ve said earlier, we plan to continue revealing more about Dragon Age: The Veilguard and answer your burning questions. However, there’ll be some things we have to keep close to the chest as we get closer to launch. Remember to join the custom console giveaway before entries close on June 16th*, and set a reminder for our Developer Discord Q&A on June 14th at 10am PT. Submit your questions in the #ask-bioware channel on the server! Dragon Age: The Veilguard will be coming to PC, Xbox Series X|S, and PlayStation 5 in Fall 2024. That’s all for now, talk soon! -- The Dragon Age Community Team *Sponsor: Trufan Inc. NO PURCHASE NEC. 18+ Ends June 17, 2024. For full details see https://go.ea.com/DATVGiveaway"
#dragon age: the veilguard#dragon age: dreadwolf#dragon age 4#the dread wolf rises#da4#dragon age#bioware#video games#long post#longpost
112 notes
·
View notes
Text
a sort of general thing spinning off "static site generators kind of suck" is issues about ease of use vs philosophy vs productivity.
How many programmers do you know who want to make a game but refuse to use Unity or Godot or even like, löve2d because it's Ideologically Impure to use an existing engine, so they have 50 git repos with seven features bolted on to an SDL2 demo and no meaningful game design.
Part of why I don't like Static Site Generators is that they add a lot of friction. I'm writing this on my phone while waiting for a kettle to boil at work, and this ease of use is a big part of why I blog on Tumblr multiple times a day but the old SSG that hosted my website got a post every couple years.
Increasingly I'm happier to take shortcuts and borrow from other people in order to get Things Out The Door. I don't have to design/pattern/program/calculate everything myself. I care much more about end products.
I still have some philosophies I guess. I won't use VMware even if that means fighting with otherwise worse VM solutions. There are still plenty of things I enjoy designing and fabricating myself rather than buying or copying. For some people building the game engine is the fun part! But it's worth asking yourself whether that's you, or the person you wish you were.
I like embroidering and backstitching by hand. This doesn't mean I can't use components from the esp-idf components library.
See Also: How To Make Good Small Games, Do It Scared, etc.
46 notes
·
View notes
Note
your icons are soooooo so cute honestly!!! i wanted to ask if there's any way you can make a tutorial on how to make them? of course if you want, if you don't want to, that's okay :)
Hi! I really appreciate that you like my icons, thank you so much! 💖💖💖🥹
It's been a long time since I've done a tutorial so I hope I can explain it well haha
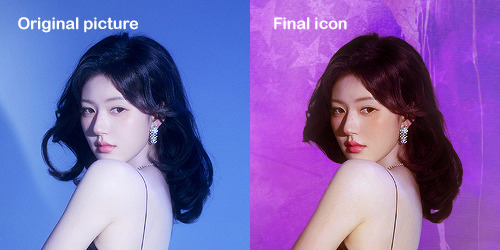
So I will explain how i go from the original picture and the final icon below:
I'm using Adobe Photoshop 2024 but you can use other versions too!
First, I create a 250x250px document and apply a random color fill layer to be the background color of the icon, you can do it by going on Layer > New Layer Fill > Solid color (the color in this moment doesn't matter because I change them later according to the picture I choose to edit).
Then I place the picture I want, adjust the size to make the subject on the center and apply some smart sharpen:

I apply some adjustments to try to color correct if the original picture using Levels, Selective Color and Color Balance to get something like this:

If you want to know the exact adjustments settings I used on this picture you can download the psd here.
To remove the background, I do the hack where I go to the Properties panel (Window > Properties) and click on the "Remove background" option. It's not always that I will get a perfect result but I think it makes easier for me to adjust the little details such as hair and accessories, etc. And I do that using the Lasso tool (shortcut L).
Now, with the background removed I pick a color that I think will match the icon in the Color Fill layer that I created before. To make the background more "fun" I like to add a Gradient Fill layer (Layer > New Layer Fill > Gradient) with a color that might go well with the one I picked earlier to make a smooth and light gradient.
My result until now:
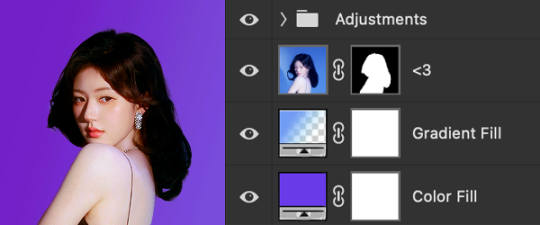
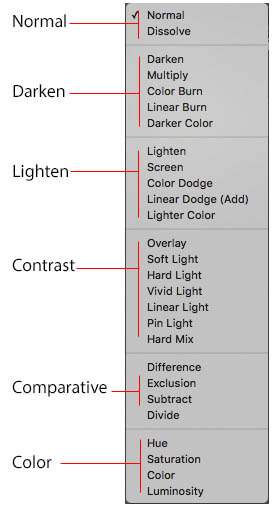
Now it comes the fun: adding textures! I like to add some textures to make the icon more lively and I usually download them on deviantart or on resources websites. You can download some cool textures here, here and here. On this part I really test a lot of textures with different Layer blending. There are a lot of different blending options so you can try as much as you want.
Other thing I like to do is add a clipping mask above the subject layer when I want to color something specific in my picture such as the hair, the clothes or even applying some "fake" blush on the cheeks. I do this adding a new layer, then using the shortcut option (or alt) + command (or ctrl) + g to make it a clipping mask and then using the Brush layer to color what I want. For the blending mode I usually use Soft Light and sometimes Color if I want the color to really stand out.
And in the end I will have something like this:
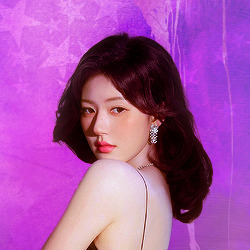
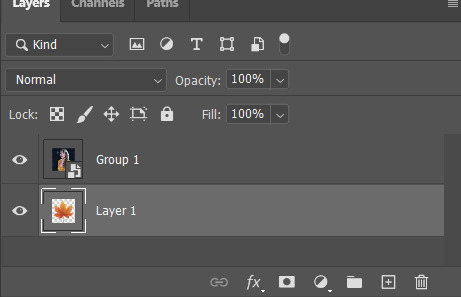
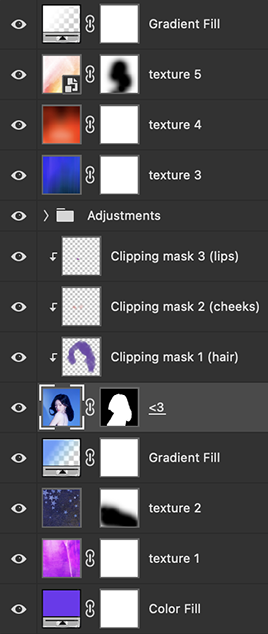
And my layer tab will be like this:
For using on the dashboard I usually resize it to 100x100 to make it look more sharper and defined but it's really a choice, you can already start making your icon using the size you want, I just prefer doing on 250x250px because i'm used to.
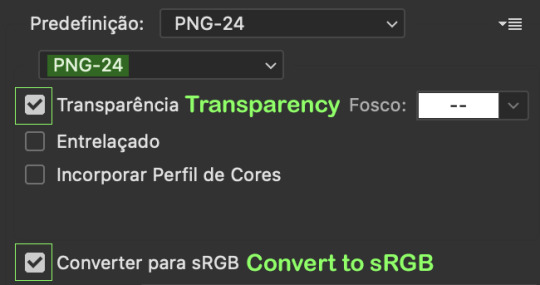
To save it I use the shortcut shift + option (alt) + command (ctrl) + s to save it for web with these settings:
And that's it! Sorry for not going to deep in each step but I guess you can get the feeling when you try making your own icons! Is really about trying different methods and things until you became satisfied with your result.
104 notes
·
View notes
Note
Hi caden i always scroll through your blog and whenever i leave i find myself questioning if you are the Scihub wizard. What's your range regulation on your topics of study (as in, how do you seek what catches your interest more thoroughly) and how do you sort out what qualifies articles on such as readable or relevant to engage with? Every time I search up stuff on jstor it just gives me the most stalest stuff ever. If you have any specific websites or tricks to recommend it would mean it all. Thank you
hm well... i guess the short answer would be that i do spend a lot of time reading things that i ultimately decide are stupid or irrelevant or redundant, lol. like, if i'm not actively writing i'm probably researching. so if i post, like, book recs, there's probably at least a few years of reading around and behind that... some of this work will eventually become useful or interesting to me (appendix my advisor made me cut and said was irrelevant in 2020 whose footnotes i raided today) and some of it will probably just live forever in some dusty corner of my mind (zotero folder on phonographic physiology that has only an extremely tangential connection to anything else i literally ever write on).
but in general, my approach is usually to read more, not less—i don't know what connections i might want to make if i never read on those topics, ykwim? i definitely get faster at finding things and sifting through sources the more familiar i am with a topic. but even so, i like to read widely, knowing full well that some (large) percentage of it will be useless to whatever i'm currently working on, lol. there's plenty in my library that i've never cited, or i only quoted a line or two, or i named it only to say it sucks. i think this is all fine and fun honestly. but, a few ways to narrow some of this down:
when you're looking for the seminal literature on a certain topic, you can shortcut some of the searching by picking up anything recent and just picking through the footnotes. (this is called 'snowballing' sometimes.) it's not a comprehensive strategy because you won't find newer or obscure texts—but it's a decent starting point
i work with historical sources, so often the way i find really interesting stuff is by searching the actual names i'm finding in the primary literature. these tend to be figures with a smaller footprint in the secondary literature, who often get overshadowed in more general topic searches, and i often end up reading about all kinds of weird niche topics i didn't even know to look for
some professional societies and journals maintain databases and bibliographies of recent publications; these are worth scanning from time to time. you can often find them by googling, like, "[field] bibliography / database" or sometimes you can find them thru journal websites (but these index more than just the journal's publications). usually free at least to see article titles/abstracts
you can also pick a couple flagship journals in your subtopic and just scan their recent issues from time to time; again article titles are generally free to view. don't rely exclusively on journals, but again, can be a good place to start
dissertations and theses are also good for footnotes, since part of the assignment is usually to show that you're familiar with the recent literature. you don't really want to rely on dissertations for actual citations if you don't have to (the qc is on average even lower than professional publishing... lol) but for reading recs, go for it
28 notes
·
View notes