#items dropdown
Explore tagged Tumblr posts
Visit Tumblr Blog
Explore Tumblr blogs with no restrictions, modern design and the best experience.
Last Seen Tumblr Blogs


Fun Fact
When “GIF” was named word of the year in 2012, Oxford Dictionaries U.S.A. credited Tumblr for pushing the word.
Text
The UI for Sophie's is so much better than what we have for Baldwin rn- I'm hoping it comes to Baldwin soon! Edit: Jeez this got a lot of notes/likes oml. Over 100 so far. o.o Edit 2: As of 6/21/25, we've gotten pagination, tabs for the categories instead of a dropdown (which had been honestly a bit annoying), and a secret QoL update to the color of Sophie used items in the hoard. c: Note: If your Stylus Dark Mode isn't working with Sophie at all, uninstall and reinstall it.
126 notes
·
View notes
Text
Basic Pathologic 3: Quarantine Cheats
To use any cheats, toggle open the developer overlay with Ctrl+Shift+`. This view will default to the Info menu, which displays information about your hardware and performance. Use the dropdown in the top left to switch between menus.
From the Settings menu, you can toggle on and off several useful cheats as well as in-game settings. Here are the most useful options:
Debugs:
UIVisible: Turning the entire user interface off is basically “photo mode” – useful to take pretty screenshots. You’ll need to turn it back on to access the map or menus.
DebugMove: Get around quickly! Enables jumping, and boosts your running and jumping speed. This allows you to go out of bounds.
DevMenu:
DebugVisible: Enables a submenu of the Main Menu from which you can load saved games, and another that lets you load into any scene in the game. If you try to load a scene that doesn’t exist (like Grief’s lair), the game will hang while loading.
From the Console menu, you can enter commands to affect the game state. Type “?” to view the list of all commands.
camera: Use “camera Fly” and “camera FirstPerson” to toggle a fast fly camera mode which does not move the player entity.
game_save: Use this command to save your game. You can add a second argument to specify the save file name.
item_add: Type “item_add ?” to view the list of all items, then “item_add item_name.def” to add them to your inventory.
player_parameter: View and modify various player setting values.
time_set: Sets the time of day. For example, “time_set 13h 30m 2s” for 1:30:02 pm. This appears to only affect the skybox.
weather_set: Sets the current weather (type “weather_set ?” for the list). For example,
“weather_set Empty 0” disables all clouds.
“weather_set Clouds 0” makes the skies entirely overcast.
"weather_set "Rain 0.8" 0" makes it overcast and furiously raining.
“weather_set MainMenu 0” changes the weather to localized rain, while small clouds quickly blow past.
#The rest are either not super useful or we're still figuring them out :-)#quarantine#pathologic#console
146 notes
·
View notes
Text
Tuesday, September 17th, 2024
🌟 New
The character limit has been raised from 500 characters to 1,975 characters for all replies on web! No more having to string multiple replies together to say what you want. Thank you to everyone who tested this first in communities!
We started enabling some of those long-anticipated community discovery features for a subset of users! Anyone currently in a community, plus a small and random percentage of all users, will see a new dropdown option on search that lets you browse communities related to your search term. We will also show a sidebar of “Related Communities” on the web for some folks. Communities that are free-to-join will be ranked higher, so if you are the admin of your community and want to get your community in front of more eyes, consider changing your join setting from “invite-only” to “free to join.” We also leverage the tags (in addition to title and description) that you’ve set for your community to rank results, so update those if you haven’t yet!
When you engage with your first community, new signposts will guide you through the experience.
🛠 Fixed
When purchasing items in TumblrMart, important elements will no longer be missing or obscured.
🚧 Ongoing
No ongoing incidents to speak of right now.
🌱 Upcoming
Over the next little while, we’ll slowly increase that percentage of random users until all users are able to find communities via search.
Experiencing an issue? Check for Known Issues and file a Support Request if you have something new. We’ll get back to you as soon as we can!
Want to share your feedback about something? Check out our Work in Progress blog and start a discussion with other users.
Wanna support Tumblr directly with some money? Check out Premium and the Supporter badge in TumblrMart!
345 notes
·
View notes
Text


Azul Ashengrotto
Owner of the town saloon! But he sells more than food and drink… With the right price he’ll get you items you never knew existed!
He’s an octopus merman that earned his and the Leech twins human form with the help of the mysterious wizard after making a deal with him.
His plan is to expand his business to the neighbouring town then the city then internationally but for now he’s getting the hang of it in Night Raven Valley.
A lot of special bulletin board requests are going to be from him on behalf of his business and he might form a partnership with your farm if you’re able to provide him proof of your crops' quality. (Iridium Quality Ancient Fruit Wine basically)
Is often found running the saloon or in the library.
Loved Gifts: Sand Dollar, Fried Chicken, Universal Loves
“How generous of you! Here’s a voucher for a 70% discount on anything in the saloon~”
Hated Gifts: Salad, Broken Glasses, Universal Hates
“Why, thank you farmer!” (Next time you go to the saloon the prices are suddenly higher)
Jade Leech
Azul’s right hand man and the bartender at the town saloon! Took interest in Azul and his plans while in the sea and followed him up to NRV.
A moray eel merman that came to the surface with Azul and Floyd.
Owns a mushroom cave hidden in the forest (Azul and Floyd don’t know about this and are confused where he’s getting them from).
Regularly goes foraging in the forests and mountains as well as exploring the mines.
Is often found at the saloon tending bar, in the forests or in the mines.
Loved Gifts: Octopus Carpaccio, All Mushrooms, Sturgeon, Universal Loves
“Oya? How kind of you. ^^”
Hated Gifts: Eel (He doesn’t like the texture), Universal Hates
“Oh dear… How uninteresting.”
Floyd Leech
Security squad (No, I did not mistype that he is the whole squad) for the town saloon.
A moray eel merman that came to the surface with Azul and Jade.
Is often found by the entrance of the saloon with a bored to death look on his face or jumping around town doing parkour. Goes down to the mines sometimes for fun.
Plays basketball with Ace and Jamil every sunny Wednesday.
Loved Gifts: Takoyaki, Sturgeon, tbh feels like it changes every week, Universal Loves
“!! Shrimpy!!! You’re so sweet~”
Hated Gifts: All Mushrooms, Universal Hates
“...Are you askin’ to be squeezed?”
---
TWST x SDV Masterlist
Tag List (Interact with the linked post to be tagged in future updates mwah)
Tag List Below Dropdown
@coffee-or-hot-cocoa @neuvilletteshusbandd @multifandomlazywriter @whimsybloom
@petaled-pages @blerp-22 @lazy-raven @the-ghost-0f-t0m0
@iamlowkeycrying @sleep-ydragon @loopdydee @hrhqueenfox
@mielle-estelar
#twisted wonderland#twst#twisted wonderland x reader#twst x reader#twst headcanons#disney twisted wonderland#night raven valley#twst stardew au#azul ashengrotto#jade leech#floyd leech#azul ashengrotto x reader#jade leech x reader#floyd leech x reader
223 notes
·
View notes
Note
Sorry to ask. But is there a reason why on the lackadaisy store the only standalone Keychain your able to get is viktors while the other 2 come in a bundle with viktor, is there a way to get them all as standalone? Or can you only obtain the Ivy and Ruby Keychains by buying it with Viktor's?
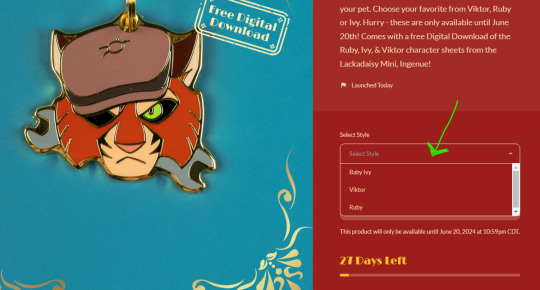
You can get any of them as a standalone! Just click on the 'Select Style' dropdown in the item page.
352 notes
·
View notes
Text
Day 6 [Forms In HTML]
Introduction To HTML
Day 2 [Multimedia Elements In HTML]
Day 3 [Table in HTML]
Day 4 [Link Tag In HTML]
Day 5 [Lists In HTML]
Forms are basically used for collecting user information. And they are really important to learn. Here's a simple form in HTML:
Code:


Line By Line Explanation:
<form>: Used for creating forms. All the form elements go in this tag. Action: When submitted, data is sent to this file or URL [index.html] Method="post": Sends data
<label> : This describes the input tag for="___": Connects the label to the input with id="name" id : gives a unique identification to the tag <input>: It's used to make the form elements
<input> Type Elements :
type="text" : A simple text box is created.
type="email" : A box to input email.
type="checkbox" : A small square that users can tick. Can select multiple options using this.
type="radio" : A small circle, you can only select one option.
type="submit" : A button that submits the data to the server.
<textarea>: Accepts multiple lines of text. rows="4": It creates 4 lines cols="30": It creates 30 characters
<select> : Creates a drop-down list <option>: Creates an item in the dropdown. value="colorname": This is the data sent to the server if chosen.
Output For The Code:

_______________________
Hope This Helps !!
#code#codeblr#css#html#javascript#python#studyblr#progblr#programming#comp sci#web design#web developers#web development#website design#webdev#website#tech#html css#learn to code#school#study motivation#study aesthetic#study blog#student#high school#studying#study tips#studyspo#website development#coding
34 notes
·
View notes
Text
How To Fix The Placement of Eyelashes (In The Glasses Category)
We know the latest Sims 4 patch (2024-08-08) broke the placement of eyelashes found in the glasses category. Here is a method to fix them and place them in the Eyelash category.
NOTE: This is only a placement fix. If your eyelashes conflicted with glasses before and the eyelashes could not be worn at the same time as glasses, you will still have a conflict between the two items. Eyelashes in the glasses category are usually mapped in the same texture space as glasses, so now you will get texture bleeding from the eyelashes to the glasses. This is NOT a fix for that issue. To fix that issue, you'd need to use Blender to move the textures.
For this method, you do not need to know how to use Blender. You need Sims 4 Studio. If you do not have it, you can download it from here.
I've tried this method myself, and it works. Here it is, step-by-step:
In Sims 4 Studio, open the package file (eyelashes) you want to convert. These should be eyelashes in the Glasses category. The easiest way to do this is to find the file in your mods folder and move it to its own folder before you start, so it'll be less difficult to locate. You can also set the properties of package files to open automatically in S4S when you double-click on them. (That's what I've done, because I make a lot of CC)
We'll call this package the original package. Once it is opened in S4S, click on the "Meshes" tab and export the mesh. Save it somewhere you can find it easily
Next, click on the "Textures" tab and export the textures of the swatches you want to add to your package. Make sure you export the "Diffuse" texture (even if you don't export anything else). Save your exported textures somewhere you can easily find them again.
You can also export the custom thumbnail, if your original package has one. You can find it on the right side of the screen on the "Textures" tab. Again, save this in a place where you can easily find it later.
Go to the "Categories" tab and scroll all the way to the bottom. You should see three items; Allow for Random, Restrict Opposite Gender and Restrict Opposite Frame. Make note of which boxes are ticked or unticked in your original package.
Close the original package by returning to the Main Menu of Sims 4 Studio. You don't need to save the original package, as you haven't made any changes to it.
On the main menu screen of S4S, go to the CAS section (bottom left) and choose "Create 3D Mesh" and then click the large blue CAS button.
Search for the base game eyelashes. You should see a drop-down menu called "Part Type" near the top of the window, in the middle. Choose "Eyelashes" from this menu. In the main part of the window, the in-game eyelashes should appear. Click on the one you want, and it should turn blue.
Click the "Next" button.
You will be prompted to save your new package. Give it a name (preferably one that includes your creator name, so you can find it again) and save it in your Mods folder, or whichever sub-folder within your Mods folder that you like to use for CC making.
In your new package, click on the "Meshes" tab and import the mesh you exported from the original package. Look for a dropdown menu where it says "LOD 0" (you have just replaced LOD 0). Now click on "LOD 1" and then import the mesh to this LOD as well. LOD stands for "Level Of Detail" and you might see higher numbered LODs looking degraded. Don't panic. This is normal.
Save your package, but don't close it.
Go back to the "Textures" tab and import the textures you exported from your original package file. You can import the custom thumbnails during this step too.
Save your package again. Do not close it.
In the menu at the top of your Sims 4 Studio window, look for one called "Tools", click on it and scroll down until you see "Modding" and click on that. A sub-menu will appear. Scroll down the sub-menu until you find "Glass Shader (CAS)" and click on that. You should get a notification that X number of shaders have been changed to SimGlass. Click OK.
Save your package.
Go to the "Categories" tab, scroll all the way to the bottom of the window, and make sure the same boxes are ticked/unticked as in your original package. If something is ticked in your new package that was unticked in your original package, this may cause your new item to not show up for one gender or the other once you get it into CAS.
Save one final time.
Open your game and test your package. Your new lashes should appear in the eyelash category in game.
136 notes
·
View notes
Text
How to Add 3D Models to TS4
Required Applications:
S4Studio - https://sims4studio.com/
Blender - https://www.blender.org/download/releases/4-3/
Note: Make sure the blender path is set up in your S4Studio settings
*This tutorial assumes you know your way around blender*
Step 1: Open S4Studio
Step 2: Under Object, select Create 3D Mesh
Step 3: Check 'Show Debug Items', change 'Mesh Groups' to 1 and search for arch. Choose the following object:
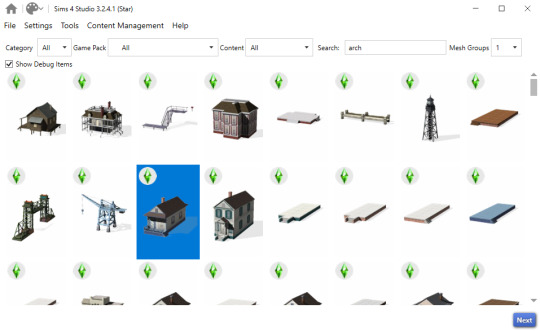
Step 3: Click next, name your package and hit save.
Step 4: Name your object. I suggest adding your creator name or initials in the front so that you can search for it in the catalog faster (ex. creatorname_objectname)
Step 5: Import your textures. The diffuse will be the main texture and the material_lighttex will be what will be illuminated on the mesh. If you don't want an illumination map, just import a plain black image or choose a different object to clone that doesn't have one (eg. the wooden slab/pole??) Ex:

Step 6: Go to the meshes tab and export LOD 0.
Step 7: Open the LODs .blend file.
Step 8: Tab into edit mode and delete the object. Do not delete it in object mode or else you'll lose all the mesh data and S4Studio will throw you an error. Tab out of edit mode.
Step 9: Import your object.
Step 10: Under the object's scene properties, you will see a tab that reads 'S4Studio Mesh Tools'. Add the number 0 to the blank space beside 'Cut'.

Step 11: Go to the data properties and change the UVMap's name to uv_0
Step 12: In the side panel where it displays the name of the objects in your scene, click on the object and then ctrl click on 's4studio_mesh_0'. Make sure your mouse is hovering over the 3D viewport window and hold ctrl+j to join the objects together. The name of your object should now be s4studio_mesh_0.
Step 13: In the modifiers tab add the 'Edge Split' modifier and then apply it. Before I do this, I tend to go into edit mode, select all vertices, click m and merge by distance just to make sure there are no double vertices. Note: If you do not add the modifier, the object will look weird in game, trust me.
Step 14: Save your blend file as 'objectname'_mesh
Step 15: Once you have saved it, go to the data properties again and change the UV from uv_0 to uv_1, this will be the shadow mesh.
Step 16: Save file as 'objectname'_shadowmesh. Choose save as and not save because it will overwrite your main mesh blend file.
Step 17: Back in S4Studio import your main mesh into LOD 0. Once that has loaded in, click on the dropdown and choose the Shadow LOD 0. Import your shadow mesh.
Step 18: Under the tags tab you can change where you'd like your object to show up in the catalog. If you leave it as is, your object will show up in the debug menu, which will have to have the debug/live edit cheat to be able to see. If you'd like it to show up as a decor object instead, uncheck world object, scroll down until you see the 'Decorative' drop down menu and choose where you'd like it to show up. I suggest the Decoration (misc) option.
Step 19: Save your package and test in game
I use this same process for all world/decor objects I make/convert. Let me know if you have any questions.
23 notes
·
View notes
Text
Update #2: A New Outlining Method, Dropdown Plotter
I've been having a hard time conceptualizing how to plan out a novel lately. It used to come so easy to me. Now that I'm a real adult, it feels like there isn't enough space in my brain anymore for me to have my story all in my head without writing my ideas down somewhere.
So, good outlining methods, which can be hard to come by, are crucial for my writing process.
But, a lot of traditional methods don't work for me.
In my opinion, it's extremely important to have an outlining method that doesn't overwhelm you, and which feels creatively freeing. And when do I need to be more creatively free, than when writing an IT Crowd fanfiction?
So I've come up with a new outlining method that I'd love to share with you all! I call it Dropdown Plotter.

Dropdown Plotter uses the dropdown menu feature, which can be found in both Google Sheets and Microsoft Excel, to help you better visualize (and, most importantly, easily reorganize) the major aspects of each chapter of your story.
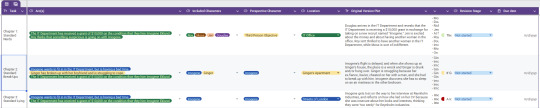
Basically, it's a spreadsheet that includes, at minimum, 8 columns.
Chapter Title
Plotlines
Included Character(s)
Perspective Character(s)
Location(s)
Chapter Story Description
Writing Stage
Due Date
Why keep track of these things? Balance. Basically, making sure your characters, plotlines, POVs, and important locations all get adequate page time.
It's a lot easier to conceptualize these things when you have it on a color-coded spreadsheet, zoomed out really far, and can see in a big picture way. For example, you might see that the red color indicating "Legolas" is in a scene, drops off after Chapter 17. You might see that the green-coded plot about his missing shoe is only important for 5 chapters in the middle of the story, or that we're spending almost the entire story in the bathroom and never in the evil lair.
So, how do you use the Dropdown Plotter?
First, you go into the dropdown menu, and you can see all the plots you've selected. There's a handy "search feature" for those writing the next Game of Thrones. You want to click the little pencil icon in the bottom right, which is the "edit" button.

On the right-hand side of your screen, a column will pop up called "Data Validation Rules." From here, you can edit the names and colors of each item in the dropdown menu, and add or delete things as you'd like.
Make sure to click "allow multiple selections" on the bottom of the data validation rules pop-up. This will allow you to select multiple characters, multiple locations, and multiple plots when you're in the dropdown menus.

Don't forget to click "Done" at the bottom!
On top of the dropdown menus, the nice thing about working in a spreadsheet is that you can always drag and drop the rows and columns. This makes it extremely easy to change the order of scenes around, in a way that feels very impermanent and easy.
Here is what my Dropdown Plotter looked like for the first three chapters of The Grant: An IT Crowd Fanfiction.
Looks pretty, right? And pretty outlines build confidence! Not only that, but what I like most about this outlining method is that it encourages me to be less precious with my ideas.
It's way less intimidating to overhaul major aspects of your story, such as the dominant POV, the main plot, etc., when all you have to do is click a little button in the dropdown menu to change everything. When I'm editing a little blurb in a spreadsheet versus an entire step outline, it reminds me that no writing problem is insurmountable, and nothing is ever really set in stone.
Again, it builds confidence.
Unfortunately, I've only built a Dropdown Plotter in Google Sheets, but I've provided a blank version to share with you all. The nice thing about spreadsheets is that you can add and delete things as you see fit. For example, some people might want to add...
More columns indicating multiple scenes within the same chapter!
A "Story Beat" column, to mark the specific plot beats each chapter follows (as in the Hero's Journey or the Blake Snyder Beat Sheet).
An "Important Info" column, to mark any worldbuilding or character details discussed or introduced in a certain chapter.
Literally anything your little heart desires!
Happy outlining and I hope you enjoy the Dropdown Plotter!
#the grant an it crowd fanfiction#it crowd unexpected reboot#writing advice#creative writing#writeblr#writers on writing#writers on tumblr#writerscommunity#writing community#writers#outline#book writing#plotting#outlining#novel writing#spreadsheets#dropdown plotter#outlining method#writing tool#posts#it crowd
27 notes
·
View notes
Text
here is how you have fun: open theanarchistlibrary.org, click the archive dropdown and navigate to the topics section. scroll around and try finding a really vague topic that means absolutely fuck all, and only has one or two items listed under it like, "gesture". click on it and read whatever stupid fucking bullshit is in there. this can change your life
23 notes
·
View notes
Text
Tuesday, August 8th, 2023
🌟 New
On web, the keyboard shortcuts reference guide is now accessed through the keyboard icon floating in the bottom-right corner of the page. This replaces the “Keyboard shortcuts” item in the Account menu.
On web, we’ve added the current Color Palette selection setting as a dropdown in the Dashboard Settings page. You can still use the Shift + P shortcut to change palettes everywhere.
Also on web, if you’re seeing the experimental vertical navigation layout, we’ve removed the Settings sub-menu items in the left sidebar. The Settings nav item now takes you to Account Settings, with the other different setting pages on the right sidebar.
🛠 Fixed
In the post editor on web, we’ve adjusted the spacing around the floating content block icons to fit better on smaller screens and not overlap the placeholder text.
Over the weekend some users couldn’t access their Following or For You feeds, we resolved the issue after a few hours of investigation, and the feeds are loading again.
🚧 Ongoing
We’re still aware that sometimes Spotify embeds are showing a “Not found” error on web, but may work if you try again. We’re still investigating if this is an issue on our side or Spotify’s.
🌱 Upcoming
Nothing to report here today either.
Experiencing an issue? File a Support Request and we’ll get back to you as soon as we can!
Want to share your feedback about something? Check out our Work in Progress blog and start a discussion with the community.
359 notes
·
View notes
Note
Hey Moss :)
How are you? I hope you're having a pleasant weekend?!
I have a couple of questions regarding the post about polycount you made a while ago: I've found contradictory instructions on which polycount value to look at in different tutorials. As far as I understand it now, you'd want to look at the MLOD 00000000 High detail mesh, but another tutorial says look at the MODL, which is actually the low resolution one. Which polycount values did you look at for your list of average polycount for EA items? The MODL one or the highest MLOD one?
My second question is: How did you open the EA items that came with the game in order to check the polycount? Do you know a tutorial? I tried googling it but couldn't find any tutorial on how to do it…
Hi! :)
I used this tutorial by @simlicious, which explains how to use TSR Workshop to check polycounts. For my average polycounts of EA items project, I always used the polycount of the mesh with the highest level of detail.
Using TSRW to check EA item polycounts
To check the polycount of an in-game EA item using TSRW, follow the tutorial I linked above. However, instead of clicking “New import,” you’ll select the category of the item you’re looking for under “Clone an item,” such as Clothing, Makeup/Facial Overlay, Hair, Accessory, Object, etc. From there, navigate to the item you want, and then the instructions stay the same: find the “Mesh” tab and select “Highest level of detail” from the dropdown menu (or whichever lod you want to check).
I use the version of TSRW linked in this post from @greenplumbboblover.
Extracting EA Meshes with S3PE
I’ve always used TSRW to extract EA meshes because it works well for me, and that’s how I first learned to do it. But there are other methods too, and maybe this post could help: How to extract items from the game, the KL way. (I've never done this).
MODL/MLOD
I hadn’t used the S3pe method for checking polycounts since TSRW worked fine for me, but your ask made me curious, so I tried following this tutorial. You’re right—the MODL is showing the polycount for lower level of detail rather than the highest, which seems to contradict other instructions.
I’m wondering if someone more knowledgeable than me could provide further explanation on why we might want to check the MODL file instead of the highest level of detail in this context—I might be missing something. :)
Anyways, for my project of recording average polycounts of objects and CAS items, I used the highest level of detail for reference, based on my findings in TSRW!
11 notes
·
View notes
Text
Handy book of tips and tricks for using Krita (by a user thats used krita for a while)
HI! So i'm a krita user, and i figure since i know fellow artists that are moving to krita, i might as well make a handy guide to some of the tricks i use to snazzy up my art and basic howtos. This will be splitup into three sections: Tools, Layers, Filters. I'll also be interspersing how i used them in my art as examples!! Thisll be a two parter so hold on tight.
Shortcut keys: P = colourpick E = eraser B = brush
Tools:
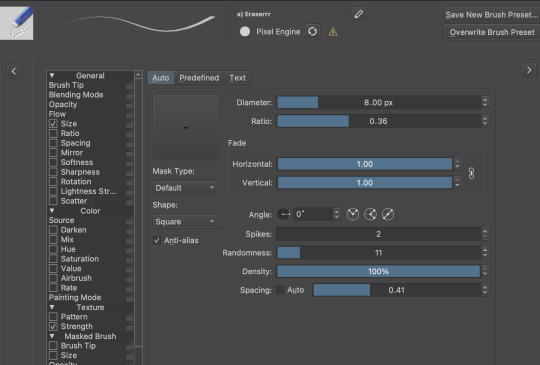
Obviously try using all of the brushes and seeing which ones you like. Krita has a myriad of handy and good brushes, and you can even make your own if you feel like it. I personally like to modify the rectangle eraser to a normal brush and using it, before i modified it a little more to be my own brush.
You can change the settings of the brush youre using on any layer by clicking this little dropdown menu in the top left of your screen. That little three dot button by the left side also goes into more detail about the brushes in case you want to fine tune a brush to your liking.

Personally, these are the custom brush edits ive used to make my art just that bit crunchier. As you can see, theres a lot more options you can tick and mess around with if you feel like it too.
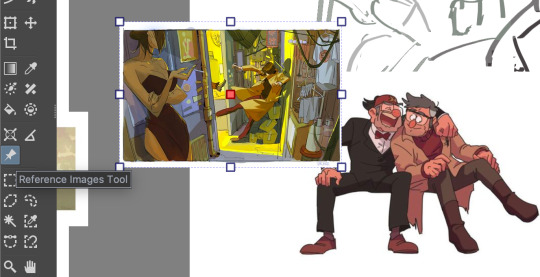
The pin button is the reference tool. If you copy paste an image into krita while the pin tool is selected, it will appear as its own image above all layers that can be moved around using the pin tool to use as a reference. Real handy so you dont waste layers on ref images.
Layer styles
Ok, you probably know the basics of how to change layers, (its this little dropdown menu here) but did you know that krita has a cool thing called LAYER PROPERTIES??

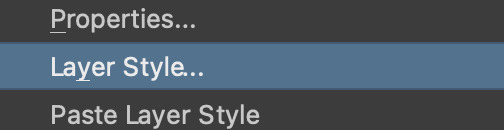
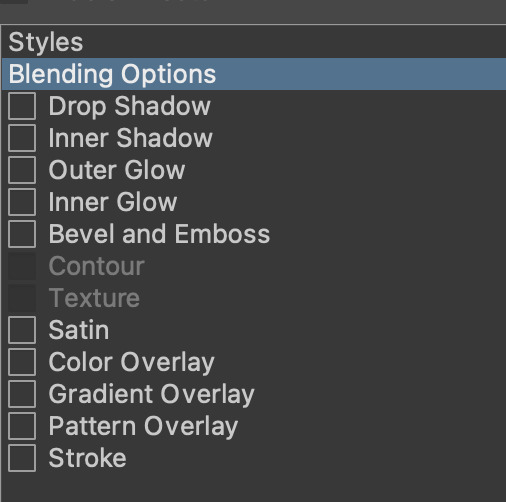
If you right click a layer and click this little button here..it should bring you to this handy menu with styles! These are really useful
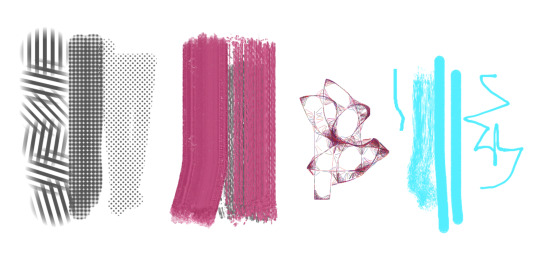
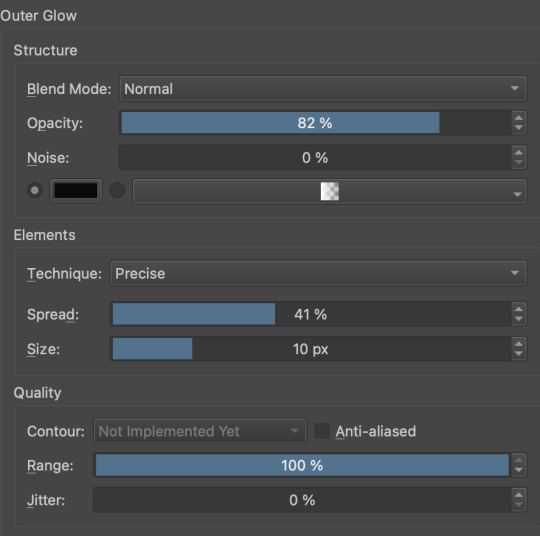
Now, i used to usually use outer glow set to these parameters to give the illusion of lines (and this is how anime artists usually line their very delicate pieces of hair and stuff), but i found an even better way!!
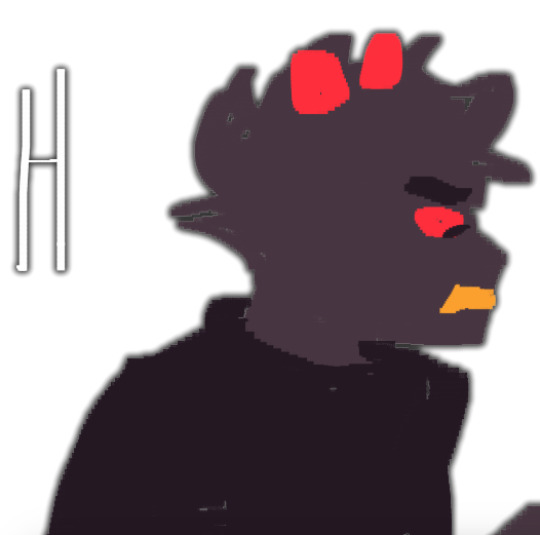
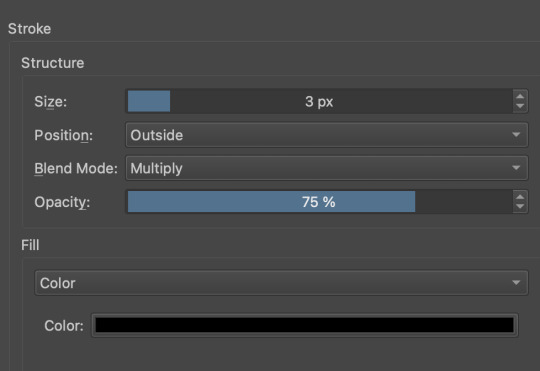
Its called stroke, and you can just modify it to be as thin or thick as you like. I recently used it for these two pieces, because its more precise, and used across multiple layers makes your work look cool and like you gave a damn about lineart. This is especially helpful if youre a stubborn son of a bitch that isnt going to to take the time to line your lineless work, or if you want to line really small items like string on shoelaces and not have it look messy (just set the colour to white and draw as usual.)
PART TWO
68 notes
·
View notes
Text
So YouTube just randomly decided to ruin their desktop homepage.
Suddenly all the thumbnails are massive. I can fit three in a row on my screen. There is no setting to change this. Why the fuck did they do this.
But! There is hope.
I found an add-on (works for both chrome and Firefox) called "Tweaks for YouTube" that allows you to change how many thumbnails you see per row, as well as adjusting many other things about YouTube.
To fix the thumbnails: open the extension, press the six squares icon ("Appearance & Other Features"), and turn on "Custom Rich Grid Layout". This automatically has 3 checked boxes under it, but if you just want to fix the layout to what it was before you're gonna want to uncheck all of them. Then, there's a dropdown labelled "Items Per Row", and change it to whatever you had before (for me it was 5)
Have fun fixing YouTubes mistakes!
8 notes
·
View notes
Text


[NEWS] Musical Touken Ranbu: Goods for the "Musical Touken Ranbu ~Iwainojuku Ranbu Ongyoku Sai~" are Available Online
Featuring Sato Ryuji as Kashuu Kiyomitsu
Sales Period: Now until 23.59 (Japan time) on December 27, 2024
To purchase the goods, please refer to the links below.
Nelke Online Shop
Bromide Touken Danshi (Battle + Uchiban ver.): HERE
Bromide Touken Danshi (Live ver.): HERE
Penlight Arrangement Set: HERE
Ribbon Clip: HERE
Muffler Towel: HERE
Random Photo Card (Battle ver.): HERE
Random Can Badge (Live ver.): HERE
Performance Pamphlet: HERE
NOTE: To purchase Ryuji's solo goods, click on the dropdown box beside the word "キャラクター" and select "加州清光/佐藤流司".
Silkroad Store
Bromide Touken Danshi (Battle + Uchiban ver.): HERE
Bromide Touken Danshi (Live ver.): HERE
Penlight Arrangement Set: HERE
Ribbon Clip: HERE
Muffler Towel: HERE
Random Photo Card (Battle ver.): HERE
Random Can Badge (Live ver.): HERE
Performance Pamphlet: HERE
NOTE:
[1] If the words "I do not see items of condemnation." show up, look for the button that says "LANGUAGE". Click on the button, and switch the language to "JAPANESE".
[2] To purchase Ryuji's solo goods, look for "加州清光", select the number of goods you want to buy, and click "カートに入れる".
"Musical Touken Ranbu" Official Store
Bromide Touken Danshi (Battle + Uchiban ver.): HERE
Bromide Touken Danshi (Live ver.): HERE
Penlight Arrangement Set: HERE
Ribbon Clip: HERE
Muffler Towel: HERE
Performance Pamphlet: HERE
NOTE: To purchase Ryuji's solo goods, look for "加州清光", select the number of goods you want to buy, and click "カートに入れる".
For more information on proxy services available in Japan, please refer to this link: HERE
15 notes
·
View notes
Text
Beta Update
Alright everyone! We've gotten started on fixing the Guild (though no official push yet), and we were able to get started on our bug report and task sheet we're going to publish. We made halfway progress on the support articles we'll be publishing, and we got through a good chunk of bugs today, including:
* An infrastructure error which was overloading the server with so many accounts, fixed many latent issues on the backend. Many of the errors you see are remnants of it, but things should be smoother from here
* Midwife freezing
* User profile CSS box display
* Users online counter (something quick we got working during downtime!)
* Got many users through onboarding and tackled a bricking issue
* Mobile formatting issues: currency, nav dropdown, and onboardingWe've requested server expansion from our provider, which should also help. And we've replaced a good bit of flavor text! We will continue the replacements in between the big tasks!
Hopefully we'll be able to complete those articles by tomorrow! Here is what else we'll continue working on when we're all back on the grind:
* Latent breeding issues
* Guild problems
* Metamorphic item issues (incense, breed changes, etc.)
* General item functionality issuesItem functionality is our next big step following the Guild!
As always, I'll return in the morning to attend to any issues cropping up and update in real time as we work! Though it's the weekend, so we may see slower updates on the development end as some of our team is off. I'll be here though! I'm fading a little right now, so it's time for some rest!
Have a good night and a good weekend, catfolk!
#paw borough#pet site#virtual pet#indie game#petsite#pet sim#pawborough#closed beta#development update#beta test
11 notes
·
View notes