#HTML tutorials
Explore tagged Tumblr posts
Visit Tumblr Blog
Explore Tumblr blogs with no restrictions, modern design and the best experience.
Last Seen Tumblr Blogs


Fun Fact
Tumblr was created by web developers David Karp and Marco Arment.
Text
How to create a Live Tile on Windows 11 (Tutorials) (Codes)
Learn how to create custom live tiles for your blogs and websites for use on Windows 8, Windows 10 and Windows 11.
#warrenwoodhouse#bookmark#bookmarks#link#links#.lnk#.url#tutorials#tutorial#html tutorial#html tutorials#html#2024#codes#how tos#how to#howtos#howto
3 notes
·
View notes
Text
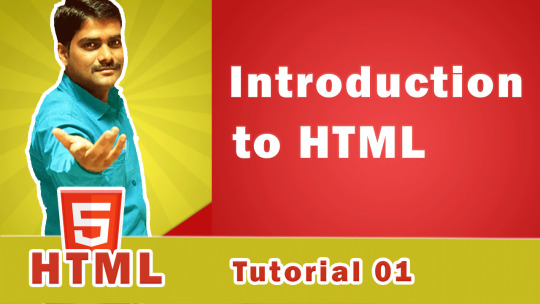
Introduction to HTML: https://youtu.be/kP2wrUxJeCw HTML Tutorials Playlist: https://www.youtube.com/playlist?list=PLdE8ESr9Th_uUR1vA9h-AP4uyzZXb0lqA
#html tutorials#html5#htmlcoding#html#frontend#web development#webdev#ui development#programming#coding
1 note
·
View note
Text
Uncovering 10 Advanced HTML Tags for Proficient Developers

In the vast universe of web development, HTML (Hypertext Markup Language) stands as the foundation upon which the entire web is built. From simple text formatting to structuring complex web pages, HTML tags play a crucial role in defining the structure, content, and appearance of a website. In this blog post, we're going to delve into the world of HTML tags, focusing on 10 advanced tags that can take your web development skills to new heights.
<canvas>: Unleash Your Creative Side
The <canvas> tag allows you to draw graphics, create animations, and render images directly on a web page. It's an essential tag for creating interactive games, data visualizations, and engaging multimedia content.
<video> and <audio>: Rich Media Experience
Enhance user engagement by embedding videos and audio files using the <video> and <audio> tags. These tags enable you to provide a seamless multimedia experience within your web pages.
<iframe>: Seamless Integration
Want to embed external content like maps, videos, or social media feeds? The <iframe> tag lets you do just that while maintaining a clean and responsive layout.
<progress>: Visualizing Progress
Display progress bars and indicators using the <progress> tag. It's great for showing the status of ongoing tasks, file uploads, or any process that requires visual feedback.
<details> and <summary>: Interactive Disclosure
Create interactive disclosure widgets using the <details> tags and <summary> tags. These are perfect for hiding and revealing additional content or information on demand.
<figure> and <figcaption>: Captioned Images
When you need to associate captions with images, the <figure> tags and <figcaption> tags provide a semantic way to do so, improving accessibility and structure.
<mark>: Highlighting Text
Emphasize specific text within paragraphs or blocks by using the <mark> tag. It's particularly handy for drawing attention to search terms or key points.
<time>: Semantic Time Representation
The <time> tag lets you mark up dates and times in a way that's machine-readable and user-friendly. It's an excellent choice for showing published dates or event schedules.
<article> and <section>: Structured Content
When organizing content, the <article> tags and <section> tags provide semantic structure. <article> is suitable for standalone content like blog posts, while <section> helps group related content together.
Unlock Your Full Coding Potential with WebTutor
If you're looking to master the art of web development and delve deeper into the world of HTML, CSS, JavaScript, and beyond, look no further than WebTutor. This premier online learning platform offers comprehensive courses and tutorials that cater to beginners and advanced learners alike.
With WebTutor, you will experience
Expert Instruction
Learn from industry professionals who are passionate about sharing their knowledge.
Hands-on Practice
Gain practical experience through interactive coding challenges and real-world projects.
Flexible Learning
Study at your own pace, fitting your learning journey into your busy schedule.
Supportive Community
Connect with fellow learners, ask questions, and collaborate on projects in a supportive online environment.
Whether you are a budding web developer or seeking to level up your skills, WebTutor provides the resources and guidance you need to excel in the world of coding. Visit today and embark on a journey of discovery and innovation!
In conclusion, HTML tags are the building blocks of the web, enabling developers to create diverse and engaging experiences for users. By harnessing the power of advanced HTML tags and supplementing your learning with WebTutor, you will be well on your way to becoming a proficient web developer capable of crafting exceptional online experiences.
#Advanced HTML tags#Learn Online HTML#Online HTML Tutorial#Introduction to HTML#HTML tutorials#Learn HTML online#Basic HTML tags#HTML tags
1 note
·
View note
Text
HTML HAND WRITTEN NOTES
Html HAND WRITTEN Notes
View On WordPress
0 notes
Text
========================================================
[tutorial: build your own neocities/nekoweb page]
========================================================
a beginner's guide for making your very own home on the indie web—retro, personal, weird, and 100% yours.
this ain’t an average wix, squarespace, or tiktok aesthetic.
we’re talking full html/css with soul and attitude.
[ prerequisites ]
------------------
> an idea
> basic text editor (vscode, notepad++, or even notepad)
> account on https://neocities.org or https://nekoweb.org
> some gifs or tiles you love (dig deep or make your own)
> optional: image host or gif repo (or self-host everything)
[ feeling overwhelmed? read this. ]
-----------------------------------
you do *not* need to know everything.
html is not a mountain. it's a garden.
you plant one tag. then another. then a style. then a button.
you can build your site piece by piece.
and every piece is a portal to somewhere personal.
you are allowed to make broken pages.
you are allowed to use templates.
you are allowed to start over as many times as you want.
this is *your* world. you control the weird.
[ step 1: create an account ]
-----------------------------
> neocities: https://neocities.org
> nekoweb: https://nekoweb.org
register a name, log in, and enter your file manager.
this is where you upload your files and see your site live.
[ step 2: your first file - index.html ]
----------------------------------------
make a new file: `index.html`
basic starter:
<html>
<head>
<title>my weird little corner</title>
<link rel="stylesheet" href="style.css">
</head>
<body>
<h1>welcome to the void</h1>
<p>this is my page. it’s strange. like me.</p>
<img src="mygif.gif">
</body>
</html>
> upload to the dashboard
> boom. you’re live at
https://yoursite.neocities.org
or https://nekoweb.org/u/yoursite
[ step 3: add a style sheet - style.css ]
-----------------------------------------
create a file called `style.css` and upload it.
here’s some nostalgic magic:
body {
background: url('tile.gif');
color: lime;
font-family: "Courier New", monospace;
text-shadow: 1px 1px 0 black;
}
img {
image-rendering: pixelated;
}
marquee {
font-size: 20px;
color: magenta;
}
link it in your html and the vibes activate.
[ step 4: decorate it like a haunted usb ]
------------------------------------------
> use <marquee> for chaos scrolls
> embed gifs from https://gifcities.org/
> steal buttons from https://cyber.dabamos.de/88x31/
> set up a guestbook at https://www.smartgb.com/
> loop audio with <audio autoplay loop>
> add fake errors, 90s web lore, random link lists
[ step 5: resources, themes, and comfort ]
------------------------------------------
> templates & layouts: https://numbpilled-themes.tumblr.com
> glitchy gifs & buttons: https://glitchcat.neocities.org/resources
> layout builder: https://sadgrl.online/projects/layout-builder/
> free tiled backgrounds: https://backgrounds.neocities.org/
> beginner html intro: https://www.w3schools.com/html/
> pixel fonts & cyber assets: https://fontstruct.com/
remember:
you don't need to know js. you don't need to be a coder.
you just need a mood, a direction, a dream.
the html will follow.
[ bonus concept: shrine pages ]
-------------------------------
> a page just for one character you love
> a room to house digital fragments of your identity
> embed quotes, music, images like altars
> call it shrine.html and link it from your homepage
[ closing mantra ]
------------------
you are not here to be optimized.
you are not a brand.
you are a ghost inside the machine,
carving your initials into the silicon void.
welcome to Your website.
========================================================
#webcore#old web graphics#neocities#web graphics#carrd graphics#carrd resources#rentry decor#rentry graphics#carrd moodboard#carrd inspo#neopets#indie#indie web#early web#webdevelopment#web development#web resources#web design#old internet#old web#oldweb#nekoweb#transparent gif#tiny pixels#pixel gif#moodboard#tutorial#html page#html theme#htmlcoding
468 notes
·
View notes
Note
Hellooo
Quick question:
How do you make the text in your posts rainbow? Like literally (with the gradient and everything)?
Thanks for your time, have a nice dayy 🤍
I figured it out from a tutorial that I sadly can't find anymore but here's my process broken down quickly!
I use these two websites to do it: Text colorizer Replace Text
Step 1:
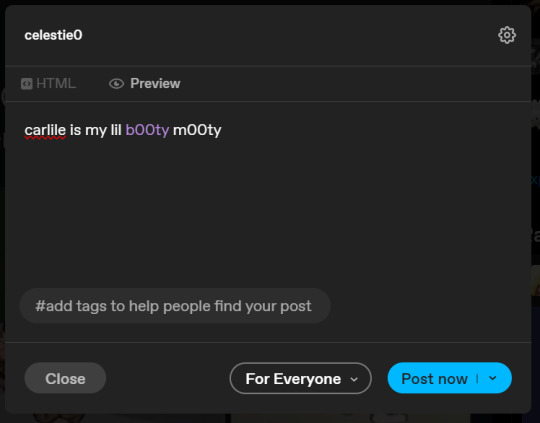
So as a note, you can only do this on the browser version of Tumblr because you need to activate the HTML editing mode. If you're on your phone, you can go to the website and request the desktop view, but it's a bit more finnicky on a phone - so I recommend using a PC for this if you can.
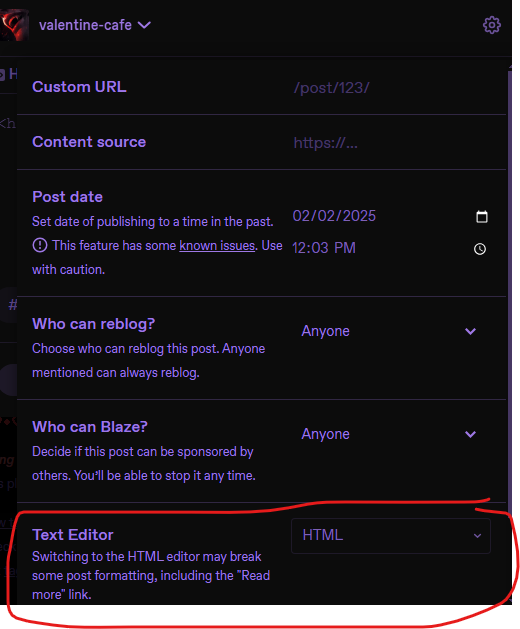
To do that, first click on create post, then go to the settings on your post (the little gear at the top right) and turn on HTML in the Text Editor dropdown menu where it says rich text.
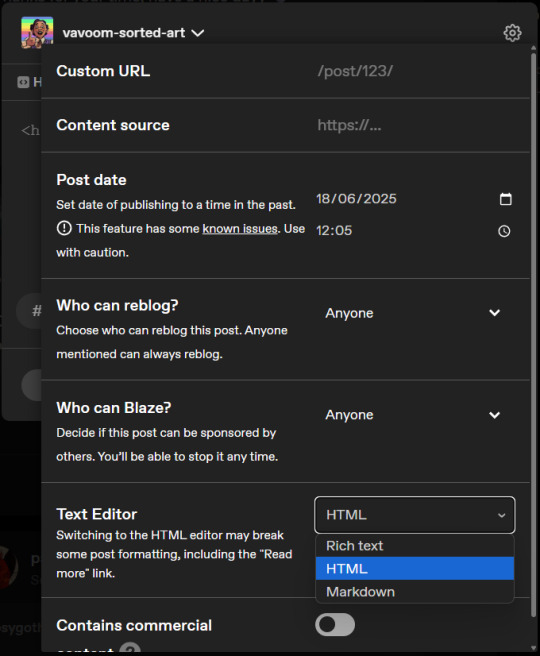
I like to write out my post first and then switch over to HTML mode.
Step 2:
Then you'll switch to Text Colorizer and type in your text and select your colours. You can choose any colours for your gradients, different modes or a rainbow effect!
Once the preview looks good, go select and copy everything in the bottom field where it says HTML code. Use CTRL+A to make sure you selected everything!
Step 3:
If you paste this in your post, it won't work yet. First, you need to go to Replace Text and remove all the semicolons, so you paste in your copied HTML and type a ; into the field where it says "Replace this:" and leave the Field "With This:" empty.
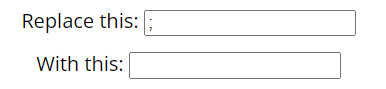
Click Replace Text and then Copy to Clipboard.
Step 4:
Now you're ready to paste your rainbow text into your post! If you've already written it out, find the bit you want to colour and replace it with your code, or you can just paste it in.
Once you pasted it, you can click on the "Preview" tab at the top and format your post like normal. Don't return to Rich Text mode, that might break it!
You're done!
Enjoy your rainbow text!
35 notes
·
View notes
Text
custom font colors tutorial
note: this is for my bb @tobaccosunbxrst but also just wanted to post it to public for anyone curious on how to do custom fonts w html on tumblr. i originally made this tutorial privately for my mutual @certainlysyko so apologies for the silly choice of example text that i used lol. anyways.
so as we know, tumblr only has the following default color options for text:
but what if we want some other cool colors like coral pink or cerulean blue or barf green?
to do custom fonts, it’s very simple, but it needs to be done on pc/laptop (cannot be done on app). we are going to start with a post:
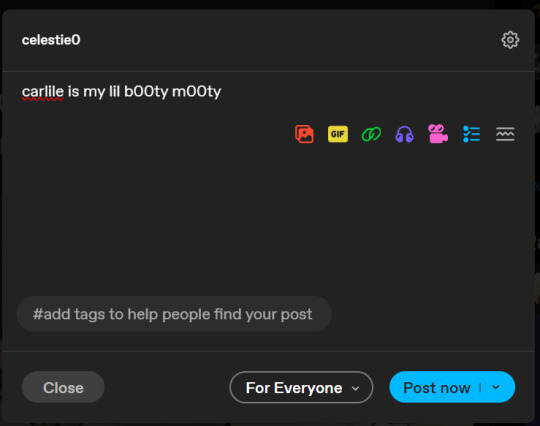
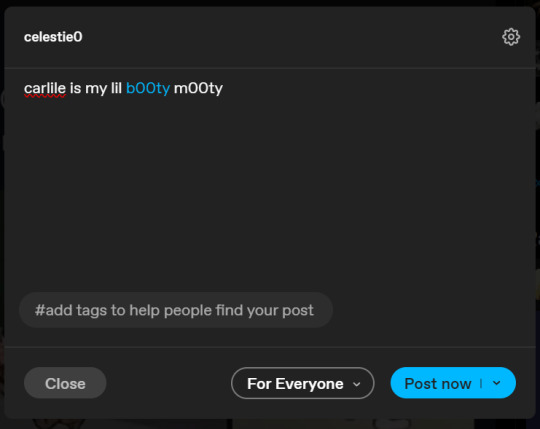
then, you’re just gonna change whatever word that you want the custom color for into one of the tumblr defaults. you do this by just selecting the text with your cursor and then tumblr’s default colors pop up. you can change into any of them, this just establishes the code in the html and makes it easy to spot
then you're going to go to the little settings thingy at the top right of the post (the settings wheel) and click on this drop down, then click on "html" which will switch it to html

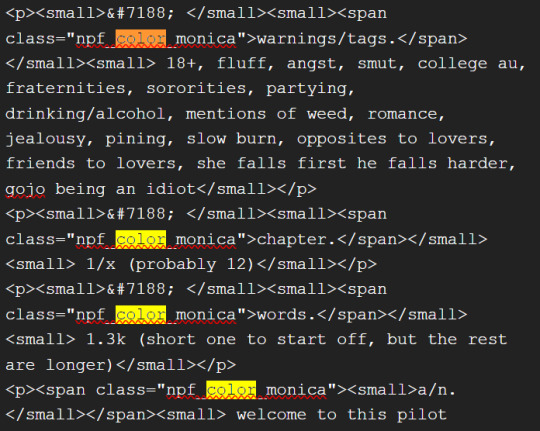
now it's in html. this looks very simple bc there is only one statement here. i’ll touch on how to deal with more lengthier blocks of html code later. but for now, note this section only:
<span class="npf_color_rachel">
this is ALL we need to work with in the code
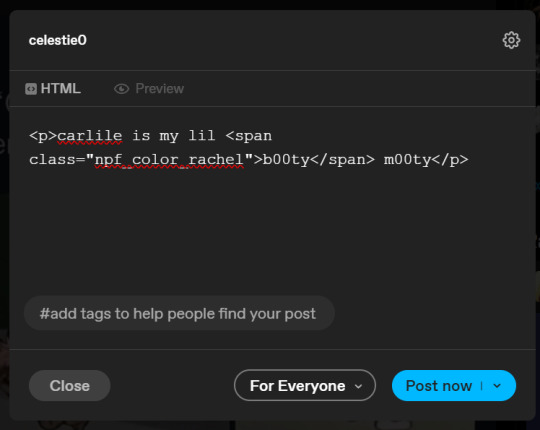
we're going to change it from
<span class="npf_color_rachel">
to
<span style="color: #[hex code]">
so, for example, something like
<span style="color: #81b7ce">
note. you can also just copy paste the lines above so you don’t have to type it out
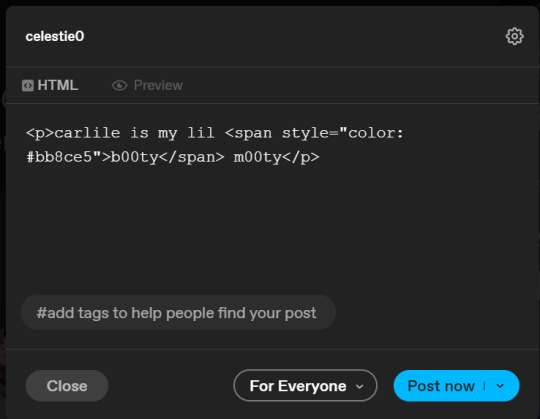
soooo all we did was delete the class=npf_color_rachel part and just replaced it with style=“color: #[hex code]
and here's the preview! all done :)
this is the website i use to find the hex codes. a hex code is basically those codes after the hashtag so like #81AACE (don't forget to input the hashtag)
now, for those lengthier posts i mentioned, you can use ctrl+f and search the word "color". it will show up any place on the post where you have a colored font (so do this after you’ve already changed all the places you want custom colors into default tumblr colors, like in the 1st step)
this way, you can easily find the places with <span blah blah> that you need to edit
here is an example of that in one of my posts:
and yeah! that’s basically it. disclaimer, i’m not a software engineer nor so i know much about tech haha, this is just for tumblr aesthetics
alright peace out! 🧚♀️✨ hope this is helpful
#tumblr#tumblr tips#tumblr html#tumblr hacks#tumblr colors#html#tumblr custom colors#tumblr girls#custom colors#tumblr tutorial#custom colors tutorial#html tutorial#hacks
237 notes
·
View notes
Text

here's a tutorial on how to have multilingual shenanigans without having to link back your translations in the ANs or something like that but also make it look nice in EPUB format? Here's my take on it. :)
mm whatcha say?: Changing Text On Hover for Multilingual Fics (A Download Friendly Workskin)

go forth and be free my lovelies
this is heavily inspired by @teekettle's tutorial on AO3!!
41 notes
·
View notes
Text
Tags Masterlist on this blog. Click to find posts.
Updated 31 October 2024.
General tags:
themes - patterns - resources - navigation - sidebar - interactive - header - fansite - contained - fandom - tools - tags - pixels - gif - graphics - dividers - pages - all in one - blinkies - code - colours - html - javascript - no javascript - neocities - templates - tutorial -
Specific tags:
kingdom hearts - seashells - splatoon - summer - steven universe - book - cats - colourful - computer - constellation - cute - eyestrain - facebook - fish - hexagon - horizontal - metal gear solid - music player - particles - pokemon - reddit - simple - social media - space - spongebob - tarot - undertale - water - webcore - writing -
You can also search tags by year of creation from 2013 to 2024.
Full masterlist page:
More will be added later. Feel free to suggest anything!
#masterlist#themes#sidebar#fandom#dividers#gif#header#resources#patterns#navigation#interactive#fansite#contained#tools#tags#graphics#music player#pages#html#neocities#blinkies#all in one#code#colours#javascript#no javascript#templates#tutorial
104 notes
·
View notes
Text
Convert HTML to Image: A Step-by-Step Guide ✨

Do you want to turn some HTML code you've made that's on your website and have a way to convert it into an image for you to save?
Well, look no further! I too wanted to do the same thing but funny enough, there weren't any straightforward tutorials out there that could show you how! After hours of searching, I finally discovered the solution~!
This is an old tutorial I made 🐼

💛 Set your environment
Before we dive into the conversion process, I'll assume you already have your HTML code ready. What you want to learn is how to turn it into an image file. You should have a good grasp of HTML and JavaScript. For this tutorial, we'll use the following HTML code example:

We won't include the CSS code, as it doesn't affect this tutorial. The JavaScript file (script.js) at the bottom of the body element is where we'll add the functionality for the conversion.
Your page should resemble the following:

As you can see, the "Click me" button will handle the conversion. We aim to convert everything within the div.info-div into an image.
💛 Using the html2canvas JavaScript Library
The html2canvas library allows you to take screenshots of webpages and target specific elements on a screen. Here are the steps to include the library in your project:
The steps to put the library in your project:
Visit the html2canvas website for more information.
Copy the CDN link from here

and include it in a script tag in your project's head tag in the HTML file:

That's it for including the library on the HTML side. Now, let's move on to the JavaScript code.
💛 JavaScript Functionality
Here's the JavaScript code to handle the conversion:

In this code, I want to turn the whole div.info-div into an image, I put it into a variable in const div = document.querySelector(".info-div");.
I also put the button into a variable in const button = document.querySelector("button");
I added a click event listener to the button so when the user clicks the button, it will follow the code inside of the event listener!
You can find similar code like this in the documentation of the html2canvas library:

What is happening here is:
We add the div (or what the element we want to take an image of) into the html2canvas([element]).then((canvas)
Added the image file type url to a variable = const imageDataURL = canvas.toDataURL("image/png"); - You can replace the png to other image file types such as jpg, jpeg etc
Created an anchor/link tag, added the href attribute to imageDataURL
The download attribute is where we will give the default name to the image file, I added "dog.png"
Perform the click() function to the anchor tag so it starts to download the image we created
And that's it!
💛 The End
And that's it! You've successfully learned how to turn your HTML into an image. It's a great way to save and share your web content in a unique format.

If you have any questions or need further clarification, please comfortable to ask. Enjoy converting your HTML into images! 💖🐼
#my resources#coding#codeblr#programming#progblr#studying#studyblr#programmer#html#html css#javascript#neocities#coding tips#html5 tutorial#html tutorial
155 notes
·
View notes
Text
How to Import your Tumblr Blogs from your other accounts on Tumblr (Tutorials) (How Tos) (Guides) (Codes)
Guide by @warrenwoodhouse #warrenwoodhouse
You can import your Tumblr blogs from your other accounts on Tumblr, though it was a feature in 2012 and discontinued a decade later. Currently, the only way to import your content from your other blogs on your other accounts is to use the backup feature found in the Blog Settings area. You’ll need to use a computer as the exporting feature saves your blogs in ZIP Archives. You can then import them on another account.
You can learn more about this by CLICKING HERE to see the article on Tumblr Support.
#warrenwoodhouse#2024#support#help#tumblr tricks#tips and tricks#how to#how tos#howtos#howto#tumblr support#tumblr help#codes#codesblog#tutorials#tutorial#html tutorials#zip tutorials
1 note
·
View note
Text
Want to upgrade your coding skill to create animations and interactive graphics? This blog covers everything about HTML animation including the Canvas API.
#Basic HTML tagsexplained#Introduction to HTML elements#HTML basics#HTML tutorial#Master HTML#HTML tags#Web development#Learn HTML#HTML for beginners#HTML guide#HTML syntax#Building web pages#Basic HTML elements#Learn HTML elements#Learn Online HTML#Online HTML Tutorial#Introduction to HTML#HTML tutorials#Learn HTML online
0 notes
Text

Web design is my passion
#shitpost#wobbledog#just 1#as you can see my programming class is going very well#html#i know a lot more than i did about html but i can barely do ANYTHING with what i know#fun fact i actually had to put in MORE effort to make it look like this m#quick image tutorial incoming#when you alter the image size in css you use the string img { width: 400px; } (or your desired pixel number or percentage)#and this scales your image accordingly. however.#you can also add a second value of height or width depending on what you started with and the image WILL stretch#so my code looked like this:#img { width: 100%; height: 400px; }#also ☝️ the colour of the title is dodgerblue and i think its the best blue. followed closely by aliceblue
39 notes
·
View notes
Text
﹙ cafe v. ﹚ ─── A guide for tumblr text colour 𖹭 ݁


It is quite simple actually! 𖹭 Three big steps ( with some sub steps guys, you can do it, I believe in you ) is all you have to go through for you to find the colour for your blog aesthetic!
step 1 ) find a colour
first, you find the colour desired for your blog. You can do this by looking up sites such as:
HTML colour codes
colour designer ( you can play around with this one a lot !! )
or by simply looking up the hexcode of your desired colour if you already have one or more!!

step 2 ) formatting the colour into your posts
You guys still with after step 1? You're doing great! Gold star for you alright! you got the colour you want for your blog aesthetic! now, this is where it might seem a bit intimidating, but we assure you, it is not!
now, we are all excited to put in the colour, and we'd think: "it's time to put it onto tumblr!" but then suddenly you notice, that doesn't work?
that is because to put things into tumblr with colour. You must use a formatter site. odd, we know
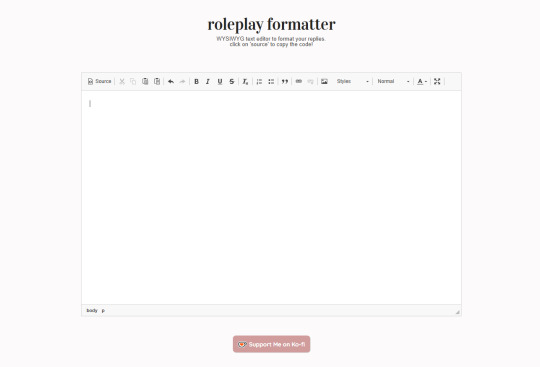
the one we here at valentine café use is ( drumroll )
Roleplay formatter
let us show you how it is done with some small screenshots!
oh hey! good job you got on there with me! now just follow my steps, and you'll be good to go on your aesthetic adventure!
ready? okay let's go :DD !!
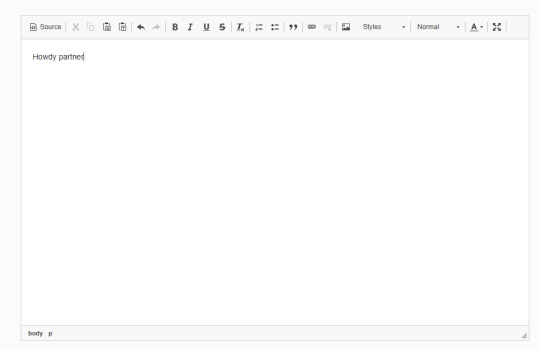
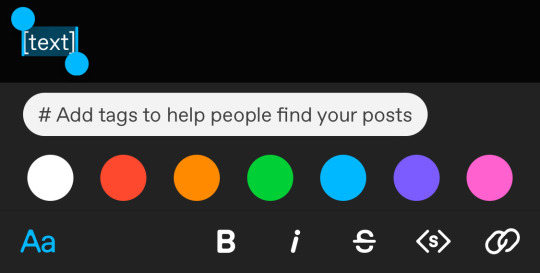
first, you write a little sentence ( you know, when eden first taught me this. I thought it'd be so complicated and hard, my brain couldn't comprehend it. I love my wife guys )

you then select your text, and then go to the little A in the corner! this is where you will find the colour options for your text, then at the bottom of the colour palate, there is an option that says "more colours"
jingle jingle jingle, pay attention. are you with? okay good! I give you a cookie and a gold star.
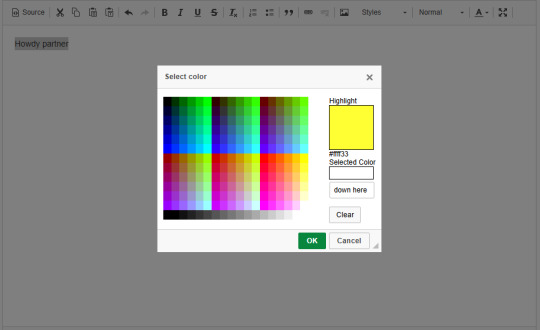
now that we are on more colours, you see the selected colour option in the corner! you paste the hexcode, right there <3
WHAPEESH, you got dat smexy colour down on your text now! What you do next, is perhaps the most intimdating of all. . . HTML ( screams of tired agony from Eden at 3AM )
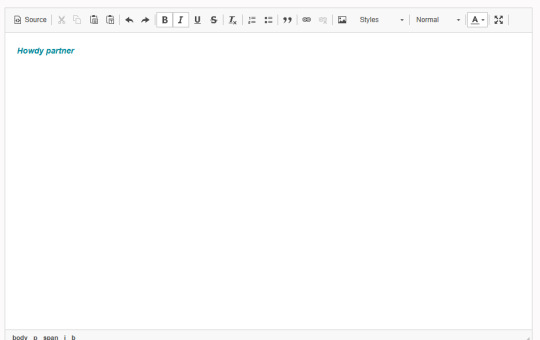
You go up to the big tempting button that is called: "Source" and then you click on dat and-

oh my god bro. . . what IS THAT. That, my darling, is HTML and it looks like the link to hell I know. but this is what you use when you go to tumblr and go on the options button on post
Step 3 ) put the text into tumblr
okay guys, ( sobs ) it's been a journey. I'm so glad I can teach all of you about HTML and colour :,)) This is the last big step. . . Putting it into tumblr!! YIPPEE
What you will do now, is make the post for your fancy new text and smack that HTML onto it! But how do we do that?
It's not too hard, don't worry, just a little clicking here and there you go onto the options and then right down by text editer!
After that, your posting pop up on tumblr will tell you that you can copy the HTML you have onto the page and whambam thank you ma'am, you'll have that fancy schmancy text spread out on the paper sheet! You can sprinkle some more aesthetics onto the post even more for some extra good stuff!!
we really hope that this was of some help to those curious on how to make their blogs fit their own aesthetics more!
let us know if it helped!
19 notes
·
View notes
Text

Para estrenar la sección de tutoriales que mejor que hacerlo con esta hermosa firma realizada en código.
Advertencia de mucho texto y tendrán que escribirlo así se familiarizan con el lenguaje; estará explicado lo más detallado posible.
¿Qué necesitamos?
Cuenta en Dropbox, para almacenar el css.
Una imagen png sin fondo del personaje en cuestión.
Paginas externas
Subes una imagen y te ayuda seleccionado colores.
Para texturas.
Para Iconos.
Pueden realizar el tutorial en codepen o el editor que tengan, yo utilizo Visual Studio Code.
Y no será más, ¡vamos al tutorial!
✦ Personaje: Columbina | Genshin impact ✦ Cualquier duda, pregunta, sugerencia estoy a un ask de distancia.
✦ Si te gusta mi trabajo el like y reblog me ayudan a crecer. ✦ No olviden hacer clic en “Recibir notificaciones” para no perderte ningún código nuevo. ✦ Disponible para crear todas sus ideas y volverás realidad; ¡Comisiones abiertas! ¡Pregúntame!
[Code] @elalmacen-rp XOX Luxury Poison
#tutorial#code#firma#rol#foroactivo#tablillas#rpg#roleplay#code signatures#signature#signatures#html#css
11 notes
·
View notes
Text
Html Tutorial Rec Wednesday
Twitter
Do the characters in your works use Twitter? Would you like them to?

Are they posting thirst tweets? Long threads compiling information against a specific celebrity or politician? Are they regular people whose tweets accidentally go viral, or are they celebrities that people pay close attention to?
Either way, this tutorial by gadaursan makes it super easy to make tweets for your AO3 fanfictions! Gadaursan has also taken the time to make a code free html generator for any tweets you might want to embed into an AO3 fic!
The tutorial lets you embed images, show polls, and use quote retweets, all while explaining the HTML and CSS structure behind it all. Dark mode tweets are also available, if you prefer that!
Multiple AO3 users have created their own versions of twitter work skins, each with a slightly different look and feel; check them out!
[Ao3 Skin] Twitter with threads by oakleaf
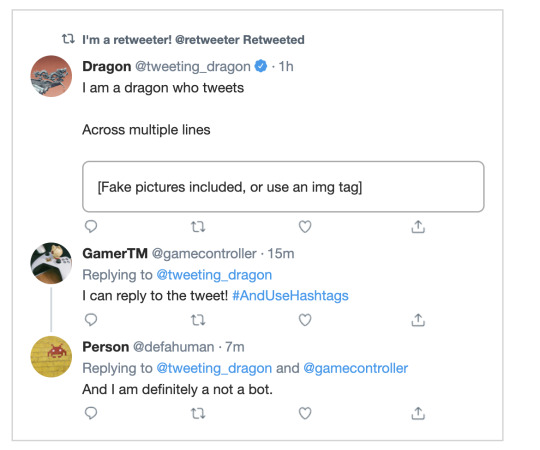
Mimicking Twitter Posts for Fics - Some Twitter Workskins by Ultraviollett
Twitter Work Skin: Tweets & Profile (newest layout) by starskin

Twitter Work Skin Template by etc e tal (pe_pe_peperoncinocandy)
and so on!
These examples are just to show you how there are many different ways to convey the same information / achieve the same result. Hopefully it inspires you to incorporate twitter into your own fics!
#html#html reference#reference#html tutorial rec#twitter#we're not calling it x#fanfiction#ao3#it's actually wednesday this time!! im doing so good
23 notes
·
View notes