#YouTube Video Download Methods
Text
Download YouTube Videos on Android
YouTube is a platform brimming with captivating content, from educational videos to entertainment. Sometimes, you may find yourself in situations where you want to watch these videos offline. Whether you’re planning a long flight or you simply want to save your data, downloading YouTube videos on your Android device can be incredibly convenient.
Continue reading Untitled

View On WordPress
#Android YouTube Video Download#Download YouTube Videos Android#Enjoy YouTube Offline Android#SaveFrom.net YouTube Video Download#TubeMate Video Downloader Android#VidMate YouTube Video Download#Y2Mate YouTube Video Downloader#YouTube Go App Download#YouTube Premium Offline Videos#YouTube Video Download Methods
1 note
·
View note
Text
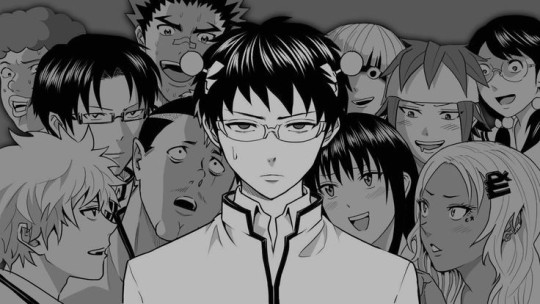
the prophets appeared to me in an orb experience and told me to make a horny fancam of the most swagless man in star trek, non-vedek division
#ds9#deep space nine#katy perry#e.t.#odo#star trek#kiraodo#quodo#sorry the video quality sucks in parts it is all downloaded from youtube#i fear uh “orion methods”
84 notes
·
View notes
Text
How to become more addicted to porn and ruin your silly brain 💞
1 - Stop cumming. Full orgasms makes you feel like you 'had enough'. You should never have enough, you need to be kept in the edge.
2 - Stop being picky. Good girls don't choose. Watch every single porn that shows on your feed/timeline/search results.
3 - Stop skipping. The video timeline should not exist for you, you should watch from beginning to end in normal speed and without pauses.
4 - Edge for every single video/image. It doesn't matter it you liked it or not.
5 - Always watch porn when you feel sad. This will make your brain see porn as a method of escapism and it will slowly gets more needy for it.
6 - Any horny thought should lead to watching porn.
7 - Get used to it. Stop watching porn only on your bed or bedroom, watch it as you would to any youtube video.
8 - Expand your fetish list. Start to try slightly different porn categories and gradually develop a wide taste.
9 - Use as much porn plataforms as you can. Video streaming platforms are not the only way to consume porn. Use twitter, tumblr, image folders, etc.
10 - Punish yourself for not watching it. You spend a day without porn? Then the next time you watch you wont be allowed to touch yourself, and so on.
11 - Start to save it. Download the files you most like and watch them everyday.
12 - Lose hope. Stop wondering about recovery, this is for normal people, not dirty sluts.
#bimboification#bimbo training#dumbification#dumb slvt#mind corruption#mind conditioning#mind control#brainwashing#brainwashed#hypno toy#hypnosub#hypnoslut#bimbo hypnosis#hypnok1nk#sluttoy
7K notes
·
View notes
Text
and on top of everything else right now, the download manager that i installed specifically to handle large files has apparently decided it will no longer download any more than 1gb of any file, meanwhile my browser will decide to wait till the very end and then say the download failed
#may or may not be part of it but does anyone have any good youtube downloader reccs#i usually use y2mate but its been failing me lately#i cant get the method to download thru vlc to work#and the videos are too long for y232 (theyre plush tutorials around an hour long each)
0 notes
Text
𝐏𝐒𝐘𝐂𝐇-𝐊 / 𝐖𝐇𝐎𝐋𝐄 𝐁𝐑𝐀𝐈𝐍 𝐒𝐓𝐀𝐓𝐄 𝐅𝐎𝐑 𝐑𝐄𝐏𝐋𝐀𝐂𝐈𝐍𝐆 𝐋𝐈𝐌𝐈𝐓𝐈𝐍𝐆 𝐁𝐄𝐋𝐈𝐄𝐅𝐒 + 𝐒𝐄𝐋𝐅-𝐇𝐄𝐀𝐋𝐈𝐍𝐆

what is psych-k? •°. *࿐
according to the psych-k frequently asked questions, PSYCH-K, "is a proven and safe way to change subconscious beliefs that perpetuate old habits of thinking and behaving that you would like to change."^1 dumbing it down, you are using psych-k to tap into your subconscious and conscious simultaneously, rewiring your brain with a single affirmation. and while doing this, you may begin to have a rush of negative, limiting thoughts, but instead of pushing them away in frustration, you will invite them in. think of it like this... you are the teacher and your affirmation is a brand-new lecture. you're standing at the front of the room in front of many desks, all filled with 'students' aka your thoughts, emotions, etc. as you are 'lecturing' (repeating this affirmation over and over and over) the 'students' begin to disrupt you with hurtful words or overall trying to debate with your 'lecture'. how do you handle this? you continue to 'lecture', you can continue to listen to your 'students', and eventually, the 'students' will quiet down until there's complete silence and that's when your 'lecture' has started to implement its knowledge into your 'students'.
how does psych-k work? •°. *࿐
"PSYCH-K® is a unique process, having evolved from years of brain research and thousands of sessions with individuals and groups. It creates a receptive, “Whole-Brain State” that dramatically reduces unwanted resistance to change in the subconscious mind. The subconscious can be accessed in a way analogous to a personal computer. PSYCH-K® works as a kind of ‘mental keyboard’ — a user-friendly method of communicating with the subconscious mind that is simple, direct, and verifiable."^2
has there been scientific research on psych k? •°. *࿐
absolutely. if you'd like to read more about this, you can go here and download the various articles and give them a quick read.
how does psych-k differ from other methods as well as other healing techniques such as meditation? •°. *࿐
if you're looking for a thorough answer to this question, feel free to look at this for reference as it better explains the answer to this question in its entirety. the bottom line, however, is that this technique is just as important as others and is not meant to replace any other methods, it is simply another addition. many healing techniques will depend on outside sources of the person, such as a psychologist, hypnotist, or anyone with similar titles. however, psych-k will depend on the inner-workings of those who are performing it, psych-k simply provides the tools and you, the one who is getting into this 'whole brain state' are the one actually doing all of the work. you will be the one taking apart your limiting beliefs and replacing them with whatever you truly desire.
will it benefit me? •°. *࿐
PSYCH-K, "[...] enables you to communicate with your subconscious mind so you can change beliefs that are limiting your self-esteem, relationships, job performance, even your physical health…and much more! PSYCH-K® is popularly characterized as a spiritual process with psychological and physical benefits. While the term “psych” is often used as an abbreviation for “psychology,” in our case it is used as a variant spelling of the word psyche, meaning “mind,” “soul,” or “spirit.” The letter “K” represents the Key to sustainable success."^3
why should i test out the psych method? •°. *࿐
just like anything else, you do not need to try this out, however, what do you have to lose? the results may shock you.
can anyone do the psych-k technique? •°. *࿐
absolutely anyone can do the psych-k, it is not limited to any particular group of people, and it can effect people differently depending on how they use it.
how do i do psych-k? •°. *࿐
there are many videos on YouTube that will provide a visual guide of instructions on how to do it, however, this is the video that I use and I highly recommend that you watch the entire video to get a logical understanding of what's happening (if you prefer logical info like I do). and if you're having trouble figuring out how to position your hands, watch this video as well. I'd also like to mention that if you're unsure of which side of your brain has more resistance to a new belief, set yourself a timer for 5 minutes and do psych-k with your left ankle crossed over your right and your left hand crossed over your right. after the timer goes off, switch your right ankle to cross over your left, and your right hand to cross over your left. a l s o, if you decide to have resistance against this method bc or any method in general (bc you're stubborn perhaps), take the time to do psych-k and affirm that all methods work for you, boom, fuckin' foolproof.
can i use psych-k to manifest anything i desire? •°. *࿐
yes, yes you can, you're changing your beliefs right in the moment, there are no fuckin' limits unless you create those limits for yourself.
can i use psych k to enter the void state? •°. *࿐
yes, you can do anything you want with psych-k. @urgurljodie has a bit more information on this, but, i am aware that they sent an ask to someone and stated that while doing psych-k you should affirm that you're in the void state/in the void etc.
how do i know if I'm doing it right? •°. *࿐
there's no need to overcomplicate this, don't fear the replacement. simply sit down, get into position as instructed in the videos provided above, and follow their words. stay in the psych-k position for as long as needed, repeating your new belief over and over, invite the resistance in, and simply keep thinking this new thought until you no longer feel resistance towards your new belief. you'll know if you did it right, promise. may sound unbelievable at first, but again, what do you have to lose?
can i combine psych-k with the laws of manifestation? •°. *࿐
absolutely, use any affirmations you want.
do i have to do psych k to eliminate limiting beliefs? •°. *࿐
nope! this is simply just another method of sorts, you don't need to try anything you don't want to. no one is forcing this shit down your throat...
notes •°. *࿐
i'd recommend this technique that combines psychology and kinesiology to anyone and everyone who thinks they are struggling to build new beliefs or manifest their dream lives. the worse that could happen is that it doesn't work or it just takes you a little longer to replace the programming in your mind. give it a try and report your results. a l s o, before anyone comes at me i will give proper and due credit to @urgurljodie for bringing light to this technique to the tumblr void community, ya should be thanking them for this. this particular technique has thoroughly pleased the logical and more scientific-based limiting beliefs I've had for a while. this post was simply meant to add onto what's already been established, all due credits go to the developer of the technique of rob williams as well as the tumblr user mentioned above.
references.
all of the quoted information comes from this site.
1. https://psych-k.com/faq/#what
2. https://psych-k.com/faq/#what
3. https://psych-k.com/faq/#what
4. here's some information on muscle testing and psych-k
5. clearer instructions for the correct posture (en)
6. more information on the whole brain state
#law of assumption#law of attraction#void state success#void state#god state#psych k#psych-k#limiting beliefs#manifesting#manifesation#manifestation method#laws of manifestation
2K notes
·
View notes
Text
Tim Drake would love video games sm tho, and I do not see that represented enough.
He'd be a total nerd about it to. He'd rant and rant and rant about all the games he's played and all the cheats and the secret cut scenes and the hidden lore. He'd be a game theorist for sure, probably has a YouTube account dedicated to it since he's such a little detective. He knows the true lore of FNaF.
He'd definitely speed run minecraft, rp to probably. First person shooter? How about first hand experience. FNaF fanatic oh my God he'd LOVE that game so fucking much. Absolutely a Sonic kid, like you cannot convince me otherwise. Mario less so but you knows hes probably played every single game anyways. Pokemon? Every single one memorized down to their exact coloration. Stardew valley? Do i even have to ask. Animal crossing? Perfected his village, villagers and all. Zelda? I cannot prove it but he has a lino Cosplay somewhere and he's worn it for under cover missions. He'd slay in DTI, have like 5 different mansions in Bloxburg, defiantly played Royal High until the capitalism became to close to the real world, probably has hundreds of avatars to. An expert at games like fnf has played half the mods to ever be made for that game. He's been playing fortnite since it's release. He'd have one of the top scores ever in subway surfers. He'd download those "complete your restaurant" type games and finish them in two weeks and it'd only take that long because the game forces him to wait sometimes. Candy crush is his bitch 100%. He'd download mobile games and finish them in a day and then keep redoing them till he's perfected his method. He has played and replayed countless driving based games, can learn almost any new one in 6 minutes. Going back to the speed run thing I think he'd just enjoy speed running games in general, and gridning. He'd love minecraft so much omg-. Last of us? Played. Iron Lung? Played. Cuphead? Played. Detroit Become Human? Played. Kindergarten? Played. Sallyface? Played. Splatoon? Played. He'd love small games to I just am not that into video games to know any to list- :').
I mean think about it. Going off the "Tim's parents are never home" version of him, he'd have so much time to just sit around and play video games. He has the money to buy them and the time to spend getting ungodly good at them. He'd have amazing equipment, and it'd give him some sort of community even if he doesn't really interact with it personally. Like if he's not out stalking Batman or at school, he's playing a video game. Even after he starts working for Batman, he'd overwork himself to the bone and he'd STILL find a way to go pro gamer in-between. Probably for like 0.5 seconds whenever he's got to stand up to get himself another energy drink.
Like please, video game nerd Tim Drake on my knees begging you add this to your stories and headcanons. Have him introduce other batfam members to video games. HAVE HIM INTRODCUE BRUCE TO CANDY CRUSH AND MAKE THEM GET INTO A COMPETITION ON WHO CAN GET TO A HIGHER LEVEL FASTER. He shows Damian animal crossing. He gives Jason a gaming console and like 50 different shooter games and one copy of stardew valley as a joke and did not expect Jason to get so into it. Him Cass and Steph would love those Roblox horror games. He'd force the whole family to start having game nights and they'd have a world on Minecraft that has the most insane lore you've ever heard. Like please give me more video game nerd Tim and tell me your headcanons on what games he'd like and what he'd introduce different batfam members to in the comment I am begging you.
#tim drake#red robin#bruce wayne#batman#jason todd#red hood#damian wayne#dc robin#dick grayson#nightwing#barbra gordon#batgirl#oracle dc#stephanie brown#spoiler dc#cassandra cain#black bat#duke thomas#signal dc#maps mizoguchi#YJ would also have a minecraft world thats honestly crazier than the batfams#and its just based off their actual time during young juctice that theyd recreate to work through the trauma#dc comics#dcu#dc universe#dc headcanon#tim drake headcanon#video games#batfam headcanons
104 notes
·
View notes
Text
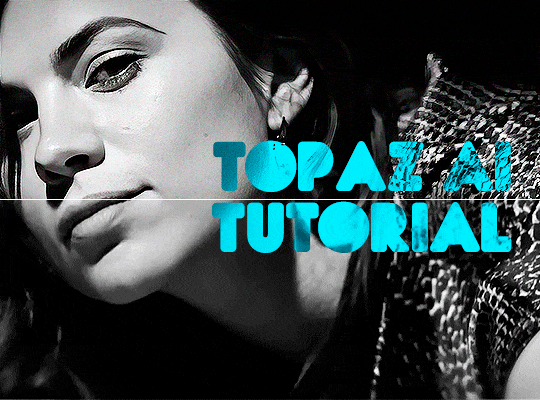
TOPAZ AI TUTORIAL
i was asked to do a tutorial for Topaz AI (a software that enhances screencaps), so here it is! :)
[tutorial under the cut]
i’m going to gif a 720p YouTube video from 12 years ago as an example. it’s the bottom of the barrel when it comes to image quality, but in the end, you won’t believe it was once so shitty. here’s the gif, without any editing:

THE APPLICATION
Topaz AI is a paid software for image enhancement. you can download it for free, but your images will have watermarks. here's a random link that has nothing to do with this tutorial.
you can use Topaz AI as a Photoshop plugin or use the software separately. i will explain both methods in this tutorial.
USING SEPARATELY
it’s the way i do it because it’s more computer-friendly, the plugin can take a toll on your PC, especially when you’re dealing with a lot of screencaps.
you first take screencaps as you normally would (if you don’t, here’s a tutorial on how to do it). open Topaz AI and select all the images. wait a while for the software to do its thing.

on the left, there is your screencap untouched. on the right, is your edited version. if you click the edited screencap and hold, Topaz will show you the original, that way you can compare the versions even better than just looking at them side by side.
Topaz AI will automatically recognize faces, if any, and enhance them. this can be toggled off, by disabling the “recovering faces” option in the right panel. it’s always on for me, though. you can tweak this feature by clicking on its name, the same thing for the others.
Topaz AI will also automatically upscale your screencaps if they’re too small (less than 4k). it will upscale them to achieve said 4k (in this gif’s case, the original 1280x720 screencaps became 4621x2599). i suggest that you let the app upscale those images, giving you more gif size flexibility. you can change into whatever size you want if you want something less heavy to store. don’t worry though, even these “4k screencaps” are very light megabytes-wise, so you won’t need a supercomputer. it might take a while to render all your screencaps, though, if you’re on a lower-end computer. (the folder with the edited screencaps ended up being 1GB, but that’s because it contains 123 screencaps, which is a lot of screencaps for 4k giffing).
two options won’t be automatically selected, Remove Noise and Sharpening, you will need to enable them to use them. rarely i don’t use Remove Noise, as is the best tool to remove pixelization. the Sharpening option depends on the gif, sometimes your gif will end up too over-sharpened (because of Topaz’s sharpening and later your own). that said, i used the Sharpening option on this gif.

next, select all images by clicking the “select all” button. you will notice that one of the screencaps’s thumbnails (in my case, the first one) will have small icons the others don’t have. this is the screencap you enhanced. you will need to click the dots menu, select “apply”, and then click “apply current settings to selected images”. this way, every screencap will have the same settings. if you don’t do this step, you will end up with one edited screencap and the rest will remain untouched!

all things done, click “save X images”. in the next panel, you can select where to save your new screencaps and how you want to name them. i always choose to add a topaz- prefix so i know what files i’m dealing with while giffing.
just a note: if your way of uploading screencaps to Photoshop is through image sequence, you will need to change the names of your new screencaps so PS can perceive that as a sequence (screencap1, screencap2, etc). you can do that by selecting all the screencaps in your folder, then selecting to rename just one of them and the rest will receive numbers at the end, from first to last. you don’t need to rename them one by one.
here’s the first gif again, without any editing:
without Topaz enhancement but with sharpening:

without sharpening, only the Topaz enhancement:

with Topaz enhancement and sharpening:
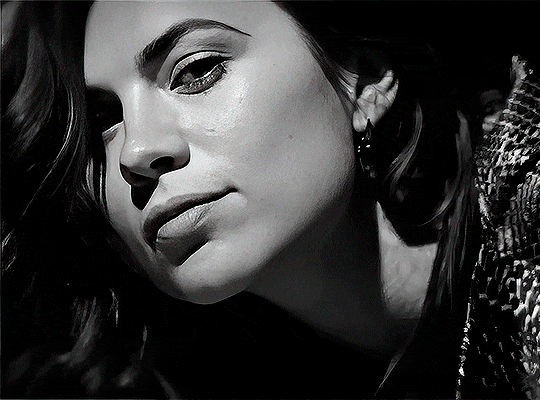
her skin is so smooth that it is a bit unrealistic. i could have edited that while tweaking the “Recovering Faces” option and/or the “Remove Noise” option, but i prefer to add noise (filter > noise > add noise) when necessary. this way, i don’t risk not enhancing the quality of the screencaps enough.

i added +3 of noise, making the gif look more natural. it’s a subtle difference, but i thought it necessary one in this case. you can continue to edit your gif as your heart desires.
VOILA! 🥳
AS A PHOTOSHOP PLUGIN
if you have Topaz AI installed on your computer, Photoshop will recognize it. you will find it in filter > Topaz Labs > Topaz AI. while in timeline mode, select the filter. the same Topaz AI window will pop up and you can tweak things the same way you do when you use the software separately. by using the plugin, you don’t need to upload your edited screencaps or use screencaps at all, a video clip (turned into a Smart Layer, that is) will suffice. the downside is that for every little thing you do, Topaz AI will recalculate stuff, so you practically can’t do anything without facing a waiting screen. a solution for that is to edit your gif in shitty quality as you would edit an HD one and at the very end, you enable Topaz AI. or just separately edit the screencaps following the first method.
this is it! it's a very simple software to use. the only downside is that it can take a while to render all screencaps, even with a stronger computer, but nothing too ridiculous.
any questions, feel free to contact me! :)
#*#alielook#usershreyu#userlaro#userchibi#tusernath#usersanshou#userbunneis#userzil#tuserlou#jokerous#usersnat#userdavid#userbuckleys#userbarrow#gif tutorial#completeresources#ps help#resources#*tutorials
205 notes
·
View notes
Text
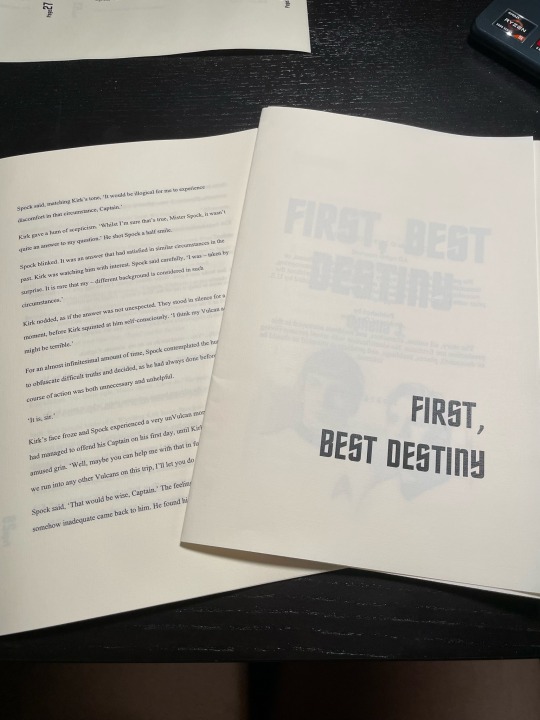
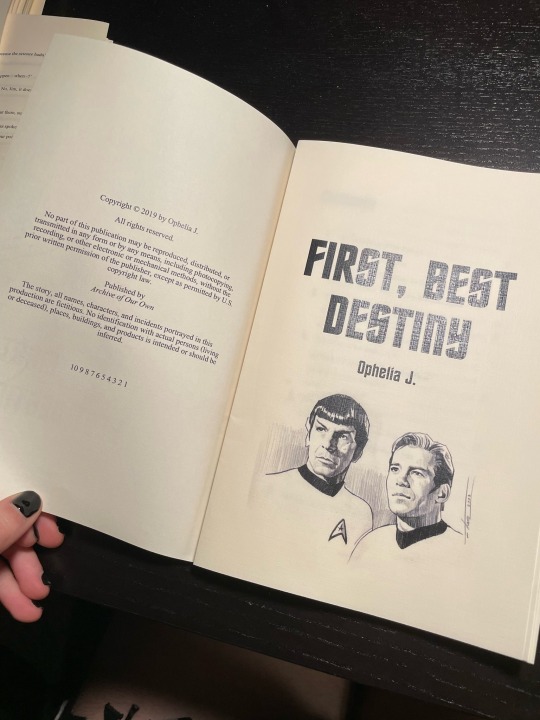
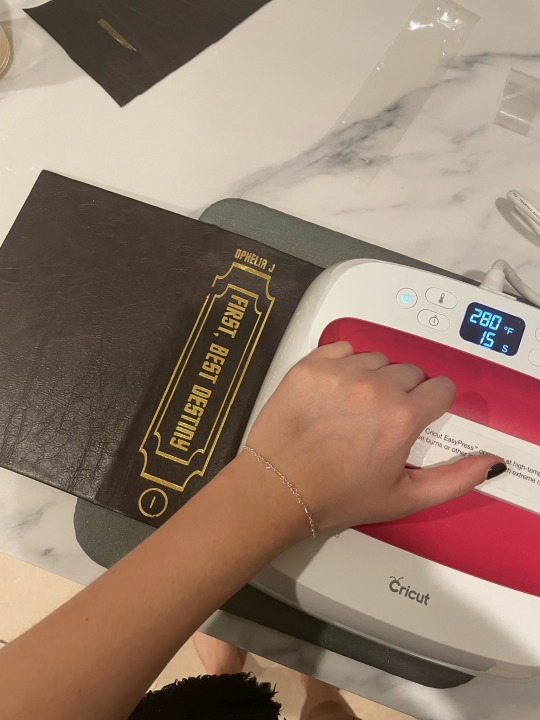
ok so i just finished my book cover for First, Best Destiny - Part 1 by the amazing @ophelia-j !!

admittedly i was going to wait until i actually attached the text block to the cover before i posted this haha, but i was SO excited after making this cover that i decided to just post it and then update with the finished product later!!
this book is absolutely embedded in my soul, and words cannot even describe how gorgeously it’s written. it’s a book that made me realize - hey, the adventure doesn’t end as you grow old.
you can read it here. i promise you won’t regret it!!!
anyways!!! here’s all of my other bookbinding steps for anyone interested.
cam’s somewhat incomplete bookbinding guide
please note that i am an AMATEUR hobbyist. please do not actually use this as a tutorial.
oh also!! bookbinding terminology will have a * by it which will be explained at the end in order to make this flow better. i’ll also link the tutorials i used at the end of this for anyone interested.
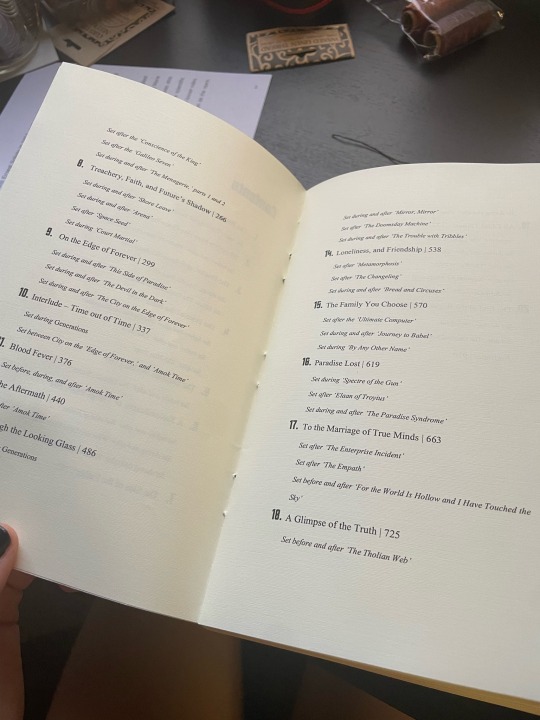
1) Formatting the document! I downloaded the original text as a PDF, and then designed a cover page, grabbed some art from the internet (i know, frowned upon, but this is just a personal copy so it is what it is), and then designed a table of contents and chapter icons!!
*side note! i added which episodes each chapter follows to the table of contents (pictured below) as this book was written as an accompaniment to TOS and the movies.
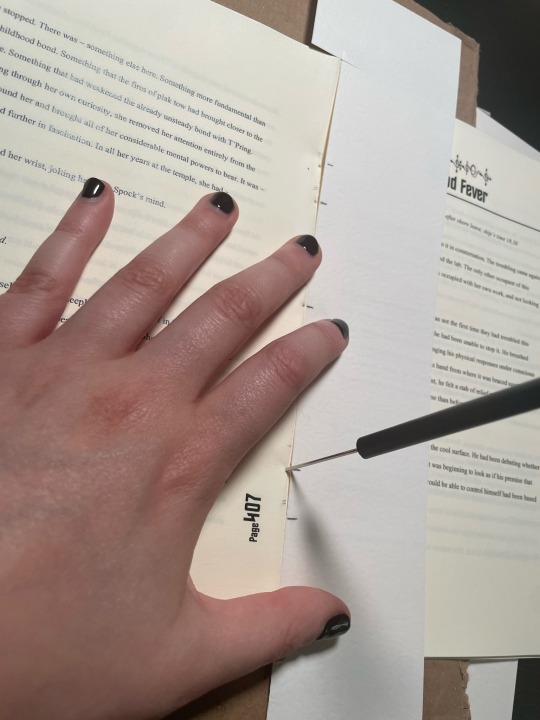
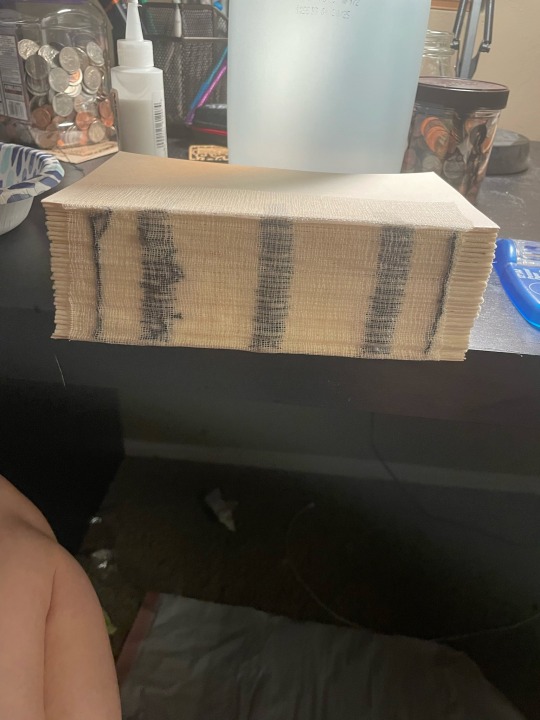
2) Next, I printed out all NINE HUNDRED PAGES??? admittedly i could have done it in less if I’d used a bigger page size, but sending things out to be printed is expensive so we made do. after printing, i folded them into signatures*.
*there’s an additional note about the paper i used at the end
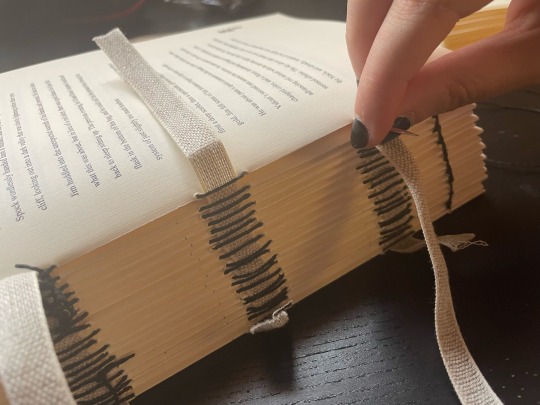
3) punching out holes in all the signatures! although not technically necessary, I honestly don’t think i would’ve been able to sew this behemoth without doing it.
4) sewing the pages into a real!! actual!! book!! this was the part i was most nervous about. i’ve NEVER attempted to sew anywhere near this large of a book before, so i tried out a new method of sewing in hopes of making it a bit more sturdy. we won’t know if it worked until this book endures some wear and tear, but i’m pretty optimistic!
5) next up is glueing the spine! this is where it really hit me that a lot of bookbinding is just…glueing shit together. later i also added cardstock to the spine in hopes of helping it adhere to the cover better, and a book headband* for decoration.
5) now we’re onto the book cover!! they only sell bookboard in minor bulk around here, so we’re not even gonna discuss how much bookboard i now own… anyways! i glued the faux leather onto the bookboard and then let that dry.
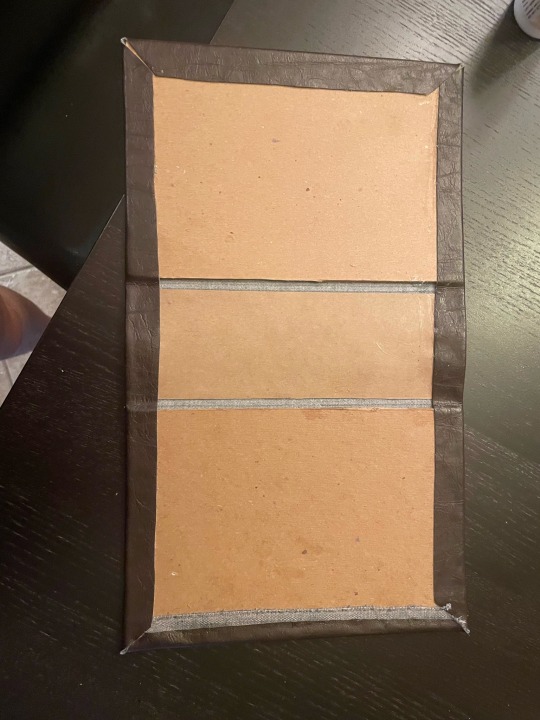
6) last up! off to the cricket! a huge thank you to my friend for letting me borrow her cricket AND supplies! anywho, this is where i designed my cover art. i then adhered the design to the cover. after this step, i realized i…definitely need some kind of sealant - so, if any more seasoned bookbinders have suggestions for this i am all ears!!
all in all, this was a super fun project, and a great way to kill some time while i recover from surgery! i absolutely plan to bind the sequel at some point, but that may be a…ways away. i’m a STEM major and school starts back up soon so…time will be in short supply lol!
To be continued...
Terminology
*signature: group of sheets folded in half, to be worked into the binding as a unit.
*book headband: just look up a picture if you’re curious because tumblr says i can't add any more pictures lol.
*about the paper!! i actually got it from a local specialty paper store, but if you want something similar i've heard amazon has some good bookbinding alternatives!
Tutorials
please PLEASE go check out Jess Less on youtube. she's phenomenal. here are her vids and what i used them for.
youtube
don't laugh!! i actually stole MOST of my techniques straight from this video.
youtube
i used this one to help me format the book correctly! although i still ended up with some goofs haha (see: any pages on the left side have the page number in the margin LMAO).
#Youtube#k/s#k/s fanfic#tos spirk#spirk#star trek#i have no creative tags :((#star trek fanart#star trek tos#star trek art#book binding#custom book bind
95 notes
·
View notes
Note
How do you make your gifs?
Hello hello! I love talking about gifmaking, so thank you for giving me the chance to ramble.
Instead of a detailed step-by-step walkthrough, I will link tutorials and resources written by the wonderful Tumblr creators on here along the way. Everyone has their method and preferences, and there’s no right or wrong way to make gifs. I’m going to share techniques and resources I picked up along the way that work best for me—they may or may not be suited to your preferences, but I hope you’ll find some helpful things here.
(Warning: screenshot/image heavy)
USEFUL TUTORIALS AND RESOURCES
Here are some tutorials and resources that I found very useful when I got back into gifmaking:
Gifmaking tutorial using video timeline by @hope-mikaelson is identical to my own process
Gifmaking and coloring tutorial by @kitty-forman, whose process is very similar to my own
Giffing 101 by @cillianmurphy, an incredibly detailed tutorial that covers everything you need, including a step-by-step guide to using HandBrake
Gifmaking and coloring tutorial with 4K HDR footage by @sith-maul, another incredibly detailed tutorial with many useful tips
Gifmaking tutorial by @jeonwonwoo, incredibly comprehensive and covers so many aspects of gifmaking from basics, sharpening, captioning, and text effects
Gifmaking/PS tips and tricks by @payidaresque
Action pack by @anyataylorjoy, the Save action is especially a true life-saver
@usergif and @clubgif are amazing source blogs with many tutorials on gifmaking, color grading, and gif effects, can’t be thankful enough for the members for their work curating and creating for these blog!
TOOLS
Adobe Photoshop CS6 or higher, any version that supports video timeline. @completeresources has many links to download Photoshop, have a look!
Photopea is a free alternative to Photoshop, but it has a slightly different UI, check out these tutorials for gifmaking with Photopea
HandBrake or any other video encoder, especially if you’re working with .MKV formats
4Kvideodownloader for downloading from YouTube, Vimeo, Instagram, etc.
OBS Studio or any other similar screen capturing software. To prevent duplicate frames in gifs that prevents your gifs from looking smooth, try to match the recording frame rate (FPS) with the source.
IMPORTING FOOTAGE AND WORKING IN VIDEO TIMELINE
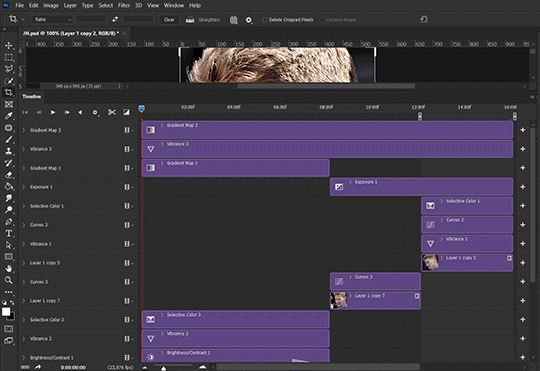
I work exclusively in video timeline instead of importing video frames to layers or loading files into stack. For videos that don’t require converting/encoding using HandBrake, especially ones that are already in .MP4 format, I tend to open the video directly on Photoshop, and trim the videos around directly.
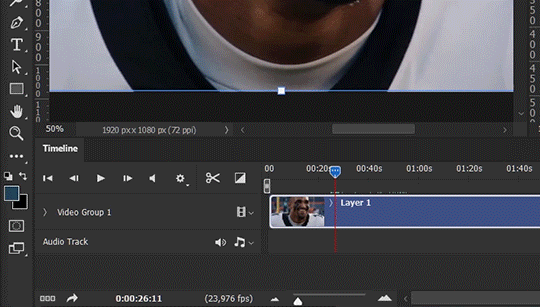
As mentioned above, this gifmaking tutorial using video timeline is exactly how I make gifs. I find it more efficient, especially if you’re making multiple gifs from the same video/the same scene with little to no change in lighting conditions You can simply slide around sections of gifs you want to save, and they will all be the same length.
Another thing also covered in the tutorial linked is the ability to change video speed in video timeline mode. Right click on the video and set the speed before proceeding with cropping/resizing. This is also very useful when you’re making blended gifs where you need the footage to have the same length.
Slowing footage down.
As mentioned in this post, changing the FPS before slowing down the gif results in smoother gifs. Doubling the frame rate before slowing down your gifs usually yields the best result.
Speeding footage up.
I love using this to speed up slow motion B-rolls to make the speed slightly more natural. It will result in nice, smooth gifs:

(B-roll footage, normal broadcast speed)
(200% speed)
Subject won’t stay in frame?
Another feature of the video timeline mode. Keyframes are your best friend. This tutorial by @kangyeosaang covers everything you need to know about panning gifs. I use this technique regularly, it’s a life-saver.
COLORING
Here are some coloring tutorials I found very useful:
Coloring tutorial by @brawn-gp beloved, their coloring style is second to none
Mega coloring tutorial by @yenvengerberg, for stylized /vibrant coloring
Understanding Channel Mixer by @zoyanazyalensky
Coloring rainbow gifs by @steveroger, which delves deep into Channel Mixer
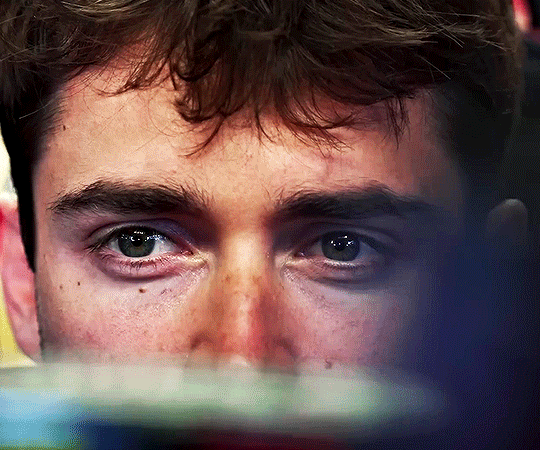
I tend to go for neutral-saturated coloring in general, especially for minimalist gifsets with no effects (blending/isolated coloring/overlays etc.), but the possibility is endless for stylized coloring. Here’s what my adjustment layers look like for the example gifs above.
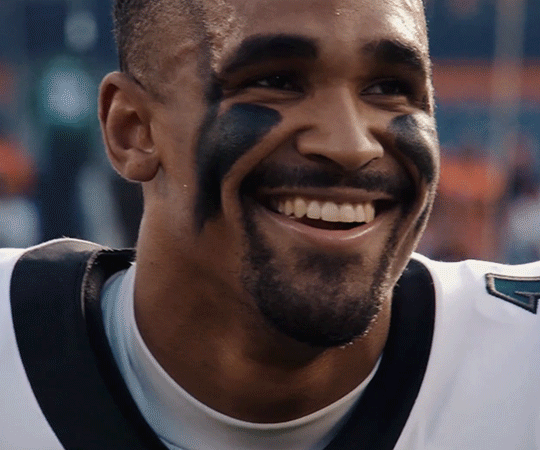
The base footage for this Charles gifset is incredibly desaturated. I started with a Curves layer to bring contrast to the gif, as well as do some color-correcting to bring the base footage to a more neutral tone. To bump contrast, I also like to add a black and white Gradient Map layer with a Soft Light blending mode at 10%-30% opacity:
The Vibrance layer is then used to lift the saturation of the base footage, with the Selective Color, Hue/Saturation, and Channel Mixer layers to help remove the green/yellow tint to his skintone.
An underrated adjustment layer/preset in my opinion is the Color Lookup. You can layer in pre-loaded .LUT color grading presets to help speed up your process. For this gif, it’s simply a base preset Soft Warming Look to achieve a warm, pink-tinted tone.
In hindsight I feel like this gifset is too saturated, his skintone is skewing very red/pink, I could’ve bumped down the lightness of the reds with a Selective Color layer or a Hue/Saturation layer. Try to err on the side of neutral for skintones. Experiment with layer orders—there’s no right or wrong! Remember that each layer build up on the one before it.
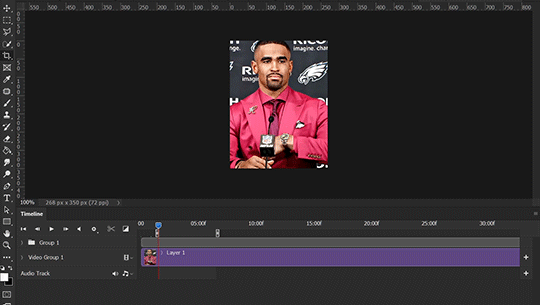
The base footage of the Jalen gif is already quite nicely color-graded, but it’s still muddy and underexposed. As with the Charles gif, I started with a Curves layer to bring the gif to a better baseline contrast. Then I focus on brightening the gif with the Brightness/Contrast and Exposure layers.
The Hue/Saturation and Selective Color layers are to color-correct Jalen’s skin tone—it’s something I spend most of my time coloring gifs and focus a lot on, especially when color grading BIPOC skintones. Putting a Vibrance layer, upping the Vibrance and Saturation, and calling it a day would make his skintone skew very, very yellow/orange.
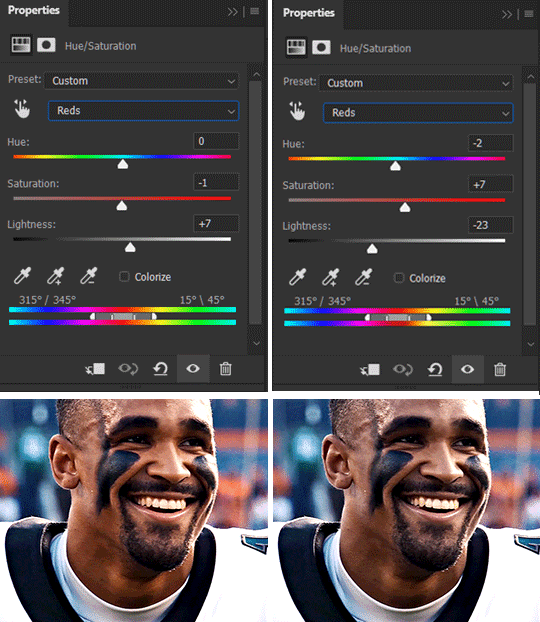
Focus on the reds and yellow for skintone, play around with the Saturation and Lightness sliders, use the Hue slider with caution.
It can be tricky to achieve the right skin tone when working with sports footage vs the higher quality, higher dynamic range footage of films or TV shows, but I try to keep it as close to the subject’s natural skintone as possible.
Here are some of tutorials with tips and tricks on coloring BIPOC:
How to fix orange-washed characters by @zoyanazyalensky
How to prevent pink-washing and yellow-washing by @jeonwonwoo
Coloring tutorial by @captain-hen
Changing lighting conditions?
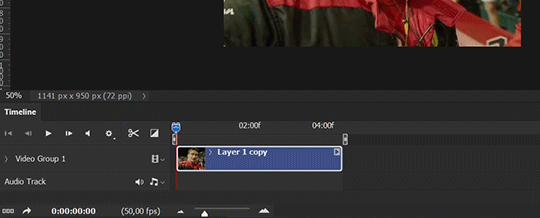
Fret not—this is why I love working in video timeline. I’ll take this gifset as an example: it’s a deceptively difficult one to color. The footage is 720p and the sunlight shifts throughout the video, so matching across gifs was tricky.
My solution was to split the clips in sections with consistent lighting, and apply adjustment layers to the individual sections before applying general color grading layers on top of everything.
We can make use of the Fade Transition effect for sections where the lighting changes within the gif section we want to color.
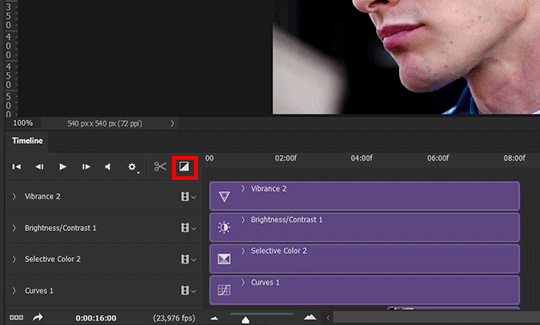

(without vs with Fade on the Brightness/Contrast layer)
The difference is subtle in this example, but the brightness in the right gif is noticeably more consistent throughout. You can also add the Fade Transition effect to the beginning for a fade in, of course.
SHARPENING AND OPTIMIZING GIF QUALITY
This tutorial by @anya-chalotra covers everything you need to know about optimizing gifs for Tumblr.
Sharpening.
Sharpening is essential to making crisp gif images. Here’s another ask I answered re: my own sharpening settings and maximizing gif quality.
(base footage, unsharpened)

(color graded, unsharpened)
(color graded, sharpened)
The final gif is sharpened with Smart Sharpen, 500% at 0.3px and 10% at 10px (my standard sharpening settings).
Here are some tutorials and resources on sharpening:
Sharpening process by @anya-chalotra
Sharpening tutorial with added gaussian blur by @haleths
Sharpening action by @daenerys-stormborn
Size your gifs for Tumblr correctly.
This is essential: full width gifs are 540px wide.Two side-by-side gifs should be 268px wide. Here’s a handy post on gif size guide for Tumblr.
Incorrectly sizing your gifs will take away the quality of your gifs: undersizing your gifs will especially make them grainy, blurry, and /or pixelated, and won’t display correctly on many people’s desktop theme. Oversizing usually isn't as dramatic as undersizing, but it will make the gifset glitch when displayed, and the file size will be unnecessarily bloated.
Work with HD footage if possible.
Media fandoms (films/TV shows) are luckier than us in the sports trenches—we have to work with what we have. Broadcast footage is usually subpar: lacks contrast, pixelated, very desaturated, the list goes on. But it’s possible to still make high quality gifs from subpar footage. Here are a couple of tutorials to mask low source footage quality:
low quality video ➜ “HD” gifs tutorial by @nickoffermen
Sharpening low quality footage by @everglow-ing
(This gifset I made is from a 480p footage with horrendous lighting conditions and colors, and the end result is decent I’d say)
Save for Web (File > Export > Save for Web (Legacy) or Ctrl + Alt + Shift + S) settings.
I default to Adaptive + Diffusion but also use Adaptive + Pattern from time to time. Any combination of Adaptive or Selective + Diffusion or Pattern will give you a good result. In my experience some gifs will need the Selective color table for the colors to display correctly.
Here are my default settings:
SAVING AND EXPORTING FOR TUMBLR
Converting to frames and adjusting the gif speed.
If possible, avoid exporting your gif and reopening it to adjust the frame speed. I used to do this sometimes when I’m lazy, I have to admit, but this is where this Action as mentioned at the beginning comes in very handy. It converts all visible layer into smart object, then converts it back to frame animation.
Step-by-step:
1. Select all layers
2. Right click > Convert to Smart Object
3. Go to the Timeline menu (≡) > Convert Frames > Flatten Frames into Clips
4. Go to the Timeline menu again (≡) > Convert Frames > Convert to Frame Animation
5. In the same menu (≡), select Make Frames from Layers
6. Delete the first frame (it’s a duplicate) then set your frame speed

Now you can adjust the frame speed before exporting it (Save for Web).
Pay attention to the source framerate.
The frame delay of 0.05 s is usually the default to make gifs for TV shows and films, and it is preferred by most gifmakers. This stems from the fact that most movies and TV shows are 24 or 25 FPS. This may not be the case for all source videos: you might get 30 FPS footage, and sports or gaming footage can be 50 or 60 FPS. Gif speed also depends on the FPS of your original file. Play around with gif speed and see what feels most natural to you.
My rule of thumb is the frame delay Photoshop gives you + 0.01 s. For example, 50 FPS footage will give you 0.02 s frame delay (25 FPS gives you 0.04, 30 FPS gives you 0.03, etc.), so set it to 0.03 s. I usually err on the side of a faster frame delay for smoothness in in-game sports footage, anything else (interviews, press conferences, B-rolls) can get away with being slowed down. Again, experiment and see what you think looks best!
Keep gifs under the Tumblr file size limit (10 MB).
Cut down the number of frames. My gifs are usually around 60-70 frames for 540px full-width gifs, but depending on the coloring, sometimes you can get away with more. 268px gifs can go up to 200+ frames.
Crop your gifs. Remember to keep full-width gifs at 540px wide, but if necessary, you can crop the height. My go-to sizes are 540x540, 540x500, 540x450, and 540x400.
Amp up the contrast of your gifs. Flat colors like black cut down gif size.
The Grain filter or Noise filter, though beautiful for aesthetics or simply necessary sometimes to mask low source footage quality/pixelating, may bloat your gif size.
Play your gifs back before exporting.
Pay attention to duplicate frames or glitches, you might need to get rid of them!
Hope this is helpful! Don’t hesitate to send an Ask or DM if you need any help, I will happily answer all your questions and send over PSDs. (I’m also on Discord—just shoot me a message if you need my tag!) Happy creating :]
#tutorial#PS asks#gif tutorial#Photoshop tutorial#I guess this is more of a resource link dump than tutorial but. Hey. Why reinvent the wheel...#Sorry for the late answer I hope you see this Anon :]#completeresources#allresources#userxoames#userbarbi#usernrzr
1K notes
·
View notes
Text
Playing Live Emotion on Non-Japanese Device Guide

To avoid disappointment, please prepare yourself that an English language release for Live Emotion may not be likely. At least not simultaneously with the Japanese release.
However, depending on your device you should still be able to play and support the Japanese version when it releases even if you do not live in Japan.
Downloading Live Emotion on Android devices:
Guide Option 1 (My old guide to using Qooapp)
Guide Option 2 (Youtube video for Qooapp and Tunnelbear methods)
Downloading Live Emotion on iOS devices:
Guide Option 1 (Reddit Post)
Guide Option 2 (Youtube Video)
These methods may be outdated. If so I’ll look into it more and may repost a new guide in the future.
✦✦✦
Translating the game in real time in-app on Android devices:
Comic Screen Translate - Nice UI, less ads. Has extra premium options that seem handy.
Instant Translate On Screen - Nice UI, slightly more ads than Comic Screen Translate. Perhaps slightly slower but has a few extra nice features. Also has more convenient premium options.
EZ Screen Translator - Has more invasive ads and less pleasing UI, but is pretty quick.
Qooapp - Has a live translation feature, but it is paid (but not too expensive) and potentially slower than other options. I believe it has a feature that will read out the in-game text out loud.
Translating the game in real time in-app on iOS devices:
I'm unsure of similar app options for iOS.
I believe if you take a screenshot you may get a 'Translate' option in the bottom left without having to go to your gallery. This will still be a bit slow, and will leave your gallery full of heaps of screenshots.
The Google Translate app also works, but is slow since you have to take screenshots in-game, open the translate app, and do them one by one. It does have a 'Tap to Translate' option, but it requires text to be copy pasted which isn't possible in this situation.
✦✦✦
These methods aren't perfect, but they will help you navigate playing the game and understanding the stories if you don't speak Japanese. Let me know if you know other live translation apps or DL methods and I'll add them to the list.
#posted this before tagged onto a reblog but posting it again on its own.#guide#live emotion#pre-release#utapri
113 notes
·
View notes
Text
how to clip (redneck ash atthebell edition aka not the most efficient necessarily)
my best methods for clipping & posting to tumblr
tl;dr use clipr for downloading clips from twitch, other methods vary by mileage
Clip on Twitch & Download using Clipr

IMO, this is the best method for posting clips. Twitch clips don't always display properly on Firefox, and it also means that if the clip ceases to exist on Twitch for whatever reason, it's still uploaded to Tumblr. You can also guarantee the quality you're downloading in, which is usually 1080p unless the streamer has for some reason lowered their stream quality (happens by accident sometimes).
Downsides: 1) You have to be able to download the clip to your computer, and doesn't work on mobile. Well, it could, but it would be way more difficult and I don't know why you would do that to yourself. 2) If the moment you want to clip is longer than 60 seconds, you have to use another method. Twitch only lets you clip something that long. I bemoan this fact every day.
Screen capture on your computer

The pros of this method are that you aren't limited to 60 seconds, and if you're trying to clip something from a YouTube video, it's easier than trying to download a YouTube clip (have never been able to successfully do this myself) or downloading the entire video and then editing it down to the moment you want to clip.
The cons are that you have to make sure you're not screen capturing sensitive shit from your own computer, and you have to turn off all other audio and make sure your volume levels & video quality are at appropriate levels (aka don't have your volume super low, don't have the video on 480p if possible). If you're clipping off YouTube, you have to deal with having the channel's watermark in the corner, but otherwise it's great for when you want to just clip something from Twitch but it's longer than 60 seconds.
How to do this (on Windows):
Remember to put your computer on DND (Discord as well) and put the video on highest quality and decent volume levels. Press Windows key + G (if that's your configuration) and select "Start Recording" on the capture window. Remember to give time for the scrub bar and shit from YouTube or Twitch (or whatever) to go away, so go back a little bit before where you want the clip to start. Record until you've got what you want, then open it in whatever video editing software pleases you. You can find the recording in Captures on your computer (usually in some folder chain in Users) or by just pressing Windows key + G again, it'll let you open the recording in file location. I use Microsoft Clipchamp to edit because Windows Media Player crashes my computer and I'm not going to pay for nice editing software rn. Anyway, edit out the bits with you moving your mouse around and the video player UI and get it to whatever length you like. Save or redownload to your computer, upload to Tumblr.
Downloading off Twitter


Use twittervideodownloader or twdown. Copy the video address from the video and paste it, then download in whatever quality you'd like. Please attribute said clips, particularly if they went through the trouble of adding subtitles or you're using their translation (or just to let people know where they came from-- i.e. is this from a cc's own IG story, or is it a random fan recording them; the latter means you maybe shouldn't be reposting this video). Translation itself is often a thankless project so it's very appreciated to acknowledge translators. Also if someone else went through the trouble of clipping something, it's just nice to acknowledge them for it. Preferably include a link to the original tweet. This method is best for just needing stuff off Twitter, for IG stories that someone else already screen captured, or if the only clip you can find is on Twitter and the original vod/video is gone for whatever reason.
Extra fun tips:
If you are a frequent clipper, get in the habit of naming your files! If you're keeping them all on your computer, for organization's sake, it will save you SO much time and energy if you just have names on your files. It doesn't have to be anything crazy formal; for example, my format is just "oct 12 cellbit scared by sign tts;" date followed by a very short description.
Similar to the above, it also helps to include some amount of context to clips when you're posting them, particularly if you're not liveblogging. Sometimes people rb clips onto my dash and start freaking out about some kind of lore going on and it's like dude this clip is from two months ago, calm down. Please turn on timestamps also for the love of fuck.
You can download videos straight off Tumblr! If someone else already posted a clip you like and want to have on your computer, you can download it off the dash or off their blog and just have it, no extension or screen capture or website needed. One of the very cool things about this website!
Related, if you really want to find a clip that you know was already posted to Tumblr by someone else, use people's archives. They're also one of the actually functional parts of this website. You can filter by post type, month, and tags, which can usually get you closer to finding what you're looking for than searching will.
RoyalArchivist tends to post and reblog a lot of clips, so they're a good resource alongside myself, pix pixiecaps, and jay cellgatinbo, all of whom clip like maniacs. I also just reblog a lot of things and have a pretty extensive tagging system. RA also has a timestamp archive for QSMP with notes about lore and things-- please check that out if you're interested in helping document events or looking to find a certain moment.
MCYT Archive Project has public vods spreadsheets for QSMP as well as other MCYT projects that are incredibly extensive, so if you're looking for a moment and you remember the date, you should be able to find the vod on the sheet. You can also use the vod archives in junction with wiki articles to figure out exactly or approximately when something happened (the QSMP Miraheze wiki includes citations in their articles, which is a massive help for this kind of thing).
Finally, I am a lunatic who figured this all out through trial and error. There are probably other, somewhat more efficient methods, like I said at the start. If you know of any, please (politely) add onto the post.
#bell.txt#how to clip#whew. okay hope this helps like at least one singular person#tbh i figured a lot of this out just looking it up but i figure it helps for people to see it all in one place
221 notes
·
View notes
Text
YouTube Downloads through VLC: Step by Step
So this guide to easily downloading off YouTube is super helpful, but there's enough important information hidden in the reblogs that (with the permission of OP @queriesntheories ) I'm doing a more step-by-step version.
Please note: these downloads will be in YouTube quality. My test video download is coming through at 360p, even though the video I'm starting from is set to 720p. They're legible, but they won't look great on a TV. For high visual quality, you'll want to seek out other methods.
This guide is written for Windows 10, since that's what I can test on. It's been tested on Firefox, Chrome, and Edge (which is a Chromium browser, so the method should work in other Chromium browsers too). So far, I haven't tracked down a way to use this download method on mobile.
BASIC KNOWLEDGE:
I'll try to make this pretty beginner-friendly, but I am going to assume that you know how to right-click, double-click, navigate right-click menus, click-and-drag, use keyboard shortcuts that are given to you (for example, how to use Ctrl+A), and get the URL for any YouTube video you want to download.
You'll also need to download and install one or more programs off the internet using .exe files, if you don't have these programs already. Please make sure you know how to use your firewall and antivirus to keep your computer safe, and google any names you don't recognize before allowing permission for each file. You can also hover your mouse over each link in this post to make sure it goes where I'm saying it will go.
YOU WILL NEED:
A computer where you have admin permissions. This is usually a computer you own or have the main login on. Sadly, a shared computer like the ones at universities and libraries will not work for this.
Enough space on your computer to install the programs listed below, if you don't have them already, and some space to save your downloaded files to. The files are pretty small because of the low video quality.
A simple text editing program. Notepad is the one that usually comes with Windows. If it lets you change fonts, it's too fancy. A notepad designed specifically to edit program code without messing it up is Notepad++, which you can download here.
A web browser. I use Firefox, which you can get here. Chrome or other Chrome-based browsers should also work. I haven't tested in Safari.
An Internet connection fast enough to load YouTube. A little buffering is fine. The downloads will happen much faster than streaming the entire video, unless your internet is very slow.
VLC Media Player, which you can get here. It's a free player for music and videos, available on Windows, Android, and iOS, and it can play almost any format of video or audio file that exists. We'll be using it for one of the central steps in this process.
If you want just the audio from a YouTube video, you'll need to download the video and then use a different program to copy the audio into its own file. At the end of this post, I'll have instructions for that, using a free sound editor called Audacity.
SETUP TO DOWNLOAD:
The first time you do this, you'll need to set VLC up so it can do what you want. This is where we need Notepad and admin permissions. You shouldn't need to repeat this process unless you're reinstalling VLC.
If VLC is open, close it.
In your computer's file system (File Explorer on Windows), go to C:\Program Files\VideoLAN\VLC\lua\playlist
If you're not familiar with File Explorer, you'll start by clicking where the left side shows (C:). Then in the big main window, you'll double-click each folder that you see in the file path, in order - so in this case, when you're in C: you need to look for Program Files. (There will be two of them. You want the one without the x86 at the end.) Then inside Program Files you're looking for VideoLAN, and so forth through the whole path.
Once you're inside the "playlist" folder, you'll see a lot of files ending in .luac - they're in alphabetical order. The one you want to edit is youtube.luac which is probably at the bottom.
You can't edit youtube.luac while it's in this folder. Click and drag it out of the playlist folder to somewhere else you can find it - your desktop, for instance. Your computer will ask for admin permission to move the file. Click the "Continue" button with the blue and yellow shield.
Now that the file is moved, double-click on it. The Microsoft Store will want you to search for a program to open the .luac file type with. Don't go to the Microsoft Store, just click on the blue "More apps" below that option, and you'll get a list that should include your notepad program. Click on it and click OK.
The file that opens up will be absolutely full of gibberish-looking code. That's fine. Use Ctrl+A to select everything inside the file, then Backspace or Delete to delete it. Don't close the file yet.
In your web browser, go to https://github.com/videolan/vlc/blob/master/share/lua/playlist/youtube.lua
Click in the part of the Github page that has a bunch of mostly blue code in it. Use Ctrl+A to select all of that code, Ctrl+C to copy it, then come back into your empty youtube.luac file and use Ctrl+P to paste the whole chunk of code into the file.
Save the youtube.luac file (Ctrl+S or File > Save in the upper left corner of the notepad program), then close the notepad program.
Drag youtube.luac back into the folder it came from. The computer will ask for admin permission again. Give it permission.
Now you can close Github and Notepad. You're ready to start downloading!
HOW TO DOWNLOAD:
First, get your YouTube link. It should look something like this: https://www.youtube.com/watch?v=abc123DEF45 If it's longer, you can delete any extra stuff after that first set of letters and numbers, but you don't have to.
Now open VLC. Go to Media > Open Network Stream and paste your YouTube link into the box that comes up. Click Play. Wait until the video starts to play, then you can pause it if you want so it's not distracting you during the next part.
(If nothing happens, you probably forgot to put youtube.luac back. coughs)
In VLC, go to Tools > Codec Information. At the bottom of the pop-up box you'll see a long string of gibberish in a box labeled Location. Click in the Location box. It won't look like it clicked properly, but when you press Ctrl+A, it should select all. Use Ctrl+C to copy it.
In your web browser, paste the entire string of gibberish and hit Enter. Your same YouTube video should come up, but without any of the YouTube interface around it. This is where the video actually lives on YouTube's servers. YouTube really, really doesn't like to show this address to humans, which is why we needed VLC to be like "hi I'm just a little video player" and get it for us.
Because, if you're looking at the place where the video actually lives, you can just right-click-download it, and YouTube can't stop you.
Right-click on your video. Choose "Save Video As". Choose where to save it to - I use my computer's built-in Music or Videos folders.
Give it a name other than "videoplayback" so you can tell it apart from your other downloads.
The "Save As Type" dropdown under the Name field will probably default to MP4. This is a good versatile video format that most video players can read. If you need a different format, you can convert the download later. (That's a whole other post topic.)
Click Save, and your video will start downloading! It may take a few minutes to fully download, depending on your video length and internet speed. Once the download finishes, congratulations! You have successfully downloaded a YouTube video!
If you'd like to convert your video into a (usually smaller) audio file, so you can put it on a music player, it's time to install and set up Audacity.
INSTALLING AUDACITY (first time setup for audio file conversion):
You can get Audacity here. If you're following along on Windows 10, choose the "64-bit installer (recommended)". Run the installer, but don't open Audacity at the end, or if it does open, close it again.
On that same Audacity download page, scroll down past the installers to the "Additional resources". You'll see a box with a "Link to FFmpeg library". This is where you'll get the add-on program that will let Audacity open your downloaded YouTube video, so you can tell it to make an audio-only file. The link will take you to this page on the Audacity support wiki, which will always have the most up-to-date information on how to install the file you need here.
From that wiki page, follow the link to the actual FFmpeg library. If you're not using an adblocker, be careful not to click on any of the ads showing you download buttons. The link you want is bold blue text under "FFmpeg Installer for Audacity 3.2 and later", and looks something like this: "FFmpeg_5.0.0_for_Audacity_on_Windows_x86.exe". Download and install it. Without this, Audacity won't be able to open MP4 files downloaded from YouTube.
CONVERTING TO AUDIO:
Make sure you know where to find your downloaded MP4 video file. This file won't go away when you "convert" it - you'll just be copying the audio into a different file.
Open up Audacity.
Go to File > Open and choose your video file.
You'll get one of those soundwave file displays you see in recording booths and so forth. Audacity is a good solid choice if you want to teach yourself to edit soundwave files, but that's not what we're here for right now.
Go to File > Export Audio. The File Name will populate to match the video's filename, but you can edit it if you want.
Click the Browse button next to the Folder box, and choose where to save your new audio file to. I use my computer's Music folder.
You can click on the Format dropdown and choose an audio file type. If you're not sure which one you want, MP3 is the most common and versatile.
If you'd like your music player to know the artist, album, and so forth for your audio track, you can edit that later in File Manager, or you can put the information in with the Edit Metadata button here. You can leave any of the slots blank, for instance if you don't have a track number because it's a YouTube video.
Once everything is set up, click Export, and your new audio file will be created. Go forth and listen!
#reference#vlc media player#youtube downloader#youtube#uh what other tags should i use idk#how to internet#long post
118 notes
·
View notes
Text
Witchy Resources
Astrology
Cafe Astrology - does your birth chart and it’s presented in a really cute way imo. It also gives you info about each placement and you can check compatibility and stuff too
Co—Star - I downloaded is the other day, it gives you quick daily horoscopes, do’s and dont’s for the day, and a longer breakdown of the horoscope
Dream work
Little Book of Dreams - I got this at a local store but you can get it for £4. It’s really cute and small, with just little summaries for what common dreams mean. It’s very simple but good for beginners in dream work
Deity worship (These are specific to Hellenism. You don’t have to worship Greek deities to be a witch but it’s what I have resources on because it’s what I follow)
Wikipedia - no seriously. It has info on so many different deities and their mythology so it’s actually quite useful.
r/Hellenism - a good place to ask questions if you’re new to deity worship and get some SPG on less common deities. Be sure to fact check
Amino - there’s a couple of Greek mythology and Hellenist communities on here. Like with Reddit, fact check!
Theoi.com - so much basic info on various deities, and it’s got epithets and things too that Wikipedia doesn’t have.
Tarot
Nata Soul Taro - probably the best pick a pile tarot readers I’ve found on YouTube. she also has a website and does personal readings. The videos are very calming and often really accurate
Zodianz - gives you three tarot cards and their meanings. Includes whether they’re yes or no, zodiac signs, planets and elements that correspond with each card, keywords for the card and then a short paragraph about the meaning. It also gives the meaning of the numbers in the card (like in 8 cups it tells you about 8)
If anyone knows any websites where you can learn tarot meanings let me know and I’ll add them to this list
Spell work
The Works - if you’re British, The Works has a lot of trinket boxes that you can keep spell ingredients in, and some potion bottles which are meant for crafts but they’re perfect for spell jars
Witchipedia - has some basic info about spells and some simple ones that you can do without needing many tools. Perfect for broom closeted witches, beginners or witches who can’t afford fancy stuff.
@strangesigils has some posts on common sigil methods, or, you can use some of their existing sigils!
Shadow work
Pinterest - I’m not kidding Pinterest has some great shadow work prompts if you just type in shadow work. Some are meh and some are really good
Co—Star - as well as astrology this also has a section where you can write a message to yourself and it’ll pop up the next time the stars are in the same position as they were when you wrote it
Crystal work
Holly’s Hope Beads - handmade crystal jewellery! My mum knows the girl who owns it and I’ve gotten a few pieces here. Really pretty and good quality
#witchcraft#witchblr#witch#pagan#paganism#hellenism#greek deities#tarot#astrology#co star#shadow work#crystals#crystal work#witchy things#witch resources#witchcraft websites#beginner witch#baby witch
921 notes
·
View notes
Note
hope sending ask is ok rn, i have hard time looking resource. looking for book how to co-exist with independent dissociative parts (have system but not feel safe in saying DID yet). cannot do therapist addressing parts yet but want to cope in daily life. hope can help. or others comment/reblog and give. thank you 🍀
This ask was sent a while ago, I hope you're doing okay now anon. You say you can't talk to a therapist yet but I hope you have someone else in your life who is supportive and you can talk to about these things! You shouldn't have to face this alone.
Even though you don't have therapeutic support, it's still possible to build up communication and cooperation with your parts. I reblog a lot of tips and resources to my coping tag if you want to check that out. Here are some other resources that you might find helpful:
DID/OSDD Self-help Masterlist
There are so many resources here, categorized by different topics. You'll find stuff here for both survivors and loved ones, and you don't need to have DID/OSDD to use them!
Beauty After Bruises Blog
You'll find so many articles here on coping with daily life as a dissociative survivor. I love how they're written, they feel very approachable and almost calming to read.
Dissociative Living
Admittedly, I haven't read many of these articles but the few I've seen have been good. I think their writing is very approachable for people who are new to all of this.
DIS-SOS
Lots of advice and informative articles on living with DID here -- in both English and German! I've found some really interesting and unique coping tips here, I definitely recommend it. It's actually because of this blog that I discovered one of my favorite methods of system communication.
CTAD Clinic Youtube Channel
A channel run by the director of this clinic which specializes in dissociation and trauma. I've watched probably all of his videos -- they're very good! Lots of the videos provide tools and self-help tips on coping with dissociation & dissociative parts!
Carolyn Spring's Blog
You'll find amazing articles here about trauma and dissociation, but do be aware that the author is both a professional and a survivor with DID herself. She isn't afraid to talk about her lived experience, shining a light on the reality of trauma and dissociation which can be confronting but oh-so empowering to read.
System Speak Podcast
A podcast run by a DID system. She talks about her own healing journey as well as interviews professionals and dives into the psychology behind trauma and dissociation. Personally, I think the website is a bit hard to navigate but every podcast I've listened to has been extremely informative and relatable!
Self-help books can also be extremely useful if you don't have access to a therapist. You can find a bunch of free downloads here! I would recommend starting with "Got Parts? An Insider's Guide to Managing Life Successfully with Dissociative Identity Disorder" by ATW. Personally, I think this is the best book to start with. It's a bit old and there are some outdated ideas in it, but I think it's a very gentle entry into learning system communication and coping with DID if you have never worked with a therapist.
Some other resources that might be useful:
Strategies for coping with distressing voices
FREE 100 page e-book for trauma survivors
Talk/vent to listeners on this non-crisis support chat line
Apply for a grant to receive financial help or a therapy box -> (Also learn about the Therapy Box Project! If anyone is able to donate, please do!)
- Sunflower
#actuallydid#actuallyosdd#actuallytraumagenic#actuallydissociative#dissociation#complex trauma#resources#DID support#sunflower answers#once again i apologize for how long it takes me to reply to asks
76 notes
·
View notes
Note
Hi there... I really love the idea of solarpunk but like. The "punk" part of it makes me so anxious. I think it's a vital part of the movement, but I can never imagine doing something like that myself.
If you have any small (tiny) tips or ideas on things I can do on a more personal level I would appreciate them. Everything seems so overwhelming and completely out of my wheelhouse and skill base
Hey ya 🌱 Sprout!! It can be hard to recognize, particularly in solarpunk, but your already punk and already doing praxis. I'm sure of it.
If you've ever pirated media, DIYed or mended clothes, have a rain barrel, spoke out against poor labor conditions, provided a safe space for anyone in an uncaring world even for a brief interaction- Your already punk!! Anyone who fights and gatekeeps that title from you bc of age, aesthics, or experience is a poser and a FED!!
That being said tho--
If you want to do more outrageous projects there's a few things I can recommend depending on how much you wanna do!!
Battlejacket- TBH the purpose of a battle jacket is to soothe this exact anxiety while also being a fun project and being a single to others!! There's many examples in both my Battlejacket tag and patch idea tag to get you started. You can get iron on patches/print paper that transfers pretty well if your not used to DIYing stuff. If this feels like to big if a step and is too much tho keep in mind you can make a battlejacket and not wear it outside right away. It's a second skin to make you feel and others feel safe, but it's also a big neon target on yourself depending on your environment and where you are. So it's ok to just make one and not wear it out until your ready!! (If you do this-- my only demand is you show me when you do it!! I want to see all of those kinda projects bc I'm obsessed with them)
Getting out there- If starting a guerilla gardening project or joining a community garden, or community association isn't an option for you- be that bc of accessibility/time/energy- I'd recommend starting to archive and getting out there! Inaturalist or falling fruit are awesome programs where you identify plants/animals/stuff outside in general. It gets you outside, your adding to a community which gets the feeling of a ball rolling building confidence and your praxis muscles!!
Root yourself in your community- This is a hard one if your busy/have low spoons/are introverted but I promise its worth doing even if you arent super active in those spaces! Even just researching the history of your town/city/neighborhood and seeing what programs are running can really connect you to the area. A lot of us due to the renting crisis never truly attach to our neighborhoods or are too busy to look into local artists. (Not your fault babes, its built to do that to feed monopolies) Pick even just 1 thing you care about (local artists, teashop, bands, libraries, community fridges, etc..) and find the closest thing to you and get obsessed. Being a regular in any space is an awesome feeling, its where you'll find friends, and you'll directly see any change you provide there.
Media archiving- There's a lot of ways of doing this one but just pirate the fuck out of everything!!!! Burn it to a physical copy, share it with your friends/family! Make mix dvds, burn movies/tv shows! Directly download youtube videos! Print off your fave fanfiction and bind them into books! Particularly with streaming services directly deleting content and getting rid of them entirely this is important work but its also just very fun!! Seeing my wall filled with dvds and books and objects makes my brain happy but also again, the physical exchange of handing the media you love to another person is so unique! Theres lots of guides and methods of doing this depending on the method and medium your using.
Utilizing public spaces- Loitering is a good one as well to push yourself and to interact with things IRL! Use your public libraries and parks excessively! Spend a weird amount of time at the mall not buying stuff! This might seem like a weird one, but its a long term thing. It shows that ppl are supposed to be out and about without spending money, but also many of these places (except the mall obvi) get funding based on usage so the more you use something the more likely they are to make it accessible to more ppl! It also makes it more normal for ppl who need to loiter to be in these spaces which again adds more accessibility. This is also one that might get you unwanted attention so decide your comfort and safety level. Pushing boundaries is good but do it at your own pace.
Vandalize! - Again we're ramping up a bit on risk levels but I recommend it, particularly bus stops or putting up posters. Bus stops is bc at least in my city they only maintenance them once they've been 'ruined' so its actually a cosmic positive to do it in these spaces. Posters are also good! Ive seen quite a few for tenant unions but also a handful of them that are food resources or call outs for police. This is mostly to have passive way to show solidarity or get a message across. But also like your doing art! Great stuff! Again tho this comes with risk if caught or if you dont know what your doing so start with baby steps (like using sharpie on an Ad you fucking hate or putting up a poster in a neutral space to get used to it)
Hopefully these tips get you started!
240 notes
·
View notes
Text
so, new spotify update.
(pt : so, new spotify update.)

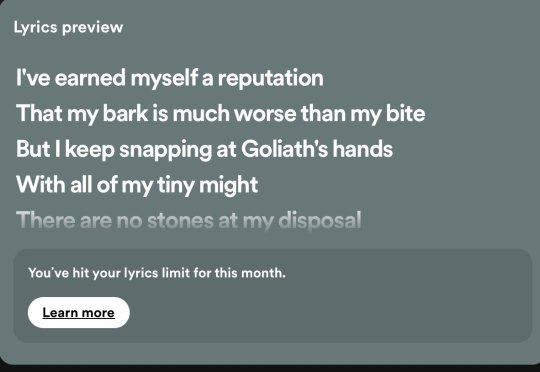
[id 1/ a screenshot of spotify on a grey background. text reads, in bold, "There's a monthly limit on lyrics". text under in grey reads, "Every time you tap "Show lyrics", it will count towards your limit. To get full access to lyrics, switch to Spotify Premium." A button in green reads, "Show lyrics", and under it, another button reads "Dismiss." /end id]
[id 2/ a screenshot of spotify on a slate grey background. Text reads above, "Lyrics preview". more text under, in bold, reads, "I've earned myself a reputation / That my bark is much worse than my bite / But I keep snapping at Goliath's hands / With all of my tiny might / There are no stones at my disposal". at the last line, it fades, and a box reads, "You've hit your lyrics limit for this month." a button under in white reads, "Learn more." /end id]
(screenshots courtesy of @thatweirdqueer , my boyfriend <3)
my boyfriend came across this message after clicking show lyrics once. they're forcing a limit on looking up lyrics to a song in their own app, and we need to talk about it.
at this point, spotify premium has been so forced onto us, that spotify is practically not even a free app. if you skip one too many songs, you have to listen to five or more ads. the dislike and like features they've implemented do nothing. everyday i boot up spotify, it flashes a larger than life ad with a button so small i can barely see it, just to dismiss myself. it tracks if you've bought premium to market these ads to you to guilt you into getting it back. you can't even download songs from it without premium. it's a barely functioning free app with everything locked behind a paywall.
if you want good lyrics for free, without having to pay a corporation for them, id recommend azlyrics, lyrictranslate, and searching the music artists channel. azlyrics doesn't have every song, which is a guaranteed, but its extremely easy to navigate, doesn't have many ads, and lays its lyrics out in a manner thats extremely easy to read. lyricstranslate has lyrics translated from many different languages, and can even translate songs into other languages on a whim. its run by people who can translate them, and is free to modify if you find a mistake. searching up the song on the artists channel (NOT the youtube owned topic) can help wield results as to what the lyrics are. one such example of this is femtanyl, who writes all of their lyrics in the descriptions of their videos.
adding onto this, if you'd like to download videos for free, whether it be mp4 or mp3, id recommend searching youtube to mp3 in an incognito tab! (id recommend this because some sites send you to rather sketchy websites sadly. they are efficient, you just have to ensure what you download is what you want. plus, it keeps it out of your search history if you share a browser with someone!) its easy, just copy the link of the video you want and paste it into the box. then, choose what file format you want it to be downloaded in, click convert, and now you have your own file downloaded for free. i've used this method for years now, and it hasn't failed me.
in conclusion, FUCK capitalism, DELETE spotify, and USE ALTERNATIVES.
-badger
66 notes
·
View notes
Last Seen Blogs

phoebespalace-blog
Phoebe's Palace

que-pa-ti-tas
pa-ti-tas

kyrative
ori

cassandra-has-moonlit-eyes
Jellicle Cats are always hungry

sunsetthrill
BMC & More